AIX系统管理手册
IBM AIX命令手册:IBM MQ管理、安装和卸载说明书

Summary of AIX commands to administrate MQhttps:///support/pages/node/6407842Date last updated: 17-Jun-2021Angel Rivera –*************.comIBM MQ Support+++ Objective +++T o provide the most common AIX commands to administrate, install and uninstall MQ.The organization of the sections is based on what will be the commands to start the installation of MQ from scratch:- ensuring that you have a supported version of AIX: uname, oslevel- create the group “mqm” (mkgroup) and the user “mqm” (mkuser),- unpack the .Z or tar.gz file downloaded from IBM Passport Advantage or IBM Fix Central: gunzip, uncompress, zcat, tar- install/uninstall via installp- querying filesets via lslpp- create (mkusil), list (lsusil), remove (rmusil) a USIL, and- specifying USILs (-R ALL or -R /usr/mqm92) with installp and lslpp++ Update from 17-Jun-2021The AIX command “install -r” that is discussed in this chapter will REJECT all the fix packs installed in the server. If you have only 1 fix pack or if you want to delete at the same time all the fix packs, then the procedure in this chapter is fine.But if you have multiples fix packs and you want to uninstall ONL Y the LATEST one, then you need to use another procedure, which is documented in the article:https:///support/pages/node/6464857Uninstalling only the latest fix pack for MQ in AIX and leaving behind other previous fix packs+++ Related tutorials +++https:///support/pages/node/6405792Customization of an AIX server for using MQ+ Customization of Putty for using Function Key F3 with smitty+ Creating groups and userids+ Downloading, customizing and using the sample scripts+ Customization of bash login for root+ Customization of set-mq-xxx scripts in /usr/local/bin to reflect MQ installations+ Customize the bash login for user "mqm" or the normal user "fulanohttps:///support/pages/node/6407850Installing in AIX - MQ 9.0.0.1 LTS, applying Fix Pack 9.0.0.11, Uninstalling MQChapter 1: How to get the installation imagesChapter 2: Create userid "mqm" and group "mqmChapter 3: Installation of MQ 9.0.0.1 (Installation1 in /usr/mqm)Chapter 4: Setting the environment for MQChapter 5: Creating a test queue manager, quick verification testChapter 6: Installation of the Fix Pack 9.0.0.11Chapter 7: Uninstallation of the Fix Pack 9.0.0.11Chapter 8: Uninstallation of the base 9.0.0.1Chapter 9: Appendices showing full output from installp for the scenarioshttps:///support/pages/node/6415777Upgrading in AIX from MQ 9.0.0.1 to MQ 9.1.0.0 LTSChapter 1: How to get the installation imagesChapter 2: T ake a backup of the queue manager data and recovery logsChapter 3: Uninstalling MQ 9.0Chapter 4: Installing MQ 9.1.0.0 LTSChapter 5: Running setmqenv to use MQ 9.1 commandsChapter 6: Creating a queue manager under 9.1Chapter 7: Upgrading an existing queue manager to MQ 9.1https:///support/pages/node/6415921Installing in AIX - MQ 9.2 LTS to coexist with MQ 9.1 LTS, including applying Fix Packs 9.1.0.7 and 9.2.0.1 Chapter 1: How to get the installation imagesChapter 2: Creating USIL and installing MQ 9.2 side-by-side to MQ 9.1Chapter 3: Need to run setmqenv to use MQ 9.1 or MQ 9.2 commandsChapter 4: Creating a queue manager under MQ 9.2Chapter 5: Migrating an MQ 9.1 queue manager to MQ 9.2Chapter 6: Installing Fix Pack 9.1.0.7 in Installation1 (default location)Chapter 7: Installing Fix Pack 9.2.0.1 in Installation2 (USIL /usr/mqm92)Chapter 8: Uninstallation of MQ 9.2Chapter 9: Deleting the USIL /opt/mqm92https:///support/pages/node/6429607Life cycle for a USIL in AIX for non-default installations of MQ++ Displaying version of operating systemDisplaying the platform and hostname+ROOT+ aglet: /downloads# uname -aAIX aglet 2 7 00F944604C00Displaying the version (high lievel)# oslevel7.2.0.0Displaying the detailed version# oslevel -s7200-05-01-2038+++ Creating group ‘mqm’ and user ‘mqm’The following steps show how to create:- a group “mqm” (gid 202),- a user “mqm” (userid 205),- under /home/mqmLogin as user: rootCreate a group called “mqm” with groupid of 202:mkgroup -'A' id='202' mqmCreate a user also called “mqm” with userid of 205 and who belongs to group “mqm”: mkuser id='205' pgrp='mqm' home='/home/mqm' mqmYou can assign the password:passwd mqmYou can use the command “id” to find out the ids and the group membership:$ id mqmuid=205(mqm) gid=202(mqm) groups=1(staff)+++ How to unpack tar.Z and tar.gz filesWhen you download MQ files from IBM Passport Advantage or IBM Fix Central, there are 2 possible suffixes for the file names:tar.Ztar.gzThe tar options are:-x T o extract members from the archive into the file system.-v T o be verbose about the operation being performed.-f FileArchive T o use the specified file archive as the tar archive.The rest of this section provides more details on how to unpack the files.a) Suffix: tar.ZThe most common ways to unpack this type of files are:a.1) One (1) long compound command (it preserves the file tar.Z)zcat MQ_V9.0_F_AIX_EIMAGE.tar.Z | tar -xvf -The output of zcat is sent to the standard output file (i.e., stdout).This allows the user to decompress the compressed tar file (leaving the compressed file unchanged), and then to expand the tar file to the current directory.The "f -" tar command line option tells the tar command to read its input from the standard input file (i.e., stdin).a.2) T wo (2) simpler commands (the tar.Z is uncompressed, leaving a .tar file) Decompress the file tar.Z by issuing:uncompress MQ_V9.0_F_AIX_EIMAGE.tarThen unpack the file:tar -xvf MQ_V9.0_F_AIX_EIMAGE.tarb) Suffix: tar.gzb.1) One (1) long compound command (it preserves the file tar.gz)gunzip -c IBM_MQ_9.1_AIX.tar.gz | tar -xvf -A common convention is to use the "-c" command line option on the gunzip command so that instead of replacing the tar.gz, the output of the command is sent to the standard output file (i.e., stdout). This allows the user to decompress the compressed tar file (leaving the compressed file unchanged), and expand the tar file to the current directory. The "f -" tar command line option tells the tar command to read its input from the standard input file (i.e., stdin).b.2) T wo (2) simpler commands (the tar.gz is uncompressed, leaving a .tar file) Decompress the file tar.gz by issuing:gunzip IBM_MQ_9.1_AIX.tar.gzThen unpack the file:tar -xvf IBM_MQ_9.1_AIX.tar+++ Creating a USIL to install in a non-default location, such as /usr/mqm92+ Create a dedicated installation directory and designate it as a USILLogin as userid root to create the USIL- Create directory for the USIL.This directory will be designated to be a USIL in a step mentioned later on.# mkdir /usr/mqm92- List the subdirectories that will have the MQ code.Note that /usr/mqm is the default location for Installation1 (in this case,it already has MQ 9.1)# ls -dl /usr/mq*dr-xr-xr-x 20 mqm mqm 4096 Jan 27 07:34 /usr/mqmdrwxr-xr-x 2 root system 256 Jan 27 09:17 /usr/mqm92- So far, we do not have any USI Ls. Let’s verify by issuing the following command:# lsusil(empty)- Make the newly created directory a USIL.Note that the directory will be known as: INSTALL_ROOT_PATH# mkusil -R /usr/mqm92 -c 'MQ 9.2' -Xmkusil: Return Status = SUCCESSWhere:-R /usr/mqm92 => usil location-c comment-X Expands the space needed automatically.- List the USILs and note the new one:# lsusilINSTALL PATH = /usr/mqm92COMMENTS = MQ 9.2- Proceed to use the USIL with installp and lslpp.- If you uninstall MQ from the USIL and if you decide to not use the USIL anymore, then delete it.Please keep in mind that rmusil does not delete the directory structure for the USIL! # rmusil -R /usr/mqm92rmusil: Return Status = SUCCESS- List the USILs (it should show no USILs)# lsusil(empty)- Remove the directory structure that was associated with the USIL:# rm -fr /usr/mqm92+++ Using installp to install and uninstallAfter using “tar -xvf” to unpack the base code to install, you need to go to the newly created directory “MQServer”# cd MQServer++ Install the base code:T o install the base code in the default location /usr/mqm:# installp -acgXYd . all- T o install the base code in a non-default location such as /usr/mqm92# installp -R /usr/mqm92 -acgXYd . allWhere “-R usil” is the path of the User Specified Installation Location (USIL) specified when the product was installed.++ Install the fix pack code on top of an existing installation:T o install the fix pack code in the default location /usr/mqm:# installp -agXYd . all- T o install the fix pack code in a non-default location# installp -R /usr/mqm92 -agXYd . allWhere “-R usil” is the path of the User Specified Installation Location (USIL) specified when the product was installed.++ Reject ALL the Updates (uninstall all the Fix Packs)From the default location:# installp -r "mqm*"From a USIL:# installp -R /usr/mqm92 -r "mqm*"++ Update from 17-Jun-2021The AIX command “install -r” that is discussed in this chapter will REJECT all th e fix packs installed in the server. If you have only 1 fix pack or if you want to delete at the same time all the fix packs, then the procedure in this chapter is fine.But if you have multiples fix packs and you want to uninstall ONL Y the LATEST one, then you need to use another procedure, which is documented in the article:https:///support/pages/node/6464857Uninstalling only the latest fix pack for MQ in AIX and leaving behind other previous fix packs++ Uninstalling the base code:T o uninstall or modify IBM MQ by using installp, enter one of the following commands:- T o uninstall an installation in the default location /usr/mqm:installp -u mqm- T o uninstall an installation in a non-default location:installp -R /usr/mqm92 -u mqmWhere “-R usil” is the path of the User Specified Installation Location (USIL) specified when the product was installed.+++ Using lslpp to list the MQ filesetsa) This is the most comprehensive command to list all the installed MQ filesets ACROSS the different USILs and including the normal location of /usr/mqm.The following shows the output when MQ is not installed at all and there are no USILs. Note that ALL is in UPPERCASE!# lslpp -R ALL -la "mqm.*"+-----------------------------------------------------------------------------+INSTALL ROOT PATH = /+-----------------------------------------------------------------------------+lslpp: 0504-132 Fileset mqm.* not installed.If there are no USILs, then this is the command.In this case, no MQ filesets are installed.# lslpp -la "mqm.*"lslpp: 0504-132 Fileset mqm.* not installed.b) Listing the file sets from the default location /usr/mqm# lslpp -la "mqm*"Fileset Level State Description----------------------------------------------------------------------------Path: /usr/lib/objreposmqm.amqp.rte 9.0.0.1 COMMITTED IBM MQ AMQP Service9.0.0.11 APPLIED IBM MQ AMQP Servicemqm.ams.rte 9.0.0.1 COMMITTED IBM MQ Advanced MessageSecurity9.0.0.11 APPLIED IBM MQ Advanced MessageSecurityc) Listing the file sets for the USIL# lslpp -R /usr/mqm92 -la "mqm*"Fileset Level State Description----------------------------------------------------------------------------Path: /usr/mqm92/usr/lib/objreposmqm.amqp.rte 9.2.0.0 COMMITTED IBM MQ AMQP Servicemqm.ams.rte 9.2.0.0 COMMITTED IBM MQ Advanced - AdvancedMessage Securitymqm.base.runtime 9.2.0.0 COMMITTED IBM MQ Runtime for Client andServerServer+++ References+++ AIX 7.1 documentationhttps:///support/knowledgecenter/en/ssw_aix_71/m_commands/mkusil.htmlAIX 7.1 / Commands / m /mkusil Command.Creates or attaches a new user-specified installation location (USIL) instance.Syntaxmkusil -R RelocatePath -c Comments [-XFa]DescriptionThe mkusil command creates or attaches a new USIL instance.A user-specified installation location (USIL) is a tracked, relocated installation path that is created by the administrator. The location is tracked by the system and can be used as an alternate installation path for packages that use relocation of file sets or software. Multiple instances or versions of the same software package can be installed on a single system by delegating each installation to a separate USIL.An existing USIL instance can be attached or detached from any given system.Each USIL instance maintains its own set of Software Vital Product Data (SWVPD) in three installp parts:InstallRoot/etc/objreposInstallRoot/usr/lib/objreposInstallRoot/usr/share/lib/objrepos++ Information about the flags for the AIX command: installpThe flags for installp mentioned in the online manual for MQ indicate to apply, commit, expand file system, agree with license, using the .toc (table of contents) file and filesets in the current directory:installp -acgXYd . allhttps:///support/knowledgecenter/en/ssw_aix_72/i_commands/installp.htm lAIX 7.2 / Commands / i /installp CommandPurposeInstalls available software products in a compatible installation package.Flags:-R path Indicates a user-specified installation location.-a Applies one or more software products or updates. This is the default action. This flag can be used with the -c flag to apply and commit a software product update when installed.-c Commits all specified updates that are currently applied but not committed. When an update is committed all other software products it is dependent on must also be committed (unless they are already in the committed state). The specified software product is dependent on any software product that is a prerequisite or corequisite of the specified product. If the requisite software products are not in the committed state, the commit fails and error messages are displayed. The -g flag can be used to automatically commit requisite software product updates.-g When used to install or commit, this flag automatically installs or commits, respectively, any software products or updates that are requisites of the specified software product. When used to remove or reject software, this flag automatically removes or rejects dependents of the specified software.-X Attempts to expand any file systems where there is insufficient space to do the installation. This option expands file systems based on current available space and size estimates that are provided by the software product package. Note that it is possible to exhaust available disk space during an installation even if the -X flag is specified, especially if other files are being created or expanded in the same file systems during an installation. Also note that any remote file systems cannot be expanded.-Y Agrees to required software license agreements for software to be installed. This flag is only valid with the -a flag.-d Device Specifies where the installation media can be found.Notice that "d ." means: current directory-r Rejects all specified software updates that are currently applied but not committed. When a software update is rejected any other software product that is dependent on it (that is, those software products that have the specified software product as a requisite) must also be rejected. The -g flag can be used to reject automatically dependent software updates.-u Removes the specified software product and any of its installed updates from the system. The product can be in either the committed or broken state.https:///support/knowledgecenter/ssw_aix_72/l_commands/lslpp.htmlAIX 7.2 /lslpp Command-R { path | ALL } Indicates a user-specified installation location.-a Displays all the information about filesets specified when combined with other flags. This flag shows all updates when combined with the -l flag and all history when combined with the -h flag.-l (lowercase L) Displays the name, most recent level, state, and description of the specified fileset.++ MQ Documentationhttps:///support/knowledgecenter/SSFKSJ_9.2.0/com.ibm.mq.ins.doc/q008600_.htm IBM MQ 9.2.x / Installing and uninstalling IBM MQ / Installing and uninstalling IBM MQ on AIX /Installing IBM MQ server on AIX.You must install the second version of the product in a location that is not the default. To create the non-default installation location you must use the mkusil command, which is available only from the command line..Install the whole product in a non-default location using the -R flag:installp -R USIL_Directory -acgXYd . allhttps:///support/knowledgecenter/SSFKSJ_9.2.0/com.ibm.mq.mig.doc/q008 010_.htmlIBM MQ 9.2.x / IBM MQ / Maintaining and migrating / Applying maintenance to IBM MQ / Applying and removing maintenance on UNIX and Linux /Applying maintenance level updates on AIX (Installation of Fix Packs)*** Note: The components will be either COMMITTED or APPLIED depending on the options chosen when applying the fix pack.https:///support/knowledgecenter/SSFKSJ_9.2.0/com.ibm.mq.mig.doc/q008 020_.htmlIBM MQ 9.2.x / IBM MQ / Maintaining and migrating / Applying maintenance to IBM MQ / Applying and removing maintenance on AIX and Linux /Reverting to the previous maintenance level on AIXT o back out ALL maintenance updates, as the user root, issue the command:installp [ -R usil ] -r "mqm*"https:///support/knowledgecenter/SSFKSJ_9.2.0/com.ibm.mq.ins.doc/q0094 20_.htmlIBM MQ 9.2.x / IBM MQ / Installing and uninstalling / Installing and uninstalling IBM MQ on AIX /Uninstalling or modifying IBM MQ on AIXT o uninstall an installation in the default location /usr/mqm:installp -u mqm+++ end。
AIX系统管理手册
索引1 命令索引2 存储管理2.1 概述AIX下磁盘首先是一个物理卷(PV),几个物理卷组成一个巻组(VG)。
定义巻组过程中,需要指定分区大小(PP),这个尺寸用于逻辑卷(LV)的定义。
Fget_config –Av2.2 物理卷定义(PV)系统扫描到磁盘以后,首先给他增加一个pvid,使其变成PV,命令如下:Chdev –l hdisk7 –a pv=yes删除pvid,命令如下:Chdev –l hdisk7 –a pv=clear查看物理卷的详细信息,使用lspv命令。
2.3 巻组定义(VG)使用lsvg –l查看巻组的详细信息,包括此巻组分成了几个逻辑卷,这几个逻辑卷又挂载在那个文件系统上。
创建一个卷组使用mkvg命令。
Extendvg:将一个物理卷添加到已有卷中。
Chvg:更改卷组属性。
Reducevg:删除或者导出一个物理卷。
Lsvg列出vg列表。
2.4 逻辑卷定义(LV)使用lslv查看逻辑卷的详细定义。
Mklv:创建一个逻辑卷。
Chlv:修改一个逻辑卷的名称或者特征。
Extendlv:增加逻辑卷分配的逻辑分区的数据。
Cplv:复制逻辑卷。
Rmlv:除去逻辑卷。
Mklvcopy:增加逻辑卷的副本数目,用于逻辑卷镜像。
Rmlvcopy:减少逻辑卷的副本数目,用于删除逻辑卷镜像。
Crfs:为逻辑卷创建一个文件系统。
2.5 交换空间(PS)Mkps:创建新的页面空间。
Chps:修改页面空间属性。
Lsps –a:显示页面空间列表。
Rmps:移除页面空间。
Swapon,swapoff:激活或者禁用页面空间。
2.6 文件系统命令Backup、restore:备份和还原。
Chfs:修改jfs文件属性,例如,为文件系统扩容。
Dd:将数据从一个存储设备直接复制到另一个存储设备。
Df:获得文件已使用空间大小。
Fsck:检查文件系统的一致性,并修复。
Crfs:在卷组上直接创建文件系统。
Mkfs:在逻辑卷上创建文件系统。
超经典的AIX系统管理手册

BOS(Base Operating System)安装
打开主机电源。 连接好系统终端,把第一张安装介质(磁带、光碟)插入驱动器。 在开机后按<F5>(图形终端)进入系统安装画面。 当终端显示如下信息时:
☆☆☆☆☆☆Please define the system console☆☆☆☆☆☆ Type a 1 and press enter to use this terminal as the system console. Type een 1 en druk op enter om deze terminal als de systeemconsole to gebruiken. Skrive tallet 1 og trykk paa enter for aa bruke denne terminalen som systemkonsoll. Pour definir ce terminal comme console systeme, appuyez sur 1puis sur entree. Taste 1 and ansch1iessend die eingabetaste druecken,um diese datenstation als systemkonsole zu verwenden. Prenier I1 tasto 1 ed invio per usare questo terminal como consolo. Escriba 1 y pulse intro para utilizer esta terminal como consola del sistema. a)Tryck paa 1 och sedan paa enter om dy vill att haer terminalen ska vara systemkonsol 键入“1”并回车(注意:键入的“1”不回显)选择主控台 (5) 屏幕上将不断显示一些信息,几分钟后出现: >>> 1 Type 1 and press enter to have English during install. 2 Type 2 en druk op enter om tijdens het installeren het Nederlands te krijgen. 3 Entrez 3 pour effectuer 1 installation en francais.
AIX操作系统安全配置要求及操作指南

AIX操作系统安全配置要求及操作指南
一、AIX操作系统安全配置要求
1.分级访问控制:要实施分级访问控制机制,明确管理者和普通用户
的访问等级,并分配不同的权限,使不同的用户层次由不同的权限控制。
2. 加强密码的安全策略:要加强密码的安全策略,包括定期更改密码,禁止使用过于简单的密码,不要在没有严格安全限制的情况下使用
root 权限。
3. 运行级别:禁止用户以root 身份登录系统,只有当用户需要以root 身份执行一些操作时,才能以root 身份登录,否则以普通用户身
份登录。
4.防火墙:根据网络的具体情况,采用专用防火墙或者网络模式的防
火墙,控制和限制外部计算机的访问权限。
5. 禁止外部访问:禁止外部访问系统,如FTP,telnet,外部的terminal访问等,除非有必要。
启用SSL/TLS 加密 socket 服务,防止
攻击者窃取数据。
6.定期备份:定期对重要的数据进行备份,以便在发生意外时及时进
行恢复。
7.实施流量监测:实施流量监测,实时检测系统中的网络流量和活动,以便及时捕获非法活动。
AIX系统安全配置手册
AIX系统安全配置1 身分识别1.1 账户设定1.2 推荐用户属性6.1.3用户帐户控制6.1.4登录用户标识1.5 使用访问控制表增强用户安全性1.6 停用无用的账户(Unnecessary Accounts)2 身分验证2.1 设定BIOS通行码2.2 设定账户密码2.3 使用 /etc/passwd 文件2.4 使用 /etc/passwd 文件和网络环境2.5 隐藏用户名和密码2.6 设置推荐的密码选项2.7 扩展密码限制3 访问控制3.1 保护使用者环境设定(User Configurations)3.2 使用 Noshell设置登录控制3.4 更改登录屏幕的欢迎消息3.5 更改公共桌面环境的登录屏幕3.6 设置系统缺省登录参数3.7 保护无人照管终端3.8 强制自动注销3.9 限制Root只可从控制台存取3.10 保护SUID 程序3.11 限制性的Restricted Shell3.12 检查World Writable Files3.13 使用 TCP Wrappers 限制存取4 数据保护4.1 完整性检测(Integrity Checking)4.2 使用MD5 Checksum 检查一致性5 安全事件记录5.1 加强系统日志5.2 系统错误日志工具(Systems Error Log)5.3 检查Cron 文件5.4 清除文件及目录6 网络服务设定1 防止IP 转送及主机欺骗(Host Spoofing)2 设定闲置(Inactive)的Time-out值3 关闭不必要的服务3.1 系统起动命令集(Startup-Script)3.2 /etc/inittab3.3 /etc/inetd.conf3.4 /etc/rc.nfs3.5 /etc/rc.tcpip3.6 停用TFTP3.7 停用Finger3.8 停用'r' 相关的命令服务3.9 执行securetcpip4 X-windows4.1 除去 /etc/rc.dt 文件4.2 阻止远程 X 服务器的未经授权的监视4.3 禁用和启用访问控制4.4 禁用运行 xhost 命令的用户许可权5 SNMP 服务6 Sendmail 的配置设定7 安装 SSH Secure Shell7.1 OpenSSH 编译的配置。
AIX操作系统运行维护手册-Ver1.0
AIX操作系统工作手册文件编号版 本0.1作成日2023年10月24日修订日发布日修 改 履 历序号版本修改日期章节号修改记录修改人批准人10.12023/10/23创建修游书目1引言 (5)1.1编写目的 (5)1.2适用范围 (5)1.3预期读者 (5)1.4文档说明 (5)2操作系统健康性检查 (6)2.1系统日志 (6)系统硬件错误日志检查 (6)系统全部错误日志检查 (7)系统错误日志Core_dump检查 (8)系统错误日志DELAYED_INT检查 (9)系统邮件日志内容检查 (9)系统邮件日志大小检查 (11)登录失败日志文件大小检查 (11)登录日志文件大小检查 (12)su日志文件大小检查 (13)异样终止的vi日志文件大小检查 (13)2.2系统性能 (14)系统CPU运用率检查 (14)查看占用CPU资源最多的进程 (17)系统内存运用率检查 (18)系统占用内存资源最多的进程 (20)系统磁盘繁忙程度检查 (22)2.3交换空间 (23)交换空间运用率检查 (23)2.4进程状态 (24)僵尸进程检查 (24)2.5网络状态 (24)网卡状态检查 (24)路由状态检查 (25)网络传输检查 (26)网络连接数量及状态检查 (30)主机解析检查 (32)2.6存储状态 (32)HBA卡状态检查 (32)2.7文件系统状态 (33)文件系统运用率检查 (33)文件系统挂载检查 (34)NFS文件系统挂载检查 (35)dump设备空间检查 (35)2.8逻辑卷状态 (36)Rootvg的剩余空间检查 (36)PV状态检查 (37)是否存在stale的pp检查 (37)2.9系统平安 (38)系统登录状况检查 (38)特权用户检查 (39)Su操作次数检查 (40)失败登录记录检查 (40)2.10双机状态 (41)双机心跳状态检查 (41)Hacmp.out日志检查 (42)Cluster.log日志检查 (42)双机节点状态检查 (43)2.11其它 (44)操作系统时间检查 (44)3操作系统异样快速排查规范 (44)3.1系统日志检查 (45)3.2CPU运用率检查 (45)3.3内存运用率检查 (45)3.4I/O运用率检查 (46)3.5网络检查 (46)3.6交换区检查 (47)3.7文件系统检查 (47)3.8双机检查 (48)1引言1.1编写目的为了保证项目组所运维系统的持续健康运行,降低操作系统的出错几率,并在出现问题时刚好且有效的进行排查、处理,故编写本手册。
AIX系统管理指南
IBM SystemP AIX培训教材目录第1 章RS/6000产品概述 (11)1.1 IBM RISC芯片技术 (11)1.2 对称多处理技术(Symmetric Mulit-Processor , SMP) (12)1.2.1 传统SMP的缺点 (12)1.2.2 RS/6000的解决方案 (12)1.3 SP技术 (13)1.4 RS/6000的体系结构 (13)1.4.1 MAC (13)1.4.2 PCI (14)1.5 系统的可靠性 (14)1.6 高可靠性群集多处理软件HACMP (15)第2 章AIX操作系统简介 (16)2.1 AIX的来历 (16)2.2 AIX操作系统的主要特点 (17)2.2.1 遵循众多工业标准 (17)2.2.2 先进的系统设计 (17)2.2.3 AIX的连接性 (18)2.2.4 终端支持 (19)2.3 命令语言解释器(ksh) (19)2.4 AIX文本编辑器 (19)2.5 AIX系统中的DOS工具 (19)2.6 AIX系统的用户界面 (19)2.7 联机帮助 (20)2.8 AIX的几个重要技术 (20)2.8.1 LVM-Logical Volume Manager (20)2.8.2 JFS-Journal File System (20)2.8.3 系统管理接口工具(smit) (20)第3 章AIX基本命令使用 (21)3.1 基本系统使用命令 (21)3.1.1 系统进入和退出 (21)3.1.1.1 系统进入 (21)3.1.1.2 系统退出 (21)3.1.2 系统关闭和重启 (22)3.1.3 修改密码passwd (22)3.1.4 日期和日历 (22)3.1.5 CLEAR、ECHO、BANNER (23)3.1.6 who、who am i、finger (23)3.1.7 mail (23)3.1.8 查找命令find (24)3.1.9 grep (26)3.1.10 UNAME命令 (26)3.1.11 查看命令帮助 (27)3.2 DOS工具 (27)第4 章文件和目录操作 (28)4.1 文件和目录 (28)4.2 文件命名规则 (28)4.3 路径 (29)4.4 显示当前工作目录 (30)4.5 改变目录层次 (30)4.6 创建目录mkdir (31)4.7 删除目录rmdir (31)4.8 文件操作命令 (31)4.8.1 列文件ls (31)4.8.2 文件拷贝cp (31)4.8.3 文件移动mv (32)4.8.4 文件删除rm (32)4.8.5 查看文件内容cat、more、pg (32)4.8.6 测试文件wc (32)4.8.7 链接ln (33)4.9 文件权限 (33)4.9.1 文件所有权 (34)4.9.2 文件权限 (34)4.9.3 改变文件所有权 (35)4.9.4 改变文件权限 (35)4.10 设备文件 (36)第5 章SHELL入门 (37)5.1 命令结构 (37)5.2 通配符 (37)5.3 环境变量 (38)5.4 PS1环境变量 (39)5.5 PS2环境变量 (39)5.6 标准输入、输出、出错和重定向 (40)5.6.1 标准输入、输出和出错 (40)5.6.2 重定向 (40)5.6.3 重定向的组合 (41)5.7 文件结束标记 (41)5.8 管道线和过滤器 (42)5.9 tee—分叉 (42)5.10 命令返回值 (42)5.11 反引号操作符 (43)5.12 命令序列 (43)5.13 反斜线操作符 (43)第6 章vi 使用 (44)6.1 vi简介 (44)6.2 vi的进入与离开 (44)6.3 vi 的文本输入模式 (45)6.4 删除文本 (45)6.5 更改文本 (46)6.6 vi常用功能 (47)6.7 文件处理子命令 (47)6.8 vi 基本编辑命令 (48)第7 章系统管理工具 (52)7.1 传统UNIX系统管理方法 (52)7.2 三个系统管理工具 (52)7.2.1 SMIT (52)7.2.2 DSMIT (53)7.2.3 VSM (53)7.3 系统管理工具工作方式 (53)7.4 各种系统管理工具功能及使用介绍 (54)7.4.1 SMIT功能及使用方法介绍 (54)7.4.1.1 SMIT用户界面组件 (54)7.4.1.2 SMIT的启动与使用 (55)7.4.1.3 SMIT主要功能及主菜单的使用 (56)7.4.1.4 smit对话屏幕的使用 (57)7.4.1.5 输出屏幕 (60)7.4.1.6 smit屏幕及脚本记录文件 (60)7.4.2 DSMIT简介 (61)7.4.3 可视化系统管理器(VSM)简介 (61)第8 章系统及软件安装 (64)8.1 操作系统安装 (64)8.1.1 安装介质和方式 (64)8.1.2 安装前的准备工作 (64)8.1.3 基本操作系统(BOS)的安装步骤 (65)8.1.4 安装辅助菜单 (70)8.2 软件安装与维护 (70)8.2.1 软件包的定义 (70)8.2.2 Bundle (71)8.2.3 Package命名 (72)8.2.4 代码服务 (73)8.2.5 软件更新 (74)8.2.6 安装状态 (74)8.2.7 软件安装 (75)8.2.8 软件清单 (76)8.2.9 软件维护 (76)8.2.10 instfix命令 (77)第9 章系统启动和关闭 (78)9.1 系统启动 (78)9.1.1 系统启动的几个阶段 (78)9.1.2 BIST – POST阶段 (78)9.1.2.1 基于MCA体系的系统 (78)9.1.2.2 基于PCI体系的系统 (79)9.1.3 Boot phase 1阶段 (81)9.1.4 Boot phase 2阶段 (81)9.1.5 Boot phase 3阶段 (82)9.2 查看启动信息 (82)9.3 /etc/inittab文件 (82)9.4 系统资源控制器 (84)9.4.1 SRC概念 (84)9.4.2 SRC命令 (84)9.5 系统关闭 (85)第10 章ODM管理 (86)10.1 ODM概述 (86)10.2 ODM概念: (86)10.3 ODM命令 (87)第11 章设备管理 (89)11.1 设备术语 (89)11.2 设备文件 (89)11.3 ODM预定义和定制设备数据库 (90)11.4 lsdev命令 (91)11.4.1 列出所有被支持的设备 (91)11.4.2 列出所有定义了的设备 (92)11.5 设备状态 (93)11.6 设备寻址 (94)11.7 设备配置 (94)11.7.1 自动配置设备 (94)11.7.2 手工配置 (95)11.7.2.1 SMIT设备菜单 (95)11.7.2.2 增加配置设备 (96)11.8 获取硬件配置信息 (97)第12 章存储管理概述 (98)12.1 AIX4.3版本存储组件 (98)12.2 传统UNIX磁盘存储 (98)12.3 LVM的优点 (98)12.4 物理存储 (99)12.4.1 物理存储概念 (99)12.4.2 卷组考虑 (100)12.4.3 卷组描述字段 (100)12.5 逻辑存储 (101)12.5.1 逻辑存储概念 (101)12.5.2 逻辑卷用途 (103)12.5.3 显示逻辑卷信息 (103)12.6 文件系统 (104)12.6.1 文件系统概念 (104)12.6.2 文件系统优点 (104)12.6.3 AIX 4.3的标准文件系统 (105)12.6.4 /etc/filesystems文件 (105)12.6.5 文件系统挂接(MOUNT) (106)12.6.6 文件系统列表 (108)第13 章逻辑卷管理(LVM) (110)13.1 卷组管理 (110)13.1.1 显示卷组信息 (111)13.1.2 增加和删除卷组 (113)13.1.3 修改卷组特性 (113)13.1.4 增加或删除卷组中的物理卷 (114)13.1.5 重组卷组 (115)13.1.6 激活和停止卷组 (115)13.1.7 引入/导出卷组 (116)13.2 逻辑存储 (117)13.2.1 基本概念 (117)13.2.1.1 镜像(mirror) (117)13.2.1.2 条带化(striping) (118)13.2.1.3 逻辑卷分配策略 (119)13.2.2 逻辑卷的管理 (119)13.2.2.1 显示逻辑卷信息 (120)13.2.2.2 增加逻辑卷 (121)13.2.2.3 删除逻辑卷 (122)13.2.2.4 设置逻辑卷的特性 (123)13.2.2.5 增加/删除逻辑卷拷贝 (123)13.3 物理卷管理 (125)13.3.1 显示物理卷信息 (125)13.3.2 增加磁盘 (127)13.3.3 迁移物理卷内容 (127)13.4 获取存储系统的配置信息 (127)第14 章文件系统管理 (128)14.1 基本概念 (128)14.1.1 日志文件系统的结构 (128)14.1.2 inode节点结构 (128)14.1.3 磁盘分段(fragmentation) (129)14.1.4 inode节点的数目 (130)14.1.5 文件系统压缩 (130)14.1.6 JFS文件系统日志 (131)14.2 文件系统管理 (131)14.2.1 列出文件系统 (132)14.2.1.1 列出系统中定义的所有文件系统 (132)14.2.1.2 列出系统中已挂接的文件系统 (133)14.2.2 增加文件系统 (133)14.2.2.1 在已有逻辑卷上创建文件系统 (133)14.2.2.2 直接创建JFS文件系统 (135)14.2.3 文件系统的挂接和拆卸 (136)14.2.4 更改/显示日志文件系统特性 (137)14.2.5 删除文件系统 (138)14.2.6 整理文件系统碎片 (138)14.2.7 文件系统检查 (139)14.2.8 获取文件系统信息 (139)14.3 磁盘空间管理 (139)14.3.1 显示文件系统空间使用情况 (140)14.3.2 控制增长较快的文件 (140)14.3.3 显示磁盘使用情况 (141)第15 章系统交换区管理 (142)15.1 换页空间的概念 (142)15.2 为什么使用换页空间 (143)15.3 如何提高换页空间的性能 (143)15.4 换页空间相关命令和文件 (143)15.5 增加换页空间 (144)15.6 修改换页空间 (145)15.7 删除换页空间 (145)15.8 换页空间问题解决 (145)第16 章系统备份和恢复 (147)16.1 概念与术语 (147)16.1.1 备份和恢复 (147)16.1.2 恢复 (148)16.1.3 备份的类型 (148)16.1.4 备份的策略 (148)16.1.5 备份用设备 (149)16.1.5.1 软盘 (149)16.1.5.2 磁带 (150)16.2 备份和恢复的实施 (151)16.2.1 备份及恢复的SMIT菜单 (151)16.2.2 rootvg的备份与恢复 (151)16.2.2.1 rootvg的备份-mksysb (151)16.2.2.2 rootvg的/image.data文件: (152)16.2.2.3 rootvg的/bosinst.data文件: (154)16.2.2.4 rootvg的恢复 (155)16.2.3 非rootvg卷组的备份与恢复 (156)16.2.3.1 非rootvg卷组的备份 (156)16.2.3.2 非rootvg卷组的恢复 (157)16.2.4 文件和目录的备份与恢复 (158)16.2.4.1 备份文件或目录 (158)16.2.4.2 恢复文件或目录 (159)16.2.5 文件系统的备份与恢复 (159)16.2.5.1 备份文件系统 (159)16.2.5.2 文件系统的恢复 (161)16.2.6 其它UNIX备份和恢复命令 (162)16.2.6.1 tar命令 (162)16.2.6.2 cpio命令 (163)16.2.6.3 dd命令 (163)16.2.7 其他与备份相关命令 (163)16.2.8 备份文档的策略 (164)第17 章网络管理 (165)17.1 TCP/IP基本概念 (165)17.2 互联网实例 (165)17.3 TCP/IP配置 (167)17.4 配置IP地址和主机名 (168)17.5 修改IP地址和主机名 (169)17.6 相关文件 (169)17.7 路由管理 (169)17.7.1 查看路由 (169)17.7.2 增加/ 删除静态路由 (170)17.8 基本TCP/IP工具 (170)17.8.1 检验连通性ping (170)17.8.2 文件传输ftp (170)17.8.3 远程登陆 (171)17.8.3.1 telnet (171)17.8.3.2 rlogin (171)17.8.4 远程执行 (171)17.8.4.1 rcp (171)17.8.4.2 rexec (172)第18 章用户和组管理 (173)18.1 概述 (173)18.1.1 用户和组 (173)18.1.2 用户登录和初始化 (173)18.1.2.1 用户登录过程 (173)18.1.2.2 用户初始化文件 (175)18.1.3 组的分类 (176)18.1.4 用户划分 (176)18.1.5 安全性和用户菜单 (177)18.2 用户管理 (178)18.2.1 显示系统中所有用户 (178)18.2.2 添加用户 (179)18.2.3 修改/显示用户属性 (180)18.2.4 删除用户 (181)18.2.5 设置、更改用户口令 (181)18.2.6 紧急情况下删除root口令 (182)18.3 组管理 (183)18.3.1 显示系统中所有的组 (183)18.3.2 添加组 (184)18.3.3 修改//显示组属性 (185)18.3.4 删除组 (185)18.4 系统管理员与用户通讯的工具 (186)18.4.1 motd文件 (186)18.4.2 write和wall命令 (186)18.4.3 talk命令 (187)18.4.4 mesg命令 (187)第 1 章RS/6000产品概述RS/6000是IBM公司的出色产品。
AIX技术手册v0.01
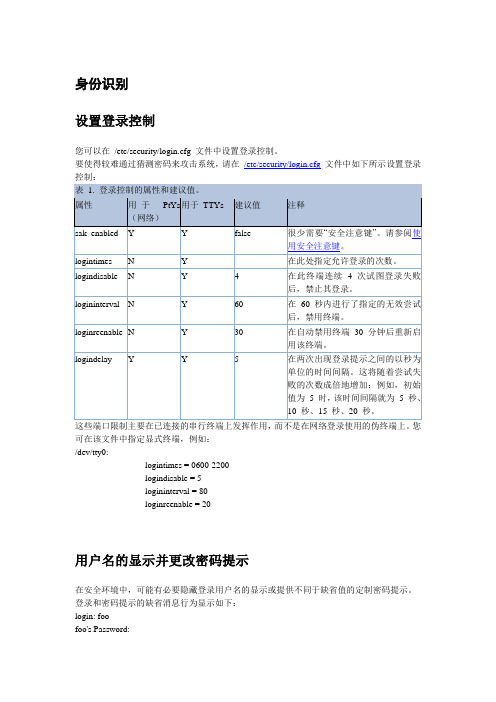
身份识别设置登录控制您可以在/etc/security/login.cfg 文件中设置登录控制。
要使得较难通过猜测密码来攻击系统,请在/etc/security/login.cfg文件中如下所示设置登录控制:这些端口限制主要在已连接的串行终端上发挥作用,而不是在网络登录使用的伪终端上。
您可在该文件中指定显式终端,例如:/dev/tty0:logintimes = 0600-2200logindisable = 5logininterval = 80loginreenable = 20用户名的显示并更改密码提示在安全环境中,可能有必要隐藏登录用户名的显示或提供不同于缺省值的定制密码提示。
登录和密码提示的缺省消息行为显示如下:login: foofoo's Password:要在提示和系统错误消息中禁用用户名的显示,请在/etc/security/login.cfg 文件中编辑usernameecho 参数。
usernameecho 的缺省值为true,该值会导致显示用户名。
您可用chsec 命令或直接编辑文件来更改该参数。
以下示例用chsec 命令将缺省的usernameecho 参数更改为false:# chsec -f /etc/security/login.cfg -s default -a usernameecho=false有关chsec 命令的更多信息,请参阅《AIX 5L V5.3 命令参考大全,卷1》。
要直接编辑文件,请打开/etc/security/login.cfg 文件并如下添加或修改usernameecho 参数:default:usernamecho = false将usernameecho 参数设置为false 将导致登录提示不会显示用户名。
对于系统提示和错误消息,将使用“*”字符掩盖用户名,如下所示:login:***'s Password:可通过在/etc/security/login.cfg 文件中设置pwdprompt 参数来单独将密码提示修改为定制字符串。
AIX 操作系统安全配置要求及操作指南
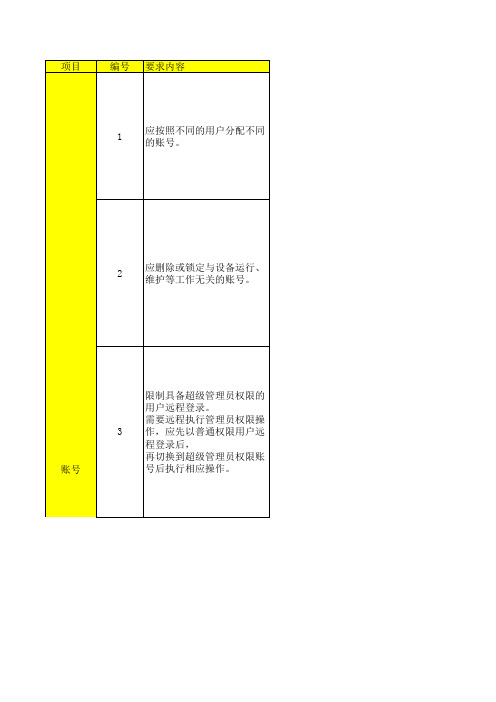
1、参考配置操作 方法一: chsec -f /etc/security/user -s default -a histexpire=13 方法二: 用 vi 或其他文本编辑工具修改chsec -f /etc/security/user 文 件如下 值: histexpire=13 histexpire=13 #密码可重复使用的星期为13 周(91 天) 2、补充操作说明 1、参考配置操作 方法一: chsec -f /etc/security/user -s default -a histsize=5 方法二: 用 vi 或其他文本编辑工具修改chsec -f /etc/security/user 文 件如下值: histsize=5 histexpire=5 #可允许的密码重复次数 1、参考配置操作 查看帐户帐户属性: #lsuser username 设置6 次登陆失败后帐户锁定阀值: #chuser loginretries=6 username 备注:root 账户不在锁定范围内
1、参考配置操作 a. 限制某些系统帐户不准 ftp 登录: 通过修改ftpusers 文件,增加帐户 #vi /etc/ftpusers b.限制用户可使用 FTP 不能用Telnet,假如用户为ftpxll 创建一个/etc/shells 文件, 添加一行 /bin/true; 修改/etc/passwd 文件, ftpxll:x:119:1::/home/ftpxll:/bin/true 注:还需要把真实存在的shell 目录加入/etc/shells 文件,否则 没有用户能够登录ftp 以上两个步骤可参考如下shell 自动执行: lsuser -c ALL | grep -v ^#name | cut -f1 -d: | while read NAME; do if [ `lsuser -f $NAME | grep id | cut -f2 -d=` -lt 200 ]; then echo "Adding $NAME to /etc/ftpusers" echo $NAME >> /etc/ftpusers.new fi done sort -u /etc/ftpusers.new > /etc/ftpusers rm /etc/ftpusers.new chown root:system /etc/ftpusers chmod 600 /etc/ftpusers c. 限制 ftp 用户登陆后在自己当前目录下活动 编辑 ftpaccess,加入如下一行restricted-uid *(限制所有), restricted-uid username(特定用户) ftpaccess 文件与ftpusers 文件在同一目录 d. 设置ftp 用户登录后对文件目录的存取权限,可编辑 /etc/ftpaccess。 1、参考配置操作 先把补丁集拷贝到一个目录,如/08update,然后执行 #smit update_all 选择安装目录/08update 默认 SOFTWARE to update [_update_all] 选择不提交,保存被覆盖的文件,可以回滚操作,接受许可协议 COMMIT software updates? no SAVE replaced files? yes ACCEPT new license agreements? yes 然后回车执行安装。 2、补充操作说明
AIX6.1系统安装(串口)配置手册v1.0

AIX6.1系统安装(串口)配置手册v1.0目录一.版本 (4)二.准备光盘 (4)三.AIX系统安装 (4)3.1 AIX安装方式简介 (4)3.2 AIX系统安装具体步骤 (6)3.2.1系统安装 (6)3.2.2安装bundle (17)3.2.3系统镜像设置及启动顺序设置 (18)3.2.4 AIX系统补丁安装 (19)四 AIX系统配置及参数修改 (21)4.1 服务器IP及路由配置 (21)4.2 修改服务器主机名 (22)4.3 修改时区 (22)4.4 修改时间 (23)4.5 修改文件系统大小 (23)4.6 系统用户的limits参数 (23)4.7 Paging Space (23)4.8 修改用户最大进程数 (24)4.9 安装中文语言包 (24)4.10安装Bash shell (28)4.11 NTP服务配置 (29)4.12创建用户 (30)4.13限制某些用户无法ftp至power服务器 (31)4.14限制root用户通过telnet/ssh/rlogin登录至power服务器 (31)4.15 ASMI(超级系统管理口)的使用 (32)4.16 数据库和应用自启动脚本配置 (34)4.17 AIX中samba Server的配置方法 (35)4.18 AIX中普通用户拥有sqlplus的执行权限配置方法 (36)五.AIX常用系统命令简介 (37)5.1系统开关机 (37)5.2设备查看命令 (38)a)lsdev命令 (38)b)lspv命令 (40)c)lscfg命令 (41)d)lsattr命令 (42)5.3逻辑卷操作命令 (43)a) mkvg43b) lsvg (43)c) mklv (45)d) lslv (45)5.4文件系统操作命令 (45)a)smitty crfs (45)c)mount (47)d) df (48)5.5文件操作命令 (48)a)ls (48)b)cp (48)c)mv (48)d)rm (49)e)chown (49)5.6网络命令 (49)a)netstat (49)b)ifconfig (50)c)smitty tcpip (50)5.7查看系统运行状况 (52)a)topas (52)b)vmstat (53)附录一.系统补丁介绍及下载步骤 (53)附录二.配置超级终端步骤 (56)本文档仅供研发内部使用,如需在生产环境使用,请先对指导书各步骤进行验证一.版本采用的操作系统是I BM 的A IX6.1二.准备光盘系统安装盘D VD2 张: AIX 6 1-03如无系统补丁光盘,可以到IBM网站去下载对应补丁(见附件一.)三.AIX系统安装3.1 AIX安装方式简介AIX 可供选择的安装方式有三种:1)全新覆盖安装(New and Complete Overwrite)使用这种方法安装系统将会覆盖用户所选择目标盘上的所有数据。
aix系统管理指南
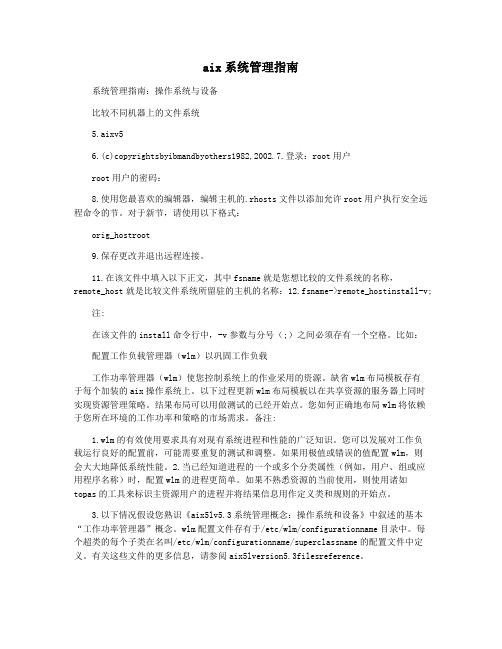
aix系统管理指南系统管理指南:操作系统与设备比较不同机器上的文件系统5.aixv56.(c)copyrightsbyibmandbyothers1982,2002.7.登录:root用户root用户的密码:8.使用您最喜欢的编辑器,编辑主机的.rhosts文件以添加允许root用户执行安全远程命令的节。
对于新节,请使用以下格式:orig_hostroot9.保存更改并退出远程连接。
11.在该文件中填入以下正文,其中fsname就是您想比较的文件系统的名称,remote_host就是比较文件系统所留驻的主机的名称:12.fsname->remote_hostinstall-v;注:在该文件的install命令行中,-v参数与分号(;)之间必须存有一个空格。
比如:配置工作负载管理器(wlm)以巩固工作负载工作功率管理器(wlm)使您控制系统上的作业采用的资源。
缺省wlm布局模板存有于每个加装的aix操作系统上。
以下过程更新wlm布局模板以在共享资源的服务器上同时实现资源管理策略。
结果布局可以用做测试的已经开始点。
您如何正确地布局wlm将依赖于您所在环境的工作功率和策略的市场需求。
备注:1.wlm的有效使用要求具有对现有系统进程和性能的广泛知识。
您可以发展对工作负载运行良好的配置前,可能需要重复的测试和调整。
如果用极值或错误的值配置wlm,则会大大地降低系统性能。
2.当已经知道进程的一个或多个分类属性(例如,用户、组或应用程序名称)时,配置wlm的进程更简单。
如果不熟悉资源的当前使用,则使用诸如topas的工具来标识主资源用户的进程并将结果信息用作定义类和规则的开始点。
3.以下情况假设您熟识《aix5lv5.3系统管理概念:操作系统和设备》中叙述的基本“工作功率管理器”概念。
wlm配置文件存有于/etc/wlm/configurationname目录中。
每个超类的每个子类在名叫/etc/wlm/configurationname/superclassname的配置文件中定义。
AIX操作系统安全配置手册
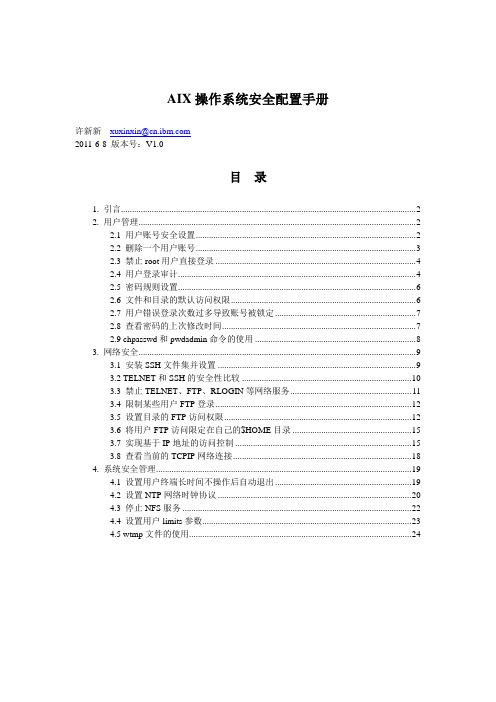
AIX操作系统安全配置手册许新新***************.com2011-6-8 版本号:V1.0目录1. 引言 (2)2. 用户管理 (2)2.1 用户账号安全设置 (2)2.2 删除一个用户账号 (3)2.3 禁止root用户直接登录 (4)2.4 用户登录审计 (4)2.5 密码规则设置 (6)2.6 文件和目录的默认访问权限 (6)2.7 用户错误登录次数过多导致账号被锁定 (7)2.8 查看密码的上次修改时间 (7)2.9 chpasswd和pwdadmin命令的使用 (8)3. 网络安全 (9)3.1 安装SSH文件集并设置 (9)3.2 TELNET和SSH的安全性比较 (10)3.3 禁止TELNET、FTP、RLOGIN等网络服务 (11)3.4 限制某些用户FTP登录 (12)3.5 设置目录的FTP访问权限 (12)3.6 将用户FTP访问限定在自己的$HOME目录 (15)3.7 实现基于IP地址的访问控制 (15)3.8 查看当前的TCPIP网络连接 (18)4. 系统安全管理 (19)4.1 设置用户终端长时间不操作后自动退出 (19)4.2 设置NTP网络时钟协议 (20)4.3 停止NFS服务 (22)4.4 设置用户limits参数 (23)4.5 wtmp文件的使用 (24)1. 引言AIX作为IBM Power系列开放平台服务器的专用操作系统,属于UNIX操作系统的一个商业版本。
作为企业级服务器的操作平台,安全性是AIX必备的一个重要特性。
由于我们的小型机上往往运行着客户的核心生产业务,因此对于系统的安全设置往往会有着严格的要求。
2. 用户管理AIX是一个多用户操作系统,多个用户要在同一个系统环境中协同工作,用户访问权限的设置、用户作业的相互隔离、用户系统资源的限制,都是AIX操作系统不可或缺的功能。
2.1 用户账号安全设置为了保证整个操作系统的安全,每个用户账号必须满足如下安全设置要求:(1)每个系统管理员应该设置单独的账号,不允许多个管理员共用一个账号;(2)root用户不允许直接登录,必须通过其他用户登录后,通过su命令获得root用户权限;(3)禁用或者删除不使用的系统账号;(4)设置必要的密码规则。
AIX系统管理
IBMAIX 操 作 系 统 管 理 手 册目录一、AIX操作系统介绍 (5)1.模块化内核 (5)2.动态调整内核 (5)3.线程内核 (5)4.高效输入/输出 (5)5.日志文件系统 (6)6.存储管理 (6)7.系统管理 (6)二、系统启动和关机 (7)2.1多用户引导模式 (7)2.2单用户引导模式 (8)2.3系统关机 (9)三、用户登录和退出 (10)3.1启动CDE (10)3.2登录 (10)3.3退出 (11)3.4用户属性 (11)四、设备管理 (16)4.1设备管理介绍 (16)4.2 对象数据库 (17)4.3 添加设备(命令行) (18)4.4 添加设备(SIMT) (18)4.5 ODM未定义的设备 (20)4.6 删除设备 (21)五、磁盘和文件系统 (22)5.1 系统目录 (22)5.2 逻辑卷管理 (23)5.3 安装磁盘 (24)5.4 创建逻辑卷 (25)5.5 创建文件系统 (26)5.6 管理调页空间 (28)5.7 总结 (28)六、进程管理 (29)6.1 显示/修改进程属性 (29)6.1.1 显示进程属性 (29)6.1.2 修改进程优先级 (29)6.2 停止进程 (29)6.3 性能检测 (30)6.4 系统资源控制器SRC (30)6.5 进程的定时启动 (35)七、备份和恢复 (37)7.1.1 rootvg的备份 (38)7.1.2 Non-rootvg 的备份 (39)7.1.3文件系统的备份 (40)7.2 恢复 (41)7.2.1文件系统的恢复 (42)7.3 映象备份 (42)7.4 磁带驱动器 (43)八、TCP/IP (45)8.1 配置IP地址和主机名 (45)8.2 路由管理 (46)8.3 网卡配置 (47)8.4 配置域名服务器 (47)8.5 编辑一些重要文件 (48)8.6 管理其它服务 (49)8.7 BSD配置风格 (50)九、域名服务 (52)9.1服务器配置文件 (52)9.2主域名服务器 (52)9.3次域名服务器 (53)9.4代理(Cache-Only)域名服务器 (54)9.5域名服务客户机 (54)9.6域名解析顺序 (55)10、网络信息系统 (56)10.1服务器配置文件 (56)10.2 设置本机为住NIS服务器 (56)10.3设置本机为次NIS服务器 (57)10.4设置本机为NIS客户机 (58)10.5描述图和命令 (58)10.6 NIS守护进程 (60)11、网络文件系统 (62)11.1 NFS守侯进程 (62)11.2 NFS服务器 (62)11.3 NFS客户机 (63)11.4 其他命令 (65)11.5 自动mount (65)12、邮件 (67)12.1 邮件系统配置文件 (67)12.2 邮件系统守侯进程 (67)12.3 邮件别名 (68)12.4 邮件队列 (68)12.5 邮件日志和统计 (69)13、X window (70)13.1文件和目录结构 (70)13.3退出X环境 (72)13.4终端仿真 (73)13.5 字体服务器 (73)13.6显示管理器 (73)13.7 X11互操作性 (74)13.7.1 远地主机的显示输出 (74)13.7.2 把工作站变为X终端 (75)13.8 CDE互操作性 (75)14、打印 (77)14.1队列系统 (77)14.2本地打印机 (78)14.3远程打印机 (80)15、日常维护常用命令 (84)15.1 smitty (84)15.2 lsdev (85)15.3 lsattr (86)15.4 lsvg (87)15.5 lspv (87)15.6 netstat (88)15.7 df (88)15.8 du (88)15.9 fsck (89)15.10 lssrc (89)15.11 sar (90)15.12 errpt (90)15.13 mail (92)16、HACMP日常维护命令 (93)16.1 HA的启动 (93)16.2 HA的停止 (93)16.3监控HA (93)16.4同步HA (93)16.5注意事项 (94)17、系统日常管理的主要工作 (95)17.1必须完成的任务 (95)17.2经常任务 (95)17.3不经常任务 (95)17.4定期任务 (96)17.5偶尔任务 (96)18、TSM磁带库的操作 (97)18.1 备份操作 (97)18.2恢复 (98)相关系统资源 (99)一、AIX操作系统介绍AIX全名为Advanced Interactive eXecutive, 俗称“An IBM Unix”或“Advanced IBM Unix”。
HMCAIX用户基础手册和管理基础手册

HMC&AIX用户手册和管理手册目录目录.............................................................................................. 错误!未定义书签。
1Basic operation............................................................ 错误!未定义书签。
1.1登录HMC............................................................ 错误!未定义书签。
1.2注销HMC............................................................ 错误!未定义书签。
1.3重启HMC............................................................ 错误!未定义书签。
1.4查看网络拓状态(View Network Topology). 错误!未定义书签。
2Service Management常见功效项:............................ 错误!未定义书签。
2.1状态栏功效....................................................... 错误!未定义书签。
3Service Plans ............................................................... 错误!未定义书签。
3.1怎样查看小型机资源配置:........................... 错误!未定义书签。
3.2怎样开关机及激活分区:............................... 错误!未定义书签。
日常管理手册-AIX

AIX日常管理手册目录1主机开关机步骤 (3)1.1主机关机步骤 (3)1.2主机开机步骤 (3)2系统日常检查 (3)1主机开关机步骤1.1主机关机步骤1.停止前端主机IO,包括RPA2.通过putty登录vplexcli(service/ Mi@Dim7T),进行VPLEX健康检查# VPlexcli:/ >health-check3.收集VPLEX当前信息# VPlexcli:/ >collect-diagnostics -–minimum4.确认VPLEX当前无rebuild操作#VPlexcli:/>rebuild status5.确认VPLEX电池状态# VPlexcli:/ >battery-conditioning summary6.关闭VPLEX电池的conditioning功能#VPlexcli:/> battery-conditioning disable -s /engines/*/stand-by-power-supplies/*7.关闭VPLEX Cluster#VPlexcli:/>clusters/cluster-1> cluster shutdown8.关闭VPLEX的两个director#VPlexcli:/>exit#service@vplex-1:~> ssh -l root 128.221.252.35#director-1-1-a:~ # shutdown -P "now"# director-1-1-a:~ # exit#service@vplex-1:~> ssh -l root 128.221.252.36#director-1-1-b:~ # shutdown -P "now"# director-1-1-b:~ # exit9.关闭VPLEX电源1.2主机开机步骤1.打开VPLEX电源2.通过putty登录vplexcli(service/ Mi@Dim7T),启用VPLEX电池的conditioning功能#VPlexcli:/> battery-conditioning enable -s /engines/*/stand-by-power-supplies/*3.VPLEX健康检查# VPlexcli:/ >health-check4.收集VPLEX当前信息# VPlexcli:/ >collect-diagnostics -–minimum2系统日常检查➢系统日志检查# errptroot@zd04:/ #errptIDENTIFIER TIMESTAMP T C RESOURCE_NAME DESCRIPTIONDCB47997 020******* T H hdisk32 DISK OPERATION ERRORDCB47997 020******* T H hdisk1 DISK OPERATION ERROR其中,TIMESTAMP代表日期,以MMDDhhmmYY格式;如020*******表示2014年02月09日23时55分T(Type)一栏中,P表示永久性错误(或性能降低错误),T 表示临时性错误,U 表示未知错误,I 表示信息而并非错误。
AIX小型机操作系统学习指南-系统管理概述

整理ppt
15
P550 服务器外观
整理ppt
16
P5系列指示灯状态及意义
整理ppt
17
P5系列控制盘简介1
整理ppt
18
P5系列控制盘简介2
A Power button B On/off power symbol C Type and serial number label D Function/Data display E Ethernet connector F Power on light
IntelliStation POWER 185
整理ppt
9
IBM SN 的命名方式
型号的命名方式:
4位的(model)和3位的type号码组成的,model是一个系列的号码, 而type是他这款机型的一个代码.
SN的命名方式:
IBM的产品为7位, 前两位是代表工厂的编号 (比如 65 、 10 都代表 USA 、75代表匈牙利等等)后5位代码是这台机器的序列号.
整理ppt
5
IBM unix cpu 发展历史
Copper 代表铜芯片技术 SOI 代表绝缘硅技术 Low-K 代表Low-K绝缘整介理质p技p术t
*IBM特有的SMP(对称多处理器技术) 6
RS6000系列产品
7025-6F1(F85) 7025-6F0 (F80)
7026-6H1(H85) 7026-H80(H80)
location. This function is available only in the manual operating mode and
from power on standby.
整理ppt
21
1.1.3 工作站配置
OBackup30AIX版系统管理手册.pdf

OBackup 3.0 AIX版系统管理手册-适用AIX2011年7月免责声明此出版物所有含信息如有更改,恕不另行通知, Inc不对本手册提供任何担保。
对于本手册所含错误以及由于本手册的提供,执行或使用而导致的任何偶然或必然损害赔偿, Inc均不承担任何法律责任。
目录一、概述 (4)1、原理说明 (4)2、版本说明及获取方式 (5)二、OBackup安装 (6)1、安装步骤 (6)2、安装组件 (6)2.1、MasterServer组件安装 (6)2.2、MasterServer 配置 (9)2.3、登录OBackup管理中心 (10)2.4、MediaServer组件安装 (11)2.5、MediaServer配置 (11)2.6、创建存储单元 (13)2.7、BackupAgent组件安装 (17)2.8、BackupAgent配置 (17)三、OBackup配置 (19)3.1、客户端管理 (19)3.1.1、添加主机 (19)3.1.2、管理主机 (19)3.1.3、添加Oracle实例 (20)3.1.4、管理Oracle实例 (20)3.2、作业管理 (20)3.2.1、新建备份作业 (20)3.2.2、管理备份作业 (23)3.2.3、新建恢复作业 (24)3.2.4、作业状态 (25)3.3、介质服务器管理 (25)3.3.1、备份集信息 (25)3.3.2、存储单元 (26)3.3.3、状态 (26)3.4、许可信息 (26)四、联系我们 (26)一、概述OBackup是一个采用异地备份及恢复备份软件, OBackup通过网络将Oracle 生产数据进行在线异地备份及恢复,不占用本地存储空间。
OBackup支持硬盘,磁带存储介质,能够将Oracle备份出来的生产数据直接存储到硬盘或者磁带中,有效的避免了生产数据和备份数据同时损坏的风险。
1、原理说明OBackup 原理说明:BackupAgent:备份客户端,安装到Oracle数据库主机上,实现备份恢复作业。
aix操作系统系统安全配置手册
UNIX系统安全加固实施细则:1日志记录选择不合理或系统日志数据不完整设置审计,在/etc/syslog.conf文件中增加下列四行内容: /var/adm/croerr.log /var/adm/auth.loguser. warning /var/adm/user.log /var/adm/kern.log2日志记录备份建议使用磁带机定期做系统差分备份。
由系统管理员定期完成。
#mksysb3系统开启了与业务无关的服务关闭不需要的服务:#vi /etc/inetd.conf在文件中找到相关服务名称,将其注释即可。
更改后需要刷新:#refresh –s inetd。
4系统开启了与业务无关的端口关闭服务即关闭了端口,故只需找到无关服务即可。
5账户策略配置不当在/etc/security/user中修改maxrepeat=3、minlen=6;在/etc/security/login.cfg中修改maxlogin=5;6定时任务在/etc/crontab文件中注释掉不需要的定时任务。
7系统未限制能够su为root的用户在/etc/security/user中修改default中su=false;在需要保留su功能的相应账户名下添加su=ture。
8系统未开启超时自动注销功能在/etc/profile、/etc/enviroment、/etc/security/.profile文件中添加下列三行内容:TMOUT=600TIMEOUT=600export TMOUT TIMEOUT9远程管理方式配置不当关闭ftp 和telnet进程。
#vi /etc/inetd.conf。
安装SSH工具。
10操作系统存在弱口令账号建议使用长密码,包含数字,字母和符号的密码。
11访问旗标泄漏系统信息1在/etc/security/login.cfg中修改head项旗标内容。
/etc/motd中添加旗标内容。
12系统R族文件配置不合理13系统允许root用户远程登录要禁止远程登录root用户,需要编辑/etc/security/user,在root项中选定false为rlogin的值。
- 1、下载文档前请自行甄别文档内容的完整性,平台不提供额外的编辑、内容补充、找答案等附加服务。
- 2、"仅部分预览"的文档,不可在线预览部分如存在完整性等问题,可反馈申请退款(可完整预览的文档不适用该条件!)。
- 3、如文档侵犯您的权益,请联系客服反馈,我们会尽快为您处理(人工客服工作时间:9:00-18:30)。
索引2存储管理.................................................2.1概述................................................2.2物理卷定义(PV)...................................2.3巻组定义(VG).....................................2.4逻辑卷定义(LV)...................................2.5交换空间(PS).....................................2.6文件系统命令 .......................................2.7作启动镜像盘 .......................................2.8创建文件系统过程 ...................................3系统管理.................................................3.1系统错误日志(errdemon)..........................3.2系统日志(alog)......................................3.3系统状态及设备查询 .................................3.4系统关机及重启 .....................................3.5光驱加载 ...........................................3.6性能监控 ...........................................3.7服务管理 ...........................................3.8环境变量 ...........................................3.9启动常见错误码 .....................................4网络管理.................................................4.1TCPIP服务组........................................ 1命令索引2存储管理2.1概述AIX下磁盘首先是一个物理卷(PV),几个物理卷组成一个巻组(VG)。
定义巻组过程中,需要指定分区大小(PP),这个尺寸用于逻辑卷(LV)的定义。
Fget_config–Av2.2物理卷定义(PV)系统扫描到磁盘以后,首先给他增加一个pvid,使其变成PV,命令如下:Chdev–lhdisk7–apv=yes删除pvid,命令如下:Chdev–lhdisk7–apv=clear查看物理卷的详细信息,使用lspv命令。
2.3巻组定义(VG)使用lsvg–l查看巻组的详细信息,包括此巻组分成了几个逻辑卷,这几个逻辑卷又挂载在那个文件系统上。
创建一个卷组使用mkvg命令。
Extendvg:将一个物理卷添加到已有卷中。
Chvg:更改卷组属性。
Reducevg:删除或者导出一个物理卷。
Lsvg列出vg列表。
2.4逻辑卷定义(LV)使用lslv查看逻辑卷的详细定义。
Mklv:创建一个逻辑卷。
Chlv:修改一个逻辑卷的名称或者特征。
Extendlv:增加逻辑卷分配的逻辑分区的数据。
Cplv:复制逻辑卷。
Rmlv:除去逻辑卷。
Mklvcopy:增加逻辑卷的副本数目,用于逻辑卷镜像。
Rmlvcopy:减少逻辑卷的副本数目,用于删除逻辑卷镜像。
Crfs:为逻辑卷创建一个文件系统。
2.5交换空间(PS)Mkps:创建新的页面空间。
Chps:修改页面空间属性。
Lsps–a:显示页面空间列表。
Rmps:移除页面空间。
Swapon,swapoff:激活或者禁用页面空间。
2.6文件系统命令Backup、restore:备份和还原。
Chfs:修改jfs文件属性,例如,为文件系统扩容。
Dd:将数据从一个存储设备直接复制到另一个存储设备。
Df:获得文件已使用空间大小。
Fsck:检查文件系统的一致性,并修复。
Crfs:在卷组上直接创建文件系统。
Mkfs:在逻辑卷上创建文件系统。
Rmfs:删除一个文件系统。
Lsfs:显示一个文件系统属性。
Mount、umount:挂载和取消挂载一个文件系统。
2.7作启动镜像盘1、查看是否镜像lsvg–lrootvgLP=1PP=NN=1没有作镜像N=2做了一份镜像2、创建启动分区(只针对rootvg)bosboot–adhdisk0Bosboot–adhdisk1Bosboot-mnormal–o启动列表Bosboot–mnormalhdisk0hdisk1更改启动顺序3、创建镜像盘Smittymirrorvg4、创建完镜像后,增加lv,使用smittymklv,一定要指定硬盘号,然后再执行Smittymirrorvg执行synchoronizelv做镜像。
2.8创建文件系统过程1、smittymkvgorextendvg2、Smittymklvorchlv创建lv3、Smittycrfsorchfs然后创建文件系统3系统管理3.1系统错误日志(errdemon)系统默认启动错误日志守护进程errdemon,该程序路径为/var/adm/ras,默认情况下,日志文件放在/var/adm/ras/errlog,也可以通过errdemon的-l参数查看。
阅读日志通过errpt命令完成,如果要详细查看一条错误日志,errpt–aj错误号的方式查看。
Errclear-0清空日志3.2系统日志(alog)使用alog–L查看系统的日志列表。
使用alog–ot查看指定的日志内容。
3.3系统状态及设备查询检查系统状态:系统整体: prtconf文件系统:df–k,df-g设备:lsdev–C获取设备名称、状态、位置和描述。
例:查看硬盘:lsdev–Ccdisk查看磁带机:lsdev–Cctape查看适配卡:lsdev–Ccadapter处理器个数lsdev–C|grepproc系统配置:lscfg–vp获取所有已配置硬件设备的详细信息。
例:查看硬盘信息:lscfg–vlhdiskxx表示数字查看网卡信息:lscfg–vlentxx表示数字查看磁带机:lscfg–vlrmtx x表示数字查看硬件属性:lsattr–El获取已配置设备的属性信息。
例:查看硬盘属性:lsattr–Elhdiskxx表示数字查看网卡属性:lsattr–Elentxx表示数字查看磁带机属性:lsattr–Elrmtxx表示数字内存大小:lsattr–Elmem03.4系统关机及重启–shutdown一分钟后关机–shutdown+2二分钟后关机–shutdown–Fr快速重启关机重启(-r)关机命令调用/etc/rc.shutdown关闭程序,可以在这个文件里加上你自己的脚本。
3.5光驱加载使用:mount-rvcdrfs/dev/cd0/cdrom–或者创建一个CD-ROM文件系统并进行加载smitcdrfsmount/cdrom卸载cdrom–unmount/cdrom3.6性能监控常用命令#ps#sar#vmstat#iostat#tprof#svmon#nmon(需要单独安装,t=TopProcessStats1=basic2=CPU-Use3=CPU4=Size5=Disk-I/O)#filemon例:CPU的使用情况(sar–u)这条命令的语法是:#sar[options]intervalnumber例如:#sar–u603AIXNODE230000021107/06/99%usr %sys %wio %idle08:25:11 48 52 0 008:26:10 63 37 0 008:27:12 59 41 0 0.Average 56 44 0 0当%usr+%sys>80%时,CPU紧张。
查看运行队列(sar–q)这条命令的语法是:#sar[options]intervalnumber例如:#sar–q603AIXNODE230000021107/06/9908:41:21 runq-sz %runocc swap-sz %swpocc08:42:21 1.2 10008:43:21 1.0 10008:44:21 1.1 100.Average 1.2 100注:命令#sar–q的输出:-runq-sz=运行队列的平均长度。
(运行队列的平均长度就是等待在队列中的进程数目)-%runocc=运行队列被占用的时间百分比。
-swap-sz=等待被内存页交换的进程的平均数目。
-%swapocc=内存页交换队列被占用的时间百分比。
这些数据会更有意义,如果收集一段时间并且研究它的趋势。
在有些环境下可以接受庞大的运行队列,而另外的环境就不一定适用。
例如,在一个传统的商业环境中,进程都是简单而运行快速的,这时系统性能还可以忍受大的运行队列。
而在一个工程或者科学计算环境中,进程一般都是巨大且需要更密集的资源的,此时就不能忍受大的运行队列。
#vmstat13注:命令vmstat的输出:-procs=(每秒)r 在运行队列中的进程b 在等待队列中的进程-memory=(那个时刻的统计数据)avm 活动的虚拟页的数目fre 在空闲列表中的物理内存槽数-page=(每秒)re 收回的页pi/po 交换进内存的页/交换出内存的页fr/sr 空闲的页/被时钟计算法则检测的页cy 时钟循环(一般为0)-faults=(每秒)in 设备中断数sy 系统调用数cs 上下文交换数-cpu=(就象命令sar–u,为百分比)us 用户进程sy 核心进程id 空闲时间wa I/O等待时间这些信息是sar报告的补充。
wa如果超过25%,那么磁盘子系统可能没有平衡好。
Lsps–a查看换页内存,一般情况下换页内容不超过20%,如果超过50%系统运行速度很慢,如果超过80%系统不可用.另外,换页内存一般是文件系统使用的比较频繁,文件打开后关闭不释放内存.换页空间的大小一般是物理内存的一半+512M或者1024M,如果物理内存较小,则是2倍物理内存.3.7服务管理3.8环境变量●env:用于查看系统环境变量●用户的环境变量设置在/home/用户名/.profile文件内,设置方法是:●ORACLE_SID=ORCL●exportORACLE_SID●修改过文件后,可以执行source文件名来使文件生效3.9启动常见错误码常见错误代码在上电的每一阶段,LCD面板都要显示一些数字信息:它为您指示:正在进行加载的设备当前的工作状态加载失败的原因可以在诊断手册中查到数字信息的含义主机启动时的常用LED错误代码0223-0229:Invalidbootlist.0551,0555,0557:Corruptedfilesystem,corruptedJFSlog,andsoon0552,0554,0556:SuperblockcorruptedandcorruptedcustomizedODM 0553:Corrupted/etc/inittabfile硬件报错通常LED会显示8位代码,请将这8位号码记录下来除了8位代码外,报修还需要记录故障服务器的型号和序列号,这些号码在服务器的前面板上,也可以通过prtconf命令来查看:设备型号一览表:550的型号为:9113-550570的型号为:9117-570DS4300的型号为:1722-60UDS4500的型号为:控制柜:1742-90U扩展柜:1740-1RU3582的型号为:3582-L233583的型号为:3583-L36光纤交换机的型号为:2026-E12报修方法:拨打IBM4网络管理4.1TCPIP服务组。
