2011北京现代雅尊AZERA(TG)G3.8维修手册(英文版)
现代J3发动机(共轨)机械系统维修

现代J3发动机(共轨)机械系统第1版轿车前言本维修服务培训手册专为授权的现代汽车公司经销商的维修技师熟悉现代发动机而编制。
我们的目的是增进维修服务人员的技能和知识水平,以便有效和高效地进行故障诊断和修理。
Chonan技术维修服务培训中心的目标是提供有成效的技术维修服务培训以期实现一个具有竞争力的维修服务质量标准。
最终因售后服务和支持素质的提高而获得最大的用户满意度。
关于详细的修理和装配程序,请参阅相关的车间手册。
©现代汽车公司版权所有保留所有权利。
Chonan技术维修服务培训中心http://training.co.krtraining@hmc.co.kr现代发动机机械系统发动机(KJ2.9 TCI DOHC柴油共轨系统)·································· EM-2 润滑系统····················································································EM-52 冷却系统·····················································································E M59 进气和排气系统 ·········································································EM-65EM-2 发动机(KJ2.9TC DOHC柴油共轨系统)专用维修工具发动机专用维修工具0K130 990 007发动机工作台用于拆装发动机。
北京现代维修保养手册

维修保养2008-06-02 21:06北京现代汽车华德特约销售服务店,是经北京现代汽车有限公司授权,珠海地区唯一的北京现代汽车4S特约销售服务店。
是集韩国现代汽车销售、维修、配件销售和汽车技术培训四位一体的专业化企业。
公司地处珠海市香洲区,占地7489.33平米。
公司交通便利,拥有现代化厂房,环境优雅。
本公司的核心经营理念为:“顾客满意为我们的最高宗旨”。
以一流的质量,合理的价格,周到的服务,完善的管理体系服务于现代汽车用户。
使代表最高设计理念及制造水平的现代汽车品牌在本企业得到与其品牌相符合的全面服务。
保修规定1.整车保修1)保修期普通顾客自用车为:自购车之日起24个月或6万公里。
用于出租公司运营的车辆为:自购车之日起12个月或10万公里。
以上两项指标以先到者为准。
2)保修规定的适用范围由北京现代汽车有限公司生产或供应的用于汽车上的零部件,被发现有材料或制造上的缺陷。
2.零件保修在保修期内的车辆,其零件的保修期与整车保修期相同。
超过保修期的车辆,更换零件的保修期为自更换之日起12个月内。
在零件保修期内因零件本身存在质量缺陷造成不能正常使用的给予免费更换。
保修更换下的零件归北京现代汽车有限公司所有。
3.本保修规定只与车辆有关,不因车辆易主而终止。
4.本条例解释权归北京现代汽车有限公司所有。
二、强制保养有关强制保养的规定1、行驶里程及时间要求:5000公里/6个月2、强制保养的项目:北京现代汽车有限公司5000公里首次保养检查项目区分检查项目检查事项1 检查各种油机油更换机油(SH级)与机油滤芯制动液检查,必要时添加.变速箱油检查,必要时添加.动力转向油检查,必要时添加.2 检查发动机各种传感器等检查是否正常工作,必要时更换皮带检查,必要时调整火花塞检查3 检查冷却系统软管及连接部位检查是否漏水,必要时拧紧或更换冷却液箱检查冷却液液面,必要时添加4 检查制动系统制动管路及软管包括ABS系统检查是否漏油,有无磨损制动分泵检查是否正常工作,有无磨损制动钳及制动衬片检查厚度和差异驻车制动器检查是否正常工作,必要时调整5 检查LPG系统仅限LPG车辆 LPG钢瓶检查液化气加气状态,计量器是否正常各种阀,连接部位检查液化气是否泄露,必要时采取措施6 转向/悬挂装置相关配件检查有无磨损及有无异常噪音7 轮胎轮胎(包括备胎)检查轮胎有无磨损以及轮胎气压8 其他电子装置(包括各种灯具、仪表)是否正常工作,有效附加装置(操作开关、空调等)是否正常工作,有效电瓶是否正常工作,有效三、保修范围由北京现代生产、供应的车辆和零部件,在正常使用、保养条件下发现有材料或制造工艺缺陷的。
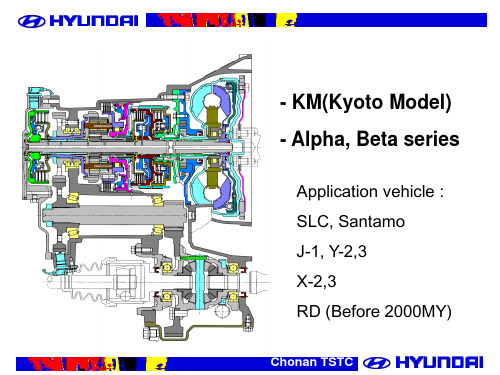
1999韩国现代santamo MPV汽车自动变速器维修手册(英文版)
Q 4.381
4th. Vehicle
5th. 6th. T/Con Spare Remarks
A
SLC
A
SLC
X-3 1.5 DOHC C
X-3 1.5 SOHC
B X-3 1.3 SOHC
RD 1.5 SOHC E
RD 1.5 DOHC
SEDAN
F RD 1.5 DOHC
WAGON
1st. Digit A/T Type G A4AF1
K A4AF2
2nd. M/Year
J : 1988 K : 1989 L : 1990 M : 1991 N : 1992 P : 1993 R : 1994 S : 1995
3rd. F/Gear ratio P 4.029 Erect Y 4.310 Erect L 3.656
Identification number is stamped as 2 rows of 6 digits each as below on the transaxle case. Identification number ☞
☜ Product Serial No.
1. Identification No. for α, β Series
KM176-5 KM175-5 KM175-6 F4A33 A4AF1 A4BF1
2500?00 2.17
3 elements with damper clutch
←
←
2200-2500 2500?00
←
←
2.02Βιβλιοθήκη 1.90Electronically controlled full-automatic
北京现代索纳塔维修手册_0081-0120

图 2-163 检查推杆长度
ldjauto@;ldjauto126@;013809031422
北京现代轿车维修手册-李东江汽车工作室
④检查自动张紧器时,如图 2-164 所示,要水平夹住自动张紧器。为防止自动张紧器的 损坏,应用软垫夹住自动张紧器推入推杆,如果伸缩自如,则应更换张紧器。好的张紧器在 推入推杆时应有适当的阻力。
in 段)
皮磨损、颜色变白、结构不 ⑧皮带侧面严重磨损
室 s 明确)
东江汽车;工ldj作auto126@ ⑤齿条严重磨损(最后阶 受 负 荷 时 齿 条 磨 损 剥 皮 ( 齿
李 om 段)
条宽度减小)
126.c ⑨皮带侧面产生裂纹
ldjauto@
三、正时皮带及附件的安装 ①如图 2-166 所示安装曲轴正时齿轮 B,安装时应注意发兰盘方向不正确时有可能 使皮带受损。 ②垫外侧加一层机油后安装在右侧时:应确认平衡轴是否如图 2-167 所示的方向安 装。
图 2-179 对准曲轴正时齿轮正时标记
ldjauto@;ldjauto126@;013809031422
北京现代轿车维修手册-李东江汽车工作室
图 2-180 对准机油泵正时齿轮正时标记 (17)张紧轮和曲轴正时齿轮上安装正时皮带并用左手抓紧张紧轮上的正时皮带。 (18)用右手拉正时皮带,将皮带安装在机油泵正时齿轮上。 (19)将正时皮带安装在惰轮上。 (20)将正时皮带安装在进气正时齿轮上。 (21)旋转进排气凸轮轴正时齿轮对准正时标记。 (22)在张紧轮上带上皮带后拔出自动张紧器固定销。 (23)如图 2-181 所示,旋转曲轴确认正时标记是否正确。 (24)拆卸自动张紧器定位销。 (25)曲轴顺时针方向旋转两周,等待 15min 后检查“A”间隙,如图 2-182 所示(张
现代特拉卡维修手册(2002)电气系统1

一般事项
BE-5
照明系统
大灯 前转向灯 前示宽灯 前雾灯 后组合灯
尾灯/刹车灯 倒车灯 转向灯 后雾灯 侧面灯 牌照灯 行李箱灯 室内灯 地图灯
音响
项目 输出功率 扬声器阻抗
波段 调谐类型
暗电流
项目
H240 最大 20W×4
不亮 检查音响保 险丝(10A)
断
继续断
更换
检查短路
好 修理
OK
检查音响控
制器保险丝
检查扬声器连接器 不好
检查音响所有的连接器 连接好不好?
是
不好 连 接 好 连 接器
好 正确 连接
检查 M26 连接器 16 号端子 不是
和搭铁之间是否(12V)?
检查导线
是
检查收音机和录音机的安 不正确 重 新 安 装
BE-8
现象 危险警告灯不亮
转向灯闪光频率过高或过低 倒车灯不亮
车顶灯不亮
原因 2 号保险丝(15A)断 闪光器故障 危险警告灯开关故障 导线或搭铁故障 灯炮不合规格 闪光器故障 18 号保险丝(10A)断 倒车开关故障 导线或搭铁故障 易熔丝(50A)断 导线或搭铁故障
车身电气系统
排除方法 检查短路,更换保险丝 检查闪光器 检查开关 修理 更换灯炮 更换闪光器 检查短路,更换保险丝 检查开关 修理 更换易熔丝 修理
原因 灯丝断 连接器、导线、搭铁故障 灯丝断 易熔丝(40A)断 大灯继电器故障 大灯开关故障 导线或搭铁故障 尾灯保险丝(10A)断 易熔丝断 尾灯继电器故障 尾灯开关故障 导线或搭铁故障 3 号保险丝(15A)断 刹车灯开关故障 刹车灯继电器故障 导线或搭铁故障 刹车灯开关故障 刹车灯继电器故障 亮度调节器故障 导线或搭铁故障 灯丝断 转向开关故障 导线或搭铁故障 20 号保险丝(10A)断 闪光器故障 转向开关故障 导线或搭铁故障
湖南万通汽修学校,雅尊3.3维修手册5

w 5. 备件 w 6. 变速器生产系列号码 / - 000001 ~ 999999 http:/ 警告/注意标签位置
- 0 : None
w - 1:2 侧 - 主动安全带 w - 2:两侧 - 安全带 / -3:驾驶席侧-主动安全带&安全气囊
助手席侧 - 主动安全带或被动安全带
:/ - 4:减压安全气囊 p - 5:高级安全气囊 t 8. 发动机类型 t - D : 汽油 3.3 h - F : 汽油 3.8
9. 校验数位或其他 - P : LHD - R : RHD
●
2009 > G 3.3 V6 DOHC
●
2009 > G 2.7 V6 DOHC
●
2008 > G 3.3 V6 DOHC
●
2008 > G 2.7 V6 DOHC
●
2007 > G 3.3 V6 DOHC
●
2007 > G 2.7 V6 DOHC
●
2006 > G 3.3 V6 DOHC
●
2006 > G 2.7 V6 DOHC
乌木黑 特殊颜色 纯珍珠白 精致银 米黄色 深紫色 R档紧急驻车 干叶片 薄暮效应 亮灰色 晶体银
1. 发动机燃油
0.10 ~ 0.28mm (0.0039 ~ 0.0110in.)
2. 发动机范围
- 4 : 4 周期 6 气缸
3. 发动机开发顺序
- D : Lambda engine
4. 发动机容量 - A : 3778 cc (汽油) - B : 3342 cc (汽油)
5. 生产年度 -5=2005, 6=2006
081114:北京现代-燃气系统维修手册(CNG 机械分册)J精品资料

3-3 二级腔部分◆拧紧力矩——13 Nm ◆分别拧下连接钢带和钢瓶支架连接件的螺栓上的螺母,取下螺栓,松开钢带,即可取出钢瓶。
◆检查钢瓶与钢瓶支架间、与连接件间、与钢带间的柔性胶垫,必要时更换。
注意:拆卸钢瓶前必须先关闭钢瓶上的手动截止阀门,燃尽高压管路内剩余的气体燃料(见减压器拆卸部分),然后拆卸与气瓶阀门相连的高压钢管。
拆卸地点及周是否合格?是是否合格?是是否合格?是是否合格?是是否顺利启动?是是否顺利启动?是否转换成功?转换瞬间减压器电磁阀是否电磁阀线圈是否通电?开启?高频电磁阀组是否工作?燃气怠速是否平稳?★运转不平稳、动力不足、发吐热车时间是否足够?是喷油嘴是否关闭不严?否火花塞是否已累计行驶3万公里?空气滤清器是否已累计使用3万公里?检查节气门或怠速控制机构是否过脏?否故障是否排除?否故障是否排除?否4气缸缸压是否达标(参见发动机维修标准)?否是否发出啸叫声?)高压柱塞是否有擦痕?有无怠速通道是否畅通?否用细砂纸小心打磨有擦痕的高压柱塞或更换高压柱塞和高压柱塞座(上图件14),用少许润滑油润滑高压柱塞和高压柱塞座更换辅助调压阀芯、辅助调压弹簧和辅助调节压帽,用少许润滑油润滑辅助调压阀芯、辅助调压弹簧和辅助调节压帽检查阀体(3)分配气接头(10)、温度传感器是(4)、压力传感器(7)、以及除O形圈(8)之外的其它O形圈是否有影响安装和更换损伤的零件参见本手册(减压器维护)相应。
全新雅尊手册
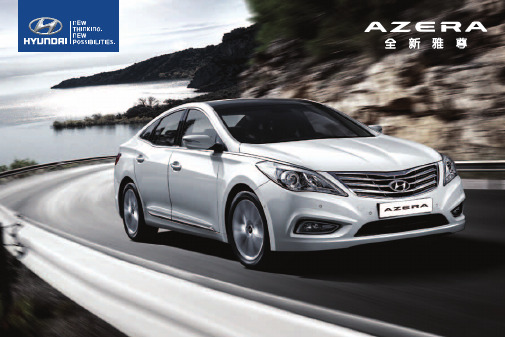
进 化由内而外的全面革新不可逆转的进步本能以科技与美学之名超越雷同、庸常与不可能向未来深处全速前进全新雅尊,睿智启程新.骑士风范全新雅尊,从骑士甲胄中汲取设计灵感,以富有力量感与肌肉感的强健线条,勾勒出高贵、睿智、专注进取的革新者形象。
长轴距及短悬垂的设计,形成了更加优美侧面曲线,彰显一往无前的运动天赋。
新.奋进之心对于革新者而言,超越是一门已然熟稔的技艺。
沉稳气度下,一颗始终澎湃的“芯”始终蓄势待发,启动,加速,领先已成胜势。
第二代高性能引擎与6速手自一体变速器相得益彰,为全新雅尊提供卓越的操控及动力性能。
6速手自一体变速箱6速手自一体变速箱提供更稳定的变速感和优秀的燃油经济性能。
使用节能技术的半永久性变速器油无须频繁更换及补充,使其使用起来更为方便,大幅提升了经济性。
智能钥匙&一键启动接近汽车时,智能钥匙会自动打开侧灯,展开车外后视镜。
车主轻触门把手打开车门时,车内灯、车内氛围心情灯及脚灯也将自动点亮。
进入车内,驾驶者只需触摸启动按键即可启动发动机。
第二代Theta(θ) 2.4 MPI 发动机类型:双顶置凸轮轴D-CVVT 发动机排量:2,359cc 最大功率(KW/rpm ):132(180ps)/6,000最大扭矩(N.M/rpm):231(23.6kg .m)/4,000可变阻尼减震器(ASD)通过自动变换减震器阻尼力,适应不同的平滑及崎岖不平的路面情况,在确保驾驶稳定性的同时也增强了驾乘舒适性。
前麦弗逊式悬架麦弗逊式前悬架能够增强轮胎的抓地力,保障车辆行驶的平稳。
后多连杆式悬架后轮使用的多连杆式悬架,能够有效提高车辆在行进及刹车时的稳定性,将车辆的不稳定性降到最低。
245/45 R18合金轮毂大尺寸车轮增强了车辆的运动力,并保证更优秀的刹车表现。
225/55 R17钻石切割合金轮毂提供卓越的摩擦力,在不同路况下始终保证驾驶的稳定性。
225/55 R17合金轮毂高性能轮胎,提供强劲的运动力与刹车的稳定性。
现代汽车保养手册说明书

All information in this Owner’s Manual is current at the time of publication. However, HYUNDAI reserves the right to make changes at any time so that our policy of continual product improvement may be carried out.This manual applies to all models of this vehicle and includes descriptions and explanations of optional as well as standard equipment.As a result, you may find material in this manual that does not apply to your specific vehicle.* T rademarks and tradenames owned or licensed in Canada by HYUNDAI Auto Canada Corp. which carries on business as “HYUNDAI Auto Canada”.OWNER’S MANUALOperation Maintenance SpecificationsIntroductionF2F3Introduction1-2FOREWORDCongratulations, and thank you for choosing HYUNDAI. We are pleased to welcome you to the growing number of discerning people who drive HYUNDAI. We are very proud of the advanced engineering and high-quality construction of each HYUNDAI we build.Your Owner’s Manual will introduce you to the features and operation of your new HYUNDAI. To become familiar with your new HYUNDAI, so that you can fully enjoy it, read this Owner’s Manual carefully before driving your new vehicle.This manual contains important safety information and instructions intended to familiarize you with your vehicle’s controls and safety features so you can safely operate your vehicle.This manual also contains information on maintenance designed to enhance safe operation of the vehicle. It is recommended that all service and maintenance on your car be performed by an authorized HYUNDAI dealer. An authorized HYUNDAI dealer are prepared to provide high-quality service, maintenance and any other assistance that may be required.This Owner’s Manual should be considered a permanent part of your vehicle, and should be kept in the vehicle so you can refer to it at any time. The manual should stay with the vehicle if you sell it to provide the next owner with important operating, safety and maintenance information.HYUNDAI AUTO CANADACAUTIONSevere engine and transmission damage may result from the use of poor quality fuels and lubricants that do not meet HYUNDAI specifications. You must always use high quality fuels and lubricants that meet the specifications listed on Page 2-14 in the Vehicle Specifications section of the Owner’s Manual.Copyright 2021 HYUNDAI Auto Canada Corp. All rights reserved. No part of this publication may be reproduced, stored in any retrieval system or transmitted in any form or by any means without the prior written permission of HYUNDAI Auto Canada Corp. All trademarks and tradenames owned in Canada by HYUNDAI Auto Canada Corp.011-3GUIDE TO HYUNDAI GENUINE PARTS1. What are HYUNDAI Genuine Parts?HYUNDAI Genuine Parts are the same parts used by HYUNDAI Motor Company to manufacture vehicles. They are designed and tested for the optimum safety, performance, andreliability for our customers. 2. Why Hyundai Genuine Parts?HYUNDAI Genuine Parts are engineered and built to meet rigid manufacturing requirements. Damage caused by using imitation, counterfeit or used salvage parts is not covered under the HYUNDAI New Vehicle Limited Warranty or any other HYUNDAI warranty.In addition, any damage to or failure of HYUNDAI Genuine Parts caused by the installation or failure of an imitation, counterfeit or used salvage part is not covered by any HYUNDAIWarranty.3. How can you tell if you are purchasing HYUNDAI Genuine Parts?Look for the HYUNDAI Genuine Parts Logo on the package (see below).HYUNDAI Genuine Parts exported are packaged with labels written only in English.HYUNDAI Genuine Parts are only sold through authorized HYUNDAIDealerships.Introduction1-4We want to help you get the greatest possible driving pleasure from your vehicle. Your Owner’s Manual can assist you in many ways. To gain an overview of the contents of your Owner’s Manual, use the Table of Contents in the front of the manual. The first page of each Chapter includes a detailed Table of Contents of the topics in that Chapter.To quickly locate information about your vehicle, use the Index in the back of the manual. It is an alphabetical list of what is in this manual and the page number where it can be found.For your convenience, we have incorporated tabs on the right-hand page edges. These tabs are coded with the Chapter titles to assist you with navigating through the manual.SAFETY MESSAGESYour safety, and the safety of others, is very important. This Owner’s Manual provides you with many safety precautions and operating procedures. This information alerts you to potential hazards that may hurt you or others, as well as damage to your vehicle.Safety messages found on vehicle labels and in this manual describe these hazards and what to do to avoid or reduce the risks.Warnings and instructions contained in this manual are for your safety. Failure to follow safety warnings and instructions can lead to serious injury or death.Throughout this manual DANGER, WARNING, CAUTION, NOTICE and the SAFETY ALERT SYMBOL will be used.This is the safety alert symbol. It is used to alert you to potential physical injury hazards. Obey all safety messages that follow this symbol to avoid possible injury or death. The safety alert symbol precedes the signal words DANGER, WARNING and CAUTION.DANGERDANGER indicates a hazardous situation which, if not avoided, will result in death or serious injury. WARNINGWARNING indicates a hazardous situation which, if not avoided, could result in death or serious injury. CAUTION CAUTION indicates a hazardous situation which, if not avoided, could result in minor or moderate injury.NOTICE indicates a situation which, if not avoided, could result in vehicle damage.HOW TO USE THIS MANUAL011-5Gasoline engine UnleadedYour new vehicle is designed to use only unleaded fuel having an octane number ((R+M)/2) of 87 (Research Octane Number 91) or higher. (Do not use methanol blended fuels.)Your new vehicle is designed to obtain maximum performance with UNLEADED FUEL, as well as minimize exhaust emissions and spark plug fouling.To prevent damage to the engine and engine components, never add any fuel system cleaning agents to the fuel tank other than what has been specified.Consult an authorized HYUNDAI dealer for additional information.WARNINGś Do not “top off” after the nozzle automatically shuts off when refueling.ś Always check that the fuel cap is installed securely to prevent fuel spillage in the event of an accident.Gasoline containing alcohol and methanolGasohol, a mixture of gasoline and ethanol (also known as grain alcohol) are being marketed along with or instead of leaded or unleaded gasoline. For example, “E15” is a gasohol comprised of 15% ethanol and 85% gasoline.Do not use gasohol containing more than 15% ethanol, and do not use gasoline or gasohol containing any methanol. Either of these fuels may cause drivability problems and damage to the fuel system, engine control system and emission control system.Discontinue using gasohol of any kind if drivability problems occur.“E85” fuel is an alternative fuel comprised of 85 percent ethanol and 15 percent gasoline, and is manufactured exclusively for use in Flexible Fuel Vehicles. “E85” is not compatible with your vehicle. Use of “E85” may result in poor engine performance and damage to your vehicle’s engine and fuel system. HYUNDAI recommends that customers do not use fuel with an ethanol content exceeding 15 percent.To prevent damage to your vehicle’s engine and fuel system:ś Never use gasohol which contains methanol.ś Never use gasohol containing more than 15% ethanol.ś Never use leaded fuel or leaded gasohol.ś Never use “E85” fuel.Your New Vehicle Limited Warranty does not cover damage to the fuel system or any performance problems caused by the use of “E85” fuel.FUEL REQUIREMENTSIntroduction 1-6Using Fuel Additives (except Detergent Fuel Additives)Using fuel additives such as:-Silicone fuel additive-Ferrocene (iron-based) fuel additive-Other metallic-based fuel additivesMay result in cylinder misfire, poor acceleration, engine stalling, damage to the catalyst, or abnormal corrosion, and may cause damage to the engine resulting in a reduction in the overall life of the powertrain.-The Malfunction Indicator Lamp (MIL) may illuminate.Damage to the fuel system or performance problem caused by the use of these fuels may not be covered by your New Vehicle Limited Warranty.Gasoline containing MMTSome gasoline contains harmful manganese-based fuel additives such as MMT (Methylcyclopentadienyl Manganese Tricarbonyl).HYUNDAI does not recommend the use of gasoline containing MMT.This type of fuel can reduce vehicle performance and affect your emission control system.The malfunction indicator lamp on the cluster may come on.Detergent Fuel AdditivesHYUNDAI recommends that you use good quality gasolines treated with detergent additives such as TOP TIER Detergent Gasoline, which help prevent deposit formation in the engine. These gasolines will help the engine run cleaner and enhance performance of the Emission Control System. For more information on TOP TIER Detergent Gasoline, please go to the website (www. ).For customers who do not use TOP Tier Detergent Gasoline regularly, and have problems starting or the engine does not run smoothly, detergent-based fuel additives that you can purchase separately may be added to the gasoline. If TOP TIER Detergent Gasoline is not available, one bottle of additive added to the fuel tank according to the maintenance schedule is recommended (refer to the Maintenance Schedule in chapter 9).Additives are available from your authorized HYUNDAI dealer along with information on how to use them. Do not mix other additives.Operation in foreign countriesIf you are going to drive your vehicle in another country, be sure to:ś Observe all regulations regarding registration and insurance.ś Determine that acceptable fuel is available.011-7VEHICLE MODIFICATIONSś This vehicle should not be modified. Modification of your vehicle could affect its performance, safety or durability and may even violate governmental safety and emissions regulations.In addition, damage or performance problems resulting from any modification may not be covered under warranty.ś If you use unauthorized electronic devices, it may cause the vehicle to operate abnormally, wire damage, battery discharge and fire. For your safety, we recommend that you do not use unauthorized electronic devices.9(+,&/( %5($.ǘ,1 352&(66By following a few simple precautions for the first 1,000km (600 miles) you may add to the performance, economy and life of your vehicle.ś Do not race the engine.ś While driving, keep your engine speed (rpm, or revolutions per minute) between 2,000 rpm and 4,000 rpm.ś Do not maintain a single speed for long periods of time, either fast or slow. Varying engine speed is needed to properly break-in the engine.ś Avoid hard stops, except in emergencies, to allow the brakes to seat properly.ś Fuel economy and engine performance may vary depending on vehicle break-in process and be stabilized after 6,000 km (4,000 miles). New engines may consume more oil during the vehicle break-in period.ś Do not tow a trailer during the first 2,000km (1,200 miles) of operation.Introduction1-8VEHICLE DATA COLLECTION AND EVENT DATA RECORDERS This vehicle is equipped with an event data recorder (EDR). The main purpose of an EDR is to record, in certain crash or near crash-like situations, such as an air bag deployment or hitting a road obstacle, data that will assist in understanding how a vehicle’s systems performed. The EDR is designed to record data related to vehicle dynamics and safety systems for a short period of time, typically 30 seconds or less.The EDR in this vehicle is designed to record such data as:ś How various systems in your vehicle were operating;ś Whether or not the driver and passenger safety belts were buckled/fastened;ś How far (if at all) the driver was depressing the accelerator and/or brake pedal; and,ś How fast the vehicle was traveling.These data can help provide a better understanding of the circumstances in which crashes and injuries occur. NOTE: EDR data are recorded by your vehicle only if a non-trivial crash situation occurs; no data are recorded by the EDR under normal driving conditions and no personal data (e.g., name, gender, age, and crash location) are recorded. However, other parties, such as law enforcement, could combine the EDR data with the type of personally identifying data routinely acquired during a crash investigation.To read data recorded by an EDR, special equipment is required, and access to the vehicle or the EDR is needed. In addition to the vehicle manufacturer, other parties, such as law enforcement, that have the special equipment, can read the information if they have access to the vehicle or the EDR.。
北京现代汽车维护保养使用说明书

使用说明书操作维护保养规格和技术参数本使用说明书内记载的所有内容是出版本《使用说明书》当时的最新信息。
北京现代汽车公司保留随时变更设计的权利,以便北京现代汽车持续不断地改进汽车产品的政策、策略得以延续和实现。
在本使用说明书内记载的内容,包括标配项目和选配项目的概述、解释和使用说明等,适用于本车型的所有款式车辆。
因此,您可能会发现您的北京现代汽车没有配备在本《使用说明书》记载内容中的部分功能、系统或装置。
F2F311. 前言前言........................................................1-2北京现代汽车公 司...........................................1-2如何使用本使用说明书........................................1-3安全信息....................................................1-3燃油规格 ...................................................1-4车辆改装....................................................1-6车辆磨合程序前言1-2前言感谢并恭喜您选择北京现代汽车。
欢迎您正式成为日益发展的北京现代汽车的尊贵车主。
北京现代汽车公司为拥有优秀的技术人员和品质卓越的车辆而感到自豪。
本使用说明书将向您详细介绍您的北京现代汽车配备的各种系统、功能和正确的操作方法。
您应熟悉您的北京现代汽车配备的各种功能,而且要掌握车辆正确的操控方法,以便于您随时畅享您的北京现代新车。
因此,请您在开始畅享您的北京现代新车之前,仔细阅读本《使用说明书》的内容。
本使用说明书向您提供了本车辆操作安全性、行驶安全性、交通安全性有关的重要信息和说明,以便于您熟悉安全操控车辆。
081114:北京现代-燃气系统维修手册(CNG 机械分册)J收集资料

3-3 二级腔部分◆拧紧力矩——13 Nm ◆分别拧下连接钢带和钢瓶支架连接件的螺栓上的螺母,取下螺栓,松开钢带,即可取出钢瓶。
◆检查钢瓶与钢瓶支架间、与连接件间、与钢带间的柔性胶垫,必要时更换。
注意:拆卸钢瓶前必须先关闭钢瓶上的手动截止阀门,燃尽高压管路内剩余的气体燃料(见减压器拆卸部分),然后拆卸与气瓶阀门相连的高压钢管。
拆卸地点及周是否合格?是是否合格?是是否合格?是是否合格?是是否顺利启动?是是否顺利启动?是否转换成功?转换瞬间减压器电磁阀是否电磁阀线圈是否通电?开启?高频电磁阀组是否工作?燃气怠速是否平稳?★运转不平稳、动力不足、发吐热车时间是否足够?是喷油嘴是否关闭不严?否火花塞是否已累计行驶3万公里?空气滤清器是否已累计使用3万公里?检查节气门或怠速控制机构是否过脏?否故障是否排除?否故障是否排除?否4气缸缸压是否达标(参见发动机维修标准)?否是否发出啸叫声?)高压柱塞是否有擦痕?有无怠速通道是否畅通?否用细砂纸小心打磨有擦痕的高压柱塞或更换高压柱塞和高压柱塞座(上图件14),用少许润滑油润滑高压柱塞和高压柱塞座更换辅助调压阀芯、辅助调压弹簧和辅助调节压帽,用少许润滑油润滑辅助调压阀芯、辅助调压弹簧和辅助调节压帽检查阀体(3)分配气接头(10)、温度传感器是(4)、压力传感器(7)、以及除O形圈(8)之外的其它O形圈是否有影响安装和更换损伤的零件参见本手册(减压器维护)相应。
北京现代索纳塔维修手册_0121-0160
ldjauto@;ldjauto126@;013809031422
北京现代轿车维修手册-李东江汽车工作室
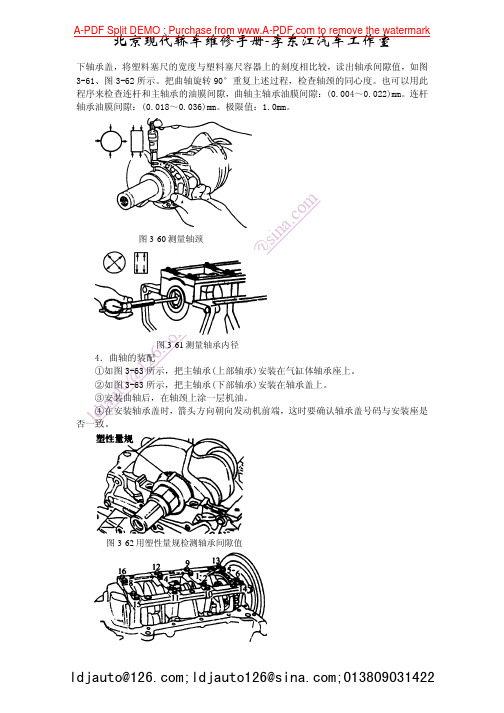
图 3-82 检查电机 ②检查电机旋转时有无异常噪声。 ③检查散热器风扇电机继电器,如图 3-83 所示,从发动机室继电器盒拆下冷却风
图 3-77 水泵结构图
ldjauto@;ldjauto126@;013809031422
北京现代轿车维修手册-李东江汽车工作室
图 3-78 安装水泵 ③安装自动张紧器和正时皮带,调整皮带张力,安装正时皮带壳。
om ④安装驱动皮带、水泵皮带轮、调整皮带张力。 .c ⑤补充冷却水。 ina ⑥转动发动机检查有无泄漏。 室 s 五、散热器 作 6@ 1.散热器的拆卸 工 12 ①拆下蓄电池负极导线连接器。 车 uto ②拆下风扇电机导线连接器。 汽 ja ③松开散热器堵塞,放出冷却水。 江 ld ④在软管和夹子上做好标记,如图 3-79 所示,拆卸上、下水管和溢水管。 东 ; ⑤A/T 车辆,拆下变速器冷却油管。 李 om 注意:在拆卸下水管后,应堵住水管口,防止进入灰尘和杂质。 6.c ⑥如图 3-80 所示,拆卸散热器上部固定螺栓。 12 ⑦拆卸散热器总成。在散热器上拆卸冷却风扇和冷凝器风扇。 ldjauto@ 2.散热器的检查
图 3-72 节温器分解图
二、水温传感器的拆卸与安装 1.拆卸水温传感器 ①放出冷却水。拆下蓄电池负极导线连接器和水温传感器导线。 ②如图 3-74 所示,拆卸水温传感器。
ldjauto@;ldjauto126@;013809031422
北京现代轿车维修手册-李东江汽车工作室
定期检查,一般每行驶 6000km 应检查一次,必要时应予以更换。节温器的检查方法如 下:
现代汽车 ACCENT 快速参考手册说明书
The Hyundai ACCENT ☐ UNLOCKING VEHICLE - page 01UNLOCK TRUNK OPEN LOCK ALARMLooking For more detailed information? This Quick Reference Guide does not replace your vehicle’s Owner’s Manual. If you require additional information or are unsure of a specific issue, We recommend that you always refer to the vehicle’s Owner’s Manual or contact your authorized Hyundai dealer. The information contained in this Quick Reference Guide is correct at the time of printing; however, specifications and equipment can change without notice. No warranty or guarantee is being extended in this Quick Reference Guide, and Hyundai reserves the right to change product specifications and equipment at any time without incurring obligations.Some vehicles are shown with optional equipment.NP150-Q2021Roadside Assistance: 1-800-243-7766 Consumer Affairs: 1-800-633-5151 Sirius XM ®Radio: 1-800-967-2346 Quick Reference Guide Sales Consultant Date Sales Manager DateCustomer Date☐ INTRODUCTION AND LOCATION OF THE SERVICE DEPARTMENT ☐ SET FIRST SERVICE APPOINTMENT☐ REVIEW FACTORY RECOMMENDED MAINTENANCE SCHEDULE ☐ WAS THE CONDITION OF YOUR VEHICLE (AT DELIVERY) TO YOURSATISFACTION?☐ BLUE LINK- A ssist with creating account- Assist with Blue Link enrollment- Show Blue Link User's Manual- Encourage customer to download the MyHyundai with Blue Link appHYUNDAI VEHICLE OWNER PRIVACY POLICYYour Hyundai vehicle may be equipped with technologies and services that use information collected, generated, recorded or stored by the vehicle. Hyundai has created a Vehicle Owner Privacy Policy to explain how these technologies and services collect, use, and share this information.You may read our Vehicle Owner Privacy Policy on the website at https:///owner-privacy-policy.aspxIf you would like to receive a hard copy of our Vehicle Owner Privacy Policy, please contact our Customer Connect Center at:Hyundai Motor AmericaHyundai Customer Connect CenterP.O. Box 20850Fountain Valley, CA 92728-0850**************************************Hyundai's Customer Connect Center representatives are available Monday through Friday, between the hours of 5:00 AM and 7:00 PM PST and Saturday and Sunday between 6:30 AM and 3:00 PM PST (English). For Customer Connect Center assistance in Spanish or Korean, representatives are available Monday through Friday between 6:30 AM and 3:00 PM PST.2. Check “Smart Trunk”.INSTRUMENT CLUSTERType A1 Type BCLIMATE CONTROLFace-LevelBi-LevelFloor-LevelFloor & Defrost-LevelDefrost-Levelkeep the interior surface of the windshield clean by wiping it with a cleancloth and glass cleaner. In addition, select air intake control to theoutside (fresh) air position whenever possible while operating the vehicle.ManualAutomatic1 Temperature control knoboutside (fresh) air position whenever possible while operating the vehicle.3. C onfirm the 6-digit passkey displayed on the audio screen and the Bluetooth device are identical.4. Press OK in your Bluetooth device.5. Pairing is complete.NOTE: V ehicle must be parked to complete the pairing process.• “Call <John Smith> on <on Mobile / at Work / at Home /on Other>”: Connects the call to John’s Mobile, Work, Home, or Other phone number.Dialing by Number:1. Press the button. 2. Say “Dial Number.” 3. S ay the desired phone number.For complete list of commands, refer to your Owner’s Manual.• P ress the button on the steering wheel. To Adjust Ring Volume:• Use the VOLUME buttons on the steering wheel. To Transfer a Call to the Phone(Private call on handset – do not use while driving): • P ress and hold the button on the steering wheel until theaudio system transfers a call to the phone. To Finish a Call:• P ress the button on the steering wheel.In the following situations you or the other party may have difficulty hearing each other:1. K eep the Bluetooth ® volume to a low level. High level volume may result in distortion and echo.VOICE RECOGNITION TIPS (if equipped)Your vehicle is equipped with Voice Recognition technology which allows drivers to operate their phones without having to take their eyes off the road to minimize distractions.Voice recognition performance may be affected if driving with windows and sun roof open; when the heating-cooling system is on; when passing in a tunnel or when driving on rugged and uneven roads.Quick reference on using voice commandsTo start voice command, press the key, the following commands are available:CAR SETUP1. Press the SETUP button on the radio.2. Touch the “Phone Projection” icon on screen.3. Select “On” for Android Auto.4. Connect your Android phone to the vehicle USB port. Agree to the notification and disclaimers on your phone then the “Android Auto” icon will appear confirming the setup.For more detailed information on how to operate Android Auto, please refer to your display audio or navigation manual.For additional Android Auto support, please refer to the Android Auto Support Websitehttps:///androidauto/Android Auto, Google Play, Android, and other marks are trademarks of Google Inc.PHONE SETUPTurn on Bluetooth ® on your phone and connect the micro USB cable to your phone and the USB port on the vehicle.Phone will prompt you to download the Android Auto app and update other needed apps (i.e. Google Maps™, Google Play Music™, Google Now™).NOTE: Vehicle must be parked.- Location mode setting should be set to High accuracy.- Car and phone setup should be completed in one sitting. If phone setup needs to be resumed, recommend to Force Stop the Android Auto app on the Phone then reopen the app and accept the Disclaimer notifications.REQUIREMENTS:- Micro USB cable- OS Android™ 5.0 or higher - Compatible Android Phone- Data and wireless plan for applicable featuresBEFORE YOU BEGIN:- Android Auto features may operate differently than on your phone.- Message and data charges may apply when using Android Auto.- Android Auto relies on the performance of your phone. If you experience performance issues:- Close all apps and then restart them or - Disconnect and then reconnect your phone- Using the micro USB cable that was provided with your phone is recommended.- When Android Auto is active, your in-vehicle voice recognition system is disabled and you will be using talk to Google™ to makeyour requests.ANDROID AUTO SUPPORThttps:///androidauto/ANDROID AUTO ™CAR SETUP1. Press the SETUP button.2. Touch the “Phone Projection” icon on the screen.3. Touch “iOS” on the Phone Projection Settings screen then touch “On” to enable Apple CarPlay.4. Connect your Apple iPhone to the vehicle USB port then touch ‘OK’ when the pop-up message appears. The Apple CarPlay icon will now appear on the vehicle Home screen confirming the setup.Apple CarPlay, Apple, and other marks are trademarks of Apple Inc.REQUIREMENTS- Apple Lightning ® cable - Latest iOS- iPhone ® 5 or above- Data and wireless plan for applicable featuresBEFORE YOU BEGIN- Apple ® CarPlay features may operate differently than on your phone.- Message and data charges may apply when using Apple CarPlay.- Apple CarPlay relies on the performance of your phone. If you experience performance issues:- Close all apps and then restart them or - Disconnect and then reconnect your phone- Using the Apple Lightning cable that was provided with your phone is recommended.- When Apple CarPlay is active, your voice recognition system is disabled and you will be using Siri ® to make your requests.APPLE CARPLAY ™PHONE SETUPOn your phone, go to Settings > General > Restrictions > CarPlay to allow CarPlay access.On your phone, go to Settings > General > Siri and ensure Siri is turned ON.automatically asks ‘Who you would like to call’ when the PHONE 5 Using the Lightning cable that came with the phone is recommended.APPLE MUSICTouch the APPLE MUSIC 6 icon to access the Apple Music screen. APPLE MAPSTouch the APPLE MAPS 7 icon to access the Apple Map screen. MESSAGESTouch the MESSAGES 8 icon to access the Message screen. Siri will automatically asks ‘To hear unread messages or create a new one’ when the MESSAGE icon is selected.3rd PARTY APPSSupported CarPlay apps that are downloaded on your phone will appear on the CarPlay screen. Touch the apps icons to access those supported apps.NOTE: A list of the supported CarPlay supported apps can be foundat /ios/carplay/Ensure phone has latest version of the 3rd Party Apps.Apple CarPlay uses Siri to perform many actions like sendingmessages, placing calls, and looking up/setting POI/Destinations. A Siri session can be initiated on any screen by:1. Touch and holding the HOME icon 1 on the CarPlay screen or2. Press the steering wheel VOICE RECOGNITION 13 button.Note: Ensure Siri feature is set to ON in your phone (Go to Settings > General > Siri).3. Say any of the following commands;•“Text <John Smith> ‘Call you later’” to send a text message. •“Read text messages” to read available text message. •“Call <John Smith>” to make a phone call.•“Find <POI/Destination>” to locate a POI/Destination.CarPlay Home ScreenSIRI1 HOME ICON2 W3 C4 PHONE TIME 5P HONE6A PPLE MUSIC™PARTY APPS CREEN PAGE INDICATOR CURRENT CARPLAY AUDIO PLAYING 234156781112AUX AND USB PORTVisit for more information or refer to your BlueLink User’s Manual for detailed information on system operation.For immediate assistance with subscription services, please call1-855-2BLUELINK (1-855-225-8354).Google TM is a registered trademark of Google, Inc.You can download the Blue Link mobile app to your compatible smart phone from the following sites:• iPhone ® — Apple ® App Store • Android ™ — Google Play ™Remote StartBlue Link Mobile App• R emote Start will automatically shut off after 10 minutes or after selected engine timer runs out in navigation vehicles.• W hile this feature is active, the parking lights will blink until the vehicle is turned off or when vehicle is in operation.• T o continue to operate the vehicle, the proximity key must be inside the vehicle with the driver, prior to pressing the brake and being able to move the gearshift from the P (Park) position.Remember:Visit FAQs to see a list of compatible devices.NOTE: Remote Start is not available on all models. Remote Start isonly available for Push Start equipped vehicle with an Automatic Transmission. Remote Start with Climate Control additionally requires Fully Automatic Temperature Control.Remote Start enables you to remotely start your vehicle virtually from anywhere. For vehicles equipped with full-automatictemperature control, you can also enable climate control remotely and turn on the front window defroster, ensuring a warm or cool car is ready to go when you are.• To use this feature, you must have a Blue Link Personal Identification Number (PIN). To create or change your PIN, log in to .Preconditions:• I gnition is OFF• A larm is armed (i.e., vehicle locked by key fob Remote Door Lock) • G earshift level is in the P (Park) position • B rake pedal is not depressed • E ngine hood is securely closed • A ll the doors are closed and locked • T he tailgate or trunk lid is closed• T he security / panic system is not activated • T he proximity key is not inside the vehicle • T he battery power is not low• V ehicle is located in an open area• I t has been less than 4 days since last vehicle ignition off • V ehicle located in area with good cell receptionRemote Start will terminate:• After 10 minutes or after selected engine timer runs out in navigation vehicles• B rake is pressed without the proximity key inside the vehicle • A larm is triggered without the proximity key inside the vehicle • D oor / trunk is opened from inside the vehicleNotice: Laws in some communities may restrict the use of thefeatures that remotely start the engine. For example, some laws may require a person using the remote start feature to have the vehicle in view when doing so, or limit the length of time a vehicle engine may idle. Please check local and state regulations for any requirements and restrictions on remote starting of vehicles and engine idling time.The radar type Forward Collision-Avoidance Assist (FCA) system is to help reduce or to avoid accident risk. In certain circumstances, itFCA Warning Message and System ControlFCA produces warning messages, warning alarms, and emergency braking based on the level of risk of a frontal collision, such as when a vehicle ahead suddenly brakes, when there is no following distance from the vehicle in front.Collision Warning (1st warning)This initial warning message appears on the LCD display with a warning chime.Collision Warning (2nd warning)The warning message appears on the LCD display with the warning alarms. The vehicle will reduce its speed to a certain limit.- The brake activates gradually for vehicles ahead.- The brake control activates within an arranged limit to ease the impact from a collision.Emergency Braking (3rd warning)The warning message appears on the LCD display with the warning alarms. The vehicle will reduce its speed to a certain limit.- The brake control activates within an arranged limit to ease the impact from a collision. Maximum brake control is activated just before the collision.To activate the system, select 'User Settings → Driving Assist → Forward Collision-Avoidance Assist (FCA)' The system deactivates, when the system setting is canceled.The system will activate when the ESC(Electronic Stability Control) is on, and driving speed exceeds approximately 6 mph.FORWARD COLLISION-AVOIDANCE A SSIST (FCA) SYSTEMNOTE:or operate for pedestrians in front.DRIVE MODE INTEGRATED CONTROL SYSTEMNormal mode provides regular daily driving performance with some fuel efficiency.Sport mode focuses on managing the driving dynamics by adjusting the steering effort along with the responsiveness of the engine and transmission.SPORT modeAdjusting the vehicle speedTo Cancel Cruise Control2. Toggle "-SET" switch (3) DOWN to set cruising speed.1. Toggle "+RES" switch 2 UP to increase cruising speed.2. Toggle "-SET" switch 3 DOWN to decrease cruising speed.Press the "CANCEL" button 4 or depress the brake pedal.NOTE:Quick toggle up/down will change speed by 1 mph, Holding switch up/down will change speed by 5 mph.NOTE:The system cancels automatically if vehiclespeed is under 20mph. Depress the acceleratoror brake pedal to actively adjust the vehiclespeed, and the distance to the vehicle ahead.☐ S ET TIRE PRESSURE LF RF RR LR ☐ V ERIFY VEHICLE IS CLEAN, IN GOOD CONDITION,FREE OF CHIPS AND SCRATCHES · CLEAN WINDSHIELD AND BACK WINDOW☐ ENSURE FLOORMATS ARE SNAPPED INTO PLACEBEFORE DELIVERY☐ HOW TO DEFROST1P ress the front defrost button 2 S et to the warmest temperature setting3 Set to the highest fan speedWALK THE CUSTOMER THROUGH EACH OF THE FOLLOWING KEY DELIVERY FEATURESB L U E T O O T H ® H A N D S -F R E ESWITCHING BETWEEN PAIRED PHONESOn the radio:1. Push the SETUP button.2. Select Bluetooth .3. Select Bluetooth Connection .4. Select Connect next to the desired phone.CONNECTING YOUR PHONEOn the radio:1. Push the SETUP button.2. Select Bluetooth .3. Select Bluetooth Connection .4. Select Add New . In your phone’sBluetooth settings:5. Select the <Vehicle Name> on your phone.6. Enter the passkey from theradio or accept the authorization pop-up on your phone.For more information, visit Using Voice Command:“Change Bluetooth device”☐ REVIEW QUICK REFERENCE GUIDE☐ PAIR CUSTOMER'S PHONE TO THE BLUETOOTH SYSTEM ☐ REVIEW AND TEAR OFF VOICE COMMAND / QUICK TIP CARD。
北京现代索纳塔维修手册_0161-0200
北京现代轿车维修手册-李东江汽车工作室
ldjauto@李1东26江.co汽m车;工ldj作au室to126@
图 4-6 2.7LV6 发动机 ECR 系统结构图 ECM:发动机控制模块;EVAP:蒸发气体;UCC:三元催化器; 1-燃油喷射;2-点火线圈;3-进气温度传感器;4-ISC 电机;5-节气门位置传感器;6-空气 流量传感器;7-EVAP 活性炭罐清除电磁阀;8-凸轮轴位置传感器;9-氧传感器;10-水温传 感器;11-爆震传感器;12-曲轴位置传感器。
进气歧管侧(高真空) 进气歧管侧(适当的真空) 进气歧管侧(低真空)
l气d门ja室u盖to侧@
气门室盖侧
气门室盖侧
气门室盖侧
(a)
(b)
(c)
(d)
发动机 不运转 发动机
怠速或减速 发动机
正常工作 发动机 加速或大负荷
PCV阀
不工作 PCV阀
完全工作 PCV阀
适当的工作 PCV阀
轻微的工作
真空通道 关闭
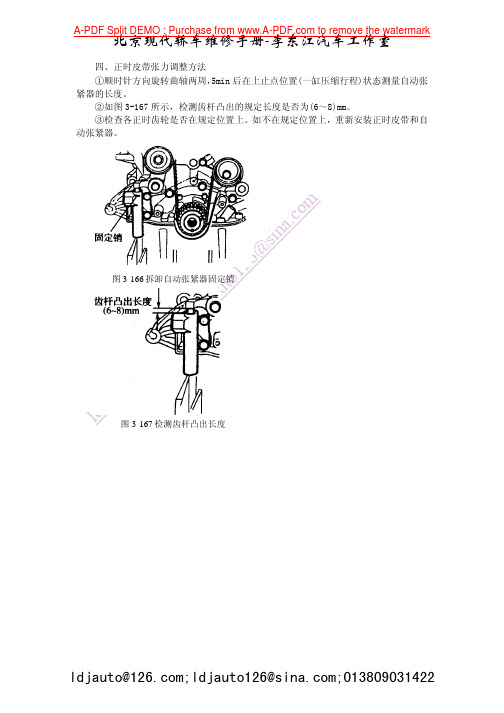
图 3-16李61拆东2卸6江自.c动o汽m张车;紧器工ld固j作a定u销室to126@ ldjau图to@3-167 检测齿杆凸出长度
ldjauto@;ldjauto126@;013809031422
北京现代轿车维修手册-李东江汽车工作室
第四章 排放控制装置与燃油系统的维修
ldjauto@;ldjauto126@;013809031422
北京现代轿车维修手册-李东江汽车工作室
李1东26江.co汽m车;工ldj作au室to126@
ldjauto@
图 4-2 V6 2.7L 发动机废气排放控制系统结构图 A-PCV 阀;B-EVAP 活性炭罐清除电磁阀;
北京现代索纳塔维修手册_0041-0080

北京现代轿车维修手册-李东江汽车工作室
⑦把新的 O 型圈环安装在前壳槽上。 ⑧如图 2-55 所示,使用专用工具(09213-33000)按规定扭矩拧紧螺塞堵。螺塞堵的扭矩: (20~27)N·m。
图 2-50图安2装李-5曲11东轴在26前曲江.c壳轴o汽油前m封端车;安工l装d专j作a用u室t工o具126@ ldjauto@
图 2-64 检查凸轮轴 李东6江.co汽m车;工ldj作au室to126@sin 图 2-65 确认定位销位置 12 ⑤按照图 2-66 所示的顺序,分成(2~3)回逐步均匀地拧紧轴承盖螺栓,最后按规定扭 @ 矩拧紧。轴承盖固定螺栓的扭矩:(19~21)N·m。 to ⑥在凸轮轴油封外圈上涂抹一层机油后,如图 2-67 所示,利用专用工具 09221-21000 ldjau 和 09221-21100 安装油封。
图 2-52 安装前壳
图 2-53 前壳紧固
ldjauto@;ldjauto126@;013809031422
北京现代轿车维修手册-李东江汽车工作室
图 2-54 固定并紧固平衡轴
江汽车工ldj作au室to126@ 图 2-55 紧固螺塞堵 东 ; ⑨如图 2-56 所示,在油底壳上涂一层密封胶,涂层厚度约 4mm。涂上密封胶以后 15min 李 om 内安装油底壳。安装时应注意油底壳固定螺栓长度的差异。油底壳固定螺栓的扭矩:(10~ 6.c 12)N·m。 ldjauto@12 ⑩在机油压力开关螺丝部分涂上密封胶。如图 2-57 所示,用 24mm 长套筒拧紧。机油压
北京现代轿车维修手册-李东江汽车工作室
③其工具以支撑附属装置组成:包括衬垫、导管、接头、安装器和拆卸工具。当安 装或拆卸活塞销时,支撑附属装置支撑着活塞,连杆被衬垫支撑时,导管帮助配置销的 安装与拆卸。
汽车原厂维修手册
汽车原厂维修手册汽车原厂维修手册全套500G 汽车维修资料详细目录以下是资料详细目录全车系维修手册本田飞度原厂维修手册2009 本田思域原厂维修手册2009 本田新雅阁原厂维修手册2008 本田CR-V电子版维修手册单项资料版2007本田CR-V原厂维修手册2004 本田CR-V文档版维修手册本田CR-V(05款)用户手册本田款新CR-V原厂维修手册2007 本田本田CR-V原厂维修手册2001 本田奥德赛维修手册2002 本田奥德赛 ODYSEEY维修手册2006 本田本田飞度原厂维修手册2004年本田飞度原厂维修手册2009 本田飞度原厂维修手册2006 本田飞度原厂维修手册2008 本田时韵原厂维修手册2002 本田时韵原厂维修手册2004 本田思迪原厂维修手册2006 本田思迪原厂维修手册本田思域原厂维修手册2006 本田civic电子版维修手册本田CIVIC混合动力版原厂维修手册本田civic原厂维修手册(92-04款) 本田本田雅阁原厂维修手册98 本田2.3原厂维修手册本田2.0 2.4 3.0原厂维修手册2003款本田雅阁原厂维修手册2006 本田雅阁 2.0 R20A3发动机维修手册本田CD7_CD9英文维修手册新款广州雅阁维修手册本田讴歌原厂维修手册2007 本田讴歌 TL 中文原厂维修手册2009丰田威姿原厂维修手册2007 丰田雅力士原厂维修手册2008 丰田RAV4 英文原厂维修手册2006 丰田RAV4培训教材2009丰田大霸王小客车结构图解与维修规范丰田大霸王发动机彩色电路图丰田大霸王汽车故障码检修流程丰田新款大霸王培训丰田大霸王原厂维修手册2000款丰田1RZ 2RZ-E原厂维修手册丰田大霸王2AZ-FE发动机原厂维修手册丰田新大霸王原厂维修手册丰田汉兰达原厂维修手册2007 丰田汉兰达新车培训2007丰田台湾花冠原厂维修手册2001 丰田花冠AE111,EE111,SEP原厂维修手册1998丰田花冠原厂维修手册(04年英文)丰田花冠原厂维修资料扫描版丰田花冠轿车原厂维修手册丰田柯罗那发动机电路图2007 丰田1ZZ-FE.3ZZ-FE发动机(花冠)维修手册丰田威驰花冠特锐检修专辑丰田花冠NZE12.ZZE12原厂维修手册丰田新皇冠维修手册2006丰田新皇冠Crown新车型培训2010 进口丰田皇冠汽车结构图解与维修规范一汽丰田皇冠培训丰田新皇冠原厂维修手册2006 凌志LS400皇冠CROWN3.0轿车电脑控制系统结构与维修丰田新皇冠维修手册丰田卡罗拉维修手册(04年英文) 丰田新卡罗拉培训资料丰田卡罗拉原厂维修手册2007 丰田凯美瑞轿车原厂维修手册2006 丰田凯美瑞原厂维修手册混合动力2010年丰田佳美ACV30L-AEPNKW原厂维修手册丰田佳美轿车结构图解与维修规范丰田佳美原厂维修手册ACV3.MCV30 2001年丰田佳美.大霸王维修手册丰田佳美2.4原厂维修手册丰田凯美瑞原厂维修手册2006 丰田凯美瑞特性丰田凯美瑞维修手册丰田新款佳美维修手册丰田四川考斯特客车丰田酷路泽原厂维修手册丰田陆地巡洋舰检修专辑2005 丰田新霸道PRADO新车型培训2010丰田陆地巡洋舰 1FZ-FE .3RZ-F.3RZ-FE杌械,电器维修手册6654321丰田陆地巡洋舰检修专辑丰田陆地巡洋舰结构图解与维修规范丰田沙漠王子原厂维修手册丰田陆地巡洋舰原厂维修手册4500 丰田霸道4000和陆地巡洋舰4700汽车原厂维修手册丰田陆地巡洋舰3400原厂维修手册丰田陆地巡洋舰4500原厂维修手册丰田丰田普瑞斯原厂维修手册2003-04 丰田普锐斯新车型培训2010 丰田普瑞斯原厂维修手册2006 丰田普锐斯丰田混合动力丰田新锐志原厂维修手册2009 丰田REIZ新车特征 05年丰田锐志原厂维修手册2005 丰田特锐原厂维修手册丰田威驰培训丰田威驰原厂维修手册丰田威姿原厂维修手册丰田Avalon丰田亚洲龙原厂维修手册雷克萨斯1991 ES 250 原厂维修手册雷克萨斯1993 ES 300 原厂维修手册雷克萨斯1993 ES 300 原厂维修手册雷克萨斯1997 ES 300 原厂维修手册雷克萨斯2001 ES 300 原厂维修手册英文雷克萨斯2005 ES 330 原厂维修手册英文雷克萨斯2005 ES330原厂维修手册雷克萨斯ES350原厂维修手册英文07 雷克萨斯GS430.GS300原厂维修手册丰田凌志GS430-300培训资料雷克萨斯IS250原厂维修手册雷克萨斯is300 原厂维修手册2000-05 雷克萨斯IS300 原厂维修手册2004 雷克萨斯LS400原厂维修手册雷克萨斯LX470 2004雷克萨斯LS_430雷克萨斯LS600h混合动力车型培训雷克萨斯LS400皇冠CROWN3.0轿车电脑控制系统结构与维修日产阿蒂玛原厂维修手册2003日产碧莲原厂维修手册1999年日产A32风度原厂维修手册1994-1998 日产A33风度原厂维修手册2001 日產CEFIRO(A33)原厂维修手册台灣(00年)\ 日产CEFIRO、风度、蓝鸟、阳光原厂维修手册日产风度维原厂维修手册日产Y50风雅原厂维修资料2006年日产尼桑贵士原厂维修手册2005年日产 E24佳奔旅行车原厂维修手册1987 日产 E25佳奔原厂维修手册2001 日产骏逸原厂维修手册2006年日产350Z原厂维修手册英文跑车2002 日产350Z Z33原厂维修手册2006年日产蓝鸟U13原厂维修手册1992 日产风神蓝鸟轿车维修手册\日产风神蓝鸟(EQ7200-II型)原厂维修手册日产蓝鸟原厂维修手册2003 日产新蓝鸟原厂维修手册日产骊威原厂维修手册2007日产D22帕拉丁原厂维修手册1998-2003 日产郑州日产 P27原厂维修手册2005 日产郑州帕拉丁原厂维修手册2002日产郑州奥丁原厂维修手册2007日产帕拉丁原厂维修手册2003日产郑州帕拉丁原厂维修手册日产 T30奇骏原厂维修手册2001日产 T30奇骏原厂维修手册2003日产骐达颐达原厂维修手册2005日产(千里马)原厂维修手册2004日产锐骐原厂维修手册日产东风日产尼桑新天籁原厂维修手册2004~06 日产尼桑天籁原厂维修手册2005日产新天籁原厂维修手册2006日产新天籁4缸2.0原厂维修手册2007 日产尼桑天籁原厂维修手册2008年日产Y61 途乐原厂维修手册日产Q45(无限)原厂维修手册2002 日产无限QX4原厂维修手册日产西尔维亚 S14 SR20DET原厂维修手册1994 日产F50西玛原厂维修手册2004-05年日产西玛(CIMA)原厂维修手册2004 日产逍客原厂培训资料日产原厂逍客原厂维修手册日产轩逸原厂维修资料2006日产 B14阳光原厂维修手册1994-97 日产N16阳光原厂维修手册2002年日产N16阳光EQ7202原厂维修手册2003年日产阳光原厂维修手册2005款日产英菲尼迪 EX35培训手册中文原厂2008 日产英菲尼迪 EX35原厂维修手册中文原厂2008 日产英菲尼迪 Y50原厂维修手册中文原厂2009 日产御轩原厂维修手册(C24)YUMSUN系列2008 日产郑州奥丁原厂维修手册2007马自达Mazda RX-8原厂维修手册马自达2 原厂维修手册 2008 马自达M2培训手册马自达福美来原厂维修手册2003 马自达新M3原厂维修手册2006 马自达长安马自达3 M3两厢原厂维修手册2010马自达长安M3培训手册马自达海马福美来原厂维修手册进口马自达3原厂维修手册马自达5参数配置表(终版发布) 马自达M6轿车学习手册马自达M6原厂维修手册06-08款马自达M6 睿翼原厂维修手册09 马自达m6原厂维修手册一汽M6原厂维修手册一汽马自达M6原厂维修手册-07年海南马自达MPV原厂维修手册马自达MPV原厂维修手册马自达普利马原厂电路及原厂维修手册新一代普力马培训手册斯巴鲁森林人原厂维修手册2007 斯巴鲁富士力狮原厂维修手册2007年斯巴鲁森林人原厂维修手册软件版2009 斯巴鲁翼豹原厂维修手册中文版斯巴鲁富士云雀GHK7071原厂维修手册斯巴鲁MY富士森林人原厂维修手册2004 斯巴鲁MY 力狮原厂维修手册2005 斯巴鲁MY力狮原厂维修手册2006 斯巴鲁弛鹏0207 斯巴鲁富士森林人2008斯巴鲁森林人原厂维修手册( 05款 ) 斯巴鲁森林人原厂维修手册( 06款 ) 三菱新戈蓝培训手册三菱格蓝迪原厂维修手册2004三菱格蓝迪原厂维修手册2006 三菱格蓝迪原厂维修手册2010三菱格蓝迪_原厂维修手册2008 三菱格蓝迪原厂维修手册2007 三菱格蓝迪车间维修光盘2007三菱蓝瑟原厂维修手册2007三菱三菱蓝瑟翼豪陆神原厂维修手册2009年10月三菱长丰猎豹汽车CS6原厂维修手册三菱长丰猎豹汽车原厂维修手册三菱猎豹CJY6421D及CJY2030原厂维修手册三菱猎豹汽车车间维修手册三菱猎豹维修维修培训三菱新猎豹CS6原厂维修手册07款三菱长丰CS7原厂维修手册09款三菱猎豹越野车原厂维修手册三菱欧蓝德原厂维修手册2004三菱欧蓝德原厂维修手册2008三菱欧蓝德原厂维修手册2009年10月三菱欧蓝德维修手册2009三菱欧蓝德自学教材三菱PAJERO原厂维修手册2008 三菱帕杰罗英文原厂维修手册2006 三菱帕杰罗V86V93V98W原厂维修手册2009年10月三菱帕杰罗V87V97V93原厂维修手册2010 三菱Pajero Pinin原厂维修手册2000-2001 三菱帕杰罗V87V97V93原厂维修手册2010三菱帕杰罗原厂维修手册2006三菱帕杰罗原厂维修手册2002三菱帕杰罗原厂维修手册(06年英文) 三菱帕杰罗速跑原厂维修手册2002 三菱Pajero原厂维修手册1999-2000 三菱帕杰罗(速跑)原厂维修手册(02年) 三菱帕杰罗蒙太罗MONTERO V75 英文原厂维修手册三菱V73 6G72发动机电控系统检修. 三菱V73车间检修手册(发动机与变速箱机械) 三菱帕杰罗V73V75原厂维修手册三菱L200原厂维修手册1999-2001 三菱车系-Montero车型发动机针脚电压1994 三菱4G6FF发动机三菱电喷系统维修手册三菱伊柯丽斯原厂维修手册2010 三菱菱绅(原厂维修手册)三凌4G64发动机维修培训三菱Carisma原厂维修手册1997-2000 三菱MONTERO原厂维修手册V75三菱MONTERO原厂维修手册V75(04年英文 ) 三菱V73全车检修手册三菱发动机维修资料三菱伊柯丽斯原厂维修手册2009东南4G63 4G64S4 MPI维修手册\东南得利卡汽车维修手册东南富力利中文维修手册东南戈蓝原厂维修手册东南凌绅原厂维修手册东南凌帅维修手册东南菱帅原厂维修手册东南新菱绅台湾版大众CC原厂维修手册2010款大众CC培训大众宝来原厂维修手册大众宝来01年维修资料大众宝来02年维修资料大众宝来03年维修资料大众宝来04年维修资料大众宝来05-06年维修资料大众新宝来原厂维修手册2008 大众宝来培训资料2004大众宝来运动版培训教材大众宝来维修资料大众波罗1.4中文原厂维修手册2001-2003大众劲情劲取原厂维修手册2007 大众POLO 原厂维修手册大众POLO 1.6原厂维修手册大众上海波罗维修手册大众GOL原厂维修手册(2003) 大众高尔原厂维修手册大众golf-a4教案大众一汽高尔夫A6原厂维修手册2009 大众一汽高尔夫A6维修手册+3月版2010大众Golf A4 培训资料大众辉腾培训资料大众甲克虫原厂维修手册大众新甲壳虫原厂维修手册大众捷达柴油电喷发动机培训资料大众大众捷达柴油捷达配书光盘大众捷达SDI原厂维修手册大众捷达轿车包括柴油车培训一汽大众捷达柴油车原厂培训08大众捷达1.6L四缸汽油发动机(BJG)机械部分大众捷达1.6L四缸汽油发动机(BJG_BWG)自诊断大众捷达LPG 机械部分大众捷达双燃料CNG LPG 电器部分大众捷达双燃料CNG 机械部分大众捷达双燃料CNG LPG 电器部分大众捷达双燃料CNG LPG 机械部分大众捷达柴油机电子控制系统大众Jetta双燃料喷射系统大众捷达(2V)轿车发动机数据流分析大众捷达(5V)轿车发动机数据流分析大众捷达.宝来五气门发动机电控系统的维修大众捷达2V电喷车维修手册大众捷达LPG燃气原理大众捷达SDI 发动机维修诊断手册[原厂] 大众捷达电喷系列轿车维修手大众捷达都市先锋维修手册大众捷达两阀电喷轿车维修手册大众捷达前卫数据流分析大大众一汽大众开迪维修手册及培训资料大众朗逸4缸汽油发动机(1.6升4缸链式) 大众迈腾原厂维修手册2007大众迈腾警车原厂维修手册大众PASSAT领域原厂维修手册2007 大众帕萨特B5培训资料大众上海帕萨特B5轿车电系故障检测与维修大众国产帕萨特全车维修手册大众帕萨特B5 1.8T维修手册大众帕萨特使用手册大众上海大众桑塔纳3000原厂维修手册大众桑塔纳2000轿车电控与电气系统检修图解大众桑塔纳入2000原厂维修资料2004款大众桑塔纳2000原厂维修手册大众桑塔纳GLI 世纪新秀原厂维修手册大众桑塔纳2000结构与维修大众速腾原厂维修手册2006 大众速腾电气系统培训09大众途安原厂维修手册2004 大众途安原厂维修手册2005 大众途安Touran多用途乘用车产品手册大众途安Touran培训教材大众途锐自学手册长安铃木燕雨原厂维修手册铃木吉姆尼原厂维修手册铃木SOLIO(所力歐)1.3L原厂维修手册羚羊轿车原厂维修手册羚羊世纪星轿原厂维修手册铃木天语SX4原厂维修手册铃木维特拉原厂维修手册新奥拓YC5原厂维修手册长安奥拓轿车原厂维修手册长安铃木初级技术培训教材铃木羚羊CNG原厂维修手册铃木全新天语SX4维修手册五十铃UBS英文原厂维修手册江铃陆风(JX6474E)原厂维修手册江铃皮卡原厂维修手册江铃全顺4G64原厂维修手册江铃全顺客车全车电路图江铃全顺原厂维修手册江铃陆风SUV龙腾版(配VM发动机)培训教材江铃陆风风华原厂维修手册2007 江铃陆风风尚原厂维修手册2006五十铃T型皮卡REDEO9(竞技者)原厂维修手册江铃全顺欧III发动机原厂维修手册2006 江铃N系列欧III发动机原厂维修手册2007 江铃T系列欧三发动机原厂维修手册2007 江铃全顺欧III发动机原厂维修手册2007 江铃汽车09款T系列(N301)原厂维修手册2008 江铃T系列欧三原厂维修手册江铃电喷柴油T系列欧三原厂维修手册轻骑兵 Isuzu Trooper 英文原厂维修手册庆铃600P原厂维修手册五十铃N系列发动机维修说明五十菱原厂维修手册大宇蓝龙原厂维修手册大宇希望原厂维修手册大宇蓝龙新巧龙旅行家典雅轿车原厂维修手册大宇(DAEWOO)王子超级沙龙轿车电控燃油喷射系统原厂维修手册大宇Daewoo贵族希望ESPERO轿车电喷系统原厂维修手册大宇貴族原厂维修手册大宇蓝龙发动机电控系统检修起亚东风悦达福瑞迪原厂维修手册起亚嘉华骄车原厂维修手册起亚嘉华原厂原厂维修手册进口嘉华原厂维修手册起亚千里马原厂维修培训手册起亚普莱特原厂维修手册起亚锐欧G 1.4 DOHC原厂维修手册2009 起亚赛拉图汽车维修电路图起亚赛拉图原厂维修手册起亚狮跑维修手册起亚2009狮跑原厂维修手册起亚狮跑原厂维修手册起亚sorento索兰托原厂维修手册起亚威客 G3.8原厂维修手册 2006 起亚威客G3.8DOHC(VVT)原厂维修手册 2007起亚远舰原厂维修手册起亚远舰新车技术培训教材现代XG君爵XG原厂维修手册现代劳恩斯原厂维修手册2009 现代领翔NFC原厂维修手册2009 现代领翔NFC 培训手册现代美佳(FC)原厂维修手册2009 现代瑞风与风行检修专辑2005年瑞风英文原厂维修手册瑞风与风行检修专辑2005年现代新圣达V6原厂维修手册2008 现代圣达菲培训资料现代圣达菲维修手册现代索纳塔AT原厂维修手册2007 现代北京索纳塔原厂维修手册北京现代索纳塔发动机培训北京现代索纳塔原厂维修手册北京现代索纳塔专辑现代华泰现代特拉卡原厂维修手册2002 华泰现代培训现代特拉卡柴油发动机原厂维修手册现代特拉卡原厂维修手册现代途胜维修手册2009现代途胜培训教材现代途胜维修手册现代维拉克斯维修手册2008 现代雅科仕维修手册现代雅申特原厂维修手册2009 现代雅绅特维修手册现代雅尊维修资料2009 现代悦动维修手册2008 现代伊兰特维修手册2009 现代伊兰特维修手册现代NF御翔原厂维修手册2005 富豪VOLVO S80原厂维修手册 VOLVO S80检修专辑-迪威2004,12.pdf宝马X3 E83培训资料宝马X5 E53培训教材宝马X5 培训教材2003 宝马X5 培训教材2004 宝马新X5E70底盘培训宝马08新七系培训教材宝马BMWE65培训教材宝马E65-原厂2001宝马新一代发动机 N73培训教材宝马E38 E39原厂维修手册宝马E65-E66新系统原厂维修手册宝马745 E65原厂维修手册宝马E65系列保养灯归零宝马745控制系统检修专辑2004年宝马E 90 培训教材宝马E90培训教材宝马E90培训教材宝马3系培训手册宝马E60 E61培训教材宝马华晨新5系培训教材宝马MINI和E60培训教材宝马525i维修手册宝马国产维修手册华晨宝马新5系原厂中文维修手册宝马99 培训教材宝马BMW525i维修手册新宝马5系使用手册-原厂保时捷Boxster车间维修手册保时捷卡宴维修手册保时捷汽车培训与自学习保时捷 993 911 车间维修手册保时捷911维修手册保时捷968维修手册保时捷968原厂维修手册 Maybach迈巴赫车间维修手册奔驰BENZ-06BENZ奔驰培训教材奔驰SLK 171培训教材奔驰W210培训教材奔驰W211娱乐系统培训奔驰W220车间维修手册奔驰600车间维修手册奔驰w202车间维修手册奔驰W203,W210系统检修奔驰轿车维修数据(35 43 59 79奔驰车系电脑控制检修技术资料库奔驰BENZS320维修手册2006 奔驰s系使用手册奔驰车系电脑控制检修技术资料库奔驰车系维修手册标致206-406原厂维修手册标致306原厂维修手册标致307原厂维修手册标致307综合资料东风标致206原厂发动机电喷系统培训东风标致408培训标致307-607维修软件系统标致系列中文.nrg东风标致307 2004-2006 新雅途EPS维修资料捷豹Jaguar Tis 2004 捷豹JAGUAR XK8 1997电路图捷豹维修手册 XJ6 - XJ40 拉古娜英文原厂维修手册梅甘娜英文原厂维修手册雷诺新风景2英文原厂维修手册雷诺轿车维修手册(英文) 雷诺RENAULT维修手册欧宝新款欧美佳原厂维修手册欧宝赛飞利英文原厂维修手册欧宝汽车维修手册欧宝赛飞利培训欧宝威达原厂维修手册欧宝威达VECTRA-B英文原厂维修手册欧宝威达VECTRA-C英文原厂维修手册欧宝雅特英文原厂维修手册欧宝CECTRA-B原厂维修手册萨博9-3 原厂维修手册进口绅宝轿车修理手册机工2000 绅宝车系维修手册斯柯达法比亚原厂维修手册斯柯达昊锐培训教材斯柯达技术通报斯柯达新明锐培训教材PICASSO原厂维修手册2007 雪铁龙c2培训与电路图雪铁龙C2培训-原厂雪铁龙爱利舍原厂维修手册雪铁龙爱丽舍轿车雪铁龙毕加索轿车原厂维修手册雪铁龙新毕加索课堂练习图册雪铁龙毕加索萨拉改进型技术资料-美河提供雪铁龙富康电气维修资料东风雪铁龙凯旋雪铁龙凯旋维修手册雪铁龙塞纳维修手册雪铁龙世嘉培训内容1-1 雪铁龙世嘉车型介绍路虎Land Rover RAVE 原厂维修手册(英文)路虎发现者和自由人原厂维修手册路虎拦胜原厂维修手册陆虎更早陆虎览胜车间手册路虎览胜车主手册2006 英国陆虎英文原厂维修手册路虎维修手册(修理指南别克陆尊原厂维修手册别克GL8 2.5L原厂维修手册2006 别克GL8陆遵原厂维修手册2005 别克GL8原厂维修手册2001 别克昂科雷原厂维修手册别克新君威原厂维修手册2008别克君威原厂维修手册2003别克新君威2。
2012年北京现代雅绅特(MC)G1.4DOHC发动机缸盖总成维修手册
2012 > G 1.4 DOHC > 发动机机械系统结构图此程序不需要拆卸发动机总成。
2012 > G 1.4 DOHC > 发动机机械系统拆卸• 使用防护板盖以免损坏油漆表面。
• 为避免损坏气缸盖,等到发动机冷却温度降到常温后再拆卸气缸盖。
• 在处理金属衬垫时,小心不要折叠衬垫或损坏衬垫表面。
• 为避免损坏,固定部分连接器,同时小心拔导线连接器。
• 标记所有导线和软管,避免错接。
• 拆卸气缸盖前检查正时皮带。
• 转动曲轴皮带轮,使得1号活塞在上止点。
(参考EM-23 页)。
1.分离蓄电池和端子(A)。
2.拆卸发动机盖(A )。
3.拆卸下盖(A)。
4.排出发动机冷却水。
(参考EM-94 页)拆卸散热器盖,加速排水。
5.拆卸进气软管和空气滤清器总成。
(1)分离AFS(空气流量传感器)连接器(A)。
(1.6CVVT)(2)分离进气软管(D)上的通气软管(B)(3)拆卸进气软管(D)和空气滤清器上盖(C)。
(4)分离ECM连接器(A)和ECM连接器(B)(仅A/T)。
(5)拆卸空气滤清器滤芯和空气滤清器下盖(C)。
6.拆卸蓄电池支架(A)。
7.拆卸散热器上水管(A)和散热器下水管(B)。
8.拆卸暖风加热器软管(A)。
9.拆卸燃油软管(B)。
10.松动锁紧螺母,拆卸加速踏板拉线(A ),在节气门上将拉线端滑出。
11.分离TPS(节气门位置传感器)连接器(B )。
12.分离MAP 传感器连接器(C )。
<1.4 DOHC LHD><1.6 DOHC RHD>13.拆卸气缸盖和进气歧管上的发动机线束连接器和线束夹。
(1)分离后氧传感器连接器(A)。
(2)分离空调压缩机开关连接器(B)。
(3)分离爆震传感器连接器(C)。
(4)分离喷油嘴连接器(N3,4)(D)(5)分离喷油嘴连接器(N1,2)(E)(6)拆卸导线线束支架(A)。
(7)分离ISA(怠速执行器)连接器(B)。
- 1、下载文档前请自行甄别文档内容的完整性,平台不提供额外的编辑、内容补充、找答案等附加服务。
- 2、"仅部分预览"的文档,不可在线预览部分如存在完整性等问题,可反馈申请退款(可完整预览的文档不适用该条件!)。
- 3、如文档侵犯您的权益,请联系客服反馈,我们会尽快为您处理(人工客服工作时间:9:00-18:30)。
AZERA(TG) >2011 > G 3.8 DOHC > MFI Control System(2010.03.02~) > Schematic Diagrams MFI Control System
AZERA(TG) >2011 > G 3.8 DOHC > MFI Control System(2010.03.02~) > Schematic Diagrams MFI Control System
AZERA(TG) >2011 > G 3.8 DOHC > MFI Control System(~2010.03.01) > Schematic Diagrams MFI Control System
AZERA(TG) >2011 > G 3.8 DOHC > MFI Control System(~2010.03.01) > Schematic Diagrams MFI Control System
AZERA(TG) >2011 > G 3.8 DOHC > MFI Control System(2010.03.02~) > Schematic Diagrams MFI Control System
AZERA(TG) >2011 > G 3.8 DOHC > MFI Control System(2010.03.02~) > Schematic Diagrams MFI Control System
AZERA(TG) >2011 > G 3.8 DOHC > Control Harness > Schematic Diagrams Control Harness
AZERA(TG) >2011 > G 3.8 DOHC > MFI Control System(2010.03.02~) > Schematic Diagrams MFI Control System
AZERA(TG) >2011 > G 3.8 DOHC > MFI Control System(2010.03.02~) > Schematic Diagrams MFI Control System
AZERA(TG) >2011 > G 3.8 DOHC > MFI Control System(~2010.03.01) > Schematic Diagrams MFI Control System
AZERA(TG) >2011 > G 3.8 DOHC > MFI Control System(~2010.03.01) > Schematic Diagrams MFI Control System
AZERA(TG) >2011 > G 3.8 DOHC > MFI Control System(2010.03.02~) > Schematic Diagrams MFI Control System
AZERห้องสมุดไป่ตู้(TG) >2011 > G 3.8 DOHC > MFI Control System(2010.03.02~) > Schematic Diagrams MFI Control System
AZERA(TG) >2011 > G 3.8 DOHC > MFI Control System(2010.03.02~) > Schematic Diagrams MFI Control System
AZERA(TG) >2011 > G 3.8 DOHC > MFI Control System(2010.03.02~) > Schematic Diagrams MFI Control System
AZERA(TG) >2011 > G 3.8 DOHC > MFI Control System(~2010.03.01) > Schematic Diagrams MFI Control System
AZERA(TG) >2011 > G 3.8 DOHC > MFI Control System(~2010.03.01) > Schematic Diagrams MFI Control System
AZERA(TG) >2011 > G 3.8 DOHC > MFI Control System(2010.03.02~) > Schematic Diagrams MFI Control System
AZERA(TG) >2011 > G 3.8 DOHC > MFI Control System(2010.03.02~) > Schematic Diagrams MFI Control System
AZERA(TG) >2011 > G 3.8 DOHC > MFI Control System(~2010.03.01) > Schematic Diagrams MFI Control System
AZERA(TG) >2011 > G 3.8 DOHC > MFI Control System(~2010.03.01) > Schematic Diagrams MFI Control System
AZERA(TG) >2011 > G 3.8 DOHC > MFI Control System(~2010.03.01) > Schematic Diagrams MFI Control System
AZERA(TG) >2011 > G 3.8 DOHC > MFI Control System(2010.03.02~) > Schematic Diagrams MFI Control System
AZERA(TG) >2011 > G 3.8 DOHC > MFI Control System(~2010.03.01) > Schematic Diagrams MFI Control System
AZERA(TG) >2011 > G 3.8 DOHC > MFI Control System(~2010.03.01) > Schematic Diagrams MFI Control System
