Linux Apache 的 HTTPS 配置
Linux系统配置HTTPSSL

Linux系统配置HTTPSSL centos6配置⼀个基于SSL VPN的Apache服务,制作该服务的证书安装Apacheyum -y install httpd*安装mod_sslyum -y install mod_ssl开启HTTP服务service httpd start关闭防⽕墙service iptables stop进⼊/etc/pki/tls/certs/⽬录下cd /etc/pki/tls/certs/⽣成证书make server.crtumask 77 ; \/usr/bin/openssl genrsa -aes128 2048 > server.keyGenerating RSA private key, 2048 bit long modulus...................................+++.....+++e is 65537 (0x10001)Enter pass phrase:Verifying - Enter pass phrase: //输⼊通⾏短语umask 77 ; \/usr/bin/openssl req -utf8 -new -key server.key -x509 -days 365 -out ser ver.crt -set_serial 0 Enter pass phrase for server.key://输⼊server.key的密码短语You are about to be asked to enter information that will be incorporatedinto your certificate request.What you are about to enter is what is called a Distinguished Name or a DN.There are quite a few fields but you can leave some blankFor some fields there will be a default value,If you enter '.', the field will be left blank.-----Country Name (2 letter code) [XX]:cn //国家名称(2个字母代码)State or Province Name (full name) []:beijing //省份(全名)Locality Name (eg, city) [Default City]:tam //地点名称Organization Name (eg, company) [Default Company Ltd]:xm //组织名称Organizational Unit Name (eg, section) []:shit //组织单位名称Common Name (eg, your name or your server's hostname) []:localhost //公⽤名Email Address []:123@ //电⼦邮箱配置ssl.conf,第77⾏中将图中的两个注释去掉修改为本地IP即可vi /etc/httpd/conf.d/ssl.conf修改第113 ,路径要正确,第⼆个key由为关键SSLCertificateFile /etc/pki/tls/certs/server.crtSSLCertificateKeyFile /etc/pki/tls/certs/server.key改完后保存并退出重启httpd服务,输⼊制作证书时的密码service httpd restart如果报错SSLCertificateKeyFile: file '/etc/pki/tls/certs/server.key' does not exist or is empty 报错的原因可能是因为key不存在或者为空,不⽤担⼼,删掉key和crt 可以重新⽣成cd /etc/pki/tls/certs/server.crtrm server.keyrm server.crtmake server.crt //重新验证Openssl 验证⼀切准备好后,可以看这⼀步,每次重启使HTTP服务器⽆需密码openssl rsa -in server.key -out server.key⽆需输⼊密码直接重启。
Apache配置HTTPS协议

Apache配置HTTPS协议搭载SSl配置全过程1.安装必要的软件从Apache官方()下载必要的ApacheHttpServer安装包,可以直接官方提供的绑定openssl的apache.文件名是:httpd-2.2.15-win32-x86-openssl-0.9.8m-r2.msi(我用的是Apache2.2.15for windows的版本,你可以点击此处下载最新的版本进行安装,最好选择含有openssl版本的哦)否则单独安装windows下的openssl比较麻烦,要么找到一个第三方的编译结果,要么自己编译安装完毕后检查检查在Apache安装路径的bin下是否有以下文件:openssl.exessleay32.dlllibeay32.dll2. 生成服务器证书安装好在bin目录下有一个openssl.exe文件,用来生成证书和密钥。
1). 生成服务器用的私钥文件server.key(注:在Windows操作系统环境下需先设置Openssl环境变量:在DOS命令下进入conf目录,执行命令行:set OPENSSL_CONF=..\conf\f;请在执行之前确保f存在,否则会出现:WARNING: can't open config file: /usr/local/ssl/f 信息提示。
还有在windows系统下.cnf 默认会被当成快捷方式,看不到扩展名。
)在DOS命令下进入bin目录,执行命令行命令:openssl genrsa 1024> server.key说明:这是用128位rsa算法生成密钥,得到server.key文件>是输出文件的标识符这种生成方法生成的是没有密钥的私钥文件,当然,Apache提供了加入密钥(Password)的命令,就是加入参数-des3,全部的命令为:命令:openssl genrsa 1024-des3 > server.key使用 openssl genrsa -des3 > 1024 server.key生成私钥文件是需要输入密钥的,运行的时候会让你输入并确认你的密钥,但是在Windows环境下会导致以下错误:错误:Apache启动失败,错误提示是:Init: SSLPassPhraseDialog builtin is not supported on Win32 (key file .....)原因是window下的apache不支持加密的私钥文件。
如何在Linux上安装和配置Apache服务器
如何在Linux上安装和配置Apache服务器Apache是一个流行的开源Web服务器软件,被广泛用于搭建和管理网站。
在Linux系统上安装和配置Apache服务器是一项基本的技能。
本文将介绍如何在Linux操作系统下安装和配置Apache服务器。
一、安装Apache服务器首先,打开终端窗口,并使用以下命令来更新软件包列表:sudo apt update接下来,使用以下命令来安装Apache服务器:sudo apt install apache2安装过程中,您需要输入管理员密码进行确认。
安装完成后,Apache服务器将自动启动。
二、配置Apache服务器1. 配置文件路径Apache的配置文件位于/etc/apache2目录下。
在终端中使用cd命令进入该目录:cd /etc/apache22. 主配置文件编辑主配置文件apache2.conf,使用以下命令打开该文件:sudo nano apache2.conf在打开的文件中,可以找到一些常用的配置选项,您可以根据需要进行修改。
例如,您可以更改服务器名称、监听端口等。
3. 虚拟主机配置虚拟主机配置允许您在同一台服务器上运行多个网站。
默认情况下,Apache服务器已经为您配置了一个默认的虚拟主机。
如果您想添加更多的虚拟主机,您可以在/etc/apache2/sites-available目录下创建配置文件。
使用以下命令进入该目录:cd /etc/apache2/sites-available使用以下命令创建一个新的虚拟主机配置文件,例如mywebsite.conf:sudo nano mywebsite.conf在此配置文件中,您可以设置您的网站的域名、目录路径和其他相关设置。
保存并关闭文件。
接下来,使用以下命令启用新的虚拟主机配置文件:sudo a2ensite mywebsite.conf最后,重新加载Apache服务器以应用配置更改:sudo service apache2 reload您的新虚拟主机现在应该已经生效了。
linuxapacheTomcat配置SSL(https)步骤

linuxapacheTomcat配置SSL(https)步骤1. https简介它是由Netscape开发并内置于其浏览器中,⽤于对数据进⾏压缩和解压操作,并返回⽹络上传送回的结果。
HTTPS实际上应⽤了Netscape的安全套接字层(SSL)作为HTTP应⽤层的⼦层。
(HTTPS使⽤端⼝443,⽽不是象HTTP那样使⽤端⼝80来和TCP/IP进⾏通信。
)SSL使⽤40 位关键字作为RC4流加密算法,这对于商业信息的加密是合适的。
HTTPS和SSL⽀持使⽤X.509数字认证,如果需要的话⽤户可以确认发送者是谁。
也就是说它的主要作⽤可以分为两种:⼀种是建⽴⼀个信息安全通道,来保证数据传输的安全;另⼀种就是确认⽹站的真实性。
2. HTTPS和HTTP的区别 ⼀、https协议需要到ca申请证书,⼀般免费证书很少,需要交费。
⼆、http是超⽂本传输协议,信息是明⽂传输,https 则是具有安全性的ssl加密传输协议。
三、http和https使⽤的是完全不同的连接⽅式,⽤的端⼝也不⼀样,前者是80,后者是443。
四、http的连接很简单,是⽆状态的;HTTPS协议是由SSL+HTTP协议构建的可进⾏加密传输、⾝份认证的⽹络协议,⽐http协议安全。
3. SSL介绍为Netscape所研发,⽤以保障在Internet上数据传输之安全,利⽤数据加密(Encryption)技术,可确保数据在⽹络上之传输过程中不会被截取及窃听。
⽬前⼀般通⽤之规格为40 bit之安全标准,美国则已推出128 bit之更⾼安全标准,但限制出境。
只要3.0版本以上之I.E.或Netscape浏览器即可⽀持SSL。
当前版本为3.0。
它已被⼴泛地⽤于Web浏览器与服务器之间的⾝份认证和加密数据传输。
SSL协议位于TCP/IP协议与各种应⽤层协议之间,为数据通讯提供安全⽀持。
SSL协议可分为两层:SSL记录协议(SSL Record Protocol):它建⽴在可靠的传输协议(如TCP)之上,为⾼层协议提供数据封装、压缩、加密等基本功能的⽀持。
Linux下Apache服务的部署和配置
Linux下Apache服务的部署和配置⽬录1 Apache的作⽤2 Apache的安装3 apache的启⽤4 apache的基本信息5 apache的访问控制5.1 基于客户端ip的访问控制5.2 基于⽤户认证的访问控制6 apache的虚拟主机7 apache的加密访问8 ⽹页重写9 正向代理10 反向代理11 apache ⽀持的语⾔1 Apache的作⽤解析⽹页语⾔,如html,php,jsp等接收web⽤户的请求,并给予⼀定的响应2 Apache的安装安装apche软件:dnf install httpd.x86_64 -y3 apache的启⽤开启apache服务并设置开机启动:systemctl enable --now httpd查看apache服务的状态:systemctl enable --now httpd查看⽕墙信息:firewall-cmd --list-all 在⽕墙中永久开启http服务:firewall-cmd --permanent --add-service=http在⽕墙中永久开启https服务: f irewall-cmd --permanent --add-service=https在不改变当前⽕墙状态的情况下刷新防⽕墙:firewall-cmd --reload4 apache的基本信息apche的基本信息服务名称:httpd主配置⽂件:/etc/httpd/conf/httpd.conf⼦配置⽂件:/etc/httpd/conf.d/*.conf默认发布⽬录:/var/www/html默认端⼝:80 (http),443(https)⽇志⽂件:/etc/httpd/logs开启apche服务后,输⼊ip查看默认发布页⾯:(1)更改apche服务的端⼝号查看httpd服务的默认端⼝号:netstat -antlupe |grep httpd编辑配置⽂件:/etc/httpd/conf/httpd.conf,修改端⼝号重启httpd服务:systemctl restart httpd查看httpd服务的端⼝号:netsat -antlupe | grep httpd更改端⼝号后,输⼊ip后⽆法正常连接,原因是8080端⼝未添加在⽕墙中在防⽕墙⾥添加888端⼝号:firewall-cmd --permanent --add-port=888/tcp在不改变当前⽕墙状态的情况下刷新防⽕墙:firewall-cmd --reload输⼊IP地址:端⼝号,可以正常访问(2)修改apche的默认发布⽂件默认⽬录:cd /var/www/html在⽂件默认发布⽬录下新建⼀个⽂件index.html输⼊:http://172.25.254.144查看默认发布⽂件就是访问apache时没有指定⽂件名,即默认访问的⽂件,此⽂件可以指定多个,但有访问顺序。
Linux下Apache的安装与配置
Linux下Apache的安装与配置⼀、编译安装1、解决依赖关系⼆、后续操作1、启动httpd两种⽅法:第⼀种、/usr/local/apache/bin/apachectl start第⼆种⽅法:先修改http.pid⽂件位置打开配置⽂件增加⼀⾏vim /etc/httpd/httpd.conf 增加PidFile “/var/run/httpd.pid”为了启动httpd更加⽅便,#!/bin/bash## httpd Startup script for the Apache HTTP Server## chkconfig: - 85 15# description: Apache is a World Wide Web server. It is used to serve \# HTML files and CGI.# processname: httpd# config: /etc/httpd/conf/httpd.conf# config: /etc/sysconfig/httpd# pidfile: /var/run/httpd.pid# Source function library.. /etc/rc.d/init.d/functionsif [ -f /etc/sysconfig/httpd ]; then. /etc/sysconfig/httpdfi# Start httpd in the C locale by default.HTTPD_LANG=${HTTPD_LANG-"C"}# This will prevent initlog from swallowing up a pass-phrase prompt if# mod_ssl needs a pass-phrase from the user.INITLOG_ARGS=""# Set HTTPD=/usr/sbin/httpd.worker in /etc/sysconfig/httpd to use a server# with the thread-based "worker" MPM; BE WARNED that some modules may not# work correctly with a thread-based MPM; notably PHP will refuse to start.# Path to the apachectl script, server binary, and short-form for messages.apachectl=/usr/local/apache/bin/apachectlhttpd=${HTTPD-/usr/local/apache/bin/httpd}prog=httpdpidfile=${PIDFILE-/var/run/httpd.pid}lockfile=${LOCKFILE-/var/lock/subsys/httpd}RETVAL=0start() {echo -n $"Starting $prog: "LANG=$HTTPD_LANG daemon --pidfile=${pidfile} $httpd $OPTIONSRETVAL=$?echo[ $RETVAL = 0 ] && touch ${lockfile}return $RETVAL}stop() {echo -n $"Stopping $prog: "killproc -p ${pidfile} -d 10 $httpdRETVAL=$?echo[ $RETVAL = 0 ] && rm -f ${lockfile} ${pidfile}}reload() {echo -n $"Reloading $prog: "if ! LANG=$HTTPD_LANG $httpd $OPTIONS -t >&/dev/null; thenRETVAL=$?echo $"not reloading due to configuration syntax error"failure $"not reloading $httpd due to configuration syntax error"elsekillproc -p ${pidfile} $httpd -HUPRETVAL=$?fiecho}# See how we were called.case "$1" instart)start;;stop)stop;;status)status -p ${pidfile} $httpdRETVAL=$?;;restart)stopstart;;condrestart)if [ -f ${pidfile} ] ; thenstopstartfi;;reload)reload;;graceful|help|configtest|fullstatus)$apachectl $@RETVAL=$?;;*)echo $"Usage: $prog {start|stop|restart|condrestart|reload|status|fullstatus|graceful|help|configtest}" exit 1esacexit $RETVAL将以上代码加⼊到vim /etc/init.d/httpd中⽽后为此脚本赋予执⾏权限:chmod +x /etc/rc.d/init.d/httpd加⼊服务列表:chkconfig --add httpd给3,5启动chkconfig --level 3,5 httpd on最后加路径将 export PATH=$PATH:/usr/local/apache/binvim /etc/profile.d/httpd.sh完成后重新登录就可以了。
阿里云服务器apache配置SSL证书成功开启Https(记录趟过的各种坑)
阿⾥云服务器apache配置SSL证书成功开启Https(记录趟过的各种坑)环境:步骤:申请证书(某度很多教程的,⼤家⾃⾏搜索)上传证书登陆阿⾥云控制台=》安全(云盾)=》CA证书服务=》上传原有证书(也可以直接买阿⾥云的证书,这样就不⽤上传,不过个⼈⽹站⼀般是申请免费的证书)开启服务器443端⼝(https默认端⼝)阿⾥云控制台=》云计算基础服务=》云服务器ECS=》⽹络和安全=》安全组,没有安全组的创建⼀个安全组,有的直接选择相应安全组,点击配置规则=》添加安全组规则(把80端⼝和443端⼝添加进安全组,授权对象填0.0.0.0/0)开启apache相应配置#修改httpd.conf⽂件LoadModule ssl_module modules/mod_ssl.soInclude conf/extra/httpd-ssl.confLoadModule rewrite_module#去掉上⾯三⾏前的"#"保存退出在apache⽬录下的conf⽬录下新建⼀个cert⽬录,将你的证书⽂件放在这⾥⾯开启php的openssl模块,在phpstudy的“php扩展及设置”⾥⾯开启即可修改httpd-ssl.conf⽂件,保存退出在..\Apache\conf\extra⽬录下,打开httpd-ssl.conf⽂件(注:先备份⼀遍,以免出错,因为这个⽂件的错误我重装phpstuy不下10回)在⽂件⾥定位到 Listen 443 这句话这⾥,把从这句话到这个⽂件结尾的⽂本全部注释掉或者删除掉,替换成以下代码Listen 443 //这⾥强调⼀下,如果Listen 443这句代码在这个⽂件⾥重复出现了,即重复监听,apache会报错,然后不能启动SSLStrictSNIVHostCheck offSSLCipherSuite AESGCM:ALL:!DH:!EXPORT:!RC4:+HIGH:!MEDIUM:!LOW:!aNULL:!eNULLSSLProtocol all -SSLv2 -SSLv3<VirtualHost *:443>#这⾥的路径设置你的⽹站根⽬录DocumentRoot "C:\phpStudy\PHPTutorial\WWW"#这⾥替换成你的域名ServerName #这⾥替换成你的域名ServerAlias #这⾥的路径设置你的⽹站根⽬录<Directory "C:\phpStudy\PHPTutorial\WWW">Options FollowSymLinks ExecCGIAllowOverride AllOrder allow,denyAllow from allRequire all granted</Directory>SSLEngine on#你的公钥⽂件SSLCertificateFile "C:/phpStudy/PHPTutorial/Apache/conf/cert/server.crt"#你的私钥⽂件(有的机构命名为private或者以你的域名为⽂件名命名)SSLCertificateKeyFile "C:/phpStudy/PHPTutorial/Apache/conf/cert/server.key"#证书链⽂件(有的机构命名为CA)我尝试过注释掉这个选项,结果apache不能运⾏SSLCertificateChainFile "C:/phpStudy/PHPTutorial/Apache/conf/cert/chain.crt"</VirtualHost>重启apache,看看能不能正常启动,如果有异常,尝试把第4步中httpd-ssl.conf代码恢复注释(把#重新加上去,保存退出),再次重启apache,如果此时能够正常启动,则说明httpd-ssl.conf⽂件中有错误(是不是重复监听了?证书路径对不对?证书是否有效?),请认真检查,直到能够正常启动apache打开hosts⽂件我的hosts⽂件在C:\Windows\System32\drivers\etc⽬录下⽤记事本打开,在127.0.0.1 localhost下⾯添加⼀句话:127.0.0.1 //这⾥替换成你的域名保存退出保存退出重启apache启动浏览器检查是否可以访问localhost 及你的域名,并且域名头部标志为https。
linux下ssl环境配置
linux下ssl环境配置1. 配置apache时把ssl模块载入进来./configure \--with-ldap \--prefix=/usr/local/apache_smart_static \--enable-include \--enable-rewrite \--enable-ssl \--with-ssl=/usr/local/OpenSSL/ \--enable-proxy \--enable-ldap \--enable-auth-ldap=======================================检查模块有没装进去,可以用命令:bin/apache -l=======================================2. 安装数字证书使用https方式验证vi /usr/local/apache/conf/http.conf# Secure (SSL/TLS) connectionsInclude conf/extra/httpd-ssl.conf //把此处的#去掉 (Include conf/ssl.conf 版本问题,有些版本是没有httpd-ssl.conf这个属性,只有ssl.conf,效果是一样的)## Note: The following must must be present to support# starting without SSL on platforms with no /dev/random equivalent# but a statically compiled-in mod_ssl.## cd /usr/local/apache2# ./bin/apachectl startSyntax error on line 108 of /usr/local/apache2/conf/ssl.conf:SSLCertificateFile: file '/usr/local/apache2/conf/server.key' does not exist or is empty 这又是什么原因呢?因为我们没有配置ssl,需要生成ssl需要的证书。
Linux下配置tomcat+https

keystorePass="hellohello"
clientAuth="false" sslProtocol="TLS" />
[root@localhost ~]# mv jdk1.5.0_19 /usr/local/
[root@localhost local]# ln -s jdk1.5.0_19 jdk
下面是配置路径:
[root@localhost local]# vi /etc/profile
在文件的最后加入:
[Unknown]: suzhou
What is the two-letter country code for this unit?
[Unknown]: cn
Is CN=liu, OU=bea, O=bea, L=suzhou, ST=suzhou, C=cn correct?
catalina-tasks.xml digest.sh setclasspath.bat startup.sh tool-wrapper.bat
commons-daemon.jar jkstatus-tasks.xml setclasspath.sh tomcat5.exe tool-wrapper.sh
[root@localhost tomcat5.5]# ls
bin common conf LICENSE logs NOTICE RELEASE-NOTES RUNNING.txt server shared temp webapps work
linux-Apache 配置
Apache 配置一、安装Apache下载地址:/1. 安装Apache# tar zxvf httpd-2.2.11.tar.gz# cd httpd-2.2.11# ./configure --prefix=/usr/local/apache --enable-so//编译时加上加载模块参数--enable-so# make# make install2. 配置系统启动时自动启动Apache服务。
# vi /etc/rc.d/rc.local//在rc.local上加入一行/usr/local/apache/bin/apachectl –k start。
二、配置Apache1. 修改httpd.conf文件# vi /usr/local/apache/conf/httpd.conf1)设置根目录的路径根目录是指Apache存放配置文件和日志文件的目录,配置参数为ServerRoot,默认位于“/u sr/local/apache”。
命令如下:2)设置监听IP地址及端口号默认侦听本机所有IP地址的TCP80端口,命令如下:Listen 80用户也可以按自己的需求,使用多个Listen语句在多个地址和端口上侦听客户端请求。
比如:Listen 192.168.99.9:80Linsten 172.16.0.20:80803)设置系统管理员E-m ail使用ServerAdmin参数设置管理员E-m ail,比如管理员的Email地址为root@guoxuemin. cn:4)设置服务器主机的名称参数ServerName用来设置服务器的主机名称,如果没有域名则填入服务器的IP地址,比如服务器的IP地址为192.168.99.9:5)设置主目录的路径用户可以使用参数Document Root配置服务器主目录默认路径,比如,主目录路径为:6)设置默认文件Apache的默认文件名为index.ht ml,可以使用Directory Index参数来配置,比如,将ind ex.php设置为默认文件名:7)测试:打开浏览器,输入地址:http://192.168.99.9,可以打开站点了:2. 配置目录权限使用<Directory 目录路径>和</Directory>设置目录的权限。
CentOS linux下安装和配置Apache+SVN(用浏览器http方式访问SVN目录)

CentOS linux下安装和配置Apache+SVN(用浏览器http方式访问SVN目录)在CentOS linux下安装SVN,我们可以进行以下步骤:第一步:安装CentOS Linux操作系统,并在CentOS安装进行的同时,自定义安装这一步,一定要勾选Subversion(在“开发工具”里)和Web服务器(Apache)。
我用的是CentOS 6.4版本,只需要安装DVD1这个iso文件即可。
这个DVD文件中有我们下面用到的许多配置文件和模块文件,像mod_dav_svn等文件,都不需要用yum 命令进行额外下载安装(光盘中的文件的版本都是进行严格匹配的)。
第一次启动CentOS时,你就可以运行命令svn --version,查看是否提示SVN版本信息。
[root@svn ~]# svn --versionsvn,版本1.6.11 (r934486)编译于 Jun 232012,00:44:03版权所有 (C) 2000-2009 CollabNet。
Subversion 是开放源代码软件,请参阅 / 站点。
此产品包含由 CollabNet(/) 开发的软件。
可使用以下的版本库访问模块:* ra_neon : 通过 WebDAV 协议使用 neon 访问版本库的模块。
-处理“http”方案-处理“https”方案* ra_svn : 使用 svn 网络协议访问版本库的模块。
-使用 Cyrus SASL 认证-处理“svn”方案* ra_local : 访问本地磁盘的版本库模块。
- 处理“file”方案【准备工作】1.关闭防火墙、做好网络配置。
此时,我们要关闭防火墙,执行命令service iptables stop。
同时执行命令setup,选择“网络配置”,去掉DHCP,设置192.168.2.20(客户端也在192.168.2.x同一个网段内),子网掩码255.255.255.0。
Linux网络操作系统项目教程项目13配置与管理Apache服务器ppt课件
③ 让防火墙放行http服务,重启httpd服务。
[root@RHEL7-1 ~]# firewall-cmd --permanent --add-service=http[root@RHEL7-1 ~]# firewall-cmd --reload[root@RHEL7-1 ~]# firewall-cmd --list-all
图13-4 Apache服务器运行正常
任务2 认识Apache服务器的配置文件
在Linux系统中配置服务,其实就是修改服务的配置文件,httpd服务程序的主要配置文件及存放位置如表13-1所示。
Apache服务器的主配置文件是httpd.conf,该文件通常存放在/etc/httpd/conf目录下。文件看起来很复杂,其实很多是注释内容。本节先作大略介绍,后面的章节将给出实例,非常容易理解。
HTTP(Hypertext Transfer Protocol,超文本传输协议)可以算得上是目前国际互联网基础上的一个重要组成部分。而Apache、IIS服务器是HTTP协议的服务器软件,微软的Internet Explorer和Mozilla的Firefox则是HTTP协议的客户端实现。
(2)更改当前的SELinux值,后面可以跟Enforcing、Permissive或者1、0。[root@RHEL7-1 ~]# setenforce 0[root@RHEL7-1 ~]# getenforcePermissive
13.2.3 子任务3 测试httpd服务是否安装成功
启动Apache服务器,并设置开机自动加载Apache服务。[root@RHEL7-1 ~]# systemctl start httpd[root@RHEL7-1 ~]# systemctl enable httpd[root@RHEL7-1 ~]# firefox http://127.0.0.1如果看到图13-4所示的提示信息,则表示Apache服务器已安装成功。也可以在Applications菜单中直接启动firefox,然后输入在地址栏输入http://127.0.0.1,测试是否成功安装。
Linux下Apache,MySQL,PHP安装与配置
LAMP攻略: LAMP环境搭建,Linux下Apache,MySQL,PHP安装与配置之前写过一个red hat 9下的LAMP环境的配置,不过由于版本比较旧,很多不适用了。
所以决定写一个新的LAMP环境搭建与配置教程。
本配置是在CentOS-5.3下httpd-2.2.11.tar.gzMySQL-client-community-5.1.33-0.rhel5.i386.rpmMySQL-devel-community-5.1.33-0.rhel5.i386.rpmMySQL-server-community-5.1.33-0.rhel5.i386.rpmphp-5.2.9.tar.gz以上软件可以直接点击到下载页面下载。
这个配置也基本适用于相应的red hat as 5或fedora版本中的配置/*********************************************** 作者: 我不是鱼* LAMP中文网: * PHP爱好者站: * Email: deng5765@* 博客: /blog**********************************************/首先说明一下,这个需要会员,并且回复才可以完全查看。
不同意就不必再往下看了。
之前的一些配置教程中很多人都没有成功,发现大多问题都是出在本身,虽然对着教程做,但也粗心大意。
这个配置教程时我实践可行的,如果不成功请重新认真检查自己的步骤。
一般情况下,Linux默认安装了Apache。
如果已经安装Apache,那我们就先把它协卸载掉。
怎么知道是否已经安装呢?安装系统是软件都是通过rpm包安装的,所以可以通过命令rpm -qa | grep httpd-qa是指列出所以安装的软件,加上grep httpd,是只列出包含httpd 的所有软件。
如果大家还不熟悉这个命令的话可以记记,下面以及以后的配置都会用到。
Linux——搭建Apache(httpd)服务器
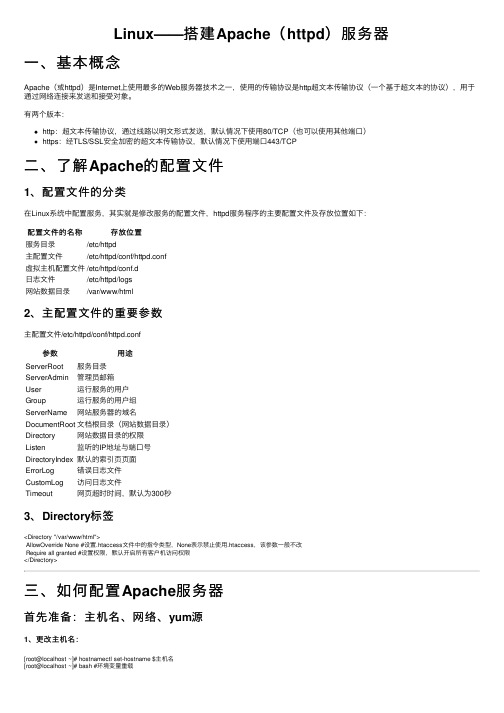
Linux——搭建Apache(httpd)服务器⼀、基本概念Apache(或httpd)是Internet上使⽤最多的Web服务器技术之⼀,使⽤的传输协议是http超⽂本传输协议(⼀个基于超⽂本的协议),⽤于通过⽹络连接来发送和接受对象。
有两个版本:http:超⽂本传输协议,通过线路以明⽂形式发送,默认情况下使⽤80/TCP(也可以使⽤其他端⼝)https:经TLS/SSL安全加密的超⽂本传输协议,默认情况下使⽤端⼝443/TCP⼆、了解Apache的配置⽂件1、配置⽂件的分类在Linux系统中配置服务,其实就是修改服务的配置⽂件,httpd服务程序的主要配置⽂件及存放位置如下:配置⽂件的名称存放位置服务⽬录/etc/httpd主配置⽂件/etc/httpd/conf/httpd.conf虚拟主机配置⽂件/etc/httpd/conf.d⽇志⽂件/etc/httpd/logs⽹站数据⽬录/var/www/html2、主配置⽂件的重要参数主配置⽂件/etc/httpd/conf/httpd.conf参数⽤途ServerRoot服务⽬录ServerAdmin管理员邮箱User运⾏服务的⽤户Group运⾏服务的⽤户组ServerName⽹站服务器的域名DocumentRoot⽂档根⽬录(⽹站数据⽬录)Directory⽹站数据⽬录的权限Listen监听的IP地址与端⼝号DirectoryIndex默认的索引页页⾯ErrorLog错误⽇志⽂件CustomLog访问⽇志⽂件Timeout⽹页超时时间,默认为300秒3、Directory标签<Directory "/var/www/html">AllowOverride None #设置.htaccess⽂件中的指令类型,None表⽰禁⽌使⽤.htaccess,该参数⼀般不改Require all granted #设置权限,默认开启所有客户机访问权限</Directory>三、如何配置Apache服务器⾸先准备:主机名、⽹络、yum源1、更改主机名:[root@localhost ~]# hostnamectl set-hostname $主机名[root@localhost ~]# bash #环境变量重载2、配置⽹络(1)虚拟交换机、⽹络适配器选择仅主机模式,并且配置为192.168.100.0⽹段;(2)编辑⽹络配置⽂件:[root@localhost ~]# vim /etc/sysconfig/network-scripts/ifcfg-ens33修改: BOOTPROTO=static #改为静态IP地址ONBOOT=yes #改为开机⾃启IPADDR=192.168.100.10PREFIX=24 或者 NETMASK=255.255.255.0(3)重启⽹络服务:[root@localhost ~]# systemctl restart network3、配置yum源(1)先在VMware⾥⾯把系统镜像⽂件连接到虚拟机的光驱上;(2)挂载光驱⾥的镜像:[root@localhost ~]# mount /dev/cdrom /media(3)修改yum源配置⽂件:[root@localhost ~]# vim /etc/yum.repos.d/local.repo[rhel]name=rhelbaseurl=file:///mediaenabled=1gpgcheck=0(4)清空yum源缓存信息:[root@localhost ~]# yum clean all(5)检索当前yum源信息:[root@localhost ~]# yum repolist任务⼀:配置简单的httpd服务1、安装httpd服务[root@server ~]# yum -y install httpd2、启动httpd服务[root@server ~]# systemctl restart httpd[root@server ~]# systemctl enable httpd3、配置防⽕墙[root@server ~]# firewall-cmd --permanent --add-service=http[root@server ~]# firewall-cmd --reload4、关闭SELinux[root@server ~]# setenforce 05、客户端测试[root@client ~]# firefox http://IP地址或者 curl http://IP地址任务⼆:配置基于⽤户的个⼈⽹站注意:该⽤户必须在Linux系统中存在1、新建⼀个⽤户(⽹站基于该⽤户)[root@server ~]# useradd user0[root@server ~]# passwd user02、修改⽤户的家⽬录权限,使其他⽤户具有读取和执⾏的权限[root@server ~]# chmod -R 705 /home/user03、创建存放⽤户个⼈主页空间的⽬录,写user0的⽹页⽂件[root@server ~]# mkdir /home/user0/public_html[root@server ~]# cd /home/user0/public_html[root@server ~]# echo "this is user0's web">>index.html4、修改基于⽤户的httpd配置⽂件[root@server ~]# vim /etc/httpd/conf.d/userdir.conf修改: UserDir enabled #开启,表⽰让httpd服务程序开启个⼈⽤户主页功能UserDir public_html #去注释,UserDir参数表⽰⽹站数据在⽤户家⽬录中的保存⽬录名称5、配置防⽕墙(同上)[root@server ~]# firewall-cmd --permanent --add-service=http[root@server ~]# firewall-cmd --reload6、修改selinux权限[root@server ~]# getsebool -a|grep home[root@server ~]# setsebool httpd_enable_homedirs on7、重启服务[root@server ~]# systemctl restart httpd8、客户端测试[root@client ~]# firefox http://IP地址/~username 或者curl http://IP地址/~username任务三:配置基于域名访问的虚拟主机1、新建虚拟主机的⽹页⽂件[root@server ~]# mkdir /www/one /www/two[root@server ~]# cd /www/one[root@server ~]# echo "this is a web for virtual host one">>index.html[root@server ~]# cd /www/two[root@server ~]# echo "this is a web for virtual host two">>index.html[root@server ~]# chmod o+x /www2、配置虚拟主机的⽂件[root@server ~]# cd /etc/httpd/conf.d[root@server ~]# vim vhost.conf<Directory /www/one> #设置⽹站⽬录权限Require all granted #开启所有客户机访问权限</Directory><VirtualHost 192.168.100.10> #虚拟主机ServerName #定义服务器名称DocumentRoot /www/one/ #⽹站数据⽬录</VirtualHost><Directory /www/two>Require all granted</Directory><VirtualHost 192.168.100.11>ServerName DocumentRoot /www/two/</VirtualHost>3、做域名解析⽂件server/client[root@server ~]# vim /etc/hosts192.168.100.10 192.168.100.11 4、配置防⽕墙(同上)[root@server ~]# firewall-cmd --permanent --add-service=http[root@server ~]# firewall-cmd --reload5、修改虚拟主机⽹页⽂件的selinux上下⽂类型[root@server ~]# semanage fcontext -a -t httpd_sys_content_t '/www(/.*)?'[root@server ~]# restorecon -RFv /www6、重启服务[root@server ~]# systemctl restart httpd任务四:配置基于端⼝访问的虚拟主机1——新建虚拟主机的⽹页⽂件[root@server ~]# mkdir /www/8088[root@server ~]# echo "this is a web for port 8088 ">>index.html[root@server ~]# mkdir /www/8089[root@server ~]# echo "this is a web for port 8089 ">>index.html2——配置虚拟主机的⽂件[root@server ~]# cd /etc/httpd/conf.d[root@server ~]# vim vhost.conf<Directory /www/8088/>Require all granted</Directory><virtualHost 192.168.100.10:8088>DocumentRoot /www/8088/</virtualHost><Directory /www/8089/>Require all granted</Directory><virtualHost 192.168.100.10:8089>DocumentRoot /www/8089/</virtualHost>3、配置防⽕墙[root@server ~]# firewall-cmd --permanent --zone=public --add-port=8089/tcp[root@server ~]# firewall-cmd --permanent --zone=public --add-port=8088/tcp[root@server ~]# firewall-cmd --reload4、关闭SELinux[root@server ~]# setenforce 05、重启服务[root@server ~]# systemctl restart httpd6、使⽤浏览器访问任务五:配置基于TLS加密的虚拟主机注意:经TLS/SSL安全加密的超⽂本传输协议,默认情况下使⽤端⼝443/TCP 1、安装TLS加密软件,⽹站内容不⽤明⽂传输[root@server ~]# yum -y install mod_ssl2、⽣成密钥[root@server ~]# openssl genrsa >tlsweb.key3、⽣成证书请求⽂件[root@server ~]# openssl req -new -key tlsweb.key > tlsweb.csr4、⽣成证书⽂件[root@server ~]# openssl req -x509 -days 365 -key tlsweb.key -in tlsweb.csr >tlsweb.crt5、修改ssl.conf配置⽂件[root@server ~]# vim /etc/httpd/conf.d/ssl.confSSLCertificateFile /etc/pki/tls/certs/tlsweb.crtSSLCertificateKeyFile /etc/pki/tls/private/tlsweb.key6、把证书⽂件拷贝到ssl.conf配置⽂件⾥的对应路径下⾯[root@server ~]# cp tlsweb.crt /etc/pki/tls/certs/7、把秘钥⽂件拷贝到ssl.conf配置⽂件⾥的对应路径下⾯[root@server ~]# cp tlsweb.key /etc/pki/tls/private/。
Linux下导入SSL证书

回车创建新文件,
MakingCA certificate ...
Generatinga 1024 bit RSA private key
....++++++
..++++++
writingnew private key to './demoCA/private/./cakey.pem'
[root@localhost openssl-1.0.1e]#ln –s /usr/local/ssl/bin/openssl/usr/bin/openssl
[root@localhost openssl-1.0.1e]#ln –s/usr/local/ssl/include/openssl /usr/include/openssl
一、安装/升级OpenSSL
首先确认是否已安装过openssl
[root@openssl-1.0.1e]#openssl version -a
如果已经安装过,则根据需要版本看是否需要升级,如果没有安装过,则使用全新安装方法进行安装。
1、全新安装
[root@localhost media]#wget /source/openssl-1.0.1e.tar.gz
c、生成服务器公钥(证书)
[root@localhost ssl.crt]#openssl ca -in server.csr -days 18250 -out server.crt -cert ca.crt -keyfile ca.key
Apache 配置支持HTTPS的SSL证书-生成CA证书

Apache 配置支持HTTPS的SSL证书在设置Apache + SSL之前, 需要做:安装Apache, 下载安装Apache时请下载带有ssl版本的Apache安装程序.并且ssl需要的文件在如下的位置:[Apache安装目录]/modules/ mod_ssl.so[Apache安装目录]/bin/ openssl.exe, libeay32.dll, ssleay32.dll, f [Apache安装目录]/conf/ f创建SSL证书(注意,我下载的是PHPStudy里面自带了openssl,但是bin目录下没有f,需要将conf下的f拷贝一份到bin目录下,但总体原理一样)一.生成一个带CA(Certificate Authority)授权的证书打开CMD,进入到Apache安装目录下的bin目录下:步骤一:执行命令,生成私钥:openssl genrsa -out tian_server.key 2048(RSA密钥对的默认长度是1024,取值是2的整数次方,并且密钥长度约长,安全性相对会高点)。
完成密钥server.key生产完毕后进行步骤二操作。
步骤二:配置f请确保以下数据这里所要求的值default_md = md5 #默认是default,会触发[default digest message is not supported ]req_extensions = v3_req #默认签名被注释了[ v3_req ]basicConstraints = CA:FALSEkeyUsage = nonRepudiation, digitalSignature, keyEncipherment subjectAltName = @alt_names #此项不存在,需要添加[ alt_names ] #此项不存在,需要添加,注意DNS.xDNS.1 = #自定义DNS.2 = #自定义DNS.3 = #自定义DNS.4 = #自定义DNS.5 = #自定义DNS.6 = #自定义然后创建目录和文件demoCA/newcerts/private/index.txtindex.txt.attrserial #此文件初始值输入00即可生成Certificate Signing Request文件,用于向CA机构申请证书:openssl req -new -key tian_server.key -out tian_server.csr -config f (如果不加-config f参数的话,常会报Unable to load config info from .../ssl/f)之后就会要求输入一系列的参数:Country Name (2 letter code) [AU]:CN ISO 国家代码(只支持两位字符)State or Province Name (full name) [Some-State]:ZJ 所在省份Locality Name (eg, city) []:HZ 所在城市Organization Name (eg, company): 公司名称Organizational Unit Name (eg, section) []: 组织名称Common Name (eg, YOUR name) []: 申请证书的域名(建议和httpd.conf中serverName必须一致)Email Address []:admin@ 管理员邮箱Please enter the following 'extra' attributes to be sent with your certificate re quest A challenge password []: 交换密钥An optional company name []:注:Common Name建议和httpd.conf中serverName必须一致,或者与f 中的alt_names中的一个域名保持一致,否则证书有可能申请不到,并且启动apache 时错误提示为:server RSA certificate CommonName (CN) `Kedou' does NOT match server name!?)我们得到CSR之后,第三方CA机构申请通过后,会把生成好下发给你,如果你选择了第三方机构,可以跳过步骤三和四,直接到步骤五。
linux apache 配置 http和https 访问

linux apache 配置http和https 访问1、安装openssl:#tar zxvf openssl-0.9.81.tar.gz#cd openssl-0.9.81#./config#make#make install2、安装apache:#tar zxvf httpd-2.0.63.tar.gz#cd httpd-2.0.63#./configure --prefix=/usr/local/apache/httpd --enable-ssl=static --with-ssl=/usr/local/ssl#make#make install此步骤在/apache/httpd目录中安装httpd服务(通过参数--prefix指定),同时使用--with-ssl指定刚才所安装OpenSSL的路径,用于将mod_ssl静态的编译到httpd服务中。
修改3、生成证书:openssl genrsa 1024 > server.keyopenssl req -new -key server.key > server.csr填写相关信息:Country Name (2 letter code) [GB]:CNState or Province Name (full name) [Berkshire]:BEIJINGLocality Name (eg, city) [Newbury]:BEIIJINGOrganization Name (eg, company) [My Company Ltd]:TESTOrganizational Unit Name (eg, section) []:TESTCommon Name (eg, your name or your server's hostname) []:TESTEmail Address []:TEST@openssl req -x509 -days 365 -key server.key -in server.csr > server.crt4、配置ssl:修改conf/httpd.conf文件将httpd.conf 中的Include conf/extra/httpd-ssl.conf 打开修改conf/extra/httpd-ssl.conf文件找到SSLCertificateFile 和SSLCertificateKeyFile 项将上面生成的测试证书路径填写完整5、配置域名:修改conf/httpd.conf文件将httpd.conf 中的Include conf/extra/httpd-vhost.conf 打开修改conf/extra/httpd-vhost.conf 文件配置需要访问的域名注:由于证书为我们自己测试创建,如有需要应到指定公司去认证。
详解在Ubuntu上的Apache配置SSL(https证书)的正确姿势

详解在Ubuntu上的Apache配置SSL(https证书)的正确姿势⾸先看⼀下阿⾥云官⽅的教程:⽂件说明:1. 证书⽂件xxxxxx.pem,包含两段内容,请不要删除任何⼀段内容。
2. 如果是证书系统创建的CSR,还包含:证书私钥⽂件xxxxxxxx.key、证书公钥⽂件public.pem、证书链⽂件chain.pem。
( 1 ) 在Apache的安装⽬录下创建cert⽬录,并且将下载的全部⽂件拷贝到cert⽬录中。
如果申请证书时是⾃⼰创建的CSR⽂件,请将对应的私钥⽂件放到cert⽬录下并且命名为xxxxxxxx.key;( 2 ) 打开 apache 安装⽬录下 conf ⽬录中的 httpd.conf ⽂件,找到以下内容并去掉“#”:#LoadModule ssl_module modules/mod_ssl.so (如果找不到请确认是否编译过 openssl 插件)#Include conf/extra/httpd-ssl.conf( 3 ) 打开 apache 安装⽬录下 conf/extra/httpd-ssl.conf ⽂件 (也可能是conf.d/ssl.conf,与操作系统及安装⽅式有关),在配置⽂件中查找以下配置语句:# 添加 SSL 协议⽀持协议,去掉不安全的协议SSLProtocol all -SSLv2 -SSLv3# 修改加密套件如下SSLCipherSuite HIGH:!RC4:!MD5:!aNULL:!eNULL:!NULL:!DH:!EDH:!EXP:+MEDIUMSSLHonorCipherOrder on# 证书公钥配置SSLCertificateFile cert/public.pem# 证书私钥配置SSLCertificateKeyFile cert/xxxxxxx.key# 证书链配置,如果该属性开头有 '#'字符,请删除掉SSLCertificateChainFile cert/chain.pem( 4 ) 重启 Apache。
linux下安装apache的及反向代理配置完整过程
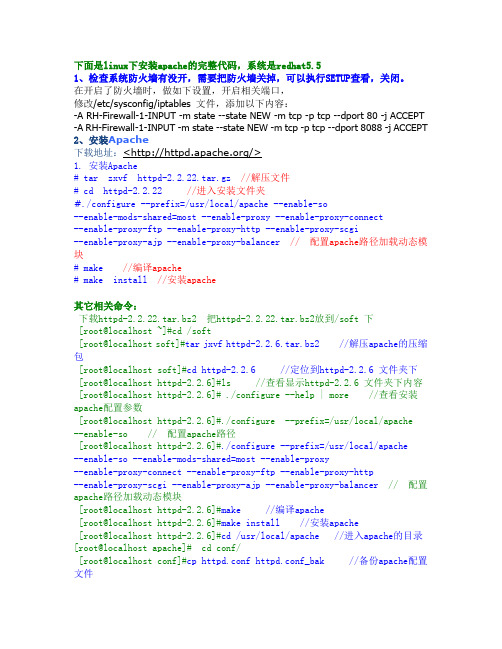
下面是linux下安装apache的完整代码,系统是redhat5.51、检查系统防火墙有没开,需要把防火墙关掉,可以执行SETUP查看,关闭。
在开启了防火墙时,做如下设置,开启相关端口,修改/etc/sysconfig/iptables 文件,添加以下内容:-A RH-Firewall-1-INPUT -m state --state NEW -m tcp -p tcp --dport 80 -j ACCEPT -A RH-Firewall-1-INPUT -m state --state NEW -m tcp -p tcp --dport 8088 -j ACCEPT 2、安装Apache下载地址:</>1. 安装Apache# tar zxvf httpd-2.2.22.tar.gz //解压文件# cd httpd-2.2.22//进入安装文件夹#./configure --prefix=/usr/local/apache --enable-so--enable-mods-shared=most --enable-proxy --enable-proxy-connect--enable-proxy-ftp --enable-proxy-http --enable-proxy-scgi--enable-proxy-ajp --enable-proxy-balancer // 配置apache路径加载动态模块# make //编译apache# make install//安装apache其它相关命令:下载httpd-2.2.22.tar.bz2 把httpd-2.2.22.tar.bz2放到/soft 下[root@localhost ~]#cd /soft[root@localhost soft]#tar jxvf httpd-2.2.6.tar.bz2 //解压apache的压缩包[root@localhost soft]#cd httpd-2.2.6 //定位到httpd-2.2.6 文件夹下[root@localhost httpd-2.2.6]#ls //查看显示httpd-2.2.6 文件夹下内容 [root@localhost httpd-2.2.6]# ./configure --help | more //查看安装apache配置参数[root@localhost httpd-2.2.6]#./configure --prefix=/usr/local/apache --enable-so // 配置apache路径[root@localhost httpd-2.2.6]#./configure --prefix=/usr/local/apache--enable-so --enable-mods-shared=most --enable-proxy--enable-proxy-connect --enable-proxy-ftp --enable-proxy-http--enable-proxy-scgi --enable-proxy-ajp --enable-proxy-balancer// 配置apache路径加载动态模块[root@localhost httpd-2.2.6]#make //编译apache[root@localhost httpd-2.2.6]#make install //安装apache[root@localhost httpd-2.2.6]#cd /usr/local/apache //进入apache的目录[root@localhost apache]# cd conf/[root@localhost conf]#cp httpd.conf httpd.conf_bak //备份apache配置文件[root@localhost conf]#chkconfig --list httpd //查看httpd服务是否已存在[root@localhost conf]#chkconfig httpd off //关闭系统自带了httpd的服务,如果存在httpd服务[root@localhost conf]#service httpd status //查看自带httpd服务状态[root@localhost conf]# /usr/local/apache/bin/apachectl -k start//linux启动apache命令[root@localhost conf]# /usr/local/apache/bin/apachectl -k stop //linux 停止apache命令[root@localhost conf]#netstat -an | grep :80 //查看linux80端口是否开启[root@localhost conf]#ps -aux | grep httpd //linux下查看apache进程[root@localhost conf]#cd ../..[root@localhost local]#cp /usr/local/apache/bin/apachectl/etc/rc.d/init.d/apache //拷贝apache启动脚本[root@localhost local]#vi /etc/rc.d/init.d/apache // 这里是编辑apache 启动脚本在开头的#!/bin/sh 下面加上#chkconfig: 2345 85 15[root@localhost local]#chkconfig --add apache //添加apache服务[root@localhost local]#chkconfig --list apache //列出apache服务[root@localhost local]#service apache stop //停止apache服务[root@localhost local]#netstat -an | grep :80 //查看linux的80端口是否开启[root@localhost local]#ps -aux | grep httpd //查看是否存在httpd服务,若果之前自带httpd服务启动的话会导致新添加的apache服务启动失败[root@localhost local]#service apache start //启动apache服务打开你的服务器ip地址,看看是否出现了tomcat的默认首页,如果出现的话,那么恭喜你linux下安装apache已经成功了3、修改httpd.conf文件vi /usr/local/apache/conf/httpd.conf以下为httpd.conf内容:# This is the main Apache HTTP server configuration file. It contains the # configuration directives that give the server its instructions.# See <URL:/docs/2.2> for detailed information.# In particular, see# <URL:/docs/2.2/mod/directives.html># for a discussion of each configuration directive.## Do NOT simply read the instructions in here without understanding# what they do. They're here only as hints or reminders. If you are unsure # consult the online docs. You have been warned.## Configuration and logfile names: If the filenames you specify for many # of the server's control files begin with "/" (or "drive:/" for Win32), the # server will use that explicit path. If the filenames do *not* begin # with "/", the value of ServerRoot is prepended -- so "logs/foo_log"# with ServerRoot set to "/usr/local/apache" will be interpreted by the # server as "/usr/local/apache/logs/foo_log".## ServerRoot: The top of the directory tree under which the server's# configuration, error, and log files are kept.## Do not add a slash at the end of the directory path. If you point# ServerRoot at a non-local disk, be sure to point the LockFile directive # at a local disk. If you wish to share the same ServerRoot for multiple # httpd daemons, you will need to change at least LockFile and PidFile. #ServerRoot "/usr/local/apache"## Listen: Allows you to bind Apache to specific IP addresses and/or# ports, instead of the default. See also the <VirtualHost># directive.## Change this to Listen on specific IP addresses as shown below to# prevent Apache from glomming onto all bound IP addresses.##Listen 12.34.56.78:80Listen 80Listen 8088 --增加监听端口## Dynamic Shared Object (DSO) Support## To be able to use the functionality of a module which was built as a DSO you# have to place corresponding `LoadModule' lines at this location so the # directives contained in it are actually available _before_ they are used.# Statically compiled modules (those listed by `httpd -l') do not need# to be loaded here.## Example:# LoadModule foo_module modules/mod_foo.so#LoadModule authn_file_module modules/mod_authn_file.so --加载的模块,正确安装完会自动加载以下模块LoadModule authn_dbm_module modules/mod_authn_dbm.soLoadModule authn_anon_module modules/mod_authn_anon.soLoadModule authn_dbd_module modules/mod_authn_dbd.soLoadModule authn_default_module modules/mod_authn_default.soLoadModule authz_host_module modules/mod_authz_host.soLoadModule authz_groupfile_module modules/mod_authz_groupfile.so LoadModule authz_user_module modules/mod_authz_user.soLoadModule authz_dbm_module modules/mod_authz_dbm.soLoadModule authz_owner_module modules/mod_authz_owner.soLoadModule authz_default_module modules/mod_authz_default.soLoadModule auth_basic_module modules/mod_auth_basic.soLoadModule auth_digest_module modules/mod_auth_digest.soLoadModule dbd_module modules/mod_dbd.soLoadModule dumpio_module modules/mod_dumpio.soLoadModule reqtimeout_module modules/mod_reqtimeout.soLoadModule ext_filter_module modules/mod_ext_filter.soLoadModule include_module modules/mod_include.soLoadModule filter_module modules/mod_filter.soLoadModule substitute_module modules/mod_substitute.soLoadModule deflate_module modules/mod_deflate.soLoadModule log_config_module modules/mod_log_config.soLoadModule logio_module modules/mod_logio.soLoadModule env_module modules/mod_env.soLoadModule expires_module modules/mod_expires.soLoadModule headers_module modules/mod_headers.soLoadModule ident_module modules/mod_ident.soLoadModule setenvif_module modules/mod_setenvif.soLoadModule version_module modules/mod_version.soLoadModule proxy_module modules/mod_proxy.soLoadModule proxy_connect_module modules/mod_proxy_connect.soLoadModule proxy_ftp_module modules/mod_proxy_ftp.soLoadModule proxy_http_module modules/mod_proxy_http.soLoadModule proxy_scgi_module modules/mod_proxy_scgi.soLoadModule proxy_ajp_module modules/mod_proxy_ajp.soLoadModule proxy_balancer_module modules/mod_proxy_balancer.so LoadModule mime_module modules/mod_mime.soLoadModule dav_module modules/mod_dav.soLoadModule status_module modules/mod_status.soLoadModule autoindex_module modules/mod_autoindex.soLoadModule asis_module modules/mod_asis.soLoadModule info_module modules/mod_info.soLoadModule cgi_module modules/mod_cgi.soLoadModule dav_fs_module modules/mod_dav_fs.soLoadModule vhost_alias_module modules/mod_vhost_alias.soLoadModule negotiation_module modules/mod_negotiation.soLoadModule dir_module modules/mod_dir.soLoadModule imagemap_module modules/mod_imagemap.soLoadModule actions_module modules/mod_actions.soLoadModule speling_module modules/mod_speling.soLoadModule userdir_module modules/mod_userdir.soLoadModule alias_module modules/mod_alias.soLoadModule rewrite_module modules/mod_rewrite.soTimeout 300 --新增的配置参数KeepAlive OnMaxKeepAliveRequests 1000KeepAliveTimeout 15UseCanonicalName OffAccessFileName .htaccessServerTokens FullServerSignature OnHostnameLookups Off<IfModule !mpm_netware_module><IfModule !mpm_winnt_module>## If you wish httpd to run as a different user or group, you must run # httpd as root initially and it will switch.## User/Group: The name (or #number) of the user/group to run httpd as. # It is usually good practice to create a dedicated user and group for # running httpd, as with most system services.#User daemonGroup daemon</IfModule></IfModule>----------------------------------以下内容是新增的关键参数<IfModule mpm_prefork_module>StartServers 40MinSpareServers 40MaxSpareServers 80MaxClients 256MaxRequestsPerChild 10000</IfModule><IfModule mpm_worker_module>StartServers 40MaxClients 2000MinSpareThreads 100MaxSpareThreads 300ThreadsPerChild 200MaxRequestsPerChild 0</IfModule>ProxyRequests OffRewriteEngine onRewriteCond %{REQUEST_METHOD} ^(TRACE|TRACK)RewriteRule .* - [F]RewriteEngine onRewriteCond %{HTTP:range} !(^bytes=[^,]+(,[^,]+){0,4}$|^$)RewriteRule .* - [F]TraceEnable off#NameVirtualHost 10.46.85.137:9080#<VirtualHost 10.46.85.137:9080>#ServerName 10.46.85.137:9080#ProxyPass /ponApp/ http://10.209.122.40:7001/xponApp/#ProxyPassReverse /ponApp/ http://10.209.122.40:7001/xponApp/#</VirtualHost>NameVirtualHost 10.46.85.137:8088<VirtualHost 10.46.85.137:8088>ServerName kuangdai --kuangdai LINUX系统的主机名ProxyPass /xponApp/ http://10.209.122.40:7001/xponApp/ ProxyPassReverse /xponApp/ http://10.209.122.40:7001/xponApp/启动服务报错--/etc/hosts 增加127.0.0.1 localhost.localdomainlocalhost ”kuangdai“主机名</VirtualHost><Proxy *>--配置反向代理的访问权限Order deny,allowAllow from all</Proxy>-----------------------------以上内容是新增的关键参数# 'Main' server configuration## The directives in this section set up the values used by the 'main'# server, which responds to any requests that aren't handled by a# <VirtualHost> definition. These values also provide defaults for# any <VirtualHost> containers you may define later in the file.## All of these directives may appear inside <VirtualHost> containers,# in which case these default settings will be overridden for the# virtual host being defined.### ServerAdmin: Your address, where problems with the server should be# e-mailed. This address appears on some server-generated pages, such # as error documents. e.g. admin@#ServerAdmin you@## ServerName gives the name and port that the server uses to identify itself.# This can often be determined automatically, but we recommend you specify # it explicitly to prevent problems during startup.## If your host doesn't have a registered DNS name, enter its IP address here. #ServerName 127.0.0.1:80 --这个ServerName可随意配置一定去掉前面### DocumentRoot: The directory out of which you will serve your# documents. By default, all requests are taken from this directory, but # symbolic links and aliases may be used to point to other locations.#DocumentRoot "/usr/local/apache/htdocs"## Each directory to which Apache has access can be configured with respect # to which services and features are allowed and/or disabled in that# directory (and its subdirectories).## First, we configure the "default" to be a very restrictive set of# features.#<Directory />Options FollowSymLinksAllowOverride NoneOrder deny,allowDeny from all</Directory>## Note that from this point forward you must specifically allow# particular features to be enabled - so if something's not working as # you might expect, make sure that you have specifically enabled it# below.### This should be changed to whatever you set DocumentRoot to.#<Directory "/usr/local/apache/htdocs">## Possible values for the Options directive are "None", "All",# or any combination of:# Indexes Includes FollowSymLinks SymLinksifOwnerMatch ExecCGI MultiViews## Note that "MultiViews" must be named *explicitly* --- "Options All" # doesn't give it to you.## The Options directive is both complicated and important. Please see # /docs/2.2/mod/core.html#options# for more information.#Options Indexes FollowSymLinks## AllowOverride controls what directives may be placed in .htaccess files.# It can be "All", "None", or any combination of the keywords:# Options FileInfo AuthConfig Limit#AllowOverride None## Controls who can get stuff from this server.#Order allow,denyAllow from all</Directory>## DirectoryIndex: sets the file that Apache will serve if a directory# is requested.#<IfModule dir_module>DirectoryIndex index.html</IfModule>## The following lines prevent .htaccess and .htpasswd files from being # viewed by Web clients.#<FilesMatch "^\.ht">Order allow,denyDeny from allSatisfy All</FilesMatch>## ErrorLog: The location of the error log file.# If you do not specify an ErrorLog directive within a <VirtualHost># container, error messages relating to that virtual host will be# logged here. If you *do* define an error logfile for a <VirtualHost> # container, that host's errors will be logged there and not here.#ErrorLog "logs/error_log"## LogLevel: Control the number of messages logged to the error_log.# Possible values include: debug, info, notice, warn, error, crit,# alert, emerg.#LogLevel warn<IfModule log_config_module>## The following directives define some format nicknames for use with # a CustomLog directive (see below).#LogFormat "%h %l %u %t \"%r\" %>s %b \"%{Referer}i\" \"%{User-Agent}i\"" combinedLogFormat "%h %l %u %t \"%r\" %>s %b" common<IfModule logio_module># You need to enable mod_logio.c to use %I and %OLogFormat "%h %l %u %t \"%r\" %>s %b \"%{Referer}i\"\"%{User-Agent}i\" %I %O" combinedio</IfModule>## The location and format of the access logfile (Common Logfile Format). # If you do not define any access logfiles within a <VirtualHost># container, they will be logged here. Contrariwise, if you *do*# define per-<VirtualHost> access logfiles, transactions will be# logged therein and *not* in this file.#CustomLog "logs/access_log" common## If you prefer a logfile with access, agent, and referer information # (Combined Logfile Format) you can use the following directive.##CustomLog "logs/access_log" combined</IfModule><IfModule alias_module>## Redirect: Allows you to tell clients about documents that used to # exist in your server's namespace, but do not anymore. The client # will make a new request for the document at its new location.# Example:# Redirect permanent /foo /bar## Alias: Maps web paths into filesystem paths and is used to# access content that does not live under the DocumentRoot.# Example:# Alias /webpath /full/filesystem/path## If you include a trailing / on /webpath then the server will# require it to be present in the URL. You will also likely# need to provide a <Directory> section to allow access to# the filesystem path.## ScriptAlias: This controls which directories contain server scripts. # ScriptAliases are essentially the same as Aliases, except that# documents in the target directory are treated as applications and # run by the server when requested rather than as documents sent to the # client. The same rules about trailing "/" apply to ScriptAlias# directives as to Alias.#ScriptAlias /cgi-bin/ "/usr/local/apache/cgi-bin/"</IfModule><IfModule cgid_module>## ScriptSock: On threaded servers, designate the path to the UNIX# socket used to communicate with the CGI daemon of mod_cgid.##Scriptsock logs/cgisock</IfModule>## "/usr/local/apache/cgi-bin" should be changed to whatever your ScriptAliased# CGI directory exists, if you have that configured.#<Directory "/usr/local/apache/cgi-bin">AllowOverride NoneOptions NoneOrder allow,denyAllow from all</Directory>## DefaultType: the default MIME type the server will use for a document # if it cannot otherwise determine one, such as from filename extensions. # If your server contains mostly text or HTML documents, "text/plain" is # a good value. If most of your content is binary, such as applications # or images, you may want to use "application/octet-stream" instead to # keep browsers from trying to display binary files as though they are # text.#DefaultType text/plain<IfModule mime_module>## TypesConfig points to the file containing the list of mappings from # filename extension to MIME-type.#TypesConfig conf/mime.types## AddType allows you to add to or override the MIME configuration# file specified in TypesConfig for specific file types.##AddType application/x-gzip .tgz## AddEncoding allows you to have certain browsers uncompress# information on the fly. Note: Not all browsers support this.##AddEncoding x-compress .Z#AddEncoding x-gzip .gz .tgz## If the AddEncoding directives above are commented-out, then you# probably should define those extensions to indicate media types: #AddType application/x-compress .ZAddType application/x-gzip .gz .tgz## AddHandler allows you to map certain file extensions to "handlers": # actions unrelated to filetype. These can be either built into the server # or added with the Action directive (see below)## To use CGI scripts outside of ScriptAliased directories:# (You will also need to add "ExecCGI" to the "Options" directive.) ##AddHandler cgi-script .cgi# For type maps (negotiated resources):#AddHandler type-map var## Filters allow you to process content before it is sent to the client. ## To parse .shtml files for server-side includes (SSI):# (You will also need to add "Includes" to the "Options" directive.) ##AddType text/html .shtml#AddOutputFilter INCLUDES .shtml</IfModule>## The mod_mime_magic module allows the server to use various hints from the # contents of the file itself to determine its type. The MIMEMagicFile # directive tells the module where the hint definitions are located.##MIMEMagicFile conf/magic## Customizable error responses come in three flavors:# 1) plain text 2) local redirects 3) external redirects## Some examples:#ErrorDocument 500 "The server made a boo boo."#ErrorDocument 404 /missing.html#ErrorDocument 404 "/cgi-bin/missing_handler.pl"#ErrorDocument 402 /subscription_info.html### MaxRanges: Maximum number of Ranges in a request before# returning the entire resource, or one of the special# values 'default', 'none' or 'unlimited'.# Default setting is to accept 200 Ranges.#MaxRanges unlimited## EnableMMAP and EnableSendfile: On systems that support it,# memory-mapping or the sendfile syscall is used to deliver# files. This usually improves server performance, but must# be turned off when serving from networked-mounted# filesystems or if support for these functions is otherwise# broken on your system.##EnableMMAP off#EnableSendfile off# Supplemental configuration## The configuration files in the conf/extra/ directory can be# included to add extra features or to modify the default configuration of # the server, or you may simply copy their contents here and change as# necessary.# Server-pool management (MPM specific)#Include conf/extra/httpd-mpm.conf# Multi-language error messages#Include conf/extra/httpd-multilang-errordoc.conf# Fancy directory listings#Include conf/extra/httpd-autoindex.conf# Language settings#Include conf/extra/httpd-languages.conf# User home directories#Include conf/extra/httpd-userdir.conf# Real-time info on requests and configuration#Include conf/extra/httpd-info.conf# Virtual hosts#Include conf/extra/httpd-vhosts.conf# Local access to the Apache HTTP Server Manual#Include conf/extra/httpd-manual.conf# Distributed authoring and versioning (WebDAV)#Include conf/extra/httpd-dav.conf# Various default settings#Include conf/extra/httpd-default.conf# Secure (SSL/TLS) connections#Include conf/extra/httpd-ssl.conf## Note: The following must must be present to support# starting without SSL on platforms with no /dev/random equivalent # but a statically compiled-in mod_ssl.#<IfModule ssl_module>SSLRandomSeed startup builtinSSLRandomSeed connect builtin </IfModule>。
Apache配置多个https协议(ssl加密)站点

Apache配置多个https协议(ssl加密)站点Apache 配置多个https协议(ssl加密)站点工作中经常会遇到多个站点实现https访问,并指向同一个网页,本文将详解如何在Centos 环境下配置Apache多站点实现HTTPS访问。
准备工作OS:CentOS release 6.8 (Final)Web:Apache安装Apache1、安装Apache[root@node1 ~]# yum install httpd -y2、启动服务[root@node1 ~]# service httpd startStarting httpd: [ OK ][root@node1 ~]#3、修改测试页面[root@node1 ~]# cat /var/www/html/index.html<h1>Apache Test Page~</h1>4、测试访问Apache 配置多个HTTPS站点实现HTTPS访问1、安装SSL模块[root@node1 ~]# yum install mod_ssl -y #mod_ssl模块,是apache的https传输安全ssl支持模块,必须安装2、检测[root@node1 ~]# cd /etc/httpd/modules/[root@node1 modules]# ll | grep ssl-rwxr-xr-x 1 root root 181872 Oct 20 2017 mod_ssl.so3、上传证书文件这里我们可以到各大厂商去申请免费证书,可满足个人网站的需求,如企业网站,建议购买企业收费证书;[root@node1 ~]# cd /etc/httpd/ #证书文件通常也可放到linux的/etc/pki/tls/certs目录下[root@node1 httpd]# mkdir ssl/default[root@node1 httpd]# cd ssl/default[root@node1 default]# rz[root@node1 default]# lltotal 12-rw-r--r-- 1 root root 1683 Apr 13 22:26 1_root_bundle.crt-rw-r--r-- 1 root root 2008 Apr 13 22:26 2_.crt -rw-r--r-- 1 root root 1678 Apr 13 22:26 3_.key [root@node1 default]#4、修改配置[root@node1 ~]# cd /etc/httpd/conf.d/[****************]#lsREADME ssl.conf welcome.conf[****************]#vim ssl.conf #安装mod_ssl模块后,该ssl.conf会自动生成,里面有配置443虚拟主机的案例文件参见附件给出了mod_ssl的原始文件LoadModule ssl_module modules/mod_ssl.soListen 443<VirtualHost *:443>DocumentRoot "/var/www/html"ServerName SSLEngine onSSLCertificateFile/etc/httpd/ssl/default/2_.crtSSLCertificateKeyFile/etc/httpd/ssl/default/3_.keySSLCertificateChainFile/etc/httpd/ssl/default/1_root_bundle.crt</VirtualHost>配置文件参数说明LoadModule 加载SSL模块Listen 监听443端口DocumentRoot 网页目录ServerName 站点域名SSLEngine on 启用SSL功能SSLCertificateFile 证书文件SSLCertificateKeyFile 私钥文件SSLCertificateChainFile 证书链文件5、重启服务[root@node1 ~]# httpd -tSyntax OK可以先试用httpd -t 检测一下配置文件是否正确,然后再重启服务;[root@node1 ~]# service httpd restartStopping httpd: [ OK ]Starting httpd: [ OK ]6、检测端口是否监听[****************]#ss-ntlState Recv-Q Send-Q Local Address:Port Peer Address:PortLISTEN 0 128 *:80 *:*LISTEN 0 128 *:22 *:*LISTEN 0 100 127.0.0.1:25 *:*LISTEN 0 128 *:443 *:*[****************]#7、测试访问建议使用google浏览器进行测试访问,f12查看,会显示“This page is secure (valid HTTPS).”,说明证书配置正确;Apache 配置多个HTTPS站点配置多个HTTPS站点1、上传证书文件[root@node1 ~]# cd /etc/httpd/ssl/[root@node1 ssl]# mkdir web[root@node1 ssl]# cd web/[root@node1 web]# rz2、修改配置文件修改的是ssl.confLoadModule ssl_module modules/mod_ssl.soListen 443NameVirtualHost *:443 #配置多个https站点,该行一定要加入# 第一个虚拟主机<VirtualHost *:443>DocumentRoot "/var/www/html"ServerName SSLEngine onSSLCertificateFile /etc/httpd/ssl/default/2_.crt SSLCertificateKeyFile/etc/httpd/ssl/default/3_.keySSLCertificateChainFile/etc/httpd/ssl/default/1_root_bundle.crt</VirtualHost>#第二个虚拟主机<VirtualHost *:443>DocumentRoot "/var/www/html"ServerName SSLEngine onSSLCertificateFile/etc/httpd/ssl/web/2_.crtSSLCertificateKeyFile/etc/httpd/ssl/web/3_.keySSLCertificateChainFile/etc/httpd/ssl/web/1_root_bundle.crt</VirtualHost>3、重启服务[****************]#servicehttpdrestartStopping httpd: [ OK ]Starting httpd: [ OK ][****************]#4、测试访问Apache 配置多个HTTPS站点Apache 配置多个HTTPS站点到这里,Apache多站点https就实现了~附件1:yum安装mod_ssl模块后生成的配置完成2个https网站的ssl文件/etc/httpd/conf.d/ssl.conf文件:## This is the Apache server configuration file providing SSL support.# It contains the configuration directives to instruct the server how to# serve pages over an https connection. For detailing information about these# directives see <URL:>## Do NOT simply read the instructions in here withoutunderstanding# what they do. They're here only as hints or reminders. If you are unsure# consult the online docs. You have been warned.#LoadModule ssl_module modules/mod_ssl.so## When we also provide SSL we have to listen to the# the HTTPS port in addition.#Listen 443NameVirtualHost *:443#### SSL Global Context#### All SSL configuration in this context applies both to## the main server and all SSL-enabled virtual hosts.### Pass Phrase Dialog:# Configure the pass phrase gathering process.# The filtering dialog program (`builtin' is a internal# terminal dialog) has to provide the pass phrase on stdout.SSLPassPhraseDialog builtin# Inter-Process Session Cache:# Configure the SSL Session Cache: First the mechanism# to use and second the expiring timeout (in seconds).SSLSessionCache shmcb:/var/cache/mod_ssl/scache(51 2000)SSLSessionCacheTimeout 300# Semaphovre:# Configure the path to the mutual exclusion semaphore the# SSL engine uses internally for inter-process synchronization.SSLMutex default# Pseudo Random Number Generator (PRNG):# Configure one or more sources to seed the PRNG of the # SSL library. The seed data should be of good random quality.# WARNING! On some platforms /dev/random blocks if not enough entropy# is available. This means you then cannot use the /dev/random device# because it would lead to very long connection times (as long as# it requires to make more entropy available). But usually those# platforms additionally provide a /dev/urandom device which doesn't# block. So, if available, use this one instead. Read the mod_ssl User# Manual for more details.SSLRandomSeed startup file:/dev/urandom 256SSLRandomSeed connect builtin#SSLRandomSeed startup file:/dev/random 512#SSLRandomSeed connect file:/dev/random 512#SSLRandomSeed connect file:/dev/urandom 512## Use "SSLCryptoDevice" to enable any supported hardware # accelerators. Use "openssl engine -v" to list supported# engine names. NOTE: If you enable an accelerator and the # server does not start, consult the error logs and ensure# your accelerator is functioning properly.#SSLCryptoDevice builtin#SSLCryptoDevice ubsec#### SSL Virtual Host Context##<VirtualHost *:443># General setup for the virtual host, inherited from global configurationDocumentRoot"/var/www/html/qiangshangkeji/web/web/weixinpronew.qiangs "ServerName :443# 添加 SSL 协议支持协议,去掉不安全的协议SSLProtocol all -SSLv2 -SSLv3# 修改加密套件如下SSLCipherSuiteHIGH:!RC4:!MD5:!aNULL:!eNULL:!NULL:!DH:!EDH:!EXP:+MEDIU MSSLHonorCipherOrder on# 证书公钥配置SSLCertificateFile /etc/pki/tls/certs/public.pem# 证书私钥配置SSLCertificateKeyFile/etc/pki/tls/certs/215024286030114.key# 证书链配置,如果该属性开头有 '#'字符,请删除掉SSLCertificateChainFile /etc/pki/tls/certs/chain.pem</VirtualHost><VirtualHost *:443># General setup for the virtual host, inherited from global configurationDocumentRoot"/var/www/html/qiangshangkeji/web/web/weixin.qiangshangke "ServerName :443# 添加 SSL 协议支持协议,去掉不安全的协议SSLProtocol all -SSLv2 -SSLv3# 修改加密套件如下SSLCipherSuiteHIGH:!RC4:!MD5:!aNULL:!eNULL:!NULL:!DH:!EDH:!EXP:+MEDIU MSSLHonorCipherOrder on# 证书公钥配置SSLCertificateFile/etc/pki/tls/certs//public.pem # 证书私钥配置SSLCertificateKeyFile/etc/pki/tls/certs//215024163410114. key# 证书链配置,如果该属性开头有 '#'字符,请删除掉SSLCertificateChainFile/etc/pki/tls/certs//chain.pem </VirtualHost>附件2:yum安装mod_ssl模块后生成的配置完成ssl文件/etc/httpd/conf.d/ssl.conf文件原始文件:## This is the Apache server configuration file providingSSL support.# It contains the configuration directives to instruct the server how to# serve pages over an https connection. For detailing information about these# directives see <URL:>## Do NOT simply read the instructions in here without understanding# what they do. They're here only as hints or reminders. If you are unsure# consult the online docs. You have been warned.#LoadModule ssl_module modules/mod_ssl.so## When we also provide SSL we have to listen to the# the HTTPS port in addition.#Listen 443NameVirtualHost *:443#### SSL Global Context#### All SSL configuration in this context applies both to## the main server and all SSL-enabled virtual hosts.### Pass Phrase Dialog:# Configure the pass phrase gathering process.# The filtering dialog program (`builtin' is a internal# terminal dialog) has to provide the pass phrase on stdout.SSLPassPhraseDialog builtin# Inter-Process Session Cache:# Configure the SSL Session Cache: First the mechanism# to use and second the expiring timeout (in seconds).SSLSessionCache shmcb:/var/cache/mod_ssl/scache(51 2000)SSLSessionCacheTimeout 300# Semaphovre:# Configure the path to the mutual exclusion semaphore the# SSL engine uses internally for inter-process synchronization.SSLMutex default# Pseudo Random Number Generator (PRNG):# Configure one or more sources to seed the PRNG of the # SSL library. The seed data should be of good random quality.# WARNING! On some platforms /dev/random blocks if not enough entropy# is available. This means you then cannot use the /dev/random device# because it would lead to very long connection times (as long as# it requires to make more entropy available). But usually those# platforms additionally provide a /dev/urandom device which doesn't# block. So, if available, use this one instead. Read the mod_ssl User# Manual for more details.SSLRandomSeed startup file:/dev/urandom 256SSLRandomSeed connect builtin#SSLRandomSeed startup file:/dev/random 512#SSLRandomSeed connect file:/dev/random 512#SSLRandomSeed connect file:/dev/urandom 512## Use "SSLCryptoDevice" to enable any supported hardware # accelerators. Use "openssl engine -v" to list supported# engine names. NOTE: If you enable an accelerator and the # server does not start, consult the error logs and ensure# your accelerator is functioning properly.#SSLCryptoDevice builtin#SSLCryptoDevice ubsec#### SSL Virtual Host Context##<VirtualHost *:443># General setup for the virtual host, inherited from global configurationDocumentRoot"/var/www/html/qiangshangkeji/web/web/weixin.qiangshangke "ServerName :443# Use separate log files for the SSL virtual host; note that LogLevel# is not inherited from httpd.conf.ErrorLog logs/ssl_error_logTransferLog logs/ssl_access_logLogLevel warn# SSL Engine Switch:# Enable/Disable SSL for this virtual host.SSLEngine on# SSL Protocol support:# List the enable protocol levels with which clients will be able to# connect. Disable SSLv2 access by default:SSLProtocol all -SSLv2# SSL Cipher Suite:# List the ciphers that the client is permitted to negotiate.# See the mod_ssl documentation for a complete list.SSLCipherSuiteDEFAULT:!EXP:!SSLv2:!DES:!IDEA:!SEED:+3DES# Server Certificate:# Point SSLCertificateFile at a PEM encoded certificate. If# the certificate is encrypted, then you will be prompted for a# pass phrase. Note that a kill -HUP will prompt again. A new# certificate can be generated using the genkey(1) command.#SSLCertificateFile /etc/pki/tls/certs/localhost.crtSSLCertificateFile /etc/pki/tls/certs/server.crt# Server Private Key:# If the key is not combined with the certificate, use this# directive to point at the key file. Keep in mind that if# you've both a RSA and a DSA private key you can configure# both in parallel (to also allow the use of DSA ciphers, etc.) #SSLCertificateKeyFile /etc/pki/tls/private/localhost.keySSLCertificateKeyFile /etc/pki/tls/private/server.key# Server Certificate Chain:# Point SSLCertificateChainFile at a file containing the# concatenation of PEM encoded CA certificates which form the# certificate chain for the server certificate. Alternatively# the referenced file can be the same as SSLCertificateFile # when the CA certificates are directly appended to the server# certificate for convinience.#SSLCertificateChainFile /etc/pki/tls/certs/server-chain.crtSSLCertificateChainFile /etc/pki/tls/certs/server.crt# Certificate Authority (CA):# Set the CA certificate verification path where to find CA # certificates for client authentication or alternatively one # huge file containing all of them (file must be PEM encoded)#SSLCACertificateFile /etc/pki/tls/certs/ca-bundle.crt# Client Authentication (Type):# Client certificate verification type and depth. Types are # none, optional, require and optional_no_ca. Depth is a # number which specifies how deeply to verify the certificate# issuer chain before deciding the certificate is not valid.#SSLVerifyClient require#SSLVerifyDepth 10# Access Control:# With SSLRequire you can do per-directory access control based# on arbitrary complex boolean expressions containing server# variable checks and other lookup directives. The syntax is a# mixture between C and Perl. See the mod_ssl documentation# for more details.#<Location />#SSLRequire ( %{SSL_CIPHER} !~ m/^(EXP|NULL)/ \# and %{SSL_CLIENT_S_DN_O} eq "Snake Oil, Ltd." \ # and %{SSL_CLIENT_S_DN_OU} in {"Staff", "CA", "Dev"} \# and %{TIME_WDAY} >= 1 and %{TIME_WDAY} <= 5 \# and %{TIME_HOUR} >= 8 and %{TIME_HOUR} <= 20 ) \# or %{REMOTE_ADDR} =~ m/^192\.76\.162\.[0-9]+$/ #</Location># SSL Engine Options:# Set various options for the SSL engine.# o FakeBasicAuth:# Translate the client X.509 into a Basic Authorisation. This means that# the standard Auth/DBMAuth methods can be used for access control. The# user name is the `one line' version of the client's X.509 certificate.# Note that no password is obtained from the user. Every entry in the user# file needs this password: `xxj31ZMTZzkVA'.# o ExportCertData:# This exports two additional environment variables:SSL_CLIENT_CERT and# SSL_SERVER_CERT. These contain the PEM-encoded certificates of the# server (always existing) and the client (only existing when client# authentication is used). This can be used to import the certificates# into CGI scripts.# o StdEnvVars:# This exports the standard SSL/TLS related `SSL_*' environment variables.# Per default this exportation is switched off for performance reasons,# because the extraction step is an expensive operation and is usually# useless for serving static content. So one usually enables the# exportation for CGI and SSI requests only.# o StrictRequire:# This denies access when "SSLRequireSSL" or "SSLRequire" applied even# under a "Satisfy any" situation, i.e. when it applies access is denied# and no other module can change it.# o OptRenegotiate:# This enables optimized SSL connection renegotiation handling when SSL# directives are used in per-directory context.#SSLOptions +FakeBasicAuth +ExportCertData +StrictRequire<Files ~ "\.(cgi|shtml|phtml|php3?)$">SSLOptions +StdEnvVars</Files><Directory "/var/www/cgi-bin">SSLOptions +StdEnvVars</Directory># SSL Protocol Adjustments:# The safe and default but still SSL/TLS standard compliant shutdown# approach is that mod_ssl sends the close notify alert but doesn't wait for# the close notify alert from client. When you need a different shutdown# approach you can use one of the following variables:# o ssl-unclean-shutdown:# This forces an unclean shutdown when the connection is closed, i.e. no# SSL close notify alert is send or allowed to received. This violates# the SSL/TLS standard but is needed for some brain-dead browsers. Use# this when you receive I/O errors because of the standard approach where# mod_ssl sends the close notify alert.# o ssl-accurate-shutdown:# This forces an accurate shutdown when the connection is closed, i.e. a# SSL close notify alert is send and mod_ssl waits for the close notify# alert of the client. This is 100% SSL/TLS standardcompliant, but in# practice often causes hanging connections with brain-dead browsers. Use# this only for browsers where you know that their SSL implementation# works correctly.# Notice: Most problems of broken clients are also related to the HTTP# keep-alive facility, so you usually additionally want to disable# keep-alive for those clients, too. Use variable "nokeepalive" for this.# Similarly, one has to force some clients to use HTTP/1.0 to workaround# their broken HTTP/1.1 implementation. Use variables "downgrade-1.0" and# "force-response-1.0" for this.SetEnvIf User-Agent ".*MSIE.*" \nokeepalive ssl-unclean-shutdown \downgrade-1.0 force-response-1.0# Per-Server Logging:# The home of a custom SSL log file. Use this when you want a# compact non-error SSL logfile on a virtual host basis.CustomLog logs/ssl_request_log \"%t %h %{SSL_PROTOCOL}x %{SSL_CIPHER}x \"%r\" %b"</VirtualHost>案例:#用于建筑行业招聘求职小程序,customlog配置访问日志的目录,也就是https的来自443端口的访问目录,经过实际测试即使来自https的访问,记录的协议类型也是HTTP/1.1,与http一样,因此可以配置与80端口不同的访问日志目录来区分来自https的访问。
- 1、下载文档前请自行甄别文档内容的完整性,平台不提供额外的编辑、内容补充、找答案等附加服务。
- 2、"仅部分预览"的文档,不可在线预览部分如存在完整性等问题,可反馈申请退款(可完整预览的文档不适用该条件!)。
- 3、如文档侵犯您的权益,请联系客服反馈,我们会尽快为您处理(人工客服工作时间:9:00-18:30)。
Linux Apache 的 HTTPS 配置我以前在 Windows 上配置过Apache的 SSL/HTTPS 双向认证,即对 Web 服务器与浏览器同时进行认证,而建立的 HTTPS 安全连接。
最近,我在 Linux 下也配置了下Apache的 HTTPS,并将配置过程和遇到的问题记录了一下。
配置环境∙Web 服务器系统:VMware Workstation 6.0.2,Debian Linux 5.0.2,kernel=2.6.26-2-686∙Web 服务器:Apache 2.2.9-10∙Web 浏览器系统:Windows XP Professional∙Web 浏览器:Firefox 3.0.11Linux Apache的基本配置现在 Linux 下较新的Apache配置,要比 Windows 下的配置方便、灵活的多。
比如,我的 Debian 5 下的Apache2 包安装后,就将Apache的配置文件放在:/etc/apache2目录下,并按照 Linux 下经典的:xxx-available,xxx-enabled,xxx.d目录来组织配置文件,看到这里有没有想到 Emacs 的配置文件组织方式呢?(*^_^*)。
玩 Linux 的人看到这里,大多都能猜地出 Linux Apache是怎么组织的。
下面简单列举一下Apache配置文件的组织结构:∙apache2.conf:Apache的入口配置文件,包含其它配置文件的主控文件∙conf.d/:包含一些零碎的配置,一般不和具体的 mod 相关,是全局性质的,比如:字符集 charset、安全选项 security。
∙ports.conf:设置Apache的监听端口,默认时,HTTP 为 80,HTTPS 为443。
∙envvars:导出一些环境变量,比如:∙export APACHE_RUN_USER=www-data∙export APACHE_RUN_GROUP=www-data∙export APACHE_PID_FILE=/var/run/apache2.pid∙httpd.conf:额外的用户设置的配置,默认里面内容为空。
Windows 下的Apache喜欢用这个名字作为主控配置文件,但在 Linux 下,作用不大。
∙mods-available/:包含Apache中所有可用 mod 的加载和设置配置,加载配置一般用 xxx.load 表示,设置配置一般用 xxx.conf 表示,比如:mod_ssl 的加载配置为:ssl.load,设置配置为:ssl.conf ∙mods-enabled/:实际启动的 mod 的加载和设置配置,是到mods-available/ 中配置文件的符号链接。
∙sites-available/:Web 站点的配置,可以是全局的,或虚拟主机作用域的。
默认有两个附带的配置文件:default、default-ssl,其中 default 为一般的 HTTP 服务的虚拟主机配置,而 default-ssl 就是 HTTPS 服务的虚拟主机配置。
这两个配置文件可以直接使用,配置内容只需做适当的调整即可。
∙sites-enabled/:实际启动的 Web 站点配置,是到 sites-available/ 中配置文件的符号链接。
默认时,只有一个000-default链接指向sites-available/default,说明默认的Apache配置,只启动 HTTP 服务,而不启动 HTTPS 服务。
另外,列举一下配置 HTTPS 时,Apache的相关文件路径:∙Apache日志文件:在:/var/log/apache2目录中保存。
错误日志为:error.log,HTTP 访问日志为:access.log,HTTPS 访问日志为:ssl_access.log。
∙Apache的启动:可以使用Apache在:/etc/init.d/中安装的 Run Level 脚本:apache2,来启动/停止Apache服务。
和大多数 Run Level 脚本一样,使用参数start启动服务,使用参数stop停止服务,如下:∙# /etc/init.d/apache2 start∙Starting web server: apache2apache2: Could not reliably determine the server's fully qualified domain name, using 192.168.2.108 for ServerName∙∙# /etc/init.d/apache2 stop∙Stopping web server: apache2apache2: Could not reliably determine the server's fully qualified domain name, using 192.168.2.108 for ServerName∙ ... waiting .∙Web 文件目录:使用 sites-available 中,配置文件 default 和default-ssl 的DocumentRoot选项,默认指定的 Web 文件目录:/var/www/。
/var/www 目录下默认只有一个 Web 文件:index.html,我就用它作为HTTPS 配置的测试页面,并更改了下它的内容:<html><body><h1>Hello World! --zy</h1></body></html>证书、密钥和测试场景有 2 台主机系统:∙一个 Linux 安装Apache服务器,主机名:zy-13∙另一个为 Windows,使用 Firefox 作为浏览器,主机名:zy-1。
使用Firefox 作为浏览器,是因为 HTTPS 基于的 SSL 最早是由 Netscape 提出的,并且 Netscape 一直在发展 SSL 技术(参考:Mozilla SSL/TLS),而 Mozilla 是 Netscape 的开源社区,所以我想 Mozilla 的 Firefox应该比其它浏览器对 SSL 支持地更完善(其实这是借口,我只是喜欢用Firefox 而已)。
有3套证书,用openssl工具生成,作用如下:∙zy-root.cer:用作CA证书,PEM格式,对其它两个证书进行签发,它自己是自签的。
∙zy-13.cer:用作Web服务器证书,PEM格式。
它的密钥文件为:zy-13.key,用DES3加密保护。
注意:服务器证书zy-13.cer中的通用名属性,即CN:Common Name字段,应该和服务器的主机名一致,我都设定为:zy-13,否则,浏览器会报错:ssl_error_bad_cert_domain,如下:这个要求的作用是显然的,目的是防止其它人冒用服务器证书,比如:当服务器证书zy-13.cer,和服务器密钥zy-13.key,同时落入攻击者手中,并且zy-13.key不使用密码保护时,这种冒充攻击就可能奏效。
在实际工作中,CN名应该设定为服务器主机的全域名(FQDN:Fully Qualified Domain Name)。
我在测试中,用IP地址访问HTTPS服务时,浏览器也会出现该错误,这可能是因为主机名和IP地址的映射不是由DNS系统完成的,而是由Windows LAN完成的。
另外,对于这种“无效的安全证书”错误,Firefox有一种“迁就的”用户放过的方法:通过服务器证书的散列码(指纹)和其它属性信息,人工验证证书的有效性,如果最后你确定信任这个证书,可以在Firefox中加入一条“安全例外”。
“安全例外”型证书是Firefox对待证书认证的一种灵活方式,但使用这种方式后安全性交由Firefox用户自己负责,而依靠授权证书链的认证策略也荡然无存了,这也不是HTTPS认证的正常使用方式。
安全例外可以在Firefox的报错页面上点击“或者,您可以添加一个例外”来增加,例外的证书被放置在“证书管理器”中的“服务器”类别中,在那里也可以点击“添加例外”增加例外证书。
zy-1.cer:用作浏览器中使用的Web客户端证书,PEM格式。
它的密钥文件为:zy-1.key,用DES3加密保护。
将zy-1.cer与zy-1.key合成为PKCS#12格式的文件:zy-1.p12,并设定导出密码(Export Password)保护zy-1.p12文件。
注意:这个导出密码就是在浏览器中导入PKCS#12文件时,提示输入的密码,而原来的密钥文件zy-1.key的DES3保护密码是没有用的。
HTTPS服务器端认证配置Apache中对服务器端的HTTPS认证配置、使用过程如下:1.启用Apache默认附带的HTTPS服务配置文件:sites-available/default-ssl,只需在目录:sites-enabled中建立一个指向它的符号链接即可:2.#cd sites-enabled3.#ln -s -T ../sites-available/default-ssl 001-default-ssl4.在:sites-available/default-ssl中设置HTTPS服务器端认证的选项。
首先,启动SSL传输层引擎SSLEngine,如下:5.# SSL Engine Switch:6.# Enable/Disable SSL for this virtual host.7.SSLEngine on8.使用SSLCertificateFile和SSLCertificateKeyFile选项,设置服务器证书zy-13.cer和服务器密钥zy-13.key。
9.# A self-signed (snakeoil) certificate can be created byinstalling10.# the ssl-cert package. See11.# /usr/share/doc/apache2.2-common/README.Debian.gz for moreinfo.12.# If both key and certificate are stored in the same file, onlythe13.# SSLCertificateFile directive is needed.14.SSLCertificateFile /root/common/key/zy-13.cer15.SSLCertificateKeyFile /root/common/key/zy-13.key设置完后,服务器端认证大致就配置完成了,不要忘记重启Apache服务器。
