LucisArt滤镜应用实例(优质参考)
帮助文件里as做滤镜效果的类整理
帮助文件里as做滤镜效果的类整理用as做滤镜效果,每种滤镜效果对应一个类,这些类都在Macromedia\Flash 8 Beta 2\zh_cn\First Run\Classes\FP8\flash\filters这个文件夹里一、渐变斜角——GradientBevelFilter类二、投影——DropShadowFilter类三、模糊——BlurFilter类(这个最容易了,参数少)四、发光——GlowFilter类五、渐变发光——GradientGlowFilter类六、斜角——BevelFilter类我暂时就只知道这6个做法是用new关键字新建一个相应类的对象,暂时就叫myfilters吧,然后把这个对象添加进一个数组filters_array,最后把这个数组赋值给mc的fliters属性,大功告成。
我想其中关键应该就是创建对象时如何设置里面的参数吧,我想滤镜的面板大家都很熟悉的了,那么,我就把as添加滤镜的一些参数和它们的面板相对照,这样可能更容易理解。
下面逐个举例(都是帮助里的例子啦,里面的参数名字都是可以改的,不过我觉得就用那些名字就蛮好),例子里都有函数setUpFlatRectangle(也有叫createRectangle的),是用来做一个方形mc的。
function setUpFlatRectangle(w:Number, h:Number, bgColor:Number, name:String):MovieClip {var mc:MovieClip = this.createEmptyMovieClip(name, this.getNextHighestDepth());mc.beginFill(bgColor);mc.lineTo(w, 0);mc.lineTo(w, h);mc.lineTo(0, h);mc.lineTo(0, 0);return mc;}直接把脚本复制到主场景的第一帧就ok了,不要忘记上面的函数哦,要注意改函数名的一、渐变斜角——GradientBevelFilter类面板:截图暂无,就是截的滤镜面板啦,各位大哥请麻烦自己打开flash对照吧脚本:import flash.filters.GradientBevelFilter;import flash.filters.BitmapFilter;var art:MovieClip = setUpFlatRectangle(150, 150, 0xCCCCCC, "gradientBevelFilterExample");//创建新的mc,实例名:artvar distance:Number = 5;var angleInDegrees:Number = 225; // opposite 45 degreesvar colors:Array = [0xFFFFFF, 0xCCCCCC, 0x000000];var alphas:Array = [1, 0, 1];var ratios:Array = [0, 128, 255];var blurX:Number = 8;var blurY:Number = 8;var strength:Number = 2;var quality:Number = 3;var type:String = "inner";var knockout:Boolean = true;//设置各个参数var filter:GradientBevelFilter = new GradientBevelFilter(distance, angleInDegrees, colors, alphas, ratios, blurX, blurY, strength, quality, type, knockout);//创建斜角滤镜对象filtervar filterArray:Array = new Array();filterArray.push(filter); //把filter添加进数组filterArray,如果art上有多个滤镜效果,就直接添加进这个数组好了art.filters = filterArray;//将art的filters属性设置为filterArray下面是脚本中的参数和面板中的参数对比:colors、alphas、ratios用来控制渐变颜色的,colors是色彩,alphas是百分比(这里面是0~1的小数),ratios是偏移量0~255(可以参考Color类)blurX、blurY是就对应面板里的模糊x、模糊ystrength是面板里的强度,是0~255的数quality是品质,只有1、2、3分别对应低、中、高distance是距离,默认4.0type是类型,用字符串表示,例子中的”inner”是内侧,还有outer、fuller knockout是个布尔值,表示是否挖空二、投影——DropShadowFilter类面板:截图暂无,就是截的滤镜面板啦,各位大哥请麻烦自己打开flash对照吧脚本:import flash.filters.DropShadowFilter;var art:MovieClip = createRectangle(100, 100, 0x003366, "gradientGlowFilterExample");var distance:Number = 20;var angleInDegrees:Number = 45;var color:Number = 0x000000;var alpha:Number = 0.8;var blurX:Number = 16;var blurY:Number = 16;var strength:Number = 1;var quality:Number = 3;var inner:Boolean = false;var knockout:Boolean = false;var hideObject:Boolean = false;var filter:DropShadowFilter = new DropShadowFilter(distance, angleInDegrees, color, alpha, blurX, blurY, strength, quality, inner, knockout, hideObject);var filterArray:Array = new Array();filterArray.push(filter);下面是脚本中的参数和面板中的参数对比:Distance是距离angleInDegrees是角度0~360blurX、blurY是模糊x、模糊ystrength是强度,脚本里是0~5的数quality是品质,只能是1、2、3,分别对应低、中、高inner是内侧阴影knockout是挖空hideObject是隐藏对象三、模糊——BlurFilter类(这个最容易了,参数少嘛)面板:截图暂无,就是截的滤镜面板啦,各位大哥请麻烦自己打开flash对照吧脚本:import flash.filters.BlurFilter;var rect:MovieClip = createRectangle(100, 100, 0x003366, "BlurFilterExample"); var blurX:Number = 30;var blurY:Number = 30;var quality:Number = 3;var filter:BlurFilter = new BlurFilter(blurX, blurY, quality);var filterArray:Array = new Array();filterArray.push(filter);这个就不解释了,就三个参数,前面都介绍过了,下面遇到介绍过的参数就都不介绍了四、发光——GlowFilter类面板:截图暂无,就是截的滤镜面板啦,各位大哥请麻烦自己打开flash对照吧脚本:import flash.filters.GlowFilter;var rect:MovieClip = createRectangle(100, 100, 0x003366, "gradientGlowFilterExample");var color:Number = 0x33CCFF;var alpha:Number = .8;var blurX:Number = 35;var blurY:Number = 35;var strength:Number = 2;var quality:Number = 3;var inner:Boolean = false;var knockout:Boolean = false;var filter:GlowFilter = new GlowFilter(color, alpha, blurX, blurY, strength, quality, inner, knockout);var filterArray:Array = new Array();filterArray.push(filter);五、渐变发光——GradientGlowFilter类面板:截图暂无,就是截的滤镜面板啦,各位大哥请麻烦自己打开flash对照吧脚本:import flash.filters.GradientGlowFilter;var art:MovieClip = createRectangle(100, 100, 0x003366, "gradientGlowFilterExample");var distance:Number = 0;var angleInDegrees:Number = 45;var colors:Array = [0xFFFFFF, 0xFF0000, 0xFFFF00, 0x00CCFF];var alphas:Array = [0, 1, 1, 1, 1];var ratios:Array = [0, 63, 126, 255];var blurX:Number = 50;var blurY:Number = 50;var strength:Number = 2.5;var quality:Number = 3;var type:String = "outer";var knockout:Boolean = false;var filter:GradientGlowFilter = new GradientGlowFilter(distance, angleInDegrees, colors, alphas, ratios, blurX, blurY, strength, quality, type, knockout);var filterArray:Array = new Array();filterArray.push(filter);art.filters = filterArray;这里的参数跟发光那个很像,需要说明的就是用来设置颜色的那几个数组里的4项依次是表示从外到内的颜色的六、斜角——BevelFilter类面板:截图暂无,就是截的滤镜面板啦,各位大哥请麻烦自己打开flash对照吧脚本:import flash.filters.BevelFilter;var distance:Number = 5;var angleInDegrees:Number = 45;var highlightColor:Number = 0xFFFF00;var highlightAlpha:Number = 1;var shadowColor:Number = 0x0000FF;var shadowAlpha:Number = 1;var blurX:Number = 10;var blurY:Number = 10;var strength:Number = 2;var quality:Number = 3;var type:String = "inner";var knockout:Boolean = false;var filter:BevelFilter = new BevelFilter(distance, angleInDegrees, highlightColor,highlightAlpha, shadowColor, shadowAlpha, blurX, blurY, strength, quality, type, knockout);var rect:MovieClip = createRectangle(100, 100, 0x00CC00, "bevelFilterExample"); rect.filters = new Array(filter);参数:highlightColor、highlightAlpha设置加亮颜色shadowColor、shadowAlpha设置阴影颜色。
“滤镜”讲稿
主讲:刘井利
第六讲 滤镜
授课内容:滤镜
练习内容:
第六单元 滤镜效果
知识点:
内置式效果滤镜
授课方法:
例子→讲解菜单命令使用→ 展开
一、 Artitic(艺术化)
15种艺术化效果:
1.
2.
Colored Pencil(彩色铅笔):用彩色铅笔 在背景色、黑色与背景色的混合色纸上作 画,铅笔颜色使用图像中比较主要的颜色, 图像中次要的颜色变为纸色。 Cutout(剪切):在一叠彩色纸上剪切一 顶口,然后通过这些色彩叠加在一起,近 似地平刮图像,使图像的细节部分丧失。
十、 Stylize(风格化)
5.
6. 7.
8.
9.
Glowing Edges(边界发光):边界处闪闪发光, 没有发光的区域用黑色填充。 Solarize(曝光):模拟照片曝光的效果。 Tiles(平铺):使图像切割成一块一块,块与块 之间有一定的间隙。 Trace Contour(追踪边界):对图像边界用很细 的颜色线条进行描绘,其它区域用白色填充。 Wind(吹风)
九、 Sketch(素描)
11.
12.
13. 14.
15.
Plaster(石膏):将图像处理成三维石膏模式,黑暗区域 凸出,明亮区域凹下;黑暗区域使用前景色,明亮区域 使用背景色。 Reticulation(网格):将原图像简化成由背景色和前景 色组成的图像,在背景色图像中填充前景色颗粒,在前 景色图像中填充背景色颗粒。 Stamp(印章):用前景色来渲染图像明亮部分,达到 “印章”效果。 Torn Edges(分裂边缘):模拟用破布、碎纸重绘图像, 再用前景色、背景色对其进行上色,产生撕裂图像边界 的效果。 Water Paper(水彩纸):用饱和的笔在一种含纤维的湿 润的纸张上绘画,使得色彩流动、混合,产生图像浸湿 的效果。
photoshop外挂滤镜的分类及效果(按字母顺序)2.0
Ps滤镜的分类及效果(按字母顺序)约定:1、突出显示:分类的字母用紫色,滤镜名字用黄色,效果用鲜绿,好评用红色,疑问用灰色(50%)2、需要说明术语的能放前尽量放到前言,前言:Photoshop 插件兼容型滤镜(依照 Redfield 的说法就是符合PS 插件标准,兼容 Adobe Photoshop 、Jasc Paint Shop Pro 、Xara Xtreme 、Corel Photo Paint 、Macromedia Fireworks 、Ulead Photo Impact)AAdobe Camera Raw 2.4对于数字摄影师们来说,处理RAW文件实在是一个令人头疼棘手的问题,因为这种文件通常处理起来要耗费很长的时间,而且不同数码相机所生成的RAW文件也千差万别。
不过现在,Adobe公司的Photoshop Camera Raw and JPEG 2000插件包能够为你缓解一下这方面的痛苦。
有了它,你就能够在熟悉的Photoshop界面内打开并编辑这些RAW文件了。
Adrenaline.Snowflakes.v1.01制作下雪效果的滤镜AGD Color Temperature Correction For Photoshop v3.0 Final用于修正图片的色温。
主要特征:支持24位或48位图片;支持Adobe Photoshop CS 48bpp 层;根据supersampling算法可高质量预览图片;精确的浮点算法;能校正曝光不足、感光过度和绿色不均等等。
AlienSkinAlienSkin Eye Candy 5 Nature 英文版是一款包含10种Photoshop自然滤镜的套装。
Eye Candy 4000的三个升级套装的第二版,模拟自然界中的火、烟、锈、雪、冰等效果。
AlienSkin Announces Eye Candy 5: Impact推荐理由:几乎把能想到的字体特效都集合了,而且还能把这些特效应用到图层中去,处理速度也不慢,完全符合了绿晶应该方便使用者这一原则,绝对的五星大作!!!官方网站:/Demo 下载:/downloads/getmail1.asp讨论交流:/bbs/viewthread.php?tid=19054&extra=page%3D1滤镜介绍:为一个带有10个滤镜并支持Adobe Photoshop和其它兼容主体软件的插件包,包括了合金、导角、玻璃按钮、透视图阴影等效果。
学会Photoshop插件的使用技巧
学会Photoshop插件的使用技巧Photoshop 是一款功能强大的图像处理软件,通过插件的使用,可以进一步提升其功能和效率。
本文将介绍几种常用的 Photoshop 插件,并分享一些使用技巧。
第一章:滤镜插件滤镜插件是最常见的 Photoshop 插件之一,提供了各种图像处理效果,如模糊、锐化、光照效果等。
常用的滤镜插件有Nik Collection和Topaz Labs。
通过这些插件,可以为照片增加艺术效果、改善细节。
第二章:调整插件调整插件可以帮助我们更方便地调整图像的色彩、对比度和曝光等参数。
其中,Luminar是一款广受欢迎的调整插件,提供了丰富的调色工具,可以快速调整图像的色彩效果。
第三章:截图插件截图插件可以快速捕捉屏幕上的内容,并进行编辑和保存。
其中,Snagit是一款功能强大的截图插件,支持全屏捕捉、特定区域捕捉和滚动截屏等功能,可以帮助我们快速创建教程、演示和报告。
第四章:图像处理插件图像处理插件可以帮助我们修复照片中的缺陷,如去除噪点、修复划痕等。
其中,PT Lens是一款优秀的镜头校正插件,可以自动矫正镜头畸变和色差。
第五章:图层插件图层插件可以提供更高级的图形设计功能,如创造逼真的3D 效果、设计复杂的文字效果等。
其中,ExtrudePhotoshop是一款强大的3D设计插件,可以快速生成3D模型,并控制光照和纹理效果。
第六章:扩展脚本扩展脚本可以帮助我们自动化繁琐的操作,提高工作效率。
其中,EasyMockups是一款方便实用的扩展脚本,可以快速生成各种设备上的模拟效果,如手机、平板电脑、电视等。
第七章:后期处理插件后期处理插件可用于添加特殊效果、调整图像风格,使图像更加独特。
其中,Alien Skin Exposure是一款专业的后期处理插件,提供了各种胶片模拟和故障模拟效果,可以快速为照片增加复古或电影感。
第八章:工作流插件工作流插件可以帮助我们优化图像处理过程,提高效率。
LucisArt滤镜应用实例
第一部分:应用HDR效果到人物相片。
这个教程分三部分,我们将重复使用lucisart滤镜并应用HDR效果在不同类型的图片。
在第一个部分里,我们将兴趣关注在人物相片方面。
Step 1Open up your image in Photoshop. I'll start with a portrait image I shot.打开一副人物肖像的相片,不要问我在哪里打开!用什么软件打开!Step 2First thing you need to do is to duplicate the layer (J). Then go to Filter > Lucis > LucisArt. Here you will need to select the Sculpture option and set it to something like 30.首先需要先复制图层CTRL+J , 然后使用滤镜-lucis-lucisart。
选择sculpture (雕刻的意思) 选项,设置参数30.(我感觉就是在做锐化。
)Step 3Create a Layer Mask for this layer and fill it with black. This will hide all the effect. Then, take the brush (set to white) and draw over the man and the products he was selling. Leave the trees untouched.为该层建立一个图层蒙版并填充黑色,它将隐藏所有的效果。
然后,将笔刷前景色设置成白色,把人和农作物画出来,不要碰到后面的树叶。
Step 4Next I will add a new adjustment layer. Select the curves from the drop-down menu.下面我将添加一个调整图层,选择曲线并将中心点略微向下拉。
[考试]iSee支持的PS滤镜之二
![[考试]iSee支持的PS滤镜之二](https://img.taocdn.com/s3/m/29485c9ff021dd36a32d7375a417866fb84ac0dc.png)
[考试]iSee支持的PS滤镜之二iSee支持的PS滤镜之二一、Redfield 系列滤镜:1、Sketch Master (素描大师)能将照片进行处理、制作为现实主义风格的手绘作品。
可模拟铅笔、墨水笔、彩色粉笔、炭笔和喷雾器等工具。
下载地址:文件大小:1.05M安装方法:解压到iSee\PSFilter,重新运行ISEE即可在PS滤镜的栏目中看到Redfield 滤镜组,点击相应的滤镜即可进入使用 2、Fractalius 魔幻光影效果滤镜,是一款功能强大的处理制作艺术图像滤镜。
具有多种样式并可产生多种的纹理效果、彩色铅笔、碳笔画、点画法、凡高画、马赛克、黑白照片等效果。
下载地址:文件大小:171K安装方法:解压到iSee\PSFilter,重新运行ISEE即可在PS滤镜的栏目中看到Redfield 滤镜组,点击相应的滤镜即可进入使用效果图:3、Umatrix一款几何抽象画生成器,Redfield 系列滤镜中最强大,最热门的一款,轻点几下鼠标即可创建完全的 3D 艺术品~4、iEmboss可以在图片上添加浮雕花纹类效果的滤镜,提供了包括融化玻璃、动感石头在内的多种效果。
下载地址:文件大小:1.04M安装方法:解压到iSee\PSFilter,重新运行ISEE即可在PS滤镜的栏目中看到Redfield 滤镜组,点击相应的滤镜即可进入使用效果图:5、LatticeXPLattice XP 是一款极为强大的 3D 结构生成器,它可以创建卡通样式、精致宝石、水滴纽扣、融化玻璃、光亮金属,以及塑料表面等特效,其 3D 渲染及插补的品质均属上乘。
Lattice XP 是为您的图片增添超现实主义观感的王道~下载地址:文件大小:55.1K安装方法:解压到iSee\PSFilter,重新运行ISEE即可在PS滤镜的栏目中看到Redfield 滤镜组,点击相应的滤镜即可进入使用。
该滤镜包中有一个“样式扩展.reg”文件,运行后确认可增加几十种预设的滤镜方案。
滤镜的介绍

典型案例——匹配组合两幅图像
案例目标
本案例将对两幅图像进行有机组
合,使组合后的透视关系保持平衡, 主要练习抽出和消失点滤镜的设置
与使用方法。
典型案例——匹配组合两幅图像
操作思路 (1)打开素材文件,通过抽出滤镜将图像中的 MP3图像从背景中分离出来。 (2)将分离出的MP3图像复制到剪贴板中。
层或图像选区内的图像效果,将其制作成各种特效。
滤镜的工作原理是通过对图像中的像素进行分析,按 每种滤镜的特殊数学算法进行像素色彩和亮度等参数 的调节,从而完成原图像部分或全部像素的属性参数 的调节或控制,使图像呈现所需要的变化。
2.应用滤镜的注意事项
滤镜只能应用于当前可见图层,且可以反复应用,连续应用,但一次
在滤镜设置窗口中,如果对调节的效果感觉不满意,希望恢复调节前 的参数,可以按住【Alt】键,单击【复位】按钮将参数重置为调节 前的状态。
3.滤镜的一般使用方法
系统默认为每个滤镜设置了效果,当应用该滤镜时,自带
的滤镜效果就会应用到图像中,如果觉得不满意,可通过
滤镜提供的参数设置功能加以修正。 预览滤镜 应用滤镜
滤镜库提出了一个滤镜效果图层的概念,即可以为图 像同时应用多个滤镜,每个滤镜被认为是一个滤镜效果图 层,与普通图层一样,它们也可以进行复制、删除或隐藏 等,从而将滤镜效果叠加起来,得到更加丰富的特殊图像。
1.添加滤镜效果图层 当在滤镜选择区选择一个滤镜后,滤镜参数设置区 底部的列表框会出现显示当前选择滤镜名称的滤镜效果 图层,这时可以在预览框中观察该滤镜作用在图像上的 效果。 2.改变滤镜效果图层叠加顺序 改变滤镜效果图层的叠加顺序,可以改变图像应用 滤镜后的最终效果,只须拖动要改变顺序的效果图层到 其他效果图层的前面或后面,待该位置出现一条黑色的 线时释放鼠标即可。
PS滤镜使用方法和技巧
PS滤镜使用方法和技巧ps内置滤镜简介风格化:通过替换像素或增加相邻像素的对比度来使图像产生加粗夸张的效果几乎能完全模拟真实的艺术手法进行创作.查找边缘;通过搜索主要颜色的变化区域突出边缘效果就像是用笔勾勒过轮廓一样,此滤镜对不同模式的彩色图像的处理效果不同.等高线:此滤镜与搜索边缘滤镜相似,所不同的是它围绕图像边缘勾画出一条较细的线,它要在每一个彩色通道内搜索轮廓线.风:通过在图像中增加一些小的水平线而产生风吹的效果,该滤镜只在水平方向起作用.浮雕效果:通过勾画图像或选区的轮廓和降低周围色值来产生不同程度的凸起和凹陷效果.扩散:将图像中相邻的象素随机替换使图像扩散,产生一种像是透过磨砂玻璃观看景像的效果.拼贴:该滤镜根据用户的设定把图像分割成许多瓷砖,使图像就像是白瓷砖拼贴在一起一样.曝光过度:将图像的正片与负片想混和,产生就像在摄影中增加光线强度的过度曝光的效果,使用一次该滤镜和多次使用该滤镜的效果相同.凸出:可以用来制作处于三维空间的物体,用户可以将图像转化为一系列的三维物体.照亮边缘:搜索图像边缘并加强其过度像素,产生发光效果.模糊滤镜:可以光滑边缘太清晰或对比度太强烈的区域产生匀开模糊的效果以柔化边缘还可以制作柔和阴影.其原理是减少像素间的差异使明显边缘模糊或使凸出的部分与背景接近(包括动感模糊,高斯模糊,进一步模糊,径向模糊,模糊,特殊模糊)动感模糊:可以产生运动模糊,它是模仿物体运动时暴光的摄影手法,增加图像的运动效果.高斯模糊:可以根据高斯算法中的曲线调节像素的色值控制模糊程度造成难以辨认的浓厚的图像模糊.模糊:通过减少相邻像素之间的颜色对比来平滑图像.它的效果轻微,能非常轻柔地柔和明显的边缘或突出的形状.进一步模糊:与模糊效果相似,但它的模糊程度大约是模糊的三到四倍.径向模糊:该滤镜属于特殊效果滤镜,使用该滤镜可以将图像旋转成圆形或从中心辐射图像特殊模糊:可以产生一种清晰边界的模糊方式,它自动找到图像的边缘并只模糊图像的内部区域,它的很有用的一项是可以除去图像中肤色调中的斑点.扭曲滤镜:可以将图像做几何方式的变形处理生成一种从波纹到扭曲或三维的图像特殊效果,可以创作非同一般的艺术作品哟!波浪:波浪滤镜的控制参数是最复杂的,包括波动源的个数,波长,波纹幅度以及波纹类型波纹:模拟一种微风吹拂水面的方式使图像产生水纹涟漪的效果.玻璃:该滤镜产生一种透过玻璃看图像的效果.海洋波纹:该滤镜能移动像素产生一种海面波纹涟漪的效果.极坐标:能产生图像坐标向极坐标转化或从极其坐标向直角坐标转化的效果,它能将直的物体拉弯,圆形物体拉直.挤压:该滤镜能产生一种图像或选区被挤压的或膨胀的效果,实际上是压缩图像或选区中间部位的像素使图像呈现向外凸或向内凹.扩散亮光:该滤镜产生一种弥散的亮光和热的效果.其原理是在图像的亮调区添加柔和的灯光效果.切变:沿一条曲线扭曲图像,通过拖移框中的线条来指定曲线.形成一条扭曲曲线.可调整曲一上的任何一点.球面化:此滤镜产生将图像贴在球面或柱面上的效果.水波:产生的效果就像把石子扔进水中所产生的同心圆波纹或旋转变形的效果.旋转扭曲:创造出一种螺旋形的效果,在图像中央出现最大的扭曲逐渐向边界方向递减就像风轮一般.置换:置换滤镜是最为与众不同的一种技巧一般很难预测它的效果.(这里就不多说了反正用到它的时候也不特别多)锐化滤镜USM:该滤镜是产生边缘轮廓的锐化效果,可以通过设置参数来调节锐化的程度.锐化:通过增加相邻像素之间的对比使图像变得清晰.该滤镜的效果比较轻微.进一步锐化: 锐化效果比较强烈.锐化边缘: 该滤镜仅仅锐化图像的边缘部分,使得界线明显.像素化滤镜是指单元格中颜色值相近的像素结成块来清晰的定义一个选区.彩块化: 通过分组和改变示例像素成相近的有色像素块,将图像的光滑边缘处理出许多锯齿.彩色半调:将图像分格然后向方格中填入像素,以圆点代替方块,处理后的图像看上去就像铜板画.点状化: 将图像分解成一些随机的小圆点,间隙用背景色填充产生点画派作品的效果.晶格化: 将相近的有色像素集中到一个象素的多角形网络中,创造出一种独特的风格.马赛克: 将图像分解成许多规则排列的小方块.其原理是把一个单元内的所有像素的颜色统一产生马赛马克的效果.碎片:自动考贝图像,然后以半透明的显示方式错开粘贴4次,产生的效果就像图像中的像素在震动.铜版调刻: 该滤镜用点,线条重新生成图像,产生金属版画的效果.它将灰度图转化为黑白图.将彩色图饱和.渲染滤镜:该滤镜主要可以在图像中产生一种照明效果或喷红光源的效果.3D变换:充许用户对两维图像就像对待三维图像一样进行操作.分层云彩:将图像与云块背景混合起来产生图像反白效果.光照效果:这是一种较复杂的滤镜,只能应用于RGB模式.镜头光晕:模似光线照射在镜头上的效果,产生折射纹理.如同摄像机镜头的炫光效果.云彩:利用选区在前景色和背景色之间的随机像素值在图像上产生云彩状效果,产生烟雾飘渺的景象.艺术效果:使图像产生一种艺术效果,看上去就像艺术家处理过的.只能用于RGB和八位通道色彩模式.壁画:该滤镜将产生古壁画的斑点效果,它和干画笔有相同之处,能强烈地改变图像的对比度,产生抽象的效果.彩色铅笔:模似美术中的彩色铅笔绘画效果,使得经过处理的图像看上去就像彩色铅笔绘制的,使其模糊化,并在图像中产生一些主要由背景色,灰色组成的十字斜线.粗糙蜡笔:产生一种覆盖纹理效果,处理后的图像看上去就像用彩色蜡笔在材质背景上作画一样.底纹效果:模拟传统的用纸背面作画的技巧,产生一种纹理喷绘效果.调色刀:使颜色相近融合,产生大写意的笔法效果.干画笔:使画面产生一种不饱和不湿润干枯的油画效果.海报边缘:可以使图像转化成漂亮的剪贴画效果,它将图像中的颜色分别设定了几种,捕捉图像的边缘并用黑线勾边,提高图像对比度.海绵:该滤镜将产生画面浸湿的效果,就好像使用海绵蘸上颜料在纸上涂抹图像一样.绘画涂抹:产生不同画笔涂抹过的效果.胶片颗粒:产生一种软片颗粒纹理效果,它给原图加上一些颗粒,同时调亮图像局部,加入到图像中的颗粒.木刻:可以模似剪纸效果,看上去就像是经过精心修剪的彩纸图.霓红灯光:产生彩色氖光灯照射的效果,如果选取合适的颜色,该滤镜能在图像中产生三色调或四色调的效果.水彩:产生水彩画的效果,加深图像的颜色.塑料包装:产生一种表面质感很强的塑料包效果,经处理后图像就像包上了一层塑料薄膜,使图像具有很强的主体感.涂抹棒:该滤镜产生私有权纹涂抹效果,使用条状涂抹滤镜将使图像中的暗调区域变模糊,使亮调区变得更亮.18条滤镜使用技巧1. 滤镜快捷键Ctrl+F——再次使用刚用过的滤镜。
精通CSS滤镜(filter)(实例解析)
好久没弄弄美工了,前端时间由于学校的一个小网站的老师需要网站整体为绿色风格,但是他们又不能提供相关素材,这个项目就一直拖着,需求也定不下来。
后台基本功能都已经哦了,就等页面了,本来是想好好学学别的东西,巩固下Java一些基础,但是这事拖着,还是够不爽的。
security框架的例子也不好弄,于是还是决定总结一下最近学习的CSS滤镜。
Css滤镜比较帅,可以取代一部分PS才能实现的效果,但是缺点也比较明显,浏览器并不是都支持。
但考虑到IE6,7...占的市场份额还是挺很大的,所以有学习的必要。
网上不缺CSS滤镜的知识,但是大多是长篇大论,或不够全面。
现在结合自己做的例子和网上的资料,自己的学习心得总结如下。
毕竟我不是专业搞美工,所以这篇随笔,是基本是面向初学者,并使其快速掌握。
也了解现在的CSS都能做什么。
为了充实内容,顺便给出jQuery实现弹出层特效的源码。
CSS(Cascading Style Sheets) 层叠样式表单。
1998年5月12日,Cascading Style Sheets,level 2 成为了W3C的新标准。
同时,”W3C CoreStyles '和CSS2 Validation Service' 以及“CSS Test Suite' 宣布成立。
它是一组样式,样式中的属性在HTML元素中依次出现,并显示在浏览器中。
样式可以定义在HTML文档的标志(TAG)里,也可以在外部附加文档作为外加文档。
此时,一个样式表单可以作用于多个页面---甚至整个站点,因此具有更好的易用性和扩展性。
对于滤镜和渐变效果,前者是基础,因为后者就是滤镜效果的不断变化和演示更替。
当滤镜和渐变效果结合到一个基本的SCRIPT小程序中后,网页设计者就可以拥有一个建立动态交互文档的强大工具。
也就是CSS FILTER+ SCRIPT,这就说明想要建立动态的文档还要一些SCRIPT (脚本语言)的基础。
第11章 滤镜效果
11.3 滤镜效果介绍
滤镜库 课堂案例——制作中信达娱乐H5首页 课堂案例——制作金珠旺理财公众号 首页次图 “自适应广角”滤镜 “Camera Raw”滤镜 “镜头校正”滤镜 “液化”滤镜 课堂案例——制作美妆护肤类公众号 封面首图 “消失点”滤镜 “3D”滤镜组 “风格化”滤镜组 “模糊”滤镜组
第11章 滤镜效果
本章简介:
本章将详细介绍滤镜的功能和 特效。读者通过学习本章要了解并 掌握滤镜的各项功能和特点,通过 反复地实践练习,可制作出丰富多 彩的图像效果。
课堂学习目标
了解滤镜菜单的介绍 了解滤镜与图像模式 掌握对滤镜效果的介绍和应用 掌握滤镜的使用技巧
11.1 滤镜菜单介绍
在Photoshop CC 2019的“滤镜”菜单下提供了多种功能的滤镜, 选择这些滤镜命令,可以制作出奇妙的图像效果。
效果图
11.3.21 “渲染”滤镜组
使用“渲染”滤镜组可以在图片中产生照明的效果,可以产生不同 的光源效果和夜景效果等。
11.3.22 “杂色”滤镜组
“杂色”滤镜组可以用来混合干扰,制作出着色像素图案的纹理。
11.3.23 “其它”滤镜组
“其它”滤镜组不同于其他分类的滤镜。在此滤镜特效中,用户可 以创建自己的特殊效果滤镜。
单击“滤镜”菜单,弹出下拉菜单。Photoshop CC 2019“滤镜” 菜单被分为4个部分,并已用横线划分开。
“滤镜”下拉菜单
11.2 滤镜与图像模式
当打开一幅图像,并对其使用滤镜时,必须了解图像模式和滤镜的 关系。RGB颜色模式可以使用Photoshop CC 2019中的任意一种滤镜。 不能使用滤镜的图像模式有位图、16位灰度图、索引颜色和48位RGB 图。在CMYK和Lab颜色模式下,不能使用的滤镜有画笔描边、视频、 素描、纹理和艺术效果等。
第四章-滤镜应用实例
滤镜应用实例(1)改善照片曝光在素材拍摄过程中经常会遇到一些自然条件与人为条件的限制,这样会造成素材的效果不是很理想,最常见的现象就是曝光不足。
这个例子就是利用“自动曝光”和“亮度和对比度”2个滤镜来改善曝光不足的素材。
实例操作:(1)右击项目时间轴→插入照片→选择素材“风景.jpg”(4-1);(2)在“滤镜”素材库中选择“暗房”类别,在素材库中选择“自动曝光”滤镜,将其拖拽到视频轨的素材上;(3)双击视频轨上的素材,进入属性面板,取消“替换上一个滤镜”复选框;(4)继续使用滤镜素材库中的“亮度和对比度”滤镜;(5)双击视频轨上的素材,进入属性面板,选择“亮度和对比度”滤镜,单击“自定义滤镜”按钮;(6)在弹出的“亮度和对比度”对话框中,设置第1和第2关键帧:亮度:45 对比度:252增强照片细节滤镜可以对素材进行细节方面的处理。
这个例子就是利用“自动调配”、“锐化”和“去除马赛克”3个滤镜组合来修饰素材的细节,目的是使人像的头发更加清晰、去除人像面部的斑纹并适当地改变色调。
实例操作:(1)右击项目时间轴→插入照片→选择素材“人像.jpg”(4-2);(2)在“滤镜”素材库中选择“暗房”类别,在素材库中选择“自动调配”滤镜,将其拖拽到视频轨的素材上;(3)双击视频轨上的素材,进入属性面板,取消“替换上一个滤镜”复选框;(4)继续使用滤镜素材库中的“焦距”类别中的“锐化”滤镜,单击“预设效果”按钮,选择第1行第2列预设效果;(5) 继续使用滤镜素材库中的“调整”类别中的“去除马赛克”滤镜,双击视频轨上的素材,进入属性面板,选择“去除马赛克”滤镜,单击“自定义滤镜”按钮;(6)在弹出的“去除马赛克”对话框中,设置第1和第2关键帧:压缩比:100 修复程度:5第1、2关键帧尝试用复制/粘贴的方法3制作油画风格“自然绘图”类滤镜用于模拟油画、漫画等手绘风格的效果。
这个例子就是利用“水彩”和“油画”2个滤镜组合来表现逼真的油画效果。
尼康 COOLPIX S8200 数码照相机 使用说明书
数码照相机参考手册商标信息•Microsoft、Windows和Windows Vista是Microsoft Corporation在美国和/或其它国家的注册商标或商标。
•Macintosh、Mac OS 和 QuickTime 是 Apple Inc. 在美国和其它国家的注册商标。
iFrame 标志和 iFrame 符号是 Apple Inc. 的商标。
•Adobe和Acrobat是Adobe Systems Inc.的注册商标。
•SDXC、SDHC和SD标志是SD-3C, LLC的商标。
•PictBridge是商标。
•HDMI、标志和High-Definition Multimedia Interface(高清晰度多媒体接口)是HDMI Licensing LLC的商标或注册商标。
•在本说明书或随尼康产品提供的其它文件中所提及的所有其它商标名称,分别为其相关所有者所持有的商标或注册商标。
AVC Patent Portfolio License本产品在AVC Patent Portfolio License下被授权于客户在个人和非商业使用范围内使用,用以(i)按照AVC标准进行视频编码(“AVC视频”),和/或(ii)对从事个人和非商业活动的客户编码的和/或从经授权可以提供AVC视频的视频供应商处获得的AVC视频进行解码。
任何其它使用范围均未获得授权或予以默示。
可以从MPEG LA, L.L.C.获得更多信息。
请访问。
简介照相机部件和基本操作拍摄和播放的基本操作拍摄功能播放功能录制和播放动画一般照相机设定参考部分技术注释和索引iii*如果在需要使用插头适配器的国家或地区购买了照相机,则会附带插头适配器。
插头适配器的形状会因购买照相机的国家或地区而异。
注:照相机不附送存储卡。
可充电电源适配器EH-69P*USB 连接线 UC-E6EG-CP16音频/视频线ViewNX 2 Installer CD (ViewNX 2安装光盘)Reference Manual CD (参考手册光盘)•保修卡iii简介关于本说明书如果您想立即使用照相机,请参见“拍摄和播放的基本操作”(A 13)。
iSee支持的PS滤镜 之一
iSee支持的PS滤镜之一iSee并不能支持所有PS滤镜,目前主要支持的是一些第三方滤镜,而PS官方滤镜和部分第三方滤镜还不能支持。
我们会将测试后确认支持的滤镜在论坛的“PS滤镜”板块发布,以便大家下载使用一、Alien Skin 公司出品的PS滤镜:1、Eye Candy 5 Textures》》漩涡效果样图:2、Splat:比较有趣的滤镜,和iSee的相框、涂鸦有些类似,操作也还简单》》填充图案样图:3、Xenofex:非常强大的平面影像滤镜,包含了14种效果:Electrify触电、Television电视、Shatter粉碎、Classic Mosaic经典马赛克、Rip Open卷边、Cracks裂纹、Puzzle拼图、Flag旗帜、Burnt Edges燃烧边缘、Lightning闪电、Stain污染、Constellation星座、Little Fluffy Clouds絮云、Crumple 折皱》》燃烧边缘样图:以上滤镜下载地址:/plugins/ps/AlienSkin.zip文件大小:10.08M使用限制:Eye Candy 5 Textures需要注册(运行“Eye Candy 注册.reg”)后使用安装方法:下载后解压到iSee\PSFilter目录,重新运行iSee后即可在PS滤镜的栏目中看到以 Alien Skin 开头的滤镜组,点击相应的滤镜即可进入使用二、Flaming Pear 公司出品的滤镜:只要是该公司出品的滤镜,iSee一般都可以支持,比较常见的滤镜主要有:1、Flood:可以做出令人叫绝的倒影效果,是该公司的经典产品》》112版本的效果样图:2、Glitterato:制作星空效果3、Melancholytron:边缘虚化效果,可以对照片做许多特殊处理以上滤镜下载地址:/plugins/ps/FlamingPear.zip文件大小:3.73M使用限制:不注册有时间限制,压缩文件中有注册码产生器安装方法:下载后解压到iSee\PSFilter目录,重新运行iSee后即可在PS滤镜的栏目中看到 Flaming Pear 滤镜组,点击相应的滤镜即可进入使用三、Kodak出品的照片美化修复滤镜:一共有4个滤镜1、Kodak Eastman Digital ROC Pro(解决偏色问题)曾获得2002年DIMA创新产品奖及2002年American Photo Magazine的“编辑选择”奖。
dreamweaver cs5滤镜详解——免费
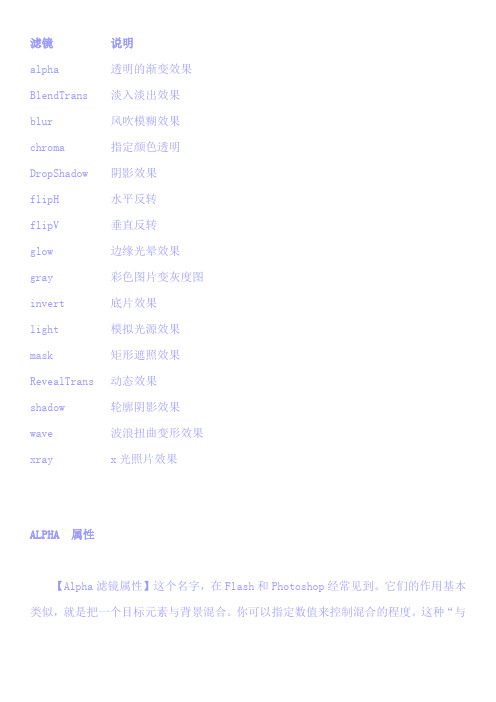
滤镜说明alpha 透明的渐变效果BlendTrans 淡入淡出效果blur 风吹模糊效果chroma 指定颜色透明DropShadow 阴影效果flipH 水平反转flipV 垂直反转glow 边缘光晕效果gray 彩色图片变灰度图invert 底片效果light 模拟光源效果mask 矩形遮照效果RevealTrans 动态效果shadow 轮廓阴影效果wave 波浪扭曲变形效果xray x光照片效果ALPHA 属性【Alpha滤镜属性】这个名字,在Flash和Photoshop经常见到。
它们的作用基本类似,就是把一个目标元素与背景混合。
你可以指定数值来控制混合的程度。
这种“与背景混合”通俗地说就是一个元素的透明度。
通过指定坐标,可以指定点、线、面的透明度。
由于“Alpha”滤镜的参数多,我们先来看一下下图:“opacity”:代表透明度程度。
范围是从0~100,他们其实是百分比的形式。
也就是说,0代表完全透明,100代表完全不透明。
“finishopacity”:是一个可选参数,如果想要设置渐变的透明效果,就可以使用他们来指定结束时的透明度。
范围也是0 到 100。
“style”:指定了透明区域的形状特征。
其中0代表统一形状、1代表线形、2代表放射状、3代表长方形。
“StartX”和“StartY”:代表渐变透明效果的开始X和Y坐标。
“FinishX”和“FinishY”:代表渐变透明效果结束X和Y坐标。
BLENDTRANS 属性【BlendTrans属性】淡入淡出的效果滤镜,能产生极精细的图片转换效果。
BlendTrans滤镜功能也比较单一,只有一个参数:Duration(变换时间)。
需要借助于 java script来调用它的方法来实现转换功能。
使用BlendTrans滤镜,首先您要准备几张宽高尺寸相同的图片,并分别命名,保存在图像目录下,如:images/*.jpg。
如果用4幅的话,分别取名为:blen1.jpg; blen2.jpg; blen3.jpg;blen4.jpg。
滤镜效果(四)修改
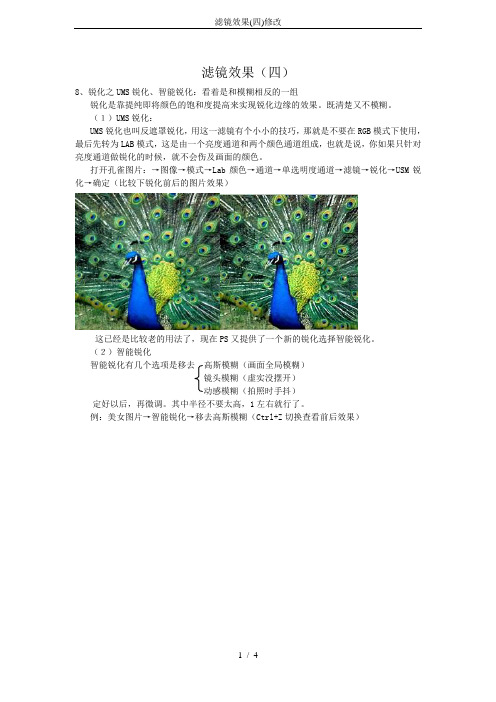
滤镜效果(四)8、锐化之UMS锐化、智能锐化:看着是和模糊相反的一组锐化是靠提纯即将颜色的饱和度提高来实现锐化边缘的效果。
既清楚又不模糊。
(1)UMS锐化:UMS锐化也叫反遮罩锐化,用这一滤镜有个小小的技巧,那就是不要在RGB模式下使用,最后先转为LAB模式,这是由一个亮度通道和两个颜色通道组成,也就是说,你如果只针对亮度通道做锐化的时候,就不会伤及画面的颜色。
打开孔雀图片:→图像→模式→Lab颜色→通道→单选明度通道→滤镜→锐化→USM锐化→确定(比较下锐化前后的图片效果)这已经是比较老的用法了,现在PS又提供了一个新的锐化选择智能锐化。
(2)智能锐化智能锐化有几个选项是移去高斯模糊(画面全局模糊)镜头模糊(虚实没摆开)动感模糊(拍照时手抖)定好以后,再微调。
其中半径不要太高,1左右就行了。
例:美女图片→智能锐化→移去高斯模糊(Ctrl+Z切换查看前后效果)其他的进一步锐化、锐化、锐化边缘可以用,但用一步两步还可以,用多了片子就有了糟粕,出现杂色,也是靠提纯,也会伤及到颜色。
七、动作(Action):很有用(比如出去拍了三千多张照片,统一编成动作,随时可以一齐调用),在条板中可以找到动作。
在动作条板中,先新建一个文件夹,把你要做的动作放在一个组里面。
然后按新建动作按钮新建一个动作,名称由你自己取;功能键你可以设置一个,用起来更方便;颜色也可以设置。
这时就在录制状态中了。
录制结束就可以点停止按钮。
这个动作你也可以随时修改的。
如果其中一步动作不想要,可以删掉也可以将此动作之前的钩关掉。
另外如果想针对某一张图片进行参数修改,可以把此动作之前钩之后的标签点中,这样,在动作进行到这一步时,会打开话框,就可以修改了。
注意1:用文件→自动→批处理可以处理一大批图片。
注意2:单纯一个动作是无法保存的,只能存一个文件夹。
动作的好处:非常方便快捷,可以省去做许多重复的无意义的工作。
设计人员刚工作时往往从做完稿开始,默认你是个PS使用高手(设计师出完稿后的工作由你去做)。
- 1、下载文档前请自行甄别文档内容的完整性,平台不提供额外的编辑、内容补充、找答案等附加服务。
- 2、"仅部分预览"的文档,不可在线预览部分如存在完整性等问题,可反馈申请退款(可完整预览的文档不适用该条件!)。
- 3、如文档侵犯您的权益,请联系客服反馈,我们会尽快为您处理(人工客服工作时间:9:00-18:30)。
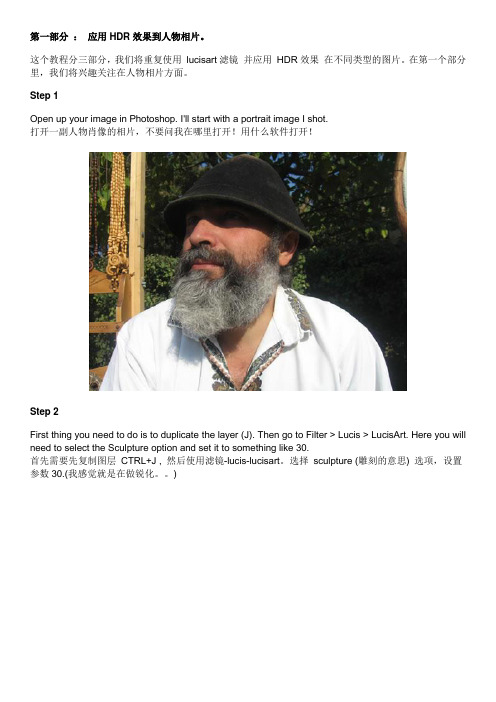
第一部分:应用HDR效果到人物相片。
这个教程分三部分,我们将重复使用lucisart滤镜并应用HDR效果在不同类型的图片。
在第一个部分里,我们将兴趣关注在人物相片方面。
Step 1
Open up your image in Photoshop. I'll start with a portrait image I shot.
打开一副人物肖像的相片,不要问我在哪里打开!用什么软件打开!
Step 2
First thing you need to do is to duplicate the layer (J). Then go to Filter > Lucis > LucisArt. Here you will need to select the Sculpture option and set it to something like 30.
首先需要先复制图层CTRL+J , 然后使用滤镜-lucis-lucisart。
选择sculpture (雕刻的意思) 选项,设置参数30.(我感觉就是在做锐化。
)
Step 3
Create a Layer Mask for this layer and fill it with black. This will hide all the effect. Then, take the brush (set to white) and draw over the man and the products he was selling. Leave the trees untouched.
为该层建立一个图层蒙版并填充黑色,它将隐藏所有的效果。
然后,将笔刷前景色设置成白色,把人和农作物画出来,不要碰到后面的树叶。
Step 4
Next I will add a new adjustment layer. Select the curves from the drop-down menu.
下面我将添加一个调整图层,选择曲线并将中心点略微向下拉。
(注意观察图像的深浅变化)
Step 5
Now using a black brush, simply draw over the eyes. But do this into the mask that was automatically created. In a portrait it is important that the eyes are not covered by the shadow. They need to be visible. 现在使用一个黑色笔刷,对曲线层蒙版进行修饰,对着眼睛周围的阴影进行修饰,注意不要让笔刷盖到眼睛上。
Step 6
Next press Command + A to make a selection, go to Edit > Copy Merged, and again go to Edit > Paste. Then go to Filter > Lucis > LucisArt and this time select Exposure and set it to 60. Then set the Opacity to 50%.
下面按CTRL+A 全选(苹果上就是commnd+a),然后点编辑-合并拷贝然后编辑-粘贴(英文版对照原文操作)。
然后滤镜-LUCIS-LUCISART,这次选择exposure(定时曝光)设置参数为60.然后设置不透明度为50%。