CentOS+Zimbra详细配置教程
Zimbra系统安装过程

目录目录 (1)Zimbra系统的安装过程 (2)前言、系统架构及DNS (2)一、安装环境 (4)1.1操作系统 (4)2.1 Zimbra版本 (5)3.1需要安装的软件包 (5)4.1修改文件 (5)二、安装Zimbra LDAP,实现主从复制 (5)1.1安装一个主的LDAP,两个从的LDAP (5)2.1安装第一个从的LDAP (11)3.1安装第二个从的LDAP (16)三、安装Zimbra MailStore (21)1.1安装 (21)2.1安装 (32)3.1安装其他邮箱服务器 (42)四、安装zimbra MTA (43)1.1安装mta01 (43)2.1安装mta02 (48)五、安装proxy (48)1.1安装 (48)六、归档组件及服务器的安装 (54)1.1安装zimbra-archiving组件 (54)2.1在其他服务器上安装zimbra-archiving组件 (58)3.1在上执行以下命令 (59)4.1在上执行以下命令 (59)5.1安装archive01服务器 (59)七、安装LVS (68)1.1安装ipvsadm (68)2.1负载服务器 (69)3.1 mta服务器 (70)4.1测试 (70)Zimbra系统的安装过程前言、系统架构及DNS1、系统架构vCPU vRAM vDISK OS IP1:DNS 1 512M 20G Centos 5.6 192.168.13.20 2:LVS 1 512M 20G Centos 5.6 192.168.13.21 3:ldap-master 2 1G 50G Centos 6.3 192.168.13.32 4:ldap-replica 2 1G 50G Centos 6.3 192.168.13.33 5:mail (jetty, mysql) 2 1G 50G Centos 6.3 192.168.13.30 6:mail-archive 2 1G 50G Centos 6.3 192.168.13.31 7:proxy (nginx),mta 2 1G 50G Centos 6.3 192.168.13.34 8:proxy (nginx),mta 2 1G 50G Centos 6.3 192.168.13.35 9:Zimbra-VIP 192.168.13.242、安装DNS# yum install bind3、配置DNS# vi /etc/named.conf输入以下内容:options {directory "/var/named";pid-file "/var/named/named.pid";forwarders { 202.101.224.67; 202.101.224.68; };allow-query { any; };};zone "." IN {type hint;file "named.root";};zone "0.0.127.in-addr-arpa" IN {type master;file "named.local";allow-update { none; };};zone "" IN {type master;file "";allow-update { none; };};zone "13.168.192.in-addr-arpa" IN {type master;file "named.13.168.192";allow-update { none; };};# cp /usr/share/doc/bind-9.3.6/sample/var/named/named.root /var/named/ # vi /var/named/named.local输入以下内容:$TTL 3h0.0.127.in-addr.arpa. IN SOA . admin@. (1 ; Serial3h ; Refresh after 3 hours1h ; Retry after 1 hours1w ; Expire after 1 week1h ) ; Negative caching TTL of 1 hour1.0.0.127.in-addr.arpa. IN PTR localhost.# vi /var/named/输入以下内容:$TTL 3h. IN SOA . admin@. (1 ; Serial3h ; Refresh after 3 hours1h ; Retry after 1 hours1w ; Expire after 1 week1h ) ; Negative caching TTL of 1 hour . IN NS .. IN MX 10 mail. IN A 192.168.13.20www IN A 192.168.13.24mail IN A 192.168.13.24zldapmaster IN A 192.168.13.32zldapreplica IN A 192.168.13.33zproxymta01 IN A 192.168.13.34zproxymta02 IN A 192.168.13.35zmailstore IN A 192.168.13.30zmailstore-archive IN A 192.168.13.31# vi /var/named/named.13.168.192输入以下内容:$TTL 3h13.168.192.in-addr.arpa. IN SOA . admin@. (1 ; Serial3h ; Refresh after 3 hours1h ; Retry after 1 hours1w ; Expire after 1 week1h ) ; Negative caching TTL of 1 hour 13.168.192.in-addr.arpa. IN NS .226.1.168.192.in-addr.arpa. IN PTR .4、启动DNS# /usr/sbin/named -g &注:-g显示启动时的日志,一边分析启动过程出现错误的原因。
CentOS安装Bugzilla
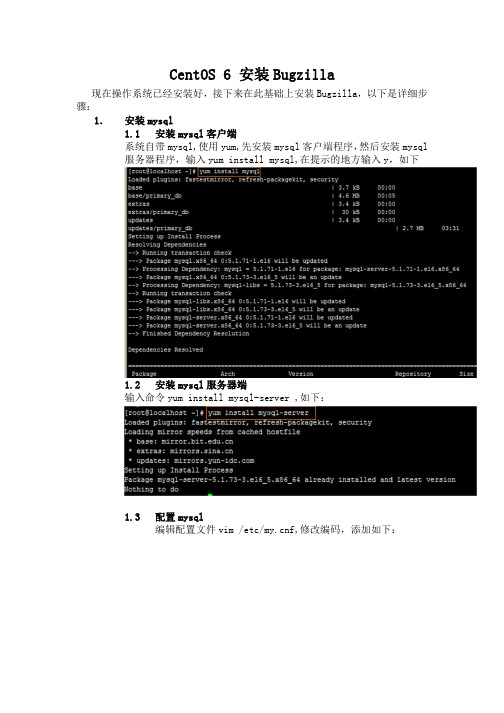
CentOS 6 安装Bugzilla现在操作系统已经安装好,接下来在此基础上安装Bugzilla,以下是详细步骤:1.安装mysql1.1安装mysql客户端系统自带mysql,使用yum,先安装mysql客户端程序,然后安装mysql服务器程序,输入yum install mysql,在提示的地方输入y,如下1.2安装mysql服务器端输入命令yum install mysql-server ,如下:1.3配置mysql编辑配置文件vim /etc/f,修改编码,添加如下:然后保存,退出。
启动mysql服务,输入service mysqld start然后修改root密码(默认密码为空):mysql –u root –p 用root用户登录MySQL服务器重新进入mysql,创建bugzilla要使用的数据库至此数据库安装完。
2.部署Bugzilla2.1 安装bugzilla把bugzilla压缩包放在/var/www/html/文件夹下,解压压缩包:tar –zxvf bugzilla-4.4.8 ,这时解压出一个文件夹,重命名该文件夹,mv压缩包名 bugzilla, cd命令进入文件夹,ls浏览文件如下:执行./checksetup.pl,如图:安装cpan,输入命令yum install cpan,安装perl模块,输入命令perl install-module.pl –all,自动安装perl模块,此时提示gcc包未安装,yum install gcc安装缺省的包:输入命令perl install-module.pl –all 自动安装bugzilla依赖的所有perl模块,这边需要一点时间,执行完该命令后,再执行./checksetup.pl查看生成的信息2.2 配置bugzilla必须包全部安装成功执行./checksetup.pl会生成localconfig文件,提示修改该文件的数据库用户名密码等信息,输入命令vim ./localconfig,在文件中作如下修改:再次执行./checksetup.pl,生成数据库,填写管理员邮件地址,真实用户名,和密码(邮箱密码)等3. 配置apache3.1 查看apache3.2 配置apache httpd配置apache httpd,修改httpd.conf文件(确定将bugzilla安在/var/www/html/bugzilla)执行命令:vi /etc/httpd/conf/httpd.conf 来编辑改配置文件。
Zimbra邮件系统安装配置
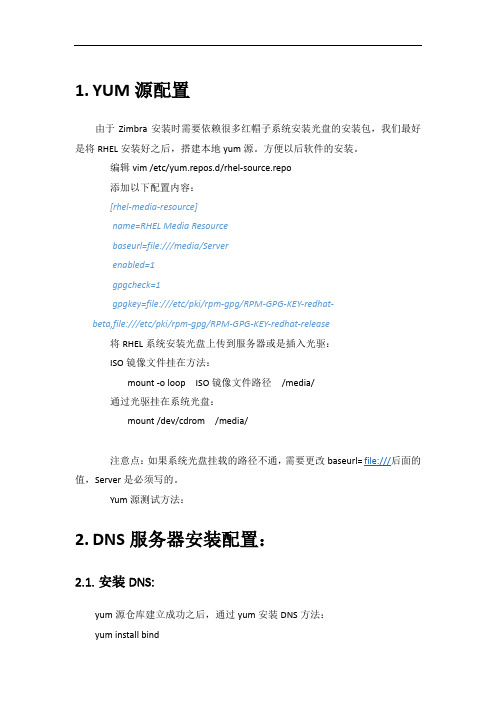
1.YUM源配置由于Zimbra安装时需要依赖很多红帽子系统安装光盘的安装包,我们最好是将RHEL安装好之后,搭建本地yum源。
方便以后软件的安装。
编辑vim /etc/yum.repos.d/rhel-source.repo添加以下配置内容:[rhel-media-resource]name=RHEL Media Resourcebaseurl=file:///media/Serverenabled=1gpgcheck=1gpgkey=file:///etc/pki/rpm-gpg/RPM-GPG-KEY-redhat-beta,file:///etc/pki/rpm-gpg/RPM-GPG-KEY-redhat-release将RHEL系统安装光盘上传到服务器或是插入光驱:ISO镜像文件挂在方法:mount -o loop ISO镜像文件路径/media/通过光驱挂在系统光盘:mount /dev/cdrom /media/注意点:如果系统光盘挂载的路径不通,需要更改baseurl= file:///后面的值,Server是必须写的。
Yum源测试方法:2.DNS服务器安装配置:2.1.安装DNS:yum源仓库建立成功之后,通过yum安装DNS方法:yum install bind根据提示输入Y,确定安装或证书验证。
2.2.配置DNS由于我们没有安装bind-chroot,Bind的所有配置文件都在/etc/下面,区域文件都在/var/named下面。
2.2.1.修改DNS配置文件编辑/etc/named.conf删除以下两行:listen-on port 53 { 127.0.0.1; };listen-on-v6 port 53 { ::1; };修改以下配置:allow-query { localhost; };修改成allow-query { any; };2.2.2.添加区域配置:添加区域配置:在/etc/named.rfc1912.zones添加域名的区域配置:内容如下:zone "" IN {type master;file ".zone";};将/var/named/下的named.localhost文件复制一份,文件名更改为.zone。
centossamba服务器配置
CentOS Samba 服务器配置CentOS Samba 服务器配置前言在我们使用Windows 作为客户机的时候,通常有文件、打印共享的需求。
作为Windows 网络功能之一,通常可以在Windows客户机之间通过Windows Network 固有的功能实现这些要求。
然而,通过Samba 我们也可以让一台CentOS 主机来兼容Windows 网络,实前言在我们使用Windows 作为客户机的时候,通常有文件、打印共享的需求。
作为Windows 网络功能之一,通常可以在Windows客户机之间通过Windows Network 固有的功能实现这些要求。
然而,通过Samba 我们也可以让一台CentOS 主机来兼容Windows 网络,实现同样的功能,进而充分发挥CentOS 主机的可用性。
本篇文档主要介绍怎样通过Samba 服务器的构建实现Windows 网络中的文件共享。
安装Samba首先,通过yum 来在线安装Samba 。
[root@sample ~]# yum -y install samba ← 安装SambaSetting up Install ProcessSetting up repositoriesupdate 100% |=========================| 951 B 00:00base 100% |=========================| 1.1 kB 00:00addons 100% |=========================| 951 B 00:00extras 100% |=========================| 1.1 kB 00:00Reading repository metadata in from local files primary.xml.gz 100% |=========================| 73 kB 00:00update :################################################## 212/212Added 212 new packages, deleted 0 old in 4.94 seconds primary.xml.gz 100% |=========================| 569 kB 00:00base :############################################## #### 1500/1500Added 1500 new packages, deleted 0 old in 28.97 secondsprimary.xml.gz 100% |=========================| 157 B 00:00Added 0 new packages, deleted 0 old in 0.03 seconds primary.xml.gz 100% |=========================| 32 kB 00:00extras :############################################## #### 124/124Added 124 new packages, deleted 0 old in 1.93 seconds Parsing package install argumentsResolving Dependencies--> Populating transaction set with selected packages. Please wait.---> Downloading header for samba to pack into transaction set.samba-3.0.10-1.4E.9.i386. 100%|=========================| 101 kB 00:00---> Package samba.i386 0:3.0.10-1.4E.9 set to be updated--> Running transaction check--> Processing Dependency: samba-common =0:3.0.10 for package: samba--> Restarting Dependency Resolution with new changes.--> Populating transaction set with selected packages. Please wait.---> Downloading header for samba-common to pack into transaction set.samba-common-3.0.10-1.4E. 100%|=========================| 37 kB 00:00---> Package samba-common.i386 0:3.0.10-1.4E.9 set to be updated--> Running transaction check Dependencies Resolved============================================ =================================Package Arch Version Repository Size============================================ =================================Installing:samba i386 3.0.10-1.4E.9 base 13 MInstalling for dependencies:samba-common i386 3.0.10-1.4E.9 base 5.0 M Transaction Summary============================================ =================================Install 2 Package(s)Update 0 Package(s)Remove 0 Package(s)Total download size: 18 MDownloading Packages:(1/2): samba-common-3.0.1 100%|=========================| 5.0 MB 00:04(2/2): samba-3.0.10-1.4E. 100%|=========================| 13 MB 00:11 warning: rpmts_HdrFromFdno: V3 DSA signature: NOKEY, key ID 443e1821Public key for samba-common-3.0.10-1.4E.9.i386.rpm is not installedRetrieving GPG key from/centos/RPM-GPG-KEY-centos4 Importing GPG key 0x443E1821 "CentOS-4 key <>" Key imported successfullyRunning Transaction TestFinished Transaction TestTransaction Test SucceededRunning TransactionInstalling: samba-common######################### [1/2]Installing: samba ######################### [2/2] Installed: samba.i386 0:3.0.10-1.4E.9Dependency Installed: samba-common.i3860:3.0.10-1.4E.9Complete!配置Samba然后,通过编辑/etc/samba/smb.conf ,根据需求配置Samba。
CentOS 7 安装配置SAMBA服务器及权限配置

Samba服务器是我们常用文件资源共享服务器,Samba服务器配置多种多样,可以根据不同用户或用户组访问不同目录进行配置。
下面开始讲解配置流程1、安装Samba服务器# yum -y install samba samba-client samba-common//或者使用rpm安装#rpm -ivh samba-4.1.1-37.el7_0.src.rpm2、创建共享目录#mkdir /smb3、配置内核参数# ulimit -n 16384# vi /etc/security/limits.conf#在最后加入以下内容* - nofile 16384Tip: 这主要是避免在启动Samba时出现以下警告信息:rlimit_max: increasing rlimit_max (1024) tominimum Windows limit (16384) 4、配置Samba参数#cd /etc/samba#mv smb.conf smb.conf.bf#touch smb.conf#vi smb.conf将下面内容复制进去[global]workgroup=WORKGROUPnetbios name=Amapleserver string=Samba Server#security=sharesecurity=usermap to guest = Bad User[share]path = /smbpublic = nowritable = yeswrite list = @sambavalidusers = @samba如果需要根据不同用户进入不同目录用share参数修改为[Share]path = /smb/%upublic = nowritable = yeswrite list = @sambavalidusers = @samba如果需要开启公共区域可以在share后面追加,根据需要开启[Public]path=/smb/docsreadonly=yesbrowseable=yesguest ok=yes5、创建用户组# groupadd samba6、创建用户# useradd -g samba amapleuseradd -g samba samba7、创建SAMBA用户# smbpasswd -a amaple8、赋值目录权限# chown samba:samba /smb# chmod 770 /smb9、启动samba服务器sysctltem start samaba然后在windows测试下如果不行关闭下防火墙和selinux 如果选择的是根据不同用户进入不同目录用share参数修改为10、创建用户目录mkdir /smb/amaple# chown amaple:samba /smb# chmod 755 /smb/amaple如果会setfacl建议用该它进行设置权限更加妥当,还有可以搭配mount目录挂载使用更加方便。
(1)CENTOS5.5_SAMBA详细配置说明
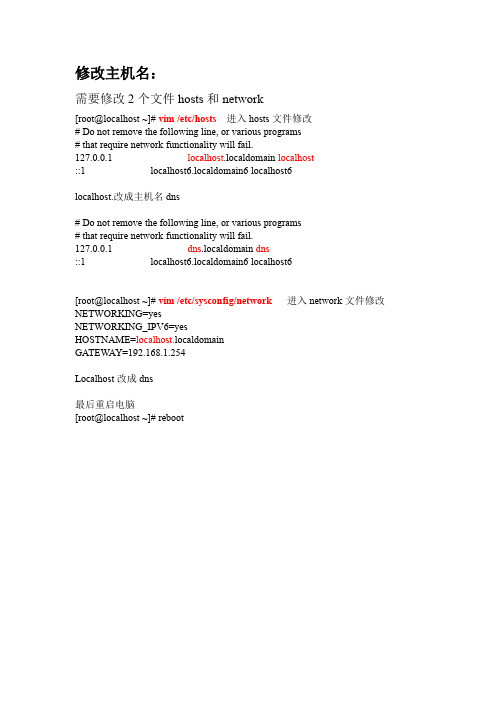
修改主机名:需要修改2个文件hosts和network[root@localhost~]#vim/etc/hosts进入hosts文件修改#Do not remove the following line,or various programs#that require network functionality will fail.127.0.0.1localhost.localdomain localhost::1localhost6.localdomain6localhost6localhost.改成主机名dns#Do not remove the following line,or various programs#that require network functionality will fail.127.0.0.1dns.localdomain dns::1localhost6.localdomain6localhost6[root@localhost~]#vim/etc/sysconfig/network进入network文件修改NETWORKING=yesNETWORKING_IPV6=yesHOSTNAME=localhost.localdomainGATEWAY=192.168.1.254Localhost改成dns最后重启电脑[root@localhost~]#reboot修改网卡IP地址:进入网卡配置文件修改[root@dns~]#vim/etc/sysconfig/network-scripts/ifcfg-eth0#Advanced Micro Devices[AMD]79c970[PCnet32LANCE]DEVICE=eth0//设备名字BOOTPROTO=static//ip获取方式dhcp动态或static静态BROADCAST=192.168.1.255//广播地址HWADDR=00:0C:29:99:1A:ED//MAC地址IPADDR=192.168.1.1//IP地址IPV6INIT=yesIPV6_AUTOCONF=yesNETMASK=255.255.255.0//子网掩码NETWORK=192.168.1.0ONBOOT=yes一般红色加粗部分是需要自己填写,可以静态设置IP地址。
zimbra 8.6.0 安装部署手册V1.0.0
Linux下安装Zimbra 8.6.0 协同办公套件(邮件系统)1Zimbra简介Zimbra是一家提供专业的电子邮件软件开发供应商,主要提供ZimbraDesktop邮件管理软件。
2007年9月,Zimbra被雅虎收购。
雅虎用3.50亿美元收购电子邮件软件提供商Zimbra。
Zimbra提供的品牌电子邮件软件包含日历和移动功能以及离线工作功能。
这家公司拥有200个教育行业、商业和互联网服务提供商合作伙伴,其中包括Comcast公司。
该公司向大约900万用户提供品牌的电子邮件服务。
Zimbra与众不同的特点是其“Zimlet“网络服务提供了更多的电子邮件功能。
例如,人们可以简单地用鼠标点击电子邮件程序中的航班信息以检查航班的状况。
用户还可以在电子邮件中跟踪FedEx公司的投递情况并且获得地图、股票和其它信息。
ZIMBRA公司目前通过自己的开放平台向用户提供电邮、日程管理程序和联系人管理工具。
Zimbra开放平台可让用户定制功能并将自己与其他网络服务连接起来。
通过较低价格和更灵活的服务方式,Zimbra从微软上海Exchange电邮平台手中夺得了客户。
Zimbra与众不同的特点是其“Zimlet”网络服务提供了更多的电子邮件功能。
例如,人们可以简单地用鼠标点击电子邮件程序中的航班信息以检查航班的状况。
用户还可以在电子邮件中跟踪FedEx公司的投递情况并且获得地图、股票和其它信息。
Zimbra的核心产品是Zimbra协作套件(Zimbra Collaboration Suite,简称ZCS)。
除了它的核心功能是电子邮件和日程安排服务器,当然还包括许多其它的功能,就象是下一代的微软Exchange。
在电子邮件和日程安排之外,它还提供文档存储和编辑、即时消息以及一个利用获奖技术开发的全功能的管理控制台。
ZCS同时也提供移动设备的支持,以及与部署于Windows、Linux或apple操作系统中的桌面程序的同步功能。
CentOS5.1 L.M.A.P环境配置全图解之一——系统安装
CentOS5.1 L.M.A.P环境配置全图解之一——系统安装其实我的很多朋友都说,这个根本没必要专门去写文档,因为系统都不会装还搞什么环境,但是我总不这么认为,记得我第一次配置的时候,不是这个编译不过,就是那个错误,所以我觉得要不然不写,既然写了就完完整整地写,也不过就说多花半个小时而已!Ok,下面我们开始,老规矩,还是在虚拟机下演示,从最开始的系统安装开始!至于怎么调整BIOS支持从光驱引导就我就不说了。
这个太基本了………从光驱引导后,第一个界面:直接回车就可以!是否检查安装媒体:我们这里选择Skip跳过吧,我的安装盘也是从电驴上下载,装了几十台出去了,没有问题……下面引导程序将检测硬件,然后自动引导进入PE系统(win下习惯了,暂时就这么称呼吧-_-!),这时候你的鼠标就可以用了欢迎界面:用鼠标点击Next(下一步)语言选择界面,我曾经写过一篇同样的文档,但因为硬盘更换,丢失了,以前那个写的是选择中文,这次我们选择英语,即默认!在下一步键盘选择界面:默认,下一步!分区方式选择,几个选项的大概意思就是,让系统自动分区,保留原分区,自定义手工分区,看我下图,选择自定义手工分区!下一步分区界面:现在说说分区约定/boot 引导分区 256M/ 根分区 6000MSwap 交换分区(虚拟内存)根据你物理内存的2倍分/tmp 临时文件4000M/usr 程序安装目录 ./configure –prefix=/usr/local/软件目录下面的分区我说明用途你根据你的硬盘实际大小分/var 数据库存档位置/home 网站页面存放目录下面是我分好区的截图:分好后我们下一步!引导界面安装界面:默认,直接下一步!网络配置配置界面,这里我说明各个位置是什么意思,你们按照你们自己的网络自己填!第二副:下面是我全部设置好后的图:全部设置好后我们下一步!时区选择界面:选择Asia/Shanghai (上海) 看下图继续下一步!设置root密码,这里必须设置,root是类unix系统中最高的管理员!从这里开始可以比较关键了!因为这里到了组建选择界面,按照下图设置!取消掉Desktop-Gnome(图形界面,谁配置服务器用图形阿,特别是linux下-_-!)选项选择Customiz now (立即定制组建)然后下一步!具体组建选择这里我只说需要的,没有的全部取消掉,而且我说的全部的意义是,子选项里面全部的!下面有一个Optional packages 按选项,点开后里面有每个项目的具体组件!Development 下的Development tools 全部选择!Legacy Software Development 全部选择Base System 下的取消掉Dialup Networking Support (拨号网络支持,谁现在还用这个啊-_-!)Base 默认,不要动它!其他的全部不要,毕竟服务器越精简资源使用的越小!下面我选择好的图:好,继续,下一步!这时系统将对你选择的组件做依赖性检查,稍等……检查完后:这时候系统将格式化硬盘,然后做内核和组件安装,我在实机上,也不过15分钟左右就安装完了,毕竟可以说是最精简安装了……安装完成!看下图,看下图:此时光驱会自动弹出,取出光盘(我超级喜欢linux这个设计-_-: 不像win还要自己按光驱!看样子我是懒到家了…….),点击Reboot,调整BIOS直接从硬盘启动,然后进入系统!重起后进入到这个界面:依次往下分别是验证配置防火墙配置网络配置系统服务配置这里我们先不管它,后面在实际配置环境中我们还要须用到它,到时候会作特别说明直接用TAB键选择Exit(退出)登陆界面:好了,系统安装就到这里,明天就是环境配置!。
Zimbra和Active Directory的结合,Zimbra使用AD进行认证
Zimbra和Active Directory的结合,Zimbra使用AD进行认证在日常Active Directory管理中,需要AD辅佐认证的服务好多,今天进行Zimbra和AD结合,是Zimbra通过AD进行认证,账号管理更简单方便。
测试准备:安装系统:PC1:Centos6.5 64 最小化安装。
PC2:Windows server 2012安装Zimbra1.yum安装依赖库2.yum -y install libidn11 curl fetchmail libpcre3 libgmp3c2 libxml2libaiolibstdc++6opensslperlsysstatlibtool-ltdlcompat-libstdc* nc file3.yum -y update4.停止系统默认邮件服务5.chkconfig postfix off6./etc/init.d/postfix stopShutting down postfix: [ OK ]7.关闭SELINUX(zimbra要求的。
)8.vi /etc/selinux/config# This file controls the state of SELinux on the system.# SELINUX= can take one of these three values:# enforcing – SELinux security policy is enforced.# permissive – SELinux prints warnings instead of enforcing.# disabled – No SELinux policy is loaded.SELINUX=disabled# SELINUXTYPE= can take one of these two values:# targeted – Targeted processes are protected,# mls – Multi Level Security protection.SELINUXTYPE=targeted9.改系统防火墙配置(根据个人需要修改)10.vi /etc/sysconfig/iptables增加iptables内容如下:# enable zimbra ports-A INPUT -mstate --state NEW -m tcp -p tcp --dport25 -j ACCEPT-A INPUT -mstate --state NEW -m tcp -p tcp --dport80 -j ACCEPT-A INPUT -mstate --state NEW -m tcp -p tcp --dport110 -j ACCEPT-A INPUT -mstate --state NEW -m tcp -p tcp --dport389 -j ACCEPT-A INPUT -mstate --state NEW -m tcp -p tcp --dport443 -j ACCEPT-A INPUT -mstate --state NEW -m tcp -p tcp --dport465 -j ACCEPT-A INPUT -mstate --state NEW -m tcp -p tcp --dport993 -j ACCEPT-A INPUT -mstate --state NEW -m tcp -p tcp --dport995 -j ACCEPT-A INPUT -mstate --state NEW -m tcp -p tcp --dport5222 -j ACCEPT-A INPUT -mstate --state NEW -m tcp -p tcp --dport7071 -j ACCEPT-A INPUT -mstate --state NEW -m tcp -p tcp --dport873 -j ACCEPT-A INPUT -mstate --state NEW -m tcp -p tcp --dport7110 -j ACCEPT-A INPUT -mstate --state NEW -m tcp -p tcp --dport7780 -j ACCEPT11.修改hosts文件12.vi /etc/hostshosts文件增加内容如下:10.11.32.74 13.重新启动系统SELINUX需要重启才能生效。
centos操作系统安装配置详解
CentOS操作系统安装配置作者:传媒学院 08现教1班 2010-7-29一.系统环境部署及调整1.检查系统是否正常# more /var/log/messages(检查有无系统级错误信息)# dmesg (检查硬件设备是否有错误信息)# ifconfig(检查网卡设置是否正确)# ping (检查网络是否正常)2.关闭不需要的服务# ntsysv以下仅列出需要启动的服务,未列出的服务一律关闭:atdcrondirqbalancemicrocode_ctlnetworksendmailsshdsyslog3.重新启动系统# init 64.使用yum程序安装所需软件包(以下为标准的RPM包名称)# yum install ntp vim-enhanced gcc gcc-c++ flex bison autoconf automake bzip2-devel ncurses-devel libjpeg-devel libpng-devel libtiff-devel freetype-devel pam-devel kernel5.定时校正服务器时钟,定时与中国国家授时中心授时服务器同步# crontab -e加入一行:*/30 * * * * ntpdate 210.72.145.446.源代码编译安装所需包(1) GD2# cd /usr/local/src# wget /releases/oldreleases/gd-2.0.35.tar.gz# tar xzvf gd-2.0.35.tar.gz# cd gd-2.0.35# ./configure --prefix=/usr/local/gd2# make 编译# make install 这是安装(2) LibXML2# cd /usr/local/src#wget /pub/gnome/sources/libxml2/2.6/libxml2-2.6.30.tar.gz # tar xzvf libxml2-2.6.30.tar.gz# cd libxml2-2.6.30# ./configure --prefix=/usr/local/libxml2# make# make install(3) Apache 日志截断程序# cd /usr/local/src# wget /download/cronolog-1.6.2.tar.gz# tar xzvf cronolog-1.6.2.tar.gz# cd cronolog-1.6.2# ./configure –prefix=/usr/local/cronolog# make# make install8.升级OpenSSL和OpenSSH# cd /usr/local/src# wget /source/openssl-0.9.8e.tar.gz# wget /openssh/portable/openssh-4.6p1.tar.gz # tar xzvf openssl-0.9.8e.tar.gz# cd openssl-0.9.8e# ./config --prefix=/usr/local/openssl# make# make test# make install# cd ..# tar xzvf openssh-4.6p1.tar.gz# cd openssh-4.6p1# ./configure\"--prefix=/usr" \"--with-pam" \"--with-zlib" \"--sysconfdir=/etc/ssh" \"--with-ssl-dir=/usr/local/openssl" \"--with-md5-passwords"# make# make install(1)禁用 SSH V1 协议找到:#Protocol 2,1改为:Protocol 2(2)禁止root直接登录此处先建立一个普通系统用户:# useradd username# passwd username找到:#PermitRootLogin yes改为:PermitRootLogin no(3)禁用服务器端GSSAPI找到以下两行,并将它们注释:GSSAPIAuthentication yesGSSAPICleanupCredentials yes(4)禁用 DNS 名称解析找到:#UseDNS yeas改为:UseDNS no(5)禁用客户端 GSSAPI# vi /etc/ssh/ssh_config找到:GSSAPIAuthentication yes将这行注释掉。
Linux CentOS7 Samba
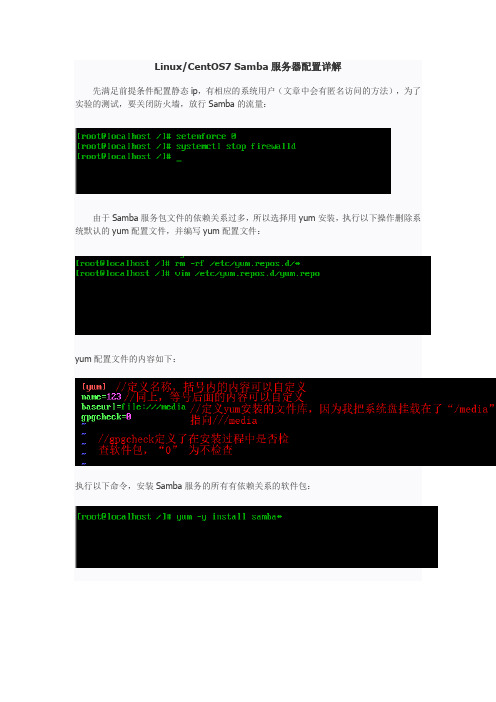
Linux/CentOS7 Samba服务器配置详解先满足前提条件配置静态ip,有相应的系统用户(文章中会有匿名访问的方法),为了实验的测试,要关闭防火墙,放行Samba的流量:由于Samba服务包文件的依赖关系过多,所以选择用yum安装,执行以下操作删除系统默认的yum配置文件,并编写yum配置文件:yum配置文件的内容如下:执行以下命令,安装Samba服务的所有有依赖关系的软件包:安装成功后,执行以下命令,进入Samba服务的配置文件中,增加共享目录(在这之前我们要有用来共享的目录文件,以及系统用户账号)Samba服务的配置文件如下:在“smb.conf ” 文件中存在三个特殊的配置段:[ global ] :全局设置:这部分配置项的内容对整个Samba服务器都有效。
[ homes ] :宿主目录的共享设置:设置Linux用户的默认共享,对应用户的宿主目录。
当用户访问服务器中与自己用户名同名的共享目录时,通过验证后将自动映射到该用户的宿主文件夹中。
[ printers ]:打印机共享设置:如果需要共享打印机设备,可以在这部分进行配置Smb.conf文件中常见的配置项及含义说明:常见全局配置项的含义workgroup:所在工作组名称;server string:服务器描述信息;security:安全级别,可用值如下:User(本服务器验证连接)、server(指定另一台服务器验证)、ads(由Windows域控制器验证);log file:日志文件位置,“%m” 变量表示客户机地址;passwd backend:设置共享账户文件的类型;comment:对共享目录的注释、说明信息;path:共享目录在服务器中对应的实际路径;browseable:该共享目录在“网上邻居”中是否可见;guest ok:是否允许所有人访问,等效于“public” ;writable:是否可写,与read only 的作用相反;我们想要共享某个目录时,在配置文件的最后另起一行,按照上面的格式输入相应的信息,就可以了以上是我要共享的目录,目录属主为用户“test”,为了方便,权限给到了最大,在实际中可以根据情况设置相应的权限,在smb.conf配置文件中写入以下字段:其中各项含义如下:comment:共享目录的描述信息;path:设置对应共享目录在服务器上的文件夹路径;public:是否所有人可以访问共享目录;read only:是否只读,与“writable” 作用相反;valid users:共享目录的授权设置,允许哪些用户访问共享目录,这里设置了两个用户“ t est”和“root”。
linuxcentos下安装zebra标签打印机

用户可将本文的内容或服务用于个人学习、研究或欣赏,以及其他非商业性或非盈利性用途,但同时应遵守著作权法及其他相关法律的规定,不得侵犯本网站及相关权利人的合法权利。除此以外,将本文任何内容或服务用于其他用途时,须征得本人及相关权利人的书面许可,并支付报酬。
个人收集整理勿做商业用途转载或引用本文内容必须是以新闻性或资料性公共免费信息为使用目的的合理善意引用不得对本文内容原意进行曲解修改并自负版权等法律责任封面Leabharlann 作者:PanHongliang
仅供个人学习
linux centos5.6下添加zebra标签打印机
1、root用户执行startx,进入图形界面。
2. lp -d printer aa.lbl注:printer为新建的打印机名称
7、说明:linux的打印机驱动中还可以选择zebra-zpl驱动,但打印的是文本内容支持中文。
如果需要发送zpl指令打印,需要选择Raw驱动,如果要打印中文,需要给打印机上传中文字库。
版权申明
本文部分内容,包括文字、图片、以及设计等在网上搜集整理。版权为潘宏亮个人所有
Users may use the contents or services of this article for personal study, research or appreciation, and other non-commercial or non-profit purposes, but at the same time, they shall abide by the provisions of copyright law and other relevant laws, and shall not infringe upon the legitimate rights of this website and its relevant obligees. In addition, when any content or service of this article is used for other purposes, written permission and remuneration shall be obtained from the person concerned and the relevant obligee.
CentOS5.1 L.M.A.P环境配置全图解之二——环境配置
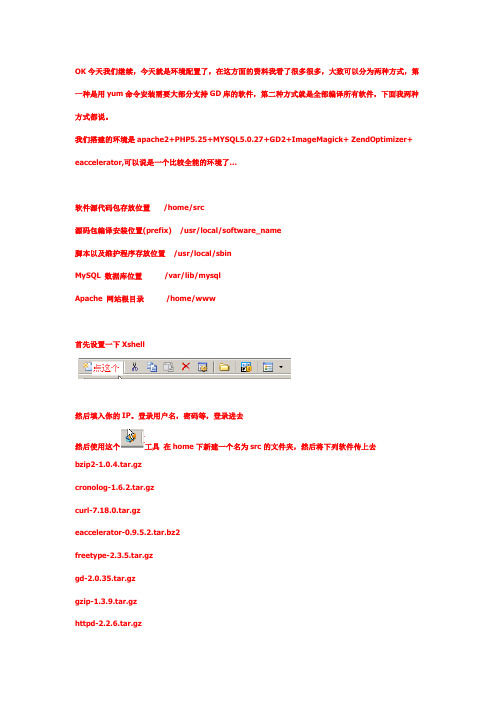
OK今天我们继续,今天就是环境配置了,在这方面的资料我看了很多很多,大致可以分为两种方式,第一种是用yum命令安装需要大部分支持GD库的软件,第二种方式就是全部编译所有软件,下面我两种方式都说。
我们搭建的环境是apache2+PHP5.25+MYSQL5.0.27+GD2+ImageMagick+ ZendOptimizer+ eaccelerator,可以说是一个比较全能的环境了…软件源代码包存放位置 /home/src源码包编译安装位置(prefix) /usr/local/software_name脚本以及维护程序存放位置/usr/local/sbinMySQL 数据库位置 /var/lib/mysqlApache 网站根目录 /home/www首先设置一下Xshell然后填入你的IP。
登录用户名,密码等,登录进去然后使用这个工具在home下新建一个名为src的文件夹,然后将下列软件传上去bzip2-1.0.4.tar.gzcronolog-1.6.2.tar.gzcurl-7.18.0.tar.gzeaccelerator-0.9.5.2.tar.bz2freetype-2.3.5.tar.gzgd-2.0.35.tar.gzgzip-1.3.9.tar.gzhttpd-2.2.6.tar.gzImageMagick-6.3.2-9.tar.gzimagick-2.1.0.tgzjpegsrc.v6b.tar.gzlibiconv-1.9.2.tar.gzlibmcrypt-2.5.7.tar.gzlibpng-1.2.25.tar.gzlibxml2-2.6.31.tar.gzmhash-0.9.9.tar.gzmysql-5.0.27.tar.gzncurses-5.6.tar.gzopenssh-4.7p1.tar.gzopenssl-0.9.8g.tar.gzphp-5.2.5.tar.bz2suhosin-patch-5.2.5-0.9.6.2.patch.gztiff-3.8.2.tar.gzZendOptimizer-3.3.0a-linux-glibc21-i386.tar.gzzlib-1.2.3.tar.gz以上这些是使用全手工编译安装需要的,如果你怕麻烦是用yum命令安装GD需要支持的一些软件化。
在centos中使用zipalign

在centos中使用zipalignzipalign是一个用于优化Android应用程序的工具,它可以对APK文件进行对齐操作,从而提高应用程序的性能和效率。
在CentOS操作系统中,我们可以通过以下步骤来使用zipalign工具。
第一步,安装zipalign工具。
在CentOS中,我们可以使用以下命令来安装zipalign:```sudo yum install android-tools```这个命令会安装Android SDK中的工具包,其中包括zipalign工具。
第二步,找到要优化的APK文件。
在CentOS中,我们可以使用以下命令来查找APK文件:```find /path/to/apk/files -name "*.apk"```将“/path/to/apk/files”替换为你存放APK文件的路径。
第三步,使用zipalign工具对APK文件进行对齐操作。
在CentOS 中,我们可以使用以下命令来对APK文件进行对齐操作:```zipalign -v 4 /path/to/input.apk /path/to/output.apk```将“/path/to/input.apk”替换为要优化的APK文件的路径,将“/path/to/output.apk”替换为优化后的APK文件的路径。
在这个命令中,“-v”参数表示输出详细信息,“4”参数表示对齐的字节大小,默认为4字节。
第四步,验证优化后的APK文件。
在CentOS中,我们可以使用以下命令来验证优化后的APK文件是否已经对齐:```zipalign -c -v 4 /path/to/output.apk```将“/path/to/output.apk”替换为优化后的APK文件的路径。
在这个命令中,“-c”参数表示检查APK文件是否已经对齐。
通过以上步骤,我们就可以在CentOS中使用zipalign工具对APK 文件进行对齐操作了。
zimbra安装

AGREEMENT, THEN DO NOT DOWNLOAD, INSTALL OR USE THE PRODUCT.
License Terms for the Zimbra Collaboration Suite:
perl-5.8.8...FOUND standard system perl-5.8.8
安装过程:
a) 卸载Zimbra光盘:
Umount /media
b) 在VIC上,右键点击 Guest OS ,选择Setting;
c) Hardware > CD/DVD Drive 1(edited) > Datastore ISO file然后输入[storage2] Iso/CentOS-5.1-x86_64-bin-DVD.iso;
gmp-4.1.4-10
compat-libstdc++-296...FOUND compat-libstdc++-296-2.96-138
compat-libstdc++-33...FOUND compat-libstdc++-33-3.2.3-61
compat-libstdc++-33-3.2.3-61
Found zimbra-spell
Found zimbra-proxy
9. 选择安装的组件包括:
Install zimbra-ldap [Y] Y
Install zimbra-logger [Y] Y
Install zimbra-mta [Y] Y
CentOS_6.5_安装_Bugzilla(绝对可用)
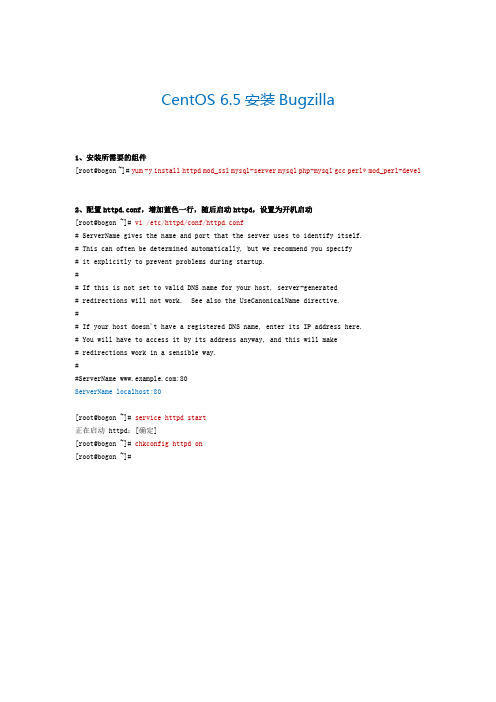
CentOS 6.5安装Bugzilla1、安装所需要的组件[root@bogon ~]# yum -y install httpd mod_ssl mysql-server mysql php-mysql gcc perl* mod_perl-devel2、配置httpd.conf,增加蓝色一行,随后启动httpd,设置为开机启动[root@bogon ~]# vi /etc/httpd/conf/httpd.conf# ServerName gives the name and port that the server uses to identify itself.# This can often be determined automatically, but we recommend you specify# it explicitly to prevent problems during startup.## If this is not set to valid DNS name for your host, server-generated# redirections will not work. See also the UseCanonicalName directive.## If your host doesn't have a registered DNS name, enter its IP address here.# You will have to access it by its address anyway, and this will make# redirections work in a sensible way.##ServerName :80ServerName localhost:80[root@bogon ~]# service httpd start正在启动 httpd:[确定][root@bogon ~]# chkconfig httpd on[root@bogon ~]#3、编辑hosts文件,为主机名配置一个本地IP地址,随后启动mysqld服务[root@bogon ~]# vi /etc/hosts127.0.0.1 localhost localhost.localdomain localhost4 localhost4.localdomain4 ::1 localhost localhost.localdomain localhost6 localhost6.localdomain6 127.0.0.1 bogon[root@bogon ~]# service mysqld start初始化 MySQL 数据库: Installing MySQL system tables...OKFilling help tables...OKTo start mysqld at boot time you have to copysupport-files/mysql.server to the right place for your systemPLEASE REMEMBER TO SET A PASSWORD FOR THE MySQL root USER !To do so, start the server, then issue the following commands:/usr/bin/mysqladmin -u root password 'new-password'/usr/bin/mysqladmin -u root -h bogon password 'new-password'Alternatively you can run:/usr/bin/mysql_secure_installationwhich will also give you the option of removing the testdatabases and anonymous user created by default. This isstrongly recommended for production servers.See the manual for more instructions.You can start the MySQL daemon with:cd /usr ; /usr/bin/mysqld_safe &You can test the MySQL daemon with mysql-test-run.plcd /usr/mysql-test ; perl mysql-test-run.plPlease report any problems with the /usr/bin/mysqlbug script![确定]正在启动 mysqld: [确定][root@bogon ~]# chkconfig mysqld on[root@bogon ~]#4、配置mysql[root@bogon ~]# mysqladmin -u root -p password "123456"Enter password: 这里要求输入之前的密码,由于默认密码为空,直接回车即可[root@bogon ~]# mysql -uroot -p123456Welcome to the MySQL monitor. Commands end with ; or \g.Your MySQL connection id is 9Server version: 5.1.73 Source distributionCopyright (c) 2000, 2013, Oracle and/or its affiliates. All rights reserved.Oracle is a registered trademark of Oracle Corporation and/or itsaffiliates. Other names may be trademarks of their respectiveowners.Type 'help;' or '\h' for help. Type '\c' to clear the current input statement.mysql> create database bugs;Query OK, 1 row affected (0.00 sec)mysql> grant all on bugs.* to root@localhost identified by "123456";Query OK, 0 rows affected (0.00 sec)mysql> flush privileges;Query OK, 0 rows affected (0.01 sec)mysql> quitBye[root@bogon ~]#5、下载并解压Bugzilla[root@bogon ~]# tar xf bugzilla-4.4.tar.gz -C /var/www/html/[root@bogon ~]# cd /var/www/html/[root@bogon html]# mv bugzilla-4.4/ bugzilla[root@bogon html]#5、检测Bugzilla缺少的组件[root@bogon html]# cd bugzilla/[root@bogon bugzilla]# ./checksetup.pl --check-modules随后会打印一些信息,会看到一些标为not found的缺失组件6、在线安装Bugzilla缺少的组件(安装时间较长)[root@bogon bugzilla]# perl install-module.pl --allChecking for CPAN (v1.81) ok: found v1.9402Checking for YAML (any) ok: found v0.70Checking for ExtUtils-MakeMaker (v6.31) ok: found v6.55_02Fetching with LWP:/authors/01mailrc.txt.gz......Installing /var/www/html/bugzilla/lib/man/man3/DBD::SQLite::Cookbook.3pmInstalling /var/www/html/bugzilla/lib/man/man3/DBD::SQLite::Fulltext_search.3pmInstalling /var/www/html/bugzilla/lib/man/man3/DBD::SQLite::VirtualTable.3pmAppending installation info to /var/www/html/bugzilla/lib/x86_64-linux-thread-multi/perllocal.podISHIGAKI/DBD-SQLite-1.48.tar.gz/usr/bin/make install -- OK[root@bogon bugzilla]#7、执行checksetup.pl后,目录下会生成一个localconfig文件[root@bogon bugzilla]# ./checksetup.pl* This is Bugzilla 4.5.2 on perl 5.10.1* Running on Linux 2.6.32-431.el6.x86_64 #1 SMP Fri Nov 22 03:15:09 UTC 2013Checking perl modules...Checking for CGI.pm (v3.51) ok: found v3.64......Please edit the file ./localconfig and then re-run checksetup.plto complete your installation.[root@bogon bugzilla]#8、编辑localconfig文件,将如下参数设置正确[root@bogon bugzilla]# vi localconfig# The DNS name or IP address of the host that the database server runs on.$db_host = 'localhost';# The name of the database. For Oracle, this is the database's SID. For# SQLite, this is a name (or path) for the DB file.$db_name = 'bugs';# Who we connect to the database as.$db_user = 'root';# Enter your database password here. It's normally advisable to specify# a password for your bugzilla database user.# If you use apostrophe (') or a backslash (\) in your password, you'll# need to escape it by preceding it with a '\' character. (\') or (\)# (It is far simpler to just not use those characters.)$db_pass = '123456';# Sometimes the database server is running on a non-standard port. If that's# the case for your database server, set this to the port number that your# database server is running on. Setting this to 0 means "use the default# port for my database server."$db_port = 3306;9、设置管理员信息和密码。
CentOS+Zimbra详细配置教程
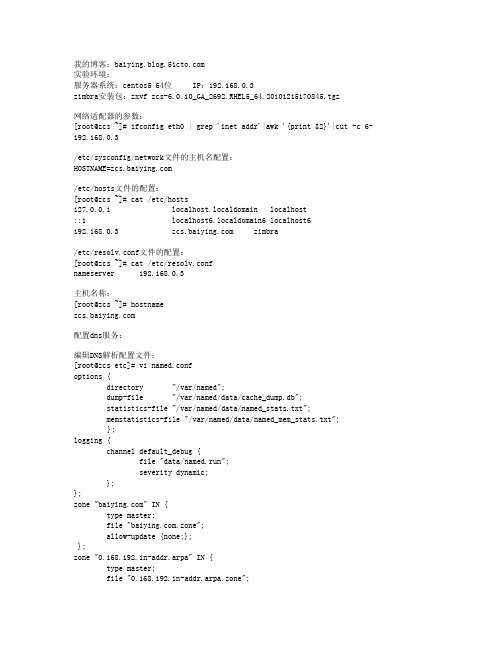
我的博客:实验环境:服务器系统:centos5 64位 IP:192.168.0.3zimbra安装包:zxvf zcs-6.0.10_GA_2692.RHEL5_64.20101215170845.tgz网络适配器的参数:[root@zcs ~]# ifconfig eth0 | grep 'inet addr'|awk '{print $2}'|cut -c 6- 192.168.0.3/etc/sysconfig/network文件的主机名配置:HOSTNAME=/etc/hosts文件的配置:[root@zcs ~]# cat /etc/hosts127.0.0.1 localhost.localdomain localhost::1 localhost6.localdomain6 localhost6192.168.0.3 zimbra/etc/resolv.conf文件的配置:[root@zcs ~]# cat /etc/resolv.confnameserver 192.168.0.3主机名称:[root@zcs ~]# hostname配置dns服务:编辑DNS解析配置文件:[root@zcs etc]# vi named.confoptions {directory "/var/named";dump-file "/var/named/data/cache_dump.db";statistics-file "/var/named/data/named_stats.txt";memstatistics-file "/var/named/data/named_mem_stats.txt";};logging {channel default_debug {file "data/named.run";severity dynamic;};};zone "" IN {type master;file ".zone";allow-update {none;};};zone "0.168.192.in-addr.arpa" IN {type master;file "0.168.192.in-addr.arpa.zone";allow-update {none;};};复制文件localhost.zone为.zone,更改.zone区域解析文件属性:[root@zcs named]# cp localhost.zone .zone编辑.zone区域解析文件:[root@zcs named]# vi .zone$TTL 86400@ IN SOA @ root (20110308 ; serial (d. adams)3H ; refresh15M ; retry1W ; expiry1D ) ; minimum. IN NS .. IN A 192.168.0.3. IN MX 10 .mail IN CNAME .复制.zone为0.168.192.in-addr.arpa.zone,将后者作为反向解析配置文件,更改0.168.192.in-addr.arpa.zone的文件属性:[root@zcs named]# cp .zone 0.168.192.in-addr.arpa.zone[root@zcs named]# vi 0.168.192.in-addr.arpa.zone编辑0.168.192.in-addr.arpa.zone反向解析文件:[root@zcs named]# vi 0.168.192.in-addr.arpa.zone$TTL 86400@ IN SOA @ root (20110308 ; serial (d. adams)3H ; refresh15M ; retry1W ; expiry1D ) ; minimum@ IN NS .@ IN MX 10 .25 IN PTR .25 IN PTR .利用nslookup测试:也可以在客户端解析,但需要将客户端的DNS服务器配置为邮件服务器的IP:[root@zcs ~]# nslookup> serverDefault server: 192.168.0.3Address: 192.168.0.3#53> Server: 192.168.0.3Address: 192.168.0.3#53Name: Address: 192.168.0.3> Server: 192.168.0.3Address: 192.168.0.3#53 canonical name = .Name: Address: 192.168.0.3> set type=mx> Server: 192.168.0.3Address: 192.168.0.3#53 mail exchanger = 10 .> set type=ptr> 192.168.0.3Server: 192.168.0.3Address: 192.168.0.3#533.0.168.192.in-addr.arpa name = .3.0.168.192.in-addr.arpa name = ....将named及network服务设置为开机启动,将sendmail服务停止:[root@zcs ~]# chkconfig named on[root@zcs ~]# chkconfig network on[root@zcs ~]# chkconfig named --level 35 on[root@zcs ~]# chkconfig network --level 35 on[root@zcs ~]# service sendmail stop[root@zcs ~]# chkconfig sendmail off[root@zcs ~]# chkconfig sendmail --level 35 off进入ZCS软件包的目录,解压ZCS tgz包:[root@zcs Desktop]# tar zxvf zcs-6.0.10_GA_2692.RHEL5_64.20101215170845.tgz进入ZCS软件包目录,找到安装启动文件并查看帮助:[root@zcs Desktop]# mv zcs-6.0.10_GA_2692.RHEL5_64.20101215170845 zcs在CentOS-5.5-64bit上安装ZCS For RHEL5的软件包,需要加参数--platform-override:[root@zcs zcs]# ./install.sh --platform-overrideOperations logged to /tmp/install.log.3602Checking for existing installation...zimbra-ldap...NOT FOUNDzimbra-logger...NOT FOUNDzimbra-mta...NOT FOUNDzimbra-snmp...NOT FOUNDzimbra-store...NOT FOUNDzimbra-apache...NOT FOUNDzimbra-spell...NOT FOUNDzimbra-convertd...NOT FOUNDzimbra-memcached...NOT FOUNDzimbra-proxy...NOT FOUNDzimbra-archiving...NOT FOUNDzimbra-cluster...NOT FOUNDzimbra-core...NOT FOUNDPLEASE READ THIS AGREEMENT CAREFULLY BEFORE USING THE SOFTWARE. ZIMBRA, INC. ("ZIMBRA") WILL ONLY LICENSE THIS SOFTWARE TO YOU IF YOU FIRST ACCEPT THE TERMS OF THIS AGREEMENT. BY DOWNLOADING OR INSTALLING THE SOFTWARE, OR USING THE PRODUCT, YOU ARE CONSENTING TO BE BOUND BY THIS AGREEMENT. IF YOU DO NOT AGREE TO ALL OF THE TERMS OF THIS AGREEMENT, THEN DO NOT DOWNLOAD, INSTALL OR USE THE PRODUCT.License Terms for the Zimbra Collaboration Suite:/license/zimbra_public_eula_2.1.htmlDo you agree with the terms of the software license agreement? [N] yChecking for prerequisites...FOUND: NPTLFOUND: sudo-1.7.2p1-5FOUND: libidn-0.6.5-1.1libidn-0.6.5-1.1FOUND: gmp-4.1.4-10FOUND: /usr/lib64/libstdc++.so.6Checking for suggested prerequisites...FOUND: perl-5.8.8FOUND: sysstatPrerequisite check complete.Checking for installable packagesFound zimbra-coreFound zimbra-ldapFound zimbra-loggerFound zimbra-mtaFound zimbra-snmpFound zimbra-storeFound zimbra-apacheFound zimbra-spellFound zimbra-memcachedFound zimbra-proxySelect the packages to install选择默认安装:Install zimbra-ldap [Y]Install zimbra-logger [Y]Install zimbra-mta [Y]Install zimbra-snmp [Y]Install zimbra-store [Y]Install zimbra-apache [Y]Install zimbra-spell [Y]Install zimbra-memcached [N]Install zimbra-proxy [N]Checking required space for zimbra-corechecking space for zimbra-storeInstalling:zimbra-corezimbra-ldapzimbra-loggerzimbra-mtazimbra-snmpzimbra-storezimbra-apachezimbra-spellYou appear to be installing packages on a platform differentthan the platform for which they were built.This platform is CentOS5_64Packages found: RHEL5_64This may or may not work.Using packages for a platform in which they were not designed formay result in an installation that is NOT usable. Your supportoptions may be limited if you choose to continue.Install anyway? [N] yThe system will be modified. Continue? [N] yesRemoving /opt/zimbraRemoving zimbra crontab entry...done.done.Cleaning up zimbra init scripts...done.Cleaning up /etc/ld.so.conf...done.Cleaning up /etc/prelink.conf...done.Cleaning up /etc/security/limits.conf...done.Finished removing Zimbra Collaboration Suite.Installing packageszimbra-core......zimbra-core-6.0.10_GA_2692.RHEL5_64-20101215170845.x86_64.rpm...done zimbra-ldap......zimbra-ldap-6.0.10_GA_2692.RHEL5_64-20101215170845.x86_64.rpm...done zimbra-logger......zimbra-logger-6.0.10_GA_2692.RHEL5_64-20101215170845.x86_64.rpm...d onezimbra-mta......zimbra-mta-6.0.10_GA_2692.RHEL5_64-20101215170845.x86_64.rpm...done zimbra-snmp......zimbra-snmp-6.0.10_GA_2692.RHEL5_64-20101215170845.x86_64.rpm...donezimbra-store......zimbra-store-6.0.10_GA_2692.RHEL5_64-20101215170845.x86_64.rpm...don ezimbra-apache......zimbra-apache-6.0.10_GA_2692.RHEL5_64-20101215170845.x86_64.rpm...d onezimbra-spell......zimbra-spell-6.0.10_GA_2692.RHEL5_64-20101215170845.x86_64.rpm...don eOperations logged to /tmp/zmsetup.03082011-230427.logInstalling LDAP configuration database...done.Setting defaults...DNS ERROR resolving MX for It is suggested that the domain name have an MX record configured in DNSChange domain name?[Yes] yes更改域名,主机名,域名设置为:Create domain: [] MX: (192.168.0.3)Interface: 192.168.0.3Interface: 127.0.0.1done.Checking for port conflictsMain menu1) Common Configuration:2) zimbra-ldap: Enabled3) zimbra-store: Enabled+Create Admin User: yes+Admin user to create: admin@******* +Admin Password UNSET+Enable automated spam training: yes+Spam training user: spam.eovfzo7db@+Non-spam(Ham) training user: ham.w5affdc60@+Global Documents Account: wiki@+SMTP host: +Web server HTTP port: 80+Web server HTTPS port: 443+Web server mode: http+IMAP server port: 143+IMAP server SSL port: 993+POP server port: 110+POP server SSL port: 995+Use spell check server: yes+Spell server URL: :7780/aspell.php +Configure for use with mail proxy: FALSE+Configure for use with web proxy: FALSE+Enable version update checks: TRUE+Enable version update notifications: TRUE+Version update notification email: admin@+Version update source email: admin@4) zimbra-mta: Enabled5) zimbra-snmp: Enabled6) zimbra-logger: Enabled7) zimbra-spell: Enabled8) Default Class of Service Configuration:r) Start servers after configuration yess) Save config to filex) Expand menuq) Quit设置网页管理端admin的登录密码:Address unconfigured (**) items (? - help) 3Store configuration1) Status: Enabled2) Create Admin User: yes3) Admin user to create: admin@** 4) Admin Password UNSET5) Enable automated spam training: yes6) Spam training user: spam.eovfzo7db@7) Non-spam(Ham) training user: ham.w5affdc60@8) Global Documents Account: wiki@9) SMTP host: 10) Web server HTTP port: 8011) Web server HTTPS port: 44312) Web server mode: http13) IMAP server port: 14314) IMAP server SSL port: 99315) POP server port: 11016) POP server SSL port: 99517) Use spell check server: yes18) Spell server URL: :7780/aspell.php19) Configure for use with mail proxy: FALSE20) Configure for use with web proxy: FALSE21) Enable version update checks: TRUE22) Enable version update notifications: TRUE23) Version update notification email: admin@24) Version update source email: admin@Select, or 'r' for previous menu [r] 4 //设置管理密码Password for admin@ (min 6 characters): [OUYQ0Ht8] 123456 //密码Store configuration1) Status: Enabled2) Create Admin User: yes3) Admin user to create: admin@4) Admin Password set5) Enable automated spam training: yes6) Spam training user: spam.eovfzo7db@7) Non-spam(Ham) training user: ham.w5affdc60@8) Global Documents Account: wiki@9) SMTP host: 10) Web server HTTP port: 8011) Web server HTTPS port: 44312) Web server mode: http13) IMAP server port: 14314) IMAP server SSL port: 99315) POP server port: 11016) POP server SSL port: 99517) Use spell check server: yes18) Spell server URL: :7780/aspell.php19) Configure for use with mail proxy: FALSE20) Configure for use with web proxy: FALSE21) Enable version update checks: TRUE22) Enable version update notifications: TRUE23) Version update notification email: admin@24) Version update source email: admin@返回上层页面:Select, or 'r' for previous menu [r] rMain menu1) Common Configuration:2) zimbra-ldap: Enabled3) zimbra-store: Enabled4) zimbra-mta: Enabled5) zimbra-snmp: Enabled6) zimbra-logger: Enabled7) zimbra-spell: Enabled8) Default Class of Service Configuration:r) Start servers after configuration yess) Save config to filex) Expand menuq) Quit*** CONFIGURATION COMPLETE - press 'a' to apply输入“a”以应用配置:Select from menu, or press 'a' to apply config (? - help) aSave configuration data to a file? [Yes] yesSave config in file: [/opt/zimbra/config.11174]Saving config in /opt/zimbra/config.11174...done.The system will be modified - continue? [No] yesOperations logged to /tmp/zmsetup.03082011-230427.logSetting local config values...done.Setting up CA...done.Deploying CA to /opt/zimbra/conf/ca ...done.Creating SSL certificate...done.Installing mailboxd SSL certificates...done.Initializing ldap...done.Setting replication password...done.Setting Postfix password...done.Setting amavis password...done.Setting nginx password...done.Creating server entry for ...done.Saving CA in ldap ...done.Saving SSL Certificate in ldap ...done.Setting spell check URL...done.Setting service ports on ...done.Adding to zimbraMailHostPool in default COS...done. Installing webclient skins...beach...done.zmail...done.lake...done.yahoo...done.hotrod...done.bones...done.pebble...done.bare...done.lemongrass...done.sand...done.waves...done.oasis...done.tree...done.sky...done.steel...done.lavender...done.twilight...done.smoke...done.Finished installing webclient skins.Setting zimbraFeatureIMEnabled=FALSE...done.Setting zimbraFeatureTasksEnabled=TRUE...done.Setting zimbraFeatureBriefcasesEnabled=TRUE...done.Setting zimbraFeatureNotebookEnabled=TRUE...done.Setting MTA auth host...done.Setting TimeZone Preference...done.Initializing mta config...done.Setting services on ...done.Creating domain ...done.Setting default domain name...done.Creating domain ...already exists.Creating admin account admin@...done.Creating root alias...done.Creating postmaster alias...done.Creating user wiki@...done.Creating user spam.eovfzo7db@...done.Creating user ham.w5affdc60@...done.Setting spam training accounts...done.Initializing store sql database...done.Setting zimbraSmtpHostname for ...done.Configuring SNMP...done.Checking for default IM conference room...not present.Initializing default IM conference room...done.Setting up syslog.conf...done.You have the option of notifying Zimbra of your installation.This helps us to track the uptake of the Zimbra Collaboration Suite.The only information that will be transmitted is:The VERSION of zcs installed (6.0.10_GA_2692_CentOS5_64)The ADMIN EMAIL ADDRESS created (admin@)Notify Zimbra of your installation? [Yes] noNotification skippedStarting servers...done.Installing common zimlets...com_zimbra_date...done.com_zimbra_url...done.com_zimbra_dnd...done.com_zimbra_phone...done.com_zimbra_adminversioncheck...done.com_zimbra_bulkprovision...done.com_zimbra_cert_manager...done.com_zimbra_ymemoticons...done.com_zimbra_email...done.Finished installing common zimlets.Initializing Documents...done.Restarting mailboxd...done.Setting up zimbra crontab...done.Moving /tmp/zmsetup.03082011-230427.log to /opt/zimbra/logConfiguration complete - press return to exit安装完成,按任意键退出:切换成zimbra用户(安装zimbra时系统自动创建),查看ZCS套件工作的状态:[root@zcs ~]# su - zimbra[zimbra@~]$ zmcontrol statusHost antispam Runningantivirus Runningldap Runninglogger Runningmailbox Runningmta Runningsnmp Runningspell Runningstats Running浏览器访问页面地址:管理员登陆页面:https://192.168.0.3:7071/zimbraAdmin/(需要DNS配置成功做解析支持)或https://192.168.0.3:7071,帐户:admin,密码:123456(安装时的设置)。
centos安装samba共享服务器详细步骤
centos安装samba共享服务器详细步骤Centos下安装新版samba服务器详细过程作者:陈秋飞本文档是本人基于centos下搭建samba服务器做的笔记,新版的samba已经修改了一些功能和配置,因为有些人还按照百度上面那些老的方法去处理,已经是无法解决一些问题的了。
比如新版的samba中已经是不能创建smbpasswd文件的了,就算你在配置文件注释掉原来的密码存放方式,也没用。
现在不用纠结,我已经找出了适合新版samba的整个搭建和权限分配过程。
希望对大家有所帮助。
1、yum安装samba# yum -y install samba samba-client samba-common2、环境分析数据目录:/home/gongxiang公司共享目录:/home/gongxiang/人事部/通告栏由人事部成员管理共享目录技术部目录:/home/gongxiang/技术部运维部目录:/home/gongxiang/运维部金融部目录:/home/gongxiang/金融部人事部目录:/home/gongxiang/人事部部门管理账号情况:总经理:最大权限账号manager技术部:最大权限账号jishu,普通员工jishu01、jishu02运维部:最大权限账号yunwei,普通员工yunwei01、yunwei02金融部:最大权限账号jinrong,普通员工jinrong01、jinrong02人事部:最大权限账号 hr,普通员工hr01、hr02需要的分组:技术部:tech运维部:maintain金融部:finance人事部:hure3、解决方案(1)、在samba服务器建立共享目录# mkdir /home/gongxiang/人事部/通告栏-p# mkdir /home/gongxiang/技术部-p# mkdir /home/gongxiang/运维部-p# mkdir /home/gongxiang/金融部-p# mkdir /home/gongxiang/人事部-p# ll /home/gongxiang总用量16drwxr-xr-x 2 root root 4096 9月 2 09:26 技术部drwxr-xr-x 2 root root 4096 9月 2 09:27 金融部drwxr-xr-x 3 root root 4096 9月 1 14:42 人事部drwxr-xr-x 2 root root 4096 9月 1 14:42 运维部(2)、设置/home/gongxiang 共享目录的用户权限# chmod 777 /home/gongxiang/ -R# ll总用量16drwxrwxrwx 2 root root 4096 9月 2 09:26 技术部drwxrwxrwx 2 root root 4096 9月 2 09:27 金融部drwxrwxrwx 3 root root 4096 9月 1 14:42 人事部drwxrwxrwx 2 root root 4096 9月 1 14:42 运维部(3)、添加用户和组组:# groupadd tech# groupadd maintain# groupadd finance# groupadd hure用户:# useradd manager# useradd -g tech -s /sbin/nologin jishu# useradd -g tech -s /sbin/nologin jishu01# useradd -g tech -s /sbin/nologin jishu02# useradd -g maintain -s /sbin/nologin yunwei# useradd -g maintain -s /sbin/nologin yunwei01# useradd -g maintain -s /sbin/nologin yunwei02 # useradd -g finance -s /sbin/nologin jinrong# useradd -g finance -s /sbin/nologin jinrong01 # useradd -g finance -s /sbin/nologin jinrong02 # useradd -g hure -s /sbin/nologin hr# useradd -g hure -s /sbin/nologin hr01# useradd -g hure -s /sbin/nologin hr024、添加samba用户和用户对应的密码# smbpasswd -a manager# smbpasswd -a jishu# smbpasswd -a jishu01# smbpasswd -a jishu02# smbpasswd -a yunwei# smbpasswd -a yunwei01# smbpasswd -a yunwei02# smbpasswd -a jinrong# smbpasswd -a jinrong01# smbpasswd -a jinrong02# smbpasswd -a hr# smbpasswd -a hr01# smbpasswd -a hr025、配置smb.conf文件(1)、建立单独的配置文件# cp -ar smb.conf manager.smb.conf# cp -ar smb.conf tech.smb.conf# cp -ar smb.conf maintain.smb.conf# cp -ar smb.conf finance.smb.conf# cp -ar smb.conf hure.smb.conf(2)、配置主配置文件smb.conf# cat smb.conf[global]workgroup = MYGROUPserver string = Samba Server Version %v log file = /var/log/samba/log.%mmax log size = 50security = userpassdb backend = tdbsaminclude = /etc/samba/manager.smb.conf include = /etc/samba/tech.smb.confinclude = /etc/samba/maintain.smb.conf include = /etc/samba/finance.smb.confinclude = /etc/samba/hure.smb.confload printers = yescups options = raw[通告栏]comment = 这是人事部管理的通告栏,所有人可以看到 path = /home/gongxiang/人事部/通告栏public = yeswritable = no(3)、配置总经理的配置文件# cat manager.smb.conf[技术部]comment = 这是技术部的共享path = /home/gongxiang/技术部writable = yesvalid users = manager[金融部]comment = 这是金融部的共享path = /home/gongxiang/金融部writable = yesvalid users = manager[人事部]comment = 这是人事部的共享path = /home/gongxiang/人事部writable = yes valid users = manager[运维部]comment = 这是运维部的共享path = /home/gongxiang/运维部writable = yes valid users = manager(4)、配置技术部的配置文件# cat tech.smb.conf[技术部]comment = 这是技术部的共享path = /home/gongxiang/技术部writable = yes valid users = @tech manager(5)、配置金融部的配置文件# cat finance.smb.conf[金融部]comment = 这是金融部的共享path = /home/gongxiang/金融部writable = yes valid users = @finance manager(6)、配置人事部的配置文件# cat hure.smb.conf[人事部]comment = 这是人事部的共享path = /home/gongxiang/人事部writable = yesvalid users = @hure manager(7)、配置运维部的配置文件# cat maintain.smb.conf[运维部]comment = 这是运维部的共享path = /home/gongxiang/运维部writable = yesvalid users = @maintain manager6、重新启动smb服务# /etc/init.d/smb restart关闭SMB 服务: [确定]启动SMB 服务: [确定]7、概述目前只有几种角色manager 可以看各个部门的共享文件jishu、普通员工jishu01、jishu02只能看和操作技术部共享目录yunwei、普通员工yunwei01、yunwei02只能看和操作运维部共享目录jinrong、普通员工jinrong01、jinrong02只能看和操作金融部共享目录hr、普通员工hr01、hr02只能看和操作人事部目录,以及管理共享目录和通告栏共享目录有两个,通告栏和共享资源,这两个目录是谁都可以看,但是只有hr可以删除和管理。
centossamba配置和设计
centossamba配置和设计CentOS是一种流行的Linux操作系统,其可以用于搭建各种企业级应用,包括Samba文件服务器。
Samba是一种开源软件,用于实现File and Printer Sharing(FPS)服务,这使得Linux/Unix系统和Windows系统之间的文件共享变得非常方便。
本文将介绍如何在CentOS上配置和设计Samba文件服务器。
一、安装Samba在CentOS上安装Samba非常简单,我们只需要使用yum命令安装即可:yum install samba samba-client samba-common安装完成后,我们需要启动Samba服务并设置开机启动:systemctl start smb.servicesystemctl startnmb.servicesystemctl enable smb.servicesystemctl enablenmb.service二、创建Samba共享目录接下来,我们需要创建一个共享目录,以便其他计算机上的用户可以访问它。
在本例中,我们将创建一个名为“share”的共享目录:mkdir /sharechmod -R 0777 /share要使Samba可以共享这个目录,我们需要在配置文件中定义它。
编辑Samba配置文件,即/etc/samba/smb.conf:vi /etc/samba/smb.conf在末尾添加以下代码:[share] path = /share writable = yes public = yes guest ok = yes以上代码中定义了一个名为“share”的共享,它的路径为/share,允许对该共享目录进行写操作,任何人都能够访问该共享,并且允许以“guest”的身份访问。
在真实环境下,您应该在guest ok = no,并为访问共享的用户创建Samba账户。
三、重启Samba服务修改配置文件后,需要重启Samba服务以使更改生效:systemctl restart smb.service四、验证Samba配置在确认Samba服务已经启动的情况下,我们可以在Windows主机上访问共享文件夹,方法如下:1. 在Windows主机上打开文件资源管理器2. 在地址栏输入\\CentOS服务器的IP地址或主机名\share3. 提供Windows 用户的用户名和密码如果一切正常,现在您应该可以访问共享文件夹,或者在Windows主机上创建和编辑文件并将其保存到共享文件夹中。
- 1、下载文档前请自行甄别文档内容的完整性,平台不提供额外的编辑、内容补充、找答案等附加服务。
- 2、"仅部分预览"的文档,不可在线预览部分如存在完整性等问题,可反馈申请退款(可完整预览的文档不适用该条件!)。
- 3、如文档侵犯您的权益,请联系客服反馈,我们会尽快为您处理(人工客服工作时间:9:00-18:30)。
我的博客:实验环境:服务器系统:centos5 64位 IP:192.168.0.3zimbra安装包:zxvf zcs-6.0.10_GA_2692.RHEL5_64.20101215170845.tgz网络适配器的参数:[root@zcs ~]# ifconfig eth0 | grep 'inet addr'|awk '{print $2}'|cut -c 6- 192.168.0.3/etc/sysconfig/network文件的主机名配置:HOSTNAME=/etc/hosts文件的配置:[root@zcs ~]# cat /etc/hosts127.0.0.1 localhost.localdomain localhost::1 localhost6.localdomain6 localhost6192.168.0.3 zimbra/etc/resolv.conf文件的配置:[root@zcs ~]# cat /etc/resolv.confnameserver 192.168.0.3主机名称:[root@zcs ~]# hostname配置dns服务:编辑DNS解析配置文件:[root@zcs etc]# vi named.confoptions {directory "/var/named";dump-file "/var/named/data/cache_dump.db";statistics-file "/var/named/data/named_stats.txt";memstatistics-file "/var/named/data/named_mem_stats.txt";};logging {channel default_debug {file "data/named.run";severity dynamic;};};zone "" IN {type master;file ".zone";allow-update {none;};};zone "0.168.192.in-addr.arpa" IN {type master;file "0.168.192.in-addr.arpa.zone";allow-update {none;};};复制文件localhost.zone为.zone,更改.zone区域解析文件属性:[root@zcs named]# cp localhost.zone .zone编辑.zone区域解析文件:[root@zcs named]# vi .zone$TTL 86400@ IN SOA @ root (20110308 ; serial (d. adams)3H ; refresh15M ; retry1W ; expiry1D ) ; minimum. IN NS .. IN A 192.168.0.3. IN MX 10 .mail IN CNAME .复制.zone为0.168.192.in-addr.arpa.zone,将后者作为反向解析配置文件,更改0.168.192.in-addr.arpa.zone的文件属性:[root@zcs named]# cp .zone 0.168.192.in-addr.arpa.zone[root@zcs named]# vi 0.168.192.in-addr.arpa.zone编辑0.168.192.in-addr.arpa.zone反向解析文件:[root@zcs named]# vi 0.168.192.in-addr.arpa.zone$TTL 86400@ IN SOA @ root (20110308 ; serial (d. adams)3H ; refresh15M ; retry1W ; expiry1D ) ; minimum@ IN NS .@ IN MX 10 .25 IN PTR .25 IN PTR .利用nslookup测试:也可以在客户端解析,但需要将客户端的DNS服务器配置为邮件服务器的IP:[root@zcs ~]# nslookup> serverDefault server: 192.168.0.3Address: 192.168.0.3#53> Server: 192.168.0.3Address: 192.168.0.3#53Name: Address: 192.168.0.3> Server: 192.168.0.3Address: 192.168.0.3#53 canonical name = .Name: Address: 192.168.0.3> set type=mx> Server: 192.168.0.3Address: 192.168.0.3#53 mail exchanger = 10 .> set type=ptr> 192.168.0.3Server: 192.168.0.3Address: 192.168.0.3#533.0.168.192.in-addr.arpa name = .3.0.168.192.in-addr.arpa name = ....将named及network服务设置为开机启动,将sendmail服务停止:[root@zcs ~]# chkconfig named on[root@zcs ~]# chkconfig network on[root@zcs ~]# chkconfig named --level 35 on[root@zcs ~]# chkconfig network --level 35 on[root@zcs ~]# service sendmail stop[root@zcs ~]# chkconfig sendmail off[root@zcs ~]# chkconfig sendmail --level 35 off进入ZCS软件包的目录,解压ZCS tgz包:[root@zcs Desktop]# tar zxvf zcs-6.0.10_GA_2692.RHEL5_64.20101215170845.tgz进入ZCS软件包目录,找到安装启动文件并查看帮助:[root@zcs Desktop]# mv zcs-6.0.10_GA_2692.RHEL5_64.20101215170845 zcs在CentOS-5.5-64bit上安装ZCS For RHEL5的软件包,需要加参数--platform-override:[root@zcs zcs]# ./install.sh --platform-overrideOperations logged to /tmp/install.log.3602Checking for existing installation...zimbra-ldap...NOT FOUNDzimbra-logger...NOT FOUNDzimbra-mta...NOT FOUNDzimbra-snmp...NOT FOUNDzimbra-store...NOT FOUNDzimbra-apache...NOT FOUNDzimbra-spell...NOT FOUNDzimbra-convertd...NOT FOUNDzimbra-memcached...NOT FOUNDzimbra-proxy...NOT FOUNDzimbra-archiving...NOT FOUNDzimbra-cluster...NOT FOUNDzimbra-core...NOT FOUNDPLEASE READ THIS AGREEMENT CAREFULLY BEFORE USING THE SOFTWARE. ZIMBRA, INC. ("ZIMBRA") WILL ONLY LICENSE THIS SOFTWARE TO YOU IF YOU FIRST ACCEPT THE TERMS OF THIS AGREEMENT. BY DOWNLOADING OR INSTALLING THE SOFTWARE, OR USING THE PRODUCT, YOU ARE CONSENTING TO BE BOUND BY THIS AGREEMENT. IF YOU DO NOT AGREE TO ALL OF THE TERMS OF THIS AGREEMENT, THEN DO NOT DOWNLOAD, INSTALL OR USE THE PRODUCT.License Terms for the Zimbra Collaboration Suite:/license/zimbra_public_eula_2.1.htmlDo you agree with the terms of the software license agreement? [N] yChecking for prerequisites...FOUND: NPTLFOUND: sudo-1.7.2p1-5FOUND: libidn-0.6.5-1.1libidn-0.6.5-1.1FOUND: gmp-4.1.4-10FOUND: /usr/lib64/libstdc++.so.6Checking for suggested prerequisites...FOUND: perl-5.8.8FOUND: sysstatPrerequisite check complete.Checking for installable packagesFound zimbra-coreFound zimbra-ldapFound zimbra-loggerFound zimbra-mtaFound zimbra-snmpFound zimbra-storeFound zimbra-apacheFound zimbra-spellFound zimbra-memcachedFound zimbra-proxySelect the packages to install选择默认安装:Install zimbra-ldap [Y]Install zimbra-logger [Y]Install zimbra-mta [Y]Install zimbra-snmp [Y]Install zimbra-store [Y]Install zimbra-apache [Y]Install zimbra-spell [Y]Install zimbra-memcached [N]Install zimbra-proxy [N]Checking required space for zimbra-corechecking space for zimbra-storeInstalling:zimbra-corezimbra-ldapzimbra-loggerzimbra-mtazimbra-snmpzimbra-storezimbra-apachezimbra-spellYou appear to be installing packages on a platform differentthan the platform for which they were built.This platform is CentOS5_64Packages found: RHEL5_64This may or may not work.Using packages for a platform in which they were not designed formay result in an installation that is NOT usable. Your supportoptions may be limited if you choose to continue.Install anyway? [N] yThe system will be modified. Continue? [N] yesRemoving /opt/zimbraRemoving zimbra crontab entry...done.done.Cleaning up zimbra init scripts...done.Cleaning up /etc/ld.so.conf...done.Cleaning up /etc/prelink.conf...done.Cleaning up /etc/security/limits.conf...done.Finished removing Zimbra Collaboration Suite.Installing packageszimbra-core......zimbra-core-6.0.10_GA_2692.RHEL5_64-20101215170845.x86_64.rpm...done zimbra-ldap......zimbra-ldap-6.0.10_GA_2692.RHEL5_64-20101215170845.x86_64.rpm...done zimbra-logger......zimbra-logger-6.0.10_GA_2692.RHEL5_64-20101215170845.x86_64.rpm...d onezimbra-mta......zimbra-mta-6.0.10_GA_2692.RHEL5_64-20101215170845.x86_64.rpm...done zimbra-snmp......zimbra-snmp-6.0.10_GA_2692.RHEL5_64-20101215170845.x86_64.rpm...donezimbra-store......zimbra-store-6.0.10_GA_2692.RHEL5_64-20101215170845.x86_64.rpm...don ezimbra-apache......zimbra-apache-6.0.10_GA_2692.RHEL5_64-20101215170845.x86_64.rpm...d onezimbra-spell......zimbra-spell-6.0.10_GA_2692.RHEL5_64-20101215170845.x86_64.rpm...don eOperations logged to /tmp/zmsetup.03082011-230427.logInstalling LDAP configuration database...done.Setting defaults...DNS ERROR resolving MX for It is suggested that the domain name have an MX record configured in DNSChange domain name?[Yes] yes更改域名,主机名,域名设置为:Create domain: [] MX: (192.168.0.3)Interface: 192.168.0.3Interface: 127.0.0.1done.Checking for port conflictsMain menu1) Common Configuration:2) zimbra-ldap: Enabled3) zimbra-store: Enabled+Create Admin User: yes+Admin user to create: admin@******* +Admin Password UNSET+Enable automated spam training: yes+Spam training user: spam.eovfzo7db@+Non-spam(Ham) training user: ham.w5affdc60@+Global Documents Account: wiki@+SMTP host: +Web server HTTP port: 80+Web server HTTPS port: 443+Web server mode: http+IMAP server port: 143+IMAP server SSL port: 993+POP server port: 110+POP server SSL port: 995+Use spell check server: yes+Spell server URL: :7780/aspell.php +Configure for use with mail proxy: FALSE+Configure for use with web proxy: FALSE+Enable version update checks: TRUE+Enable version update notifications: TRUE+Version update notification email: admin@+Version update source email: admin@4) zimbra-mta: Enabled5) zimbra-snmp: Enabled6) zimbra-logger: Enabled7) zimbra-spell: Enabled8) Default Class of Service Configuration:r) Start servers after configuration yess) Save config to filex) Expand menuq) Quit设置网页管理端admin的登录密码:Address unconfigured (**) items (? - help) 3Store configuration1) Status: Enabled2) Create Admin User: yes3) Admin user to create: admin@** 4) Admin Password UNSET5) Enable automated spam training: yes6) Spam training user: spam.eovfzo7db@7) Non-spam(Ham) training user: ham.w5affdc60@8) Global Documents Account: wiki@9) SMTP host: 10) Web server HTTP port: 8011) Web server HTTPS port: 44312) Web server mode: http13) IMAP server port: 14314) IMAP server SSL port: 99315) POP server port: 11016) POP server SSL port: 99517) Use spell check server: yes18) Spell server URL: :7780/aspell.php19) Configure for use with mail proxy: FALSE20) Configure for use with web proxy: FALSE21) Enable version update checks: TRUE22) Enable version update notifications: TRUE23) Version update notification email: admin@24) Version update source email: admin@Select, or 'r' for previous menu [r] 4 //设置管理密码Password for admin@ (min 6 characters): [OUYQ0Ht8] 123456 //密码Store configuration1) Status: Enabled2) Create Admin User: yes3) Admin user to create: admin@4) Admin Password set5) Enable automated spam training: yes6) Spam training user: spam.eovfzo7db@7) Non-spam(Ham) training user: ham.w5affdc60@8) Global Documents Account: wiki@9) SMTP host: 10) Web server HTTP port: 8011) Web server HTTPS port: 44312) Web server mode: http13) IMAP server port: 14314) IMAP server SSL port: 99315) POP server port: 11016) POP server SSL port: 99517) Use spell check server: yes18) Spell server URL: :7780/aspell.php19) Configure for use with mail proxy: FALSE20) Configure for use with web proxy: FALSE21) Enable version update checks: TRUE22) Enable version update notifications: TRUE23) Version update notification email: admin@24) Version update source email: admin@返回上层页面:Select, or 'r' for previous menu [r] rMain menu1) Common Configuration:2) zimbra-ldap: Enabled3) zimbra-store: Enabled4) zimbra-mta: Enabled5) zimbra-snmp: Enabled6) zimbra-logger: Enabled7) zimbra-spell: Enabled8) Default Class of Service Configuration:r) Start servers after configuration yess) Save config to filex) Expand menuq) Quit*** CONFIGURATION COMPLETE - press 'a' to apply输入“a”以应用配置:Select from menu, or press 'a' to apply config (? - help) aSave configuration data to a file? [Yes] yesSave config in file: [/opt/zimbra/config.11174]Saving config in /opt/zimbra/config.11174...done.The system will be modified - continue? [No] yesOperations logged to /tmp/zmsetup.03082011-230427.logSetting local config values...done.Setting up CA...done.Deploying CA to /opt/zimbra/conf/ca ...done.Creating SSL certificate...done.Installing mailboxd SSL certificates...done.Initializing ldap...done.Setting replication password...done.Setting Postfix password...done.Setting amavis password...done.Setting nginx password...done.Creating server entry for ...done.Saving CA in ldap ...done.Saving SSL Certificate in ldap ...done.Setting spell check URL...done.Setting service ports on ...done.Adding to zimbraMailHostPool in default COS...done. Installing webclient skins...beach...done.zmail...done.lake...done.yahoo...done.hotrod...done.bones...done.pebble...done.bare...done.lemongrass...done.sand...done.waves...done.oasis...done.tree...done.sky...done.steel...done.lavender...done.twilight...done.smoke...done.Finished installing webclient skins.Setting zimbraFeatureIMEnabled=FALSE...done.Setting zimbraFeatureTasksEnabled=TRUE...done.Setting zimbraFeatureBriefcasesEnabled=TRUE...done.Setting zimbraFeatureNotebookEnabled=TRUE...done.Setting MTA auth host...done.Setting TimeZone Preference...done.Initializing mta config...done.Setting services on ...done.Creating domain ...done.Setting default domain name...done.Creating domain ...already exists.Creating admin account admin@...done.Creating root alias...done.Creating postmaster alias...done.Creating user wiki@...done.Creating user spam.eovfzo7db@...done.Creating user ham.w5affdc60@...done.Setting spam training accounts...done.Initializing store sql database...done.Setting zimbraSmtpHostname for ...done.Configuring SNMP...done.Checking for default IM conference room...not present.Initializing default IM conference room...done.Setting up syslog.conf...done.You have the option of notifying Zimbra of your installation.This helps us to track the uptake of the Zimbra Collaboration Suite.The only information that will be transmitted is:The VERSION of zcs installed (6.0.10_GA_2692_CentOS5_64)The ADMIN EMAIL ADDRESS created (admin@)Notify Zimbra of your installation? [Yes] noNotification skippedStarting servers...done.Installing common zimlets...com_zimbra_date...done.com_zimbra_url...done.com_zimbra_dnd...done.com_zimbra_phone...done.com_zimbra_adminversioncheck...done.com_zimbra_bulkprovision...done.com_zimbra_cert_manager...done.com_zimbra_ymemoticons...done.com_zimbra_email...done.Finished installing common zimlets.Initializing Documents...done.Restarting mailboxd...done.Setting up zimbra crontab...done.Moving /tmp/zmsetup.03082011-230427.log to /opt/zimbra/logConfiguration complete - press return to exit安装完成,按任意键退出:切换成zimbra用户(安装zimbra时系统自动创建),查看ZCS套件工作的状态:[root@zcs ~]# su - zimbra[zimbra@~]$ zmcontrol statusHost antispam Runningantivirus Runningldap Runninglogger Runningmailbox Runningmta Runningsnmp Runningspell Runningstats Running浏览器访问页面地址:管理员登陆页面:https://192.168.0.3:7071/zimbraAdmin/(需要DNS配置成功做解析支持)或https://192.168.0.3:7071,帐户:admin,密码:123456(安装时的设置)。
