Fluent 并行运算
fluent并行计算配置(曙光文档)
1.并行处理•Fluent支持并行计算,且提供检查和修改并行配置工具。
你可用一个专用并行机(如多处理器工作站)或通过工作平台的网络运行Fluent。
下面介绍Fluent并行计算的特点。
• 1.1 并行计算简介•Fluent并行计算就是利用多个计算节点(处理器)同时进行计算。
并行计算可将网格分割成多个子域,子域的数量是计算节点的整数倍(如8个子域可对应于1、2、4、8个计算节点)。
每个子域(或子域的集合)就会“居住”在不同的计算节点上。
它有可能是并行机的计算节点,或是运行在多个CPU工作平台上的程序,或是运行在用网络连接的不同工作平台(UNIX平台或是Windows平台)上的程序。
计算信息传输率的增加将导致并行计算效率的降低,因此在作并行计算时选择求解问题很重要•推荐运行并行Fluent的操作步骤如下:•开启平行求解器,选择计算节点数。
•读入case文件,让Fluent自动将网格分割为几个子域。
最好是在建立问题之后分割,因为这种分割和计算的模型有关(象非等形接触面、滑移网格、shell-conduction encapsulation的自适应)。
如果你的case文件中包含滑移网格,或是在计算过程中要对非等形接触面进行修改,那就得用串行求解器进行分割。
•还有其他的方法进行分割,如在串行或并行求解器上进行手工分割。
•仔细检查分割区域,如必要再重新分割,。
•进行计算。
•--------------------------------------------------------------•ID Hostname O.S. PID Mach ID HW ID Name •--------------------------------------------------------------•node-2 fili irix 16729 2 11 Fluent Node •node-1 bofur irix 16182 1 10 Fluent Node •host balin sunos 5845 0 7 Fluent Host •node-0* balin sunos 5864 0 -1 Fluent Node •O.S.指体系结构,PID是进程ID数,Mach ID是计算节点ID,HW ID 是交换机的标识符。
第28章 fluent并行处理sa

28. 并行处理Fluent支持并行计算,且提供检查和修改并行配置工具。
你可用一个专用并行机(如多处理器工作站)或通过工作平台的网络运行Fluent。
下面介绍Fluent并行计算的特点。
28.1 并行计算简介Fluent并行计算就是利用多个计算节点(处理器)同时进行计算。
并行计算可将网格分割成多个子域,子域的数量是计算节点的整数倍(如8个子域可对应于1、2、4、8个计算节点)。
每个子域(或子域的集合)就会“居住”在不同的计算节点上。
它有可能是并行机的计算节点,或是运行在多个CPU工作平台上的程序,或是运行在用网络连接的不同工作平台(UNIX平台或是Windows平台)上的程序。
计算信息传输率的增加将导致并行计算效率的降低,因此在作并行计算时选择求解问题很重要。
推荐运行并行Fluent的操作步骤如下:1.开启平行求解器,选择计算节点数,详见28.2和28.3节。
2.读入case文件,让Fluent自动将网格分割为几个子域。
最好是在建立问题之后分割,因为这种分割和计算的模型有关(象非等形接触面、滑移网格、shell-conduction encapsulation的自适应)。
如果你的case文件中包含滑移网格,或是在计算过程中要对非等形接触面进行修改,那就得用串行求解器进行分割。
还有其他的方法进行分割,如在串行或并行求解器上进行手工分割。
3.仔细检查分割区域,如必要再重新分割,详见28.4.5节如何检查分割区域。
4.进行计算,详见28.5节如何检查和提高并行计算。
28.2 开启并行求解器开启Fluent并行求解器的方法依赖于操作平台是专用并行机还是工作站。
28.2.1 在UNIX系统下开启并行求解器可以在装有UNIX系统的专用并行机或工作平台网络上运行Fluent,如何运行如下:在多处理器UNIX机上运行Figure 28.2.1: Select Solver控制面板在专用并行机(多处理器工作平台或大型并行机)运行Fluent,键入运行命令,点击Fluent 中File Run...,用Select Solver(图28.2.1)控制面板设定并行架构和求解器信息。
FLUENT并行计算操作步骤!!!
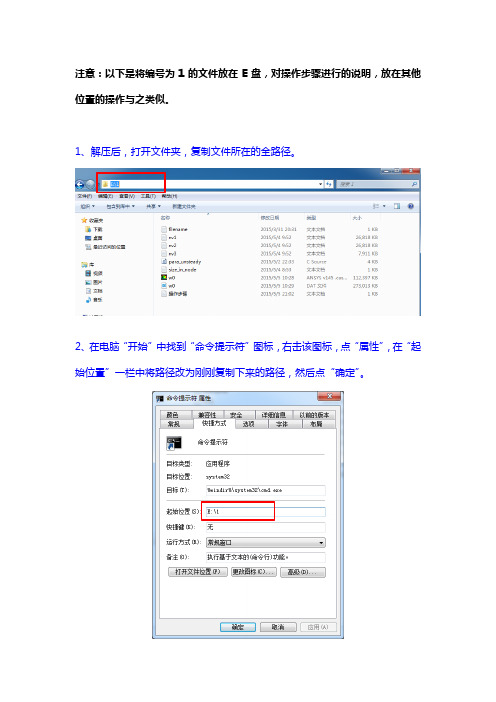
注意:以下是将编号为1的文件放在E盘,对操作步骤进行的说明,放在其他位置的操作与之类似。
1、解压后,打开文件夹,复制文件所在的全路径。
2、在电脑“开始”中找到“命令提示符”图标,右击该图标,点“属性”,在“起始位置”一栏中将路径改为刚刚复制下来的路径,然后点“确定”。
2、打开“命令提示符”窗口,可以看到显示的路径即为文件所在的路径,输入fluent 3d -t4(注意“fluent”、“3d”、“-t4”之间各有一个空格)后回车,即可打开fluent计算软件。
3、将case和data文件读入fluent,此过程中会出现error,点OK。
文件导入完成是下图这个样子。
4、设置自动保存路径:file>>write>>autosave,删掉file name下面的路径,点OK,路径即自动变成所需保存的路径。
5、编译:define>>user-defined>>functions>>compiled(如下图)>>add>>双击para_unsteady文件>>路径改为文件的全路径(例如:E:\1\libudf)>>build>>OK出现下图所示,即表示build成功,否则在路径后加上1(E:\1\libudf1),再次点击build,直至出现下图为止,点击load。
6、导入来流风速:define>>boundary conditions>>inlet>>velocity-inlet>>set>>点击velocity magnitude的第二个下拉框选择udf一项>>OK7、计算:solve>>iterate>>设置时间步长和计算的时间步数>>确认正确之后点击iterate进行计算。
fluent并行

28. 并行处理Fluent支持并行计算,且提供检查和修改并行配置工具。
你可用一个专用并行机(如多处理器工作站)或通过工作平台的网络运行Fluent。
下面介绍Fluent 并行计算的特点。
28.1 并行计算简介Fluent并行计算就是利用多个计算节点(处理器)同时进行计算。
并行计算可将网格分割成多个子域,子域的数量是计算节点的整数倍(如8个子域可对应于1、2、4、8个计算节点)。
每个子域(或子域的集合)就会“居住”在不同的计算节点上。
它有可能是并行机的计算节点,或是运行在多个CPU工作平台上的程序,或是运行在用网络连接的不同工作平台(UNIX平台或是Windows平台)上的程序。
计算信息传输率的增加将导致并行计算效率的降低,因此在作并行计算时选择求解问题很重要。
推荐运行并行Fluent的操作步骤如下:1.开启平行求解器,选择计算节点数,详见28.2和28.3节。
2.读入case文件,让Fluent自动将网格分割为几个子域。
最好是在建立问题之后分割,因为这种分割和计算的模型有关(象非等形接触面、滑移网格、shell-conduction encapsulation的自适应)。
如果你的case文件中包含滑移网格,或是在计算过程中要对非等形接触面进行修改,那就得用串行求解器进行分割。
还有其他的方法进行分割,如在串行或并行求解器上进行手工分割。
3.仔细检查分割区域,如必要再重新分割,详见28.4.5节如何检查分割区域。
4.进行计算,详见28.5节如何检查和提高并行计算。
28.2 开启并行求解器开启Fluent并行求解器的方法依赖于操作平台是专用并行机还是工作站。
28.2.1 在UNIX系统下开启并行求解器可以在装有UNIX系统的专用并行机或工作平台网络上运行Fluent,如何运行如下:在多处理器UNIX机上运行Figure 28.2.1: Select Solver控制面板在专用并行机(多处理器工作平台或大型并行机)运行Fluent,键入运行命令,点击Fluent中File Run...,用Select Solver(图28.2.1)控制面板设定并行架构和求解器信息。
fluent f_p详细讲解

fluent f_p详细讲解
Fluent是一种流体动力学仿真软件,用于解决与流体流动、传
热和化学反应相关的工程问题。
而f_p则代表着Fluent中的
“fluent-parallel”,它是指Fluent的并行计算功能。
首先,让我们来详细讲解一下Fluent。
Fluent是由Ansys公司
开发的一款CFD(计算流体力学)软件,它能够模拟和分析液体和
气体在各种工程应用中的流动、传热和化学反应等现象。
Fluent具
有强大的求解器和网格生成器,能够处理复杂的流体流动问题,如
湍流、多相流、燃烧等。
用户可以通过Fluent对液体和气体在管道、汽车、飞机、建筑等各种工程领域中的流动行为进行模拟和分析,
从而优化设计、提高性能和降低成本。
接下来,我们来详细讲解一下f_p,即Fluent中的并行计算功能。
在Fluent中,用户可以利用并行计算技术来加速求解复杂的流
体动力学问题。
并行计算可以将计算任务分配给多个处理器或计算
节点同时进行,从而提高计算效率和速度。
通过f_p,用户可以利
用多核处理器、集群系统或其他并行计算平台来加速Fluent的求解
过程,特别是对于大规模、高精度的流体动力学仿真问题来说,这
一功能显得尤为重要。
总的来说,Fluent是一款强大的流体动力学仿真软件,而f_p 则是其并行计算功能,能够帮助用户更高效地进行复杂流体流动问题的求解。
希望这个回答能够帮助你更好地理解Fluent和f_p。
Fluent15.0并行运算设置
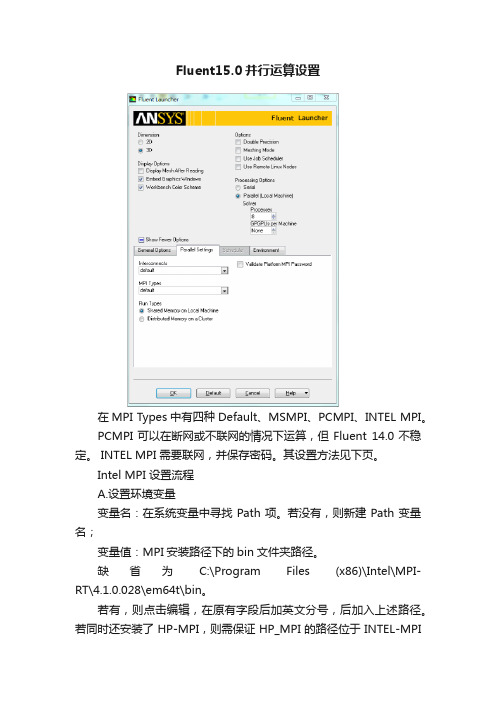
Fluent15.0并行运算设置在MPI Types中有四种Default、MSMPI、PCMPI、INTEL MPI。
PCMPI可以在断网或不联网的情况下运算,但Fluent 14.0不稳定。
INTEL MPI 需要联网,并保存密码。
其设置方法见下页。
Intel MPI 设置流程A.设置环境变量变量名:在系统变量中寻找Path项。
若没有,则新建Path变量名;变量值:MPI安装路径下的bin文件夹路径。
缺省为C:\Program Files (x86)\Intel\MPI-RT\4.1.0.028\em64t\bin。
若有,则点击编辑,在原有字段后加英文分号,后加入上述路径。
若同时还安装了HP-MPI,则需保证HP_MPI的路径位于INTEL-MPI路径之后。
B.Cache password设置开始菜单,CMD键入cd c:\program files (X86)\intel\mpi-rt\4.0.2.005\em64t\bin\ 即进入intel mpi的安装文件,回车。
mpiexec –register 回车显示account ,输入相应主机名,回车密码,回车(光标不动,不要误以为没有输入)确认密码,回车显示password encrypted into the registry, 即成功。
C.Fluent设置打开Fluent选择parallel settings, 在mpi types下拉菜单中选择intel一项,单击ok;输入相应的用户名(非注册密码时的主机名),一般主机名XXX-PC,则此处输入XXX),回车输入密码(开机密码),回车确认密码,回车现在,即可以开始运行了。
注意:需要设置相应的开机密码(账户管理里面),否则可能出现问题。
Fluent 并行计算(中文)

CFD环境下利用Fluent软件求解气体动力学问题时进行并行计算的可能性注切博塔廖夫数学和力学研究所,喀山国立大学,喀山,俄罗斯2008年8月25日收录摘要:本文主要得到了一种不可压缩气体流动场的研究结果,该流气体动场位于一种多孔结构的周期性元素中,这个多孔结构由一些半径相同的球体组成。
这些研究是基于使用Fluent软件对Navier–Stokes 方程进行的求解。
同时本文对使用并行计算可加快求解过程的可能性进行了论证,并且给出了在周期性元素中,压强差改变后的计算结果。
使并行计算得以实现的多处理器计算机最近开始应用于科学和工程领域的计算。
并行计算促进了一次相当大的进步,其应用领域之一就是流体力学三维问题的解决。
许多研究者使用通用的商业CFD软件,该软件提供了快速且方便的复杂领域三维问题的解决方法。
当前的CFD软件包旨在求解Navier–Stokes方程,这个方程描绘了空间任意区域的流动状况,该软件包拥有进行并行处理的可能性。
本文的目的是检测气体动力学三维问题的求解方法,该方法是在并行处理模式下依靠多处理器计算机使用Fluent软件进行计算得到的。
下面计算多孔结构中不可压缩气体的流动问题,该多孔结构由一些紧密排列的球体组成。
在筛选理论中,不同球体排列出的结构广泛应用于多孔介质模型。
使用多孔元素使得实现过滤进程和阶段分割变得可能,这些也应用在飞行器工程当中。
对多孔结构中的小雷诺系数区域内水动力流动的描述,按照规则,在斯托克斯近似下不考虑流体运动方程中的惯性因素。
同时在多孔介质镇南关流动速度可能较大,斯托克斯近似将不能描绘真实的流动模型。
在这个例子中,全Navier–Stokes方程的求解应该被应用。
在不同球体排列组成的结构中,考虑流体运动方程中惯性因素的流动已在一些地方进行理论和实验研究。
问题陈述在多孔结构的三维周期性元素中,我们分析一种不可压缩气体的流动,这种多孔结构由一些直径相等的球体紧密排列而成,他的中心在规则网格的节点上。
fluent计算技巧

fluent计算技巧Fluent计算技巧是指在使用Fluent软件进行流体力学仿真时,能够提高计算效率和准确性的一系列技巧和方法。
以下是一些常用的Fluent计算技巧:1. 网格优化:良好的网格质量是获得准确结果的关键。
在进行计算前,应对网格进行优化,包括网格划分、剖分、网格尺寸调整等操作,以确保网格质量良好。
2. 边界条件设置:正确设置边界条件对计算结果的准确性至关重要。
应根据具体情况选择合适的边界条件,如速度入口、压力出口、壁面摩擦等,并确保边界条件设置正确无误。
3. 松弛因子调整:在迭代计算过程中,调整松弛因子可以加快收敛速度。
通常情况下,可以逐步减小松弛因子,直到收敛为止。
4. 迭代收敛准则:设置合适的收敛准则可以控制计算的精度和收敛速度。
通常情况下,可以将残差的变化率设置为一个较小的值,以确保计算结果的准确性。
5. 并行计算:Fluent支持并行计算,可以利用多个处理器同时进行计算,提高计算效率。
在进行大规模计算时,可以选择使用并行计算来加快计算速度。
6. 结果后处理:合理的结果后处理可以更好地理解和分析计算结果。
Fluent提供了丰富的后处理功能,可以绘制流线、剖面、矢量图等,以及计算各种流体力学参数。
7. 参数优化:在进行计算前,可以通过参数优化来寻找最佳的计算条件。
可以通过改变模型参数、边界条件、松弛因子等来优化计算结果。
8. 多尺度模拟:对于复杂的流动问题,可以采用多尺度模拟的方法,将整个流场划分为多个区域进行计算。
这样可以提高计算效率,并且可以更好地捕捉流动的细节。
9. 网格独立性分析:在进行计算前,可以进行网格独立性分析,通过逐步细化网格来确定所需的最小网格尺寸。
这样可以确保计算结果对网格的依赖性较小。
总之,Fluent计算技巧是一系列在使用Fluent软件进行流体力学仿真时的实用技巧和方法,通过合理应用这些技巧,可以提高计算效率和准确性,得到更可靠的计算结果。
FLUENT和ANSYS的并行计算设置
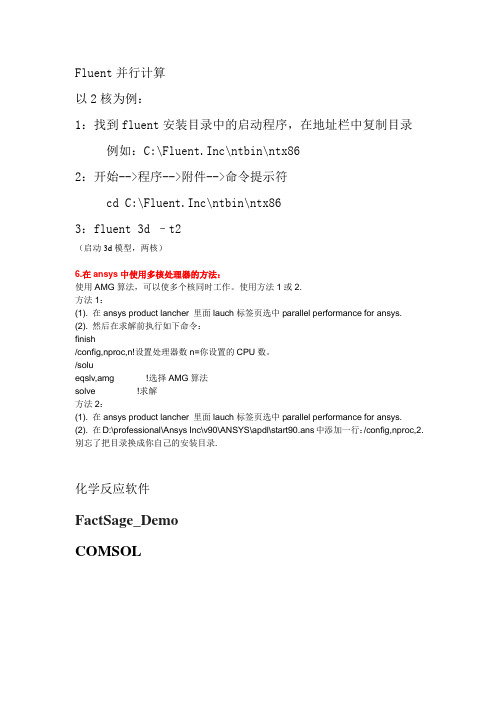
Fluent并行计算以2核为例:1:找到fluent安装目录中的启动程序,在地址栏中复制目录例如:C:\Fluent.Inc\ntbin\ntx862:开始-->程序-->附件-->命令提示符cd C:\Fluent.Inc\ntbin\ntx863:fluent 3d –t2(启动3d模型,两核)6.在ansys中使用多核处理器的方法:使用AMG算法,可以使多个核同时工作。
使用方法1或2.方法1:(1). 在ansys product lancher 里面lauch标签页选中parallel performance for ansys.(2). 然后在求解前执行如下命令:finish/config,nproc,n!设置处理器数n=你设置的CPU数。
/solueqslv,amg !选择AMG算法solve !求解方法2:(1). 在ansys product lancher 里面lauch标签页选中parallel performance for ansys.(2). 在D:\professional\Ansys Inc\v90\ANSYS\apdl\start90.ans中添加一行:/config,nproc,2.别忘了把目录换成你自己的安装目录.化学反应软件FactSage_DemoCOMSOLCourant number实际上是指时间步长和空间步长的相对关系,系统自动减小courant数,这种情况一般出现在存在尖锐外形的计算域,当局部的流速过大或者压差过大时出错,把局部的网格加密再试一下。
在FLUENT中,用courant number来调节计算的稳定性与收敛性。
一般来说,随着courant number的从小到大的变化,收敛速度逐渐加快,但是稳定性逐渐降低。
所以具体的问题,在计算的过程中,最好是把courant number从小开始设置,看看迭代残差的收敛情况,如果收敛速度较慢而且比较稳定的话,可以适当的增加courant number的大小,根据自己具体的问题,找出一个比较合适的courant number,让收敛速度能够足够的快,而且能够保持它的稳定性。
ansys, fluent, CFX并行计算设置

ansys,fluent,CFX 并行计算设置32位Fluent 6.3.26并行计算 测试平台为Windows XP(32位、64位)、Windows 2003 Server 企业版(32位、64位) 命令行启动格式 fluent version -t nprocs [-p interconnect ] [-mpi= mpi_type ] [-cnf= hosts_file ] [-path\\computer_name\share_name ] version 选择计算模型维数和求解精度(2d, 3d, 2ddp, 3ddp) -t 并行计算的进程数,如果-cnf未指定,则仅使用本机计算 -p 指定网络连接方式,默认为ethernet -mpi 指定并行进程间数据交换方式,Fluent6.3支持net和mpich2,默认为mpich2 -cnf 指定包含并行计算可用的主机列表文件名 -path 指定Fluent6.3共享文件夹的网络路径(安装后Fluent6.3根目录设为共享) 选项说明 version 2d为二维计算,3d为三维计算,2ddp和3ddp分别是2d和3d的双精度版本。
-t 该项是并行计算的必选项,如果只进行单机并行计算,命令格式如下 fluent version -tn version如上所述,n是并行进程数,不受CPU物理核数的限制,单核CPU同样可以开启多个并行进程,只不过计算速度不但不会加快,反而会因为计算过程中在并行进程间交换数据而导致速度下降。
只有在一种情况下推荐开启比CPU实际核数多的进程数,那就是你电脑内存超大1,因为32位进程的寻址空间为4G,减掉操作系统保留的部分,单个进程可支配的空间为 2G,也就是说一个Fluent进程能使用的最大内存为2G,所以要充分利用电脑内存,开启的进程数应为“内存(G)/2G”取整数2。
-p 该项一般使用默认值即可。
Fluent的并行计算设置方法总结

并行计算资料来自傲雪论坛和流体中文网!Winnt平台下搭建Fluent并行计算的一些经验以下是本人在NT平台下搭建Fluent并行计算的一些经验,不足和错误的地方请各位高手指出!系统配置:winnt,win2000操作系统,每台主机只有一个CPU,Fluent6.1,每台主机有自己的IP地址,安装好TCP/IP协议1、 Fluent安装光盘上找到RSHD.exe这个文件。
(注意,必须使用Fluent公司提供的这个远程控制软件)2、用管理员的身份登陆计算机,拷贝该软件到系统盘的winnt目录下,在MS-DOS方式下执行 RSHD -install。
3、配置RSHD。
WINNT系统下:控制面板-〉服务-〉RSH Daemon,双击之,在Logon里面输入用户名/密码。
(一般情况下,为了您的计算机的安全,请不要使用具有管理员权限的用户名和口令。
)您可以在开始-〉程序-〉管理工具 -〉用户管理器里面设定,给guest权限就可以了。
Win2000系统下:控制面板-〉管理工具-〉服务-〉RSH Daemon,以下同于NT的操作。
完成上述操作后,请启动RSH服务。
4、资源管理器里面将Fluent的安装目录设置为共享。
注意:这个时候要分别从其他的计算机登陆到本机这个被共享的目录。
这个步骤一定不可缺少。
同样所有的计算机上的Fluent的安装目录都要被设置为共享,然后分别登陆.....5、编写hosts.txt文件,文件的格式在Fluent的帮助文件中又很详细的描述,这里不再复述。
hosts文件中应这样写computer1’s IP, com puter1’s namecomputer1’‘s IP,computer1’s namecomputer2’s IP,computer2’s namecomputer2’s IP,computer2’s name在命令行输入:fluent 3d -pnet然后在parallel-network-configuer菜单下配置即可。
fluent并行计算、UDF添加及常见并行计算错误的全套解决方案

fluent并行计算、UDF添加及常见并行计算错误的全套解决方案一、并行计算配置1.配置计算机1) 操作系统: winxp sp32) fluent软件:fluent 6.2.163) 参与并行的机器都要装,并且把安装目录Fluent6.2.16.Inc共享(安装目录可以自己定义,但机群的安装目录应保持一致,本例:安装目录为:D:\Fluent6.2..16.Inc) 4) 关闭window自带防火墙5) 通过网络邻居,确定并行机群可以互访6) 注册fluent的环境变量(否则可能无法安装rshd.exe文件),方法:找到开始——程序——Fluent Inc Products——Fluent 6.2.16——Set Environment,点击后——点“是”——再点“确定”7) 在D:\Fluent6.2.16.Inc\ntbin\ntx86下找到rshd.exe文件拷贝到文件夹C:\Program Files\Windows NT下,双击rshd.exe文件8) 开始——运行,输入cmd后回车,命令行下输入rshd –install后回车9) 右键点我的电脑----管理---服务和应用程序---服务---找到 RSH Daemon,双击之,选登陆标签,在选择允许服务与桌面交互,点确定10) 右击RSH Daemon,点击启动11) 运行并行版本的Fluent时,可以在如图所示的文本框中输入fluent 2d -t2 -pnet其中,fluent 2d是Fluent版本(2d, 3d, 2ddp, 3ddp):-t2是指计算节点数,以上的两个参数都可以根据具体情况进行改变。
2 fluent软件的设置1)步骤1:配置计算节点启动fluent并行求解器,并行Fluent启动以后的情形如图所示。
配置计算节点:Parallel——Network——Contigure。
打开如图所示的对话框配置计算节点。
从spawned Computer Nod。
fluent单机多核并行计算设置方法

单机多核并行计算是指在一台计算机上利用多个核心进行并行计算,以提高计算效率和加快计算速度。
在当前计算机硬件发展的趋势下,多核处理器已成为主流,因此如何正确设置单机多核并行计算成为了计算机领域中一个重要的问题。
本文将介绍如何进行fluent单机多核并行计算的设置方法,以帮助读者更好地利用计算资源。
一、了解fluent软件支持的并行计算类型在开始进行fluent单机多核并行计算设置之前,首先需要了解fluent软件支持的并行计算类型。
fluent支持两种并行计算类型,一种是多核并行计算,另一种是集群并行计算。
本文将重点介绍多核并行计算的设置方法。
二、检查计算机硬件配置在进行fluent单机多核并行计算设置之前,需要先检查计算机的硬件配置,确保其支持多核并行计算。
通常情况下,多核并行计算要求计算机至少具备双核处理器,并且需要足够的内存和硬盘空间来支持并行计算的运行。
三、安装fluent软件如果计算机上还未安装fluent软件,需要先进行软件的安装。
fluent软件是由ANSYS公司开发的一款专业的计算流体动力学(CFD)软件,广泛应用于工程领域的流体分析和模拟中。
四、配置fluent软件的并行计算环境在fluent软件中进行多核并行计算设置,需要进行如下步骤:1. 打开fluent软件,并选择“Calculation Activities”菜单下的“Parallel…”选项。
2. 在弹出的对话框中,选择“Enable”并设置“Number of CPUs”为计算机实际拥有的核心数。
3. 点击“OK”按钮保存设置并退出对话框。
五、进行并行计算在完成fluent软件的多核并行计算设置后,可以开始进行并行计算。
在进行计算前,需要确保模型设置正确并且计算参数已经调整到最佳状态。
然后可以点击“Calculate”菜单下的“Calculate…”选项来开始并行计算过程。
六、监控并行计算过程在进行并行计算过程中,可以通过fluent软件提供的监控工具来实时监控计算的进度和性能。
fluent并行(Parallelfluent)
fluent并行(Parallel fluent)Introduction to parallel computingFluent parallel computing is the use of multiple computing nodes (processors) simultaneously computing. Parallel computing can segment the meshInto multiple subdomains, the number of subdomains is an integer multiple of the computational node (e.g., 8 sub domains corresponding to 1, 4, and computed nodes). 2, 8Each subdomain (or subset of subdomains) will "reside" on different computational nodes. It may be the computing node of the parallel machine,Or programs running on multiple CPU platforms, or running on different platforms connected by a network (UNIX flat)A program on a platform or Windows platform. The increase of computing information transmission rate will lead to the reduction of parallel computing efficiencyIn parallel computing, it is important to choose the solution.The recommended steps for running parallel Fluent are as follows:1. open parallel solver, select the number of nodes calculated, see section 28.2 and 28.3.2. reads into the case file, and Fluent automatically dividesthe mesh into several subdomains.Make it best to break up after building a problem,Because this segmentation is related to the computational model (like non conformal contact surfaces, sliding mesh, and shell-conduction)Adaptive encapsulation. If your case file contains a sliding mesh, or in the calculation processIn order to modify the non - uniform contact surface, the serial solver is used to segment the non - contact surface.There are other ways to do segmentation, such as manual segmentation on a serial or parallel solver.3. examine the segmentation area carefully and, if necessary, re segmentation, see section 28.4.5, how to check the segmentation area.4. for calculations, see how to check and improve parallel computing in section 28.5.28.2 open parallel solverThe way to turn on the Fluent parallel solver depends on whether the operating platform is a dedicated parallel machine or a workstation.28.2.1 opens the parallel solver under the UNIX systemYou can run Fluent on a dedicated parallel machine or work platform network with a UNIX system, and how to run as follows:Run on a multiprocessor UNIXSelect Solver control panelFigure 28.2.1:Run Fluent on a dedicated parallel machine (a multiprocessor work platform or a large parallel machine), type the running command, and click FluentThe File Run... Uses the Select Solver (Figure 28.2.1) control panel to configure the parallel architecture and solver information.1. in the Version box, click 3D and Double Precision to choose whether the problem is "3D" or "2D"The accuracy of the problem is single or double precision, and then click the Parallel option.2. in the Options box, select the information transfer library you want to use in the Communicator drop-down menu. RecommendUse the Default library because it provides the most comprehensive parallel operations for parallel machines.Vendor, MPI, and Shared Memory MPI (MPICH) are also includedhere. Vendor MPI selects the receiverHardware optimized information transfer library. If the hardware on the machine supports parallel toolkits,When using Default,Fluent will automatically detect it. The Shared Memory MPI (MPICH) uses the MPICH information transfer Library (MPIPublic domain).3. select the number of CPU in parallel computing on Processes.4. click on the Run button to do parallel calculations, and once the solver starts running, you don't need anything elseEquipment now.If you want to start the parallel calculation with the command, type the following command:"Fluent, version, N, [-p, comm] [[-load, host] [[-path, path]] -t]Among them, version can choose 2D, 3D, 2ddp and 3ddp, and N refers to the number of CPU. Other uses as needed,When used, write according to the information implied by square brackets (excluding brackets in writing). Comm refers to the name of the parallel transport library, hostRefers to the connection to the host of the computing node (the default is the host you use), and path refers to the path to the Fluent.Inc installation.Generally speaking, you only need to set up -p comm when you want to avoid using the default transport library.The transport device on a dedicated parallel machine and the list of related transport libraries are listed below:Vmpi vendor MPISmpi, shared, memory, MPI (MPICH)Net socketRun on the UNIX workbenchRun Fluent on the UNIX workbench network, type the run command, and click File Run in Fluent...,Using the Select Solver (Figure 28.2.1) control panel, the parallel architecture and solver information are set.1. in the Version box, click 3D and Double Precision to choose whether the problem is "3D" or "2D"The accuracy of the problem is single or double precision, and then click the Parallel option.2. in the Options box, select the Socket information transfer Library in the Communicator drop-down menu.When you use the parallel network version, you must select Communicator from the Socket drop-down menu, unless VendorMPI support integration. If Default is selected, a parallel version of MPI will be used, and that cannot be generatedAdditional computing nodes.3. sets the initial number of parallel computing nodes on the Processes. You can start with 1 or 0 nodes and regenerate it laterFor nodes, see section 28.3.1.4. (optional) at Hosts File, type the name of the file that contains the machine list. If Processes is set to 0,Fluent generates a node for every machine listed in the file.5. click on the Run button to do parallel calculations.If you want to use the command to start network parallel computing, type the following command:Fluent version - T1 - PNET (using socket transport device)Fluent version - T1 - pnmpi (using network MPI transport device)This allows you to open the solver on a computing node on the work platform, and then use Network控制面板添加远程工作平台上的计算节点 limit configuration, 详见节.如果键入如下命令.–t0 fluent version –pnet - cnf = hostsfile] (用 socket 传输装置)–t1 fluent version –pnmpi - cnf = hostsfile] (用网络 mpi 传输装置)这样就可以开启远程机器上的计算节点的控制程序.如果设置了 - cnf = hostsfile, 则在hostsfile 文件中列出的每个机器都被设为一个计算节点, 详见节limit.if 在 windows 系统下开启并行求解器系统的专用并行机或网络可以在装有 windows windows 平台上运行 fluent.机上运行在多处理器 windows在系统下可通过 windows, ms-dos 窗口开启 fluent 专用并行版本.如在处理器上 x x x x x x x开启并行版本, 可键入the fluent version x x x x x x x在提示命令下, 将替换为求解器版本 version (2d、3d、2dpp、3ddp), 替换为处理将 x x x x x x x器的数量 (如 fluent 3d –t3 是在 3 台处理器上运行 3d 版本). 如果 fluent 命令不被识别,.节介绍了如何修改用户的环境变量.工作平台上运行在 windows有两种方法在 windows 工作平台网络上运行一种是用 rshd 传输装置软件, fluent.另外一种是采用硬件支持的信息传输接口 (vmpi).参考 windows 并行安装说明书来安装.启动说明书是在假定机器已经装了必要的软件 (遵照安装说明书安装) 前提下的.启动基于 rshd 并行版本的 fluent如果你的机器是采用 rshd 软件进行网络传输的, 在命令提示符中键入.fluent version sharename pnet [path] [-] - nprocs hostfile cnf.必须用你所运行的 version fluent 版本 (2d、3d、2ddp、3ddp) 代替.path sharename inc. 路径的网络共享名.只有你不是用通用命名标准设定 fluent.是在安装 fluent 的那台机器上计算才进行这项操作, 如果是在同一台机器上进行计算就不必键入这项信息.例如, fluent 是安装在 computer1 上, 就将sharename 用共享路径 \ \ computer1 \ fluent.inc 代替.- 如果这个文件不在系 cnf = hostfile 指定所有你要运行并行工作的计算机列表的文件.统默认的路径下, 就要给出它的全路径.用 notepad 类文本编辑器生成 hostfile, 仅有的要求就是文件名中不能含有空格, 如 hosts.txt 是对的, 而 my hosts.txt 不行.这个hostfile 要包含如下内容.computer1computer2! - 列表中的第一个计算机必须是你所使用的计算机.If the computer on the network is a multiprocessor, you can write it several times in the list. For example, computer1 hasThe two CPU, in hosts.txt, is going to list the computer1 two times, as follows:Computer1Computer1ComputeR2If you do not use the -cnf option, Fluent will do the nprocs operation in the command bar. Then you can use FluentThe Network Configuration control panel introduces interactive computing nodes on the workstation.The number of nodes used in -t nprocs settings. If -cnf is selected, hostfile will select the computers for himselfConcurrent work. For example, hostfile include 10 computers, and you just want to use one of the 5 nodes of meterYou can set nprocs to 5 (-t5), and Fluent will work with the first 5 computers listed in the hostfile.The Network Configuration control panel can be used to kill the process or introduce other nodes, as shown in section 28.3.Example: for a RSHD based 3D problem, the first 3 computers in the hostfile named hosts.txt are enabledThe complete command for parallel computing is:Fluent, 3D, -pnet, -cnf=hosts.txt,-path\\computer1\fluent.inc, -t3Start a Fluent based parallel version of Vendor-MPIIf your machine is using a hardware supported MPI software for network transmission, type it at the command prompt:Fluent version - pvmpi [-path sharename] [-cnf= hostfile] -t nprocsThe meanings of the options are the same as in the previous section, but note the following two points:Hostfile is a must. You cannot use the Network Configuration control panel as a worker when using MPI softwareTake a station to introduce a compute node (Note: the first computer in the list must be the computer that you use).When using MPI software, you cannot use the Network Configuration control panel to kill the process or introduce new onesCompute node.Example: for a Vendor-MPI based 3D problem, enable the first 3 sets of hostfile in the name hosts.txtThe complete command of the computer for parallel computation is that:Fluent 3D - pvmpi -cnf=hosts.txt -path\\computer1\fluent.inc -t328.3 using a parallel network work platformA computing platform can be introduced (killing) computing nodes to form a virtual parallel machine. Even oneThe work platform has only one CPU, and also allows multiple computing nodes to exist together.28.3.1 configuration networkIf you want to introduce a compute node to a few machines, or modify the current network configuration, such as when you start the solutionWhen you find a host of too many computing nodes on the host, you can click Parallel Network Configure...Open the Network Configuration control panel (see figure 28.3.1) to set it up.Figure 28.3.1: Network Configuration control panelnetwork structureThe tab of the calculated node increases sequentially from 0.In addition to the compute node, there is also a host node. Fluent boot timeThe host node also starts automatically, and when it exits the Fluent it is also closed and cannot be turned off when the Fluent is running.The compute node can be closed at any time, except for node 0, because it is the last computing node, and the host always introduces the nodes0, and node 0 introduces all the other nodes.Steps to introduce a computational nodeThe basic steps for introducing a compute node are as follows:1. in the Available Hosts list, select the host to which the node is to be introduced. If the required machine is not listed,Manually add a host to the Host Entry, or copy the host you need from the host database (see)28.3.2 section).2. set the number of compute nodes for each selected host in Spawn Count.3. click the Spawn button, and the new node is introduced and added to the Spawned Compute Nodes columnIn table.Other uses related to network configuration are described below:Add host manuallyManually add a host to the list of Available Hosts on the Network Configuration control panelIn the Hostname under Host Entry, type the network name of the remote machine. In username, type the name of the machine in the registry(unless all accounts are the same registration name, this case does not need to specify username), and then click the Add button,This designated host is added to the Available Hosts list.Delete hostRemove a host from the list of Available Network on the Configuration Hosts control panel, and select thisA host, click the Delete button, the host name is Available Hosts from the list of deleted (but the host databaseNot affected, see section 28.3.2.Kill calculated nodesIf an unnecessary computational node is introduced, it is killed in the Spawned Compute Nodes listSelect it, and then click the Kill button.Note: the compute node 0 can be killed only when it is the last calculated node.Save the Hosts fileIf you have edited a list of Available Hosts and want to use it in another process, you can group this columnAll the information in the table is saved as a hosts file. Click the Save... Button to pop up the Select File dialog box and type in the fileName, execute, save. When you want to use it, you can load this file into the host database (see section 28.3.2) to generate the current AvailableHosts list, all the hosts in the file are developed to the Network Configuration control panel.Problems that occur when nodes are introducedWhen the process is introduced, the system attempts to establish a connection with the new node, but after 50 seconds the system does not receive a response from the new nodeThe introduction will be considered unsuccessful. This happens if the remote computer cannot find an identifiable Fluent.To test whether a new node is generated when a new machine is introduced,You can run the following command on the DOS window on the incoming machineRSH, [-l, username] hostname, fluent, -t0, -vHostnam is the network name of the machine that wants to introduce new nodes, and username is the registered name of the remote machine specified by hostnam.If all accounts are of the same registration name, this case does not specify username (-l in brackets)Username does not always need to be set, and when typing the registration name does not contain square brackets. Also note that under certain systems, DOSCommand RSH is replaced by remsh.What are the reasons for introducing a node failure?:Incorrect registration. The introduction of new nodes to the machine must be able to RSH the new process to execute the machine, otherwise the introduction will fail. wantThere are several ways to succeed in RSH, which can be turnedto system administrators.Fluent is not recognized. Successful RSH to remote machine, but can not find Fluent path on remote machine, thisYou can use the CSH command to add the path of Fluent to the path variable of the.Cshrc file. If this is a failure, then...Before you introduce a new node, set the path to the Fluent.Inc installation directly with the parallel/network/path command.28.3.2 host databaseWhen you build a parallel network of work platforms, it is easy to generate a list of LAN machines ("hosts file") that will contain these machinesThe file of the device name is loaded into the host database, and then click Parallel Network Database... (or click)Database Database button on the Network Configuration control panel, using the Hosts 28.3.2 shown in the iconControl panel, on the work platform, select the hosts that make up the parallel configuration (or network).Figure 28.3.2: Hosts Database control panelIf the host file fluent.hosts or.Fluent.hosts is in the root directory, the contents inside it will start at the time the program startsDynamically load into the host database, otherwise the host database is empty until a host file is read in.Read host fileIf you have a host file that contains the list of machines in the LAN, click the Load... Button to eject the Select File pairIn the dialog box, select this file and load it into the Hosts Database control panel. When the file is read in, the host nameThe word will be explicitly shown in the Hosts list (Fluent automatically adds the IP address of each recognizable machine, if a machine does notIn the current LAN, it will be marked as unknown.).Copy the host to the Network Configuration control panelTo copy the Hosts in the Hosts Database control panel to the Network Configuration control panelIn the Available Hosts list, select the name you need to copy in the list, and click the button, and the selected host will be addedTo the list of Available Hosts you want to import the node machine.28.3.3 detects network connectivityFor any computing node, you can view the following network connectivity information: host name, architecture, operation, ID, andSelect node ID and all connected computers. The ID of the selected node is marked with an asterisk.The ID of the Fluent master process is always the host, and the computing nodes start in node-0, and all the computing nodes areConnected together, the computing node 0 is connected to the main process.To obtain connectivity information for a computing node, click Parallel Show Connectivity... OpenParallel Connectivity control panel (Figure 28.3.3)Figure 28.3.3: Parallel Connectivity control panelIn the Compute Node region, select the number of nodes that want to understand the connectivity information, and then click the Print button, for exampleFor example, the output information for node 0 is as follows:--------------------------------------------------------------ID, Hostname, O.S., PID, Mach, ID, HW, ID, Name--------------------------------------------------------------Node-2 fili IRIX 16729211 Fluent NodeNode-1 bofur IRIX 16182110 Fluent NodeHost Balin SunOS 584507 Fluent HostNode-0* Balin SunOS 58640-1 Fluent NodeO.S. refers to the architecture, PID is the process ID number, Mach ID is the computing node ID, and HW ID is the identifier of the switchFu.You can also see the connectivity of a computing node in the Network Configuration control panelSelect this node in the Spawned Compute Nodes list, and then click the Connectivity button. If not selectedAny node in Spawned Compute Nodes and the Connectivity button, Network ConfigurationThe control panel will be re opened and will follow the above method. If Spawned Compute Nodes is selectedFor more than two nodes, the point Connectivity button can explicit the connectivity information of each node.。
FLUENT并行设置

FLUENT并行设置FLUENT并行设置FLUENT14.0的设置并行计算的启动界面如图所示。
通过选择processing options下的parallel(Local Machine)选项,可以激活并行计算。
注意到激活了并行计算后,Option中多出了一个use remote Linux node项,对于其它计算节点为Linux的情况,可以勾选此选项并进行相关设置。
1、Number of Processes此处设定使用的计算机数量。
只是针对本地计算机,设置的是要使用的计算机核心数量。
此处不能设置分布式计算。
若本机除了计算还需要进行其它的工作的话,建议CPU数量不要设满。
2、Parallel Settings标签页此标签页下设定的是并行计算的一些连接方式。
一般情况下使用默认方式即可。
3、Run typeFLUENT提供了两种并行工作方式:shared memory on local machine与distributed memory on a cluster。
Shared memory on local machine:通常用于单机计算。
单计算机共享内存计算。
Distributed memory on a cluster:分布式内存计算。
激活此选项后如下图所示。
可以有两种方式指定计算机:利用计算机名与导入包含计算机名的文本文件。
4、Remote标签页勾选use remote Linux node选项后,将多出一个Remote标签页。
如下图所示。
Remote FLUENT Root Path:设置远程FLUENT根路径。
Embed Graphics Windows:此选项控制是否将图形窗口嵌入至FLUENT主程序中。
若不勾选此选项,则图形窗口与FLUENT程序是分离的。
老版本的FLUENT (12.0以前的版本)即是这样。
默认情况下该选项被勾选。
Workbench Color Scheme:此选项设置是否使用workbench色彩。
- 1、下载文档前请自行甄别文档内容的完整性,平台不提供额外的编辑、内容补充、找答案等附加服务。
- 2、"仅部分预览"的文档,不可在线预览部分如存在完整性等问题,可反馈申请退款(可完整预览的文档不适用该条件!)。
- 3、如文档侵犯您的权益,请联系客服反馈,我们会尽快为您处理(人工客服工作时间:9:00-18:30)。
在file下拉菜单里可以看到run项已经开启。进去选项卡选择默认是2d单精度单核运算。
通过点击3d选择维度,
double precision选择精度,
parallel选择并行计算。选定并行后下方出现process核数选择。那就看你怎么填了。
Architechture: ntx86
MPI types: mpich2
然后点击launch,运行并行计算。
方法二:
在启动图标右击——属性——目标(显示fluent安装位置和版本号)
在版本号后加入空格,然后是t2(有人说四核应该是t4,你们试试吧。我用四核也是加空格和t2)
关闭。
方法一:
1. 安装C:\Fluent.Inc\ntbin\ntx86\rshd.exe
运行——cmd——cd C:\Fluent.Inc\ntbin\ntx86\——rsh –install
2. 我的电脑——右键——管理——服务——RSHD demon——启动——属性——登录——此帐户——浏览:选择用户名和密码。点击应用。
3. C:\Fluent.Inc\fluent6.3.26\launcher\launcher.exe
4. fluent launcher 1.1 对话框。设置:
Fluent.inc path: C:\fluent.inc
version: 3d or 2d
number of process: 2,4,8luent的快捷方式上右键,属性,复制路径,打开运行,把路径复制进去,在后面加上 3d 空格 -t6
t后面的数字 你想用几核算就输几,如果编译udf,把做好的这个快捷方式复制到和你case同样的目录下,直接运行打开,编译就行了。