TP-LINK路由器使用说明书
TP-LINK 无线宽带路由器 快速说明书

自动获得 IP 地址(0 ) 使用以下的 IP 地址(S ) IP 地址(T ) 子网掩码(U ) 默认网关(D )
自动获得 DNS 服务器地址(P ) 使用以下的 DNS 服务器地址(E ) 首选 DNS 服务器地址(F ) 备用 DNS 服务器地址(A )
安装 (N)
卸载 (U)
属性 (R)
TCP/IP 是默认的广域网协议。它提供跨越多种互联网络 的通讯。
连接后在通知区域显示图标(w) 此连接被限制或无连接时通知我(M)
确定
取消
4 选择“ 自动获得 IP 地址 ”和“ 自 动获得 DNS 服务器地址 ”。点 击“ 确定 ”。返回上一个界面, 点击“ 确定 ”。
1 右键单击“ 网上邻居 ”, 选择“ 属性 ”。
2 右键单击“ 本地连接 ”, 选择“ 属性 ”。
3 双击“Internet 协议 (TCP/IP)”。
打开(0) 资源管理器(X) 搜索计算机(C)
映射网络驱动器(N) 断开网络驱动器(I)
创建快捷方式(S) 删除(D) 重命名(M)
属性(R)
本地连接 已连接上 有防火...
网络适配器 Realtek RTL8168/8111 PCI-E Gigabit Ethernet NIC TL-WN321G/WN321G+ Wireless USB Adapter
如果网卡前面的图标有一个红叉,表示网卡未启用,请右键单击该网卡,选择启用。如果 网卡前面的图标有一个问号或叹号,表示网卡驱动未安装成功,请重新安装网卡驱动。如 果未发现无线网卡,请右键点击任意图标,选中“扫描检测硬件改动”,或者重新安装网 卡。
TP-LINK TL-WR802N 300Mbps Wireless N Nano路由器说明书

TL-WR802N300Mbps Wireless N Nano RouterRev: 1.0.2COPYRIGHT & TRADEMARKSSpecifications are subject to change without notice. is a registered trademark of TP-LINK TECHNOLOGIES CO., LTD. Other brands and product names are trademarks or registered trademarks of their respective holders.No part of the specifications may be reproduced in any form or by any means or used to make any derivative such as translation, transformation, or adaptation without permission from TP-LINK TECHNOLOGIES CO., LTD. Copyright © 2015 TP-LINK TECHNOLOGIES CO., LTD. All rights reserved.FCC STATEMENTThis equipment has been tested and found to comply with the limits for a Class B digital device, pursuant to part 15 of the FCC Rules. These limits are designed to provide reasonable protection against harmful interference in a residential installation. This equipment generates, uses and can radiate radio frequency energy and, if not installed and used in accordance with the instructions, may cause harmful interference to radio communications. However, there is no guarantee that interference will not occur in a particular installation. If this equipment does cause harmful interference to radio or television reception, which can be determined by turning the equipment off and on, the user is encouraged to try to correct the interference by one or more of the following measures:•Reorient or relocate the receiving antenna.•Increase the separation between the equipment and receiver.•Connect the equipment into an outlet on a circuit different from that to which the receiver is connected.•Consult the dealer or an experienced radio/ TV technician for help.This device complies with part 15 of the FCC Rules. Operation is subject to the following two conditions:1)This device may not cause harmful interference.2)This device must accept any interference received, including interference that may cause undesired operation.Any changes or modifications not expressly approved by the party responsible for compliance could void the user’s authority to operate the equipment.Note: The manufacturer is not responsible for any radio or TV interference caused by unauthorized modifications to this equipment. Such modifications could void the user’s authority to operate the equipment.FCC RF Radiation Exposure Statement:This equipment complies with FCC RF radiation exposure limits set forth for an uncontrolled environment. This device and its antenna must not be co-located or operating in conjunction with any other antenna or transmitter.“To comply with FCC RF exposure compliance requirements, this grant is applicable to only Mobile Configurations. The antennas used for this transmitter must be installed to provide a separation distance of at least 20 cm from all persons and must not be co-located or operating in conjunction with any other antenna or transmitter.”CE Mark WarningThis is a class B product. In a domestic environment, this product may cause radio interference, in which case the user may be required to take adequate measures.RF Exposure InformationThis device meets the EU requirements (1999/519/EC) on the limitation of exposure of the general public to electromagnetic fields by way of health protection.The device complies with RF specifications when the device used at 20 cm form your body.National restrictionsThis device is intended for home and office use in all EU countries (and other countries following the EU directive 1999/5/EC) without any limitation except for the countries mentioned below: Country Restriction Reason/remarkBelarus Not implementedNorway Implemented This subsection does not apply for the geographical areawithin a radius of 20 km from the centre of Ny-Ålesund onSvalbardItaly Implemented The public use is subject to general authorisation by therespective service providerRussian Federation Limitedimplementation1. SRD with FHSS modulation1.1. Maximum2.5 mW e.i.r.p.1.2. Maximum 100 mW e.i.r.p. Permitted for use SRD foroutdoor applications without restriction on installation heightonly for purposes of gathering telemetry information forautomated monitoring and resources accounting systems.Permitted to use SRD for other purposes for outdoorapplications only when the installation height is not exceeding10 m above the ground surface.1.3.Maximum 100 mW e.i.r.p. Indoor applications2. SRD with DSSS and other than FHSS widebandmodulation2.1. Maximum mean e.i.r.p. density is 2 mW/MHz. Maximum100 mW e.i.r.p.2.2. Maximum mean e.i.r.p. density is 20 mW/MHz. Maximum100 mW e.i.r.p. It is permitted to use SRD for outdoorapplications only for purposes of gathering telemetry information for automated monitoring and resources accounting systems or security systems.2.3. Maximum mean e.i.r.p. density is 10 mW/MHz. Maximum 100 mW e.i.r.p. Indoor applicationsUkraine Limitedimplementation e.i.r.p. ≤100 mW with built-in antenna with amplification factor up to 6 dBiATTENTION: Due to EU law, the country settings must be identical to the country where the device is operating (important due to non-harmonised frequencies in the EU).Canadian Compliance StatementThis device complies with Industry Canada license-exempt RSS standard(s). Operation is subject to the following two conditions:1)This device may not cause interference, and2)This device must accept any interference, including interference that may cause undesired operation of the device.Le présent appareil est conforme aux CNR d’Industrie Canada applicables aux appareils radio exempts de licence. L’exploitation est autorisée aux deux conditions suivantes :1)l’appareil ne doit pas produire de brouillage;2)l’utilisateur de l’appareil doit accepter tout brouillage radioélectrique subi, meme si le brouillage est susceptible d’en compromettre le fonctionnement.Radiation Exposure Statement:This equipment complies with IC radiation exposure limits set forth for an uncontrolled environment. This equipment should be installed and operated with minimum distance 20cm between the radiator & your body.Déclaration d'exposition aux radiations:Cet équipement est conforme aux limites d'exposition aux rayonnements IC établies pour un environnement non contrôlé. Cet équipement doit être installé et utilisé avec un minimum de 20 cm de distance entre la source de rayonnement et votre corps.Industry Canada StatementCAN ICES-3 (B)/NMB-3(B)Korea Warning Statements당해무선설비는운용중전파혼신가능성이있음.NCC Notice & BSMI Notice注意!依據低功率電波輻射性電機管理辦法第十二條經型式認證合格之低功率射頻電機,非經許可,公司、商號或使用者均不得擅自變更頻率、加大功率或變更原設計之特性或功能。
TP-Link无线路由器说明书
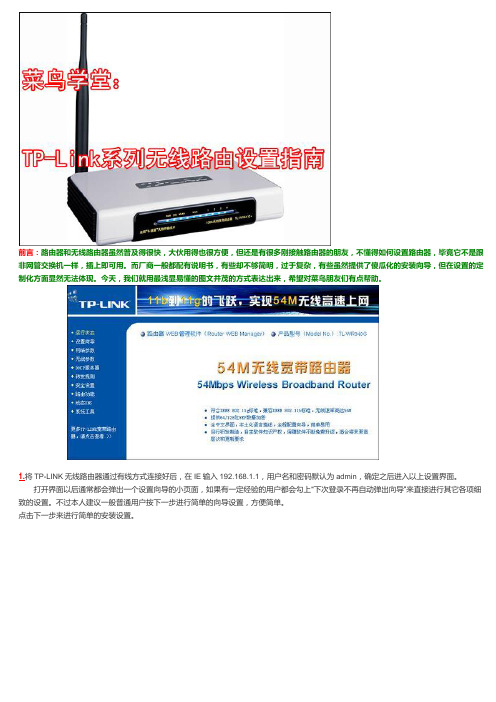
前言:路由器和无线路由器虽然普及得很快,大伙用得也很方便,但还是有很多刚接触路由器的朋友,不懂得如何设置路由器,毕竟它不是跟非网管交换机一样,插上即可用。
而厂商一般都配有说明书,有些却不够简明,过于复杂,有些虽然提供了傻瓜化的安装向导,但在设置的定制化方面显然无法体现。
今天,我们就用最浅显易懂的图文并茂的方式表达出来,希望对菜鸟朋友们有点帮助。
1.将TP-LINK无线路由器通过有线方式连接好后,在IE输入192.168.1.1,用户名和密码默认为admin,确定之后进入以上设置界面。
打开界面以后通常都会弹出一个设置向导的小页面,如果有一定经验的用户都会勾上“下次登录不再自动弹出向导”来直接进行其它各项细致的设置。
不过本人建议一般普通用户按下一步进行简单的向导设置,方便简单。
点击下一步来进行简单的安装设置。
2.通常ASDL拨号上网用户选择第一项PPPoE来进行下一步设置。
但是如果你是局域网内或者通过其它特殊网络连接(如视讯宽带、通过其它电脑上网之类)可以选择以下两项“以太网宽带”来进行下一步设置。
这里先说明一下ADSL拨号上网设置,以下两项在后面都将会进行说明。
到ADSL拨号上网的帐号和口令输入界面,按照字面的提示输入用户在网络服务提供商所提供的上网帐号和密码然后直接按下一步。
3.接下来可以看到有无线状态、SSID、频段、模式这四项参数。
检测不到无线信号的用户留意一下自己的路由器无线状态是否开启。
SSID这一项用户可以根据自己的爱好来修改添加,这一项只是在无线连接的时候搜索连接设备后可以容易分别需要连接设备的识别名称而已。
另外在频段这一项我们拉下来可以看到有13个数字选择,这里的设置只是你路由的无线信号频段,如果你附近有多台无线路由的话你可以在这里设置使用其它频段来避免一些无线连接上的冲突。
接着模式这一选项拉下来我们可以看到TP-LINK无线路由的几个基本无线连接工作模式,11Mbps(802.11b)最大工作速率为11Mbps;54Mbps(802.11g)最大工作速率为54Mbps,也向下兼容11Mbps。
TP-Link 无线路由器快速设置图文教程
TP-Link 无线路由器快速设置下面给大家介绍tp link无线路由器设置,示例中是以全新路由器进行演示的,如果不确定路由器之前是否被设置过,那么建议对TP-Link无线路由器进行复位操作,大家可以参考下无线路由器的基础配置下面给大家介绍tp link无线路由器设置,示例中是以全新路由器进行演示的,如果不确定路由器之前是否被设置过,那么建议对TP-Link无线路由器进行复位操作。
TP-Link无线路由器正确的复位方法:请在路由器通电的情况下,按住后面板上标识为QSS/RESET的按钮,持续5秒钟以上,保持按压的同时观察SYS灯,当SYS灯由缓慢闪烁变为快速闪烁状态时,表示路由器已成功恢复出厂设置,此时松开该按钮,路由器将重启。
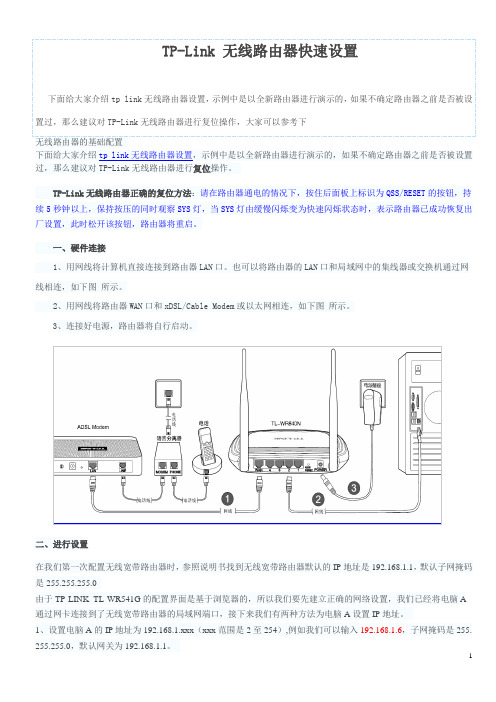
一、硬件连接1、用网线将计算机直接连接到路由器LAN口。
也可以将路由器的LAN口和局域网中的集线器或交换机通过网线相连,如下图所示。
2、用网线将路由器WAN口和xDSL/Cable Modem或以太网相连,如下图所示。
3、连接好电源,路由器将自行启动。
二、进行设置在我们第一次配置无线宽带路由器时,参照说明书找到无线宽带路由器默认的IP地址是192.168.1.1,默认子网掩码是255.255.255.0由于TP-LINK TL-WR541G的配置界面是基于浏览器的,所以我们要先建立正确的网络设置,我们已经将电脑A 通过网卡连接到了无线宽带路由器的局域网端口,接下来我们有两种方法为电脑A设置IP地址。
1、设置电脑A的IP地址为192.168.1.xxx(xxx范围是2至254),例如我们可以输入192.168.1.6,子网掩码是255. 255.255.0,默认网关为192.168.1.1。
2、设置电脑A的TCP/IP协议为“自动获取IP地址”,然后关闭无线宽带路由器和电脑A的电源,首先打开无线宽带路由器电源,然后再启动电脑A,这样无线宽带路由器内置的DHCP服务器将自动为电脑A设置IP地址。
TP-LINK路由器(有线、无线)通用设置图解

TP- LINK路由器(有线、无线)通用设置图解目录TP-LINK路由器(有线、无线)设置详解(修订版) (1)1. 进入路由器设定 (2)(有些其他品牌路由器用户名、密码不一样,但在机壳下面或说明书里有) (2)1-10 为家用路由器一般设定................................................................................................................. 1-711. 单位用户静态IP设定 (7)12. 有线电脑IP指定地址设定 (8)13. 无线电脑IP指定地址设定 (11)14. 路由器恢复出厂设置 (14)15. 如果路由器不自动拨号,克隆MAC就OK (15)16. 网络中同时有两台路由器的两种设定方法(经过实践验证可行) (16)17. 网络中同时有三台或三台以上路由器有两种设定方法(经过实践验证可行) (18)18. 共享打印机 (21)19. 打开/关闭隐藏文件 (22)20. 两台计算机共享文件夹 (23)21 迷你路由器TL-WR700N 设定 (24)22. 如果路由器用一段时间自动断线,一般是设置问题-------------------------------24所有TP—LINK路由器设置方法基本通用1. 进入路由器设定-------按说明接好线路后在电脑浏览器地址栏输入“192.168.1.1”,之后直接敲回车键2.弹出下图用户名密码菜单---------输入用户名:admin --------密码:admin(有些其他品牌路由器用户名、密码不一样,但在机壳下面或说明书里有)3.点确定------弹出下图菜单------点左侧设置向导-------点中间下一步4.弹出如下菜单------如果是家里装的宽带就选PPPOE(ADSL虚拟拨号)-----点下一步------输入上网账号和上网口令(也就是电信或网通公司给的宽带账号和密码)-------点下一步-----设置无线设置5、选无线状态开启------在SSID中输入无线用户账号(最好是你的名字的拼音字母加数字,但不要拼全,总之你要能从众多用户名中一下直观认出是你的无线帐户。
TP-Link 无线路由器设置图文教程 怎么设置TP-Link无线路由器图解

下面给大家介绍tp link无线路由器设置,示例中是以全新路由器进行演示的,如果不确定路由器之前是否被设置过,那么建议对TP-Link无线路由器进行复位操作,大家可以参考下所需要的资料如下:1、宽带拨号用户名与密码2、路由器+网线(如果是无线路由器就不需要另外接电脑的网线了)如果路由器忘了密码或者不是新买的可以通过用牙签按住 reset 键10秒左右就可以回复出厂设置了。
(登录用户名一般就是admin/admin),现在新买的路由器可能只需要设置密码(admin)就可以了。
一、硬件连接我们首先要明白无线路由器的插孔都有什么用处,先来看一下图解如下图所示WAN口连接宽带进线即网络公、LAN口连接局域网内的电脑。
在我们第一次配置无线宽带路由器时,参照说明书找到无线宽带路由器默认的IP地址是1 92.168.1.1,默认子网掩码是255.255.255.0由于TP-LINK TL-WR541G的配置界面是基于浏览器的,所以我们要先建立正确的网络设置,我们已经将电脑A通过网卡连接到了无线宽带路由器的局域网端口,接下来我们有两种方法为电脑A设置IP地址。
1、设置电脑A的IP地址为192.168.1.xxx(xxx范围是2至254),例如我们可以输入192. 168.1.6,子网掩码是255.255.255.0,默认网关为192.168.1.1。
2、设置电脑A的TCP/IP协议为“自动获取IP地址”,然后关闭无线宽带路由器和电脑A的电源,首先打开无线宽带路由器电源,然后再启动电脑A,这样无线宽带路由器内置的D HCP服务器将自动为电脑A设置IP地址。
在完成上面的步骤后,我们使用电脑A,打开一个IE浏览器的窗口,在地址栏上输入http: //192.168.1.1(输入密码默认是admin,admin)即可进入配置界面。
这个不必介绍了吧,登录后的初时界面,呵呵登陆之后首先运行设置向导,我已经把登陆运行向导功能关闭,大家可以在左边栏点击设置向导。
TP-Link无线路由器设置指南

打开界面以后通常都会弹出一个设置向导的小页面, 如果有一定经验的用户都会勾上“下次登 置。不过本人建议一般普通用户按下一步进行简单的向导设置,方便简单。
点击下一步来进行简单的安装设置。
如果无线路由器还需要连接 100/10M 有线网络, 那么我们还需要进行进一步设置。 在主界面选择 C IP Configuration 配置界面。此时我们所要做的仅仅是将当 DHCP 一项设为 Enable,一旦用户的 IP 地址,就能由无线路由器处得到一个 IP 地址了。至于 DNS IP 地址,大家可以查询当地的 ISP
只要注意不和其他工作站的 IP 有冲突基本上都没什么太大问题。记得在修改以后按保存后重启路 注意:当 LAN 口 IP 参数(包括 IP 地址、子网掩码)发生变更时,为确保 DHCP 态地址与新的 LAN 口 IP 是处于同一网段的,并请重启路由器。
server 能够
6.在这里基本上 TP-LINK 提供 7 种对外连接网络的方式,由于现在基本上家庭用户都是用 ADSL 拨
WPA-PSK/WPA2-PSK(基于共享密钥的 WPA 模式)。这里的设置和之前的 WPA/WPA2 也大致类同 始密码,最短为 8 个字符,最长为 63 个字符。
9.无线网络 MAC 地址过滤设置。大家可以可以利用本页面的 MAC 地址过滤功能对无线网络中的主机
过滤功能,并且过滤规则选择了“禁止列表中生效规则之外的 MAC 地址访问本无线网络”,而过滤 以访问本无线网络。
MAC 地址的计算机预留静态的 IP 地址。之后,此计算机请求 DHCP 服务器获得 IP 地址时,DHCP 服
TP-LINK TL-R460 路由器使用说明书
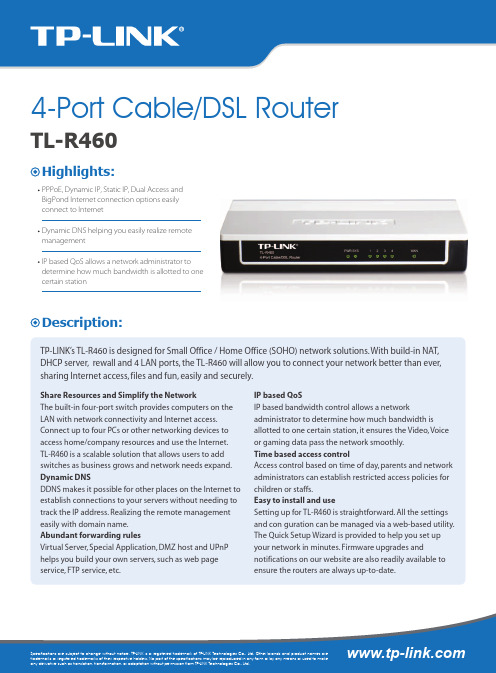
Description:Highlights:PPPoE, Dynamic IP, Static IP, Dual Access and BigPond Internet connection options easily connect to InternetDynamic DNS helping you easily realize remote managementIP based QoS allows a network administrator to determine how much bandwidth is allotted to one certain stationTP-LINK’s TL-R460 is designed for Small Office / Home Office (SOHO) network solutions. With build-in NAT, DHCP server, rewall and 4 LAN ports, the TL-R460 will allow you to connect your network better than ever, sharing Internet access, files and fun, easily and securely.Share Resources and Simplify the NetworkThe built-in four-port switch provides computers on the LAN with network connectivity and Internet access. Connect up to four PCs or other networking devices to access home/company resources and use the Internet. TL-R460 is a scalable solution that allows users to add switches as business grows and network needs expand.Dynamic DNSDDNS makes it possible for other places on the Internet to establish connections to your servers without needing to track the IP address. Realizing the remote management easily with domain name.Abundant forwarding rulesVirtual Server, Special Application, DMZ host and UPnP helps you build your own servers, such as web page service, FTP service, etc.IP based QoSIP based bandwidth control allows a networkadministrator to determine how much bandwidth is allotted to one certain station, it ensures the Video, Voice or gaming data pass the network smoothly.Time based access controlAccess control based on time of day, parents and network administrators can establish restricted access policies for children or staffs.Easy to install and useSetting up for TL-R460 is straightforward. All the settings and con guration can be managed via a web-based utility. The Quick Setup Wizard is provided to help you set up your network in minutes. Firmware upgrades andnotifications on our website are also readily available to ensure the routers are always up-to-date.TL-R4604-Port Cable/DSL RouterSpecification:Features:TL-R460PortsNetwork Media(Cable)Standards Internet AccessSecurityQoS DHCP DDNSForwarding RulesManagement Power Supply Cert cations Temperature HumidityDimensions(LxWxH)4-Port Cable/DSL RouterWAN 1 10/100M Auto-Negotiation RJ45 port, Auto MDI/MDIX LAN 4 10/100M Auto-Negotiation RJ45 ports, Auto MDI/MDIX 10Base-T: UTP category 3, 4, 5 cable (maximum 100m)EIA/TIA-568 100Ω STP (maximum 100m)100Base-TX: UTP category 5, 5e cable (maximum 100m) EIA/TIA-568 100Ω STP (maximum 100m)IEEE802.3 10Base-T, IEEE802.3u 100Base-TXPPPoE, Dynamic IP , Static IP , L2TP , PPTP , Dual Access, BigPond IP and MAC address binding VPN pass-throughIP Address Filtering MAC Address Filtering Domain Name FilteringIP based bandwidth control DHCP Server and Client Supports Dynamic DNS Virtual Server Special ApplicationDMZ Host UPnP Static RoutingWeb management Remote Web management External power adapter CE, FCCOperating: 0°C~40°C (32°F~104°F )Storage: -40°C~70°C (-40°F~158°F)Operating: 10%~90% RH Non-Condensing Storage: 5%~90% RH Non-Condensing 6.5 x 4.3 x 1.1 in.(165 x 108 x 28 mm)• Complies with IEEE 802.3, IEEE 802.3u standards• 1 10/100Mbps RJ45 WAN port, 4 10/100Mbps RJ45 LAN ports, Auto-negotiation, Auto MDI/MDIX • Built-in NAT and DHCP server shares Internet Access• Supports PPPoE, Dynamic IP , Static IP , L2TP , PPTP , Dual Access, BigPond • Supports MAC Address Clone• Built-in firewall supports IP Address Filtering, MAC Address Filtering and Domain Name Filtering • Supports Virtual Server, Special Application, DMZ Host, UPnP , Static Routing and VPN Pass-through • Built-in DDNS Client • Provides IP based QoS• Supports IP and MAC address binding• Supporting Access Control, parents and administrators can set time-based access polices • Web Management, Firmware Upgrade, Backup & Restore ConfigurationDiagram:Package:- TP-LINK Cable/DSL Broadband Router TL-R460- Quick Installation Guide - AC Power Adapter - Resource CDRelated Products:- 10/100M PCI Network Adapter TF-3200- Gigabit PCIe Network Adapter TG-3468- External ADSL2+ Modem TD-8610- 8-Port Unmanaged 10/100M Desktop Switch TL-SF1008D10/100M PCI Network Adapter54Mbps Wireless USB AdapterTF-3239DLTL-WN321GExternal ADSL2+ ModemTD-86104-Port Cable/DSL RouterTL-R46054Mbps eXtended Range Wireless Access PointTL-WA500GWired Wireless。
TP-Link无线路由基本配置

TP-Link无线路由基本配置随着无线网络的普及,越来越多的人开始购买无线路由器来搭建自己的家庭网络。
TP-Link作为一家知名的网络设备厂商,其无线路由器深受消费者的喜爱。
本文将向您介绍TP-Link无线路由器的基本配置方法,帮助您快速搭建家庭无线网络。
1. 准备工作在开始配置无线路由器之前,首先要确保您已经正确连接好路由器。
将无线路由器的电源插头插入电源插座,并将一端连接到无线路由器的WAN口,另一端连接到您的宽带调制解调器上。
确保所有的连接都牢固可靠。
2. 打开配置页面接下来,打开您的电脑浏览器,输入无线路由器的默认管理地址。
通常情况下,TP-Link无线路由器的默认管理地址为192.168.1.1。
输入地址后按下Enter键,即可访问路由器的配置页面。
3. 登录路由器在配置页面中,您需要输入管理员账户和密码来登录路由器。
默认情况下,TP-Link无线路由器的管理员账户和密码均为admin。
输入正确的账户和密码后,点击登录按钮,即可成功登录路由器。
4. 配置无线网络名称(SSID)和密码登录成功后,您将看到路由器的配置界面。
首先,点击无线设置选项,进入无线网络的配置页面。
在无线设置页面中,您可以设置无线网络的名称(SSID),这是其他设备搜索和连接您的无线网络时所看到的名称。
选择一个易于区分和记忆的名称,并确保将无线网络的广播功能开启。
同时,您还可以设置无线网络的安全密码。
点击安全设置选项,进入安全设置页面。
选择WPA2-PSK方式,并输入一个安全性较高的密码。
强烈建议您使用字母、数字和特殊符号的组合来设置密码,确保网络的安全性。
5. 分配IP地址在网络设置页面中,您可以选择使用动态IP地址获取方式,也可以手动分配固定IP地址。
如果您的宽带服务提供商支持动态IP地址获取,建议您选择这种方式,无需额外设置。
如果您需要手动分配固定IP地址,可以点击静态IP设置选项。
根据您的网络环境,输入合适的IP地址、子网掩码、网关和首选DNS服务器。
TP-LINK 路由器 使用手册(适用型号:TL-R410)

前面板指示灯:后面板1)电源插孔:这个插孔供您接插电源。
注意:电源规格为9v~50hz0.8a,如果使用不匹配的电源,可能会导致路由器损坏。
2) reset:复位按钮。
关闭电源,按住此按钮,然后打开电源,约过3秒钟,m1,m2指示灯同时闪烁后,可松开按钮,待路由器启动后,其配置将恢复到出厂默认值。
ATTENTION:在路由器未完全启动前,不能关闭电源,否则,配置有可能没有恢复到出厂默认值。
3) wan:广域网端口(rj-45)。
连接xdsl modem或以太网。
4)局域网端口:4个rj-45接口。
计算机和hub/交换机通过这些端口连入局域网。
硬件安装步骤在安装路由器前,我们希望您已经能够利用您的宽带服务在单台计算机上成功上网。
如果您单台计算机上宽带网有问题,请先和您的网络服务商(isp)联系解决问题。
当您成功地利用单台计算机上网后,请遵循以下步骤安装您的路由器。
切记安装时拔除电源插头,保持双手干燥。
1)建立局域网连接用一根网线连接路由器和局域网中的hub或交换机如下图所示。
您也可以用一根网线将路由器与您的计算机网卡直接相连。
2)建立广域网连接用一根网线连接路由器和xdsl modem或以太网,如下图所示。
3)连接电源将电源连接好,路由器将自行启动。
建立正确的网络设置路由器默认ip地址是192.168.1.1,默认子网掩码是255.255.255.0。
这些值可以根据您的需要而改变,但是我们在这本用户手册上将按默认值说明。
首先请将您的计算机接到路由器的局域网端口,接下来您可以使用两种方法为您的计算机设置ip地址。
方法一、手动设置ip地址。
1)设置您计算机的tcp/ip协议,请参考附录。
如果您已经正确设置完成,请跳过第一步。
2)设置您计算机的ip地址为192.168.1.xxx(xxx范围是2至254),子网掩码为255.255.255.0,默认网关为192.168.1.1。
方法二、利用路由器内置dhcp服务器自动设置ip地址。
TP-Link 无线路由器设置图文教程 设置TP-Link无线路由器图解

当前位置 : 主页 > 软件教程 > 网络通讯 >TP-Link 无线路由器设置图文教程怎么设置TP-Link无线路由器图解来源:互联网作者:佚名时间:08-01 11:39:13【大中小】下面给大家介绍tp link无线路由器设置,示例中是以全新路由器进行演示的,如果不确定路由器之前是否被设置过,那么建议对TP-Link无线路由器进行复位操作,大家可以参考下无线路由器的基础配置在我们第一次配置无线宽带路由器时,参照说明书找到无线宽带路由器默认的IP地址是1 92.168.1.1,默认子网掩码是255.255.255.0由于TP-LINK TL-WR541G的配置界面是基于浏览器的,所以我们要先建立正确的网络设置,我们已经将电脑A通过网卡连接到了无线宽带路由器的局域网端口,接下来我们有两种方法为电脑A设置IP地址。
1、设置电脑A的IP地址为192.168.1.xxx(xxx范围是2至254),例如我们可以输入192. 168.1.6,子网掩码是255.255.255.0,默认网关为192.168.1.1。
2、设置电脑A的TCP/IP协议为“自动获取IP地址”,然后关闭无线宽带路由器和电脑A 的电源,首先打开无线宽带路由器电源,然后再启动电脑A,这样无线宽带路由器内置的D HCP服务器将自动为电脑A设置IP地址。
在完成上面的步骤后,我们使用电脑A,打开一个IE浏览器的窗口,在地址栏上输入http: //192.168.1.1(输入密码默认是admin,admin)即可进入配置界面。
计算机已与路由器成功建立连接。
如果屏幕显示为:这说明设备还未安装好,请按照下列顺序检查: 1、硬件连接是否正确? 路由器面板上对应局域网端口的 Link/Act 指示灯和计算机上的网卡指示灯必须亮。
2、 计算机的 TCP/IP 设置是否正确? 若计算机的 IP 地址为前面介绍的自动获取方式,则无须进行设置。
TP-LINK路由器使用说明书

o各种路由器的硬件安装,基本上都是一样的,有关路由器的安装,不在本文讨论范然而有关路由器的功能设置,各路由器的品牌不同,在操作上也有所差别,例如路由器安装设置。
TP-Link路由器是一款使用人数相当多的路由器,质量也相当不错。
很多人都喜欢。
下面是详细的设置方法:1、准备路由器、网线、猫等硬件器材下图为1TP-LINK TL-402M图1 TP-LINK TL-402M2、TP-Link路由器设置前电脑的设置如果线都已经接好.我们这个时候随便打开一台连好的PC电脑.打开网上邻居属性(图片2),本地连接属性(图片3),tcp/ip协议属性(图片4),设置ip为192.168.1.2 子网:255.255.255.0 网关:192.168.1.1(图片5)确定,DNS在配置路由器完后在行设置.注:可以到到控制面板网络连接去设置.以xp为例,请看图2至图5的细节图2 打开网上邻居属性图3 本地连接属性图4 tcp/ip协议属性图5 设置ip等这里提醒一下大家,ip设置网段,可以设置在192.168.1.2-192.168.1.254之间都可以,不要将同一IP设置为多台电脑,这样就会引起IP冲突了.切记.接着就可以打开桌面的Internet Explorer,输入192.168.1.1回车,请看图片6图6 打开桌面的Internet Explorer注,如果输入192.168.1.1打不开网页怎么办?请看《无线路由无法登陆设置(192.168.1.1打不开)的解决方法》。
这里提示输入用户名和密码,默认的用户名和密码都是admin,在路由器说明书上也有写着.输入后按回车,即可进入路由器配置界面.注,tplink的路由器默认IP基本都是192.168.1.1 密码基本都是admin。
3、TP-Link路由器设置首次进入路由器界面,请看图片7图7 进入路由器界面这里我们选择设置向导.请看图片8图8 选择设置向导然后下一步,请看图片9图9 下一步这里选择adsl虚拟拨号,我们大多都是选择它的,其他的静态那是专线用户选择的,我们这里不做详细介绍,知道宽带用户,铁通,网通等虚拟拨号用户,选择它就行了,然后下一步请看图片10图10 下一步再点下一步,看到图片11,按完成即可设置好路由.图11 下一步然后在设置在点网络参数,WAN口设置,请看图片12图12 网络参数好了到了,这里路由器里的配置一切都设置好了,现在我们只有重起路由器就OK了.点系统工具,重起路由器,几秒钟后就好了,请看图片13图13 重起路由器这个时候我们关掉配置的网页窗口,接上其他的电脑就可以上网了.注:因为本路由器的DHCP服务是自动开起的,所以你只要接上PC电脑,路由器就会分配IP,等给电脑,所以其他的电脑基本无须设置,直接用网线连接路由器或者交换机就可以上网了.4、TP-Link路由器设置说明当然也可以手动设置IP:◆IP设置范围:192.168.1.2-192.168.1.254◆子网:255.255.255.0◆网关:192.168.1.1。
TP-Link Archer C2 路由器设置指南说明书

Tp-link archer c2 manual español. Tp liual. Tp link kasa reset.
Archer C2 Setup Video This video will show you how to set up Address Reservation on TP-Link routers.
To Upgrade IMPORTANT: To prevent upgrade failures, please read the following before proceeding with the upgrade process Please upgrade firmware from the local TP-Link official website of the purchase location for your TP-Link device, otherwise it will be against the warranty. Please click here to change site if necessary. Please verify the hardware version of your device for the firmware version. Wrong firmware upgrade may damage your device and void the warranty. (Normally Vx.0=Vx.6/Vx.8 (eg:V1.0=V1.6/V1.8); Vx.x0=Vx.x6/Vx.x8 (eg:V1.20=V1.26/V1.28) How to find the hardware version on a TP-Link device Do NOT tu
TP-Link无线路由器说明书

前言:路由器和无线路由器虽然普及得很快,大伙用得也很方便,但还是有很多刚接触路由器的朋友,不懂得如何设置路由器,毕竟它不是跟非网管交换机一样,插上即可用。
而厂商一般都配有说明书,有些却不够简明,过于复杂,有些虽然提供了傻瓜化的安装向导,但在设置的定制化方面显然无法体现。
今天,我们就用最浅显易懂的图文并茂的方式表达出来,希望对菜鸟朋友们有点帮助。
1.将TP-LINK无线路由器通过有线方式连接好后,在IE输入192.168.1.1,用户名和密码默认为admin,确定之后进入以上设置界面。
打开界面以后通常都会弹出一个设置向导的小页面,如果有一定经验的用户都会勾上“下次登录不再自动弹出向导”来直接进行其它各项细致的设置。
不过本人建议一般普通用户按下一步进行简单的向导设置,方便简单。
点击下一步来进行简单的安装设置。
2.通常ASDL拨号上网用户选择第一项PPPoE来进行下一步设置。
但是如果你是局域网内或者通过其它特殊网络连接(如视讯宽带、通过其它电脑上网之类)可以选择以下两项“以太网宽带”来进行下一步设置。
这里先说明一下ADSL拨号上网设置,以下两项在后面都将会进行说明。
到ADSL拨号上网的帐号和口令输入界面,按照字面的提示输入用户在网络服务提供商所提供的上网帐号和密码然后直接按下一步。
3.接下来可以看到有无线状态、SSID、频段、模式这四项参数。
检测不到无线信号的用户留意一下自己的路由器无线状态是否开启。
SSID这一项用户可以根据自己的爱好来修改添加,这一项只是在无线连接的时候搜索连接设备后可以容易分别需要连接设备的识别名称而已。
另外在频段这一项我们拉下来可以看到有13个数字选择,这里的设置只是你路由的无线信号频段,如果你附近有多台无线路由的话你可以在这里设置使用其它频段来避免一些无线连接上的冲突。
接着模式这一选项拉下来我们可以看到TP-LINK无线路由的几个基本无线连接工作模式,11Mbps(802.11b)最大工作速率为11Mbps;54Mbps(802.11g)最大工作速率为54Mbps,也向下兼容11Mbps。
TP-Link Wi-Fi路由器设置指南说明书

Set Up the Network1. Connect your device to the router wirelessly or with an Ethernet cable.Method TWO: Via a Web Browser2. Launch a web browser, and enter or http://192.168.0.1 in the address bar. Create a password to log in.3. Follow the step-by-step instructions to set up the internet connection and register for the TP-Link Cloud service.Note: If the login window does not appear, please refer to Q1 of Method ONE: Via TP-Link T ether App1. Download the T ether app.Scan for TetherTetheror2. Open the T ether app and log in with your TP-Link ID.3. Tap the button in the T ether app and select Wireless Router > Standard Routers. Follow the steps to complete Note: If you don’t have an account, create one first.The default wireless network names (SSIDs) and password 2Note: If the 2.4 GHz LED and 5 GHz LED are off, press and hold the Wi-Fi button on the back for more than 2 seconds. Both the LEDs should turn solid on.Power OnInternet On2.4 GHz On5 GHz Onrouter’s 2.5 Gbps WAN/LAN port to it, then follow steps 3 and 4 to complete the hardware connection.• Unplug the power to turn off your modem, if any, and remove the backup battery if it has one.• Refer to Q5 of Need Help to place the router for optimalWi-Fi performance.Unplug the powerVerify that the hardware connection is correct by checking the following LEDs.41Q1. What should I do if I want to use 1 Gbps WAN/LAN port forinternet service?• Connect to the 1 Gbps WAN/LAN port with an Ethernet cable. During the quick network setup, select the 1 Gbps WAN/LAN port as the Internet port. Or after the network setup, you can go to T ools > Internet Connection > Internet Port (T ether app) or Internet > Internet Port (web management page) to change it.Q2. What should I do if I can’t access the web management page?• Reboot your router and try again.• If the computer is set to a static IP, change its settings to obtain an IP address automatically.• Verify that is correctly entered in the web browser. Alternatively, enter http://192.168.0.1 or http://192.168.1.1 in the web browser.• Use another web browser and try again.• Disable and enable the network adapter in use.Q3. What should I do if I can’t access the internet?• Power off your modem for about 5 minutes, then power it on and check the internet. If your modem has more than one Ethernet port, keep other ports unconnected.• Check if the internet is working normally by connecting a computer directly to the modem via an Ethernet cable. If it is not, contact your internet service provider.• L og in to the web management page, and go to the Network Map page to check whether the internet IP address is valid or not. If it’s valid, go to Advanced > Network > Internet , click Advanced Settings , select Use the Following DNS Addresses , set the primary DNS to 8.8.8.8, and set the secondary DNS to 8.8.4.4. If it is not, check the hardware connection or contact your internet service provider.• For cable modem users, log in to the web management page of the router and go to Advanced > Network > Internet > MAC Clone . Select Clone Current Device MAC and click SAVE . Then reboot both the modem and the router.Q4. What should I do if I forget my wireless password?• If you have not changed the default wireless password, it can be found on the label at the bottom of the router.• Connect a computer directly to the router using an Ethernet cable. Log in to the router’s web management page at , and go to the Wireless page to retrieve or reset your wireless password .Q5. How should I position my router for optimal Wi-Fi performance?• Don’t place your router in a corner or in a closet.• Avoid obstacles and high-powered appliances.• Keep your router in a central location at a certain height.• Keep the antennas vertical when the router is placed on a desktop. Keep the antennas upright when the router is hanging on a wall.TP-Link HomeShield premium security services keep your home network safe with cutting-edge features for network. TP-Link HomeShieldUSB ApplicationsWith the USB port, it’s easy to share files and media with multiple devices. Visit https:///app/usb to learn more about the USB applications.Local Storage Sharing : Share files from the USB drive with devices on your home networkMedia Server: Play media from the USB drive on your computer and smart devicesRemote Access: Access the USB drive when you are away from home©2022 TP-Link 7106509766 REV1.0.0Need Help?Button ExplanationAX5400 Multi-Gigabit Wi-Fi 6 RouterQuick Installation GuideLED Button: Press the button for 1 second to turn on or off the LEDs of your router.WPS Button: Press the button for 1 second, and immediatelypress the WPS button on your client to start the WPS process.Wi-Fi Button: Press and hold the button for more than 2 seconds to turn on or off the wireless function of your router.Reset Button: Press and hold the button for about 6 seconds until the Power LED blinks to reset the router to its factory For technical support, replacement services, user guides, and other information, please visit https:///support .· Do not attempt to disassemble, repair, or modify the device. If you need service, please contact us.· Do not use any other chargers than those recommended.· Do not use damaged charger or USB cable to charge the device.· Do not use the device where wireless devices are not allowed.· Adapter shall be installed near the equipment and shall be easily accessible.。
- 1、下载文档前请自行甄别文档内容的完整性,平台不提供额外的编辑、内容补充、找答案等附加服务。
- 2、"仅部分预览"的文档,不可在线预览部分如存在完整性等问题,可反馈申请退款(可完整预览的文档不适用该条件!)。
- 3、如文档侵犯您的权益,请联系客服反馈,我们会尽快为您处理(人工客服工作时间:9:00-18:30)。
o各种路由器的硬件安装,基本上都是一样的,有关路由器的安装,不在本文讨论范
然而有关路由器的功能设置,各路由器的品牌不同,在操作上也有所差别,例如
路由器安装设置。
TP-Link路由器是一款使用人数相当多的路由器,质量也相当不错。
很多人都喜欢。
下面是详细的设置方法:
1、准备路由器、网线、猫等硬件器材
下图为1TP-LINK TL-402M
图1 TP-LINK TL-402M
2、TP-Link路由器设置前电脑的设置
如果线都已经接好.我们这个时候随便打开一台连好的PC电脑.打开网上邻居属性(图片2),本地连接属性(图片3),tcp/ip协议属性(图片4),设置ip为192.168.1.2 子网:255.255.255.0 网关:192.168.1.1(图片5)确定,DNS在配置路由器完后在行设置.
注:可以到到控制面板网络连接去设置.
以xp为例,请看图2至图5的细节
图2 打开网上邻居属性
图3 本地连接属性
图4 tcp/ip协议属性
图5 设置ip等
这里提醒一下大家,ip设置网段,可以设置在192.168.1.2-192.168.1.254之间都可以,不要将同一IP设置为多台电脑,这样就会引起IP冲突了.切记.
接着就可以打开桌面的Internet Explorer,输入192.168.1.1回车,请看图片6
图6 打开桌面的Internet Explorer
注,如果输入192.168.1.1打不开网页怎么办?请看《无线路由无法登陆设置(192.168.1.1打不开)的解决方法》。
这里提示输入用户名和密码,默认的用户名和密码都是admin,在路由器说明书上也有写着.输入后按回车,即可进入路由器配置界面.
注,tplink的路由器默认IP基本都是192.168.1.1 密码基本都是admin。
3、TP-Link路由器设置
首次进入路由器界面,请看图片7
图7 进入路由器界面这里我们选择设置向导.请看图片8
图8 选择设置向导然后下一步,请看图片9
图9 下一步
这里选择adsl虚拟拨号,我们大多都是选择它的,其他的静态那是专线用户选择的,我们这里不做详细介绍,知道宽带用户,铁通,网通等虚拟拨号用户,选择它就行了,然后下一步请看图片10
图10 下一步
再点下一步,看到图片11,按完成即可设置好路由.
图11 下一步
然后在设置在点网络参数,WAN口设置,请看图片12
图12 网络参数
好了到了,这里路由器里的配置一切都设置好了,现在我们只有重起路由器就OK了.点系统工具,重起路由器,几秒钟后就好了,请看图片13
图13 重起路由器
这个时候我们关掉配置的网页窗口,接上其他的电脑就可以上网了.
注:因为本路由器的DHCP服务是自动开起的,所以你只要接上PC电脑,路由器就会分配IP,等给电脑,所以其他的电脑基本无须设置,直接用网线连接路由器或者交换机就可以上网了.
4、TP-Link路由器设置说明
当然也可以手动设置IP:
◆IP设置范围:192.168.1.2-192.168.1.254
◆子网:255.255.255.0
◆网关:192.168.1.1。