交换机配置命令
交换机的配置命令
网络互连设备1、交换机基本配置命令(1)用户模式Switch>(2)特权模式Switch>enable Switch#(3)特权模式退回到用户模式:disable(4)下一级模式退回到上一级:exit(5)某个模式直接退回到特权模式:end(6)配置交换机名称命令hostname <交换机>(7)进入交换机端口模式命令模式:switch(config)# 命令:interface <端口类型> <端口号>交换机常见的端口类型:ethernet、fastethernet、gigabitethernet以及VLAN 接口等。
端口号一般采用插槽号/端口号,如0/1。
(8)进入交换机的某个端口模式switch(config-if)#显示交换机端口状态命令switch# show interface <端口类型> <端口号>(9)进入控制台线路模式模式:switch(config)# 命令:line console <编号>参数:编号是配置口的编号,从0开始编号。
结果:进入控制台模式switch(config-line)#。
(10)配置控制台口令模式:switch(config-line)# 命令:password <密码>参数:密码支持字母和数字。
启用密码认证模式:switch(config-line)# 命令:login(11)配置进入特权模式口令模式:switch(config)#命令:enable password|secret <密码> 参数:password表示密码以明文形式存放,secret表示密码以密文形式存放。
密码支持字母和数字。
(12)为之前设置的口令加密模式:switch(config)#命令:service password-encryption 结果:将之前设置的所有口令加密。
交换机配置命令大全
交换机配置命令大全交换机是网络中非常重要的设备,它可以实现局域网内计算机之间的数据传输和通信。
在进行交换机的配置时,我们需要掌握一些基本的配置命令,以确保交换机能够正常运行并满足网络的需求。
下面将介绍一些常用的交换机配置命令,希望对大家有所帮助。
1. 设置交换机的主机名。
在配置交换机之前,我们首先需要设置交换机的主机名,以便在网络中进行识别和管理。
我们可以通过以下命令来设置交换机的主机名:```。
Switch(config)#hostname S1。
```。
这条命令将交换机的主机名设置为S1,您也可以根据实际情况进行修改。
2. 配置交换机的管理IP地址。
为了实现对交换机的远程管理,我们需要为交换机配置一个IP地址。
我们可以通过以下命令来配置交换机的管理IP地址:```。
Switch(config)#interface vlan 1。
Switch(config-if)#ip address 192.168.1.1 255.255.255.0。
Switch(config-if)#no shutdown。
```。
这条命令将VLAN 1接口的IP地址设置为192.168.1.1,子网掩码为255.255.255.0,并启用该接口。
3. 配置交换机端口。
在实际网络中,我们需要对交换机的端口进行配置,以满足不同设备的连接需求。
以下是一些常用的端口配置命令:```。
Switch(config)#interface fastethernet 0/1。
Switch(config-if)#switchport mode access。
Switch(config-if)#switchport access vlan 10。
```。
这条命令将FastEthernet 0/1端口设置为接入模式,并将该端口划分到VLAN 10中。
4. 配置交换机的VLAN。
VLAN是虚拟局域网的缩写,它可以将一个物理局域网划分成多个逻辑上的局域网。
交换机基本配置命令汇总大全
交换机基本配置命令汇总大全一、交换机基本操作:1.1进入特权模式Switch>enableSwitch#1.2返回用户模式Switch#exitPress RETURN to get started!Switch>二、配置模式:全局配置模式[主机名(config)#]:配置交换机的整体参数2.1子模式:1.线路配置模式[主机名(config-line)#]:配置交换机的线路参数2.接口配置模式[主机名(config-if)#]:配置交换机的接口参数2.2进入、退出全局配置模式Switch#configure terminalSwitch(config)#exitSwitch#2.3进入、退出线路配置模式Switch(config)#line console0Switch(config-line)#exitSwitch(config)#2.4进入、退出接口配置模式Switch(config)#interface fastEthernet0/1Switch(config-if)#exitSwitch(config)#2.5从子模式下直接返回特权模式Switch(config-if)#endSwitch#三、交换机操作帮助:Ø支持命令简写(按TAB键将命令补充完整)Ø在每种操作模式下直接输入“?”显示该模式下所有的命令Ø命令空格“?”显示命令参数并对其解释说明Ø“字符?”显示以该字符开头的命令Ø命令历史缓存:(Ctrl+P)显示上一条命令,(Ctrl+N)显示下一条命令Ø错误提示信息四、交换机显示命令:Ø显示交换机硬件及软件的信息Switch#show versionØ显示当前运行的配置参数Switch#show running-configØ显示保存的配置参数Switch#show configure五、常用交换机flash中的命令:5.1将当前运行的配置参数复制到flashSwitch#write memoryBuilding configuration...[OK]Switch#5.2清空flashSwitch#delete flash:config.textSwitch#5.3交换机重新启动:Switch#reloadSystem configuration has been modified.Save?[yes/no]:n Proceed with reload?[confirm]5.4配置交换机主机名:Switch(config)#hostname S2126G-1S2126G-1(config)#5.5配置交换机口令:1)配置交换机的登陆密码S2126G(config)#enable secret level10star“0”表示输入的是明文形式的口令2)配置交换机的特权密码S2126G(config)#enable secret level150star“0”表示输入的是明文形式的口令六、常用交换机配置命令:6.1为交换机分配管理IPS2126G(config)#interface vlan1S2126G(config-if)#ip address{IP address}{IP subnetmask}[secondary]6.2将接口启用S2126G(config-if)#no shutdown6.3将接口关闭S2126G(config-if)#shutdown6.4配置接口速率S2126G(config-if)#speed[10|100|auto]6.5配置接口双工模式S2126G(config-if)#duplex[auto|full|half]七、显示接口状态:S2126G#show interface八、测定目的端的可达性:S2126G>ping{IP address}九、从TFTP服务器下载配置参数:S2126G#copy tftp startup-config十、管理交换机MAC地址表:10.1查看MACS2126G#show mac-address-table10.2配置MACS2126G(config)#mac-address-table aging-time<10-1000000> 10.3查看MACS2126G#show mac-address-table aging-time十一、VLAN的配置:11.1添加一个VLANS2126G(config)#vlan<1-4094>S2126G(config-vlan)#11.2为VLANS2126G(config-vlan)#name名字十二、将交换机端口分配到VLAN12.1配置Port VLANSwitch(config-if)#switchport access vlan<1-4094>12.2配置Tag VLANSwitch(config-if)#switchport mode trunk1)配置本地(native)VLANSwitch(config-if)#switchport trunk native vlan<1-4094> Native VLAN即PVID,默认情况下每个trunk口的native VLAN是12)从主干链路中清除VLANSwitch(config-if)#switchport trunk allowed vlanexcept vlan-list注:VLAN1不可被清除3)在主干链路中允许所有VLANSwitch(config-if)#switchport trunk allowed vlan all4)向主干链路中加入VLANSwitch(config-if)#switchport trunk allowed vlanadd vlan-list12.3VLAN1.显示全部的VLAN:Switch#show vlan2.显示单独的VLAN:Switch#show vlan id<1-4094>十三、RSTP的配置:13.1启用生成树:S2126G(config)#spanning-tree13.2配置交换机优先级:S2126G(config)#spanning-tree priority<0-61440>“0”或“4096”的倍数(RSTP BPDU该值后12bit全0)13.3配置交换机端口优先级:S2126G(config-if)#spanning-tree port-priority<0-240>“0”或“16”的倍数(RSTP BPDU该值后4bit全0)13.4生成树helloS2126G(config)#spanning-tree hello-time<1-10>13.5生成树的验证:Switch#show spanning-treeSwitch#show spanning-tree interface<接口名称><接口编号>十四、三层交换机路由功能:14.1开启三层交换机的路由功能Switch(config)#ip routing14.2开启端口的三层路由功能Switch(config)#interface fastethernet0/1Switch(config-if)#no switchport(这样就可以为某一端口配置IP)Switch(config-if)#ip address192.168.1.1255.255.255.0 Switch(config-if)#no shutdown。
华为交换机配置命令大全
华为交换机配置命令大全华为交换机是一种高性能、高可靠的数据通信设备,广泛应用于各种网络环境中。
为了更好地使用华为交换机,我们需要了解一些基本的配置命令。
本文将为大家详细介绍华为交换机的配置命令大全,帮助大家更好地了解和使用华为交换机。
1. 登录华为交换机。
首先,我们需要登录华为交换机进行配置。
一般来说,我们可以通过串口、Telnet或SSH方式登录交换机。
以SSH方式登录为例,我们可以使用以下命令:```shell。
ssh -l username 192.168.1.1。
```。
其中,username为登录用户名,192.168.1.1为交换机的IP地址。
登录成功后,我们需要输入密码进行验证。
2. 查看交换机当前配置。
在登录成功后,我们可以使用以下命令查看交换机的当前配置信息:```shell。
display current-configuration。
```。
这条命令可以显示出交换机当前的全部配置信息,包括接口配置、VLAN配置、路由配置等。
3. 配置交换机接口。
接下来,我们可以对交换机的接口进行配置。
比如,我们可以通过以下命令配置一个VLAN接口:```shell。
interface Vlanif1。
ip address 192.168.1.1 255.255.255.0。
```。
这条命令将为VLAN接口Vlanif1配置IP地址为192.168.1.1,子网掩码为255.255.255.0。
4. 配置交换机VLAN。
除了配置接口,我们还可以对交换机的VLAN进行配置。
比如,我们可以使用以下命令创建一个VLAN:```shell。
vlan 10。
```。
这条命令将创建一个VLAN ID为10的VLAN。
5. 配置交换机路由。
在需要进行路由配置时,我们可以使用以下命令添加静态路由:```shell。
ip route-static 0.0.0.0 0.0.0.0 192.168.1.254。
```。
交换机常用配置命令大全
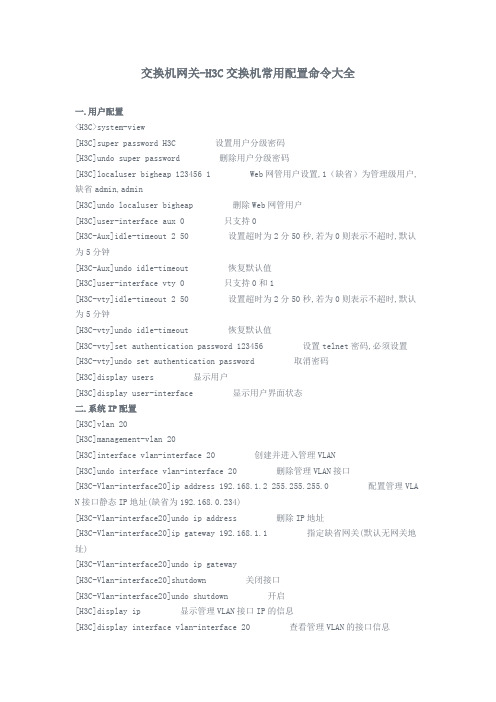
交换机网关-H3C交换机常用配置命令大全一.用户配置<H3C>system-view[H3C]super password H3C 设置用户分级密码[H3C]undo super password 删除用户分级密码[H3C]localuser bigheap 123456 1 Web网管用户设置,1(缺省)为管理级用户,缺省admin,admin[H3C]undo localuser bigheap 删除Web网管用户[H3C]user-interface aux 0 只支持0[H3C-Aux]idle-timeout 2 50 设置超时为2分50秒,若为0则表示不超时,默认为5分钟[H3C-Aux]undo idle-timeout 恢复默认值[H3C]user-interface vty 0 只支持0和1[H3C-vty]idle-timeout 2 50 设置超时为2分50秒,若为0则表示不超时,默认为5分钟[H3C-vty]undo idle-timeout 恢复默认值[H3C-vty]set authentication password 123456 设置telnet密码,必须设置[H3C-vty]undo set authentication password 取消密码[H3C]display users 显示用户[H3C]display user-interface 显示用户界面状态二.系统IP配置[H3C]vlan 20[H3C]management-vlan 20[H3C]interface vlan-interface 20 创建并进入管理VLAN[H3C]undo interface vlan-interface 20 删除管理VLAN接口[H3C-Vlan-interface20]ip address 192.168.1.2 255.255.255.0 配置管理VLA N接口静态IP地址(缺省为192.168.0.234)[H3C-Vlan-interface20]undo ip address 删除IP地址[H3C-Vlan-interface20]ip gateway 192.168.1.1 指定缺省网关(默认无网关地址)[H3C-Vlan-interface20]undo ip gateway[H3C-Vlan-interface20]shutdown 关闭接口[H3C-Vlan-interface20]undo shutdown 开启[H3C]display ip 显示管理VLAN接口IP的信息[H3C]display interface vlan-interface 20 查看管理VLAN的接口信息<H3C>debugging ip 开启IP调试功能<H3C>undo debugging ip三.DHCP客户端配置[H3C-Vlan-interface20]ip address dhcp-alloc 管理VLAN接口通过DHCP方式获取IP地址[H3C-Vlan-interface20]undo ip address dhcp-alloc 取消[H3C]display dhcp 显示DHCP客户信息<H3C>debugging dhcp-alloc 开启DHCP调试功能<H3C>undo debugging dhcp-alloc四.端口配置[H3C]interface Ethernet0/3[H3C-Ethernet0/3]shutdown[H3C-Ethernet0/3]speed 100 速率,可为10,100,1000和auto(缺省)[H3C-Ethernet0/3]duplex full 双工,可为half,full和auto(缺省) 光口和汇聚后不能配置[H3C-Ethernet0/3]flow-control 开启流控,默认为关闭[H3C-Ethernet0/3]broadcast-suppression 20 设置抑制广播百分比为20%,可取5,10,20,100,缺省为100,同时组播和未知单播也受此影响[H3C-Ethernet0/3]loopback internal 内环测试[H3C-Ethernet0/3]loopback external 外环测试,需插接自环头,必须为全双工或者自协商模式[H3C-Ethernet0/3]port link-type trunk 设置链路的类型为trunk,可为access (缺省),trunk[H3C-Ethernet0/3]port trunk pvid vlan 20 设置20为该trunk的缺省VLAN,默认为1(trunk线路两端的PVID必须一致)[H3C-Ethernet0/3]port access vlan 20 将当前access端口加入指定的VLAN [H3C-Ethernet0/3]port trunk permit vlan all 允许所有的VLAN通过当前的t runk端口,可多次使用该命令[H3C-Ethernet0/3]mdi auto 设置以太端口为自动监测,normal(缺省)为直通线,a cross为交叉线[H3C]link-aggregation Ethernet 0/1 to Ethernet 0/4 将1-4口加入汇聚组,1为主端口,两端需要同时配置,设置了端口镜像以及端口隔离的端口无法汇聚[H3C]undo link-aggregation Ethernet 0/1 删除该汇聚组[H3C]link-aggregation mode egress 配置端口汇聚模式为根据目的MAC地址进行负荷分担,可选为 in gress,egress和both,缺省为both[H3C]monitor-port Ethernet 0/2 将该端口设置为镜像端口,必须先设置镜像端口,删除时必须先删除被镜像端口,而且它们不能同在一个端口,该端口不能在汇聚组中,设置新镜像端口时,新取代旧,被镜像不变[H3C]mirroring-port Ethernet 0/3 to Ethernet 0/4 both 将端口3和4设置为被镜像端口,both为同时监控接收和发送的报文,inbound表示仅监控接收的报文,outbou nd表示仅监控发送的报文[H3C]display mirror[H3C]display interface Ethernet 0/3<H3C>reset counters 清除所有端口的统计信息[H3C]display link-aggregation Ethernet 0/3 显示端口汇聚信息[H3C-Ethernet0/3]virtual-cable-test 诊断该端口的电路状况五.VLAN配置[H3C]vlan 2[H3C]undo vlan all 删除除缺省VLAN外的所有VLAN,缺省VLAN不能被删除[H3C-vlan2]port Ethernet 0/4 to Ethernet 0/7 将4到7号端口加入到VLAN2中,此命令只能用来加access端口,不能用来增加trunk或者hybrid端口[H3C-vlan2]port-isolate enable 打开VLAN内端口隔离特性,不能二层转发,默认不启用该功能[H3C-Ethernet0/4]port-isolate uplink-port vlan 2 设置4为VLAN2的隔离上行端口,用于转发二层数据,只能配置一个上行端口,若为trunk,则建议允许所有VLAN通过,隔离不能与汇聚同时配置[H3C]display vlan all 显示所有VLAN的详细信息S1550E支持基于端口的VLAN,通过创建不同的user-group来实现,一个端口可以属于多个user-group,不属于同一个user-group的端口不能互相通信,最多支持50个user-group [H3C]user-group 20 创建user-group 20,默认只存在user-group 1[H3C-UserGroup20]port Ethernet 0/4 to Ethernet 0/7 将4到7号端口加入到VLAN20中,初始时都属于user-group 1中[H3C]display user-group 20 显示user-group 20的相关信息六.集群配置S2100只能作为成员交换机加入集群中,加入后系统名改为"集群名_成员编号.原系统名"的格式.即插即用功能通过两个功能实现: 集群管理协议MAC组播地址协商和管理VLAN协商[H3C]cluster enable 启用群集功能,缺省为启用[H3C]cluster 进入群集视图[H3C-cluster]administrator-address H-H-H name switch H-H-H为命令交换机的MAC,加入switch集群[switch_1.H3C-cluster]undo administrator-address 退出集群[H3C]display cluster 显示集群信息[H3C]management-vlan 2 集群报文只能在管理VLAN中转发,同一集群需在同一个管理VLAN中,需在建立集群之前指定管理VLAN<H3C>debugging cluster七.QoS配置QoS配置步骤:设置端口的优先级,设置交换机信任报文的优先级方式,队列调度,端口限速[H3C-Ethernet0/3]priority 7 设置端口优先级为7,默认为0[H3C]priority-trust cos 设置交换机信任报文的优先级方式为cos(802.1p优先级,缺省值),还可以设为dscp方式(dscp优先级方式)[H3C]queue-scheduler hq-wrr 2 4 6 8 设置队列调度算法为HQ-WRR(默认为WR R),权重为2,4,6,8[H3C-Ethernet0/3]line-rate inbound 29 将端口进口速率限制为2Mbps,取1-28时,速率为rate*8*1024/125,即64,128,192...1.792M;29-127时,速率为(rate-27)*1024,即2M,3M,4M...100M,千兆时可继续往下取,128-240时,速率为(rate-115)*8*1024,即104 M,112M,120M...1000M[H3C]display queue-scheduler 显示队列调度模式及参数[H3C]display priority-trust 显示优先级信任模式八.系统管理[H3C]mac-address blackhole H-H-H vlan 1 在VLAN1中添加黑洞MAC[H3C]mac-address static H-H-H interface Ethernet 0/1 vlan 1 在VLAN1中添加端口一的一个mac[H3C]mac-address timer aging 500 设置MAC地址表的老化时间为500s[H3C]display mac-address[H3C]display arp[H3C]mac-address port-binding H-H-H interface Ethernet 0/1 vlan 1 配置端口邦定[H3C]display mac-address port-binding[H3C]display saved-configuration[H3C]display current-configuration<H3C>save[H3C]restore default 恢复交换机出厂默认配置,恢复后需重启才能生效[H3C]display version<H3C>reboot[H3C]display device[H3C]sysname bigheap[H3C]info-center enable 启用系统日志功能,缺省情况下启用[H3C]info-center loghost ip 192.168.0.3 向指定日志主机(只能为UNIX或LI NUX,不能为Windows)输出信息,需先开启日志功能,缺省关闭[H3C]info-center loghost level 8 设置系统日志级别为8,默认为5.级别说明: 1.emergencies 2.alerts 3.critical 4.errors 5.warnings 6.notifications rma tional 8.debugging<H3C>terminal debugging 启用控制台对调试信息的显示,缺省控制台为禁用<H3C>terminal logging 启用控制台对日志信息的显示,缺省控制台为启用<H3C>terminal trapping 启用控制台对告警信息的显示,缺省控制台为启用[H3C]display info-center 显示系统日志的配置和缓冲区记录的信息[H3C]display logbuffer 显示日志缓冲区最近记录的指定数目的日志信息[H3C]display trapbuffer 显示告警缓冲区最近记录的指定数目的日志信息<H3C>reset logbuffer 清除日志缓冲区的信息<H3C>reset trapbuffer 清除告警缓冲区的信息九.网络协议配置NDP即是邻居发现协议,S1550E只能开启或关闭NDP,无法配置,默认有效保留时间为180 s,NDP报文发送的间隔60s[H3C]ndp enable 缺省情况下是开启的[H3C-Ethernet0/3]ndp enable 缺省情况下开启[H3C]display ndp 显示NDP配置信息[H3C]display ndp interface Ethernet 0/1 显示指定端口NDP发现的邻居信息<H3C>debugging ndp interface Ethernet 0/1HABP协议即Huawei Authentication Bypass Protocol,华为鉴权旁路协议,是用来解决当交换机上同时配置了802.1x和HGMPv1/v2时,未经授权和认证的端口上将过滤HGMP报文,从而使管理设备无法管理下挂的交换机的问题。
华为交换机配置及常用命令
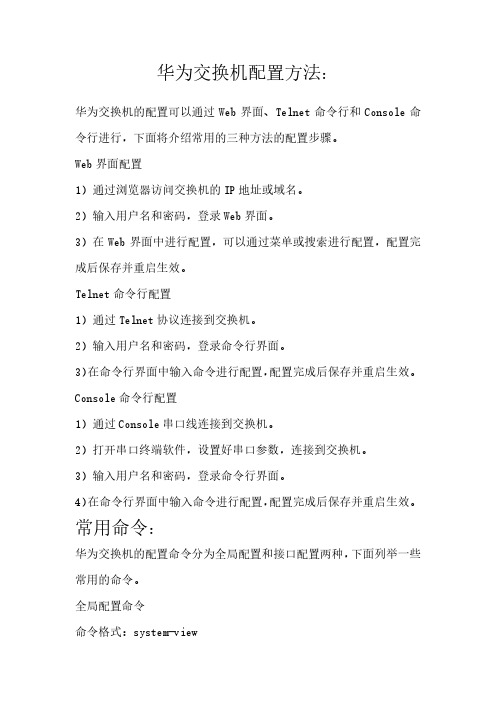
华为交换机配置方法:华为交换机的配置可以通过Web界面、Telnet命令行和Console命令行进行,下面将介绍常用的三种方法的配置步骤。
Web界面配置1)通过浏览器访问交换机的IP地址或域名。
2)输入用户名和密码,登录Web界面。
3)在Web界面中进行配置,可以通过菜单或搜索进行配置,配置完成后保存并重启生效。
Telnet命令行配置1)通过Telnet协议连接到交换机。
2)输入用户名和密码,登录命令行界面。
3)在命令行界面中输入命令进行配置,配置完成后保存并重启生效。
Console命令行配置1)通过Console串口线连接到交换机。
2)打开串口终端软件,设置好串口参数,连接到交换机。
3)输入用户名和密码,登录命令行界面。
4)在命令行界面中输入命令进行配置,配置完成后保存并重启生效。
常用命令:华为交换机的配置命令分为全局配置和接口配置两种,下面列举一些常用的命令。
全局配置命令命令格式:system-view说明:进入系统视图,进行全局配置。
接口配置命令命令格式:interface 接口类型接口编号说明:进入接口视图,进行接口配置。
VLAN配置命令命令格式:vlan vlan-id说明:创建VLAN。
VLAN接口配置命令命令格式:interface Vlan vlan-id说明:进入VLAN接口视图,进行VLAN接口配置。
静态路由配置命令命令格式:ip route-static 目的网络地址目的网络掩码下一跳地址说明:配置静态路由。
ACL配置命令命令格式:acl number rule-id rule说明:配置ACL。
QoS配置命令命令格式:qos car { inbound | outbound } cir cir-value [ cbs cbs-value ]说明:配置CAR(流量控制)。
STP配置命令命令格式:stp mode stp-mode说明:配置STP(生成树协议)。
以上仅是一些常用命令的示例,具体配置命令还需要根据实际情况进行调整和修改。
(完整版)华为交换机命令大全
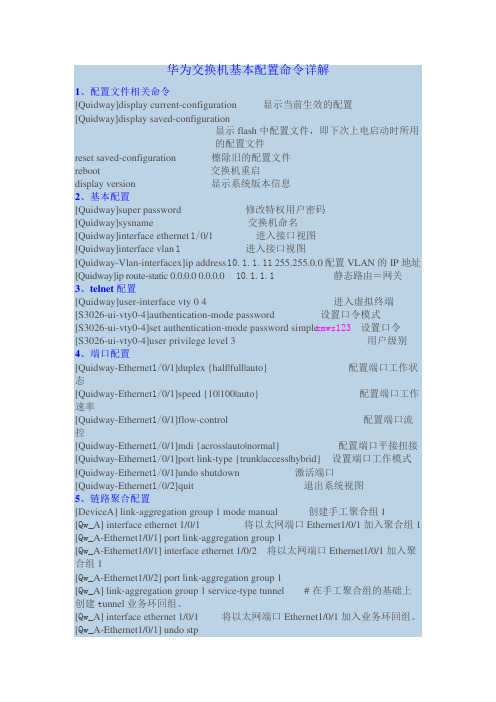
华为交换机基本配置命令详解1、配置文件相关命令[Quidway]display current-configuration 显示当前生效的配置[Quidway]display saved-configuration显示flash中配置文件,即下次上电启动时所用的配置文件reset saved-configuration 檫除旧的配置文件reboot 交换机重启display version 显示系统版本信息2、基本配置[Quidway]super password 修改特权用户密码[Quidway]sysname 交换机命名[Quidway]interface ethernet 1/0/1 进入接口视图[Quidway]interface vlan 1进入接口视图[Quidway-Vlan-interfacex]ip address 10.1.1.11 255.255.0.0配置VLAN的IP地址[Quidway]ip route-static 0.0.0.0 0.0.0.0 10.1.1.1静态路由=网关3、telnet配置[Quidway]user-interface vty 0 4 进入虚拟终端[S3026-ui-vty0-4]authentication-mode password 设置口令模式[S3026-ui-vty0-4]set authentication-mode password simple xmws123设置口令[S3026-ui-vty0-4]user privilege level 3 用户级别4、端口配置[Quidway-Ethernet1/0/1]duplex {half|full|auto} 配置端口工作状态[Quidway-Ethernet1/0/1]speed {10|100|auto} 配置端口工作速率[Quidway-Ethernet1/0/1]flow-control 配置端口流控[Quidway-Ethernet1/0/1]mdi {across|auto|normal} 配置端口平接扭接[Quidway-Ethernet1/0/1]port link-type {trunk|access|hybrid} 设置端口工作模式[Quidway-Ethernet1/0/1]undo shutdown 激活端口[Quidway-Ethernet1/0/2]quit 退出系统视图5、链路聚合配置[DeviceA] link-aggregation group 1 mode manual 创建手工聚合组1[Qw_A] interface ethernet 1/0/1 将以太网端口Ethernet1/0/1加入聚合组1 [Qw_A-Ethernet1/0/1] port link-aggregation group 1[Qw_A-Ethernet1/0/1] interface ethernet 1/0/2 将以太网端口Ethernet1/0/1加入聚合组1[Qw_A-Ethernet1/0/2] port link-aggregation group 1[Qw_A] link-aggregation group 1 service-type tunnel # 在手工聚合组的基础上创建t unnel业务环回组。
交换机配置命令
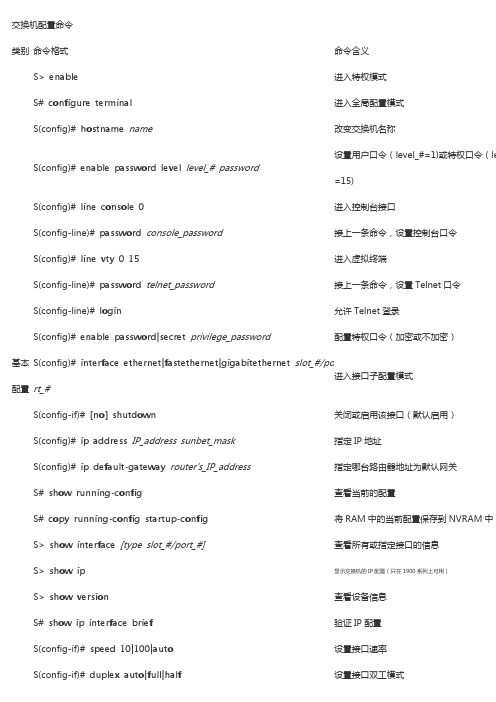
交换机配置命令类别命令格式命令含义基本配置S> enable进入特权模式S# configure terminal进入全局配置模式S(config)# hostname name改变交换机名称S(config)# enable password level level_# password设置用户口令(level_#=1)或特权口令(le=15)S(config)# line console 0进入控制台接口S(config-line)# password console_password接上一条命令,设置控制台口令S(config)# line vty 0 15进入虚拟终端S(config-line)# password telnet_password接上一条命令,设置Telnet口令S(config-line)# login允许Telnet登录S(config)# enable password|secret privilege_password配置特权口令(加密或不加密)S(config)# interface ethernet|fastethernet|gigabitethernet slot_#/port_#进入接口子配置模式S(config-if)# [no] shutdown关闭或启用该接口(默认启用)S(config)# ip address IP_address sunbet_mask指定IP地址S(config)# ip default-gateway router's_IP_address指定哪台路由器地址为默认网关S# show running-config查看当前的配置S# copy running-config startup-config将RAM中的当前配置保存到NVRAM中S> show interface[type slot_#/port_#]查看所有或指定接口的信息S> show ip显示交换机的IP配置(只在1900系列上可用)S> show version查看设备信息S# show ip interface brief验证IP配置S(config-if)# speed 10|100|auto设置接口速率S(config-if)# duplex auto|full|half设置接口双工模式S> show mac-address-table查看CAM表S# clear mac-address-table清除CAM表中的动态条目1900(config)# mac-address-table permanent MAC_address type [slot_#/]port_#在CAM表中创建静态条目2950(config)# mac-address-table static MAC_address vlan VLAN_# interface type [slot_#/] port_#在CAM表中创建静态条目1900(config)# mac-address-table restricted static MAC_address source_port list_of_allowed_interface设置静态端口安全措施1900(config-if)# port secure启用粘性学习1900(config-if)# port secure max-mac-count value设置粘性学习特性能够学到的地址数量(默认132,取值范围是1-132)1900(config)# address-violation suspend|ignore|disable改变安全选项1900> show mac-address-table security验证端口安全措施2950(config)# switchport mode access定义接口为主机端口而不是中继端口2950(config)# switchport port-security启用端口安全措施2950(config)# switchport port-security maximum value指定可与此接口相关的设备的最大数量2950(config)# switchport port-security violation protect|restrict|shutdown指定出现安全违规时应该发生的事2950(config)# switchport port-security mac-address MAC_address指定允许与此接口相关的确切的MAC地址2950(config)# switchport port-security mac-address sticky启用粘性学习特性2950(config)# show port interface type [slot_#/] port_#验证接口配置2950(config-if) description name设置接口描述信息2950# show buffers查看系统缓存的大小1900# copy nvram tftp://IP_address_of_TFTP_server/ file_name将配置文件备份到TFTP服务器上1900# copy tftp://IP_address_of_TFTP_server/ file_name nvram从TFTP服务器上恢复配置到NVRAM1900# delete nvram删除配置文件2950# erase startup-config删除配置文件3550# show tcam qos TCAM_ID statistics 查看TCAM 剩余容量 4000> enable进入特权模式 4000>(enable) set password 设置用户模式密码 4000>(enable) set enablepass设置授权密码 4000>(enable) set interface sc0 IP_address mask 配置IP 地址 4000>(enable) set port enable|disable slot_#/port_# 启用/禁用接口 4000>(enable) show port [slot_#/port_#]显示接口信息4000>(enable) set port name slot_#/port_# name设置交换机接口描述信息 4000>(enable) set port speed slot_#/port_# 4|10|16|100|auto 设置交换机接口速率 4000>(enable) set port duplex slot_#/port_# full|half 设置交换机接口双工模式 4000>(enable) clear config all 删除NVRAM 中的配置信息 4000>(enable) erase all删除FLASH 中的内容4000>(enable) show flash 显示FLASH 中的内容 4000>(enable) show cam [count] dynamic|static|permanent|system [vlan_#]显示CAM 表VLAN 1900(config)# vtp domain VTP_domain_name 定义交换机域名1900(config)# vtp server|client|transparent 定义交换机VTP 模式(默认服务器) 1900(config)# vtp password VTP_password 配置VTP 口令1900(config)# vtp pruning enable|disable 启用/禁用修剪(默认启用) 1900(config)# vtp trap enable 启用SNMP 陷阱(默认启用) 1900# show vtp 验证VTP 配置2950# vtp database访问VLAN 和VTP 配置(以下均是在IOS12.1前用,12.1后全是在全局配置模式下)2950(vlan)# vtp domain VTP_domain_name 定义交换机域名2950(vlan)# vtp server|client|transparent 定义交换机VTP 模式(默认服务器) 2950(vlan)# vtp password VTP_password 配置VTP 口令2950(vlan)# vtp pruning启用/禁用修剪(默认启用) 2950(config)# snmp-server enable traps vtp 启用SNMP 陷阱(默认启用)2950# show vtp status 检查VTP 配置2950# show vtp counters显示与VTP 消息发送与接收相关的VTP 统计1900(config-if)# trunk on|off|desirable|auto指定中继类型1900# show trunk A|B 验证接口中继(A 是fa0/26,B 是fa0/27)2950(config-if)# switchport mode trunk|dynamic desirable|dynamic auto|nonegotiate指定中继类型(默认自动协商)2950(config-if)# switchport trunk native|allowed|pruning vlan VLAN_# 配置中继2950(config-if)# switchport trunk pruning vlan remove VLAN_#清除不希望消减的VLAN 2950# show interfaces [type 0/port_#] switchport|trunk 验证接口中继1900(config)# vlan VLAN_# [name VLAN_name ]创建VLAN1900(config-if)# vlan-membership static VLAN_# 将该接口静态地分配给一个VLAN 1900# show vlan验证VLAN1900# show vlan-membership 查看VLAN 成员关系 1900# show spantree [VLAN_#]查看VLAN 的STP 信息2950# vlan database进入VLAN 数据库(ISO12.1前用) 2950(vlan)# vlan VLAN_# [name VLAN_name ] 创建VLAN2950(config)# vlan VLAN_#进入VLAN 数据库(ISO12.1后用) 2950(config-vlan)# name VLAN_name创建VLAN2950(config-if)# switchport mode access指定连接是接入链路连接 2950(config-if)# switchport access vlan VLAN_#指定VLAN 是接入链路连接4000>(enable) set vlan VLAN_# name VLAN_name 配置VLAN 4000>(enable) set vlan VLAN_# slot_#/port_#-port_# 为VLAN 分配端口 4000>(enable) set trunk slot_#/port_# [on|off|desirable|auto|nonegotiate] [VLAN_#] [isl|dot1q|dot10|lane|negotiate] 配置中继4000>(enable) clear trunk slot_#/port_# VLAN_# 删除VLAN4000>(enable) show trunk slot_#/port_#验证中继端口4000>(enable) set vtp v2 enable配置VTPv24000>(enable) set vtp [domain name] [mode client|server|transparent][passwd password] [pruning enable|disable] [v2 enable|disable]设置VTP4000>(enable) show vtp domain验证VTP域的信息4000>(enable) show vtp statistics显示发出或收到的VTP通告信息的摘要内容4000>(enable) set vtp pruneeligible VLAN_#设置VTP消减4000>(enable) clear vtp pruneeligible VLAN_#清除不希望消减的VLANSTP 4000>(enable) set spantree enable|disable VLAN_#启用/禁用STP(默认启用)2950(config)# [no] spanning-tree vlan VLAN_#启用/禁用STP(默认启用)4000>(enable) show spantree[VLAN_#]验证STP状态2950# show spanning-tree验证STP状态4000>(enable) set spantree root [secondary]VLAN_# [dia network_diameter] [hello hello_time]设置主根节点桥、备份节点桥、最大桥数-7)、持续时间(1-10,默认2)4000>(enable) set spantree portcost slot_#/port_# cost_#设置端口开销2950(config-if)# spanning-tree cost cost_#设置端口开销4000>(enable) set spantree portpri slot_#/port_# priority_#设置端口优先级4000>(enable) set spantree portvlanpri slot_#/port_# priority_#[VLAN_#]改变VLAN的优先级设置2950(config-if)# spanning-tree vlan VLAN_#port-priority priority_#设置端口优先级4000>(enable) set spantree fwddelay delay_# [VLAN_#]设置从侦听状态到学习状态再到转发状时间间隔(默认15秒,取值范围是4-4000>(enable) set spantree hello interval_time [VLAN_#]设置根节点交换机发送BPDU的时间间隔认2秒,取值范围是1-10秒)4000>(enable) set spantree maxage agingtime [VLAN_#]设置交换机持有BPDU的时间(默认20值范围是6-40秒)2950(config)# spanning-tree vlan VLAN_# forward-time forward_time设置从侦听状态到学习状态再到转发状时间间隔(默认15秒,取值范围是4-2950(config)# spanning-tree vlan VLAN_# hello-time hello_time设置根节点交换机发送BPDU的时间间隔认2秒,取值范围是1-10秒)2950(config)# spanning-tree vlan VLAN_#max-age maxage设置交换机持有BPDU的时间(默认20值范围是6-40秒)4000>(enable) set port channel slot_#/port_# on建立以太通道集合4000>(enable) show port capabilities slot_#/port_#查看端口的配置4000>(enable) show port channel验证以太通道集合的配置2950(config-if)# channel-group group_number mode auto|desirable|on建立以太通道集合2950# show etherchannel group_number|brief|detail|load-balance|port|port-channel|summary验证以太通道集合的配置4000>(enable) set spantree portfast slot_#/port_#enable配置PortFast2950(config-if)# spanning-tree portfast配置PortFast4000>(enable) set spantree uplinkfast enable|disable [rate station_update_rate] [all-protocols off|on]启用/禁用UplinkFast4000>(enable) show spantree uplinkfast验证UplinkFast配置2950(config)# spanning-tree uplinkfast [max_update_rate]启用/禁用UplinkFast2950# show spanning-tree uplinkfast验证UplinkFast配置4000>(enable) set spantree backbonefast enable|disable启用/禁用BackboneFast4000>(enable) show spantree backbonefast验证BackboneFast配置2950(config)# spanning-tree backbonefast启用BackboneFast虚拟网间路由2600(config)# interface type slot_#/port_#.subint_number配置子接口2600(config-subif)# encapsulation dot1q|isl|sde|tr-isl VLAN_#配置封装类型4000>(enable) show module查看交换机的硬件配置4000>(enable) session module_#访问L3SML3SM(config-if)# mac-address mac_address分配MAC地址MLS 2600(config)# mls rp ip启动MLS2600(config-if)# mls rp vtp-domain domain_name分配路由器接口到VTP域中2600(config-if)# mls rp vlan-id VLAN_#向接口分配VLAN2600(config-if)# mls rp management-interface指定该接口为管理接口2600# show mls rp提供全局MLS信息2600# show mls rp interface type slot_#/port_#提供指定接口的MLS信息2600# show mls rp vtp-domain domain_name提供VTP域的MLS信息6500>(enable) set mls enable在MLS-SE上启动MLS6500>(enable) set mls include rp_ip_address告诉交换机哪一个IP地址是正确的6500>(enable) show mls include显示外部路由处理器的IP地址列表6500>(enable) set mls flow [destination|destination-source|full]告诉MLS交换机要缓存候选数据包的哪6500>(enable) show mls entry显示第三层缓存表6500>(enable) set mls agingtime aging_time改变缓存的衰老时间(默认256秒,取值是8-2032秒中的8的倍数值)6500>(enable) set mls agingtime fast fast_aging_time pkt_threshold改变快速衰老周期和数据包门限值6500>(enable) show mls ip验证MLS-SE的配置6500>(enable) clear mls entry [destination IP_address] [sourceIP_address] [flow protocol] [source_port] [destination_port][all]删除所有或指定MLS缓存记录3550(config)# ip routing启动IP路由3550(config)# ip cef启动CEF3550(config-if)# no switchport将第二层接口转换为第三层接口3550(config-if)# ip route-cache cef在接口上启动CEF3550# show ip cef验证CEF组播3640(config)# ip multicast-routing启动路由器上的组播服务3640(config-if)# ip pim dense-mode将接口设置为PIM密集模式3640(config-if)# ip pim sparse-mode将接口设置为PIM稀疏模式3640(config-if)# ip pim sparsed-dense-mode将接口设置为PIM稀疏-密集模式3640(config)# ip pim rp-address IP_address group_ACL_# [override]手工配置RP3640(config)# ip pim send-rp-announce type slot_#/port_# scopettl_value group-list ACL_#通告RP组的分配3640(config)# ip pim send-rp-discovery scope ttl_value配置RP映射代理3640(config-if)# ip multicast ttl-threshold ttl_value设置TTL门限值3640(config-if)# ip igmp join-group group_address加入组播组3640# show ip mroute查看组播信息3640# ping验证RP之间或其他组播路由器之间的连3640# mtrace source_IP_address [destination_IP_address][group]组播traceroute3640(config-if)# ip cgmp配置CGMP路由器4000>(enable) set cgmp enable启动CGMP4000>(enable) show cgmp statistics查看CGMP统计信息4000>(enable) show multicast group cgmp查看交换机了解到的组播组信息4000>(enable) set cgmp leave enable检查由客户端产生的IGMPv2的离开信息4000>(enable) set igmp enable启动IGMP4000>(enable) ip igmp snooping启动IGMP探听4000>(enable) set igmp fastleave enable启动快速离开过程4000>(enable) show igmp statistics显示交换机上IGMP探听的状态信息QoS 2950(config)# wrr-queue cos-map queue_ID cos_value建立队列2950(config)# wrr-queue bandwidth bandwidth_value设置队列门限2950(config)# class-maps name定义对信息传输分类时的匹配标准2950(config-cmap)# match access-group ACL_#识别被分类的信息传输2950(config)# policy-map name确定为接入信息传输所设置的分类标准2950(config-pmap)# class name2950(config-pmap-c)# set ip dscp number2950(config-if)# service-policy input name对该接口应用策略3550(config)# mls qos启动QoS3550(config-if)# auto qos voip在接口上启动自动服务质量3550(config)# priority-list priority_queue_#protocol protocolhigh|medium|normal|low [list ACL_#]为优先级队列定义信息流3550(config)# priority-list priority_queue_#queue-limit limit_#定义特定优先级队列的最大队列空间3550(config-if)# priority-group priority_queue_#向特定输出接口分配优先级队列3550(config)# queue-list queue_list_#interface type slot_#/port_# queue_number为一个特定的定制队列定义信息流3550(config)# queue-list queue_list_#queue queue_number byte-count size_in_bytes [limit number_of_queue]为特定的定制队列定义队列的最大空间3550(config-if)# custom-queue-list custom_queue_number为特定的输出接口分配优先级队列4840(config)# ip slb serverfarm serverfarm_name配置SLB冗余4840(config-slb-sfarm)# real IP_address [port_#]指定虚拟IP地址4840(config-slb-sfarm)# inservice启动服务器4840(config)# virtual IP_address [network_mask]tcp|udp [port_number|wsp|wsp-wtp|wsp-wtls|wsp-wtp-wtls] [service service_name]。
交换机配置命令大全
switch>enableswitch#switch#Switch#configure terminalSwitch(config)#switch(config)#hostname 交换机名Switch(config)#interface gigabitEthernet 1/1switch (config)#enable secret level 1 0 rg 配置telnet管理密码为rg,其中1表示telnet密码,0表示密码不加密switch (config)#enable secret level 15 0 rg 配置特权模式下的管理密码rg,其中15表示为特权密码switch (config)#interface vlan 1 //假设管理VLAN为VLAN 1switch (config-if)#ip address 192.168.1.1 255.255.255.0 //给管理VLAN配置管理IP地址switch (config-if)#no shutdown //激活管理IP,养成习惯,无论配置什么设备,都使用一下这个命令switch(config)#ip default-gateway 192.168.1.254 //假设网关地址为192.168.1.254,此命令用户二层设备。
通过以上几个命令的配置,设备便可以实现远程管理,在项目实施时(尤其是设备位置比较分散)特别能提高效率。
2.1 接口介质类型配置锐捷为了降低SME客户的总体拥有成本,推出灵活选择的端口形式:电口和光口复用接口,方便用户根据网络环境选择对应的介质类型。
但光口和电口同时只能用其一,如图1,如使用了光口1F,则电口1不能使用。
图1接口介质类型的转换:Switch(config)#interface gigabitethernet 0/1Switch(config-if)#medium-type fiber //把接口工作模式改为光口Switch(config-if)#medium-type copper //把接口工作模式改为电口? 默认情况下,接口是工作在电口模式? 在项目实施中,如果光纤模块指示灯不亮,工作模式是否正确也是故障原因之一。
交换机命令大全
交换机配置命令华为,思科,北电,迈普等配置命令各有不同,以下先以思科设备为例:switch> 用户模式1:进入特权模式 enableswitch> enableswitch#2:进入全局配置模式 configure terminalswitch> enableswitch#configure terminalswitch(conf)#3:交换机命名 hostname aptech2950 以aptech2950为例switch> enableswitch#configure terminalswitch(conf)#hostname aptch-2950aptech2950(conf)#4:配置使能口令 enable password cisco 以cisco为例switch> enableswitch#configure terminalswitch(conf)#hostname aptch2950aptech2950(conf)# enable password cisco5:配置使能密码 enable secret ciscolab 以cicsolab为例switch> enableswitch#configure terminalswitch(conf)#hostname aptch2950aptech2950(conf)# enable secret ciscolab6:设置虚拟局域网vlan 1 interface vlan 1 和网关地址switch> enableswitch#configure terminalswitch(conf)#hostname aptch2950aptech2950(conf)# interface vlan 1aptech2950(conf-if)#ip address 192.168.1.1 255.255.255.0 配置交换机端口ip和子网掩码aptech2950(conf-if)#no shut 是配置处于运行中aptech2950(conf-if)#exitaptech2950(conf)#ip default-gateway 192.168.254 设置网关地址7:进入交换机某一端口 interface fastehernet 0/17 以17端口为例switch> enableswitch#configure terminalswitch(conf)#hostname aptch2950aptech2950(conf)# interface fastehernet 0/17aptech2950(conf-if)#8:查看命令 showswitch> enableswitch# show version 察看系统中的所有版本信息show interface vlan 1 查看交换机有关ip 协议的配置信息show running-configure 查看交换机当前起作用的配置信息show interface fastethernet 0/1 察看交换机1接口具体配置和统计信息show mac-address-table 查看mac地址表show mac-address-table aging-time 查看mac地址表自动老化时间9:交换机恢复出厂默认恢复命令switch> enableswitch# erase startup-configureswitch# reload10:双工模式设置switch> enableswitch#configure terminalswitch2950(conf)#hostname aptch-2950aptech2950(conf)# interface fastehernet 0/17 以17端口为例aptech2950(conf-if)#duplex full/half/auto 有full , half, auto 三个可选项11:cdp相关命令switch> enableswitch# show cdp 查看设备的cdp全局配置信息show cdp interface fastethernet 0/17 查看17端口的cdp配置信息show cdp traffic 查看有关cdp包的统计信息show cdp nerghbors 列出与设备相连的cisco设备12:csico2950的密码恢复拔下交换机电源线。
交换机的一般设置命令
2009年09月25日星期五 12:54一、交换机的一般设置命令switch>用户模式switch>enable进入特权模式switch#特权模式switch#config terminal进入配置模式switch(config)#配置模式switch(config)#interface fastethernet*/*进入接口配置模式switch(config-if)#接口配置模式switch(config)#enable password Cisco设置enable password为Ciscoswitch(config)#enable secret Cisco1设置enable secret为Cisco1switch(config)#hosename C2950设置主机名为C2950switch(config)#ip address 192.168.1.1 255.255.255.0设置交换机ip地址switch(config)#ip default-gateway 192.168.1.254设置默认网关switch(config)#ip domain-name 设置域名switch(config)#ip name-server 200.0.0.1设置域名服务器组配置模式:switch(config)#interface range fastethernet 0/1-20进入配置状态switch(config-if-range)#switchport mode access设置端口工作在访问接入模式switch(config-if-range)#switchport access allowed vlan10设置端口1-20为vlan10成员二、交换机端口的设置命令switch(config)#interface fastethernet 0/1进入接口0/1的配置模式switch(config-if)#speed?查看speed命令的子命令switch(config-if)#speed 100设置网络速度switch(config-if)#duplex full使用全双工模式switch(config-if)#description TO_PC1设置端口描述是TO_PC1switch(config)#show interface fastethernet 0/1查看0/1的配置结果switch(config)#show interface fastethernet 0/1 status查看端口0/1的配置状态三、设置MAC地址表的相关命令switch(config)#show mac-address-table查看整个mac地址表switch(config)#mac-address-table aging-time 100设置超时时间为100Sswitch(config)#mac-address-table permanent 0000.0C01.BBCC f0/3加入永久地址switch(config)#mac-address-table restricted static 0000.0C01.BBCC f0/6 f0/7加入静态地址(其中f0/6是目标端口,f0/7是源端口)switch(config)#clear mac-address-table restricted static清除限制性地址四、配置VTP协议首先进入特权模式switch#vlan database进入vlan配置子模式switch(vlan)#vtp server设置本交换机为server模式switch(vlan)#vtp domain vtpserver设置域名switch(vlan)#vtp pruning启动修剪功能switch(vlan)#exit退出vlan配置子模式switch#show vtp status查看vtp设置信息(以上是配置VTP服务模式,下面是客户模式,上下不是同台交换机)switch#vlan database进入vlan配置子模式switch(vlan)#vtp client设置本交换机为client模式五、配置VLAN TRUNK端口首先进入配置模式switch(config)#interface f0/24进入端口24的配置子模式switch(config-if)#switchport mode trunk设置当前端口为trunk模式switch(config-if)#switchport trunk allowed vlan all设置全部vlan允许在该端口进行数据交换六、创建VLAN以及将某端口加入VLAN首先进入特权模式switch#vlan database进入vlan配置子模式switch(vlan)#vlan 2创建一个vlan 2(系统会自动将其命名为VLAN0002)switch(vlan)#vlan 3 name vlan3创建一个vlan 3,命名为vlan3switch(vlan)#exit进入配置模式switch(config)#interface f0/9进入端口为9的配置子模式switch(config-if)#switch mode access设置端口为静态vlan访问模式switch(config-if)#switchport accessvlan 2把端口9分配给vlan 2 switch(config-if)#^z退出switch#show vlan 2查看vlan 2的配置信息七、生成树协议STP的配置STP协议的配置有两种,一种是基于端口权值负载均衡,一种是基于路径值的负载均衡交换机1的23、24口交换机2的两个端口相连,这样便会产生一个环路,帧就有可能在这个回路上不停的绕行,为了避免这种情况的发生,因此要配置生成树协议生成树协议(Spanning Tree)定义在 IEEE 802.1D 中,是一种链路管理协议,它为网络提供路径冗余同时防止产生环路。
华为路由器交换机配置命令大全
华为路由器交换机配置命令大全华为路由器交换机配置命令大全一、登录与认证命令1.Telnet 登录命令2.SSH 登录命令3.Console 登录命令4.用户认证命令二、设备管理命令1.设备信息查看命令2.设备参数配置命令3.设备重启命令4.设备保存配置命令三、接口配置命令1.查看接口状态命令2.配置接口描述命令3.配置接口IP地质命令4.配置接口MTU命令5.开启/关闭接口命令四、路由配置命令1.配置静态路由命令2.配置默认路由命令3.配置动态路由命令4.查看路由表命令5.清空路由表命令五、VLAN 配置命令1.配置VLAN命令2.配置端口VLAN命令3.配置VLAN接口命令六、交换机功能配置命令1.配置端口镜像命令2.配置链路聚合命令3.配置交换机端口安全命令4.配置交换机QoS命令七、安全配置命令1.配置访问控制列表命令2.配置NAT命令3.配置防火墙命令4.配置SSL VPN命令附录:附件:1.示例配置文件2.常见问题解答法律名词及注释:1.Telnet:一种远程登录协议,用于远程连接路由器或交换机进行管理和配置。
2.SSH:Secure Shell,一种用于远程登录的网络协议,提供安全的数据通信和用户认证方式。
3.Console:一种通过串口连接设备进行本地登录的方式。
4.VLAN:Virtual Local Area Network,虚拟局域网,将不同的物理分组划分到不同的逻辑分组中,实现逻辑分离。
5.MTU:Maximum Transmission Unit,最大传输单元,指数据链路层上一次发送的帧的最大长度。
6.NAT:Network Address Translation,网络地质转换,用于在私有网络和公共网络之间进行通信的转换技术。
7.QoS:Quality of Service,服务质量,用于在网络通信中对不同数据流进行优先级和带宽控制。
交换机路由器命令大全(结合配置实例)
交换机路由器命令大全(结合配置实例)交换机路由器命令大全(结合配置实例)交换机和路由器是计算机网络中常用的网络设备,用于实现数据包的转发和路由选择。
在实际应用中,我们需要使用命令来配置交换机和路由器的各项参数。
本文将给出交换机和路由器常用命令的大全,并结合实际配置示例进行说明。
一、交换机命令1. 查看交换机基本信息查看交换机型号、固件版本、序列号等基本信息:show version2. 配置交换机端口设置交换机接口的速率、全双工模式等参数:interface interface_namespeed speed_valueduplex {full | half}3. 查看交换机端口状态查看交换机端口的连接状态、速率、工作模式等信息:show interfaces status4. 配置交换机VLAN创建VLAN和端口关联,实现VLAN的隔离和管理:vlan vlan_idname vlan_nameinterface interface_name5. 查看交换机MAC表显示交换机学习到的MAC地址和对应的端口:show mac-address-table6. 配置交换机链路聚合将多个物理端口绑定为一个逻辑端口,提高带宽和冗余性:interface port-channel channel_numberdescription description_textswitchport mode trunk/access7. 交换机Spanning Tree配置配置交换机的Spanning Tree协议参数,避免网络环路:spanning-tree vlan vlan_idpriority priority_value二、路由器命令1. 查看路由表显示路由器的路由表,包括直连路由、静态路由和动态路由表项:show ip route2. 配置静态路由手动配置路由器的静态路由表,指定目的网络和下一跳信息:ip route destination_network subnet_mask next_hop_ip3. 配置路由器接口配置路由器的接口参数,包括IP地址、子网掩码、描述等:interface interface_nameip address ip_address subnet_maskdescription description_text4. 配置路由器OSPF协议配置路由器之间的OSPF动态路由协议,实现网络的动态路由选择:router ospf process_idnetwork network_address wildcard_mask area area_number5. 配置路由器ACL配置路由器的访问控制列表,用于控制数据包的流量:access-list access_list_number permit/deny source destination6. 配置路由器NAT配置路由器的网络地址转换功能,实现内网与外网的互通:interface interface_nameip nat inside/outside三、配置实例1. 配置交换机端口接口GigabitEthernet0/1配置为100Mbps全双工模式:interface GigabitEthernet0/1speed 100duplex full2. 配置交换机VLAN创建VLAN10,将接口GigabitEthernet0/1划分到VLAN10:vlan 10name VLAN10interface GigabitEthernet0/13. 配置路由器接口将接口GigabitEthernet0/0配置为192.168.1.1/24的IP地址:interface GigabitEthernet0/0ip address 192.168.1.1 255.255.255.0description LAN interface4. 配置静态路由配置路由器的静态路由表,将目的网络192.168.2.0/24指向下一跳192.168.1.2:ip route 192.168.2.0 255.255.255.0 192.168.1.25. 配置路由器ACL设置访问控制列表,允许源IP地址为192.168.1.0/24的流量通过:access-list 1 permit 192.168.1.0 0.0.0.2556. 配置路由器NAT设置路由器的NAT,将内部接口GigabitEthernet0/1地址转换为公网地址:interface GigabitEthernet0/1ip nat inside以上是交换机和路由器常用命令的大全以及配置实例。
交换机配置命令大全
(config)#enable secret level 1 0 star 配置远程登陆密码为star
(config)#enable secret level 15 0 star 配置特权密码为star
(config-vlan)#name vlanname 命名VLAN为vlanname
(config-if)#switchport access vlan 10 将该端口划入VLAN10中
某端口的接口配置模式下进行
(config)#interface vlan 10 进入VLAN 10的虚拟端口配置模式
端口安全
(config)# interface fastethernet 0/1 进入一个端口
(config-if)# switchport port-security 开启该端口的安全功能
1.配置最大连接数限制
(config-if)# switchport port-secruity maxmum 1 配置端口的最大连接数为1,最大连接数为128
(config-if)#no shutdown 开启该端口
(config-if)#switchport access vlan 10 将该端口划入VLAN10中,用于VLAN
(config-if)#switchport mode trunk 将该端口设为trunk模式,用于Tag vlan
(config-if)# ip address 192.168.1.1 255.255.255.0
(config-if)# no shutdown
三层交换机路由协议
常见交换机配置命令
交换机常用命令及配置(cisco)switch> 用户模式1.进入特权模式enableswitch> enableswitch#2.进入Setup模式setupswitch> enableswitch#setup3.进入全局配置模式configure terminalswitch> enableswitch#configure terminalswitch(conf)#4.交换机命名hostname (以switch01 为例)switch> enableswitch#configure terminalswitch(conf)#hostname switch01switch01(conf)#5.配置密文密码enable secret (以123 为例)switch> enableswitch#configure terminalswitch(conf)# enable secret1236.配置明文密码enable password (以456 为例)switch> enableswitch#configure terminalswitch (conf)# enable password45611.设置虚拟端口的IP地址、网关等(以vlan 1为例)switch> enableswitch#configure terminalswitch(conf)# interface vlan 1switch(conf-if)# ip address192.168.1.254 255.255.255.0//配置交换机端口ip 和子网掩码switch (conf-if)#no shutdown //激活端口switch (conf-if)#exit //退出到上层配置模式switch (conf)#ip default-gateway192.168.1.254 //设置网关地址为什么要设置虚拟端口?虽然PC和交换机都可以配IP地址,但PC上的IP地址是绑定到以太网接口,交换机上的IP地址是绑定到VLAN。
交换机配置常用命令

[] port link-type access 设置端口类型为access
6、 IP和MAC地址绑定
arp static 192.168.1.11 0023-7d3e-14cf 10 GigabitEthernet2/0/5
7、 上行接口配置
quit 退出vlan 20
[] int vlan 20 进入vlan 20
port Ethernet 1/0/1 to Ethernet 1/0/20 从1口到20口加入vlan 20
5、 [] port link-type trunk 设置端口类型为trunk
一、登录交换机
1、telnet
从IMC拓扑图中选telnet登录,或者直接在 命令提示行 窗口telnet交换机地址
2、直接串口登录
在 开始 附件 进入超级终端,新建名称 选择还原默认
二、收集信息
1、securCRT软件中,文件 记录会话
2、超级终端中,记录 捕获文字
3、重启交换机前,dis diag
#
interface GigabitEthernet1/0/21 进入接口
port link-type trunk 设置端口类型为trunk
port trunk permit vlan 13 4093 接口设置允许通过 vlan 13 vlan 4093
undo port trunk permit vlan 1 接口禁止通过vlan1
broadcast-suppression 5 接口设置 广播报文限定为5%
duplex full 强制双工
speed 1000 强制千兆
shutdown 关闭端口
交换机配置命令大全
交换机配置命令大全Switch命令:全局配置模式:Switch(config)# 配置交换机的全局参数接口配置模式:Switch(config-if)# 对交换机的接口进行配置,如某个接口属于那个Vlan,启用及禁用接口等线路配置模式:Switch(config-line)# 对控制台访问VLAN数据库配置模式:Switch(Vlan)# 对Vlan的参数进行配置一、模式命令:1. 用户模式:Switch>2. 特权模式:Switch>enableSwitch#3. 全局配置模式:Switch#config terminalSwitch(config)#4. 接口配置模式:Switch(config)#interface fastethernet0/1Switch(config-if)#5. Line模式:Switch(config)#line console 0Switch(config-line)#二、特权模式下的命令:1. 查看机MAC地址:Switch#show mac-address-table2. 发现(CDP):Switch#show cdpSwitch#show cdp interface fastethernet0/1Switch#show cdp neighborsSwitch#show cdp neighbors detailSwitch#show cdp entry3. 保存机配置:Switch#copy running-config startup-config或者Switch#write4. 恢复交换机出厂值:Switch#erase startup-configSwitch#reload三、全局配置模式下的命令:1. 配置主机名:Switch(config)#hostname Sw1Sw1(config)#2、设置登陆台密码:Switch(config)#line console 0Switch(config-line)#password 密码Switch(config-line)#login3. 使能口令:Switch(config)#enable Password 密码4. 加密保存的使能口令:Switch(config)#enable secret 密码5. 配置IP地址:Switch(config)#interface vlan 1Switch(config-if)#ip address IP地址网关Switch(config-if)#no shutdown6. 配置交换机网关:Switch(config)#ip default-gateway 网关四、VLAN配置命令:1. 创建vlan命令:a) 全局配置模式下:Switch(config)#vlan 2Switch(config)#name v2Switch(config)#mtu 数值Switch(config)#endb) Vlan数据库下:Switch#vlan databaseSwitch#vlan 2 name v2Switch#vlan 2 mut 数值Switch#exit2. 删除vlan命令:a) 全局配置模式下:Switch(config)#no vlan 2Switch(config)#endb) Vlan数据库下:Switch#no vlan 2 name v2Switch#exit3. 在vlan中添加端口:Switch#config terminalSwitch(config)#interface f0/1(端口)Switch(config-if)#Switchport mode accessSwitch(config-if)#switchport access vlan 2Switch(config-if)#end一次将多个端口添加到vlan中:Switch#config terminalSwitch(config)#interface range f0/1 - 5(端口)Switch(config-if)#switchport access vlan 2Switch(config-if)#end注:switch#show vlan biref(查看vlan信息)4. 配置vlan trunk:1. 配置接口为trunk命令:Switch(config)# interface f0/1(端口)Switch(config-if)#Switchport mode trunk2. 配置接口为动态协商模式的命令:Switch(config)# interface f0/1(端口)Switch(config-if)#switchport mode dynamic desirable/auto 3. 从trunk中删除vlan:Switch(config)# interface f0/1(端口)Switch(config-if)#Switchport trunk allowed vlan remove 2 4. 在trunk中添加vlan:Switch(config)# interface f0/1(端口)Switch(config-if)#Switchport trunk allowed vlan add 2----------------------------------------------------------- Catalyst 2950交换机密码恢复(1)拔下交换机的电源。
华为交换机常用命令配置介绍
华为交换机常用命令配置介绍华为交换机是一种常见的网络设备,用于构建大型网络。
配置华为交换机需要使用一些常用的命令,通过这些命令可以设置交换机的各种功能和参数。
本文将介绍一些常用的华为交换机配置命令,包括基本配置、端口配置和VLAN配置等。
一、基本配置命令:1.设置设备主机名:[HUAWEI] sysname Switch //将设备主机名设置为Switch2.配置管理口:[Switch] interface gigabitethernet 0/0/1 //进入GigabitEthernet 0/0/1接口[Switch-GigabitEthernet0/0/1] port link-type access //设置接口类型为access[Switch-GigabitEthernet0/0/1] port default vlan 10 //设置默认VLAN为103.配置IP地址:[Switch-GigabitEthernet0/0/1] ip address 192.168.1.1255.255.255.0 //配置接口IP地址为192.168.1.1,子网掩码为255.255.255.04.设置设备登录认证:[Switch] aaa //进入AAA视图[Switch-aaa] local-user admin //创建本地用户admin[Switch-aaa] password simple admin123 //设置密码为admin1235.开启SSH远程登录:[Switch] ssh server enable //开启SSH服务[Switch] ssh user admin //创建SSH用户admin[Switch-ssh-user-admin] authentication-type password //设置认证方式为密码[Switch-ssh-user-admin] service-type stelnet //设置服务类型为SSH二、端口配置命令:1.查看端口状态:[Switch] display interface gigabitethernet 0/0/1 //查看GigabitEthernet 0/0/1接口的状态信息2.端口速率设置:[Switch] interface gigabitethernet 0/0/1 //进入GigabitEthernet 0/0/1接口[Switch-GigabitEthernet0/0/1] speed 100 //设置速率为100Mbps 3.端口流量控制:[Switch] interface gigabitethernet 0/0/1 //进入GigabitEthernet 0/0/1接口[Switch-GigabitEthernet0/0/1] flow-control //开启流量控制4.端口VLAN成员关系设置:[Switch] interface gigabitethernet 0/0/1 //进入GigabitEthernet 0/0/1接口[Switch-GigabitEthernet0/0/1] port link-type trunk //设置接口类型为trunk[Switch-GigabitEthernet0/0/1] port trunk allow-pass vlan 1020 //设置允许通过的VLAN为10和20三、VLAN配置命令:1.创建VLAN:[Switch] vlan 10 //创建VLAN 10[Switch-vlan10] quit //退出VLAN 10视图2.VLAN接口配置:[Switch] interface vlanif 10 //进入VLAN 10接口[Switch-Vlan-interface10] ip address 192.168.10.1255.255.255.0 //配置接口IP地址为192.168.10.1,子网掩码为255.255.255.03.VLAN端口关联:[Switch] interface gigabitethernet 0/0/1 //进入GigabitEthernet 0/0/1接口[Switch-GigabitEthernet0/0/1] port link-type hybrid //设置接口类型为hybrid(混合)[Switch-GigabitEthernet0/0/1] port hybrid vlan 10 untagged //设置接口为VLAN 10的未标记端口四、其他常用命令:1.查看设备信息:[Switch] display version //查看设备版本信息[Switch] display interface brief //查看所有接口的基本信息2.保存配置:[Switch] save //保存当前配置3.重启设备:[Switch] reboot //重启设备以上是一些常用的华为交换机配置命令。
- 1、下载文档前请自行甄别文档内容的完整性,平台不提供额外的编辑、内容补充、找答案等附加服务。
- 2、"仅部分预览"的文档,不可在线预览部分如存在完整性等问题,可反馈申请退款(可完整预览的文档不适用该条件!)。
- 3、如文档侵犯您的权益,请联系客服反馈,我们会尽快为您处理(人工客服工作时间:9:00-18:30)。
配置命令交换机之间用交叉线1进入特权模式:Switch>enable2配置模式Switch#config3配置主机名:Switch(config)#hostname S14.设置访问口令S1#configure terminalS1(config)#line console 0S1(config-line)#password ciscoS1(config-line)#loginS1(config-line)#line vty 0 15S1(config-line)#password ciscoS1(config-line)#loginS1(config-line)#exit5.将使能加密口令设置为class。
S1(config)#enable secret classS1(config)#ip default-gateway 172.17.99.1 配置默认网关6.在虚拟接口vlan99设置交换机ip地址S1(config)#interface vlan99S1(config-if)#ip address 172.17.99.11 255.255.255.0S1(config-if)#no shutdownS1(config-if)#exit7.交换机VLAN 分配端口S1(config)#interface fa0/1S1(config-if)#switchport mode accessS1(config-if)#switchport access vlan 99S1(config-if)#exit8.给vlan命名S1(config)#vlan 10S1(config-vlan)#name Faculty/StaffS2.S3.本征vlan即分配端口 s2.s3连接s1 使用中继vlan S1中继vlan S1(config)#interface FastEthernet 0/1S1(config-if)#switchport mode trunkS1(config-if)#switchport trunk native vlan 999..设置交换机默认网关S1(config)#ip default-gateway 172.17.99.1S1(config)#exit10..配置快速以太网接口的端口速率和双工设置。
S1#configure terminalS1(config)#interface fastethernet 0/18S1(config-if)#speed 100S1(config-if)#duplex fullS1(config-if)#end11.清除mac地址表S1#clear mac-address-table dynamic12.设置静态MAC 地址。
S1(config)#mac-address-table static 0002.16E8.C285 vlan 99 interface fastethernet 0/1813.在接入端口上配置端口安全性。
配置交换机端口FastEthernet 0/18 仅接受两台设备,动态学习这些设备的MAC 地址,并在发生安全违规事件时关闭端口。
S1(config-if)#switchport mode accessS1(config-if)#switchport port-securityS1(config-if)#switchport port-security maximum 2S1(config-if)#switchport port-security mac-address stickyS1(config-if)#switchport port-security violation shutdownS1(config-if)#exit14.配置并测试MOTD 标语。
配置当天消息(MOTD),文本使用Authorized Access Only(仅限授权访问)。
标语文本区分大小写。
请勿在标语文本前后添加空格。
在标语文本前后使用定界符指示文本从何处开始,到何处结束。
下例中使用的定界符为&,但是您可以使用标语文本中未使用的任何字符。
配置完MOTD 后,从交换机注销,然后再次登录,检查是否显示了上述标语。
S1(config)#banner motd &Authorized Access Only&S1(config)#end [or exit]S1#exit15.首先必须启用端口安全性,方能在接口上使用其它端口安全性命令。
启用18号端口安全性S1(config-if)#interface fa0/18S1(config-if)#switchport port-securityShow1.Show vlan 看默认vlan 配置2.发出show running-config命令,检查当前的运行配置3.发出show startup-config命令,检查当前NVRAM 的内容4.发出show interface vlan1命令,检查虚拟接口VLAN1 的特征5.现在使用show ip interface vlan1命令查看该接口的IP 属性6.使用show version命令显示Cisco IOS 信息7.使用show interface fastethernet 0/18命令检查PC1 所用快速以太网接口的默认属性。
8.在特权执行模式下使用show mac-address-table命令显示MAC 地址9.创建VLAN 后,返回特权执行模式并发出show vlan brief命令,检查新VLAN 是否创建成功。
其他命令删除vlan数据库信息Switch#delete flash:vlan.dat从NVRAM中删除交换机启动配置文件Switch#erase startup-config在特权执行模式提示符下,输入reload命令开始这一过程。
Switch#reload要把运行配置文件的内容保存到非易失性RAM (NVRAM),请发出命令copyrunning-config startup-config。
Switch#copy running-config startup-config第四章1.vtp默认配置: show vtp status2.S1 将成为VTP 服务器。
将S1 设置为服务器模式。
S1(config)#vtp mode serverDevice mode already VTP SERVER.3. 将S1 的VTP 域名配置为CCNA。
请记住,VTP 域名区分大小写。
S1(config)#vtp domain CCNAChanging VTP domain name from NULL to CCNA4. 将S1 的VTP 域口令配置为cisco。
请记住,VTP 域口令区分大小写。
S1(config)#vtp password ciscoSetting device VLAN database password to ciscoS1(config)#5.配置主辅银桥S1 (config): spanning-tree vlan 1 root primaryS1(config): spanning-tree vlan 1 root secondary6.配置桥的优先级S1 (config):spanning-tree vlan 1 priority 40967.检验网桥优先级Show spanning-tree8.使用802.1Q 封装配置子接口。
在R1 上创建两个子接口:Fa0/1.10 和Fa0/1.30。
将这两个子接口分配到不同的VLAN。
要创建第一个子接口,请发出interface fa0/1.10 命令进入Fa0/1.10 的子接口配置模式。
请留意,路由器的命令提示符会更改。
在子接口配置模式下发出encapsulation dot1Q 10 命令,将封装类型设置为802.1Q 并将VLAN 10 分配给该虚拟接口。
为端口分配正确的IP 地址。
Fa0/1.10 的IP 地址应为172.17.10.1,子网掩码为255.255.255.0。
使用正确的IP 地址和VLAN ID 对Fa0/1.30 接口重复上述步骤。
R1(config)#interface fa0/1.10R1(config-subif)#encapsulation dot1Q 10R1(config-subif)#ip address 172.17.10.1 255.255.255.0R1(config-subif)#interface fa0/1.30R1(config-subif)#encapsulation dot1Q 30R1(config-subif)#ip address 172.17.30.1 255.255.255.0任务2:将PPP 配置为封装方法。
步骤1. 将R1 配置为与R2 之间使用PPP 封装。
R1(config)#interface serial0/0/0R1(config-if)#encapsulation ppp步骤1. 将ISP 配置为与R2 之间使用HDLC 封装。
ISP(config)#interface serial0/0/0ISP(config-if)#encapsulation hdlcISP(config-if)#no shutdown步骤1. 将ANSI 配置为R1、R2 和R3 上的LMI 类型。
对每台路由器的串行接口输入下列命令。
R1(config-if)#interface s0/0/0R1(config-if)#frame-relay lmi-type ansi。