IBM+AIX操作系统手册
IBM_AIX小机命令手册

?EXCLUDE files:如果选择yes,将使得文件/etc/exclude.rootvg文件中列出的文件和目录不被备份。
?Make BOOTABLE backup:是否生成可启动备份,一般取默认值——yes。
?EXPAND /tmp if needed:是否在需要时自动扩展/tmp文件系统。强烈建议选yes。
内存大小: lsattr –El mem0
? 磁盘 lspv
? 交换分区 lsps –a
? 软件 lslpp –l 文件包名字
? 用户 who
关机命令:
–shutdown
一分钟后关机
–shutdown +2
二分钟后关机
–shutdown –Fr
关机重启(-r)
–或者创建一个CD-ROM文件系统并进行加载
?smit cdrfs
?mount /cdrom
?卸载cdrom
– unmount /cdrom
二、备份与恢复
rootvg备份 — mksysb
●只备份rootvg
●只备份已挂接的文件系统
●以备份格式创建可启动磁带
●保存rootvg中的换页空间设备定义
●tar (tape archive)
◇适用范围广
◇非常适合在不同UNIX平台间传送文件
◇可恢复空目录(-d选项)
◇不支持AIX访问控制列表(ACL,属于扩展inode内容)
●cpio(copy input to output)
◇适用范围广
◇符号链接较多时可能不能正常工作
?ls 显示目录中的内容(文件名)
#ls –a 列出当前目录中的所有文件
IBM内部员工操作手册AIXHACMP安装配置详细文档

HACMP 5.4安装实用手册1.HACMP 5.4的安装步骤a)安装前提i.如果操作系统为AIX 5.2或者AIX 5.3时,需检查:AIX 5L Version RSCT Version RSCT FilesetsAIX 5L v.5.3 plus ML 1 2.4.2 pat.basic.hacmp 2.4.2.0pat.clients.hacmp 2.4.2.0rsct.core.sec 2.4.2.1rsct.core.rmc 2.4.2.1AIX 5L v.5.2 plus ML 5 2.3.6 pat.basic.hacmp 2.3.6.0pat.clients.hacmp 2.3.6.0rsct.core.sec 2.3.6.1rsct.core.rmc 2.3.6.1ii.此次安装的AIX 环境为AIX 5.3 ML6b)安装过程在安装HACMP的过程中,除HAview和HA Tivoli这两个安装包不装外,其他都正常安装c)安装HACMP补丁下载地址:-933.ibm./support/fixcentral/2.HACMP 5.4配置前的规划工作:Cluster Name Byh_clusterNode Name HA1 HA2IP Label HA1_boot HA1_svc HA1_stb HA2_boot HA2_svc HA2_stb IP Address 10.10.10.102 9.9.9.102 192.168.0.1 10.10.10.103 9.9.9.103 192.168.0.2 Persistent IP HA1_per:9.181.1.100 HA2_per:9.181.1.101HeartBeat Hb_HA1: /dev/hdisk1 Hb_HA2: /dev/hdisk2Res. Grp. Name Service IP Volume GroupApp NameByh_rg HA1_svcHA2_svcSharevg None3.HACMP5.4配置方法:a)配置两台机器的/etc/hosts文件:分别在/etc/hosts中加入:b)在HA1上,配置网路连接:i.配置HA1上boot IP----ent0上ii.配置HA1上stb IP----ent1上在HA2节点上也要将boot IP和stb IP也要提前配置好c)建立共享VG---sharevg和用于磁盘心跳的VG---convg这两个VG的* Activate volume group AUTOMATICALLY at system restart选项必须为No建好convg后,在Node1上执行/usr/sbin/rsct/bin/dhb_read -p hdisk1 -r命令在Node2上执行/usr/sbin/rsct/bin/dhb_read -p hdisk1 -t命令,确认可以正常通讯。
AIX操作系统手册
IAIX系统操作手册系统操作手册版本:5L目录第一章AIX操作系统的安装 (5)安装介质与方式 (5)BOS(Base Operating System)安装 (5)第二章AIX操作系统基本命 (8)系统的进入和退出 (8)password (8)mkdir、rm、mv和cd (8)ls (9)date (10)wc (10)who (11)finger (11)ps (11)kill (15)find (15)grep (16)第三章vi编辑器 (18)3.1vi 简介 (18)3.2vi的进入与离开 (18)3.3vi 的文本输入模式 (19)3.4vi 基本编辑命令 (19)3.5文件处理子命令 (21)第四章存储管理 (22)4.1相关术语 (22)PV (Physical V olume) (22)VG (Volume Group) (22)PP (Physical Partition) (22)LP (Logical Partition) (22)LV(Logical V olume) (22)Mirror(镜像) (23)VGDA(Volume Group Description Area,卷组描述区) (23)VGSA(V olume Group Status Area,卷组状态区) (23)4.2PV的管理 (23)硬盘安装 (23)配置一个PV (24)修改PV的属性 (24)删除一个PV (24)4.3VG的管理 (24)创建一个VG (24)删除一个VG (25)4.4LV的管理 (28)增加一个LV (28)修改LV的属性 (29)删除一个LV (31)第五章RS6000 更换硬盘的过程 (33)HDISK0和HDISK1做成MIRROR,是ROOTVG (33)先做系统备份 (33)查看HDISK0的S/N,P/N号等,在换盘的时候做对照 (33)查看所有硬盘(包括逻辑盘)的状态# lsdev -Cc disk (34)停HACMP (34)把HDISK0从ROOTVG中不做MIRROW (34)关机 (35)开机 (35)把HDISK0加到ROOTVG中并做镜像 (35)重启动2号机 (36)关闭1号机的HACMP (36)重启动1号机 (36)启动1号机的HACMP (36)启动2号机的HACMP (36)第六章HACMP安装配置 (36)准备工作 (36)检测连8port卡的TTY (37)使用AIX安装CD安装文件 (37)修改电源管理 (38)Netscape安装和配置 (38)安装HACMP/ES软件 (38)安装最新的AIX和HACMP补丁 (39)SSA微码升级 (39)设置主机名 (39)为所有网卡绑定boot或standby的IP地址 (39)创建VG、LV和FS (40)修改系统参数 (41)重启两台机器 (42)配置HACMP (42)HA测试(一):启动和关闭 (44)HA测试(二):本机IP接管 (44)HA测试(三):资源接管 (45)第七章模拟硬盘更换 (46)预做方案 (46)查看硬盘信息 (46)把要更换硬盘从VG中拿掉 (46)关机 (47)准备工作 (47)拆机箱 (47)更换硬盘 (47)开机 (47)改PV (47)做镜像 (47)把另一块盘18G拿掉 (48)关机 (48)更换硬盘 (48)开机 (48)查看硬盘信息 (48)改PV (48)做镜像 (48)起服务 (48)英迈强人 (49)第二方案 (50)把把机器的前面板拆下 (50)查看硬盘信息,看哪个盘是干什么用的 (50)把要更换硬盘从VG中拿掉 (50)把硬盘做成PV (51)lspv查看硬盘情况 (51)把硬盘加到VG中 (51)把18G硬盘数据复制到36G上, (51)取下另一18G硬盘 (51)把硬盘做成PV (51)做镜像 (52)检查,OK (52)第一章AIX操作系统的安装安装介质与方式AIX操作系统的安装可以:1)通过Tape安装。
IBM AIX命令手册:IBM MQ管理、安装和卸载说明书

Summary of AIX commands to administrate MQhttps:///support/pages/node/6407842Date last updated: 17-Jun-2021Angel Rivera –*************.comIBM MQ Support+++ Objective +++T o provide the most common AIX commands to administrate, install and uninstall MQ.The organization of the sections is based on what will be the commands to start the installation of MQ from scratch:- ensuring that you have a supported version of AIX: uname, oslevel- create the group “mqm” (mkgroup) and the user “mqm” (mkuser),- unpack the .Z or tar.gz file downloaded from IBM Passport Advantage or IBM Fix Central: gunzip, uncompress, zcat, tar- install/uninstall via installp- querying filesets via lslpp- create (mkusil), list (lsusil), remove (rmusil) a USIL, and- specifying USILs (-R ALL or -R /usr/mqm92) with installp and lslpp++ Update from 17-Jun-2021The AIX command “install -r” that is discussed in this chapter will REJECT all the fix packs installed in the server. If you have only 1 fix pack or if you want to delete at the same time all the fix packs, then the procedure in this chapter is fine.But if you have multiples fix packs and you want to uninstall ONL Y the LATEST one, then you need to use another procedure, which is documented in the article:https:///support/pages/node/6464857Uninstalling only the latest fix pack for MQ in AIX and leaving behind other previous fix packs+++ Related tutorials +++https:///support/pages/node/6405792Customization of an AIX server for using MQ+ Customization of Putty for using Function Key F3 with smitty+ Creating groups and userids+ Downloading, customizing and using the sample scripts+ Customization of bash login for root+ Customization of set-mq-xxx scripts in /usr/local/bin to reflect MQ installations+ Customize the bash login for user "mqm" or the normal user "fulanohttps:///support/pages/node/6407850Installing in AIX - MQ 9.0.0.1 LTS, applying Fix Pack 9.0.0.11, Uninstalling MQChapter 1: How to get the installation imagesChapter 2: Create userid "mqm" and group "mqmChapter 3: Installation of MQ 9.0.0.1 (Installation1 in /usr/mqm)Chapter 4: Setting the environment for MQChapter 5: Creating a test queue manager, quick verification testChapter 6: Installation of the Fix Pack 9.0.0.11Chapter 7: Uninstallation of the Fix Pack 9.0.0.11Chapter 8: Uninstallation of the base 9.0.0.1Chapter 9: Appendices showing full output from installp for the scenarioshttps:///support/pages/node/6415777Upgrading in AIX from MQ 9.0.0.1 to MQ 9.1.0.0 LTSChapter 1: How to get the installation imagesChapter 2: T ake a backup of the queue manager data and recovery logsChapter 3: Uninstalling MQ 9.0Chapter 4: Installing MQ 9.1.0.0 LTSChapter 5: Running setmqenv to use MQ 9.1 commandsChapter 6: Creating a queue manager under 9.1Chapter 7: Upgrading an existing queue manager to MQ 9.1https:///support/pages/node/6415921Installing in AIX - MQ 9.2 LTS to coexist with MQ 9.1 LTS, including applying Fix Packs 9.1.0.7 and 9.2.0.1 Chapter 1: How to get the installation imagesChapter 2: Creating USIL and installing MQ 9.2 side-by-side to MQ 9.1Chapter 3: Need to run setmqenv to use MQ 9.1 or MQ 9.2 commandsChapter 4: Creating a queue manager under MQ 9.2Chapter 5: Migrating an MQ 9.1 queue manager to MQ 9.2Chapter 6: Installing Fix Pack 9.1.0.7 in Installation1 (default location)Chapter 7: Installing Fix Pack 9.2.0.1 in Installation2 (USIL /usr/mqm92)Chapter 8: Uninstallation of MQ 9.2Chapter 9: Deleting the USIL /opt/mqm92https:///support/pages/node/6429607Life cycle for a USIL in AIX for non-default installations of MQ++ Displaying version of operating systemDisplaying the platform and hostname+ROOT+ aglet: /downloads# uname -aAIX aglet 2 7 00F944604C00Displaying the version (high lievel)# oslevel7.2.0.0Displaying the detailed version# oslevel -s7200-05-01-2038+++ Creating group ‘mqm’ and user ‘mqm’The following steps show how to create:- a group “mqm” (gid 202),- a user “mqm” (userid 205),- under /home/mqmLogin as user: rootCreate a group called “mqm” with groupid of 202:mkgroup -'A' id='202' mqmCreate a user also called “mqm” with userid of 205 and who belongs to group “mqm”: mkuser id='205' pgrp='mqm' home='/home/mqm' mqmYou can assign the password:passwd mqmYou can use the command “id” to find out the ids and the group membership:$ id mqmuid=205(mqm) gid=202(mqm) groups=1(staff)+++ How to unpack tar.Z and tar.gz filesWhen you download MQ files from IBM Passport Advantage or IBM Fix Central, there are 2 possible suffixes for the file names:tar.Ztar.gzThe tar options are:-x T o extract members from the archive into the file system.-v T o be verbose about the operation being performed.-f FileArchive T o use the specified file archive as the tar archive.The rest of this section provides more details on how to unpack the files.a) Suffix: tar.ZThe most common ways to unpack this type of files are:a.1) One (1) long compound command (it preserves the file tar.Z)zcat MQ_V9.0_F_AIX_EIMAGE.tar.Z | tar -xvf -The output of zcat is sent to the standard output file (i.e., stdout).This allows the user to decompress the compressed tar file (leaving the compressed file unchanged), and then to expand the tar file to the current directory.The "f -" tar command line option tells the tar command to read its input from the standard input file (i.e., stdin).a.2) T wo (2) simpler commands (the tar.Z is uncompressed, leaving a .tar file) Decompress the file tar.Z by issuing:uncompress MQ_V9.0_F_AIX_EIMAGE.tarThen unpack the file:tar -xvf MQ_V9.0_F_AIX_EIMAGE.tarb) Suffix: tar.gzb.1) One (1) long compound command (it preserves the file tar.gz)gunzip -c IBM_MQ_9.1_AIX.tar.gz | tar -xvf -A common convention is to use the "-c" command line option on the gunzip command so that instead of replacing the tar.gz, the output of the command is sent to the standard output file (i.e., stdout). This allows the user to decompress the compressed tar file (leaving the compressed file unchanged), and expand the tar file to the current directory. The "f -" tar command line option tells the tar command to read its input from the standard input file (i.e., stdin).b.2) T wo (2) simpler commands (the tar.gz is uncompressed, leaving a .tar file) Decompress the file tar.gz by issuing:gunzip IBM_MQ_9.1_AIX.tar.gzThen unpack the file:tar -xvf IBM_MQ_9.1_AIX.tar+++ Creating a USIL to install in a non-default location, such as /usr/mqm92+ Create a dedicated installation directory and designate it as a USILLogin as userid root to create the USIL- Create directory for the USIL.This directory will be designated to be a USIL in a step mentioned later on.# mkdir /usr/mqm92- List the subdirectories that will have the MQ code.Note that /usr/mqm is the default location for Installation1 (in this case,it already has MQ 9.1)# ls -dl /usr/mq*dr-xr-xr-x 20 mqm mqm 4096 Jan 27 07:34 /usr/mqmdrwxr-xr-x 2 root system 256 Jan 27 09:17 /usr/mqm92- So far, we do not have any USI Ls. Let’s verify by issuing the following command:# lsusil(empty)- Make the newly created directory a USIL.Note that the directory will be known as: INSTALL_ROOT_PATH# mkusil -R /usr/mqm92 -c 'MQ 9.2' -Xmkusil: Return Status = SUCCESSWhere:-R /usr/mqm92 => usil location-c comment-X Expands the space needed automatically.- List the USILs and note the new one:# lsusilINSTALL PATH = /usr/mqm92COMMENTS = MQ 9.2- Proceed to use the USIL with installp and lslpp.- If you uninstall MQ from the USIL and if you decide to not use the USIL anymore, then delete it.Please keep in mind that rmusil does not delete the directory structure for the USIL! # rmusil -R /usr/mqm92rmusil: Return Status = SUCCESS- List the USILs (it should show no USILs)# lsusil(empty)- Remove the directory structure that was associated with the USIL:# rm -fr /usr/mqm92+++ Using installp to install and uninstallAfter using “tar -xvf” to unpack the base code to install, you need to go to the newly created directory “MQServer”# cd MQServer++ Install the base code:T o install the base code in the default location /usr/mqm:# installp -acgXYd . all- T o install the base code in a non-default location such as /usr/mqm92# installp -R /usr/mqm92 -acgXYd . allWhere “-R usil” is the path of the User Specified Installation Location (USIL) specified when the product was installed.++ Install the fix pack code on top of an existing installation:T o install the fix pack code in the default location /usr/mqm:# installp -agXYd . all- T o install the fix pack code in a non-default location# installp -R /usr/mqm92 -agXYd . allWhere “-R usil” is the path of the User Specified Installation Location (USIL) specified when the product was installed.++ Reject ALL the Updates (uninstall all the Fix Packs)From the default location:# installp -r "mqm*"From a USIL:# installp -R /usr/mqm92 -r "mqm*"++ Update from 17-Jun-2021The AIX command “install -r” that is discussed in this chapter will REJECT all th e fix packs installed in the server. If you have only 1 fix pack or if you want to delete at the same time all the fix packs, then the procedure in this chapter is fine.But if you have multiples fix packs and you want to uninstall ONL Y the LATEST one, then you need to use another procedure, which is documented in the article:https:///support/pages/node/6464857Uninstalling only the latest fix pack for MQ in AIX and leaving behind other previous fix packs++ Uninstalling the base code:T o uninstall or modify IBM MQ by using installp, enter one of the following commands:- T o uninstall an installation in the default location /usr/mqm:installp -u mqm- T o uninstall an installation in a non-default location:installp -R /usr/mqm92 -u mqmWhere “-R usil” is the path of the User Specified Installation Location (USIL) specified when the product was installed.+++ Using lslpp to list the MQ filesetsa) This is the most comprehensive command to list all the installed MQ filesets ACROSS the different USILs and including the normal location of /usr/mqm.The following shows the output when MQ is not installed at all and there are no USILs. Note that ALL is in UPPERCASE!# lslpp -R ALL -la "mqm.*"+-----------------------------------------------------------------------------+INSTALL ROOT PATH = /+-----------------------------------------------------------------------------+lslpp: 0504-132 Fileset mqm.* not installed.If there are no USILs, then this is the command.In this case, no MQ filesets are installed.# lslpp -la "mqm.*"lslpp: 0504-132 Fileset mqm.* not installed.b) Listing the file sets from the default location /usr/mqm# lslpp -la "mqm*"Fileset Level State Description----------------------------------------------------------------------------Path: /usr/lib/objreposmqm.amqp.rte 9.0.0.1 COMMITTED IBM MQ AMQP Service9.0.0.11 APPLIED IBM MQ AMQP Servicemqm.ams.rte 9.0.0.1 COMMITTED IBM MQ Advanced MessageSecurity9.0.0.11 APPLIED IBM MQ Advanced MessageSecurityc) Listing the file sets for the USIL# lslpp -R /usr/mqm92 -la "mqm*"Fileset Level State Description----------------------------------------------------------------------------Path: /usr/mqm92/usr/lib/objreposmqm.amqp.rte 9.2.0.0 COMMITTED IBM MQ AMQP Servicemqm.ams.rte 9.2.0.0 COMMITTED IBM MQ Advanced - AdvancedMessage Securitymqm.base.runtime 9.2.0.0 COMMITTED IBM MQ Runtime for Client andServerServer+++ References+++ AIX 7.1 documentationhttps:///support/knowledgecenter/en/ssw_aix_71/m_commands/mkusil.htmlAIX 7.1 / Commands / m /mkusil Command.Creates or attaches a new user-specified installation location (USIL) instance.Syntaxmkusil -R RelocatePath -c Comments [-XFa]DescriptionThe mkusil command creates or attaches a new USIL instance.A user-specified installation location (USIL) is a tracked, relocated installation path that is created by the administrator. The location is tracked by the system and can be used as an alternate installation path for packages that use relocation of file sets or software. Multiple instances or versions of the same software package can be installed on a single system by delegating each installation to a separate USIL.An existing USIL instance can be attached or detached from any given system.Each USIL instance maintains its own set of Software Vital Product Data (SWVPD) in three installp parts:InstallRoot/etc/objreposInstallRoot/usr/lib/objreposInstallRoot/usr/share/lib/objrepos++ Information about the flags for the AIX command: installpThe flags for installp mentioned in the online manual for MQ indicate to apply, commit, expand file system, agree with license, using the .toc (table of contents) file and filesets in the current directory:installp -acgXYd . allhttps:///support/knowledgecenter/en/ssw_aix_72/i_commands/installp.htm lAIX 7.2 / Commands / i /installp CommandPurposeInstalls available software products in a compatible installation package.Flags:-R path Indicates a user-specified installation location.-a Applies one or more software products or updates. This is the default action. This flag can be used with the -c flag to apply and commit a software product update when installed.-c Commits all specified updates that are currently applied but not committed. When an update is committed all other software products it is dependent on must also be committed (unless they are already in the committed state). The specified software product is dependent on any software product that is a prerequisite or corequisite of the specified product. If the requisite software products are not in the committed state, the commit fails and error messages are displayed. The -g flag can be used to automatically commit requisite software product updates.-g When used to install or commit, this flag automatically installs or commits, respectively, any software products or updates that are requisites of the specified software product. When used to remove or reject software, this flag automatically removes or rejects dependents of the specified software.-X Attempts to expand any file systems where there is insufficient space to do the installation. This option expands file systems based on current available space and size estimates that are provided by the software product package. Note that it is possible to exhaust available disk space during an installation even if the -X flag is specified, especially if other files are being created or expanded in the same file systems during an installation. Also note that any remote file systems cannot be expanded.-Y Agrees to required software license agreements for software to be installed. This flag is only valid with the -a flag.-d Device Specifies where the installation media can be found.Notice that "d ." means: current directory-r Rejects all specified software updates that are currently applied but not committed. When a software update is rejected any other software product that is dependent on it (that is, those software products that have the specified software product as a requisite) must also be rejected. The -g flag can be used to reject automatically dependent software updates.-u Removes the specified software product and any of its installed updates from the system. The product can be in either the committed or broken state.https:///support/knowledgecenter/ssw_aix_72/l_commands/lslpp.htmlAIX 7.2 /lslpp Command-R { path | ALL } Indicates a user-specified installation location.-a Displays all the information about filesets specified when combined with other flags. This flag shows all updates when combined with the -l flag and all history when combined with the -h flag.-l (lowercase L) Displays the name, most recent level, state, and description of the specified fileset.++ MQ Documentationhttps:///support/knowledgecenter/SSFKSJ_9.2.0/com.ibm.mq.ins.doc/q008600_.htm IBM MQ 9.2.x / Installing and uninstalling IBM MQ / Installing and uninstalling IBM MQ on AIX /Installing IBM MQ server on AIX.You must install the second version of the product in a location that is not the default. To create the non-default installation location you must use the mkusil command, which is available only from the command line..Install the whole product in a non-default location using the -R flag:installp -R USIL_Directory -acgXYd . allhttps:///support/knowledgecenter/SSFKSJ_9.2.0/com.ibm.mq.mig.doc/q008 010_.htmlIBM MQ 9.2.x / IBM MQ / Maintaining and migrating / Applying maintenance to IBM MQ / Applying and removing maintenance on UNIX and Linux /Applying maintenance level updates on AIX (Installation of Fix Packs)*** Note: The components will be either COMMITTED or APPLIED depending on the options chosen when applying the fix pack.https:///support/knowledgecenter/SSFKSJ_9.2.0/com.ibm.mq.mig.doc/q008 020_.htmlIBM MQ 9.2.x / IBM MQ / Maintaining and migrating / Applying maintenance to IBM MQ / Applying and removing maintenance on AIX and Linux /Reverting to the previous maintenance level on AIXT o back out ALL maintenance updates, as the user root, issue the command:installp [ -R usil ] -r "mqm*"https:///support/knowledgecenter/SSFKSJ_9.2.0/com.ibm.mq.ins.doc/q0094 20_.htmlIBM MQ 9.2.x / IBM MQ / Installing and uninstalling / Installing and uninstalling IBM MQ on AIX /Uninstalling or modifying IBM MQ on AIXT o uninstall an installation in the default location /usr/mqm:installp -u mqm+++ end。
IBM小型机操作系统日常维护手册
日常维护手册一.AIX操作系统常用命令1系统开关机AIX引导分为多用户(NORMAL)和单用户(SERVICE)引导两种。
多用户(NORMAL)引导:在主机液晶面板显示“OK”情况下,按下主机前面板的白色电源按钮;单用户(SERVICE)引导:将AIX第一张系统光盘放入CDROM,按下主机前面板的白色电源按钮,在屏幕出现显示后,第二声喇叭声响起之前,按下“5”键。
系统关机命令及顺序:1.将应用顺序及数据库系统停止;2.利用#shutdown指令;2设备查看命令a)lsdev命令该命令用来查看系统设备信息。
#lsdev –Cc 设备类型常用的设备类型有:processor, disk, adapter, tape,memory, tty等。
b)lspv命令用来查看系统硬盘信息。
#lspv 硬盘名用来查看具体硬盘的信息,#lspv -l 硬盘名用来查看硬盘上逻辑卷信息,#lspv –p 硬盘名查看该硬盘物理分区的信息。
c)lscfg命令该命令用来查看设备配置信息。
#lscfg –vl 设备名d)lsattr命令该命令用来查看设备的属性信息。
#lsattr -El设备名3逻辑卷操作命令a)lsvg该命令用来查看系统定义的VG(卷组)。
#lsvg -o查看系统当前激活的VG (卷组)。
#lsvg VG名查看该VG(卷组)的信息,包括PP大小、多少,已使用(分配)的空间,自由空间大小等信息。
#lsvg -l VG名查看该VG(卷组)已经定义的逻辑卷。
#lsvg -o |lsvg -il列出所有系统mount上的逻辑卷。
4文件系统操作命令a)lslv该命令用来列出该逻辑卷所有属性。
b)smitty crjfs该命令用来创建一个文件系统。
c)mount该命令用来查看已安装的文件系统。
#mount 文件系统名用来安装一个文件系统。
#mount -a用来安装所有定义的文件系统#unmount 文件系统名用来卸载一个文件系统。
IBM小型机AIX基本操作命令文档
1.如何移动与重命名文件要将文件和目录从一个目录移动到另一个目录,或重命名一个文件或目录,使用mv 命令。
如果将一个文件或目录移动到新的目录而不指定新的名字,则其保留原来的名字。
注意:如果不指定-i 标志,mv 命令可能会覆盖许多已存在的文件。
-i 标志会在覆盖文件之前提示确认。
而-f 标志则不会提示确认。
如果一起指定了-f 和-i 两个标志,则后一个指定的标志优先。
以下是如何使用mv 命令的示例:1.要将文件移动到另一个目录并给它一个新名字,请输入:# mv intro manual/chap1按下Enter 键。
该命令将intro 文件移动到manual/chap1 目录。
名字intro 从当前目录被除去,同样的文件在manual 目录中以chap1 的名字出现。
2.要将文件移动到另一个目录,且不改变名字,请输入:# mv chap3 manual按下Enter 键。
该命令将chap3 移动到manual/chap3.用mv 命令重命名文件可以使用mv 命令改变文件的名字而不将其移动到另一目录。
3.要重命名文件,请输入:# mv appendix apndx.a按下Enter 键。
该命令将appendix 文件重命名为apndx.a.如果名为apndx.a 的文件已存在,则旧的内容被appendix 文件的内容替换。
2.如何在系统中移动或者重命名目录?如果需要移动或者重命名目录,可以在系统中使用mvdir 命令。
例如,如果需要移动目录,可以在命令行中输入下面的命令:# mvdir book manual然后按下Enter(回车) 键。
如果manual 目录在系统中已经存在,则上面的命令会将book 目录移动到名为manual 的目录下面。
否则,book 目录会被重新命名为manual.例如,如果需要移动和重命名目录,请在命令行中输入下面的命令:# mvdir book3 proj4/manual然后按下Enter(回车)键。
AIX系统管理手册

索引2存储管理.................................................2.1概述................................................2.2物理卷定义(PV)...................................2.3巻组定义(VG).....................................2.4逻辑卷定义(LV)...................................2.5交换空间(PS).....................................2.6文件系统命令 .......................................2.7作启动镜像盘 .......................................2.8创建文件系统过程 ...................................3系统管理.................................................3.1系统错误日志(errdemon)..........................3.2系统日志(alog)......................................3.3系统状态及设备查询 .................................3.4系统关机及重启 .....................................3.5光驱加载 ...........................................3.6性能监控 ...........................................3.7服务管理 ...........................................3.8环境变量 ...........................................3.9启动常见错误码 .....................................4网络管理.................................................4.1TCPIP服务组........................................ 1命令索引2存储管理2.1概述AIX下磁盘首先是一个物理卷(PV),几个物理卷组成一个巻组(VG)。
AIX 6.1快速入门指南说明书
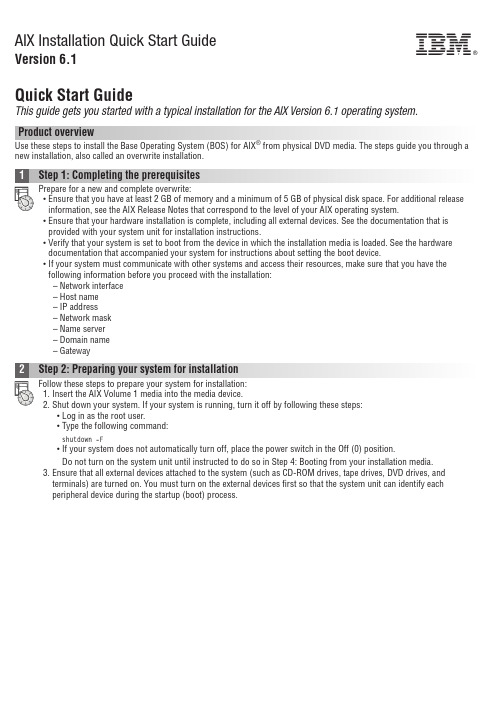
AIX Installation Quick Start GuideVersion 6.1Quick Start GuideThis guide gets you started with a typical installation for the AIX Version 6.1operating system.Product overviewUse these steps to install the Base Operating System (BOS)for AIX ®from physical DVD media.The steps guide you through a new installation,also called an overwrite installation.Prepare for a new and complete overwrite:v Ensure that you have at least 2GB of memory and a minimum of 5GB of physical disk space.For additional release information,see the AIX Release Notes that correspond to the level of your AIX operating system.v Ensure that your hardware installation is complete,including all external devices.See the documentation that is provided with your system unit for installation instructions.v Verify that your system is set to boot from the device in which the installation media is loaded.See the hardware documentation that accompanied your system for instructions about setting the boot device.v If your system must communicate with other systems and access their resources,make sure that you have the following information before you proceed with the installation:–Network interface–Host name–IP address–Network mask–Name server–Domain name–GatewayFollow these steps to prepare your system for installation:1.Insert the AIX Volume 1media into the media device.2.Shut down your system.If your system is running,turn it off by following these steps:v Log in as the root user.v Type the following command:shutdown -Fv If your system does not automatically turn off,place the power switch in the Off (0)position.Do not turn on the system unit until instructed to do so in Step 4:Booting from your installation media.3.Ensure that all external devices attached to the system (such as CD-ROM drives,tape drives,DVD drives,and terminals)are turned on.You must turn on the external devices first so that the system unit can identify each peripheral device during the startup (boot)process.If you have not set up your ASCII terminal,set the communications,keyboard,and display e the followingcriteria and your terminal reference documentation to set the communications,keyboard,and display options.The following settings are typical,but your terminal might have different option names and settings than these options: Communication Options:Options SettingsLine speed(baud rate)9600Word Length(bits per character)8Parity no(none)Number of stop bits1Interface RS-232C(or RS-422A)Line control IPRTSKeyboard and display options:Options SettingsScreen normalRow and Column24x80Scroll jumpAuto LF(line feed)offLine Wrap onForcing Insert line(or both)Tab fieldOperating Mode echoTurnaround Character CREnter returnReturn new lineNew Line CRSend pageInsert Character spaceFollow this procedure for booting from your installation media:1.Turn on the system unit power switch.2.When the system beeps twice,press5on your ASCII terminal.The word keyboard is shown when the beeps occur.3.If you have more than one console,each one might display a panel that directs you to press a key to identify yoursystem console.A different key is specified for each console that is displayed on this panel.If this panel opens,press the specified key only on the console that you want to use for the installation.(The system console is the keyboard and display device that is used for installation and system administration.)4.Select the language that you prefer to use during installation,and press Enter.1.Display the installation settings before you install the BOS,by typing2in the Choice field to select2Change/Show2.Verify the default installation settings from the Overwrite Installation and Settings panel.3.If the installation and system settings are correct,type0in the Choice field and press Enter.Confirm that theselections on the installation summary panel are correct,and press Enter to begin the BOS installation.The system automatically reboots after the system installation is complete.Go to Step9:Finishing the BOS installation.If your installation settings are not correct,or you want to change the installation settings,go to Step6.Changing the installation settings.To change the installation settings,complete the following steps:1.2.When the Change Method of Installation panel is displayed,type1New and Complete Overwrite Installation and pressEnter.When the Change Disk(s)Where You Want to Install panel is displayed,you can change the destination disk for the3.If the default settings shown are correct,type0in the Choice field and press Enter.To change the destination disk,complete the following steps:a.Type the number for each disk where you want to install the BOS in the Choice field and press Enter.Do not pressEnter a final time until you have finished selecting all disks.If you need to deselect a disk,type its number asecond time and press Enter.b.To finish selecting disks,type0in the Choice field and press Enter.The Installation and Settings panel is displayedwith the selected disks listed under System Settings.1.Type2(Primary Language Environment Settings)in the Choice field on the Installation and Settings panel.2.Select the appropriate set of cultural convention,language,and keyboard options.Most of the options are apredefined combination;however,you can define your own combination of options.3.To select a predefined Primary Language Environment,type the corresponding number in the Choice field and pressEnter.To configure your own Primary Language Environment,complete the following steps:a.Select More Choices.b.Page through the choices and select the Create Your Own Combination option.c.On the Set Primary Cultural Convention panel,type the corresponding number in the Choice field and press Enter.d.On the Set Primary Language panel,type the number in the Choice field that corresponds to your choice for theprimary language and press Enter.e.On the Set Keyboard panel,type the number in the Choice field that corresponds to the keyboard that is attachedto the system and press Enter.To verify your BOS installation settings:1.2.Press Enter to begin the BOS installation.installed.The system automatically reboots.The Installation Assistant guides you through the configuration tasks. Related informationFor more information,see the following resources:v For additional release information,see the AIX Release Notes that corresponds to your level of the AIX operatingsystem.v For late-breaking information,which might include information about the configuration process and installed software, see the readme files.v For more detailed installation notes,see the Installation and migration topic collection in the IBM®AIX6.1Information Center(/infocenter/aix/v6r1/index.jsp).AIX Version6.1Licensed Materials-Property of IBM.©Copyright IBM Corp.2012,ernment Users Restricted Rights-Use,duplication or disclosure restricted by GSA ADP Schedule Contract with IBM Corp.IBM,the IBM logo,and are trademarks or registered trademarks of International Business Machines Corp.,registered in many jurisdictions worldwide.Other product and service names might be trademarks of IBM or other companies.A current list of IBM trademarks is available on the web at“Copyright and trademark information”(/legal/copytrade.shtml).Document Number:SA23-2248-04Printed in USA。
AIX操作系统运行维护手册-Ver1.0
AIX操作系统工作手册文件编号版 本0.1作成日2023年10月24日修订日发布日修 改 履 历序号版本修改日期章节号修改记录修改人批准人10.12023/10/23创建修游书目1引言 (5)1.1编写目的 (5)1.2适用范围 (5)1.3预期读者 (5)1.4文档说明 (5)2操作系统健康性检查 (6)2.1系统日志 (6)系统硬件错误日志检查 (6)系统全部错误日志检查 (7)系统错误日志Core_dump检查 (8)系统错误日志DELAYED_INT检查 (9)系统邮件日志内容检查 (9)系统邮件日志大小检查 (11)登录失败日志文件大小检查 (11)登录日志文件大小检查 (12)su日志文件大小检查 (13)异样终止的vi日志文件大小检查 (13)2.2系统性能 (14)系统CPU运用率检查 (14)查看占用CPU资源最多的进程 (17)系统内存运用率检查 (18)系统占用内存资源最多的进程 (20)系统磁盘繁忙程度检查 (22)2.3交换空间 (23)交换空间运用率检查 (23)2.4进程状态 (24)僵尸进程检查 (24)2.5网络状态 (24)网卡状态检查 (24)路由状态检查 (25)网络传输检查 (26)网络连接数量及状态检查 (30)主机解析检查 (32)2.6存储状态 (32)HBA卡状态检查 (32)2.7文件系统状态 (33)文件系统运用率检查 (33)文件系统挂载检查 (34)NFS文件系统挂载检查 (35)dump设备空间检查 (35)2.8逻辑卷状态 (36)Rootvg的剩余空间检查 (36)PV状态检查 (37)是否存在stale的pp检查 (37)2.9系统平安 (38)系统登录状况检查 (38)特权用户检查 (39)Su操作次数检查 (40)失败登录记录检查 (40)2.10双机状态 (41)双机心跳状态检查 (41)Hacmp.out日志检查 (42)Cluster.log日志检查 (42)双机节点状态检查 (43)2.11其它 (44)操作系统时间检查 (44)3操作系统异样快速排查规范 (44)3.1系统日志检查 (45)3.2CPU运用率检查 (45)3.3内存运用率检查 (45)3.4I/O运用率检查 (46)3.5网络检查 (46)3.6交换区检查 (47)3.7文件系统检查 (47)3.8双机检查 (48)1引言1.1编写目的为了保证项目组所运维系统的持续健康运行,降低操作系统的出错几率,并在出现问题时刚好且有效的进行排查、处理,故编写本手册。
AIX 7.2快速入门指南说明书
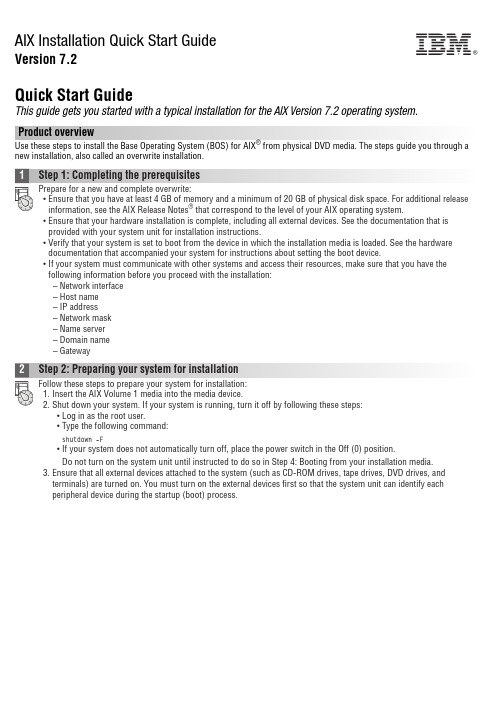
AIX Installation Quick Start GuideVersion 7.2Quick Start GuideThis guide gets you started with a typical installation for the AIX Version 7.2 operating system.Product overviewUse these steps to install the Base Operating System (BOS) for AIX®from physical DVD media. The steps guide you through a new installation, also called an overwrite installation.1Step 1: Completing the prerequisitesPrepare for a new and complete overwrite:v Ensure that you have at least 4 GB of memory and a minimum of 20 GB of physical disk space. For additional release information, see the AIX Release Notes®that correspond to the level of your AIX operating system.v Ensure that your hardware installation is complete, including all external devices. See the documentation that is provided with your system unit for installation instructions.v Verify that your system is set to boot from the device in which the installation media is loaded. See the hardware documentation that accompanied your system for instructions about setting the boot device.v If your system must communicate with other systems and access their resources, make sure that you have the following information before you proceed with the installation:–Network interface–Host name–IP address–Network mask–Name server–Domain name–Gateway2Step 2: Preparing your system for installationFollow these steps to prepare your system for installation:1.Insert the AIX Volume 1 media into the media device.2.Shut down your system. If your system is running, turn it off by following these steps:v Log in as the root user.v Type the following command:shutdown-Fv If your system does not automatically turn off, place the power switch in the Off (0) position.Do not turn on the system unit until instructed to do so in Step 4: Booting from your installation media.3.Ensure that all external devices attached to the system (such as CD-ROM drives, tape drives, DVD drives, andterminals) are turned on. You must turn on the external devices first so that the system unit can identify eachperipheral device during the startup (boot) process.IBM®3Step 3: Setting up an ASCII terminalIf you have not set up ASCII terminal, set the communications, keyboard, and display options. Use the following criteriaand your terminal reference documentation to set the communications, keyboard, and display options. The following settings are typical, but your terminal might have different option names and settings than those listed here:Communication Options:Options SettingsLine speed(baud rate)9600Word Length(bits per character)8Parity no(none)Number of stop bits1Interface RS-232C(or RS-422A)Line control IPRTSKeyboard and display options:Options SettingsScreen normalRow and Column24x80Scroll jumpAuto LF(line feed)offLine Wrap onForcing Insert line(or both)Tab fieldOperating Mode echoTurnaround Character CREnter returnReturn new lineNew Line CRSend pageInsert Character space4Step 4: Booting from your installation mediaFollow this procedure for booting from your installation media:1.Turn on the system unit power switch.2.When the system beeps twice, press 5 on your ASCII terminal. The word keyboard is shown when the beeps occur.3.If you have more than one console, each one might display a panel that directs you to press a key to identify yoursystem console. A different key is specified for each console that is displayed on this panel. If this panel opens, press the specified key only on the console that you want to use for the installation. (The system console is the keyboard and display device that is used for installation and system administration.)4.Select the language that you prefer to use during installation, and press Enter.5Step 5: Verifying the installation settingsFollow this procedure to verify your installation settings:1.Display the installation settings before you install the BOS, by typing 2 in the Choice field to select 2 Change/Show2.Verify the default installation settings from the Overwrite Installation and Settings panel.3.If the installation and system settings are correct, type 0 in the Choice field and press Enter. Confirm that theselections on the installation summary panel are correct, and press Enter to begin the BOS installation. The system automatically reboots after the system installation is complete. Go to Step 9: Finishing the BOS installation.If your installation settings are not correct, or if you want to change the installation settings, go to Step 6. Changing the installation settings.6Step 6: Optional: Changing the installation settingsTo change the installation settings, complete the following steps:1.2.When the Change Method of Installation panel is displayed, type 1 for New and Complete Overwrite Installation andpress Enter.When the Change Disk(s) Where You Want to Install panel is displayed, you can change the destination disk for the3.If the default settings shown are correct, type 0 in the Choice field and press Enter.To change the destination disk, complete the following steps:a.Type the number for each disk where you want to install the BOS in the Choice field and press Enter. Do not pressEnter a final time until you finish selecting all disks. If you must deselect a disk, type its number a second time andpress Enter.b.To finish selecting disks, type 0 in the Choice field and press Enter. The Installation and Settings panel is displayedwith the selected disks listed under System Settings.7Step 7: Changing Primary Language EnvironmentTo change the primary language that is used by this installation:1.Type 2 Primary Language Environment®Settings in the Choice field on the Installation and Settings panel.2.Select the appropriate set of cultural convention, language, and keyboard options. Most of the options are apredefined combination; however, you can define your own combination of options.3.To select a predefined Primary Language Environment, type the corresponding number in the Choice field and pressEnter.To configure your own Primary Language Environment, complete the following steps:a.Select More Choices.b.Page through the choices and select the Create Your Own Combination option.c.On the Set Primary Cultural Convention panel, type the corresponding number in the Choice field and press Enter.d.On the Set Primary Language panel, type the number in the Choice field that corresponds to your choice for theprimary language and press Enter.e.On the Set Keyboard panel, type the number in the Choice field that corresponds to the keyboard that is attachedto the system and press Enter.8Step 8: Verifying BOS installation settingsTo verify your BOS installation settings:1.2.Press Enter to begin the BOS installation.9Step 9: Finishing the BOS installationAfter the base runtime environment is installed, status information is displayed about other software that is beinginstalled. The system automatically reboots.The Installation Assistant guides you through the configuration tasks.Related informationFor more information about installing AIX, see the following resources:v For additional release information, see the AIX Release Notes that corresponds to your level of the AIX operatingsystem in the IBM®Knowledge Center (/support/knowledgecenter/ssw_aix_72/com.ibm.aix.base/ releasenotes_kickoff.htm).v For more detailed installation documentation, see the AIX Version 7.2 installation and migration topic collection in the IBM Knowledge Center (/support/knowledgecenter/ssw_aix_72/com.ibm.aix.install/insgdrf-kickoff.htm).AIX Version 7.2 Licensed Materials - Property of IBM. © Copyright IBM Corp. 2015. U.S. Government Users Restricted Rights - Use, duplication or disclosure restricted by GSA ADP Schedule Contract with IBM Corp.IBM, the IBM logo, and ®are trademarks or registered trademarks of International Business Machines Corp., registered in many jurisdictions worldwide. Other product and service names might be trademarks of IBM or other companies. A current list of IBM trademarks is available on the web at “Copyright and trademark information” (/legal/copytrade.shtml).Document Number:SA23-2267-03Printed in USA。
12_538_AIX_用户手册

AIX用户手册网络与计算机应用部2008-6-10编者的话 (1)前言 (2)第一章AIX操作系统简介 (3)1.1AIX操作系统的主要特点 (3)1.1.1遵循众多工业标准 (3)1.1.2先进的系统设计 (3)1.1.3强大的通讯能力 (4)1.1.4终端支持 (5)1.2AIX系统架构 (5)1.3命令语言解释器(KSH) (5)1.4AIX文本编辑器 (5)1.5AIX系统中的DOS工具 (5)1.6AIX系统的用户界面 (6)1.7联机帮助 (6)1.8AIX的几个重要技术 (8)1.8.1LVM-Logical Volume Manager (8)1.8.2JFS-Journal File System (8)1.8.3系统管理接口工具(smit) (8)第二章AIX操作系统基本命令 (11)2.1系统的登录和退出 (11)2.2PASSWORD (11)2.3MKDIR、RM、MV和CD (11)2.4LS (12)2.5DATE (12)2.6CAL (12)2.7CAT (12)2.8WC (12)2.9CLEAR 、ECHO和BANNER (13)2.10WHO (13)2.11FINGER (13)2.12MAIL (13)2.13PS (14)2.14KILL (15)2.15FIND (15)2.16GREP (16)2.17CUT (16)2.18SORT (17)2.19HEAD 和TAIL (18)2.20DOS工具 (18)2.21管道与重定向 (19)2.22LSDEV (19)2.23LSPV (21)2.24LSATTR (22)2.25CRON后台进程 (23)AIX用户手册2.26AT (24)2.27BATCH (24)2.28VMSTAT (25)2.29IOSTAT (26)2.30NETSTAT (27)第三章VI编辑器 (29)3.1VI 简介 (29)3.2VI的进入与离开 (29)3.3VI 的文本输入模式 (30)3.4VI 基本编辑命令 (30)3.5文件处理子命令 (32)第四章文件或目录的备份与恢复 (33)4.1TAR (34)4.2CPIO (35)4.3DD (37)第五章KSH脚本简介 (38)5.1K SH调试 (38)5.1.1命令行方式 (38)5.1.2set 语句 (38)5.1.3解释器参数 (39)5.2调试参数用法举例: (39)5.2.1未置变量退出和立即退出 (39)5.2.2shell程序的跟踪 (39)5.3例子 (40)5.3.1函数的语法: (40)5.3.2if条件语句: <> (40)5.3.3test测试命令 (41)5.3.4预定义变量 (42)第六章程序的编译与执行 (43)6.1用户文件的编译和执行 (43)6.1.1串行程序编译方法 (44)6.1.2OpenMP编译 (44)6.1.3MPI编译 (44)6.1.4混合模式编译 (44)6.2使用L OAD L EVELER提交作业 (44)6.2.1作业卡的编写,编写job.cmd文件,文件内容如下所示: (44)6.2.2串行作业卡 (44)6.2.3OpenMp作业卡 (45)6.2.4MPI和混合作业的作业卡 (45)6.2.5提交loadleveler作业 (46)6.2.6察看作业状态 (46)6.2.7察看loadleveler的整个执行状态 (47)6.2.8取消Loadleveler提交的作业 (47)6.2.9参考文献: (48)编者的话国家海洋环境预报中心于2005年4月引进美国IBM公司生产的Cluster 1600高性能集群计算机系统,此系统由三台IBM P690服务器、一台P630服务器、FastT700高性能磁盘阵列、一个高速交换机和操作控制台组成。
IBM 内部员工操作手册 AIX HACMP 安装配置详细文档

HACMP 5.4安装实用手册1.HACMP 5.4的安装步骤a)安装前提i.如果操作系统为AIX 5.2或者AIX 5.3时,需检查:AIX 5L Version RSCT Version RSCT FilesetsAIX 5L v.5.3 plus ML 1 2.4.2 pat.basic.hacmp 2.4.2.0pat.clients.hacmp 2.4.2.0rsct.core.sec 2.4.2.1rsct.core.rmc 2.4.2.1AIX 5L v.5.2 plus ML 5 2.3.6 pat.basic.hacmp 2.3.6.0pat.clients.hacmp 2.3.6.0rsct.core.sec 2.3.6.1rsct.core.rmc 2.3.6.1ii.此次安装的AIX 环境为AIX 5.3 ML6b)安装过程在安装HACMP的过程中,除HAview和HA Tivoli这两个安装包不装外,其他都正常安装c)安装HACMP补丁下载地址:/support/fixcentral/2.HACMP 5.4配置前的规划工作:Cluster Name Byh_clusterNode Name HA1 HA2IP Label HA1_boot HA1_svc HA1_stb HA2_boot HA2_svc HA2_stb IP Address 10.10.10.102 9.9.9.102 192.168.0.1 10.10.10.103 9.9.9.103 192.168.0.2 Persistent IP HA1_per:9.181.1.100 HA2_per:9.181.1.101HeartBeat Hb_HA1: /dev/hdisk1 Hb_HA2: /dev/hdisk2Res. Grp. Name Service IP Volume GroupApp NameByh_rg HA1_svcHA2_svcSharevg None3.HACMP5.4配置方法:a)配置两台机器的/etc/hosts文件:分别在/etc/hosts中加入:b)在HA1上,配置网路连接:i.配置HA1上boot IP----ent0上ii.配置HA1上stb IP----ent1上在HA2节点上也要将boot IP和stb IP也要提前配置好c)建立共享VG---sharevg和用于磁盘心跳的VG---convg这两个VG的* Activate volume group AUTOMATICALLY at system restart选项必须为No 建好convg后,在Node1上执行/usr/sbin/rsct/bin/dhb_read -p hdisk1 -r命令在Node2上执行/usr/sbin/rsct/bin/dhb_read -p hdisk1 -t命令,确认可以正常通讯。
IBM小型机维护手册

IBM小型机维护手册一、AIX操作系统简介AIX操作系统是有IBM公司研发的Unix操作系统,在技术、功能上又有许多增强:模块化的内核;动态调整内核;多线索内核;高效率的输入/输出;实时处理;安全性能;日志文件系统;存储管理(包括镜像技术和条块化技术);系统管理;在线帮助查询。
二、设备管理2.1块设备(Block Device):采用结构化的随机访问方式的具有缓冲的设备。
块设备通常为磁盘文件系统(Disk File System)。
2.2字符设备(Character Device):裸设备(Raw Device),是无缓冲的连续、定向流设备。
字符设备通常为系统周边设备,如终端、打印机等。
2.3主设备号(Major Number):标识系统内核中的设备驱动号。
2.4次设备号(Minor Number):标识特殊的设备类型。
ODM数据库由预定义数据库(Predefined Database)和定制数据库(Customized Database)组成。
用于存储系统中所有逻辑设备的信息及其属性。
其中:预定义数据库:包含所有基于系统配置的系统可支持的设备(Supported Devices)的配置数据。
定制数据库:包含当前系统中所有定义的(Defined Devices)和可用的(Available Devices)设备配置数据。
设备的类(Class):标识设备设备的子类(Subclass):标识设备如何连接至系统设备的类型(Type):标识设备的类型设备的名字(Name):标识逻辑设备名# lsdev 设备列表# lsattr 设备属性列表# chdev 更改设备属性# lscfg 显示当前系统中设备的配置信息2.5设备的配置:# mkdev –c Class –s Subclass –t Type –p Parent_Adapter –w Connection_Location–a Attribute=value-c Class:指定设备所属的类(如:tape)-s Subclass:指定设备所属的子类(如:scsi)-t Type:指定设备所属的类型(如:150mb)-p Parent_Adapter:指定设备的父卡号(如:scsi0)-w Connection_Location:指定设备连接在父卡上的位置或地址(如:5,0)-a Attribute=value:指定设备的属性(如:ret=no)2.6设备的状态:Undefined:系统中没有此设备的存在记录(设备信息存储于预定义数据库中)(Supported)Defined:系统已为此设备分配了逻辑设备名和端口,但系统当前不能访问此设备(设备信息存储于定制数据库中)(Defined)Available:设备在系统中已经定义了并且可以使用(设备信息存储于定制数据库中)(Available)# cfgmgr自动配置系统中的自适应设备(Self-Configuring Devices)三、存储管理3.1AIX中逻辑存储的限制卷组(VG) 255个/每个系统物理卷(PV)32个/每个卷组物理分区(PP)1016个/每个物理卷逻辑卷(LV)256个/每个卷组逻辑分区(LP)32512个/每个逻辑卷AIX系统逻辑卷:Paging Space:/dev/hd6,用于存储虚拟内存中信息的固定的磁盘空间Journal Log:/dev/hd8,用于记录系统中文件系统结构的改变Boot LV:/dev/hd5,用于系统启动映象的物理上连续的磁盘空间AIX系统文件系统:/(root):系统启动进程所需的重要的系统设备信息及应用程序的存储空间/usr:/dev/hd2,系统命令、信息库以及应用程序的存储空间/var:/dev/hd9var,系统的日志文件和打印数据文件的存储空间/home:/dev/hd1,系统中用户数据的存储空间/tmp:/dev/hd3,系统临时文件和用户工作的存储空间3.2LVM操作命令:# lsvg 查看系统中属于活动VG的LV的信息# lslv 查看属于指定LV的信息时,系统将给出指定LV的LP数及其拷贝数。
IBM-AIX操作系统的安装
AIX 操作系统的安装步骤一、AIX 操作系统的安装步骤二、扩展一个文件系统的大小三、安装Bundle四、安装Oracle 所需要的操作系统包五、安装操作系统补丁六、如何做系统镜像七、更改主机名八、如何给网卡配置IP 地址九、修改系统的配置参数一、AIX 操作系统的安装步骤我们使用来安装操作系统的。
主机接好电源,主机不开机(开关下的绿灯闪烁,LED 显示01 N V=F的状态。
T根据提示按2确认控制台(有时也可能提示按其他数字键如1或0等)一会会出现如下图所示界面,这时可以按5键直接进入光盘引导(一般机器出厂设置都是默认从光盘起),如果不能确定可以不按5,按1键进入如下图所示界面下面则选择5 S elect Boot Options进入下图所示界面按1 (Select Install/Boot Device) 并按Enter回车键进入下图所示界面按3 CD/DVD并按Enter回车键进入下图所示界面按4 IDE 并按Enter回车键进入下图所示界面按1并按Enter回车键进入下图所示界面按2并按Enter回车键进入下图所示界面按1并按Enter回车键进入下图所示界面前面黑色字体所说的按5如果能够直接进入也会进入如下图所示界面等待片刻,会出现绿色字体的界面如下图所示则根据提示键入1(注意根据提示键入,有时可能时提示键入别的数字键)并回车,确认控制台,一会出现如下图所示界面、选择“1”,安装期间使用英语。
选择“2”,改变安装设置。
选择“1”,系统设置选择“1”,进行新的完全安装。
选择安装到那块硬盘,通常是选择hdisk0。
选中的磁盘前有三个“>>>”符号选择完硬盘回车继续又出现如下图所示如果2中的语言不是English(United States)请进入2选择第48项的英文的1那一项即为English(United States),选择完毕进入3中More options 如下图根据用户需求选择系统内核和JFS 类型,然后再选择“7”选择“3”,把Server Bundle 安装上。
IBM AIX 系统管理指南 第 1 部分:启动过程(上)

IBM AIX 系统管理指南第1 部分:启动过程(上)IBM AIX 系统管理指南: 第 1 部分:启动过程启动过程启动过程包含下面的一些步骤:? ? ? ? ?? 启动一个系统的初始步骤是上电自检。
其目的是验证基本硬件是否处于正常的工作状态。
同时初始化内存、键盘、通信,以及音频设备。
您可以看到在屏幕上显示了所有的这些设备。
在这个步骤中,您可以按下功能键,以选择不同的启动列表。
这个阶段中所显示的LED 值是模型特定的。
硬件和软件方面的问题都可能使得系统无法启动。
注意:基于MCI 体系结构的旧系统在这个步骤之前还将执行一个附加的步骤,即所谓的内建自检。
对于基于PCI 体系结构的系统,不再需要执行这个步骤。
系统只读存储器对于每种类型的系统来说都是特定的。
它是启动AIX 5L Version 所必需的,但是它并不为启动工作构建所需的数据结构。
它将定位和加载引导(bootstrap) 代码。
系统ROS 中包含通用的启动信息,并且是独立于操作系统的。
软件ROS构成了IPL 控制块,它与AIX 5L Version 是兼容的,用于接收控制和构建AIX 5L 的特定启动信息。
将在内存中定位一种特殊的文件系统,并创建一种名为RAMFS 的文件系统。
然后,软件ROS 定位、加载、并将控制权交给AIX 5L 启动逻辑卷(BLV)。
软件ROS 是基于计算机类型的AIX 5L 信息,并且负责完成计算机准备工作,以使得它能够启动AIX 5L 内核。
可以从/usr/lib/boot 目录中获得BLV 中所包含的文件的完整列表。
其中最重要的组件包含以下内容:o AIX 5L 内核o 在启动过程中调用的启动命令,如bootinfo 和cfgmgr o ODM 的一个简化的版本。
在hd4 可供使用之前,需要对许多设备进行配置,所以它们的相应方法必须存储在BLV 中。
这些设备都被标记为预定义设备(PdDv) 中的基础设备。
o 脚本加载AIX 5L 内核,并接管控制权。
IBM小型机AIX基本操作命令文档

IBM小型机AIX基本操作命令文档
一、文件操作
1.ls 显示文件列表
语法:ls [-l,-a,-d,-t,-F] [文件或目录]
-l以长列表模式显示文件或目录的详细信息
-a显示文件夹中所有文件和目录,包括以.开头的文件
-d显示目录本身
-t按时间排序显示文件
-F显示文件类型
2.cd 切换目录
语法:cd [路径]
将当前目录改变到路径 path:cd .. 回到上一级目录;cd / 返回到根目录;cd 切换到当前用户的宿主目录
3.mkdir 创建目录
语法:mkdir [-p] [路径]
-p递归建立所有的目录,若中间目录不存在则创建
例:mkdir -p /tmp/dir1/dir2/dir3
4.rm 删除文件或目录
语法:rm [-i,-f] [文件或目录]
-i交互模式,每删除一个文件或目录前都会要求用户确认
-f强制删除模式,不需要交互,但有可能会错误的删除文件
注:rm 默认只能删除普通文件,不能删除目录。
必须使用 -r 参数才能够递归删除目录
5.touch 更改文件时间
语法:touch [文件名]
此命令可以更改指定文件创建时间和最后修改时间,但不影响文件内容
6.cp 复制文件
语法:cp [-i,-R,-f] [源文件] [目标文件]
-i交互模式,每次复制前都会要求用户确认
-R递归模式,复制目录时会将其中的所有文件复制
-f强制复制模式,不需要交互,但有可能会错误的复制文件。
IBM小型机AIX操作系统安装指导书

IBM 小型机操作系统安装指导书V1.0-201006001-A上海楚星信息技术有限公司版权所有侵权必究修订记录目录第1章软件相关概念 (4)1.1 基本介绍 (4)1.2 重要概念介绍 (4)1.2.1软件产品的命名格式: (4)1.2.2 FILE_SET (4)1.2.3 PACKAGE (4)1.2.4 LPP (5)1.2.5 ML (5)1.2.6 RML (5)1.2.7 PTF & APAR (6)第2章硬件安装及微码 (8)2.1 安装前准备 (8)2.1.1检查机房环境 (8)2.1.2检查设备的外包装 (8)2.1.3开箱 (8)2.1.4 清点设备 (8)2.2硬件连接 (8)2.2.1主机定位 (8)2.2.2 主机连接 (9)2.3 上电检测 (9)2.4 升级系统Firmware微码 (10)2.4.1 检查系统使用的Firmware版本 (10)2.4.2下载并升级最新的Fireware程序 (10)第3章软件安装和配置 (11)3.1 软件安装前提 (11)3.2 操作系统软件安装过程 (11)3.2.1 安装基本操作系统包(BOS) (11)3.2.2 系统自动重启,并自动运行配置助手 (26)3.2.3 补充安装需要的包 pakage (35)3.2.4 安装 RML(ML) 推荐维护包 (维护包) (39)3.2.5安装必要的APAR 以及 PTF(instfix –I ,smitty update_all) (45)3.2.6系统备份mksysb –i /dev/rmt0 (45)3.2.7重启系统 (46)3.3安装HACMP 机群软件 (46)3.3.1安装HACMP软件(smitty installp) (46)3.3.2安装HACMP软件补丁包(smitty installp) (47)3.3.3再次系统备份mksysb –i /dev/rmt0 (47)3.3.4重启系统 (47)3.4 AIX操作系统配置 (47)3.4.1修改主机名 (47)3.4.2修改时间 (47)3.4.3检查网卡及设置 IP地址 (47)3.4.4如何做rootvg镜象: (48)3.4.5如何将操作系统内核改为64Bit (48)3.4.6如何清除小型机上由于告警造成的黄灯 (49)3.4.7如何修改系统参数 (49)3.4.8如何设置本地磁盘空间 (53)3.4.9如何设置PAGINGSPACE (54)3.4.10如何设置系统提示符带主机名及路径 (54)3.4.11如何CDE配置环境 (54)第4章常用AIX命令 (54)第5章常用网址 (55)关键词:AIX HACMP 安装指导书摘要:缩略语清单:参考资料清单:《AIX 5L 系统管理技术》电子工业出版社IBM Redbook: /说明:本文档仅供上海楚星信息技术有限公司内部参考,作为公司技术文档,请勿外传!IBM 小型机操作系统安装指导书第1章软件相关概念1.1 基本介绍AIX 操作系统系统是 IBM 公司专为 IBM pSeries 和 RS6000服务器开发的unix操作系统。
aix5.3操作系统安装:入门(IBM官方文档)
"bZ9C>J O0d'V D z7.0,k D A Z113D:y w;P D E"#Z;f(2004j8B)>f>J CZ AIX5L V5.3M>z7D y P s x"P f,1=Z B f>P m P y w*9#>v f o D s f a)K;E A_b{m#g{C m Q}%,r+b{D y:IBM P z+>O#V+>:/?,P z O#P 4#P7333E p2c!10%,J~`k:200021#*(}g S D N=a)b{,k9C K L5r X x X7: ctscrcf@#R G I\a9C z a)D N N E",x^k T z P#N N p N#Copyright(c)1993,1994Hewlett-Packard CompanyCopyright(c)1993,1994International Business Machines Corp.Copyright(c)1993,1994Sun Microsystems,Inc.Copyright(c)1993,1994Novell,Inc.All rights reserved.>z70d`X D5\f(#$"R Z m I$B V",S x^F T d9C"4F"V"M4`k#4 -i f Z(,>z7r`X D5D N N?V<;C T N N N=N N==x P4F#RESTRICTED RIGHTS LEGEND:Use,duplication,or disclosure by the United States Government is subject to the restrictions set forth in DFARS252.227-7013(c)(1)(ii)and FAR52.227-19.>v f o04V41a)>v f o,;=P N N V`D(^[G w>D9G5,D)#$,|(+;^Z5,D P X G V("J z M J CZ3V X(C>D#$#>v f o P I\|,<u=f;;<7DX=r!"m s#K&D E"+(Z|D;b)|D+`k>J O D B f> P#>J O P h v D z7M/r L r I T f1D x M/r|D,x;m P(*#©Copyright International Business Machines Corporation2002,2004.All rights reserved.?<X Z>i (v)>i D Z] (v);v T> (v)AIX P D s!4x V (v)ISO9000 (v)`X v f o (v)Z1B y>Y w5320i\ (1)g S m I$-i (1)Z2B+B D M j+2G20 (3)Z;=<853 (3)Z~=S AIX z7CD}< (3)Z}=h C M i$20h C (4)Z D=20s d C53 (5)Z3B(F20 (7)Z;=<853 (7)Z~=S AIX z7CD}< (8)Z}=i$(F20h C"*<20 (8)Z D=20s i$53d C (9)=<.y w (11)L j (12)©Copyright IBM Corp.2002,2004iiiiv AIX5L f>5.3:Y w5320:k EX Z>i>i*53\m1a)P X g N Z@"53P9C CD-ROM h820M d C AIX Y w53D E"#>v f o 2I T Z,Y w53;p0k D D5CD P C=#>i D Z]>i D>f>4|,<u|D#Z]k H0f>G`,D#;v T>>i9C T B D;v T><(:V e j6|n"S}L"X|V"D~"a9"?<M d|{F I53$(e D n?#,1j6C'!q D<N T s,H g4%"j)M<j#1e j6IC'a)5J{F M5D N}#H V V e j6X(}]5D>}"k z I\4=D D>T>`F D>}"k z w*L r1I\`4D?V L r z k`F D>}"4T53D{"r z&5J d k D E"#AIX P D s!4x VAIX Y w53P D y P Z]<G x V s!4D,b b6E|x V s4M!4V8#}g,z I T9C ls|n 4P v D~#g{d k LS,53+l&z:04R=1C|n#,y,FILEA"FiLea M filea G}v;,D D~{,49|G$t Z`,D?<o#*K\b}p4P;k*D Y w,k\G7#z9C K}7D s!4 V8#ISO9000>z7D*"M z z P9C K ISO9000J?O$e5#`X v f oB P v f o+o z z\m AIX73:v6AIX5L V5.3208O k N<s+7v6AIX5L V5.32+8O7v6AIX5L V5.353\m E n:Y w53k h87v6AIX5L V5.353\m8O:Y w53k h87v6AIX5L V5.353\m8O:(E k x g7v6AIX5L V5.3(C`L E n:L r`4k w T7v6AIX5L V5.3(E`L E n7v6AIX5L V5.3T\\m8O7v Performance Toolbox Version2and3for AIX:Guide and Referencev6AIX5L V5.3|n N<s+7v6AIX5L V5.3D~N<s+7v6AIX5L V5.3J c m7©Copyright IBM Corp.2002,2004vv6AIX5L V5.353C'8O:Y w53k h87 v6AIX5L V5.353C'8O:(E k x g7vi AIX5L f>5.3:Y w5320:k EZ1B y>Y w5320i\>8O a)K j I AIX 5.2y>Y w53(BOS)20y h=h D E v#BOS20L r W H V4K P1D bos3s,;s20J1D D~/,b!v Z z G S<N539G S ASCII 5320#y]z!q D o T M y20z w D2~d C,20L r T/X20*s D{"D~/M h8D~ /#I T9C B P=(20AIX:B(M j+2GK=(Z B D z w O20AIX 5.2r_j+2G53O f Z D N N BOS f>#(F C=(S AIX4.2r AIX5.2D|B f>|B#(F20#t s`}D~53,|,y m i"_-mM53d C D~#|2G/tmp D~53##f C=(z f BOS D g Z f>,+#t y m i"C'4(D_-m M/home D~53#|2G/usr"var"tmp M/(y)D~53#z7(&C L r)D~M d C}]*'#X Z#f20D E",k N D6AIX5L V5.3208O k N<s+7#B m T>B(M j+2G20=(M(F20=(D20=h.d D n p#m1.AIX BOS20=(20=h B(M j+2G(FF w rootvgG qF w D~53/"/usr M/varG qF w D~53/homeG q#f d C q GV4BOS G G20=S D~/G GV4d C q Gg S m I$-iAIX5.2f m~m I$-i0k"I T C g S N=i4#g{z7P g S m I$-i,m~20L x0X k S \|#g{G u<BOS20,z I T Z20*<s,+G Z53I w*0d Cz V1(<N X F()D;? V r_020z V1(ASCII X F()9C.0Z m I$T0r P i4M S\m I$-i#0y>Y w531(BOS)P m I$-i,+"G y P m~|<P m I$-i#1z T BOS20S\m I$-i1,z2T N N T/X f BOS20D m~S\y P m I$-i#;)m~,H g GNOME r_KDE@f, Z BOS20}L P I T!q T X20;b)m~D`&m I$E"%@T>#P X m I$Y w D|`E",k N D6AIX5L V5.3208O k N<s+7#©Copyright IBM Corp.2002,200412AIX5L f>5.3:Y w5320:k EZ2B+B D M j+2G209C B P=h44P AIX 5.2D+B M j+2G20#v:Z;=<853;v:Z~=S AIX z7CD}<;v Z43D:Z}=h C M i$20h C;v Z53D:Z D=20s d C53;P X B(M j+2G20D|`E",k N D6AIX5L V5.3208O k N<s+7P D:y>Y w53i\; ;Z#g{}Z4P AIX D x g20,k N<6AIX5L V5.3208O k N<s+7P D:x g20\m(NIM); ;Z#Z;=<8531.X h P c;D I C E L U d M Z f#AIX5.2*s128MB Z f M2.2GB o m E L U d#X Z=S"Pf E",k N D6AIX5L"P5w7#2.7#2~20Q j I,|,+?b?h8#P X205w,k N D f53?~a)D D5#3.g{10Q2053R g{}Z AIX D V P f>O20,k F w53m~M}]D8]1>#P X g N4(538]D5w,k N D6AIX5L V5.3208O k N<s+7P D:4(538];;Z#4.g{53h*,d|53(E"C J|G D J4,7#Z x P20.0C=T B E":m2.x g d C E"$w mx g S Z J d w S Z4(Z J d w O#w z{IP X7______._______._______._______x g Z k______._______._______._______{F~q w______._______._______._______r{x X______._______._______._______Z~=S AIX z7CD}<1.+AIX m1CD e k CD-ROM h8#2.7#r*,S A53D y P b?h8(H g CD-ROM}/w"Ex z"DVD}/w M U K)#;P20AIX D CD-ROM}/w&C|,20i J#3.r*53g4#4.153"v=N d y y,4|L O D F5|(r_ASCII U K O D5)#g{P<N T>w,1"v d y y1I T Z A;O4=|L<j#g{P ASCII U K(2F*tty U K),1"v d y y1,+4=keyboard ;J#V Z53+S20i J}<#":g{53;9C F5|(r_ASCII U K O D5|)}<,k N<2~D5T q C P X g N S AIX z7CD}<53D E"#©Copyright IBM Corp.2002,200435.4F1|(r_ASCII U K O D1)M Enter|4!q53X F(#g{P`v T>w r U K,4U T>w r U K O D8>E"!q;v w*X F(#6.(}Z!n V N P d k`&D}V*0BOS201K%!q o T#4Enter|r*06-9C y>Y w5320k,$1A;#7.Z!n V N P d k2T!q2|D/T>20h C"20,"4Enter|#6-9C y>Y w5320k,$d k!n E"4Enter|#!n T>>>m>#19C1!h C*<"420>>>2|D/T>20h C"203*53V4t/,$#=88o z?99O6K%>>>!n[1]:2Z}=h C M i$20h C1.Z020M h C1A;P,(}l i20=((+B M j+2G)"z k*20D E L"w o T73h CM20!n4i$20h C G q}7#a T>!(D!n**#7O!q"4Enter|*<BOS D20#20j I s53a T/X B}<#*AZ53D:Z D=20s d C53;#q r,k*A S=h2#2.*|D53h C(||(20=(M*20D E L),Z!n V N P d k1"4Enter|#20M h Cd k0"4X59C10h C20,r d k z*|D D h C D}V"4X5#153h C:20=(.............+B M j+2G20E L;C.............hdisk0>>>!n[0]:13.Z!n V N P d k1,T!q0+B M j+2G1"4Enter|#b1T>0|D20D E L;C1A;#|D20D E L;Cd k;v r`v*CZ20D E L D}V;s4Enter|#*!{!n,d k`&D}V"4Enter|#A Y(X k)!q;v}<L#10!n T>>>m>#{F;C z k s!(MB)VG4,G q I}<1hdisk004-B0-00-2,04296^G2hdisk104-B0-00-5,04296^G3hdisk204-B0-00-6,012288^G>>>0L x O v m>D!n66y>Y w53204*D E L77T>|`E L E"88o z?99O6K%>>>!n[0]:4AIX5L f>5.3:Y w5320:k E4.(}d k k2L{F T&D}V!q*20D E L,"4Enter|#10!P D E L T>>>m>#T?v*I*AIX y m i;?V D E L4P C Y w#*!{?j E L D!q,k Y N d k E L}V"4B Enter |#5.(}Z!n V N P d k0"4Enter|T j I E L!q#020M h C1A;T>+B M j+2G(w*20=()M C'!(D E L#6.*|D w o T73h C,k Z!n V N P d k2"4Enter|#d k k!q D00W<(1"0o T1M0|L1`T&D}V"4Enter|#7.*|D|`!n,k Z!n V N P d k3"4Enter|#Z AIX5.2I C D20!n P,z I T:v|D@f&C L rv t C r{C0I E F c y1!n#v t C r{C0\X D C J#$E*D~1(CAPP)M Evaluation Assurance Level4+(EAL4+)!n# v t C64;Z K#v t C0v?D U>D~531(JFS2)#v20<N m~#v20D5~q m~#P X Z AIX 5.2P I q CD20!n D|`E",k N D6AIX5L V5.3208O k N<s+7P D:2 0!n;;Z#8.k g B i$02G20**1A;P D!q G q}7:2G20**E L:hdisk00W<(:en_USo T:en_US|L:en_USQ t C64;Z K:qQ4(JFS2D~53:q@f:CDEt C538]T20N N53:G}Z20D I!m~:>>>1L x2088o z?99O6K%>>>!n[1]:9.4B Enter|*<BOS20#20j I s53a T/X B}<#Z D=20s d C531.Z_P<N T>D53P,Z+B M j+2G20.s,0d Cz V1+r*#Z_P ASCII T>D53P,Z+B M j+2G20.s,020z V1+r*#2.!q S\m I$!n T S\Y w53Dg S m I$#3.h C U Z M1d,*\m1(root C')h C\k,"d C x g(E(TCP/IP)#b1I T9C N N d|!n#I T(}Z|n P d k configassist r_smitty assist5X A0d Cz V1 r_020z V1#4.!q K v d Cz V"!q B;=#r_,4F10|(r ESC+0)K v020z V1#5.g{Z0d Cz V1P,k!q"4j I,X B t/AIX1;t/d Cz V,"!q j I#Z2B+B D M j+2G205K1,j I K+B M j+2G BOS20,"R2j I K53D u<d C# 6AIX5L f>5.3:Y w5320:k EZ3B(F209C T B=h+z10D Y w53f>(F=AIX 5.2:v:Z;=<853;v Z83D:Z~=S AIX z7CD}<;v Z83D:Z}=i$(F20h C"*<20;v Z93D:Z D=20s i$53d C;P X0(F201D|`E",k N D6AIX5L V5.3208O k N<s+7P D:(F20;;Z#g{*4P AIX D x g20,k N<6AIX5L V5.3208O k N<s+7P D:x g20\m(NIM);; Z#/f:K}L h*X U M X B20y Y w53#^[N1X B20N N Y w53,k w{#z1d,9d n M^H X0l$w:I,@9I\D}]r&\D*'#4P(F200,k7#5P T}]M N N(F D& C L r r m i D I?8]#P X g N4(538]D5w,k N<6AIX5L V5.3208O k N<s+7P D :4(538];#Z;=<8531.7#root C'5P SYSTEM D w O$=(#I T(}d k T B|n4l i C u~:#lsuser-a auth1rootg{h*,(}d k T B|n4|D5:#chuser auth1=SYSTEM root2.*<200,d|C J C53D C'X k"z#3.i$z D&C L r I T Z AIX5.2O K P#,y9*l i&C L r G q k AIX5.2~x F f]#g{53G&C L r~q w,k i$;P m I$J b#k N<&C L r D5r I/)&L4i$&C L r;'V M m I D A I X6p#2I T Z B P W e b X7l i A I X a p p l i c a t i o n a v a i l a b i l i t y guide /servers/aix/products/ibmsw/list/:4.(}9C lppchk|n,i$10y P20D m~Q}7X d k Z0m~X*z7}]b1(SWVPD)P#*i$y P D~/<5P*s D X h7"j+20,d k T B|n:#lppchk-v5.l i7O z D2~"k G n B D#6.y P D X h D2~,|(N N b?h8(H g Ex zr CD/DVD-ROM}/w)X k o m O,S C"S g#g{z h*x;=D E",k N<53=x D2~D5#7.9C errpt|n S53m s U>P D u?z I;v m s(f#*T>j{D j8(f,k d k T B|n:#errpt-a8.X h P c;D E L U d M Z f I C#AIX5.2*s128MB Z f M2.2GB o m E L U d#P X n b D"PE",k N D6AIX 5.2"P5w7#9.*z D53m~M}]F w8]1>#P X g N4(538]D5w,k N D6AIX5L V5.3208O kN<s+7P D:4(538];;Z#10.g{,S h894r*,+d r*#©Copyright IBM Corp.2002,20047Z~=S AIX z7CD}<1.+AIX m1CD e k CD-ROM r_DVD-ROM h8#2.(}d k B P|n X B}<53:#shutdown-r3.153"v=N d y y,4B|L O D F5(r_ASCII U K O D5)#g{z5P D G<N T>w,1"v d y y1z I T Z A;O4=|L<j#g{z5P D G ASCII U K(2F*tty U K),1"v d y y1,z+4=|L;J#":g{z D53;9C F5|(r_Z ASCII U K O D5|)4}<,N<z D2~D5T q C X Z u y S AIX z7CD}<53D E"#4.4B F1(r_ASCII U K O D1)"4B Enter|4!q53X F(#5.(}Z!q a>{&d k`&D E k"4B Enter|4*BOS20K%!q o T#06-9C y>Y w5320k,$1K%r*#6.Z!q V N d k2!q2|D/T>20h C"20"4B Enter|#6-9C y>Y w5320k,$d k z!q D E k"4B Enter#!q T>>>m>#19C1!h C"4*<202|D/T>20h C"203*53V4t/,$#=88o z?99O6K%>>>!q[1]:2Z}=i$(F20h C"*<201.i$(F G20D=(#g{(F;G20=(,k!q|#!q z*20D;v(r`v)E L#153h C:20=(.............(F20E L.............hdisk02.!q w o T73h C(20s)#3.d k3!q|`D!n"4B Enter|#*9C o z K%q*P X Z(F20}L P I C D!n D|`*6,d k88"Z|`!n K%P4B Enter|#P X AIX5.2P I C D20!n D|`E",k N D6AIX 5L V5.3208O k N<s+7P D:20!n;;Z#4.i$0(F20**1A;P D!q"4B Enter|#5.1T>0(F7O1K%1,4K%5w P v53E",r_d k0"4B Enter|L x(F#(F7Od k0"4Enter|T L x20,r d k z!q D}V;s4Enter#1P v;a O"=53P D Q#f D0y>531d C D~#b)D~#f Z/tmp/bos P#2P v+}%";f;D D~/#3P v+;}%y P10Z]D?<#4;(F x X B}<#*s9C530S\m I$-i#8AIX5L f>5.3:Y w5320:k E53X B}<s a a>z S\#>>>0L x(F#88o z?+---------------------------------------------------------------------------/f:+S0y>531P}%!P D D~"?<M D~/(I20!n)#P X|`E",k!q2r3#>>>!q[0]:(F j I s,S/tmp/bos?<C J K E"#Z D=20s i$53d C(F j I s,53+X B}<#g B d C53:1.Z_P<N T>w D53O,(F20s,0d Cz V1+r*#Z_P ASCII T>w D53O,(F20s,020z V1r*#P X0d Cz V1r020z V1D|`E",k N D6AIX5L V5.3208O k N<s+7P D:d C Y w53;;Z#2.!q S\m I$!n4S\Y w53Dg S m I$#3.i$\m1(root C')\k M x g(E(TCP/IP)E"#Z b19C N N d|!n#I(}Z|n P d k configassist r_smitty assist5X=0d Cz V1r _020z V1#4.!q K v d Cz V"!q B;=#r_,4B F10(r ESC+0)K v020z V1#5.g Z0d Cz V1P,k!q"4j I,R X B t/AIX1;t/0d Cz V1,"!q j I#1v V G<a>{1,T root C'G<"4P53\m N q#Z3B(F20910AIX5L f>5.3:Y w5320:k E=<.y w>E"G*Z@z a)D z7M~q`4D#IBM I\Z d|z R r X x;a)>D5P V[D z7"~q r&\X T#P X z10y Z x r D z7M~q D E",k r z1XD IBM z m I/#N N T IBM z7"L r r~q D}C"G b Z w>r5>;\9C IBM D z7"L r r~q#;*;V8IBM D*6z(,N N,H&\D z7"L r r~q,<I T z f IBM z7"L r r~q#+G,@@M i$N N G IBM z7"L r r~q,r IC'T P:p#IBM+>I\Q5P r}Z j k k>D5Z]P X D w n({#a)>D5"4Z hC'9C b)({D N N m I$#z I T C i f==+m I$i/D y:IBM Director of LicensingIBM CorporationNorth Castle DriveArmonk,NY10504-1785U.S.A.>u n;J C*O u z r N N b y D u n k1X(I;;B D z R r X x:z J L5z w+>T04V41D y!a)>v f o,;=P N N N=D(^[G w>D,9G,>D)#$,|((+;^Z)T G V(T" J z T M J CZ3X(C>D,>#$#3)z R r X x Z3);W P;J m b}w>r,>D#$#r K> u nI\;J CZ z#>E"P I\|,<u=f;;<7DX=r!"m s#K&D E"+(Z|D;b)|D+`k>J O D B f>P#IBM I T f1T>J O P h v D z7M/r L r x P D x M/r|D,x;m P(*#>L r D;m I=g{*K b P X L r D E"T o=g B?D:(i)J m Z@"4(D L r M d|L r(|(> L r).d x PE";;,T0(ii)J m T Q-;;D E"x P`%9C,k k T B X7*5:IBM CorporationDept.LRAS/Bldg.00311400Burnet RoadAustin,TX78758-3498U.S.A.;*q XJ1D u~M u n,|(3)i N B D;(}?D6Q,<I q C b=f D E"#>J O P h v D m I L r0d y P I C D m I J O y P IBM@]IBM M'-i"IBM z J L rm I$-i r N N,H-i P D u n a)#P X+V Z(DBCS)E"D m I$i/,k k z y Z z R r X x D IBM*6z(?E*5,r C i f==+ i/D y:IBM World Trade Asia CorporationLicensing2-31Roppongi3-chome,Minato-kuTokyo106,JapanIBM I T4|O*J1D N N==9C r V"z y a)D N N E"x^k T z P#N N p N#©Copyright IBM Corp.2002,200411f0G IBM z7D E"I S b)z7D)&L"d v f5w r d|I+*q CD J O P q!#IBM;P T b )z7x P b T,2^(7O d T\D+7T"f]T r N N d|X Z G IBM z7D y w#P X G IBM z7 T\D J b&1r b)z7D)&L a v#>E"P T G IBM Web>cD N N}C<;G*K=c p{E a)D,;T N N==d1T G)Web>c D#$#G)Web>c P D J O;G IBM z7J O D;?V,9C G)Web>c x4D g U+I z T P P ##>J O|,U#L q Y w P y9C D}]M(f D>}#*K!I\j!X5w|G,>}|,v K"+>" 7F M z7D{F#y P b){F<G i9D,g P W,,?t I O#L jT B u o G z J L5z w+>Z@z M/r d|z R r X x D L j:AIXAIX5LIBMd{+>"z7r~q{F I\G d{+>D L j r~q j G#12AIX5L f>5.3:Y w5320:k EA_b{mU{X7 %;0?Eg0E kA _b {mS151-0019-00S151-0019-00 k X K _:B r [p k X K _:B r [p[p "b Z k p 9C $i z [p "b Z [p "b Z k p 9C $i z [p "b ZZ Ky OJ 1IBM P z+>O #V +>,:/?P z O #P 4#P 7333E p 2c !10%200021___________________________________________________________________________________________________________________________________________________________________________________________________________________________________________________________________________________P z!"S151-0019-00。
IBM_AIX操作系统
AIX操作系统概述一、AIX的性能和特点:1、短小强干的内核和丰富的核外系统程序AIX的设计者对系统的内核进行了精心设计,使之既简短又强干,可常驻内存。
把凡是能从内核中分离出来的部分都从中分离出来,被分离出来的部分均按核外系统程序对待。
2、良好的用户界面AIX向用户提供的界面功能齐备,使用方便。
其中包括:命令是用户通过键盘和显示终端与系统进行交互会话的界面。
系统调用命令是供用户在编写应用程序时使用的界面。
X-WINDOWS 是系统与用户之间的图形界面环境。
3、可装卸文件卷的文件系统AIX的整个文件系统由一个基本文件系统和若干个可装卸的子文件系统构成,它允许用户根据需要把自己的文件卷装入并与基本文件系统连接起来,不需要时可以拆卸下来。
AIX 的这种特点既便于扩大文件存储空间,又有利于安全和保密。
4、文件、目录和各种I/O设备均作为文件统一处理为了方便用户使用,AIX将普通数据文件、目录文件和I/O设备均以文件论之,三者使用相同的保护机制,在用户面前它们具有相同的语法和语义。
5、性能良好的网络环境AIX为用户提供了良好的网络环境,主要包括:一组网络通信协议,例如TCP/IP。
一组网络通信工具,例如mail, write,wall,talk等。
一组网络编程接口,例如TLI(Transport Layer Interface)和Socket等。
6、完善的安全机制AIX具有完善的多级安全/保密机制,其中用户级机制的一些基本内容包括:AIX将其用户分为普通用户和特权(超级)用户,它们各自享有不同的权限。
AIX为每一个用户都建立一个户头,称之为用户帐户。
系统通过用户帐户来组织和记录各用户在系统中的活动,并将其限制在一定的活动范围之内。
AIX要求每一个用户必须用合法的用户名、正确的口令进行注册,并将每一个用户都归划到某一个特定的用户组中。
AIX要求每一个用户必须按照自己拥有的权限对文件/目录进行访问,不符合权限规定的访问不被系统所接受。
- 1、下载文档前请自行甄别文档内容的完整性,平台不提供额外的编辑、内容补充、找答案等附加服务。
- 2、"仅部分预览"的文档,不可在线预览部分如存在完整性等问题,可反馈申请退款(可完整预览的文档不适用该条件!)。
- 3、如文档侵犯您的权益,请联系客服反馈,我们会尽快为您处理(人工客服工作时间:9:00-18:30)。
IAIX系统操作手册系统操作手册版本:5L目录第一章AIX操作系统的安装 (5)安装介质与方式 (5)BOS(Base Operating System)安装 (5)第二章AIX操作系统基本命 (7)系统的进入和退出 (7)password (7)mkdir、rm、mv和cd (8)ls (8)date (8)wc (8)who (9)finger (9)ps (9)kill (10)find (10)grep (11)第三章vi编辑器 (13)3.1vi 简介 (13)3.2vi的进入与离开 (13)3.3vi 的文本输入模式 (13)3.4vi 基本编辑命令 (14)3.5文件处理子命令 (16)第四章存储管理 (16)4.1相关术语 (16)PV (Physical V olume) (16)VG (V olume Group) (16)PP (Physical Partition) (17)LP (Logical Partition) (17)LV(Logical V olume) (17)Mirror(镜像) (17)VGDA(V olume Group Description Area,卷组描述区) (17)VGSA(V olume Group Status Area,卷组状态区) (18)4.2PV的管理 (18)硬盘安装 (18)配置一个PV (18)修改PV的属性 (19)删除一个PV (19)4.3VG的管理 (19)创建一个VG (19)删除一个VG (20)4.4LV的管理 (22)增加一个LV (22)修改LV的属性 (23)删除一个LV (26)第五章RS6000 更换硬盘的过程 (27)HDISK0和HDISK1做成MIRROR,是ROOTVG (27)先做系统备份 (27)查看HDISK0的S/N,P/N号等,在换盘的时候做对照 (28)查看所有硬盘(包括逻辑盘)的状态# lsdev -Cc disk (28)停HACMP (29)把HDISK0从ROOTVG中不做MIRROW (29)关机 (29)开机 (29)把HDISK0加到ROOTVG中并做镜像 (30)重启动2号机 (30)关闭1号机的HACMP (30)重启动1号机 (30)启动1号机的HACMP (30)启动2号机的HACMP (30)第六章HACMP安装配置 (31)准备工作 (31)检测连8port卡的TTY (32)使用AIX安装CD安装文件 (32)修改电源管理 (33)Netscape安装和配置 (33)安装HACMP/ES软件 (33)安装最新的AIX和HACMP补丁 (33)SSA微码升级 (34)设置主机名 (34)为所有网卡绑定boot或standby的IP地址 (34)创建VG、LV和FS (35)修改系统参数 (36)重启两台机器 (36)配置HACMP (36)HA测试(一):启动和关闭 (38)HA测试(二):本机IP接管 (39)HA测试(三):资源接管 (39)第七章模拟硬盘更换 (41)预做方案 (41)查看硬盘信息 (41)把要更换硬盘从VG中拿掉 (41)关机 (41)准备工作 (41)拆机箱 (41)更换硬盘 (42)查看硬盘 (42)改PV (42)做镜像 (42)把另一块盘18G拿掉 (42)关机 (43)更换硬盘 (43)开机 (43)查看硬盘信息 (43)改PV (43)做镜像 (43)起服务 (43)英迈强人 (43)第二方案 (45)把把机器的前面板拆下 (45)查看硬盘信息,看哪个盘是干什么用的 (45)把要更换硬盘从VG中拿掉 (45)把硬盘做成PV (46)lspv查看硬盘情况 (46)把硬盘加到VG中 (46)把18G硬盘数据复制到36G上, (46)取下另一18G硬盘 (46)把硬盘做成PV (46)做镜像 (46)检查,OK (47)第一章AIX操作系统的安装安装介质与方式AIX操作系统的安装可以:1)通过Tape安装。
需要16M RAM。
PCI总线的RS/6000系列小型机不支持该方式。
2)通过CD-ROM安装。
需要有8M RAM.3)通过网络安装。
这需要使用AIX Network Install Manager (NIM)来实现。
系统支持通过Token Ring 、FDDI、ethernet的安装。
4)预先安装(Preinstall).在购买时选择“预装操作系统”。
AIX操作系统的安装方式(Installation Method)有以下四种:完全覆盖安装:操作系统被安装在rootvg的第一块硬盘上,这将覆盖原系统中所有的系统保留目录。
保留安装:这种安装方式可以保留操作系统的版本不变,同时保留 rootvg上的用户数据,但将覆盖/usr 、/tmp、/var 和/ 目录。
用户还可以利用/etc/preserve.list指定系统安装时需要保留的文件系统。
默认的需保留的文件系统为/etc/filesystem中所列。
升级安装:这种安装方式用于操作系统的升级,这将覆盖/tmp目录。
这是系统默认的安装方式。
备份带安装:恢复用mksysb命令生成的安装带中/image.data中指定的文件系统,这种安装方式用于系统(rootvg)的复制。
BOS(Base Operating System)安装打开主机电源。
连接好系统终端,把第一张安装介质(磁带、光碟)插入驱动器。
在开机后按<F5>(图形终端)进入系统安装画面。
当终端显示如下信息时:☆☆☆☆☆☆Please define the system console☆☆☆☆☆☆键入“1”并回车(注意:键入的“1”不回显)选择主控台(5) 屏幕上将不断显示一些信息,几分钟后出现:>>> 1 Type 1 and press enter to have English during install.>>>Choice【1】:键入“1”后回车,选择语言环境为English(4) 此后屏幕出现:Welcome to Base Operating SystemInstallation and MaintenanceType the number of your choice and press enter .Choice is indicated by>>> >>>1 Start install now with default settings2 Change/show installation settings and install3 Start Maintenance Mode for system Recovery88 Help?99 Previous Menu>>>Choice 〔1〕:这是系统安装和维护的主菜单。
安装BOS基本操作系统键入“2”并回车,屏幕出现“Ins tall and Setting”画面:>>>Choice 〔1〕:这是系统安装的默认设置,用户可以根据需要进行修改。
与此同时,在屏幕的右下角会出现如下的警告信息:以上是提醒用户安装系统的后果将破坏用户原有的硬盘上的数据。
安装时可以选择保护安装(Preserve install) 或完全覆盖安装(New and complete overwrite)。
(6) 设置完毕选择0 安装即开始,屏幕将不断显示安装的进行情况,当BOS安装完毕系统将自动重启,否则在BOS安装完毕时屏幕会再次提示拧钥匙并处于等待状态。
(7) 系统重新启动后,屏幕会提示输入终端类型,键入主控台的类型(vt100或ibm3151),此后将出现系统设置屏,用上下键移动亮条进行基本系统参数的设置:★set date and time 设置time zone选择cur+8★set root password 分两次输入相同口令,即可设置成功,移动光标至Task complete-Exit to AIX LOGIN退出。
注意:不能用F3或F10键退出,而应选菜单以通知操作系统设置任务已完成;否则,在下次启机时仍会自动进入系统设置画面。
同时如果终端类型输入错误,屏幕显示将不可预料,此时可以用ctrl-c退出,重新输入。
至此,BOS安装完毕,以后启动机器时将不会有配置信息,直接出现LOGIN提示符。
第二章AIX操作系统基本命令系统的进入和退出login: 输入用户名(例如:user01)password: 输入用户口令若用户名及口令均正确,则用户将登陆成功。
此时系统会出现命令提示符$或#,即表示可接收用户输入的操作系统命令。
退出系统:<ctrl+d>或exit或logout。
例:#(or$)exit#(or$)Ctrl^D注,#为ROOT用户的命令提示符,$为一般用户passwordpassword命令用于建立或修改用户的密码。
如:#passwordpasswd: —输入旧口令new passwd: —输入新口令re-enter new paswd: —重新输入新口令mkdir、rm、mv和cdmkdir :用于创建目录$ mkdir oraclerm :用于删除文件或目录(rm –r 删除目录时目录内有内容,用-r一起删除)$ rm -r oraclemv :用于改变文件或目录名,或移动文件和目录cd :用于进入系统某一级目录中去ls功能:显示目录中的内容,列出当前目录中所有文件的文件名参数说明:a :列出目录中所有文件d :列出所有子目录l :列出长格式文件信息举例:ls –a :列出当前目录中的所有文件ls –l :显示文件的详细信息date功能:显示当前日期和时间,超级用户可以进行修改举例:$ dateMon Sep 22 10:28:26 BEIST 2003$wc✓功能:计算文件中的行数、字数和字符数✓参数说明:c :计算字符数l :计算行数w :计算字数举例:# wc profile13 53 381 profile| | |行数字数字符数$ wc smit.log422 1162 8971 smit.log$who功能:列出当前系统注册的用户举例:$who am i-- 列出当前系统使用者身份$ whooracle lft0 Sep 22 09:05oracle pts/0 Sep 22 10:17 (192.168.100.79)oracle pts/4 Sep 22 09:05 (:0.0)$ who am ioracle pts/0 Sep 22 10:17 (192.168.100.79)$finger显示当前登陆到系统中的用户的信息举例:# fingerLogin Name TTY Idle When Site I nfooracle ??? *l0 2:02 Mon 09:05oracle ??? p4 1:59 Mon 09:05root ??? p0 Mon 11:06# finger oracleLogin name: oracleDirectory: /usr/oracle/ora90 Shell: /usr/bin/kshOn since Sep 22 09:05:35 on lft0, 2 hours 2 minutes Idle Time(messages off)On since Sep 22 09:05:41 on pts/4, 1 hour 59 minutes Idle Timefrom :0.0No Plan.#ps功能:显示后台进程的有关信息。