单片机原理与嵌入式系统的实验源代码
MCS51单片机原理及嵌入式系统应用课程设计 (2)

MCS51单片机原理及嵌入式系统应用课程设计一、课程设计背景嵌入式系统是一个以计算机技术为基础,集成了计算机硬件和软件系统的设备。
随着信息技术的飞速发展,嵌入式系统已经成为各种各样产品的重要组成部分,如家电、汽车、医疗器械等。
因此,对嵌入式系统的研究和开发也变得越来越重要。
MCS51是一种被广泛应用于嵌入式系统设计的单片机。
MCS51拥有稳定的性能和丰富的硬件资源,同时使用起来也非常方便。
在本课程设计中,我们将探究MCS51单片机的原理以及其在嵌入式系统中的应用,旨在帮助学生更好地理解嵌入式系统,提高其技能水平,为未来就业做好准备。
二、课程设计内容2.1 MCS51单片机原理MCS51单片机由CPU、存储器、输入输出接口及其它外设组成。
本部分内容主要包括以下几个方面:•MCS51的CPU结构和工作原理•存储器及存储器扩展方式•输入输出接口及其应用•定时器和中断控制器的原理2.2 嵌入式系统应用MCS51单片机在嵌入式系统中的应用非常广泛,包括控制电路、仪器设备、工业控制等领域。
本部分内容将侧重于MCS51单片机在嵌入式系统中的具体应用,主要包括以下几个方面:•定时器的应用•中断的应用•A/D转换的应用•串口通信的应用•基于MCS51的嵌入式系统设计案例2.3 课程设计实践课程设计实践环节是本设计的重点部分。
学生将按照以下流程完成实践:•组建小组,编写嵌入式系统设计方案•搭建硬件平台,包括MCS51单片机和相关外设•编写程序,完成设计方案的实现•测试程序,调试错误并进行优化三、课程设计评估本课程设计采用绩效考核制度。
学生将分小组完成课程设计,小组成员之间责任明确,根据完成情况和实现效果,将对小组进行绩效评估。
评估方案主要从以下方面考虑:•设计方案的合理性•实现方案的正确性及完整性•程序的优化程度及代码质量四、总结本课程设计旨在通过MCS51单片机的原理和应用让学生更好地理解嵌入式系统的设计和开发过程。
《嵌入式系统原理与应用》实验报告02-汇编指令实验2
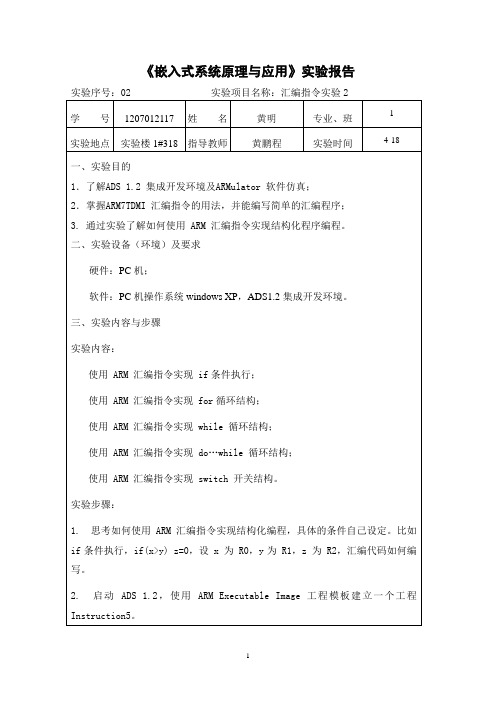
《嵌入式系统原理与应用》实验报告实验序号:02 实验项目名称:汇编指令实验21学号1207012117 姓名黄明专业、班实验地点实验楼1#318 指导教师黄鹏程实验时间4-18 一、实验目的1.了解ADS 1.2 集成开发环境及ARMulator 软件仿真;2.掌握ARM7TDMI 汇编指令的用法,并能编写简单的汇编程序;3. 通过实验了解如何使用 ARM 汇编指令实现结构化程序编程。
二、实验设备(环境)及要求硬件:PC机;软件:PC机操作系统windows XP,ADS1.2集成开发环境。
三、实验内容与步骤实验内容:使用 ARM 汇编指令实现 if条件执行;使用 ARM 汇编指令实现 for循环结构;使用 ARM 汇编指令实现 while 循环结构;使用 ARM 汇编指令实现 do…while 循环结构;使用 ARM 汇编指令实现 switch 开关结构。
实验步骤:1. 思考如何使用 ARM 汇编指令实现结构化编程,具体的条件自己设定。
比如if条件执行,if(x>y) z=0,设 x 为 R0,y为 R1,z 为 R2,汇编代码如何编写。
2. 启动 ADS 1.2,使用 ARM Executable Image 工程模板建立一个工程Instruction5。
3. 建立汇编源文件 TEST2.S,编写实验程序,然后添加到工程中。
4. 编译连接工程,选择【Project】->【Debug】,启动 AXD进行软件仿真调试。
5. 打开寄存器窗口(Processor Registers),选择 Current 项监视各寄存器的值。
6. 单步运行程序,判断程序是否按设计的程序逻辑执行。
四、实验结果与数据处理(1)if(x>y) z=100;else z=50;源程序:MOV R0,#101 ; 初始化x的值MOV R1,#250 ; 初始化y的值CMP R0,R1MOVHI R2,#100MOVLS R2,#50(2)for(i=0; i<10; i++){x++;}设x为R0,i为R2 (i、x均为无符号整数) 源程序:MOV R0,#0MOV R2,#0FOR_L1 CMP R2,#10BHS FOR_ENDADD R0,R0,#1ADD R2,R2,#1 ; i++B FOR_L1FOR_END NOP(3)while(x<=y) {x*=2;R0,y 为R1 (x、y 均为无符号整数)源程序:MOV R0,#1 ; 初始化x的值MOV R1,#10 ; 初始化y的值B WHILE_L2WHILE_L1 MOV R0,R0,LSL #1WHILE_L2 CMP R0,R1BLS WHILE_L1WHILE_END NOP(4)do{x--;} while(x>0);设x为R0 (x为无符号整数)源程序MOV R0,#5 ; 初始化x的值DOWHILE_L1 ADD R0,R0,#-1 ; 循环体,x--DOWHILE_L2 MOVS R0,R0 ; R0 ←R0,并影响条件码标志BNE DOWHILE_L1 ; 若R0不为0(即x不为0),则继续循环DOWHILE_END NOP(5); switch(key&0x0F); { case 0:; case 2:; case 3: x = key + y;; break;; case 5: x = key - y;; break;; case 7: x = key * y;; break;; default: x = 168;; break;; }; 设x为R0,y 为R1,key 为R2 (x、y、key 均为无符号整数)源程序MOV R1,#3 ; 初始化y的值MOV R2,#2 ; 初始化key的值SWITCH AND R2,R2,#0x0F ; switch(key&0x0F) CASE_0 CMP R2,#0 ; case 0:CASE_2 CMPNE R2,#2 ; case 2:CASE_3 CMPNE R2,#3 ; case 3:BNE CASE_5ADD R0,R2,R1 ; x = key + yB SWITCH_END ; breakCASE_5 CMP R2,#5 ; case 5:BNE CASE_7SUB R0,R2,R1 ; x = key - yB SWITCH_END ; breakCASE_7 CMP R2,#7 ; case 7:BNE DEFAULTMUL R0,R2,R1 ;x = key * yB SWITCH_END ; breakDEFAULT MOV R0,#168 ; default: x = 168 SWITCH_END NOPHALT B HALTEND五、分析与讨论六、教师评语成绩签名:日期:。
嵌入式系统实验、GPIO、PWM、UART汇编程序与c语言混合编程
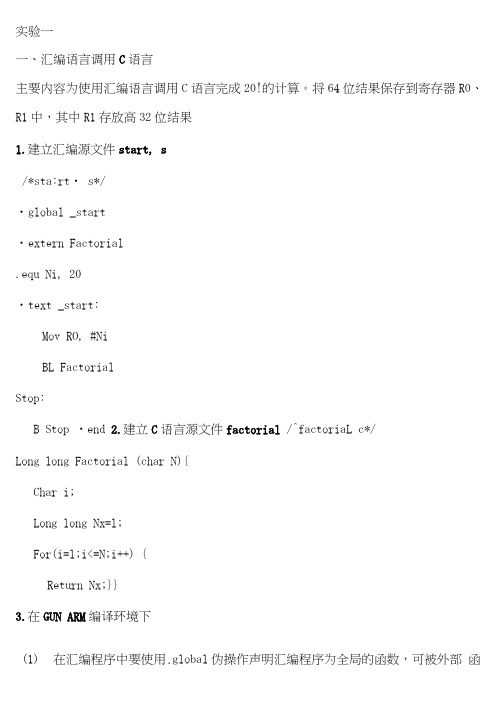
实验一一、汇编语言调用C语言主要内容为使用汇编语言调用C语言完成20!的计算。
将64位结果保存到寄存器R0、R1中,其中R1存放高32位结果1.建立汇编源文件start, s/*sta:rt・ s*/・g lobal _start・e xtern Factorial.equ Ni, 20・t ext _start:Mov RO, #NiBL FactorialStop:B Stop ・end 2.建立C语言源文件factorial /^factoriaL c*/Long long Factorial (char N){Char i;Long long Nx=l;For(i=l;i<=N;i++) {Return Nx;}}3.在GUN ARM编译环境下(1)在汇编程序中要使用.global伪操作声明汇编程序为全局的函数,可被外部函数调用。
(2)同时在C程序中要用关键字extern声明要调用的汇编语言程序。
二、C语言调用汇编语言在GUN ARM编译环境下设计程序,用C语言调用ARM汇编语言C语言实现20!操作,并将64位结果保存到OxFFFFFFFO开始的内存地址单元,按照小端格式低位数据存放在低位地址单元。
1、建立C语言源文件main, c/* main. c */extern void Factorial(char Nx);Main () {Char N =20;Factoral(N);While (1);}2、建立汇编语言源文件factorial/* factoriaL s */.global FactorialFactoral:Mov R8, ROMov R9, #0SUB RO, R8, #1Loop:Mov Rl, R9UMULL R8, R9, RO, R8MLA R9, Rl, RO, R9SUBS RO, RO, #1BNE LoopLDR RO, =0xFFFFFFF0STMIA RO, {R8, R9}MOV PC, LR三、实验一内容在汇编语言中定义符号常量A和B,调用C语言程序求这两个数的最大值,返回汇编程序后,将结果存入R3。
嵌入式系统 实验报告
使能 IRQ 中断。
4 装载并使能外中断;
5 选用 DebugInExram 生成目标,然后编译连接工程。
6 选择【Project】->【Debug】,启动 AXD 进行 JTAG 仿真调试。
7 全速运行程序,LED 闪烁;
8 每一次按键 Key,蜂鸣器就会转换静音或鸣响状态。
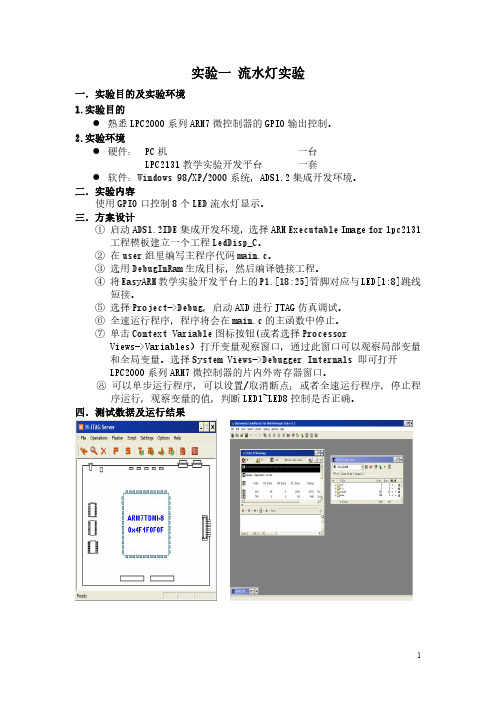
四.测试数据及运行结果
1
五.总结
1.实验过程中遇到的问题及解决办法;
由于本次实验较简单,且我们之前学习的微机原理课程也进行了流水灯的设
计实验,所以对于本次实验,我完成地很顺利,在实验中没有遇到问题。
2.对设计及调试过程的心得体会。
本次实验是本学期该课程我们进行的第一次实验,总的来说,实验不是很难,
设计过程也相对简单,其主要目的是让我们熟悉一下实验环境,并且能在实验环
6
五.总结 1.实验过程中遇到的问题及解决办法;
实验第一次运行时,蜂鸣器一直处于鸣响状态,及时按了按键,蜂鸣器还是 一直鸣叫,不产生外中断。后来仔细检查了程序,发现原来是忘记使能 EINT0 中 断了,加上 VICIntEnable = 1<<0x0e 代码,程序就能正常运行了。 2. 对设计及调试过程的心得体会。
境下进行简单的实验操作,为之后的实验打下坚实的基础。
六.附录:源代码(电子版)
#include "config.h"
const uint32 LEDS8 = 0xFF << 18;//P1[25:18]控制 LED1~LED8,低电平点亮
const uint32 KEY = 1 << 16;
//P0.16 连接 KEY1
三.方案设计
① 启动 ADS1.2IDE 集成开发环境,选择 ARM Executable Image for lpc2131
嵌入式系统实验——定时器代码
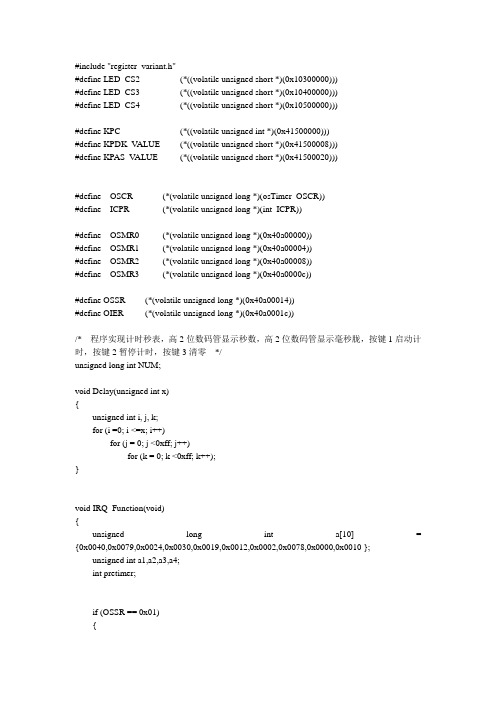
#define LED_CS2(*((volatile unsigned short *)(0x10300000)))
#define LED_CS3(*((volatile unsigned short *)(0x10400000)))
#define LED_CS4(*((volatile unsigned short *)(0x10500000)))
{
LED_CS4=NUM;
a4=NUM/1000;
a3=(NUM%1000)/100;
a2=(NUM%100)/10;
a1=NUM%10;
LED_CS2 = a[a4]+(a[a3]<<8); //
LED_CS3 = a[a2]+(a[a1]<<8); //
if (NUM==9999)
{NUM=0;}
//Delay(10);
break;
case 0x02:
OIER = 0x02;//pause time
break;
case 0x04:
NUM= 0x00;//clear time
LED_CS2 =0x4040;
LED_CS3 = 0x4040;
break;
default : break;
}
}
}
#defineOSMR1(*(volatile unsigned long *)(0x40a00004))
#defineOSMR2(*(volatile unsigned long *)(0x40a00008))
#defineOSMR3(*(volatile unsigned long *)(0x40a0000c))
嵌入式设计实验报告
一、实验目的1. 熟悉嵌入式系统开发的基本流程和常用工具;2. 掌握嵌入式系统硬件资源的使用方法;3. 熟悉嵌入式系统软件开发的基本方法;4. 提高嵌入式系统设计能力。
二、实验内容1. 硬件平台:基于STM32F103系列单片机的开发板;2. 软件平台:Keil uVision5集成开发环境;3. 实验任务:设计一个简单的嵌入式系统,实现按键输入和LED灯控制功能。
三、实验原理1. 硬件原理:STM32F103系列单片机是一款高性能、低功耗的ARM Cortex-M3内核微控制器,具有丰富的片上外设资源,如GPIO、定时器、ADC等。
在本实验中,主要使用GPIO进行按键输入和LED灯控制。
2. 软件原理:嵌入式系统软件开发主要包括底层驱动程序、中间件和应用层。
底层驱动程序负责硬件资源的管理和配置;中间件提供系统服务,如通信、定时器等;应用层实现用户功能。
在本实验中,主要使用C语言编写程序,实现按键输入和LED灯控制功能。
四、实验步骤1. 硬件连接:将开发板上的按键和LED灯分别连接到单片机的GPIO端口;2. 软件编写:(1)创建项目:在Keil uVision5中创建一个新的项目,选择STM32F103系列单片机作为目标设备;(2)添加源文件:添加一个C语言源文件,用于编写主程序;(3)配置GPIO:在源文件中编写GPIO初始化代码,配置按键和LED灯的GPIO端口为输入和输出模式;(4)编写按键输入程序:编写按键扫描函数,用于检测按键状态,并根据按键状态控制LED灯;(5)编译程序:编译项目,生成目标文件;(6)下载程序:将编译好的程序下载到开发板;3. 实验验证:在开发板上运行程序,观察按键输入和LED灯控制功能是否正常。
五、实验结果与分析1. 实验结果:按键按下时,LED灯点亮;按键松开时,LED灯熄灭;2. 实验分析:通过编写程序,实现了按键输入和LED灯控制功能,验证了嵌入式系统开发的基本流程和常用工具。
单片机原理与嵌入式系统的实验源代码

单片机原理与嵌入式系统的实验源代码#include //80C52特殊功能寄存器定义#define LED_PORT0 P0 //用P0口驱动灯,低亮,高灭#define LED_PORT1 P1 //用P1口驱动灯,低亮,高灭#define LED_PORT2 P2 //用P2口驱动灯,低亮,高灭#define LED_PORT3 P3 //用P3口驱动灯,低亮,高灭void time(unsigned int ucMs);/* 延时单位:毫秒 */void main(void){unsigned char ucTimes;#define DELAY_TIME 400 //延时while(1){for(ucTimes=0;ucTimes<8;ucTimes++){//循环点亮P0口灯LED_PORT0 = LED_PORT0 - (0x80>>ucTimes);//亮灯需低电平驱动time(200);}LED_PORT0=0xff;//灭P0口灯for(ucTimes=0;ucTimes<8;ucTimes++){//循环点亮P1口灯LED_PORT1 = LED_PORT1 - (0x80>>ucTimes);//亮灯需低电平驱动time(200);}LED_PORT1=0xff;//灭P1口灯for(ucTimes=0;ucTimes<8;ucTimes++){//循环点亮P2口灯LED_PORT2 = LED_PORT2 - (0x80>>ucTimes);//亮灯需低电平驱动time(200);}LED_PORT2=0xff;//灭P2口灯for(ucTimes=0;ucTimes<8;ucTimes++){//循环点亮P3口灯LED_PORT3 = LED_PORT3 - (0x80>>ucTimes);//亮灯需低电平驱动time(200);}LED_PORT3=0xff;//灭P3口灯LED_PORT3=0x00;//然后从右往左依次点亮LEDfor(ucTimes=0;ucTimes<8;ucTimes++){//循环点亮P1口灯LED_PORT3 = LED_PORT3 - (0x01<time(200);}LED_PORT3=0x00;//全亮LED_PORT3=0x00;//然后从右往左依次点亮LEDfor(ucTimes=0;ucTimes<8;ucTimes++){//循环点亮P1口灯LED_PORT2 = LED_PORT2 - (0x01<time(200);}LED_PORT2=0x00;//全亮LED_PORT3=0x00;//然后从右往左依次点亮LEDfor(ucTimes=0;ucTimes<8;ucTimes++){//循环点亮P1口灯LED_PORT1 = LED_PORT1 - (0x01<time(200);}LED_PORT1=0x00;//全亮LED_PORT3=0x00;//然后从右往左依次点亮LEDfor(ucTimes=0;ucTimes<8;ucTimes++){//循环点亮P0口灯LED_PORT0 = LED_PORT0 - (0x01<time(200);}LED_PORT0=0x00;//全亮}}/*********** time C **************/void time(unsigned int ucMs)//延时单位:ms {#define DELAYTIMES 239unsigned char ucCounter; // 延时设定的循环次数while (ucMs!=0) {for (ucCounter=0; ucCounterucMs--;}}。
西南科技大学单片机原理实实验四及代码

2.1 实验四中断实验一、实验目的加深对MCS-51单片机中断系统基础知识的理解。
二、实验设备Keil C单片机程序开发软件。
Proteus仿真软件DP51-PROC单片机综合实验仪。
三、实验内容和步骤内容:利用外部中断输入引脚(以中断方式)控制步进电机的转动。
要求:每产生1次中断,步进电机只能步进1步。
实验程序:使用INT0的中断服务程序控制步进电机正向步进;使用INT1中断服务程序控制步进电机反向步进。
设计思路:①主程序在完成对INT0和INT1的设置后,可进入死循环(等待中断请求)。
②为便于实验观察和操作,设INT0和INT1中断触发方式为边沿。
③步进电机的转动控制由外部中断的服务程序来实现。
④当前步进电机的相位通电状态信息可以使用片内RAM中的一个字节单元来存储。
设计参考:①主程序需要设置的中断控制位如下:IT0和IT1 外部中断触发方式控制0=电平1=边沿(下降沿)EX0和EX1 外部中断允许控制0=屏蔽1=允许PX0和PX1 中断优先级级别控制0=低级1=高级在同级别(PX0=PX1)时INT0的优先级高于INT1EA 中断允许总控制0=屏蔽1=允许②外部中断服务程序的入口地址:0003H 外部中断00013H 外部中断1预习:1)编写好实验程序。
2)根据编写的程序和实验步骤的要求制定调试仿真的操作方案。
实验单元电路:1) 步进电机驱动电路。
步进电机共有4相,当以A →B →C →D →A →B …的顺序依次通电时,电机就会正转,若按相反的顺序依次通电,电机就会反转。
每顺序切换一相(1步),电机旋转18°,切换的频率决定电机的转速(切换的频率不能超过电机的最大响应频率)。
根据图2.4中的电路,当BA (插孔)输入为高时,对应的A 相通电。
2) SW 电路开关SW X 拨在下方时,输出端SWX 输出低电平,开关SW X 拨在上方时,输出端SWX 输出高电平。
其中SW1和SW3具备消除抖动电路,这样,SW1或SW3每上下拨动一次,输出端产生单一的正脉冲(上升沿在前,下降沿在后)。
基于STM32的嵌入式系统原理与设计实验报告
XXXX学院XX级嵌入式系统设计实验报告班级:指导老师:学期:小组成员:实验一我的第一个工程实验一.实验简介我的第一个工程,流水灯实验二.实验目的掌握STM32开发环境,掌握从无到有的构建工程。
三.实验内容熟悉MDK KEIL开发环境,构建基于固件库的工程,编写代码实现流水灯工程。
通过ISP下载代码到实验板,查看运行结果。
使用JLINK下载代码到目标板,查看运行结果,使用JLINK在线调试。
四.实验设备硬件部分:PC计算机(宿主机)、亮点STM32实验板、JLINK。
软件部分:PC机WINDOWS系统、MDK KEIL软件、ISP软件。
五.实验步骤1.熟悉MDK KEIL开发环境2.熟悉串口编程软件ISP3.查看固件库结构和文件4.建立工程目录,复制库文件5.建立和配置工程6.编写代码7.编译代码8.使用ISP下载到实验板9.测试运行结果10.使用JLINK下载到实验板11.单步调试12.记录实验过程,撰写实验报告六.实验结果及测试七.实验总结实验二带按键控制的流水灯实验一.实验简介在实验一的基础上,使用按键控制流水灯速度,及使用按键控制流水灯流水方向。
二.实验目的熟练使用库函数操作GPIO,掌握中断配置和中断服务程序编写方法,掌握通过全局变量在中断服务程序和主程序间通信的方法。
三.实验内容实现初始化GPIO,并配置中断,在中断服务程序中通过修改全局变量,达到控制流水灯速度及方向。
使用JLINK下载代码到目标板,查看运行结果,使用JLINK在线调试。
四.实验设备硬件部分:PC计算机(宿主机)、亮点STM32实验板、JLINK、示波器。
软件部分:PC机WINDOWS系统、MDK KEIL软件、ISP软件。
五.实验步骤1在实验1代码的基础上,编写中断初始化代码2在主程序中声明全局变量,用于和中断服务程序通信,编写完成主程序3编写中断服务程序4编译代码,使用JLINK下载到实验板5.单步调试6记录实验过程,撰写实验报告六.实验结果及测试七.实验总结实验三串口发送和接收实验一.实验简介编写代码实现串口发送和接收,将通过串口发送来的数据回送回去。
嵌入式原理实验代码集合

嵌⼊式原理实验代码集合=============================================================实验⼀AREA Examplel,CODE,READONLY;声明代码段ENTRY ;标识程序⼊⼝CODE32 ;声明32位ARM指令START MOV R0,#15 ;设置参数MOV R1,#8ADDS R0,R0,R1 ;R0=R0+R1B STARTEND========================================================================= 实验⼆=========================================================================实验⼆汇编指令实验1COUNT EQU 0x40003100 ;定义⼀个变量,地址为0x40003100AREA Example2,CODE,READONLY ;声明代码段Example2ENTRY ;标识程序⼊⼝CODE32 ;声明32位ARM指令START LDR R1,=COUNT ;R1<=COUNTMOV R0,#0 ;R0<=0STR R0,[R1] ;[R1]<=R0LOOP LDR R1,=COUNTLDR R0,[R1] ;R0<=[R1]ADD R0,R0,#1 ;R0<=R0+1CMP R0,#10 ;R0与10⽐较,影响条件码标志MOVHS R0,#0 ;若R0⼤于等于10.执⾏R0<=0STR R0,[R1] ;[R1]<=R0,即保存COUNTB LOOPEND实验⼆思考题:思考题:第五题:COUNT EQU 0x40003400 ;定义⼀个变量,地址为0x40003400AREA Example2,CODE,READONLY ;声明代码段Example2ENTRY ;标识程序⼊⼝CODE32 ;声明32位ARM指令START LDR R1,=COUNT ;R1<=COUNTMOV R0,#80 ;R0<=80STR R0,[R1] ;[R1]<=R0LOOP LDR R1,=COUNTLDR R0,[R1] ;R0<=[R1]SUB R0,R0,#2 ;R0<=R0-2CMP R0,#60 ;R0与60⽐较,影响条件码标志MOVLO R0,#80 ;若R0⼤于等于60.执⾏R0<=80STR R0,[R1] ;[R1]<=R0,即保存COUNTB LOOPEND思考题第六题COUNT EQU 0x40003400 ;定义⼀个变量,地址为0x40003400AREA Example2,CODE,READONLY ;声明代码段Example2ENTRY ;标识程序⼊⼝CODE32 ;声明32位ARM指令START LDR R1,=COUNT ;R1<=COUNTLDR R0,=0xAA11BB22 ;R0<=0xAA11BB22STR R0,[R1] ;[R1]<=R0LDR R1,=COUNTLDR R0,[R1]LDRH R0,[R1]LDRSH R0,[R1]LDRB R0,[R1]LDRSB R0,[R1]LDR R0,=0xFFFFFFCCSTRB R0,[R1]STRH R0,[R1]STR R0,[R1]B STARTEND实验三汇编指令实验2X EQU 11 ; 定义X的值为11Y EQU 8 ; 定义Y的值为8BIT23 EQU (1<<23) ; 定义BIT23的值为0x00800000AREA Example3,CODE,READONLY ; 声明代码段Example3ENTRY ; 标识程序⼊⼝CODE32 ; 声明32位ARM指令START ; 使⽤MOV、ADD指令实现:R8 = R3 = X + YMOV R0,#X ; R0 <= X,X的值必须是8位图数据MOV R1,#Y ; R1 <= Y,Y的值必须是8位图数据ADD R3,R0,R1 ; 即是R3 = X + YMOV R8,R3 ; R8 <= R3; 使⽤MVN、SUB指令实现:R5 = 0x5FFFFFF8 - R8 * 8MVN R0,#0xA0000007 ; 0xA0000007的反码为0x5FFFFFF8SUB R5,R0,R8,LSL #3 ; R8左移3位,结果即是 R8 * 8; 使⽤CMP指令判断(5*Y/2)>(2*X)吗?若⼤于则R5 = R5&0xFFFF0000,否则R5 = R5|0x000000FF MOV R0,#YADD R0,R0,R0,LSL #2 ; 计算R0 = Y + 4*Y = 5*YMOV R0,R0,LSR #1 ; 计算R0 = 5*Y/2MOV R1,#XMOV R1,R1,LSL #1 ; 计算R1 = 2*XCMP R0,R1 ; ⽐较R0和R1,即(5*Y/2)和(2*X)进⾏⽐较LDRHI R2,=0xFFFF0000 ; 若(5*Y/2)>(2*X),则R2 <= 0xFFFF0000ANDHI R5,R5,R2 ; 若(5*Y/2)>(2*X),则R5 = R5&R2ORRLS R5,R5,#0x000000FF ; 若(5*Y/2)≤(2*X),则R5 = R5|0x000000FF; 使⽤TST指令测试R5的bit23是否为1,若是则将bit6位清零(使⽤BIC指令)TST R5,#BIT23BICNE R5,R5,#0x00000040B STARTEND实验三思考题:思考题1:不正确,直接带⼊,不符合图8位AREA Example4,CODE,READONLY;声明代码段 Example4ENTRY;CODE32 ;声明32位ARM指令STARTLDR R2,=0x1234LDR R3,=0x5678LDR R5,=0x9ACDLDR R6,=0xEF12ADDS R5,R2,R5;ADC R6,R3,R6;B STARTENDX EQU 11 ; 定义X的值为11Y EQU 8 ; 定义Y的值为8BIT23 EQU (1<<23) ; 定义BIT23的值为0x00800000AREA Example3,CODE,READONLY ; 声明代码段Example3ENTRY ; 标识程序⼊⼝CODE32 ; 声明32位ARM指令START ; 使⽤MOV、ADD指令实现:R8 = R3 = X + YMOV R0,#X ; R0 <= X,X的值必须是8位图数据MOV R1,#Y ; R1 <= Y,Y的值必须是8位图数据ADD R3,R0,R1 ; 即是R3 = X + YMOV R8,R3 ; R8 <= R3; 使⽤MVN、SUB指令实现:R5 = 0x5FFFFFF8 - R8 * 8MVN R0,#0xA0000007 ; 0xA0000007的反码为0x5FFFFFF8SUB R5,R0,R8,LSL #3 ; R8左移3位,结果即是 R8 * 8; 使⽤CMP指令判断(5*Y/2)>(2*X)吗?若⼤于则R5 = R5&0xFFFF0000,否则R5 = R5|0x000000FF MOV R0,#YADD R0,R0,R0,LSL #2MOV R0,R0,LSR #1MOV R1,#XMOV R1,R1,LSL #1CMP R0,R1LDRLS R2,=0xFFFF0000;ANDHI R5,R5,#0x000000FF;ORRLS R5,R5,R2B STARTENDX EQU 200 ; 定义X的值为11Y EQU 163 ; 定义Y的值为8BIT23 EQU (1<<23) ; 定义BIT23的值为0x00800000AREA Example3,CODE,READONLY ; 声明代码段Example3ENTRY ; 标识程序⼊⼝CODE32 ; 声明32位ARM指令START ; 使⽤MOV、RSB指令实现:R8 = R3 = X - YMOV R0,#X ; R0 <= X,X的值必须是8位图数据MOV R1,#Y ; R1 <= Y,Y的值必须是8位图数据RSB R3,R0,R1 ; 即是R3 = X-YMOV R8,R3 ; R8 <= R3;R5=R8*5-0x123ADD R8,R8,R8,LSL #2;R8=R8+4*R8=5R8LDR R2,=0x123;SUB R5,R8,R2;; 使⽤CMP指令判断(4*Y/3+30)>(3*X-20)吗?若⼤于则R5 = R5&0xFF0000FF,否则R5 = R5|0x00FF0000 MOV R0,#Y/3MOV R0,R0,LSL #2ADD R0,R0,#30MOV R1,#XADD R1,R1,R1,LSL #1SUB R1,R1,#20;CMP R0,R1 ; ⽐较R0和R1LDRHI R2,=0xFF0000FF ; 若断(4*Y/3+30)>(3*X-20)则R2 <= 0xFF0000FFANDHI R5,R5,R2 ; 若(4*Y/3+30)>(3*X-20),则R5 = R5&R2ORRLS R5,R5,#0x00FF0000 ; 若(4*Y/3+30)<=(3*X-20),则R5 = R5|0x00FF0000B STARTEND实验四汇编指令实验3实验的⽬的使⽤ARM汇编指令实现结构化程序编程1 使⽤ARM汇编指令实现 if 条件执⾏2 使⽤ARM汇编指令实现 for 循环结构3 使⽤ARM汇编指令实现 while 循环结构4 使⽤ARM汇编指令实现 do...while 循环结构5 使⽤ARM汇编指令实现 switch 开关结构1 使⽤ARM汇编指令实现 if 条件执⾏第⼀个案例 if结构;if(x>y); z=100;;else; z=50;;设x为R0,y为R1,z为R2(x,y,z均为⽆符号整数)AREA Example4,CODE,READONLY;声明代码段 Example4ENTRY;CODE32 ;声明32位ARM指令START MOV R0,#76;初始化x的值MOV R1,#234;初始化y的值CMP R0,R1;判断x>yMOVHI R2,#100;x>y条件正确,z=100MOVLS R2,#50;条件失败,z=502 使⽤ARM汇编指令实现 for 循环结构⼆案例 for结构;forIi==0;i<10;i++);{;x++;};设x为R0,i为R2(i,x均为⽆符号整数)AREA Example5,CODE,READONLY;声明代码段 Example5ENTRY;CODE32 ;声明32位ARM指令MOV R0,#0;初始化x的值MOV R2,#0;设置i=0FOR_L1 CMP R2,#10;判断i<10?BHS FOR_END;若条件失败,退出循环ADD R0,R0,#1;循环体,X++ADD R2,R2,#1;i++B FOR_L1FOR_END NOP3 使⽤ARM汇编指令实现 while 循环结构第三个案例 while结构;while(x<y);{;x*=2;};设x为R0,y为R1(x,y均为⽆符号整数)AREA Example6,CODE,READONLY;声明代码段 Example6 ENTRY;CODE32 ;声明32位ARM指令MOV R0,#1;初始化x的值MOV R2,#20;初始化y的值B WHILE_L2;⾸先要盘判断条件WHILE_L1 MOV R0,R0,LSL #1;循环体,x*=2WHILE_L2 CMP R0,R1;判断x<=yBLS WHILE_L1;若条件正确,继续循环WHILE_END NOP4 使⽤ARM汇编指令实现 do...while 循环结构第四个案例do....while()结构;do;{;x--;;}while(x>0);设x为R0,(x为⽆符号整数)AREA Example6,CODE,READONLY;声明代码段 Example6 ENTRY;CODE32 ;声明32位ARM指令MOV R0,#5;初始化x的值DOWHILE_L1 ADD R0,R0,#-1;循环体,x--;DOWHILE_L2 MOVS R0,R0;R0<=R0,并且影响条件标志BNE DOWHILE_L1;若R0不为0(即x不为0)继续循环DOWHILE_END NOP5 使⽤ARM汇编指令实现 switch 开关结构第五个案例switch;switch(key&0x0F);{; case0:; case2:; case3:x=key+y;; break;; case5:x=key-y;; break;; case7:x=key*y;; break;; default x=168;; break;;};设x为R0,y为R1,key为R2(x,y,key均为⽆符号整数)AREA Example6,CODE,READONLY;声明代码段 Example6 ENTRY;CODE32 ;声明32位ARM指令MOV R1,#3;初始化y的值MOV R2,#2;初始化key的值SWITCH AND R2,R2,#0x0F;switch(key&0x0F)CASE_0 CMP R2,#0;case0:CASE_2 CMPNE R2,#2;case2:CASE_3 CMPNE R2,#3;case3:BNE CASE_5ADD R0,R2,R1;x=key+yB SWITCH_END;break;CASE_5 CMP R2,#5;case5:BNE CASE_7SUB R0,R2,R1;x=key-yB SWITCH_END;break;CASE_7 CMP R2,#7;case7:BNE DEFAULTMUL R0,R2,R1;x=key*yB SWITCH_END;breakDEFAULT MOV R0,#168;default x=168SWITCH_END NOPHALT B HALTEND实验四思考题:;if(x>80){; if(x>90){; z=4;; }else{; z=3;; };}else{; if(x>70){; z=2;; }else{; if(x>=60) z=1;else z=0;; };};设x为R0,z为R2(x,z均为⽆符号整数)AREA Example4,CODE,READONLY;声明代码段 Example4 ENTRY;CODE32 ;声明32位ARM指令START MOV R0,#76;初始化x的值CMP R0,#80;x与80⽐较BHS IF_L1;⼤于或者等于80的时候BLO IF_L2;⼩于80的时候IF_L1 CMP R0,#90;x与90⽐较MOVHS R2,#4;⼤于等于90的时候对z=4MOVLO R2,#3;⼤于80⼩于90的时候z=3IF_L2 CMP R0,#70;x与70⽐较MOVHS R2,#2CMPLO R0,#60;MOVHS R2,#1;MOVLO R2,#0;HALT B HALTEND思考题3:if结构;if(a==b) c=100;;else c=50;;设a为R0,b为R1,c为R2;a,b,c均为⽆符号整数AREA Example4,CODE,READONLY;声明代码段 Example4 ENTRY;CODE32 ;声明32位ARM指令START MOV R1,#3;初始化y的值MOV R2,#2;初始化key的值CMP R0,R1;判断a==bMOVEQ R2,#100;MOVHE R2,#50;思考题3:for结构;for(x=0;i=5;i>0;i--);{;x=x+i;;};设x为R0,i为R2(i,x均为⽆符号整数)AREA Example4,CODE,READONLY;声明代码段 Example4ENTRY;CODE32 ;声明32位ARM指令START MOV R0,#0;初始化x的值MOV R2,#5;初始化iFOR_L1 CMP R2,#0;i>0?BLS FOR_END;ADD R0,R0,R2;SUB R2,R2,#1;B FOR_L1FOR_END NOP思考题3:while()结构;x=0;y=0;;while(x<10);{; y=y+x;; x++;;};设x为R0,y为R1(x,y均为⽆符号整数)AREA Example4,CODE,READONLY;声明代码段 Example4ENTRY;CODE32 ;声明32位ARM指令START MOV R0,#0;MOV R1,#0;B WHILE_L1;⾸先要盘判断条件WHILE_L1 ADD R1,R0,R1;ADD R0,R0,#1;WHILE_L2 CMP R0,#10;BLO WHILE_L1;WHILE_END NOP;思考题3:swith()结构;x=1;;switch(x){; case0:y=0;break;; case1:y=1;break;; case2:y=2;break;; default:y=3;break;;};设x为R0,y为R1(x,y均为⽆符号整数)AREA Example4,CODE,READONLY;声明代码段 Example4ENTRY;CODE32 ;声明32位ARM指令START MOV R0,#1;SWITCHCASE_0 CMP R0,#0;ENE CASE_1MOV R1,#0;B SWITCH_ENDCASE_1 CMP R0,#1;BNE CASE_2MOV R1,#1;B SWITCH_ENDCASE_2 CMPNE R0,#2;BNE DEFAULTMOV R1,#2;B SWITCH_ENDDEFAULT MOV R1,#3;SWITCH_END实验五;定义堆栈的⼤⼩USR_STACK_LEGTH EQU 64SVC_STACK_LEGTH EQU 0FIQ_STACK_LEGTH EQU 16IRQ_STACK_LEGTH EQU 64ABT_STACK_LEGTH EQU 0UND_STACK_LEGTH EQU 0AREA Example5,CODE,READONLY ; 声明代码段Example5ENTRY ; 标识程序⼊⼝CODE32 ; 声明32位ARM指令START MOV R0,#0MOV R1,#1MOV R2,#2MOV R3,#3MOV R4,#4MOV R5,#5MOV R6,#6MOV R7,#7MOV R8,#8MOV R9,#9MOV R10,#10MOV R11,#11MOV R12,#12BL InitStack ; 初始化各模式下的堆栈指针; 打开IRQ中断 (将CPSR寄存器的I位清零)MRS R0,CPSR ; R0 <= CPSRBIC R0,R0,#0x80MSR CPSR_cxsf,R0 ; CPSR <= R0; 切换到⽤户模式MSR CPSR_c, #0xd0MRS R0,CPSR; 切换到管理模式MSR CPSR_c, #0xdfMRS R0,CPSRHALT B HALT; 名称:InitStack; 功能:堆栈初始化,即初始化各模式下的堆栈指针。
《嵌入式系统》课程实验报告-stm32单片机gpio程序开发

实验概述
【实验目的及要求】 实验目的: 1. 掌握 STM32 单片机输入输出接口程序开发 2. 掌握用寄存器开发 STM32 单片机程序 3. 掌握用库函数开发 STM32 单片机程序 实验要求: 1. 完成实验要求中提到要完成的所有内容,完成代码并提交主要代码。 2. 分析寄存器和库函数编程的优势和劣势,你喜欢用哪种方式。 3. 对每行主要代码要进行注释,说明其功能。 实验内容:
1.熟悉 TEB-CM5000 嵌入式单片机实验系统上的 LED 灯电路和单独按钮电路。
2.学习并掌握寄存器版本、库函数版本相关的实例程序,主要学习实例 stm32referencesrcforch5 目录下的,LED、LEDLib、KEY_LED 和 KEY_LEDlib 四 个程序。
3.利用寄存器位操作模式、库函数分别开发出 USER2(PD3)按钮控制 LD5(PF7)亮灭。具体功能:USER2(PD3)按钮按下时,LD5 灯闪烁;当 USER2(PD3) 按钮弹开时,LD5 灯停止闪烁。 4.实现利用寄存器位操作模式、库函数分别开发出: 当每次 USER2(PD3)按钮 按下时,LD5 灯只闪烁一次。 【实验环境】 1. TEB-CM5000 嵌入式单片机实验系统 2. MDK4.12 嵌入式软件开发环境
2.当每次 USER2(PD3)按钮按下时,LD5 灯只闪烁一次。
(1)寄存器位操作模式 循环判断 PD3 的状态,并执行对应操作(点亮或熄灭灯)
(3) 库函数
循环判断 PD3 的状态,并执行对应操作(点亮或熄灭灯)
小结
1. 只闪烁一次跟一直闪烁的区别主要在于 Flag 值。 在只闪烁一次的程序中, 设置 flag 值作为标志,灯亮以后改变 flag 值的状态,flag 的状态改变灯的 状态就不再继续。
嵌入式系统基础--单片机实验
课程名称:嵌入式系统基础实验一双字节BCD加法实验一、实验目的(1)熟悉MCS-51指令系统,掌握程序设计方法。
(2)掌握双字节BCD加法的程序算法。
二、实验设备计算机一台。
应用软件:WAVE 6000三、实验内容和原理两数的低位相加后保留进位位,高位数相加时,将低位的进位加上。
编写并调试一个双字节BCD加法程序,设两个加数存放在30H(高)和31H(低)及35H(高)36H(低)中,结果存放在40H(高)41H(低)中在此以23H19H+79H06H为例四、实验步骤按照软件运行要求正确设置WAVE 6000软件的各种参数,然后新建ASM源程序文件,输入程序代码。
然后进行编译调试,根据编译提示结果修改错误直到编译成功,没有错误。
合理运用单步执行和全速执行等操作查看CPU、数据存储空间等的变化情况以及代码是否实现所期望的功能五、实验源代码ORG 0000HMOV 30H,#23HMOV 31H,#19HMOV 35H,#79HMOV 36H,#06HMOV R0,#30HMOV R1,#35HSTART: MOV A,@R0ADD A,@R1MOV 40H,AINC R0INC R1CLR AADDC A,@R0ADD A,@R1MOV 41H,ACLR AADDC A,#0HMOV 42H,ASJMP $END六、实验结果及截图七、实验心得通过本次实验,我学会了WAVE 6000软件的基本使用,通过对实验撑血的调试,加强了对单片机的进一步的理解,加深了对单片机编程的兴趣。
实验二冒泡排序实验一实验目的(1)熟悉MCS-51指令系统,掌握程序设计方法。
(2)掌握排序程序算法。
(3)掌握用循环程序实现数据排序的基本方法。
二实验设备计算机一台。
应用软件:WAVE 6000三实验内容编写并调试一个通用排序子程序,其功能为将RAM的30H~39H单元10个字节无符号二进制整数按从小到大顺序排序。
四实验原理从30H单元的第一个数开始依次和相邻单元的另一个数比较,如果顺序对,则不作任何操作;如果顺序不对,则将这两个数交换位置。
嵌入式开发与应用课程设计源程序代码
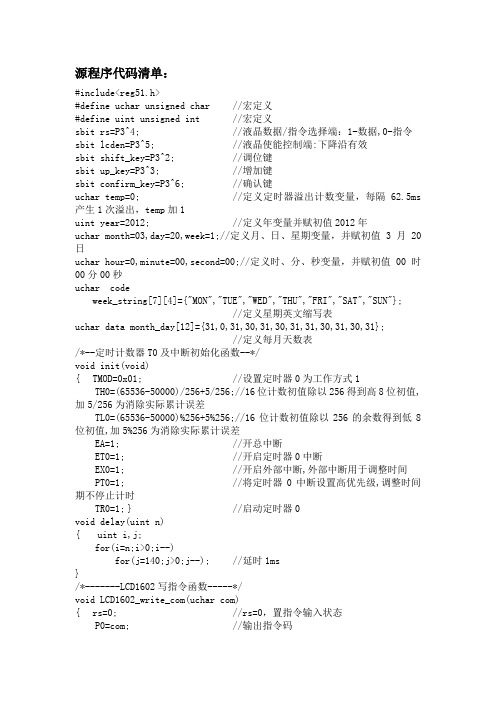
源程序代码清单:#include<reg51.h>#define uchar unsigned char //宏定义#define uint unsigned int //宏定义sbit rs=P3^4; //液晶数据/指令选择端:1-数据,0-指令sbit lcden=P3^5; //液晶使能控制端:下降沿有效sbit shift_key=P3^2; //调位键sbit up_key=P3^3; //增加键sbit confirm_key=P3^6; //确认键uchar temp=0; //定义定时器溢出计数变量,每隔62.5ms 产生1次溢出,temp加1uint year=2012; //定义年变量并赋初值2012年uchar month=03,day=20,week=1;//定义月、日、星期变量,并赋初值3月20日uchar hour=0,minute=00,second=00;//定义时、分、秒变量,并赋初值00时00分00秒uchar codeweek_string[7][4]={"MON","TUE","WED","THU","FRI","SAT","SUN"};//定义星期英文缩写表uchar data month_day[12]={31,0,31,30,31,30,31,31,30,31,30,31};//定义每月天数表/*--定时计数器T0及中断初始化函数--*/void init(void){ TMOD=0x01; //设置定时器0为工作方式1TH0=(65536-50000)/256+5/256;//16位计数初值除以256得到高8位初值,加5/256为消除实际累计误差TL0=(65536-50000)%256+5%256;//16位计数初值除以256的余数得到低8位初值,加5%256为消除实际累计误差EA=1; //开总中断ET0=1; //开启定时器0中断EX0=1; //开启外部中断,外部中断用于调整时间PT0=1; //将定时器0中断设置高优先级,调整时间期不停止计时TR0=1; } //启动定时器0void delay(uint n){ uint i,j;for(i=n;i>0;i--)for(j=140;j>0;j--); //延时1ms}/*-------LCD1602写指令函数-----*/void LCD1602_write_com(uchar com){ rs=0; //rs=0,置指令输入状态P0=com; //输出指令码delay(1); lcden=1;delay(1); lcden=0;} //lcden下降沿,使能端有效/*-------LCD1602写数据函数-----*/void LCD1602_write_dat(uchar dat){ rs=1; //rs=1,置数据输入状态P0=dat; //输出待显示字符的字符码(ASCII码)delay(1); lcden=1; delay(1); lcden=0; }void leapyear() //判断某年是否闰年函数{ if ((year%400==0) || (year%100!=0) && (year%4==0))month_day[1]=29; //闰年2月29天elsemonth_day[1]=28; } //平年2月28天uchar CaculateWeek(int y,char m, char d)//由年、月、日计算星期函数{ uchar w;if(m==1){m=13;y=y-1;}else if(m==2){m=14;y=y-1;}w=(d+2*m+3*(m+1)/5+y+y/4-y/100+y/400)%7;return w; }/*定时计数器中断程序,每当定时计数器溢出时触发中断,执行该程序*/ void time0() interrupt 1{ TH0=(65536-50000)/256+5/256;//16位计数初值除以256得到高8位初值 TL0=(65536-50000)%256+5%256;//16位计数初值除以256的余数得到低8位初值if(temp==19) //折合值,使计时准确{ temp=0;if(second==59){ second=0;if(minute==59){ minute=0;if(hour==23){ hour=0;leapyear();//闰、平年计算if(day==month_day[month-1])//判断日期是否到了每月最后一天{ day=1;if(month==12){ month=1; year++; } //年加一else month++;} //月加一else day++;} //日加一else hour++;} //时加一else minute++;} //分加一else second++;} //秒加一else temp++;week=CaculateWeek(year,month,day); } //根据年月日计算星期void int0() interrupt 0//外部中断函数,当按下shift_key键时产生外部中断进入调整状态{ bit flag;uchar setup_bit=0; //setup_bit用于计数移位次数do{ if(confirm_key==0) //判断确认键是否按下{ delay(1); //延时消抖if(confirm_key==0) //确认确认键是否按下{while(!confirm_key); //等待确认键释放setup_bit=0; //移位计数值返回0LCD1602_write_com(0x0c); //关闭光标显示goto rep; } //转移到中断程序结束处}elseif(shift_key==0) //判断移位键是否按下{delay(1);//延时消抖if(shift_key==0) //确认移位键是否按下{ while(!shift_key); //等待移位键释放if(setup_bit==10) //共10位{ setup_bit=0; //移位计数值返回0LCD1602_write_com(0x0c);//关闭光标显示goto rep; } //转移到中断程序结束处else{ setup_bit++; //移位计数值加1LCD1602_write_com(0x0e); }//打开光标显示} }switch(setup_bit) //判断调整哪位,从而确定光标显示位置{ case 1:LCD1602_write_com(0x80+0x48+4);//光标设置到分个位显示位置 break;case 2:LCD1602_write_com(0x80+0x48+3);//光标设置到分十位显示位置 break;case 3:LCD1602_write_com(0x80+0x48+1);//光标设置到时个位显示位置 break;case 4:LCD1602_write_com(0x80+0x48+0);//光标设置到时十位显示位置 break;case 5:LCD1602_write_com(0x80+0x01+9);//光标设置到日个位显示位置 break;case 6:LCD1602_write_com(0x80+0x01+8);//光标设置到日十位显示位置break;case 7:LCD1602_write_com(0x80+0x01+6);//光标设置到月个位显示位置 break;case 8:LCD1602_write_com(0x80+0x01+5);//光标设置到月十位显示位置 break;case 9:LCD1602_write_com(0x80+0x01+3);//光标设置到年个位显示位置 break;case 10:LCD1602_write_com(0x80+0x01+2);//光标设置到年十位显示位置 break;default:break; }if(up_key==0) //判断增加键是否按下{delay(1);if(up_key==0) //确认增加键是否按下{while(!up_key); //等待增加键释放flag=1; } //增加键已按动elseflag=0; } //增加键未按动elseflag=0; //增加键未按动if(flag) //若增加键按动{ switch(setup_bit) //判断是哪位,从而调整哪位{ case 1:if(minute%10==9) //若分个位为9minute=minute-9; //则分个位清零elseminute++; //否则分个位加1LCD1602_write_dat(0x30+minute%10);//写入1602LCD break;case 2:if(minute/10==5) //若分十位为5minute=minute-50; //则分十位清零elseminute=minute+10;//否则分十位加1LCD1602_write_dat(0x30+minute/10);//写入1602LCDbreak;case 3:if(hour%10==9)hour=hour-9;elsehour++;LCD1602_write_dat(0x30+hour%10);//写入1602LCDbreak;case 4:if(hour/10==2)hour=hour-20;elsehour=hour+10;LCD1602_write_dat(0x30+hour/10);//写入1602LCD break;case 5:if(day%10==9)day=day-9;elseday++;LCD1602_write_dat(0x30+day%10);//写入1602LCD break;case 6:if(day/10==3)day=day-30;elseday=day+10;LCD1602_write_dat(0x30+day/10);//写入1602LCD break;case 7:if(month%10==9)month=month-9;elsemonth++;LCD1602_write_dat(0x30+month%10);//写入1602LCD break;case 8:if(month/10==1)month=month-10;elsemonth=month+10;LCD1602_write_dat(0x30+month/10);//写入1602LCD break;case 9:if(year%10==9)year=year-9;elseyear++;LCD1602_write_dat(0x30+year%10);//写入1602LCDbreak;case 10:if(year%100/10==9)year=year-90;elseyear=year+10;LCD1602_write_dat(0x30+year%100/10);//写入1602LCD break;default: break; }} }while(setup_bit!=0); //若所有位未调整完则返回,否则退出调整模式 rep:; }/*-------LCD1602初始化函数-----*/void LCD1602_init(){LCD1602_write_com(0x38); //设置液晶显示方式:16x2行,5x7点阵,8位数据总线LCD1602_write_com(0x0c); //设置字符显示开关及光标显示模式:开启字符显示,不显示光标LCD1602_write_com(0x06); //设置数据指针及显示屏移动模式:数据指针增(即光标右移),显示屏不移LCD1602_write_com(0x01); }//液晶屏幕清屏void main(){ init(); //定时计数器T0及中断初始化LCD1602_init(); //LCD1602初始化while(1){ uchar i;LCD1602_write_com(0x80+0x01); //设置第1行显示首地址01LCD1602_write_dat(0x30+year/1000);//输出年千位的字符码LCD1602_write_dat(0x30+(year%1000)/100);//输出年百位的字符码 LCD1602_write_dat(0x30+(year%100)/10);//输出年十位的字符码LCD1602_write_dat(0x30+year%10);//输出年个位的字符码LCD1602_write_dat('-');//输出'-'字符码LCD1602_write_dat(0x30+month/10);//输出月十位的字符码LCD1602_write_dat(0x30+month%10);//输出月个位的字符码LCD1602_write_dat('-');//输出'-'字符码LCD1602_write_dat(0x30+day/10);//输出日十位的字符码LCD1602_write_dat(0x30+day%10);//输出日个位的字符码LCD1602_write_dat('(');//输出'('字符码for (i=0;i<3;i++)LCD1602_write_dat(week_string[week][i]);//输出星期英文缩写字符码 LCD1602_write_dat(')');//输出')'字符码LCD1602_write_com(0x80+0x40+0x02); //设置第2行显示首地址04 LCD1602_write_dat('T');//输出'T'字符码LCD1602_write_dat('I');//输出'I'字符码LCD1602_write_dat('M');//输出'M'字符码LCD1602_write_dat('E');//输出'E'字符码LCD1602_write_dat(':');//输出' '字符码LCD1602_write_dat(' ');//输出' '字符码LCD1602_write_dat(0x30+hour/10);//输出小时十位的字符码 LCD1602_write_dat(0x30+hour%10);//输出小时个位的字符码 LCD1602_write_dat(':');//输出':'字符码LCD1602_write_dat(0x30+minute/10);//输出分十位的字符码 LCD1602_write_dat(0x30+minute%10);//输出分个位的字符码 LCD1602_write_dat(':');//输出':'字符码LCD1602_write_dat(0x30+second/10);//输出秒十位的字符码 LCD1602_write_dat(0x30+second%10);//输出秒个位的字符码 }}}。
嵌入式系统实验(代码)
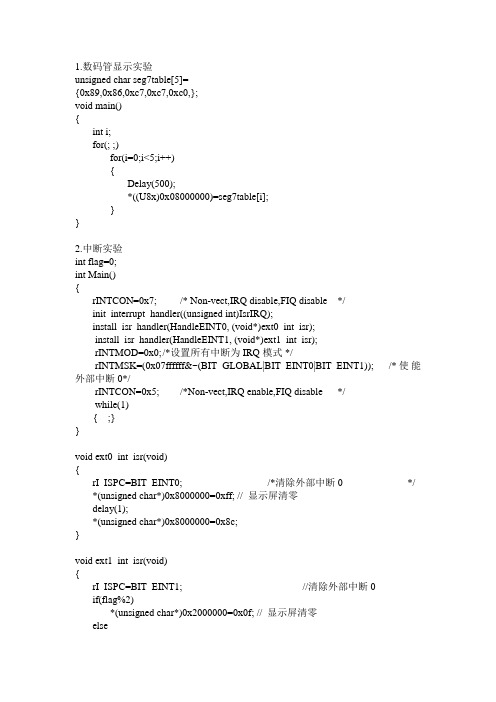
1.数码管显示实验unsigned char seg7table[5]={0x89,0x86,0xc7,0xc7,0xc0,};void main(){int i;for(; ;)for(i=0;i<5;i++){Delay(500);*((U8x)0x08000000)=seg7table[i];}}2.中断实验int flag=0;int Main(){rINTCON=0x7; /* Non-vect,IRQ disable,FIQ disable */init_interrupt_handler((unsigned int)IsrIRQ);install_isr_handler(HandleEINT0, (void*)ext0_int_isr);install_isr_handler(HandleEINT1, (void*)ext1_int_isr);rINTMOD=0x0; /*设置所有中断为IRQ模式 */rINTMSK=(0x07ffffff&~(BIT_GLOBAL|BIT_EINT0|BIT_EINT1)); /*使能外部中断0*/rINTCON=0x5; /*Non-vect,IRQ enable,FIQ disable */while(1){ ;}}void ext0_int_isr(void){rI_ISPC=BIT_EINT0; /*清除外部中断0 */ *(unsigned char*)0x8000000=0xff; // 显示屏清零delay(1);*(unsigned char*)0x8000000=0x8c;}void ext1_int_isr(void){rI_ISPC=BIT_EINT1; //清除外部中断0if(flag%2)*(unsigned char*)0x2000000=0x0f; // 显示屏清零else*(unsigned char*)0x2000000=0xff;flag++;}3.串口通信实验void Main(){unsigned char data;unsigned int mclk = 60*1024*1024; /* 60MHZ */ unsigned int baud = 115200; /* 115200 BPS */ rUFCON0=0xf7; /* 设置FIFO属性,并清除FIFO中的内容*/ rUMCON0=0x0; /* 关闭流控功能*/ rULCON0=0x3; /* 设置8数据位,1停止位,无奇偶校验*/ rUCON0=0x345; /* 设置中断为电平触发,关闭超时功能*/ rUBRDIV0=( (int)(mclk/16.0/baud + 0.5) -1 ); /* 设置波特率*/while(1){while((rUTRSTAT0 & 0x1)==0x0); /* 等待数据*/data = rURXH0; /* 读取数据*/if(data=='\r') /*如果是换行字符,补充一个回车*/{while(!(rUTRSTAT0 & 0x2)); /* 等待发送缓冲空.*/rUTXH0 = data; /* 将数据写到数据端口*/while(!(rUTRSTAT0 & 0x2)); /* 等待发送缓冲空.*/rUTXH0 = '\n'; /* 将数据写到数据端口*/}else{while(!(rUTRSTAT0 & 0x2)); /* 等待发送缓冲空.*/rUTXH0 = data; /* 将数据写到数据端口*/ }}}。
实验指导书基于STM32的嵌入式系统原理与设计.docx

实验指导书(实验)课程名称:基于STM32的嵌入式系统设计实验实验一电路板焊接与调试-•实验简介完成实验板上部分兀件的焊接,焊接完成后进行基本测试。
实验目的及原理掌握STM32F103实验板的基本原理,掌握焊接电路板的基本技能,掌握下载测试程序的基本方法。
原理:详细内容参考教材《基于STM32的嵌入式系统原理与设计》MCU和周边电路如图为MCU及其周边电路。
图1 MCU及其周边电路1. 唤醒电路,高有效,不按时接220K 电阻下拉。
2. 复位电路,低有效。
带RC 启动复位。
3. 配置启动,用跳线选择B00T1和BOOTO 接高电平或低电平。
4. 高速晶振电路,采用8M 晶振,在STM32内部倍频为72M 。
5. AD 参考电路,采用LC 滤波,可跳线选择直接接VCC 或通过TL431稳压电路产生的参考电压。
6. 后备电池。
可通过跳线选择直接接VCC 或电池。
7. AD 输入,可选择使用RC 滤波,共8路。
&低速晶振电路,选用32. 768kHz 晶振,为产生准确的串口波特率。
USB 转串口电路USB 转串口电路可以方便没有串口的笔记本电脑用户通过USB 接口下载代码到FLASH 中,及进行RS232串行通信。
USB 转串口芯片是CP2102,该芯片稳定性较好。
当其正常工作的时候,灯LED6亮。
该 芯片DP/D+引脚连MINI USB 接口的脚3, DM/D-引脚连MINI USB 接口的脚2,为一对USB 输入输出线。
TXD 与 RXD 引脚接 MCU 的 PA10 (USART1_RX)和 PA9 (USART1_TX)。
I2C 接口电路Jusbm USB图2 USB 转串口接口电路14NCNCNCNCNCNCNCONS.LO(一XE- (一ON 二 N (INHdsfls 二N 二一二乂ON本书选择的EEPROM 是AT24C02是256字节的电可擦出PROM,通过I2C 协议与STM32 进行通信,连接十分简单。
单片机原理及应用实验代码 -回复

单片机原理及应用实验代码-回复什么是单片机?单片机(Microcontroller,简称MCU)是一种集成了处理器、存储器和输入输出设备的微型计算机系统。
它具有体积小、功耗低、可编程性强等特点,被广泛应用于嵌入式系统和电子产品中。
单片机的基本原理单片机系统由CPU、存储器和输入输出设备等部分组成。
CPU是单片机的核心,它负责处理数据和控制系统的运行。
存储器包括程序存储器(ROM)和数据存储器(RAM),分别用于存储程序和数据。
输入输出设备用于与外部环境进行通信。
单片机主要靠程序来控制其内部运行。
程序是通过编程语言编写的一系列指令,通过存储器加载到单片机中。
单片机按照程序中的指令逐条执行,完成各种任务。
应用实验代码下面,我将为你介绍一些基本的单片机应用实验,并给出相应的代码示例:1. 点亮LED实验这是最基础的单片机应用实验之一。
通过编写程序控制单片机输出电平,从而点亮LED。
代码示例:include <reg52.h>sbit LED = P1^0; 定义LED连接的IO口void main(){LED = 0; 将LED引脚置低,点亮LEDwhile(1){无限循环,保持LED亮}}2. 数码管显示实验数码管是一种常见的输出设备,可用于显示数字和字符。
通过编写程序控制单片机输出电平,实现数码管上数字的显示。
代码示例:include <reg52.h>sbit SDA = P1^0; 定义SDA引脚sbit SCL = P1^1; 定义SCL引脚void delay(unsigned int x){unsigned int i, j;for(i = 0; i < x; i++){for(j = 0; j < 500; j++){空循环延时,具体时间根据单片机时钟频率确定}}}void IIC_Start(){SDA = 1;SCL = 1;SDA = 0;delay(5);SCL = 0;}void IIC_Stop(){SDA = 0;SCL = 1;SDA = 1;delay(5);}void IIC_Send_Byte(unsigned char dat){unsigned char i;for(i = 0; i < 8; i++){SDA = (dat & 0x80) >> 7;dat <<= 1;SCL = 1;SCL = 0;}}void main(){IIC_Start(); 发送起始信号IIC_Send_Byte(0x76); 发送数据,例如0x76用于控制数码管上显示的数字IIC_Stop(); 发送停止信号while(1){无限循环,保持数字的显示}}这里只是展示了两个简单的单片机实验示例,实际应用中单片机可以实现更复杂的功能,如控制电机、传感器数据处理等。
单片机嵌入式系统实验报告

单片机嵌入式系统实验报告Abstract本实验报告通过实际操作单片机嵌入式系统,并进行了相关实验,测试了其性能和功能。
本报告分为以下几个部分进行叙述:实验目的、实验器材和软件、实验方法和步骤、实验结果和分析、实验总结和展望。
1. 实验目的单片机嵌入式系统在当今的电子领域中具有广泛的应用,本实验旨在深入理解单片机工作原理和嵌入式系统的基本构成,并通过实际操作,掌握单片机编程和应用开发的技巧。
2. 实验器材和软件2.1 实验器材本次实验所需的主要器材如下:- 单片机主板- 硬件外设(例如按键、LED灯等)- 电路模块- 逻辑分析仪2.2 实验软件本次实验所用的软件工具如下:- Keil μVision- Proteus3. 实验方法和步骤3.1 硬件连接根据实验要求,将单片机主板和所需的硬件外设进行正确的连接。
确保电路连接准确无误,避免因连接错误导致的实验失败。
3.2 软件编程使用Keil μVision编写单片机嵌入式系统的程序代码。
根据实验要求,编写相应的程序逻辑,包括引脚控制、时钟配置、中断设置等。
3.3 程序下载与调试通过下载器将编写好的程序代码下载到单片机主板中。
在调试过程中,可以使用逻辑分析仪等工具,对程序运行过程中的信号波形进行观测和分析,以确保程序的正常运行。
4. 实验结果和分析根据实验过程中的观测和分析,得出以下实验结果和结论:- 实验中所编写的程序能够正确地控制硬件外设,实现预期的功能。
- 通过逻辑分析仪观测,可以清晰地看到单片机工作时各个引脚的变化情况。
- 在实际应用中,单片机嵌入式系统具有稳定可靠、节能环保的特点,适用于很多领域和场景。
5. 实验总结和展望通过本次实验,我深入了解了单片机嵌入式系统的工作原理和应用开发技巧,增强了我在嵌入式领域的实践能力和应用水平。
然而,本次实验只是对单片机嵌入式系统的简单应用,还有很多更深入和复杂的实验和应用可以开展。
未来,我将继续学习和探索嵌入式系统的更多领域和应用,提升自己的技能和能力。
单片机原理及其嵌入式应用实 验
;程序总循环入口——
;读取A口状态 ;A口7-4输入控制A口3-0输出 ;刚好为A.7-4->A.3-0
;取开关PTB0状态,0-闭合 ;剩下PTB0位 ;放入变量TmpVar
2020/2/21
25
NOP
LDA PTC
;取开关PTC0状态,0-闭合
AND #%00000001 ;剩下PTC0位
NOP
org FlashStartAddr ;程序起始地址
MainInit:
;复位后程序从此开始执行
;系统初始化
SEI
;禁止所有中断
LDHX #$023F
;堆栈初始化,放入GP32的RAM最高端
TXS
JSR Init0
;调系统初始化子程序Init0,初始学习时跳过此处
;I/O初始化
BSET 1,DDRA
;设置PTA.1为输出
ORG $FFFE DW MainInit
;复位矢量
2020/2/21
31
备注说明:
• 仅作为基本教学例程
2020/2/21
32
串行通信及AD转换实验
• 实验目的 • 实验器材 • 硬件接线 • VB界面
2020/2/21
• 软件功能 • 程序清单 • 备注说明
<<<
33
2020/2/21
34
BSET 1,PTA
;初始时,PTA.1指示灯"暗"
MainLoop:
;程序总循环入口
BCLR 1,PTA
;PTA.1指示灯“亮”
MOV #$2,N1
;延时子程序DelaySub的时间长度入口
JSR DelaySub
- 1、下载文档前请自行甄别文档内容的完整性,平台不提供额外的编辑、内容补充、找答案等附加服务。
- 2、"仅部分预览"的文档,不可在线预览部分如存在完整性等问题,可反馈申请退款(可完整预览的文档不适用该条件!)。
- 3、如文档侵犯您的权益,请联系客服反馈,我们会尽快为您处理(人工客服工作时间:9:00-18:30)。
}
LED_PORT0=0x00;//全亮
}
}
/*********** time C **************/
void time(unsigned int ucMs)//延时单位:ms
{
#define DELAYTIMES 239
LED_PORT3=0xff;//灭P3口灯
LED_PORT3=0x00;
//然后从右往左依次点亮LED
for(ucTimes=0;ucTimes<8;ucTimes++){//循环点亮P1口灯
LED_PORT3 = LED_PORT3 - (0x01<<ucTimes);//亮灯需低电平驱动
unsigned char ucCounter; // 延时设定的循环次数
while (ucMs!=0) {
for (ucCounter=0; ucCounter<DELAYTIMES; ucCounter++){}//延时
ucMs--;
}
}
time(200);
}
LED_PORT3=0x00;//全亮
பைடு நூலகம்
LED_PORT3=0x00;
//然后从右往左依次点亮LED
for(ucTimes=0;ucTimes<8;ucTimes++){//循环点亮P1口灯
LED_PORT2 = LED_PORT2 - (0x01<<ucTimes);//亮灯需低电平驱动
time(200);
}
LED_PORT1=0xff;//灭P1口灯
for(ucTimes=0;ucTimes<8;ucTimes++){//循环点亮P2口灯
LED_PORT2 = LED_PORT2 - (0x80>>ucTimes);//亮灯需低电平驱动
time(200);
#include <REG52.H>//80C52特殊功能寄存器定义
#define LED_PORT0 P0 //用P0口驱动灯,低亮,高灭
#define LED_PORT1 P1 //用P1口驱动灯,低亮,高灭
#define LED_PORT2 P2 //用P2口驱动灯,低亮,高灭
#define LED_PORT3 P3 //用P3口驱动灯,低亮,高灭
time(200);
}
LED_PORT2=0x00;//全亮
LED_PORT3=0x00;
//然后从右往左依次点亮LED
for(ucTimes=0;ucTimes<8;ucTimes++){//循环点亮P1口灯
LED_PORT1 = LED_PORT1 - (0x01<<ucTimes);//亮灯需低电平驱动
}
LED_PORT2=0xff;//灭P2口灯
for(ucTimes=0;ucTimes<8;ucTimes++){//循环点亮P3口灯
LED_PORT3 = LED_PORT3 - (0x80>>ucTimes);//亮灯需低电平驱动
time(200);
}
void time(unsigned int ucMs);/* 延时单位:毫秒 */
void main(void)
{
unsigned char ucTimes;
#define DELAY_TIME 400 //延时
while(1)
{
for(ucTimes=0;ucTimes<8;ucTimes++){//循环点亮P0口灯
time(200);
}
LED_PORT1=0x00;//全亮
LED_PORT3=0x00;
//然后从右往左依次点亮LED
for(ucTimes=0;ucTimes<8;ucTimes++){//循环点亮P0口灯
LED_PORT0 = LED_PORT0 - (0x01<<ucTimes);//亮灯需低电平驱动
LED_PORT0 = LED_PORT0 - (0x80>>ucTimes);//亮灯需低电平驱动
time(200);
}
LED_PORT0=0xff;//灭P0口灯
for(ucTimes=0;ucTimes<8;ucTimes++){//循环点亮P1口灯
LED_PORT1 = LED_PORT1 - (0x80>>ucTimes);//亮灯需低电平驱动
