SMB服务配置
Samba服务器
Samba服务器配置
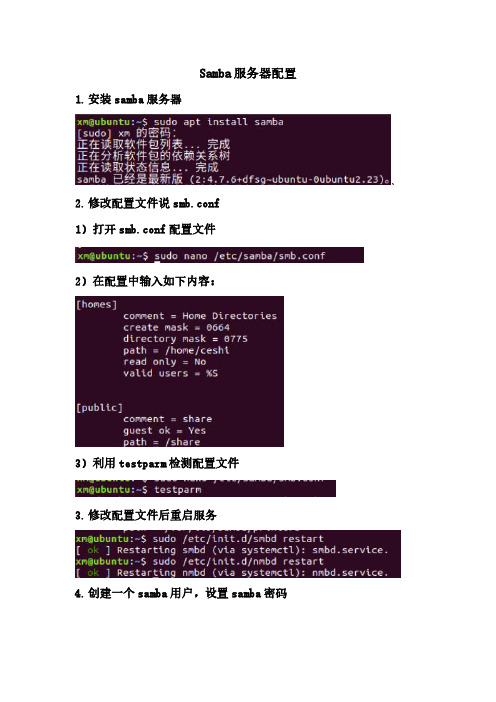
1.安装samba服务器
、2.修改配置文件说smb.conf
1)打开smb.conf配置文件
2)在配置中输入如下内容:
3)利用testparm检测配置文件
3.修改配置文件后重启服务
4.创建一个samba用户,设置samba密码
5.查看服务器IP
6.客户端登录测试在windows里面选择开始菜单->运行:输入\\IP 地址即可(如果没有办法弹出这个输入密码的对话框,可以在cmd 命令里输入net use*/del,删除windows的连接)
7.Linux客服端登录测试
1)安装smbclient
2)连接服务器利用smbclient命令(注意IP后面是共享文件名)
备注:
1.samba用户必须是服务器本地已经存在的用户
2.Samba用户必须创建用户samba密码
3.用户是否能创建文件或者目录取决于服务器的权限同时受限于操作目录权限本身。
linux下smb服务配置心得-frankma
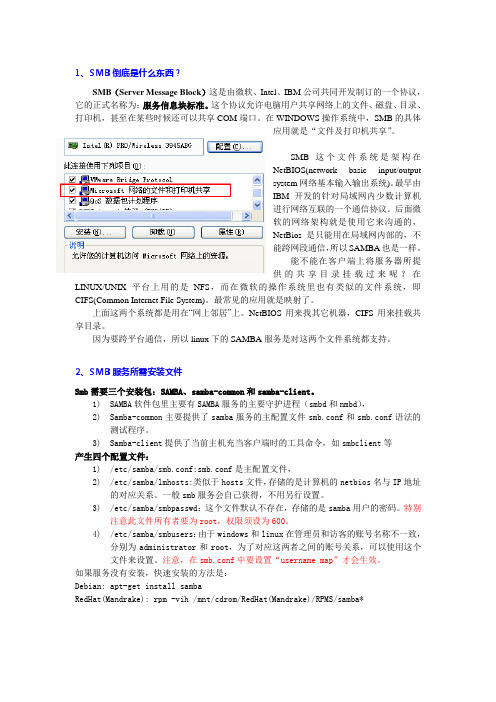
1、S MB倒底是什么东西?SMB(Server Message Block)这是由微软、Intel、IBM公司共同开发制订的一个协议,它的正式名称为:服务信息块标准。
这个协议允许电脑用户共享网络上的文件、磁盘、目录、打印机,甚至在某些时候还可以共享COM端口。
在WINDOWS操作系统中,SMB的具体应用就是“文件及打印机共享”。
SMB这个文件系统是架构在NetBIOS(network basic input/outputsystem网络基本输入输出系统)。
最早由IBM开发的针对局域网内少数计算机进行网络互联的一个通信协议。
后面微软的网络架构就是使用它来沟通的,NetBios是只能用在局域网内部的,不能跨网段通信,所以SAMBA也是一样。
能不能在客户端上将服务器所提供的共享目录挂载过来呢?在LINUX/UNIX平台上用的是NFS,而在微软的操作系统里也有类似的文件系统,即CIFS(Common Internet File System)。
最常见的应用就是映射了。
上面这两个系统都是用在“网上邻居”上。
NetBIOS用来找其它机器,CIFS用来挂载共享目录。
因为要跨平台通信,所以linux下的SAMBA服务是对这两个文件系统都支持。
2、S MB服务所需安装文件Smb需要三个安装包:SAMBA、samba-common和samba-client。
1)SAMBA软件包里主要有SAMBA服务的主要守护进程(smbd和nmbd),2)Samba-common主要提供了samba服务的主配置文件smb.conf和smb.conf语法的测试程序。
3)Samba-client提供了当前主机充当客户端时的工具命令,如smbclient等产生四个配置文件:1)/etc/samba/smb.conf:smb.conf是主配置文件,2)/etc/samba/lmhosts:类似于hosts文件,存储的是计算机的netbios名与IP地址的对应关系。
SMB服务器配置与使用
SMB服务器配置与使⽤⼀、samba简介SMB协议是建⽴在NetBIOS协议之上的应⽤协议,是基于TCP138、139两个端⼝的服务,NetBIOS出现之后,Microsoft就使⽤NetBIOS实现了⼀个⽹络⽂件/打印服务系统。
这个系统基于NetBIOS设定了⼀套⽂件共享协议,Microsoft称之为SMB(Server Message Block)协议,这个协议被⽤于Lan Manager和Windows服务器系统中,实现不同计算机之间共享打印机和⽂件等。
因此,为了让Windows和Unix/Linux计算机相集成,最好的办法就是在Unix/Linux计算机中安装⽀持SMB协议的软件。
这样使⽤Windows的客户端不需要更改设置,就能像使⽤Windows NT或Windows 2000服务器⼀样,使⽤Unix/Linux计算机上的共享资源了。
Samba使SMB协议运⾏在NetBIOS协议上,并且使⽤Windows的NetBEUI协议让Unix/Linux服务器可以在Windows的⽹络邻居上被访问到。
⼆、Samba的守护进程1. smbd 监听139 TCP端⼝设置共享⽬录、打印等2. nmbd 137. 138 UDP端⼝管理群组、NetBIOS 等解析⼯作这⾥要注意的是fedora9基于安全考虑,把smb和nmb两个服务给分离了,平时我们在使⽤samba服务的时候,在启动smb服务的同时nmb这个服务也会跟着启动,fedora9中则不然,这就造成了我们设置好fedora9中共享的时候,只能使⽤\\ip 来访问,⽽不能使⽤\\计算机名来访问,解决的办法就是同时启动smb和nmb服务三、软件的安装使⽤rpm –qa|gerp samba来检查是否安装了samba 软件包,如果没有安装的话请⾃⾏安装以下的软件包#rpm –ivh samba-3.2.0-1.pre3.9.fc9.i386.rpm#rpm –ivh samba-winbind-3.2.0-1.pre3.9.fc9.i386.rpm#rpm –ivh samba-common-3.2.0-1.pre3.9.fc9.i386.rpm#rpm –ivh samba-client-3.2.0-1.pre3.9.fc9.i386.rpm#rpm –ivh system-config-samba-1.2.63-1.fc9.noarch.rpm或者你⽤yum install samba* -y就可以⼀次搞定了。
SMB服务器配置与使用
SMB服务器配置与使用SMB服务器(Server Message Block)是一种用于文件共享和打印服务的网络协议,常用于局域网中的文件共享和资源访问。
本文将介绍SMB服务器的配置步骤和使用方法,帮助读者快速搭建和利用SMB服务器。
一、SMB服务器配置1. 操作系统选择SMB服务器可在多种操作系统上进行配置,包括Windows、Linux 和Mac OS等。
根据服务器的需求和管理员的喜好,选择合适的操作系统进行配置。
2. 安装SMB服务器软件在选择的操作系统上安装适当的SMB服务器软件。
不同的操作系统有不同的软件选择,例如在Windows上可以使用Windows Server操作系统提供的SMB服务器功能,或者使用第三方软件如Samba。
3. 网络设置配置SMB服务器所在计算机的网络设置,确保服务器能够与其他计算机进行通信。
设置IP地址、子网掩码、网关等参数,以确保服务器的网络可用性。
4. 共享文件夹设置选择要共享的文件夹,并进行相应的设置。
在操作系统中选择文件夹属性,设置共享权限和访问权限,以控制其他计算机对该文件夹的访问。
5. 用户管理配置SMB服务器的用户管理,包括添加和删除用户账号、分配用户权限等。
确保只有授权用户能够访问共享文件夹,增强服务器的安全性。
二、SMB服务器使用方法1. 访问共享文件夹在其他计算机上访问SMB服务器共享的文件夹。
打开文件资源管理器,输入服务器的IP地址或计算机名,并输入正确的用户名和密码,即可浏览和访问共享文件夹中的文件。
2. 文件上传和下载将本地文件上传到SMB服务器,或从服务器下载文件到本地计算机。
在文件资源管理器中选择要上传或下载的文件,右键点击选择相应的操作,即可完成文件传输。
3. 文件权限管理根据需要对共享文件夹中的文件进行权限管理。
在服务器上设置文件的访问权限,包括读、写、删除等操作权限,以控制用户对文件的操作。
4. 打印服务SMB服务器还支持打印服务。
LinuX下SMB的配置 详解
LinuX下SMB的配置详解二、在linux服务器端开始SAMBA:(以下操作在192.168.0.31上执行)1、默认情况下,SMB服务是停止的,首先启动SMB。
启动SMB服务:service smb start2、设置SMB共享目录:vi /etc/samba/smb.conf,在最后加入想要共享的文件夹:[rhhhome];共享名称path = /home/rhh;共享文件夹路径writeable = yes;是否可写guest ok = yes;是否允许GUEST访问3、设置SMB用户:用root登陆,smbpasswd -a rhh;增加SMB用户,同时会提示设置密码smbpasswd –x rhh;删除SMB用户三、在客户端连接SMB服务器:(以下操作在192.168.10.1上执行)连接SMB共享有两种方式:smbclient和smbmount1、smbclient:连接后的操作方法与FTP登陆基本一样smbclient -L 192.168.0.31;查看共享资源,会看到有一个"rhhhome"共享目录smbclient //192.168.0.31/rhhhome-U rhh;连接SMB共享目录,进入后上传和下载文件的命令用法与FTP类似。
例如:get xxxxx;下载某个文件put xxxxx;上传某个文件mget *;下载当前目录下所有文件tar c test.tar notes/;打包notes目录下所有文件2、smbmount:推荐使用-方便mkdir /mnt/smbtmp;为共享文件建立mount点smbmount //192.168.0.31/rhhhome /mnt/smbtmp -o rhh;mount共享目录,mount后就可以进入/mnt/smbtmp操作远端主机上的共享目录了。
smbumount /mnt/smbtmp;umount共享目录3、用主机名代替IP地址进行连接:vi /etc/samba/lmhosts,加入主机名和IP的映射关系:例如:加入一行192.168.0.31 RHAS3这样上面所有的命令中的IP地址都可以用RHAS3来代替。
Linux下的SMB服务安装及配置

SMB服务安装及配置:一、联通网络:1、安装系统时候,在虚拟机设置里面把网络适配器改成桥接模式。
(已经安装好的系统可以在虚拟机菜单下的【虚拟机】→【设置】下面改)2、在Linux下修改网络IP为:192.168.12.201。
3、在Win下打开【网络和Internet】→【网络连接】,查看本地连接的属性,IPV4属性,设置静态IP地址:192.168.12.200。
点击【确定】保存退出。
4、在虚拟机的Linux系统下,Ping本身IP:命令输入:Ping 192.168.12.201;Ping过了再PingWin下的IP:Ping 192.168.12.200。
如果Ping通了,再到Win下命令提示符下Ping本身和Linux的IP。
如果都Ping通了就开始下一步操作。
二、SMB安装与配置:1.安装smb服务:首先在shell里面查询自己是否安装了smb。
[root@localhost ~]# rpm -qa samba | grep 'samba'samba-3.0.21b-2 // 如果有类似这行输出,则表示安装了 smb,否则需要安装下载或从光盘上找到SMB服务安装包。
安装(samba*代表其安装包名称):# rpm -ivh samba*2.配置SMB文件:# vi /etc/samba/smb.conf在“Share Definitions”区段添加如下内容:[Test]comment = Test Directoriespath = /home/sharebrowseable = yeswriteable = yes保存并退出。
添加一个用户并设置密码:# useradd smbtest# passwd smbtest......SMB与系统共用用户名,但不共用密码。
也就是说,上面设置的用户名对SMB有效,但密码对SMB无效,需用smbpasswd命令另外添加一个密码。
Samba服务的配置总结
Samba服务的配置总结之前介绍了,这⾥简单总结下Samba服务参数的配置说明:Samba服务的主配置⽂件是smb.conf,默认在/etc/samba/⽬录下。
smb.conf含有多个段,每个段由段名开始,直到下个段名。
每个段名放在⽅括号中间。
每段的参数的格式是:名称=指。
配置⽂件中⼀⾏⼀个段名和参数,段名和参数名不分⼤⼩写。
除了[global]段外,所有的段都可以看作是⼀个共享资源。
段名是该共享资源的名字,段⾥的参数是该共享资源的属性。
Samba安装好后,使⽤testparm命令可以测试smb.conf配置是否正确。
使⽤testparm –v命令可以详细的列出smb.conf⽀持的配置参数。
[root@samba-server ~]# testparm /etc/samba/smb.confLoad smb config files from /etc/samba/smb.confrlimit_max: increasing rlimit_max (1024) to minimum Windows limit (16384)Processing section "[homes]"Processing section "[printers]"Processing section "[print$]"Processing section "[kevin]"Loaded services file OK.Server role: ROLE_STANDALONEPress enter to see a dump of your service definitions.......[kevin]comment = please do not modify it all willpath = /home/kevinread only = No⼀、全局参数====================Global Settings =====================[global]config file = /usr/local/samba/lib/smb.conf.%m说明:config file可以让你使⽤另⼀个配置⽂件来覆盖缺省的配置⽂件。
smb安装与配置
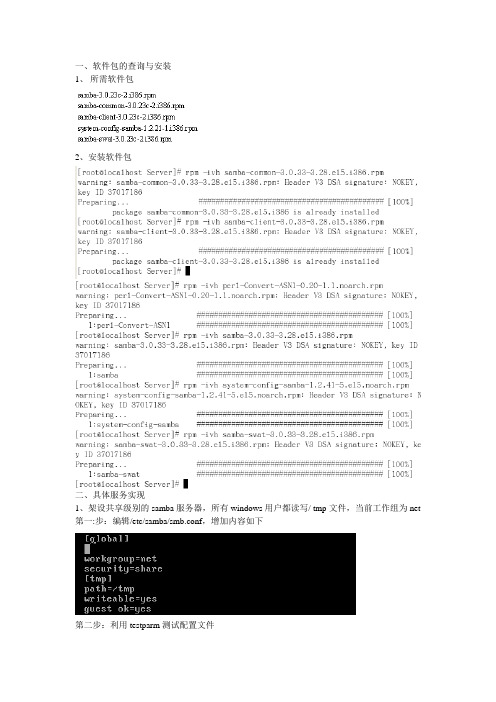
一、软件包的查询与安装
1、所需软件包
2、安装软件包
二、具体服务实现
1、架设共享级别的samba服务器,所有windows用户都读写/ tmp文件,当前工作组为net 第一:步:编辑/etc/samba/smb.conf,增加内容如下
第二步:利用testparm测试配置文件
第三步:按Enter键显示详细配置内容
第四步:重启动smb服务
2.架设共享级别的samba服务器,jerry用户和hellen用户可利用samba服务器访问其主目录中的文件,当前工作组为workgroup
第一步:添加samba用户
第二步:编辑/etc/samba/smb.conf,增加内容如下
第三步:利用testparm测试配置文件
第四步:按Enter键显示详细配置内容
第五步:重启动smb服务
3、架设用户级别的Samba服务器,其中jerry用户和hellen用户可访问个人其主目录、/tmp 目录和/var/samba/he-jerry,而其他用普通用户只能访问其个人主目录和/tmp,假设jerry和hellen用户存在,/var/samba/he-jerry目录存在,工作组为net
第一步:添加samba用户
第二步:编辑/etc/samba/smb.conf,增加内容如下
第三步:利用testparm测试配置文件
第四步:按Enter键显示详细配置内容
第五步:重启动smb服务
第六步:读取共享信息。
(完整word版)samba服务器配置
Samba概述接触Linux我们听的最多的就是Samba服务,为什么Samba应用这么广泛,原因是Samba 最先在Linux和Windows两个平台之间架起了一座桥梁,正是由于Samba的出现,我们可以在Linux系统和Windows系统之间互相通信,比如拷贝文件、实现不同操作系统之间的资源共享等等,我们可以将其架设成一个功能非常强大的文件服务器,也可以将其架设成打印服务器提供本地和远程联机打印,甚至我们可以使用Samba Server完全取代NT/2K/2K3中的域控制器,做域管理工作,使用也非常方便。
一、Samba相关进程Samba服务是由两个进程组成,分别是nmbd和smbd.nmbd:其功能是进行NetBIOS名解析,并提供浏览服务显示网络上的共享资源列表。
smbd:其主要功能就是用来管理Samba服务器上的共享目录、打印机等,主要是针对网络上的共享资源进行管理的服务。
当要访问服务器时,要查找共享文件,这时我们就要依靠smbd这个进程来管理数据传输。
二、Samba的安装及工作原理建议在安装Samba服务之前,使用rpm -qa命令检测系统是否安装了Samba相关性软件包:Rpm –qa | grep samba如果系统还没有安装Samba软件包,我们可以使用rpm命令安装所需软件包。
安装Samba主程序包:rpm –ivh samba-3。
0.25b—0。
el5。
4.i386.rpm其他软件包的安装方法也一样安装Samba客户端工具:rpm –ivh samba—client—3.0.25b-0.el5。
4。
i386。
rpm安装Samba通用工具和库文件:rpm –ivh samba-common-3。
0.25b—0。
el5.4。
i386.rpm 其实我们一开始rpm —qa|grep samba命令查询时已经发现客户端工具和通用工具及库文件已经安装了,我们上面两步安装就可以不要执行了,最后我们安装Samba图形化管理工具: rpm –ivh samba—swat—3。
Samba服务器配置和访问Samba共享

Samba服务器配置和访问Samba共享Samba是一款开源软件,可以实现基于SMB/CIFS协议的文件和打印机共享。
它可以在不同的操作系统之间共享数据,例如在Linux和Windows之间。
在本文中,我们将学习如何配置Samba服务器并访问Samba共享。
配置Samba服务器首先,我们需要安装Samba软件包。
对于基于Debian或Ubuntu的Linux系统,可以使用以下命令进行安装:sudo apt-get updatesudo apt-get install samba安装完成后,我们需要编辑Samba的配置文件smb.conf。
该文件通常位于/etc/samba目录下。
我们可以使用vim或nano等文本编辑器来编辑此文件。
以下是一些重要的配置选项:全局设置[global]workgroup = WORKGROUP # 工作组名称server string = Samba Server %v # 服务器描述信息netbios name = ubuntu # NetBIOS名称security = user # 认证方式map to guest = bad user # 没有Samba帐户时模拟来宾帐户dns proxy = no # 是否启用DNS代理共享设置以下是一个名为smbshare的示例共享,共享路径是/home/smbshare。
[smbshare]path = /home/smbshare # 共享路径valid users = @smbgrp # 允许访问的Samba组guest ok = no # 是否允许来宾访问writable = yes # 是否可写用户设置可以使用pdbedit命令添加Samba用户。
sudo pdbedit -a username替换username为要添加的用户名。
启动Samba服务在完成配置之后,我们需要启动Samba服务,并在防火墙中打开Samba端口(TCP 137-139和TCP / UDP 445)。
Samba服务配置及配置文件说明
max log size = 50
//日志文件的大小,单位默认为KB
security = user
share:匿名访问,即客户端访问共享时不必输入用户名和密码,较为常用
user:基于身份认证访问,即客户端访问共享时必须输入正确的用户名和密码,较为常用
server:使用指定主机进行身份验证。即基于远程主机完成认证的访问
//提供服务的接口,可写接口名,IP地址等
hosts allow = 127. 192.168.12. 192.168.13.
//允许访问服务的客户端,可写网络号,主机IP地址等
log file = /var/log/samba/log.%m 分
//以每一个客户机建立一个独立的日志文件,%m代表以客户机主机名或IP地址为文件名的组成部
指明写操作后是否进行同步操作 指明忽略文件名大小写 指明保持文件名大小写 指明是否对大小写敏感 指明混合大小写 指明缺省的文件名是全部大写还是小写 强制指定建立文件的属主是谁 指明是否允许共享外符号连接 设定同时连接数是n 指明能否删除已经被定义为只读的文件
root preexec = /bin/mount -t iso9660 /dev/cdrom /mnt/cdrom root postexec = /bin/umount /mnt/cdrom
//工作组名称
server string = qiangge Samba Server //服务器描述
netbios name = SMBSERVER1
//SAMBA服务NETBIOS名,可与hostname不同
interfaces = lo eth0 192.168.12.2/24 192.168.13.2/24
amba服务器的配置
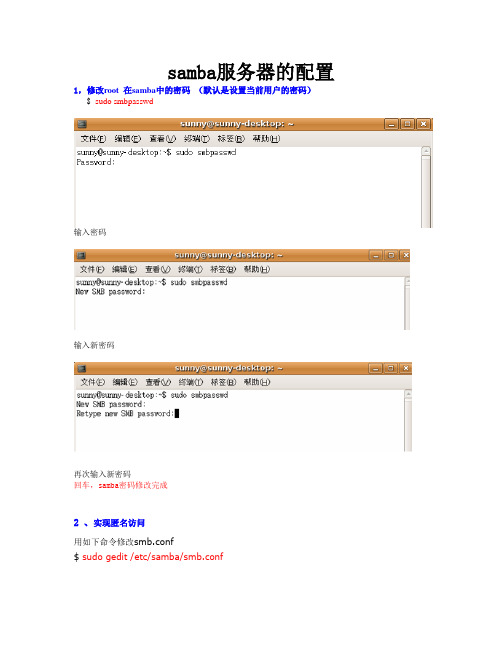
samba服务器的配置1,修改root 在samba中的密码(默认是设置当前用户的密码)$sudo smbpasswd输入密码输入新密码再次输入新密码回车,samba密码修改完成2 、实现匿名访问用如下命令修改smb.conf$ sudo gedit /etc/samba/smb.conf回车将security=user那一行前的注释符";"去掉,然后把user改为share,这样可以实现匿名访问。
再用如下命令重启samba$ sudo /etc/init.d/samba restart3、修改配置文件vi /etc/samba/smb.conf将其中禁止root用户的语句屏蔽掉invalid users = root改为#invalid users = root取消homes的屏蔽,这样才能看到root目录[homes]comment = Home Directoriesbrowseable = no取消写保护writable=no改为writable=yes保存退出4、重新启动samba/etc/init.d/samba restart5、在xp的浏览器的地址栏中输入\\ XXX.XXX.XXX.XXX输入用户root 和密码完成!!SAMBA最简单的配置方法1.先察看系统是否有SAMB是否有SAMB[root@LinuxServer ~]# rpm -qa |grep sambasamba-3.0.10-1.4E.6samba-client-3.0.10-1.4E.6system-config-samba-1.2.21-1samba-common-3.0.10-1.4E.62.配置smb.conf文件# cd /etc/samba/# vi smb.conf-----------------------------------------# This is the main Samba configuration file. You should read the# smb.conf(5) manual page in order to understand the options listed# here. Samba has a huge number of configurable options (perhaps too# many!) most of which are not shown in this example## Any line which starts with a ; (semi-colon) or a # (hash)# is a comment and is ignored. In this example we will use a ## for commentry and a ; for parts of the config file that you# may wish to enable## NOTE: Whenever you modify this file you should run the command "testpa rm"# to check that you have not made any basic syntactic errors.##======================= Global Settings =============================== ======[global]# workgroup = NT-Domain-Name or Workgroup-Nameworkgroup = workgroup 设置工作组,与windodws同组# server string is the equivalent of the NT Description field server string = Samba Server 主机说明# This option is important for security. It allows you to restrict# connections to machines which are on your local network. The# following example restricts access to two C class networks and# the "loopback" interface. For more examples of the syntax see# the smb.conf man page; hosts allow = 192.168.1. 192.168.2. 127.# if you want to automatically load your printer list rather# than setting them up individually then you'll need thisprintcap load printers = yes# It should not be necessary to spell out the print system type unless # yours is non-standard. Currently supported print systems include:# bsd, sysv, plp, lprng, aix, hpux, qnx; printing = cups# This option tells cups that the data has already been rasterizedcups options = raw# Uncomment this if you want a guest account, you must add this to /etc/ passwd# otherwise the user "nobody" is used; guest account = pcguest# this tells Samba to use a separate log file for each machine# that connectslog file = /var/log/samba/%m.log# all log information in one file# log file = /var/log/samba/smbd.log# Put a capping on the size of the log files (in Kb).max log size = 50# Security mode. Most people will want user level security. See# security_level.txt for details.security = share 用来设置共享模式,share是不进行安全登陆# Use password server option only with security = server; password server =# Password Level allows matching of _n_ characters of the password for # all combinations of upper and lower case.; password level = 8; username level = 8# You may wish to use password encryption. Please read# ENCRYPTION.txt, Win95.txt and WinNT.txt in the Samba documentation. # Do not enable this option unless you have read those documents; encrypt passwords = yes; smb passwd file = /etc/samba/smbpasswd# The following are needed to allow password changing from Windows to # update the Linux system password also.# NOTE: Use these with 'encrypt passwords' and 'smb passwd file' above. # NOTE2: You do NOT need these to allow workstations to change only# the encrypted SMB passwords. They allow the Unix password# to be kept in sync with the SMB password.; unix password sync = Yes; passwd program = /usr/bin/passwd %u; passwd chat = *New*UNIX*password* %n\n *ReType*new*UNIX*password* %n\ n *passwd:*all*authentication*tokens*updated*successfully*# Unix users can map to different SMB User names; username map = /etc/samba/smbusers# Using the following line enables you to customise your configuration # on a per machine basis. The %m gets replaced with the netbios name# of the machine that is connecting; include = /etc/samba/smb.conf.%m# Most people will find that this option gives better performance.# See speed.txt and the manual pages for detailssocket options = TCP_NODELAY SO_RCVBUF=8192 SO_SNDBUF=8192# Configure Samba to use multiple interfaces# If you have multiple network interfaces then you must list them# here. See the man page for details.; interfaces = 192.168.12.2/24 192.168.13.2/24# Configure remote browse list synchronisation here# request announcement to, or browse list sync from:# a specific host or from / to a whole subnet (see below); remote browse sync = 192.168.3.25 192.168.5.255# Cause this host to announce itself to local subnets here; remote announce = 192.168.1.255 192.168.2.44# Browser Control Options:# set local master to no if you don't want Samba to become a master# browser on your network. Otherwise the normal election rules apply; local master = no# OS Level determines the precedence of this server in master browser # elections. The default value should be reasonable; os level = 33# Domain Master specifies Samba to be the Domain Master Browser. This # allows Samba to collate browse lists between subnets. Don't use this # if you already have a Windows NT domain controller doing this job; domain master = yes# Preferred Master causes Samba to force a local browser election on sta rtup# and gives it a slightly higher chance of winning the election; preferred master = yes# Enable this if you want Samba to be a domain logon server for# Windows95 workstations.; domain logons = yes# if you enable domain logons then you may want a per-machine or# per user logon script# run a specific logon batch file per workstation (machine); logon script = %m.bat# run a specific logon batch file per username; logon script = %U.bat# Where to store roving profiles (only for Win95 and WinNT)# %L substitutes for this servers netbios name, %U is username # You must uncomment the [Profiles] share below; logon path = 错误!超链接引用无效。
samba服务器配置
samba服务器配置Samba是在Linux和UNIX系统上实现SMB协议的一个免费软件,由服务器及客户端程序构成。
SMB(Server Messages Block,信息服务块)是一种在局域网上共享文件和打印机的一种通信协议,它为局域网内的不同计算机之间提供文件及打印机等资源的共享服务。
SMB协议是客户机/服务器型协议,客户机通过该协议可以访问服务器上的共享文件系统、打印机及其他资源。
配置Samba服务,实现与windows 系统文件共享。
Linux系统默认已经安装了Samba,但是没有安装Samba服务:1、先查看安装情况:rpm -qa|grep samba根据系统的安装情况选择下载或者通过光驱安装所缺的rpm包。
我的安装情况是:使用命令:mount /dev/cdrom1 /mnt/cdrom1通过mount把cdrom1挂载到系统临时目录/mnt/cdrom1,在Packets包下面使用命令:rpm -ivh samba.*.rpm包安装。
切换到放置rpm文件的目录[root@smb_server root]# rpm -ivh samba-common-3.6.9-151.el6.x86_64这是Samba 必备的程序,必须安装[root@smb_server root]# rpm -ivh samba-3.6.9-151.el6.x86_64安装Samba 服务器程序,可以使我Windows 主机访问Samba 服务器共享的资源。
如果需要使Linux 主机访问Windows 主机上的共享资源,则还应该安装Samba 客户端程序。
[root@smb_server root]# rpm -ivh samba-client-3.6.9-151.el6.x86_642、安装samba的rpm包完成后samba-common-3.6.9-151.el6.x86_64 //主要提供samba服务器的设置文件与设置文件语法检验程序te stparmsamba-client-3.6.9-151.el6.x86_64 //客户端软件,主要提供linux主机作为客户端时,所需要的工具指令集samba-swat-3.6.9-151.el6.x86_64 //基于https协议的samba服务器web配置界面samba-3.6.9-151.el6.x86_64 //服务器端软件,主要提供samba服务器的守护程序,共享文档,日志的轮替,开机默认选项Samba服务器安装完毕,会生成配置文件目录/etc/samba和其它一些samba可执行命令工具,/etc/samba/smb.conf是samba的核心配置文件,/etc/init.d/smb是samba的启动/关闭文件。
- 1、下载文档前请自行甄别文档内容的完整性,平台不提供额外的编辑、内容补充、找答案等附加服务。
- 2、"仅部分预览"的文档,不可在线预览部分如存在完整性等问题,可反馈申请退款(可完整预览的文档不适用该条件!)。
- 3、如文档侵犯您的权益,请联系客服反馈,我们会尽快为您处理(人工客服工作时间:9:00-18:30)。
samba 是一个文件共享协议,用于在计算机之间共享文件。
linux 支持支持 samba 协议。
但在 linux 系统之间进行文件共享时,一般使用 nfs。
samba 一般用于 linux 和 windows 之间 的文件共享,在服务器环境中,Windows 服务器对设备的支持较好,比如一些备份设备;上 层的应用软件也可能需要 linux 的文件,由于 windows 2003 及以下版本对 nfs 支持不好,在 linux 和 Windows 之间共享文件一般用 samba。
假设有一台磁带机安装在 Windows Server 下, 为了实现备份 linux 的文件, 则需要 linux 系统安装 samba 服务,发布共享目录,便于 Windows 系统共享和备份。
(一)安装 SMB[root@myserver ~]# rpm -q samba package samba is not installed [root@myserver ~]# mount /dev/cdrom /mnt mount: block device /dev/cdrom is write-protected, mounting read-only [root@myserver ~]# cd /mnt/Server [root@myserver Server]# ls *samba* samba-3.0.23c-2.i386.rpm samba-swat-3.0.23c-2.i386.rpm samba-client-3.0.23c-2.i386.rpm system-config-samba-1.2.39-1.el5.noarch.rpm samba-common-3.0.23c-2.i386.rpm [root@myserver Server]# rpm -ivh samba-3.0.23c-2.i386.rpm warning: samba-3.0.23c-2.i386.rpm: Header V3 DSA signature: NOKEY, key ID 37017186 Preparing... ########################################### [100%] 1:samba ########################################### [100%] [root@myserver Server]# service smb status smbd 已停 nmbd 已停 [root@myserver Server]# service smb start 启动 SMB 服务: [确定] 启动 NMB 服务: [确定] 为了让 windows 访问共享,需要先添加一个系统帐户,并为该帐户设置 smb 密码,该 密码和 linux 帐户密码可以不同,以便保证即使知道共享密码也不能直接登入 linux。
[root@myserver samba]# useradd smbwin [root@myserver samba]# smbpasswd -a smbwin New SMB password: Retype new SMB password: Added user smbwin. [root@myserver samba]# cat smbpasswd smbwin:504:44EFCE164AB921CAAAD3B435B51404EE:32ED87BDB5FDC5E9CBA885 47376818D4:[U ]:LCT-4A55A486: [root@myserver samba]# gedit smb.conf添加一个名为 attshare 的共享, 共享上个实验中 nfs 服务器对应的/nfs 目录, 以便 Windows 备份该目录的文件,共享用户为 smbwin,可读不可写: [attshare] comment=nfs attachment share path=/nfs valid users=smbwin public=no writable=no 保存。
[root@myserver samba]# service smb restart 关闭 SMB 服务: 关闭 NMB 服务: 启动 SMB 服务: 启动 NMB 服务:[确定] [确定] [确定] [确定]在 windows 下,打开资源管理器或浏览器,在地址栏中输入\\172.16.1.155\,输入 smbwin 用户和密码,即可看到对应的共享目录了。
(二)samba 配置文件smb.conf 文件的功能包括: [global] 模拟域名或工作组名 workgroup = MYGROUP 服务器名 server string = Samba Server 安全模式,用户/服务器/域/活动目录 security = user IP 地址过滤 ; hosts allow = 192.168.1. 192.168.2. 127. 打印机共享 load printers = yes 打印机共享名 ; printcap name = /etc/printcap printcap name = lpstat 打印系统类型 # bsd, cups, sysv, plp, lprng, aix, hpux, qnx ; printing = cups # This option tells cups that the data has already been rasterized cups options = raw 匿名用户组 # Uncomment this if you want a guest account, you must add this to /etc/passwd # otherwise the user "nobody" is used ;; guest account = pcguest 日志记录 # this tells Samba to use a separate log file for each machine # that connects log file = /var/log/samba/%m.log 日志最大大小 K # Put a capping on the size of the log files (in Kb). max log size = 50 当安全限定为服务器时的服务器密码 # Use password server option only with security = server # The argument list may include: # password server = My_PDC_Name [My_BDC_Name] [My_Next_BDC_Name] # or to auto-locate the domain controller/s # password server = * ; password server = <NT-Server-Name> 安去限定为活动目录时名称 # Use the realm option only with security = ads # Specifies the Active Directory realm the host is part of ; realm = MY_REALM 附加配置文件 ; include = /usr/local/samba/lib/smb.conf.%m 网卡 IP 地址使用限定 ; interfaces = 192.168.12.2/24 192.168.13.2/24 默认用户目录共享 [homes] comment = Home Directories browseable = no writable = yes 默认打印机共享 [printers] comment = All Printers path = /usr/spool/samba browseable = no # Set public = yes to allow user 'guest account' to print guest ok = no writable = no printable = yes 共享实例 myshare ;[myshare] 共享名称说明; comment = Mary's and Fred's stuff 路径 ; path = /usr/somewhere/shared 用户 ; valid users = mary fred 是否公开 ; public = no 是否可写 ; writable = yes 是否打印机 ; printable = no 掩码 ; create mask = 0765(三) 使用 smbclient 在 linux 下访问 smb 共享[root@myserver Server]# rpm -ivh samba-client-3.0.23c-2.i386.rpm warning: samba-client-3.0.23c-2.i386.rpm: Header V3 DSA signature: NOKEY, key ID 37017186 Preparing... ########################################### [100%] 1:samba-client ########################################### [100%] [root@myserver Server]# 以某用户身份列某服务器上的共享目录 安装 smbclient 客户端 [root@myserver samba]# smbclient -L //myserver -U smbwin Password: Domain=[MYSERVER] OS=[Unix] Server=[Samba 3.0.23c-2] Sharename Type Comment -----------------attshare Disk nfs attachment share IPC$ IPC IPC Service (Samba Server) smbwin Disk Home Directories Domain=[MYSERVER] OS=[Unix] Server=[Samba 3.0.23c-2] Server --------Workgroup --------Comment ------Master -------MYGROUP 以某用户身份访问共享目录 [root@myserver samba]# smbclient //myserver/attshare -U smbwin Password: Domain=[MYSERVER] OS=[Unix] Server=[Samba 3.0.23c-2] smb: \> ls . D 0 Thu Jul 9 10:31:15 2009 .. D 0 Sat Jul 25 08:22:11 2009 111 D 0 Thu Jul 9 09:29:56 2009 a.txt 17 Thu Jul 9 09:28:39 2009 att.tar 10240 Sun Jul 8 10:27:49 2007 attachment D 0 Thu Jul 9 10:44:33 2009 58113 blocks of size 262144. 46514 blocks available 使用方式与 FTP 命令类似 smb: \> help ? altname case_sensitive cd dir du hardlink help lowercase ls mkdir more print prompt queue quit rename reput stat symlink volume vuid ! smb: \> quit [root@myserver samba]# 使用 smbmount 映射共享目录 archive chmod exit history mask mput put rd rm tar logon blocksize chown get lcd md newer pwd recurse rmdir tarmode listconnect cancel del getfacl link mget open q reget setmode translate showconnect。
