JEEP大切诺基2010产品手册
克莱斯勒Cherokee漫步者 快速维修技术资料手册.doc
Cherokee快速维修技术资料手册2007年4月目录1.车辆识别号码 (2)2.车辆排放控制信息(VECI) (4)3.车辆证明书标签 (5)4.公英制转换 (6)5.车辆常用扭矩参考说明 (8)6.液体、润滑油技术参数 (9)7.保险丝位置和类型 (18)8.车轮定位参数 (24)9.差速器与动力传动系统电子诊断DTC诊断故障码 (29)10.制动器部件维修信息 (30)11.ABS及APS的DTC故障码和验证测试 (32)12.车身电器 (38)1. 车辆识别号码车辆识别号码(VIN)牌挂在仪表板的左上侧上。
VIN包含提供关于车辆的数据的17个字符。
参见解码图以确定车辆的识别。
为保护消费者免遭盗窃,也避免受欺骗,制造商必须将车辆识别号码的第9位数设为“检查数字”。
制造商和政府机构可利用此检查数字检验车辆及政府文件是否为真。
检查数字的译码公式不对一般大众公布。
2. 车辆排放控制信息(VECI)所有车辆配备有组合车辆排放控制信息(VECI)标签。
标签位于车辆发动机罩上的发动机舱内。
两条标签用于为在加拿大出售而制造的车辆。
●VECI标签包含下列各项:●发动机系列和排量●蒸发系列●排放控制系统示意图●证明书申请●火花塞和间隙标签也包含发动机真空示意图。
在加利福尼亚和加拿大销售的车辆标签唯一。
加拿大标签用英语和法语两种语言书写。
标签永久连接在车辆上,不毁坏信息且损坏标签就无法摘下标签。
3. 车辆证明书标签每一台戴姆勒克莱斯勒公司制造的车辆都有车辆证明书标签。
标签证明车辆符合所有适用的联邦汽车标准。
标签还列出:●车辆制造的年份和月份。
●车辆总重量(GVWR)。
前车桥和后车桥总重量(GAWR)以最小轮缘尺寸和最大冷胎充气压力为准。
●车辆识别号码(VIN)。
●车辆类型。
●后轮类型。
●条形码。
●最后组装的月、日、时(MDH)。
●油漆和饰件代码。
●原产国家。
标签位于驾驶员侧车门关闭面上。
4. 公英制转换公制系统以一、十、百、千和百万为基数。
2010日产Cube快速参考手册说明书

2010c u beLOW TiRe PReSSuRe WARninG LiGHT inSTRuMenT BRiGHTneSS cOnTROL* TWin TRiP OdOMeTeR*HeAdLiGHT And TuRn SiGnAL cOnTROL WindSHieLd WiPeR AndWASHeR SWiTcHSTeeRinG WHeeL SWiTcHeS fOR AudiOcOnTROL/BLueTOOTH®cRuiSe cOnTROLTiL T STeeRinGVeHicLe dYnAMic cOnTROL (Vdc)Off SWiTcHfueL-fiLLeR dOOR ReLeASeHOOd ReLeASe*AudiO SYSTeMfROnT PASSenGeR AiR BAGSTATuS LiGHTcLiMATe cOnTROL01 02 03 0405081206091314 0710110102030405090612070814 111013*See your Owner’s Manual for more information.This easy-to-use Quick Reference Guide is intended to help you more fully appreciate some of the unique features and functions of your new vehicle. However, it is not intended to replace your Owner’s Manual. The Owner’s Manual contains more detailed information to help you better understand the important safety warnings, features, operation and maintenance of your vehicle. All information, specifications, photographs and illustrations in this publication are those in effect at the time of printing. niSSAn reserves the right to change specifications or design without notice and without obligation.The niSSAn intelligent key™ allows you to lock or unlock your vehicle, opennOTe: it is important to make sure the intelligent key is with you (that is, inonce.01 Move the shift lever to the P (PARk) position and applyAcceSSORY POSiTiOnPress the ignition switch START/STOP button once without depressing the brake pedal to access the Acc position. This position activates electrical accessories such as the radio.Press the ignition switch START/STOP button a second time without depressing the brake pedal to access the On position. This position turns on the ignition switch and all electrical accessories.niSSAn inTeLLiGenT keY™ BATTeRY diScHARGeif the battery of the intelligent key is completely discharged, the Array intelligent key system warning light in the instrument panel blinks inyellow after pushing the ignition switch START/STOP button. To startthe engine with a discharged intelligent key, perform the followingprocedure:Move the shift lever to the P (PARk) position.firmly apply the foot brake.Touch the ignition switch START/STOP button with the intelligentkey. A chime will sound.Push the ignition switch START/STOP button while depressingthe brake pedal within 10 seconds after the chime sounds. Theengine will start.if the intelligent key system warning light in the instrument panel is blinking in green, replace the battery as soon as possible. This warning means that the intelligent key battery is almost discharged. nOTe: if the ignition switch is pushed without depressing the brake pedal, the ignition switch will change to the Acc position.OPeninG THe BAck dOORTo open the back door, unlock and pull the handle.unlock the back door using one of the following01 operations:Push the button on the keyfob or the intelligentkey twice.Push the back door Request Switch 01(if soequipped).Push the power door lock switch to the unlock position.insert the key into the driver’s door key cylinder and turn towards the rear of the vehicle twice.1B 04051A 02 030102AB STEERING WHEEL SWITCHES FOR AUDIO CONTROL/* (if socan be used to perform the following:switch for less than 1.5 seconds to changeswitch for more than 1.5 secondsswitch for less than 1.5 seconds to change tracks on a cd, iPod® orvolume control is a trademark of Apple inc., registered in the u.S. and other countries.6switch or tap the brake pedal.switch. The vehicle returns to the last set cruising speed when the vehicle speed is over 24 MPH (38 km/h).switch. The cRuiSe indicator light in AUTOMATIC CLIMATE CONTROL (if so equipped)01 AUTO BUTTONPress the AUTO button 01 . use the temperature control buttons 02 to set the desired temperature. This will allow the fan speed, air flow distribution and temperature to be automatically maintained at the selected temperature.T o disable auto mode, press the MODE button 03 , one of the fan speed control buttons 04 or the front defroster control button 05 .02 TEMPERATURE CONTROL BUTTONS Press the temperature control buttons 02 , up to increase the temperature or down to decrease the temperature.The temperature range is between 60°f and 90°f .0510040308090702010603MODE BUTTONPress the MODE button03to cycle through the following air flow outlets:Air flows from the center and side vents.Air flows from the center, side and foot vents.Air flows mainly from the foot vents.Air flows from the defroster and foot vents.Air flows mainly from the defroster vents.04FAN SPEED CONTROL BUTTONSPress the (slower) or (faster) button to adjust the fan speed.using the fan speed control buttons will disable the auto mode; to resume auto mode, press the AUTO button01.05DEFROSTING/DEMISTING FRONT AND SIDE WINDOWSPress the defroster control button to turn the system on. The A/c automatically turnson when the defroster mode is selected.use the temperature control buttons02to set the desired temperature.T o set the defroster on high, press the fan speed control button to increase the fanspeed to the maximum setting.06DEFROSTING REAR WINDOW AND OUTSIDE HEATED MIRRORS (if so equipped)Push the rear window defroster switch on.Push the rear window defroster switch again to manually turn the defroster off.This function automatically turns off after approximately 15 minutes.07A/C BUTTONPress the A/C button to manually turn the A/c on or off.08AIR RECIRCULATION BUTTONPress the air recirculation button to recirculate air inside the vehicle; the indicator light on the button will illuminate.The air recirculation mode can only be selected if the air flow mode control is in thefollowing positions: , or.Press and hold the air recirculation button for more than 2 seconds to set automatic control for the air recirculation and outside air circulation modes.09OUTSIDE AIR BUTTONPress the outside air button to draw fresh air into the vehicle; the indicator light on the button will illuminate.10OFF BUTTONPress the OFF button to turn the climate control system off.8FM/AM/SAT* RADIO WITH CD PLA YER (if so equipped)01SCAN BUTTONPress the SCAN button to stop at each broadcasting station (fM, AM or XM ®) for 5 seconds. Pressing the button again during this 5-second period will stop scan tuning and the radio willremain tuned to that station.02EJECT BUTTONPress the button. The cd will eject.03STATION SELECT BUTTONSY our radio is equipped with three separate banks, each with six station presets. choose a radio band AM, fM1 or fM2 using the FM/AM button. T une to the desired station using Seek/cAT or ScAn tuning. Press and hold any of the desired STATiOn SeLecTbuttons (1 - 6) until a beep is heard. The station is now set in memory.04RDM and 05RPT BUTTONSPress the RDM or RPT buttons to change the play pattern while listening to a cd or iPod ®/uSB.06SEEK/CAT BUTTONSTo scan through each broadcasting station, press the SEEK/CAT buttons.To skip from one track to another on a cd, iPod ® or uSB device, press the SEEK/CAT buttons.To rewind or fast forward a cd, iPod ® or uSB device, press and hold the SEEK/CATbuttons. Release the buttons to return to normal play.07FM/AM BUTTONPressing the FM/AM button will change the band to either AM, fM1 or fM2 radio stations.08CD BUTTONPress the CD button to play a cd.01030405070911100612020809AUX BUTTONPress the AUX button to play a compatible device such as an MP3 player when it is plugged into the AUX (auxiliary) jack. The AUX button is also used to play a device plugged into the USB jack. if there are devices plugged into both the AUX jack and the USB jack, pressing the AUX button will toggle between the two functions. if so equipped, you can also press the AUX button to access XM® SAT1 and SAT2 preset banks.nOTe: Y ou may need to adjust the volume on any compatible device plugged into the auxiliary jack to find the most desired sound level of the audio system.10ENTER/SETTINGS BUTTON AND11TUNE/SCROLL CONTROL DIAL T o manually tune the radio, turn the TUNE/SCROLL dial. if playing a cd that is formattedwith MP3/WMA folders, turn the TUNE/SCROLL dial to scroll through the available folders.To adjust the Bass, Treble, fade, Balance, Speed Sensitive Volume (SSV), Brightness,contrast and clock (On/Off) press the ENTER/SETTINGS button until the desiredmode is displayed, then turn the TUNE/SCROLL dial to adjust to the desired level.12iPod® PLA YER OPERATION (if so equipped)The USB jack is located in the lower center of the instrument panel. connect the cable that is supplied with your iPod® to the outlet, and then attach the other end of the cable to your iPod®. if compatible, the battery of your iPod® will charge during the connection to the vehicle.PLA YING AN iPod®The interface for iPod® operation shown on the vehicle center display is similar to the iPod®interface. The iPod® can only be operated by the vehicle audio controls while connected.Select the iPod® by using one of the following methods:Press the12iPod®/MENU button.Press the SOURCE select switch on the steering wheel.SEEK/CAT BUTTONS AND TUNE/SCROLL DIALPress the SEEK/CAT buttons while a track is being played; the next track or the beginning of the current track will be played.Press and hold either SEEK/CAT (rewind or fast forward) button for more than approximately1.5 seconds, the track will play while rewinding or fast forwarding. When the SEEK/CAT(rewind or fast forward) button is released, the track will return to the normal playing speed.Press the iPod MENU button, then use the TUNE/SCROLL dial to scroll through themenu (Playlists, Artists, Albums, Songs, Podcasts, Genres, composers and Audiobooks) and press ENTER to make a selection. The display will return to the previous menu or list screen each time the iPod MENU button is pressed.if the system is turned off while the iPod® is playing, the iPod® will start when the ON/OFF or iPod MENU button is pressed. depending on the iPod® or software version, some functions may not work as described.*XM® Satellite Radio is only available on vehicles equipped with optional XM® Satellite subscription service.jack cover, connect the uSB end of the cable supplied to the jack, then connect the other end of the cable to the iPod®. When the(if compatible) will01When the shift lever is moved to the R (ReVeRSe) position, the monitorellow 3 ft (1 m); Green 7 ft (2 m) and 10 ft (3 m).01switch again to activate the Vdc system. The The Vdc system is active while the vehicle is running until the switch is pushed to turn off.by a small adult, child or child restraint as outlined in the Owner’s Manual, the will illuminateair bag is OFF and will not inflate in a crash.When the front-passenger’s seat is occupied and the passenger meets the conditions outlinedto indicate that the front passenger air *When the system detects that the front-passenger’s seat is unoccupied, the front passenger air bag status light will not illuminate even though the front passenger air0101030202010101.o raise the seatback, lift up each seatback and push it to the upright position until it is latched. After raising the seatback, pull the seat belt buckles out of the seat cushion pockets until theyHANDS-FREE PHONE SYSTEM (if so equipped)button on the steering wheel to activate voice recognition.Speak in a clear and natural voice without pausing between words.To go back to the previous command, say “Go back” or “correction.”To cancel a voice recognition session, simply wait 5 seconds; say “cancel,” “Quit” or pressTo increase or decrease the volume of the voice prompts, press the VOL (volume) control switch or on the steering wheel or turn the POWER/VOLUME knob on theaudio system while the system is responding.if the Voice Recognition system does not recognize your voice commands, train the system using the Speaker Adaptation Mode. See your Owner’s Manual for detailed information.Some commands are not available while the vehicle is in motion.The “Help” command can be used in any menu to hear a list of available commands.Please refer to the cellular phone manufacturer’s Owner’s Manual for detailed information regarding your Bluetooth® phone.For recommended phones and detailed instructions, please visit/bluetooth.cOnnecTinG YOuR PHOneTo use the hands-free feature, you need to set up, or connect, the system to recognize your compatible cellular phone(s). five compatible Bluetooth®-enabled phones can be connected. After setup, the system automatically connects with a connected phone when the ignition is in the Acc or On position, as long as the phone is on and in the vehicle.nOTe: Some cellular phones require the user to enable the automatic reconnection feature. Please refer to the cellular phone manufacturer’s Owner’s Manual for Bluetooth® setup information. cOnnecTinG PROceduRenOTe: The vehicle must be stationary when connecting the phone.1. Press the button on the steering wheel. The system announces the available commands.2. Say “connect Phone.”3. The system acknowledges the previous command and announces the next set of availablecommands. Say “Add phone.”4. initiate connecting from the phone.The connecting procedure varies according to each cellular phone model. for detailedconnecting instructions and a list of compatible phones, please visit/bluetooth.When prompted for a Passkey code, enter “1234” from the handset. (The Passkey code is assigned by niSSAn and cannot be changed.)5. Say a name for the phone when the system asks you to provide one. Y ou can give the phonea name of your choice.MAkinG A PHOne cALL1. Press the button.2. After the tone, do one of the following:Say “call.” After the system responds, say the name of the person in the phonebook.Say “call Phone number.” After waiting for the tone, say [number]. for example, say “call Phone number.” After waiting for the tone, say “123-456-7891.”Say “Redial” to redial the previous phone number.16 Say “call Phone number.” After the system responds, say “Special number” to dial more than 10 digits or special characters.Y ou can say all the digits of a 7- or 10-digit phone number at one time.for a 10-digit number, saying the phone number in groups of 3, 3 and 4 digits may improve recognition for some speakers. To use this group dialing method, say only the first 3 digits of the phone number. After the system recognizes the number, it will request the next 3 digits and finally the last 4 digits.if a phone number is incorrectly recognized, you can try entering the phone number again using the 3-3-4 group dialing procedure by saying “correction.”When you have finished speaking the phone number wait for the system to repeat it back to you, then say “dial.”ReceiVinG/endinG A PHOne cALLWhen you receive a phone call, a ring tone sounds through the audio system.To accept the call, press the button. To reject the call, press the button.To hang up the phone at the end of a call or to disconnect during call placement, pressthe button.HOW TO SAY nuMBeRSniSSAn Voice Recognition permits numbers to be spoken in a variety of ways.Say “zero” or “oh” for “0.” example: 1-800-662-6200 – Say “one eight zero zero six six two six two oh oh.”Say “pound” for “#.” Say “star” for “*” (available when using the “call Phone number” then “Special number” command and the “Send” command during a call).Say “plus” for “+” (available only when using the “call Phone number” then “Special number”command).Say “pause” for a 2-second pause.uSinG YOuR PHOneBOOkWhen a compatible phone is connected to the system, the phonebook is automatically downloaded. This allows you to access your phonebook from the Bluetooth® system to call contacts by name. up to 1,000 phone numbers will be transferred. T o access your phonebook:1. Press the button and wait for the tone.2. Say “Phonebook.”3. Wait for the tone, then say [a name] or say “List names.” The name must be said exactly as itis entered in your phonebook for the system to recognize it. for example, say “Phonebook”then after the system responds, say “Michelle.”The phonebook can transfer multiple numbers for each entry. if you select a name with multiple numbers, the system will ask you which number you want to dial.17The system allows for up to 40 voice tags to be recorded. Y ou can record a voice tag for phone-book entries that the system has difficulty recognizing or to directly dial an entry with multiple numbers. To record a voice tag:1. Press the button and wait for the tone.2. Say “Phonebook.”3. Wait for the tone, then say [a name] or say “List names.” Select the name for which you want to record a voice tag.4. Say “Record name.”nissan, the nissan Brand Symbol, “SHifT_” tagline, Z and nissan model names are nissan trademarks.© 2009 nissan north America, inc.QR0e-0Z12u0Printing: October 2009 (03)。
jeep汽车

Jeep在中国的发展
• 图片说明: Jeep®家族的 旗舰车型, “三排七座” 的高端越野车 型,搭载 “世 界十佳越野引 擎”HEMI V8 发动机,售价 49.80-64.99万
Jeep在中国的发展
图片说明: 越野、公路两相宜的大切诺基, 提供3.7L和5.7L两款,售价为 42.19-59.69万元
• 2001年初举行的 北美国际汽车展 上,克莱斯勒新 款吉普“liberty” (自由)亮相。 “liberty”又称为第 二代切诺基。
Jeep—大切诺基
• 2004年3月全新的 05款大切诺基亮相 纽约车展,并于当 年在杰夫森装配工 厂和奥地利graz市 magna steyr装配 厂生产,在过去一 年的时间里仅北美 地区就卖出了售价 为3万~5万的大切 诺基8万多辆。
Jeep车发展历史
2011 作为全路况 都市SUV代表之作, 2011款Jeep指南 者代表了美系城市 SUV的全新面貌, 兼备出色的四驱性 能与灵敏的公路体 验,同时也提供了 堪比轿车的燃油经 济性和美系车型一 贯的舒适与安全。
Jeep车发展历史
2011款Jeep Patriot自由客延 续了自Jeep Willys威利斯时 代流传至今的 70年
照片说明:1966年11月10日, 毛泽东主席在天安 门广场乘212检阅 红卫兵
Jeep在中国的发展
• 军用领域的应用更加广泛:
BJ-212广泛地装备 解放军部队,除主 要用于指挥员的乘 用车,也有一些用 于武器运载平台和 其它用途。
照片说明: 改装为火炮架的BJ212
Jeep在中国的发展
• 1983年,北京汽车制造 厂和美国汽车公司(后 被克莱斯勒汽车有限公 司收购)组建了中国汽 车工业的第一家合资企 业——北京吉普汽车有 限公司(BJC——Beijing Jeep Corporation., LTD), 其所生产的产品就是后 来越野文化的奠基者— —Jeep 2020,车型设计 和生产工艺来自于美国 汽车公司中的Jeep®品牌。
大切诺基维修手册-车架与保险杠
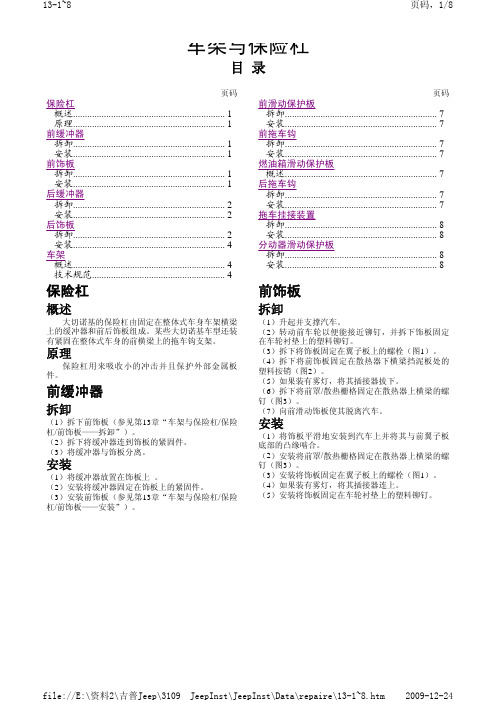
车架与保险杠目录页码保险杠概述 (1)原理 (1)前缓冲器拆卸 (1)安装 (1)前饰板拆卸 (1)安装 (1)后缓冲器拆卸 (2)安装 (2)后饰板拆卸 (2)安装 (4)车架概述 (4)技术规范 (4)页码前滑动保护板拆卸 (7)安装 (7)前拖车钩拆卸 (7)安装 (7)燃油箱滑动保护板概述 (7)后拖车钩拆卸 (7)安装 (7)拖车挂接装置拆卸 (8)安装 (8)分动器滑动保护板拆卸 (8)安装 (8)保险杠概述大切诺基的保险杠由固定在整体式车身车架横梁上的缓冲器和前后饰板组成。
某些大切诺基车型还装有紧固在整体式车身的前横梁上的拖车钩支架。
原理保险杠用来吸收小的冲击并且保护外部金属板件。
前缓冲器拆卸(1)拆下前饰板(参见第13章“车架与保险杠/保险杠/前饰板——拆卸”)。
(2)拆下将缓冲器连到饰板的紧固件。
(3)将缓冲器与饰板分离。
安装(1)将缓冲器放置在饰板上 。
(2)安装将缓冲器固定在饰板上的紧固件。
(3)安装前饰板(参见第13章“车架与保险杠/保险杠/前饰板——安装”)。
前饰板拆卸(1)升起并支撑汽车。
(2)转动前车轮以便能接近铆钉,并拆下饰板固定在车轮衬垫上的塑料铆钉。
(3)拆下将饰板固定在翼子板上的螺栓(图1)。
(4)拆下将前饰板固定在散热器下横梁挡泥板处的塑料按销(图2)。
(5)如果装有雾灯,将其插接器拔下。
(6)拆下将前罩/散热栅格固定在散热器上横梁的螺钉(图3)。
(7)向前滑动饰板使其脱离汽车。
安装(1)将饰板平滑地安装到汽车上并将其与前翼子板底部的凸缘啮合。
(2)安装将前罩/散热栅格固定在散热器上横梁的螺钉(图3)。
(3)安装将饰板固定在翼子板上的螺栓(图1)。
(4)如果装有雾灯,将其插接器连上。
(5)安装将饰板固定在车轮衬垫上的塑料铆钉。
图3 前饰板1.螺钉 2.饰板 图1 前饰板1.车身 2.饰板后缓冲器拆卸(1)拆下后饰板(参见第13章“车架与保险杠/保险杠/后饰板——拆卸”)。
JEEP指南者操作手册.

本手册包括了截止至该手册印刷时的最新信息。
本公司保留随时更新该手册版本而不另行通知的权利。
本手册由专业维修人员与工程师协助编写,希望有助于您了解新车的各项操作与保养细节。
除本手册外,另外提供“保修信息手册”及其它各种专为客户编写的资料,请务必仔细阅读。
依照本手册各项指示与建议驾驶车辆,可确保您的安全,提高驾驶乐趣。
手册阅读完毕后,请将其存放于车内,以便随时参考,车辆转售时亦应随车附上。
制造商保留改变车辆设计与规格的权利,并(或)可随时增加或改进其产品,对于已售出车辆并无安装新改良装备的义务。
“用户手册”说明和描述标准装备或额外付费的选装件。
因此,本手册中所列的设备和配件并不一定会在您的车上出现。
>$@开始驾驶本车、欲安装零件/配件,或对车辆进行改装之前,请务必先阅读“用户手册”。
>$@鉴于市面上有很多不同制造商生产的替换零件与配件,若您安装此类零件或配件,制造商无法保证您车辆的行驶安全性不会受到影响。
即使这些零件经过正式认可(例如获得一般操作认可的零件或经过原厂正式认可的零件设计),或在加装或安装之后个别发给认可证明,并不代表您车辆的驾驶安全不受影响。
因此,无论是汽车制造商还是正式代理商均不对此负责。
所以,只有在授权经销商处,加装或安装由制造商明确授权或建议的零件,制造商才承担相关责任。
当对制造商车辆原有状况进行修改时,此声明亦同样适用。
您的保修服务范围不涵盖任何非制造商提供的部件,也不涵盖由于安装或使用非制造商零件、部件、设备、材料或附加件所引起的维修和调整成本。
保修还不涵盖车辆上任何不符合制造商规格的改动所造成的损坏或状况的维修成本。
欲取得原装Mopar 零件与配件,以及其它经制造商认可的产品,包括合格的咨询建议,请洽各地授权经销商。
至于维护,请记住:经销商最了解您的汽车,其所有技师经过正式培训,并提供原厂Mopar零件,以顾客满意为最高目标。
版权所有 2006 Chrysler IntemadOnal用户手册使用须知请参阅目录,查询您想要了解的章节内容。
2010款陆虎说明书

103mm
21mm
-7-
-产品外观
LED DIP S/W IR MODE LCD-OUT
SEL
POWER
A/V(IN/OUT)
-8-
RGB(IN)
-插口布线图
*Power Connect
*RGB-IN Connect
①
②
③
④
⑤
⑥
⑦
① ② ③ ④ ⑤ ⑥ ⑦
① ACC (Red) ② GND (Black) ③ CAN-H (Green+Brown) ④ CAN-L (Green) ⑤ F-CAM-DET (Orange) ⑥ SAFE (Violet) ⑦ REAR-C (Grey)
· Analog RGB Mode · Video Mode
在IMAGE Menu上可实现下面的功能 :
- BRIGHTNESS : 调节画面的亮度 - CONTRAST : 调节画面的明暗 - SATURATION :调节画面的色度 - HUE : 调节画面的颜色 - SHARPNESS : 调节画面的清晰度 - USER IMAGE : 设定为最初值
-5-
-产品构成图
IR Switch for source toggle OEM Navi Button (Can Intrface) NAVIGATION Input (Analog RGB) MCU
DISPLAY
Car Installation OEM LCD
A/V 1 A/V 2 A/V 3 CVBS (R (Rear camera) ) Car Screen Input
-14-
OSD(On ( Screen Display) p y)
吉普车大切诺基545RFE自动变速器
GRAND CHEROKEE
曲轴位置传感器: 曲轴位置传感器:
GRAND CHEROKEE
输出/ 输出/输入转速传感器
GRAND CHEROKEE
TCM间接输入信号 TCM间接输入信号
• • • • • • • • • • 发动机和车身型号识别码—来自PCM/BCM 进气歧管压力—来自PCM 目标怠速—来自PCM 扭距降低信息—来自PCM 巡航控制开关—来自PCM — 相互转速控制—来自PCM 发动机冷却液温度—来自PCM 蓄电池/环境温度—来自PCM 制动状态—来自PCM DRB III 通讯—来自DRB III
• 输入:低速离合器---低速太阳轮 超速离合器—倒档行星架 其中:倒档行星架=输入齿圈
GRAND CHEROKEE
四档
• 输入:超速离合器—反作用太阳轮 倒档行星架 • 锁定:四档制动器—反作用齿圈 • 输出:输入行星架
GRAND CHEROKEE
主二档
• 输入:低速离合器—输入太阳伦 • 锁定:四档制动器—反作用齿圈 • 输出:输入行星架
GRAND CHEROKEE
变速器维护与保养
• 变速器油---MOPAR ATF +4型 • 主副两个滤清器同时更 换 • 油位的检查: 保养--4.7L 大修--11.4L
GRAND CHEROKEE
第一部分 变速器机械部件组成与动力传递
GRAND CHEROKEE
变速器的主要机械部件包括: 变速器的主要机械部件包括: 液力变矩器 三个多片输入离合器 低速档(UD);超速档(OD);倒档(REV) 三个制动器 二档(2C);四档(4C);低/倒档(L/R) ) 单向离合器( 单向离合器(OWC) 三个行星齿轮组 反作用行星齿轮组;倒档行星齿轮组;输入行星 齿轮组 驻车锁止机构
北京吉普生产的切诺基JEEP型号全解释
北京吉普生产的切诺基JEEP型号全解释北京吉普生产的切诺基JEEP型号全解释,拿来和XDJM们一起分享。
北京吉普(BJC)生产的切诺基是在原美国汽车公司生产的切诺基XJ型的基础上引进的,由简单组装到仿制零部件整车生产.此后,由于合资方的更迭,外方发生了从美国汽车公司到克莱斯乐,再到戴克的变更.其先后型号受国家政策调整有很大区别.第一. 车型前缀,为”BJ”开头,这是生产厂家的标识,意思是:北京吉普汽车有限公司第二. 车型.按照国家发改委及其前身发布的车型准生产目录,切诺基有如下几种:1,:”2”字头,为轻型越野车,如20212,”5”字头为专用改装越野车3,”6”字头为小型客车,如64204,”7”字头为轿车,如7250“2”系列车毋须多说.仅仅有四六缸车和手动自动区别,”6”字头和”7”字头的区别比较大,早期,国家对”7”字头的轿车目录控制比较严格,申请比较困难,对质量标准的要求也比较高,因此不少厂家在廉价车型和预生产型均申请”6”字头车型,切诺基也不例外,”7250”系列是属于轿车类型的车辆,无论在质量配置上都优于”6”系列,单单从车厢钢板的使用上区别就比较明显,前者是使用的双面镀锌板,后者使用的是单面镀锌板.但外观和内设区别不大.”7”系列车更接近”2”系列车,升级到”2”系列车应该更容易些. 第三, 车型后缀的含义英文”E”字为电喷发动机的标志,如2021E的含义为四驱电喷四缸越野车后缀如果是数字,如2021E6Y的含义为四驱电喷六缸越野车后缀英文字母”L”的含义为加长型号.如2021EL,意思是四驱四缸加长型越野车后缀里如果出现第二个英文字母,即为改进型号的批次的标志,如6420EA,含义为首次改进型电喷两驱小型客车;六缸车系列:型号统称为2021E6Y/E6L/A6/A6L/A6A,均为四驱配置 ,标配225/75/R15轮胎2021E6Y,手动五挡分时四驱,电喷六缸发动机,全车电窗中控,脚灯,顶置阅读灯,带照明的化妆镜灯,方向盘角度可调,雨刷速度可调,有后雨刷,车型最经典,97年前早期车型基本都是原装件,即便是方向盘都是。
一份Jeep Wrangler一部车辆的一部机械修理手册说明书
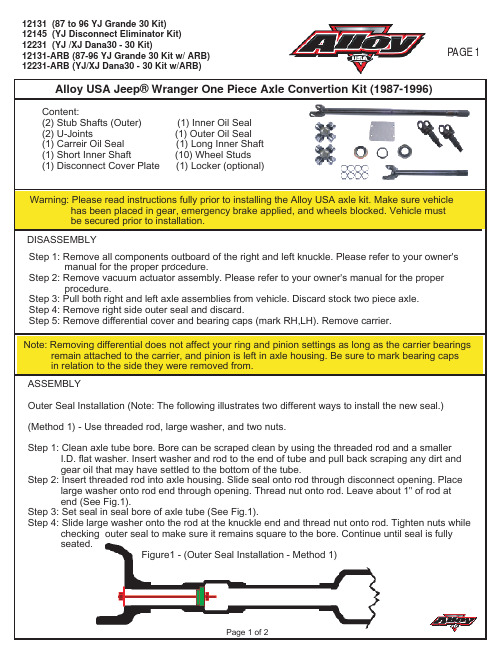
12231-ARB (YJ/XJ Dana30 - 30 Kit w/ARB)seated.Figure1 - (Outer Seal Installation - Method 1)12231-ARB (YJ/XJ Dana30 - 30 Kit w/ARB)Alloy USA Jeep® Wranger One Piece Axle Convertion Kit (1987-1996).(Method 2) - Will be necessary to fabricate or buy seal insertion tool as shown (Fig.2)Step 1: Clean axle tube bore. Bore can be scraped clean by using the threaded rod and a smaller ID flat washer. Insert washer and rod to the end of tube and pull back scraping any dirt and gear oil that may have settled to the bottom of the tube. Step 2: Using seal insertion tool, drive seal into bore and impact with hammer (See Fig.2). Check seal, through disconnect opening, to ensure seal remains square in tube seal bore. Figure 2 - (Outer Seal Installation - Method 2)INNER SEAL INSTALLATION - Driver's sideStep 1: Clean axle tube bore. Bore can be scraped clean by using the threaded rod and a smaller I.D. flat washer. Insert washer and rod to the end of tube and pull back scraping any dirt and gear oil that may have settled to the bottom of the tube.Step 2: Place seal into seal bore through carrier opening. Use a 1-3/8" socket or a correct sized wood block. Impact with hammer until fully seated. Before hitting make sure that the seal is square with seal bore. Refer to owner's manual if needed.AXLE INSTALLATIONStep 1: Install differential carrier noting correct end cap placement. Tighten to correct fl/lbs, and install cover. Step 2: Assemble inner and outer axle shafts with u-joints. Insert axle assembly into housing. Take care to avoid damaging seal when installing. Step 3: Install left axle assembly (driver's side).Step 4: Install new Block-Off plate in place of vacuum disconnect cover. Either an O.E. gasket orsilicone sealant can be used (Fig.3). Step 5: Reinstall outer steering knuckle and brakes per owner's manual. Fill differential housingwith gear oil.page 2 of 2Figure 3 - ( Cover Plate)。
Jeep指南者维修技术手册

Compass指南者维修技术资料小手册2007年8月Compass 指南者维修技术资料小手册1目录1. ........................................................................2 车辆识别号码2. ........................................................4 发动机舱国际符号说明3. ........................................................4 液体、润滑油技术参数4. .......................................................7 车辆集成动力模块(IPM)5. .............................................9 2.4L 发动机正时链和导轨安装6. ..........................................13 自动变速器的故障诊断及排除7. ..............................................14 发动机及变速箱的故障码表8. ......................................................23 发动机点火系统故障码9. (23)自动变速器的故障码10. ..............................................................26 车辆电子讯息中心11. .....................................................................30 EVIC 显示模式12. .......................................................................31 HVAC 故障码13. ......................................................................32 车轮定位参数14. ..................................................................34 ABS 诊断与测试15. ......................................................................35 ABS 故障码表16. ..............................................................39 电动门锁故障码表17. ..............................................................39 电动车窗故障码表18. ..............................................41 车胎压力监测系统故障码表19. .....................................................41 音响/视频系统故障码表20. . (44)SRS 气囊约束故障码表Compass 指南者维修技术资料小手册21. 车辆识别号码车辆识别号码说明车辆识别号码(VIN )位于仪表板左上角,靠近左侧A 柱。
大切诺基用户手册书(可编辑)

大切诺基用户手册书(可编辑)大切诺基用户手册书北京吉普大切诺基用户手册BJ2021GBJ2021V8GRAND CHEROKEE用户手册产品如有更改恕不另行通知2002 年版第 1 页共 256 页北京吉普大切诺基用户手册尊敬的朋友感谢您选择了 Jeep 您已成为北京吉普汽车有限公司最尊贵的顾客我们期待着以最优质的产品和服务为您的工作和生活带来乐趣北京吉普汽车有限公司是中国第一家汽车合资企业合资伙伴是制造出全世界第一辆汽车的戴姆勒克莱斯勒公司开拓进取的传统和精神保证了我们为您提供的产品和服务达到最佳水准成为最佳是我们一贯的宗旨BJ2021GBJ2021V8 是 Jeep 系列的顶级车型大切诺基GRAND CHEROKEE 它是一款高档运动型多用途车其外型美观性能先进设施豪华乘坐舒适基于人性化设计操作非常方便采用了安全气囊 ABS 智能电控中央差速器锁和大排量发动机等先进技术使越野通过性和可靠性得到显著提高其全时四轮驱动设计更是居世界越野车的领先地位近年来已多次被美国最权威的四轮驱动杂志评为年度最佳越野车在国际市场享有盛誉本手册为您提供了使用和保养的基本知识请务必仔细阅读北京吉普汽车有限公司将不断地对产品进行改进欢迎您通过书信电话传真互联网等各种方式了解我公司产品的最新信息祝您一路顺风第 2 页共 256 页北京吉普大切诺基用户手册产品合格证随车发放给用户它是我公司对产品质量担保的凭证请用户务必妥善保存第 3 页共 256 页北京吉普大切诺基用户手册目录引言用户须知 15翻车警告 16简介 17警告与注意 18整车出厂标牌 19整车基本技术参数 20发动机技术参数 21启动汽车前注意事项汽车钥匙使用须知 22安全钥匙防盗禁止启动系统 22 备用钥匙 23车主钥匙设定 23取下点火钥匙 25钥匙插入点火提醒装置 25 方向盘锁 25手动锁止方向盘 26释放方向盘锁 26车门与举升门锁 26举升门外掀式玻璃通风窗 27 车门锁 28电动门锁系统 29车门开启照明 30乘客安全防护系统 30第 4 页共 256 页北京吉普大切诺基用户手册座椅安全带警示 31三点式安全带 32三点式安全带操作说明 32上肩带高低调整固定装置 35怀孕妇女使用安全带须知 36后座中央腰带 36儿童安全防护装置 37驾驶员与前乘客辅助约束系统 SRS 安全气囊 41新车磨合建议 50行车安全检查 51尾气排放 51车内安全检查 52车外安全检查 53汽车常用功能说明遥控无钥匙进入系统 54解除车门与举升门锁 54锁上车门与举升门 55一般信息 55设定其他遥控器 55遥控器电池更换 56吉普车记忆系统若配备 56若配备 58防盗警报系统设定警报系统 59解除警报系统的设定 59电动窗 60座椅 61前座椅调整调角器 61第 5 页共 256 页北京吉普大切诺基用户手册头部保护装置头枕 62电动座椅调整器 63加热式座椅若配备 666040 可折叠式后座椅 67后视镜 71车内日夜后视镜 71车内自动调光后视镜若配备 71 车外后视镜折合功能 72车外后视镜 73加热式遥控后视镜若配备 73电动遥控车外后视镜 73电动折合式车外后视镜若配备 74 照明化妆镜若配备 74照明装置 75室内灯 75前座地图阅读灯 76多功能控制杆 76蓄电池省电功能外部照明装置 76 前照灯视廓灯及仪表板灯 77车灯未关提醒装置 77前雾灯若配备 77后雾灯 78转向信号灯 78前照灯调光开关 78超车灯 78前照灯光束调整系统若配备 79 前照灯延时装置 80挡风玻璃刮水器和洗涤器 80第 6 页共 256 页北京吉普大切诺基用户手册除雾器 81速度感应间歇雨刷系统若配备 82 可调倾角式转向管柱 82电子车速控制装置若配备 83启动方式 83设定速度 83解除方式 84恢复速度 84设定不同速度 84加速超车 84上下坡行驶 85点烟器与烟灰缸 86电源插座 86手套箱 87饮料架 88顶置控制台若配备 88圆顶灯阅读灯 89车辆信息中心 89用户可自行设计的功能 90 罗盘温度旅程电脑 94 旅程电脑 95电动玻璃天窗若配备 98 快速开启模式 99手动开启模式 99关闭操作 100通风操作 100点火关闭操作 100遮阳操作 101第 7 页共 256 页北京吉普大切诺基用户手册保养 101后车窗功能 102后车窗刮水器洗涤器 102 后车窗除雾器 103行李区设备 104行李厢灯 104可拆式行李厢罩 104行李固定绑钩 105车顶行李架 106开启与关闭发动机罩 109仪表板各项指示说明仪表板与内部控制开关 110组合仪表汽油发动机 111组合仪表说明汽油机车型 111收音机的操作与移动电话 118电子时钟 118时钟设定程序 119带有图形化均衡器磁带播放器及换片箱控制器的 AMFM 立体声收音机 119操作说明收音机模式 119电源开关音量控制 119Seek 按键收音机模式 120调谐器 120左右平衡 120前后平衡 120音质 120AMFM 选项 120第 8 页共 256 页北京吉普大切诺基用户手册Scan 按键 121设定收音机按键记忆功能 121时钟与收音机模式间的切换 121磁带播放器的操作 121Seek 按键 122快速前转 FF 122倒带 RW 122退带 122Scan 按键 122换面 122金属带选项 70 s 123夹式转子释放装置 123杜比降噪系统 123CD 换片箱的操作说明 123 TAPECD-C 键 123Program 键 1 124Program 键 4 随机播放 124FF TUNE RW 124Program 键 5 124Seek 按键 124Time 键 124Scan 按键 125磁带播放器及 CD 播放器的AM 立体声FM带有图形化均衡器立体声收音机 125操作说明收音机模式 125电源开关音量控制 125 Seek 键收音机模式 126调谐器 126第 9 页共 256 页北京吉普大切诺基用户手册左右平衡 126前后平衡 126音质控制 126AMFM 选项 126设定收音机按键记忆功能 127 时间 127操作说明磁带模式 127换面 ? 128磁带 128搜寻 128快速前转 FF 128倒带 RW 128退带 128金属带选项 70 s 129夹式转子释放装置 129杜比降噪 129操作说明 CD 播放器 129放入 CD 129搜寻 Seek 130退出CD 130FFTUNERW 130RND 随机播放 130CDCD-C 131时间 131音响系统遥控控制若配备 131收音机的操作 132磁带播放器 132CD 播放器 132第 10 页共 256 页北京吉普大切诺基用户手册遥控 CD 换片箱若配备 132装入 C 换片箱 133磁带与播放器的保养 136CD 的保养 137空调控制器 137风速控制 138温度控制 138模式选择 139空调装置 140红外线双重区域恒温控制若配备 141 车窗结雾 144启动及操作启动程序 144正常启动 144若发动机无法启动时 144启动后 145驻车互锁系统 146驻车制动 146自动变速器 148档位 149过热模式 152液力变矩器 153摇动车辆 153四轮驱动操作 153Selec-Trac-若配备 153 Quadra-Trac -若配备 158 Quadra-Drive 系统-若配备 160 第 11 页共 256 页北京吉普大切诺基用户手册驾车要领 161公路行驶 161越野行驶 161前后桥差速器锁若配备 164后桥拖曳力锁 164动力转向 165防抱死制动系统 165燃油选择无铅汽油 167燃油添加剂 168油箱盖与加油口 168油箱容量 171轮胎和车轮 171轮胎气压 171更换轮胎 173胎纹磨损指示器 175轮胎对调 175校准与平衡 176轮胎链条或牵引装置 176紧急情况措施危险警示闪光器 177三角警告牌 178灭火器 178发动机过热 178更换轮胎 180千斤顶与车轮扳手的位置 180 备胎位置 182换胎程序 183第 12 页共 256 页北京吉普大切诺基用户手册跨接启动程序 187紧急拖钩若配备 189车辆保养40L 6 缸发动机 19147L 8 缸发动机 191内置式电脑诊断系统 OBD 192 售后服务 192更换零件 193保养程序 193液位检查指南 193发动机废油液的弃置 195发动机机油汽油发动机 195 冷却系统 200发动机空气滤清器 205自动变速器 205动力转向液 208挡风玻璃清洗液前与后 210 挡风玻璃雨刷片 211制动系统 212空调保养 214分动器 214前后桥油液 215传动系统与转向元件润滑 216 润滑脂的选择 216车身润滑 217蓄电池 217外观保养与防锈处理 220第 13 页共 256 页北京吉普大切诺基用户手册三元催化转换器 223保险丝盒 224电气系统故障 226配电中心 227车辆储放 227更换灯泡 227前照灯 227前示廓灯 228转向信号灯 230侧位灯 231尾灯制动灯后雾灯转向信号灯以及倒车灯231中央高位制动灯 232牌照灯 233更换灯泡 234液体容量 235建议使用的油液润滑剂与零件 236底盘 236发动机 237车身 237保养时间表排放控制系统保养 238保养时间表汽油发动机 238时间表 A 240时间表 B 245第 14 页共 256 页北京吉普大切诺基用户手册引言用户须知感谢您选购北京吉普汽车有限公司Jeep 车本公司的Jeep 车秉承戴姆勒克莱斯勒传统造车工艺精良造型独特品质优良绝对值得您信赖本车型是特别针对一般道路与野外行驶而精心设计的一种运动型多用途车 SUV具有传统二轮驱动车辆所没有的优异性能拥有本车就能行遍天下由于本车在道路或野外驾驶时与许多轿车的操控方式不尽相同所以请您花费一点时间来熟悉您的车子在开始操作本车之前请详读用户手册及附件资料确切了解汽车所有的操作方法尤其在制动转向换档系统及分动器换档方面更应特别注意此外还应熟悉各种路面驾驶技术虽然会随着经验累积而提高但不管操作何种车辆一开始都应特别谨慎在野外驾驶或操作车辆时请勿使车辆过载或期望征服大自然的力量驾驶车辆时应遵守各地交通法规和其它车型的车辆一样如未按正确方式操作本车将会使车辆失控或发生意外请确实详读本手册的[公路行驶]与[越野行驶]指南第 15 页共 256 页北京吉普大切诺基用户手册翻车警告运动型多用途车 SUV 比起其他车型的车辆更容易发生翻车意外本车型比起一般轿车其离地间隙较大轮距较窄所以能在多种越野路面上表现出较佳的性能任何车辆若未按正确方式驾驶将会导致失控由于本车型重心较高且轮距较窄万一车子失控会比其它车型更容易造成翻车意外应避免高速急转弯剧烈操作车辆或进行危险的驾驶行为否则可能使车辆失控未按正确方式操作本车将会导致事故翻车及人员伤亡请务必小心驾驶翻车警告标识驾驶员和乘客未系安全带是导致身体严重伤害甚至死亡的主要原因据有关报道显示在翻车事故中未系安全带者明显比系上安全带者的死亡率更高所以请务必系上安全带以超高速驾驶或酒后驾车将导致车辆失控撞击其它车辆或物体偏离路面或翻车上述任何一项失误将导致身体严重伤害甚至死亡第 16 页共 256 页北京吉普大切诺基用户手册为保持车辆最佳状态请按本手册建议的里程区间定期保养车辆各项保养工作应交由北京 Jeep 特约维修服务站或四位一体经销商执行他们拥有合格的技术人员专业工具与设备可提供各项服务北京吉普汽车有限公司与其经销商希望您对本车感到完全满意若您在服务或车辆售后保证方面有不满意之处请随时向本公司销售市场部反映北京 Jeep 特约维修服务站或四位一体经销商将很乐意为您解决任何有关车辆的问题简介本手册内所有内容以出版的最新资料为准本公司保留随时推出新版本的权利本手册由专业服务人员与工程师协助编制完成其内容有助于驾驶员了解新车的各项操作与保养细节请务必详细阅读按照本手册的各项指示与建议来驾车将确保车辆使用者的安全提高驾驶乐趣手册阅读完毕后请存放于车内供随时参阅车辆转售时应附上用户手册北京吉普汽车有限公司保留更改车辆设计与规格的权利并可随时增加或修改其产品配置对于已售出的车辆将无安装这些配件的义务本用户手册内所介绍的配件分标准与选装额外付费两种因此部分设备与配件将不会出现在您的车辆上第 17 页共 256 页北京吉普大切诺基用户手册说明开始驾驶本车之前或欲安装零件配件或对车辆进行改装之前请先阅读用户手册市面上有很多不同制造商生产的替换零件与配件如车主安装这些零配件之后北京吉普汽车有限公司将无法保证您的Jeep 车的安全即使这些零配件经过正式认可例如获得一般操作允许的零件或经过原厂正式认可的零件设计或在安装之后获得本公司的个别操作许可并不代表您的 Jeep 车的驾驶安全不受影响因此本公司与北京 Jeep 特约维修服务站或四位一体经销商将对此不负任何责任只有北京 Jeep 特约维修服务站或四位一体经销商所安装或加装零件的车辆北京吉普汽车有限公司才会承担责任同样原则亦适用于购车后对车辆所进行的任何改装欲获得 Mopar 原厂零件与配件及其它经过北京吉普汽车有限公司认可的产品请与北京 Jeep 特约维修服务站联系北京 Jeep 特约维修服务站最了解您的汽车所有维修人员经过原厂培训并提供原厂 Mopar 零件他们以顾客满意为最高目标当您的汽车欲进行维修保养时请切记交由北京Jeep 特约维修站或四位一体经销商执行警告与注意对于会造成事故或身体伤害的操作过程本手册内均以[警告]表示对于会损坏车辆与配件的操作过程则以[注意]表示应全数阅读手册内容以免忽略任何重要信息所有[警告]与[注意]的指示均应确保遵守第 18 页共 256 页北京吉普大切诺基用户手册整车出厂标牌整车出厂标牌装在发动机罩下水箱上横梁左端打印有车辆识别号整车型号发动机号及出厂日期等车辆识别号是具有唯一性的标识车辆身份的 17 位代码简称 VIN此代码也标识在仪表板左上部的牌子上及后货厢右后侧地板上请勿滥用此码整车型号是中国汽车产品目录所发布的车型代码发动机号与发动机缸体或缸盖上刻印的代码相一致第 19 页共 256 页北京吉普大切诺基用户手册整车基本技术参数车型 BJ2021G BJ2021V8全长毫米 4610 4610全宽毫米 18261826全高毫米整车整备质量状态 1763 1763厂定最大总质量状态 1713 1713轴距毫米 2690 2690轮距毫米1511 1511载货容积立方米座椅竖起 1110 1110座椅放倒 2059 2059载客人数 5 5最大总质量千克 2313 2348整备质量千克 1793 1828发动机型号 C698QA1 C8V93Q 第 20 页共 256 页北京吉普大切诺基用户手册发动机技术参数40 升发动机 47 升发动机型号 C698QA1 C8V93Q型式直列六缸液冷 V 型八缸液冷顶缸径行程顶置气门置气门984 867 930 865毫米毫米排量升 40 47压缩比 871 901燃油系统电控多点燃油喷射电控多点燃油喷射式汽油机式汽油机额定功率转速1454600 1754600千瓦转分最大扭矩转速3113000 4003000牛米转分第 21 页共 256 页北京吉普大切诺基用户手册启动汽车前注意事项汽车钥匙使用须知您的新车钥匙放在塑料袋里袋上随附有钥匙专用码如果有钥匙而无塑料袋请向您的经销商索取此钥匙专用码此钥匙专用码也可以凭购车发票从经销商处获得安全钥匙防盗禁止启动系统本车配备安全钥匙系统利用本系统内含识别码的点火钥匙会将信号传送至车辆电脑只有在车辆电脑确认来自点火钥匙的信号后车辆才会启动和运转若本系统没有确认来自点火钥匙的信号则车辆会在启动运转 2 秒后熄灭发动机安全钥匙灯在点火开关首次转至 ON 位置时会亮起约 2 秒钟如果车辆电脑没有确认来自点火钥匙内的信号时安全钥匙灯会一直闪烁以表明车辆无法开动直到接到发动机熄灭的信号而如果安全钥匙灯在正常操作时持续亮着则表示系统的电子装置出现故障所有附随本车的钥匙均已针对本车的电子装置进行设定说明第 22 页共 256 页北京吉普大切诺基用户手册本车配备的安全钥匙系统与遥控启动系统并不兼容同时使用这些系统可导致车辆启动问题并丧失有效的安全保护大的金属饰物也可造成车辆启动问题这些装置虽不会损及安全钥匙系统但如果这些装置在启动发动机时与安全钥匙非常靠近则可造成暂时性问题若发生问题关闭点火开关并移除安全钥匙圈上的所有金属饰物重新启动发动机备用钥匙说明只有针对本车设定的钥匙才能启动本车对于任何备用钥匙均需要四位数的 PIN 码请向您的经销商询问此码复制备用钥匙时需提供此码钥匙的复制可交由北京 Jeep 特约维修服务站或利用[车主钥匙设定]程序来执行钥匙复制过程必须将空白钥匙与汽车电脑设定配对空白钥匙是指从未设定的钥匙说明若安全钥匙系统必须维修则必须将所有的钥匙交给北京Jeep 特约维修服务部或四位一体经销商车主钥匙设定只要有两把有效的钥匙即可按照以下步骤进行新钥匙与系统的设定配对1 将第一把有效的钥匙插入点火开关并转至 ON 位置至少3 秒钟但以不超过 15 秒为原则然后将点火开关转回至 OFF 位置并取出第一把钥匙第 23 页共 256 页北京吉普大切诺基用户手册2 在 15 秒之内插入第二把有效的钥匙并将点火开关转至ON 位置 10 秒钟后警笛声响起且安全钥匙灯会开始闪烁然后将点火开关转回至 OFF 位置并取出第二把钥匙3 在取出第二把钥匙的 60 秒之内将空白的安全钥匙插入点火开关并转至 ON 位置 10 秒钟后会听到一声警声发出安全钥匙灯会停止闪烁然后再度亮起约 2 秒钟之后熄灭此时新的安全钥匙的设定便告完成重复本程序最多可设定把钥匙一般信息本安全钥匙系统的载波为 43392MHz 符合 EEC 规定这些装置必须经过认证才能适用于每个国家的特殊法规关系到两种不同的法规 ETS 欧洲电子通讯标准 300-220 是大多数国家所使用的 German BZT 联邦法规 225Z125 是以ETC300-220 为基础而建立的但是前者有额外的独特要求操作受到下列两种情况限制1 这个装置不可造成有害的干扰2 这个装置必须接受可能收到的任何干扰包括可能造成非预期操作的干扰第 24 页共 256 页北京吉普大切诺基用户手册取下点火钥匙插入钥匙任何一面朝上均可然后转动开关至图中所示四个位置之一只有在 LOCK 位置才能取出或插入钥匙取下点火钥匙将钥匙朝点火开关锁芯压入然后转至 LOCK 位置自动变速器变速杆必须在停车档的位置钥匙插入点火提醒装置钥匙仍插在点火开关上且未转至 ON 位置时如果打开驾驶员侧车门则会听到警告信号以提醒您取出钥匙注意离开车辆时请务必取出钥匙并锁好所有车门方向盘锁本车配有被动式方向盘锁可避免在没有钥匙的情况下驾驶汽车若方向盘向左或向右转动未超过半圈且钥匙未插入点火开关则方向盘将会被锁住第 25 页共 256 页北京吉普大切诺基用户手册手动锁止方向盘在发动机运转状态下将方向盘转到偏离正常位置半圈然后关闭发动机取出钥匙接着向左或向右轻转方向盘直到锁住为止释放方向盘锁插入钥匙至点火开关后向左或向右轻转方向盘直到锁跳开为止说明若是右转方向盘而将方向盘锁住则必须向右轻转方向盘以开锁若是左转方向盘而将方向盘锁住则必须向左轻转方向盘以开锁车门与举升门锁说明用于启动汽车的钥匙同样适用于开启或锁上驾驶员侧车门将钥匙插入锁芯并转动以打开驾驶员侧车门本车其他三扇车门举升门或外掀式玻璃通风窗没有配置锁芯利用车内电动门锁开关或遥控无钥匙进入遥控器可开启其他三扇车门举升门或外掀式玻璃通风窗欲开启举升门时如上述方式先解除门锁然后拉动车门把手并往上掀起第 26 页共 256 页北京吉普大切诺基用户手册警告在举升门开启的情况下行驶会使有毒的尾气进入车内这些尾气对驾驶员与乘客有害因此行驶中请确保关好举升门举升门外掀式玻璃通风窗当举升门解除门锁时举升门外掀式玻璃通风窗也会随着解除锁定欲开启外掀式玻璃通风窗时将位于举升门上的车窗开关往上扳动即可举升门外掀式玻璃通风窗一旦开启接至后窗雨刷的连线便会中断因此外掀式玻璃通风窗开启时后雨刷便不会动警告在外掀式玻璃通风窗开启的情况下行驶会使有毒的尾气进入车内这些尾气对驾驶员与乘客有害行驶中请确保关好外掀式玻璃通风窗第 27 页共 256 页北京吉普大切诺基用户手册车门锁所有车门均配有滑拨式内侧门锁离开车辆欲锁上车门时将门锁杆往后拨动朝车后至 LOCK 位置即可一旦上锁之后除非将锁杆放松否则便无法从车内开启后车门而前车门则仍可利用车内把手开启离开车辆欲开启车门时将门锁杆往前拨动朝车前至UNLOCK 位置即可警告考虑到乘客安全与撞车时的安全请在开车停车或离开车辆时锁上车门儿童保护锁本车后车门配有儿童保护锁打开后车门将门边的安全杆往上推则该车门关闭后便无法由车内开启将安全杆往下推即可解除锁定第 28 页共 256 页北京吉普大切诺基用户手册警告应避免撞车时乘客受困于车内当启用儿童保护锁时切记只有从车外才能开启后车门电动门锁系统电动门锁开关位于一个控制板上将开关往车后方向按下可锁上所有车门往前方按下则解除所有车门锁止驾驶员侧与前乘客侧的电动门锁开关可打开所有车门和举升门若驾驶员侧车门开启钥匙仍留在点火开关内则无法使用电动门锁开关锁上车门此安全设计可防止您将钥匙误锁在车内一旦上锁之后除非将锁杆放松否则便无法从车内开启后车门而两个前车门则仍可利用车内把手开启第 29 页共 256 页北京吉普大切诺基用户手册自动门锁选定此功能后只要车速超过 24 公里小时 15 英里小时且所有车门均已关好时本车的门锁会自动锁上而任一个车门再开启时此功能即会重设此功能是可以选择的即可以开启或关闭请参阅[顶置控制台]章节中用户可自行设计的功能以便选取这个功能自动开锁功能如果车辆是在停止状态而档位是在停车档或是空档时当驾驶员侧车门锁打开时此功能会将所有车门的锁打开请参阅[顶置控制台]章节中用户可自行设计的功能。
进口汽车用户操作手册 Jeep Wrangler(JK)型号(2012年至2017年)V6-3.6L

advanced FLOW engineeringInstruction Manual P/N: 51-76204 / 54-76204 / 75-76204 Make: Jeep Model: Wrangler (JK) Year: 2012-2017 Engine: V6-3.6LLabel Qty. Description Part Number A1 1 Air Filter (Pro DRY S) 21-91062 (51-76204)A2 1 Air Filter (Pro 5R)24-91062 (54-76204) A3 1 Air Filter (Pro-GUARD 7) 72-91062 (75-76204) B 1 Tube 05-76204B1C 1 Housing 05-76204B2D 1 Clamp, T -bolt 03-50290E 2 Clamp, T -bolt 03-50292F 1 Coupler, Silicone, 3-1/4” ID x 2”L 05-01223G 1 Hose, Fuel 5/8” (9” Long) 05-00069H 1 Grommet, Temp Sensor 03-50167I 1 Plug, Air Box 05-00937J 1 Fitting, Air Temp Sensor 05-01336Tools needed: 8mm nut driver, 10mm nut driver, 7/16” nut driver and 1/4” driver with 10mm deep socket.Note: This intake is 50-state legal (C.A.R.B. E.O. Number D-550-14).• Please read the entire instruction manual before proceeding.• Ensure all components listed are present.• If you are missing any of the components, call customer support at 951-493-7100.• Ensure you have all necessary tools before proceeding.• Do not attempt to work on your vehicle when the engine is hot.• Disconnect the negative battery terminal before proceeding.• Retain factory parts for future use.Page 2Page 3A3A2DB A1C E EF H IJGFigure ARefer to Figure A for Step 1Step 1: Remove the engine cover by lifting firmly out of the vehicle.Page 42Refer to Figure B for Steps 2-6Step 2: Remove the two 10mm bolts from the intake tube. 1Step 3: Disconnect the temp sensor wire harness. 2Step 4: Loosen the hose clamp at the throttle body.Step 5: Completely remove the small section of crankcase vent (CCV) hose. It should be pulled off of the air filter housing and the tube to the engine. 3Step 6: Remove the stock intake tube, and air filter housing by pulling straight up and out of the vehicle.Page 5Step 7: Twist the temp sensor about 45 degrees counter-clockwise and pull it straight up to removefrom stock tube.Page 64Figure DRefer to Figure D for Step 8Step 8: Remove the 10mm bolt that secures the plastic tray onto the inner fender, but do not remove the plastic tray. 4 This screw will be reused in later step.Page 75Refer to Figure E for Step 9Step 9: Install the housing into the vehicle as shown 5 . Secure the hosuing using the stock screw removed in Step 8.Page 8Step 10: Slide 7.00” clamp over flange on housing 6 .Step 11: Install the air filter into the housing and slide clamp 5.50” over end of filter 7 .Page 9Refer to Figure F for Steps 10-1176Figure GRefer to Figure G for Steps 12-13Step 12: Insert the billet adaptor into the grommet.Step 13: Insert the factory temp sensor into the billet adaptor and twist 1/8 turn until the plastic tab locks over the small bump on the adaptor.Page 10Figure HRefer to Figure H for Step 14 Step 14: Plug in the temp sensor harness.Refer to Figure I for Steps 15-19Step 15: Place the silicone coupler onto the small end of the intake tube 8 .Step 16: Place the two 3.50” clamps over the coupler and then drop tube assembly into the filter 9 .Step 17: Place the larger end of the intake tube into the filter first then slide onto throttle body. Make sure all of the t-bolt clamps are loose at this time in order to install the tube easily.Step 18: Snap the coolant overflow line into the clip on the front of the aFe intake tube.Step 19: Install the new CCV hose (Note: use lubricant on the outside of the aFe tube).Figure I895Figure JRefer to Figure J for Step 20Step 20: Tighten all clamps and re-install engine cover. Your install is now complete.*Verify all connections are secure 100-200 miles after installationTo purchase any of the items above, view airflow charts, dyno graphs, photos, and video; please go to .Pro DRY S Air FilterP/N: 21-91062P/N: 24-91062P/N: 90-50501P/N: 90-59999Pro 5R Air FilterPro DRY S Restore KitBlue Squeeze Restore KitP/N: 90-50500Gold Squeeze Restore Kit P/N: 72-91062Pro-GUARD 7 Air Filter P/N: 46-70162 (Dana 44) 46-70192 (Dana 30)Differential CoverP/N: 49-48056-B (Black Tips) 49-48056-P (Polished)Exhaust SystemP/N: 77-16203 (M/T) 77-16204 (A/T)Sprint BoosterP/N: 46-79001Glide GuardP/N: 46-35003Throttel Body SpacerP/N: 49-08045-PExhaust SystemWarrantyGeneral Terms:• aFe warrants their products to be free from manufacturer’s defects due to workmanship and material.• This warranty applies only to the original purchaser of the product and is nontransferable.• Proof of purchase of the aFe product is required for all warranty claims.• Warranty is valid provided aFe instructions for installation and/or cleaning were properly followed.• Proper maintenance with regular inspections of product is required to insure warranty coverage.• Damage due to improper installation, abuse, unauthorized repair or alteration is not warranted.• Incidental or consequential damages or cost, including installation and removal of part, incurred due to failure of aFe product is not covered under this warranty.• All warranty is limited to the repair and/or replacement of the aFe part. To request Return Goods Authorization (“RGA”),***************************(951)493-7100.UponreceiptoftheRGA,youmustreturntheproduct to the address provided in the RGA, freight prepaid and accompanied with a dated proof of purchase and the RGA.Upon receipt of the defective product and upon verification of proof of purchase, aFe will either repair or replace the defective product within a reasonable time, not to exceed thirty days.Product Category P/N Prefix Warranty duration Direct OE Replacement Filters 10, 11, 30, 31, 71, 73 Life of the vehicle Racing Filters 18 1 year Universal 21, 24, 72 2 yearsAir Intake Systems 50, 51, 54, 55, 75 2 yearsExhaust Systems 49 2 years Intercoolers & Intercooler Tubes 46-2 2 yearsIntake Manifolds 46-1 2 years Differential Cover 46-7 Life of the vehicle Exhaust Manifolds 46 2 yearsThrottle Body Spacers 46-3 2 yearsFluid Filters 44 90 daysPre-Filters 28 2 yearsHeavy Duty OE Replacement 70 2 years PowerSports OE Replacement 81, 87 2 years PowerSports Intake Systems 85 2 yearsNo other warranty expressed or implied applies nor is any person or advanced FLOW engineering authorized to assume any other warranty. Some States do not allow the exclusion or limitation of incidental or consequential damages or do not allow limitations on how long an implied warranty lasts, so the above limitations or exclusions may not apply to you. This warranty gives you specific legal rights, and you may also have other rights which vary from State to State.advanced FLOW engineering, inc.252 Granite Street Corona, CA 92879TEL: 951.493.7155 • TECH: 951.493.7100。
大切诺基用户手册书(可编辑)

大切诺基用户手册书(可编辑)Beijing Jeep ___(Editable)Beijing Jeep ___BJ2021GBJ2021V8___User ___Product changes without notice2002 ___Page 1 of 256Beijing Jeep ___Dear friend。
Thank you for choosing Jeep。
You are now the most valued customer of Beijing Jeep Automotive Co。
Ltd。
We look forward to bringing you joy in your work and life with the highest quality products and services.Beijing Jeep ___ Co。
Ltd。
is China's first ___。
which manufactured the world's first car。
Our neering spirit ___ youwith the best products and services。
and being the best is our consistent goal.BJ2021G and BJ2021V8 are the top models of the Jeep series。
Grand Cherokee。
It is a high-end sport ___ appearance。
advanced performance。
us facilities。
comfortable seating。
___ airbags。
ABS。
___ differential lock。
and ___ full-time four-wheel drive design is leading in the world of off-road vehicles and has been named the best off-road vehicle of the year by the most authoritative four-wheel drive magazine in the United States for many years。
特拉福适用于适用于Jeep Wrangler JK短杆控制臂工程手册说明书
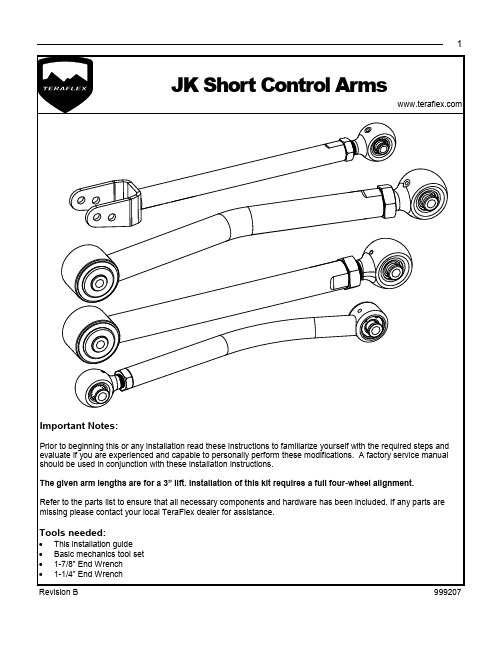
Remove the frame side bolt, the nut is a flag nut, with an 18mm and remove the arm.
the axle side. Install all bolts finger tight.
Taper on bottom
7
Reattach any removed wiring. After the vehicle is on the ground, torque all bolts to 75 ft-lbs (102 Nm).
Important Notes
Be sure to tighten each jam nut to prevent unwanted joint rotation and thread wear. Re-torque all hardware after 500
miles. All serviceable joints require greasing every 3000 miles or after water crossings. This will greatly lengthen the lift of your joints. Installation of these arms requires a full 4 wheel alignment. We recommend your local ASE Certified mechanic. Failure to do so may result in uneven tire wear
大切诺基用户手册书(可编辑)
大切诺基用户手册书(可编辑)大切诺基用户手册书北京吉普大切诺基用户手册BJ2021GBJ2021V8GRAND CHEROKEE用户手册产品如有更改恕不另行通知2002 年版第 1 页共 256 页北京吉普大切诺基用户手册尊敬的朋友感谢您选择了 Jeep 您已成为北京吉普汽车有限公司最尊贵的顾客我们期待着以最优质的产品和服务为您的工作和生活带来乐趣北京吉普汽车有限公司是中国第一家汽车合资企业合资伙伴是制造出全世界第一辆汽车的戴姆勒克莱斯勒公司开拓进取的传统和精神保证了我们为您提供的产品和服务达到最佳水准成为最佳是我们一贯的宗旨BJ2021GBJ2021V8 是 Jeep 系列的顶级车型大切诺基GRAND CHEROKEE 它是一款高档运动型多用途车其外型美观性能先进设施豪华乘坐舒适基于人性化设计操作非常方便采用了安全气囊 ABS 智能电控中央差速器锁和大排量发动机等先进技术使越野通过性和可靠性得到显著提高其全时四轮驱动设计更是居世界越野车的领先地位近年来已多次被美国最权威的四轮驱动杂志评为年度最佳越野车在国际市场享有盛誉本手册为您提供了使用和保养的基本知识请务必仔细阅读北京吉普汽车有限公司将不断地对产品进行改进欢迎您通过书信电话传真互联网等各种方式了解我公司产品的最新信息祝您一路顺风第 2 页共 256 页北京吉普大切诺基用户手册产品合格证随车发放给用户它是我公司对产品质量担保的凭证请用户务必妥善保存第 3 页共 256 页北京吉普大切诺基用户手册目录引言用户须知 15翻车警告 16简介 17警告与注意 18整车出厂标牌 19整车基本技术参数 20发动机技术参数 21启动汽车前注意事项汽车钥匙使用须知 22安全钥匙防盗禁止启动系统 22 备用钥匙 23车主钥匙设定 23取下点火钥匙 25钥匙插入点火提醒装置 25 方向盘锁 25手动锁止方向盘 26释放方向盘锁 26车门与举升门锁 26举升门外掀式玻璃通风窗 27 车门锁 28电动门锁系统 29车门开启照明 30乘客安全防护系统 30第 4 页共 256 页北京吉普大切诺基用户手册座椅安全带警示 31三点式安全带 32三点式安全带操作说明 32上肩带高低调整固定装置 35怀孕妇女使用安全带须知 36后座中央腰带 36儿童安全防护装置 37驾驶员与前乘客辅助约束系统 SRS 安全气囊 41新车磨合建议 50行车安全检查 51尾气排放 51车内安全检查 52车外安全检查 53汽车常用功能说明遥控无钥匙进入系统 54解除车门与举升门锁 54锁上车门与举升门 55一般信息 55设定其他遥控器 55遥控器电池更换 56吉普车记忆系统若配备 56若配备 58防盗警报系统设定警报系统 59解除警报系统的设定 59电动窗 60座椅 61前座椅调整调角器 61第 5 页共 256 页北京吉普大切诺基用户手册头部保护装置头枕 62电动座椅调整器 63加热式座椅若配备 666040 可折叠式后座椅 67后视镜 71车内日夜后视镜 71车内自动调光后视镜若配备 71 车外后视镜折合功能 72车外后视镜 73加热式遥控后视镜若配备 73电动遥控车外后视镜 73电动折合式车外后视镜若配备 74 照明化妆镜若配备 74照明装置 75室内灯 75前座地图阅读灯 76多功能控制杆 76蓄电池省电功能外部照明装置 76 前照灯视廓灯及仪表板灯 77车灯未关提醒装置 77前雾灯若配备 77后雾灯 78转向信号灯 78前照灯调光开关 78超车灯 78前照灯光束调整系统若配备 79 前照灯延时装置 80挡风玻璃刮水器和洗涤器 80第 6 页共 256 页北京吉普大切诺基用户手册除雾器 81速度感应间歇雨刷系统若配备 82 可调倾角式转向管柱 82电子车速控制装置若配备 83启动方式 83设定速度 83解除方式 84恢复速度 84设定不同速度 84加速超车 84上下坡行驶 85点烟器与烟灰缸 86电源插座 86手套箱 87饮料架 88顶置控制台若配备 88圆顶灯阅读灯 89车辆信息中心 89用户可自行设计的功能 90 罗盘温度旅程电脑 94 旅程电脑 95电动玻璃天窗若配备 98 快速开启模式 99手动开启模式 99关闭操作 100通风操作 100点火关闭操作 100遮阳操作 101第 7 页共 256 页北京吉普大切诺基用户手册保养 101后车窗功能 102后车窗刮水器洗涤器 102 后车窗除雾器 103行李区设备 104行李厢灯 104可拆式行李厢罩 104行李固定绑钩 105车顶行李架 106开启与关闭发动机罩 109仪表板各项指示说明仪表板与内部控制开关 110组合仪表汽油发动机 111组合仪表说明汽油机车型 111收音机的操作与移动电话 118电子时钟 118时钟设定程序 119带有图形化均衡器磁带播放器及换片箱控制器的 AMFM 立体声收音机 119操作说明收音机模式 119电源开关音量控制 119Seek 按键收音机模式 120调谐器 120左右平衡 120前后平衡 120音质 120AMFM 选项 120第 8 页共 256 页北京吉普大切诺基用户手册Scan 按键 121设定收音机按键记忆功能 121时钟与收音机模式间的切换 121磁带播放器的操作 121Seek 按键 122快速前转 FF 122倒带 RW 122退带 122Scan 按键 122换面 122金属带选项 70 s 123夹式转子释放装置 123杜比降噪系统 123CD 换片箱的操作说明 123 TAPECD-C 键 123Program 键 1 124Program 键 4 随机播放 124FF TUNE RW 124Program 键 5 124Seek 按键 124Time 键 124Scan 按键 125磁带播放器及 CD 播放器的AM 立体声FM带有图形化均衡器立体声收音机 125操作说明收音机模式 125电源开关音量控制 125 Seek 键收音机模式 126调谐器 126第 9 页共 256 页北京吉普大切诺基用户手册左右平衡 126前后平衡 126音质控制 126AMFM 选项 126设定收音机按键记忆功能 127 时间 127操作说明磁带模式 127换面 ? 128磁带 128搜寻 128快速前转 FF 128倒带 RW 128退带 128金属带选项 70 s 129夹式转子释放装置 129杜比降噪 129操作说明 CD 播放器 129放入 CD 129搜寻 Seek 130退出CD 130FFTUNERW 130RND 随机播放 130CDCD-C 131时间 131音响系统遥控控制若配备 131收音机的操作 132磁带播放器 132CD 播放器 132第 10 页共 256 页北京吉普大切诺基用户手册遥控 CD 换片箱若配备 132装入 C 换片箱 133磁带与播放器的保养 136CD 的保养 137空调控制器 137风速控制 138温度控制 138模式选择 139空调装置 140红外线双重区域恒温控制若配备 141 车窗结雾 144启动及操作启动程序 144正常启动 144若发动机无法启动时 144启动后 145驻车互锁系统 146驻车制动 146自动变速器 148档位 149过热模式 152液力变矩器 153摇动车辆 153四轮驱动操作 153Selec-Trac-若配备 153 Quadra-Trac -若配备 158 Quadra-Drive 系统-若配备 160 第 11 页共 256 页北京吉普大切诺基用户手册驾车要领 161公路行驶 161越野行驶 161前后桥差速器锁若配备 164后桥拖曳力锁 164动力转向 165防抱死制动系统 165燃油选择无铅汽油 167燃油添加剂 168油箱盖与加油口 168油箱容量 171轮胎和车轮 171轮胎气压 171更换轮胎 173胎纹磨损指示器 175轮胎对调 175校准与平衡 176轮胎链条或牵引装置 176紧急情况措施危险警示闪光器 177三角警告牌 178灭火器 178发动机过热 178更换轮胎 180千斤顶与车轮扳手的位置 180 备胎位置 182换胎程序 183第 12 页共 256 页北京吉普大切诺基用户手册跨接启动程序 187紧急拖钩若配备 189车辆保养40L 6 缸发动机 19147L 8 缸发动机 191内置式电脑诊断系统 OBD 192 售后服务 192更换零件 193保养程序 193液位检查指南 193发动机废油液的弃置 195发动机机油汽油发动机 195 冷却系统 200发动机空气滤清器 205自动变速器 205动力转向液 208挡风玻璃清洗液前与后 210 挡风玻璃雨刷片 211制动系统 212空调保养 214分动器 214前后桥油液 215传动系统与转向元件润滑 216 润滑脂的选择 216车身润滑 217蓄电池 217外观保养与防锈处理 220第 13 页共 256 页北京吉普大切诺基用户手册三元催化转换器 223保险丝盒 224电气系统故障 226配电中心 227车辆储放 227更换灯泡 227前照灯 227前示廓灯 228转向信号灯 230侧位灯 231尾灯制动灯后雾灯转向信号灯以及倒车灯231中央高位制动灯 232牌照灯 233更换灯泡 234液体容量 235建议使用的油液润滑剂与零件 236底盘 236发动机 237车身 237保养时间表排放控制系统保养 238保养时间表汽油发动机 238时间表 A 240时间表 B 245第 14 页共 256 页北京吉普大切诺基用户手册引言用户须知感谢您选购北京吉普汽车有限公司Jeep 车本公司的Jeep 车秉承戴姆勒克莱斯勒传统造车工艺精良造型独特品质优良绝对值得您信赖本车型是特别针对一般道路与野外行驶而精心设计的一种运动型多用途车 SUV具有传统二轮驱动车辆所没有的优异性能拥有本车就能行遍天下由于本车在道路或野外驾驶时与许多轿车的操控方式不尽相同所以请您花费一点时间来熟悉您的车子在开始操作本车之前请详读用户手册及附件资料确切了解汽车所有的操作方法尤其在制动转向换档系统及分动器换档方面更应特别注意此外还应熟悉各种路面驾驶技术虽然会随着经验累积而提高但不管操作何种车辆一开始都应特别谨慎在野外驾驶或操作车辆时请勿使车辆过载或期望征服大自然的力量驾驶车辆时应遵守各地交通法规和其它车型的车辆一样如未按正确方式操作本车将会使车辆失控或发生意外请确实详读本手册的[公路行驶]与[越野行驶]指南第 15 页共 256 页北京吉普大切诺基用户手册翻车警告运动型多用途车 SUV 比起其他车型的车辆更容易发生翻车意外本车型比起一般轿车其离地间隙较大轮距较窄所以能在多种越野路面上表现出较佳的性能任何车辆若未按正确方式驾驶将会导致失控由于本车型重心较高且轮距较窄万一车子失控会比其它车型更容易造成翻车意外应避免高速急转弯剧烈操作车辆或进行危险的驾驶行为否则可能使车辆失控未按正确方式操作本车将会导致事故翻车及人员伤亡请务必小心驾驶翻车警告标识驾驶员和乘客未系安全带是导致身体严重伤害甚至死亡的主要原因据有关报道显示在翻车事故中未系安全带者明显比系上安全带者的死亡率更高所以请务必系上安全带以超高速驾驶或酒后驾车将导致车辆失控撞击其它车辆或物体偏离路面或翻车上述任何一项失误将导致身体严重伤害甚至死亡第 16 页共 256 页北京吉普大切诺基用户手册为保持车辆最佳状态请按本手册建议的里程区间定期保养车辆各项保养工作应交由北京 Jeep 特约维修服务站或四位一体经销商执行他们拥有合格的技术人员专业工具与设备可提供各项服务北京吉普汽车有限公司与其经销商希望您对本车感到完全满意若您在服务或车辆售后保证方面有不满意之处请随时向本公司销售市场部反映北京 Jeep 特约维修服务站或四位一体经销商将很乐意为您解决任何有关车辆的问题简介本手册内所有内容以出版的最新资料为准本公司保留随时推出新版本的权利本手册由专业服务人员与工程师协助编制完成其内容有助于驾驶员了解新车的各项操作与保养细节请务必详细阅读按照本手册的各项指示与建议来驾车将确保车辆使用者的安全提高驾驶乐趣手册阅读完毕后请存放于车内供随时参阅车辆转售时应附上用户手册北京吉普汽车有限公司保留更改车辆设计与规格的权利并可随时增加或修改其产品配置对于已售出的车辆将无安装这些配件的义务本用户手册内所介绍的配件分标准与选装额外付费两种因此部分设备与配件将不会出现在您的车辆上第 17 页共 256 页北京吉普大切诺基用户手册说明开始驾驶本车之前或欲安装零件配件或对车辆进行改装之前请先阅读用户手册市面上有很多不同制造商生产的替换零件与配件如车主安装这些零配件之后北京吉普汽车有限公司将无法保证您的Jeep 车的安全即使这些零配件经过正式认可例如获得一般操作允许的零件或经过原厂正式认可的零件设计或在安装之后获得本公司的个别操作许可并不代表您的 Jeep 车的驾驶安全不受影响因此本公司与北京 Jeep 特约维修服务站或四位一体经销商将对此不负任何责任只有北京 Jeep 特约维修服务站或四位一体经销商所安装或加装零件的车辆北京吉普汽车有限公司才会承担责任同样原则亦适用于购车后对车辆所进行的任何改装欲获得 Mopar 原厂零件与配件及其它经过北京吉普汽车有限公司认可的产品请与北京 Jeep 特约维修服务站联系北京 Jeep 特约维修服务站最了解您的汽车所有维修人员经过原厂培训并提供原厂 Mopar 零件他们以顾客满意为最高目标当您的汽车欲进行维修保养时请切记交由北京Jeep 特约维修站或四位一体经销商执行警告与注意对于会造成事故或身体伤害的操作过程本手册内均以[警告]表示对于会损坏车辆与配件的操作过程则以[注意]表示应全数阅读手册内容以免忽略任何重要信息所有[警告]与[注意]的指示均应确保遵守第 18 页共 256 页北京吉普大切诺基用户手册整车出厂标牌整车出厂标牌装在发动机罩下水箱上横梁左端打印有车辆识别号整车型号发动机号及出厂日期等车辆识别号是具有唯一性的标识车辆身份的 17 位代码简称 VIN此代码也标识在仪表板左上部的牌子上及后货厢右后侧地板上请勿滥用此码整车型号是中国汽车产品目录所发布的车型代码发动机号与发动机缸体或缸盖上刻印的代码相一致第 19 页共 256 页北京吉普大切诺基用户手册整车基本技术参数车型 BJ2021G BJ2021V8全长毫米 4610 4610全宽毫米 18261826全高毫米整车整备质量状态 1763 1763厂定最大总质量状态 1713 1713轴距毫米 2690 2690轮距毫米1511 1511载货容积立方米座椅竖起 1110 1110座椅放倒 2059 2059载客人数 5 5最大总质量千克 2313 2348整备质量千克 1793 1828发动机型号 C698QA1 C8V93Q 第 20 页共 256 页北京吉普大切诺基用户手册发动机技术参数40 升发动机 47 升发动机型号 C698QA1 C8V93Q型式直列六缸液冷 V 型八缸液冷顶缸径行程顶置气门置气门984 867 930 865毫米毫米排量升 40 47压缩比 871 901燃油系统电控多点燃油喷射电控多点燃油喷射式汽油机式汽油机额定功率转速1454600 1754600千瓦转分最大扭矩转速3113000 4003000牛米转分第 21 页共 256 页北京吉普大切诺基用户手册启动汽车前注意事项汽车钥匙使用须知您的新车钥匙放在塑料袋里袋上随附有钥匙专用码如果有钥匙而无塑料袋请向您的经销商索取此钥匙专用码此钥匙专用码也可以凭购车发票从经销商处获得安全钥匙防盗禁止启动系统本车配备安全钥匙系统利用本系统内含识别码的点火钥匙会将信号传送至车辆电脑只有在车辆电脑确认来自点火钥匙的信号后车辆才会启动和运转若本系统没有确认来自点火钥匙的信号则车辆会在启动运转 2 秒后熄灭发动机安全钥匙灯在点火开关首次转至 ON 位置时会亮起约 2 秒钟如果车辆电脑没有确认来自点火钥匙内的信号时安全钥匙灯会一直闪烁以表明车辆无法开动直到接到发动机熄灭的信号而如果安全钥匙灯在正常操作时持续亮着则表示系统的电子装置出现故障所有附随本车的钥匙均已针对本车的电子装置进行设定说明第 22 页共 256 页北京吉普大切诺基用户手册本车配备的安全钥匙系统与遥控启动系统并不兼容同时使用这些系统可导致车辆启动问题并丧失有效的安全保护大的金属饰物也可造成车辆启动问题这些装置虽不会损及安全钥匙系统但如果这些装置在启动发动机时与安全钥匙非常靠近则可造成暂时性问题若发生问题关闭点火开关并移除安全钥匙圈上的所有金属饰物重新启动发动机备用钥匙说明只有针对本车设定的钥匙才能启动本车对于任何备用钥匙均需要四位数的 PIN 码请向您的经销商询问此码复制备用钥匙时需提供此码钥匙的复制可交由北京 Jeep 特约维修服务站或利用[车主钥匙设定]程序来执行钥匙复制过程必须将空白钥匙与汽车电脑设定配对空白钥匙是指从未设定的钥匙说明若安全钥匙系统必须维修则必须将所有的钥匙交给北京Jeep 特约维修服务部或四位一体经销商车主钥匙设定只要有两把有效的钥匙即可按照以下步骤进行新钥匙与系统的设定配对1 将第一把有效的钥匙插入点火开关并转至 ON 位置至少3 秒钟但以不超过 15 秒为原则然后将点火开关转回至 OFF 位置并取出第一把钥匙第 23 页共 256 页北京吉普大切诺基用户手册2 在 15 秒之内插入第二把有效的钥匙并将点火开关转至ON 位置 10 秒钟后警笛声响起且安全钥匙灯会开始闪烁然后将点火开关转回至 OFF 位置并取出第二把钥匙3 在取出第二把钥匙的 60 秒之内将空白的安全钥匙插入点火开关并转至 ON 位置 10 秒钟后会听到一声警声发出安全钥匙灯会停止闪烁然后再度亮起约 2 秒钟之后熄灭此时新的安全钥匙的设定便告完成重复本程序最多可设定把钥匙一般信息本安全钥匙系统的载波为 43392MHz 符合 EEC 规定这些装置必须经过认证才能适用于每个国家的特殊法规关系到两种不同的法规 ETS 欧洲电子通讯标准 300-220 是大多数国家所使用的 German BZT 联邦法规 225Z125 是以ETC300-220 为基础而建立的但是前者有额外的独特要求操作受到下列两种情况限制1 这个装置不可造成有害的干扰2 这个装置必须接受可能收到的任何干扰包括可能造成非预期操作的干扰第 24 页共 256 页北京吉普大切诺基用户手册取下点火钥匙插入钥匙任何一面朝上均可然后转动开关至图中所示四个位置之一只有在 LOCK 位置才能取出或插入钥匙取下点火钥匙将钥匙朝点火开关锁芯压入然后转至 LOCK 位置自动变速器变速杆必须在停车档的位置钥匙插入点火提醒装置钥匙仍插在点火开关上且未转至 ON 位置时如果打开驾驶员侧车门则会听到警告信号以提醒您取出钥匙注意离开车辆时请务必取出钥匙并锁好所有车门方向盘锁本车配有被动式方向盘锁可避免在没有钥匙的情况下驾驶汽车若方向盘向左或向右转动未超过半圈且钥匙未插入点火开关则方向盘将会被锁住第 25 页共 256 页北京吉普大切诺基用户手册手动锁止方向盘在发动机运转状态下将方向盘转到偏离正常位置半圈然后关闭发动机取出钥匙接着向左或向右轻转方向盘直到锁住为止释放方向盘锁插入钥匙至点火开关后向左或向右轻转方向盘直到锁跳开为止说明若是右转方向盘而将方向盘锁住则必须向右轻转方向盘以开锁若是左转方向盘而将方向盘锁住则必须向左轻转方向盘以开锁车门与举升门锁说明用于启动汽车的钥匙同样适用于开启或锁上驾驶员侧车门将钥匙插入锁芯并转动以打开驾驶员侧车门本车其他三扇车门举升门或外掀式玻璃通风窗没有配置锁芯利用车内电动门锁开关或遥控无钥匙进入遥控器可开启其他三扇车门举升门或外掀式玻璃通风窗欲开启举升门时如上述方式先解除门锁然后拉动车门把手并往上掀起第 26 页共 256 页北京吉普大切诺基用户手册警告在举升门开启的情况下行驶会使有毒的尾气进入车内这些尾气对驾驶员与乘客有害因此行驶中请确保关好举升门举升门外掀式玻璃通风窗当举升门解除门锁时举升门外掀式玻璃通风窗也会随着解除锁定欲开启外掀式玻璃通风窗时将位于举升门上的车窗开关往上扳动即可举升门外掀式玻璃通风窗一旦开启接至后窗雨刷的连线便会中断因此外掀式玻璃通风窗开启时后雨刷便不会动警告在外掀式玻璃通风窗开启的情况下行驶会使有毒的尾气进入车内这些尾气对驾驶员与乘客有害行驶中请确保关好外掀式玻璃通风窗第 27 页共 256 页北京吉普大切诺基用户手册车门锁所有车门均配有滑拨式内侧门锁离开车辆欲锁上车门时将门锁杆往后拨动朝车后至 LOCK 位置即可一旦上锁之后除非将锁杆放松否则便无法从车内开启后车门而前车门则仍可利用车内把手开启离开车辆欲开启车门时将门锁杆往前拨动朝车前至UNLOCK 位置即可警告考虑到乘客安全与撞车时的安全请在开车停车或离开车辆时锁上车门儿童保护锁本车后车门配有儿童保护锁打开后车门将门边的安全杆往上推则该车门关闭后便无法由车内开启将安全杆往下推即可解除锁定第 28 页共 256 页北京吉普大切诺基用户手册警告应避免撞车时乘客受困于车内当启用儿童保护锁时切记只有从车外才能开启后车门电动门锁系统电动门锁开关位于一个控制板上将开关往车后方向按下可锁上所有车门往前方按下则解除所有车门锁止驾驶员侧与前乘客侧的电动门锁开关可打开所有车门和举升门若驾驶员侧车门开启钥匙仍留在点火开关内则无法使用电动门锁开关锁上车门此安全设计可防止您将钥匙误锁在车内一旦上锁之后除非将锁杆放松否则便无法从车内开启后车门而两个前车门则仍可利用车内把手开启第 29 页共 256 页北京吉普大切诺基用户手册自动门锁选定此功能后只要车速超过 24 公里小时 15 英里小时且所有车门均已关好时本车的门锁会自动锁上而任一个车门再开启时此功能即会重设此功能是可以选择的即可以开启或关闭请参阅[顶置控制台]章节中用户可自行设计的功能以便选取这个功能自动开锁功能如果车辆是在停止状态而档位是在停车档或是空档时当驾驶员侧车门锁打开时此功能会将所有车门的锁打开请参阅[顶置控制台]章节中用户可自行设计的功能。
JEEP STT810
2012 Jeep® Grand Cherokee SRT8® (2012款Jeep大切诺基SRT8)EXTERIOR (车身外部装备介绍)Colors 外观颜色Black Clear Coat, Bright Silver Metallic Clear Coat, Deep Molten Red Pearl Coat, Mineral Gray Metallic Clear Coat(亮黑色,亮金属银色,深红色,金属灰色)Black chrome exhaust tips (黑色镀铬排气尾喉)Black roof molding (黑色行李架)Body-color fascias with gloss black insert and chrome bezels (front) (前机盖亮黑透气罩)and separate trailer hitch cover (rear) (后单独拖车钩罩)Body-color grille with chrome throat bezels(车身的镀铬格栅与前挡板同色)Body-color rear spoiler (车身同色尾翼)Body-color sill extension (车身同色窗边装饰条)Bright daylight opening (DLO), bright grilleBright racing style brake and accelerator pedal padsBright license plate brow (亮银日行灯开关,中网,刹车和油门踏板,还有牌照框)Deep tint sunscreen glass (深色防晒玻璃)Door sill scuff pads (brushed aluminum) with Jeep® logoCommandview dual-pane panoramic sunroof w/power shade Flipper liftgate glass (带JEEP标志拉丝铝迎宾踏板,全景双向电动全景天窗)Front door tinted glass (前门有色玻璃)Front license plate bracket (车牌支架)Automatic headlamps (自动大灯)Auto headlamp leveling system (自动水平大灯)Bi-xenon headlamps (双氙气大灯)LED Daytime Running Lamps (led白天行车灯)Premium Fog Lamps (高级雾灯)Mirrors Body color, power heated memory, multi-functioning mirrors, fold away (车身同色外后视镜,电动带加热记忆翻折)Power liftgate (电动尾门)SRT hood with heat extractors ( SRT的引擎盖散热孔)Sunroof, single pane power front (with rear DVD) (电动天窗带后排DVD)Wipers Rain-sensitive windshield (前感应雨刷)Rear window wiper/washer and rear window defroster (后雨刷带加热除霜)INTERIOR (车身内部装备)Auxiliary power (辅助电源)12-volt auxiliary power outlets front and rear(12伏前后电源)115-volt auxiliary power outlet (115伏辅助电源插座)Air Conditioning (空调系统)Air conditioning with automatic dual zone temperature control Air filtering (双区独立空调带过滤)Carbon fiber interior accents (碳纤维内饰)Electronic Vehicle Information Center (EVIC) with Performance Pages (电子车辆信息中心附带性能浏览页)Floor console – premium full length (主控制台简洁大方)Illuminated cupholders (杯架等氛围照明)Interior colors:Black 内饰颜色:黑Laminated front door glass (双层前门玻璃)LED lighting – lower driver and passenger doors (迎宾led 照明灯)Deluxe door trim panel (豪华门内饰板)Luxury front/rear floor mats (豪华前后地毯)Passenger assist handles (侧帘手扶把手)Perforated leather-wrapped shift knob (打孔真皮包裹换档头)Premium instrument cluster with tachometer and dual note electric horns 180mph speedometer(高级仪表盘电动调节方向盘,180英里时速的表盘)Premium silver strakes in rear cargo area(后备箱银色面板)Premium insulation group (高级隔热材料组成)Radio/driver seat/mirrors memory Seats (广播/驾驶员座/后视镜全部带记忆功能)Heated front seats (前排加热座椅)Heated second-row seats (第二排加热座椅)Power eight-way driver and passenger seats (电动八向驾驶员和乘客座椅)Power driver/pass four-way lumbar (电动四向腰托)Premium Nappa leather-trimmed bucket seats with preferred suede, vented (功能高级真皮+鹿皮包裹筒式运动座椅)Rear seat 60/40 folding (后排座60/40比例放倒)Ventilated front seats (通风前排座椅)Sound systems and entertainment (音响娱乐系统)Nine amplified speakers with subwoofer and 506 watt amp(9个喇叭带506瓦低音炮)SIRIUS Satellite Radio (卫星收音)SIRIUS Travel Link (卫星旅行链接)Media Center 430N AM/FM/CD/DVD/HDD/MP3 radio with Garmin navigation (DVD+MP3+GAEMIN 导航系统)SRT High Performance Audio from Harman Kardon®with 19 speakers, 10-inch subwoofer, 825-watt amplifier;includes Media Center 730N CD/DVD/HDD radio with premium navigationincluding voice recognition, dead reckoning and SIRIUS Real Time Traffic, GPS with voice command(可选装高性能哈曼卡顿音响系统19喇叭外加10寸低音炮,825瓦功放附带高级声控导航系统,语音识别,实时路况信息回馈)Steering column (液压助力转向)Power tilt/telescoping Steering wheel(电动调节方向盘)Leather-wrapped, heated with additional controls Paddle shifters, mounted Speed control Storage (真皮包裹方向盘带加热拨片换档,速度控制)Center floor console and overhead console Cargo compartment cover Cargo net (附带中心和头顶控制台,后备箱储物盖网兜)POWERTRAIN AND CHASSIS (机械部分)Alternator 220-amp alternator (电瓶220A发电机)Axle ratio (轴率)230 mm rear axle, 3.70 real axle ratio, electronic limited slip 195 mm front conventional differential (230毫米的后轴,3.70 后轴比率,电子限滑195毫米前传统的差分)Battery (电池)700-amp maintenance free (700A免维修)Brakes (刹车系统)SRT high performance, anti-lock 4-wheel discBrembo six-piston front calipers; four-piston rear calipers(全新SRT高性能Brembo制动器,后者配备了四轮防抱死制动系统(ABS)。
2010年福特福斯特用车手册说明书

Feel the difference Ford FiestaGuide rapidecontenues dans cette publicationétaient correctes a la date d'impression.Toutefois, soucieuse de l'amélioration permanente de ses produits,Ford se réserve le droit d'en modifier a tout moment et sans préavis les caractéristiques,la conception et l'équipement sans encourir aucune obligation.Cette publication ne peut pas etre reproduite ni traduite,en totalitéou en partie,sans notre autorisation préalable.Sauf erreurs ou omissions.©Ford Motor Company2010Tous droits réservés.Numéro de pièce:(CG3559fr)04/201020100427122757APROPOS DE CE MANUELMerci d'avoir choisi Ford.Nous vous recommandons de prendre un peu de temps pour vous familiariser avec cevéhicule en lisant ce manuel.Plus vous en saurez sur lui,plus vous aurez de plaisiràle conduire et plus vous pourrez le faire en sécurité.Ce Guide rapide doitêtre lu conjointement avec le Manuel propriétaire.AVERTISSEMENTVeillezàtoujours conduire etàles commandes et fonctionsvéhicule avec l'attention et les précautions qui s'imposent.DÉMARRAGE RAPIDEVue d'ensemble du combinédes instruments ConduiteàgaucheE102562H GFEDCBAU T S QR P O N L JKM IConduite àdroiteE102559AE C D BFGH IJ L K M S P Q R O N UTCommutateurd'allumage.N Régulateur de vitesse.O Avertisseur sonore.P Réglage du volant.Q Airbag genoux conducteur.RCommande audio.S E71963AB C E78276Verrouillagedu véhiculeE87384121E87964Neconduite.122E95178AVERTISSEMENTVeillez àengager complètement le levier de verrouillage lorsqu'il est ramenéàsa position d'origine.3E95179ESSUIE-GLACE ÀACTIVATION AUTOMATIQUEE102033BCASensibilitéélevée A ActivéB SensibilitéfaibleCLe capteur de pluie mesure en continu la quantitéd'eau sur le pare-brise et règle automatiquement la vitesse de balayage des essuie-glaces.Réglez la sensibilitédu capteur de pluie àl'aide de la commande rotative.ALLUMAGE AUTOMATIQUE DES PHARESE70719Les phares s'allument et s'éteignent automatiquement en fonction de la luminositéambiante.CLIGNOTANTSE102016:Soulever ou abaisser légèrement levier pour que les clignotants ne clignotent qu'àtrois reprises.E112145E112146E102397CLIMATISATION AUTOMATIQUERéglagesrecommandés la fonction de refroidissementE112147E112148132E112675E112676231MONTRE DE BORDPour régler l'horloge,mettre leappuyer sur les boutons H oubesoin.E85766DÉMARRAGE SANS CLÉE103203démarrageappuyezsecondes.E119080permettre l'écoulementtout carburantE119081plus d'informations,Manuel du propriétaire.。
2007-2010 Jeep Wrangler 四门车型配音箱mundantaller产品说明书
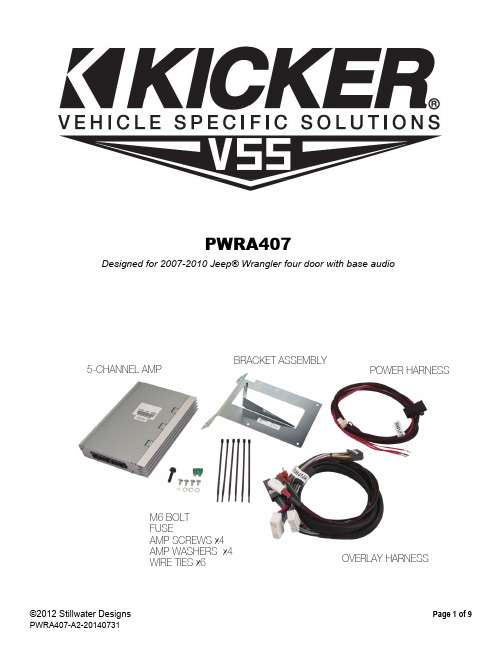
PWRA407Designed for 2007-2010 Jeep® Wrangler four door with base audioBRACKET ASSEMBLYM6 BOLT FUSEAMP SCREWS x4 AMP WASHERS x4 WIRE TIES x65-CHANNEL AMPOVERLAY HARNESSPOWER HARNESSFig. 1 Fig. 2Radio Removal1.Disconnect the negative battery terminal before you begin.ing a panel removal tool, pry up on the plastic trim panel located above the radio. Make sure to pry on the side of the panel closest to the window. Fig. 1ing a panel removal tool pry loose the top edge of the panel below the HVAC controls. Fig. 24.Remove the four screws securing the radio trim bezel. There are two at the top and two at the bottom.Fig. 35.Starting at the top and working your way down pull out on the trim bezel to release the fasteners securing it. Once the bezel is completely detached from the dash it is not necessary to disconnect any of the wiring or the HVAC linkage. Simply allow the bezel to rest on the console to allow access to the screws securing the radio. Fig. 4T-TAP x2 FUSEWIRE T I ES x6 SUBWOOFER ASSEMBLY200 WATT AMPPOWER HARNESSOVERLAY HARNESSFig. 5 Fig. 6Fig. 3Fig. 4Fig. 7 Fig. 86.Remove the screws securing the radio and pull the radio from the dash and disconnect the wiring.Disconnect the antenna cable by pulling the locking antenna connector away from the radio. Caution:Pulling the antenna cable straight out of the radio without pulling on the locking antenna connector could damage the cable or radio.Amp Installation7.Gently pull out on the panel just below the steering column, rotate down and remove. Fig. 58.Find the small panel just below the one you just removed and pull to remove it as well. Fig. 69.Remove the two bolts securing the metal plate below the steering column. Fig. 710. Install the amp bracket in between the dash frame rails and line up the holes in the bracket with the holes. Install the supplied 10mm bolt in the lower middle hole but do not tighten.11. Temporarily install the two bolts that retain the metal plate in order to stabilize the amp bracket while the amp is mounted. Fig. 8Fig. 9 Fig. 1212. Place the amp on top of the bracket by sliding it under the dash past the brake pedal. Make sure theconnecters on the amp are facing toward the fire wall and the mounting holes are facing down.13. Using a Torx® T-25 screwdriver install the four supplied screws and washers to attach the amp to the amp bracket. Fig. 914. Pass the factory radio harness connecter behind the metal framework indicated by the arrow. Fig. 1015. Connect the amplifier harness to the amplifier and route the harness up to the radio cavity.16. Connect the male radio harness connecter to the female connecter of the amp harness and tuck this connection into the void between the radio opening and the instrument cluster to avoid interference with radio during reinstallation.17. Route male connector of the amp harness back around the beam as the radio harness originally was.Fig. 1118. You can now connect the radio to the amplifier harness and reconnect the antennae wire and reinstall the radio.19. Remove the two 10mm bolts temporarily installed in step 10. Position the metal plate removed previously over the top of the amp bracket and secure both with the two 10mm bolts.20. Tighten the bottom bolt.21. Loosen the four screws indicated by the arrows in Fig. 12 approximately 4 turns.22. Remove the screw indicated by arrow A completely. Fig. 1223. Install the amplifier with the long tab toward the center of the car. Slide the long tab behind the plastic and under the lower right screw while pulling out on the plastic. Once tab is completely seated rotate the amplifier down and secure the short tab in the same manner. Reinstall screw A and retighten the screws but leave the covers uninstalled. Fig. 13Fig. 10Fig. 11Fig. 14 Fig. 15Fig. 16 Fig. 17Power Harness Installation24. Find the rubber grommet in the top driver’s side of the fire wall underneath the hood and remove it. Fig.1425. Using a razor knife make a small cut in the center of the grommet. Pass the end of the wires with the small terminal on the ends through the grommet and pull the grommet up to the point where the plastic sheathing starts. Fig. 1526. Run the wires through the grommet hole in the fire wall and reinstall the grommet.27. Run the wires along the top of the fire wall toward the battery and secure with wire ties.28. Remove the top of the fuse cover and using a 13mm socket and ratchet loosen and remove the nut on the positive battery accessory lug. Fig. 1629. Connect the ring terminals of the power harnesses to the lug and retighten the nut. Torque to 10Nm.30. Using a panel removal tool remove the four plastic retainers (three in front door opening and one in rear door opening) securing the driver’s side sill plate and B pillar post cover. Fig. 17Fig. 13Fig. 20 Fig. 18 Fig. 21Fig. 1931. Gently pull the kick panel/sill plate toward the brake pedal to release the fasteners securing it.32. Connect the ten pin connector of the harness to the amplifier. Slide the red locking tab over to prevent the connector from accidentally coming disconnected.33. Route the harness along the bottom of the front and rear door jam and toward the back seat.34. Connect the two pin connector of the amplifier harness to the two pin connector of the subwooferharness.35. Install the supplied white, three-pin connector by inserting the terminals on the end of the power wire into the back of the connector until they click and lock. Any wire can go in any hole. Fig. 1836. Install the supplied black, two-pin connector by inserting the terminals on the end of the power wire into the back of the connector until it clicks and locks. Fig. 1937. Depress the blue terminal retainer down in the center of the connector.38. Remove one of the factory ground nuts on the driver’s side kick area. Connect the two black ground wires, reinstall the nut and tighten. Fig. 20. Torque to 8Nm.39. Connect the green wire of the amplifier harness to the green wire of the subwoofer harness. Then,connect the brown wire of the amplifier harness to the brown wire of the subwoofer harness. Fig. 2140. Run the wire harness along the floor under the rear seats to approximately the middle of the vehicle and pull the end of the harness under the seat to the cargo area.41. Set the subwoofer in place and connect the wire harness.42. Rotate the rear seat back until it is nearly vertical. While holding the seat back with one hand, slide the enclosure back until the hooks on the bracket are centered under the anchor points at the bottom of the seat. Slowly rotate the seat back toward the rear of the vehicle until it locks into place. Fig. 22Fig. 2243.Reinstall all previously removed parts in reverse order.44.Reinstall supplied fuses in the fuse holders under hood.45.Reconnect the negative battery cable. Torque to 5Nm.Troubleshooting the Kicker Integrated SystemsIf you experience a problem once the Subwoofer is installed use this guide to locate the trouble.The radio is working, but the Subwoofer is not working:•Check the battery voltage to make sure it is not discharged below 11 volts.•Check the negative battery cable to see if it has been securely tightened back on the battery.•Check the inline fuse located near the battery to make sure it is plugged in completely, and not blown.•Check the inline +12Volt power-connector near the firewall to make sure it is plugged in securely.•Check the inline connectors near the subwoofer enclosure to make sure they are plugged securely.•Check the ground wire connection to make sure it is tightly secured to the proper ground in the vehicle.•Check the audio input signal connection to make sure it is secure and connected to the proper wiring.•Test with different music in case there is no low frequency audio in the initial sound check.There is a buzz or rattle noise that accompanies thelow frequency element of the music:•Check for a connector or any other object that could be very near the subwoofer or the enclosure.•Check the subwoofer enclosure mounting brackets to make sure they are secure.There is a problem with the multi-channel stereo amplifier:•Check the battery voltage to make sure it is not discharged below 11 volts.•Check the negative battery cable to see if it has been securely tightened back on the battery.•Check the inline fuse located near the battery to see if it is plugged in completely and not blown.•Check the multi-pin connectors at the back of the radio and at the amplifier chassis to make sure they are plugged all the way in.•Check the ground wire connection to make sure it is tightly secured to the proper ground in the vehicle.If you continue to experience problems after troubleshooting with this list, please contact KICKER Technical Support at (800)256-0808ext.6009,********************.P.O. Box 459 • Stillwater, Oklahoma 74076 • USA • (405) 624–8510。