LabWindows_CVI仪器驱动程序与IVI体系结构
IVI配置文件的管理
仪器无关测试系统IVI配置文件的管理(转载)( 更新时间:2006-08-31 16:15:08)1概述VPP规范中定义了VISA(virtualinstrumentsoftwarearchitecture)接口软件,对串行总线、GPIB总线、VXI总线仪器的操作提供了统一接口,提高了仪器的可互换性。
19 9 8年8月,为了进一步提高仪器驱动程序的执行性能,达到真正的仪器互换性,由9个公司成立IVI(InterchangeableVirtualInstrumentation)基金会,在VPP的基础上为仪器驱动程序制定新的编程接口标准,使应用程序可以实现完全独立于硬件,而不管其是何种总线接口,并增加了仪器仿真、状态缓存等机制,使仪器执行效率大大提高。
2IVI系统结构目前,IVI基金会共规范和开发了5类驱动程序:示波器、数字多用表、任意波形/函数发生器、开关和直流电源。
即将推出射频信号发生器、频谱分析仪、功率计、数字仪器分类驱动程序。
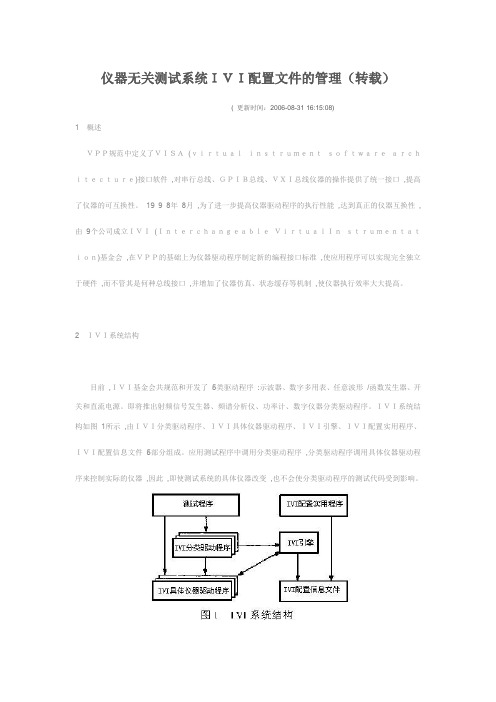
IVI系统结构如图1所示,由IVI分类驱动程序、IVI具体仪器驱动程序、IVI引擎、IVI配置实用程序、IVI配置信息文件5部分组成。
应用测试程序中调用分类驱动程序,分类驱动程序调用具体仪器驱动程序来控制实际的仪器,因此,即使测试系统的具体仪器改变,也不会使分类驱动程序的测试代码受到影响。
2 1分类驱动程序一个分类驱动程序是一组仪器无关函数和属性用于控制某一类型的仪器,比如示波器、数字多用表、函数发生器等,这些函数有一个通用功能前缀如IviScope、IviDmm或IviFgen。
目前IVI驱动程序工具箱共有5类:示波器、数字多用表、任意波形/函数发生器、开关和电源,每个分类驱动程序调用具体仪器驱动程序来控制实际的仪器。
因为每一类中的所有仪器不可能具有完全相同的功能和性能,没有一个单一的编程接口可以适用于所有的仪器,因此IVI分类驱动程序将仪器能力分为固有的IVI能力、基本能力、扩展组能力、仪器特有的能力4种。
LabWindowsCVI教程(1)PPT课件
LabWindows/CVI
19.08.2020
4/18
2. LabWindows/CVI的历史
19.08.2020
5/18
3. LabWindows/CVI的特点
(1)针对测试测量领域的ANSI C语言开发环境
C compiler for Virtual Instruments (CVI)
变量命名 程序的格式和注释 复杂的程序要事先规划设计
19.08.2020
7/18
4. 程序结构
测控软件一般包括:用户界面、程序控制、数 据采集和数据分析4部分
19.08.2020
8/18
5. 开发环境
(1)主要窗口
LabWindows/CVI开发环境的三个主要窗口是工程窗口 (.prj)、源代码窗口(.c)和用户界面编辑器窗口(.uir)。
19.08.2020
15/18
LabWindows/CVI的函数库
19.08.2020
16/18
(4)交互式代码生成 C文件中生成程序结构:Main, Switch, If, For Loop… … UIR文件中生成代码框架: Main Function, Callback Functions (panel, control, menu) 函数面板中函数的自动插入
20/18
C源代码文件
.uir 用户界面资源文件
.h
用户界面资源头文件
.lib 外部静态库模块文件
.obj 目标文件
.h
外部模块头文件
.dll 动态链接库文件
.lib 动态链接库导入库文件
.fp 函数库(函数数和函数面板)文件
19.08.2020
LabWindowsCVI 帮助文件翻译
LabWindows/CVI的组件LabWindows/CVI是一个程序环境,用于开发仪器控制、自动测试和数据采集,以ANSI C.为核心的应用软件。
LabWindows/CVI包括下面特征:为下面组件提供标准函数库和交互式的函数面板:通用接口总线采用串行二进制数据交换的数据终端设备与数据通信设备之间的接口虚拟仪器软件体系结构数据采集数据分析数据格式化传输控制协议动态数据交换通信网络通信数字输入适配器连通性输入/输出美国国家标准化组织C语言用户交互式图形编辑,编码程序范例,内附和显示的数据库,用户图形交互式控制。
网络化多媒体对象技术范例和数据库。
IVI仪器控制范例和数据库一套仪器驱动包括高水平的函数和控制特殊仪器的交互式函数面板。
管理工程,源程序,调试,用户保护的windows开发环境。
新建和编辑NI-DAQmx任务的工具。
新建和编辑仪器控制任务的工具。
在完整开发系统中,还可以利用附加函数库,高级函数分析库,网络函数库。
如何新建LabWindows/CVI应用程序在整个程序中把LabWindows/CVI当作一个文本编辑器。
通过使用功能面板执行LabWindows/CVI功能和自动在程序中插入代码,你可以简单开发。
功能面板包含完整的在线帮助。
一个工程包含你应用的所有组件文件。
最简单的例子就是一个源文件。
当然,一个典型的工程包含复杂代码和用户交互式源文件。
你可以包含代码模型作为源文件或者编译文件。
你可以调试源文件。
当你在源文件中执行代码,LabWindows/CVI可以检查运行时间错误。
包含库文件或者目标文件等编译文件在你的工程中,你必须编译LabWindows/CVI主题或者可并立的外部编译。
编译/联接主题提供更多的可并立的外部编译的信息。
编译文件消耗较少的内存,运行比源文件快。
当然,你不能调试它们,它们也没有运行时间错误检查。
你可以在工程中标记原文件,没有除错,编译使用较少内存。
你可以平衡开始启动时间,实行速度, 内存消耗和调试代码模型能力,通过改变你工程中的代码模型的类型。
National Instruments LabWindows CVI 8.0 用户手册说明书
QUICK REFERENCE LabWindows/CVI™™System Requirements •Personal computer using a Pentium 600 or higher microprocessor• Microsoft Windows 2000/XP• 800 x 600 resolution (or higher) video adapter• Minimum of 128 MB of RAM, 256 MB recommended•150 MB free hard disk space •Microsoft-compatible mouse Installation1.Insert the CD into the CD drive.If the CD does not run automatically,open Windows Explorer, right-click the CD drive icon, and select AutoPlay.2. On installation startup, the NationalInstruments LabWindows/CVI 8.0screen appears.3. Continue to follow the instructionson the screen.National Instruments LabWindows/CVI is a proven test and measurement ANSI C development environment that increases the productivity of engineers and scientists. LabWindows/CVI streamlines application development with hardware configuration assistants, comprehensive debugging tools, and interactive execution utilities you can use to run functions at design time. Use the built-in measurement libraries to rapidly develop complex applications such as multithreaded programs and ActiveX server/client programs. The flexibility of LabWindows/CVI optimizes data acquisition, analysis, and presentation in test and measurement applications. LabWindows/CVILabWindows/CVI meets the changing needs of test engineers with an interactive development environment designed for virtual instrumentation. With easy-to-use development tools, you can quickly create, configure, and display measurements during program design, verification, and testing. LabWindows/CVI automates much of the manual coding and compiling.Product ResourcesNational Instruments provides extensive product resources for new and experienced LabWindows/CVI users.Online ResourcesFor complete technical information, developer exchange opportunities, and the latest news about LabWindows/CVI, visit :•Technical support•Online community•Sample programs•Application notes and white papers•Add-on products•Training information•Product tutorialsSample ProgramsUse the National Instruments Example Finder to browse and search installed examples and examples on NI Developer Zone. To launch the NI Example Finder from LabWindows/CVI, select Help»Find Examples.Documentation Resources•LabWindows/CVI Help—Use theLabWindows Help to accesscomprehensive information aboutLabWindows/CVI windows, functions,tools, and menus. To launch theLabWindows/CVI Help fromLabWindows/CVI, select Help»Contents.•Guide to Documentation—Use the Guideto LabWindows/CVI Documentation topicto find resources that can help youdevelop applications in LabWindows/CVI.The Guide to LabWindows/CVIDocumentation contains information fornew and upgrade users, directions forsearching installed PDFs and usingcontext-sensitive help, and links to PDFsof the following documents:–LabWindows/CVI Release Notes–Getting Started with LabWindows/CVI–LabWindows/CVI Instrument DriverDevelopers Guide–Application notes–White papersTo access the Guide to LabWindows/CVIDocumentation, select Guide toDocumentation in the LabWindows/CVIHelp table of contents.Designing User InterfacesDesign graphical user interfaces (GUIs) in the intuitive User Interface Editor.Select from controls designed specifically for instrumentation.1Customizing ControlsCustomize each GUI control with easy-to-use dialog boxes.2Generating CodeAutomatically generate an ANSI Cprogram based on the GUI withLabWindows/CVI CodeBuilder.CodeBuilder creates code thatresponds automatically to userevents such as mouse clicks,key presses, and menu selections.3Using Function PanelsUse interactive functionpanels to generate librarycalls, test the calls, andinsert them into the program.A function panel is agraphical representation ofa LabWindows/CVI functionand its parameters.4Editing Source CodeComplete your program using the built-in source editor. Use thesource code completion options to view functions, variables,prototypes, and help within the Source window. You also canaccess input selection dialog boxes for parameters and declareparameter variables from within the Source window.5Distributing ApplicationsCreate a distribution topackage your LabWindows/CVIapplication and all of itsdependencies so that you candistribute your application toanother computer.7DebuggingUse LabWindows/CVI debugging tools to catch common programming mistakes.The patented User Protection feature automatically checks for invalid programbehavior. Set breakpoints and use tooltips to pause program execution and viewor modify variable values.6National Instruments, NI, , and LabVIEW are trademarks of National Instruments Corporation. Refer to the Terms of Use section on /legal for more information about National Instruments trademarks. Other product and company names mentioned herein are trademarks or trade names of their respective companies. For patents covering National Instruments products, refer to the appropriate location: H H e l p»P a t e n t s in your software, the patents.txt file on your CD, or /patents. For a listing of the copyrights, conditions, and disclaimers regarding components used in USI (Xerces C++, ICU, and HDF5), refer to the USICopyrights.chm.© 2003–2005 National Instruments Corporation. All rights reserved. Printed in Ireland.373551A-01Oct05LabWindows/CVIUse built-in instrumentation libraries to interface test applications to the outside world. LabWindows/CVI includes a large set of run-time libraries for instrument control, data acquisition, analysis, and user interface creation. This chart illustrates the classes in each library. To find specific functions, press <Ctrl-Shift-P> in the Source window. You also can use the Library Tree to browse to and search for functions.L a b W i n d o w s /C V I L i b r a r y R e f e r e n c e。
labwindows-CVI-教程

l a b w i n d o w s-C V I-教程本页仅作为文档封面,使用时可以删除This document is for reference only-rar21year.MarchLabWindows/CVI基础教程序言LabWindows/CVI是National Instruments公司推出的一套面向测控领域的软件开发平台。
它以ANSI C为核心,将功能强大,使用灵活的C语言平台与数据采集,分析和表达的测控专业工具有机地接和起来。
它的集成化开发平台,交互式编程方法,丰富的控件和库函数大大增强了C语言的功能,为熟悉C语言的开发人员建立检测系统,自动测量环境,数据采集系统,过程监控系统等提供了一个理想的软件开发环境。
本教程面向的是那些从未使用过LabWindows/CVI的读者,但是假设读者以有了C语言的基础并且熟悉Windows 2000/9x/NT操作系统。
在每一章节的学习中,作者都是通过一个具体的实例让读者迅速的掌握本章的知识点;而不是长篇大论,述及边枝细叶,反而使读者望而却步,只见树木,不见森林。
想信通过对本教程的学习,读者可迅速掌握LabWindows/CVI编程思想及步骤,为读者日后进一步学习打下基础。
本书约定:“File>>Page Setup>>Options”File 这一种黑色斜体字是指多级菜单名,按扭名,窗口名或者是关键性词汇。
“>>”是指打开一个多级菜单或对话框。
如:File>>Page Setup>>Options是指你首先打开File 菜单,然后选择Page Setup项,最后从弹出的对话框中选择Options 项。
“说明:通过这种方式你可以修改Panel顶端所显示的名字。
”该种字体所写的文字是值得读者注意并记忆的内容。
“该椭圆形框所框住的内容是读者需修改的地方。
第一部分 CVI快速入门本部分通过编制一个简单的LabWindows/CVI程序,使读者对CVI编程环境,思想及步骤有一初步的认识。
LabWindows CVI教程
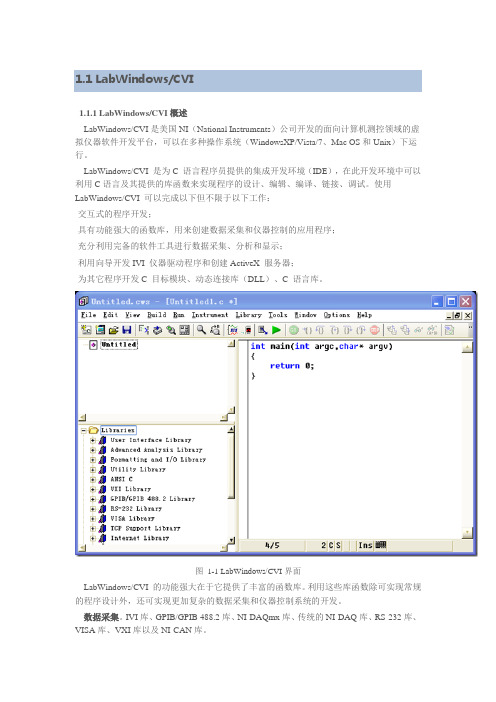
第一章 : LabWindows/CVI1.1 LabWindows/CVI1.1.1 LabWindows/CVI概述LabWindows/CVI是美国NI(National Instruments)公司开发的面向计算机测控领域的虚拟仪器软件开发平台,可以在多种操作系统(WindowsXP/Vista/7、Mac OS和Unix)下运行。
LabWindows/CVI 是为C 语言程序员提供的集成开发环境(IDE),在此开发环境中可以利用C语言及其提供的库函数来实现程序的设计、编辑、编译、链接、调试。
使用LabWindows/CVI 可以完成以下但不限于以下工作:·交互式的程序开发;·具有功能强大的函数库,用来创建数据采集和仪器控制的应用程序;·充分利用完备的软件工具进行数据采集、分析和显示;·利用向导开发IVI 仪器驱动程序和创建ActiveX 服务器;·为其它程序开发C 目标模块、动态连接库(DLL)、C 语言库。
图 1‐1 LabWindows/CVI界面LabWindows/CVI 的功能强大在于它提供了丰富的函数库。
利用这些库函数除可实现常规的程序设计外,还可实现更加复杂的数据采集和仪器控制系统的开发。
数据采集。
IVI库、GPIB/GPIB 488.2库、NI-DAQmx库、传统的NI-DAQ库、RS-232库、VISA库、VXI库以及NI-CAN库。
数据分析。
格式化IO库、分析库以及可选的高级分析库。
GUI库。
使用LabWindows/CVI 的用户界面编辑器可以创建并编辑图形用户界面(GUI),而使用LabWindows/CVI 的用户界面库函数可以在程序中创建并控制GUI。
此外,LabWindows/CVI为GUI 面板的设计,准备了许多专业控件,如:曲线图控件、带状图控件、表头、旋钮和指示灯等,以适应测控系统软件开发的需求,利用这些控件可以设计出专业的测控程序界面。
国家仪器 IVI合规性软件包4.2说明书
RELEASE NOTESIVI Compliance Package Version 4.2These release notes contain installation and uninstallation instructions anda list of installed components for the IVI Compliance Package 4.2.Note If you are upgrading from IVI software versions earlier than IVI Compliance Package 3.0, refer to the IVI Compliance Package 3.0 Release Notes for upgradeinformation. You can download a copy of the release notes from the National Instruments Web site at /info . Enter the Info Code icp3rn .IntroductionThe IVI Compliance Package is a software package that contains IVIclass drivers and support libraries necessary to develop and useapplications that leverage IVI instrument interchangeability. TheIVI Compliance Package also is based on and is compliant with thelatest version of the instrument programming specifications definedby the IVI Foundation. You can use the IVI class drivers in theIVI Compliance Package with IVI specific drivers.IVI class drivers implement functions and attributes for controlling aninstrument within a specified class, as defined by the IVI Foundation.The IVI Compliance Package provides IVI class drivers for the followingspecifications:•IviDCPwr •IviDmm •IviFgen •IviPwrMeter •IviRFSigGen •IviScope •IviSpecAn •IviSwtch™•IviCounter•IviUpconverter•IviDownconverter•IviDigitizerIVI specific drivers are drivers for the most popular instruments from allof the currently defined IVI Foundation classes and from the largestinstrument manufacturers including National Instruments, AgilentTechnologies, and Tektronix. You can create IVI specific driversyourself,or download them from /idnet. InstallationNational Instruments recommends that you close all other applicationsbefore you install the IVI Compliance Package.For system requirements, refer to the NI IVI Compliance Package Readme,which you can access by selecting Start»All Programs»NationalInstruments»IVI»IVI Compliance Package Readme.The IVI Compliance Package is included with various NationalInstruments distributions, such as National Instruments Device Drivers,Switch Executive, and Calibration Executive. You also can obtain theIVI Compliance Package as a stand-alone Web-only distribution.If you install a product that is dependent on the IVI Compliance Package,such as Switch Executive, you do not need to install this separateIVI Compliance Package because it is already included in the productinstallation.To install the IVI Compliance Package from the National InstrumentsDevice Drivers media, insert the media and follow the installationsteps.When prompted with feature selections, enable theIVI Compliance Package.To install the stand-alone, Web-only IVI Compliance Package 4.2,complete the following steps:1.Download the IVI Compliance Package 4.2 self-extracting archivefrom /downloads by navigating through the Drivers andUpdates link.2.Double-click the self-extracting archive to launch the installer.3.Click OK to begin installation.4.Follow the directions that appear on the screen.IVI Compliance Package Release © National Instruments Corporation 3IVI Compliance Package Release NotesNoteThe IVI Compliance Package Web distribution does not install NI-Spyor Measurement & Automation Explorer (MAX). NI-Spy tracks the calls your application makes to National Instruments test and measurement drivers, such as NI-VXI and NI-VISA. You can use MAX for IVI configuration support. You can use IVI software without these components, but you will not have the features these products supply unless you install them. If you have installed other National Instruments products, such as the National Instruments Device Drivers media, you might already have NI-Spy and MAX installed.If you install a National Instruments product that installs MAX after installing the Web distribution of the IVI Compliance Package, you must reinstall theIVI Compliance Package to be able to use the updated IVI configuration userinterface in MAX. You must have MAX 4.2.1 or later installed to use the IVI configuration utility in MAX.Installed ComponentsDepending on the software support you select when you install theIVI Compliance Package, the installation includes one or more of thefollowing components:•IVI class drivers •IVI class driver LabWindows ™/CVI ™ support •C++ wrappers for IviDmm , IviScope , IviDCPower , IviSwtch , and IviFGen class drivers for Measurement Studio (Windows XP only)•IVI class driver wrappers for supported versions of LabVIEW •IVI class simulation drivers •IVI-COM adapters (32-bit only)•IVI class driver examples for LabWindows/CVI, LabVIEW, and Measurement Studio •IVI Shared Components 2.1.0•IVI configuration plug-in for MAX 4.2.1 and later •Online helpUninstallationIf you no longer want to use IVI software components, complete thefollowing steps to uninstall them.Note If you installed the IVI Compliance Package as part of another distribution that depends on the IVI Compliance Package, you cannot uninstall theIVI CompliancePackage without uninstalling the dependent product.CVI, LabVIEW, National Instruments, NI, , the National Instruments corporate logo, and theEagle logo are trademarks of National Instruments Corporation. Refer to the Trademark Information at/trademarks for other National Instruments trademarks. The mark LabWindows is usedunder a license from Microsoft Corporation. Windows is a registered trademark of MicrosoftCorporation in the United States and other countries. Other product and company names mentionedherein are trademarks or trade names of their respective companies. For patents coveringNational Instruments products/technology, refer to the appropriate location: Help»Patents in yoursoftware, the patents.txt file on your media, or the National Instruments Patent Noticeat /patents .© 2003–2010 National Instruments Corporation. All rights reserved.370733E-01Aug101.Select Start»Control Panel»Add or Remove Programs .2.Select National Instruments Software and click Change/Remove .3.Select NI IVI Compliance Package 4.2 and click Remove .Note After you uninstall the IVI Compliance Package, IVI Shared Components remain on your computer. To remove the remaining components, select Start»Control Panel»Add or Remove Programs , select IVI Shared Components , and click Change/Remove .LabWindows/CVI Version SupportThe IVI Compliance Package provides support only for the latest versionof LabWindows/CVI installed on your computer. If you install the IVICompliance Package with LabWindows/CVI installed and then upgrade toa later version of LabWindows/CVI, complete the following steps tomodify the IVI Compliance Package installation to get IVI support for thelater version of LabWindows/CVI:1.Select Start»Control Panel»Add or Remove Programs .2.Select National Instruments Software and click Change/Remove .3.Select NI IVI Compliance Package 4.2 and click Modify .4.For the LabWindows/CVI Support feature under IVI Class Drivers , select Remove this feature and complete the installation.5.Repeat steps 1–3.6.For the LabWindows/CVI Support feature under IVI Class Drivers ,selectInstall this feature to a local drive and complete theinstallation.This process removes IVI class driver support for the previous version ofLabWindows/CVI and adds this support for the later version ofLabWindows/CVI.。
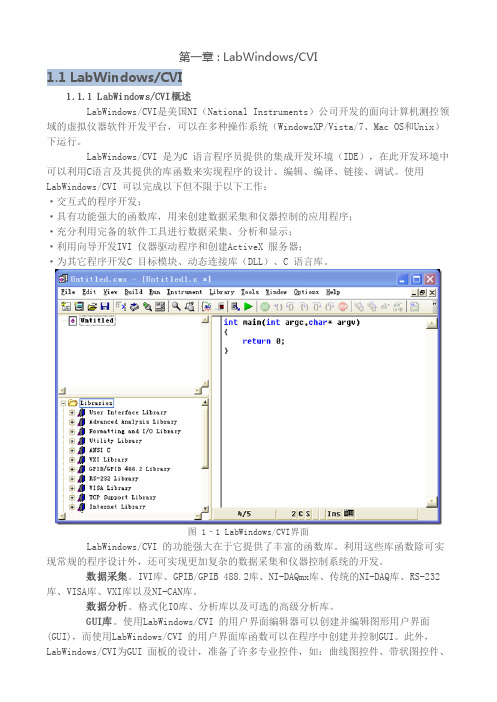
LabWindowsCVI(一):各文件类型的含义及初始项目的搭建
LabWindowsCVI(⼀):各⽂件类型的含义及初始项⽬的搭建1、基本定义虚拟仪器(VI)是计算机技术、仪器技术和通信技术相结合的产物。
虚拟仪器的⽬的是利⽤计算机强⼤资源使硬件技术软件化,分⽴元件模块化,降低程序开发的复杂程度,增强系统的功能和灵活性LabWindows/CVI是⼀个完全的ANSI C开发环境,⽤于仪器控制、⾃动检测、数据处理的应⽤软件使⽤LabWindows/CVI设计的应⽤程序可以脱离LabWindows/CVI开发环境独⽴运⾏,并可以打包⽣成.msi安装⽂件LabWindows/CVI主要采⽤事件驱动与回调函数⽅式,编程⽅法简单易学LabWindows/CVI⽂件类型⼯作空间⽂件(*.cws)通常包含的⽂件类型有如下六种:1、*.prj ⼯程⽂件是⼯程的主体框架,主要由*.uir⽂件、*.c⽂件、*.h⽂件组成。
程序调试运⾏后,可以⽣成可执⾏⽂件(*.exe)2、*.c C源程序。
他主要包含头⽂件、主程序⽂件和回调函数,其结构和C语⾔结构⼀致3、*.uir ⽤户界⾯⽂件,即⾯板⽂件。
该⽂件中包括菜单和各种控件资源4、*.h 在LabWindows/CVI中,头⽂件是由系统⾃动⽣成的。
它的作⽤⼀⽅⾯是便于打开和编辑,另⼀⽅⾯是确保编译器在编译时能引⽤它们5、*.fp 当打开⼯程的仪器驱动函数⾯板⽂件时,LabWindows/CVI⾃动加载仪器驱动⽂件6、*.lib 这类⽂件可能是DLL导⼊库⽂件,也可以是静态库⽂件2、构建⼀个简单程序1、建⽴⼯程⽂件 ——> (*.prj)File ——> New ——> Project(*.prj) 默认⽂件名为untitledFlie ——> Save Untitled Project As ... 保存新建的⼯程⽂件 (重命名)2、创建⽤户界⾯⽂件 ——> (*.h ,*.uir)(1) 创建空⾯板窗⼝File ——> New ——> User Interface(*.uir)(2) 向⾯板中添加控件点击⾯板,菜单栏出现 Create ,点击 Create 选择相应的控件进⾏添加或在⾯板右击选择添加(3) 保存File ——> Save Untitled.uir (重命名)3、⽣成源代码⽂件:(1)、⽣成全部源代码框架 (*.cws ,*.exe ,*.c ,cvibuild.项⽬名)Code ——> Generate——> All Code(2)、主函数及回调函数分布⽣成 ——> (*.c)a、⽣成主函数:Code ——> Generate ——> Mainb、保存⽂件Edit ——> Add Files to Project ——> Source(*.c) 把⽂件添加到该⼯程中来c、⽣成回调函数源代码框架i、⽤户界⾯菜单:Code ——> Preference ——> Default Control Events弹出控件回调事件对话框,选择该控件所要响应的事件,点击OK键ii、右击需要产⽣回调函数的控件选择 Generate Control Callback。
基于LabWindowsCVI的网络化虚拟仪器软件系统的设计与实现

2、功能模块设计
2、功能模块设计
系统主要包括数据采集、数据处理、远程控制、数据存储和数据显示等功能 模块。数据采集模块负责从硬件设备中获取数据,数据处理模块对数据进行处理 和分析,远程控制模块实现客户端对服务器的远程控制,数据存储模块将数据保 存到本地或云端,数据显示模块则将数据以图形或数字的形式展示给用户。
一、研究现状
一、研究现状
网络化虚拟仪器软件系统以其独特的优势,在仪器仪表行业中占有重要地位。 但目前,这类系统仍存在一些问题,如实时性不足、可靠性差、远程控制能力有 限等。此外,现有的虚拟仪器软件多基于PC平台,缺乏对嵌入式设备的支持,这 限制了其应用范围。因此,开发一种具有实时性、可靠性和远程控制能力的网络 化虚拟仪器软件系统具有重要意义。
基于LabWindowsCVI的网络化虚 拟仪器软件系统的设计与实现
01 一、研究现状
目录
02 二、系统设计
03 三、系统实现
04 四、系统测试
05 五、系统应用
06 六、结论
内容摘要
随着仪器仪表行业的不断发展,网络化虚拟仪器软件系统逐渐成为研究的热 点。这类系统以其灵活性和扩展性为主要特点,在测试、测量和控制等领域得到 了广泛应用。本次演示基于LabWindowsCVI环境,探讨网络化虚拟仪器软件系统 的设计与
1、代码实现
在LabWindowsCVI环境下,我们使用C++和LabVIEW编程语言实现本系统。其 中,数据采集、数据处理、远程控制和数据显示等功能模块均用LabVIEW编程语 言实现,TCP/IP通信则用C++编程语言实现。
2、界面设计
2、界面设计
界面设计是本系统的一个重要部分,我们采用LabVIEW的图形界面功能,根据 实际需求设计了一套简洁明了的用户界面。界面上包括数据采集、处理、显示、 控制等功能的按钮和指示灯,方便用户进行操作。
基于LabWindows_CVI平台的仪器驱动器开发
对该仪器 的熟悉 及 实际操作在 虚拟 仪 器 面 板上 进行
。
计 者 必 须 根 据 它 们 的 功 能把 它们 分 成 两 组 或 多 组 函
一
一
国 外 电 子 测 量 技术
生 成 功 能树
,
。
·
年第
期
一
、
技术
生 成 包含 文 件
一
。 。
打开
,
打开
。
八
,
八
加人 函
,
一 一
文件 根据 需 要 加 人 特 定 的 函 数 如 等 输人 帮 助 信 息 以 文 件名
,
只 有正
。
仪器 驱 动 程 序
。
确使 用 高 级 和 低 级 函 数才 能实 现 对 仪 器 的 完 美 的 控制
一
一
国 外 电子 测 量 技 术
·
年第
。
期
测 试程序 的
,
技术
数
。
了解 仪器 驱 动器 之 间 的 相 互 关 系
、
、
例如 如果 仪 器手 册将触发 组 态 命 令 和 触 发 执 行命
。
最 后 给 出 了一 个
框 架 设计 实例
关键 词
仪 器驱 动 器
前
的 一种软件 上运行
,
。 。
言
,
仪器 驱 动 器的设计
在 开 发 仪 器 驱 动 器 的 时 候 首先 必 须定 义 它 的 层
次 结 构 即定 义 它 的基 本 功能 和 开 发 时模块 的 层 次
。
,
仪 器 驱 动 器 是 处 理 与 一 特 定 仪 器 进 行 控制 和 通 讯
LabWindowsCVI入门之第一章:LabWindowsCVI开发环境
1.1 LabWindows/CVI1.1.1 LabWindows/CVI概述LabWindows/CVI是美国NI(National Instruments)公司开发的面向计算机测控领域的虚拟仪器软件开发平台,可以在多种操作系统(WindowsXP/Vista/7、Mac OS和Unix)下运行。
LabWindows/CVI 是为C 语言程序员提供的集成开发环境(IDE),在此开发环境中可以利用C语言及其提供的库函数来实现程序的设计、编辑、编译、链接、调试。
使用LabWindows/CVI 可以完成以下但不限于以下工作:·交互式的程序开发;·具有功能强大的函数库,用来创建数据采集和仪器控制的应用程序;·充分利用完备的软件工具进行数据采集、分析和显示;·利用向导开发IVI 仪器驱动程序和创建ActiveX 服务器;·为其它程序开发C 目标模块、动态连接库(DLL)、C 语言库。
图1-1 LabWindows/CVI界面LabWindows/CVI 的功能强大在于它提供了丰富的函数库。
利用这些库函数除可实现常规的程序设计外,还可实现更加复杂的数据采集和仪器控制系统的开发。
数据采集。
IVI库、GPIB/GPIB 488.2库、NI-DAQmx库、传统的NI-DAQ库、RS-232库、VISA库、VXI库以及NI-CAN库。
数据分析。
格式化IO库、分析库以及可选的高级分析库。
GUI库。
使用LabWindows/CVI 的用户界面编辑器可以创建并编辑图形用户界面(GUI),而使用LabWindows/CVI 的用户界面库函数可以在程序中创建并控制GUI。
此外,LabWindows/CVI为GUI 面板的设计,准备了许多专业控件,如:曲线图控件、带状图控件、表头、旋钮和指示灯等,以适应测控系统软件开发的需求,利用这些控件可以设计出专业的测控程序界面。
网络和进程间通信库。
基于LabWindowsCVI的矢量网络分析仪自动检定系统
INNOVATIVE DESIGN|创新设计摘要:矢量网络分析仪作为微波测试重要组成仪器,广泛应用于科研生产的多个领域,但因其型号各异、检定项目多、测试数据量大,给日常计量带来了诸多不便。
文章介绍了一种基于LabWindows/CVI设计的矢量网络分析仪自动检定系统,详细介绍了其测试系统的组成、软件设计及数据处理等问题。
该系统能实现快速测试、减小误差,具有数据存储与打印、结果判断等功能,大大提高了计量工作效率,节约了成本。
关键词:LabWindows/CVI;矢量网络分析仪;自动检定系统基于LabWindows/CVI的矢量网络分析仪自动检定系统■文/蒋波苟秀梅李胜谭亮随着科学技术的发展,业内对微波仪器的计量提岀了更高的要求,主要表现在测试内容日趋复杂,测试工作量急剧增加,对测试设备在功能、性能、测试速度、准确度等方面的要求也日愈提高。
目前,矢量网络分析仪的检定项目主要有:源频率准确度、源功率准确度、源相对电平精度、动态范围、S参数测量准确度等。
传统手动计量方法耗时长,操作复杂,效率低,已经不能满足仪器计量的新要求。
同时,日常测试过程中的数据输入、记录、处理、证书打印等要经过烦琐的步骤和较长的时间,不但效率低,而且存在实时跟踪性能差、人为误差大、数据的准确性受到一定影响等问题。
为了解决上述问题,本文结合虚拟仪器技术、计算机技术、GPIB总线技术设计了自动检定系统,不仅提高了工作效率和测试精度,而且降低了成本,同时系统本身具有很好的开放性、稳定性和可扩展性。
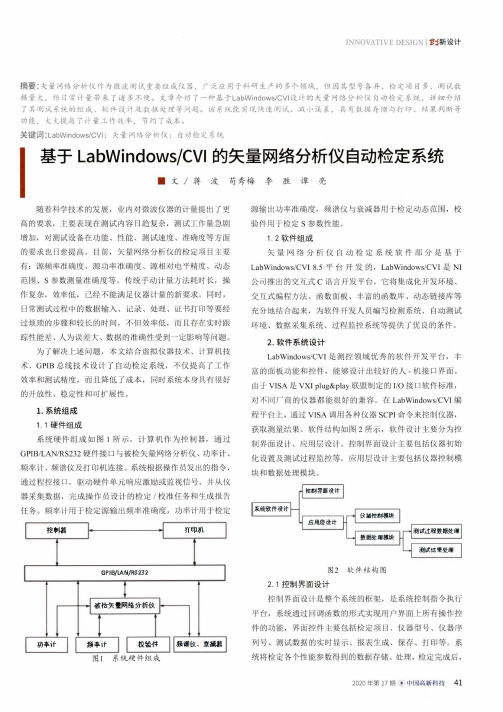
1.系统组成1■1硬件组成系统硬件组成如图1所示,计算机作为控制器,通过GPIB/LAN/RS232硬件接口与被检矢量网络分析仪、功率计、频率计、频谱仪及打印机连接。
系统根据操作员发出的指令,通过程控接口,驱动硬件单元响应激励或监视信号,并从仪器釆集数据,完成操作员设计的检定/校准任务和生成报告任务。
频率计用于检定源输出频率准确度,功率计用于检定«------------------------打印机GPIB/LAN/RS232功率计濒丰计校蚩■(牛濒谱仪、袁刪图1系统硬件组成源输出功率准确度,频谱仪与衰减器用于检定动态范围,校验件用于检定S参数性能。
《2024年基于LabWindows-CVI的便携式热车试验台测控系统设计与开发》范文

《基于LabWindows-CVI的便携式热车试验台测控系统设计与开发》篇一基于LabWindows-CVI的便携式热车试验台测控系统设计与开发一、引言随着汽车行业的迅猛发展,汽车发动机热车试验的准确性、稳定性和便携性成为重要关注点。
本设计主要探讨基于LabWindows/CVI(一款图形化开发平台)的便携式热车试验台测控系统的设计与开发,该系统具备智能化控制、精确的数据测量与记录以及灵活的携带特性,适用于汽车零部件制造企业以及各类实验室使用。
二、系统设计概述(一)系统需求分析设计一套针对热车试验台的测控系统,需求包含精确控制测试条件、高效收集实验数据、即时进行结果反馈及报警等功能。
系统需要支持数据的自动存储、实时监测与反馈控制。
同时,要满足设备的便携性,能够满足在各类场地及实验室中的快速安装和运行。
(二)设计原则系统设计应遵循以下原则:稳定可靠、功能完善、操作简便、可扩展性强和高度集成。
同时,应注重系统的实时性、可维护性和可移植性。
三、硬件设计(一)硬件组成硬件部分主要包括传感器模块、控制模块、执行模块和电源模块等。
传感器模块负责实时监测发动机的各项参数;控制模块是整个系统的核心,负责处理数据并控制执行模块;执行模块则负责根据控制模块的指令执行操作;电源模块为整个系统提供稳定的电力支持。
(二)硬件接口设计系统采用模块化设计,各模块之间通过标准接口进行连接,方便后期的维护和升级。
此外,为确保数据传输的稳定性和实时性,所有传感器均采用高速数据线进行连接。
四、软件设计(一)软件架构设计软件采用LabWindows/CVI作为开发平台,使用其强大的图形化界面开发功能,使操作更加直观便捷。
软件架构分为用户界面层、数据处理层和控制执行层。
用户界面层负责与用户进行交互;数据处理层负责数据的处理和存储;控制执行层则负责根据处理后的数据发送控制指令。
(二)软件开发流程软件开发流程包括需求分析、系统设计、编码实现、测试与调试等环节。
@+labwindows+cvi测试技术及工程应用

@+labwindows+cvi测试技术及工程应用第一篇基础篇本篇主要介绍虚拟仪器的基本概念、虚拟仪器开发语言LabWindows/CVI的编程环境和程序结构以及基本控件的使用方法,并通过讲解简单实例,使初学者可以迅速掌握利用LabWindows/ CVI开发平台构建一般应用程序的基本思想、方法和步骤.本书使用的是LabWindows/CVI 8.0版本。
奢侈品保养虚拟仪器虚拟仪器(virtual instrument,简称“vi")是计算机技术、仪器技术和通信技术相结合的产物奢侈品维护.虚拟仪器的目的是利用计算机强大资源使硬件技术软件化,分立元件模块化,降低程序开发的复杂程度,增强系统的功能和灵活性。
奢侈品清洗1.1.1虚拟仪器的基本概念虚拟仪器基于计算机的软硬件测试平台,它可代替传统的测量仪器,如示波器、逻辑分析仪、信号发生器、频谱分析仪等:可集成自动控制、工业控制系统:可自由构建专有仪器系统。
它由计算机、奢侈品保养应用软件和仪器硬件组成。
虚拟仪器系统是将仪器硬件搭载到计算机平台,并辅以相应软件而构成的.奢侈品护理加盟虚拟仪器通过软件将计算机硬件资源与仪器硬件有机地融合为一体,从而把计算机强大的计算处理能力和仪器硬件的测量、控制能力结合在一起,大大降低了仪器硬件的成本,并通过软件实现对数据的显示、奢侈品维护存储以及分析处理功能。
从发展史看,电子测量仪器经历了由模拟仪器、智能仪器到虚拟仪器三个阶段。
奢侈品清洗如果在计算机中插入数据采集卡,利用计算机高速计算能力完成仪器信号的分析与处理、结果的输出,就可以把传统仪器的所有功能模块集成在一台计算机上,软件成为仪器系统的关键.在此基础上,美国国家仪器公司(National Instrument,简称“NI")提出了“软件就是仪器”的观点。
奢侈品保养奢侈品护理加盟虚拟仪器技术的优势在于可由用户自己定义通用仪器系统,且功能灵活,很容易构建,所以应用面极为广泛,尤其在科研、开发、.测量、检测、计量、控制等领域,更是不可多得的优秀开发工具。
基于LabWindowsCVI的电子测量系统设计
基于LabWindowsCVI的电子测量系统设计基于LabWindows/CVI的电子测量系统设计作者:蔡军、高宝成单位:北京邮电大学自动化学院、北京邮电大学自动化学院转载:仪器仪表学报发布时间:2009-05-041 引言电子测量仪器主要用于电子产品电信号和数字信号的测量。
当需要对电子产品的多个特性进行测量时,需组建电子测量系统。
传统电子测量系统以独立仪器为单元,以GPIB总线等方式联接在一起,组成多机测量系统。
由于传统仪器均采用独立设计方式,仪器间存在通讯同步问题,不同仪器测量不确定度难以统一评估,不适宜于测量移动性、随机性较强的测量目标。
随着虚拟仪器的发展(虚拟仪器技术是日益发展的计算机技术、仪器技术、信息技术密切结合的产物,它就是在通用计算机上加上软件和(或)硬件,使用者在操作这台计算机时,就像是在操作一台用户自己设计的专用电子仪器),电子测量仪器在集成测量方面有了新的突破。
采用统一的软件控制平台,根据所选择的测量功能,完成多项测量任务。
不过其功能模块仍然相互独立,并未实现不同模块之间的“联动”。
在实际应用中,比如使用存储示波器观测信号波形时,还想同时观察信号频谱,现有电子测量系统将不得不在两个程序窗口之间进行切换,或进行功能变换,导致示波器所观测到的信号与频谱仪所观测到的信号不同步,带来测量误差。
设计硬件集成、关联测量模块联动的电子测量系统,已成为电子测量行业新的发展趋势。
本文顺应这一发展趋势,设计和实现了基于虚拟仪器的嵌入式电子测量系统。
该系统将众多电子测量仪器的功能、参数和精度指标等集成在一个的电子测量系统中,通过配置相应的软硬件模块,在一台工作站或个人计算机上实现多个电子测量仪器的功能[1]。
由于功能模块众多,如果均采用硬件实现,成本较高,灵活性不够。
因此采用虚拟仪器体系结构,实现多种测量功能的集成,具有成本低、使用和系统升级方便等优势[2]。
本文实现的电子测量系统测量数据量较大,对设备与主机之间的通讯速率要求较高。
基于Lab Windows-CVI平台的虚拟仪器的设计与开发共3篇
基于Lab Windows-CVI平台的虚拟仪器的设计与开发共3篇基于Lab Windows/CVI平台的虚拟仪器的设计与开发1随着电子技术的不断发展, 虚拟仪器作为一种数量庞大、功能多样的软件应用程序, 逐渐成为了各行各业进行测量、控制和测试的必备工具。
这些虚拟仪器通过计算机上的物理实验平台, 将传感器和其他实际输入设备的测量数据传输给计算机并进行处理, 最后通过软件界面来呈现出来。
在虚拟仪器的设计和开发领域中, LabWindows/CVI (Laboratory Windows/C语言 Visual Interface)平台已成为一种主流的选择。
这是由于LabWindows/CVI能够提供大量的函数库, 在实现各种测量和分析任务时具有更好的灵活性、可扩展性和稳定性。
本文将介绍如何在LabWindows/CVI平台上进行虚拟仪器的设计和开发,包括以下几个主要方面。
一、LabWindows/CVI软件环境和数据传输方式要实现LabWindows/CVI平台上的虚拟仪器设计和开发, 需要在计算机上安装LabWindows/CVI软件,然后将传感器所得的数据传入计算机。
数据的传输方式可以通过串口通信、USB接口、网口等方式进行,并对数据进行预处理,例如校准、补偿,以确保获得最准确的数据。
二、虚拟仪器的界面设计虚拟仪器的界面设计是虚拟仪器开发的关键。
理智的界面设计能够使用户快速进行各种实验,迅速了解实验结果。
在LabWindows/CVI平台上, 用户可以通过库函数来设计操作面板并实现交互。
LabWindows/CVI提供了丰富的控件(例如按钮、复选框、滑块、列表框和编辑框等),用于构建、显示和操作虚拟仪器界面。
此外,LabWindows/CVI还支持定制控件,以实现更加复杂的界面效果。
三、数据处理和分析算法的实现设计虚拟仪器的另一个重要方面是数据处理和分析算法的实现。
在LabWindows/CVI平台上,用户可以基于C语言自定义函数库来实现数据处理和分析算法,因此可以更加灵活地对接采集数据的传感器类型、样本数、采样间隔等各种参数进行调整。
Anritsu LabWindows CVI 基于 IVI 的设备驱动开发方法说明书
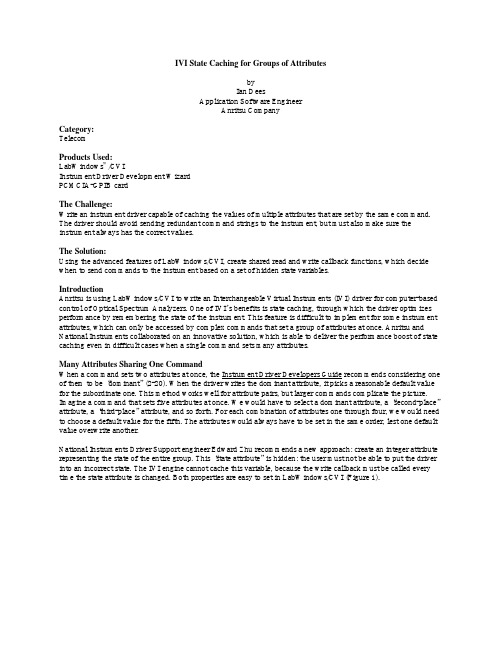
IVI State Caching for Groups of AttributesbyIan DeesApplication Software EngineerAnritsu CompanyCategory:TelecomProducts Used:LabWindows™/CVIInstrument Driver Development WizardPCMCIA-GPIB cardThe Challenge:Write an instrument driver capable of caching the values of multiple attributes that are set by the same command. The driver should avoid sending redundant command strings to the instrument, but must also make sure the instrument always has the correct values.The Solution:Using the advanced features of LabWindows/CVI, create shared read and write callback functions, which decide when to send commands to the instrument based on a set of hidden state variables.IntroductionAnritsu is using LabWindows/CVI to write an Interchangeable Virtual Instruments (IVI) driver for computer-based control of Optical Spectrum Analyzers. One of IVI’s benefits is state caching, through which the driver optimizes performance by remembering the state of the instrument. This feature is difficult to implement for some instrument attributes, which can only be accessed by complex commands that set a group of attributes at once. Anritsu and National Instruments collaborated on an innovative solution, which is able to deliver the performance boost of state caching even in difficult cases when a single command sets many attributes.Many Attributes Sharing One CommandWhen a command sets two attributes at once, the Instrument Driver Developers Guide recommends considering one of them to be “dominant” (2-20). When the driver writes the dominant attribute, it picks a reasonable default value for the subordinate one. This method works well for attribute pairs, but larger commands complicate the picture. Imagine a command that sets five attributes at once. We would have to select a dominant attribute, a “second-place”attribute, a “third-place” attribute, and so forth. For each combination of attributes one through four, we would need to choose a default value for the fifth. The attributes would always have to be set in the same order, lest one default value overwrite another.National Instruments Driver Support engineer Edward Zhu recommends a new approach: create an integer attribute representing the state of the entire group. This “state attribute” is hidden: the user must not be able to put the driver into an incorrect state. The IVI engine cannot cache this variable, because the write callback must be called every time the state attribute is changed. Both properties are easy to set in LabWindows/CVI (Figure 1).Figure 1: Configuring the State AttributeThe state attribute can have one of four values: “1 means no updates (instrument I/O) required and defer all future updates, 2 means future updates required, 3 means update now, and 4 is the do nothing state.” (Zhu) Figure 2 shows how our driver will manage the attributes based on the state attribute.Figure 2: State DiagramTo manage the transitions between states, we’ll define three callback routines:•The shared read callback is called by the IVI engine whenever a user-level attribute is read. The driver simply has to “do an instrument I/O, parse the data string, and update the cached values of all the attributes accordingly” (Zhu).•The shared write callback is called when an attribute is changed. This function sets the state attribute to inform the driver that the values in memory no longer match those in the instrument (Zhu).•The state attribute write callback (Figure 3, parts omitted for brevity) is only invoked when our state-caching code changes the state attribute. If the driver is in state 3 (i.e., if some attributes have changed), this callback sends all the attribute values to the instrument (Zhu).Figure 3: State Attribute Write CallbackThe state-transition behavior is hidden inside a function the user can call to set all the attributes at once. At the beginning of this high-level function (Figure 4), we set the state attribute to 1 to hold communications until all attributes have been set. Next, we call the appropriate SetAttribute function on each attribute. At the end of the function, we set the state attribute to 3, so that all the attributes will be sent to the instrument (Zhu).Figure 4: High-Level Configuration FunctionFinishing TouchesWe can make writing high-level configuration functions easier by moving the state transition logic into the callback functions. To simplify the process, let’s reexamine the state definitions (Figure 5):State 1:None of the attributes have been changed (the attributes are “clean”). If any of them change in the near future, don’t send any I/O (the attributes are “locked”).State 2:At least one attribute has changed (the attributes are “dirty”). The attributes are still locked, so do not send any I/O.State 3:The attributes are dirty and have just been unlocked. Send the new values to the instrument.State 4:The attributes are clean and unlocked.Figure 5: Modified State DiagramWe have replaced the integer state attribute with a pair of Boolean state attributes, Locked and Dirty, both of which share the state attribute write callback. Our high-level function (Figure 6) is now simpler: we set Locked to True before changing our attributes. When we’re done, we set Locked to False, and the state attribute write callback(Figure 7) will check the value of the Dirty and Locked flags to decide whether or not to send any communication.Figure 6: New High-Level Configuration FunctionFigure 7: New State Attribute Write CallbackIn the shared read callback Figure 8), after we query the instrument, some of the retrieved values may be older than the cached values we’re holding. For each attribute, we call AttributeIsCached to see whether or not its in-memory value has changed; if the attribute has not changed, we call SetAttribute to update it with the new value from the instrument. At the end of the shared read callback, a quick check of the “attributeId” parameter tells us which attribute we must return.Figure 8: New Shared Read CallbackFurther ImprovementsIn most cases, the attributes in a group are more diverse than in our five-integer example. Instead of sharing one read callback and one write callback, the group might share one integer read callback, one integer write callback, one floating-point read callback, and so on. These shared callbacks could call the same implementation function. Developers who are interested in more complex behavior could easily extend this state-caching scheme. For example, if one attribute’s range depends on another attribute’s value, more sophisticated range checking could be added into the callbacks. Another potential improvement would be to turn off our state-caching scheme when the user wants to disable state caching for the entire driver.Works CitedNational Instruments. Instrument Driver Developers Guide. Austin: National Instruments Corporation, 1998. Zhu,Edward.[************************].“RE:IVIQuestion.”Privatee-mailmessagetoIanDees.[********************].20October1999.。
仪器驱动程序的设计开发
作者简介: 魏坚华,女,北京工业大学计算机学院教师,主要从事计算机应用。
仪器驱动程序的设计开发魏坚华1 李强2 房征21北京工业大学计算机学院(100022)2北京东英泰思特测试技术公司(100088)摘要:本文主要介绍在BC3192测试程序中,如何利用LabWindows/C VI 软件,进行仪器驱动程序的开发,实现同VXI 总线进行通信。
并且可以方便地使用通用仪器编程语言及I/O 通信方式快速构建自己的元件测试平台。
关键词:仪器 驱动程序 VXI 总线Development of LabWindow s/CVI I nstrument Drive ProgramAbstract : This paper mainly describes how to develop instrument drive programs to communicatewith VXI Bus using LabW indows/C VI s oftware in BC3192test programs.And it can conveniently use general instrument programming language and I/O communication m ode to construct instrument test platform.K eyw ords : Instrument ,drive program ,VXI Bus.引言 在BC3192测试程序的开发过程中最复杂的是仪器驱动程序的开发。
同VXI 总线间进行的每一步联系和操作,都少不了仪器驱动程序的帮助。
用LabWindows/C VI (以下简称LabWin )软件可以开发出仪器的驱动程序。
这主要是源于LabWin 具有一部分通用的仪器设备驱动库。
有了它,用户可以比较容易地开发出几个系列的总线兼容设备驱动,如RS 2232仪器驱动系列、G PI B 仪器驱动系列、VXI 总线系列驱动程序,还有一些典型的特定驱动程序的样例,如Fluke45Digital Multimeter (VIS A I/O )(Fluke45数字型万用表)、Hewlett 2Packard 34401A Multimeter (VIS A )(安捷伦34401A 型万用表)等等。
- 1、下载文档前请自行甄别文档内容的完整性,平台不提供额外的编辑、内容补充、找答案等附加服务。
- 2、"仅部分预览"的文档,不可在线预览部分如存在完整性等问题,可反馈申请退款(可完整预览的文档不适用该条件!)。
- 3、如文档侵犯您的权益,请联系客服反馈,我们会尽快为您处理(人工客服工作时间:9:00-18:30)。
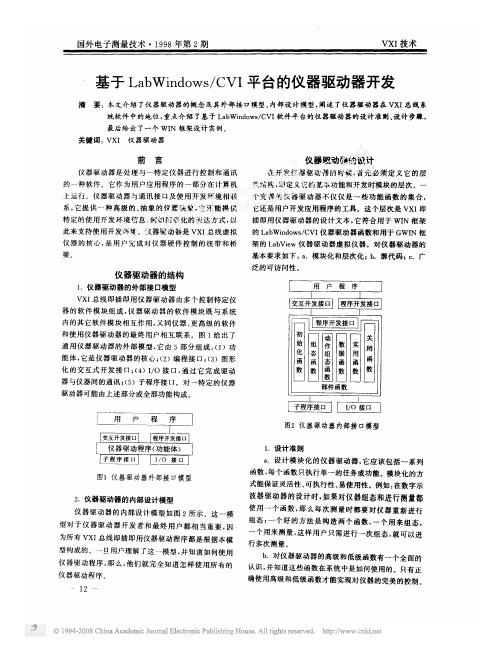
仪器驱动程序 ’ 函数体 ( 内部子例程接口 图# &%+) % , - 接口
仪器驱动程序外部接口模型图
图中各部分的说明: ’ # ( 应用程序 用户开发的用于自动测试的应用程序。 ’ ! ( 交互式开发界面 对于 /012345678 , 9&% 来讲, 交互式开发界 面就是图形化的 /012345678 , 9&% 函数面板。 /012345678 , 9&% 函数面板允许用户通过 /01: 2345678 , 9&% 函数面板交互式的操作特定的仪 器或向应用程序的代码中自动添加仪器驱动函 数的调用。 在 /012345678 , 9&% 函数面板还提供 了对函数的接口的详细说明,帮助程序员理解 每一个函数的作用与使用方法。 ’ $ ( 程序开发接口 程序开发接口是指在高层的应用程序中调 用仪器驱动程序的方法。 在 /012345678 , 9&% 仪 器驱动程序中,仪器驱动程序的软件接口是用 标准的函数调用实现的,与标准的库函数调用 没有什么不同。 ’ . ( 仪器驱动程序 ’ 函数体 ( /012345678 , 9&% 仪器驱动程序是用来控
收稿日期 N #""" O "& O #(
1 > E 协议就可以容易的控制仪器,包括 FG1B、 串行设备或者其它设备。早期的仪器驱动 *71、 程序有很多局限性,用户希望仪器驱动程序是 开放的和可修改的,并且最好是围绕一种标准 来构造驱动程序。 *71 H0.@IH0/J 系统联盟自建立以来一直从 事解决系统级的软件问题,并且为发展已存在 的 仪 器 驱 动 程 序 标 准 做 了 有 效 的 工 作 。 *71 H0.@IH0/J 仪器驱动程序体系结构,综合了已有 的流行的技术, 构造了成功的 8/9:+2;<=3 > ?*1 仪器驱动程序标准。 这些标准使用 *1DC % *+,-./0 123-,.452-/-+<2 D<K-=/,5 C,LM+-5L-.,5 ) 定义的数 据类型来定义所有仪器驱动程序函数的接口。 这些数据类型提高了仪器驱动程序在不同操作 系统和编程语言之间的可移植性。 1*1( 12-500+@52*+,-./0 123-,.452-3)模型将 *71 H0.@IH0/J 模型 向前推进了一步,而且并未导致复杂性的增加 和性能的降低。 1*1 给仪器驱动程序增加了许多 新的重要的特性, 比较重要的有以下几个: % $ ) 状态缓存 只有当 1*1 驱动程序自动缓存仪器的状态, 仪器的状态设置与驱动程序所需要的不同时才 执行仪器 1 > E。这样就消除了许多冗余的命令, 加快了测试的速度。 % # ) 可配置的范围检查 1*1 驱动程序自动范围检查功能检验程序 员给仪器的属性所设置的值是否在有效范围之 内, 为了加快执行速度也可以取消这个功能。 % ! ) 可配置的状态查询 1*1 驱动程序自动状态查询特性在对仪器
!"
微电子学与计算机
仪器驱动程序 应用函数 元件函数 初 始 化 函 数 动 作 8 状 态 函 数 实 用 工 具 函 数
"##$ 年第 $ 期配 Nhomakorabea置 函 数
数 据 函 数
属 性 函 数
关 闭 函 数
’(’ 引擎
回调函数 图" 仪器驱动程序内部设计模型图
化或关闭到仪器的软件连接、 配置仪器状态、 数 据读写、仪器属性的查询和设置以及其它一些 特殊的功能。 % ! & 回调函数 在 ’(’ 驱动程序中, 回调函数用来查询或修 改仪器的设置, 检查仪器的状态, 或执行其它操 作。 非 ’(’ ’(’ 引擎在适当的时间调用回调函数。 驱动程序没有回调函数。 ! 应用实例
;<=3 > ?*1 仪器驱动程序、 1*1 体系结构中各部分的作用及 8/9:+2;<=3 > ?*1 仪器驱动程序的工作原理。
关键字: 8/9:+2;<=3 > ?*1, 仪器驱动程序 1*1,
.
引言
虚拟仪器 % *+,-./0 123-,.452-36 简称 *1 ) 技术 是当今自动测试领域的前沿技术。 它的出现, 使 用户能根据自己的需要定义仪器的功能。通过 虚拟仪器技术, 使用相同的硬件设备, 通过不同 的软件, 即可实现各种测量功能。 因此软件是虚 拟仪器技术的核心。 *71 总线是当今最先进的 仪器总线, 具有高速、 高精度、 易扩展、 小型轻便 等优点,基于 *71 总线的虚拟仪器在测试领域 得到广泛应用。 8/9:+2;<=3 > ?*1 是面向测试领 域的功能强大的开发工具。 1*1( 12-500+@52- *+,A ) -./0 123-,.452-3 是仪器驱动程序的最新标准, 1*1 在与已有的仪器驱动程序标准兼容的基础 上带来了许多新特性,增强了仪器驱动程序的 效率。 本文主要讨论 8/9:+2;<=3 > ?*1 仪器驱动 程序的结构和 1*1 体系结构。 / 仪器驱动程序标准的发展过程 仪器驱动程序的目的是控制仪器。对于早 期的计算机控制的仪器系统,程序员在应用程 序中使用 BCD1? 1 > E 指令来操作通过 FG1B 连 接到计算机的仪器。程序员只能通过低层的指 令来控制仪器,如果程序员对相同的仪器编写 不同的应用程序,那么他必须要做许多重复工 作。 显然, 如果能提供通用、 模块化、 高层的例程 使其在开发相同仪器的不同应用程序时可重 用, 这将大大节省仪器应用程序的开发时间。 这 种可重用的例程就是仪器驱动程序。有了仪器 驱动程序, 程序员无须知道低层的命令语法或
应用程序 交互式开发界面 ’ 函数面板 ( 程序开发接口 ’ )*% ( %&% 引擎
制特定仪器的一组函数。因为这些函数是用 用 /012345678 , 9&% 的 9 语言开发环境开发的, 户可以查看这些代码或根据自己的需要优化这 些代码。 ’ ; ( %&% 引擎 %&% 引擎监视仪器属性的状态并且缓存仪 器的状态。%&% 引擎与 %&% 仪器驱动程序结合工 作, 管理仪器属性的读写。 %&% 驱动程序与非 %&% 驱动程序的关键区别就在于非 %&% 驱动程序不 非 %&% 驱动程序通过直接的仪器 使用 %&% 引擎。 % , - 来查询和修改仪器的设置。 %&% 驱动程序则 通过仪器的属性来查询和修改仪器的设置。 ’ < ( 内部子例程接口 内部子例程接口经常被用来调用仪器驱动 程序支持函数,这些函数可以在仪器驱动程序 源文件中定义,也可以由已编译的外部模块提 供。 ’ = ( &%+) % , - 接口 仪器驱动程序的一个应该考虑的重要方面 是它们如何执行仪器 % , -。在 /012345678 , 9&% 仪器驱动程序体系结构中, % , - 接口是由一个 标准的并与平台无关的独立软件层 &%+) % , 接口提供的。 &%+)( &3>?@0A %48?>@BC4?0?364 +6D?: 70>C )>EF3?CE?@>C)% , - 接 口 是 G0?3640A %48?>@: BC4?8 公司的下一代 % , - 体系结构。 &%+) % , 接口是与控制器无关的,它可通过 H*%I、JK%、 嵌 入 式 &K% 和 H*%I L &K% 控 制 器 与 仪 器 通 信。对于 &%+) 不支持的接口, 程序员可使用其 它的 % , - 库。 # 仪器驱动程序内部设计模型 仪器驱动程序内部设计模型如图 ! 所示。 图示各部分的说明: ’ # ( 应用函数 应用函数是一些面向测量与测试的高层的 例程。一个应用函数将调用一系列的元件函数 来完成一个高层操作。 ’ ! ( 元件函数 元件函数分为七类: 初始化、 配置、 动作 , 状 态、 数据、 实用工具、 属性、 关闭。分别完成初始
!""# 年第 # 期
微电子学与计算机
$$
图%
采集到的波形
数 &’()* 将采集到的波形显示到 +,-&. 图形 控件中。在退出程序的回调函数中加入函数 )/)0123%45’(16 关闭应用程序和仪器的会话,释 放系统资源。这样就完成了一个简单的仪器应 用程序。运行此程序, 在界面中单击 “ 采集” 按 钮, 则显示采集到的波形 7 如图 % 所示 8 。 对于采集到的数据除了显示之外还可以进 行进一步的处理,比如信号的变换和低通、高 通、 带通滤波, 信号的频率、 相位、 振幅等特性的 确定。 由 以 上 过 程 我 们 可 以 看 出 使 用 9:;<=>? 0(@1 A BCD 作为开发工具,使用 DCD 仪器驱动程 序, 可以很容易的开发出软硬件紧密结合、 功能 强大的用于测量与测试的应用程序。 ! 结束语 虚拟仪器技术是开发自动测试系统的先进 技术。 9:;<=>0(@1 A BCD 是开发虚拟仪器测试系 统的强大开发环境。虚拟仪器测试系统是以软 件为核心的,软件与硬件紧密结合,协同工作 的。仪器驱动程序是连接软件与硬件的关键部 分。 DCD 仪器驱动程序是仪器驱动程序的最新标 准。 9:;<=>0(@1 A BCD 的仪器驱动程序体系结构 和 DCD 体系结构对使用 9:;<=>0(@1 A BCD 进行 虚拟仪器测试系统开发的技术人员来说是十分 重要的。
!""# 年第 # 期
微电子学与计算机
$#
的每一个操作之后自动检查仪器的状态寄存 器, 为了加快执行速度也可以取消这个功能。 ’ . ( 仪器仿真 %&% 驱动程序可以在没有仪器的条件下模 拟对仪器的操作, 返回模拟的数据。 有了这个特 性,程序员可以在实际的仪器并不存在的情况 下使用仪器驱动程序开发应用程序的代码。 ! 仪器驱动程序的外部接口模型 仪器 驱动程 序的 外部接 口模 型如图 " 所 示。