博朗剃须刀7系中文使用说明书
Philips 系列 7000 电子剃须刀产品说明书

Shaver series 7000SkinGlide RingsGentlePrecisionPRO BladesSmartClick precision trimmerS7370/12Smooth glide, sensitive shavePhilips’ no 1 on sensitive skin*The Philips series 7000 protects against the key signs of skin irritation. SkinGliderings with anti-friction coating enable the shaver to glide effortlessly across yourface. Its blades cut close and protect skin, even with 3-day stubble.Designed for maximum skin comfortSkinGlide rings with anti-friction coating for smooth glide5 direction flex heads follow contours with less pressureAquatec gives you a comfortable dry or refreshing wet shaveA close and smooth shaveBlades protect skin and cut close even with 3-day stubbleEasy to useIntuitive display with 1-level battery indicator50 minutes of cordless shavingShaver can be rinsed clean under the tapComes with a 2-year guaranteeGet the most out of your shaverSmartClick precision trimmer for mustache and sideburnsHighlightsSkinGlide ringsExperience a more comfortable shave with anti-friction SkinGlide rings coated with microspheres. Thousands of tiny glass-like rounded spheres reduce friction and surface resistance between the shaver and the skin.This gives the shaver a smooth, easy glide and helps protect against skin irritation.5-direction Dynamic Flex HeadsOur shaver heads flex easily in 5 directions,gently following all the contours of the face and neck. Less pressure is needed to shave closely and skin stress is minimized.GentlePrecision PRO bladesOur updated cutting system has skin protection technology, designed to only cut hair not skin.V shaped blades guide the skin away from the blades for a close smooth shave - even on 3-day stubble.1 level battery indicatorThe intuitive display shows relevantinformation, enabling you to get the bestperformance out of your shaver: 1-level battery indicator - cleaning indicator - battery low indicator - replacement head indicator - travel lock indicatorAquatec Wet & DryAdapt your shave routine to your needs. With the Aquatec Wet & Dry, you can go for a comfortable dry shave or a refreshing wet shave. You can shave with gel or foam even under the shower.50 minutes of cordless shavingThe energy-efficient, powerful lithium-Ion battery system gives you two convenient options: Charge it for an hour for up to 50minutes of shaving time, or a quick charge for one full shave. All Shaver series 7000 models are designed to operate only in cordless mode to ensure safety in wet environments.Built to lastWe back this Philips shaver with a 2-year guarantee. Our Series 7000 shavers are designed for performance and durability.Fully washable shaverSimply open the shaver head to rinse itthoroughly under the tap.iF DESIGN AWARD 2016Shaver series 7000iF DESIGN AWARD 2016Red Dot Award 2016: WinnerShaver series 7000Red Dot Award 2016:WinnerSpecificationsShaving PerformanceSkinComfort: SkinGlide Rings, SkinProtection System, AquaTec Wet & DryShaving system: GentlePrecisionPRO Blades Contour following: 5-direction DynamicFlex HeadsAccessoriesSmartClick: Precision trimmerPouch: Travel pouch PowerRun time: 50 min / 17 shavesCharging: 1 hour full charge, Quick charge 5min for 1 shaveBattery Type: Lithium-ionAutomatic voltage: 100-240 VMax power consumption: 5.4 WStand-by power: 0.15 WEase of useDisplay: 1 level battery indicator, Battery lowindicator, Cleaning indicator, Replace shavingheads indicator, Travel lock indicatorWet & Dry: Wet and dry useCleaning: Fully washableOperation: Cordless use, Unplug before useDesignHandle: Ergonomic grip & handlingFrame color: WhiteFront color: Tesla ocean blueService2-year guaranteeReplacement head: Replace every 2 yrs withSH70* Philips' no.1 on sensitive skin - compared to other Philipsshavers© 2019 Koninklijke Philips N.V.All Rights reserved.Specifications are subject to change without notice. Trademarks are the property of Koninklijke Philips N.V. or their respective owners.Issue date 2019‑10‑20 Version: 8.4.1EAN: 08 71010 37334 54 。
Philips Series 7000 电动剃须刀说明书
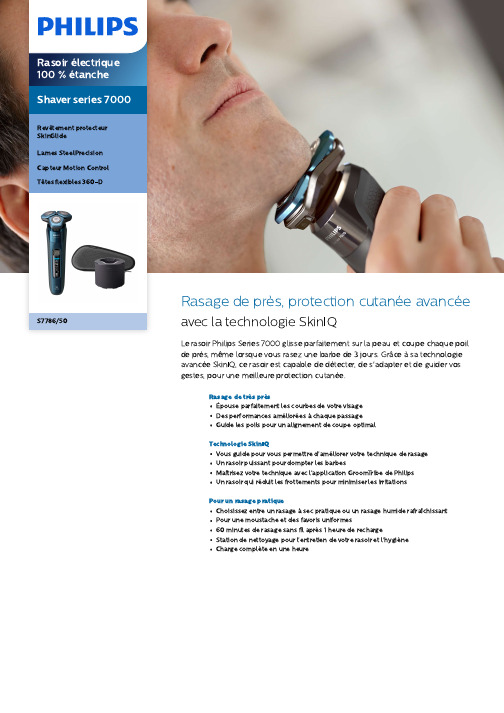
S7786/50de près, protection cutanée avancée la technologie SkinIQLe rasoir Philips Series 7000 glisse parfaitement sur la peau et coupe chaque poil de près, même lorsque vous rasez une barbe de 3 jours. Grâceàsa technologie avancée SkinIQ, ce rasoir est capable de détecter, de s'adapter et de guider vos gestes, pour une meilleure protection cutanée.Rasage de très prèsÉpouse parfaitement les courbes de votre visageDes performances amélioréesàchaque passageGuide les poils pour un alignement de coupe optimalTechnologie SkinIQVous guide pour vous permettre d'améliorer votre technique de rasageUn rasoir puissant pour dompter les barbesMaîtrisez votre technique avec l’application GroomTribe de PhilipsUn rasoir qui réduit les frottements pour minimiser les irritationsPour un rasage pratiqueChoisissez entre un rasageàsec pratique ou un rasage humide rafraîchissantPour une moustache et des favoris uniformes60 minutes de rasage sans fil après 1 heure de rechargeStation de nettoyage pour l'entretien de votre rasoir et l'hygièneCharge complète en une heurePoints fortsRevêtement protecteurSkinGlideUn revêtement protecteur sépare les têtes de rasage de votre peau . Contenant jusqu 'à2 000 microbilles par millimètre carré, il réduit les frottements sur la peau de 25 %* pour minimiser les irritations .LamesSteelPrecisionPuissantes et respectueuses de la peau , les 45 lames auto -a ffûtées SteelPrecision de ce rasoir Philips peuvent e ffectuer jusqu 'à90 000 coupes par minute pour plus de poils coupés par passage **, et une finition nette et confortable .Capteur MotionControlLa technologie de détection des mouvements de ce rasoir électrique surveille votre rasage et vous guide pour vous permettre d 'acquérir une technique plus e fficace . A près seulement trois rasages , la majorité des hommes ont amélioréleur technique de rasage et réduit le nombre de passages ***.Personnaliser à l ’aide de l ’applicationJumelez votre rasoir électrique Philips àl ’application GroomTribe et préparez -vous àmaîtriser votre technique . Il vous su ffit de suivre vos progrès et de personnaliser votre routine pour obtenir un rasage de près et doux .Capteur Power AdaptCe rasoir électrique est équipé d 'un capteur intelligent de pilosité faciale qui détecte la densité des poils 125 fois par seconde . Cette technologie ajuste automatiquement la puissance de coupe pour vous procurer un rasage en douceur et sans e ffort .Têtes flexibles 360-DConçu pour épouser les contours de votre visage , ce rasoir électrique de Philips est dotéde têtes flexibles qui tournent à 360° pour un rasage en profondeur et confortable .Tête de rasoir de précision Hair -GuideCe nouveau rasoir de précision est amélioréavec des grilles pour les poils pour une coupe et un confort de la peau optimaux .Quick Clean Pod sanscâble10 fois plus e fficace qu 'un nettoyage àl 'eau ****, le puissant module de nettoyage nettoie et lubri fie votre rasoir en 1 minuteseulement . Son utilisation permet de maintenir les performances du rasoir et d 'améliorer l 'hygiène .Rasage sur peau sèche ouhumideUn rasoir à sec ou humide qui s ’adapte à vos préférences . Choisissez un rasage à secpratique ou jumelez -le à votre mousse ou gel favori pour un rasage humide rafraîchissant .CaractéristiquesA ccessoiresEntretien: Brossette de nettoyageQuick Clean Pod: 1 cartouche incluse, Oui Tondeuse rétractable intégréeVoyage et rangement: Housse de voyage LogicielsMiseàjour du logiciel: Philips offre des misesàjour de logiciels pendant une période de deux ans après la date d'achat.A pplication: GroomTribe, Connexion Bluetooth®Compatibilitédes smartphones: iPhone etA ndroid™A limentationTension automatique: 100-240 VType de batterie: Li-ionA utonomie: 60 minutesCharge: Charge complète en 1 heure, Recharge rapide en 5 minConsommation en veille: 0,04 WConsommation maximale: 9 WDesignCouleur: BleuélectriqueManche: Poignée antidérapanteTêtes de rasoir: A ngulairesEntretienGarantie de 2 ansTête de rechange SH71: Remplacer tous les2 ans avec SH71Performance de rasageSystème de rasage: Lames SteelPrecisionSuivi des contours: Têtes flexibles 360-DTechnologie SkinIQ: Revêtement protecteurSkinGlide, Capteur Motion Control, CapteurPower A daptFacile d'utilisationNettoyage: Ouverture d'une simple pression,Entièrement lavableÀsec ou avec de la mousse: Utilisableàsec ouavec de la mousseAfficheur: Indicateur Motion Control, AffichageLED, Voyant de niveau de charge, Système deverrouillage pour voyageSmartClickA daptéaux types de produits: Le produitRQ585/51 NE s’adapte P A S au type de têteangulaire* par rapport aux matériaux sans revêtement* * Tests comparatifs avec le Philips Series 3000.* * * Basésur les utilisateurs du Philips Series S7000 et del'application GroomTribe en 2019.* * * * Comparaison des débris de rasage après utilisationdu liquide de nettoyage par rapportàde l'eau dans lacartouche© 2023 Koninklijke Philips N.V. Tous droits réservés.Les caractéristiques sont sujettesàmodification sans préavis. Les marques commerciales sont la propriétéde Koninklijke Philips N.V. ou de leurs détenteurs respectifs.Date de publication 2023‑12‑17 Version: 7.7.1E A N: 87 10103 95938 0 。
多功能智能剃须刀的使用说明书
多功能智能剃须刀的使用说明书使用说明书:多功能智能剃须刀一、产品简介多功能智能剃须刀是一款为每位绅士独家设计的高端剃须工具。
它集剃须、修剪、清洁于一体,采用先进的智能技术与高品质材料制成。
本说明书旨在为您提供详细的产品使用方法和注意事项,确保您能充分发挥其功能并获得最佳剃须体验。
二、外观及配件1.剃须刀主体:采用优质金属材料,外观精致典雅。
2.剃须刀刀头:采用高效锋利的刀片,可有效剃除须发。
3.修剪头:用于修剪胡须、鬓角等细节部位。
4.清洁刷:用于清洁剃须刀刀头和剃须刀主体。
三、使用方法1.准备工作在使用剃须刀前,请确保电源充足,并将剃须刀进行充电。
同时,将剃须刀清洁彻底以确保卫生。
2.剃须a.洗净脸部后,取适量剃须泡涂抹在脸部,使须发变软。
b.按下电源开关,将剃须刀刀头顺着脸部轻轻移动,不需用力压迫。
c.若您需要剃除颈部须发,将剃须刀从下往上逆向移动以获得更加彻底的剃须效果。
d.剃须过程中,您可利用剃须刀背面的修剪器修整蓄须、胡须等细节部位。
3.修剪将修剪头装到剃须刀主体上,开启修剪模式进行修整。
a.根据个人需要和要求选择合适的修剪头,将其固定到剃须刀上。
b.将修剪头靠近要修整的部位,轻柔地移动剃须刀,修整出理想效果。
c.修剪完毕后,将修剪头取下并重新安装剃须刀刀头。
4.清洁a.剃须刀使用完毕后,断开电源,拆下剃须刀刀头。
b.利用清洁刷将剃须刀刀头上残留的须发、清洁剂等物质清理干净。
c.将清洁刷洗净并晾干后,放入原处。
四、注意事项1.请确保剃须刀处于关机状态下进行清洁和更换配件操作。
2.使用剃须刀前请确认刀头安装牢固,防止因松动导致安全事故。
3.避免将剃须刀浸入水中或长时间接触水分,以免损坏剃须刀。
4.为了保持产品的性能和寿命,请定期清洁和润滑剃须刀。
5.请保持剃须刀干燥,避免阳光直射和高温环境下存放。
6.儿童请在成人监护下正确使用剃须刀,并避免将其用于其他用途。
五、维护保养1.请根据使用频率,定期更换剃须刀刀头,以保证剃须效果和舒适体验。
博朗190s-1, 170s-1剃须刀说明书中文版
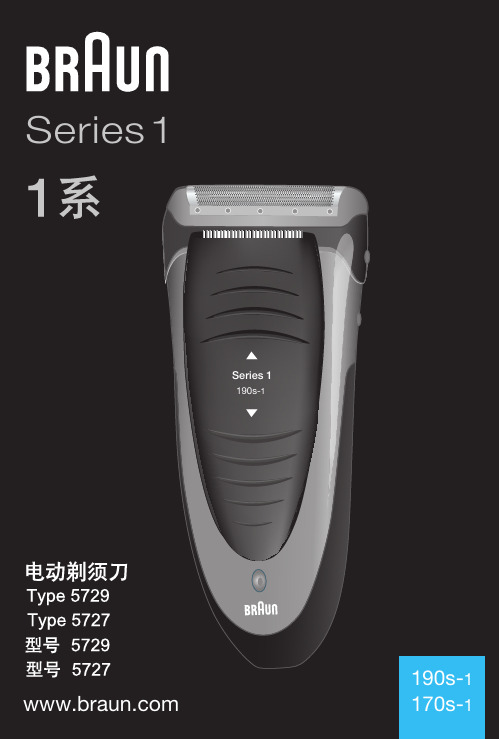
Series1Series 1190s-1612 English 16Braun GmbH Frankfurter Straße 145 61476 Kronberg/Germany Our products are designed to meet the highest standards of quality, functionality and design. We hope you entirely enjoy your new Braun shaver.WarningYour shaver is provided with a special cord set with integrated Safety Extra Low Voltage power supply. Do not exchange or manipulate any part of it. Otherwise there is a risk of electric shock.Never use the appliance with a damaged foil or cord.This appliance is not intended for use by children or persons with reduced physical or mental capabilities, unless they are given supervision by a person responsible for their safety. In general, we recommend that you keep the appliance out of reach of children. Children should be supervised to ensure that they do not play with the appliance.Oil bottleKeep out of reach of children. Do not swallow. Dispose of properly when empty.Description1 Foil protection cap2 Shaver foil3 Cutter block4 Long hair trimmer5 Charging light (190s only)6 On/off switch7 Special cord setCharging (190s only)The best environmental temperature for charging is between 15 °Cand 35 °C.• Using the special cord set, connect the shaver to an electrical outlet with the motor switched off.• When charging for the first time, leave the shaver to charge continuously for 4 hours. The charging light (5) shows that the shaver is being charged. When the battery is fully charged, the charging light intermit-tently blinks on and off. This indicates that the battery maintains its full English• Once the shaver is completely charged, discharge the shaver through normal use. Then recharge to full capacity. Subsequent charges will take about 1 hour.• Maximum battery capacity will only be reached after several charging/ discharging cycles.• If the rechargeable batteries are discharged, you may also shave by connecting the shaver to an electrical outlet via the special cord set.ShavingRemove the foil protection cap (1). Activate the on/off switch (6). The floating foil frame automatically adapts to your skin surface for a close, smooth shave.For pre-shaving after a few days of not having shaved, use the long hair trimmer (4) to pre-cut long hairs. For a close, smooth shave, finish with the foil.TrimmingPush out the long hair trimmer (a). It allows controlled trimming of moustache and sideburns. It evenly cuts and trims larger areas: ideal for shaping sideburns, moustaches and partial short beards.Frequent use of the long hair trimmer may reduce the battery capacity (190s only).Tips for the perfect shave• We recommend that you shave before washing, as the skin tends to be slightly swollen after washing.• Hold the shaver at right angles (90°) to the skin. Stretch the skin andshave against the direction of beard growth.• To maintain 100% shaving performance, replace your foil and cutterblock at least every 18 months or when worn.CleaningThe shaver head is suitable for cleaning under running tap water.Warning: Detach the shaver from the power supply before cleaningthe shaver head in water.• Model 190s only: Switch the shaver on and rinse the shaver head under hot running water.• You may use liquid soap without abrasive substances. Rinse off all foam and let the shaver run for a few more seconds.• Next, (model 190s: switch off the shaver) remove the shaver foil (2) and cutter block (3). Then leave the disassembled shaving parts to dry. Alternatively, you may clean the shaver using the brush provided (c):• Switch off the shaver. Remove the shaver foil.• Using the brush, clean the cutter block and the inner area of the shaver head. However, do not clean the shaver foil with the brush as this may damage the foil.Keeping your shaver in top shapeAbout every four weeks, clean the cutter block with Braun cleaning agents. Put a drop of light machine oil onto the long hair trimmer and the shaverfoil (d).Replacing the shaving partsTo maintain 100% shaving performance, replace your foil and cutter blockat least every 18 months or when worn. Change both parts at the same time for a closer shave with less skin irritation.(Shaver foil and cutter block: 10B)Preserving the batteries (190s only)In order to maintain the optimum capacity of the rechargeable batteries, the shaver has to be fully discharged (by shaving) every 6 months approximately. Then recharge the shaver to full capacity. Do not expose the shaver to temperatures higher than 50 °C for extended periods of time.Environmental noticeThis product contains rechargeable batteries. In the interest ofprotecting the environment, please do not dispose of the product inthe household waste at the end of its useful life. Disposal can takeplace at a Braun Service Centre or at appropriate collection points provided in your country.。
电动刮胡刀使用说明

电动刮胡刀使用说明使用电动刮胡刀前,请务必阅读以下说明以确保正确的使用方法,并获得最佳刮胡体验。
一、前言电动刮胡刀是一种方便快捷的刮胡工具,它能够提供干净、舒适的剃须效果。
本使用说明将为您介绍刮胡刀的基本组件、操作方法以及注意事项。
二、刮胡刀构造1. 刮刀头:刮刀头是用来剃须的主要部分。
请注意保持刮刀头的清洁,避免积聚细菌。
2. 电源开关:刮胡刀通常配有一个电源开关,用来控制刀头的旋转。
3. 充电插头:电动刮胡刀通常通过充电器进行充电,充电插头是与充电器插座相连接的部分。
三、使用方法1. 准备工作a. 确保刮胡刀已经充电完毕。
请根据所配充电器的说明进行充电,一般需要约1-2小时。
b. 清洁刮刀头,确保其表面没有残留物,并保持干燥。
2. 使用步骤a. 打开刮胡刀的电源开关,确保刮刀头旋转。
b. 用右手握住刮胡刀的手柄,将刮刀头轻轻贴近脸部的皮肤。
c. 沿着胡须生长的方向,轻轻地将刮刀头从上至下或者从下至上刮动。
避免用力过猛,以免造成皮肤刺激或伤口。
d. 在刮胡的过程中,可以用左手拉紧皮肤以提供更平滑的刮剃体验。
e. 刮胡完成后,关闭电源开关。
四、注意事项1. 刮胡前应将脸部清洁干净,使用洗面奶或者热毛巾敷脸能够软化胡须,减少刮胡时的不适感。
2. 刮胡刀仅适用于脸部和颈部的剃须,不可用于其他部位的剃毛。
3. 刮胡刀使用过程中应避免与水直接接触,以防水分进入电机造成损坏。
4. 保持刀头的清洁,并定期更换刮刀头,以保证刮胡效果和卫生安全。
5. 如果您对刮胡刀刀头的清洁和更换有任何疑问,请参照刮胡刀的说明书或者咨询专业人士。
五、总结电动刮胡刀是一种现代化的剃须工具,使用方便,刮胡效果出色。
在使用刮胡刀时,请确保按照正确的步骤进行操作,并保持刮刀头的清洁和更换。
祝您拥有一个清爽的剃须体验!以上就是电动刮胡刀的使用说明。
希望本文对您有所帮助,如果您还有其他问题或需要更多信息,请参考刮胡刀的专业说明书或向专业人士咨询。
博朗,说明书

篇一:博朗产品说明书全系列buran博朗系列超细干粉自动灭火装置南京燕苑博朗消防设备有限公司目录第一部分第二部分第三部分第四部分第五部分第六部分悬挂式超细干粉灭火装置1 适用范围2 技术性能3 结构和工作原理4 运输、保管注意事项5 安装注意事项6 维护注意事项7 装箱单8 售后服务悬挂式超细干粉灭火装置1 适用范围2 技术性能3 结构和工作原理4 运输、保管注意事项5 安装注意事项6 维护注意事项7 装箱单8 售后服务悬挂式超细干粉灭火装置1 适用范围2 技术性能3 结构和工作原理4 运输、保管注意事项5 安装注意事项6 维护注意事项7 装箱单8 售后服务自动温感启动器手动启动功能模块1 概述2 探测器性能特点3 主要技术指标4 安装方法5 使用方法6 维护安装注意事项备注 fzxa2.5-buran fzxa5-buran fzxa8-buran第一部分 fzxa2.5-buran悬挂式超细干粉灭火装置1 适用范围1.1 能迅速扑灭a、b、c类火灾和带电电气火灾。
如生产车间、办公室、小型仓库、商店、配电房等层高比较小的相对封闭空间及火车、船舶等交通工具消防使用。
1.2 防爆标志exibiibt32 技术性能2.1 外形尺寸(含固定架;mm)直径 ??????????????200±5高度??????????????375±52.2 灭火装置重量(kg)?????????????????????6.0±0.5 2.3 灭火超细干粉重量(kg)???????????????????2.5±0.125 2.4保护面积、体积(不密闭程度5%)2.5自动温感启动器启动温度(℃)???????????????? ≥70 2.6启动电流(a)????????????????????????≥1 2.7 检查电启动的安全电流(ma)????????????????≤150 2.8 喷射时间(秒)????????????????????????≤5 2.9 灭火时间(秒)???????????????????????≤1 2.10 使用环境温度(℃)?????????????????? -40~+50 2.11 装置启动有效期(年)?????????????????????10 2.12 可人控电启动或与火灾自动报警系统配套使用。
博朗IRT6520中文说明书家用版
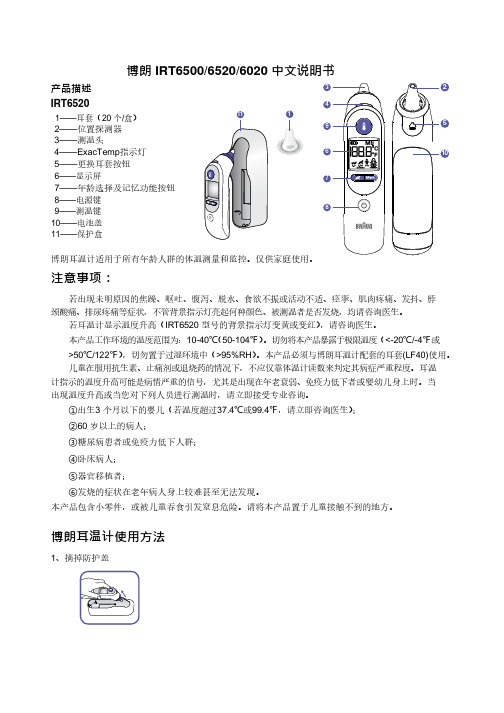
博朗 IRT6500/6520/6020 中文说明书产品描述 IRT65201——耳套(20 个/盒) 2——位置探测器 3——测温头4——ExacTemp 指示灯 5——更换耳套按钮 6——显示屏7——8——电源键 9——测温键 10——电池盖 11——保护盒注意事项:若出现未明原因的焦躁、呕吐、腹泻、脱水、食欲不振或活动不适、痉挛、肌肉疼痛、发抖、脖颈酸痛、排尿疼痛等症状,不管背景指示灯亮起何种颜色、被测温者是否发烧,均请咨询医生。
若耳温计显示温度升高(IRT6520 型号的背景指示灯变黄或变红),请咨询医生。
本产品工作环境的温度范围为:10-40℃(50-104℉)。
切勿将本产品暴露于极限温度(<-20℃/-4℉或 >50℃/122℉),切勿置于过湿环境中(>95%RH )。
本产品必须与博朗耳温计配套的耳套(LF40)使用。
儿童在服用抗生素、止痛剂或退烧药的情况下,不应仅靠体温计读数来判定其病症严重程度。
耳温计指示的温度升高可能是病情严重的信号,尤其是出现在年老衰弱、免疫力低下者或婴幼儿身上时。
当出现温度升高或当您对下列人员进行测温时,请立即接受专业咨询。
①出生 3 个月以下的婴儿(若温度超过 37.4℃或 99.4℉,请立即咨询医生);②60 岁以上的病人;③糖尿病患者或免疫力低下人群;④卧床病人;⑤器官移植者;⑥发烧的症状在老年病人身上较难甚至无法发现。
本产品包含小零件,或被儿童吞食引发窒息危险。
请将本产品置于儿童接触不到的地方。
博朗耳温计使用方法1、摘掉防护盖2最后一次测得的温度将在显示屏显示 5 秒钟。
3、如果有需要,耳套指示灯将闪烁。
请注意:博朗耳温计戴上耳套才能工作。
4、利用AgeSmart 年龄选择功能按钮选择年龄, 如下图所示。
按下按钮可切换年龄组别。
63 秒钟常亮。
“精准温度”指示灯将熄灭,显示屏将显示8、下次测量时,按更换键取下并丢掉用过的耳套,换上新的干净的耳套(同一个人使用,可以多次使用旧耳套8-10 次)。
剃须刀使用说明
开发研制的升级产品,造型独特美观,采用强劲有力低噪声电机,具有适用于不同长度的剪发调节功能及可更换卸式电池,可长时间反复充电使用。
技术参数充电电压:AC.220V-50HZ输出电压:3V DC.300mA最大功率:18W充电方法:1.首次使用时,应于使用前充电8-10小时,以激活内置充电式电池,以后充电时间为8个小时,不宜充电时间过长,否则会影响电池使用寿命2.在充电过程中,指示灯一直显示红灯3.充电时将开关推至OFF,充电完结应切断电源4.在充电过程中,电源外部及变压器有微热,属于正常现象使用说明:1.使用前,应在刀刃和刀片部位滴注1-2滴润滑油,然后开启开关,空运转几秒即可工作2.电推剪采用整付刀片可脱卸结构,使用一段时间后,如果要清理刀片或更换刀片,只要用手托住刀片往外推,刀片即自动脱离刀架座,然后可以清理,安装时用手抓紧刀片,调节圈调至2.0mm 位置,对准刀座内缺口向内用力推,直至喀嚓一声后即可3.本电推剪设计为交直两用,如果充电电池内的点用完,可将充电器插上220V~50HZ电源,带线使用效果不变。
4.该电推剪配有2组电池,轮换使用,均可脱机充电或带机充电1、机身时尚高雅,符合人体工程学设计2、强劲马达、低振动,超静音设计3、特殊合金钢、陶瓷刀片,锋利、耐磨,能剪切大量头发4、高容量镍氢充电池,充满电后可连续使用一个小时左右5、五档尺寸可调节刀片,剪发长度可从0.8-2.0毫米6、充电、插电两用,当电池不够时,可以直接连接充电器使用附件:电池2块、充电器1件、清洁刷1件、润滑油1件、卡齿梳(3mm6mm9mm12 mm4种规格)说明书1份使用建议:1、使用前滴1-2滴润滑油于刀片上,使用后清扫碎发滴1-2滴润滑油再收好2、在拆刀头或组装清洁时,一定要将调节环调到2.0mm处,才能开始拆卸或组装刀头3、充电时间不得超出6小时静音注释:静音不是说没有声音,而是相对来说声音很轻。
这款剪发器在对声音的处理上十分的完美,该剪发器的核定声音为30-60分贝,正常为35分贝左右。
Philips Series 7000 Wet and Dry 电子剃须Razor说明书

Wet and Dry electricshaverShaver series 7000Nano SkinGlide CoatingSteelPrecision bladesMotion Control sensor360 D Flexing headsProduct PictureS7887/35Close shave, advanced skin protection with SkinIQ TechnologyThe Philips Series 7000 glides smoothly over your skin, while cutting each hair close - even on 3 day beards. Equipped with advanced SkinIQ technology, the shaver senses, adapts and guides on the correct motion, for better skin protection.A close shavePowerful performance in every passEngineered for precision and cutting efficiencyA djusts to your facial contour for optimal skin contactSkinIQ technologyReduces friction on skin to minimise irritationA djusts to your beard for effortless shavingEnhanced shaving experience with appGuides you to an improved technique with fewer passesFor a convenient shaveOne-touch open for easy cleaningShave wet, dry and even under the showerPrecision trimmer integrated in the handleSustainabilityConvenient chargingHighlightsNano SkinGlidecoatingA protective coating lies between the shaver heads and your skin . Made of up to 250.000micro -tech beads per square centimetre ,improves gliding on skin by up to 30%***, to minimise irritation .SteelPrecisionbladesWith up to 90,000 cutting actions per minute ,the SteelPrecision blades shave close , cutting more hair per stroke *. The 45 high -performance blades are self -sharpening and made in Europe .Motion ControlsensorMotion -sensing technology tracks how you shave and guides you to a more e fficienttechnique . A fter just three shaves , the majority of men achieved a better shaving technique for fewer passes ****.Personalisation viaappPerfect your shave by pairing your shaver with the Philips GroomTribe app . Shave by shave ,track the progress of your skin , personalise your shave and master your technique for a shave that 's as close as it is kind to skin .Power A daptsensorThe intelligent facial -hair sensor reads hair density 500 times per second . The technology auto -adapts cutting power for an e ffortless and gentle shave .360 D FlexingheadsFully flexible heads turn 360° to follow your facial contours . Experience optimal skincontact for a thorough and comfortable shave .Hair -Guide PrecisionheadsThe new shape of the shaving heads is engineered for precision . The surface isenhanced with hair guiding channels , designed to move hair into an e ffective cutting position .One -touchopenClean the shaver with ease . A t the touch of a button , flip open the shaver head and rinse with water .Wet andDryA dapt your shaving routine to your needs . With Wet and Dry , you can go for a comfortable dry shave or a refreshing wet shave . You can shave with gel or foam , even under the shower .SpecificationsPowerBattery type: Li-IonRun time: 60 minutesCharging: 1 hour full charge, 5-min quick chargeA utomatic voltage: 5 VStand-by power: 0.04 WMax power consumption: 9 WDesignColour: Dark ChromeHandle: Rubber gripShaving heads: A ngular Ease of useDisplay: LED display, Battery level indicator,Motion control indicator, Travel lockCleaning: One-touch open, Fully washableWet and Dry: Wet and dry useCharging: USB-A ChargingA ccessoriesCharging standMaintenance: Cleaning brushIntegrated pop-up trimmerTravel and storage: Travel caseUSB-A cable included: Power adapter notincludedShaving PerformanceContour following: 360 D Flexing headsShaving system: SteelPrecision bladesSkinIQ technology: Nano SkinGlide Coating,Motion Control sensor, Power A dapt sensorService2 year warrantyReplacement head SH71: Replace every 2 yrswith SH71SoftwareA pp: GroomTribe, Connects via Bluetooth®Smartphone compatibility: iPhone andA ndroid™ devices* compared to non-coated material* *Tested versus Philips Series 3000.* **Based on Philips Series S7000 and GroomTribe appusers in 2019* ***comparing shaving debris after using cleaning fluid vs.water in the cartridge© 2023 Koninklijke Philips N.V.A ll Rights reserved.Specifications are subject to change without notice. Trademarks are the property of Koninklijke Philips N.V. or their respective owners.Issue date 2023‑03‑08 Version: 8.8.1E A N: 87 20689 00783 2 。
博朗CruZer5,face剃须刀中文版说明书

5612 English 17Braun GmbH Frankfurter Straße 145 61476 Kronberg/Germany c r u Z e r f a c eo i lOur products are designed to meet the highest standards of quality, functionality and design. We hope you entirely enjoy your new Braun shaver.WarningYour shaver is provided with a special cord set with an integrated Safety Extra Low Voltage power supply. Do not exchange or manipulate any part of it. Otherwise there is risk of electric shock.This appliance is not intended for use by children or persons with reduced physical, sensory or mental capabilities, unless they are given supervision by a person responsible for their safety. In general, we recommend that you keep the appliance out of reach of children. Children should be supervised to ensure that they do not play with the appliance.For usage in other body areas, please make sure that the skin is stretched. For hygienic reasons, do not share this appliance with other persons.Oil bottleKeep out of reach of children. Do not swallow. Dispose of properly when empty.Description1 3-day beard comb & protective cap2 Shaver foil3 Cutter block4 Twistable trimmer4a Wide trimmer (28 mm)4b Narrow trimmer (14 mm)5 Charging light6 On/off switch7 Adjustable comb8 Beard length selector9 Special cord setChargingThe best environmental temperature for charging is between 15 °C and35 °C. Do not expose the shaver to temperatures higher than 50 °C for English• When charging for the first time or when the shaver is not used for a few months, leave the shaver to charge continuously for 4 hours.• The charging light (5) shows that the appliance is being charged. When the battery is fully charged, the charging light turns off. Intermittent blinking after a while indicates that the battery maintains its full capacity. This can also happen short term when charging after the battery was completely discharged.• A full charge provides 30 minutes of cordless shaving time depending on your beard growth.• Once the shaver is completely charged, discharge the shaver through normal use. Then recharge to full capacity. Subsequent charges will take about 1 hour.• Maximum battery capacity will only be reached after several charging/ discharging cycles.• 5-minute quick charge is sufficient for a shave.ShavingFirst, remove the adjustable comb (7): Using your thumbs, press against theside clips of the adjustable comb so that they swing off in the direction of the arrows (a). Activate the on/off switch (6). The floating foil frame automatically adapts to your skin surface for a close, smooth shave.For best results:• Always shave before washing your face.• At all times, hold the shaver at right angles (90°) to the skin (b).• Stretch the skin and shave against the direction of beard growth.• For pre-shaving after a few days of not having shaved, use the wide trimmer (4a) to pre-cut long hairs. For a close, smooth shave, finish with the foil.• To maintain 100% shaving performance, replace your foil and cutter block at least every 18 months or when worn.StyleUsing the twistable trimmerThe wide trimmer (4a) evenly cuts and trims large areas (c). It is ideal for shaping sideburns, moustaches and partial short beards. The wide trimmerstretching the skin, guide the wide trimmer against the direction of hair growth.The narrow trimmer (4b) precisely defines lines and edges (d), being ideal for precise contouring.To use the narrow trimmer, push up the twistable trimmer and turn it 180°. Frequent use of the twistable trimmer will reduce the battery capacity.TrimUsing the trimming attachments (1) and (7)Place the respective trimming attachment onto the shaver foil (2) alternatively on the twistable trimmer (4) and press it against the shaver housing until it snaps into place with a click (e).3-day beard comb & protective cap (1): This attachment is perfectly suited for creating a stubble look and maintaining it.• Place the attachment onto the foil (2) and push up the twistable trimmer (4). Turn on the shaver and use the appliance as shown in the illustration (e). The attachment ensures an optimum usage angle.Adjustable comb (7): This attachment is ideal for beard trimming and keeping it at a constant length.• Place the attachment onto the shaver foil (2) and set desired beard length. Press beard length selector (8) and slide it up (f) (possible length settings from top to bottom: 1.2 mm / 2.8 mm / 4.4 mm / 6 mm). Push up the twistable trimmer (4).• Press the on/off switch and trim against hair growth by guiding the transparent comb part over the skin (f).CleaningThe shaver head is suitable for cleaning under running tap water.Warning: Detach the shaver from the power supply before cleaningthe shaver head in water.Regular cleaning ensures better shaving performance. Rinsing the shaving head after each shave under running water is an easy and fast way to keep it clean:• Next, switch off the shaver, remove the shaver foil and the cutter block. Then leave the disassembled shaving parts to dry.• If you regularly clean the shaver under water, then once a week apply a drop of light machine oil onto the trimmers (4a, 4b) and shaver foil (h). Alternatively, you may clean the shaver using the brush provided (i):• Switch off the shaver. Remove the shaver foil.• Using the brush, clean the cutter block and the inner area of the shaver head. However, do not clean the shaver foil with the brush as this may damage the foil.Keeping your shaver in top shapeReplacing the shaving partsTo maintain 100% shaving performance, replace your foil and cutter block at least every 18 months or when worn. Change both parts at the same time for a closer shave with less skin irritation. (Shaver foil and cutter block: 10B)Preserving the batteriesIn order to maintain the optimum capacity of the rechargeable batteries, the shaver has to be fully discharged (by shaving) every 6 months approximately. Then recharge the shaver to full capacity.Environmental noticeThis product contains rechargeable batteries. In the interest ofprotecting the environment, please do not dispose of the product inthe household waste at the end of its useful life. Disposal can takeplace at a Braun Service Centre or at appropriate collection points provided in your country.Subject to change without notice.For electric specifications, see printing on the special cord set.。
Philips Series S7000 电动剃须刀用户手册说明书

Series S7000 S7780, S7720, S7530English 6简体中文 39IntroductionCongratulations on your purchase and welcome to Philips! To fully benefit from the support that Philips offers, register your product at/welcome .General description1Protection cap for cleansing brush attachment 2Click-on cleansing brush attachment3Comb for beard styler attachment (specific types only)4Click-on beard styler attachment (specific types only)5Click-on trimmer attachment6Click-on shaving unit7Handle8Socket for small plug9Battery charge indicator with 3 lights 10Unplug for use symbol11Travel lock symbol12Replacement reminder13Cleaning reminder14Cleaning cartridge for SmartClean system 15SmartClean system (specific types only)16Cap of SmartClean system17On/off button18Replacement symbol19Rinsing symbol20Ready symbol21Battery symbol22Supply unit23Small plug 24PouchThe accessories supplied may vary for different products. The box shows the accessories that have been supplied with your product.6EnglishImportant safety information Read this important information carefully before you use the appliance and its accessories and save it for future reference. The accessories supplied may vary for different products.Danger-Keep the supply unit dry.-This symbol means: Forbidden to clean under a running tap.Warning -To charge the battery, only use the detachable supply unit (HQ8505) provided with the appliance.-The supply unit contains a transformer. Do not cut off the supply unit to replace it with another plug, as this causes a hazardous situation.-This appliance can be used by children aged from 8 years and above and persons withreduced physical, sensory or mental capabilities or lack of experience and knowledge if they have been given supervision or instruction concerning use of the appliance in a safe way and understand the hazards involved. Children shall not play with the appliance. Cleaning and user maintenance shall not be made by children without supervision.-Always unplug the shaver before you clean it under the tap.-Always check the appliance before you use it.Do not use the appliance if it is damaged, as this may cause injury. Always replace adamaged part with one of the original type.7English-Do not open the appliance to replace the rechargeable battery.Caution -Never immerse the cleaning system or the charging stand in water and do not rinse it under the tap.-Never use water hotter than 60°C to rinse the shaver.-Only use this appliance for its intended purpose as shown in the user manual.-For hygienic reasons, the appliance should only be used by one person.-Never use compressed air, scouring pads,abrasive cleaning agents or aggressive liquids such as petrol or acetone to clean theappliance.-If your shaver comes with a cleaning system,always use the original Philips cleaning fluid (cartridge or bottle, depending on the type of cleaning system).-Always place the cleaning system on a stable,level and horizontal surface to prevent leakage.-If your cleaning system uses a cleaning cartridge, always make sure the cartridge compartment is closed before you use the cleaning system to clean or charge the shaver.-When the cleaning system is ready for use, do not move it to prevent leakage of cleaning fluid.-Water may drip from the socket at the bottom of the shaver when you rinse it. This is normal and not dangerous because all electronics are enclosed in a sealed power unit inside the shaver.-Do not use the supply unit in or near wallsockets that contain an electric air freshener to prevent irreparable damage to the supply unit.8EnglishElectromagnetic fields (EMF)This Philips appliance complies with all applicable standards and regulations regarding exposure to electromagnetic fields.General-This symbol means: Suitable to be used in the shower. It is allowed to use this appliance close to a bathtub, shower or other containers filled with water.-This shaver is waterproof. It is suitable for use in the bath or shower and for cleaning under the tap. For safety reasons, the shaver cantherefore only be used without cord.-The supply unit is suitable for mains voltages ranging from 100 to 240 volts.-The supply unit transforms 100-240 volts to a safe low voltage of less than 24 volts.The display ChargingNote: If you press the on/off button during charging, the 'unplug for use' symbol flashes white to remind you that you have to disconnect the appliance from the wall socket.Quick charge: When the battery is empty and you connect the appliance to the wall socket, the lights of the battery charge indicator light up one after the other repeatedly. When the appliance contains enough energy for one shave, the bottom light of the battery charge indicator starts flashing slowly.9EnglishWhile the appliance continues to charge, first the bottom light of the battery charge indicator flashes and then lights up continuously. Then the second light flashes and then lights up continuously, and so on until the appliance is fully charged.Battery fully chargedNote: When the battery is full, the display switches off automatically after 30 minutes.Note: This appliance can only be used withoutcord.When the battery is fully charged, all lights of the the battery charge indicator light up white continuously.Note: When the battery is full, the display switches off automatically after 30 minutes.When the battery is almost empty, the bottom light of the battery charge indicator flashes orange.The remaining battery charge is shown by the lights of the battery charge indicator that light up continuously.The appliance is equipped with an ‘unplug for use’reminder. The ‘unplug for use’ symbol flashes to remind you that you have to disconnect the appliance from the supply unit before you can switch it on.Clean the shaver after every shave for optimal performance. When you switch off the appliance, the cleaning reminder flashes to remind you to clean the appliance.You can lock the appliance when you are going to travel. The travel lock prevents the appliance from being switched on by accident.Activating the travel lock1Press the on/off button for 3 seconds to enter the travel lock mode.While you activate the travel lock, the travel lock symbol lights up continuously. When the travel lock is activated, the travel lock symbol flashes. Deactivating the travel lock1Press the on/off button for 3 seconds.The travel lock symbol flashes and then lightsup continuously. The appliance is now ready foruse again.For maximum shaving performance, we advise youto replace the shaving heads every two years. Theappliance is equipped with a replacementreminder which reminds you to replace theshaving heads. The shaving unit symbol lights upand the arrows flash to indicate that you have toreplace the shaving heads.Note: After replacing the shaving heads, you needto reset the replacement reminder by pressing theon/off button for 7 seconds.ChargingCharge the shaver before you use it for the firsttime and when the display indicates that thebattery is almost empty.Charging takes approx. 1 hour. A fully chargedshaver has a shaving time of up to 50 minutes.Note: You cannot use the appliance while it ischarging.Charging with the supply unit1Make sure the appliance is switched off.2Put the small plug in the appliance and put the supply unit in the wall socket.3After charging, remove the supply unit from the wall socket and pull the small plug out of theappliance.Charging in the SmartClean system (specific types only)1Put the small plug in the back of the Array SmartClean system.2Put the supply unit in the wall socket.3Press the top cap to be able to place the shaverin the holder ('click').4Hold the shaver upside down above the holder.Make sure the front of the shaver pointstowards the SmartClean system holder.5Place the shaver in the holder, tilt the shaverbackwards and press down the top cap toconnect the shaver (‘click’).The battery symbol starts to flash to indicatethat the appliance is charging. When the batteryis fully charged, the battery symbol lights upcontinuously.Note: This appliance can only be used withoutcord.1To switch on the appliance, press the on/off button once.2To switch off the appliance, press the on/off button once.Battery charge indicator with 3 lights: The display lights up for a few seconds to show the remaining battery status.Skin adaptation periodYour first shaves may not bring you the result you expect and your skin may even become slightly irritated. This is normal. Your skin and beard need time to adapt to any new shaving system. To allow your skin to adapt to this new appliance, we advise you to shave regularly (at least 3 times a week) and exclusively with this appliance for a period of 3 weeks.Dry shaving1Switch on the appliance.2Move the shaving heads over your skin in circular movements to catch all hairs growing in different directions. Make sure each shavinghead is fully in contact with the skin. Exertgentle pressure for a close, comfortable shave.Note: Do not press too hard, this can cause skin irritation.3Clean the appliance after use.Wet shavingFor a more comfortable shave, you can also use this appliance on a wet face with shaving foam or shaving gel.To shave with shaving foam or shaving gel, follow the steps below:1Apply some water to your skin.2Apply shaving foam or shaving gel to your skin. 3Rinse the shaving unit under the tap to ensure that the shaving unit glides smoothly over your skin.4Switch on the appliance.5Move the shaving heads over your skin in circular movements to catch all hairs growing in different directions. Make sure each shavinghead is fully in contact with the skin. Exertgentle pressure for a close, comfortable shave.Note: Do not press too hard, this can cause skin irritation.Note: Rinse the shaving unit regularly to ensure that it continues to glide smoothly over yourskin.6Dry your face.7Clean the appliance after use.Note: Make sure you rinse all foam or shaving gel off the appliance.Using the click-on attachmentsNote: The accessories supplied may vary fordifferent products. The box shows the accessoriesthat have been supplied with your product.Removing or attaching the click-onattachmentsYou can use the beard styler with the combattached to style your beard at one fixed setting,but also at different length settings. You can also use it to pre-trim any long hairs before shaving for a more comfortable shave.The length settings on the beard styler attachment correspond to the remaining hair length after cutting and range from 1 to 5mm (3/64 - 3/16in).Attach the attachment to the appliance ('click').Slide the comb straight into the guiding grooves on both sides of the beard styler (‘click’).Press the length selector and then push it tothe left or right to select the desired hair length setting.Switch on the appliance.Move the appliance upwards while you exertgentle pressure. Make sure the front of thecomb is in full contact with the skin.Clean the attachment after use (see 'Cleaningand maintenance').the comb to contour your beard, moustache, sideburns or neckline to a length of 0.5mm (1/32 in).cleansing cream. The cleansing brush removes oil and dirt, contributing to a healthy and oil-free skin.Cleaning and maintenanceNote: The accessories supplied may vary fordifferent products. The box shows the accessoriesthat have been supplied with your product. Cleaning the shaver under the tapClean the shaver after every shave for optimal5Rinse the shaving head holder under a warm tap.6Carefully shake off excess water and let the shaving head holder air-dry completely.7Attach the shaving head holder to the bottom part of the shaving unit (‘click’).We advise you to clean the shaving heads thoroughly once a month or when the appliance does not shave as well as it used to.Note: The shaving heads are locked by a blue or an orange retaining ring. Follow the correctinstructions.1Switch off the appliance.2Pull the shaving head holder off the bottompart of the shaving unit.3Rinse the hair chamber and shaving head holder under the tap.4Turn the retaining ring anticlockwise and lift it off the shaving head.Repeat this process for the other retaining rings.Place them aside in a safe place.5Remove the shaving heads from the shaving head holder. Each shaving head consists of acutter and guard.6Clean the cutter and guard under the tap.7Shake off excess water.8Put the cutter back into the guard.9Place the shaving heads in the shaving headholder.11Attach the shaving head holder to the bottompart of the shaving unit (‘click’).Cleaning the shaver in the SmartClean systemPreparing the SmartClean system for useNote: Hold the SmartClean system while you prepare it for use.Note: If you clean the shaver in the SmartClean system once a week, the SmartClean cartridge lasts approximately three months.1Put the small plug in the back of theSmartClean system.2Put the supply unit in the wall socket.3While holding the SmartClean system with one hand, press the button on the side of theSmartClean system and lift the top part of the SmartClean system.4Pull the seal off the cleaning cartridge.5Place the cleaning cartridge in the SmartCleansystem.6While holding the SmartClean system with one hand, gently push the top part of theSmartClean system back down (‘click’).When the cleaning program is done, the ready symbol lights up continuously.30 minutes after the cleaning program andcharging are done, the SmartClean systemswitches off automatically.The battery symbol lights up continuously toindicate that the shaver is fully charged.Charging takes approx. 1 hour.5To let the shaver dry, you can leave it in the SmartClean system until your next shave. Youcan also remove the shaver from theSmartClean system, shake off excess fluid, open the shaving unit and let the shaver air dry. Note: If you press the on/off button of the SmartClean system during the cleaning program,the program stops. In this case, the cleaning or drying symbol goes out.Note: If you disconnect the SmartClean system from its power source, the cleaning program stops. Replacing the cartridge of the SmartClean systemReplace the cleaning cartridge when the replacement symbol flashes orange or when you are no longer satisfied with the cleaning result. If you clean the shaver in the SmartClean system once a week, the SmartClean cartridge lasts approximately three months.1While holding the SmartClean system with one hand, press the button on the side of theSmartClean system and lift the top part of the SmartClean system.6While holding the SmartClean system with onehand, gently push the top part of theSmartClean system back down (‘click’). Cleaning the click-on attachmentsNever dry trimmer or beard styler attachments witha towel or tissue, as this may damage the trimmingteeth.The accessories supplied may vary for differentproducts. The box shows the accessories that havebeen supplied with your product.Cleaning the trimmer attachmentClean the trimmer attachment after each use.1Switch on the appliance with the trimmerattachment attached.2Rinse the attachment under a warm tap.3After cleaning, switch off the appliance.4Carefully shake off excess water and let the attachment air-dry completely.Tip: For optimal performance, lubricate the teeth of the attachment with a drop of sewing machine oil every six months.4Remove the cutting unit from the beard stylerattachment. By pushing the cutting unit fromthe beard styler attachment you can removeany hairs that have accumulated inside thebeard styler. You can also rinse the back of the cutting unit.5Rinse cut hairs out of the beard stylerattachment.6Carefully shake off excess water and leave the comb, cutting unit and beard styler attachment to dry before next usage.7When the cutting unit is dry attach it to thebeard styler attachment.8When the comb is dry attach it to the beard styler attachment.9For optimal performance, lubricate the teeth of the attachment with a drop of sewing machine oil regularly.Clean the cleansing brush attachment after each use.1Switch off the appliance.2Detach the brush head from the attachment holder.3Clean the parts thoroughly with warm water and soap.4Dry the cleansing brush attachment with a towel.Storage Store the appliance in the pouch (if supplied).Note: We advise you to let the appliance dry before you store it in the pouch.Put the protection cap on the cleansing brushattachment to protect it from dirt accumulation. ReplacementReplacing the shaving headsFor maximum shaving performance, we advise youto replace the shaving heads every two years.Replace damaged shaving heads immediately.Always replace the shaving heads with original Philips shaving heads (see 'Ordering accessories'). Replacement reminderThe replacement reminder indicates that the shaving heads need to be replaced. The shaving unit symbol lights up continuously, the arrows flash white and you hear a beep when you switch off the shaver.1To replace the shaving heads, remove the shaving heads from the shaving head holderone by one. See chapter Thorough Cleaning for the instructions on how to remove the retaining rings and shaving heads.Note: The shaving heads are locked by a blue or an orange retaining ring. Follow the correctinstructions.2To reset the replacement reminder, press and hold the on/off button for approx. 7 seconds.Wait until you hear two beeps.The cleansing brush attachment should bereplaced every 3 months or earlier if the brushhairs are bent or damaged (see 'Orderingaccessories').Ordering accessoriesTo buy accessories or spare parts, visit/service or go to yourPhilips dealer. You can also contact the PhilipsConsumer Care Center in your country (see theinternational warranty leaflet for contact details).The following accessories and spare parts areavailable:-SH70 Philips shaving heads-HQ110 Philips shaving head cleaning spray-RQ111 Philips beard styler attachment-RQ585 Philips cleansing brush attachment-MS591 Philips cleansing brush head (sensitive)-RQ560/RQ563 Philips cleansing brush heads (normal)31English-JC302/JC305 cleaning cartridge-HQ8505 supply unitNote: The availability of the accessories may differ by country.Recycling-Do not throw away the product with the normal household waste at the end of its life, but hand it in at an official collection point for recycling.By doing this, you help to preserve theenvironment.-This product contains a built-in rechargeable battery which shall not be disposed of withnormal household waste. Please take yourproduct to an official collection point or aPhilips service center to have a professionalremove the rechargeable battery.-Follow your country’s rules for the separate collection of electrical and electronic productsand rechargeable batteries. Correct disposalhelps prevent negative consequences for theenvironment and human health.Removing the rechargeable appliance battery32EnglishRemove the screw in the back of the shaver.Remove the back panel.Take out the power unit.Warranty and supportIf you need information or support, please visit /support or read theinternational warranty leaflet.33EnglishWarranty restrictionsThe shaving heads (cutters and guards) are not covered by the terms of the international warranty because they are subject to wear.TroubleshootingThis chapter summarizes the most commonproblems you could encounter with the appliance.If you are unable to solve the problem with the information below, visit /support for a list of frequently asked questions or contact the Consumer Care Center in your country.ShaverProblem Possible cause Solution The appliance does not work when I press the on/off button.The appliance is stillattached to the wall socket. For safety reasons, the appliance can only be used without cord.Unplug the appliance andpress the on/off button to switch on the appliance.The rechargeable battery is empty.Recharge the battery.The travel lock is activated.Press the on/off button for 3 seconds to deactivate the travel lock.The shaving unit is soiled or damaged to such an extent that the motor cannot run. Clean the shaving heads thoroughly or replace them.Also see 'Hairs or dirtobstruct the shaving heads'for a detailed description of how to clean the shaving heads thoroughly.34EnglishProblem Possible cause SolutionThe appliance d oes not shave as well as it used to.The shaving headsare damaged orworn.Replace the shaving heads.Hairs or dirtobstruct the shavingheads.Clean the shaving heads inthe regular way or cleanthem thoroughly (see'Thorough cleaning').I replaced the shaving heads, but the replacement reminder is still showing.You have not resetthe replacementreminder.To reset the replacementreminder, press and holdthe on/off button forapprox. 7 seconds.A shaving head symbol has suddenly appeared on the display.This symbol is thereplacementreminder.Replace the shaving heads.Water is leaking from the bottom of the appliance.During cleaning,water may collectbetween the innerbody and the outershell of theappliance.This is normal and notdangerous because allelectronics are enclosed ina sealed power unit insidethe appliance.SmartClean systemProblem Possible cause SolutionThe SmartClean system does not work when I press the on/off button.The SmartCleansystem is notconnected to thewall socket.Put the small plug in theSmartClean system and putthe supply unit in the wallsocket.35EnglishProblem Possible cause SolutionThe cleaning cartridge is empty.The replacement symbol flashes to indicate that you have to replace the cleaning cartridge.Place a new cleaning cartridge in the SmartClean system.The shaver is not entirely clean after I clean it in the SmartClean system.You have not placed the shaver in the SmartClean system properly, so there is no electrical connection between the SmartClean system and the shaver.Press down the top cap (‘click’) to ensure a proper connection between the shaver and the SmartClean system.The battery of the shaver is not charged sufficiently.If the battery of the shaver is not charged sufficiently,the SmartClean system may not work properly. The shaver needs to be able to switch on briefly during the rinsing phase. Charge the shaver for a short time before you use the SmartClean system to clean your shaver.The cleaning cartridge needs to be replaced.Replace the cleaning cartridge.You have used another cleaning fluid than the original Philips cleaning cartridge.Only use the original Philips cleaning cartridge.The drain of the cleaning cartridge is blocked.Remove the cartridge from the SmartClean system and push the hairs down the drain with a toothpick.36EnglishProblem Possible cause Solution The shaver is not fully charged after I charge it in the SmartClean system.You have not placed the shaver inthe SmartClean system properly, so there is no electrical connection between the SmartClean system and the shaver.Press down the top cap (‘click’) to ensure a proper connection between the shaver and the SmartCleansystem.37English38English简介感谢您的惠顾,欢迎光临飞利浦! 为了让您能充分享受飞利浦提供的支持,请在 /welcome 上注册您的产品。
电动剃须刀使用说明

电动剃须刀使用说明电动剃须刀已经成为现代男士个护必备的工具,它的便捷性和效果受到广大男性用户的赞赏。
然而,对于一些初次使用电动剃须刀的人来说,可能会遇到一些问题。
因此,本文将为大家提供电动剃须刀的使用说明,以帮助大家更好地掌握使用电动剃须刀的技巧和注意事项。
一、充电和清洁1. 在使用电动剃须刀之前,确保其已经充满电。
使用电动剃须刀附带的充电器将其连接到电源,并等待直到充电指示灯显示电池已满。
通常充电时间为几个小时,具体时间可以根据剃须刀的型号而有所不同。
2. 定期清洁剃须刀刀头是保持其良好性能的必要步骤。
大多数电动剃须刀配备了清洁刷,使用清洁刷去除刀头上的剃须膏、毛发等杂质。
另外,一些电动剃须刀还具备自动清洁功能,可以通过清洁液自动清洁和消毒刀头。
二、剃须前的准备工作1. 在开始剃须之前,先确保脸部和剃须区域充分清洁。
洗脸可以软化毛发,并使剃须更加顺滑。
2. 如果您有长须或者胡须,建议使用剪刀或修容刀修整,确保毛发长度合适,以免造成不便。
3. 如有需要,可以涂抹须后水或者剃须胶,这样可以增加剃须的舒适感,并减少皮肤刺激。
三、正确使用电动剃须刀的技巧1. 一般来说,剃须时应该先从颈部开始,逐渐向上移动到脸部的其它部位。
这有助于确保剃须更加均匀,避免遗漏。
2. 在使用电动剃须刀时,应将其垂直于脸部,不需要过多施加压力。
电动剃须刀的刀头会自动旋转进行修剪,过多的压力反而会导致剃须刀的性能下降,并可能造成皮肤刮伤。
3. 沿着毛发生长的方向进行剃须,这样可以减少皮肤的刺激和不适感。
如果需要更加光滑的剃须效果,可以逆着毛发生长的方向再次修整。
四、剃须后的护理1. 剃须后应该使用温水彻底清洁剃须刀。
清洁刀头有助于保持其性能和延长使用寿命。
2. 使用温水洗净脸部剩余的剃须胶或者须后水,并轻轻拍干。
3. 使用须后乳液或者须后水进行肌肤护理。
这样可以防止皮肤干燥、紧绷,并有助于镇静剃须后的肌肤。
综上所述,正确使用电动剃须刀可以帮助您轻松达到理想的剃须效果。
电动剃须刀产品说明书呵护男士精致形象的好帮手
电动剃须刀产品说明书呵护男士精致形象的好帮手电动剃须刀产品说明书尊敬的用户:非常感谢您选择我们的电动剃须刀产品作为呵护男士精致形象的好帮手。
为了确保您能够正确、安全地使用我们的产品,我们特别为您准备了详尽的产品说明书。
请您仔细阅读以下内容,以充分了解我们产品的特点和使用方法。
一、产品概述我们的电动剃须刀采用先进的刀片技术和高效的电动驱动系统,为男士们提供快捷、舒适的剃须体验。
该产品具有以下特点:1. 精确剃须:刀片采用高品质不锈钢材料制成,确保剃须过程中的切割精度和刀片的持久锋利。
2. 人性化设计:刀头部分采用动态刀片浮动系统,可自适应面部轮廓,实现更加贴合、平稳的剃须效果。
3. 便捷清洁:产品配备清洁刷和可水洗的刀头结构,方便用户清洁剃须刀,保持卫生。
4. 灵活电源:产品支持直流电源充电和干电池供电两种方式,满足不同使用场景的需求。
二、使用须知在使用电动剃须刀之前,请您阅读以下使用须知并在使用前确保遵循这些指导:1. 请确定产品是否完好无损,使用过程中如遇到质量问题,请及时联系我们的售后服务人员。
2. 使用前,请确保剃须刀全部充电或者安装好电池。
3. 在使用电动剃须刀时,刀头应轻轻贴近面部,以45度角进行剃须,进行均匀的按摩剃须,切勿用力过猛,以免对皮肤造成不必要的刺激。
4. 刀头应定期更换,以保证剃须刀的切割效果和舒适感。
一般建议每6至12个月更换一次刀头。
5. 使用完毕后,请清洁剃须刀,以保持卫生。
先将刀头结构拆下,用清洁刷去除残留的须发,然后可以将刀头放入清水中彻底清洗。
6. 请保持产品远离水源以及潮湿的环境,以防止电气元件损坏。
三、常见问题及解答以下是一些常见问题和解答,希望能够帮助您更好地使用我们的电动剃须刀产品:1. 剃须刀不能正常工作怎么办?答:首先,请检查是否已安装好电池或者正确连接电源充电。
如果电源充足但仍不能正常工作,请联系我们的售后服务人员。
2. 剃须刀使用后皮肤感到不适怎么办?答:在剃须过程中,请确保刀头与皮肤保持45度角,避免用力过猛。
Philips Norelco 腮胡子剃须刀7300说明书

Vacuum beard/stubbletrimmer Series 7000Beardtrimmer 7300Integrated vacuum system18 built-in length settings75mins cordless use/1h chargeTurbo boostQT4070/41Perfect Beard, less messwith new Vacuum SystemThe Philips Norelco Beardtrimmer 7300, a stubble and beard trimmer, delivers superior trimming performance. The stubble comb is designed to create the perfect stubble. The integrated vacuum system captures hairs for less mess guaranteed.Best performance that feels greatContour following comb for a precise and even trimBrings maximum ease of useVacuum system captures cut hairs for mess-free trimmingMaintenance-free bladesMultifunctional displayTravel LockCreate the look you wantStubble comb designed to trim with more precision18 secured length settings from 1mm up to 18mmProvides optimal powerTurbo power boost button boosts cutting and fan speedStrong lithium-ion battery for optimal power useUse corded and cordlessHighlights18 secured lengthsettingsSelect and locks your desired length within a versatile range of possible lengths .Contour followingcombFlexing guide comb that follows every curve of your face for getting an even trim in an easy and comfortable way .Maintenance freebladesThe blades stay sharp and need no oiling , so your product is always ready for use .MultifunctionaldisplayMultifuntcional display shows easily the length settingPowerful Lithium -IonbatteryThis product has a powerful lithium -ion battery with quick charge so you can charge the product in only 1 hour for 75 minutes use .Travel lockTravel lock option protects your product against unintentionally switching on when you are carrying it in your bag .Turbo power boostbuttonWhen greater suction power and increasedcutting speed is desired while trimming , simply press the Turbo Power Button .Integrated vacuumsystemThe integrated vacuum mechanism absorbs cut -o ff hairs during use and gives you a cleaner washbasin after use .StubblecombThe stubble comb has been designed for giving more sight while you are trimming as there are no frontal teeth . Moreover , byapplying the tip of the trimmer fine contours are possible , by applying the trimmer at di fferent angle on the skin you get morecontrol on individual hair length . This comb is ideal for a perfect stubble or a 5 o 'clock shadow where every detail counts .Corded and cordlessuseUse your electric beard trimmer corded or cordless with the rechargeable battery for maximum power and freedom .SpecificationsCreate the look you want Styles: Short beard, Stubble look Power systemBattery type: Li-ionRunning time: 75 minutes Quick charge: 1 hour(s)A ccessoriesCleaning brushDesignFinishing: White side panels Soft touch handle Service2-year worldwide guaranteeCutting systemCutter width: 32 mmCutting element: Stainless steel bladesNumber of length settings: 18Range of length settings: 1 up to 18 mmPrecision (size of steps): by 1 mmSelf-sharpening stainless steel bladesNon-scratching teeth: For more comfortComb type: Contour following, StubbleEase of useZoom wheel: Easily adjust length settingsVacuum system: For hair collectionSecured length settingsMultifunctional display: Battery indication,Charging indication, Length setting indicationMaintenance free - No Oil needPerformanceTrimming performance: Turbo power boostbutton© 2023 Koninklijke Philips N.V.A ll Rights reserved.Specifications are subject to change without notice. Trademarks are the property of Koninklijke Philips N.V. or their respective owners.Issue date 2023‑07‑25 Version: 13.0.1UPC************* 。
博朗剃须刀7系中文使用说明书

博朗剃须刀7系中文使用说明书保存这些说明我们的产品设计符合最高的质量标准,功能和设计。
我们希望您喜欢新的博朗剃须刀。
本产品仅限于家用。
描述1.箔刀盒2.箔刀盒释放按钮3.剃须刀头锁动开关4.弹出式鬓角修剪器5.开关6.设置按钮(敏感度)7.设置按钮(密集度)8.复位按钮9.剃须刀显示器10.剃须刀电源插口11.旅行盒12.专用电源线充电推荐充电环境的温度为41华氏度到95华氏度或者5摄氏度到35摄氏度。
极端低温或高温条件下,电池可能无法正常或完全充电。
推荐剃须环境的温度为60华氏度到95华氏度或者15摄氏度到35摄氏度为了延长使用时间,不要将剃须刀暴露在温度高于50摄氏度或122华氏度的环境下。
•使用电源线连接剃须刀至电源插座充电至少一小时。
•一次充满电可提供高达50分钟无绳剃须,这可能会根据你的胡须生长变化。
剃须刀显示器剃须刀显示屏显示电池的充电状态。
在充电过程中或使用剃须刀时,相应的绿色充电状态会闪烁。
当电池充满电绿色充电状态将持续点亮。
在完成充电几分钟后,剃须刀切换到待机模式:显示关闭当剃须刀打开,电池电量不足时,红色指示灯闪烁。
剩余的电量还将足够用于2到3个剃须。
使用你的剃须刀个性化你的剃须刀使用(一)⑥和(+)⑦按钮,你可以为你脸不同的部位和特定的需求选择最佳的设置。
不同的设置通过开关键⑤结合指示灯指示•深蓝色(强力剃须)•浅蓝色(通常)•白色(为你脸敏感地区进行一个彻底舒适的剃须,如颈部)为彻底快速的剃须我们推荐(+)设定。
当下次切换的时候,上次使用的设置将被激活完美干剃小贴士为了获得最佳的剃须效果,博朗建议您遵循3个简单步骤:1.始终洗脸之前刮胡子2.在任何时候,保持剃须刀垂直于你的皮肤3.绷紧你的皮肤,逆着胡须生长的方向刮如何使用按开关键⑤来操作剃须刀•旋转剃须刀头和自动浮动箔,调整到适应你的脸轮廓的每个部分。
•剃一些难剃的地方(例如鼻下),以一定的角度滑动剃须刀头锁定开关③到后面的位置去锁定旋转头。
- 1、下载文档前请自行甄别文档内容的完整性,平台不提供额外的编辑、内容补充、找答案等附加服务。
- 2、"仅部分预览"的文档,不可在线预览部分如存在完整性等问题,可反馈申请退款(可完整预览的文档不适用该条件!)。
- 3、如文档侵犯您的权益,请联系客服反馈,我们会尽快为您处理(人工客服工作时间:9:00-18:30)。
博朗剃须刀7系中文使用说明书
保存这些说明
我们的产品设计符合最高的质量标准,功能和设计。
我们希望您喜欢新的博朗剃须刀。
本产品仅限于家用。
描述
1.箔刀盒
2.箔刀盒释放按钮
3.剃须刀头锁动开关
4.弹出式鬓角修剪器
5.开关
6.设置按钮(敏感度)
7.设置按钮(密集度)
8.复位按钮
9.剃须刀显示器
10.剃须刀电源插口
11.旅行盒
12.专用电源线
充电
推荐充电环境的温度为41华氏度到95华氏度或者5摄氏度到35摄氏度。
极端低温或高温条件下,电池可能无法正常或完全充电。
推荐剃须环境的温度为60华氏度到95华氏度或者15摄氏度到
35摄氏度
为了延长使用时间,不要将剃须刀暴露在温度高于50摄氏度或122华氏度的环境下。
•使用电源线连接剃须刀至电源插座充电至少一小时。
•一次充满电可提供高达50分钟无绳剃须,这可能会根据你的胡须生长变化。
剃须刀显示器
剃须刀显示屏显示电池的充电状态。
在充电过程中或使用剃须刀时,相应的绿色充电状态会闪烁。
当电池充满电绿色充电状态将持续点亮。
在完成充电几分钟后,剃须刀切换到待机模式:显示关闭
当剃须刀打开,电池电量不足时,红色指示灯闪烁。
剩余的电量还将足够用于2到3个剃须。
使用你的剃须刀
个性化你的剃须刀
使用(一)⑥和(+)⑦按钮,你可以为你脸不同的部位和特定的需
求选择最佳的设置。
不同的设置通过开关键⑤结合指示灯指示
•深蓝色(强力剃须)
•浅蓝色(通常)
•白色(为你脸敏感地区进行一个彻底舒适的剃须,如颈部)为彻底快速的剃须我们推荐(+)设定。
当下次切换的时候,上次使用的设置将被激活
完美干剃小贴士
为了获得最佳的剃须效果,博朗建议您遵循3个简单步骤:
1.始终洗脸之前刮胡子
2.在任何时候,保持剃须刀垂直于你的皮肤
3.绷紧你的皮肤,逆着胡须生长的方向刮
如何使用
按开关键⑤来操作剃须刀
•旋转剃须刀头和自动浮动箔,调整到适应你的脸轮廓的每个部分。
•剃一些难剃的地方(例如鼻下),以一定的角度滑动剃须刀头锁定开关③到后面的位置去锁定旋转头。
•要修剪鬓角、胡须,滑动弹出鬓角修剪器④向上
清洁
定期清理,确保更好的剃须效果。
每次剃须后,将剃须刀头置于流动的水下冲洗是一个容易快速确保干净的方法。
•关闭剃须刀,并处于无线即不充电的状态下,将剃须刀头置于流动的
热水下冲洗,直到所有残留物被移除,你可以使用不含研磨物质的肥皂液。
冲洗掉所有的泡沫,让剃须刀运转几秒钟。
•接着,关掉剃须刀,按下释放按钮②去移除箔刀盒①,并让它①变干燥。
剃须刀不得使用除非它已经干了。
•如果你经常用水清理剃须刀,需要每周一次滴一滴光机油在箔刀盒顶部或者,你也可以用刷子清理剃须刀
•关闭剃须刀,取出箔刀盒①并在一个平坦的平面上敲击。
使用刷子,清洁旋转头的内部区域。
但是不要用刷子清理箔刀盒,因为这可能会损坏它。
保持你的剃须刀在最佳状态
更换箔刀盒
当更换符号在显示屏⑨上亮起(大约18个月)或者当箔刀盒磨损,为了保证100%勺剃须效果,请更换箔刀盒①。
替换符号将在接下来的7次剃须过程中提醒你去更换箔刀盒。
然后剃须刀将自动重置显示器。
在你更换箔刀盒后,用圆珠笔去推复位按钮③至少3秒来重新设置数据。
当这样做的时候,更换指示灯闪烁并熄灭后,重置完成。
手动重置可以在任何时候进行。
故障排除。
