D-Link USB无线网卡使用手册
D-LINK DIR-635中文安装说明书

D-link DIR-635 中文设置界面详解产品特征:-新增支持SharePort功能(即可支持外接USB设备,如移动硬盘、U盘,打印服务器、扫描仪)-应用了MIMO、OFDM以及增大信道带宽等多项先进技术,使得最大传输数量可以达到300Mbps。
-获奖的QoS 引擎和最近的draft 802.11n 技术产生完美的网络性能。
-符合802.11n,并且向下兼容802.11g和802.11b的所有无线设备。
-3根外置可反折SMA天线。
-1个百兆W AN口、4个百兆LAN口均支持MDI/MDI-X技术。
-支持UPnP、DDNS、静态路由、VPN Pass-through。
-支持虚拟服务器、特殊应用程序和DMZ主机等多种端口转发,可用于建设内网网站。
-支持SSID广播控制、基于MAC地址的访问控制列表。
-更多的带机量,DIR-635拥有高达100-110M 的传输速率,可以在不影响速度的情况下,带更多的用户。
-更先进的WEPTM, WPA TM, or WPA2TM 加密技术保护您的网络。
-更安全的WCN,1个USB2.0接口配合无线存储安全技术,备份您的配置资料。
-更方便的D-Link 路由器安装精灵。
-保持信号独立,不会和周围的其他无线信号互相干扰性能优于11g 650%的无线路由器D-Link 的无线路由器(DIR-635)是一个款符合802.11n 的设备,比802.11g 连接速度更快,性能相当于它的650%并且超过传统的100Mbps有线以太网络。
您可以在你的家里创建一个无线网路,一起来分享相片,文件,音乐,视频,打印机和网络存储设备。
D-Link的QoS 技术将有线、无线的数据分析并分隔成多层数据流。
这个数据流按照它的重要性分级,所以像V oIP、视频服务、在线游戏的数据优先级就比网页浏览的要高。
这样的应用会使得您应用网络更加流畅。
完整家庭覆盖范围这个高性能的路由器提供出众的覆盖范围,消除死角。
USB无线网络卡安装指南说明书

USB无线网络卡I. Windows 即插即用设定I-1. 插入网络卡将装置插入计算机的 USB 接端口。
I-2. 即插即用联机方式1. 如果您的操作系统,对此网络卡支持即插即用,无线网络的图标 就会显示在Windows 的任务栏上. (若没有无线网络图标,请参考 III. 常见问题FAQ -> Q1)。
2. 点击无线网络图标,以显示可用的无线网络. 依照操作系统的不同,无线网络的图标可能会有所差异。
I-3. 联机到无线网络选择您的无线网络名称 (SSID),点选 "联机",若需要的话在弹跳窗口上输入网络联机密码,完成联机。
插入网络卡 即插即用 联机网络II. Windows & Mac安装驱动程序设定II-1.插入网络卡将装置插入计算机的USB 接端口。
II-2.下载及安装驱动程序1.联机到以下网址,在网页搜寻栏输入机种型号,并下载适当的驱动程序。
https:///download2.解压缩下载的档案,点击setup.exe (Windows)、或install.pkg (macOS) 执行档,开始依照指示完成安装驱动程序。
WindowsmacOS插入网络卡下载驱动程序联机网络II-3. 联机到无线网络1. 点击无线网络图标,以显示可用的无线网络。
依照操作系统的不同,无线网络的图标可能会有所差异。
(参考 III. 常见问题FAQ -> Q2)2. 选择您的无线网络名称 (SSID),联机无线网络,若需要的话输入网络联机密码,完成联机。
Windows macOS WindowsmacOSIII. 常见问题FAQQ1.为何无线网络图标,没有出现在Windows 任务栏上? A.您的计算机可能对此网络卡不支持即插即用,请跳到章节II-2,下载及安装驱动程序后,再试试看。
Q2.安装驱动程序后,为何无线网络图标,仍没有出现在Windows 任务栏中?A.如果您是使用Windows 7,请在任务栏的"日期时间"上,点击鼠标右键,选择"内容",找到名为"网络"的系统图标,将行为的选项改为"开启",如此无线网络图标就会显示在任务栏上。
D-Link DIR-825 中文快速说明书

D-Link DIR-825Xtreme N™Dual Band Wireless Gigabit Broadband Router 中文快速安裝/設定指南目錄一、DIR-825面板燈號及背版說明 (4)二、開始安裝DIR-825 (6)透過光碟片中的快速安裝程式安裝您的寬頻路由器 (6)手動進行寬頻路由器安裝設定 (7)硬體接線方式說明 (8)三、開始設定DIR-825 (11)電腦端IP 設定 (11)DIR-825網際網路連線設定 (16)DIR-825 無線網路安全設定 (24)四、無線網卡與DIR-825無線連線設定說明 (28)D-Link DWA系列無線網卡與DIR-825無線連線設定說明 (29)使用Windows XP SP2 內建之無線網路工具程式設定 (31)使用Windows Vista 內建之無線網路工具程式設定 (34)使用WPS 方式快速設定無線網路 (39)使用MAC OSX 內建之無線線網路工具程式(AirPort)設定 (42)五、 SharePort軟體使用方式說明 (44)附錄(1) 使用DIR-825 WEB設定畫面做回復出廠預設值方式 (51)附錄(2) DIR-825 韌體更新方式說明 (52)附錄(3) Windows Vista使用者電腦端TCP/IP 設定 (55)附錄(4) Windows 98/Me 使用者電腦端TCP/IP 設定 (58)附錄(5) MAC OSX 使用者電腦端TCP/IP 設定 (61)附錄(6) 乙太網路RJ-45 連接頭標準排列方式(EIA/TIA 568A/B) (63)D-Link台灣地區技術支援資訊 (64)感謝您購買D-Link優質網路產品,本快速安裝指南將逐步導引您快速並正確的完成DIR-825硬體安裝及其相關設定設定,請您務必仔細閱讀本手冊。
若您仍有其他安裝上的疑惑或不明之處,歡迎您與我們的技術支援工程師連絡。
D-Link DUB-E100 USB 2.0 Fast Ethernet Adapter 说明书
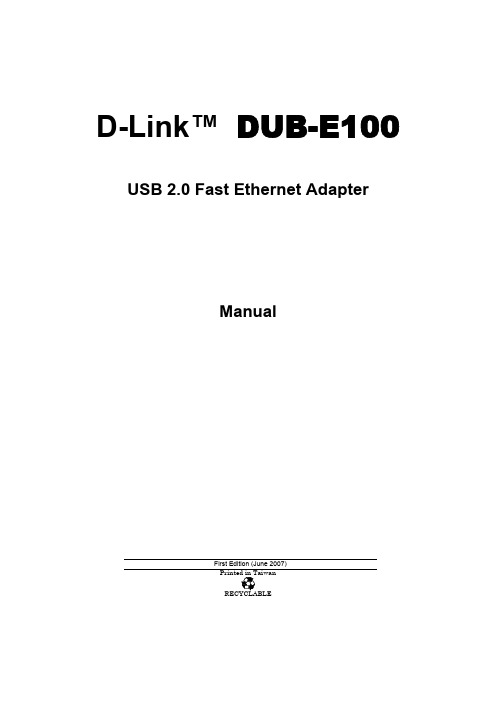
D-Link™ DUB-E100 USB 2.0 Fast Ethernet AdapterManualFirst Edition (June 2007)Printed in TaiwanTable of ContentsINTRODUCTION (3)System Requirements (3)Features (3)INSTALLATION (4)Unpack and Inspect (4)Installing the Adapter (4)connecting the network cable (3)software installation (4)TROUBLESHOOTING (19)SPECIFICATIONS (23)1IntroductionThank you for choosing the D-Link DUB-E100. The D-Link DUB-E100 is a Hi-Speed USB 2.0 10/100Mbps Fast Ethernet Adapter specifically designed to plug into an available Universal Serial Bus (USB) port on a desktop or laptop PC running Microsoft Windows Vista, XP, Server 2003, 2000,ME 98SE ,Mac OS X, and Linux. Based on USB 2.0, the DUB-E100 extends the transfer speed of earlier USB Fast Ethernet adapters to true 10/100Mbps connectivity. Power for the DUB-E100 is provided directly by the USB bus, eliminating the need for an external power adapter. It also supports USB's energy saving suspend and resume functions to minimize power consumption, which is especially useful for laptop/notebook users.System RequirementsBefore installing the DUB-E100, check your system for the following minimum configuration requirements.200MHz or above based computer with a minimum of 32MB RAMOne available USB portWindows Vista x64/86, XP x32/x64 Edition, Server 2003 x32/x64 Edition, 2000, Me, 98SE, Linux or Mac OS XFeaturesDesigned for versatility and performance, the DUB-E100 USB 2.0 Fast Ethernet Adapter provides the following:•Compliant with USB 2.0 and USB 1.1 specifications•Universal Bus support 3.3V•Compliance with IEEE 802.3u Fast Ethernet standards and IEEE 802.3 Ethernet standards.• Plug-and-Play installation•Supports half and full duplex at 10Mbps, half and full-duplex at 100Mbps.•One built-in RJ-45 connector•Auto-negotiation to the highest available speed•Two LED indicators: Link/ TX/RX•Driver support:√ Microsoft Windows Vista (x86 ,x64) √ Linux (kernel 2.6.9~13)√ Microsoft Windows XP (x32/x64 Edition) √ Linux (kernel 2.6.14 & above)√ Microsoft Windows Server 2003 (x32/x64 Edition) √Macintosh OSX (10.x) √ Windows 98SE/ME√ Microsoft Windows 20002InstallationUnpack and InspectOpen the shipping carton and carefully remove all items. Ensure that the following items are included: •One DUB-E100 USB 2.0 Fast Ethernet Adapter•DUB-E100 Drivers and Manual on CD-ROM•Quick Installation GuideIf any of these items are missing or damaged, please contact your local reseller for replacement.Installing the AdapterPlug the DUB-E100’s USB cable into an available USB port on your computer.Windows will detect new hardware and prompt you for the drivers. The installation process varies slightly for each operating system. Insert the DUB-E100 CD into your CD-ROM drive. Then proceed to the appropriate installation section on the following pages for your operating system.Connecting the Network CableA. Attach an Ethernet cable to the Ethernet port on the DUB-E100.B. Attach the other end of the Ethernet cable to your network switch, hub, or router.Software InstallationInsert the DUB-E100 CD into your CD-ROM drive. Then proceed to the appropriate installation sectionon the following pages for your operating system.Windows Vista x64/86Windows Vista driver installation is complete. Now you may connect the DUB-E100 to a network using an Ethernet cable.Windows XPFor Windows XP 64 EditionFor Windows XP 32 EditionWindows XP driver installation is complete. Now you may connect the DUB-E100 to a network using an Ethernet cable.Windows 2000Windows 2000 driver installation is complete. Now you may connect the DUB-E100 to a network using an Ethernet cable.Windows 2003For Windows Server 2003 x64 EditionFor Windows Server 2003 x32 EditionWindows Server 2003 driver installation is complete. Now you may connect the DUB-E100 to a network using an Ethernet cable.Windows MEWindows ME driver installation is complete. Now you may connect the DUB-E100 to a network using an Ethernet cable.Windows 98SEWindows begins copying the necessary files ontoyour computer. You may be prompted to providethe original Windows 98SE CD-ROM. If so, insert the CD-ROM and click OK. If necessary, providethe path to the CD-ROM, such as D:\WIN98(where D: is your CD-ROM drive letter).If prompted, restart your computer to complete the installation. Windows 98SE driver installation is complete. Now you may connect the DUB-E100 to a network using an Ethernet cable.Mac OS X UsersThe following screen shots were taken from Mac OS 10.3 but the steps are similar in other versions of OS X. Your operating system must be version 10.1 or above.After the restart, plug the DUB-E100’s USB cable into an available USB port on your computer. Then attach one end of an Ethernet cable to the Ethernet port on the DUB-E100 and the other end to your network switch, hub or router.Mac system will detect the new hardware and show the name of the adapter, e.g. Ethernet Adapter (en1) in the example below.To configure the network settings of DUB-E100, click the Apple icon and select System Preferences. Then double-click the Network icon.Linux 2.6.14This driver is designed for Kernel 2.6.14.x or above. To compile the provided Linux driver, you need the Linux 2.6 Kernel source. Also, please make sure the kernel is built with “Support for Host-side, EHCI, OHCI, and UHCI” option.1.Insert the driver CD-ROM into the CD-ROM drive of your computer and go to the Drivers\Linux\ directory.2.Copy the LINUX2.6.14_REV101 folder to your temporary directory.3.Go to the LINUX2.6.14_REV101 folder and execute the following command to compile the driver.[**********************.14_rev101]#make4.If compiling without errors, asix.ko will be created under the current directory.5.If you want to use modprobe command to mount the driver, execute the following command to install the driver on your Linux.[**********************.14_rev101]#makeinstallTo mount the driver, go to the LINUX2.6.14_REV101 directory and executing the following command:[**********************.14_rev101]#insmodusbnet[**********************.14_rev101]#insmodasix.koor[root@localhost anywhere]# modprobe asixTo unmount the driver, just typing the following command:[root@localhost anywhere]# rmmod asix[root@localhost anywhere]# rmmod usbnetSoftware Installation (continued)Linux 2.6.9This driver is designed for Kernel 2.6.x to 2.6.13. To compile the provided Linux driver, you need the Linux 2.6 Kernel source. Also, please make sure the kernel is built with “Support for Host-side, EHCI, OHCI, and UHCI” option.Insert the driver CD-ROM into the CD-ROM drive of your computer and go to the Drivers\Linux\ directory. Copy the LINUX2.6.9_REV111 folder to your temporary directory.Go to the LINUX2.6.9_REV111 folder and execute the following command to compile the driver.[**********************.9_rev111]#makeIf compiling without errors, usbnet.ko will be created under the current directory.If you want to use modprobe command to mount the driver, execute the following command to install the driver on your Linux.[**********************.9_rev111]#makeinstallTo mount the driver, go to the LINUX2.6.9_REV111 directory and executing the following command:[**********************.9_rev111]#insmodusbnetor[root@localhost anywhere]# modprobe usbnetTo unmount the driver, just typing the following command:[root@localhost anywhere]# rmmod usbnetInstallation is Complete!Installation of the DUB-E100 is complete. The LINK LED should be solid green, indicating a good physical connection between the DUB-E100 and the network. The TX/RX LED indicates when data is being transmitted or received. If both LEDs are unlit, there may be a problem with the physical connection. Check the cables between your DUB-E100, the computer, and the network. Verify that your network switch, hub, or router is powered on.3Troubleshooting1. Can I use my DUB-E100 on a USB 1.1 port?The DUB-E100 will work on a USB 1.1 port but the transfer speeds will be limited to the limitations of USB 1.1. If your computer does not have USB 2.0 ports, you can purchase an add-in USB 2.0 adapter to add USB 2.0 functionality to your computer.D-Link offers the following USB 2.0 adapters:•DU-520 (5 Port USB 2.0 PCI Adapter) for desktop computers.•DUB-A2 (2-Port USB 2.0 PCI Adapter) for desktop computers.•DUB-C2 (2-Port USB 2.0 Cardbus Adapter) for laptops computers.2. Do I need to use a crossover cable or straight-through cable?With most of D-Link’s switches/routers, the Ethernet ports are Auto MDI-II/MDI-X. This means the port will auto-sense the cable type. Auto MDI-II/MDI-X ports may react differently if the Ethernet cable is not properly pinned. If you make your own cables, it is very important that they follow the industry standard pin-out (568A and 568B).Computer connections to a hub, switch, or router typically use a straight-through cable. When connectinga computer to another computer or to an uplink port then a cross-over cable is typically required. Rule ofThumb: ”If there is a link light, the cable is right.”3. How do I verify that my DUB-E100 is properly installed?WindowsYou can verify that the adapter has been properly installed in Device Manager:• Right click on the My Computer icon and select Properties.• For Windows 98SE and ME: Go to the Device Manager tab.• For Windows XP, 2000, and Server 2003: Go to the Hardware tab and click on the Device Manager button• For Windows Vista: Click on the Device Manager item under the Tasks group.• Expand the Network Adapters heading by clicking on the plus (+) sign next to Network Adapters.• Right click on the My Computer icon and select Properties.• The D-Link USB DUB-E100 should appear with a green and gold network adapter symbol.If the D-Link USB DUB-E100 in device manager appears with a bright yellow exclamation mark or a red x, please contact D-Link Technical Support.Mac1. Click the Apple icon on the task bar, select System Preferences and then click the Network icon.2. You will find that a new Ethernet network interface is available. It’s usually named Ethernet Adapter(en1) or Ethernet Adapter (en2).Linux 2.6.xTo verify if the DUB-E100 driver is properly installed:1. Load the DUB-E100 module by the following command:[**********************.14_rev101]#modprobeasix2. List the loaded modules with the specified pattern “asix”:[**********************.14_rev101]#lsmod|grepasixThen you should get the reply similar to the following lines:asix 26880 0usbnet 20616 1 asixmii 9600 2 asix,e100usbcore 114896 5 asix,usbnet,usb_storage,echi_hcd,uhci_hcdIf you still have problem on installing the D-Link USB DUB-E100 driver, please contact D-Link Technical Support.4SpecificationsEMC And Safety Certifications:•FCC Class B•CE Class BNetwork Interface: Female RJ45 jackData Bus: USB 2.0 (1.1 compliant)Network Standards: IEEE 802.3: 10Base-TIEEE 802.3u: 100Base-TData Transfer Rates: Ethernet: 10Mbps/20Mbps (Half/Full Duplex)Fast Ethernet: 100Mbps/200Mbps (Half/Full Duplex)Physical Dimensions: 3.15 inches(L) x 2.05 inches (W) x 0.98 inches (H) [80mm(L) x 5.2mm(W)x 25mm(H)]Environment:•Storage: −20° to 70°C (-4° to 158° F)•Operating: 0° to 55° C (32° to 131° F)•Humidity: 5% to 95% non-condensing•Power Consumption: 850mWTechnical SupportYou can find software updates and user documentation on the D-Link websites.If you require product support, we encourage you to browse our FAQ section on the Web Site before contacting the Support line. We have many FAQ’s which we hope will provide you a speedy resolution for your problem.For Customers within The United Kingdom & Ireland:D-Link UK & Ireland Technical Support over the Internet:ftp://D-Link UK & Ireland Technical Support over the Telephone:***********(UnitedKingdom)+1890 886 899 (Ireland)Lines Open8.00am-10.00pm Mon-Fri10.00am-7.00pm Sat & Sun。
D-LINK无线路由器设置方法
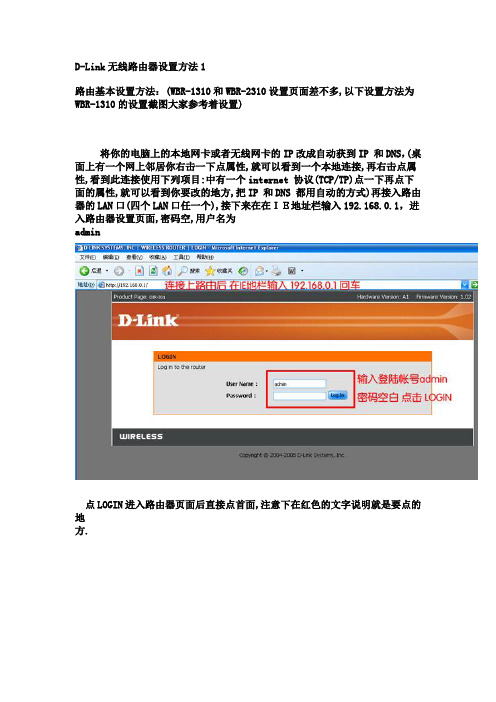
D-Link无线路由器设置方法1路由基本设置方法:(WBR-1310和WBR-2310设置页面差不多,以下设置方法为WBR-1310的设置截图大家参考着设置)将你的电脑上的本地网卡或者无线网卡的IP改成自动获到IP 和DNS,(桌面上有一个网上邻居你右击一下点属性,就可以看到一个本地连接,再右击点属性,看到此连接使用下列项目:中有一个internet 协议(TCP/TP)点一下再点下面的属性,就可以看到你要改的地方,把IP 和DNS 都用自动的方式)再接入路由器的LAN口(四个LAN口任一个),接下来在在IE地址栏输入192.168.0.1,进入路由器设置页面,密码空,用户名为admin点LOGIN进入路由器页面后直接点首面,注意下在红色的文字说明就是要点的地方.点开Manual configure 进入下面的主设置页面,在My internet connection is:选PPPOE设置(以拨号上网为例讲解),在这边可以看到多种上网接入方式.我们以ADSL宽带拨号为例讲解,如下选PPPOE.把自己的宽带用户名和密码填在这边我下面红框中的位置,密码需要填两次.有些地方是绑定了网卡的,在下在有一个克隆的功能,直接点击一下就可以.上图填好后要保存设置一下,要点Save settings保存,如下图,保存后,在STATUS会出来外网的IP地址.这样就算是成功了!无线加密说明: 对于加密的朋友可以看一下,下面就是有关加密的,注意我打红框的地方就是依次打开的顺序.WEP现在蹭网卡可以破,就加WPA加密,先如下图选择加密类型,注意我图上的文字说明,在Passphrase 后面填上8位以上密码,下面确认一下密码,再save settigs保存设置,即完成加密.另外一个重要的是不同的无线网卡使用管理软件不一样,解密方式不一样,只有你自己了解你的无线网卡如何解密时,才能加密,不然加密了不会解密连不上去麻烦大了.#网络技术。
D-Link DWL-G122无线网卡使用说明

1
12.接著會看到您剛剛連線的無線基地 13.接著在右下角會出現無線網路連線
台名稱出現在下方的慣用網路,直接再 現在已連線的訊息,表示您已經可以正
點選確定即可。
常使用無線網路了。
二、數據機安裝介紹
2. 安裝網路卡
Windows XP 由於 Windows XP 作業系統已經內建無 1.當您將卡片插入 USB 插槽時,在右下 線網路的工具管理程式,所以您不需再 角會出現找到新硬體的訊息,接著會出 安裝光碟中的無線網卡管理程式,請您 現尋找新增硬體精靈的視窗,請選擇從 直接將卡片插入您的 USB 插槽中,並將 清單或特定位置安裝,點選下一步。 本產品所附的驅動程式光碟片放入光
11.接著會跳出您連線的無線基地台內 容,直接點選確定即可。
Windows 2000 當 Windows 2000 作業系統要安裝無線網路卡時,必須執行兩種步驟: 一、 在未將 DWL-G122 插上電腦前,先安裝好 Utility 管理工具程式。 二、 安裝好 Utility 管理工具程式後,電腦重新開機後,將 DWL-G122 插上
1.電腦開機完後,將 腦的 USB 埠。
DWL-G122
插入電
2.此時電腦偵測到
USB
新硬體裝置。
8.安裝完成後在右下角會出現您的硬 體已經安裝並且已可使用的訊息,並 9.點選之後會跳出一個無線網路連線的 出現無線網路連線有一些可用的無 視窗,請您點選進階。 線網路,請您點一下兩個小電腦圖示。
10.在可用的網路框框裡會出現您附 近所有的無線基地台,直接點選所要 連線基地台,再點選設定。
單機無線網路卡安裝 取出無線網卡驅動程式光碟並置入電腦光碟機中。 安裝無線網卡驅動程式並照驅動程式指示步驟安裝。 插入無線網卡於適當介面後(USB / PCMCIA)即可使用無線網路。 若搭配本公司提供之 D-LINK 之 DWL-G122 無線網路卡,安裝步驟請照 下列詳細之無線網路卡安裝步驟安裝即可;非搭配本公司之無線網路卡 用戶則請參考 1~3 點之步驟,但仍需以各廠牌提供說明書為主。 目前眾多巿售資訊產品已內建無線網路功能,請使用前配合其說明書啟 動該裝置(如無線功能之軟/硬體開關等)以正常運作。
Dlink无线路由使用说明(图解)
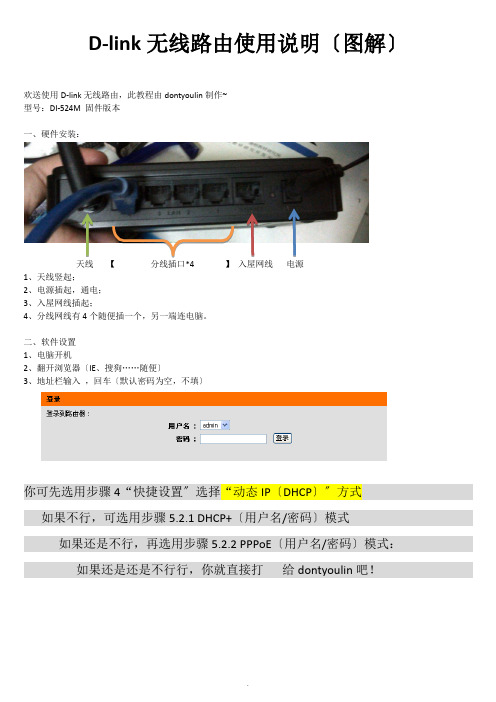
D-link无线路由使用说明〔图解〕欢送使用D-link无线路由,此教程由dontyoulin制作~型号:DI-524M 固件版本一、硬件安装:天线【分线插口*4 】入屋网线电源1、天线竖起;2、电源插起,通电;3、入屋网线插起;4、分线网线有4个随便插一个,另一端连电脑。
二、软件设置1、电脑开机2、翻开浏览器〔IE、搜狗……随便〕3、地址栏输入,回车〔默认密码为空,不填〕你可先选用步骤4“快捷设置〞选择“动态IP〔DHCP〕〞方式如果不行,可选用步骤5.2.1 DHCP+〔用户名/密码〕模式如果还是不行,再选用步骤5.2.2 PPPoE〔用户名/密码〕模式:如果还是还是不行行,你就直接打给dontyoulin吧!移动铁通应该选用“动态IP〔DHCP〕〞方式,输入你的账号密码设定无线,选用WPA2加密,无线名字可改,输入密码后下一步保存进入“设置—Internet设置—手动Internet连接设置〞设置,一般选用“DHCP+〔用户名/密码〕〞或者“PPPoE〔用户名/密码〕〞,建议选用“DHCP+〔用户名/密码〕〞DHCP+〔用户名/密码〕模式:主机名随便~用户名、密码你懂的!DNS效劳器可不填,连接后可自动获得自动填入MTU不管MAC地址:如果铁通需要“用户名/密码〞+物理地址绑定认证,那要“复制计算机的MAC地址〞,或者手动输入地址〔注意地址形式,如00:14:22:c7:29:05〕保存!PPPoE〔用户名/密码〕模式:地址模式一般动态IPIP地址不填用户名/密码/验证密码,你懂的!效劳名不填拨号模式:一般选总是开启或按需最大空闲时间、DNS、MTU不管MAC地址〔同上〕:如果铁通需要“用户名/密码〞+物理地址绑定认证,那要“复制计算机的MAC地址〞,或者手动输入地址〔注意地址形式,如00:14:22:c7:29:05〕保存!6、无线设置:无线网络设置:无线网络名可改,其余默认无线平安模式:WPA/WPA2模式,给予密码,如lovewuxian123 保存!7、检查网络连接情况,进入“状态—设备信息〞:检查外网连接,如下列图:“连接状态〞:表示入屋网线“已连接〞,如果断开需检查入屋网线;“网络状态〞:当连接状态正常连接,当外网拨号成功,即Internet设置成功并连接后,显示“已连接〞,否那么需检查Internet设置,“DHCP+〔用户名/密码〕〞或者“PPPoE〔用户名/密码〕〞,两者选择另一种试试!当外网连接成功,不久后,IP地址、掩码、网关、DNS将自动获取,这说明,外网已准备好了!检查内网连接,如下列图:LAN局部可不管无线局部,随便,一般没有问题无线记得加密哦!本次教程结束!。
D-Link USB无线网卡使用手册
Installing the Utility
請將 DWM-110 WiMaX 網路卡連接到到電腦的 USB 插 槽。 找到 D-Link Setup.exe 執行檔, 並點擊兩次該檔案.。 按下一步繼續
D-Link DWM-110 User Manual
5
Chapter 3 – DWM Series WiMAX Utility
Chapter 3 – DWM Series WiMAX Utility
軟體會自動尋找 DWM-110 網路卡, 完成後選擇"啟動 WiMAX 工具"後, 按”下一步”繼續
完成安裝後, 工具列會出現 MTW 工具軟體(如下圖) 您可以點擊兩次 M-Taiwan 圖示啟動 WiMAX 工具軟體
D-Link DWM-110 User Manual
• • • • • Transmit power 23dBm Embedded antenna Support MIMO Matrix A processing USB 2.0
LED Indicator
Power
Modulation
Support QPSK, 16QAM, 64QAM modulation (DL)
D-Link DWM-110 User Manual
9
Chapter 3 – DWM Series WiMAX Utility
連結狀態 Connection Status
本頁面顯示 WiMAX 連線狀態。若本設備沒有連線至 基地台將不會顯示網路地址 網路業者: 顯示所連結的電信業者網路. 網路位址: 顯示取得的 IP 位址, 由電信業者所提供. 上傳總量: 顯示已使用的上傳傳輸資料量 下載總量: 顯示已使用的下載傳輸資料量. 上傳速度: 表示上傳的傳輸速度 . 下載速度: 表示現在下載的傳輸速度 使用時間: 該資料顯示使用者所累計的連線時間
dlink设置教程
dlink设置教程有网友问到“dlink怎么设置?”店铺整理了相关资料,供大家阅读。
进入路由器设置页面,一般都在在IE浏览器地址栏输入192.168.1.1进入的,有的是输入192.16.0.1,输入默认用户名和密码,ADMIN进入,如果忘记了更改了的密码,还可以重启路由器恢复原始密码。
dlink设置教程具体步骤:1、先打开IE浏览器,在地址栏中输入192.168.0.1登陆无线管理界面(一般默认登陆用户名和密码都为admin/admin),具体可查看说明书及路由器背面铭牌。
2、进入WEB界面后,点击“配置向导”按钮。
3、接着点“网络连接向导”按钮进入上网方式设置界面。
4、D-Link设置向导可自动侦测网络连接类型,一般点“否”,然后点“下一步”。
如下图所示:5、进入正题,开始设置上网方式了,一般家庭用户都是ADSL拨号上网,所以选择第二项“用户名/密码连接(PPPoE)"选项,点下一步,如下图所示:6、在用户名和密码框中输入运营商提供的帐号及口令,服务器名字无需填写,点下一步。
如下图所示:7、接着再点下一步,路由器提示是否重启,表示设置完成。
如下图所示:8、设置完上网方式后,下面该是设置无线密码了,点“无线安全配置向导”按钮。
如下图所示:9、进入“安装您的无线网络”界面,选择“手动分配一个网络密钥”并勾选下面的WPA加密可选项,点下一步。
如下图所示:10、最后进入无线密钥设置选项,在这里输入所需密码,即客户端(手机、iPad)连接时所使用的密码,输入完成后,点下一步,确定之后D-Link路由器会自动重启。
自此D-Link路由器全部设置完成了。
以上就是D-Link无线路由器怎么设置D-Link路由器设置图文教程,挺简单的吧!内容来源互联网,希望能帮助到大家!dlink设置教程将本文的Word文档下载到电脑,方便收藏和打印推荐度:点击下载文档文档为doc格式。
DLINK DIR 612 无线路由器设置
检查包装内容感谢您选择D-LINK宽带路由产品!本用户手册将以Windows XP/Vista/Win7操作系统为例,指导您如何使用我们的路由器实现 共享上网。
本手册是基本设置,如需要更高级设置,请登录下载更详细的设置文档,或拨打8008296688免费技术支持热线。
如果有任何物品遗漏,请与供货商联系。
使用不同的电压额定值的电源会硬件连接首先,将连接DSL/Cable Modem或小区宽带的网线连接到DIR-612的WAN端口。
将网线一端连接到DIR-612的LAN端任意一端口(LAN 1~4),另一端连接电脑。
将DIR-612的电源适配器接头插入DIR-612后面板的电源插孔处,另一端接入电源插座。
当通电之后会看到面板的电源指示灯、INTERNET指示灯与相对应的LAN口指示灯亮。
A.B.C.硬件接口说明:指示灯说明:ADSL 宽带猫貓寬帶入戶網線DIR-612宽带无线路由器DIR-612宽带无线路由器台式電腦台式電腦無線台式電腦電電電無線台式電腦電電電筆記本筆記本网络连接示意图:注意:无线宽带路由器允许您通过有线或无线方式进行连接,但是第一次对路由器设置时,我们推荐您使用有线方式连接, 以下设置步骤,均基于有线连接。
1.以Win XP操作系统为例点击“开始”>点击“设置”>点击“控制面板”>双击“网络连接”>右击“本地连接”>点击“属性”。
在常规窗口里选择“Internet协议(TCP/IP)”点击“属性”, 点选“自动获得IP地址”,“自动获得DNS服务器地址”, 点击“确定”。
设置您的计算机在网络窗口里选择“Internet协议版本4(TCP/IPv4)”点击“属性”, 点选“自动获得IP地址”,“自动获得DNS服务器地址”, 点击“确定”。
2.以Vista操作系统为例点击 >右击 >点击“属性”>点击“管理网络连接”>右击“本地连接”>点击“属性”。
无线USB网卡详细配置指南

电脑会自动查找刚刚接入的新硬件,请在弹出的“找到新硬件”界面中点击“取消”按钮。
2.2 软件安装
网卡只有安装了软件后才可以使用,完成硬件安装后,请按照如下步骤进行网卡的软件安装。 Windows XP、Windows 7、Windows 8 和 Windows 8.1 系统下的安装步骤相似,以下以 Windows 7 的安装界面为例进行说明。 1) 插入光盘,光驱读盘后会自动运行安装向导,如下图所示,点击自动安装按钮。
附录
规格参数 ....................................................................................................... 37
TL-WN725N
TP-LINK 150M 无线 USB 网卡
第一章 产 品 概 述
第三章
3.1 3.2
将电脑连入无线网络 ................................................................................... 7
通过 TP-LINK 配置软件 ................................................................................................7 通过 QSS 功能 ...........................................................................................................11 3.2.1 QSS 设置方法一 .............................................................................................11 3.2.2 QSS 设置方法二 .............................................................................................13 3.2.3 QSS 设置方法三 .............................................................................................14 3.2.4 QSS 设置方法四 .............................................................................................16 通过 Windows 配置工具 .............................................................................................17 3.3.1 Windows XP 系统 ...........................................................................................17 3.3.2 Windows 7 系统 ..............................................................................................20 3.3.3 Windows 8/8.1 系统 ........................................................................................22
link无线网卡说明书

A Division of Cisco Systems, Inc.®Model No.Quick InstallationModel No.Wireless12The USB Network Adapter is installed and set up using the Setup Wizard that comes on the CD enclosed.ATo begin, insert the Setup Wizard CD-ROM into your CD-ROM drive. The Setup Wizard should run automatically, and the Welcome screen should appear.B To install the Adapter, click Click Here to Start on the Welcome screen.CAfter reading the License Agreement, click Next to continue the installation and Windows will begin copying the files onto your PC.DThe Setup Wizard will now prompt you to connect the Adapter to your PC’s USB port. Proceed to Step 2.Now that the Setup Wizard has prompted you to connect the Adapter, follow the instructions below.A Connect one end of the included USB cable to the Adapter’s USB portB Connect the other end of the cable to one of the USB ports on your computer.CThe Power LED should light up when the Adapter is plugged in.DRaise the antenna. Make sure the antenna points straight up into the air, at a 90º angle from the Adapter. This will ensure optimum wireless operating range and performance. EOnce the Adapter isconnected, click Next on the Connecting the Adapter screen to proceed.FWindows 98SE and ME users will need to restart their PCs.Proceed to Step 3.Package Contents•Wireless-G USB Network Adapter •One Setup CD-ROM•One User Guide on CD-ROM •USB Cable•Quick Installation GuideConnect the AdapterBegin InstallationWUSB54GUSB Network AdapterWireless-GACThe Adapter’s Connecting How to ConnectUSB Portthe AdapterIMPORTANT: Do not connect the Adapter to Your PC until you are instructed to do so in Step 2 or the Adapter will not install correctly.GHz 2.4802.11gWPA Personal Needed for Con-nectionEncryption - Select the type of algorithm you want to use, TKIP or AES , from the Encryption drop-down menu.Passphrase - Enter a Passphrase of 8-63 characters in the Passphrase field. The longer and more com-plex your Passphrase is, the more secure your network will be.Click Connect and go to Step B. PSK2 Needed for Connection Enter a Passphrase of 8-63 charac-ters in the Passphrase field.Click Connect and go to Step B.BAfter the Adapter has been config-ured for the network, the Congrat-ulations screen will appear. Click Connect to Network to connect to your network.Congratulations! Setup is complete.WEP Key NeededAIf wireless security has been enabled on this network, you will see a wireless security screen. If your network utilizes WEP (Wired Equivalent Privacy) encryption, the WEP Key Needed for Connection screen will appear. If your network utilizes WPA Personal (Wi-Fi Pro-tected Access), the WPA Personal Needed for Connection screen will appear.If your network utilizes PSK2 (Pre-Shared Key 2) encryption, the PSK2 Key Needed for Connection screen will appear.WEP Key Needed for Connection Select 64-bit or 128-bit . Then, enter a passphrase or WEP key.Passphrase - Enter a passphrase in the Passphrase field. This is case-sensitive and should not be longer than 16 alphanumeric characters. It must match the passphrase of your other wireless network devices and is compatible with Linksys wire-less products only. (Non-Linksys wire-less products, require a WEP key to be entered.)WEP Key - The WEP key must match the WEP key of your wireless net-work. For 64-bit encryption, enter exactly 10 hexadecimal charac-ters. For 128-bit encryption, enter exactly 26 hexadecimal charac-ters. Valid hexadecimal characters are “0” to “9” and “A” to “F”.Then, click Connect and proceed to Step B.The next screen to appear will be the Available Wireless Network screen. From this screen, you can launch one of the three setup methods.Setting Up the Adapter with Available NetworksOn the Available Wireless Network screen, the available networks are listed in the center table by SSID. Select the wireless network you wish to connect to and click the Connect button. (If you do not see your net-work listed, you can click the Refresh button.)If the network utilizes wireless security, you will need to configure security on the Adapter. If not, you will be taken directly to the Congratulations screen, shown in Step B.3Linksys is a registered trademark or trademark of Cisco Systems, Inc. and/or its affiliates in the U.S. and certain other countries. Copyright © 2005 Cisco Systems, Inc. All rights reserved.wusb54gv4-qi-50418NC BWSet Up the AdapterIMPORTANT: For Quick Installation, usethis document only if your network appears on the Available Wireless Net-work screen.SecureEasySetup : If you are utilitizing SecureEasySetup, click the SecureEasy-Setup button and follow the on screen prompts.Manual Setup : If you are utilitizing Manual Setup, click the Manual Setup button and follow the on screen prompts.Available Wireless NetworkNOTE:After the Adapter is installed, the Wire-less Network Monitor screen will open and its icon will appear in your PC’s system tray. Dou-ble-click the icon if you want to open the Wireless Network Monitor for finding available wireless networks or making additional con-figuration changes.Wireless NetworkMonitor iconPSK2 NeededWPA Personal Needed。
D-Link DIR-865L WiFi Router 产品说明书

Vor der erstmaligen Verwendung:y Das Gerät einschalten.y Wenn die Leuchtanzeige Power (Ein/Aus) rot leuchtet, den Akku aufladen.Status-LeuchtanzeigenDie Leuchtanzeigen am Gerät zeigen den Akkustand und den Netzwerk-Verbindungsstatus wie folgt an:Power (Ein/Aus) – Zeigt den Netzstromversorgungs- oder Akkustatus any Blinkt grün – Gerät fährt hoch oder herunter y Leuchtet dauerhaft grün – Gerät ist eingeschaltety Leuchtet dauerhaft gelb – Verbleibender Akkustand unter 30 %y Leuchtet dauerhaft rot – Verbleibender Akkustand unter 10 %y Blinkt rot – Akkustand ist sehr niedrig, und Gerät schaltet sich in Kürze ab Pair (Koppeln) – Zeigt den Bluetooth-Funkstatus any Blinkt – Warten auf Abschluss des Kopplungsvorgangs y Leuchtet dauerhaft – Mit dem mobilen Gerät gekoppelt Service (Dienst) – Zeigt den Status der Diensttests an Network (Netzwerk) – Zeigt den Status der Diensttests an Link (Verbindung) – Zeigt den Status der Diensttests anPhysical (Physikalisch) – Zeigt den Status der physikalischen Schicht anSFP – Zeigt an, dass der SFP+-Anschluss der aktive Anschluss für den aktuellen Test ist ETH – Zeigt an, dass der Ethernet-Anschluss der aktive Anschluss für den aktuellen Test ist WiFi – Zeigt an, dass die WLAN-Schnittstelle die aktive Schnittstelle für den aktuellen Test ist CHG – Zeigt den Ladestatus an Die Leuchtanzeige leuchtet nicht, wenn das Gerät nicht ans Netz angeschlossen ist oder aufgeladen wird.y Blinkt orangefarben – Ladevorgang, Akkustand ist unter 90 %y Leuchtet dauerhaft orangefarben – Ladevorgang ist fast abgeschlossen y Leuchtet dauerhaft grün – Ladevorgang abgeschlosseny Blinkt rot – Fehler beim Laden des Geräts oder bei der Versorgung des Geräts mit Strom. Das im Lieferumfang des Geräts enthaltene Ladegerät von VIAVI verwenden und den Vorgang wiederholen.Eventuell muss das Messgerät in einem zertifizierten Reparaturzentrum gewartet werden. Vor dem Einschicken des Geräts zur Reparatur bei VIAVI eine RMA anfordern.Tasten Power (Ein/Aus) und Pair (Koppeln)Die Tasten Power (Ein/Aus) und Pair (Koppeln) befinden sich nahe der Oberseite des Geräts.Pair (Koppeln) – Zur Kopplung mit einem Bluetooth-Gerät diese Taste drücken Power (Ein/Aus) – Zum Ein- und Ausschalten des Companion diese Taste drücken Play – Für die Testfunktion Delayed Start(Verzögerter Start). Ausführliche Informationen hierzu finden Sie im Benutzerhandbuch .NSC-100KurzanleitungVorteiley Testen Sie einfach alles überall: PON, Ethernet, WLANy Überprüfung des tatsächlichen Kundenerlebnisses und der physikalischen Netzwerkschicht y Kontrolle der Bereitstellung von PON-Diensten vor der Fehlerdiagnose beim Kunden y Direkte Übermittlung der Testberichte per E-Maily Einhaltung der Testabläufe durch interne und externe Techniker mit zentralem, cloudbasiertem Workflow- und ErgebnismanagementLeistungsmerkmaley GPON-, XGSPON-, Ethernet- und WLAN-Tests, einschließlich Durchsatzmessung y 3x3 WLAN-Antenne für 2,4 und 5 Ghz y PON-Datenanalyse (PON-ID) y PON-Leistungsstufeny Zukunftssicher für PON-Netze der nächsten Generation (ONT-Emulation mit auswechselbarem SFP+) y Job-ManagerAuspacken und EinrichtungBeim Auspacken:y Gerät auf Schäden untersuchen. Beschädigte Geräte wieder verpacken. Wenden Sie sich an den Kundendienst von VIAVI (siehe Abschnitt …Technische Unterstützung“ auf der nächsten Seite). y Wenn das Gerät unbeschädigt ist, sollte die gesamte Verpackung dennoch für einen eventuellen künftigen Versand aufbewahrt werden.Leuchtanzeigen Power (Ein/Aus) und Pair (Koppeln)Leuchtanzeigen Service (Dienst) und Network (Netzwerk)TastenPower (Ein/Aus) und Pair (Koppeln)Status-LeuchtanzeigenAnsicht von untenEthernet-Anschluss (10/100/1000 Mbps)USB-C-LadeanschlussUSB 3.0-Anschluss (Typ A)SFP+-optischer AnschlussSchutzabdeckung aus GummiAufladen des AkkusDen im Lieferumfang enthaltenen Netzadapter am USB-C-Anschluss des Geräts anschließen, um den Companion zu betreiben oder den Akku zu laden. Eine vollständige Aufladung des Akkus kann ca. 1 Stunde dauern.TestmodiDer Companion verfügt über eine vereinfachte Teststruktur: Die Funktionen OneCheck PON, OneCheck Ethernet, OneCheck WiFi, WiFi Expert, Loopback, TWAMP Light und Fusion Client bieten automatische Tests und Fehlerdiagnose über die VIAVI Mobile Tech-App.Mit der Funktion OneCheck werden umfassende automatische Tests des Netzwerks und der Zugangspunkte durchgeführt. Im Hauptmenü des Companion den Test und dann das zu testende Profil auswählen.Verwendung des OneCheck-DashboardsOneCheck bietet ein umfassendes Dashboard, das die Ergebnisse für Speedtests, Ping, Netzwerk, GPON, WLAN-Zugangspunkte usw. anzeigt.Durch Antippen des jeweiligen Bereichs in OneCheck können weitere Einzelheiten zu Testergebnissen angezeigt werden.© 2020 VIAVI Solutions Inc.Produktspezifikationen und -beschreibungen in diesem Dokument können ohne Vorankündigung geändert werden.22137285Okt 2020GermanVIAVI SolutionsNordamerika 1.844.GO VIAVI / 1.844.468.4284Lateinamerika +52 55 5543 6644EMEA +49 7121 862273APAC+1 512 201 6534Alle anderen Regionen/contacts****************************Mobile Tech-HauptmenüIm Hauptmenü können die Einzelheiten des Instruments angezeigt, Companion-Tests durchgeführt, die Synchronisierung mitStrataSync vorgenommen, Dateien im Gerät verwaltet und sogar die Dokumentation eingesehen werden.Außerdem werden das Datum und die Uhrzeit der zuletztvorgenommenen Synchronisierung des Messgeräts mit StrataSync angezeigt.Oben im Hauptmenü können über Show more (Mehr anzeigen) Einzelheiten zum Instrument, so z. B. alle installierten Optionen, eingesehen werden.Verwendung des Companion mit einem mobilen GerätDer Companion ist so konzipiert, dass er mit einem mobilen Gerät oder einemTablet (wie beispielsweise einem iPhone, iPad oder einem ähnlichen Android-Gerät) gekoppelt werden kann. Er nutzt dann die Benutzeroberfläche dieserGeräte zusammen mit der VIAVI Mobile Tech-App und bietet so ein reibungsloses Benutzererlebnis.Über die App können Testergebnisse angezeigt, der Companion eingerichtet,Dateien synchronisiert, das Messgerät aktualisiert und Testparameter konfiguriert werden.Um diese Funktionalität zu nutzen, die VIAVI Mobile Tech-App vom App Store oder von Google Play herunterladen.Verbindung mit StrataSyncDie Verbindung zu StrataSync kann jederzeit und von überall aus über die VIAVI Mobile Tech-App auf einem Smartphone oder Tablet hergestellt werden.Wenn die Verbindung zwischen dem Instrument und der Mobile Tech-App über Bluetooth hergestellt wurde, können den Berichten und Dateien Geolocation-Daten während der Synchronisierung mit StrataSync hinzugefügt werden. Wenn Konfigurationsdateien oder Arbeitsaufträge von StrataSync an das Messgerät übertragen werden sollen, können diese hier markiert oder die Dateien können vom Gerät selbst aus gesucht werden.Nach dem Herunterladen der App bei StrataSync erfolgt die Anmeldung genau wie auf der Website. Zum Durchführen der Tests die eingeblendeten Anweisungen in der App befolgen.Mobile T echKopplung des Companion mit dem mobilen GerätZur Bedienung der Benutzerschnittstelle des Companion muss das mobile Gerät mit dem Companion über Bluetooth gekoppelt sein.1.Die Taste Pair (Koppeln) auf dem Companion 3 Sekunden lang gedrückt halten, um in den Kopplungsmodus zu wechseln. Die blaue Leuchtanzeige Pair (Koppeln) blinkt.2.Durchzuführende Schritte auf dem mobilen Gerät:y Das Menü Settings (Einstellungen)aufrufen und dann auf Bluetooth tippen.y Bestätigen, dass das Gerät mit keinem NSC-100 Companion-Gerät gekoppelt ist.3.Im Hauptmenü der Mobile Tech unterMy Devices (Meine Geräte) den Companion (als …NSC-100“ angezeigt) ausfindig machen und auf Connect (Verbinden) tippen.Wird das Gerät nicht angezeigt, musseventuell Discover Devices (Geräte ermitteln) markiert werden.4. Wenn der Companion verbunden ist, leuchtet die Leuchtanzeige Pair (Koppeln) dauerhaft.5.Auf dem mobilen Gerät sollte der Companion nun gekoppelt sein, und im Hauptmenü wird nun das Companion-Menü angezeigt.Das Instrument kann jetzt über die Mobile Tech-App gesteuert werden, und alle Tests lassen sich auf dem Companion durchführen.Verwendung der Mobile Tech-AppAnmelden bei StrataSyncZur erstmaligen Verwendung der Mobile Tech-App ist die Anmeldung bei StrataSync erforderlich:1. Die Mobile Tech-App auf dem mobilen Gerät starten.2. Auf die Schaltfläche Login to StrataSync (Bei StrataSync anmelden) tippen. Der Login-Bildschirm wird eingeblendet.3.Den Benutzernamen und das Kennwort eingeben, und dann auf die Schaltfläche Sign In (Anmelden) tippen. Das Mobile Tech-Hauptmenü wird eingeblendet.y Companion – Durchführung von Tests und Konfiguration von Profilen für den Companion Vor der Durchführung von Tests müssen eventuell Profile für das Netzwerk eingerichtet werden. Weitere Informationen zum Menü Companion > ProfileManager (Companion > Profilmanager) sind der Gebrauchsanleitung zu entnehmen.y Job Manager (Job-Manager) – Anhängen von Aufträgen an Tests, darunter Kundeninfo und Arbeitsaufträge, und Erfassen von Testergebnissen y Instrument Sync (Instrumentensynchronisierung) – Synchronisierung des Instruments mit StrataSync und Bereitstellung der Konfigurationsdateieny NSC-100 Files (NSC-100-Dateien) und Mobile Tech Files (Mobile Tech-Dateien) – Verwaltung der Dateien auf dem Gerät, die auf dem Mobiltelefon oder Tablet gespeichert werden können Über das Menü NSC-100 Files lassen sich auf demMessgerät gespeicherte Dateien verwalten. Die auf dem Mobiltelefon gespeicherten Dateien werden über das Menü Mobile Tech Files verwaltet. y Documentation (Dokumentation) – Anzeige und Download verschiedenerDokumentationen für das Instrument, darunter Anwendungsnotizen, Hinweise zur Softwareversion und KurzanleitungenTechnische UnterstützungTechnische Unterstützung erhalten Sie telefonisch unter 1-844-GO-VIAVI / 1.844.468.4284.Aktuelle Informationen zur technischen Unterstützung erhalten Sie unter/en/services-and-support/support/technical-assistanceSchaltflächeConnect (Verbinden)NSC-100。
DWA-133无线网卡用户手册

無線 N USB 網卡DWA-133快速安裝嚮導裝箱清單包裝內容友情提示安裝光盤快速安裝嚮導以上內容若有遺漏,請聯繫您的經銷商。
無線 N USB 網卡DWA-133此快速安裝手冊將以主流操作系統如:Windows XP, Windows Vista, Windows 7來演示如何安裝和使用無線網卡。
如果您在安裝過程遇到問題,請參考本手冊“疑難解答”章節或撥打800-829-6688免費技術支持熱線。
DWA-133 2DWA-1333安裝向導一、Windows XP將安裝光盤放入電腦,當自動運行畫面出現時,點擊“應用軟件 ”安裝執行程序開始安裝。
【2】點擊“下一步”【1】 出現語言選擇對話框,根據操作系統選擇語言種類【3】 選擇驅動程序的安裝路徑,在此不做更改,點擊“下一步”【4】 出現如下提示,請將DWA-133無線網卡插入電腦USB口,點擊“下一步”(一)如何安裝驅動程序【5】驅動程序正在安裝,請等待幾分鐘【6】點擊“完成”,驅動程序安裝完成【7】 “我的電腦”右鍵“屬性”>點擊“硬件”>點擊“設備管理器”,在網絡適配器裏面如下顯示,表示驅動安裝成功DWA-1334在此以連接D-Link-615L為例。
【1】 打開“控制面板”>雙擊“網絡和Internet”>雙擊“網絡連接”【2】雙擊“無線網絡連接”圖標【3-2】點擊“仍然繼續”【3-1】 若連接網絡為不加密網絡:選中D-Link-615L點擊“連接”【4-1】 若連接網絡為加密網絡:選中D-Link-615L點擊“連接”【4-2】 輸入網絡密鑰與確認網絡密鑰,點擊“連接”【5】如下圖表示無線網絡連接成功(二)如何使用無線網卡DWA-1335二、Windows Vista/Windows 7將安裝光盤放入電腦,當自動運行畫面出現時,點擊“應用軟件 ”安裝執行程序開始安裝。
【1】出現語言選擇對話框,根據操作系統選擇語言種類【2】點擊“下一步”(一)如何安裝驅動程序【3】 選擇驅動程序的安裝路徑,在此不做更改,點擊“下一步”【6】點擊“完成”,驅動程序安裝完成【7】 “計算機”右鍵屬性,點擊 “設備管理器”,在網絡適配器裏面如下顯示,表示驅動安裝成功【4】 出現如下提示,請將DWA-133無線網卡插入電腦USB口,點擊“下一步”【5】 驅動正在安裝過程中,請等待幾分鐘DWA-1336(二)如何使用無線網卡(在此以Windows Vista系統為例)點擊電腦右下角圖標 ,點擊“連接到網絡”, 在此以連接D-Link-615L為例【1-1】 若連接網絡為不加密網絡:選擇D-Link-615L點擊連接【1-2】顯示正在連接【1-3】 等待提示“成功連接到D-Link-615L”,點擊關閉【1-4】網絡顯示“已連接”【2-1】若連接網絡為加密網絡:選中D-Link-615L點擊 “連接”【2-2】輸入無線密鑰,點擊 “連接”【2-3】顯示正在連接【2-4】如下圖設置,點擊“關閉”DWA-1337體中文【2-5】 網絡顯示“已連接”【3】 打開“網絡和共享中心”,點擊“管理網絡連接”,如下圖表示無線網絡連接成功疑難解答安裝和配置問題一、DWA-133支持哪些操作系統?答: 支持目前主流操作系統,如:微軟的WINDOWS XP(32/64位)、VISTA(32/64位)、WIN7(32/64位)。
D-Link DWA-137 无线N高增益USB适配器快速安装指南说明书
REMINDER CD-ДИСК С МАСТЕРОМ УСТАНОВКИCD CoN ASISTENTE DE CoNfIgURACIóNSET-UP AND CoNfIgURATIoN PRoBLEMSУСТАНОВКА И ПРОБЛЕМЫ КОНФИГУРАЦИИTECHNICAL SUPPoRTQUICK INSTALLATION GUIDEDWA-137 WIRELESS N HIgH-gAIN USB ADAPTER1. If I’vE LOST my CD whAT CAN I DO?The CD contains software drivers and manual which can be obtainedfrom D-Link (see Technical Support below). Windows XP , Vista, Windows 7, Windows 8 in most cases will automatically install the correct drivers.2. If I’vE fOrGOTTEN my wIrELESS ENCrypTION KEy?The wireless encryption key is configured at the Wireless AccessPoint, Router or DSL Modem Router. If you are unable to obtain yourencryption key, the only solution would be to re-configure your AccessPoint/Router to use a new encryption key. Please contact your Wireless Access Point/Router/DSL Modem Router manufacturer.3. why CAN’T I GET A wIrELESS CONNECTION?- Check that your DWA-137 is plugged in properly to the USB port or try to plug the DWA-137 into another USB port if available.- The LED on the DWA-137 should be lit, otherwise there could be a physical fault on the USB port or the driver is not installed properly.- Ensure that the wireless settings on the DWA-137 match the settings on your Access Point/Router. Please check and confirm your settings for.Wireless Network Name (SSID)Wireless Encryption Key Wireless Security Method (E.g. WEP , WPA2)To check whether a Wireless connection has been made, in the Windows System Tray (bottom right). Red means no valid connectionshave been made.- Check that your Internet is working fine on existing computers.- Ensure that you have followed and completed the software installation process, otherwise, please re-install the software. The LED on theDWA-137 should come on after software installation.1. Что делать, если компакт-диск потерян?Компакт-диск содержит программное обеспечение, драйверы и руководство пользователя, которое может быть получено от D-Link (обратитесь на страницу Технической поддержки). В большинстве случаев Windows XP , Vista, Windows 7, Windows 8 автоматически устанавливают корректные драйверы.2. Что делать, если я не помню ключ беспроводного шифрования?Беспроводной ключ шифрования настраивается через Web-интерфейс беспроводной точки доступа, маршрутизатора или DSL-модема/маршрутизатора. Пожалуйста, свяжитесь с производителем беспроводной точки доступа/DSL-модема и маршрутизатора.3. Что делать, если беспроводное соединение отсутствует?- Убедитесь, что DWA-137 правильно подключен к порту USB или подключите DWA-137 к другому доступному порту USB.- Индикатор на DWA-137 должен гореть, в ином случаенеосвещенный индикатор указывает на физическую неисправность порта USB или на неправильную установку драйвера.- Убедитесь, что беспроводные настройки на DWA-137 совпадают с настройками на точке доступа/маршрутизаторе. Пожалуйста, проверьте и подтвердите настройки для:Wireless Network Name (SSID)Wireless Encryption KeyWireless Security Method (т.е. WEP , WPA2)Проверьте наличие беспроводного подключения в системном трее Widows (в правом нижнем углу). Красный значок означает, что подключение отсутствует.- Проверьте наличие Интернет-соединения на существующих компьютерах.- Убедитесь, что процесс установки программного обеспечения выполнен последовательно и завершен, в ином случае,пожалуйста, переустановите программное обеспечение. Индикатор на DWA-137 должен загореться после установки программного обеспечения.Please remove the label from your device and paste in the section below.Paste your device’s label here:ESpAÑOLсD-диск с мастером установкиCD-диск содержит все инструкции, необходимые для установки DWA-137.вставьте CD-дискВставьте диск в привод CD-ROM. Запуск Мастера установки произойдет автоматически. Убедитесь, что Интернет-соединение активно. (Не подключайте пока DWA-137)мастер установкиВыберите нужный язык из списка и выполните шаги по установке DWA-137ТЕхНИчЕСКАя ПОДДЕРжКАОФИСЫASISTENTE DE CONfIGUrACIóNEl CD contiene todas las instrucciones requeridas para configurar el DWA-137INSErTE EL CDInserte el CD en el lector de CD de su Computador. El asistente de configuración comenzará automáticamente. Asegúrese que la conexión a internet esté activa. (No conecte el DWA-137 todavía)ASISTENTE DE CONfIGUrACIóNSeleccione su lenguaje desde la lista de opciones y siga los pasos junto al asistente para completar la configuración del DWA-137НАПОМИНАНИЕПожалуйста, удалите этикетку из своего устройства и наклейте в раздел ниже.Наклейте этикетку устройства здесь:Australia:Tel: 1300-766-86824/7 Technical SupportWeb: .au E-mail:*****************.au India:Tel: +91-22-27626600 Toll Free 1800-22-8998Web: www.dlink.co.inE-Mail:*****************.in Singapore, Thailand, Indonesia, malaysia, philippines, vietnam:Singapore - .sg Thailand - www.dlink.co.th Indonesia - www.dlink.co.id Malaysia - .my Philippines - .ph Vietnam - .vn Korea:Tel: +82-2-2028-1810Monday to Friday 9:00am to 6:00pm Web: http://d-link.co.kr E-mail:*************.krNew Zealand:Tel: 0800-900-90024/7 Technical SupportWeb: E-mail:****************.nz South Africa and Sub Sahara region:Tel: +27 12 661 2025 08600 DLINK (for South Africa only)Monday to Friday 8:30am to 9:00pmSouth Africa TimeWeb: http://www.d-link.co.za E-mail:*****************.za Saudi Arabia (KSA):Tel: +966 01 217 0008Fax: +966 01 217 0009Saturday to Wednesday 9.30AM to 6.30PM Thursdays 9.30AM to 2.00 PM E-mail:***********************D-Link middle East - Dubai, U.A.E.Plot No. S31102,Jebel Ali Free Zone South,P .O.Box 18224, Dubai, U.A.E.Tel: +971-4-8809022Fax: +971-4-8809066 / 8809069Technical Support: +971-4-8809033General Inquiries: info.me@dlink-me.com Tech Support: support.me@Egypt 1, Makram Ebeid Street - City Lights Building Nasrcity - Cairo, Egypt Floor 6, office C2Tel.: +2 02 26718375 - +2 02 26717280Technical Support: +2 02 26738470GeneralInquiries:********************T echSupport:***********************Kingdom of Saudi ArabiaOffice # 84 , Al Khaleej Building ( Mujamathu Al-Khaleej)Opp. King Fahd Road, Olaya Riyadh - Saudi Arabia Tel: +966 1 217 0008Technical Support:+966 1 2170009 / +966 2 6522951GeneralInquiries:********************T echSupport:***********************pakistanIslamabad Office:61-A, Jinnah Avenue, Blue Area,Suite # 11, EBC, Saudi Pak Tower,Islamabad - PakistanTel.: +92-51-2800397, 2800398Fax: +92-51-2800399Karachi Office:D-147/1, KDA Scheme # 1,Opposite Mudassir Park, Karsaz Road,Karachi – PakistanPhone: +92-21-34548158, 34326649Fax: +92-21-4375727Technical Support: +92-21-34548310, 34305069GeneralInquiries:********************T echSupport:***********************IranUnit 5, 5th Floor, No. 20, 17th Alley , Bokharest St., Argentine Sq.,Tehran IRANPostal Code: 1513833817Tel: +98-21-88880918,19+98-21-88706653,54GeneralInquiries:********************T echSupport:***********************morocco M.I.T.CRoute de Nouaceur angle RS et CT 1029 Bureau N° 312 ET 337Casablanca , MarocPhone: +212 663 72 73 24Email:***********************Lebanon rmA center Dbayeh/Lebanon PO Box:901589Tel: +961 4 54 49 71 Ext:14Fax: +961 4 54 49 71 Ext:12Email:******************BahrainTechnical Support: +973 1 3332904Kuwait:Technical Support: + 965 22453939 / +965 22453949Türkiye merkez İrtibat Ofisi Ayazağa Maslak yoluErdebil Cevahir İş Merkezi No: 5/A Ayazağa / Maslak İstanbul Tel: +90 212 2895659 Ücretsiz Müşteri Destek Hattı: 0 800 211 00 65Web: .tr TeknikDestek:********************.tr 073-796-2797Обновления программного обеспечения и документация доступны на Интернет-сайте D-Link.россия129626 г. МоскваГрафский пер., 14Тел.: +7 (495) 744-0099украина04080 г. Киев, ул. Межигорская, 87-А, офис 18Тел.: +38 (044) 545-64-40 E-mail:*************Беларусь220114, г. Минск, проспектНезависимости, 169, БЦ "XXI Век"Тел.: +375(17) 218-13-65 E-mail:**************казахстан050008, г. Алматы, ул. Курмангазы, 143(уг. Муканова)Tел./факс: +7 727 378-55-90E-mail:***************армения0038, г. Ереван, ул. Абеляна, 6/1, 4 этажТел./Факс: + 374 (10) 398-667E-mail:***************ГрузияТел./Факс: +995 (593) 98-3210Lietuva09120, Vilnius, Žirmūnų 139-303Tel./faks. +370 (5) 236-3629E-mail:*************EestiMustamae 55-31410621, TallinnTel +372 613 9771 e-mail:*************LatvijaMazā nometņu 45/53 (ieeja no Nāras ielas)LV-1002, RīgaTel.:+371 7 618-703Fax: +371 7 618-706e-pasts:*************You can find software updates and user documentation on the D-Link website.Tech Support for customers inПримечание: сохраните этикетку для будущего использования.Note: Keep this label for future reference.PRoBLEMAS DE CoNfIgURACIóN1. hE pErDIDO EL CD?El CD contiene controladores y el manual, que pueden obtenerse de D-Link (vea más adelante «Asistencia técnica»). Windows XP , Vista, Windows 7, Windows 8 instalarán automáticamente los controladores correctos en la mayoría de casos.2. hE OLvIDADO mI CLAvE DE ENCrIpTACIóN INALámBrICA?La clave de encriptación inalámbrica está configurada en el punto de acceso, router o módem router DSL inalámbricos. Si no puede obtener su clave de encriptación, la única solución es volver a configurar su punto de acceso o router y, de este modo, usar una nueva clave de encriptación. Póngase en contacto con el fabricante de su punto de acceso, router o módem router DSL inalámbricos. 3. NO CONSIGO UNA CONExIóN INALámBrICA?- Compruebe que el DWA-137 está conectado correctamente en el puerto USB o pruebe a conectar el DWA-137 en otro puerto USB que esté libre.D-Link предоставляет бесплатную поддержку для клиентов в течение гарантийного срока.Клиенты могут обратиться в группу технической поддержки D-Link по телефону или через Интернет.техническая поддержка D-Link: 8-800-700-5465техническая поддержка через интернет:http://www.dlink.rue-mail:****************ASSISTENTE DE CoNfIgURAÇÃo No CDPRoBLEMAS DE AJUSTE E CoNfIgURAÇÃo設定及配置問題1. pErDI O mEU CD, O QUE pOSSO fAZEr?O CD contém os drivers do software e o manual que podem ser obtidos na D-Link (consulte a Assistência Técnica abaixo). O Windows XP , Vista, Windows 7, Windows 8 na maior parte dos casos, vão instalar automaticamente os drivers correctos.2. ESQUECI-mE DO mEU CóDIGO DE ENCrIpTAçãO SEm fIOS?O código de encriptação sem fios é configurado no Ponto de Acesso Sem Fios, Router ou Router do Modem DSL. Se não conseguir obter o seu código de encriptação, a única solução será reconfigurar o seu Ponto de Acesso/Router para utilizar um novo código de encriptação. Contacte o fabricante do seu Ponto de Acesso Sem Fios/Router/Router Modem DSL.3. pOrQUE NãO CONSIGO OBTEr UmA LIGAçãO SEm fIOS?- Verifique se o seu DWA-137 está ligado correctamente à sua porta USB ou tente ligar o DWA-137 a outra porta USB se possível.- Verifique se o LED de Ligação verde está aceso. Caso contrário, tem de verificar o driver ou a porta USB.- Certifique-se de que as definições sem fios do DWA-137correspondem às definições do seu Ponto de Acesso/Router. Verifique e confirme as suas definições.Nome de Rede Sem Fios (SSID)Código de Encriptação Sem FiosMétodo de Segurança Sem Fios (P . ex. WEP , WPA2)Para confirmar se foi realizada uma ligação sem fios, vá ao ícone do Windows (canto inferior direito). Vermelho significa que não foram feitas ligações válidas.- Verifique se a Internet está a trabalhar correctamente nos computadores existentes.- Certifique-se de que seguiu e concluiu o processo de instalação do software, caso contrário, volte a instalar o software. O LED do DWA-137 deve acender-se depois da instalação do software.pOrTUGUÊS中 文ASSISTENTE DE CONfIGUrAçãO NO CDO CD contém todas as instruções necessárias para configurar o DWA-137INSIrA O CDInsira o CD na unidade de CD de seu computador. O assistente de configuração deverá ser iniciadoautomaticamente. Certifique-se de que sua conexão coma internet está ativa. (Ainda não conecte o DWA-137)ASSISTENTE DE CONfIGUrAçãOSelecione seu idioma da lista de opções e siga as etapas no assistente para completar a configuração do DWA-137SUPoRTE TéCNICoD-Link 友訊科技 台灣分公司 技術支援資訊提醒如果您還有任何本使用手冊無法協助您解決的產品相關問題,台灣地區用戶可以透過我們的網站、電子郵件或電話等方式與D-Link台灣地區技術支援工程師聯絡。
D-Link DIR-632 说明书
D-Link DIR-632 Wireless N 8埠無線寬頻路由器 中文快速安裝/設定指南目錄一、面板燈號及背版說明 (4)二、開始安裝 (6)開始進行寬頻路由器安裝設定 (6)硬體接線方式說明 (7)三、開始設定 (10)網際網路連線設定 (11)無線網路安全設定 (19)四、無線網卡與無線連線設定說明 (23)D-Link DWA系列無線網卡與無線連線設定說明 (24)使用Windows XP SP2 內建之無線網路工具程式設定 (26)使用Windows 7/Vista 內建之無線網路工具程式設定 (29)使用WPS 方式快速設定無線網路 (34)使用MAC OSX 內建之無線線網路工具程式(AirPort)設定 (37)五、 SharePort軟體使用方式說明 (39)附錄(1) 使用 WEB設定畫面做回復出廠預設值方式 (46)附錄(2) 韌體更新方式說明 (47)附錄(3)、Windows 2k/XP使用者電腦端TCP/IP 設定 (50)附錄(4) Windows 7/Vista使用者電腦端TCP/IP 設定 (52)附錄(5) Windows 98/Me 使用者電腦端TCP/IP 設定 (55)附錄(6) MAC OSX 使用者電腦端TCP/IP 設定 (58)附錄(7)、確認電腦是否取得正確的IP位址 (60)附錄(8)、IE瀏覽器設定參考(無法進入設備設定畫面時) (61)附錄(9) 乙太網路RJ-45 連接頭標準排列方式(EIA/TIA 568A/B) (63)D-Link台灣地區技術支援資訊 (64)感謝您購買D-Link優質網路產品,本快速安裝指南將逐步導引您快速並正確的完成DIR-632硬體安裝及其相關設定設定,請您務必仔細閱讀本手冊。
若您仍有其他安裝上的疑惑或不明之處,歡迎您與我們的技術支援工程師連絡。
開始安裝使用之前請先詳細閱讀以下說明:1.DIR-632可以協助您建構出一個家用無線/有線網路應用環境;但在此之前,請先確定您的電腦在尚未使用DIR-632前,已經可以依照網路服務提供者(ISP)所說的方式連結到網際網路(Internet)正確無誤。
- 1、下载文档前请自行甄别文档内容的完整性,平台不提供额外的编辑、内容补充、找答案等附加服务。
- 2、"仅部分预览"的文档,不可在线预览部分如存在完整性等问题,可反馈申请退款(可完整预览的文档不适用该条件!)。
- 3、如文档侵犯您的权益,请联系客服反馈,我们会尽快为您处理(人工客服工作时间:9:00-18:30)。
D-Link DWM-110 User Manual
1
Chapter 1 – Product Overview
包裝內容
• • DWM-110 IEEE 802.16e WiMAX USB 網路卡 CD-ROM 包括使用者手冊/WiMAX 工具軟體
系統規格的要求
• • 電腦須具備下列規格: • 至少有一個 USB 2.0 介面 • Windows XP/Vista WiMAX 工具軟體
會員服務 Service
幫助說明Help
會自動幫使用者連結到電信業者的網頁, 以提供更多 的支援與服務
提供該工具軟體的使用說明
D-Link DWM-110 User Manual
11
Appendix B – Technical Specifications
Technical Specifications
Installing the Utility
請將 DWM-110 WiMaX 網路卡連接到到電腦的 USB 插 槽。 找到 D-Link Setup.exe 執行檔, 並點擊兩次該檔案.。 按下一步繼續
D-Link DWM-110 User Manual
5
Chapter 3 – DWM Series WiMAX Utility
• • • • • Transmit power 23dBm Embedded antenna Support MIMO Matrix A processing USB 2.0
LED Indicator
Power
Modulation
Support QPSK, 16QAM, 64QAM modulation (DL)
產品特色
• • • 符合 IEEE802.16e-2005 WiMAX 標準 支援工具軟體管理網路卡的連線及設定 安全認證機制
D-Link DWM-110 User Manual
2
Chapter 2 – Overview
硬體簡介
Power LED: 當顯示穩定的 綠色燈號時, 表示該網路卡 已準備好可以等候連線
Chapter 1 – Product Overview
Introduction
D-Link DWM-110 是 符合 IEEE 802.16e-2005 標準的無線寬頻 USB 網路卡, 透過工具軟體可簡單地完成網路設置,享受高速且不 受地點限制的網路連線. 只要簡單地幾個步驟, 就可以開始快速飆網!!
使用者登入 User Login
點選
進入登入頁面。
請從[認証點]的下拉式選單選擇網路業者的名稱,並且輸入 網路業者所提供的帳號與密碼。 認證點-請從下拉式選單選擇網路業者的名稱 (相關的訊息 必須由您的網路業者所提供)。 新增認證點-請從下拉式選單中點選「新增」。輸入認証點 名稱及認証點。點選「確認」按鍵將其加入清單中 編輯-可修改或刪除相關網路業者訊息,完成後點選「確 認」按鍵儲存設定。 備註:設備在出廠時已預設設定相關網路業者的訊息,這 些資料是無法被編輯與刪除的。 開始進行設備與基地台的連線。 點選 假如連線失敗,診斷視窗將會告知您發生連線失敗的可能 原因。
D-Link DWM-110 User Manual
10
Chapter 3 – DWM Series WiMAX Utility
設備資訊 Device Information
用來檢視設備的相關訊息. 包括產品的: 實體位址(MAC address) 軟體版本(Software version) 韌體版本(Firmware version) 硬體版本( Hardware version)
Frequency Range
• 2.5GHz radio front-end cover from 2.5GHz to 2.7GHz (NCC Frequencies 2.5025~2.6875GHz )
Standards
• • • • IEEE 802.16e-2005
Interface RF/Antenna
選擇”安裝”開始安裝。
軟體會自行安裝, 使用者可透過狀態檢示安裝進度。
D-Link DWM-110 User Manual
6
Chapter 3 – DWM Series WiMAX Utility 如果您的電腦跳出該視窗, 請按”繼續安裝”
請選擇”自動安裝軟體”, 並按”下一步” 繼續
請選擇”自動安裝軟體”, 並按”下一步” 繼續 D-Link DWM-110 User Manual 完成上述步驟後, 如果電腦仍出現”新增硬體精靈”畫面, 請依上述說明完成設定。 7
Authentication
Support PKMv2 protocol, EAP-based authorization, EAP-TLS, EAP-TTLS.
Mode
Support TDD (Time Division Duplex) mode
Utility
• Device drivers: Windows XP/Vista
Table of Contents
Introduction ...........................................................1 包裝內容.............................................................2 系統規格的要求..................................................2 產品特色.............................................................2 硬體簡介.............................................................3 硬體安裝.............................................................4 開始之前.............................................................4 DWM-110 WiMAX 連結工具..................................5 Installing the Utility .............................................5 WiMAX 連結工具軟體........................................ 9 使用者登入 User Login ................................... 9 設備資訊 Device Information ....................... 11 會員服務 Service 幫助說明 Help............................................... 11 Technical Specifications..................................... 12 Warning Statement............................................. 13
Chapter 3 – DWM Series WiMAX Utility
軟體會自動尋找 DWM-110 網路卡, 完成後選擇"啟動 WiMAX 工具"後, 按”下一步”繼續
完成安裝後, 工具列會出現 MTW 工具軟體(如下圖) 您可以點擊兩次 M-Taiwan 圖示啟動 WiMAX 工具軟體
D-Link DWM-110 User Manual
D-Link DWM-110 User Manual
12
Appendix B – Technical Specifications
Warning Statement
Federal Communication Commission Interference Statement This equipment has been tested and found to comply with the limits for a Class B digital device, pursuant to Part 15 of the FCC Rules. These limits are designed to provide reasonable protection against harmful interference in a residential installation. This equipment generates, uses and can radiate radio frequency energy and, if not installed and used in accordance with the instructions, may cause harmful interference to radio communications. However, there is no guarantee that interference will not occur in a particular installation. If this equipment does cause harmful interference to radio or television reception, which can be determined by turning the equipment off and on, the user is encouraged to try to correct the interference by one of the following measures: Reorient or relocate the receiving antenna. Increase the separation between the equipment and receiver. Connect the equipment into an outlet on a circuit different from that to which the receiver is connected. Consult the dealer or an experienced radio/TV technician for help.