TinyOS学习笔记讲解
TinyOS入门共16页文档

– docs.tinyos/tinywiki/index.php/TinyOS_Tutorial s
2
安装
• 多种安装方法,参看 docs.tinyos/tinywiki/index.php/Gettin g_started_%282.1%29
TinyOS入门(1)
胡四泉
What?
• An operating system for low power, embedded, wireless devices
– Wireless sensor networks (WSNs) – Sensor-actuator networks – Embedded robotics
• 在本实习中,在WindowsXP上用 VMPlayer运行XubunTOS虚拟机
安装启动步骤
• 安装VMPlayer • 解压xubuntos-2.1-vm.tar.gz到E盘根目录,确认
E:\Xubuntos 2.1目录下包含虚拟机文件Xubuntos 2.1.vmx • 运行VMPlayer • 在VMPlayer中打开Xubuntos 2.1.vmx • 如果系统询问你虚拟机是move还是copy来的,选择 copy; • 如果内存不足,系统建议你reduce memory请accept • 等待Xubuntos启动完成 • 输入用户名xubuntos 密码tinyos • 使用Ctrl+Alt+Enter组合键在虚拟机与WindowsXP间切 换
观察程序结构
• make telosb docs
Thanks! Go Ahead! Good Luck!
第3讲-第二章 TinyOS入门
• 规范
– nesC应用程序由一个或多个组件连接而成。 – 一个组件可以提供或使用接口:
第5章(503)
11
第5章 TinyOS应用开发
用户接口组件 SerialActiveMessageC UartStream StdControl SerialActiveMessageC Receive Send
分派组件 SerialDispatcherC ReceiveBytePacket SendBytePacket 协议组件 SerialP SerialFrameComm 编码/装帧组件 HdlcTranslateC UartStream 原始组件 PlatformSerialC StdControl
5
第5章 TinyOS应用开发 【代码5-1】 HplCC2530UartP.nc module HplCC2530UartP { //串口初始化接口 provides interface Init as Uart0Init; //TX控制接口 provides interface StdControl as Uart0TxControl; //RX控制接口 provides interface StdControl as Uart0RxControl; //串口发送接收设置接口 provides interface HplCC2530Uart as HplUart0; uses interface McuPowerState; }
TinyOS的编程方法:包括在TinyOS开发过程中所使用的
与平台相关的硬件资源的编程方法以及与平台相关的应用编程 方法。 TinyOS特殊的实例编程:包括基于CC2530的串口通信、 无线射频的点对点通信和CC2530芯片ADC的信息采集。
yOS编程方法
} }
implementation
{ uint8_t m_send_buf[100]; { strcpy(m_send_buf,"qing dao dong he xin xi "); //通过UartStream.send可以发送字节数据 call UartStream.send(m_send_buf, strlen(m_send_buf)); }
TinyOS操作系统开发技术及实践(西电版)第3章 TinyOS体系结构

第3章 TinyOS体系结构
硬件抽象架构
平台无关的硬件接口
硬件接口层
平台相关的应用程序
硬件适配层
软、硬件分割
硬件表示层 硬件
图3-2 硬件抽象架构
8
第3章 TinyOS体系结构
3.2.2 硬件表示层 硬件表示层(Hardware Presentation Layer,以下简称HPL)
由一系列组件组成,该层组件直接位于硬件与软件的接口之间。 该层组件访问硬件的一般方法是通过内存或I/O映射,并且硬 件可以通过中断信号来请求服务。
第3章 TinyOS体系结构
第3章 TinyOS体系结构
3.1 概述 3.2 硬件抽象组件 3.3 综合硬件组件 3.4 高层软件组件 3.5 任务调度 3.6 系统启动顺序 3.7 跨平台应用 小结
1
第3章 TinyOS体系结构
3.1 概述
TinyOS操作系统采用组件式结构,是一个基于事件的系 统。系统本身提供了一系列的组件供用户调用,其体系结构如 图3-1所示。
16
第3章 TinyOS体系结构
async command void Port01.makeInput() { P0SEL &= ~_BV(1); P0DIR &= ~_BV(1);}
async command bool Port01.isInput() { return ~(P0DIR&_BV(1)); }
HPL组件提供的接口完全由平台的硬件模块本身功能决定。 因此HPL组件和硬件的紧密联系会降低组件设计和实现的自由 度。尽管每个HPL组件和底层硬件都是独一无二的,但这些组 件都有类似的大体结构。为了能够和硬件抽象架构的其余部分 更加完美地结合起来,每个HPL组件都应该具备以下几个功能:
tinyOS操作系统整理

前言 (3)编程小贴士 (3)链接和命名空间 (6)3.1 C (6)3.2 C++ (9)3.3 Java (11)3.4 组件与接口 (11)3.5 Why? (13)接口和模块 (15)4.1 Split Phase (15)4.2带参数的接口 (16)4.3模块的实现 (17)4.4 Tasks(任务) (19)4.5 Concurrency并发 (23)4.6 Allocation (31)Configurations and Wiring (35)5.0.1 The as keyword and other namespace tricks (39)5.1 Pass Through Wiring (41)5.1.1 Multiple Wirings, Fan-in, and Fan-out 多串联,扇入,扇出。
(42)5.2 Combine Functions (44)Parameterized Wiring (46)6.1 Defaults (50)6.2 unique() and uniqueCount() (51)第一章前言这本书介绍了如何在TinyOS 2.0(T2)下编程。
它比之前的指导性的文章更为深入些,而且还涉及到一些额外的主题,例如radio stacks的结构及其实现和一些现存的TinyOS 库。
这本书关注于如何编写nesC代码,以及解释那些nesC和TinyOS设计模式背后的概念和原理。
如果你想很快速的了解如何进行TinyOS编程,你可以先阅读指导(tutorials).如果你对TinyOS的某个子系统很感兴趣,你可以参阅TEPs(TinyOS Enhancement Proposals),它详细阐述了相应的设计,接口和组件。
这些都可以在TinyOS的发布目录下找到。
虽然本书的一些内容仍然适用于TinyOS 1.x的版本,但1.x的版本与T2版本的不同还是会导致不同编程实践。
TinyOS学习报告2
西安电子科技大学软件学院TinyOS 学习报告第二周报告学院:软件学院 姓名:刘佳 日期:2009/12/31本周主要学习了:Lesson 8 Resource Arbitration and Power ManagementLesson 11 TOSSIM Lesson 12 Network Protocols Dissemination and Collection (Old Link) Dissemination Tymo Deluge T2 BLIP Tutorial Lesson 13 TinyOS Toolchain Lesson 15 The TinyOS printf LibraryLesson 8本课主要介绍了TinyOS资源仲裁(resource arbitration)以及电源管理模型。
一、引言1. TinyOS有三种不同的资源抽象(resource abstraction): 专用的(dedicated), 虚拟 化的(virtualized)和共享的(shared)。
2. 专用抽象:代表一种资源,它的子系统总是需要互斥存取。
这种类型的资源 提供 AsyncStdControl,StdControl 或者 SplitControl 接口中的一种控制他们的电 源状态。
3. 虚拟抽象:通过软件虚拟化隐藏相互间多个客户。
虚拟资源的电源状态进行自动控制。
4. 当一个资源总是被单个组件控制,则专用抽象将很有用;当用户想用一个简 单的方式分享资源而进行全局的控制,则虚拟抽象很有用。
5. 分享资源 ①分享资源的一个例子:总线 ②在 TinyOS 中, 一个资源仲裁者负责一个共享资源在不同用户之间的多路复 用。
③分享资源本质上是建立在专用资源的基础上,它的访问权限由一个仲裁组 件来控制。
④分享资源配置:共享资源抽象给用户提供的接口仅有 Resource 和 ResourceRequested 接口。
message_t(Tinyos系统知识点介绍)
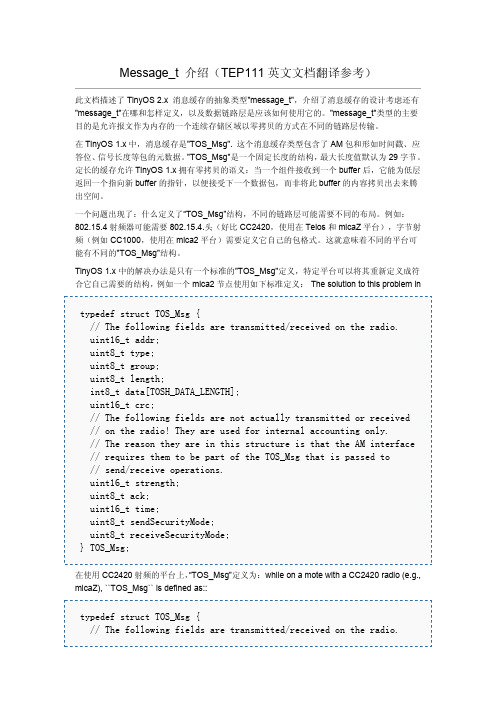
Message_t介绍(TEP111英文文档翻译参考)此文档描述了TinyOS2.x消息缓存的抽象类型"message_t",介绍了消息缓存的设计考虑还有"message_t"在哪和怎样定义,以及数据链路层是应该如何使用它的。
"message_t"类型的主要目的是允许报文作为内存的一个连续存储区域以零拷贝的方式在不同的链路层传输。
在TinyOS1.x中,消息缓存是"TOS_Msg".这个消息缓存类型包含了AM包和形如时间戳、应答位、信号长度等包的元数据。
"TOS_Msg"是一个固定长度的结构,最大长度值默认为29字节。
定长的缓存允许TinyOS1.x拥有零拷贝的语义:当一个组件接收到一个buffer后,它能为低层返回一个指向新buffer的指针,以便接受下一个数据包,而非将此buffer的内容拷贝出去来腾出空间。
一个问题出现了:什么定义了“TOS_Msg”结构,不同的链路层可能需要不同的布局。
例如:802.15.4射频器可能需要802.15.4.头(好比CC2420,使用在Telos和micaZ平台),字节射频(例如CC1000,使用在mica2平台)需要定义它自己的包格式。
这就意味着不同的平台可能有不同的"TOS_Msg"结构。
TinyOS1.x中的解决办法是只有一个标准的"TOS_Msg"定义,特定平台可以将其重新定义成符合它自己需要的结构,例如一个mica2节点使用如下标准定义:The solution to this problem intypedef struct TOS_Msg{//The following fields are transmitted/received on the radio.uint16_t addr;uint8_t type;uint8_t group;uint8_t length;int8_t data[TOSH_DATA_LENGTH];uint16_t crc;//The following fields are not actually transmitted or received //on the radio!They are used for internal accounting only.//The reason they are in this structure is that the AM interface //requires them to be part of the TOS_Msg that is passed to//send/receive operations.uint16_t strength;uint8_t ack;uint16_t time;uint8_t sendSecurityMode;uint8_t receiveSecurityMode;}TOS_Msg;在使用CC2420射频的平台上,“TOS_Msg”定义为:while on a mote with a CC2420radio(e.g., micaZ),``TOS_Msg``is defined as::typedef struct TOS_Msg{//The following fields are transmitted/received on the radio.uint8_t length;uint8_t fcfhi;uint8_t fcflo;uint8_t dsn;uint16_t destpan;uint16_t addr;uint8_t type;uint8_t group;int8_t data[TOSH_DATA_LENGTH];//The following fields are not actually transmitted or received //on the radio!They are used for internal accounting only.//The reason they are in this structure is that the AM interface //requires them to be part of the TOS_Msg that is passed to//send/receive operations.uint8_t strength;uint8_t lqi;bool crc;uint8_t ack;uint16_t time;}TOS_Msg;这个方法存在2个基本问题。
Lesson 5.1 tinyos 教程
Lesson 5.1 SensingThis lesson introduces sensor data acquisition in TinyOS. It demonstrates two sensor applications: a simple application called Sense that periodically takes sensor readings and displays the values on the LEDs. And a more sophisticated application called Oscilloscope where nodes periodically broadcast their sensor readings to a basestation node. Using the Mote-PC serial communication described in the previous lesson the basestation forwards the sensor readings to the PC, where they are visualized with a dedicated graphical user interface.IntroductionSensing is an integral part of sensor network applications. In TinyOS 1.x sensing was syntactically connected with analog-to-digital converters (ADCs): TinyOS 1.x applications such as Oscilloscope or Sense used the ADC and ADCControl interfaces to collect sensor data. When new platforms appeared with sensors that were read out via the serial interface, not only did additional interfaces like ADCError have to be introduced, but it became clear that equating a sensor with an ADC was not always the appropriate thing to do. Usually sensing involves two tasks: configuring a sensor (and/or the hardware module it is attached to, for example the ADC or SPI bus) and reading the sensor data. The first task is tricky, because a sensing application like, for example, Sense is meant to run on any TinyOS platform. How can Sense know the configuration details (like ADC input channel, the required reference voltage, etc.) of an attached sensor? It can't, because the configuration details of sensors will be different from platform to platform. Unless Sense knows about all sensors on all platforms it will be unable to perform the configuration task. However, the second task - reading the sensor data - can be solved so that the Sense application can collect sensor data even though it is agnostic to the platform it is running on. In TinyOS 2.0 platform independent sensing applications such as Oscilloscope, Sense or RadioSenseToLeds do not use configuration interfaces like ADCControlanymore; instead they use the standard data acquisition interfaces Read, ReadStream or ReadNow for collecting sensor data. All configuration details are hidden from the application and this is why you can compile Sense and display sensor data on the telosb or the micaz platform, even though the actual sensors and their connection to the rest of the system may be completely different. This raises questions like the following: Since the Sense application component only uses standard data acquisition interfaces who is in charge ofdefining which sensor it samples? If the Sense application component is not configuring the sensor, then who is responsible for that? How can an applications like Sense display sensor data when they do not know the details about sensorconfiguration? This includes questions like "what is the value range of the sensor data" or "is a temperature reading to be interpreted in degrees Celsius or Fahrenheit"? Let's assume there are several sensors on a platform: what steps have to be taken to let the Sense orOscilloscope application display data from a different sensor? After reading this tutorial you should be able to answer these questions. Using the Sense and Oscilloscope application as an example, the following sections explain how the data acquisition interfaces are used, how the configuration procedure works and, as an example, how Sense can be hooked up to sensors other than the default one on thetelosb platform.The Sense applicationSense is a simple sensing demo application. It periodically samples the default sensor and displays the bottom bits of the readings on the LEDs. The Senseapplication can be found in tinyos-2.x/apps/Sense. Let's first look at the SenseAppC.nc configuration:configuration SenseAppC { } implementation { components SenseC, MainC, LedsC, new TimerMilliC(); components new DemoSensorC() as Sensor;SenseC.Boot -> MainC; SenseC.Leds -> LedsC; SenseC.Timer -> TimerMilliC; SenseC.Read -> Sensor; }The SenseAppC configuration looks similar to the BlinkAppC configuration described in lesson 1 (if you have not done so, read the sections on the Blink application in lesson 1). To understand the wiring let's look at the signature of the SenseC.nc module:module SenseC { uses { interface Boot; interface Leds;interface Timer<TMilli>; interface Read<uint16_t>; } }Like the BlinkC.nc module the SenseC.nc module uses the interfaces Boot, Leds and Timer<TMilli>. Additionally, it uses the Read<uint16_t> interface. The sequence of actions in the SenseC.nc implementation is as follows: SenseC.nc uses the Boot interface to start a periodic timer after the system has been initialized. Every time the timer expires SenseC.nc is signalled a timer event and reads data via the Read<uint16_t> interface. Reading data is a split-phase operation, it is divided in a command Read.read() and an event Read.readDone(). Thus every time the timer expires SenseC.nc calls Read.read() and waits for the Read.readDone() event. When data is signalled in the Read.readDone() event SenseC.nc displays it on the leds: the least significant bit is displayed on LED 0 (0 = off, 1 = on), the second least significant bit is displayed on LED 1 and so on. The Read interface (in tinyos-2.x/tos/interfaces) can be used to read a single piece of sensor data, let's look at it in detail:interface Read<val_t> { /** * Initiates a read of the value. * * @return SUCCESS if a readDone() event will eventually come back. */ command error_t read();/** * Signals the completion of the read(). * * @param result SUCCESS if the read() was successful * @param val the value that has been read*/ event void readDone( error_t result, val_t val ); }If you are not familiar with generic interfaces you will wonder what the meaning of <val_t> (in the first line) is and why the signature of SenseC.nc is using Read<uint16_t>. What you see above is a generic interface definition, because the Read interface takes a type parameter. Generic interfaces are explained in the nesC Language Reference Manual (version 1.2 and above). For now it is enough to know that generic interfaces have at least one type parameter and two components can be wired together only if they provide/use the interface with the same types (note that the readDone event passes a parameter of the <val_t> parameter, which is a placeholder for the actual data type). This means that since SenseC.nc is using the uint16_t variant of theRead interface, it can only be wired to a component that provides the Read<uint16_t> interface and thus SenseC.nc expects to read 16 bit unsigned integer sensor data. If you tried to wire SenseC.nc to a component that provides, for example, a Read<uint8_t> interface you would get an error from the nesC compiler. Recall that the wiring is defined in the SenseAppC.nc configuration. Let's again take a look at which component SenseC.nc is wired to using theRead<uint16_t> interface in the SenseAppC configuration. The interesting lines arecomponents new DemoSensorC() as Sensor;andSenseC.Read -> Sensor;This means that the generic DemoSensorC component provides the Read<uint16_t> interface to SenseC.nc It is important to understand that the SenseC.nc module has no way of telling which sensor it is connected to; in fact it cannot even tell whether it is getting data from a sensor at all, because it can be wired to any component that provides a Read<uint16_t> interface. On a platform without any built-in sensors (like micaz) and no attached sensorboard the DemoSensorC component could simply return constant values. The last sentence hints that theDemoSensorCcomponent is different for every platform: therefore you will not find DemoSensorC.nc in the TinyOS libraries. Instead, a different DemoSensorC.nc has to be written for every platform, i.e. the DemoSensorC.nc implementation for telosb will be different than the DemoSensorC.nc implementation for micaz. This is the answer to the first question asked in the introduction section: the platform dependent DemoSensorC component defines which sensor the Sense or Oscilloscopeapplication is sampling and every platform that wants to run sensing applications such as Oscilloscope, Sense or RadioSenseToLeds has to provide its own version of DemoSensorC. Additionally, sensor boards may come with their own version of DemoSensorC (e.g., the basicsb sensorboard for the mica-family of motes define DemoSensorC.nc to be that board's light sensor).The DemoSensorC componentLet's take a closer look at the DemoSensorC component. Every DemoSensorC component has the following signature:generic configuration DemoSensorC() { provides interface Read<uint16_t>; }In its implementation section, however, DemoSensorC may differ from platform to platform. For example, on the telosb platform DemoSensorC instantiates a component called VoltageC, which reads data from the MCU-internal voltage sensor. Because the micaz doesn't have any built-in sensors its DemoSensorC uses system library component like ConstantSensorC or SineSensorC, which return "fake" sensor data. Thus DemoSensorC is a means of indirecting sensor data acquisition from a platform-specific sensor component (like VoltageC) to platform-independent applications like Sense or Oscilloscope. Usually the configuration of a sensor is done in the component that DemoSensorC instantiates. How can Sense be changed to sample a sensor other than the platform's default sensor? Usually this requires changing only a single line of code inDemoSensorC; for example, if you wanted to replace the VoltageC component on telosb by the constant sensor component ConstantSensorC you could change the following line in DemoSensorC from:components new VoltageC() as DemoSensor;to something likecomponents new ConstantSensorC(uint16_t, 0xbeef) as DemoSensor;What sensors are available depends on the platform. Sensor components are usually located in the respective platform subdirectory (tinyos-2.x/tos/platforms), in the respective sensorboard subdirectory(tinyos-2.x/tos/sensorboards) or, in case of microprocessor-internal sensors, in the respective chips subdirectory (tinyos-2.x/tos/chips). ConstantSensorC and SineSensorC can be found in tinyos-2.x/tos/system.Running the Sense applicationTo compile the Sense application, go to the apps/Sense directory and depending on which hardware you have, type something similar to make telosb install. If you get errors such as the following,SenseAppC.nc:50: component DemoSensorC not found SenseAppC.nc:50: component `DemoSensorC' is not generic SenseAppC.nc:55: no matchyour platform has not yet implemented the DemoSensorC component. For a quick solution you can copy DemoSensorC.nc from tinyos-2.x/tos/platforms/micaz to your platform directory (a good starting point on how to createsensor components is probably TEP 101 and TEP 114). If you have a mica-family mote and a "basic" (mda100) sensor board, you can get a more interesting test by compiling with SENSORBOARD=basicsb make platform installto run Sense using the mda100's light sensor. Once you have installed the application the three least significant bits of the sensor readings are displayed on the node's LEDs (0 = off, 1 = on). It is the least significant bits, because Sense cannot know the precision (value range) of the returned sensor readings and, for example, the three most significant bits in a uint16_t sensor reading sampled through a 12-bit ADC would be meaningless (unless the value was left-shifted). If your DemoSensorC represents a sensor whose readings are fluctuating you may see the LEDs toggle, otherwise Sense is not very impressive. Let's take a look at a more interesting application: Oscilloscope.The Oscilloscope applicationOscilloscope is an application that let's you visualize sensor readings on the PC. Every node that has Oscilloscope installed periodically samples the default sensor via ( DemoSensorC) and broadcasts a message with 10 accumulated readings over the radio. A node running the BaseStation application will forward these messages to the PC using the serial communication. To run Oscilloscope you therefore need at least two nodes: one node attached to your PC running the BaseStation application (BaseStation can be found at tinyos-2.x/apps/BaseStation and was introduced in the previous lesson) and one or more nodes running the Oscilloscope application. Let's take a look at the OscilloscopeAppC.nc configuration:configuration OscilloscopeAppC { } implementation { components OscilloscopeC, MainC, ActiveMessageC, LedsC, new TimerMilliC(), new DemoSensorC() as Sensor, new AMSenderC(AM_OSCILLOSCOPE), new AMReceiverC(AM_OSCILLOSCOPE);OscilloscopeC.Boot -> MainC;OscilloscopeC.RadioControl -> ActiveMessageC; OscilloscopeC.AMSend -> AMSenderC; OscilloscopeC.Receive -> AMReceiverC; OscilloscopeC.Timer -> TimerMilliC; OscilloscopeC.Read -> Sensor; OscilloscopeC.Leds -> LedsC; }The actual implementation of the application is in OscilloscopeC.nc. This is the signature of OscilloscopeC.nc:module OscilloscopeC { uses { interface Boot; interface SplitControl as RadioControl; interface AMSend; interface Receive; interface Timer; interface Read; interface Leds; } }Oscilloscope is a combination of different building blocks introduced in previous parts of the tutorial. Like Sense, Oscilloscope uses DemoSensorC and a timer to periodically sample the default sensor of a platform. When it has gathered 10 sensor readings OscilloscopeC puts them into a message and broadcasts that message via the AMSend interface. OscilloscopeC uses the Receive interface for synchronization purposes (see below) and the SplitControl interface, to switch the radio on. If you want to know more about mote-mote radio communication read lesson 3.Running the Oscilloscope applicationTo install the Oscilloscope application go to tinyos-2.x/apps/Oscilloscope and depending on which hardware you have, type something similar to make telosb install,1. Note the ",1" after the install option, which assigns ID 1 to the node. Assigning IDs to nodes is helpful to differentiate them later on in the GUI, so make sure you assign different IDs to all nodes on which Oscilloscope is installed (e.g. install Oscilloscope on a second node with make telosb install,2 and so on). A node running Oscilloscope will toggle its second LED for every message it has sent and it will toggle its third LED when it has received an Oscilloscope message from another node: incoming messages are used for sequence number synchronization to let nodes catch up when they are switched on later than the others; they are also used for changing the sample rate that defines how often sensor values are read. In case of a problem with the radio connection the first LED will toggle. Install BaseStation on another node and connect it to your PC. As usual, on the BaseStation node you should see the second LED toggle for every message bridged from radio to serial.Running the Java GUITo visualize the sensor readings on your PC first go to tinyos-2.x/apps/Oscilloscope/java and type make. This creates/compiles the necessary message classes and the Oscilloscope Java GUI. Now start a SerialForwarder and make sure it connects to the node on which you have installed the BaseStation application (how this is done is explained in the previous lesson). In case you have problems with the Java compilation or the serial connection work through the previous lesson. Once you have a SerialForwarder running you can start the GUI by typing ./run (in tinyos-2.x/apps/Oscilloscope/java). You should see a window similar to the one below:Each node is represented by a line of different color (you can change the color by clicking on it in the mote table). The x-axis is the packet counter number and the y-axis is the sensor reading. To change the sample rate edit the number in the "sample rate" input box. When you press enter, a message containing the new rate is created and broadcast via the BaseStation node to all nodes in the network. You can clear all received data on the graphical display by clicking on the "clear data" button. The Oscilloscope (or Sense) application displays the raw data as signalled by the Read.readDone() event. How the values are to be interpreted is out of scope of the application, but the GUI let's you adapt the visible portion of the y-axis to a plausible range (at the bottom right).。
TinyOS操作系统开发技术及实践 第5章
在HplCC2530UartP文件中对串口进行初始化,并且设置 了用户所需要的波特率。在本节内容中,将波特率设置为 57600,具体代码如代码5-2所示。
【代码5-2】 HplCC2530UartP.nc /*串口的初始化*/ command error_t Uart0Init.init() { //采用串口备用位置1 PERCFG &= ~0x01; //选择P0口作为串口 P0SEL = 0x3c; // 0011 1100 //采用UART模式,接收使能 U0CSR |= 0x80 | 0x40; /*串口波特率的设置采用57600*/ U0GCR = 0x0b; U0BAUD = 216; return SUCCESS; }
编码/装帧组件 HdlcTranslateC
UartStream
原始组件 PlatformSerialC
StdControl
图5-3 串口组件关系
1. 原始串口组件 在TinyOS 2.x版本中原始串口组件为串口的硬件接口层组 件,位于平台目录tos/platforms下。一般情况此组件的命名与 平台相关,不同的平台命名方式不同。本书以mytinyos平台为 例讲解。 原始串口组件在mytinyos平台中名为PlatformSerialC,其 位于“mytinyos\tos\platforms\ cc2530”目录下。在项目的开发 过程中,可以调用此组件通过串口直接将硬件平台的数据输出 至PC机,即数据并没有被TinyOS封装成串口数据帧格式。此 组件提供的接口如代码5-3所示。
此任务中需要完成以下工作: 首先在“mytinyos/apps”目录下新建一个名为DhSerial的文 件夹。 其次,在DhSerial文件夹创建顶层配件DhSerialAppC,核 心应用模块命名为DhSerialC.nc,在核心应用模块组件中使用 PlatformSerialC中的接口进行串口传输。 最后编写Makefile文件。 编译程序,下载至设备中,连接串口,观察现象。 (1) 创建DhSerial文件夹。 打开Cygwin,在“mytinyos/apps”目录下,输入mkdir DhSerial,创建文件夹,具体操作如图5-4所示。
KC06121301-q02-TinyOS基础知识.

医疗监控
TinyOS应 用领域
个人局域网
环境监控
智能家居
8
TinyOS 基础知识
小 结
9
*
通过本节课的学习要了解TinyOS的基本概念,应用领域,重点掌握TinyOS系统特点
专为无线传感器网络设计 采用NesC编写 功耗低 系统小 构架基于构件 开源系统 拥有多种协议
TinyOS 基础知识
TinyOS系统 特点
10
TinyOS 基础知识
谢谢关注!
11
无线组网技术
TinyOS 基础知识
TinyOS基础知识
1
无线组网技术
TinyOS 基础知识
应用领域
3
基本概念
1
系统特点
2
目录
2
无线组网技术
TinyOS 基础知识
1.基本概念
3
*
TinyOS 基础知识
TinyOS是UC Berkeley(加州大学伯克利分校)开发的开放源代码操作系统,专为嵌入式 无线传感网络设计。
4
无线组网技术
TinyOS 基础知识
2.系统特点
5
*
无线组网技术
TinyOS 基础知识
拥有多种协议
专为无线传感 器网络设计
开源系统
TinyOS 系统特点
采用NesC编写
基于构件
功耗低 系统小
6
无线组网技术
TinyOS技术
TinyOS 基础知识
传感器网络 普适计算
TinyOS学习笔记1
TinyOS学习笔记1-TinyOS安装1、Ubuntu系统的安装安装TinyOS可以在Windows中利用Cygwin进行安装,经过测试在XP中可以正确安装,但是安装的步骤过于麻烦,可以参考官方网站的安装步骤。
在Win7中安装后有问题,不能正确编译。
因此最好使用Linux系统来安装TinyOS,安装过程简单。
安装Ubuntu系统1.Ubuntu的官方网站下载iso镜像,我安装的是10.04版本2.可以有两种方式进行Ubuntu安装。
(1)传统方式安装:在系统中划分出空闲分区,利用U盘制作启动盘,官网有,可下载。
重启系统选择U盘启动。
进行安装。
(2)wubi方式进行安装:以文件形式进行安装,下载wubi,将镜像与wubi放于同一文件夹。
点击wubi进行安装。
3.更新Ubuntu更行Ubuntu时需要注意,更新时grub不更新。
利用wubi安装,我选择了更新grub,重新启动系统出现错误。
解决方法如下:1.另一台电脑,到Ubuntu网站下载镜像,安装到U盘中,制作启动盘。
2.开机,选择从U盘启动,在Boot里设置不好使,像我的ASUS A8,开机按ESC,选择U盘启动。
3.看到Ubuntu的欢迎界面,选择第一项,进入U盘中的Ubuntu系统。
4.在终端中,输入sudo apt-get install lilosudo lilo -M /dev/SD a mbr5.重启系统,问题解决4.使用root登录系统2、在Ubuntu系统下安装TinyOS我安装的时TinyOS2.1.1,安装过程参考TinOS官网的安装指导,但有问题,具体步骤如下:1)在系统的“/etc/apt/sources.list”中,添加如下代码:deb /tinyo ... lt;distribution> main<distribution>可以为(edgy,feisty,gutsy,hardy,jaunty,k ARM ic,lucid)例如 deb /tinyos/dists/ubuntu hardy main以上的源可能有问题,在安装是提示tinyos-2.1.1依赖的包找不到或无法安装,更新源如下解决此问题:deb /tinyos/dists/ubuntu hardy maindeb /tinyos oneiric main2)更新知识库,打开终端,输入sudo apt-get update3)安装TinyOSsudo apt-get install tinyos提示可选的tinyos的版本,选择最新的版本2.1.1sudo apt-get install tinyos-2.1.14)设置环境变量在~/.bashrc或者~/.profile中加入如下代码#Sourcing the tinyos environment variable setup scriptsource /opt/tinyos-2.1.1/tinyos.sh可用如下方法打开~/.bashrc或者~/.profilegedit ~/.bashrc添加成功后需要重新启动终端5)测试是否安装成功cd /opt/tinyos-2.1.1/apps/Blink/(若当前文件夹没有权限创建文件,将Blink复制到当前用户的目录进行运行)make telosb显示如下则安装成功:mkdir -p build/telosbcompiling BlinkAppC to a telosb binaryncc -obuild/telosb/main.exe -Os-O -mdisable-hwmul -fnesc-separator=__ -Wall -Wshadow -Wnesc-all-target=telosb -fnesc-cfile=build/telosb/app.c -board=-DDEFINED_TOS_AM_GROUP=0x22-DIDENT_APPNAME=/"BlinkAppC/"-DIDENT_USERNAME=/"root/"-DIDENT_HOSTNAME=/"ubuntu/"-DIDENT_USERHASH=0xa3473ba6L-DIDENT_TIMESTAMP=0x4c566efbL-DIDENT_UIDHASH=0xd972ea96L BlinkAppC.nc -lmcompiled BlinkAppC to build/telosb/main.exe2648 bytes in ROM54 bytes in RAMMSP430-objcopy --output-target=ihexbuild/telosb/main.exe build/telosb/main.ihexwriting TOS imageTinyOS学习笔记2-TinyOS的IDE-Yeti23.测试TinyOS中的Toosim∙make micaz sim∙提示找不到python2.5∙查看本机python的版本,我的版本为2.6∙进入/opt/tinyos-2.1.1/support/make/sim.extra∙修改python的版本PYTHON_VERSION=2.6∙重新make micazsim∙提示*** Successfullybuilt micaz TOSSIM library.则可运行tossim。
TinyOS NesC小结
TinyOSTinyOS是一个开源的嵌入式操作系统,它是由加州大学的伯利克分校开发出来的,主要应用于无线传感器网络方面。
它是基于一种组件(Component-Based)的架构方式,使得能够快速实现各种应用。
TinyOS 的程序采用的是模块化设计,所以它的程序核心往往都很小(一般来说核心代码和数据大概在400 Bytes左右),能够突破传感器存储资源少的限制,这能够让TinyOS很有效的运行在无线传感器网络上并去执行相应的管理工作等。
TinyOS本身提供了一系列的组件,可以很简单方便的编制程序,用来获取和处理传感器的数据并通过无线电来传输信息。
TinyOS是一个开源的嵌入式操作系统,它是由加州大学的伯利克分校开发出来的,主要应用于无线传感器网络方面。
它是基于一种组件(Component-Based)的架构方式,使得能够快速实现各种应用。
TinyOS的程序采用的是模块化设计,所以它的程序核心往往都很小(一般来说核心代码和数据大概在400 Bytes左右),能够突破传感器存储资源少的限制,这能够让TinyOS很有效的运行在无线传感器网络上并去执行相应的管理工作等。
TinyOS本身提供了一系列的组件,可以很简单方便的编制程序,用来获取和处理传感器的数据并通过无线电来传输信息。
TinyOS在构建无线传感器网络时,它会有一个基地控制台,主要是用来控制各个传感器子节点,并聚集和处理它们所采集到的信息。
TinyOS只要在控制台发出管理信息,然后由各个节点通过无线网络互相传递,最后达到协同一致的目的,比较方便。
1. tinyos和普通的os的不同点它们的应用场景不一样,tinyos是一个开源的构件化操作系统,它采用构件化描述语言nesC进行开发,主要针对资源非常有限的无线传感器网络节点而设计。
与一般的嵌入式操作系统相比,TinyOS有其自身的特点:采用模块化设计,所以核心尺寸小(一般来说核心代码和数据大概在400Bytes左右),可突破无线传感器网络存储资源少的限制;基于可重用组件的体系结构;使用事件驱动模型,通过事件触发来唤醒CPU工作;单一任务栈;内核非常简单,甚至在严格意义上说,称不上内核;没有进程管理和虚拟存储。
TinyOS学习报告

西安电子科技大学软件学院TinyOS学习报告第一周报告学院:软件学院姓名:日期:2009/12/24TinyOS的安装:在windows系统中安装TinyOS-2.0需要以下六个步骤:第一步是安装java jdk 1.5;第二步是安装cygwin;第三步是安装avr单片机工具或者MSP430工具;第四步是安装nesc和tinyos-tool;第五步是安装tinyos-2.0;第六步是配置环境变量;本周主要学习了:TinyOS Documentation Wiki—Starting with TinyOS—Tutorials中的几个Lesson:Lesson 1 Getting Started with TinyOSLesson 2 Modules and the TinyOS Execution ModelLesson 3 Mote-mote radio communicationLesson 4 Mote-PC serial communication and SerialForwarderLesson 5 SensingLesson 6 Boot SequenceLesson 7 StorageLesson 1一、TinyOS中一些主要概念:组件、模块、配置以及接口1. 任何一个nesC 应用程序都是有一个或多个组件链接起来。
组件提供(provide)并使用(use)接口。
接口声明了一组函数,称为命令(command),接口的提供者必须实现它们;还声明了另外一组函数,称为事件(event),接口的使用者必须实现它们。
2. 组件有两种类型:模块:提供一个或多个接口的实现配置:装配其他组件并使组件之间的接口相连3. 每个nesC 应用程序都由一个顶级配置所描述4. 为什么要区分模块和配置?为使设计者构建应用程序时能从实现细节中摆脱出来Q:一个配置可以使用和提供接口。
是不是使用或提供接口的配置就不能为顶级配置,而没有使用和提供接口的配置就一定是顶级配置?二、怎样编译一个TinyOS程序以及安装到平台上1.检查环境安装正确与否:tos-check-env2. 查看ncc版本:ncc --version3.使用“make”编译TinyOS应用程序,如:make micaz。
TinyOS学习笔记作者:幽暗天琴
TinyOS学习笔记1---入门当我们uses某接口时,那么该接口下的所有command和event都可以调用。
在一些情况下,组件也可以provides和usesCommand。
同样的provides的组件要实现command的函数内容。
配置文件现在,我们已经知道某些组件提供的接口,但,仅仅通过这还不足以访问这个组件。
如果a,b同时都提供了一个接口c,那么,当组件d访问c接口时访问的到底是a还是b呢?所以配置文件就产生了,它的目的就是声明你要访问的组件名称,并且将它所提供的接口与你想要使用的接口相连接。
配置文件的构成配置文件configuration首先声明了其应用程序下的组件,关键字:components.声明了组件之后,通过->可以将两个组件的接口连接起来。
Main.StdControl -> BlinkM.StdControl;这段代码就是把组件main和blinkm的stdcontrol连接起来,这样,就建立了两个组件之间的联系。
当调用main.stdcontrol的时候就相当于调用了blinkm.stdcontrol。
关键字-> 永远是将一个使用(uses)的接口(左边)于一个提供(provides)的接口(右边)相连接。
也就是说只有左边的组件能够调用右边的组件的接口。
反之则不可以。
并且该关键是一个多对多的关系,即一个组件可以连接到很多接口,反之一样配置文件还可以通过=关键字来进行接口之间的连接,=号表示两个接口之间的关系是等同的,类似于c语言中的指针。
=号两边可以是uses=pro 也可以是u=u ,p=p.注:配置文件中也可以使用或提供接口。
(后面有例子)配置文件和顶级配置文件一个程序中可以有多个配置文件,但一定要有一个顶级配置文件。
在tinyos中组件也是分层次的。
最底层的组件贴近硬件部分,是经过一层一层封装才有了上层的组件,封装的过程中就使用了配置文件。
而一个应用程序需要一个顶级配置文件,在所有其他的配置文件的更高一层,编译时会首先参照该文件进行编译。
第09章-TinyOS操作系统

TinyOS的内存管理采用完全静态分配内存的策略。虽然nesC语言 也支持指针操作,但TinyOS不采用动态分配内存策略。 首先,动态内存分配影响系统的稳定性,而完全的静态分配内存策 略增强了TinyOS系统的稳定性。 其次,静态分配内存简化了TinyOS管理内存的难度,提高了程序 运行的效率。
第三,静态分配内存提高了TinyOS对内存的使用率。动态内存分 配策略会因为内存碎片而使内存使用率降低。
1、协作式与抢占式OS
在操作系统的发展过程中,先后有2种形式的多 任务管理机制,即协作式与抢占式。 协作式:如果任务切换的时机完全取决于正在运 行的任务,那么这样的操作系统就是协作式多任务操 作系统。即任务执行时的权利比操作系统还大,只有 等正在运行的任务完成后,才会将控制权交给操作系 统,此时才能执行下一个任务。一旦某个任务运行出 错,则导致整个系统挂起(Pending)。 抢占式:如果任务优先运行的决定权取决于操作 系统,而且即使有一个任务死掉,而系统仍能正常工 作,那么这样的操作系统就是抢占式多任务操作系统 。
(4)任务和事件并发模式(Tasks And Events ConcurrencyModel)。任务之 间是平等的,即在执行时是按顺序先后来的,而不能相互抢占。事件用在对 于时间的要求很严格的应用中,而且它可以优先于任务执行。 (5)分段执行(Split-Phase Operations)。在TinyOS中由于任务之间不能互 相抢占执行,所以TinyOS没有提供任何阻塞操作,为了让一个耗时较长的操 作尽快完成,一般来说都是将对这个操作的需求和这个操作的完成分开来实 现,以便获得较高的执行效率。 (6)主动消息模式(active message)。每一个消息都维护一个应用层和处理 器,当目标节点收到这个消息后,就会把消息中的数据作为参数,传递给应 用层的处理器进行处理。应用层处理器一般完成消息数据的解包、计算处理 或发送响应消息等工作。 (7)基于可重用组件的体系结构,单一任务栈,内核非常简单,甚至在 严格意义上说,称不上内核,没有进程管理和虚拟存储。 这些特点使得TinyOS非常适合WSN的需求,所以它得到了广泛应用。
- 1、下载文档前请自行甄别文档内容的完整性,平台不提供额外的编辑、内容补充、找答案等附加服务。
- 2、"仅部分预览"的文档,不可在线预览部分如存在完整性等问题,可反馈申请退款(可完整预览的文档不适用该条件!)。
- 3、如文档侵犯您的权益,请联系客服反馈,我们会尽快为您处理(人工客服工作时间:9:00-18:30)。
第一篇基础知识TinyOS体系结构(1) 组件模型module & configurationTinyOS 是基于构件的微操作系统,采用事件驱动模型,有效的提高了系统的运行效率以及能源合理利用。
TinyOS 采用nesC 语言编写,其应用程序由一个或多个组件连接而成,而组件可以提供和使用接口,组件必须实现其所提供的command 接口,并且必须实现其连接组件中申明的事件event 接口。
接口是程序的实体,实现程序的各功能模块,分为command 和event ,command 接口由组件本身实现,而event 接口则由调用者实现,值得注意的是,接口是双向的,调用command 接口时必须实现其event 接口。
组件又可以细分为模块module 和配件。
模块亦可分为2个部分,其一,首先申明提供以及使用的接口,如module BlinkC { } 其二,在implementation 中模块包含各接口所提供的行为(方法),也包含仅供本模块内部使用的函数,以及申明本模块所具有的事件signal ,以及实现其连接或使用的event 。
implementation{uint8_t counter = 0;void ledctl() {call Leds.set(counter);}event void Boot.booted() {} event void Timer0.fired(){ledctl();}}配件configuration 也可以分为两个部分,和module 一样,第一部分是申明可以提供以及使用的接口。
第二部分implementation 中首先列出与其相连接模块的名称,使用components 标注连接的模块,然后对本配件提供的以及与其相对应模块使用以及提供的接口进行配线,如下例:{}implementation{BlinkC -> MainC.Boot; /////或者写作BlinkC.Boot -> MainC.Boot;BlinkC.Timer<TMilli> ->TimerMilliC;BlinkC.Leds -> LedsC;}在TinyOS 中存在很多中间配件,这些配件的特点是没有与之相对应的模块,其作用就是根据不同的条件将上层的连接转接到不同的模块上,如下例所示generic configuration AMSenderC(am_id_t AMId) { provides {interface AMSend; interface Packet;interface AMPacket;interface PacketAcknowledgements as Acks;}}implementation {#if defined(LOW_POWER_LISTENING)#else #endifAMSend = SenderC;Packet = SenderC;AMPacket = SenderC;Acks = SenderC;}接口文件相当于C 程序中头文件对函数的声明,接口文件一般放置于提供该接口的模块的同一目录下的interface 文件夹中,也可以放在TinyOS 根目录下的interface 目录中,其命名必须与模块中所提供接口名字相同,注意不是接口的实例化名称或nickname 。
如下例}注意:带有参数的接口在interface 中申明时不需要写出其接口参数,比如,上例中CC2420Registe 接口是带有参数的,而在模块中实现是则写成CC2420Registe [uint8_t addr]。
(2)接口interface接口是TinyOS功能实体,通过调用接口提供的方法完成某个具体任务。
在TinyOS中接口可以带有参数,用[]引人参数,接口也可以带有类型标志,用<>引入。
TinyOS中可能有多个组件提供同一个接口,比如Init接口,那么这样就会带来一个问题:当一个组件有多个用户使用时,他们分别都调用了同一个接口,当这个接口事件触发fire时,那么,应该由哪个组件来响应这个信号呢?TinyOS采用两种策略来解决这个问题:其一,多次实例化一个组件接口,这种方法在I/O上应用的最多,如下面代码configuration PlatformLedsC {provides {interface GeneralIO as Led0;interface GeneralIO as Led1;interface GeneralIO as Led2;}接口GeneralIO被实例化了3次,这样就可以分别操这3个接口了。
其二,TinyOS采用带参数的接口,允许一个组件提供多个接口实例。
比如module CC2420SpiP @safe() {provides {interface ChipSpiResource;interface Resource[ uint8_t id ];interface CC2420Fifo as Fifo[ uint8_t id ];interface CC2420Ram as Ram[ uint16_t id ];interface CC2420Register as Reg[ uint8_t id ];interface CC2420Strobe as Strobe[ uint8_t id ];}组件提供接口并实例化为带参数的接口,那么其他组件连接时,可以提供不同的id多次使用同一接口,比如SNOP = Spi.Strobe [ CC2420_INS_SNOP ];SIBUFEX = Spi.Strobe [ CC2420_INS_SIBUFEX ];SSAMPLECCA =Spi.Strobe [ CC2420_INS_SSAMPLECCA ];SXOSCON = Spi.Strobe [ CC2420_INS_SXOSCON ];其中Spi就是连接到上例组件的。
这样用起来也不是很方便,所以TinyOS由给出了可以产生唯一ID的常量函数函数。
nesC 现在有二种常量函数:unsigned int unique(char *identifier)返回值:如果程序包含n个有相同标示字符串的对unique的调用,每个调用返回一个0—n-1之间的无符号整数。
unsigned int uniqueCount(char *identifier)返回值:如果程序包含n个有相同标示字符串的对uniqueCount的调用,每个调用都返回n使用实例说明:HilTimerMilliC组件中声明了这一句:provides interface Timer[uint8_t id];表明它可以提供256 个Timer 接口的不同实例,每一个实例对应一个uint8_t 值!AppOneC.Timer -> HilTimerMilliC.Timer[unique("Timer")]; // 实例1AppTwoC.Timer -> HilTimerMilliC.Timer[unique("Timer")]; //实例2参数化接口允许一个组件通过赋予运行时或编译时参数从而提供一个接口的多个实例。
本例中,希望TinyOS 应用程序创建和使用多个定时器,且每个定时器都被独立管理。
例如,某个应用程序组件可能需要一个定时器以特定的频率(如每秒一次)来触发事件以收集传感器数据;同时另外一个组件需要另一个定时器以不同的频率来管理无线传输。
这些组件中每个Timer 接口分别与HilTimerMilliC中提供的Timer 接口的不同实例绑定起来,这样每个组件就可以有效地获取它自己“私有”的定时器了。
当然括号内的标识符一定要相同,否则不能保证调用多个unique()时得到的数是不重复的。
比如unique(“TIME”)和unique(“TIME”)会得到两个不同的随机数,但如果是unique(“TIME”)和unique(“TIME2”)就不能保证得到独一无二的数了。
uniqueCount()主要用于得到范围的上界。
比如uniqueCount(CLIENT),如果CLIENT为8位,则该次调用的返回值为255,如果将CLIENT改为16位,则返回65535。
(3)分裂相split-phase操作硬件一般都是分相型操作而非阻塞型,即采用应答或回调信号表示一个请求的完成。
比如,当使用ADC进行模数转换时,程序首先向控制寄存器写配置命令并启动转换,当ADC转换完成时,硬件触发一个中断,这时程序开始读取转换结果。
在一般的操作系统中,如果程序请求一次ADC转换,操作系统会建立一个请求,并把这个请求线程加入到等待队列中,开始转换,并调度另一个线程继续运行。
当转换完成中断发生时,唤醒等待队列中的线程,并加入到就绪队列,调度执行后返回。
但是,在嵌入式操作系统中,这样的线程会占用一定的宝贵资源,如RAM,即使该线程在等待队列中,其占用的资源也无法释放,以便于唤醒时继续执行。
TinyOS并没有采用使用线程模型来同步所有,而是采用在硬件和软件中都采用分相操作模型。
这也就意味着许多普通的操作如传感器采样、发送数据包等都是分裂相操作。
分裂相操作最大的特点在于它是双向的:有一个向下downcall开启一个操作,还有一个向上upcall触发事件完成。
在nesC语言中,downcall一般就是command语句,而upcall则是events。
下面以Send接口为例说明:Arrayinterface Send {command error_t cancel(message_t* msg);command uint8_t maxPayloadLength();command void* getPayload(message_t* msg, uint8_t len);}(4)任务task在分裂相操作中,需要触发一个callback,而这个事件的触发只能从这个command中signal。
但是,在命令command中signal此command对应的事件是危险的,因为这样可能会造成call loops,消耗存储空间并使系统瘫痪。
如下面这段代码:Command error_t Read. read (){Signal Read.readDone (SUCCESS, filterVal);}当以高频率call Read. read时,压栈的速率远高于出栈时,就会造成堆栈枯竭,因为在有限的RAM中开辟的stack也是非常有限的。
为了解决这样的问题,TinyOS采用task任务模型,通过系统调度执行,因为调度执行并不是立即就会执行,所以在上述频繁访问时就不会产生上述问题。