HellFire.V1.0-Kindle.Fire-Android4.0.4刷机教程及rom下载
NOAHlink软件更新说明说明书

Release NoteNOAHlink v.1.56.05Includes NOAHlink Kernel 1.55.03HIMSA 01-07-2013Thank you for purchasing NOAHlink software. This document includes last minute information on NOAHlink, including sections on:•compatibility issues•user documentation•known problems and issues•getting supportPlease read the NOAHlink Users guide before you install NOAHlink.Changes from v.1.56.04 to v.1.56.05The search for available NOAHlinks in the NOAHlink properties program are now only searching on COM ports with Bluetooth devices. This functionality can be turned off under the NOAHlink properties => Advanced features.During upgrade the NOAHlink properties program could set the COMport high to “9” – with the result that an available NOAHlink was not found by the fitting program. This is corrected to “99”.All NOAHlink files are signed from HIMSA.Changes from v.1.56.03a to v.1.56.04The version number cannot contain a letter and had to be changed.The functionality is the same and the user can still be logged in as a normal Windows user. Changes from v.1.56.03 to v.1.56.03aNOAHlink 1.56.03 could not be used as a “normal windows user” due to the placement of a NOAHlink log file. This is resolved with NOAHlink 1.56.03a.There are no changes to any compiled files or firmware files compared to NOAHlink 01.56.03 Changes from v.01.56.02 to v.1.56.03NOAHlink 1.56.03 still includes kernel 1.55.03 and boot loader 8.•Timers in the Noahlink detection program have been changed and optimized•One specific timer where NOAHlink was waiting 60 seconds has been removed•One NOAHlink error message (when the NOAHlink was not turned on) has been correctedThe NOAHlink 1.56.03 will detect the NOAHlink some seconds slower than previous versions (1.55.06 and before). This is because the program is now compiled with Visual Studio 2010 and it has been necessary to make smaller changes to the NOAHlink detection program.Changes from v.01.55.06 to v.01.56.02NOAHlink 1.56.02 includes kernel 1.55.03 and boot loader 8.•Boot loader 8 contains various improvements to test that the kernel image will load successfully.•The NOAHlink properties 1.56.02 is compiled with Visual Studio 2010. This will not be visible for the end user – but will ensure that the NOAHlink can communicate on newer MS platforms.Changes from v.01.55.05 to v.01.55.06NOAHlink 1.55.06 includes the kernel 1.55.03•Kernel 1.55.03 will reduce the number of returned units due to firmware problems.Changes from v.01.55.04 to v.01.55.05NOAHlink 1.55.05 contains identical components as in 1.55.04. The only difference is the writing routine for updating the new boot loader 7 to the NOAHlink. This is now more secure and will happen without errors.Changes from v.01.55.03 to v.01.55.04NOAHlink:•The NOAHlink properties program will under installation set the registry key – NOAHLinkBootTimeMS – to 10000 (10 seconds). It was previously 7 seconds.•The PWM protocol has been updated.Changes from v.01.54.01 to v.01.55.03NOAHlink Kernel 01.55.02: This new Kernel include several new features•Ability to communicate using the Toshiba bluetooth stack•Updated security routines to avoid un-wanted writing in the flash memoryo Please note that this also requires upgrade to boot loader 7 – which comesautomatically with the Kernel update.NOAHlink installation: The installation program will now detect the Operating System and choose which bluetooth stack should be used for the bluetooth communication (The end user will not be presented with the option of installing the Ezurio drivers if the Operating System is XP SP 2 or later)NOAHlink pairing wizard: The pairing wizard will detect which Bluetooth driver is used on the PC. If the Toshiba stack is detected the end user will be required to do the pairing manually using the “Toshiba Bluetooth Manager”. A relevant link to the HIMSA support site will be offered to the end user.Changes from v.01.54.00 to v.01.54.01NOAHlink Kernel: With kernel 1.52.00 installed it is possible to downgrade to older kernels.NOAHlink Kernel: Kernel 1.52.00 is compatible with the Mitsumi Bluetooth modules (C29 og C46)NOAHlink Kernel: Some older kernels did not support the features ‘HI Power Status’ and‘Power on when leaving cradle’, and would cause NOAHlink to lose connection when these kernels were upgraded. This issue no longer occurs with an upgrade to Kernel 1.52.00. Changes from v.01.53.01 to v.01.54.00NOAHlink Kernel: Correction made to the Release-Protocol-Resources where some resources were not released properly.NOAHlink Kernel: The initialization of NOAHlink Bluetooth module changed to allow the use of a new generation of Mitsumi module.Changes from v.01.52.03 to v.01.53.01NOAHlink: NOAHlink is now Vista compatible.NOAHlinkdrv: The user no longer receives a "time out" when trying to connect to a NOAHlinkNOAHlink Properties: A pairing wizard has been included to help the user pair with their NOAHlink devices. It is compatible with the Widcomm and the Microsoft Bluetooth stack. NOAHlink Properties: The installation has been rewritten, and the pairing has been moved from the installation to the Pairing Wizard. Thus, the installation no longer reboots several times during pairing.Changes from v.01.52.02 to v.01.52.03NOAHlink Properties: Due to an issue with the .Net assemblies and the .Net 2.0 framework, the interop files are no longer installed to the GACChanges from v.01.52.01 to v.01.52.02NOAHlink Properties: The .Net interop files are now again a part of the installationChanges from v.01.51.01 to v.01.52.01NOAHlinkdrv: The NOAHlink no longer crashes and silently logs out when it is moved out of rangeIDigitalAudio2 Inserted SetupDigitalFormat method that was accidently removed in buildv.01.51.01.Compatibility IssuesImportant: NOAH 2 is not compatible with NOAHlink. NOAHlink is designed and tested to work best with NOAH 3..NOAHlink DocumentationHIMSA provides electronic copies of the NOAHlink User manual in all available languages. You will also receive a hard copy of this manual in your NOAHlink package.Known Problems and IssuesPlease visit NOAHlinks web-site at to access the latest support issues.Getting SupportIf you have a support question concerning the installation or operation of NOAHlink, please check through your documentation first.If your problem persists, visit HIMSA’s website (English and German only) at .If you still cannot find the answers you need, contact your NOAHlink supplier. Your supplier is specially trained to answer NOAHlink-related questions.。
KINDLE安卓系统安装步骤
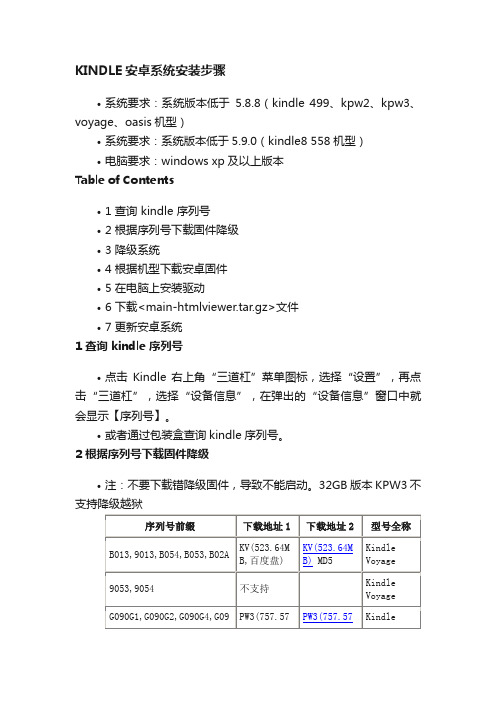
KINDLE安卓系统安装步骤•系统要求:系统版本低于5.8.8(kindle 499、kpw2、kpw3、voyage、oasis机型)•系统要求:系统版本低于5.9.0(kindle8 558机型)•电脑要求:windows xp及以上版本Table of Contents•1 查询 kindle 序列号•2 根据序列号下载固件降级•3 降级系统•4 根据机型下载安卓固件•5 在电脑上安装驱动•6 下载<main-htmlviewer.tar.gz>文件•7 更新安卓系统1 查询 kindle 序列号•点击Kindle 右上角“三道杠”菜单图标,选择“设置”,再点击“三道杠”,选择“设备信息”,在弹出的“设备信息”窗口中就会显示【序列号】。
•或者通过包装盒查询kindle序列号。
2 根据序列号下载固件降级•注:不要下载错降级固件,导致不能启动。
32GB版本KPW3不支持降级越狱3 降级系统•本越狱方法仅适用于KO、KV、KPW2、KPW3、499 入门版Kindle;不支持KPW3漫画版;•确认 Kindle 电量处于充足;用 USB 数据线把 Kindle 连接到电脑,直到出现 Kindle 磁盘。
•把下载好的固件降级文件(如update_PW2_5.4.3.2_initial.bin)拷贝到 Kindle 的根目录(和 documents 文件夹同级);•弹出 Kindle 磁盘回到 Kindle 界面,依次点击“菜单 -> 设置 -> 菜单 -> 更新您的Kindle”。
•然后耐心等待 Kindle 降级,直到降级成功后再次进入 Kindle 再进行下面操作。
•提示:•提示1:请注意,降级过程耗时较长!不要还没多长时间就认为卡大树!请稍安勿躁耐心等待!•提示2:如果超过两三个小时仍卡在大树界面,请参考“解决KPW3 卡大树、循环重启的问题”。
•提示3:如果确认序列号前缀没问题却降级失败,请重置一下Kindle 系统再重试。
Kindle无法开机提示waiting for device

Kindle无法开机提示waiting for device问题补充:我的Kindle Fire现在开不了机了,长按10s关机后,然后再开启,一直是:< waiting for device >,试了很多次都这样。
adb shell能连上,idme bootmode 4002 转换运行模式,出现Operation not permitted,权限不够。
尝试重新root,还是不成功。
下载了Kindle Fire Utility 工具root,转换fastboot模式,都无效,几近绝望。
问题产生时间:2012-03-08问题最新答案这种情况是的Kindle就是俗称的变砖了,不过是可以修复的,修复之前,要注意Kindle fire 的两种工作模式:Normal boot和fastbooot,这两种模式下kindle fire需要装不同的驱动,用设备管理器查看,两种模式下kindle fire设备名称不同:normal boot -> android composite adb interfacefastboot -> android adb interface切记要充满电再修砖,不然电脑可能不能识别下面是Kindle Fire修砖的方法和步骤:第一步、搭建ADB环境,可以参考:Kindle Fire ADB环境搭建第二步、切换到fastboot模式,下载:fbmode.zip (大小261KB),将这个解压包里的文件解压到上面第一步中adb工具文件夹,并执行如下命令:adb push fbmode /data/local/tmpadb shell chmod 755 /data/local/tmp/fbmodeadb shell /data/local/tmp/fbmodeadb reboot第三步、安装fastboot模式的驱动1. 下载:Kindle_Fire_Utility_v0.9.3.part1.rar (大小5MB)Kindle_Fire_Utility_v0.9.3.part2.rar (大小5MB)Kindle_Fire_Utility_v0.9.3.part3.rar (大小2MB)2. 解压文件,进入'drivers'文件夹,用记事本打开adb_usb.ini 在"0x1949"一行下添加"0x18D1" (去掉引号)3. 打开设备管理器找到kindle,选择刚才用的‘drivers’文件夹更新驱动,现在就已经是fastboot模式的驱动了第四步:进入TWRP修复权限1、安装TWRP这个备份和修复工具,刷机和修砖都很有用,可以参考:Kindle Fire安装TWRP2、在TWRP模式中运行如下命令:fastboot -i 0x1949 oem idme bootmode 5001fastboot -i 0x1949 reboot3、输完命令后,kindle fire重启后,进入黄色三角形画面,然后绿灯变成橙色灯,现在你看到的就是亲切的TWRP画面了。
NiPad版Kindle fire中文ROM刷机说明

特殊情况:请注意,一般情况下,
擦除设备的进度条不会超过 5 条;烧
写系统的进度不会超过 4 条;如果以
上二者有异常,并且刷机时间超过 12
分钟,设备出现假死状态。
解决办法:
1、 此时请不要关闭刷机工具及断开
数据线,只需长按 kindle 设备电
源键,等其断电关机后,再重按
电源键让其供电开机,刷机过程
Kindle Fire 中文 ROM(1 拖 3)刷机说明
特别说明: 1、 本 ROM 系统仅供学习和交流使用,使用本 ROM 系统完全出于您的自愿,作者不对使用
过程中造成的各种伤害和损失承担任何责任! 2、 NiPad 刷机工具,支持 nipad 所开发的中文 4.0、中文 2.3 以及 kindle 原系统 3 个 ROM 版
本的刷机(即 1 拖 3) 3、 亚马逊对 kindle 系统版本的升级可能会造成本工具无法使用或刷机不成功 注意事项: 1、 刷机电脑必须是 WIN7 操作系统 2、 电池电量需 50%以上才能进行刷机 3、 刷机需要在开机状态下进行 4、 刷机过程中禁止终端 USB 连接 5、 刷机需要约 8 分钟时间,请耐心等待,中途禁止任何操作 烧机步骤: 1、 将需要刷机的 ROM 解压后放到磁盘的根目录,并且不可以文件夹里面再套一个文件夹 2、 连接 KindleFire 设备,根据 ROM 包里面的《Kindle Fire USB 驱动程序安装指导.pdf》安装
驱动 3、 双击 PadTool.exe 程序打开烧机工具,点击左上角的“文件”菜单选项,选择选择 ROM
所在的路径
4、 驱动如果成功安装,操作界面会显示“正在检测设备,设备已连接”,如下图所示。此 时可以点击 “执行”按钮,进行烧机。
kindle fire升级Android 4.0 教程
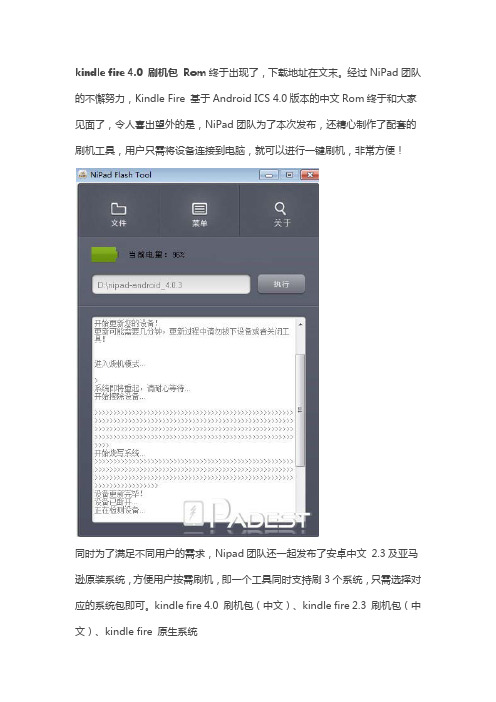
kindle fire 4.0 刷机包Rom终于出现了,下载地址在文末。
经过NiPad团队的不懈努力,Kindle Fire 基于Android ICS 4.0版本的中文Rom终于和大家见面了,令人喜出望外的是,NiPad团队为了本次发布,还精心制作了配套的刷机工具,用户只需将设备连接到电脑,就可以进行一键刷机,非常方便!同时为了满足不同用户的需求,Nipad团队还一起发布了安卓中文2.3及亚马逊原装系统,方便用户按需刷机,即一个工具同时支持刷3个系统,只需选择对应的系统包即可。
kindle fire 4.0 刷机包(中文)、kindle fire 2.3 刷机包(中文)、kindle fire 原生系统三个系统版本除了系统本身不同外,应用细节上还有如下区别系统版本支持亚马逊服务安卓中文4.0未集成(nipad-android-4.0.3)安卓中文2.3集成(nipad-android-2.3)亚马逊原装系统自带(nipad-kindle-fire)所以,如果你既想使用中文系统,又想使用亚马逊书店,请选择中文2.3版本下面我们来介绍下KindleFire 中文4.0 ROM的新特性:1. Android 4.0 全新的UI!2. 全新的通知栏。
3. 设置菜单栏4. 系统集成我搜平板市场,海豚浏览器,360平板卫士、酷我音乐、快手看片、开卷有益等优质APP应用,以满足用户对app下载、系统安全、音乐、视频、读书等的使用需求。
同时了解到Nipad团队后续可能会开放kindle的中文4.0系统代码,供爱好者及玩家研究使用,并且鼓励用户进行二次开发,好的改进及新增将可以通过“系统更新”在线更新到kindle设备中。
感谢Nipad团队的付出,为广大kindle爱好者提供了如此令人振奋的ROM及工具,希望你们能再接再厉,除了亚马逊kindle fire外,还能扩大其它产品线,同时尽量做到开源。
刷机包及下载工具下载地址: /thread-22871-1-1.html。
Kindle工具大集合啦:17种Kindle用户必备的软件工具要点

17种Kindle用户必备的软件工具2011-09-05 00:22:0148476浏览|10评论Kindle用户要在茫茫资源海中找到真正实用的工具并非易事,这篇文章就为你收集了17个Kindle必备软件,从电子书格式转换到网页投递,只有你想不到,没有它做不到。
这些软件中有许多不是专门为Kindle开发的,如果你使用的是其他电子阅读设备,一样会发现它们非常有用,比如PDF页面裁剪,电子书格式转换,等等。
软件分类包括:阅读工具,通用格式转换工具,PDF优化工具,Kindle文件管理工具和网页投递工具。
阅读工具:1. Kindle云阅读: 走到哪读到哪2. Kindle Reader for PC and Mac: 在电脑上看电子书3. Kindle Previewer: 预览转换后的电子书在Kindle上的版式通用格式转换工具:4. 亚马逊Kindle邮件转换服务: 免费的在线转换服务5. Calibre: 电子书转换和管理6. Hamster Free eBook Converter: 轻便但强大的电子书转换工具7. Auto Kindle eBook Converter: 将PDF, Lit, and HTML 格式文件转为MOBI 格式PDF优化工具:8. Briss: 可视化PDF页面调整工具9. K2PDFopt: 将版式复杂的PDF文件变的易于在Kindle上阅读Kindle文件管理工具:10. Koll3ction: 使用文件夹结构来管理你的Kindle文件网页投递工具:11. SENDtoREADER: 书签工具,发送任意网页和Google Reader中的内容到你的Kindle12. Kindle It: 浏览器扩展,发送网页到Kindle13. KindleFeeder: 通过whispernet(亚马逊3G网络服务,收费)投递最多12条RSS订阅到Kindle14. Greader2Kindle: 在Kindle上看Google Reader订阅内容15. Instapaper:自动投递Instapaper中未阅读的文章到Kindle16. ReadItLater: 自动投递ReadItLater中未阅读的文章到Kindle17. Readability:自动投递Readability的阅读清单到Kindle其他工具:一看就会用,不用写简介了1. Kindle云阅读: 走到哪读到哪这个web应用程序与你的亚马逊Kindle账户相关联,你可以在任意电脑或阅读设备上查看你的电子书选集。
Kindle fire HDX7 刷机教程
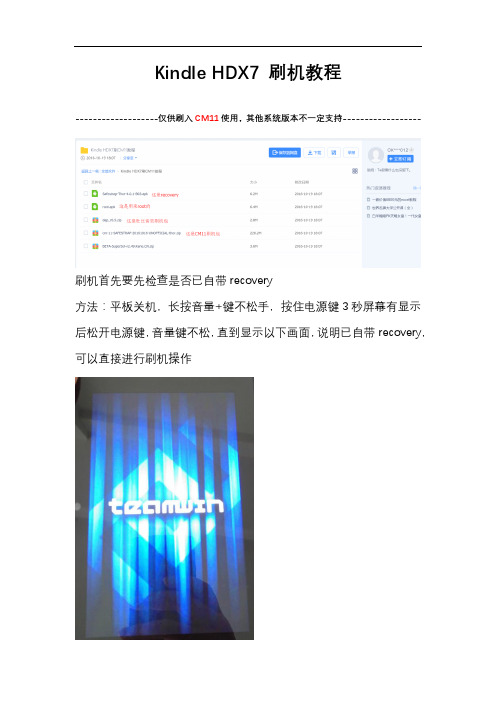
Kindle HDX7 刷机教程-------------------仅供刷入CM11使用,其他系统版本不一定支持------------------刷机首先要先检查是否已自带recovery方法:平板关机,长按音量+键不松手,按住电源键3秒屏幕有显示后松开电源键,音量键不松,直到显示以下画面,说明已自带recovery,可以直接进行刷机操作如果没有该蓝色界面,并出现以下界面时,就必须进行安装recovery 操作之后才能刷入CM11请跳过以下步骤,直接按住电脑键盘Ctrl键点这里跳转到第二教程====================================================================================以下是已自带recovery的HDX7刷入CM11的详细步骤,没有自带recovery的请不要轻易尝试,下图是recovery菜单刷入CM11前需wipe,点按以下按钮进入如下菜单显示拖动下图滑块到最右显示如下点按以下按钮两次,回到主界面然后点按以下按钮进入如下菜单此时用数据线连接电脑和HDX7平板点按两次以下按钮电脑会识别HDX7内置存储此时拷贝CM11刷机包cm-11-SAFESTRAP-20161016-UNOFFICIAL-thor.zip到HDX7内置存储根目录即可现在可以拔掉数据线,回到HDX7端操作,屏幕黑的时候按电源键就能再点亮,滑动最底部滑块就能解锁继续点按一次右下角小箭头回到主界面,再点按以下按钮进入如下界面,如图,蓝色长条可以上下滚动,红圈里是刚拷贝的CM11刷机包,点击它会进入如下界面滑动底部滑块进行刷入操作即可,稍等大概40秒,显示如下图点按以下按钮重启平板,成功刷入CM11以下是开机界面,等待30秒左右进入系统,至此刷机结束========================================================以下是没有可用recovery的刷机方法1.正常开机进系统后,用USB线连接HDX7和电脑,将网盘内的Safestrap-Thor-4.0.1-B03.apkRoot.apkcm-11-SAFESTRAP-20161016-UNOFFICIAL-thor.zip三个文件拷贝到内置存储的根目录2.拔掉数据线,平板打开文件管理器软件,图标如下3.依次安装Safestrap-Thor-4.0.1-B03.apk 和Root.apk点击安装可能会有如下提示点按以下按钮进入设置选项如下图所示,给箭头所示选项打钩,同时取消下一个选项的打钩!即可返回文件管理器继续安装两个apk安装完后回到主界面,打开KingRoot软件如下图,点击蓝色按钮跳转到如下设置界面此时设置连接上WIFI,确定已经联网后点最下方虚拟按键左边的返回键,回到KingRoot软件,点击蓝色按钮,注意文字有变化。
kindle fire 如何第三方方式安装输入法
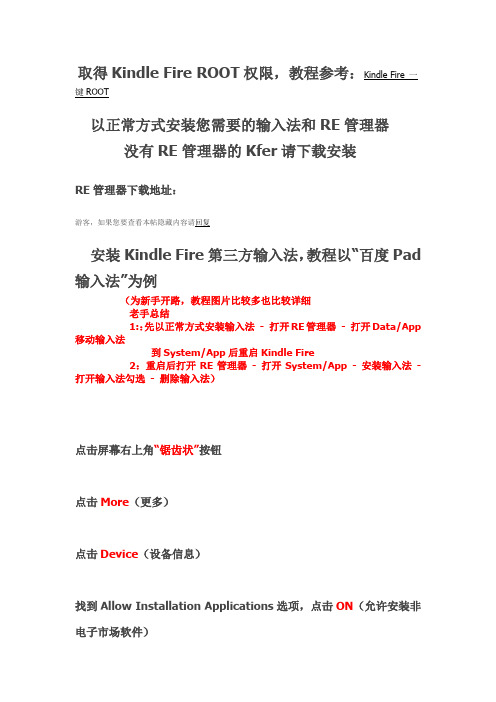
以正常方式安装您需要的输入法和RE管理器没有RE管理器的Kfer请下载安装RE管理器下载地址:安装Kindle Fire第三方输入法,教程以“百度Pad 输入法”为例(为新手开路,教程图片比较多也比较详细老手总结1::先以正常方式安装输入法- 打开RE管理器- 打开Data/App 移动输入法到System/App后重启Kindle Fire2:重启后打开RE管理器- 打开System/App - 安装输入法- 打开输入法勾选- 删除输入法)点击屏幕右上角“锯齿状”按钮点击More(更多)点击Device(设备信息)找到Allow Installation Applications选项,点击ON(允许安装非电子市场软件)回到主界面,点击RE管理器点击Allow,授权RE管理器点击data文件夹点击app文件夹按住“百度Pad输入法”选择移动,一定要选择移动哦!!点击返回键两下找到System文件夹,点击TA点击App文件夹点击读写,RE管理器装载为“读写”状态点击黏贴重启您的Kindle Fire继续以下操作重启后打开RE管理器,点击System - 点击App - 点击读写,RE管理器装载为“读写”状态点击“百度Pad输入法”点击安装点击OK点击Install点击Open点击打开输入法切换菜单,选择“百度Pad输入法”选择完成后,向下滑动- 点击退出向导重新点击System - 点击App - 点击读写,RE管理器装载为“读写”状态按住“百度Pad输入法”点击删除,一定要选择删除哦!!点击右下角房子键点击搜索框点击设置设置你喜欢输入方式,教程结束!!。
Kindle Fire Root及升级6.2.2教程

Kindle Fire FAQ一、升级6.2.2下载链接:https:///kindle-fire-updates/update-kindle-6.2.2_D01E_3205220.bin官方原生固件升级步骤:把升级包拷贝到Kindle 设备: Kindle Fire 保持开启,并且解锁屏幕。
用USB连接电脑,打开Fire 的盘符,将升级包拷贝到kindleupdates 文件夹内。
1.等待传输完毕,断开USB链接:确保文件完整传送. 点击“断开”,并拔掉USB线。
2.开始升级:确保电池充满或连接充电器。
点击右上角的“Quick Setting(快速设置)”,点击“More...(更多...)”,然后选“Device(设备)”,最后选择“Update Your Kindle”。
设备会在升级阶段重启两次。
、3.升级结束: Device界面会显示成功的版本号“X.X”.二、ADB环境搭建& KF安装驱动& 6.2.2 ROOT & TWRP安装教程& TWRP美化1:快速搭建KF的ADB环境文件下载:/file/aqufms4w#快速搭建KF的ADB环境.rar2:下载KF.rar文件下载:/file/e7qozz34#KF.rar1:ADB环境搭建1:Kindle Fire连接至您的计算机,点击Disconnect断开Kindle Fire U 盘模式2:解压下载的“快速搭建KF的ADB环境文件.rar”至电脑桌面3:复制.android文件夹至当前用户名文件夹下(笔者使用Administrator 账户,路径:C:\用户\Administrator,以此类推)Windows XP路径:C:\Documents and Settings\Administrator,以此类推4:复制adb文件夹至System32文件夹下(路径:C:\Windows\System32)2:Kindle Fire 驱动安装选择“浏览计算机以查找驱动程序软件”找到ADB文件夹,选择KindleDrivers文件夹,点击“确定”选择:“始终安装此驱动程序软件”3:Kindle Fire 6.2.2 ROOT1:将下载的KF.rar解压至C盘2:打开C盘adb文件夹,在文件夹空白处按住“Shift”键,然后点击鼠标右键选择“在此处打开命令窗口”如果您的电脑系统是Windows XP 的话,此步改操作为:点击Windows开始菜单- 运行- 输入cmd先输入一下命令:cd\cd adb3:输入以下命令:adb push BurritoRoot2.bin /data/local/adb shell chmod 777 /data/local/BurritoRoot2.binadb shell /data/local/BurritoRoot2.binadb root (到这步KF会自动打开U盘,请点击Disconnect断开KF U盘模式)adb shell idadb remountadb push su /system/xbin/suadb shell chown 0.0 /system/xbin/suadb shell chmod 06755 /system/xbin/suadb remountadb install Superuser.apk“不要关闭命令框,下面还有用”4:安装TWRP1:输入以下命令:(注意一定要关闭Kindle Fire的U盘模式)adb push u-boot.bin /sdcard/adb push twrp-blaze-2.0.0RC0.img /sdcard/adb shellsudd if=/sdcard/twrp-blaze-2.0.0RC0.img of=/dev/block/mmcblk0p5dd if=/sdcard/u-boot.bin of=/dev/block/mmcblk0p2reboot2:重启kindle后开机显示黄色三角符号,长按开机键直到绿灯变橙色时松手即可进TWRP界面,如果不做操作即直接进入原系统第一次进入TWRP,会自动安装,等待安装完毕Reboot5:TWRP美化1:Kindle Fire连接电脑- 打开SD卡- 打开TWRP的文件夹- 新建文件夹命名为theme然后把下载的ui.zip放在这个theme文件夹内(不用解压缩)2:重新启动,进入TWRP看看,是不是界面已经变化了!ICS皮肤:本帖隐藏的内容/file/dpxmm9bz#ui(1).zipFire皮肤:本帖隐藏的内容/file/e6t7dfl4#ui.zip请先搭建好ADB环境,参考此贴:6.2.2固件下载:复制固件至Kindle Fire SD卡kindleupdates文件夹,点击设置菜单- Device(设备信息)- Update Your Kindle(如您的设备已经是6.2.2,跳过此步)/file/be8qngoa#update-kindle-6.2.2_D01E_3205220.bin6.2.2 ROOT文件下载:/file/c2do0g66#6.2.2_Root.rarRE管理器(中文版):/file/dpyc8c81#RE管理器.apk1:将下载的6.2.2 Root文件解压至C盘2:Kindle Fire连接至您的计算机,点击Disconnect断开Kindle Fire U 盘模式3:打开ADB文件夹,在文件夹空白处按住“Shift”键,然后点击鼠标右键选择“在此处打开命令窗口”(如果您的电脑系统是Windows XP 的话,此步改操作为:点击Windows开始菜单- 运行- 输入cmd - 输入cd\ - 输入cd adb)4:输入一下命令:adb push BurritoRoot2.bin /data/local/adb shell chmod 777 /data/local/BurritoRoot2.binadb shell /data/local/BurritoRoot2.binadb rootadb shell idadb remountadb push su /system/xbin/suadb shell chown 0.0 /system/xbin/suadb shell chmod 06755 /system/xbin/suadb remountadb install Superuser.apkadb reboot5:安装RE管理器,看看有没有授权提醒,有的话点击Allow(允许)Amazon Kindle Fire 6.2.2ROOT OKAY。
kindlefire一代刷机教程
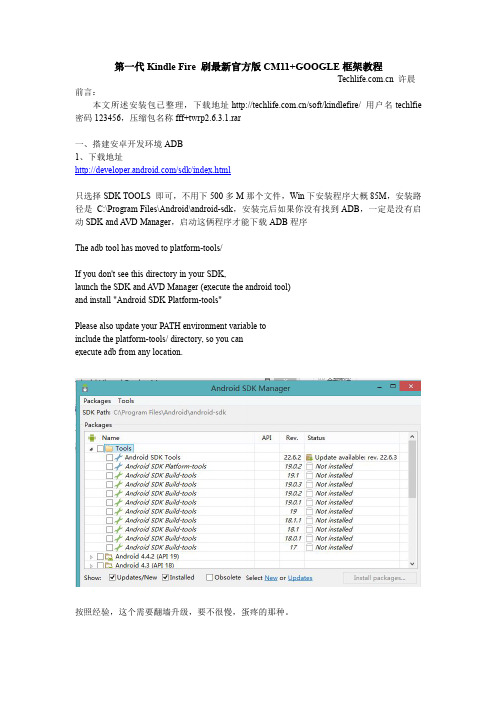
第一代Kindle Fire刷最新官方版CM11+GOOGLE框架教程许晨前言:本文所述安装包已整理,下载地址/soft/kindlefire/用户名techlfie 密码123456,压缩包名称fff+twrp2.6.3.1.rar一、搭建安卓开发环境ADB1、下载地址/sdk/index.html只选择SDK TOOLS即可,不用下500多M那个文件,Win下安装程序大概85M,安装路径是C:\Program Files\Android\android-sdk,安装完后如果你没有找到ADB,一定是没有启动SDK and AVD Manager,启动这俩程序才能下载ADB程序The adb tool has moved to platform-tools/If you don't see this directory in your SDK,launch the SDK and AVD Manager(execute the android tool)and install"Android SDK Platform-tools"Please also update your PATH environment variable toinclude the platform-tools/directory,so you canexecute adb from any location.按照经验,这个需要翻墙升级,要不很慢,蛋疼的那种。
2、配置android的adb环境变量系统属性--高级系统设置--环境变量--新增变量名称android变量值:(按照你自己的真实系统路径填写)C:\Program Files\Android\android-sdk\platform-tools;C:\Program Files\Android\android-sdk\tools在系统变量中的Path中也要添加刚刚添加的路径,用%android%添加即可。
TOUCHKEY AUTO-FIRE LOCK 安装指南说明书

TOUCHKEY AUTO-FIRE LOCK INSTALLATION GUIDEPlease note:is required for the top, centre and bottom latches.1.Insert the multipoint lock into the prepared door and fasten with appropriate screws .MPL LOCK PREPARATIONf.Alternatively, to relieve resistance, the centre keep can be offset to the hook keeps.a. Create routing required for the keep - use the routing jig provided if necessary (available on request).b. Centre line on the routing jig needs to be lined up with centre of latches.Centre KeepHook Keep1Repeat for top and bottom keeps.b.a.Insert the centre keep into the routed holeand ensure it sits flush to the face of the door frame.It is essential the keep sits flush for stability. e.In the event of operating resistance you may need to adjust the keeps, refer to 2b d.Look for any sign off resistance during operation which may indicate the fitting is not posite keeps are adjustable +/- 2mmhorizontally and vertically, timber keeps are adjustable +/- 2mm horizontally.ACentre LinePosition the keep and fasten to the frame with the appropriate screws for the substrate being used.Once keeps are fitted, open and close the door to check it is working correctly:c.Rotate thumbturn, key or handle to ensure all locking points fully retract to allow the door to open.b.Ensure the thumbturn or key rotates 360° towards the keep making sure the deadbolt is fully engaged.a.Close door and check the hooks and latches engage fully within top, centre and bottom keeps.Centre Line1.2.3.4.5.KEEP PREPARATIONAUTO FIRE MPLLEAF AND LOCK SET UPCheck gap between door leaf and frameWith the door in the closed position andstanding on the opening side. Check that there is a 3-4mm gap between the edge of the leafand the edge of the frame. The air gap must be consistent from the top to the bottom of theCheck hook operationAs stated, the latches are the compression points and when the trigger is depressed and the hooks drop, the hooks should not come into contact with the keeps. Please ensure that the door is fully closed, to check that the hooks are correctly fully engaged. However, it is important that the door is pushed or pulled fully closed to check the hooks are fully engaging.Remove the tape temporarily holding the hooks. Close the door until it latches and fires the hooks and centre deadbolt. Unlock the door by rotating the thumbturn cylinder away from the lock jamb.2.OPERATIONERA , Valiant Way Wolverhampton West Midlands WV9 5GBContact UsT : +44 (0) 1922 490049E:************************W: TROUBLESHOOTING GUIDEV1。
全面的的Cydia源推荐

360手机卫士_1.8.1-310302(这个...不解释)3G Unrestrictor_5.0.1-2(解放WIFi限制软件,使用3G/EDGE/GPRS来连接应用软件---这个必需滴,虽然俺用的是移动卡)Action Menu Plus Pack_1.2.3(系统复制粘贴增强---会自带Action Menu,中文)Activator_1.6.1(强大的手势操作软件彻彻底底解放你那脆弱的HOME键---装SBSETTING 时会自带,中文)AddCallHistory_3.2(通知记录伪造工具,这个的用途大家自己理会哈... ---无汉化)afc2add_1.01(服务补丁,解决越狱后连接iFunBox的)Airplane SBSettings_2.1(飞行模式的SBS插件---装SBS会自带)AllMail_1.4-1(邮件补丁,隐藏,标记及设密什么的---无汉化)AppInfo_1.5(查看所有安排软件的信息-包含Cydia安装的软件,可看到版本等,支持链接Cydia,无汉化会乱码中文插件名称)AppSize_1.3(想知道你已装软件的大小,时间,金额?装了这个后,按住HOME再轻按软件图标,嗯,后面出现的你自己看. ---无汉化)Appslide_1.1.1-1(退出当前程序时返回前一个打开的程序---自桌面进入的程序返回桌面---无图标)AppStorelous_2.7-50(给AppStore增加两个按钮:列队和Installous下载,前提是已装Intallous) Appsync for iOS5+_2.2(这个不废话,安装破解软件必备的插件)AppTivator_1.1-1(双击桌面图标进入指定程序. 个人觉得很有意思的一个软件,推荐.灵敏度要求高-依靠activator激活)AttachmentSaver_1.4.0(解放您的自带mail下载附件格式的限制---无图标)Autolock SBSttings_4.2-1(自动锁定的SBS插件-解决临时不需自动锁定)Barrel_1.5.9-1(改变翻页的方式,效果很炫!---有汉化)BatteryDetective_1.2.1-2(电池情况详细列出,必装---无汉化)Bigify+_2.3(修改图标方向颜色等的插件,也非常炫---有汉化)BiteSMS_6.1(很不错的短信软件!替代系统短信软件的最佳选择!)BossPaper_1.2.1(自动壁纸不能自动找到系统壁纸,请先去Cydia下载一个壁纸以创建链接,推荐Simple and clean wallpapers -找遍Cydia只得这个最小,只有98K,然后在/var/mobile/media/BossPaer/下创建文件夹并导入自己喜欢的壁纸,特大推荐---无汉化) Bulletin_1.1(锁屏状态下也可调出通知中心---中文版)CallTell for 3GS and i4_4.0(来电联络人姓名及号码读出---有汉化,有SBS的插件,请单独在Insanelyi源装)ClearLockNotifications_1.0-2(锁屏时推送信息&轻轻点图标向右滑动一点点& 删除插件,必备,)Custom NC Background_1.0(使用相片做通知中心背景---有汉化)CyDelete_2.0.5-1(直接在桌面删除程序)DOCK_2.2.3-1(这个超实用,在侧边条增加快捷程序打开方式,必装---别装官方版的,否则有激活码也会无限激活模式)Dreamboard_1.1.4(超级主题更换工具,可装大型主题,与WB有冲突.自带Endroid主题!退出点击DreamBoard的图标&可能需要进入软件列表才能找到)FakeClockup_1.0(欺骗系统被加速感觉,炫机用,建议倍速设置在1.4或1.6.否则伤眼) Flowtation_1.1.4(下拉通知中心时主屏幕随之下拉后退的装酷插件---有汉化) FolderEnhancer_1.5.7.1-1(无限文件夹,请装[]这个源的,一定不计装完的重启再重启两次手机.实测已破解---有汉化)Graviboard_2.0-1(让桌面图标充满重力感应,可以甩来甩去!很有趣!炫机!---目前汉化不全)Gridlock_1.2.6-1(让你的桌面图标随意摆放,注意该软件不要卸载,不然如果你装了几百个软件呵呵~~~你的图标会从文件夹打散)Hackulous Security_1.2.1(系统补丁-安全防火墙,一般感觉不到,大神推荐有用,有备无患-自带Source GUI)Homescreen Settings_0.96-83(将设置中的任何一个选项添加到桌面---无图标,进入设置页面后点击最下方"Add Icon To Homescreen"的按钮生效)I'm Busy sms_1.8-1(锁屏拒接来电时增加发送预设短信功能有汉化)IAP Cracker_0.6-1(游戏内购破解---玩游戏的需要& 与udidfaker(伪造-要先安装)配合使用) iBlank_4.2(空白图标建立,以占页面---无汉化)iEagleEye_0.0.1-16(增强Safari和Mail中的图片选项,搜图必备!---无汉化)iFile_1.6.1-3(修改系统文件必备程序,比起iFunbox还有用-最少程序能列出中文名.对于一些替换文件时修改权限的操作影响很大!必备!)InlinCandidate for iOS5_1.2-3(中文输入时联想词语跟随显示框,避免被挡住看不见,实用,建议装备---无图标)Installous_4.4.2(下载破解应用必备!就是可惜更新很慢---有多国语言包)IPhoneDelivery_0.5.2-25(短信回执)iProtect_2.7(密码保护。
Kindle fire 破解和获取权限
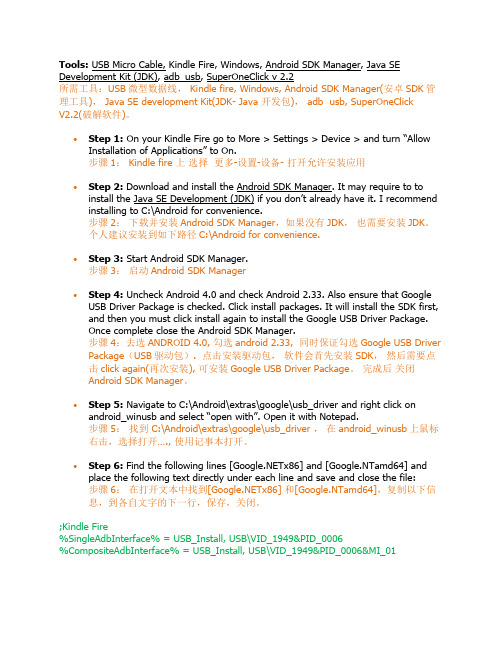
Tools: USB Micro Cable, Kindle Fire, Windows, Android SDK Manager, Java SE Development Kit (JDK), adb_usb, SuperOneClick v 2.2所需工具:USB微型数据线, Kindle fire, Windows, Android SDK Manager(安卓SDK管理工具), Java SE development Kit(JDK- Java 开发包), adb usb, SuperOneClickV2.2(破解软件)。
∙Step 1:On your Kindle Fire go to More > Settings > Device > and turn “Allow Installation of Applications” to On.步骤1: Kindle fire 上选择更多-设置-设备- 打开允许安装应用∙Step 2: Download and install the Android SDK Manager. It may require to to install the Java SE Development (JDK) if you don’t already have it. I recommend installing to C:\Android for convenience.步骤2:下载并安装Android SDK Manager,如果没有JDK,也需要安装JDK。
个人建议安装到如下路径C:\Android for convenience.∙Step 3: Start Android SDK Manager.步骤3:启动Android SDK Manager∙Step 4: Uncheck Android 4.0 and check Android 2.33. Also ensure that Google USB Driver Package is checked. Click install packages. It will install the SDK first, and then you must click install again to install the Google USB Driver Package.Once complete close the Android SDK Manager.步骤4:去选ANDROID 4.0, 勾选android 2.33, 同时保证勾选Google USB Driver Package(USB驱动包). 点击安装驱动包,软件会首先安装SDK,然后需要点击click again(再次安装), 可安装Google USB Driver Package。
平板地带出品-kf刷机包汇总
地狱之火超炫版 地狱之火超炫版 用 Padtool 工具一键安 装,存变砖风险;系统 稳定性不够 用 Padtool 工具一键安 装,存变砖风险;系统 稳定性不够 中文刷机固件,未体验 官方升级固件 官方升级固件 官方升级固件 官方升级固件的精简中 文版 官方升级固件的精简中 文版 原生国情编译版 精简版 Root 版, 已安装中文输 入法
2012.02.14 未知 2012.03.27 2012.01.20 2011.12.21 2012.03.30 2012.03.31 2012.03.23 2012.02.29 未知
☆☆ ☆☆ ☆☆☆☆ ☆☆☆ ☆☆ ☆☆☆ ☆☆☆ ☆☆☆ ☆☆ ☆☆
zip zip bin bin bin zip zip zip zip zip
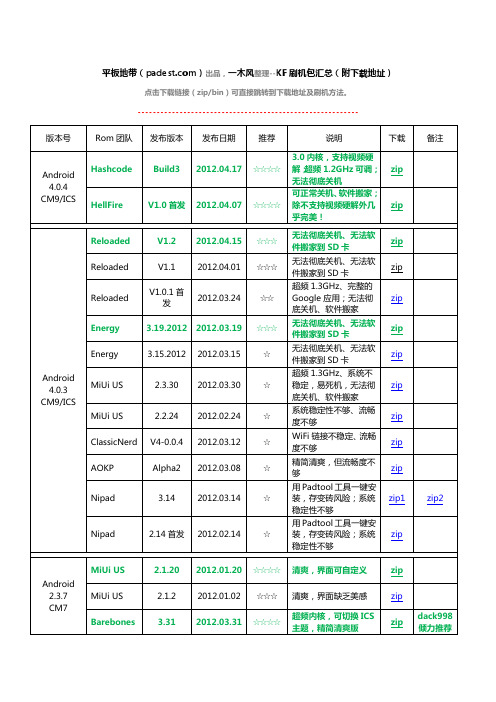
平板地带()出品,一木风整理--KF 刷机包汇总(附下载地址)
点击下载链接(zip/bin)可直接跳转到下载地址及刷机方法。
---------------------------------------------------------版本号 Rom 团队 Hashcode 发布版本 Build3 发布日期 2012.04.17 推荐 ☆☆☆☆ 说明 3.0 内核,支持视频硬 解; 超频 1.2GHz 可调; 无法彻底关机 可正常关机、 软件搬家; 除不支持视频硬解外几 乎完美! 无法彻底关机、无法软 件搬家到 SD 卡 无法彻底关机、无法软 件搬家到 SD 卡 超频 1.3GHz、完整的 Google 应用;无法彻 底关机、软件搬家 无法彻底关机、无法软 件搬家到 SD 卡 无法彻底关机、无法软 件搬家到 SD 卡 超频 1.3GHz、系统不 稳定,易死机,无法彻 底关机、软件搬家 系统稳定性不够、流畅 度不够 WiFi 链接不稳定、 流畅 度不够 精简清爽,但流畅度不 够 用 Padtool 工具一键安 装,存变砖风险;系统 稳定性不够 用 Padtool 工具一键安 装,存变砖风险;系统 稳定性不够 清爽,界面可自定义 清爽,界面缺乏美感 超频内核,可切换 ICS 主题,精简清爽版 下载 zip 备注
Kindle Fire HD 备份与恢复,刷机,修砖教程
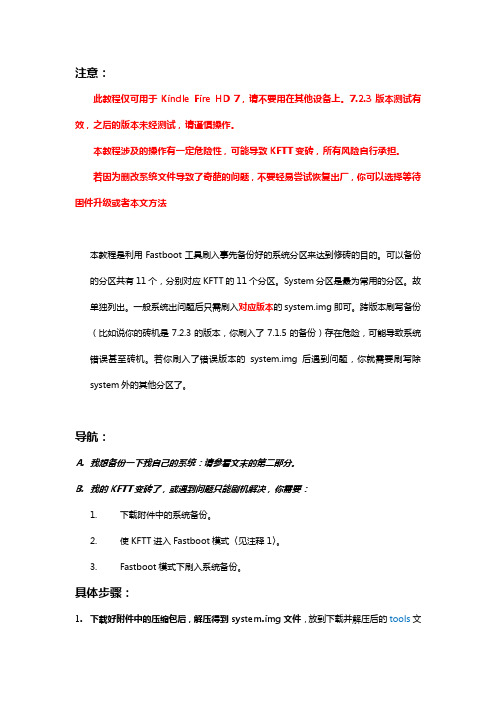
注意:此教程仅可用于KindleFireHD7,请不要用在其他设备上。
7.2.3版本测试有效,之后的版本未经测试,请谨慎操作。
本教程涉及的操作有一定危险性,可能导致KFTT变砖,所有风险自行承担。
若因为删改系统文件导致了奇葩的问题,不要轻易尝试恢复出厂,你可以选择等待固件升级或者本文方法本教程是利用Fastboot工具刷入事先备份好的系统分区来达到修砖的目的。
可以备份的分区共有11个,分别对应KFTT的11个分区。
System分区是最为常用的分区。
故单独列出。
一般系统出问题后只需刷入对应版本的system.img即可。
跨版本刷写备份(比如说你的砖机是7.2.3的版本,你刷入了7.1.5的备份)存在危险,可能导致系统错误甚至砖机。
若你刷入了错误版本的system.img后遇到问题,你就需要刷写除system外的其他分区了。
导航:A.我想备份一下我自己的系统:请参看文末的第二部分。
B.我的KFTT变砖了,或遇到问题只能刷机解决,你需要:1.下载附件中的系统备份。
2.使KFTT进入Fastboot模式〈见注释1〉。
3.Fastboot模式下刷入系统备份。
具体步骤:1.下载好附件中的压缩包后,解压得到system.img文件,放到下载并解压后的tools文件夹内,然后打开命令提示符,XP系统用CD命令切换到tools文件夹(比如tools文件夹在c盘根目录,只需在命令提示符下键入cdc:\tools 然后回车即可)。
Win7下,可以按住SHIFT右键单击tools文件夹,选择“在此处打开命令窗口”。
2.输入下面的代码然后回车fastboot -i 0x1949 flash system system.img此过程较漫长,请耐心等待,中途确保电脑运行正常,不要进行其他操作。
3.若需要刷写其他分区,代码同上(同版本刷写一般不需要此步骤,除非你遇到问题)fastboot -i 0x1949 flash XXXXXXXX.img其中XXXX.img对应分区备份文件,如boot.img文件的刷入代码为fastboot -i 0x1949 flashbootboot.img4.刷完后建议但可选的操作:擦除cache和用户数据。
火鸟帧抓取器快速入门指南说明书

FireBird Frame Grabbers - Installation and UseQUICKSTART GUIDEFIREBIRD FRAME GRABBERS – QUICKSTART GUIDEContentsFIREBIRD FRAME GRABBERS – QUICKSTART GUIDE 2HARDWARE INSTALLATION 3 SOFTWARE INSTALLATION 4 UPDATING THE FIREBIRD FIRMWARE 5 WHERE TO GO NEXT 6 ACTIVECAPTURE - INTRODUCTION 7 ACTIVECAPTURE - IN USE 8 GENTL CAMERA LINK SETUP UTILITY 9 WHAT ELSE IS INSTALLED? 10 SOFTWARE UN-INSTALLATION 11 CONTACT DETAILS 12DisclaimerWhile every precaution has been taken in the preparation of this document, Active Silicon assumes no responsibility for errors or omissions. Active Silicon reserves the right to change the specification of the product described within this document and the document itself at any time without notice and without obligation of Active Silicon to notify any person of such revisions or changes.Copyright NoticeCopyright © 2022 Active Silicon. All rights reserved. This document may notin whole or in part, be reproduced, transmitted, transcribed, stored in any electronic medium or machine readable form, or translated into any language or computer language without the prior written consent of Active Silicon.Trademarks and AcknowledgementsAll trademarks and registered trademarks are the property of their respective owners.Windows is either a registered trademark or trademark of Microsoft Corporation in the United States and/or other countries.GenICam is a trademark of EMVA, CoaXPress is a trademark of JIIA, Camera Link is a trademark of A3.Part InformationPart Number: FBD-MAN-QS.Power off and open up the computer taking the usual anti-static precautions.Please note: The boards are keyed so that they can only be fitted into a slot in which they will work.Do not modify the FireBird board or the motherboard in an attempt to override the keying as this could result in serious damage.For full performance, boards with a part number including ’PE8’ mustbe fitted in a slot that supportsPCI Express at x8 width; similarly those including ‘PE4’ must use aslot supporting x4. Boards with apart number including ’3PE’ mustbe fitted in a slot that supports PCIExpress at Gen 3 speeds; similarlythose including ‘2PE’ must use a slotsupporting Gen 2 speeds. Check yourcomputer documentation for detailsof the PCI Express connectors.CoaXPress Boards Only: Formultichannel CoaXPress boards,and the 1XCXP6-2PE8 board, if theboard will be used to power camerasthrough the CoaXPress cables usingPoCXP then the auxiliary powerconnector J13 must be connectedto the computer power supply. Thecorrect power supply cable is oneintended for PCI Express Graphics(PEG) cards, and may have 6 or 8ways. To distinguish it from othersimilar connectors in the computer,the connector should be black andmay be marked ‘PCI-E’ or ‘PEG’. Similarconnectors that are not PEG should bewhite. However this is often not thecase, so the cables should be carefullychecked for the pattern of squaresand chamfers on the plastic body ofthe connector at the end of the cable.See the images below.Also, the wires should be black onthe side with the connector clip, andcolored (often yellow or blue) on theother side.If the connector does not matchthose shown above, DO NOTattempt to force it into FireBird asthis could result in serious damage.If a 6 way connector is plugged intoFireBird, it should be aligned at theupper 6 ways of the 8 way FireBirdconnector as shown below.PEG cable splitters, PEG to SATAadapters and PEG to ‘Molex’ adaptersare available from Active Silicon andare included in the optional cablestarter kit.Close and power on the computer.The Active Silicon FireBird Package includes the FireBird Driver (device driver and core libraries), various applications including ActiveCapture, a GenICam-based GUI program, and the GenTL Producer. Additionally, ActiveSDK is for software developers.By default, selecting Typical installs everything, but individual options can be deselected if required (see image below). The packages are supplied as a compressed file which includes the installation package along with theseinstructions and the release notes.The file naming convention is:as-<product>-<OS>- vXX_YY_ZZwhere <product> is:z fbd-cxp for the FireBird CoaXPressPackage.z fbd-cl for the FireBird Camera LinkPackage.z fbd-sdk for the FireBird ActiveSDKPackage.Windows® 10 and 11Uninstall any previous version ofthe Active Silicon FireBird Package(see page 11). Note: The previousSDK can be left on the PC to allowdevelopers to refer to both old andnew SDKs.Un-zip the required msi package to alocal disk.Run the msi.Follow the on-screen prompts,including to reboot the PC onceinstallation has completed.After completing installation it isrecommended to update the FireBirdfirmware (see the next page).Windows ServicePart of the installation is a Windowsservice ‘Active Silicon FireBird’ whichautomatically runs as Windows starts.This loads the main firmware intoFireBird boards with part numbersincluding ‘3PE’. Until the service runsthese boards have limited functionality,and from a hardware viewpoint theydo not power or discover connectedcameras and LEDs do not function. Thisprocess is needed to meet PCI Expressrequirements with the larger FPGA used.Other Operating SystemsSee the specific Quickstart Guidesupplied with the installation package.It is recommended to always update the firmware on FireBird boards to match that in the current driver set. This is also important because new boards ship with firmware used in production testing.UPDATING THE FIREBIRD FIRMWARE Design option controls the configuration mode of the board. The options presenteddepend on the board in use. The options with a 4xCXP6 FireBird are shown here.Default updates the firmware keeping the same configuration mode as before the update.4xCXP6: 1 Camera selects the configuration mode with 1 camera with up to 4 coax cables.4xCXP6: 2 Camera selects the configuration mode with 2 cameras each with 2 coax cables.4xCXP6: 4 Camera selects the configuration mode with 4 cameras each with 1 coax cable.Feedback window shows which boards will be updated, their current configuration and firmware version, what they will beupdated to, and progress information duringupdating.Board option allows only selected boards in a system to be updated. By default all boards are updated. Note that updater will update any Phoenix boards it finds in a system as well as FireBirds. Program Board(s) button to start the update process. Wait for the process to complete, then reboot the PC.If the updater fails for any reason so that the board is no longer recognized, jumper J8 can be moved to the ‘FF’position before rebooting the PC to allow the board to configure from its ‘Factory’ design, to allow the update process to be run again. When the updater has finished, shut down the PC and move the jumper back to its default position before powering up the board. See the Jumpers section of the FireBird Hardware Manual for more information.and documentation for other for other operating systems refer to the specific Quickstart Guide.four coax cables, but it can be configured e.g. to support four cameras each with one coax cable by selecting Design 4xCXP6: 4 Camera .To update firmware select Flash Programming from the Tools menu in ActiveCapture to run the FireBird / Phoenix Firmware Updater utility.This utility also allows the configuration mode of the board to be changed – for example a four input CoaXPress board by default supports one camera with up toWHERE TO GO NEXTCheck the PC BIOSOlder BIOS versions in PCs cangive noticeably lower PCI Express bandwidth. It is recommended to check for available BIOS updates, especially if any bandwidth problems are seen.Many PCs now support power saving features in the BIOS. These can result in poor PCI Express bandwidth, maybe only occasionally. Therefore Active Silicon recommends that the following settings are used (where available):z C-States set to ‘Off’.z Speedstep set to ‘Off’.z PCI Performance Mode set to ‘On’.z PCI Express Power Management setto ‘Off’.Check the BandwidthNext run the Bandwidth Test utility.FireBird can transfer data at very highrates but if the PC cannot keep up thesystem will not work. This utility, in theTools menu in ActiveCapture, shows themaximum rate that FireBird can transferdata to the PC.For a board with part number including‘3PE8’ a value around 6800 Mbytes/secis typical of a good PC; similarly 3400Mytes/sec for a ‘3PE4’ or ‘2PE8’ and 1700Mbytes/sec for a ‘2PE4’. A low or unstablevalue means that problems are likely tobe seen.Low Bandwidth?If the bandwidth test reports a low orunstable value, check the following:Check that a suitable PCI Express slotis in use (see Hardware Installation onpage 3). Sometimes motherboardrestrictions mean that a Gen 2 x16 slotworks much better than a Gen 2 x8slot, so try using a x16 slot.Check the BIOS settings (see Check thePC BIOS opposite).How old is the motherboard?Old chipsets may show worseperformance than current ones.DocumentationThe Start Menu under Active SiliconFireBird <xx> – Documentation includesthis document, release notes, and thefollowing key documents:The FireBird Hardware Manual givesfull details of all connectors, LEDs andjumpers on FireBird, I/O support, and PCrequirements.The FireBird System Manual is thefirst place for system developers andprogrammers to go. It gives an overviewof the options to configure a system,describes all the trigger modes in detail,and discusses system issues.Documentation on the API is describedin the ActiveSDKsection (see page 10).Device List.Acme” highlighted here, andConnect button.Live button for continuousSingle Sequence buttonTools menu gives access to utilities such as the firmware updaterand the GenTL CL Setup Utility.ACTIVECAPTURE - IN USE and “-” keys on the keyboard, or the mouse wheel.2. The Feature Browser shows the selected in the Device List . Any feature that is not greyed out can be changed. Note that many features are greyed out whileacquisition is in progress – first stop acquistion to change them. The FireBird features for pixel format, width and height are automatically set to match the camera. Therefore to change the values of these features, change them on the camera.The Feature Browser refreshes visible features periodically while the system is in use. With Camera Link cameras this can be slow, and turning off Polling can be useful. Refresh button can then be used to update features on demand.Clicking the Histogram button displays a histogram and statistics for the selected image, or byentering coordinates, for just part of the image.Similarly, the 1D Profile button ActiveCapture featuresGENTL CAMERA LINK SETUP UTILITY The GenTL CL Setup Utility needs to be run to allow the use of Camera Link cameras that support GenICam. It is needed because Camera Link pre-dates GenICam so cameras cannot be discovered automatically.The utility only needs to be run once for a given camera connection. ToCamera Probing to select a channel on a FireBird board, and the camera that is connected to it.The list of cameras will show all the CLProtocolDLLs installed on the machine, including thegeneric GenICam#GenCP_01_00 DLL which should be used for all GenCP cameras.Click Add to attempt to connect to the camera. If it is found it will be added to the list ofknown cameras.found and added using the Camera Probing controls.Click Save when the cameras have been correctly added.A GenTL application will attempt to connect to these cameras, so if a camera is removedfrom a system or moved to another port, select the camera and click Delete .Status Log shows what the utility has done.do this run it from the Tools menu in ActiveCapture , after ensuring that no cameras are open in ActiveCapture , and closing any other application that may have the cameras open.After it has been run, refresh the Device List in the GenTL consumer applicationin use, such as ActiveCapure , and the camera should then be listed and operate correctly.The utility associates a CLProtocol DLL with a specific Camera Link port on FireBird. For cameras using GenCP , a generic GenCP DLL is provided as part ofthe FireBird installation.For other cameras, note that onlyCamera Link cameras that are provided with a CLProtocol DLL can be used with GenICam. Older Camera Link cameras may not provide a suitable DLL and therefore will not work with GenICam applications. Contact the camera vendor to obtain the correct DLL file.WHAT ELSE IS INSTALLED?GenICam GenTLThe GenTL Producer allows GenTL based GenICam applications to control the camera and FireBird. It should work with third party applications described as‘GenTL Consumers’, without needing any custom interface code.Note that some GenICam applications do not use GenTL, but rely on direct image transfer from GigE Vision cameras – these will not work with FireBird. Documentation on the Producer and the following GenTL utilities is in the FireBird GenTL Producer Manual which can be found in the Start Menu under Active Silicon FireBird <xx> – Documentation.ActiveSDKThe FireBird ActiveSDK IntroductoryManual gives an overview of ActiveSDK,and the various API Manuals describethe available ActiveSDK functions indetail. These are in the Start Menu underActive Silicon ActiveSDK vXX.YY.ZZ –Documentation.Example source code is in the theStart Menu under Active Silicon ActiveSDKvXX.YY.ZZ – View Example Source, andthe Visual Studio project can be openedfrom the Start Menu under Active SiliconActiveSDK vXX.YY.ZZ – Open ExampleProjects.Support InformationThe Help menu in ActiveCapture givestwo groups of information that can beuseful when contacting Active Silicon’ssupport team.Show Board Information gives details ofthe Active Silicon boards in the system.System Information gives more generalinformation about a system. Theinformation is both displayed to thescreen, and saved in file as_sysinfo.txt inPublic Documents \ Active Silicon.Miscellaneous:PCF setup files for many camerasare in the Start Menu under ActiveSilicon FireBird <xx> – PCF Files. Theseconfigure the FireBird board to matchthe specified camera. They can be usedwith ActiveCapture, and can be read intoprograms written using the PHX API.PhoenixCapture: This is Active Silicon’soriginal application to display imagesfrom cameras. It has been replaced byActiveCapture, but for users familiar withthe application it can be found in theProgram Files \ Active Silicon \ FireBird<xx>\ Bin \ Win64/32 directory. The utility isbest used in conjunction with PCF files(see above).WindowsWindows 10 and 11: Remove the package using the Windows Settings Apps & features. All packages are listed with names starting “Active Silicon”.Note that it is not necessary to remove previous copies of ActiveSDK before installing a new one. Multiple copies of ActiveSDK can be installed on the PC to allow developers to refer to both old and new versions.Other Operating SystemsSee the specific Quickstart Guide supplied with the installation package.SOFTWARE UN-INSTALLATIONFireBird Frame Grabbers – Quickstart Guide v2.511CONTACT DETAILS Contact DetailsNorth AmericaTel: +1 410-696-7642Email:***************************** Web: Europe & ROWTel: +44 (0) 1753 650600 Email:***************************** Web: 。
阿瓦隆炉之火闪退怎么办 阿瓦隆炉之火闪退解决方法介绍
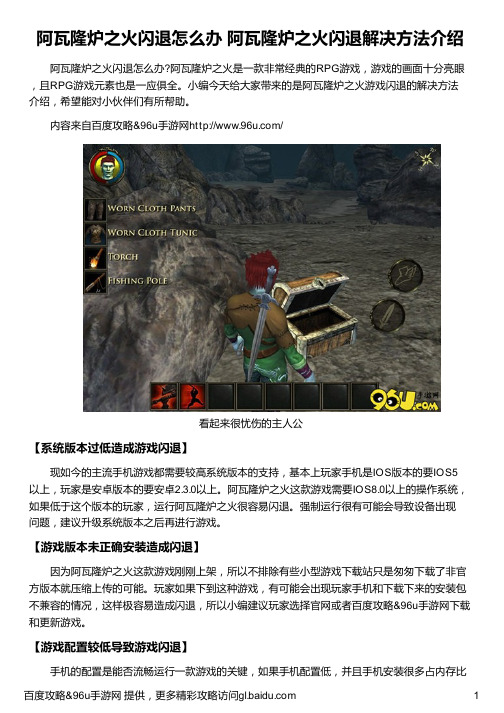
阿瓦隆炉之火闪退怎么办阿瓦隆炉之火闪退解决方法介绍阿瓦隆炉之火闪退怎么办?阿瓦隆炉之火是一款非常经典的RPG游戏,游戏的画面十分亮眼,且RPG游戏元素也是一应俱全。
小编今天给大家带来的是阿瓦隆炉之火游戏闪退的解决方法介绍,希望能对小伙伴们有所帮助。
内容来自百度攻略&96u手游网/
看起来很忧伤的主人公
【系统版本过低造成游戏闪退】
现如今的主流手机游戏都需要较高系统版本的支持,基本上玩家手机是IOS版本的要IOS5以上,玩家是安卓版本的要安卓2.3.0以上。
阿瓦隆炉之火这款游戏需要IOS8.0以上的操作系统,如果低于这个版本的玩家,运行阿瓦隆炉之火很容易闪退。
强制运行很有可能会导致设备出现问题,建议升级系统版本之后再进行游戏。
【游戏版本未正确安装造成闪退】
因为阿瓦隆炉之火这款游戏刚刚上架,所以不排除有些小型游戏下载站只是匆匆下载了非官方版本就压缩上传的可能。
玩家如果下到这种游戏,有可能会出现玩家手机和下载下来的安装包不兼容的情况,这样极容易造成闪退,所以小编建议玩家选择官网或者百度攻略&96u手游网下载和更新游戏。
【游戏配置较低导致游戏闪退】
手机的配置是能否流畅运行一款游戏的关键,如果手机配置低,并且手机安装很多占内存比
较多的游戏的时候,手机会处理不过来,游戏会经常造成闪退。
解决方法可以是清理下手机缓存,结束用不到的程序。
释放游戏运行空间,必要时换一部手机进行游戏吧。
游戏的背景十分有特色
以上就是小编带来的阿瓦隆炉之火游戏闪退的解决方法介绍,希望能帮到各位朋友!。
亚马逊Kindle Fire HD(8.9 4G)说明书
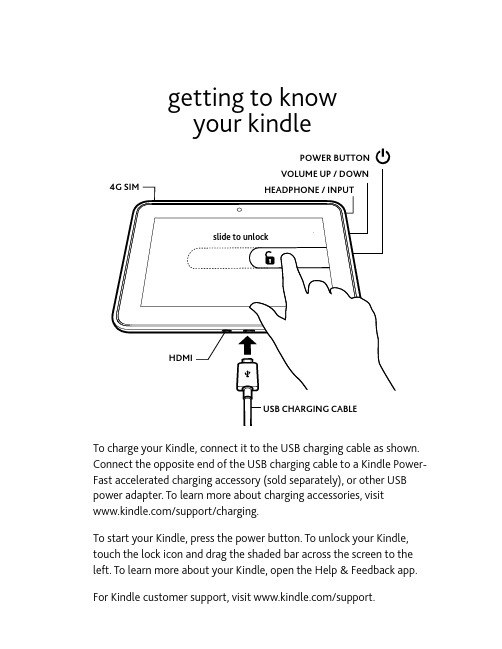
Connect the opposite end of the USB charging cable to a Kindle Power-Fast accelerated charging accessory (sold separately), or other USB power adapter. To learn more about charging accessories, visit /support/charging.To start your Kindle, press the power button. To unlock your Kindle, touch the lock icon and drag the shaded bar across the screen to the left. To learn more about your Kindle, open the Help & Feedback app. For Kindle customer support, visit /support.getting to know your kindlePOWER BUTTONimportant product informationAmazon terms & policies Safety, compliance, recycling, and other important information regarding your Kindle, can be found in the Legal & Compliance section of the Settings menu on your Kindle. For additional help, please visit /support. Before using the Kindle device, please read the terms located at/kindlefireterms and all rules and policies for the Kindle device and services related to the device (including, but not limited to, the Amazon privacy notice located at /privacy and any rules or usage provisions specified on the website or the Kindle Store) (collectively, the “Agreements”). By using the Kindle device you agree to be bound by the terms of the Agreements.AT&T terms & policies Information regarding data plans for your Kindle can be found by opening the AT&T AllAccess application from the Settings menu on your device.Your Kindle is covered by a One-Year Limited Warranty. Details are available at /kindlewarranty.© 2012 , Inc. or its affiliates. All rights reserved. Amazon, Kindle, Kindle Fire, Kindle PowerFast and the Amazon logo are trademarks of , Inc. or its affiliates.。
新版黑色Kindle DXG汉化刷机教程
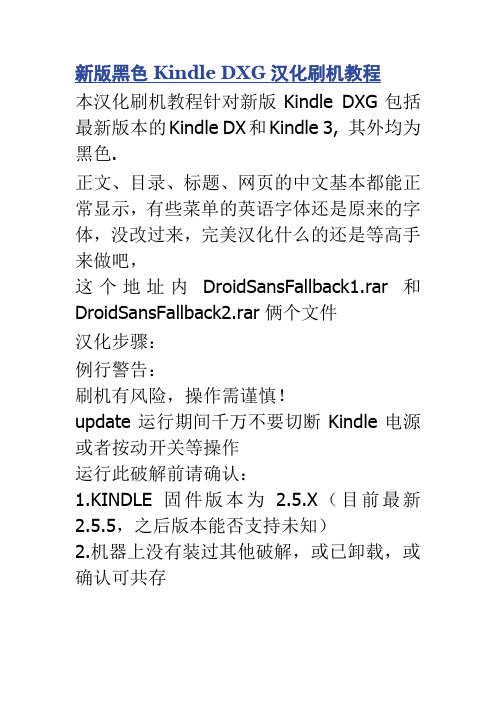
新版黑色Kindle DXG汉化刷机教程本汉化刷机教程针对新版Kindle DXG包括最新版本的Kindle DX和Kindle 3, 其外均为黑色.正文、目录、标题、网页的中文基本都能正常显示,有些菜单的英语字体还是原来的字体,没改过来,完美汉化什么的还是等高手来做吧,这个地址内DroidSansFallback1.rar 和DroidSansFallback2.rar俩个文件汉化步骤:例行警告:刷机有风险,操作需谨慎!update运行期间千万不要切断Kindle电源或者按动开关等操作运行此破解前请确认:1.KINDLE固件版本为2.5.X(目前最新2.5.5,之后版本能否支持未知)2.机器上没有装过其他破解,或已卸载,或确认可共存第一步越狱jailbreak1.解压kindle-2.5-jailbreak-0.1.N.zip2.仅复制对应bin至kindle根目录(eg. DXG 用update_jailbreak_dxg_install.bin,DXi 对应DX国际版,DX对应DX美版,K2对应KINDLE 2美版,KINDLE 2i对应KINDLE2国际版)3.断开kindle和电脑链接,通过menu>settings>menu>udate your kindle 升级4.显示FAIL,左下角错误编号U006,则成功,等机器自动重启6.如需删除jailbreak,复制uninstall对应文件运行即可第二步字体破解font hack1.解压kindle-2.5-fonts-3.4.N.zip2.复制对应bin文件和src文件夹下的linkfonts文件夹至kindle根目录(bin文件和linkfonts文件夹均放在根目录底)3.解压droidsansfallback1.rar和droidsansfallback2.rar(共12个文件),替换linkfonts/fonts下部分文件(该字体支持中文显示),fonts内其余文件不动4.断开电脑和kindle链接,通过menu>settings>menu>update your kindle 进行升级,升级完机器会自动重启5.如果要更换字体,将字体文件放入fonts 文件夹内替换原有文件(fonts内应共有26个文件),并将一个空白的“reboot”文件放入linkfonts文件夹(可将linkfonts内的autoreboot文件通过复制、重命名得到一个空白的reboot文件),断开USB链接后机器会自动重启。
- 1、下载文档前请自行甄别文档内容的完整性,平台不提供额外的编辑、内容补充、找答案等附加服务。
- 2、"仅部分预览"的文档,不可在线预览部分如存在完整性等问题,可反馈申请退款(可完整预览的文档不适用该条件!)。
- 3、如文档侵犯您的权益,请联系客服反馈,我们会尽快为您处理(人工客服工作时间:9:00-18:30)。
平板地带出品:HellFire.V1.0-Kindle.Fire-Android4.0.4刷机包(2012.04.07全球首发)
【简单说明】北京时间3月30日,Google推出官方Android 4.0.4更新。
4月7日,HellFire就推出了Kindle Fire版的刷机Rom。
对于Kindle Frie Android 4.0.4刷机包,此刷机包算是全球首发了!
【刷机说明】
①Android 4.0.4电池续航能力得到加强、屏幕旋转的效果更快;
②可以正常关机;
③可以搬家程序到SD卡;
④暂不支持高清视频、在线直播;
⑤据国外板友反馈,存在偶尔死机的情况,只需用安兔兔CPU大师,将CPU 最小值调到600MHz即可。
不过,笔者目前没碰到死机状况。
【Rom下载】
/thread-34211-1-1.html
【刷机步骤】
!!!刷机前,请用豌豆荚备份系统应用软件!
!!!刷机前,请用TWRP备份系统!
②将下载的刷机包放入SD卡;
③进入TWRP,进入Wipe,点击Factory Reset,然后Wipe System,Cache,Dalvik Cache返回。
④进入Install,选择刷机包
Padest.Android.4.0.4.HFKS_V1.0(2012.04.07).zip,然后Flash。
几分钟后,提示成功。
点击Wipe Cache/Dalvik,返回。
⑤重启Reboot System,片刻后,即可进入HellFire Android4.0.4系统。
(备注:据国外板友反馈存在一次刷机不成功的可能,只需重复刷机即可解决。
)
附上适用截图:。