【VIP专享】行车记录仪英文说明书
行车记录仪产品使用说明书
行车记录仪产品使用说明书按键功能描述1、电源键/摄像头补光灯功能一:开关机功能在关机状态下,长按【电源键】并保持3秒钟,可开启本机电源,机器开始工作。
在开机状态下,长按【电源键】并保持3秒钟,本机自动保存录像文件及用户设置并关机。
功能二:摄像头补光灯功能在待机状态下,短按【电源键】,可进行补光灯打开/关闭/自动三种模式的切换。
自动模式下,补光灯由摄像头感应光的亮度来控制。
2、模式键/菜单键/紧急录像锁定键功能一:模式切换功能在待机状态下,短按【模式键】,可在不同模式(录像/拍照/回放)之间进行切换。
功能二:菜单功能在待机状态下,长按【菜单键】进行主菜单功能设置表,短按【上翻键】或【下翻键】,选择需要设置的选项,短按【确认键】确认。
设置完成后,短按【菜单键】直至退出菜单设置功能。
(菜单设置方法在录像模式、拍照模式、回放模式中均相同)功能三:紧急锁定功能在录像模式中,如果想保护当前视频不会被覆盖,短按【菜单键】启动紧急锁定功能,此时,屏幕上方出现锁文件图标,则将事故发生时的当前正在录制的影像保存为一个特殊影像,这个影像不会被覆盖。
3、上翻键/移动测速/快退功能一:上翻页功能在菜单设置和回放模式中为上翻页功能。
功能二:移动侦测功能三:快退在回放模式上,短按【上翻键】可以快退。
4、下翻键/静音键/快进/停车模式功能一:下翻页功能在菜单设置和回放模式中为下翻页功能。
功能二:关闭录音功能在录像模式中,短按【下翻键】可关闭录音功能,此时屏幕右下方话筒变为禁止图标,表示已经关闭录音功能。
再次短按可开启录音,图标显示为开启录音。
功能三:快进在回放模式下,短按【下翻键】可以快进。
功能四:停车监控在待机模式下,长按【下翻键】可以打开或关闭停车模式功能,左下角图标会有相应的变化。
5、录像键/拍照键/确认键/屏幕背光灯开关键功能一:启动/关闭录像功能在录像模式下,短按【确认键】开始录像,再次短按【确认键】可停止录像。
功能二:拍照键在拍照模式下,短按【确认键】一下可拍摄一张照片。
博仕BH021三录行车记录仪英文说明书
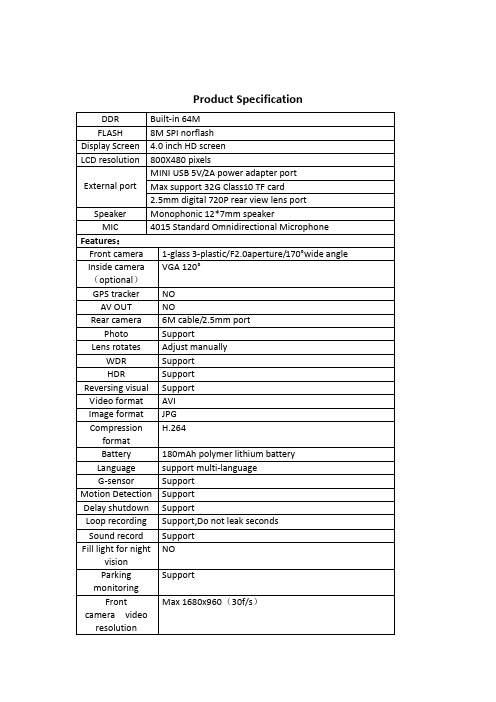
Product Specification①Menu / Camera / Playback② Power button③ Down ④ Confirm button⑤ Up⑥ Front camera⑦ Microphone ⑧ Reset button⑨ Holder interface ⑩ Rear camera interface⑪ Power interface ⑫ TF Card slot⑬ Display screen ⑭ Inside camera (optional)【】Power button, short press to turn on/off screen, long press to switch on/off the device.【M】Menu / camera / playback buttonPress 【OK】key to stop recording, press 【M】to enter photo mode, press 【OK】to take photo;In the camera mode, press 【M】to enter playback mode, press 【OK】key to playback. Lock function: In case of video recording, short press 【M】for a key lock function to protect the current video file, and this file will not be covered by the cyclevideobutton to turn on/off sound record at the shooting interface.【◀】Up key. 1, short press【◀】to select function at the Menu interface; 2, In case of video recording, short press OK button to pause, then short press【◀】button to switch front-inside view image (require inside view lens); 3, long press【◀】button to switch front-rear view image; 4, In case of front-rear view image, short press OK button to pause, then short press 【◀】button to switch front-rear view image (require rear view lens)【OK】Confirm button, short press to confirm in the menu interface , short press to video record on/off in the video modeRear view lens (optional)In case of video recording, 4 pin plug of rear view lens insert AV-in hole of device, there’s a rear view image in topright of the screen, that means connected successfully; short press OK button to pause, long press【◀】button to switch front-rear view image, When hang up “R” gear, it will show full image of rear view Note: This device can only support dual cameras to video record at the same time instead of 3 channels camera, that is front-inside camera or front-rear camera; if installed a rearview camera and choose front-inside view mode, it will automatically indicate full image of car reversing visual when you hang up "R" gear, but won't effect front-inside video record, also will automatically switch back front-inside view after cancel "R" gear.As for system update to support 3 channels camera to video record at the same time, please prevail in kind and we're sorry for no further notice.Reset key【RESET】If the recorder crashes and accidental operation is not a normal fault, press 【RESET】to shutdown the device, then press 【OK】to reboot the device.Installation Notes1. Please test the rear view camera firstly, if it works well then install (package without rear view lens can be ignored).2. Turn off the car engine.3. The TF card insert the recorder slot.【Note】Please use the high-speed TF card (Class10 above), capacity of not less than 4GB, TF card maximum support 32GB.4. The recorder via a bracket fixed to the front windshield of the car.5. Insert the car charger into the car cigarette lighter.【Note】When wiring, extend the charging line along the edge of the car door frame and carpet under the car laying.6. Install the rear camera at the rear of the vehicle, and pay attention to the up and down direction. Wiring can be buried along the edge of the car roof laying.【Note】There are two ways to install the rear camera:A.Adsorbed on the glass above and behind the car, hands-on self-installation (Reversing visual function can not be achieved, only real-time recording rear video).B.To find a professional installation staff installed in the license plate above the camera at the same time need to connect the power reversing lights(Reversing visual function can be achieved).7. Adjust the lens position to ensure the best viewing angle.8. Start the engine and check that the machine is operating properly.Featurese the automatic recording functionStart the car engine, the recorder automatically starts to open the recording function.Close the car engine, The recorder automatically saves the contents of the log and shuts down,recorded video segments are stored on the TF card,When the TF card is full, the recorder will overwrite the oldest recorded image preferentially.【Note】a. Time segment of record can be set 1/2/3 minutes in the menu .b. The video individually saved in the folder named “DCIMA” and “DCIMB” in TF card (package include rear view lens)。
wdrfullhd说明书
wdrfullhd说明书
1、行车记录仪长按电源开关键开机或关机。
开机后会自动进入录像状态,录像指示符号闪烁。
录像时,按OK键停止。
2、行车记录仪即记录车辆行驶途中的影像及声音等相关资讯的仪器。
安装行车记录仪后,能够记录汽车行驶全过程的视频图像和声音,可为交通事故提供证据。
3、行车记录仪安装位置,正确的安装位置位于后视镜区域内,位于左右两侧的话由于拍摄广角的问题,会造成拍摄的盲区,而如果简单放置于汽车中控台上,则在遭遇疑似撞车的时候不能够有足够的视野确定前车头是否真的碰撞,在鉴定“碰瓷”现象的时候会造成取证困难,所以将行车记录仪藏于后视镜后面或者下方不遮挡视线的区域才是最合理的安装位置。
4、现在常用的固定方式有两种,一种是胶粘,一种是吸盘,胶粘的话好处在于安装牢固,不易掉,不好之处在于需要安装的时候选好位置,不然取下来更换位置非常不方便,而且还会留下难看的印记。
吸盘的方式比较容易拆卸,不过吸盘式的吸附力不强,需要注意随时加固,在实际的使用过程中会存在一定隐患。
5、通常行车记录仪一般都会配备一根长线,从安装的后视镜位置塞到A柱包边和内饰里边,通过隐藏走线的方式接入汽车点烟器。
不过这种方式一般来说需要工具众多,有些车主也会因为会有破坏内部装饰的可能而不用这种方法。
这时也可以将行车记录仪的线直接下垂接入点烟器,将多余的线缆缠绕或者放入手套箱,不过这种方式也会在一定程度上影响到驾驶。
唯赛思通摩托车行车记录仪X1S(英文)使用说明书
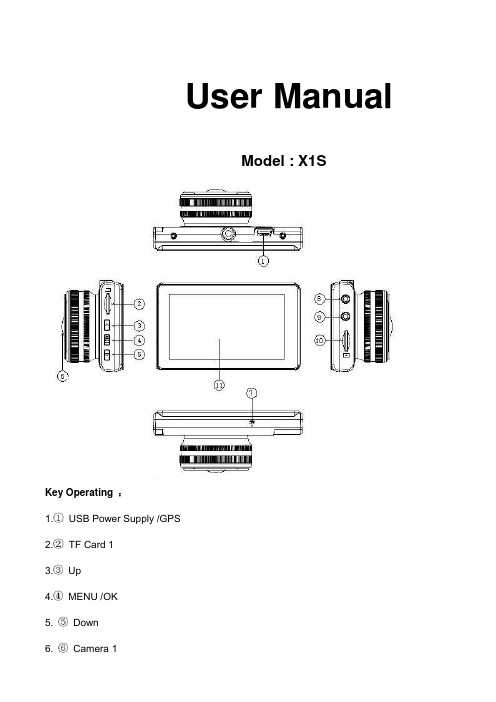
User ManualModel : X1SKey Operating :B Power Supply /GPS2.TF Card 13.Up4.MENU /OK5. Down6. Camera 17. Microphone8. Camera 29. Camera 310. TF Card 211. LCD ScreenMenu main interface and settingHow to Video recording and Menu settingVideo recordingWhen engine is started the Camera is turn on automatically, and then start to Video recording, Press “ OK ” button to stop recording ,the video file save to TF CardCamera built-in super capacitor When the Car suddenly flameout will auto save last video file to TF CardMenu Setting OptionPress Up/Down button to select setting icon Press “OK” enter Menu setting option ,and Press Up/Down button to select specific parameters Press “ OK ” button to confirm ,long Press Menu button to Exit1. Front Camera1080P 1920*1080P720P 1280*720480P 720*480VGA 640*4802. Side CameraVGA 640*480HD 1280*7203. Time StampOff No display date and timeDate Only Only display dateDate and Time Display date and Time4. Loop Recording1Min Video file 1 minute When the Card full will delete front file3Min Video file 3 minute When the Card full will delete front file5Min Video file 5 minute When the Card full will delete front fileOff Until the Card FullSystem Setting1. BeepOn Turn On operation button soundOff Turn off operation button sound2. Screen OffOff Camera LCD keep on1 Min No any operating the Camera after 1min enter screensaver3 Min No any operating the Camera after 3min enter screensaver5 Min No any operating the Camera after 5min enter screensaver(In the Screensaver status ,Press any button Can be restore)3. G-sensorSetting G-sensor sensitivity, Off/ High/Normal/LowWhen happen emergency, will auto Protect the file, and When Card full only delete Normal recording file4. Date FormatYY/MM/DDMM/DD/YYDD/MM/YY5. Date Input1)Press “Up”/Down button to setting number2)Press “OK ” button jump next setting3)Press “OK ” button confirm and Exit set6. Time Input1)Press “Up/Down ”button to setting number2)Press “OK ” button jump ne xt setting3)Press “OK ” button confirm and Exit set7. Time ZoneCancelSet Setting GPS Time zone8. Sys. ResetWhen Setup Error, Can setting this option restore factory setting9. Fw VersionCheck software version informationFormat TF Card 1 / Card 2In the Video recording Mode , long Press “Menu “ button enter Menu main interface ,Press Up/Downbutton to select format TF Card 1/ Card 2 Press “OK ” button enter setting interface Press “OK “ button finishLanguage SettingIn the Video recording Mode , long Press “Menu “ button enter Menu main interface ,Press Up/Downbutton to select Language iconEnglish/ French/ Deutsch/Italian/Spanish/Portuguese / T-Chinese/ S-Chinese/ Russian/Turkish/Korean/JapanPlayback ModeIn the Video recording Mode ,long Press “Menu “ button enter Menu main interface ,Press Up/Down button to select Playback icon Card 1 or Card 21. Press Up/Down button to select previous/next video file2. Press “OK” Play/Stop3. long Press “Menu” button Exit playback modeGPS FunctionConnect the GPS module to the GPS slot , then start to recording ,Camera start Search GPS Signal the GPS icon flashing after received GPS Signal the GPS icon light up and the date time will auto updatePlayback GPS fileOpen GPS Player ( Drplayer )Open iconClick button to select GPS file then Click “Play” button to playing as followCamera Change1) Front Camera In the other mode ,Press “ Up “ button Can be change the Front Camera to SideCamera2) Side Camera In the other mode ,Press “ Down “ button Can be change to Camera 2 or Camera 3 Parking ModeWhen the Car in the Park status, After 3 minute the Camera will auto change to parking mode, the LCD display” Parking Mode “ in the parking mode the video file is 1FPSPower Supply Mode1) OBD Cable Compatible with all the standard OBD interface in you Car the Camera willworking 24/7 days ,once your choose this power supply ( Low voltageprotection system is built in )2) Car charger Used Car charger connect to Car cigarette lighter socket, When engine isstarted the Camera is turn on automatically, and then start to Videorecording,TF Card Installment :1. Insert the TF Card in the TF Card slot according to the indicative direction ,until it softly clicks2. When removing the TF Card push in the TF Card and gently release to eject it.Notes:1. Make sure the TF Card are facing the right way ,if it is in the wrong direction ,it may damage theCamera and TF Card2. If the TF Card is incompatible with the Camera, please try to insert again ,change other TF Card3. Please use the high- speed TF Card.(The Card have CLAS S⑩icon)Technical SpecificationsNotice: Due the camera software update camera function has change, without prior notice。
唯赛思通摩托车行车记录仪C3(英文)使用说明书

Road Safety GuardOperation InstructionKey Operation :1. Power on/off2. Reset3. Camera 14. Camera 25. USB6. Menu7. Mode8. OK9. TF Card10. LCD Display screen11. MUTE/UP12. REC/DOWN13. FlashlightMenu operating instructionsVideo recording ModeIn the Video recording Mode,Press “Menu” button enter Setup interface.Press UP/Down button to select specific parameters, Press “OK” to confirm and Press “Menu”to Exit.1. Video ResolutionHD 1280*720D1 720*480VGA 640*4802. CameraSelect camera to recording, camera 1/camera 2/ camera 1+23. Time StampOff No display date and timeDate Only Only display dateDate and Time Display date and time4. Voice setupOn Turn on Voice PromptOff Turn off Voice Prompt5. REC SoundOff Video recording turn off the soundOn Video recording sound and image sync4. G-sensitivitySetting G-sensor sensitivity, Off/ high/Medium/LowWhen happen impact the video file will protect and the file name is (EVE.XXXXX) ,the card is full only delete normal recording file (REC.XXXXX).7. BrightnessSet camera 1/camera 2 brightnessSetting ModeIn the other Mode, Press “Menu” button twice enter Setup interface.Press UP/Down button to select specific parameters, Press “OK” to confirm and Press “Menu”to Exit.1. FormatFormat TF Card (S elect “Execute “format TF Card )2. ScreensaverOff Camera LCD keep on1 Min If no any operating the camera after 1min enter screensaver3 Min If no any operating the camera after 3min enter screensaver5 Min If no any operating the camera after 5min enter screensaver(Screensaver status ,Press any button to restore)3. BeepOn Turn On operation button soundOff Turn off operation button sound4. LanguageEnglish/ French/ Deutsch/Italian/Spanish/Portuguese / T-Chinese/ S-Chinese/ Russian/ Turkish/Korean5. Auto offOff Camera not auto power off1 Min If no any operating the camera after 1min auto power off3 Min If no any operating the camera after 3min auto power off5 Min If no any operating the camera after 5min auto power off6. Sys. ResetWhen Setup Error, can setting this option restore factory setting7. Light Frequency50HZ60HZ8. Date Input1)Press “Up”/Down button to setting number2)Press “Mode” button jump next setting3)Press “REC” button Exit set9. VersionCheck software version informationPlayback ModeP ress “Mode” button change to Playback mode (Press “OK” button to playback the video file)1. Press Up/Down button to select previous/next video /photo file2. Press “OK” Play/Stop1. DeleteSingle Delete single fileAll Delete all the file2. ProtectSingle Delete single fileAll Delete all the file3. Thumbnail /Execute4. File List /Execute5. VolumeAdjust volume 1~8Loop RecordingWhen TF Card is full ,the Camera will auto delete in front of the old files, When happen impact the video file will protect(EVE.XXXXX) ,the card is full only delete normal recording file (REC.XXXXX).Flashlight functionCamera in the power off or other mode, short Press power button to turn on flashlight, press again turn off .Parking ModeWhen the car in the stop status, after 3 minute will auto change to parking mode, in the parking mode the video file is 1FPSNote:1) According the need of customers, this function is options.2) In order to avoid the improper operation to install damage the camera , Please to auto service center to find a professional maintenance technicians to install, and use package accessory special cable (DC Input:12-24 V Output :5V-1.5A)Wired Controller FunctionCamera in the Video recording Standby mode or recording mode, Press any key on the wired Controller ,Camera will auto saved Video file name is (KEY-XXXX.AVI ) the same is (EVE.XXXX.AVI) When TF Card is full only delete Normal Video recording file (REC.XXXX.AVI)Connect Computer1. Connect the camcorder with computer by USB cable, [My computer] will occur removable disk, the file id stored at Removable Disk/DCIM/100DSCIM which can be downloaded to the computer.2. System support of the Computer: Windows 2000/XP/Vista/Windows 7Power on test1)First time use camera ,please use package accessory USB cable connect to charger(DC-5V 1A), then connect to USB slot, power on test normal recording and other function2)After power on test normal, can install and useCharging the battery1. Directly connect car cigarettes with the USB interface, to charge battery2. Use a USB cable to connect the computer with the USB interface, to charge battery3. Use the USB cable to connect charger the USB interface, to charge battery.4. The battery level display shows the remaining power of the battery as below:Low power Not fully charged fully chargedTF card installment :1. insert the TF card in the TF Card slot according to the indicative direction ,until it softly clicks2. When removing the TF card push in the TF card and gently release to eject it.Notes:1. Make sure the TF card are facing the right way ,if it is in the wrong direction ,it may damage thecamera and TF card2. If the TF card is incompatible with the camera, please try to insert again ,change other TF card3. Please use the high- speed TF card.(The card have CLAS S⑩icon)Notice:Suppose the camera is in dead halt due to the improper operation, you can press reset button to restore the camera will return to normalTechnical specificationsLCD screen 2.0 TFTCamera lens 120 degrees A+ level high resolution lensLanguage English/French/ German /Italian/Spanish/Portuguese / T-Chinese/S-Chinese/ Russian/ TurkishVideo format AVI (MJPG)Memory card TF Up to 32GBMicrophone Built–inFrequency 50Hz/60HzUSB interface USB2.0Battery Built-inG-SENSOR SupportNotice: Due the camera software update camera function has change, without prior notice。
EOSS DVR720E HD 720P 行车记录仪使用说明书
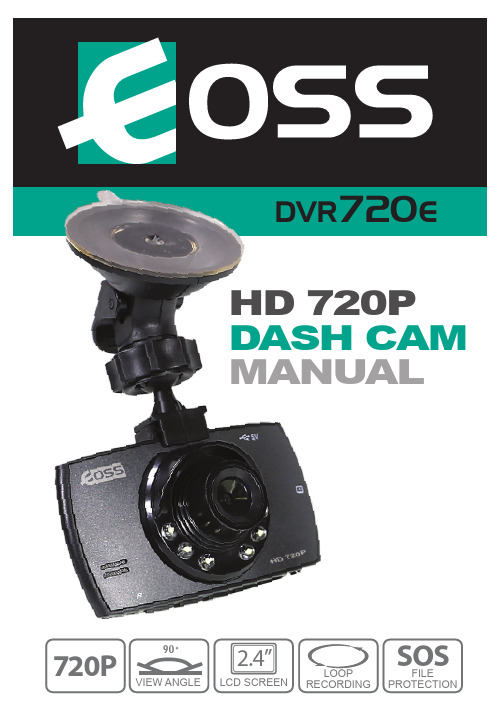
DVR720 HD 720P DASH CAM MANUAL!HD 1280 x 720 @ 30FPS 90 Degree angle lens Date & time stamp 2.4” LCD screen Mini USB interfaceSeamless loop recordingBuilt-in MIC and Speaker SOS Lock function 6x LED LightsSuction car mount with 360 degree rotation Supports Micro SD card class10 up to 32GBMini USB interface with data transfer & charging cable 12V car chargerThank you for purchasing the EOSS DVR720E Dash Cam.Please ensure that you have read the product manual and instructions in full, prior to installation and use. Failure to do so may result in product failure/damage or incorrect operation and therefore impact the product performance.The EOSS DVR720E Dash Cam has been designed to provide highdefinition recordings of your trips for security and evidence in the case of an accident. The Dash Cam simply mounts to the windscreen and records footage onto a Micro SD memory card.Table of ContentsIntroduction2223 Package components4 Product structure5 Installation of Dash Cam 678Dash Cam functionsMenu setting features explained Product specificationsInfringement of copyright warning 9 9 1214 14 15Product overviewProduct featuresTable of contentsVideo/Photo/Audio playbackSafety information & warnings Technical assistance 13Trouble shooting guideInstructions for video, photo & audio operationDVR720E Dash CamSuction MountingBracketUSB to Mini USBCar Charger!1) Micro SD card slot2) Screen display3) Emergency lock key4) Suction mount attach point5) Speaker6) LED lights7) Camera Lens8) Power On/Off button9) Arrow button10) Menu button11) OK button12) Mode button13) Arrow button14) Reset button15) Mini USB Interface!1. Ensure windscreen is clean and free of debris. Attach suction cup tothe windscreen and lock into position with the lever.2. Fix where the vision is not blocked (Place close to rear-view mirroris recommended). Don't install device on airbag or within its working range.3. Insert Micro SD card into the Dash Cam4. Insert Mini USB end of the power cord into the Mini USB interface/charging point of the Dash Cam. Place adapter into 12V power socket of vehicle.5. Adjust the mounting bracket and rotate the camera direction to getthe best view. Ensure of the vehicles bonnet is visible from thebottom of the screenfor alignment.6. Turn vehicles ignition to accessories, push the power button on theDash Cam and it will power ON and start recording automatically, you will hear an audible tone once powered.7. A RED circle will start flashing on the screen when recording hasstarted.8. A solid red LED will show when the Dash Cam is receiving power.9. For the Dash Cam to work it must receive power from the chargingadapter. Once power is removed or turned off the Dash Cam will save the current file and turn off.To turn on the Dash Cam press the Power On/Off button once, the redindication lamp will be light up if it is connected to a power source. To turn it off, hold down the power button and the device will turn off.Press the Mode button to switch to video mode if not already. To start recording in video mode press the OK button to start the recording. You know it is recording by the red circle indicator on the top left corner of the LCD. To stop the recording, simply press the OK button again.Press the Mode button to switch to photo mode. There is a camera icon at the top left corner of the LCD to signify you are on photo mode. To take a photo, press the OK button. The screen will flash and make a camera sound when a picture is taken. Pressing the Menu button in photo mode will allow you to change the photo resolution to 3M/2M/1.3M or VGA.Powering device on and off:Video ModePhoto ModeBattery BatteryLED lights OnDate/TimeVideo mode Photo mode Video resolution Photo resolutionRecording timeRecordingFile type & numberRecording timePress the mode button until you see the playback button icon on the top right of the screen representing playback mode. Using the arrow buttons, you can choose between all your recorded videos,photos or audio. The protected files have a lock icon meaning they cannot be deleted until unlocked. Press the OK button to select a file for playback. Pressing the Menu button will give the option to delete, unlock, create thumbnail and change volume of the file. Simply press the Mode button again to return to video mode.Press the Mode button to switch to audio recording mode. There is a microphone icon on the left of the LCD to signify you are on audiorecording mode. To record audio, press the OK button. A red circle will flash and clock timer will appear and start recording audio only. Press OK button to stop recording.Audio ModeMenu SettingsPress the Menu button to get into the menu settings. You can navigate the settings menu by using the Up/Down buttons. To change or edit a selected setting, press the OK button. Press the menu button again to get out of the menu settings.When the Dash Cam is charging, a red indicator on the Dash Cam glows red. The Dash Cam takes about 2 hours to fully charge.When the Dash Cam hits full charge, the red indicator will turn blue.The Dash Cam can be charged multiple ways:1. Using the provided Mini USB cable to connect to a USB interface for charging.2. Using the provided car chargerResolution:The recommended resolution should be set at ‘720p 1280x720’ inorder to get the best quality footage.Time Stamp:This feature will stamp the date and time on all your footage produced by your Dash Cam.Video Loop:This feature allows you to set the size of the files your Dash Cam will record before saving and creating a new file. We recommend the Dash Cam to be set to ‘3’ minute filesVoice Record:This Feature will allow you to turn the Dash Cam’s recording sound onor off. If you want to stop the Dash Cam recording sound in the cab of your vehicle, set this feature to ‘off’.Format:This feature allows you to format/delete all the files off your micro SD card and also reinstalls your DCIM directory and Dash Cam software on your SD card so the micro SD card can operate with your Dash Cam free of errors. It also reinstalls your EVENT (SOS locked files) and NORMAL (Video and jpegs) directories on your Micro SD card.Language:Allows you to choose from a selection of languages.Screen saver:This feature will turn your LCD off after 1, 3 or 5 minutes but will continue to record regardless. This feature is useful for night driving as having the LCD on could be a distraction.System Reset:This feature will allow the user to reset the Dash Cam’s functions to factory settingsLight Frequency:This feature allows the best recording in conditions where street lights and ac lighting is used. The Australian standard frequency is 50HZ so it should be set to ‘50hz’.Date Input:This feature will allows the user to enter Day/Month/Year to use with Time StampUSB:When connecting a USB cable with a PC, the Dash Cam will present two options. PC Cam & Disk Drive. The ‘PC Cam’ option allows you to use your Dash Cam as a webcam for your computer. ‘Disk Drive’ allows you to transfer your videos and photos to your PC.Version:This simply shows the firmware/software employed by the Dash Cam’s hardware.Resetting the Dash Cam:To hard reset the device in the case of a system jam or crash. Insert afine point paper clip into reset hole on the bottom of the unit..Maintaining the Battery:To prolong the battery life you must charged your Dash Cam on a 5 volt home charger at least once a week for 2-3 hours with the dash cam off, if you don't use the car daily, for cars that are used daily for more than 1 hour you can charge the Dash cam once every 3 weeks for 2-3 hours.It is not recommended to power the dash cam with only the battery.The battery will only run for 10 mins continuously, always use the charger provided.Formatting Card:It is advisable to format the card weekly if you have the setting G-sensor and park mode setting active, all footage that are locked in G-sensor and park mode will fill up the card causing it to stop recording any footage.LED lights:When in recording mode press the Power button once to turn on the LED’s. The Sun icon on the screen will change to a Moon icon. Note: They are not Infra-Red LED’s. These are used to record video or take pictures inside the cabin in a dark environment.Lock Footage (SOS) :Press the Emergency Lock Key button on the right side of the display for 3 seconds to activate the lock footage function, this will save any footage from getting erased from the card. Files can be unlocked in playback mode through menu settings.Power interface5V DC/1ADisplay2.4-inch LCD screenColorBlackVideoAVI720P 1280*720 at 30fpsVGA 640*480 at 30fpsPicture3M/2M/1.3M/VGAPicture formatJPG90 Degree view angleViewing AngleLED lightsx 6Loop recording, SOS file lockFunctionsOSD LanguageEnglish, Russian, Chinese, etcAudioBuilt-in Microphone and speakerStorageSupports Micro SD card 4GB-32GB Class 10 Max Input / OutputUSBBattery200mAh lithium batteryDimension6.8*4.5*3.3CM(L*W*H)AccessoriesCar mount, Car charger, USB cableUnder normal operating conditions, if there are problems with the device, please refer to the following methods to resolve.Please check whether there is enough space on the microSD card or internal storage.Stopping automatically while recording?Due to the high amount of HD video data being recorded, please use a high-speed Micro SD card. To tell if you have the required high speed card,check if it has the ‘Micro SDHC’ logo on the SD card and 8GB class 10 orabove is recommended. Make sure that your card is labeled Micro SDHC and not Micro SDXC as SDXC cards will not work with this Dash Cam.Fuzzy/dirty image?Please check if the lens is filled with dirt or fingerprints and clean carefully. Please clean lens with cloth before shooting.The DASH CAM is jammed or not responding?Please reset the device by pushing in the reset button on the underside of the Dash Cam.Why is the DASH CAM not turning on in the car?Please check and make sure that there is power in the cigarette lighter socket of your car.Micro SD card not recognised by DASH CAM?Format card in the Dash Cam’s menu setting’s before use.A coloured tinge showing up in the video?Make sure to peel off the transparent protective sticker on the front of the Dash Cam's lens.Do not use the Dash Cam in damp working conditions; the Dash Cam isnot waterproofDo not try opening the shell or trying to repair the Dash Cam by yourself. If the accessories for the Dash Cam have any problems, please take it to an authorised repair agent for repair.Do not use a chemical substance, cleaning solvent or cleaner to clean the Dash Cam, please use a moist soft cloth if you would like to clean theDash Cam.Do not use the Dash Cam under conditions where dust is present.Please pay attention to cleaning the lens surface, use a moist soft cloth toclean the lens before use, to avoid poor video footage.Please note that this product is for personal use only, the method of use shall not violate the goods, or infringe on domestic or international copyright laws. Recorded images are for personal use only, please note that in some cases to use this product to record performances, exhibitions or business activities may infringe the copyright or other legal rights and interests of others.If you need assistance setting up or using your EOSS product now or in the future, call EOSS Support.Australia Array TEL: 03 – 8587 8898FAX: 03 – 8587 8866Mon-Fri 9am – 5pm AESTThis manual is considered correct at time of printing but is subject to change.Copyright © 2017 by TDJ AustraliaAll rights reserved. No part of this publication may be reproduced, distributed, or transmitted in any form or by any means, including photocopying, recording, copying or other electronic or mechanicalmethods, without the prior written permission of the author.。
wideanglelens行车记录仪说明书

wideanglelens行车记录仪说明书(1)长按电源开关键开机成关机。
行车记录仪连接充电器时,DVR自动开机,断开充电器时,延迟5秒自动关机。
(2)录像模式DVR开机后会自动进入录像状态。
录像招示符号闪烁。
录像时。
按OK键停止。
注意:使用前请先播入SD卡。
(3)拍照模式开机后按模式塘选择拍脱模式.按OK键进行拍用。
(4)预览模式开机后按模式缠选择预览模式,按上跑/下翻键选择规频文件,按OK犍播放或暫停,按模式键退出。
(5)NWOUT功能使用AV连接线.将DVR连接到高清TV等输出终端。
即可在TV上进行录像和浏览播故录像文性。
(6)屏韩显示切换DVR开机后,按切换键,可以进行前镜头显示、后碗头显示和双路同时显示三种显示状态的切换。
(7)屏保功能DVR在待机成录像时短按电源开关键开启或关闭屏糖保护功能。
(8)移动侦测功能格系统菜¥<移动侦测>项.设置为<开启>.启动移动侦测功能。
当有物体在DVR前面移动时,DVR会自动启动录像,当物体停止移动时。
自动停止录像。
进入侦测特机状态。
退出移动你测时,自动关闭移动测功能。
(9)红外夜视功能开机状态下.按向右键开启或关闭后碗头红外灯。
(10)日期时间设置:开机后按菜单键进入设定选项菜单。
按下键选择“日期设定”选项,按OK键进入下一级棠单,使用模式键切换键上键下键对年月日时间进行调整,全部设定好后,按OK键碗定退出子菜单。
(11)充电DVR连接DC5V充电器。
USB5V充电器城电脑USB接口都可充电,充电时红色招示灯长亮,充满电后,红色招示灯熄灭。
行车记录仪英文说明书

行车记录仪英文说明书Road Safety GuardInstruction ManualThank you for purchasing Portable DVR from our company.In order to help you operate it correctly, please read this instruction carefully before using.Product Picture and Function1. USB Slot2. AV-OUT Slot3. DC-5V4. SD/MMC Card Slot5. Speaker6. Mount hole7. Microphone8.Battery cover9. Lens10. Night Lights11. ON/OFF Power Switch12. REC / Snap13. 2.4 inch LCD14. Menu15. 16.Up /Down17. Mode ButtonAttached Accessories●Manual ●Mount ●USB Cable●Car Charger (Include the adaptor 12V/24V transfers to 5V)OperateTwo Power options:A) Use can remove built-in Li-ion batteryDVR can be activated after it has been placed on the vehicle by pressing thePower Switch for 1 second and turn off by pressing it for 2 seconds.Charging: connect with USB cable or car charger.B) Connect with Car ChargerDVR will record automatically when the car starts, turn off and save the lastfile when the car stops.RecordingDVR will enter into defaulted recording mode when turn it on, the work indicator blinkers and indicates it is recording. The recording file is saved in the SD/MMC Card. To stop, press Recording Button or ending when car stops , the work indicator won`t blinker.Camera modeTurn on the DVR and press Mode Button to enter into Camera mode. To take photo by pressing Snap Button .Manual Focus FunctionIn Camera or Recording mode ,press UP/DOWN Button thescreen will show focus icon them press UP/DOWN button to choose need focus, you can choose (1x~8x) Night Vision FunctionPress Menu button then choose Night vision , DVR will enter Night vision status ,if you want to exit choose offPreview and DeleteTurn on the DVR and press Mode Button twice to enter into Preview Mode. Press Up or Down to select the previewed file. If it is video file, it can play or pause bypressing REC Button, and stop by pressing Mode Button. If you want to delete it, press Menu Button to enter into delete mode, and then, select Single, All by Menu Button and Up/Down and confirm to delete the file by Menu Button. Also select Slide show, Protect file, Thumbnail mode and volume (from 1 to 8) under the Preview Mode.Setting the functions:Turn on the DVR and Press Menu Button under Video mode or Camera mode to enter into setting interface. Confirm by Menu Button and Select by Up/Down for the following setting. Press REC Button to exit.A.Video mode1.Size: Select VGA, QVGA, SXGA.2.Time Stamp: Off/Data Only/Data &Time3.Motion Detect: Off/On4.Video Time: 3Min/5Min/10Min/15Min5.Audio: On/Off6.Night Mode: Off/OnB.Camera mode:1.Size: VGA/1.3M/2M/3M/5M/8M/12M2.Time Stamp: Off/Data Only/Data &Time3.Burst: Off/OnC.Setting ModeWhether under idle Mode, Press Menu Button and then press Mode Button to enter into Setup interface.1.Format: Select it if you want to format the SD card.2.Beep: Off/Onnguage: Select[English/ French/ Deutsch/Italian/Spanish/Portuguese / T-Chinese/ S-Chinese/ Russian/ Turkish/Korean4.Auto Off: 1Min/2Min/5Min/Off5.System Reset: select [Cancel or Execute system] reset.6.Light Frequency: 50Hz/60Hz Output: NTSC/PAL8.Data Input: Set correct recording data and time.B: PC Cam/Disk Drive10.Version :Check software versionPreview on the TVConnect the AV link of DVR with the TV, and enter into the preview mode automatically. The operating steps are same as preview on the screen.USB ModeConnect DVR with computer by USB cable, [My computer] will occur removable disk, the file id stored at Removable Disk/DCIM/100DSCIM. At the moment, the file of the DVR can be downloaded to the computer.Note:1)Please insert the SD/MMC card before recording.2)This DVR Records in cycle if you choose 3/5/10/15 minutes as storage time.When the storage medium is full, it will record from thebeginning again and erase over the previously recorded material automatically. It will have 3seconds pause time, and namely the contents in the 3 seconds will not record.3)Because the DVR is DC5Vinput, please use the attached car charger. It hasadaptor 12V/24V transfers to 5V already.Technical Specifications1)Recording resolution: 1280*960/640*480/320*240 pixels2)Video format: AVI3)Repeat storage by section: 3/5/10/15 minutes4)Power source: Built-in rechargeable battery OR 5V Car Charger5)Supports SD/MMC card(From 256MB up to 32GB)6)Microphone: can record soundNo further notice will be given for any modification of the technical specification.。
PAPAGO 行车记录器使用手册说明书

全球行车安全领先品牌使用手册行车记录器上海研亚软件信息技术有限公司Copyright©2001-2015, PAPAGO Co.,Ltd. All rights reserved.感谢您购买 行车记录器目录安全及注意事项 (02)警告 (02)注意 (03)产品介绍 (04)包装内容 (04)部件指南 (05)安装指南 (06)安装位置 (06)安装方式 (07)使用 (08)开机 (08)关机 (08)按键功能 (09)画面图示 (09)录影功能 (10)拍照功能 (10)回放功能 (10)PC 模式 (11)AV 输出 (11)固件升级 (11)设置 (12)产品规格 (14)实用信息 (15)01安全及注意事项警告● 请勿湿手安装或操作。
● 请勿安装在高湿度、有易燃易爆气体、液体处,以及干扰驾驶员视线或安全的区域。
● 请勿长时间将主机暴露于高温下的密闭车辆。
● 使用时请勿超过额定电压。
● 当车辆熄火后,点烟器仍供电的使用者,在离开车子时,务必将点烟器插头拔起,以避免耗光电瓶内的电力,或造成其他意外状况发生。
● 产品、配件及包装请远离儿童!● 限用原厂车充线,本公司对他厂车充线造成的任何损害概不负责。
● 请勿自行拆卸主机与车充线。
※ 请勿私自剪断车充线!※ 因此造成的主机烧毁不在保修范围内!02● 务必按照当地的法律法规来回收电池。
● 请勿尝试拆解、改装或加热电池。
● 电池不可自行更换,更换不当会有爆炸危险!● 请勿让电池与水(如海水)或其他液体接触。
● 请勿使电池短路。
● 电池不得暴露在诸如日照、火烤或类似过热的环境中,以防爆炸。
● 请勿将电池投入火中,以防爆炸。
注意● 不要用力按压镜头。
● 不要用锥子等尖锐物体刺戳主机及配件。
● 在关机过程中,请勿立即将存储卡取出,避免档案造成损毁。
(最大支持32GB)● 建议使用Class10 8GB以上的存储卡。
● 首次使用存储卡前,请务必在主机上将存储卡格式化,以保证 存储卡的读写稳定。
行车记录仪使用说明书

前言尊敬的用户:您好!首先非常感谢您使用我们公司的系列产品,能够为您服务是我们的荣幸!为确保您正确使用本公司产品,请仔细阅读本手册。
手册采用图文并茂的方式,配合文字的插图详细直观地阐述产品的操作,由于产品生产日期、批次不同,说明可能会与实际使用的产品有差异,请以实物为准。
最后再次感谢您的惠顾与支持,同时也希望您在使用过程中反馈一些宝贵意见。
因为这些意见,能够使我们不断地去完善产品。
因为我们都呼吁安全第一,生命无价!也希望每一位驾驶员都遵守好交通规则,快快乐乐地出门,平平安安地回家!祝各位:万事如意,事事顺心!一、外观及按键功能描述(以下所有图片仅供参考)操作功能演示●OK键/设置功能:录像和拍照确认按钮,摄像模式下,短按此键开始录像,再次短按停止录像。
●拍照模式下短按此键拍摄照片;菜单模式下为确认按钮,长按退出当前菜单界面。
●长按电源开关键:开/关机。
●上键:菜单选项中,向上选择功能键;长按打开/关闭WIFI。
录像界面中,短按开启/关闭录音。
●下键:菜单选项中,向下选择功能键;录像界面中,长按下键在摄像/拍照/回放之间相互切换,短按前后视频窗口切换。
●开机/屏保键:短按此键屏幕保护:长按此键关机或开机;二、功能简介需在待机界面长按OK键进入设置功能进行操作1、分辨率●系统默认4K,即前4K后1080P,可选择2K,即前2K后1080,1080P,即前1080P和后1080P可节省录像内存空间。
2、录像时长●启动汽车发动机,录像仪自动启动并开启记录功能,关闭汽车发动机,录像仪自动保存记录内容并关机。
●记录的影像分段保存于TF卡上,当TF卡存储满后录像仪将覆盖较早前录制的影像。
●记录的时间段可自行在菜单中设置,范围为:1分钟/3分钟/5分钟/三个档。
【注意】如果选择为“1/3/5”分钟这三个档中的任意一档时,当TF 卡存储满后录像仪将覆盖较早前录制的影像;前路普通文件夹为 front_norm / 后路普通文件夹 back_norm 前路加锁文件夹为 front_emr / 后路加锁文件夹 back_emr 前路拍照文件夹为 back_photo / 后路拍照文件夹 front_photo 温馨提示:在开机状态不允许插卡/拔卡!以免造成TF卡损坏。
【VIP专享】爱国者行车记录仪D68使用手册副本
爱国者行车记录仪D68使用说明书目录一:产品简介 (2)二:产品功能 (2)三:使用记录仪 (3)3.1.1安卓系统使用说明 (3)3.2.1IOS系统使用说明 (4)四:安装记录仪 (7)五:遥控器使用说明 (8)六:产品基本规格参数 (8)七:注意事项 (9)八:常见故障 (9)一:产品简介本产品是一款具备WIFI,蓝牙遥控,拍照,摄像,录音,重力感应等多功能的行车记录仪,其录像分辨率最高1440P 30FPS,夜视效果清晰,主要用于车载录像。
使用前请仔细阅读本说明书并妥善保存,我们希望本产品能满足您的需求并长期服务于您!1:产品结构及说明1、支架2、复位键3、USB4、电源键5、录像键6、摄像头7、喇叭8、指示灯9、TF卡槽电源键关机模式下点按开机,开机模式下长按3秒关机;在待机或录像模式下点按关闭/打开录音;录像键在开机模式下,点按开始录像,再次点按停止录像;复位键当机器因为意外操作不能正常工作时,点按复位键强制复位;指示灯连接电源待机:指示灯红色、蓝色同时亮录像录音时:红灯长亮,蓝灯闪烁;关闭录音时,红灯灭,蓝灯闪烁。
二:产品功能开/关机开/关机方式有两种:a.点按电源键开机,长按电源键3秒关机;b.接入外电时(比如:汽车启动后车充会给机器通电)自动开机,当断开外电后(比如:汽车熄火后)会自动保存录像后自动关机。
录像开机后机器自动录像,点按录像键停止录像。
拍照:机器开机后,遥控器会通过蓝牙自动与机器连接,连接成功后机器会语音提示“蓝牙已连接”,此时在录像模式下点按遥控器按键会进行抓拍图像并保存。
文件回放:视频和照片可在APP上面回放。
USB连接:USB数据线连接电脑时,产品会作为磁盘储存器使用,在电脑上可进行文件的回放,拷贝,删除等操作。
重力感应:当机器检测到震动时,会自动加锁保护当前录像且不会被覆盖。
注意:当被保护的文件达到TF卡容量的一半时,就会覆盖最早的被保护文件循环录像:本产品可以循环覆盖录像且不漏秒,可在APP录像界面里设置循环的方式,如设置为3分钟,则每三分钟保存一段录像,当卡录满时根据先进先出的原则,对未保护的文件进行覆盖。
[VIP专享]行车记录仪英文说明书
![[VIP专享]行车记录仪英文说明书](https://img.taocdn.com/s3/m/c549e6615a8102d276a22f84.png)
Road Safety GuardInstruction ManualThank you for purchasing Portable DVR from our company.In order to help you operate it correctly, please read this instruction carefully before using.Product Picture and Function1. USB Slot2. AV-OUT Slot3. DC-5V4. SD/MMC Card Slot5. Speaker6. Mount hole7. Microphone8.Battery cover9. Lens10. Night Lights11. ON/OFF Power Switch12. REC / Snap13. 2.4 inch LCD14. Menu15. 16.Up /Down17. Mode ButtonAttached Accessories●Manual●Mount●USB Cable●Car Charger (Include the adaptor 12V/24V transfers to 5V)OperateTwo Power options:A) Use can remove built-in Li-ion batteryDVR can be activated after it has been placed on the vehicle by pressing the Power Switch for 1 second and turn off by pressing it for2 seconds.Charging: connect with USB cable or car charger.B) Connect with Car ChargerDVR will record automatically when the car starts, turn off and save the last file when the car stops.RecordingDVR will enter into defaulted recording mode when turn it on, the work indicator blinkers and indicates it is recording. Therecording file is saved in the SD/MMC Card. To stop, pressRecording Button or ending when car stops , th e work indicator won`t blinker.Camera modeTurn on the DVR and press Mode Button to enter into Camera mode. To take photo by pressing Snap Button .Manual Focus FunctionIn Camera or Recording mode ,press UP/DOWN Button the screen will show focus icon them press UP/DOWN button to choose need focus, you can choose (1x~8x)Night Vision FunctionPress Menu button then choose Night vision , DVR will enter Night vision status ,if you want to exit choose offPreview and DeleteTurn on the DVR and press Mode Button twice to enter into Preview Mode. Press Up or Down to select the previewed file. If it is video file, it can play or pause by pressing REC Button, and stop bypressing Mode Button. If you want to delete it, press Menu Button to enter into delete mode, and then, select Single, All by Menu Button and Up/Down and confirm to delete the file by Menu Button.Also select Slide show, Protect file, Thumbnail mode and volume(from 1 to 8) under the Preview Mode.Setting the functions:Turn on the DVR and Press Menu Button under Video mode or Camera mode to enter into setting interface. Confirm by Menu Button and Select by Up/Down for the following setting. Press REC Button to exit.A.Video mode1.Size: Select VGA, QVGA, SXGA.2.Time Stamp: Off/Data Only/Data &Time3.Motion Detect: Off/On4.Video Time: 3Min/5Min/10Min/15Min5.Audio: On/Off6.Night Mode: Off/OnB.Camera mode:1.Size: VGA/1.3M/2M/3M/5M/8M/12M2.Time Stamp: Off/Data Only/Data &Time3.Burst: Off/OnC.Setting ModeWhether under idle Mode, Press Menu Button and then press Mode Button to enter into Setup interface.1.Format: Select it if you want to format the SD card.2.Beep: Off/Onnguage: Select[English/ French/ Deutsch/Italian/Spanish/Portuguese /T-Chinese/ S-Chinese/ Russian/ Turkish/Korean4.Auto Off: 1Min/2Min/5Min/Off5.System Reset: select [Cancel or Execute system] reset.6.Light Frequency: 50Hz/60Hz Output: NTSC/PAL8.Data Input: Set correct recording data and time.B: PC Cam/Disk Drive10.Version :Check software versionPreview on the TVConnect the AV link of DVR with the TV, and enter into the preview mode automatically. The operating steps are same as preview on the screen.USB ModeConnect DVR with computer by USB cable, [My computer] will occur removable disk, the file id stored at Removable Disk/DCIM/100DSCIM. At the moment, the file of the DVR can be downloaded to the computer.Note:1)Please insert the SD/MMC card before recording.2)This DVR Records in cycle if you choose 3/5/10/15 minutes asstorage time. When the storage medium is full, it will recordfrom the beginning again and erase over the previously recorded material automatically. It will have 3 seconds pause time, and namely the contents in the 3 seconds will not record.3)Because the DVR is DC5Vinput, please use the attached carcharger. It has adaptor 12V/24V transfers to 5V already.Technical Specifications1)Recording resolution: 1280*960/640*480/320*240 pixels2)Video format: AVI3)Repeat storage by section: 3/5/10/15 minutes4)Power source: Built-in rechargeable battery OR 5V Car Charger5)Supports SD/MMC card(From 256MB up to 32GB)6)Microphone: can record soundNo further notice will be given for any modification of the technical specification.。
行车记录仪英文说明书
Road Safety GuardInstruction ManualThank you for purchasing Portable DVR from our company.In order to help you operate it correctly, please read this instruction carefully before using.Product Picture and Function1. USB Slot2. AV-OUT Slot3. DC-5V4. SD/MMC Card Slot5. Speaker6. Mount hole7. Microphone8.Battery cover9. Lens10. Night Lights11. ON/OFF Power Switch12. REC / Snap13. 2.4 inch LCD14. Menu15. 16.Up /Down17. Mode ButtonAttached Accessories●Manual●Mount●USB Cable●Car Charger (Include the adaptor 12V/24V transfers to 5V)OperateTwo Power options:A) Use can remove built-in Li-ion batteryDVR can be activated after it has been placed on the vehicle by pressing the Power Switch for 1 second and turn off by pressing it for2 seconds.Charging: connect with USB cable or car charger.B) Connect with Car ChargerDVR will record automatically when the car starts, turn off and save the last file when the car stops.RecordingDVR will enter into defaulted recording mode when turn it on, the work indicator blinkers and indicates it is recording. Therecording file is saved in the SD/MMC Card. To stop, pressRecording Button or ending when car stops , th e work indicator won`t blinker.Camera modeTurn on the DVR and press Mode Button to enter into Camera mode. To take photo by pressing Snap Button .Manual Focus FunctionIn Camera or Recording mode ,press UP/DOWN Button the screen will show focus icon them press UP/DOWN button to choose need focus, you can choose (1x~8x)Night Vision FunctionPress Menu button then choose Night vision , DVR will enter Night vision status ,if you want to exit choose offPreview and DeleteTurn on the DVR and press Mode Button twice to enter into Preview Mode. Press Up or Down to select the previewed file. If it is video file, it can play or pause by pressing REC Button, and stop bypressing Mode Button. If you want to delete it, press Menu Button to enter into delete mode, and then, select Single, All by Menu Button and Up/Down and confirm to delete the file by Menu Button.Also select Slide show, Protect file, Thumbnail mode and volume(from 1 to 8) under the Preview Mode.Setting the functions:Turn on the DVR and Press Menu Button under Video mode or Camera mode to enter into setting interface. Confirm by Menu Button and Select by Up/Down for the following setting. Press REC Button to exit.A.Video mode1.Size: Select VGA, QVGA, SXGA.2.Time Stamp: Off/Data Only/Data &Time3.Motion Detect: Off/On4.Video Time: 3Min/5Min/10Min/15Min5.Audio: On/Off6.Night Mode: Off/OnB.Camera mode:1.Size: VGA/1.3M/2M/3M/5M/8M/12M2.Time Stamp: Off/Data Only/Data &Time3.Burst: Off/OnC.Setting ModeWhether under idle Mode, Press Menu Button and then press Mode Button to enter into Setup interface.1.Format: Select it if you want to format the SD card.2.Beep: Off/Onnguage: Select[English/ French/ Deutsch/Italian/Spanish/Portuguese /T-Chinese/ S-Chinese/ Russian/ Turkish/Korean4.Auto Off: 1Min/2Min/5Min/Off5.System Reset: select [Cancel or Execute system] reset.6.Light Frequency: 50Hz/60Hz Output: NTSC/PAL8.Data Input: Set correct recording data and time.B: PC Cam/Disk Drive10.Version :Check software versionPreview on the TVConnect the AV link of DVR with the TV, and enter into the preview mode automatically. The operating steps are same as preview on the screen.USB ModeConnect DVR with computer by USB cable, [My computer] will occur removable disk, the file id stored at Removable Disk/DCIM/100DSCIM. At the moment, the file of the DVR can be downloaded to the computer.Note:1)Please insert the SD/MMC card before recording.2)This DVR Records in cycle if you choose 3/5/10/15 minutes asstorage time. When the storage medium is full, it will recordfrom the beginning again and erase over the previously recorded material automatically. It will have 3 seconds pause time, and namely the contents in the 3 seconds will not record.3)Because the DVR is DC5Vinput, please use the attached carcharger. It has adaptor 12V/24V transfers to 5V already.Technical Specifications1)Recording resolution: 1280*960/640*480/320*240 pixels2)Video format: AVI3)Repeat storage by section: 3/5/10/15 minutes4)Power source: Built-in rechargeable battery OR 5V Car Charger5)Supports SD/MMC card(From 256MB up to 32GB)6)Microphone: can record soundNo further notice will be given for any modification of the technical specification.。
唯赛思通摩托车行车记录仪C3(英文)使用说明书
Road Safety GuardOperation InstructionKey Operation :1. Power on/off2. Reset3. Camera 14. Camera 25. USB6. Menu7. Mode8. OK9. TF Card10. LCD Display screen11. MUTE/UP12. REC/DOWN13. FlashlightMenu operating instructionsVideo recording ModeIn the Video recording Mode,Press “Menu” button enter Setup interface.Press UP/Down button to select specific parameters, Press “OK” to confirm and Press “Menu”to Exit.1. Video ResolutionHD 1280*720D1 720*480VGA 640*4802. CameraSelect camera to recording, camera 1/camera 2/ camera 1+23. Time StampOff No display date and timeDate Only Only display dateDate and Time Display date and time4. Voice setupOn Turn on Voice PromptOff Turn off Voice Prompt5. REC SoundOff Video recording turn off the soundOn Video recording sound and image sync4. G-sensitivitySetting G-sensor sensitivity, Off/ high/Medium/LowWhen happen impact the video file will protect and the file name is (EVE.XXXXX) ,the card is full only delete normal recording file (REC.XXXXX).7. BrightnessSet camera 1/camera 2 brightnessSetting ModeIn the other Mode, Press “Menu” button twice enter Setup interface.Press UP/Down button to select specific parameters, Press “OK” to confirm and Press “Menu”to Exit.1. FormatFormat TF Card (S elect “Execute “format TF Card )2. ScreensaverOff Camera LCD keep on1 Min If no any operating the camera after 1min enter screensaver3 Min If no any operating the camera after 3min enter screensaver5 Min If no any operating the camera after 5min enter screensaver(Screensaver status ,Press any button to restore)3. BeepOn Turn On operation button soundOff Turn off operation button sound4. LanguageEnglish/ French/ Deutsch/Italian/Spanish/Portuguese / T-Chinese/ S-Chinese/ Russian/ Turkish/Korean5. Auto offOff Camera not auto power off1 Min If no any operating the camera after 1min auto power off3 Min If no any operating the camera after 3min auto power off5 Min If no any operating the camera after 5min auto power off6. Sys. ResetWhen Setup Error, can setting this option restore factory setting7. Light Frequency50HZ60HZ8. Date Input1)Press “Up”/Down button to setting number2)Press “Mode” button jump next setting3)Press “REC” button Exit set9. VersionCheck software version informationPlayback ModeP ress “Mode” button change to Playback mode (Press “OK” button to playback the video file)1. Press Up/Down button to select previous/next video /photo file2. Press “OK” Play/Stop1. DeleteSingle Delete single fileAll Delete all the file2. ProtectSingle Delete single fileAll Delete all the file3. Thumbnail /Execute4. File List /Execute5. VolumeAdjust volume 1~8Loop RecordingWhen TF Card is full ,the Camera will auto delete in front of the old files, When happen impact the video file will protect(EVE.XXXXX) ,the card is full only delete normal recording file (REC.XXXXX).Flashlight functionCamera in the power off or other mode, short Press power button to turn on flashlight, press again turn off .Parking ModeWhen the car in the stop status, after 3 minute will auto change to parking mode, in the parking mode the video file is 1FPSNote:1) According the need of customers, this function is options.2) In order to avoid the improper operation to install damage the camera , Please to auto service center to find a professional maintenance technicians to install, and use package accessory special cable (DC Input:12-24 V Output :5V-1.5A)Wired Controller FunctionCamera in the Video recording Standby mode or recording mode, Press any key on the wired Controller ,Camera will auto saved Video file name is (KEY-XXXX.AVI ) the same is (EVE.XXXX.AVI) When TF Card is full only delete Normal Video recording file (REC.XXXX.AVI)Connect Computer1. Connect the camcorder with computer by USB cable, [My computer] will occur removable disk, the file id stored at Removable Disk/DCIM/100DSCIM which can be downloaded to the computer.2. System support of the Computer: Windows 2000/XP/Vista/Windows 7Power on test1)First time use camera ,please use package accessory USB cable connect to charger(DC-5V 1A), then connect to USB slot, power on test normal recording and other function2)After power on test normal, can install and useCharging the battery1. Directly connect car cigarettes with the USB interface, to charge battery2. Use a USB cable to connect the computer with the USB interface, to charge battery3. Use the USB cable to connect charger the USB interface, to charge battery.4. The battery level display shows the remaining power of the battery as below:Low power Not fully charged fully chargedTF card installment :1. insert the TF card in the TF Card slot according to the indicative direction ,until it softly clicks2. When removing the TF card push in the TF card and gently release to eject it.Notes:1. Make sure the TF card are facing the right way ,if it is in the wrong direction ,it may damage thecamera and TF card2. If the TF card is incompatible with the camera, please try to insert again ,change other TF card3. Please use the high- speed TF card.(The card have CLAS S⑩icon)Notice:Suppose the camera is in dead halt due to the improper operation, you can press reset button to restore the camera will return to normalTechnical specificationsLCD screen 2.0 TFTCamera lens 120 degrees A+ level high resolution lensLanguage English/French/ German /Italian/Spanish/Portuguese / T-Chinese/S-Chinese/ Russian/ TurkishVideo format AVI (MJPG)Memory card TF Up to 32GBMicrophone Built–inFrequency 50Hz/60HzUSB interface USB2.0Battery Built-inG-SENSOR SupportNotice: Due the camera software update camera function has change, without prior notice。
f790行车记录器用户手册说明书
f790Car Camcorder 行車記錄器User Manual使用手冊f790 Car CamcorderUser ManualContentsAbout this Guide (3)Notes on Installation (3)Regulatory notices (3)CE Regulatory Notice (4)WEEE Notice (4)Caution (4)1Introduction (5)1.1 Features (5)1.2 Package Contents (5)1.3 Product Overview (6)2. Getting Start (8)2.1 Insert the Memory Card (8)2.2 Install in Vehicles (9)2.3 Connecting to Power (10)2.4 Powering the Camcorder On / Off and Reset (11)2.4.1 Auto Power On/Off (11)2.4.2 Manual Power On/Off (11)2.4.3 Reset the camcorder (11)2.5 Initial Settings (12)2.5.1 Set the Date and Time (12)3. Using the Camcorder (13)3.1 Recording Videos (13)3.1.1 Auto Recording (13)3.1.2 Recording Screen (14)3.1.3 Emergency Recording (15)3.2 GPS (Option) (16)3.3 Rear Camera (Option) (16)3.4 File Playback (17)3.5 Parking Mode (18)3.6 Collision Detection (19)4. Adjust the Settings (20)5. Specifications (22)About this GuideThe content in this document is for information purpose and is subject to change without prior notice. We made every effort to ensure that this User Guide is accurate and complete.However, no liability is assumed for any errors and omissions that may have occurred.The manufacturer reserves the right to change the technical specifications and accessories without prior notice.Notes on Installation1.Do NOT setup the camcorder while driving or while the vehicle is inmotion. Please stop at a safe place before adjusting or installing.2.Install the camcorder above the rear-view mirror to obtain the bestopen-field view. Do NOT install the camcorder in a location that willobstruct your required driving view.3.Make sure that the lens is within the wiping range of the windscreenwiper to ensure a clear view even when it rains.4.Do not touch the lens with your fingers. Finger grease may be left on thelens and will result in unclear videos or snapshots. Clean the lens on aregular basis.5.ONLY use the adapter in the package to power-on the camcorder. DoNOT use other brand adapter to avoid the unit burned or damaged. Regulatory noticesThis document provides country- and region-specific non-wireless and wireless regulatory notices and compliance information for your product. Some of these notices may not apply to your product.Disposal of a battery into fire or a hot oven, or mechanically crushing or cutting of a battery, that can result in an explosion.Leaving a battery in an extremely high temperature surrounding environment that can result in an explosion or the leakage of flammable liquid or gas.CE Regulatory NoticeThe product herewith complies with the requirements of CB IEC 62368-1:2014, EMC Directive 2014/30/EU and the RoHS Directive 2011/65/EU.WEEE NoticeDisposal of Waste Electrical and Electronic Equipment and/or Battery by users in private households in the European UnionThis symbol on the product or on the packaging indicatesthat this cannot be disposed of as a household waste. Youmust dispose of your waste equipment and/or battery byhandling it over to the applicable take-back scheme forthe recycling of electrical and electronic equipment and/orbattery. For more information about recycling of thisequipment and/or battery, please contact your city office,the shop where you purchased the equipment or yourhousehold waste disposal service. The recycling of materials will help to conserve natural resources and ensure that it is recycled in a manner that protects human health and environment. CautionNever disassemble or attempt repair of this product. Doing so may damage the camcorder, cause electric shock and void your productwarranty.Set up time and date accurately before you use this camcorder.Exposing the camcorder to open flames can cause explosion.Due to local laws and vehicles safety considerations, do not manually operate the camcorder while driving.The values displayed in this system, such as speed, position, and the distance warning to the speed camera set points, may be inaccuratedue to the influence of surrounding environment. They are for yourreference only.HP Inc. Company is NOT responsible for the loss of anydata/content during operation.1 IntroductionThank you for purchasing this advanced camcorder. This camcorder is specifically designed for real time video and audio recording when driving.1.1 Features• Built-in super capacity • Full HD 1920*1080• 9.35” big touch displayer • F/2.4 aperture • Collision Detection• Emergency Recording File•Parking Mode (supports time-lapse recording)1.2 Package ContentsThe package contains the following items. If there are any missing or damaged items, contact your dealer immediately.Car CamcorderRubber BandCar AdapterUser ManualExternal GPS (option) Rear Camera (option)1.3 Product OverviewNo. Item1 Rearview mirror clip2 Touch LCD Screen3 Short press: LCD on/off Long press: Power on/off4 USB port: Car power adapter connection5 A/V port: Rear Camera connection (option)6 MicroSD memory card slot7 GPS port: External GPS connection (option)8 Speaker9 Reset10 Lens11 Microphone2. Getting Start2.1 Insert the Memory CardInsert the memory card with the gold contacts facing the back of the camcorder. Push the memory card until it clicks into place. (Use V30 or greater speed micro SD cards for this camcorder; It is recommended to format the micro SD cards before the initial use.)To remove the memory cardPush the edge of the memory card inward until you hear/feel it click, then allow it to push out until you can remove it from the slot.Note:1. Do not remove or insert the memory card when the camcorder is powered on. This may damage the memory card.2. Use V30 or greater speed micro SD cards and capacity higher than 16GB for this camcorder (support up to 128GB).3. It is recommended to format the micro SD cards before the initial use.4. Please periodically format the memory card(suggest once per month).5. Use memory card higher than 64GB, please use the camcorder to format the memory card before initial use.6. Memory card has certain usage life. Long use may lower down write-in speed and failure saving. In this case, we recommend you to purchase new memory card.2.2 Install in Vehicles1.Clip on to your original car mirror.2.Circle the clip with the band.3.Adjust the camcorder lens.Note:Image shown here is for installation illustration. The outlook may differ from what you purchased.2.3 Connecting to PowerUse only the supplied car adapter to power up the camcorder.1.Connect one end of the car adapter to the USB connector of thecamcorder. USB port input: DC 5V / 2A.2.Plug the other end of the car adapter to the cigarette lighter socketof your vehicle. Once the vehicle engine is started, the camcorder automatically powers on. Car adapter input: DC 12 / 24V.Note:Use only the supplied car adapter. DO NOT use the other brand of car adapters, otherwise it may cause the product mal-function.2.4 Powering the Camcorder On / Off and Reset 2.4.1 Auto Power On/OffOnce the vehicle engine is started, the camcorder automatically powers on. And the recording will automatically start.Once the vehicle engine shuts down, the camcorder automatically saves the recording and turns off the power.Note:Automatic power up and shut down assumes the power socket is linked to the car ignition.2.4.2 Manual Power On/OffTo manually turn on the power, press the POWER button.To turn off, long press the POWER button.2.4.3 Reset the camcorderTo reset, use a pin to insert RESET hole and hold for at least 3 seconds.2.5 Initial Settings2.5.1 Set the Date and TimeWe recommend to set up date and time before initial use.To set the correct date and time, do the following:1.In the recording screen, tap button to stop recording.2.tap to enter [Setting] page.e finger to slide the menu page and tap [Date/Time Setting] toset up.4.Tap [+] [-] to change the number, and tap [OK].5.Repeat 4 until all the value is set. Tap [OK] to return to menu page.6.Tap to return to preview screen.Note:To ensure accurate date/time stamped on the file, you are recommended to re-set up date/time if the car camcorder is not in use for over 7 days.3. Using the Camcorder3.1 Recording Videos3.1.1 Auto RecordingWhen the vehicle engine starts up, the camcorder automatically turns on and starts recording.Recording will automatically stop when the engine is switched off. Note:1. On some cars, the recording will continue when the engine is switched off. If this happens, please manually turn off the cigarette lighter or remove the car adapter from the cigarette lighter.2. It can be configured to save a video file for every 1 minute, 2 minutes or 3 minutes of recording.3. The camcorder saves the recording in the memory card. If the memory card capacity is full, the oldest file in the memory card will be overwritten.4. The camcorder is built-in super capacity. When the car engine starts up, please wait for a few seconds to charge the super capacity. After a few seconds, the camcorder will power on automatically.3.1.2 Recording Screen.3.1.3 Emergency RecordingThis Car Camcorder is equipped with a G-Force sensor. If the G-sensor function is enabled, when collision is detected, the camcorder will automatically trigger the Emergency Recording feature. The displayer will pop up [Lock Current File] string and the flash red dot on left upper side on screen will become yellow dot. The emergency recording files will not be overwritten by the normal loop recording files.The file length of emergency is same as normal video interval time. Once it reaches setting time, the camcorder will resume to normal loop video recording.Note:1. The sensitivity of G-sensor can be adjusted in the Menu. Tap [Collision Sensitivity] to adjust Off, Low sensitivity, Medium sensitivity, High sensitivity. If choose Off, the camcorder will not auto activate emergency recording.2. The emergency file is created as a new file and saved in Event folder, which will be protected to avoid being overwritten by normal loop recording.3. The Event folder will occupy about 20% of available memory card capacity. When the space is full, the new emergency files will be overwritten the oldest files. Please make sure to backup important files anytime.3.2 GPS (Option)Plug the optional GPS accessory into GPS port on the camcorder. Once activate the GPS function, you can preview current car speed, speed cam ahead, and direction such information.Note:1. GPS function is limited in certain areas. Please contact dealer for details.2. Once activate the GPS function, when GPS is positioned, the icon will change fromwhite to blue .3. If GPS broadcast is not working, please check Menu Setting . Make sure youturn on “GPS Broadcast”.4. Fixed speed cam alert is with white circle icon; regional speed cam alert is withyellow circle icon.5.Speed cam alert is for reference only. It’s not 100% accurate. Drivers are advised tofollow the rules of road.3.3 Rear Camera (Option)Please power off the camcorder firstly, then plug the optional rear camera into AV port on the camcorder.Note:1. Preview image can be set as Front cam, Rear cam or Dual cam.2. Rear camera doesn’t support hot plug-n-play. Please power off the main camcorderbefore plug into rear camera.3. Tap icon to switch main camcorder and rear camera preview image.3.4 File PlaybackIn the recording screen, tap to stop recording and tap to enter playback option.1. Tap to choose Normal recorded file list, or tap to chooseEvent recorded file list for playback.2. If optional rear camera is installed, tap or to switch front orrear camera file list.3. When recorded file is playback, tap the icons below video tolock/unlock, fast rewind, play/pause, fast forward, or delete the file.Note:1. Deleted files CANNOT be recovered. Ensure the files you wish to preserve are backup before deletion.2. Use dual camera recording, no matter you delete the FRONT file or BACK file, the other one will still exist and able to playback.3.5 Parking ModeTo monitor the vehicle when it is parked, you can activate Parking Mode. Before activate Parking Mode, please seek for professional shop to install ACC cable in advance.Follow the steps below to set up Parking Mode.1.In the recording screen, tap to stop recording and tap toenter menu setting.2.Slide the menu list and choose [Parking Mode] option.3.Tap to choose 12 hours or 24 hours.4.Tap to return to preview screen.5.When car’s engine is turned off, the camcorder will automaticallyenter parking mode, and record videos by 1 frame per second.When the set up time of parking mode is reached, either 12 hours or24 hours, the camcorder will power off automatically.6.In Parking Mode, when collision is detected, the camcorder willautomatically trigger the emergency recording and the file will besaved in Event folder. The emergency file’s length is same asnormal file’s, and will not be overwritten by the normal looprecording files.Note:1. ACC cable is optional. Please consult the dealer for purchase and seek for specificprofessional store for installation.2. The recorded files under Parking Mode are saved in the Normal folder.3.6 Collision DetectionIf the Collision Detection function is enabled, this camcorder begins emergency recording once it detects any collision. Sensitivity of the Collision Detection function is set to Middle by default, if user wants to change the settings of Collision Detection, do the following:1.Tap to stop recording and tap to enter menu setting.2.Slide the screen to choose Collision Detection option and tap toenter. Choose your favorite sensitivity level from the options, High, Middle, or Low. If you choose Off, then the camcorder will nottrigger emergency recording any more.3.Tap to return to recording screen.4. Adjust the SettingsIn recording preview screen, tap to stop recording and tap to enter menu setting.Refer to the below table for details on menu items and available menu options.Menu Description Available optionResolution Setting of video resolution 1080p / 720pInterval Time Set the recording durationfor each recorded video file1 /2 /3 minSound Record Enable/disable the voicerecordingOn / OffDisplay Mode To set up preview image Front cam / Rear cam / Dual camParking Mode To set up recording timewhen car parks and engineoff.*Subject to install ACCcable in advance.Off / 12h / 24hDate/TimeSettingSet the date and timeLanguage Set the on-screen displaymenu languageSimplified Chinese /Traditional Chinese /EnglishFlicker According to localelectronic power spec, setup correct frequency toreduce flicker on LCD.60Hz/50HzLCD Power Save Set up LCD auto off time.Choose “Off”, the LCD willbe always on. Choose“1min” or “3min”, LCD willOff / 1min / 3minMenu Description Available optionbe off after 1 or 3 minutesif you don’t operate thecamcorder. (LCD off won’taffect the video recording.)LCDBrightnessAdjust LCD brightness Soft / Standard / BrightCollision Sensitivity The camcorder willautomatically triggeremergency recording whentremor of a collision isdetected.Off / High / Middle / LowGPS (note*) If optional GPS is plugged,use this option to turn onor turn off GPS function.On / OffGPS Broadcast (note*) If optional GPS is plugged,use this option to turn onor turn off oral GPSbroadcast function.On / OffVolume Adjust camcorder’s keytone volume1 – 10Default Setting Resets the camcorder tothe initial factory defaultsettingsYes / NoFormatSD-CardFormat the memory card Yes / NoFW Version Showing firmware versionNote:1. These function needs to pre-install GPS accessory. Once GPS accessory is plugged,the firmware will auto show up these two options.5. SpecificationsItem DescriptionImage sensor 1/2.9” CMOS sensorEffective pixels 1920 (H) x 1080 (V)Storage media Supports Micro SD class V30 or higher, capacity 16GB orhigher (max. 128GB).LCD display 9.35” touch panelLens Wide Angle Fixed Focus lensFocus range 1.5m~InfinityVideo Resolution: Full HD 1920 x 1080 @ 30fpsHD 1280 x 720 @30fps Format: .TSShutter Auto electronic shutterG-Sensor 3-Axis G-Force sensorGPS External GPS, OptionalISO AutoWhite Balance AutoMicrophone Built-inSpeaker Built-inInterface Mini USB, A/V port(for optional rear camera), GPS port(foroptional GPS)Power Built-in super capacitor.OperatingTemperature 0° ~ 45° COperating Humidity 20 ~ 70% RHStorageTemperature -20° ~ 70° CDimensions 259.7 x 97.5 x 36 mmWeight Approx. 332g (not includes microSD)f790 行車記錄器使用手冊目錄關於本手冊 (2)安裝須知 (2)Regulatory notices (2)CE Regulatory Notice (2)WEEE 通知 (2)安全注意事項 (3)1簡介 (4)1.1 特色 (4)1.2 包裝內容 (4)1.3 產品概觀 (5)2開始 (7)2.1 插入記憶卡 (7)2.2 安裝車內 (8)2.3 連接電源 (9)2.4 電源開/關及重置 (10)2.4.1 自動開/關 (10)2.4.2 手動開/關 (10)2.4.3 重置 (10)2.5 初始設置 (11)2.5.1 設定日期及時間 (11)3使用行車記錄器 (11)3.1 錄影 (11)3.1.1 自動錄影 (11)3.1.2 錄影畫面 (12)3.1.3 緊急錄影 (13)3.2 GPS (選配) (13)3.3 後置鏡頭(選配) (14)3.4 檔案播放 (14)3.5 停車模式 (15)4調整設定 (16)5規格 (18)6限用物質含有情況說明書 (19)關於本手冊本手冊內容僅供參考, 且可隨時變更不事先通知。
平安一号行车记录仪中英文说明书
Instructions before use◆The foreword in piecesThank you for purchasing the company vehicle traveling data recorder.Before the formal use,please read this manual carefully, to ensure that the correct use of the product.Keep this manual for future use.◆Infringement of copyright warningPlease note that this product is for personal use only,the method of use shall not violate the goods infringe on domestic or international copyright laws.Even recorded images for personal use only,please note that in some cases to use this product to record performances, exhibitions or business activities of the images may infringe the copyright or other legal rights and interests of others.◆Matters needing attention-please do not open or disassemble the product without authorization,which may lead to electric shock,or equipment damage.If you have any needs,please to serviceHeart or professional processing.-the product can be used for other USE,such asphotography,take,etc.-please do not pile up on the equipment items,don't pressure according to the screen,otherwise may lead to a broken screen.-do not use sharp objects touch screen,so as not to damage the screen.-do not let children play with the equipment.In the boot state pull out after the car charger from the cigarette lighter socket,equipment will be shut down.If you have the following situation,pleasePurchase or service center:-the charger is damaged or cable rupture.-the casing damage,damage to the transformer,or revealing the internal parts;Please note that the charger itself also consumes power, in the case of not to use,please pull out in the car charger from the cigarette lighter to avoid to steamCar battery discharge.◆The working conditions-don't be exposed to high temperatures or direct sunlight,especially in the car.Avoid the equipment into the dust.-avoid in damp environment use.Please note that in aclosed environment,the moisture in the air easy to condense and attached to the equipmentOn.-avoid touch and intense impact.-equipment and its accessories from flammable and explosive,corrosive liquid or gas.-cleaning equipment,please put down from the scaffold before ing a soft wet cloth clean screen and equipment surface.-not to remove,modify or repair the equipment.This may lead to equipment damage.Please send special authorization serviceCenter for maintenance.◆Mixer temperature humidityEquipment normal working temperature is-40°-+70°, the humidity is10%-80%.Please place the equipment in a safe place◆transport-in the case of sudden changes in temperature or humidity,may cause moisture condensation inside the machine,which can causePrepare a short circuit.-protect the machine,in order to avoid in the process oftransportation into the dust or encounter collisions.-transport equipment,please use the original packaging.◆Car adapter(car charger)Car adapter all can use in your car cigarette lighter socket (dc12or24v).◆The basic function recorder1.1080p low illumination high-definition video2.The built-in low illumination high pervious to light 170degree lens3.2.4inch LTPS4.Impact sensitivity adjustment automatically lock file5.A new concept of parking monitoring mode6.Drive start simultaneously7.Video support cycle8.HDMI output port9.The biggest support32GB TF card10.Can charge while video11.Image monitor the real-time outputProduct structure◆Back view1.lens2.speaker◆Back view3.parking mode/up4.menu/play back5.down6.OK◆Left viewB8.HDMI9.RESET◆Right view10.Power11.TF slot◆Up view12.HolderMethod of use◆Insert the memory card1.According to the instructions carefully insert the card into the card slot.Errors or rough insert memory card may lead to memory card or the card slot is broken.2.Insert the memory card will be saved as image recording.3.If the device does not recognize the card,please take out the insert to try again.If you still can't identify,may be the card is damagedCard or device does not support this type of memory card.Please try to replace another memory card.4.Please pay attention to often change the memory card and copy content to other storage medium.Don't have burn on the video cardProgram or run other executable file,it could erase the above data.◆The start up and shut down of equipmentUse the built-in battery,or connect car-mounted charger can boot device or connected to computers.◆Video mode1.Boot device will automatically switch to video mode, after the left upper corner of the screen display videomode icon"".2.Press the video button to start recording.Press the video button again to stop recording.In the process of recording,the screen will appear red flashing icon””.3,The figure beside the video icon---represents the number of protected files.4,Video process,click the"menu key",to file lock manually◆Setting options1.Open the device,the machine automatically switch to video mode.Press the menu button,enter the system: Image/system parameters setting◆Setting up the image parameters1.In standby mode,press the menu button to enter the Settings menu option.e the ok button to enter submenu,use the up or down direction key,the selected configuration options. According to the confirmation key option is set.◆Setting up the image parametersImage resolution:1920х1080/1280х720Exposure compensation:[2.0]/[1.7]/[1.3]/[1.0]*/[0.7]/[0.3]/[0]/[+0.3]/[+0.7]/[+1.0]/[+1.7]/[+2.0]Loop video:1min/2min/3minImage quality:High/medium/lowVideo audio:On/offDate:Closing date/date/timeCollision automatic locking files:closed/high degrees/middle degrees/low sensitivityParking monitoring:Closed/openParking monitoring induction setting:High/medium/lowParking monitoring time:20S/1min/2minWhen parking surveillance video display:Screen closed/screen open◆System SettingsLanguageEnglish/simplified Chinese/traditionalChinese/French/German/Japanese/Korean/Russian/Spanish/Portuguese/Dutch/Swedish/Thai/Turkish/polishDate/time:2012/01/0100:11Year/month/dayAutomatic shutdown:Close/1min/3min/5minAutomatic LCD close:Close/1min/3min/5minThe key soundOn/offLight source frequency:50HZ/60HZFormatting:Yes/noThe default Settings:Yes/noVersion:******Firmware upgrade:Yes/noFeature set◆Image resolution Settings1.open the device,the machine automatically switchto video mode.Press the menu button,enter thesystem,select the image parameter setting2.select the image resolution,the press of a key,for machine resolution Settings◆The recording of close and openIn video mode,click on the"down"key to open or close the recording◆Playback modes1.Open the equipment,automatically into video standby mode.Click on”menu”button to enter the folder selection interface,select the folder to play,According to the menu button to exit.e the up and down buttons to select what you want to see video,press the OK key to view the file.◆Set the languageOpen the device,automatic video into standby mode,use the menu to enter the menu,select options selected language,for language Settings.◆The date and timeTo set the current time and date,press the MENU button in standby mode,find time option,press the left or right to cut into time set,and then use the up and down arrow keys to select.Set the date and time after press OK,to confirm the Settings.◆Parking modeUnique parking mode functions:automatic into hibernation,when parked when vibration or collision automatic video.Video time every20s(1min.2min), customer can set the sensitivity level.Operation method as follows:1,Machine in normal driving mode,the video after the car flameout,click on the"parking mode"button,the interface of"P",in a couple of seconds,the screen tips "parking monitoring start".2,the machine automatically closed,and work with a low current,when after the shock detection machines,video automatically,all video files to protect.3,After the car lighter again,machine will be prompted to "a new lock file",the first by clicking on the"confirm" button,exit the prompt,press the button"driving mode," enter the normal traffic pattern.4,In the case of not connect the car charger into driving mode:standby mode,click on the"parking mode key once,showing"P",and then long press the power button,there has a unique sound,suggests that at this time into parking mode.◆HDMIThis equipment through the HDMI cable,HDMI ports connected to the TV HDMI interface,hd audio and video signal can be output terminal display such as televisions.◆connect PCInsert TF card case with a USB cable to connect computers,computer appears on a removable disk at this time,the device has reached the U disk mode.Under the mode of mobile hard disk,can be recorded by copying files or shear to play in the computer,also can remove the TF card,the use of card reader to read the data from the card.Product specificationsLCD screen size 2.4inch TFTpixel12.0Mlens170degrees high-definition wideAngle lensVideoresolution1080P/720PVideo format H.264Looprecording1min/3min/5min memory TF max to32G USB USB1.1/2.0DC in DC5V,1500MA frequency50HZ/60HZ Batterycapacity400mAH Powerconsumption220mA Microphone/speakersupportParking monitoring mode Support(parked automatically after entering hibernation,when a rattling or collision automatic video)Note:the specification may be due to the upgrade and update changes such as reason,in kind prevail Simple questionIn the event of failure,please try to use the following method.If you cannot be ruled out,please contact the after sales and maintenance.Can't normal video recording-change the TF card-change the resolution,frames per second.-insert the larger capacity memory card.-make sure the card has been installed correctly (during the installation process,you should hear a clicking sound).-delete unnecessary files from the memory card to release space.Video is not clearAutomaticvideoCar boot video function automatically Language English/simplifiedChinese/traditionalChinese/French/German/Japanese/Korean/Russian/Spanish/Portuguese/Dutch/Swedish/Thai/Turkish/polish-ensure that the camera lens is clean.-wipe off the dust and dirt on the lens,and then shoot. Equipment to work normally,but the key does not work -press the reset button to initialize the machine.In general please careful reset initialization,the operation is likely to lead to loss of data.使用前须知◆前言感谢您购买本公司行车记录仪.在正式使用之前,请仔细阅读该手册,以确保正确使用该产品。
行车记录仪说明书
行车记录仪说明书前言感谢您购买QINQ car eyes系列行车记录仪,本机采用独特的超便携式设计,使它可以应用在各个领域,为您带来方便,安全,丰富多彩的日常生活。
确定详读本手册,然后将本手册放在安全的地方供将来参考时使用。
注意事项使用场合:敬请严格遵守国家相关法律,不得将此产品用于任何非法用途,否则后果自负。
●请在自然温度下使用,请勿在人体不能适应的温度下工作●请在人类适宜生活的环境湿度下使用,请勿将产品置于潮湿的工作环境,产品不具备防水功能,敬请避免使本产品淋水或暴露在雨水中●请在有充足光源的环境下使用,请勿将摄像头直接对着太阳等超强光源,以免光学器件受损。
●请勿在粉尘密度过大的环境下使用,以免镜头以及其它部件沾染粉尘,影响摄像效果●请注意环保,勿随意丢弃本产品。
禁止把本产品投掷于火中,以免发生爆炸。
一.产品简介●本产品体积小巧、安装方便,安装时不破坏车辆原有结构●本产品采用高性能芯片,高清晰度视频,动态画面的连续性很强,在低照度下,可进行影像的录制●本产品支持时间日期水印功能,录像和拍照可以同步显示当时时间和日期●支持高速的USB2.0●支持移动侦测功能,只要有人或物体在机器前面移动,就会自动录像●本产品采用的是循环覆盖的记录方式,能自动在原有的画面上覆盖新的画面,保持周而复始的滚动记录●本产品支持视频输出,有现场回放功能,通过车载显示器可当场查询记录中的影像内容,同时支持电视和电脑回放二.记录仪安装1)关闭汽车发动机2)将TF卡插入记录仪卡槽中(请使用高速TF卡,容量不小于2G,TF卡最大支持32G,部分型号支持64G)3)将记录可以固定于汽车后视镜或挡风玻璃上4)将车载充电器插入汽车点烟器中5)布线可沿汽车挡风玻璃边缘夹进缝隙中,调整镜头位置,确保镜头与地面保持水平6)发动引擎,检查记录仪是否已安装正确【注意】未完全发动引擎时(只开电路),记录仪将打开开始录像,完全发动汽车引擎时记录仪将关机,记录仪是根据点火次数开机和关机。
汽车行驶记录仪使用说明书
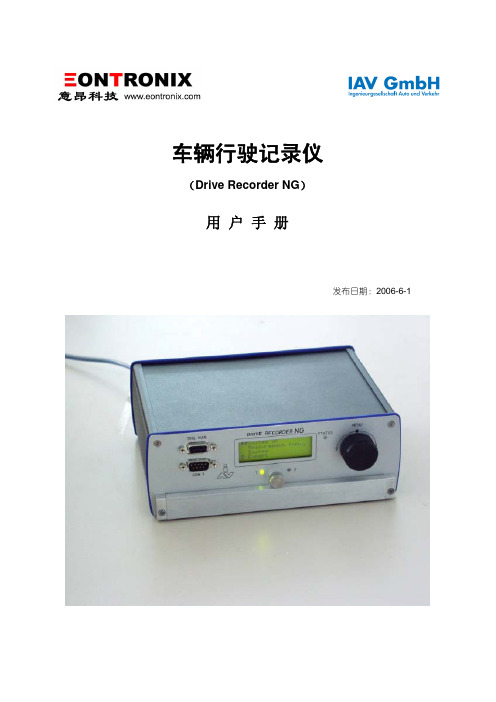
车辆行驶记录仪(Drive Recorder NG)用 户 手 册发布日期:2006-6-1Drive Recorder NG声明本用户手册仅用于意昂科技为客户提供培训之用。
由于翻译水平有限,其中难免有些内容与英文原版Operating Manual有所偏差,还望读者不吝批评指正。
偏差之处,请以“Operating Manual” Version dated 24.11.2003 对应内容为准。
为了便于读者阅读和对比参考,本手册章节编排与“Operating Manual” Version dated 24.11.2003 保持一致。
目录1 简述 (1)1.1 Drive Recorder NG系统-简述 (1)1.2 基本操作流程 (2)2 测量准备 (2)2.1 PC系统要求 (2)2.2 存储卡驱动安装 (2)2.3 安装软件包 (2)3 Drive Recorder (3)3.1 Drive Recorder-前面板 (3)3.2 Drive Recorder-后面板 (3)3.3 Drive Recorder菜单-结构和方位 (4)3.3.1 主菜单-结构 (4)3.3.1.1 设备状态(第1行) (4)3.3.1.2 测量状态(第2行) (4)3.3.2 子菜单 (5)3.3.2.1 测量子菜单 (5)3.3.2.2 系统子菜单 (5)3.3.2.3 专家子菜单 (6)3.3.2.4 故障子菜单 (6)3.3.2.5 高级用户子菜单 (6)3.4 Flash卡格式化 (6)3.5 固件升级 (6)3.6 错误显示 (6)3.7 关闭电源 (6)3.8 触发前测量 (7)3.9 触发后测量 (7)3.10 LED指示灯 (7)3.10.1 Slot LED (7)3.10.2 状态LED (7)3.10.3 手动触发LED (7)4 配置软件 (7)4.1 简述 (7)4.1.1 菜单 (8)4.1.1.1 编辑菜单 (8)4.1.1.2 选项菜单 (10)4.1.1.3 帮助菜单 (11)4.1.2 工具栏 (11)4.2 接口选项 (11)4.2.1 A/D(Analogue/Digital)项 (11)4.2.2 CAN项 (11)4.2.2.1 载入描述文件 (11)4.2.2.2 信号多路技术 (12)4.2.2.3 硬件参数浏览 (13)4.2.3 K-Line项 (13)4.2.3.1 载入描述文件 (13)4.2.3.3 KWP2000协议参数 (14)4.2.3.4 McMess协议参数 (14)4.3 配置测量任务 (14)4.3.2 记录数据 (15)4.3.2.1 Ring Buff记录模式 (15)4.3.2.2 触发操作模式 (15)4.3.3 Global 项 (15)4.3.4 Event 项 (15)4.3.5 CAN Log项 (16)4.3.6 记录数字输入状态 (17)4.3.7 测量设置 (17)4.3.7.1 激活/失效一个测量组 (17)4.3.7.2 激活一个ring buffer (17)4.3.7.3 Fast measurement模式/constant rate 模式 (18)4.3.7.4 储存模式 (18)4.3.7.5 测量序列 (19)4.3.8 编辑触发条件 (19)4.3.8.1 定义一个常量 (21)4.3.8.2 定义timeout (21)4.3.8.3 编辑条件 (21)4.3.8.4 定义flags (23)4.3.8.6 触发条件 (23)4.3.8.7 当事件触发一个测量序列后启动Post-trigger (24)4.3.9 保存配置文件/初始化测量运行 (24)5 转化软件 (25)5.1 载入读数 (25)5.2 可能的设置 (26)5.3 选择并转化测量序列 (27)5.4 设置菜单 (27)5.5 MDF time stamp的测量精度 (28)6 在线数据显示 (28)6.1 建立通信 (30)6.2 加载配置文件 (30)6.3 选择通道 (32)6.4 设置 (33)6.5 其他程序菜单 (33)6.5.1 Communication菜单 (33)6.5.2 Help 菜单 (34)6.5.3 工具栏 (34)1 简述Drive Recorder 是一款功能强大的测试系统,它用来进行耐久性试验,已经被指定为车载电控系统的专用测试设备。
- 1、下载文档前请自行甄别文档内容的完整性,平台不提供额外的编辑、内容补充、找答案等附加服务。
- 2、"仅部分预览"的文档,不可在线预览部分如存在完整性等问题,可反馈申请退款(可完整预览的文档不适用该条件!)。
- 3、如文档侵犯您的权益,请联系客服反馈,我们会尽快为您处理(人工客服工作时间:9:00-18:30)。
Road Safety GuardInstruction ManualThank you for purchasing Portable DVR from our company.In order to help you operate it correctly, please read this instruction carefully before using.Product Picture and Function1. USB Slot2. AV-OUT Slot3. DC-5V4. SD/MMC Card Slot5. Speaker6. Mount hole7. Microphone8.Battery cover9. Lens10. Night Lights11. ON/OFF Power Switch12. REC / Snap13. 2.4 inch LCD14. Menu15. 16.Up /Down17. Mode ButtonAttached Accessories●Manual●Mount●USB Cable●Car Charger (Include the adaptor 12V/24V transfers to 5V)OperateTwo Power options:A) Use can remove built-in Li-ion batteryDVR can be activated after it has been placed on the vehicle by pressing the Power Switch for 1 second and turn off by pressing it for2 seconds.Charging: connect with USB cable or car charger.B) Connect with Car ChargerDVR will record automatically when the car starts, turn off and save the last file when the car stops.RecordingDVR will enter into defaulted recording mode when turn it on, the work indicator blinkers and indicates it is recording. Therecording file is saved in the SD/MMC Card. To stop, pressRecording Button or ending when car stops , th e work indicator won`t blinker.Camera modeTurn on the DVR and press Mode Button to enter into Camera mode. To take photo by pressing Snap Button .Manual Focus FunctionIn Camera or Recording mode ,press UP/DOWN Button the screen will show focus icon them press UP/DOWN button to choose need focus, you can choose (1x~8x)Night Vision FunctionPress Menu button then choose Night vision , DVR will enter Night vision status ,if you want to exit choose offPreview and DeleteTurn on the DVR and press Mode Button twice to enter into Preview Mode. Press Up or Down to select the previewed file. If it is video file, it can play or pause by pressing REC Button, and stop bypressing Mode Button. If you want to delete it, press Menu Button to enter into delete mode, and then, select Single, All by Menu Button and Up/Down and confirm to delete the file by Menu Button.Also select Slide show, Protect file, Thumbnail mode and volume(from 1 to 8) under the Preview Mode.Setting the functions:Turn on the DVR and Press Menu Button under Video mode or Camera mode to enter into setting interface. Confirm by Menu Button and Select by Up/Down for the following setting. Press REC Button to exit.A.Video mode1.Size: Select VGA, QVGA, SXGA.2.Time Stamp: Off/Data Only/Data &Time3.Motion Detect: Off/On4.Video Time: 3Min/5Min/10Min/15Min5.Audio: On/Off6.Night Mode: Off/OnB.Camera mode:1.Size: VGA/1.3M/2M/3M/5M/8M/12M2.Time Stamp: Off/Data Only/Data &Time3.Burst: Off/OnC.Setting ModeWhether under idle Mode, Press Menu Button and then press Mode Button to enter into Setup interface.1.Format: Select it if you want to format the SD card.2.Beep: Off/Onnguage: Select[English/ French/ Deutsch/Italian/Spanish/Portuguese /T-Chinese/ S-Chinese/ Russian/ Turkish/Korean4.Auto Off: 1Min/2Min/5Min/Off5.System Reset: select [Cancel or Execute system] reset.6.Light Frequency: 50Hz/60Hz Output: NTSC/PAL8.Data Input: Set correct recording data and time.B: PC Cam/Disk Drive10.Version :Check software versionPreview on the TVConnect the AV link of DVR with the TV, and enter into the preview mode automatically. The operating steps are same as preview on the screen.USB ModeConnect DVR with computer by USB cable, [My computer] will occur removable disk, the file id stored at Removable Disk/DCIM/100DSCIM. At the moment, the file of the DVR can be downloaded to the computer.Note:1)Please insert the SD/MMC card before recording.2)This DVR Records in cycle if you choose 3/5/10/15 minutes asstorage time. When the storage medium is full, it will recordfrom the beginning again and erase over the previously recorded material automatically. It will have 3 seconds pause time, and namely the contents in the 3 seconds will not record.3)Because the DVR is DC5Vinput, please use the attached carcharger. It has adaptor 12V/24V transfers to 5V already.Technical Specifications1)Recording resolution: 1280*960/640*480/320*240 pixels2)Video format: AVI3)Repeat storage by section: 3/5/10/15 minutes4)Power source: Built-in rechargeable battery OR 5V Car Charger5)Supports SD/MMC card(From 256MB up to 32GB)6)Microphone: can record soundNo further notice will be given for any modification of the technical specification.。