AnyCAD C#三维图形控件使用说明
Anycasting软件模块介绍

- 速度: PC机6小时完成1千万网格充填 - 内存: 150万网格只占用25MB内存 - 稳定而精确的计算
铸造工艺的高级优化 !!!
▶ 重力倾转包铸造 : 倾转中的充填模式
PDF created with pdfFactory trial version
▶多种缩孔 & 缩松模式预测
涂料层的影响
设置涂料(类型,厚度等) 数据库中的涂料,或者用户自定义
微观结构预测
晶粒尺寸,二次枝晶间距等 抗拉强度, 屈服强度, 硬度, 延伸率估算
把您的经验存储在您自己的数据库 里面!!!
材料数据库
黑色金属: KS JIS ASTM AISI DIN BS ANFOR UNISIS 铸钢,铸铁,铬/镍基
充型过程中的紊流
Standard & RNG k-ε, Wilcox’s k-ω Models Bulk & Surface Turbulence Checking
表面张力效应
三维表面张力 & 润湿角 CSF(ContinuumSurface Force) 模型
有限元热应力系统
- 多项插补有限元/有限差分界面 - 快速生成有限元表面 & 体网格 - 网格 & 几何模型错误检查功能 - 糊状区 & 气隙记入考虑范围 - 热处理中的临界变形
anyPRE
AnyCasting 由此开始
3D CAD 界面
可接受文件类型: STL, IGES, STEP, NURBS, etc. IDEAS, CATIA, Pro Engineer, UniGraphics, AutoCAD
装配操作
合并, 替代 & 删除组件 分类 流道,浇口, 铸件, 渣包等
anydesk 计算机术语
anydesk 计算机术语AnyDesk是一种远程桌面软件,它允许用户通过互联网远程访问和控制其他计算机。
它提供了一种安全的方式,让用户能够在不同位置的计算机之间共享屏幕、文件和应用程序。
在计算机术语中,远程桌面是指通过网络连接到远程计算机,并能够在本地计算机上查看和操作远程计算机的桌面。
AnyDesk利用了远程桌面技术,使用户能够远程访问和控制其他计算机,就像自己坐在远程计算机前一样。
AnyDesk在远程桌面连接中使用了许多关键技术和术语。
首先是加密技术,它确保在远程连接过程中传输的数据是安全的。
AnyDesk 使用强大的加密算法来加密数据,以防止未经授权的访问和窃听。
另一个重要的术语是远程桌面协议,它定义了远程桌面连接的规则和通信方式。
AnyDesk使用自己的远程桌面协议来实现高效的远程连接,确保快速响应和良好的用户体验。
AnyDesk还使用了图像压缩技术,以减少在远程桌面连接中传输的数据量。
这种技术能够将屏幕图像压缩为更小的文件大小,从而提高连接速度和响应时间。
在远程桌面连接中,还涉及到一些网络术语。
首先是IP地址,它是计算机在网络上的唯一标识符。
AnyDesk使用IP地址来建立远程连接,确保数据能够正确地传输到目标计算机。
另一个重要的术语是端口,它是计算机上用于传输数据的通道。
AnyDesk使用特定的端口来建立远程连接,确保数据能够顺利地传输到目标计算机。
除了远程桌面连接,AnyDesk还提供了其他有用的功能。
例如,它支持文件传输,用户可以轻松地在本地和远程计算机之间传输文件。
此外,AnyDesk还支持会话记录,用户可以记录和回放远程桌面会话,以便后续参考和审查。
AnyDesk是一种强大的远程桌面软件,它利用远程桌面技术和相关的计算机术语,使用户能够在不同位置的计算机之间进行远程访问和控制。
它提供了安全的连接和高效的功能,为用户带来便利和便捷。
无论是远程办公、远程技术支持还是远程教育,AnyDesk都是一个理想的解决方案。
anycad使用实例 -回复
anycad使用实例-回复anycad如何制作3D模型及其操作流程?3D模型的制作已成为未来科技领域中不可忽视的技术,而anycad正是一款经过多年发展而成的优秀3D模型设计软件,无论是在工业设计、建筑设计还是机械制造等领域都有广泛的应用。
那么,anycad如何制作3D 模型及其操作流程是我们本文将在以下几个方面进行讲解:1.软件安装及基础操作2.3D建模工具的使用方法3.模型导出及渲染一、软件安装及基础操作首先,我们要下载anycad软件并安装。
安装完成后,打开软件,进入主工作界面,可以看到主要功能区域,包括菜单栏、工具栏和面板区,主界面如下图所示。
在anycad主界面中,我们可以通过以下方式进行操作:1. 新建模型:选择“File”>“New”>“3D Design”>“Default Design”。
2. 保存模型:选择“File”>“Save As”> 输入文件名+“.obj”(注意:obj文件是模型的标准格式,可以在许多其他3D软件中打开)。
3. 打开已有模型:在主界面选择“File”>“Open”> 找到对应模型文件。
二、3D建模工具的使用方法接下来,我们来学习anycad中常用的3D建模工具的使用方法,包括创造体、平面、边线和曲面等等。
1. 切割工具(Slice Tool)该工具用于切割模型。
在anycad中,您可以使用“切割工具”对特定体心进行截取,并将剩余部分重新编辑为新的体心。
使用步骤如下:a. 选择要切割的体心工具。
b. 在“edit”下的“slice tool”下的下拉菜单中选择“add slice plane”。
c. 在3D窗口中“左键”和“右键”控制切片的移动。
d. 按“enter”键从模型中剩余区域创建新的体心。
2. 多面体工具(Polyhedra Tool)该工具用于创建多面体,如鱼眼、球体、锥体等等。
a. 在“create”下的“polyhedron tool”中选择不同的多面体类型和层数。
苏教版译林版四年级英语上册unit练习

苏教版译林版四年级英语上册u n i t练习TTA standardization office【TTA 5AB- TTAK 08- TTA 2C】译林版四年级英语上册u n i t1-4练习Unit1 I like dogs一、辨音题(判断读音是否相同,相同的在括号里打T,不同的在括号里打F。
)(6)1.bagdog()2.hamburgerget()3.girlgood()4.pandapie()5.tigerhorse()6.catcute()二、从下列选项中,选择一个不同于其它3项的。
(6分)()1.((()4. ((三、按要求,写单词,并用适当的形式填空。
(10分,每空1分)at____________(那些)toyanimals.They’recute.!Thecatisvery__________(胖的).like__________(马).4.Look______(看)thesetoydogs.5.Doyoulike______(lion)No,I______(do)6.Ilike______(panda).7.Wouldyoulike______(一只)elephant?8.Amonkeyis______thetree.9.Doyou______(喜欢)tigers?Yes,Ido.四、选择正确的答案,把序号写在提前括号里。
(20分)()1.______thiscat.A.seeB.LookatC.Look()2.Lookatthesetoyanimals.______cute.A.They’reB.It’sC.Itis()3.Doyou______A.likecatB.likemonkeyC.likelions()4.——Doyoulikepandas?——______,Idon’tB.Yes,IdoC.No,Ido()5.——Wouldyoulikeapie?——______A.Yes,please.B.No,please.C.Yes,apie()6.I______acakehere.A.hasB.haveC.no()7.Wouldyoulike______egg?A.aB.\C.an()8.——LookatmyT-shirt.——______A.Yes,itis.B.TheyareniceC.It’snice()9.——What______ismyskirt?——It’syellow.A.niceB.colourC.cute()10.——Thisisforyou.——______A.Hownice.B.Happynewyear.C.Thankyou五、从下面中找出相应的答句。
基于AnyCAD的准双曲面齿轮建模
基于AnyCAD的准双曲面齿轮建模谨阳摘要:根据准双面齿轮的加工方法和传动特性,对准双面齿轮的结构进行研究。
并基于上海AnyCAD公司利用opencascade的开发的AnyCAD软件平台,开发准双曲面齿轮建模软件。
关键字:准双面齿轮AnyCAD 软件Opencascade1、AnyCAD的介绍AnyCAD软件是基于opencascade几何内核开发的一个显示平台和一套对opencascade内库总结的自己的内库。
显示平台时尚,美观。
具有一般三维软件的基本显示功能(如放大、旋转、平移、着色、线框等)。
同时还有一般三维软件的导入功能(iges、step等)。
其内库总结了opencascade的几何内库,可以实现建模的基本功能。
AnyCore::ATopoShapeTools Class可以实现线、面、圆、圆柱、块体等基本几何体的建模。
实现方法:如块体。
ATopoShapePtr pBox =ATopoShapeTools::MakeBox(Vector3::ZERO,Vector3::UNIT_Z,Vector3(100,100,100));并对体进行id号关联,以便对该体进行后期操作。
还可以对建立好的集合体进行基本的颜色赋给等其他功能。
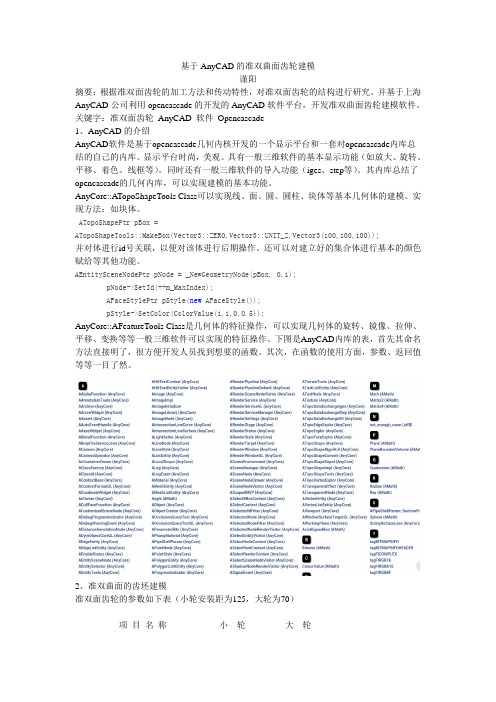
AEntitySceneNodePtr pNode = _NewGeometryNode(pBox, 0.1);pNode->SetId(++m_MaxIndex);AFaceStylePtr pStyle(new AFaceStyle());pStyle->SetColor(ColorValue(1,1,0,0.5));AnyCore::AFeatureTools Class是几何体的特征操作,可以实现几何体的旋转、镜像、拉伸、平移、变换等等一般三维软件可以实现的特征操作。
下图是AnyCAD内库的表,首先其命名方法直接明了,很方便开发人员找到想要的函数。
AnyCAD C#三维图形控件使用说明
AnyCAD.Net Graphics ComponentUser Manual(R2014UR1)2014.5Contents1.Overview (4)1.1.Capabilities (4)1.1.1.Modeling (4)1.1.2.Data exchange (4)1.1.3.Visualization (5)2.Get Start (6)2.1.Add assembly DLLs (6)2.2.Add the visualization control (6)3.Modeling (7)3.1.Modeling (7)3.2.Visualization geometry (7)3.3.Explore the TopoShape (8)3.4.Get Common Geometry Property (8)3.5.Curve information (8)3.6.Surface information (8)3.7.Face triangulation (9)4.Visualization (11)4.1.View settings (11)4.1.1.Background color (11)4.1.2.Show/Hide drawing grid (11)4.1.3.Set the camera view (11)4.1.4.Set Display Mode (12)4.1.5.Set Pick Mode (12)4.2.Scene Management (13)4.2.1.Visualize TopoShape Geometry (13)4.2.2.Create Group Node (13)4.2.3.Set Node Style (13)4.2.4.Query selected geometry (14)4.3.Point Conversion (14)4.3.1.World point to screen point (3D->2D) (14)4.3.2.Screen point to world point (2D – 3D) (14)5.Data Exchange (16)6.Reference (17)1.OverviewAnyCAD .Net Graphics Component is the professional graphics SDK for .Net developers, which can help you create 3D applications rapidly. This rapid graphics framework is focusing on 3d modeling, visualization and data exchange.Our goal is to help our customers to make great 3D applications. If you have any issues, please contact us:support@1.1.Capabilities1.1.1.ModelingFeatures of 3d modeling:Primitive geometry modeling for point, line, polyline, spline, arc, circle, sphere, box, cylinder, cone, surface from points etc…Compound: wire, shell, solid, compound.Modeling methods for extrude, sweep, loft, revole, chamfer, fillet, projection, rotate, move, scale, etc…Boolean operation for union, cut, common.1.1.2.Data exchangeThe standard AnyCAD .Net Graphics Component supports the following STEP,IGES,STL,DXF formats.STEPSupport import and export. You can get the “tree”structure of STEP file with shapenames.IGESSupport import and export.STLSupport import and export. You can control the triangulation precision when exporting.DXF (beta)Support import DXF.1.1.3.VisualizationAnyCAD .Net Graphics Component contains the visualization control for WinForm and WPF, which can help you to add the 3D control to you Form easily.Features of visualization:Default Camera operationZ oom in/out, fit window, rotation, pan… and no coding required.Selection managementPick by mouse.Add to object to selection/Clear selection set.Query selected node and geometry, including sub Face/Edge/Vertex.Set selection filter for node, group, face, edge, vertex…Scene node managementAdd, delete, find by id.Create node group.Render StyleCustomize the face, edge, vertex styles, including color, line width, point size, and facematerials.Display modeWireframe, shading, shading with edge…Gradient background color settingsPrint current view to PDFExport current view to images, such as jpg/png.2.Get Start2.1.Add assembly DLLsYou need the following two assembly dlls to your project: .dll.dll2.2.Add the visualization control Please reference the sample code of AnyCAD.Basic project.Now, you can run your application and enjoy the 3D world.3.Modeling3.1.ModelingThe modeling APIs is implemented by class BrepTools which returns the TopoShape Object. Please reference the AnyCAD .Net online documentation for more modeling APIs.You can access the global BrepTools instance by GlobalInstance.BrepTools.3.2.Visualization geometry3.3.Explore the TopoShapeTopoExplor is used to explore the sub shapes of a TopoShape, such as vertex, edge, face, shell, solid.3.4.Get Common Geometry PropertyTopoShapeProperty is used to get the geometry information:Edge lengthSurface AreaSolid VolumeCenter of the shape mass3.5.Curve informationGeomeCurve is used to get the curve parameters, and use the parameter to get the point and derivative data.3.6.Surface informationGeomeSurface is used to get the face uv parameters, and use the parameters to get the point, normal and derivative data.3.7.Face triangulationYou can triangulate the Face to meshes via FaceTriangulation API, and visualization the mesh,4.Visualization4.1.View settingsThere are many settings can help you to make your 3D application looks different.The related APIs are RenderWindow3d and View3d, you can access the View3d instance via the property of RenderWindow3d::View3d.4.1.1.Background color4.1.2.Show/Hide drawing grid4.1.3.Set the camera view4.1.4.Set Display Mode4.1.5.Set Pick ModeYou can set to pick the whole object, then you need to set RF_SceneNode|RF_Edge:RF_Face; You can also set to pick the a group of objects (GroupSceneNode), you need to set RF_ GroupSceneNode |RF_Edge:RF_Face.4.2.Scene Management4.2.1.Visualize TopoShape Geometry4.2.2.Create Group NodeYou can create a group of node to set the visible/style/selection…4.2.3.Set Node StyleYou canset the face style, line style and vertex style for a SceneNode/GroupSceneNode,Set an Id/name4.2.4.Query selected geometryAfter pressing the mouse button, you can use QuerySelectedElementContext to check selectedYou can use the node id to find other data in your database.4.3.Point Conversion4.3.1.World point to screen point (3D->2D)Using View3d::WorldPoint2ScreenPoint you can convert the 3D world point to screen 2D point4.3.2.Screen point to world point (2D – 3D)You can’t convert screen 2d point to 3d world point directly, but the SDK provides you function toThe RenderWindow3d control provides the function to compute the 3D point on the working5.Data ExchangeWe provide two samples for the data exchange model, you get the source code by the links: StpViewerdxfViewer6.Reference●Official web site: ●Online API document: /help/AGP2014/●WinForm and WPF Sample codes: https:///anycad/anycadnetsdkpro。
AnyCAD(MFC版)一些API介绍

AnyCAD(MFC版)⼀些API介绍AnyCAD(MFC版)⼀些API介绍AuView3dAPI类 该类主要包含对⽂档AuView3d(MFC⽂档程序视类)以及AuWindow3d(对话框中显⽰框)的显⽰操作。
m_View3d成员对象 类型: protected AnyCAD::API::View3d 可借⽤View3d类完成许多显⽰操作,如利⽤GetSceneManager函数进⾏擦除(代码如下);m_View3d.GetSceneManager().ClearNodes(); //清空3D场景m_View3d.GetSceneManager().ClearNodes2d(); //清空所有的2D对象m_View3d.GetRenderer().ClearSelection(); //清空选择集m_View3d.RequestDraw(1);AuWindow3d类 对话框程序显⽰框,作为三维显⽰框。
EdgeClassifier类 对TopoShape的边界进⾏分类提取。
包括三类:free edges,shared edges,standalone edges。
注:通过实验发现,有些边⽆法进⾏分类(即⽤三类进⾏提取都提取不到)。
⼀次实验中对⼀个长⽅形边界进⾏边界提取,结果为free edges(3), shared edges(0), standalone edges(0),但是⽤GlobalInstance::topoExplor.ExplorEdges(shape)发现提取得到所有4条边界。
EdgeClassifier edgeClassfier;edgeClassfier.Initialize(shape); //⽤shape初始化TopoShapeGroup shareEdgeGroup = edgeClassfier.GetSharedEdges(); //shared edges,个数为0TopoShapeGroup standaloneEdgeGroup = edgeClassfier.GetStandaloneEdges();//standalone edges,个数为0TopoShapeGroup freeEdgeGroup = edgeClassfier.GetFreeEdges(); //free edges,个数为3TopoShapeGroup shareEdgeGroup1 = GlobalInstance::topoExplor.ExplorEdges(shape); //所有边界,个数为4 多次实验的结果都是三类边界总条数⽐实际条数少1。
REITEL ANYCAD 操作指南

Senfdamm2049152Bad Essen电话:+49(0)5472/9432-0传真+49(0)5472/9432-40操作指南通过购买AnyCAD软件,您已经获得了REITEL有品质保证的产品请您阅读我们的使用介绍,特别是其中的安全提示,并且请在安装和使用设备之前认真阅读。
解封PC之后(如果包装完整),请仔细检查是否在运输过程中造成损坏。
如果发生这样的情况,请您在三天内通知运输商和制造商。
否则公司之后公司将不会对任何损失负责。
目录1.安装/配件 (3)1.1基本组件 (3)1.2配件 (3)2.安全需知 (4)2.1总则 (4)3.应用/General Notes (6)4.1系统情况 (6)4.1安装/卸载 (7)5.AnyCAD Dental Master的管理和维护 (8)6.AnyCAD Construction Software设计软件的使用 (10)6.1AnyCAD介绍 (10)6.3.单冠的制作 (13)6.4.桥体的制作 (26)7.附录 (41)7.1AnyCAD菜单导航和特性: (41)7.常见问题及解决 (45)1.1基本组件根据订货单:•AnyScan(光学扫描系统)•AnyCAD(计算机辅助设计软件,预先安装在电脑上)•AnyCAM(数控加工装置)•AnyTHERM(烧结装置)1.2配件•连接电缆•校正设备2.1总则使用此设备的人员必须阅读和遵守操作规程。
为了能够保证快速地进入系统,我们建议将操作规程放置于设备附近的安全之处。
万一遗失,您可通过支付合理的费用来重新订购。
•并且,操作人员必须遵守所有的安全规则。
•所有的设备在出厂之前都进行了最后的检查和调试。
然而,如果有设备在运输或者是由于环境的影响而发生损坏,那么这个设备不能投入使用。
请对设备的损坏程度进行系统检查。
损坏的部件应立即进行更换。
•本设备根据操作者的指示,仅被设计用于其本身的使用目的。
出于安全的原因,其他的使用目的将被禁止,并且若用于其它的使用目的,本公司将不承诺任何保证和保险赔偿。
AnyCasting 模拟软件使用说明
求解条件(结束及输出条件)
• 结束条件
– – – – 充型率 凝固率 时间 最高温度
•
输出条件
– 充型率
– 凝固率 – 时间
anySOLVER
作为AnyCasting™的求解器,anySOLVER能够根据设定, 计算流场和温度场。 铸造成型模拟包括计算熔体充型过程的流动分析和熔体凝 固过程的传热/凝固分析。只有在两个分析都准确的前提下才 能正确预测可能造成缺陷的区域。
输入 & 输出文件
• 输入文件
– 所有文件都在自动生成的文件夹 “prp file name_Res”里 – 指定读取文件
prefix.rlt : anyPOST基本数据
– 无需指定的文件
prefix.msh : 网格信息 prefix.acr : 进程结果 prefix.acf : 最终结果 f : 充型顺序 prefix.tcs : 凝固时间 prefix.sen : 传感器结果 prefix.tlt : 重力倾转铸造中旋转信息
anyPRE
作为AnyCasting™的前处理程序,anyPRE可以实现 CAD模型的导入,有限差分网格的划分,模拟条件的设置, 并调用AnySOLVER进行求解。使用anyPRE,可以进行多 种设置包括工艺流程和材料的选择来模拟铸造成型过程,
设置边界、热传导和浇口条件,也能通过特殊功能模块来
设置一些设备和模型。另外,你还可以通过anyPRE提供 的CAD功能来查看、移动/旋转实体坐标系统。
网格剖分
• 创建可变网格
–块:用户自定义块及自动块 –自适应平滑过渡
因子 : 相邻单元之间的递增比率 最大尺寸比率 : 自动平滑过渡中最大网 格尺寸跟最小网格尺寸的比值
AnyCAD .Net SDK 用户手册
v2013.1
1
1. 简介
AnyCAD .Net SDK 为.Net4.0 开发者提供简单易用的三维建模和三维可视化的 API。SDK 主要由三维建模的 API 和可视化管理 API 组成。
AnyCAD 三维建模有以下功能: 三维基本体,如点、线、多折线、Spline 曲线、圆、椭圆、圆弧、球、长方体(立
2
加载完成后:
3. 三维可视化
代码详见 AnyCAD.Basic 示例。
3.1. 系统初始化
初始化 AnyCAD SDK 和三维可视化窗口。
3.1.1. AnyCAD.Platform.Application
Application 为系统初始化类,需要在程序启动的时候创建并初始化。
private void ShowTopoShape(TopoShape topoShape, int id) {
PrsNodeManager nodeManager = theView.GetNodeManager(); Entity entity = new Entity(); entity.SetTopoShape(topoShape); PrsNode node = nodeManager.CreateSceneNode(entity, id, false); if (node != null) {
3.2.2. 自动刷新视图
为窗体添加一个计时器对象,在 Tick 事件中出发绘制命令
private void timerDraw_Tick(object sender, EventArgs ห้องสมุดไป่ตู้) {
theView.RequestDraw(); theView.Redraw(); }
anycad使用实例 -回复

anycad使用实例-回复Anycad使用实例:一步一步回答随着科技的发展,CAD(Computer-Aided Design,计算机辅助设计)成为许多行业中不可或缺的工具之一。
而Anycad作为一种CAD软件,能够为用户提供更加便捷、高效的设计方案。
本文将以Anycad使用实例为主题,为读者详细介绍如何利用Anycad进行设计与绘制。
首先,我们需要了解Anycad的基本操作。
打开软件后,我们能看到一个直观的用户界面,上方是菜单栏,左侧是工具栏,中间是设计区域,右侧有属性编辑器和对话框。
Anycad具备丰富的设计工具,包括了各种几何图形、曲线、样式、编辑操作等。
接下来,我们将以一个简单的二维图形绘制为例,来一步一步回答读者的问题。
第一步:创建新文档在菜单栏中,选择“文件”-“新建”,或使用快捷键Ctrl+N创建一个新的文档。
选择文档的尺寸和单位,点击“确定”按钮。
第二步:选择绘图工具在左侧的工具栏中,选择合适的绘图工具。
例如,我们选择“直线”工具,点击工具后,在设计区域中按下鼠标左键,并拖动鼠标,绘制出一条直线。
松开鼠标后,直线就会被创建出来。
第三步:调整绘图属性在右侧的属性编辑器中,我们可以对绘图进行一些调整。
例如,调整直线的颜色、线型、线宽等。
点击属性编辑器中的相应选项,即可进行相应的修改。
第四步:编辑绘图在绘制完一个对象后,我们还可以对其进行编辑。
点击工具栏中的“编辑”工具(一般是一个鼠标指针图标),然后在设计区域中选择需要编辑的对象。
选中对象后,我们可以对其进行移动、旋转、缩放等操作,以及调整其属性。
第五步:保存设计当设计完成后,我们需要保存它。
点击菜单栏中的“文件”-“保存”(或使用快捷键Ctrl+S),选择保存的位置和文件名,然后点击“保存”按钮。
以上就是利用Anycad进行一个简单二维图形绘制的详细步骤。
当然,Anycad的功能远不止于此,它还包括了三维建模、渲染、动画制作等高级功能。
AnyCAD .Net Graphics Component User Manual Pro ENU 2014

AnyCAD.Net Graphics Component User Manualv2014.4Contents1.Overview (3)1.1.Capabilities (3)1.1.1.Modeling (3)1.1.2.Data exchange (3)1.1.3.Visualization (3)2.Get Start (4)2.1.Add assembly DLLs (4)2.2.Add the visualization control (4)3.Modeling (5)3.1.Modeling API (5)3.2.Show the geometry (6)4.Visualization (6)4.1.View settings (6)4.1.1.Background color (6)4.1.2.Show/Hide drawing grid (7)4.1.3.Set the camera view (7)4.1.4.Set Display Mode (7)4.1.5.Set Pick Mode (7)4.2.Scene Management (8)4.2.1.Visualize TopoShape Geometry (8)4.2.2.Create Group Node (8)4.2.3.Set Node Style (9)4.2.4.Query selected geometry (9)5.Data Exchange (10)6.Reference (10)1.OverviewAnyCAD .Net Graphics Component is the professional graphics SDK for .Net developers, which can help you create 3D applications rapidly. This rapid graphics framework is focusing on 3d modeling, visualization and data exchange.Our goal is to help customers to make great 3D applications. If you have any issues, please contact us:support@1.1.Capabilities1.1.1.ModelingFeatures of 3d modeling:Primitive geometry modeling for point, line, polyline, spline, arc, circle, sphere, box, cylinder, cone, surface from points etc…Compound: wire, shell, solid, compound.Modeling methods for extrude, sweep, loft, revole, chamfer, fillet, projection, rotate, move, scale, etc…Boolean operation for union, cut, common.1.1.2.Data exchangeThe standard AnyCAD .Net Graphics Component supports the following STEP,IGES,STL,DXF formats.STEPSupport import and export. You can get the “tree”structure of STEP file with shapenames.IGESSupport import and export.STLSupport import and export. You can control the triangulation precision when exporting.DXF (beta)Support import DXF.1.1.3.VisualizationAnyCAD .Net Graphics Component contains the visualization control for WinForm, which canhelp you to add the 3D control to you Form easily.Features of visualization:Default Camera operationZoom in/out, fit window, rotation, pan… and no coding required.Selection managementPick by mouse.Add to object to selection/Clear selection set.Query selected node and geometry, including sub Face/Edge/Vertex.Set selection filter for node, group, face, edge, vertex…Scene node managementAdd, delete, find by id.Create node group.Render StyleCustomize the face, edge, vertex styles, including color, line width, point size, and facematerials.Display modeWireframe, shading, shading with edge…Gradient background color settingsPrint current view to PDFExport current view to images, such as jpg/png.2.Get Start2.1.Add assembly DLLsYou need the following two assembly dlls to your project:.dll.dll2.2.Add the visualization controlPlease reference the sample code of AnyCAD.Basic project.Run you app and you should see the following screen:3.Modeling3.1.Modeling APIThe modeling APIs is implemented by class BrepTools which returns the TopoShape Object. Please reference the AnyCAD .Net online documentation for more modeling APIs.You can access the global BrepTools instance by GlobalInstance.BrepTools.3.2.Show the geometry4.Visualization4.1.View settingsThere are many settings can help you to make your 3D application looks different.The related APIs are RenderWindow3d and View3d, you can access the View3d instance via the property of RenderWindow3d::View3d.4.1.1.Background color4.1.2.Show/Hide drawing grid4.1.3.Set the camera viewYou can also use RenderWindow3d::LookAt function to set arbitrary direction for the camera.4.1.4.Set Display Mode4.1.5.Set Pick ModeYou can set to pick the whole object, then you need to set RF_SceneNode|RF_Edge:RF_Face; You can also set to pick the a group of objects (GroupSceneNode), you need to set RF_ GroupSceneNode |RF_Edge:RF_Face.4.2.Scene Management4.2.1.Visualize TopoShape Geometry4.2.2.Create Group NodeYou can create a group of node to set the visible/style/selection…4.2.3.Set Node StyleYou canset the face style, line style and vertex style for a SceneNode/GroupSceneNode,Set an Id/name4.2.4.Query selected geometryAfter pressing the mouse button, you can use QuerySelectedElementContext to check selectedYou can use the node id to find other data in your database.5.Data ExchangeWe provide two samples for the data exchange model, you get the source code by the links: StpViewerdxfViewer6.Reference●Official web site: ●Online API document: /help/AGP2014/Sample codes: https:///anycad/AnyCAD_Sample11 。
基于ANYCAD的DXF文件读取应用
基于ANYCAD的DXF文件读取与转换Help you to make a better world!写这篇文章的目的是我这段时间关于ANYCAD的一些学习感悟,并且附上具体的操作,使新手少走一些弯路。
本人是C#的新手,从来没接触过编程,暑期跟着老师做学习,第一个任务就是用C#打开DXF文件,我以为任务很简单,BUT 在网上搜索一大堆,都是没用的(对于我这个新手来讲),偶然一次看到一篇《基于 三维图形平台快速搭建DXF文件的读取、显示、转换成JPG, PNG,以及PDF》,了解了这个ANYCAD这个控件,但是这篇文章在我把代码输进去操作的时候发现对于我这个新手来说没太大用,只能说它给我打开了一个学习的大门。
AnyCAD 三维图形控件(AnyCAD Graphics SDK)是专业的、综合的三维图形应用开发包,是一个基于 OpenCASCADE 的CAD平台,可以用于开发二维/三维模型设计、计算机仿真、有限元前后处理等应用程序。
按照功能模块,AnyCAD Graphics SDK 专业版包括几何造型、三维可视化和数据交换模块,企业版在专业版的基础上增加数据管理模块。
AnyCAD Graphics SDK 拥有.Net 和C++两个版本,其中.Net 版本支持WinForm 和WPF界面框架;C++版本支持MFC/Qt/wxWidgets 等界面库。
首先了解一下ANYCAD.SDK,这是一个动态链接库,举个例子,你要用到下边代码中的renderView,那你首先得对它定义才能使用,定义在哪呢?对,就在SDK中,所以首先得下载ANYCAD的SDK,但是由于版权问题,只有试用期,过后得购买,学生有特殊照顾,这里就不详细说啦。
当你下载SDK后(注:需要注意VS和SDK的版本),第一步是添加引用,这样才能够使用封装的函数。
最重要的是把添加的SDK文件复制到你的项目中。
然后添加USING,如下图:下面是全部的代码:具体运行效果:。
AnyPC PC远程控制软件 说明书
* AnyPC 是利用网络的软件。
AnyPC 设置后出现问题或网络环境不允许时无法连接或连接断开。本软件不适合重 要文件传送或长时间连接作业。
2
2. AnyPC 软件设置
[用语 说明] ■ 客户端 在三星电脑上设置 AnyPC 软件 为连接服务器使用 (三星笔记本电脑上提供搭载)
■ 服务器 服务器主机上设置的 AnyPC 软件 远程连接对象
4. 远程计算机................................................................................................................................... 13 4.1 远程计算机 .......................................................................................... 13 4.2 文件传送 .............................................................................................. 17
AnyPC Server Configuration
2. 为服务器安全,请不要使用固有的密码,输入密码按确认,远程连接时,每次都要确 认密码,不设密码直接按确认,远程连接时可自动连接,如丢失密码,服务器软件需 从新设置。 密码变更 AnyPC 服务器菜单环境设置里变更为新的密码。 密码用数字,英文字母组合,最多可设置 16 个。
■ 画图板
画面指示用标注。利用笔或图形工具,在服务器主机上写字或画图。 利用标注功能, 提供正确说明和教学。
AnyCAD Net SDK 专业版用户手册 2014
AnyCAD .Net SDK Prov2014.4目录1.简介 (3)1.1.三维建模 (3)1.2.文件交换 (3)1.3.三维可视化 (3)2.系统设置 (4)2.1.添加DLL模块引用 (4)3.三维可视化 (4)3.1.添加可视化控件 (4)4.三维建模 (6)4.1.建模API (6)4.2.模型显示 (6)5.SDK下载 (7)6.参考资料 (7)1.简介AnyCAD .Net SDK为.Net 4.0开发者提供简单易用的三维建模、三维可视化和文件交换的API。
若有需要增加新的API功能,欢迎联系我们:******************1.1.三维建模三维建模有以下功能:➢三维基本体,如点、线、多折线、Spline曲线、圆、椭圆、圆弧、球、长方体(立方体)、圆柱、圆锥等➢复合体:复合线(wire)、复合体等➢三维特征操作,如拉伸、扫掠、回转、放样、蒙面等➢布尔操作:交、叉、并1.2.文件交换标准SDK支持一下格式的读取和保存:➢STEP➢IGES➢STL1.3.三维可视化SDK提供WinForm控件,可以方便的添加到窗体中。
主要功能:➢标准视图操作:缩放、旋转、平移➢显示节点管理:添加、删除、根据Id查询➢实体模型显示及其显示风格设置➢鼠标拾取注:所有的API都在AnyCAD.Platform名字空间下。
2.系统设置2.1.添加DLL模块引用新建或在已有的C#工程中加载DLL引用。
选择加载引用AnyCAD.SDK bin目录下的程序集:●.dll●.dll:注意:请把SDK下所有的dll文件复制到与你的可执行程序相同的目录。
3.三维可视化代码详见AnyCAD.Basic示例。
3.1.添加可视化控件可以通过添加控件的方式把RenderWindow3d拖放到窗体上,也可以动态创建:{显示界面:4.三维建模4.1.建模API三维建模API由BrepTools类实现,每个方法都返回TopoShape对像。
anycad使用实例

anycad使用实例
AnyCAD是一个免费的开源软件,可用于创建和编辑三维CAD模型。
以下是使用AnyCAD的一个简单示例:
1. 打开AnyCAD软件,创建一个新的CAD模型。
2. 使用各种工具,如线框、曲面和实体,来构建您的模型。
您可以使用AnyCAD的几何约束引擎来定义模型中的几何关系,例如平行、相切或同心。
3. 使用AnyCAD的渲染引擎来为模型添加颜色、纹理和光照效果,以使其更加逼真。
4. 使用AnyCAD的测量工具来获取模型的各种尺寸和参数,例如长度、面积和体积。
5. 使用AnyCAD的导出功能将模型导出为各种格式,例如STEP、IGES或STL,以便在其他CAD软件中使用。
以上是一个简单的使用AnyCAD的示例,您可以根据自己的需求和技能水平来探索更多高级功能和工具。
基于大数据技术的新能源汽车软件检控平台设计

基于大数据技术的新能源汽车软件检控平台设计
魏晓艳
【期刊名称】《信息技术与信息化》
【年(卷),期】2022()7
【摘要】针对低碳经济时代背景下,新能源汽车旧车辆数量日趋增多,故障频率明显增多,安全问题日益凸显,现有系统已不能满足故障检测的需求。
提出一种基于大数据技术的新能源汽车软件检控平台设计传统的软件检测平台。
首先,进行分析系统研究现状,然后,通过系统数据分析关键技术,进行软件平台功能设计,最后,基于大数据技术采用python、大数据分析等技术,设计新能源汽车监控平台,实现数据的实时采集与传输。
通过对登录界面、故障处理、维修方案等关键功能调试、运行及测试,并且采集了大量实验数据进行分析,实验结果表明,测试功能达到了预期目标,在检测上降低了成本和提高了效率。
【总页数】4页(P88-91)
【作者】魏晓艳
【作者单位】陕西国防工业职业技术学院计算机与软件学院
【正文语种】中文
【中图分类】TP3
【相关文献】
1.新能源汽车监控平台软件的设计
2.基于RCP平台的新能源汽车整车控制器软件开发及应用
3.基于LabVIEW的新能源汽车控制器刷写软件设计
4.基于LabVIEW
的新能源汽车控制器刷写软件设计5.基于自动代码生成技术的新能源汽车整控系统软件设计方法
因版权原因,仅展示原文概要,查看原文内容请购买。
- 1、下载文档前请自行甄别文档内容的完整性,平台不提供额外的编辑、内容补充、找答案等附加服务。
- 2、"仅部分预览"的文档,不可在线预览部分如存在完整性等问题,可反馈申请退款(可完整预览的文档不适用该条件!)。
- 3、如文档侵犯您的权益,请联系客服反馈,我们会尽快为您处理(人工客服工作时间:9:00-18:30)。
AnyCAD.Net Graphics ComponentUser Manual(R2014UR1)2014.5Contents1.Overview (4)1.1.Capabilities (4)1.1.1.Modeling (4)1.1.2.Data exchange (4)1.1.3.Visualization (5)2.Get Start (6)2.1.Add assembly DLLs (6)2.2.Add the visualization control (6)3.Modeling (7)3.1.Modeling (7)3.2.Visualization geometry (7)3.3.Explore the TopoShape (8)3.4.Get Common Geometry Property (8)3.5.Curve information (8)3.6.Surface information (8)3.7.Face triangulation (9)4.Visualization (11)4.1.View settings (11)4.1.1.Background color (11)4.1.2.Show/Hide drawing grid (11)4.1.3.Set the camera view (11)4.1.4.Set Display Mode (12)4.1.5.Set Pick Mode (12)4.2.Scene Management (13)4.2.1.Visualize TopoShape Geometry (13)4.2.2.Create Group Node (13)4.2.3.Set Node Style (13)4.2.4.Query selected geometry (14)4.3.Point Conversion (14)4.3.1.World point to screen point (3D->2D) (14)4.3.2.Screen point to world point (2D – 3D) (14)5.Data Exchange (16)6.Reference (17)1.OverviewAnyCAD .Net Graphics Component is the professional graphics SDK for .Net developers, which can help you create 3D applications rapidly. This rapid graphics framework is focusing on 3d modeling, visualization and data exchange.Our goal is to help our customers to make great 3D applications. If you have any issues, please contact us:support@1.1.Capabilities1.1.1.ModelingFeatures of 3d modeling:Primitive geometry modeling for point, line, polyline, spline, arc, circle, sphere, box, cylinder, cone, surface from points etc…Compound: wire, shell, solid, compound.Modeling methods for extrude, sweep, loft, revole, chamfer, fillet, projection, rotate, move, scale, etc…Boolean operation for union, cut, common.1.1.2.Data exchangeThe standard AnyCAD .Net Graphics Component supports the following STEP,IGES,STL,DXF formats.STEPSupport import and export. You can get the “tree”structure of STEP file with shapenames.IGESSupport import and export.STLSupport import and export. You can control the triangulation precision when exporting.DXF (beta)Support import DXF.1.1.3.VisualizationAnyCAD .Net Graphics Component contains the visualization control for WinForm and WPF, which can help you to add the 3D control to you Form easily.Features of visualization:Default Camera operationZ oom in/out, fit window, rotation, pan… and no coding required.Selection managementPick by mouse.Add to object to selection/Clear selection set.Query selected node and geometry, including sub Face/Edge/Vertex.Set selection filter for node, group, face, edge, vertex…Scene node managementAdd, delete, find by id.Create node group.Render StyleCustomize the face, edge, vertex styles, including color, line width, point size, and facematerials.Display modeWireframe, shading, shading with edge…Gradient background color settingsPrint current view to PDFExport current view to images, such as jpg/png.2.Get Start2.1.Add assembly DLLsYou need the following two assembly dlls to your project: .dll.dll2.2.Add the visualization control Please reference the sample code of AnyCAD.Basic project.Now, you can run your application and enjoy the 3D world.3.Modeling3.1.ModelingThe modeling APIs is implemented by class BrepTools which returns the TopoShape Object. Please reference the AnyCAD .Net online documentation for more modeling APIs.You can access the global BrepTools instance by GlobalInstance.BrepTools.3.2.Visualization geometry3.3.Explore the TopoShapeTopoExplor is used to explore the sub shapes of a TopoShape, such as vertex, edge, face, shell, solid.3.4.Get Common Geometry PropertyTopoShapeProperty is used to get the geometry information:Edge lengthSurface AreaSolid VolumeCenter of the shape mass3.5.Curve informationGeomeCurve is used to get the curve parameters, and use the parameter to get the point and derivative data.3.6.Surface informationGeomeSurface is used to get the face uv parameters, and use the parameters to get the point, normal and derivative data.3.7.Face triangulationYou can triangulate the Face to meshes via FaceTriangulation API, and visualization the mesh,4.Visualization4.1.View settingsThere are many settings can help you to make your 3D application looks different.The related APIs are RenderWindow3d and View3d, you can access the View3d instance via the property of RenderWindow3d::View3d.4.1.1.Background color4.1.2.Show/Hide drawing grid4.1.3.Set the camera view4.1.4.Set Display Mode4.1.5.Set Pick ModeYou can set to pick the whole object, then you need to set RF_SceneNode|RF_Edge:RF_Face; You can also set to pick the a group of objects (GroupSceneNode), you need to set RF_ GroupSceneNode |RF_Edge:RF_Face.4.2.Scene Management4.2.1.Visualize TopoShape Geometry4.2.2.Create Group NodeYou can create a group of node to set the visible/style/selection…4.2.3.Set Node StyleYou canset the face style, line style and vertex style for a SceneNode/GroupSceneNode,Set an Id/name4.2.4.Query selected geometryAfter pressing the mouse button, you can use QuerySelectedElementContext to check selectedYou can use the node id to find other data in your database.4.3.Point Conversion4.3.1.World point to screen point (3D->2D)Using View3d::WorldPoint2ScreenPoint you can convert the 3D world point to screen 2D point4.3.2.Screen point to world point (2D – 3D)You can’t convert screen 2d point to 3d world point directly, but the SDK provides you function toThe RenderWindow3d control provides the function to compute the 3D point on the working5.Data ExchangeWe provide two samples for the data exchange model, you get the source code by the links: StpViewerdxfViewer6.Reference●Official web site: ●Online API document: /help/AGP2014/●WinForm and WPF Sample codes: https:///anycad/anycadnetsdkpro。