白光闪光灯_V1.0.0_使用说明书
NDC300L-AV设置程序使用说明
NDC300L-A V 设置软件使用说明(V1.0.0)目录1 光盘目录 (1)2设置软件安装与使用 (1)2.1功能说明 (1)2.2选择设备 (1)2.3 连接设备 (2)2.4断开连接 (2)2.5网络抓拍 (3)2.6抓拍参数设置 (3)2.7图像参数设置 (7)2.8识别参数 (9)2.9设置网络参数 (11)2.10调试模式 (11)附录一图片文件说明 (13)1 光盘目录设置软件——NDC 300L-AV设置软件使用手册——NDC 300L-AV使用手册SDK——NDC 300L-AV二次开发包(可选配)2设置软件安装与使用设置软件无需安装,只需将安装光盘目录下的设置软件文件夹拷贝到使用电脑上即可完成安装。
选择设置软件目录并执行Ndkset.exe即可使用。
2.1功能说明NDC 300L-AV设置程序的功能有:查找设备,连接设备、断开连接,网络抓拍,对焦功能,设置IP,参数设置。
系统启动后,显示主界面。
主界面如下:图1 设置程序主界面2.2选择设备单击【设备列表】按钮,弹出设备列表窗口,显示查找到的NDC 300L-AV设备的路口信息、IP地址、设备程序版本,如下图:图2 设置选择界面如果需要对当前网内的设备进行一次重新查找时,点击【查找设备】按钮,程序将进行扫描操作,并将查找到的设备信息显示到当前设备列表中。
选择设备的两种方法:1.选中其中一个设备,点击【关闭】按钮,退出该窗体,主窗体的设备IP地址编辑框显示所选设备的IP地址。
2.双击其中一个设备,窗口自动关闭,主窗体的设备IP地址编辑框显示所选设备的IP地址。
2.3 连接设备通过列表操作选择一个设备IP地址或者输入设备IP 地址,单击【连接设备】按钮,连接成功后,窗体的标题栏显示当前设备的IP地址及版本号。
除【设备列表】、【连接设备】按钮外,其它操作按钮显示为可用状态。
信息提示栏并提示“连接成功”。
如下图:图3 设备连接界面2.4断开连接单击【断开设备】按钮即可断开连接,断开连接后,除【设备列表】、【连接设备】按钮外,其他操作按钮变为无效状态。
Philips WhiteVision超白灯篇纸说明书

Philips WhiteVision ultracar headlight bulbType of lamp: HB4Pack of: 2 + 212V, 51Ww5w position lamps included9006WVUSMSharp irresistible lookThe latest stylish white lights for your carPhilips WhiteVision ultra , featuring the latest coating formula, delivers a stunning 4200Kelvin. These are the whitest road-legal halogen lights in our portfolio and the perfectchoice if you're looking for a cool, stylish look.Road-legal performance•Stunning white road-legal headlights for a stylish lookWhite stylish look with up to 4200 Kelvin•Up to 4200 Kelvin sharp white light•Halogen upgrade headlights that offer a highly stylish lookComfort with up to 60% more vision•White light to enhance visibility and comfort•Up to 60% more vision to maximise clarityEnhanced safety•Don't compromise on safety, change in pairs•Our whitest bulbs for stylish performance on the roadPhilips quality•Philips is the choice of major car manufacturersIssue date 2023-09-14Version: 1.0.1© 2023 Koninklijke Philips N.V.All Rights reserved.Specifications are subject to change without notice. Trademarks are the property of Koninklijke Philips N.V. or their respective Highlightscar headlight bulbType of lamp: HB4 Pack of: 2 + 2, 12V, 51W, w5w position lamps includedSpecifications4200 Kelvin sharp white lightWith up to 4200 Kelvin, Philips WhiteVision ultra headlights revolutionize the look of your car with a sharp white light. The right choice for a bright and stylish driving experience!Cool white effectPhilips WhiteVision ultra is designed for drivers who are looking for an upgrade with the style and appearance reminding of LED lighting, but drive a vehicle with halogen technology. Thanks to the new and advanced coating formula on the glass,WhiteVision ultra bulbs are our whitest road-legal lights providing a stunning look in the headlamp's reflector.Stunning road-legal headlightsWhiteVision ultra upgrade headlight bulbs are ECE certified for bright white light on the road. Drivers enjoy a vibrant look and a street-legal bulb compliant with relevant regulations. Without compromizing safety by dazzling the car in front, it gives you great visibility.Comfort light for visibilityThe new WhiteVision ultra coating formula along with its cool white light, significantly improves visibility at night and enhances driver comfort by reducing eye fatigue. When design meetsfunctionality, you enjoy a great look and enhanced driving comfort.Up to 60% more visionA longer beam pattern, with up to 60% more vision compared to the legal minimum standard, enables you to not only see other road users more clearly but also be better seen by them. It improves safety and gives you more time to react to potential hazards on the road ahead.Engineered for stylish visionBetter and brighter lights allow for increasedperformance on the road. With their optimised high-precision filament geometry, high-pressure gas filling, high-precision coating and high-quality UV-Quartz glass, Philips WhiteVision ultra headlights set a new standard for road-legal white light. Engineered for great style and visibility, these headlights provide a more relaxed and fun driving experience.Change in pairsIt is simply more efficient to change both headlamps in pairs, rather than only replace the failed one. New, modern bulbs have increased light output and increased performance, offering a safer driving experience. Overall, the benefits and advantages of replacing in pairs are numerous: less hassle, cost savings, avoiding headlight failure, a brighter and more balanced beam, but above all, safety.Highest quality car lightingTechnologically advanced Philips lighting isrenowned in the automotive industry, and has been for over 100 years. The Philips Original Equipment Quality products are designed and developedfollowing strict quality control processes (including applicable ISO norms), leading to consistently high production standards. WhiteVision ultra iscompatible with car models of major brands, such as Audi, BMW, Ford, GM, Toyota and Volkswagen. See the product selector guide for more information.Marketing specifications•Expected benefits: Style•Product highlight: Sharp white lookProduct description•Application: High beam, Low beam •Base: P22d•Designation: 9006WVUSM •Homologation ECE•Range: WhiteVision ultra •Technology:Halogen •Type:HB4Lifetime•Life time: 600Light characteristics•Lumens: 1095 ±15% lm•Color temperature: up to 4200 KElectrical characteristics•Wattage: 55 W •Voltage: 12 VOrdering information•Order entry: 9006WVUSM •Ordering code: 250130Packaging Data•Packaging type: SMA •EAN1: 8719018002501•EAN3: 8719018002518Packed product information•Gross weight per piece: 72.2 g •Length: 11 cm •Width: 5.3 cm •Height: 13.3 cm •Pack Quantity: 2•MOQ (for professionals): 10Outerpack information•Length: 28.6 cm •Width: 14.1 cm •Height:12 cm•Gross weight per piece: 0.35 kg。
大华智能交通LED补光灯ITALE-090BA ITALE-070AA_使用说明书
LED补光灯使用说明书V1.0.0声明:使用设备前请仔细阅读本说明书,阅读后请妥善保存。
产品请以实物为准,说明书仅供参考。
产品实时更新,如有升级恕不另行通知。
最新程序及补充说明文档敬请与公司客服部联系。
目录1系统功能 (1)2技术参数 (2)3产品外形尺寸 (3)4安装说明 (4)4.1 电源线 (4)4.2 信号线 (4)4.3 本体接线 (5)4.4 补光灯接入相机连线 (5)4.5 补光灯频闪信号级联说明 (6)4.6 RS485连线 (7)4.7 上电时间 (7)5软件调试说明 (8)5.1 内部参数设置说明 (8)5.1.1 软件界面 (8)5.1.2 操作说明 (9)5.1.3 注意事项 (11)5.2 程序升级说明 (11)6有毒有害物质说明 (14)1系统功能1)频闪触发与抓拍主机频闪信号输出相连,通过频闪信号控制LED灯的一定频率的亮灭,达到同步为视频补光的效果,同时人眼辨识出的是LED灯常亮状态。
2)频闪同步输出功能用于一台抓拍相机对应多个补光灯的情况,该输出线可以级联的方式连接下一台补光灯的频闪触发线,达到多车道同步补光的效果。
3)爆闪触发与抓拍主机爆闪信号输出相连,通过爆闪信号控制LED灯瞬间的高亮,亮度是频闪亮度的十几倍,达到同步为图片抓拍补光的效果。
(纯频闪灯无此功能)4)提供RS485通信功能,可对补光灯内部参数进行设置。
2技术参数3产品外形尺寸图 1 产品外形(单位:mm)图 2 产品尺寸(单位:mm)4安装说明4.1 电源线图 3 电源线4.2 信号线图 4 信号线4.3本体接线图 5 LED补光灯本体效果图LED补光灯本体下部包含两个接口,电源接口即连接图3的电源线。
信号接口即连接图4的信号线。
4.4补光灯接入相机连线AC220V爆闪触发EX频闪触发ST图 6 补光灯接入相机连线图爆闪触发EX与频闪触发ST的+、-分别接相机相应的信号输出线。
4.5 补光灯频闪信号级联说明AC220V频闪触发ST AC220V频闪触发ST频闪同步输出SOSO图 7 补光灯频闪信号级联示意图如图所示,当一台相机配有多个补光灯时,需要对视频同步补光,只需将相机的频闪输出连接在第一台补光灯的频闪触发线上,然后将第一台补光灯的频闪同步输出SO 连接到第二台补光灯的频闪触发线上即可,后面的补光灯以此类推。
罗莱电子闪光灯说明书.pdf_1719238003.2698705

Guide No. Kod. II (25ASA) Gui de No. Color Neg . (80ASA) Computer (auto) Exposure ห้องสมุดไป่ตู้ontrol Recycle T ime " AA " Alka line Batts. 2 Recycle Time-N icads2 Thyristor Regulated Energy Circuit No. of Working f stops pe r film speed External Sensor Swivel Indexed Bounce Light Head Computer (auto) Range Power Source
Now a truly pocket-size battery-powered (2 "AA" cells) Computer Flash from Rollei. It retains the same compact package that has made the previous E15 and E15B units most successful, particularly as pocket companions for the Rollei 35 , B35 and other compact cameras. The Rollei 121 BC sets a new standard for small size plus performance. Smaller than a package of cigarettes, the 121 BC uses a transverse mounted reflector, providing good illumination for small film cameras, even when equipped with a wide-angle lens of 35mm focal length. Reflector scattering screen is corrected for daylight color.
闪光灯使用指南说明书
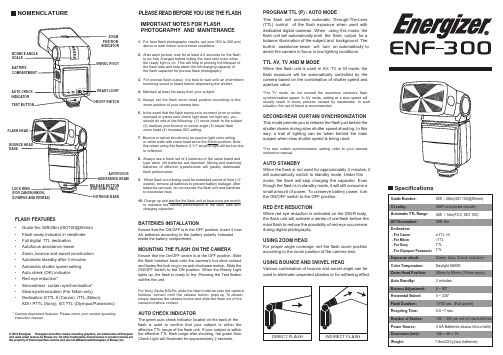
1. For best flash photography results, set your ISO to 200 and above in both indoor and outdoor conditions.2. After each picture, wait for at least 4-5 seconds for the flash to be fully charged before taking the next shot even when the ready light is on. This will help to prolong the lifespan of the flash tube and help attain the full charging capacity of the flash capacitor for precise flash photography.3. For precise flash output, it is best to wait until an intermittent humming sound is heard before depressing the shutter.4. Maintain at least 2m away from your subject.5. Always set the flash zoom head position according to the zoom position of your camera lens.6. In the event that the flash exposure is incorrect (over or under- exposed or green auto check light does not light up), you should do one of the following: (1) move closer to the subject (2) readjust your bounce or swivel angle (3) adjust flash zoom head (4) Increase ISO setting.7. Bounce or swivel should only be used on light color ceiling or white walls with zoom head set at the 50mm position. Note that when using this feature, 2-3 F stops of light will be lost due to reflection.8. Always use a fresh set of 4 batteries of the same brand and type when old batteries are depleted. Mixing and matching batteries of different types/brands will greatly deteriorate flash performance.9. When flash is not being used for extended period of time (>2 weeks), remove all batteries to prevent battery leakage. After batteries removal, do not expose the flash unit and batteries to excessive heat. 10. Charge up and test fire the flash unit at least once per monthto maintain the optimal performance of the flash tube and charging capacitor.SpecificationsNOMENCLATURE • Guide No: 92ft/28m (ISO100@50mm) • Flash ready indicator in viewfinder • Full digital TTL dedication • Autofocus assistance beam• Zoom, bounce and swivel construction • Automatic standby after 3 minutes • Automatic shutter speed setting • Auto check (OK) indicator • Red eye reduction*• Second/rear curtain synchronization* •Slow synchronization (For Nikon only)• Dedication: ETTL II (Canon), iTTL (Nikon),ADI / PTTL (Sony), 4/3 TTL (Olympus/Panasonic)* Camera dependent features. Please check your camera operating instruction manualZOOM SCALEBASEAUTOFOCUS PROGRAM TTL (P) / AUTO MODEThis flash unit provides automatic Through-The-Lens (TTL) control of the flash exposure when used with dedicated digital cameras. When using this mode, the flash unit will automatically emit the flash output for a balance illumination of the subject and background. The built-in assistance beam will turn on automatically to assist the camera to focus in low lighting conditions.TTL AV, TV AND M MODEWhen this flash unit is used in AV, TV or M mode, the flash exposure will be automatically controlled by the camera based on the combination of shutter speed and aperture value.*For TV mode, do not exceed the maximum camera’s flash synchronization speed. In AV mode, setting at a slow speed will usually result in blurry pictures caused by handshake. In such situation, the use of tripod is recommended.SECOND/REAR CURTAIN SYNCHRONIZATIONThis mode permits you to release the flash just before the shutter closes during slow shutter speed shooting. In this way, a trail of lighting can be taken behind the main subject when slow shutter speed is being used.*For rear curtain synchronization setting, referto your camera instruction manual.AUTO STANDBYWhen the flash is not used for approximately 3 minutes, it will automatically switch to standby mode. Under this mode, the flash will stop charging the capacitor. Even though the flash is in standby mode, it will still consume a small amount of power. To conserve battery power, turn the ON/OFF switch to the OFF position.RED EYE REDUCTIONWhen red eye reduction is activated on the DSLR body,the flash unit will activate a series of pre-flash before the main flash to reduce the possibility of red-eye occurrence during digital photography.USING ZOOM HEADFor proper angle coverage, set the flash zoom position according to the zoom position of the camera lens.USING BOUNCE AND SWIVEL HEADVarious combination of bounce and swivel angle can beused to eliminate unwanted shadow or for softening effect.BATTERIES INSTALLATIONEnsure that the ON/OFF is in the OFF position. Insert 4 new AA batteries according to the battery polarity indicated inside the battery compartment.MOUNTING THE FLASH ON THE CAMERAEnsure that the On/OFF switch is at the OFF position. Slide the flash hotshoe base onto the camera’s hot shoe contact and fasten the lock ring in an anti-clockwise motion. Slide the ON/OFF Switch to the ON position. When the Ready Light lights up, the flash is ready to fire. Pressing the Test Button will fire the unit.For Sony Alpha DSLRs, slide the flash hotshoe onto the camera hotshoe contact until the release button pops up. To detach,simply depress the release button and slide the flash out of the camera hotshoe contact.AUTO CHECK INDICATORThe green auto check indicator located on the back of the flash is used to confirm that your subject is within the effective TTL range of the flash unit. If your subject is within the effective TTL flash range after shooting, the green Auto Check Light will illuminate for approximately 2 seconds.IMPORTANT NOTES FOR FLASHPHOTOGRAPHY AND MAINTENANCEPLEASE READ BEFORE YOU USE THE FLASHFLASH FEATURES© 2012 Energizer Energizer and other marks, including graphics, are trademarks of Energizer and used under license by Bower , Inc. All other trademarks, brand names or product names are the property of their respective owners and are not affiliated with Energizer or Bower , Inc.。
闪光灯的使用方法

闪光灯的使用方法闪光灯的使用方法有些照相机(如镜间快门式照相机)的任何一级快门都能和闪光灯同步,但有些(如幕帘式快门照相机)则不行。
所以使用闪光灯之前,应先搞清楚哪一挡是同步快门。
大部份单反相机的同步档用“X”表示,也有的以字符的颜色(如红色)表示。
闪光灯是一个用途非常广泛的辅助工具,它是摄影光源的一种,当拍照时,周围环境的自然光源(日光)或人工光源(灯光等)不足的时候,闪光灯就成了弥补这一不足的机动光源。
各种相机内置或外加的万次闪光灯,最通用的都是通过振荡和变压器升压,经电容器储存能量,在需要的瞬间释放并感应出高压,激发惰性气体发出脉冲光源,从而获得极强的`瞬时功率。
1.闪光灯的曝光计算用闪光灯拍摄时选用哪一级光圈取决于闪光灯自身发出的光量大小,胶卷的感光度及摄影距离。
闪光灯的曝光量可以这样计算,f= GN/L GN:闪光灯指数,L:闪光灯距主体的距离。
f:所需的光圈值。
摄影时首先可遵循以下步骤:将速度设定在闪光同步档上;对焦;从调焦环上读出距离;用上述公式或从闪光灯背面的表里查出所需光圈值;调节光圈,拍摄。
2.闪光灯的几种使用方式最简单也是最常用的是将闪光灯直接装在照相机顶部的热靴内。
但是这样的缺点是光线太平,看上去不够自然,因为自然界中几乎没有这样角度的光线。
如果将闪光灯与照相机分离,使之从侧上方闪射,就能利用光的投影使主体形成一定的立体感,使画面更接近自然光效果。
将闪光灯移开,需要一根闪光同步线。
此时曝光计算中的距离应是闪光灯到主体的距离。
有些闪光灯的灯头是可以转动的(如银燕、Achieve等),此时可以将灯头对着天花板或墙壁,使光线经过反射到达主体,这种光线非常柔和,与室外薄云遮日时相似。
用彩色胶卷拍摄时,应注意反射体必须是白色或接近白色的,否? 射光会影响主体的颜色。
用反射光摄影时,曝光量一般比正常情况要加一到两级。
3.使用闪光灯时需要注意的几个问题使用闪光灯摄影时,如果主体是多个,最好能将他们安排在闪光范围内同一距离,否则会出现有些主体曝光过度,而有些曝光不足。
大华闪光灯_DH-ITALF-300AD 系列 快速操作手册说明书
大华闪光灯_DH-ITALF-300AD 系列快速操作手册V1.0.0浙江大华技术股份有限公司法律声明版权声明© 2018 浙江大华技术股份有限公司。
版权所有。
在未经浙江大华技术股份有限公司(下称“大华”)事先书面许可的情况下,任何人不能以任何形式复制、传递、分发或存储本文档中的任何内容。
本文档描述的产品中,可能包含大华及可能存在的第三人享有版权的软件。
除非获得相关权利人的许可,否则,任何人不能以任何形式对前述软件进行复制、分发、修改、摘录、反编译、反汇编、解密、反向工程、出租、转让、分许可等侵犯软件版权的行为。
商标声明●、、、是浙江大华技术股份有限公司的商标或注册商标。
●HDMI标识、HDMI和High-Definition Multimedia Interface 是HDMI Licensing LLC的商标或注册商标。
本产品已经获得HDMI Licensing LLC授权使用HDMI技术。
●VGA是IBM公司的商标。
●Windows标识和Windows是微软公司的商标或注册商标。
●在本文档中可能提及的其他商标或公司的名称,由其各自所有者拥有。
责任声明●在适用法律允许的范围内,在任何情况下,本公司都不对因本文档中相关内容及描述的产品而产生任何特殊的、附随的、间接的、继发性的损害进行赔偿,也不对任何利润、数据、商誉、文档丢失或预期节约的损失进行赔偿。
●本文档中描述的产品均“按照现状”提供,除非适用法律要求,本公司对文档中的所有内容不提供任何明示或暗示的保证,包括但不限于适销性、质量满意度、适合特定目的、不侵犯第三方权利等保证。
出口管制合规声明大华遵守适用的出口管制法律法规,并且贯彻执行与硬件、软件、技术的出口、再出口及转让相关的要求。
就本手册所描述的产品,请您全面理解并严格遵守国内外适用的出口管制法律法规。
关于本文档●产品请以实物为准,本文档仅供参考。
●本文档供多个型号产品做参考,每个产品的具体操作不一一例举,请用户根据实际产品自行对照操作。
ITALE_080BA_LED补光灯使用说明书_V1.0
ITALE-080BA LED补光灯使用说明书V1.0声明:使用设备前请仔细阅读本说明书,阅读后请妥善保存。
产品请以实物为准,说明书仅供参考。
目录目录 (1)1产品概述 (1)2系统功能和特点 (2)3技术参数 (3)4产品尺寸 (4)5工作设置 (5)5.1电源线 (5)5.2信号线 (5)5.3灯体前面板 (6)5.4闪光灯接入相机连线 (7)5.5闪光灯频闪信号级联说明 (7)5.6 RS485连线 (8)5.7启动时间 (9)6客户端设置 (10)6.1软件界面 (10)6.2操作说明 (11)6.2.1 串口选择 (11)6.2.2频闪配置 (11)6.2.4环境亮度 (13)6.2.5参数读/写控件 (13)6.2.6反馈信息显示 (13)6.3注意事项 (13)7程序升级 (14)8有毒有害物质说明 (17)1产品概述ITALE-080BA补光灯是一款可支持视频补光同步、抓拍补光同步的高性能的智能交通领域的辅助光源,用于电子警察高清摄像机抓拍系统的夜间车牌补光照明,亦可用于卡口等抓拍或检测车牌的系统,以推进公路和城市交通的现代化管理。
ITALE-080BA采用针对智能交通特殊定制设计,大大提高LED光源寿命,提高光源的工作效率。
优良的结构和散热同样是针对智能交通产品特殊定制,使光——散热——电模块化,这样保证了产品能达到最好的散热性、稳定性、安全性。
2系统功能和特点1)频闪触发与抓拍主机频闪信号输出相连,通过频闪信号控制LED灯的一定频率的亮灭,达到同步为视频补光的效果,同时人眼辨识出的是LED灯常亮状态。
2)频闪同步输出功能用于一台抓拍相机对应多个闪光灯的情况,该输出线可以级联的方式连接下一台闪光灯的频闪触发线,达到多车道同步补光的效果。
3)爆闪触发与抓拍主机爆闪信号输出相连,通过爆闪信号控制LED灯瞬间的高亮,达到同步为图片抓拍补光的效果。
(纯频闪灯无此功能)4)提供RS485通信功能,连接闪光灯客户端,可对闪光灯内部参数进行设置。
闪光灯连闪器的基本操作
一、闪光灯的基本操作:闪光灯既可以成就也可以毁掉一张照片。
正确的使用闪光灯就能让你拍出精彩的照片。
闪光灯不要直射对象,最佳使用距离是3米以内。
在光线不足的时候,或是光比很大的时候,都需要利用闪光灯来补偿暴光。
光线充足有时反而更需要闪光灯。
新学摄影的人容易产生这种误解,闪光灯就是在光线昏暗的时候拿出来打打光的。
其实不然。
一般数码相机都内置闪光灯,而且不少机型还可以外接闪光灯。
事实上,仅仅满足于使用内置闪光灯,或者不懂得如何使用闪光灯,常导致拍出的照片带有“惊悚”效果:人脸上产生光斑,看起来满面油光;被摄体光滑的表面产生刺眼反光;内置闪光灯让被摄对象变成红红的“兔子眼”;背景一片漆黑,只有镜头前的人像突兀地冒出来……就算使用内置闪光灯,也要讲究技巧:1.灯头避免直射被摄体应将闪光打在白色天花板或者白墙上,利用反射定律(入射角等于出射角),估算出反射光线的落光位置,使光线通过反射后能够正好落在拍摄对象上。
这样制造的光线柔和自然,表现人物更加生动、质感。
这一点专用闪光灯更容易做到,因为专用闪光灯可以上下左右扭动,对准不同角度。
而内置闪光灯只能正对前方,因此要让内置闪光灯改变照射方向,需要耍一点“小花招”,譬如将绵纸遮到闪光灯前,让光线分散而显柔和。
如果没有白墙,也可适当利用柔光罩、反光板。
2.光线充足也需要闪光灯人们往往有误解,当在光线充足的时候拍摄人物或物体时,就不需要用闪光灯了。
其实答案不尽如此,有时候正因为光线充足,才导致明暗对比强烈。
比如拍摄侧光或逆光的近景和人物活动特写,这时逆光的人脸会显得一团漆黑,或者人像鼻子下的阴影会格外突出,这时需要开启闪光灯以减轻阴影。
需要注意的是,使用闪光灯做辅助光,其强度不能超过主光,一般低1至2挡为宜(可以在闪光曝光补偿中调节),这样画面才显得逼真、自然。
3.暗环境下要使用“防红眼”在暗环境下,人的瞳孔会张开得很大,闪光灯发出的光线会通过瞳孔照射到眼底视网膜上再反射回来,由于人的视网膜是红色的,反射回来的红光被记录在照片上,就形成了“红眼”。
闪光灯使用说明书
6. S1/S2 ModePress the [MODE] button, then the flash will enter S1/S2 mode.These modes are applicable for slave flash in order to create manylight effects. They are respectively applicable for manual flashenvironment and TLT flash environment.When the flash is in S1 mode, it will work with the first work ofthe master flash synchronously, with the result consistent with theuse of radio slave. To use this mode correctly, the master flashshould be set at manual flash and the TTL flash system withpreflight function and the red-reduction function with multipleflashes should not be used.S2 mode is similar to S1 mode, but it can support the master flashin TTL mode. In particular, if S1 mode cannot have correct andsynchronous flash with the inbuilt flash, you can try to use S2mode.7. Menu Access of Camera (only compatible with CanonETTL camera system)On the Canon camerasupporting ETTL, you canswitch flash mode via thecamera menu. With thesetting function of theexternal flash function in theflash control menu, you canswitch between the TTLmode and the manual flash mode; in addition, on such menu, youmay also set front and rear curtain synchronization, and setmanual flash output with 1/3ev step length.8. Test FlashWhether in any mode, you can press PILOT button to test if theflash light flashes normally.In M/S1/S2 mode, press the PILOT button and the flash light willsend light with different luminance as per levels of output powerselected.9. Power-saving FunctionIn TTL/M/MULTI mode, if idle for about 30min, the flash willpower off automatically.In S1/S2mode,if idle for 60min, the flash will power offautomatically.VI. SpecificationsGuide number 33Circuit design Insulated Gate Bipolar Transistor (IGBT)Flash mode TTL, M, Multi, S1, S2Zoom range Auto, 24, 28, 35, 50, 70, 85 mmVertical rotation angle -7~90 degreesHorizontal rotation angle 0~270 degreesPower Supply 4×AAsize batteries (Alkaline or Ni-MHare usable)Lighting times 100~1500 times (AA alkaline cell used)Recycle time less than 3s (AA alkaline cell used)Color temperature 5600kFlash time 1/800s~1/20000sFlash control TTL auto flash or manual Level 8 lightquantity output control with 0.3 stopincrementAdditional featuresFEB, FEC, FEL, Automatic zooming,Rear-curtain Sync.Dimensions 60×72×172 mm(extended state)Net weight 300gAccessories Flash light (1), protecting bag (1), andmini stand(1) and manual (1)VII. Possible problems during use and solutions1. The AF LED is not on? Check if this camera needs flash lightassist AF or if it supports the function; some cameras requiresfocucal points to be in the center, focus method to adopt AF-S andrequires dark environment; check if some settings in the cameraare forbidden.2. Photos are under exposure or over exposure? Check if the setshutter, aperture and ISO are too near the flash limit or if somesettings including exposure compensation in relation to flash areproper.3. Vignetting appears in photos or only part of the subject isilluminated? This product has a designed light head zoom rangeof 24-85 mm, and is currently not compatible with full framecamera system. You may pull out the wide-angle diffuser to widenthe flash range.4. Because of differences among various models of cameras anddifferent personal preferences, the use of this product may causebrightness with the [Output control knob] within the range of ±3ev,Please Note that this compensationexposure compensation setting on thephotos by making flash light headaimed at wall or ceiling and using the light reflected back from theceiling or wall to light the desired object, so that the shade behindthe object can be decreased to getIf the wall or ceiling is too far, theweak towall orwhitein order to get efficient reflection;notwhite, color cast may appear in photo.9. Use Reflection Board to Take PhotosWith the reflection board flash, draw the reflection board and theout from the light head at the sametime and then push the wide-anglediffusion board back. In such case,if this product is being used to takeaeyes ofthe subject and thus make the eyesThiseffectwhen the flasher head is up 90°.diffusion board,board andfigure; in suchextent to 18mm and the flash effect will be softer andused in incompatible iTTL/ETTLcamera, Functions 2, 3, 4, 5, 6 and 7 are not available.物对焦后按下相机快门,闪光灯就会根据相机的指示闪出合适的光,就可以得到您所需要的相片。
ITALE_080BA_LED补光灯使用说明书_V1.0

ITALE-080BA LED补光灯使用说明书V1.0声明:使用设备前请仔细阅读本说明书,阅读后请妥善保存。
产品请以实物为准,说明书仅供参考。
目录目录 (1)1产品概述 (1)2系统功能和特点 (2)3技术参数 (3)4产品尺寸 (4)5工作设置 (5)5.1电源线 (5)5.2信号线 (5)5.3灯体前面板 (6)5.4闪光灯接入相机连线 (7)5.5闪光灯频闪信号级联说明 (7)5.6 RS485连线 (8)5.7启动时间 (9)6客户端设置 (10)6.1软件界面 (10)6.2操作说明 (11)6.2.1 串口选择 (11)6.2.2频闪配置 (11)6.2.4环境亮度 (13)6.2.5参数读/写控件 (13)6.2.6反馈信息显示 (13)6.3注意事项 (13)7程序升级 (14)8有毒有害物质说明 (17)1产品概述ITALE-080BA补光灯是一款可支持视频补光同步、抓拍补光同步的高性能的智能交通领域的辅助光源,用于电子警察高清摄像机抓拍系统的夜间车牌补光照明,亦可用于卡口等抓拍或检测车牌的系统,以推进公路和城市交通的现代化管理。
ITALE-080BA采用针对智能交通特殊定制设计,大大提高LED光源寿命,提高光源的工作效率。
优良的结构和散热同样是针对智能交通产品特殊定制,使光——散热——电模块化,这样保证了产品能达到最好的散热性、稳定性、安全性。
2系统功能和特点1)频闪触发与抓拍主机频闪信号输出相连,通过频闪信号控制LED灯的一定频率的亮灭,达到同步为视频补光的效果,同时人眼辨识出的是LED灯常亮状态。
2)频闪同步输出功能用于一台抓拍相机对应多个闪光灯的情况,该输出线可以级联的方式连接下一台闪光灯的频闪触发线,达到多车道同步补光的效果。
3)爆闪触发与抓拍主机爆闪信号输出相连,通过爆闪信号控制LED灯瞬间的高亮,达到同步为图片抓拍补光的效果。
(纯频闪灯无此功能)4)提供RS485通信功能,连接闪光灯客户端,可对闪光灯内部参数进行设置。
微距摄影闪光灯说明书

五、技术规格有效距离:功率比:如使用2×AA 镍氢电池:尺寸:重量:3cm -1.0m (1.1-40英寸)半光、全光使用时间约1.5小时(1)电源控制器:9.1(长) × 4.4 (宽)× 4.4(深)cm ;(2)环形灯:12.8(长)×10.3(宽)× 2.8(深)cm 165g (无电池时)48颗5500K ~ 6500KLED 灯珠数量 :色温:环形灯头 1个充电器 1个电源控制器 1个适配环(六种规格) 49mm 、52mm 、55mm、58mm、62mm 和67mm1、使用时需小心,避免发生碰撞或跌落。
2、勿在温度过高或过低以及潮湿的环境下使用此灯。
3、勿使用稀释剂、苯或其他清洁剂擦洗产品上的污迹或指印。
可使用柔软加湿的布清洁。
4、当闪光灯从温度较低的室外移到温度较高的室内时,LED 灯内部会出现冷凝现象,可损坏产品。
此时,应等待灯达到室温后,再使用。
5、如长时间不使用,应储存在干燥、阴凉、通风良好的地方。
注:为满足市场上新的需求,我公司不断升级我们的产品。
正因为如此,产品规格中的某些最新变更有可能未包含在本使用说明中。
六、套装配置七、使用注意事项四、使用方法:(一)安装电源控制器将靴座插入相机上的热靴,并转动热靴锁环,将其锁紧。
(二)将环形LED 灯安装到相机本产品配有六种规格的适配环与相机镜头颈圈相符:49mm 、52mm 、 55mm 、58mm 、62mm 和67mm 。
选择相应的环安装在相机镜头上,然后将灯头套在上面,即可将相机与灯头固 定好。
然后将灯头上的电源输入插头插入电源控制器上面的“OUT PUT ”插孔。
(三)开始使用A 、选择使用电池供电则装上电池,在电源控制器上将开关拨动到“BATT ”位置。
B 、选择使用充电器供电将充电器的圆形插头插到电源控制器的“DC3V ”上,另一头插上交流电 源,将电源控制器上的电源开关拨动到“DC3V ”位置,即可使用。
高端系统Lonestar白光LED灯光系统说明书

Type(s) Project Date NotesG E N E R A L I N F O R M A T I O NThe High End Systems Lonestar brings the renowned brightness, quality, and performance of our bright white LED framing fixturesin a more compact package. With more than 15,400 lumens and a rich feature set, Lonestar is a perfect addition to lighting systems in theatres, television studios, cruiseships, and other small to medium-sized venues. The luminaire’s rich colors, powerful zoom, full curtain framing, diffusion, and prism effects make Lonestar a versatile and affordable tool for designers who want maximum performance from a compact-sized automated fixture.Applications• Houses of worship• Nightclubs and retail installations• Small to medium-sized performance venues• Cruiseships and themed entertainment• Production rental companies• Tradeshow and ballroom AV• Studio and filmProduct Features• Bright white LED engine• 290 W Ultra-Bright engine• Fixture output exceeding 15,400 lumens• High quality 13-lens optic system• Extremely powerful 3.8°–55° zoom• CMY color mixing system• Electronic linear CCT mixing control• Ten position plus open color wheel• Full-curtain framing system for total control of beam shaping • 16-blade iris for extremely tight beam effects• Two diffusion Light and Medium system with additional,optional heavy diffusion• Nine position plus open Rotating Gobo Wheel• Dual prisms for compound beam and projection effects• Linearly insertable rotating animation wheel O R D E R I N G I N F O R M A T I O NModel DescriptionLS-UB-MI2550A1200-BLonestar, Black, Ultra-Bright in MoldedInsert, BoxedRC-LS2550K1001Road Case, Holds Up to Three (3) LonestarFixtures in Molded InsertColor Options: Fixtures ship standard in black. White available by request. Included Accessories: F ixture includes two (2) Omega brackets, one (1) fixturepower cord, bare ends to powerCON® TRUE1® TOP input,and a safety cable.AccessoriesModel DescriptionLS-TH2550A1020Top Hat, Snoot for LonestarLSA-HFROST2550A2083Heavy Frost Accessory for Lonestar2560B7009Fixture Power Cord Upgrade, 5-15 Edisonto powerCON TRUE1 TOP, 15 A2560B7005Fixture Power Cord Upgrade, Stage Pin topowerCON TRUE1 TOP, 20 A2560B7006Fixture Power Cord Upgrade, L6-20 topowerCON TRUE1 TOP, 20 A2560B7007Fixture Power Cord Upgrade, L5-20 topowerCON TRUE1 TOP, 20 A55040014Cheeseborough 2” Alloy 1/2 CouplerTruss Clamp67040010Mini-Claw™SourceEngine Ultra-BrightLED Details290 WField Lumens See photometrics on page 4Max Integrating Sphere Lumens15,400 lumensLPW53LED Life50,000 hoursNative CCT7000 KColorColor Mixing Cyan, magenta, yellow, CTO-linear Color Temperature Variable down to 2200 KColor Wheel Ten (10) dichroic colors plus open OpticalBeam Angle Range 3.8°–55°Gate Size15.8 mmAperture Size120 mmPattern Projection Rotating and indexable wheel with nine (9) patterns plus openAnimation Bi-directional animation wheelPrism Five facet star and four facet linear rotating prism with simultaneous insertionDiffusion Light and medium diffusion Optional heavy diffusion in prism slotIris16-blade irisFraming Four-plane, full-curtain framing system with 120° module rotationFlicker Control/Hz Range 2.4 kHz and 16 kHz ControlInput Method DMX (5-pin) or EthernetProtocols DMX via RS-485Art-Net or sACN via EthernetEthernet Pass-Thru Passive Ethernet in and thru with and without powerData Conversion Patented data conversion system for: DMX to EthernetEthernet to DMXModes (Footprint)Standard or Trifusion (48 channels) RDM Functions YesUI Type Full color graphical UI with 6-button navigational controlLocal Control YesDimming Performance16-bit, DMX controlledNotes: All LED sources experience some lessening of light output and some color shift over time. LED output will vary with thermal conditions. Thermal conditions can be affected by ambient temperatures and orientation ElectricalVoltage Range100–240 V 50–60 HzInput Method powerCON TRUE1 TOPWattage (Standard)615 WCurrent (Max) 6.2 A @ 100 VInrush (First Half Cycle)120 V: 56.8 A230 V: 78.0 AFixtures per Circuit2 fixtures (15 A power thru connector)3 fixtures (R20 module or similar)Note: TRUE1 TOP connector rated for20 A (120 V / 60 Hz) and16 A (240 V / 50 Hz)ThermalAmbient Operating Temp-10°–40°C (14°–104°F)Fan ModeStandard, Studio, and Linear Continuouscontrol channelStationary Noise TBDPhysicalPan and Tilt Range540° pan, 251° tiltMax Pan/Tilt Speed360° in 2.306 s/180° in 1.26 sMaterialsSteel and aluminum frame with molded plasticcoversColor Options Black, white by requestMounting Options Any orientationIP Rating IP20Weight22.7 kg (50 lb)Included AccessoriespowerCON TRUE1 TOP to bare end fixture tailTwo (2) clamp bracketsSafety cableWarrantyFixture WarrantyFive (5) years for light engineTwo (2) years for complete fixtureWarranty Details /Support/Warranty.aspx Regulatory & ComplianceRegulatory StandardsListed to UL 1573Certified to CSA STD. C22.2 No: 166FCC Class AEACCE compliance declared tothese standardsSafety: EN 60598-1, EN 60598-2-17,EN 62031, EN 62471EMC: EN 55015, EN 61547, EN 61000-3-2,EN 61000-3-3Complies to the ROHS directive YesSafetySafetyMinimum distance to illuminatedsurface = 3.0 m (10 ft)Minimum distance from fixture head tocombustible materials = 0.1 m (4.0 in)P R O D U C T S P E C I F I C A T I O N SF E A T U R E D E T A I L SColor Wheel DetailsShape Fixed wedgeMaterials1.1 mm glass BorofloatRotating Gobo DetailsOutside Diameter 17.5 mm (0.69 in)Image Diameter 13 mm (0.51 in)Materials0.5 mm aluminum1.1 mm glass Borofloat ®Animation Wheel DetailsMovement Bi-directional continuous rotation Materials0.6 mm aluminumLonestar - Ultra-BrightDegreeCandela Field Lumens Power Usage Lumens Per Watt Narrow 3.8°1,771,1005,209290 W 18Medium 26°143,90012,073290 W 42Wide55°30,00010,700290 W37Narrow - 3.8°Throw Distance10 ft 3.0 m 20 ft 6.1 m 30 ft 9.1 m 50 ft 15.2 m 200 ft 61 mField Diameter 0.7 ft 0.21 m 1.3 ft 0.41 m 2.0 ft 0.61 m 3.3 ft 1.02 m 13.3 ft 4.05 m Illuminance (fc)17,711 4,428 1,968 709 45 Illuminance (lux)190,564 47,641 21,174 7,623 476 Medium - 26°Throw Distance 10 ft 3.0 m 20 ft 6.1 m 30 ft 9.1 m 50 ft 15.2 m 200 ft 61 m Field Diameter 4.6 ft 1.41 m 9.2 ft 2.82 m 13.9 ft 4.23 m 23.1 ft 7.04 m 92.3 ft 28.15 m Illuminance (fc)1,439 360 160 58 4 Illuminance (lux)15,479 3,870 1,720 619 39 Wide - 55°Throw Distance 10 ft 3.0 m 20 ft 6.1 m 30 ft 9.1 m 50 ft 15.2 m 200 ft 61 m Field Diameter 10.4 ft 3.18 m 20.8 ft 6.35 m 31.2 ft 9.53 m 52.1 ft 15.87 m 208.2 ft 63.47 m Illuminance (fc)300 75 34 12 1 Illuminance (lux)3,2268073581298To determine center beam illumination in footcandles at any throw distance, divide candela by the throw distance squared.Metric conversions: F or meters, multiply feet by 0.3048.For lux, multiply footcandles by 10.76.12345166789101511121314D 74CCT940.0020R R 7225 KAdditional Color MetricsCRI R a (R 9)73 (-24)TLCI50Product Dimensions ModelHeightWidthDepthin mm in mm in mm Lonestar**23.660014.53688.7221Lonestar in Box with Molded Insert26.667621.153614.9378**Does not include mounting hardwarePower TableVAC Amps Hz Watts VA PF 100 6.2506156190.99120 5.1606116140.99200 2.9505706020.97208 2.9605836020.97220 2.7505795990.97230 2.6505805960.962402.5605756070.95Product WeightModelWeightlbkg Lonestar**50.022.7Lonestar in Box with Molded Insert7734.9A D D I T I O N A L O R D E R I N G I N F O R M A T I O NAdditional AccessoriesModel Number Description2550A3005Extra Omega bracketsH7300105Galvanized safety cable with spring snapMolded Case Insert DimensionsOptional Roadcase DimensionsCorporate Headquarters Middleton, WI USAGlobal Offices London, UK Rome, IT Holzkirchen, DE Paris, FR Hong KongDubai, UAE Singapore New York, NY Orlando, FL Los Angeles, CA Austin, TXCopyright©2021 ETC. All Rights Reserved. All product information and specifications subject to change. Rev B 2021-09*Trademark and patent info: /IP。
LED MAGIS 40W 日光均衡CCT LED锐角灯(白光,日光均衡相对色温)用户指南说明书

LED MAGIS 40 W Daylight Balanced CCTLED Fresnel SPOTLIGHT(white light, Daylight balanced Correlated Color Temperature)INSTRUCTION MANUALMANUFACTURERREPRESENTATIVEILT Italy S.r.l.Via Cancelliera # 10a, 00041 Albano Laziale (Rome- Italy).Tel. +39/06/902901 Fax. +39/06/90231051U.R.L.: www.desisti.it E-mail: ******************1. INTRODUCTIONCongratulations on your purchase of a LED MAGIS 40W lighting fixture with Daylight Balanced CCT LED. Our commitment to Total Customer Satisfaction and our consolidated experience and leadership in design innovation and manufacturing of lighting products for the professional Entertainment Industry means you can depend upon the quality of this product.The LED MAGIS 40W is a compact, highly efficient Fresnel lens spotlight using a LED ARRAY combined with the DE SISTI Patented optical system to optimize the photometric performances of LED ARRAYS when utilized in combination with either Fresnels or Plano Convex lenses.The Lighting Fixture is DMX Controlled and includes a number of parameters that can be set locally, it is equipped with a universal voltage power supply for AC feed and it is available with Daylight Balanced CCT.It utilizes Standard accessories from the DE SISTI range of equivalent Fresnel Lens size, such as Barndoor, Colour Frame, Cones, scrims.LD300.150 Daylight CCT Manual Operated2. YOKE AND ACCESSORIES ASSEMBLYThe LED LEONARDO 40W permits both POWER and DMX DAISY CHAIN.In fact each Fixture is respectively equipped with:For DMX:∙ 1 XLR5 pin Panel Mount Male (DMX IN)∙ 1 XLR5 pin Panel Mount Female (DMX OUT)For Mains Supply∙ 1 20A Powercon NAC3MPA BLUE (POWER IN)∙ 1 20A Powercon NAC3MPB WHITE (POWER OUT)It is recommended to Daisy Chain a Max of 12 fixtures, even if the limitationsimposed by DMX Standards are for an higher q.ty of units and even if thePowercon Connections are rated for 20A max.4. SAFETY INSTRUCTIONSProfessional use: This luminaire has been designed for professional use and must be operated by qualified personnel only. Not for residential use.Grounding: WARNING: THIS LUMINAIRE MUST BE GROUNDEDWARNING: Disconnect Power CORDS beforeany maintenance work or opening the FUSE HOLDER.Risk of serious injury.Electrical connections: IMPORTANT The cores in this mains lead are colored in accordance with the following code:Europe AmericaGround Green & yellow Green or green & yellowNeutral Blue WhiteLive Brown BlackIn case the colors of the cores do not correspond to the colors of the connection points on your plug, please proceed as follows:∙or colored in green or in green - yellow;∙the blue (or white) core must be connected to the connection point marked with the letter N or colored in black;∙the brown (or black) core must be connected to the connection point marked with the letter L or colored in red.Working conditionsWorking Position Lighting fixture: Max. Tilting ±90° from horizontalMinimum 5°C, maximum +40°CAmbient Temperature, t aat the place of installation and Storage25-80% (not condensing)Humidityat the place of installation and StorageTop Back Sides Front Minimum distances frominflammable surfaces0,1 m. 0,1 m. 0,1 m. 0,5 m.The luminaire should never be OPERATED close to inflammable materials. The ones indicated in the above table are the minimum distances recommended. Other requirements for safe use are:A. Do not cover the apertures of the luminaire housing. They are essential for correct ventilation.B. Use only original accessories and spares from De Sisti Lighting.C. Before hanging the luminaire ensure that the suspension point (or the stand) is properly rated to acceptthe luminaire weight.D. In case of pole operated use, fit only a P.O. stirrup from De Sisti Lighting.E. A suitable secondary safety suspension device (safety cable, chain or equivalent) must be fitted betweenthe suspension point and the eyelet at the front of the body .WARNING : DO NOT MOUNT THE LUMINAIRE ON A NORMALLY FLAMMABLE SURFACE .5. INSTALLATION INSTRUCTIONSThe following procedure should be adopted:Before connecting the luminaire to the electrical mains ensure that:A. Earth line is present on the power socket.B. The mains voltage is within the rated range of the luminaire (see technical data on the rating label)C. The front safety shield is present and in good condition.It consists of a Fresnel lens made by borosilicate un-toughened glass,with a Diameter = 120 mm , thickness = 4 mm type ( 3 min ).WARNINGS :∙Do not operate the product if the ambient temperature exceeds 40° C∙Provide a minimum clearance of 0,1m (4 in.) around fans and air vents.∙SHIELDS, LENSES SAFETY OR DICHROIC GLASSES SHALL BE CHANGED IF THEY HAVE BECOME VISIBLY DAMAGED TO SUCH AN EXTENT THAT THEIR EFFECTIVENESS ISIMPAIRED, FOR EXAMPLE BY CRACKS OR DEEP SCRATCHES.∙THE LUMINAIRE SHALL ONLY BE USED COMPLETE WITH ITS PROTECTIVE SHIELDD. Applying power:Never connect to dimmer power. Install a power plug on the power cable using the following pin assigment:1 : Neutral2 : Live Green/Yellow : Ground - This fixture must be connected to ground.Make sure the local power voltage is within the range specified. If so; connect the power cable and turn the power on.E. Stand Alone operation:Using the navigation buttons and display readout ( refer to the “Local Menu” chapter )navigate to Manual and set the desired intensity (for additional operations see “Local Menu” chapter)F. DMX operation:Connect a DMX cableNavigate to Address mode (Addr) and set the desired address, (refer to the “Local Menu” chapter).Connect to DMX controller (refer to the “Channel Setting” in the “Local Menu” chapter) and Use it.6. LOCAL MENUPGM PORTFor Firmware UpgradeFUNCTION 1 Scrolling UP / Increases value “function key”ENTERSelect / ConfirmFUNCTION 2 Scrolling DOWN / Decreases value “function key”DisplayWhen the push button are not used for more than 15seconds the display will go OFF. It will go ON again anytime a push button is activated.DMX Presence Shows the presence of DMX (LED lit = DMX present)DEFAULT SETTINGS ARE INDICATED IN BOLD LETTERS ON THE FOLLOWING TABLE:The following are the BASIC FUNCTIONS and COMMANDS that are provided on the LOCAL MENU of the LED FRESNEL. The unit is provided with a USER MENU accessible instantly on the product.The unit has also a SERVICE MENU that is only accessible through a PASSWORD and is reserved for QUALIFIED and TRAINED PERSONNEL:1st MENU Displayed(scrolling with the and the buttons)2nd MENU Displayed(after pressing the X that stands for ENTER )Explanation of Each MENU FUNCTIONDMX ADDRESSThis Function is to SET the DMX address from 1 to 512 (Product is delivered with default settingof the DMX address at 1)Once the C001 is displayed, act on the button to increase the address to thedesired value.Temporary push will increment the value by 1, if the button is kept pushed the increment on numbers is getting fast.Once the desired Address number is accomplished press X (“ENTER”) to make it activeLOCAL DIMMING CONTROLThis Function is to LOCALLY DIM the LED INTENSITY from 0 to 100% (Product isdelivered with default setting of the DIMMER at 0).The intensity goes in increments of 1/100% so the display will show 000% with the dimmer at 0% and FULL with the dimmer at 100%.Temporary push will increment the value by 1/100, if the button is kept pushed the increment on numbers is getting fast.Once the desired Lighting Level is accomplished and it is wanted to leave that level and go to other functions of the MENU, press “ENTER”.LOCAL OR REMOTE CONTROL SETTINGSThe LED Fresnel has the facility to block the LOCAL DIMMING SETTING and maintain it when the POWER is turned first OFF and than ON again.This allows for the LIGHT to be TUNED and FOCUSED locally and its dimming levelcan be blocked, so that for instance a system lighting a SET can be operated by aremote switch or simple brakers by TURNING POWER ON.The relevant menu to access this function is CTRL, to enter in this menu press X(“ENTER”), it is than possible to select either DMX or AUTO by acting on the or button and than press X (“ENTER”) again. The machine is set to DMX as default.∙In DMX mode: the Fixture accepts DMX control….if in this mode the local DIMMING CONTROL is SET to a level the Light behaviour will follow the HTP (Highest Takes Precedence) modality, in other words it will keep the localDIMMING setting until the DMX level of the specific channel will be higher, from that level onwards the DMX level will take precedence. In this condition if the DMX connection is removed, the light will keep the last level….until power is ON. It will reset and Start at 0after Power OFF and ON again.∙In AUTO mode: the light will ignore any DMX control. In this mode any localdimming setting will be maintained and will be automatically recalled after power off, when turning the power on again.TEMPERATUREThis function Displays in real time the LED ARRAY Case temperature in °C. When pressing Enter again you exit from the temperature display.The steady state TEMPERATURE of the ARRAY reaches approx. 55°C after many hours of continuous operation with an ambient temperature of 25-30°C.The Thermal Handling of the LED is Automatically handled by the local electronics and the LED will operate until the ARRAY temperature reaches 80°C, that anyway is still way within the prescribed maximum nominal prescribed by the ARRAY manufacturer that is 105°C.In case the ARRAY temperature reaches 80°C the unit will automatically turn off.Even in extreme Ambient temperature conditions the LED ARRAY shall never reach the 80°C limit.The above protection threshold is there to protect the LED ARRAY from stressed working conditions in case some other failures or specially critical working conditions are causing an over-temperature.1st MENU Displayed(scrolling with the and the buttons)2nd MENU Displayed(after pressing the X that stands for ENTER)Explanation of Each MENU FUNCTIONCHANNEL SETTING (RESOLUTION & FUNCTION)This Function is to set the DIMMING RESOLUTION either at 8 bits or at 16 bits. Once CHAN is displayed, act on the or buttons to scroll through the following choises:∙8D: 8 bits resolution (the display will show 8D and this is the default setting). The Fixture utilises 1 DMX Circuit for the Light Dimming, which is the BASE CIRCUIT set in the ADDRESS.∙8DS: NOT ACTIVE (for future use):The foreseen function for this setting is: 8 bits resolution and STROBE (the display will show 8DS). The Fixture will utilise 2 DMX Circuits,the BASE CIRCUIT set in the ADDRESS will be the LIGHT DIMMING and the second circuit (BASE +1) will be the STROBE∙16D: 16 bits resolution (the display will show 16D). The Fixture utilises 2 DMX Circuits,the BASE CIRCUIT set in the ADDRESS is the Coarse Dimming, the second Circuit (BASE +1) is the Fine Dimming.∙16DS: NOT ACTIVE (for future use):The foreseen function for this setting is: 16 bits resolution and STROBE (the display will show 16DS). The Fixture will utilise 3 DMX Circuits,the BASE CIRCUIT set in the ADDRESS will be the Coarse Dimming, the second Circuit (BASE + 1) will be the Fine Dimming . the third CIRCUIT (BASE + 2) will be the STROBEOf course the 16 bits function is useful if the corresponding circuits on the DMX LIGHTING BOARD are also set at 16 bits.WARNING: if the LED FRESNEL is set at 16 bits, but more units are having a consecutive unitary address (for instance first fixture set at Address 1, second fixture set at Address 2 and so forth, the DMX Channel controlling the Coarse Dimming of the second unit, will also control the fine dimming of the first unit. In this case it is recommended that all fixtures are set to 8 bits resolution).DMX LEVELIt Shows the DMX Input level on percentage (0-99% and FULL) received effectively from the Fixture.Press ENTER to exit this MENU .7. CHARACTERISTICS AND PERFORMANCE DATADESCRIPTION VALUEDESCRIPTIONVALUELED Power 36 WProtection Type IP 22Power supply100/240 V nominal, 50/60 HzMax Housing surface temperature 70 °C M.O.Weight of Fixture3,5 kg.4 leaf8 leaf DMX Data link USITT DMX512-AThis product uses a 5-pinXLR for DMX input and output.Use a shielded data cables. Do not overload the daisychain. Up to a maximum of 32 devices can be used on a single DMX chain. Weight of barndoor 0,3 kg.0,4 kg.Weight of color frame 0,2 kg.Accessories DiameterSize of scrims & color frame129 mmRing DiameterDMXChannels:1 at 8bit: Dimmer2 at 8bit: Dimmer w. strobe 2 at 16bit: Dimmer3 at 16bit: Dimmer w. strobeSize of Barndoor ring 133 mmProtection ClassClass 1– ground connectionrequiredLens diameter120 mm.Specifications subject to change without notice.1. Vacuum or gently blow away any dust from fan blades and grills2. Very gently clean the LED with Isopropyl alcohol.3. Clean the lenses with a soft damp cloth.4. Check the condition of the safety shield (see chapter: Installation Instructions) before every use.5. Check Power supply cable and DMX control cable proper conditions10. SAFETY STANDARDSEurope: The product conforms the Applicable European Directives & StandardsLow Voltage Directive: 73/23/EEC (as amended by 93/68/EEC)EMC Directive: 89/336/EEC (as amended by 92/31/EEC & by 93/68/EEC)Europen Standards:: EN 60598-2-17, EN 60598-1 , EN 55015 , EN 61547Disposing of this product:Help preserve the environment! Ensure that this product is recycled at the end of its life.This product is in compliance with the RoHS and WEEE directives.。
环照白灯产品使用和维护手册说明书

XIAMEN LONAKO INDUSTRY & TRADE CO., LTDTel: +86-592-5689172 Fax: +86-592-5689173 Web: Add: N307, Weiye Building, China Pioneering Park,Xiamen, Fujian361009, P.R.China 产品使用和维护手册产品名称:环照白灯产品型号:LNK-ARL-W文件编号:LNK-OM-ARL现行版次:A1制订部门:技术部制订:修订:审核:批准:页数:共8页制定日期:2020年12月03日修订说明目录1.目的 (3)2.产品描述 (3)3.安装说明 (5)4.贮存要求 (7)5.产品寿命及安全 (7)6.检查说明 (7)7.维护说明 (8)8.维修及处理说明 (8)9.包装信息 (8)10.制造商信息 (8)1.目的本手册描述了LNK-ARL-W 环照白灯的构型,功能,性能指标等、贮存要求、检测和维修等,用于指导用户正确使用和维护该产品。
2.产品描述 2.1 功能说明LNK-ARL-W 环照白灯是一款满足COLREGS72标准要求的船用号灯。
产品通过DC 12 / 24V 电源线供电并控制开关,开启后可在360°的水平弧内显示发出可视距离不少于2海里的常亮白光。
通常用作锚灯指示船舶的锚泊状态,也可与环照红灯或绿灯组合用于指示其他的船舶作业状态,或作为尾灯与桅灯组合(此组合用法仅限小于12米的船只)。
该产品采用全新的LED 光源技术和插接式的底座安装设计。
具有外观时尚精美、节能、防水等特点。
可适用于船长小于50米的各型船艇。
2.2 构型说明LNK-ARL-W 环照灯主要构型和配件包括环照灯主体 \ 安装底座 \ 防水接头 \ 电源线 \ 固定螺丝和螺母,产品结构如图2-1所示。
图 2-1 产品构型和配件2.3 技术参数产品技术参数详见表2-1;环照灯主体安装底座输入电源线(500mm 外露长度) 安装定位点M4底座固定螺丝M4内六角螺丝和螺母防水接头2.4标识2.4.1 环照白灯标准产品标识如图2-2所示:图 2-21)标识通过激光雕刻于顶盖表面; 2)标识内容包含:①品牌logo ,网址; ②基本信息:产品名称,输入电压,可视距离,生产批次号; ③认证标识;2.4.2 DC 12/24V 表示产品的输入电源电压为直流12V 或直流24V ;2 Nautical Miles 表①②③示产品发光的可视距离为2海里;2.4.3 Type :LNK-ARL-X 表示产品型号,其中“X ”分别对应环照灯系列中的不同灯具:W 表示发白光的环照白灯,型号为LNK-ARL-W ;2.4.4 Batch No.表示产品批次号,显示最新制造批次和产品状态,由6位字母+数字组成XXXXXX ,其中:① 前面两位表示产品版次,每一次的设计更改更换一次版次,例如A0,A1,A2……;当第二位的数字增加到9时,前面的字母变更为B 开始,即B0,B1,B2……以此类推;② 中间两位表示制造年份,如20代表2020年;③ 最后两位表示当年生产的批次,如06代表当年生产的第6批。
LS_600d_使用者指南_V1.0说明书

光•风暴LS 600d使用者指南前言感谢您购买 Aputure® “Light Storm”系列单色点光源灯具 - LS 600d。
LS 600d是爱图仕继Light Storm光风暴系列中的LS 600d Pro之后,特别推出的轻便精简版600瓦单色温点光源LED影视灯。
与Pro版本一样,LS 600d的最大输出功率同样为600瓦,最大输入功率为720瓦, 但重量更轻,体积更小,LS 600d是对轻便性与高输出有着同样需求的拍摄团队的不二选择。
重要的安全说明使用此摄影灯时,应始终遵循基本的安全预防措施,包括:1. 使用前阅读并理解所有说明。
2. 当儿童靠近设备或使用设备时,必须进行密切监督。
在使用设备时,请 勿将设备置于无人看管状态。
3. 必须小心接触高温部件防止被烫伤。
4. 请勿操作电源线损坏的设备以及掉落或损坏的设备,直到合格的维修人 员检查过。
5. 请归置好电源线,防止被电源线绊倒或拉扯电源线导致设备断电,且电 源线不可接触灼热表面。
6. 如果需要延长线,应使用额定电流至少等于设备额定电流的延长线。
额 定电流小于设备的电线可能过热。
7. 在清洁和维修之前以及不使用时,务必从电源插座上拔下电器插头。
切 勿拉扯电线从插座拔出插头,应抓住插头并拉动来拔出。
8. 在存放前让设备完全冷却。
存放时,请将电源线从设备上拔出,待冷却 后归置在手提包对应位置。
9. 为降低电击风险,请勿将本产品浸入水中或其他液体中。
您可以在本公司网站 中找到本设备的详细使用者指南。
10.为降低电击风险,请勿拆卸本产品,在需要维修时将其交给合格的维修 人员。
不正确的重装可能会在随后使用设备时引起电击。
11.使用非制造商推荐的配件可能会引起火灾、电击或人身伤害。
12.请将本产品连接到接地插座。
13.使用前请将保护罩取下。
14.使用标准罩前将EVA内托取下。
15.本产品工作时,请勿遮挡散热孔,勿直视灯珠; 任何情况下勿触摸灯珠。
闪光灯的专业使用方法

闪光灯的专业使用方法一般而言,使用闪光灯拍摄照片是一种无奈的选择,不是在不得已的情况下,大多数人都不愿意使用闪光灯拍摄(特别是机身自带的弹起式闪光灯)。
但是,如果你拥有一款专用闪光灯设备(如尼康SB-800或佳能580EXⅡ),并能很好地运用它,你就可以获得同样专业品质的摄影效果。
下面我们就来探讨一下闪光灯的专业使用方法。
第一,让闪光灯脱离相机,改变光线的方向。
固定在相机上的闪光灯直打在被摄体上的光是没有立体感的,这也是人们讨厌使用闪光灯的原因之一。
但是,如果你能把闪光灯从相机上移开,创建一个你认为满意的方向性光源,就可以获得更惹人喜爱、更专业的效果,从而提升你的图片的立体感和深度。
分离相机和闪光灯的方法之一就是使用闪光灯同步线,用同步线把相机和闪光灯连起来,你就可以用左手手持闪光灯高高举起,向下朝向被摄体,这样就有了像太阳光一样打在被摄物体上的定向侧光,进而获得专业品质的理想效果。
如果你使用的是尼康或佳能的单反相机,那么它们具有的无线闪光功能,会为你创造方向性光源提供更加方便的条件,你只需在相机上作一些设定,就可以在无线状态下,随意使用闪光灯。
至于怎样设定无线闪光功能,我会在以后的文章中介绍(你也可查阅或下载相关说明书进行了解)。
第二,使用慢速快门,提升背景清晰度。
室内使用闪光灯,往往是主体看起来很刺眼,而背景却非常黑暗,因而照片看起来很丑陋。
如果能使闪光灯与室内可用光线混合,被摄体后面的背景就会变得非常自然。
这种技巧就叫做“慢速快门”。
首先,相机设置为程序模式(P),然后对准被摄体半按快门,查看取景器,读取光圈和快门速度数值并记住它。
之后,再将相机切换到手动模式(M),并拨到刚才记住的那两个数值,如果相机显示快门速度是1∕60秒,那么,使用慢速快门就把它降到1∕15秒后拍摄。
你不必担心被摄体会模糊,因为闪光灯启动时会锁定被摄体,而被摄体的背景会因为长时间曝光而得到与主体相一致的混合效果。
第三,为闪光灯增加柔光罩,使光线变得柔和。
- 1、下载文档前请自行甄别文档内容的完整性,平台不提供额外的编辑、内容补充、找答案等附加服务。
- 2、"仅部分预览"的文档,不可在线预览部分如存在完整性等问题,可反馈申请退款(可完整预览的文档不适用该条件!)。
- 3、如文档侵犯您的权益,请联系客服反馈,我们会尽快为您处理(人工客服工作时间:9:00-18:30)。
i
ITALF-300AC_白光闪光灯
重要安全须知
重要安全须知
使用产品前,请认真阅读并严格遵守以下要求,以免您的产品和财产受到损失。
电源要求 l 请严格遵守当地各项电气安全标准。 l 请在安装配线时装入易于使用的断电设备。 l 请在设备运行前检查供电电源是否正确。 l 请保护电源软线免受踩踏或紧压,特别是插头、电源插座和从装置引出的接点处。 使用环境要求 l 请在允许的湿度和温度范围内运输、使用和存储设备。 l 请勿重压、剧烈振动或浸泡设备。 l 请在运送设备时以出厂时的包装或同等品质的材质进行包装。 l 建议配合防雷器使用本设备,提升防雷效果。
10%~95%(非凝结) 332.3mm×174.4mm×120.5mm
3.0kg 支架安装
-6-
ITALF-300AC_白光闪光灯
附录:有毒有害物质或元素含量参照表
5 附录:有毒有害物质或元素含量参照表
部件名称
机构材 电路板组件
线材/AC 适配器 附件/包装
铅(Pb) ○ ○ ○ ○
汞(Hg) ○ ○ ○ ○
图 3-1 闪光灯本体效果图
闪光灯灯体下部只有一个电源与信号线接口,很好的保证了密封性。 3
ITALF-300AC_白光闪光灯
3.3 闪光灯接入相机连线
图 3-2 闪光灯接入相机连线图
设备连线
爆闪触发 EX 的+、-分别接相机相应的信号输出线。
3.4 启动设备
闪光灯上电后,需要有 3 秒左右等待时间,可碰触闪光灯触发信号线查看闪光灯状态等。 安装步骤 步骤 1 将闪光灯配上支架并安装到立杆上。 步骤 2 将安装好的闪光灯连接电源(注意接地)。 步骤 3 将闪光触发信号线与相机或机件连接。 步骤 4 调节旋转灯体满足工程需求。
1.2 产品功能
本产品具有如下功能和优势: l 电压控制准确、稳定,运用先进的稳压技术; l 抓拍补光效果好:闪光灯触发与抓拍主机爆闪信号输出相连,通过爆闪信号控制闪光灯瞬间的高
亮,达到同步为图片抓拍补光的效果; l 回电时间小于 80ms,满足了市场相机连抓两张的需求; l 体积小,重量轻,方便安装; l 采用流线型设计,明朗,饱和度高; l 性价比高; l 在完全无环境光照明的情况下,可令摄像系统拍摄到清晰的车牌、车型、车内人脸图像; l 良好的防水、防尘设计,有效提升了防护等级。
iv
ITALF-300AC_白光闪光灯
产品简介
1 产品简介
1.1 产品概述
ITALF-300AC 补光灯是一款支持抓拍补光同步的高性能的智能交通领域的辅助光源,推进公路和 城市交通的现代化管理。
本产品适用于卡口高清摄像机抓拍系统的夜间车牌、车型、车内人脸补光照明。 本产品是专门针对智能交通定制的。整体外观简洁,经济实用,具有优良的结构和散热,更好的 保证了产品的散热性、稳定性、安全性。
重伤害。
表示有中度或低度潜在危险,如果不能避免,可能导致人员 轻微或中等伤害。
表示有潜在风险,如果忽视这些文本,可能导致设备损坏、 数据丢失、设备性能降低或不可预知的结果。
防静电 电击防护 激光辐射
用于表示静电敏感的设备。 用于表示高压危险。 用于表示强激光辐射。
表示能帮助您解决某个问题或节省您的时间。 表示是正文的附加信息,是对正文的强调和补充。
1
ITALF-300AC_白光闪光灯
产品外观
图 2-1 产品外观图
2 产品外观
图 2-2 产品尺寸图(单位:mm)
2
ITALF-300AC_白光闪光灯
设备连线
3 设备连线
3.1 线缆说明
表 3-1 线缆说明
序号
描述
① 2 芯细线
② 3 芯粗线
3.2 灯体
说明 闪光触发信号线,用以连接相机爆闪信号输出: l 黄:触发信号 EX+ l 蓝:触发信号 EXl 蓝线接 AC220V 的零线 N l 黄绿线接大地 l 灰线接 AC220V 的火线 L
有毒有害物质或元素
镉(Cd) ○
六价铬 (Cr VI)
○
○
○
○
○
○
○
多溴联 (PBB)
○ ○
○
○
多溴二苯醚 (PBDE)
○ ○
○
○
l ○:表示该有毒有害物质在该部件所有均质材料中的含量均在 SJ/T11363-2006 标准规定的限量要求 以下。
l ×:表示该有毒有害物质至少在该部件的某一均质材料中的含量超出 SJ/T11363-2006 标准规定的限 量要求。
1.1 产品概述......................................................................................................................................................... 1 1.2 产品功能......................................................................................................................................................... 1
闪光灯即处于正常工作状态,可配合相机进行闪光。
接线必须连接正确,特别应注意电源线和触发信号线的区别。
4
ITALF-300AC_白光闪光灯
3.5 注意事项
l 请避免激烈碰撞。 l 测试时请勿多次连续闪射,以避免闪光灯过热而损坏。 l 如发现工作异常,应先切断电源,待查明原因或排除故障后再投入使用。 l 请勿更换专用螺丝,螺丝过长会损坏内部器件。 l 内有高压,请勿随意拆卸,后果自负。 l 搬动设备时和安装设备时,请勿拔防水接头处电源信号线。 l 闪光灯闪光瞬间电流接近 30A,安装时请单独提供电源线,空开请选用 40A。
2 产品外观 ......................................................................................................................................... 2 3 设备连线 ......................................................................................................................................... 3
设备连线
5
ITALF-300AC_白光闪光灯
技术参数
4 技术参数
参数 同步接口 抓拍补光同步 回电时间 色温(K) 曝光指数 闪光持续时间 光斑覆盖范围 光斑亮度 防眩目处理 触发方式 拍摄距离 闪光灯寿命 防护等级 电源供应 功耗 工作温度 工作湿度 外形尺寸 整机重量 安装方式
1 路抓拍触发输入 支持抓拍同步补光功能
3.1 线缆说明......................................................................................................................................................... 3 3.2 灯体................................................................................................................................................................. 3 3.3 闪光灯接入相机连线 ..................................................................................................................................... 4 3.4 启动设备......................................................................................................................................................... 4 3.5 注意事项......................................................................................................................................................... 5
ITALF-300AC
<80ms,满足相机 2 张连拍需求 5800±200K
64GN
1/3000s 最大 2 车道 标准安装方式场景下,能看清车周边环境、车身特征和司乘人员面部特征。
可内置光栅,进行光污染处理
干接点触发,满足市场大部分相机触发模式Βιβλιοθήκη 最佳效果距离:16~26m
300 万次以上
IP65
AC 220V±10% <300W -30℃~+70℃
l 请勿私自拆卸本设备。 l 测试时请勿多次连续闪射,以避免闪光灯过热而损坏。 l 如发现工作异常,应先切断电源,待查明原因或排除故障后再投入使用。 l 请勿更换专用螺丝,螺丝过长会损坏内部器件。 l 内有高压,请勿随意拆卸,后果自负。 l 移动设备时和安装设备时,请勿拔防水接头处电源线,防止接头出现松动。 l 闪光灯闪光瞬间电流接近 30A,安装时请提供独立电源线,接入空开动作电流请选用 40A。 l 请使用生产厂商规定的配件或附件,并由专业服务人员进行安装及维修。 l 请勿同时对设备提供两种及以上供电方式,否则可能导致设备损坏。
