SurPad4.0使用说明书
导航系统4用户手册说明书

Manual OverviewThe manual is divided into the following sections:•Getting started - A basic introduction that discusses the controls and how tocommunicate with the system.•Entering a Destination - How to enter an address or locate a point of interest (POI).•Driving to your Destination – An explanation of the map features,guidance, and cautions.•Information Features - Message, V oice Help, Trip Computer, Map Legend,Calendar, Key to Zagat Ratings,Calculator, and Roadside Assistance.•System Set-up - How to set up and tailor the system for your personal use and use the Address Book.The back of this manual contains:•Map Coverage (p.99)•Frequently Asked Questions (FAQs) (p.113)•Troubleshooting Guide (p.116)•Glossary of Terms (p.117)•V oice Command List (p.120)•Operation specific to Alaska and Hawaii (p.108)System OverviewY our navigation system is a highlysophisticated location system with voicecontrol that uses satellites and a mapdatabase to show you where you are and tohelp guide you to a desired destination.The navigation system receives signalsfrom the global positioning system (GPS),a network of 24 satellites in orbit aroundthe earth. By receiving signals from severalof these satellites, the navigation systemcan determine the latitude, longitude, andelevation of your vehicle. In addition, agyroscopic yaw sensor and a vehicle speedsensor in your vehicle keep track of thedirection and speed of travel at all times.The navigation system applies this location,direction, and speed information to themaps and calculates a route to thedestination you enter. As you drive to thatdestination, the system provides map andvoice guidance.The navigation system is easy to use. Thelocations of many places of business andentertainment are already entered in thesystem. You can select any of them as adestination by using the Interface Dial orvoice control.There are several ways to enter adestination, such as by point of interest(POI), by address, by phone number, andby selecting it from the map. The last 50destinations are saved for reuse at a laterdate. The system also allows you to store ahome address to simplify returning homefrom your destination.Accessories PrecautionsIf you have rear window tintinginstalled, be aware that if the tint hasmetallic properties, it can seriouslydegrade or prevent GPS reception. Thisis because the GPS antenna is locatedunder the rear window beneath the rearshelf.If you plan to install electroniccomponents such as vehicle locationdevices, remote starters, additionalamplifiers, or other audio componentsensure that they are not located near thenavigation control unit in the trunk,or near the navigation display in thedash. Signal noise emanating fromthese devices can cause intermittentdisruption of the navigation system.IntroductionImportant Safety Information The navigation system can distract your attention from the road if you focus on the screen or operate the system’s controls while driving.Enter as much information as possible into the system before you begin driving, or when the vehicle is stopped. Then, as you drive, listen to the audio instructions and use voice commands when possible.While driving, do not look at the screenor operate the system controls for morethan a second or so at a time, and onlyafter deciding you can do so safely.Pull to the side of the road if you needmore time to look at the screen oroperate the controls.The navigation system is designed toprovide route information to help youreach your destination. However, thisroute guidance may sometimes conflictwith current road conditions such asstreet closures, road construction,detours, and out-of-date map data.Additionally, the system itself hascertain limitations (see page 95).Therefore, you must verify the audioand visual route information providedby the system by carefully observingthe roadway, signs and signals, etc. Ifyou are unsure, proceed with caution.Always use your own good judgment,and obey traffic laws while driving.Map OverviewYour navigation system has two kindsof streets: verified (dark colored) andunverified (light colored). Thedifferences between the two types ofstreets are contrasted in the followingchart.IntroductionIntroductionWhen displayedStreet color Map QualityRoutingdifferences CautionsGuidance voice Time and distance “to go”Verified streets (dark colored)These roads are found within metropolitan areas, and include interstate freeways and major roads connecting cities.Shown on daytime map screen as black or red, such as interstate freeways.The database vendor has verified these streets.Information like turn restrictions, average speed, and whether it is a one way street have been gathered and used when creating your route to a destination.While driving to your destination, the displayed route line is solid blue.The system provides voice and map guidance to your destination.There are no pop up boxes urging extra caution during a route. However, because roads constantly change, you are urged to use common sense, and always obey posted traffic restrictions.V oice guidance issues maneuvers such as “In a half mile make a right turn.”The time and distance “to go”, displayed while en-route to a destination, is based on the average speed and distance for the roads used for your route.Unverified streets (light colored)These roads are found in rural areas, and typically include residential streets away from the center of a town.Shown on the daytime map screen as light brown.These streets have not been verified by the database vendor.The system does not contain information about one-way streets, turn restrictions, or the road’s average speed.They are shown on the map for reference and can have errors in map location, naming,and address range.Your route line is either a blue dotted “vector line”, or a dashed pink/blue line. For information on selecting this option, and the routing differences, see Unverified Area Routing on page 81.Regardless of whether the user chooses route guidance, there are cautionary screens before and during the route urging the user to be extra cautious, and obey all traffic restrictions. See Unverified Area Routing on page 81.The suffix “if possible” is added to each guidance maneuver.For example: “In a half mile make a right turn, if possible.”Because the average speed of these roads is not known, the time and distance “to go” is based on a fixed average speed of 25mph for these roads.User AgreementIn using this DVD “Satellite Linked Navigation System” (the “DVD”), which includes HONDA MOTOR CO., LTD. software, ALPINE ELECTRONICS, INC. software,NA VTEQ database contents, INFO USA CORPORATION database, ZAGAT SURVEY database contents, and ZENRIN CO. database contents (hereinafter referred to as “Licensors”), you are bound by the terms and conditions set forth below.By using your copy of the DVD, you have expressed your Agreement to the terms and conditions of this Agreement. You should, therefore, make sure that you read and understand the following provisions. If for any reason you do not wish to be bound by the terms of this Agreement, please return the DVD to your dealer.•The DVD may not be copied,duplicated, or otherwise modified, inwhole or in part, without the expresswritten permission of the Licensors.•The DVD may not be transferred orsublicensed to any third party forprofit, rent or loan, or licensed forreuse in any manner.•The DVD may not be decompiled,reverse engineered or otherwisedisassembled, in whole or in part.•The DVD may not be used in anetwork or by any other manner ofsimultaneous use in multiplesystems.•The DVD is intended solely forpersonal use (or internal use wherethe end-user is a business) by theconsumer. The DVD is not to beused for commercial purposes.•The Licensors do not guarantee tothe customer that the functionsincluded in the DVD meet thespecific objectives of the user.•Licensor shall not be responsible forany damages caused by the use ofthe DVD to the actual user or to anythird party.•The warranty on the DVD shall notextend to an exchange or refund dueto misspelling, omission of letters, orany other cosmetic discrepancy inthe contents of the DVD.•The right to use the DVD shallexpire either when the user destroysthe DVD or software, or when any ofthe terms of this Agreement areviolated and the Licensors exercisethe option to revoke the license touse the DVD or software.User Agreement•The terms and conditions hereof apply to all subsequent users and owners as well as to the original purchaser.•The use of oil company logos in the display are for your information and convenience, and in no way implies any sponsorship, approval or endorsement of these companies, or their products. The logos are trademarks of their respective owners.The user shall indemnify and saveharmless the Licensors, and theirofficers, employees and agents, fromand against any claim, demand oraction, irrespective of the nature of thecause of the claim, demand or action,alleging loss, costs, expense, damagesor injuries (including injuries resultingin death) arising out of the use orpossession of the DVD or software.Use, duplication, or disclosure of thisDVD by or on behalf of the UnitedStates government is subject to“Restricted Rights” as set forth at FAR52.227-14, -19 or DFARS 252.227-7013, as applicable. Manufacturers arethe Licensors, including HONDAMOTOR CO., LTD., 2-1-1 MinamiAoyama Minato-Ku Tokyo 107-8556JAPAN., Alpine Electronics, Inc., 20-1Yoshima Kogyodanchi, Iwaki,Fukushima 970-1192 JAPAN.,NA VTEQ Corporation, 222Merchandise Mart, Suite 900, Chicago,IL, 60654, INFO USACORPORATION, 5711 South 86thCircle, Omaha, NE 68127.,Zagat Survey, LLC, 4 Columbus Circle,New York, NY, 10019., and ZENRINCO., LTD., 1-1-1 Muromachi,Kokurakita-ku, Kitakyushu, Fukuoka803-8630, JAPAN.。
全志4.0系统平板电脑通用说明书
7寸MID使用说明书目录1、逐步了解主屏幕 (3)1.1 主界面解锁 (3)1.2 主界面 (4)1.3 主界面各按键介绍 (5)1.3.1 屏幕上始终显示的按钮 (5)1.3.2 自动显示/隐藏的按钮 (6)1.4 通知栏 (7)1.5 应用程序和窗口小部件界面 (9)1.5.1 进入应用程序界面 (9)1.5.2 进入窗口小部件界面 (10)1.6 桌面快捷图标创建和管理 (11)1.6.1 在桌面上创建应用程序快捷图标 (11)1.6.2 桌面应用程序的快捷图标管理 (11)1.7 删除桌面应用程序的快捷图标 (14)1.8 更换壁纸 (15)1.9 连接电脑 (16)2、应用程序 (18)2.1 打开本机自带的程序 (18)2.2 屏幕兼容性缩放 (21)2.3 打开/关闭后台运行的程序 (22)2.4 获取应用程序并在平板上安装 (23)2.5 删除已安装在平板上的应用程序 (26)3、设置 (29)3.1 无线和网络 (30)3.1.1 Wi-Fi (30)3.1.2 流量使用情况 (33)3.1.3 更多 (34)3.2 设备 (35)3.2.1 声音 (35)3.2.2 显示 (36)3.2.3 存储 (37)3.2.4 电池 (38)3.2.5 应用程序 (38)3.3 个人 (39)3.3.1 帐户与同步 (39)3.3.2 位置服务 (39)3.3.3 安全 (39)3.3.4 语言和输入法 (41)3.3.5 备份和重置 (42)3.4 系统 (43)3.4.1 日期和时间 (43)3.4.2 辅助功能 (43)3.4.3 开发人员选项 (44)3.4.4 关于平板电脑 (45)4、相机 (46)4.1 拍照 (46)4.2 摄像 (48)5、平板电脑连接网络 (50)5.1 WiFi上网 (50)5.2 外接以太(有线)网卡连网线上网 (52)5.3 外接3G网卡上网 (54)1、逐步了解主屏幕Android4.0的启动器(即:开机显示的主界面)较之前版本,有很大的改变,这里简单介绍一下基本使用。
Maximus 4.0 Tablet快速入门指南说明书
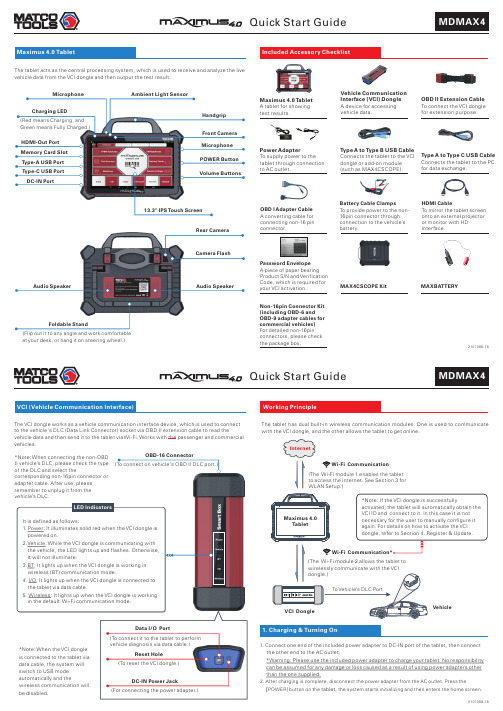
Maximus 4.0 TabletA tablet for showingtest results.Power AdapterTo supply power to thetablet through connectionto AC outlet.OBD I Adapter CableA converting cable forconnecting non-16 pinconnector.HDMI CableTo mirror the tablet screenonto an external projectoror monitor with HDinterface.MAX4CSCOPE KitType A to Type B USB CableConnects the tablet to the VCIdongle or add-on module(such as MAX4CSCOPE).Battery CableTo provide power to the non-16pin connector throughconnection to the vehicle’sbattery.ClampsType A to Type C USB CableConnects the tablet to the PCfor data exchange.Password EnvelopeA piece of paper bearingProduct S/N and VerificationCode, which is required foryour VCI activation.MAXBATTERYVehicle CommunicationInterface (VCI) DongleA device for accessingNon-16pin Connector Kit(including OBD-6 andOBD-9 adapter cables forcommercial vehicles)For detailed non-16pinconnectors, please checkthe package box.HDMI-Out PortType-A USB PortMemory Card SlotType-C USB PortDC-IN Port13.3" IPS Touch ScreenCamera FlashMicrophonePOWER ButtonVolume ButtonsRear CameraAudio SpeakerFoldable StandAudio Speaker()Flip out it to any angle and work comfortableat your desk, or hang it on steering wheel.2101068-16The VCI dongle works as a vehicle communication interface device, which is used to connectto the vehicle's DLC (Data Link Connector) socket via OBD II extension cable to read thevehicle data and then send it to the tablet via Wi-Fi. Works with the passenger and commercialvehicles.(To connect on vehicle's OBD II DLC port.)OBD-16 Connector*Note: When connecting the non-OBDII vehicle’s DLC, please check the typeof the DLC and select thecorresponding non-16pin connector oradapter cable. After use, pleaseremember to unplug it from thevehicle’s DLC.(For connecting the power adapter.)Communication(The Wi-Fi module 1 enables the tabletto access the internet. See Section 3 forWLAN Setup.)The tablet has dual built-in wireless communication modules. One is used to communicatewith the VCI dongle, and the other allows the tablet to get online.*Warning: Please use the included power adapter to charge your tablet. No responsibilitycan be assumed for any damage or loss caused as a result of using power adapters otherthan the one supplied.2. After charging is complete, disconnect the power adapter from the AC outlet. Press the[POWER]button on the tablet, the system starts initializing and then enters the home screen.2101068-16Quick Start Guide MDMAX4Tap on on the top left-handMaximus 4.0 supports multiple languages. To change the language of the tool, please do the following:1. On the home screen, tap on Settings -> Language & Input -> Languages.2. Tap on “Add a language”, and then choose the desired language from the list.3. Tap and hold the desired language and drag it to the top of the screen and then release it, the system will change into the target language.Once you're online, you can register your tool, update the diagnostic software and APK, surf the Internet and send email on your network. Follow the steps below to proceed:->, the tablet , the tablet 1. On the home screen, select Settings WLAN .2.Slide theWLANswitch to ON will start searching for all availablewireless networks.3. Select a wireless network. If the chosen network is open will connectautomatically. If the selected network is encrypted, a network password will need to be entered.2101068-16Quick Start GuideNote:To enjoy more capabilities and functions, it is recommended you check for updates on afrequent basis and keep synchronized with the latest available software.Note: For more detailed operations, please refer to the In-App User Manual stored under “ (Toolbox)” -> “About” -> “User Manual”.Pictures illustrated herein are for reference purpose only and this Quick Start Guide is subject to change without notice.Maximus 4.0 supports three kinds of diagnosis approaches: Smart Diagnosis (MaxVIN), Manual Diagnosis and Remote Diagnosis.In this mode, you have to diagnose a vehicle by performing the menu-driven command manually.For new users, please follow the operation chart shown below to get familiar with and start using this tool.1). OBD II Vehicle Connectionthe vehicle’s OBD II DLC port.Connect one end of the OBD II extension cable to the OBD-16 connector, and the other end to A. For Passenger Cars:B. For Commercial Vehicles:2). Non-OBD II Vehicle ConnectionIf the power supply on vehicle diagnostic socket is insufficient or the power pin is damaged, you can get power in the following ways:1. Locate Vehicle’s DLC PortThe DLC (Data Link Connector) is typically a connector where diagnostic code readers interface with the vehicle's on-board computer.For commercial vehicles, it is generally located in the driver's cab.For passenger cars, it is usually located on driver’s side, about 12 inches away from the center of dashboard. See Figure DLC Location.2. Vehicle ConnectionIf the DLC cannot be found, refer to the vehicle’s service manual for the exact location.2101068-16Quick Start GuideMDMAX4。
ipad详细使用说明

iPad详细使用说明强烈推荐目录:一、激活iPad…………………………………………………………………第2 页二、Cydia安装和使用..……………………………………………………....第 4 页三、i Tunes使用说明(安装软件、电影以及音乐) (31)四、安装应用软件 (36)五、网站推荐 (38)一、激活iPadiPad入门第一步——激活iPad一、激活前状态激活前iPad会显示以下屏幕,将iPad连接到电脑并打开iTunes才能激活它。
二、激活流程1.准备一台可访问互联网的电脑,并确保电脑连接互联网;2.在电脑上下载并安装iTunes软件,获取iTunes软件的地址为:/itunes/download/3.将随机附带的数据线一端插入联网电脑的USB接口,另一端接在iPad的数据接口,电脑会识别iPad并自动打开iTunes(如果尚未打开的话);4.iTunes软件运行,自动识别iPhone手机并连接苹果服务器进行激活。
5.如iTunes弹出运营商设置对话框,必须点击“更新设置”,待更新成功后即可。
附加说明1:iPad电量确认在开始iPad激活阶段之前,请确认iPad有电。
没有电的iPad无法打开,也不能激活它。
使用随附的交流电源适配器为iPad充电大约15分钟。
如果iPad的电池已耗尽,iPad至少需要充电10分钟,电脑才能识别它。
iPad根据它是否有电而显示下列屏幕之一电量不足,无法识别,没有得到电能电量不足,无法识别,正在充电iPad仅通过随附的iPad交流电源适配器充电。
在iPad有充足电之后,电脑会识别它,iTunes会打开。
附加说明2:iTunes更新如果您尚未安装iTunes或者安装的版本较旧,则必须从Apple下载最新版本的iTunes,然后进行安装。
在安装最新版本之后,iTunes 能够识别您的iPad并查看它是否需要激活。
附加说明3:自动识别执行到激活第5步如出现iTunes不能识别iPad手机时,请将连接到iPad 数据接口的数据线拔下重新连接。
surpad软件说明书2013-11-11

SurPad软件使用说明书第一版(V2.0)目录第一章:软件简介及简易操作流程 (1)1.1软件简介 (1)1.2软件简易操作流程 (1)1.3 软件菜单简介 (12)第二章项目 (13)2.1 项目管理 (13)2.2 项目属性 (13)2.3 查看数据 (14)2.4 新建(打开)文件 (14)2.5 文件(导入)导出 (15)第三章仪器 (17)3.1 通讯设置 (17)3.2工作模式设置 (20)3.2.1 静态模式 (20)3.2.2基准站模式 (21)3.2.3 移动站模式 (25)3.2.4调用配置集 (25)3.3 GPS状态 (26)3.4 数据链状态 (27)3.5 测距仪设置及其它信息 (28)第四章校正 (30)4.1 转换参数 (30)4.2 测站校准 (33)第五章测量 (36)5.1 工程测量 (36)5.1.1 点测量 (36)5.1.2 点放样 (38)5.1.3 直线放样 (39)5.1.4 物探放样 (40)5.1.5 曲线放样 (41)5.1.6 道路放样 (41)5.2电力勘测 (46)5.2.1 电力勘测 (47)5.2.2 塔基放样 (50)5.3 属性采集 (52)第六章、配置 (57)6.1 坐标系统 (57)6.2 图层配置 (57)6.3 记录设置 (58)6.4 测区设置 (58)6.5 显示设置 (59)6.6 系统设置 (59)第七章工具 (60)7.1 数据键入 (60)7.2 坐标转换 (61)7.3 角度变换 (62)7.4 计算坐标点 (62)7.5 测量计算 (62)7.6 编辑数据字典 (63)7.7 大电台设置 (63)第八章关于 (65)8.1 注册仪器 (65)8.2 电池电量 (65)8.3 关于仪器 (65)8.4 关于软件 (65)第九章SurPad软件的安装与卸载 (67)9.1 软件安装 (67)9.2 软件卸载 (67)第一章:软件简介及简易操作流程1.1软件简介SurPad软件是广州思拓力测绘科技有限公司开发的GNSS测绘软件,根据多年的市场经验积累,在结合国际主流测绘数据采集软件功能的同时,集RTK控制采集、道路设计放样、GIS数据采集和电力勘测放样等功能于一体。
4.0手机端操作手册

红圈营销V4.0标准版手机端操作手册和创(北京)科技有限公司北京市海淀区中关村大街1号海龙大厦11层1120室目录1、基本设置 (2)1.1苹果手机 (2)1.2安卓手机(华为C8815)设置方法 (3)2、软件功能使用说明 (4)2.1登录 (4)2.2软件功能 (4)2.3 报表 (5)2.3.1随时定位 (5)2.3.2客户拜访 (9)2.3.3新增客户—全部 (10)2.4沟通 (11)2.4.1通讯录 (11)2.4.2工作圈 (12)2.4.3公告和警告 (12)2.4.4群组 (13)2.5工作 (13)2.5.1客户拜访 (14)2.5.2拜访计划 (18)2.5.3考勤管理 (19)2.5.4订单管理 (20)2.5.5促销管理 (20)2.5.6客户管理 (20)2.5.7工作日报 (21)2.5.8拍照管理 (21)2.5.9工作总结 (22)2.6更多设置 (22)1、基本设置红圈营销软件正常运行必须保证移动数据流量开启和GPS定位服务同时开启;1.1苹果手机(一)苹果手机的设置方法:在“设置”→“蜂窝移动数据”→“开启移动数据”→开启移动营销管理软件(操作方法如下图);(二)点击“设置”→“隐私”→开启“定位服务”并允许“移动营销管理”软件运行;点击“设置→“隐私”→开启“相机”并允许”移动营销管理“软件运行,否则拍照时会出现黑屏1.2安卓手机(华为C8815)设置方法移动网络数据设置步骤:设定→更多设备→勾选移动网络→接入点名称→选择带net 的选项(如“中国电信互联网设置ctnet”,联通连接互联网3gnet 等)点击“设置”→“位置服务”→开启“定位服务”所有关于GPS项进行勾选;注:手机不要调成省电、睡眠模式、飞行等模式2、软件功能使用说明2.1登录点击“红圈营销”图标,进入红圈营销登陆界面,点击登录,输入用户名和密码登录,登录后需要绘制手势密码;如下图所示:2.2软件功能红圈营销共有四个功能模块构成,分别是:报表、沟通、工作、更多;(报表)(沟通)(工作)(更多)报表包含随时定位、客户拜访、客户新增和全部客户;随时定位能够根据业务员的定位情况实时查询其所在位置,客户拜访汇总业务员的拜访值;客户新增是客户新增量的数据显示,客户总量是客户新增量以及客户总数的数据显示;沟通包括:通讯录,工作圈,公告,警告以及群组;通讯录显示所有已在平台端进行数据录入人员的联系方式,可拨打,发信息;工作圈,同微信朋友圈,工作内容实时上传分享,可根据工作需要自建群组,支持评论与点赞;公告,由平台端下发的公司重要通知,如未及时查看,软件会每隔十五分钟进行一次未读通知提醒,注意要及时查看;警告,是领导针对下属的灰点率高,拜访量低而进行警告提醒的功能;群组,如同微信群,可自由沟通工作以及工作相关一切事宜。
思拓力 SurPad 4.0 软件使用说明书(Android)

工程测量软件SurPad4.0(Android版本)使用说明书广州思拓力测绘科技有限公司2018年4月目录第一章 SurPad4.0软件概述 (1)1.1软件简介 (1)1.2软件界面 (1)1.3软件的安装与卸载 (3)第二章快速入门 (6)第三章项目 (9)3.1 项目管理 (9)3.2 数据文件管理 (10)3.3 坐标系统 (11)3.4 测站校准 (15)3.5 坐标点库 (17)3.6 数据文件导出 (20)3.7 扫一扫 (21)3.8 云设置 (22)3.9 软件设置 (22)3.9 关于软件 (24)第四章仪器 (26)4.1 通讯设置 (26)4.2移动站模式 (27)4.2.1移动站-主机网络 (29)4.2.2移动站-内置电台 (30)4.2.3移动站-外置电台 (30)4.2.4移动站-手簿网络 (30)4.3基准站模式 (30)4.3.1基准站-主机网络 (32)4.3.2基准站-内置电台 (33)4.3.3基准站-外置电台 (34)4.3.4基准站-双发 (34)4.4静态站模式 (34)4.5工作状态 (36)4.6配置集 (38)4.7仪器信息 (39)4.8仪器设置 (39)4.9倾斜校准 (39)4.10重新定位 (44)4.11仪器注册 (44)4.12内置电台设置 (45)第五章测量 (46)5.1 点测量 (46)5.2碎步测量 (51)5.3 CAD (52)5.4点放样 (54)5.5直线放样 (56)5.6线路施工放样 (59)5.7线路逐点放样 (61)5.8测横断面 (63)5.9道路桥涵放样 (64)5.10桥台锥坡放样 (66)5.11电力线勘测 (68)5.12塔基放样 (73)5.13场地高程控制 (74)5.14曲线放样 (76)5.15既有线放样 (78)5.16铁路放样 (79)5.17测区设置 (82)5.18图层设置 (83)第六章工具 (84)6.1 转换参数 (84)6.2坐标转换 (86)6.3角度变换 (87)6.4周长面积计算 (87)6.5几何计算 (89)6.5.1 坐标反算 (89)6.5.2 点线计算 (89)6.5.3 空间距离 (90)6.5.4 夹角计算 (90)6.5.5 交会计算 (91)6.5.6 前方交会 (91)6.5.7 后方交会 (92)6.5.8 坐标正算 (92)6.5.9 偏点计算 (93)6.6计算器 (93)6.7大电台设置 (94)6.8土方计算 (96)6.9测站刷新 (98)第七章全站仪 (99)第一章 SurPad4.0软件概述1.1软件简介SurPad4.0软件安卓版是广州思拓力测绘科技有限公司开发的GNSS测绘软件,根据多年的市场经验积累,在结合国际主流测绘数据采集软件功能的同时,集RTK控制采集、道路设计放样等功能于一体。
Surface Laptop 4商品说明书

Performance for multi-tasking, meetings, and moreFrom video calls at home to virtual collaboration in the office, your work stands out with Surface Laptop 4.•Get more multitasking power to run the professional-grade apps you depend on, fueled by an 11th Gen Intel® Core™Processor and custom AMD Ryzen™Microsoft Surface Edition processors.•Show your best side with more accurate skin tone colors on video calls, even in low light, with the front-facing 720 HD camera.•Be heard loud and clear in Microsoft Teams* calls with dual far-field Studio Mics that capture your voice crisply and clearly.•Hear colleagues and customers clearly on calls. Listen in and be more fully engaged in meetings with Omnisonic speakers.•Fuel up fast with Fast Charging and get back to your tasks within seconds of opening the lid.•Type more accurately with responsive, backlit keys. And connect all your peripherals with USB-C® and USB-A.Surface for Business unlocks more valueWork your way in styleSurface Laptop 4 is sleek, ultra-thin, and light. Get it done in your choice of size, color, and keyboard finish. •Thin, light, and elegant design. Ultra-slim, with a hinge so innovative you can open the lid with just one finger.•Choose 13.5” or 15” sizes depending on your need for compact mobility or more screen to multi-task. •See more and do more with Microsoft 365* apps optimized for the Surface signature 3:2 screen ratio. •Interact naturally with the stunning PixelSense™touchscreen display that’s so responsive you feel like you can reach out and touch your work.•Choose from rich, tone-on-tone colors including Platinum, Matte Black, Sandstone, and new Ice Blue, and two durable keyboard finishes: warm Alcantara® material or cool metal.1Meet the newSurface Laptop 4 for BusinessDo it all with style, speed, and performanceMicrosoft SurfaceSave time and money with streamlined deployment, modern device management, and built-in, cloud-powered security.•Surface Laptop 4 lets you stay in control of yoursensitive information with a removable hard drive 2for data retention.•Make the most of your investment in Microsoft 365,* with Windows 10 Pro, the protection of Microsoft Enterprise Mobility + Security, and the Office 365* productivity apps you rely on.•Deploy and manage down to the firmware layerthrough the cloud with Microsoft Endpoint Manager* and DFCI.3•Includes Advanced Exchange, an expedited replacement service, at no additional cost.4Technical specifications*Sold separately**AMD Ryzen™Microsoft Surface® Edition processor only available in select configurations.1 Colors available on selected models only. Available colors, sizes, finishes, and processors may vary by store, market, and configuration.2 Hard drive is not user removable. Hard drive is only removable by skilled technician following Microsoft provided instructions3Surface Go and Surface Go 2 use a third-party UEFI and do not support DFCI. DFCI is currently available for Surface Laptop 4, Surface Pro 7+, Surface Laptop Go, Surface Book 3, Surface Laptop 3, Surface Pro 7, and Surface Pro X. Find out more about managing Surface UEFI settings.4Advanced Exchange Service is available at no additional charge with the following Surface for Business products: Surface Laptop 4, Surface Pro 7+, Surface Laptop Go, Surface Book 3, Surface Go 2, Surface Laptop 3, Surface Pro 7, Surface Pro X, Surface Pro 6, and Surface Laptop 2. Advanced Exchange is only available in supported markets. Restrictions apply. See Surface for Business warranty page for AES terms and conditions and list of supported markets.5Requires license or subscription to activate and use.6 Activation required. If your device is managed by your organization’s IT department, contact your IT administrator for activation. After 30 days, you will be charged the applicable monthly or annua l subscription fee. Credit card required. Cancel any time to stop future charges. See https://aka.ms/m365businesstrialinfo.7System software and updates use significant storage space. Available storage is subject to change based on system software updates and apps usage. 1GB = 1 billion bytes. 1TB = 1,000GB. See /Storage for more details.8Surface Laptop 4 battery life: Up to 19 hours on Surface Laptop 4 13.5” AMD Ryzen™5 Microsoft Surface Edition; up to 17.5 hours on Surface Laptop 4 15” AMD Ryzen™7 Microsoft SurfaceEdition; up to 17 hours on Surface Laptop 4 13.5” Intel® Core™i5; up to 16.5 hours on Surface Laptop 4 15” Intel® Core™i7. Battery life based on typical Surface device usage. Testing conducte d by Microsoft in February 2021 using preproduction software and preproduction devices. Testing consisted of full battery discharge with a mixture of active use and modern standby. The active useportion consists of (1) a web browsing test accessing 8 popular websites over multiple open tabs, (2) a productivity test utilizing Microsoft Word, PowerPoint, Excel and Outlook, and (3) a portion of time with the device in use with idle applications. All settings were default except screen brightness was set to 150nits with Auto-Brightness disabled. Wi-Fi was connected to a network. Battery life varies significantly with settings, usage and other factors.9Requires Dolby Atmos® encoded content and audio.10 Microsoft’s Limited Warranty is in addition to your consumer law rights.DimensionsSurface Laptop 4 13.5”: 12.1” x 8.8” x 0.57”(308 mm x 223 mm x 14.5mm)Surface Laptop 4 15”: 13.4” x 9.6” x 0.58”(339.5 mm x 244 mm x 14.7mm)DisplaySurface Laptop 4 13.5”:Screen: 13.5” PixelSense™Display Resolution: 2256 x 1504 (201 PPI)Aspect ratio: 3:2Surface Pen* enabledTouch: 10-point multi-touch Surface Laptop 4 15”:Screen: 15” PixelSense™Display Resolution: 2496 x 1664 (201 PPI)Aspect ratio: 3:2Surface Pen* enabledTouch: 10-point multi-touch Memory8GB, 16GB, or 32GB LPDDR4x RAM**ProcessorSurface Laptop 4 13.5”Quad Core 11th Gen Intel® Core™i5-1145G7 processor Quad Core 11th Intel Core™i7-1185G7processorAMD Ryzen™5 4680U Mobile Processor with Radeon™Graphics Microsoft Surface® Edition (6 cores)AMD Ryzen™7 4980U Mobile Processor with Radeon™Graphics Microsoft Surface® Edition (8 cores)Surface Laptop 4 15”Quad Core 11th Intel® Core™i7-1185G7 processorAMD Ryzen™7 4980U Mobile Processor with Radeon™RX Graphics Microsoft Surface® Edition (8 cores)SecurityHardware TPM 2.0 chip for enterprise security and BitLocker supportEnterprise-grade protection with Windows Hello face sign-in Surface Laptop 4 powered by AMD Ryzen™Microsoft Surface® Edition processors: Secured-Core PCSurface Laptop 4 powered by 11th Gen Intel® Core™processors: Windows enhanced hardware security Software Windows 10 ProPreloaded Microsoft 365 Apps 5Microsoft 365 Business Standard, Microsoft 365 Business Premium, or Microsoft 365 Apps 30-day trial 6SensorsAmbient light sensorKeyboard layoutActivation: Moving (mechanical) keysLayout: QWERTY, full row of function keys (F1-F12)Windows key and dedicated buttons for media controls, screen brightness BacklightWhat’s in the boxSurface Laptop 4Power supply Quick Start GuideSafety and warranty documentsWeightSurface Laptop 413.5” in Platinum and Ice Blue Alcantara®: 2.79 lb. (1,265 g)Surface Laptop 4 13.5” in Matte Black and Sandstone metal: 2.84 lb. (1,288 g)Surface Laptop 4 15” in Platinum and Matte Black metal: 3.40 lb. (1,542 g)Storage 7Removable solid-state drive (SSD)2options: 256GB, 512GB,or 1TB**Battery life 8Up to 19 hours on Surface Laptop 4 13.5” AMD Ryzen™5 Microsoft Surface ®EditionUp to 17.5 hours on Surface Laptop 4 15” AMD Ryzen™7 Microsoft Surface ®EditionUp to 17 hours on Surface Laptop 4 13.5” Intel® Core™i5Up to 16.5 hours on Surface Laptop 4 15” Intel® Core™i7GraphicsSurface Laptop 4 powered by Quad Core 11th Gen Intel® Core ™: Intel® Iris® X e GraphicsSurface Laptop 4 powered by AMD Ryzen™Microsoft Surface® Edition: AMD Radeon™Graphics Connections1 x USB-C®1 x USB-A3.5 mm headphone jack 1 x Surface Connect portCameras, video,and audioWindows Hello face authentication camera (front-facing)720p HD f2.0 camera (front-facing)Dual far-field Studio MicsOmnisonic Speakers with Dolby Atmos®9WirelessWi-Fi 6: 802.11ax compatibleBluetooth® Wireless 5.0 technologyExteriorCasing: AluminumPower and volume buttons on keyboard Surface Laptop 4 13.5” colors:1Platinum with Alcantara® material palm rest Ice Blue with Alcantara® material palm rest Matte Black with metal palm rest Sandstone with metal palm rest Surface Laptop 4 15” colors:1Platinum with metal palm rest Matte Black with metal palm rest Warranty 101-year limited hardware warranty。
Mac、移动端、平板电脑端用户指南说明书
目录账户注册 (3)手机号码验证 (4)未成年用户 (5)账户登录、预约及支付系统 (6)预约练习 (7)订单与支付 (10)银行卡支付 (11)兑换券支付 (13)准备工作 (15)参加练习 (16)练习变更 (21)取消预约和退款 (24)服务台 (26)账户注册如您尚未注册账户,请登录,进入 SpeakUP 预约及支付门户网站,然后点击“Register”按钮进行账户注册。
请依次填写您的手机号码,设置登录密码并选择您所在的地区及出生日期。
手机号码验证选择您所在的国家代码并输入手机号码,然后点击“Send Code”按钮获取验证码。
此外,您还需要进行安全验证,向右拖动滑块完成拼图。
顺利通过验证后,您会收到系统发送的短信验证码。
请注意,验证码有效时间为2 分钟。
如果您1分钟内未收到短信验证码,可点击“resend”按钮请求重新发送。
未成年用户系统要求账户所有者须年满18周岁,如您未满18周岁,请您的父母或监护人代为注册。
请在正式注册完成前,阅读隐私条款并勾选“I have read and accepted”确认框。
账户登录、预约及支付系统您可以选择以下两种方式进行登录:•手机号+短信验证码•手机号+密码点击下方相应链接切换登录方式(短信验证码或密码)。
如果您忘记登录密码,请点击“Forget Password”按钮,通过手机找回密码。
预约练习在正式预约之前,请先设置您所处的时区。
请选择您要参加练习的时间并预约练习时段。
点击“Book”按钮后,您需要依次输入您本人或未成年用户的全名、出生日期以及第一语言。
如您未满18周岁,出于保护未成年人安全的目的,您还需要输入父母或监护人的联系信息。
XXX全部确认完后,请点击“Next”按钮进行下一步操作。
在用户须知栏内,您可查阅SpeakUP 相关条款细则。
确认信息无误后,请点击“Submit Order”按钮。
XXX订单与支付订单提交成功后,您有30分钟的时间进行付款。
Windows NT 4.0 说明书
本本文包含Readme.wri 文件包括在Windows NT 4.0 版中信息的副本。
安装程序将此文件复制到System32 文件夹中。
硬件注意事项注:一定要检查所有的设备(包括网络卡、监视器、cpu、硬盘的驱动器和CD-ROM 驱动器的视频卡)在Windows NT 4.0 版列出本产品附带的硬件兼容性列表。
如果使用的是系统或设备未包含的硬件兼容性列表上,并且遇到了问题请通过使用Windows NT 4.0 版光盘上的<platform>\Probrep.txt 文件文件报表。
<platform>是任一x86,MIPS、ALPHA,或PPC,具体取决于您的计算机的平台。
Probrep.txt 文件还会同时安装%systemroot%\system32 文件夹中。
ATAPI 和PCIATAPI.SYS现在控制PCI 计算机中的所有IDE 设备。
如果计算机使用IDE 硬盘,具有一个的PCI 总线的并且要从Windows NT 3.51 的版本升级到Windows NT 4.0 版时系统启动驱动程序未能启动,指出您可能会收到一条消息。
在$ 事件查看中,您将看到ATDISK 驱动程序未能启动。
若要禁用该驱动程序和相关联框中,双击控制面版的设备图标,然后禁用ATDISK 驱动程序。
缓存的磁盘控制器和驱动器Windows 2000支持缓存的磁盘控制器及驱动器才是下列值之一为真:∙该控制器都有一个专门支持的驱动程序缓存。
(几个这些存在:DPT 和IBM SCSI 缓存适配器)∙直写处于活动状态(即,将禁用写缓存)通过设置它手动或默认情况下在计算机启动时。
∙通过设置其手动或默认情况下在计算机启动时,整个高速缓存选项已关闭。
如果重新启动计算机,或者如果电源故障发生前高速缓存已刷新本身使用在其他情况下风险丢失数据的缓存控制器或驱动器。
您可以最大限度地减少风险通过毕竟等待至少一分钟(如果您知道最长时间缓存小于前等待刷新本身)系统活动在重新启动之前停止。
RemoteView for iPhone iPad 使用手册说明书
RemoteView for iPhone/iPad User GuideiPhone/iPad版RemoteView用户使用手册Version 4.4.02019.9.16RemoteView for iPhone/iPad User GuideASP Version: 6.0.12Copyright ⓒ2001~2019 RSUPPORT Co., Ltd. All Rights Reserved随着产品的性能提高及功能的改善,本手册中的内容可能会随时更新,届时将不予另行通知,敬请谅解。
除本手册中说明的特殊用途以外,RSUPPORT(株)对市场性及适合性不予以任何保证。
RSUPPORT(株)对于本手册中包含的疏漏或在本资料的提供、执行及使用过程中所发生的直接、间接,特别是偶然或必然发生的损失不承担任何责任。
本手册的著作权及所有权归RSUPPORT(株)所有;相关权利受中华人民共和国著作权法和国际著作权条约保护。
在事先未得到RSUPPORT(株)书面同意下,严禁非法复制、转载本手册中的部分或全部内容。
iPhone, iPad, iPod Touch为Apple Inc.的注册商标并受著作权法保护。
其他本手册中使用的他公司所拥有的注册商标及著作权法保护的术语仅用于引用。
ⓒ2001-2015 RSUPPORT株式会社邮编: 100102地址: 北京市朝阳区广顺南大街16号嘉美中心写字楼1210官网: 电话:+86-10-8256-1810传真:+86-10-8441-75051.RemoteView APP介绍 (5)RemoteView for Andorid是什么? (5)移动设备配置环境 (5)2.RemoteView APP安装 (5)3.RemoteView APP卸载 (5)4.RemoteView APP使用方法 (6)运行RemoteView APP (6)登录 (8)RemoteView APP管理 (9)版本信息 (9)许可信息 (10)MAC地址 (10)教程 (10)通知事项 (12)FAQ (12)使用产品 (12)语言 (13)使用代理 (14)推荐给朋友 (15)反馈意见 (15)被控端PC管理 (15)远程控制 (17)确认连接(刷新) (18)启动电源(WOL) (18)vPro电源管理 (19)远程画面截屏 (19)登录信息 (20)注销/ 结束系统/ 重启系统 (20)删除被控端 (21)vPro电源管理 (21)登录被控端 (23)5.控制端功能 (24)Quick Menu (24)鼠标控制模式切换 (25)键盘控制 (27)屏幕控制 (28)窗口控制 (29)工具 (30)快捷键 (31)设置 (32)结束远程控制 (33)结束程序 (33)6.多任务处理 (33)远程控制时使用其他程序 (33)远程控制时接听电话 (33)远程控制时接收短信 (33)☞本使用手册中标注的iPhone是与iPod Touch的所有设置,远程控制等大部分相同。
surpad手簿软件说明书
目录第一章:软件简介 (1)第二章项目 (2)2.1 项目管理 (2)2.2 项目属性 (3)2.3 查看数据 (3)2.4 新建(打开)文件 (3)2.5 文件(导入)导出 (4)第三章仪器 (6)3.1 通讯设置 (6)3.2工作模式 (9)3.2.1 静态模式 (9)3.2.2基准站模式 (10)3.2.3 移动站模式 (14)3.2.4调用配置集 (14)3.3 GPS状态 (15)3.4 数据链状态 (16)3.5其它菜单功能 (17)第四章校正 (18)4.1 转换参数 (18)4.2 测站校准 (21)4.2 磁北校准 (24)第五章测量 (28)5.1 点测量 (28)5.2 点放样 (29)5.3 直线放样 (31)5.4 物探放样 (31)5.5 曲线放样 (32)5.6 道路放样 (33)5.7 既有线放样 (37)5.8 RoadPro道路设计软件 (38)第六章配置 (39)6.1 坐标系统 (39)6.2 图层配置 (40)6.3 记录设置 (40)6.4 测区设置 (40)6.5 显示设置 (41)6.6 系统设置 (41)第七章工具 (42)7.1数据键入 (42)7.2 坐标转换 (44)7.3角度变换 (44)7.4 计算坐标点 (44)7.5 测量计算 (45)7.6编辑数据字典 (46)7.7电台设置 (46)第八章关于 (48)8.1注册仪器 (48)8.2 电池电量 (48)8.3 关于仪器 (48)8.4 关于软件 (48)第九章SurPad软件的安装与卸载 (50)9.1 软件安装 (50)9.2 软件卸载 (50)第十章电力勘测 (52)10.1 电力作业流程简介 (52)10.2电力勘测 (52)10.3 塔基放样 (56)10.4 ElectricPro电力格式转换软件 (57)第十一章属性采集 (59)11.1 编辑数据字典 (59)11.2 影像处理软件 (59)11.3 手持机差分设置及坐标校准 (61)11.4 属性采集功能 (62)第十二章RTK外业测量简易操作流程 (65)第一章:软件简介SurPad软件是广州思拓力测绘科技有限公司开发的GNSS测绘软件,根据多年的市场经验积累,在结合国际主流测绘数据采集软件功能的同时,集RTK控制采集、道路设计放样、GIS数据采集和电力勘测放样等功能于一体。
全志A13_4.0中英文_说明书
Attention:This handbook contains important security measures and the correct use of the product information, in order to avoid accidents. Pls make sure to reading the manual carefully before use the device.本手册包含了重要的安全措施和正确使用产品的信息,以避免事故。
请务必在使用前仔细的阅读本手册。
●Please don’t be in high temperature, moisture or very dust place●请不要把本机放在高温,潮湿或灰尘的地方●Please don’t be in high temperature, Especially in summer don't put the device in thecar when Windows closed.●请不要把本机放在高温,特别是在夏天不要放在关上窗户的车里。
●●Avoid fall or Violent collisi on of the device, don’t make the TFT display screen wereviolent tremor, This could cause TFT display screen abnormal or damage.●避免碰摔,不使液晶显示屏进行猛烈的震动,这可能导致液晶显示屏异常或损坏。
●●Please choose the appropriate volume, Use headphones shoulds not be too bigvolume, If feel tinnitus, Lower the volume or stop using it●请选择适当的音量,使用耳机时不宜太大,如果感觉耳鸣,降低音量或停止使用●please charge In the following condition,●请在下列条件下充电。
4代UV平板机中文说明书要点

(FPGA控制系统)
使用说明书
沈阳飞行船数码喷印设备有限公司
TEL:024-25814066
E-mail:ft3316@
前言
●关于此说明书
这本说明书指导你如何去安装、操作、保养、维修FPGA系统UV平板喷印设备。其中也包含一些使用设备进行生产作业的方法和技巧。
工作原理是负压系统稳定的情况前提下可以操作
●fpga系统是控制系统的大脑,它根据电脑传送的命令,执行相应的任务。
主控板包括fpga芯片,SRAM和总线驱动芯片,及其他外围配置电路。
●串口:fpga微控制器带3路串口UART0,UART1,UART2。利用MAX232实现电平。UART0用于打印时命令传输通道。UART1用于读/写温度和喷头电压调整。
5CN5:无
6CN12:无
7CN13:无
8CN4:无
9CN11:CN11是升降电机的信号线接口端口
10CN3:CN3是24V直流电源的输入端口
11CN10:CN10是废墨浮子开关连接端口
12CN9:无
13CN8:无
2.2.4
(
供墨过程(详见下图):当二级墨盒中墨位降低时,(浮子开关随之下降,墨位降到一定位置时,浮子开关接通,信号传输到浮子接口板传送到供墨板接通相应颜色的墨泵油墨从墨桶补给到二级墨盒中)。当液位升高时,因浮子的比重小于油墨的比重,浮子会上升,直至浮子开关信号断开切断供墨信号,墨泵停止供墨。按此过程,供墨系统实现不间断自动供墨。
清洗液能刺激眼睛、喉咙、皮肤,生产作业时请穿好工作服,配备专业面罩。
清洗剂或油墨飞溅到眼睛里请及时用清水清洗,严重者迅速到医院进行处理。
清洗液蒸气的密度大于空气密度,它一般停留在低层空间。
大华4.0软件使用说明书

00000034证号:沪制号执行标准:GB/T7722-2005TM-A系列条码打印计价秤SY-Ab/Ac/Ad/Ae系列电子收银秤TM-H系列价格标签秤电脑软件使用手册上海大华电子秤厂(2014)目录一、软件安装 (1)二、通讯设置 (4)2.1 通讯模式 (4)2.2 以太网设置 (4)2.3 串行设置 (4)2.4 秤网卡设置 (4)三、操作指南 (6)3.1 商品设置 (6)3.1.1 刷新 (6)3.1.2 查询 (6)3.1.3 过滤 (7)3.1.4 删除 (7)3.1.5 下载 (8)3.1.6 回收 (8)3.1.7 导入 (9)3.1.8 导出 (10)3.2 标签设置 (10)3.2.1 新建 (10)3.3 热键设置 (11)3.4 特殊信息设置 (11)3.5 文本设置 (12)3.6 时钟设置 (13)3.7 系统参数设置 (13)3.8 电子秤初使化 (14)四、进销存 (15)4.1 采购 (15)4.1.1 进货 (15)4.1.2 查询 (16)4.1.3 退(调)货 (16)4.1.4 撤单 (16)4.1.5 导出 (17)4.2 销售 (17)4.2.1 回收 (17)4.2.2 导出 (17)4.2.3 查询 (18)4.2.4删除 (19)4.3 盘点 (19)4.3.1盘点 (20)4.3.2导出 (20)4.3.3查询 (21)4.3.4撤单 (21)4.4 库存 (21)五、报表 (22)5.1 采购报表 (22)5.2 销售日报表 (22)5.3 销售月报表 (22)5.4 销售秤报表 (23)5.5 销售秤报表 (23)5.6 损耗报表 (23)5.7 利润分析 (23)六、系统 (24)2一、软件安装上位机软件安装步骤如下:首先电子秤所附带光盘放入电脑光驱中,打开文件夹,将带有大华安装包标志的图标双击,出现如下界面,如图1.1:图1.1单击:“Next”进入下一步,出现如下界面,如图1.2所示:图1.2单击:“Next”进入下一步,单击“Change“浏览安装路径,如安装到d盘,出现如下界面,如图1.3所示:图1.3注:一般将软件安装到未安装系统的硬盘,一盘系统盘安装在C盘。
MnSOFT SPEEDNAVI V4.0 新版使用说明书
■ 标注点记录 ① 选择搜索过的地点,点击下方的【地图】。
② 点击界面下方的【标注点】。
③ 将该地点设置为家、公司、关心地中一个,然后选择 将显示在地图上的图标中一个。 ※ 点击【重命名】, 可以利用键盘改变该地点的名称。 点击【保存】,将该地点保存到标注点中。
22
2.5 电话号码查询 输入电话号码来搜索地点。 ① 在搜索界面上点击【电话号码】,电话号码 搜索界面如图所示。输入需要搜索的电话号码。
功能设计更加智能 通过手写识别操作,提高查询方便性,模拟导航时不仅可以调整导航速度, 而且可以根据需要拖动时间条。并且在发生紧急情况时通过紧急联络快捷键功能, 及时查询周边医院\药店、警局、汽车维修点等信息。
6
1.SPEEDNAVI V 4.0 概要
1.1 主菜单的概要 主界面是由查询界面、附加功能、系统设置等构成的。
5
SPEEDNAVI V4.0 特点
简便快捷的查询功能 只要输入一次关键词就可以进行多种搜索。今后可以更快更易使用SPEEDNAVI V4.0查询 提高使用便利性 新增我的菜单!用户可以在地图界面上添加常用菜单,从而提高使用便利性
独一无二的设计 SPEEDNAVI V4.0为了强调高档的设计、增加视觉效果,采用图形用户界面。 实现简单的菜单,8个按钮水平排列,以加强界面的应用性。而且考虑用户的喜好, 提供两种皮肤--古典皮肤和有趣皮肤。
1
HYUNDAI MNSOFT
产品认证书 Certificate of Authenticity HYUNDAI MNSOFT, Inc.公司保证本软件产品快导(SPEEDNAVI V4.0 )是正版软件。 在安装与注册产品时,需要填写以下“软件序列号”。请妥善保管。 请注意,软件序列号遗失不补。
最新-ipad4使用教程 精品

ipad4使用教程篇一:4电池维护保养使用教程很多4用户在使用久了之后觉得电池没有以前耐用了,其实这就是电池没有保养好,那么4电池该怎么保养呢?常见错误观点:错误观点1,首先使用必须进行完全放电,然后进行完全充电,重复三次,以便于激活电池。
否则电池就永远都不好用了!!解答:如果实在闲的没事做,这么做可以,但不是必须的,因为激活操作不是必须放在第一次使用就做的。
只要随着不断的使用,电极钝化无需刻意激活也可以慢慢消失。
错误观点2,充电时不要使用手机,对电池有害,也会产生超大量辐射伤害人体。
解答:充电时使用手机是否对电池有害要根据情况来说(本文后会说明),但是有一点可以确定的是,充电时使用手机绝对不会产生比平时使用手机多的辐射。
错误观点3,锂电池在寿命周期内只能充放电次,所以每次用就尽量用到自动关机,每次充就尽量充到满电。
第一个子句是对的,后面是错的。
这个次数中的每一次,都是指完整的一次,比如从20%充电到30%停止充电,这个只算是110次,从80%放电到60%,只能算是15次。
错误观点4,前三次充电必须达到12小时,否则就影响电池性能。
如果是为了激活电池,只需要手机提示充满电就已经足够,一般手机,都会在5小时内提示充满,完成后如果继续接着充电器,过冲过放保护电路会截断手机的充电电流。
之后电池就处于不工作状态,和充满后马上拨除充电线的效果是一样的。
前三次充电必须达到12小时是针对镍氢充电电池来说的,结果被很多厂家习惯性地、无知地写在锂电池用户手册上,没文化真可怕。
国际大厂,如戴尔,联想,华硕,的产品上是绝对不会出现12小时这样的文字的。
而且对于锂电池来说,这是共性,也是工作原理的一部分,不可能有的厂家生产的需要12小时,有的厂家的不需要。
需要注意的是,如果采用座充,由于绝大部分座充达不到官方线充的最高电流,充电时间可能会超过6小时,但只要充满电,坐充也会自动断电,和用线充是一样的。
错误观点5,充满电了就最好马上拨除充电线,防止过充。
- 1、下载文档前请自行甄别文档内容的完整性,平台不提供额外的编辑、内容补充、找答案等附加服务。
- 2、"仅部分预览"的文档,不可在线预览部分如存在完整性等问题,可反馈申请退款(可完整预览的文档不适用该条件!)。
- 3、如文档侵犯您的权益,请联系客服反馈,我们会尽快为您处理(人工客服工作时间:9:00-18:30)。
工程测量软件SurPad4.0(Android版本)使用说明书广州吉欧电子科技有限公司2018年8月目录第一章 SurPad4.0软件概述 (1)1.1软件简介 (1)1.2软件界面 (1)1.3软件的安装与卸载 (3)第二章快速入门 (6)第三章项目 (8)3.1 项目管理 (8)3.2 数据文件管理 (9)3.3 坐标系统 (10)3.4 测站校准 (14)3.5 坐标点库 (17)3.6 数据文件导出 (19)3.7 扫一扫 (21)3.8 云设置 (21)3.9 软件设置 (21)3.10 关于软件 (23)第四章仪器 (25)4.1 通讯设置 (25)4.2移动站模式 (26)4.2.1移动站-主机网络 (28)4.2.2移动站-内置电台 (29)4.2.3移动站-外置电台 (29)4.2.4移动站-手簿网络 (30)4.3基准站模式 (30)4.3.1基准站-主机网络 (32)4.3.2基准站-内置电台 (33)4.3.3基准站-外置电台 (33)4.3.4基准站-双发 (33)4.4静态站模式 (34)4.5工作状态 (35)4.6配置集 (37)4.7仪器信息 (38)4.8仪器设置 (38)4.9倾斜校准 (39)4.10重新定位 (43)4.11仪器注册 (44)4.12默认电台设置 (44)第五章测量 (45)5.1 点测量 (45)5.2碎步测量 (51)5.3 CAD (51)5.4点放样 (54)5.5直线放样 (56)5.6线路施工放样 (59)5.7线路逐点放样 (61)5.8测横断面 (63)5.9道路桥涵放样 (65)5.10桥台锥坡放样 (67)5.11电力线勘测 (69)5.12塔基放样 (74)5.13场地高程控制 (76)5.14曲线放样 (77)5.15既有线放样 (79)5.16铁路放样 (80)5.17测区设置 (83)5.18图层设置 (84)第六章工具 (86)6.1 转换参数 (86)6.2坐标转换 (87)6.3角度变换 (88)6.4周长面积计算 (88)6.5几何计算 (90)6.5.1 坐标反算 (90)6.5.2 点线计算 (90)6.5.3 空间距离 (91)6.5.4 夹角计算 (91)6.5.5 交会计算 (92)6.5.6 后方交会 (92)6.5.7 前方交会 (93)6.5.8 坐标正算 (93)6.5.9 偏点计算 (94)6.5.10 等分点计算 (94)6.6计算器 (95)6.7大电台设置 (95)6.8土方计算 (98)6.9测站刷新 (100)第七章全站仪 (101)第一章 SurPad4.0软件概述1.1软件简介SurPad4.0软件安卓版是一款GNSS测绘软件,根据多年的市场经验积累,在结合国际主流测绘数据采集软件功能的同时,集RTK控制采集、道路设计放样等功能于一体。
该软件具有人性化的操作流程、图形交互更加出色、功能更为强大。
本书主要介绍实际基本作业流程和SurPad软件各菜单功能。
SurPad4.0主菜单有【项目】、【仪器】、【测量】、【工具】四个选项。
【项目】主要是对工程项目进行操作,主要菜单有项目管理,数据文件管理,坐标系统,测站校准等。
在项目管理中新建了项目文件,可以在坐标系统里面设置坐标参数,测量过程中采集的点都可以在坐标点库中查看。
【仪器】主要是连接主机后,可以设置主机的工作模式,查看主机信息。
主要菜单有通讯设置,移动站模式,基准站模式,静态模式等。
在通讯连接里面通过蓝牙或WiFi成功连接仪器后,选择基准站,移动站或静态站工作模式后,可以在工作状态里面查看仪器的作业信息和数据链状态。
如果要进行仪器校正,可以先在仪器设置里面打开倾斜测量,就可以在倾斜测量功能里面进行电子气泡,磁偏角等校正操作了。
【测量】主要菜单有点测量,碎步测量,CAD,点放样,直线放样,道路放样,电力勘测等,尽可能的包含了做工程测量里面需要的各种功能。
【工具】里面包含各种计算方式和大电台设置。
主要功能有转换参数、坐标转换、角度转换、周长面积计算、几何计算、计算器、大电台设置、土方计算和测站刷新。
1.2软件界面启动界面:在安卓设备上,首次安装运行本软件,会直接进入主界面,如图1.2-1所示,依次向左滑动会进入下一导航菜单界面。
主界面标题栏:标题栏主要显示当前打开工程的功能名称和连接仪器后的解状态。
:关于软件。
点击后进入如图1.2-2所示界面,可以查看软件版权信息,升级软件,注册激活软件和反馈您使用软件的意见。
:通讯设置。
点击后进入如图1.2-3所示界面,可以连接主机。
此图标有两种状态,仪器连接成功后图标显示为蓝色,未连接仪器显示为白色。
图1.2-1 图1.2-2 图1.2-3:卫星状态。
仪器连接成功后,点击此图标进入如图1.2-4所示界面,可以查看当前定位信息。
点击下面的【基站】,如图1.2-5所示,可以查看基站信息,点击【保存】,可以保存当前基站坐标。
点击下面的【星图】,如图1.2-6所示,可以查看卫星的参考位置信息,不同颜色代表不同卫星系统,左上角圆形说明每种颜色代表的卫星系统。
点击下面的【星表】,如图1.2-7所示,显示当前搜到的各卫星编号、卫星系统、L1\L2\L5 信噪比、高度角、方位角、锁定情况等信息。
点击下面的【信噪比】,如图1.2-8所示,可以查看柱状图显示的卫星 L1、L2 、L5信噪比。
:主界面设置。
如图1.2-9所示,界面风格:功能图标进行列表布局或大图标(九宫格)布局。
其他按钮代表是否在测量界面打开使用此功能,软件默认打开全部测量功能。
图1.2-4 图1.2-5 图1.2-6图1.2-7 图1.2-8 图1.2-91.3软件的安装与卸载安装过程:⑴下载安卓SurPad4.0软件安装程序(*.apk)。
⑵安装方法一:将SurPad4.0软件安装程序拷贝到手簿设备中。
在手簿设备的文件管理中找到该软件安装程序,如图1.3-1所示。
点击该安装程序,弹出安装对话框,如图1.3-2所示。
点击【安装】,会弹出首选安装位置的对话框,如图1.3-3所示,稍等一会就会弹出安装完成对话框,如图1.3-4所示。
点击“完成”返回设备桌面,单击【打开】运行SurPad软件。
图1.3-1 图1.3-2 图1.3-3 图1.3-4 安装方法二:在电脑利用手机管理软件进行安装。
下面以应用宝为例讲解安装过程。
先通过USB数据线或者WIFI连接手机和电脑。
在电脑端找到该软件安装程序,选中安装程序,点击右键->使用应用宝安装,弹出安装对话框,如图1.3-5所示。
稍等一会,完成安装,如图1.3-6所示,并可以在手簿桌面找到该软件图标,如图1.3-7所示。
图1.3-5 图1.3-6卸载过程:卸载方法一:长按桌面上软件的图标,拉到【卸载】选项框中,如图1.3-8所示,会弹出是否卸载的对话框,如图1.3-9所示。
点击“确定”完成软件卸载。
卸载方法二:点击【设置】->【应用】中找到“SurPad软件”,如图1.3-10所示。
单击SurPad->点击【卸载】,如图1.3-11所示,弹出是否卸载应用软件对话框,如图1.3-12所示,点击“确定”完成软件卸载。
图1.3-7 图1.3-8 图1.3-9图 1.3-10 图1.3-11 图 1.3-12 卸载方法三:利用手机管理软件进行卸载,下面以应用宝为例讲解卸载过程。
通过USB 数据线或者WIFI连接手机和电脑。
打开电脑应用宝软件,点击应用->我的应用,找到SurPad软件,点击【卸载】,弹出卸载对话框,如图1.3-13所示。
点击【确定】,稍等一会完成手机SurPad软件卸载。
图1.3-13第二章快速入门以连接RTK,设置工作模式为手簿网络为例,讲一下快速连接仪器进行测量的步骤。
具体的操作步骤如下:1.准备工作一台RTK,一部安装有SurPad4.0的P9A手簿,手簿需要有网络。
2.新建项目运行SurPad4.0软件,执行【项目】->【项目管理】->【新建】,新建项目,输入项目名称,选择坐标参数类型,其它为附加信息,可留空,点击【确定】,跳转到坐标系统参数界面。
在中国内,椭球参数默认为Beijing54,投影方式是高斯投影,您可以根据实际情况,进行坐标系的设置。
3.连接仪器及设置工作模式执行【仪器】->【通讯设置】,选择仪器类型RTK,通讯模式有蓝牙,WiFi和演示模式,这里我们选择蓝牙模式,点击【搜索】,在蓝牙设备列表中找到自己仪器的蓝牙名称,点击【连接】,弹出连接进度框,即表示连接成功。
执行【仪器】->【移动站模式】,数据链模式选择【手簿网络】,设置好CORS服务器的IP和端口,获取并选择接入点,其他选项可以使用默认数值,点击【应用】,工作模式设置完毕。
返回主界面可以查看是否得到固定解。
4.校正⚫基站校正在固定解状态,执行【项目】->【测站校准】->【利用基站点校准】,输入已知坐标,设置当前基站坐标的天线参数,点击【计算】得到校准参数。
⚫点校正第一次到一个测区,想要测量的点与已知点坐标相匹配,需要做点校正。
求转换参数的做法一般情况:假设我们利用A、B、C这三个已知点来求转换参数,那么首先要有A、B、C三个点的GPS原始记录WGS-84坐标和地方坐标。
A、B、C三个点的GPS 原始记录WGS-84坐标的获取有两种方式:一是布设静态控制网,采用静态控制网布设时后处理软件的GPS原始记录WGS-84坐标;二是GPS移动站在没有任何校正参数起作用的固定解状态下记录的GPS原始WGS-84坐标。
执行【工具】->【转换参数】,输入已知点坐标(坐标点库中选取或手动输入)和WGS84椭球原始坐标(获取当前GPS数据、坐标点库中选取或手动输入),设置是否使用平面校正和高程校正,点击【确定】,完成转换参数的输入。
在转换参数界面点击【计算】得到GPS参数报告。
5.测量执行【测量】->【点测量/碎步测量】,以“地形点”为例,点击点类型按钮,选择地形点,在点击【设置】设置记录地形点限制条件(固定解,H:0.05,V:0.1,PDOP:3.0,延迟:5,平滑:1),点击右下角采点按钮或者手簿采点快捷键完成目标点采集和保存。
6.数据的导入和导出1)数据导入将需要导入的数据文件复制到手簿SurPad文件夹中,执行【项目】->【坐标点库】->【导入】,选择数据格式、角度格式和属性类型,点击【确定】,找到数据文件,点击【确定】导入数据文件。
2)数据导出执行【项目】->【数据文件导出】,选择数据文件,设置文件格式、角度格式和导出点类型,点击【导出】,选择输出文件存储路径,点击【导出】,数据文件导出成功。