JuniperNetscreen防火墙HA升级OS步骤
NetScreen产品升级步骤

N e t S c r e e n防火墙产品升级方法(以N e t S c r e e n5X P防火墙为例)北京安泰成发科技有限公司产品工程师郑东海2003-1-161.产品最新的OS下载1.首先登陆到netscreen网站,打开IE浏览器输入:2.选择Support & Services3.选择中央部分的Software Download4.选择你所购买产品型号和版本5.选择产品型号(如NetScreen 5XP)6.选择最新可下载的版本(如ScreccnOS 4.0.1)7.选择好产品型号和版本后,点击Go8.系统将提示你输入用户名和密码9.在用户名和口令栏中输入产品的序列号即可(用户名和密码都是产品的序列号),产品的序列号在防火墙设备上s/n:10.选择当前NetScreen提供的最高版本(如当前最高版本为4.0.1r3)11.选择NetScreen-5xp ScreenOS version 4.0.1r3 upgrade下载产品12.选择“将该文件保存到磁盘”,点击确定13.选择将升级文件保存到本地硬盘的目录,点击保存14.下载完成后,升级文件是一个压缩的文件15.将文件解压缩到当前目录2.产品OS升级1.为了避免意外,首先将防火墙untrust接口的网线和Internet断开;2.在含有下载升级包的计算机上打开防火墙的web界面窗口;3.选择System\Configure\General中的Software Update4.点击“浏览”,选择产品升级包的目录,选择“打开”5.点击“Apply”5.升级过程大约需要5分钟时间,请耐心等待;升级完成后,防火墙会自动重新启动;6.测试防火墙是否正常工作,在您的计算机上ping防火墙的trust接口IP地址;如果正常,则访问Internet站点,查看防火墙是否正常工作,如访问是否正常,这样防火墙升级工作已经完成。
Juniper(netscreen)防火墙TFTP升级过程
Juniper(netscreen)防火墙TFTP升级过程Juniper(netscreen)防火墙每三个月左右就会发出一个新的OS版本,修复以前版本的bug,增加新的功能,并且有些新的版本会极大提高防火墙的性能,因此,在保修期内充分利用版本升级服务是不错的选择。
基于Web的升级非常简单,但有的OS版本升级需要升级bootloader,因此需要在命令行状态下通过TFTP升级。
升级Juniper新的UTM产品SSG550、SSG520到最新的OS版本ScreenOS6.0就需要作这样的升级。
手上有SSG520,和新的bootloader,OS,做个升级试验。
第一步:升级防火墙bootloader文件。
1. 下载boot loader 镜像文件(boot2.v.1.0.3),拷贝文件到TFTP服务器的根目录下,启动TFTP server。
2。
通过网线连接TFTP服务器(笔记本或台式机)和SSG 520的eth 0/0口;3。
通过console线连接console端口和笔记本。
4. 重启防火墙(在CLI模式下输入reset命令.)5.防火墙出现ScreenOS Saipanloader V1.0.2Built Jan 19 2006/17:57:03watchdog_probe, 1046 bus/dev/fn = 0/248 ich = 2640boot_drive = 80start1 = 0768, start2 = 3840Hit 'X' and 'A' to upgrade bootloadermounting这时候按下大写的X和A,要大写,第一次没注意,升级失败了。
按完之后提示File Name [boot2.1.0.2]: boot2.1.0.3 ;输入文件名Self IP Address [192.168.1.1]: ;输入防火墙地址,随便写TFTP IP Address [192.168.1.2]: ;输入TFTP服务器地址,注意跟防火墙地址同一网段;按回车,然后看到以下系统信息:Save loader config (112 bytes)... DoneLoading file "boot2.1.0.3".../Loaded successfully! (size = 125,512 bytes)Ignore image authentication!..........................Done.升级成功。
JuniperSR防火墙简明配置手册

Juniper SRX防火墙简明配置手册卞同超Juniper 服务工程师Juniper Networks, Inc.北京市东城区东长安街1号东方经贸城西三办公室15层1508室邮编:100738电话:目录Juniper SRX防火墙简明配置手册SRX系列防火墙是Juniper公司基于JUNOS操作系统的安全系列产品,JUNOS集成了路由、交换、安全性和一系列丰富的网络服务;目前Juniper公司的全系列路由器产品、交换机产品和SRX安全产品均采用统一源代码的JUNOS操作系统,JUNOS是全球首款将转发与控制功能相隔离,并采用模块化软件架构的网络操作系统;JUNOS作为电信级产品的精髓是Juniper真正成功的基石,它让企业级产品同样具有电信级的不间断运营特性,更好的安全性和管理特性,JUNOS软件创新的分布式架构为高性能、高可用、高可扩展的网络奠定了基础;基于NP架构的SRX系列产品产品同时提供性能优异的防火墙、NAT、IPSEC、IPS、SSL VPN和UTM等全系列安全功能,其安全功能主要来源于已被广泛证明的ScreenOS操作系统;本文旨在为熟悉Netscreen防火墙ScreenOS操作系统的工程师提供SRX防火墙参考配置,以便于大家能够快速部署和维护SRX防火墙,文档介绍JUNOS操作系统,并参考ScreenOS配置介绍SRX防火墙配置方法,最后对SRX防火墙常规操作与维护做简要说明;一、JUNOS操作系统介绍层次化配置结构JUNOS采用基于FreeBSD内核的软件模块化操作系统,支持CLI命令行和WEBUI两种接口配置方式,本文主要对CLI命令行方式进行配置说明;JUNOS CLI使用层次化配置结构,分为操作operational和配置configure两类模式,在操作模式下可对当前配置、设备运行状态、路由及会话表等状态进行查看及设备运维操作,并通过执行config或edit命令进入配置模式,在配置模式下可对各相关模块进行配置并能够执行操作模式下的所有命令run;在配置模式下JUNOS采用分层分级模块下配置结构,如下图所示,edit命令进入下一级配置类似unix cd命令,exit命令退回上一级,top命令回到根级;JunOS配置管理JUNOS通过set语句进行配置,配置输入后并不会立即生效,而是作为候选配置Candidate Config等待管理员提交确认,管理员通过输入commit命令来提交配置,配置内容在通过SRX语法检查后才会生效,一旦commit通过后当前配置即成为有效配置Active config;另外,JUNOS允许执行commit命令时要求管理员对提交的配置进行两次确认,如执行commit confirmed 2命令要求管理员必须在输入此命令后2分钟内再次输入commit以确认提交,否则2分钟后配置将自动回退,这样可以避免远程配置变更时管理员失去对SRX的远程连接风险;在执行commit命令前可通过配置模式下show命令查看当前候选配置Candidate Config,在执行commit后配置模式下可通过run show config命令查看当前有效配置Active config;此外可通过执行show | compare比对候选配置和有效配置的差异;SRX上由于配备大容量硬盘存储器,缺省按先后commit顺序自动保存50份有效配置,并可通过执行rolback和commit命令返回到以前配置如rollback 0/commit可返回到前一commit配置;也可以直接通过执行save 手动保存当前配置,并执行load override / commit调用前期手动保存的配置;执行load factory-default / commit命令可恢复到出厂缺省配置;SRX可对模块化配置进行功能关闭与激活,如执行deactivate security nat/comit命令可使NAT 相关配置不生效,并可通过执行activate security nat/commit使NAT配置再次生效;SRX通过set语句来配置防火墙,通过delete语句来删除配置,如delete security nat和edit security nat / delete一样,均可删除security防火墙层级下所有NAT相关配置,删除配置和ScreenOS不同,配置过程中需加以留意;SRX主要配置内容部署SRX防火墙主要有以下几个方面需要进行配置:System:主要是系统级内容配置,如主机名、管理员账号口令及权限、时钟时区、Syslog、SNMP、系统级开放的远程管理服务如telnet等内容;Interface:接口相关配置内容;Security:是SRX防火墙的主要配置内容,安全相关部分内容全部在Security层级下完成配置,如NAT、Zone、Policy、Address-book、Ipsec、Screen、Idp等,可简单理解为ScreenOS防火墙安全相关内容都迁移至此配置层次下,除了Application自定义服务;Application:自定义服务单独在此进行配置,配置内容与ScreenOS基本一致;routing-options:配置静态路由或router-id等系统全局路由属性配置;二、SRX防火墙配置对照说明初始安装2.1.1 登陆Console口通用超级终端缺省配置连接SRX,root用户登陆,密码为空login: rootPassword:--- JUNOS built 2009-07-16 15:04:30 UTCroot% cli /进入操作模式/root>root> configureEntering configuration mode /进入配置模式/editRoot2.1.2 设置root用户口令设置root用户口令root set system root-authentication plain-text-passwordroot new password : root123root retype new password: root123密码将以密文方式显示root show system root-authenticationencrypted-password "$1$xavDeUe6$"; SECRET-DATA注意:强烈建议不要使用其它加密选项来加密root和其它user口令如encrypted-password加密方式,此配置参数要求输入的口令应是经加密算法加密后的字符串,采用这种加密方式手工输入时存在密码无法通过验证风险;注:root用户仅用于console连接本地管理SRX,不能通过远程登陆管理SRX,必须成功设置root 口令后,才能执行commit提交后续配置命令;2.1.3 设置远程登陆管理用户root set system login user lab class super-user authentication plain-text-password root new password : lab123root retype new password: lab123注:此lab用户拥有超级管理员权限,可用于console和远程管理访问,另也可自行灵活定义其它不同管理权限用户;2.1.4 远程管理SRX相关配置run set date /设置系统时钟/set system time-zone Asia/Shanghai/设置时区为上海/set system host-name SRX3400-A/设置主机名/set system name-server 1.1.1.1 /设置DNS服务器/set system services ftpset system services telnetset system services web-management http/在系统级开启ftp/telnet/http远程接入管理服务/set interfaces ge-0/0/ family inet address 10.1.1.1/24或set interfaces ge-0/0/0 unit 0 family inet address 10.1.1.1/24set interfaces ge-0/0/1 unit 0 family inet address 10.1.2.1/24set routing-options static route 0.0.0.0/0 p 10.1.1/配置逻辑接口地址及缺省路由,SRX接口要求IP地址必须配置在逻辑接口下类似ScreenOS的子接口,通常使用逻辑接口0即可/set security zones security-zone untrust interfaces ge-0/0//将ge-0/0/接口放到untrust zone去,类似ScreenOS/set security zones security-zone untrust host-inbound-traffic system-services ping set security zones security-zone untrust host-inbound-traffic system-services http set security zones security-zone untrust host-inbound-traffic system-services telnet /在untrust zone打开允许远程登陆管理服务,ScreenOS要求基于接口开放服务,SRX要求基于Zone开放,从SRX主动访问出去流量开启服务,类似ScreenOS/PolicyPolicy配置方法与ScreenOS基本一致,仅在配置命令上有所区别,其中策略的允许/拒绝的动作Action需要额外配置一条then语句将ScreenOS的一条策略分解成两条及以上配置语句;Policy 需要手动配置policy name,policy name可以是字符串,也可以是数字与ScreenOS的policy ID 类似,只不过需要手工指定;set security zones security-zone trust address-book address pc1 10.1.1.10/32set security zones security-zone untrust address-book address server1 10.0.2.1/32 /与ScreenOS一样,在trust和untrust zone下分别定义地址对象便于策略调用,地址对象的名称可以是地址/掩码形式/set security zones security-zone trust address-book address-set addr-group1 address pc1/在trust zone下定义名称为add-group1的地址组,并将pc1地址放到该地址组中/set security policies from-zone trust to-zone untrust policy 001 match source-address addr-group1 destination-address server1 application anyset security policies from-zone trust to-zone untrust policy 001 then permit/定义从trust 到untrust方向permit策略,允许addr-group1组的源地址访问server1地址any服务/NATSRX NAT较ScreenOS在功能实现方面基本保持一致,但在功能配置上有较大区别,配置的主要差异在于ScreenOS的NAT与policy是绑定的,无论是MIP/VIP/DIP还是基于策略的NAT,在policy 中均要体现出NAT内容除了缺省基于untrust接口的Souec-NAT模式外,而SRX 的NAT则作为网络层面基础内容进行独立配置独立定义地址映射的方向、映射关系及地址范围,Policy中不再包含NAT相关配置信息,这样的好处是易于理解、简化运维,当网络拓朴和NAT映射关系发生改变时,无需调整Policy配置内容;SRX NAT和Policy执行先后顺序为:目的地址转换-目的地址路由查找-执行策略检查-源地址转换,结合这个执行顺序,在配置Policy时需注意:Policy中源地址应是转换前的源地址,而目的地址应该是转换后的目的地址,换句话说,Policy中的源和目的地址应该是源和目的两端的真实IP地址,这一点和ScreenOS存在区别,需要加以注意;SRX中不再使用MIP/VIP/DIP这些概念,其中MIP被Static静态地址转换取代,两者在功能上完全一致;DIP被Source NAT取代;基于Policy的目的地址转换及VIP被 Destination NAT取代;ScreenOS中基于Untrust zone接口的源地址转换被保留下来,但在SRX中不再是缺省模式SRX中Trust Zone接口没有NAT模式概念,需要手工配置;类似ScreenOS,Static属于双向NAT,其他类型均属于单向NAT,此外,SRX还多了一个proxy-arp概念,如果定义的IP Pool可用于源或目的地址转换与接口IP 在同一子网时,需配置SRX对这个Pool内的地址提供ARP代理功能,这样对端设备能够解析到IP Pool地址的MAC地址使用接口MAC地址响应对方,以便于返回报文能够送达SRX;下面是配置举例及相关说明:2.3.1 Interface based NATNAT:set security nat source rule-set 1 from zone trustset security nat source rule-set 1 to zone untrustset security nat source rule-set 1 rule rule1 match source-address 0.0.0.0/0 destination-address security nat source rule-set 1 rule rule1 then source-nat interface上述配置定义NAT源地址映射规则,从Trust Zone访问Untrust Zone的所有流量用Untrust Zone 接口IP做源地址转换;Policy:set security policies from-zone trust to-zone untrust policy 1 match source-address 10.1.2.2set security policies from-zone trust to-zone untrust policy 1 match destination-address anyset security policies from-zone trust to-zone untrust policy 1 match application anyset security policies from-zone trust to-zone untrust policy 1 then permit上述配置定义Policy策略,允许Trust zone 10.1.2.2地址访问Untrust方向任何地址,根据前面的NAT配置,SRX在建立session时自动执行接口源地址转换;2.3.2 Pool based Source NATNAT:set security nat source pool pool-1 address to security nat source rule-set 1 from zone trustset security nat source rule-set 1 to zone untrustset security nat source rule-set 1 rule rule1 match source-address 0.0.0.0/0 destination-address security nat source rule-set 1 rule rule1 then source-nat pool pool-1set security nat proxy-arp interface ge-0/0/2 address to 上述配置表示从trust方向any到untrust方向any访问时提供源地址转换,源地址池为pool1 ,同时ge-0/0/2接口为此pool IP提供ARP代理;需要注意的是:定义Pool时不需要与Zone及接口进行关联;配置proxy-arp目的是让返回包能够送达SRX,如果Pool与出接口IP不在同一子网,则对端设备需要配置指向的Pool地址路由;Policy:set security policies from-zone trust to-zone untrust policy 1 match source-address 10.1.1.2set security policies from-zone trust to-zone untrust policy 1 match destination-address anyset security policies from-zone trust to-zone untrust policy 1 match application any set security policies from-zone trust to-zone untrust policy 1 then permit上述配置定义Policy策略,允许Trust zone 10.1.2.2地址访问Untrust方向任何地址,根据前面的NAT配置,SRX在建立session时自动执行源地址转换;2.3.3 Pool base destination NATNAT:set security nat destination pool 111 address security nat destination rule-set 1 from zone untrustset security nat destination rule-set 1 rule 111 match source-address 0.0.0.0/0set security nat destination rule-set 1 rule 111 match destination-address security nat destination rule-set 1 rule 111 then destination-nat pool 111上述配置将外网any访问地址映射到内网地址,注意:定义的Dst Pool是内网真实IP地址,而不是映射前的公网地址;这点和Src-NAT Pool有所区别;Policy:set security policies from-zone trust to-zone untrust policy 1 match source-address anyset security policies from-zone trust to-zone untrust policy 1 match destination-address security policies from-zone trust to-zone untrust policy 1 match application anyset security policies from-zone trust to-zone untrust policy 1 then permit上述配置定义Policy策略,允许Untrust方向任何地址访问Trust方向,根据前面的NAT配置,公网访问时,SRX自动执行到的目的地址转换;ScreenOS VIP功能对应的SRX Dst-nat配置:set security nat destination pool 222 address port 8000set security nat destination rule-set 1 from zone untrustset security nat destination rule-set 1 rule 111 match source-address 0.0.0.0/0set security nat destination rule-set 1 rule 111 match destination-address security nat destination rule-set 1 rule 111 match destination-port 8000set security nat destination rule-set 1 rule 111 then destination-nat pool 222上述NAT配置定义:访问地址8000端口映射至地址8000端口,功能与ScreenOS VIP端口映射一致;2.3.4 Pool base Static NATNAT:set security nat static rule-set static-nat from zone untrustset security nat static rule-set static-nat rule rule1 match destination-address security nat static rule-set static-nat rule rule1 then static-nat prefix security policies from-zone trust to-zone untrust policy 1 match source-address anyset security policies from-zone trust to-zone untrust policy 1 match destination-address security policies from-zone trust to-zone untrust policy 1 match application anyset security policies from-zone trust to-zone untrust policy 1 then permitStatic NAT概念与ScreenOS MIP一致,属于静态双向一对一NAT,上述配置表示访问时转换为,当访问Internet时自动转换为;IPSEC VPNSRX IPSEC VPN支持Site-to-Site VPN 和基于NS-remote的拨号VPN,和ScreenOS一样,site-to-site VPN也支持路由模式和Policy模式,在配置方面也和ScreenOS基本一致;SRX 中的加密/验证算法在命名上和ScreenOS存在一些区别,配置过程中建议选择ike和ipsec的proposal为 standard模式,standard中包含SRX支持的全部加密/验证算法,只要对端设备支持其中任何一种即可;SRX中通道接口使用st0接口,对应ScreenOS中的tunnel虚拟接口;下面是图中左侧SRX基于路由方式Site-to-site VPN配置:set interfaces st0 unit 0 family inet address 10.2.0.1/24set security zones security-zone untrust interfacesset routing-options static route 10.1.2.0/24 next-hop定义st0 tunnel接口地址/Zone及通过VPN通道到对端网络路由set security ike policy ABC mode mainset security ike policy ABC proposal-set standardset security ike policy ABC pre-shared-key ascii-text juniper定义IKE Phase1 policy参数,main mode,standard proposal及预共享密钥方式set security ike gateway gw1 ike-policy ABCset security ike gateway gw1 address 10.0.2.1set security ike gateway gw1 external-interface ge-0/0/定义IKE gaeway参数,预共享密钥认证,对端网关10.0.2.1,出接口ge-0/0/1位于untrust zoneset security ipsec policy AAA proposal-set standardset security ipsec vpn vpn1 bind-interfaceset security ipsec vpn vpn1 ike gateway gw1set security ipsec vpn vpn1 ike ipsec-policy AAAset security ipsec vpn vpn1 establish-tunnels immediately定义ipsec Phase 2 VPN参数:standard proposal、与接口绑定,调用Phase 1 gw1 ike网关; set security policies from-zone untrust to-zone trust policy vpn-policy match source-address anyset security policies from-zone untrust to-zone trust policy vpn-policy match destination-address anyset security policies from-zone untrust to-zone trust policy vpn-policy match application anyset security policies from-zone untrust to-zone trust policy vpn-policy then permitset security policies from-zone trust to-zone untrust policy vpn-policy match source-address anyset security policies from-zone trust to-zone untrust policy vpn-policy match destination-address anyset security policies from-zone trust to-zone untrust policy vpn-policy match application anyset security policies from-zone trust to-zone untrust policy vpn-policy then permit 开启双向policy以允许VPN流量通过Application and ALGSRX中自定义服务及ALG使用方法与ScreenOS保持一致,系统缺省开启FTP ALG,为TCP 21服务提供FTP应用ALG;自定义服务如果属于FTP类应用,需要将此自定义服务非TCP 21端口与FTP 应用进行关联;下面举例定义一个FTP类服务ftp-test,使用目的端口为TCP 2100,服务超时时间为3600秒,并将此自定义服务与FTP应用关联ALG,系统将识别此服务为FTP应用并开启FTPALG来处理该应用流量;set applications application ftp-test protocol tcp destination-port 2100 inactivity-timeout 3600set applications application ftp-test application-protocol ftpJSRPJSRP是Juniper SRX的私有HA协议,对应ScreenOS的NSRP双机集群协议,支持A/P和A/A模式,JSRP对ScreenOS NSRP协议和JUNOS Cluster集群技术进行了整合集成,熟悉NSRP协议有助于对JSRP协议的理解;JSRP和NSRP最大的区别在于JSRP是完全意义上的Cluster概念,两台设备完全当作一台设备来看待,两台设备的接口板卡顺序编号、运维变更将对两台设备同时进行操作,无需额外执行ScreenOS的配置和会话同步等操作,而ScreenOS NSRP可看作在同步配置和动态对象session基础上独立运行的两台单独设备;JSRP要求两台设备在软件版本、硬件型号、板卡数量、插槽位置及端口使用方面严格一一对应;由于SRX 是转发与控制层面完全分裂架构,JSRP需要控制层面配置同步和数据层面Session同步两个平面的互联,建议控制和数据层面互联链路使用光纤链路直连部分平台强制要求光纤链路直连;JSRP接口命名方式采用多个机箱抽象成一个逻辑机箱之后再统一为各个槽位进行编号,如上所示的SRX5800,每个SRX5800机箱有12个业务槽位,节点0槽位号从0开始编号,节点1槽位号从12开始往后编;整个JSRP配置过程包括如下7个步骤配置Cluster id和Node id 对应ScreenOS NSRP 的cluster id并需手工指定设备使用节点id指定Control Port 指定控制层面使用接口,用于配置同步及心跳指定Fabric Link Port 指定数据层面使用接口,主要session等RTO同步配置Redundancy Group 类似NSRP的VSD group,优先级与抢占等配置每个机箱的个性化配置单机无需同步的个性化配置,如主机名、带外管理口IP地址等配置Redundant Ethernet Interface 类似NSRP的Redundant冗余接口配置Interface Monitoring 类似NSRP interface monitor,是RG数据层面切换依据SRX JSRP配置样例:配置Cluster id和Node idSRX-A>set chassis cluster cluster-id 1 node 0 reboot注意该命令需在operational模式下输入,Cluster ID取值范围为1 – 15,当Cluster ID = 0时将unsets the clusterSRX-B>set chassis cluster cluster-id 1 node 1 reboot指定Control Port如果主控板RE上有固定control-ports,则无需指定:set chassis cluster control-ports fpc 11 port 0set chassis cluster control-ports fpc 23 port 0指定Fabric Link Portset interfaces fab0 fabric-options member-interfaces ge-1/0/0set interfaces fab1 fabric-options member-interfaces ge-13/0/0注:Fabric Link中的Fab0固定用于node 0,Fab1固定用于node 1配置Redundancy GroupRG0固定用于主控板RE切换,RG1以后用于redundant interface切换,RE切换独立于接口切换set chassis cluster reth-count 10 指定整个Cluster中redundant ethernet interface 最多数量set chassis cluster redundancy-group 0 node 0 priority 200高值优先,与NSRP相反set chassis cluster redundancy-group 0 node 1 priority 100set chassis cluster redundancy-group 1 node 0 priority 200高值优先,与NSRP相反set chassis cluster redundancy-group 1 node 1 priority 100每个机箱的个性化配置,便于对两台设备的区分与管理set groups node0 system host-name SRX-Aset groups node0 interfaces fxp0 unit 0 family inet address 1.1.1.1/24 带外网管口名称为fxp0,区别ScreenOS的MGT口set groups node1 system host-name SRX-Bset groups node1 interfaces fxp0 unit 0 family inet address 1.1.1.2/24set apply-groups ${node} 应用上述groups配置配置Redundant Ethernet InterfaceRedundant Ethernet Interface类似ScreenOS里的redundant interface,只不过Redundant Ethernet interface是分布在不同的机箱上这一特性又类似ScreenOS 的VSI接口;Set interface ge-0/0/0 gigether-options redundant-parent reth0 node 0的ge-0/0/0接口Set interface ge-13/0/0 gigether-options redundant-parent reth0 node 1的ge-0/0/0接口Set interface reth0 redundant-ether-options redundancy-group 1 reth0属于RG1 Set interface reth0 unit 0 family inet address 配置Interface Monitoring,被监控的接口Down掉后,RG1将自动进行主备切换与ScreenOS类似,Set cluster redundancy-group 1 interface-monitor ge-0/0/0 weight 255Set cluster redundancy-group 1 interface-monitor ge-0/0/1 weight 255Set cluster redundancy-group 1 interface-monitor ge-13/0/0 weight 255Set cluster redundancy-group 1 interface-monitor ge-13/0/1 weight 255 JSRP维护命令a)手工切换JSRP Master,RG1 原backup将成为Masterrootsrx5800a> request chassis cluster failover redundancy-group 1 node 1b)手工恢复JSRP状态,按照优先级重新确定主备关系高值优先rootsrx5800b> request chassis cluster failover reset redundancy-group 1c)查看cluster interfacerootrouter> show chassis cluster interfacesd)查看cluster 状态、节点状态、主备关系labsrx5800a run show chassis cluster statuse)取消cluster配置srx5800aset chassis cluster disable rebootf)升级JSRP软件版本SRX目前暂不支持软件在线升级ISSU,升级过程会中断业务;升级步骤如下:1.升级node 0,注意不要重启系统2.升级node 1,注意不要重启系统.3.同时重启两个系统g)恢复处于disabled状态的node当control port或fabric link出现故障时,为避免出现双master split-brain现象,JSRP 会把出现故障前状态为secdonary的node设为disabled状态,即除了RE,其余部件都不工作;想要恢复必须reboot该node;三、SRX防火墙常规操作与维护设备关机SRX因为主控板上有大容量硬盘,为防止强行断电关机造成硬件故障,要求设备关机必须按照下面的步骤进行操作:1.管理终端连接SRX console口;2.使用具有足够权限的用户名和密码登陆CLI命令行界面;3.在提示符下输入下面的命令:userhost> request system halt…The operating system has halted.Please press any key to reboot除非需要重启设备,此时不要敲任何键,否则设备将进行重启4.等待console输出上面提示信息后,确认操作系统已停止运行,关闭机箱背后电源模块电源;3.2设备重启SRX重启必须按照下面的步骤进行操作:1.管理终端连接SRX console口;2.使用具有足够权限的用户名和密码登陆CLI命令行界面;3.在提示符下输入下面的命令:userhost> request system reboot4.等待console设备的输出,操作系统已经重新启动;3.3操作系统升级SRX操作系统软件升级必须按照下面的步骤进行操作:1.管理终端连接SRX console口,便于升级过程中查看设备重启和软件加载状态;2.SRX上开启FTP服务,并使用具有超级用户权限的非root用户通过FTP客户端将下载的升级软件介质上传到SRX上;3.升级前,执行下面的命令备份旧的软件及设定:userhost> request system snapshot4.加载新的SRX软件:userhost>request system software add validate reboot5.软件加载成功后, SRX将自动重启,重启完成后检查系统当前软件版本号:userhost> show system software3.4密码恢复SRX Root密码丢失,并且没有其他的超级用户权限,那么就需要执行密码恢复,该操作需要中断设备正常运行,但不会丢失配置信息,这点与ScreenOS存在区别;要进行密码恢复,请按照下面操作进行:1.Console口连接SRX,然后重启SRX;2.在启动过程中,console上出现下面的提示的时候,按空格键中断正常启动方式,然后再进入单用户状态,并输入:boot -sLoading /boot/defaults//kernel data=…… syms=……Hit Enter to boot immediately, or space bar for command prompt.loader>loader> boot -s3.执行密码恢复:在以下提示文字后输入recovery,设备将自动进行重启Enter full pathname of shell or 'recovery' for root password recovery or RETURN for /bin/sh: recovery4.进入配置模式,删除root密码,并重现设置root密码:userhost> configureEntering configuration modeuserhost delete system root-authenticationuserhost set system root-authentication plain-text-passworduserhostNew password:userhostRetype new password:userhost commitcommit complete3.5常用监控维护命令下列操作命令在操作模式下使用,或在配置模式下run show…Show system software 查看当前软件版本号show system uptime 查看系统启动时间Show chassis haredware 查看硬件板卡及序列号show chassis environment 查看硬件板卡当前状态show chassis routing-engine 查看主控板RE资源使用及状态show route 查看路由表show arp 查看ARP表show log messages 查看系统日志show interface terse 查看所有接口运行状态show interface ge-x/y/z detail 查看接口运行细节信息monitor interface ge-x/y/z 动态统计接口数据包转发信息monitor traffic interface ge-x/y/z 动态报文抓取Tcpdump,类似ScreenOSsnoop命令show security flow session summary 查看当前防火墙并发会话数show security flow session 查看当前防火墙具体并发会话clear security flow session all 清除当前sessionshow security alg status 检查全局ALG开启情况SRX对应ScreenOS debug flow basic跟踪报文处理路径的命令:set security flow traceoptions flag basic-datapath 开启SRX基本报文处理Debugset security flow traceoptions file 将输出信息记录到指定文件中set security flow traceoptions file size <file-size> 设置该文件大小,缺省128kset security flow traceoptions packet-filter filter1 destination-prefix 5.5.5.2设置报文跟踪过滤器run file show 查看该Log输出信息SRX对应ScreenOS get tech命令,开Case时需要抓取的信息:request support information。
ScreenOS升级指导手册
ScreenOS升级指导手册ScreenOS防火墙升级方案V1.0Juniper Networks.目录1.升级前准备 (3)1.1. 配置备份 (3)1.2. 检查两台防火墙是否同步 (5)2.升级步骤 (5)2.1. 升级备用机器OS (5)2.2. 升级主用机器OS (6)2.3. 测试 (6)6.系统回退 (6)7.TFTP设置 (6)1. 升级前准备(1)对集群里的2台防火墙都分别进行备份,将配置文件、OS 备份。
(2)升级中需要提前准备好console线,并且在白天提前检查配置是否同步。
(3)升级之前需要准备好TFTP软件并且熟悉TFTP软件设置,建议使用cisco tftp。
1.1. 配置备份选择Configuration >Update > Config file > Save TO File选择配置文件保存的目录。
1.2. 检查两台防火墙是否同步防火墙配置同步检查,包括检查两台防火墙配置是否相同和两台防火墙的RTO是否同步。
在防火墙console端口执行命令:exec nsrp sync global check-sum防火墙输出有两种情况:1、Warning: configuration out of sync,说明防火墙配置或RTO不同步,需要检查配置或执行RTO同步。
建议用对比软件(例如UltraEdit)比较两台防火墙的配置文件,找出差异并进行相应的修改。
2、configuration in sync (local checksum XXX == remote checksum XXX)说明防火墙配置同步。
2. 升级步骤(下面举例说明升级SSG520M/550M本SSG500M 6.3.0r17,如是单机升级,请按照步骤2.1进行升级)2.1. 升级备用机器OS(1)将OS文件解压,放到TFTP的根目录,然后运行tftp软件。
(2)利用SSH或者telnet登陆到防火墙上。
juniper升级操作步骤
juniper升级操作步骤Juniper 设备升级操作步骤梦空第一步(收集设备信息)show chassis hardware(查看机框中的硬件信息)show chassis environment(查看设备环境)show chassis alarms(查看设备告警)show chassis routing-engine(查看路由引擎)show chassis fpc(检查fpc卡)show interfaces terse(查看端口状态)show route summary(记录路由汇总信息)show isis adjacency(记录isis邻居信息)show ospf neighbor(记录ospf邻居信息)show bgp summary(记录bgp路由汇总)show ldp neighbor(记录ldp邻居)第二部(升级准备工作)commint(提交配置)save config(备份配置)saveconfigftp://admin:*************.1.1/config(备份配置到PC机上) request system snapshot (将flash同步到硬盘上,做备份)delete chassis redundancy graceful-switchover enable(关闭快速切换)set interface fxp0 unit 0 family inet address 192.168.1.2/24commit synchronize第三部(升级)下载要升级的镜像到设备上File copy ftp://admin:*************.1.1/juns.tgz /var/tmp/juns.tgz File copy /var/tmp/juns.tgz re1:/var/tmp/juns.tgz(把镜像复制到备用引擎上,给备用引擎升级)request routing-engine login re1(登入倒备份引擎)request system software add /var/tmp/juns.tgz(加载镜像)request system reboot(从新启动引擎完成升级)升级后checkshow chassis hardware(查看机框中的硬件信息)show chassis environment(查看设备环境)show chassis alarms(查看设备告警)show chassis routing-engine(查看路由引擎)show chassis fpc(检查fpc卡)show interfaces terse(查看端口状态)show route summary(记录路由汇总信息)show isis adjacency(记录isis邻居信息)show ospf neighbor(记录ospf邻居信息)show bgp summary(记录bgp路由汇总)show ldp neighbor(记录ldp邻居)升级另一个引擎从备用引擎切换成主引擎(下面三条命令都可以,前面两条是老版本的命令)request chassis routing-engine master switch no-confirmrequest chassis routing-engine master acquire no-confirm request chassis routing-engine master release no-confirm request system software add /var/tmp/juns.tgz(加载镜像)request system reboot(从新启动引擎完成升级)升级后checkshow chassis hardware(查看机框中的硬件信息)show chassis environment(查看设备环境)show chassis alarms(查看设备告警)show chassis routing-engine(查看路由引擎)show chassis fpc(检查fpc卡)show interfaces terse(查看端口状态)show route summary(记录路由汇总信息)show isis adjacency(记录isis邻居信息)show ospf neighbor(记录ospf邻居信息)show bgp summary(记录bgp路由汇总)show ldp neighbor(记录ldp邻居)收尾工作默认juniper主引擎为RE0如果不切换RE1就会产生告警(下面命令可以在不切换引擎的情况下清除告警)set chassis redundancy routing-engine 1 master开启快速切换set chassis redundancy graceful-switchover enable清除管理口IPdelete interface fxp0 unit 0 family inet address 192.168.1.2/24commitrequest system snapshot。
juniper防火墙透明模式HA高可用性配置
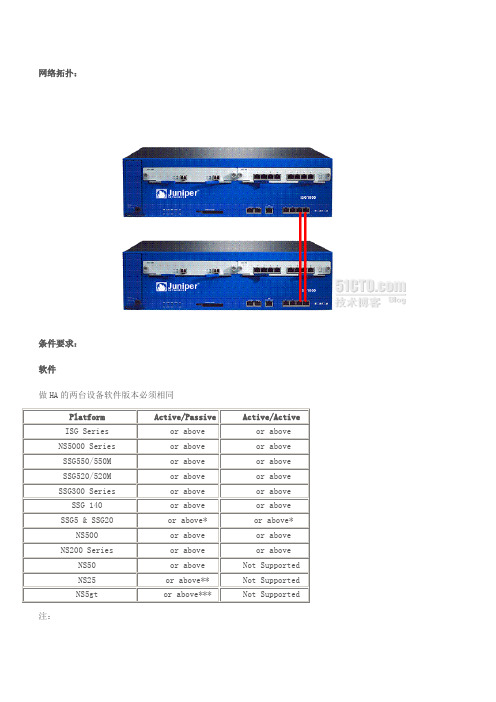
网络拓扑:条件要求:软件做HA的两台设备软件版本必须相同Platform Active/Passive Active/ActiveISG Series or above or aboveNS5000 Series or above or aboveSSG550/550M or above or aboveSSG520/520M or above or aboveSSG300 Series or above or above SSG 140 or above or above SSG5 & SSG20 or above* or above* NS500 or above or above NS200 Series or above or above NS50 or above Not SupportedNS25 or above** Not SupportedNS5gt or above*** Not Supported 注:* extended license required** Supports only NSRP Lite.*** Supports only NSRP Lite & extended license required.另外,如果防火墙要做透明模式的HA,那么Active/Active模式要在ScreenOS or above才支持的;而且是以下平台:the SSG-500 series, NS-ISG-1000, NS-ISG-2000, and all NS-5000 platforms.许可两台防火墙必须有想同功能的软件许可;硬件两台防火墙必须是相同的硬件,有相同的模块;网络详情:这里配置举例使用设备ISG1000,两台做HA,A/S模式,ethernet1/1为信任端口,ethernet1/2为非信任端口,ethernet1/4为HA接口;详细配置:1、配置主设备set interface "ethernet1/1" zone "V1-Trust"set interface "ethernet1/2" zone "V1-Untrust"set interface "ethernet1/4" zone "HA"set interface vlan1 i.1/24set interface vlan1 manage-i.2set interface vlan1 ip manageableset zone V1-Untrust manage pingset zone V1-Untrust manage webset policy id 2 from "V1-Trust" to "V1-Untrust" "Any" "Any" "ANY" permit set routeset nsrp cluster id 1set nsrp rto-mirror syncset nsrp vsd-group id 0 priority 10set nsrp vsd-group id 0 preemptset nsrp vsd-group id 0 monitor interface ethernet1/1set nsrp vsd-group id 0 monitor interface ethernet1/22、配置备设备set nsrp cluster id 1set nsrp rto-mirror syncset nsrp vsd-group id 0 priority 100set nsrp vsd-group id 0 monitor interface ethernet1/1set nsrp vsd-group id 0 monitor interface ethernet1/2nsisg1000->exec nsrp sync global saveSave global configuration successfully.Continue to save local configurations ... Save local configuration successfully.nsisg1000-> resetnsisg1000-> Configuration modified. Save? [y] y/n nnsisg1000-> System reset? Are you sure? y/n y重启后检查配置是否已经同步exec nsrp sync global-config check-sum如果已经同步,设置管理地址set interface vlan1 manage-i.33、补充:A、透明模式实现HA以后,如果要管理被设备,默认是管理不到的,可以用以下命令解决此问题:set interface vlan1 nsrp manage zone V1-Untrust此命令要在2台设备上都应用。
网络防火墙的更新与升级方法(二)

网络防火墙的更新与升级方法网络防火墙是保护企业网络安全的重要组成部分,随着网络威胁日益复杂和多样化,防火墙的更新和升级变得至关重要。
本文将分析网络防火墙的更新与升级方法,帮助企业保持网络的安全性。
一、了解网络威胁和防火墙新功能网络威胁是不断变化的,黑客们通过各种方式获取敏感信息或防止用户访问特定网站。
因此,了解最新的网络威胁以及防火墙的新功能是更新和升级防火墙的第一步。
企业可以通过参与网络安全研讨会,阅读关于网络安全的权威报告,或请咨询专业的网络安全公司来获取有关威胁趋势和新的防火墙功能的最新资讯。
二、使用最新的防火墙版本为了确保网络安全,企业应该使用最新版本的防火墙软件。
厂商通常会在新版本中修复旧版中的漏洞,并引入新的安全功能。
因此,企业应该及时更新防火墙软件,升级到最新版本,以弥补旧版中可能存在的安全漏洞。
三、定期进行安全评估和风险评估定期进行安全评估和风险评估是保持防火墙有效的重要步骤。
安全评估可以帮助企业了解其网络的安全状况,发现潜在的安全漏洞,并采取相应措施加以修复。
风险评估则有助于企业确定防火墙的保护能力是否足够以应对当前的网络威胁。
通过定期进行这些评估,企业可以及时发现并纠正防火墙中存在的安全问题。
四、更新防火墙规则防火墙规则是用来管理网络流量和访问权限的重要组成部分。
随着网络环境和业务需求的变化,防火墙规则也需要被定期更新。
企业应该审查当前的规则,识别不再需要或不再适用的规则,并添加新的规则以应对新的威胁。
同时,防火墙规则的更改需要经过严格的测试和验证,以确保不会对网络正常运行和安全性产生负面影响。
五、实施多层次的防火墙策略虽然防火墙是网络安全的重要组成部分,但单一的防火墙无法完全保护网络免受各种威胁。
因此,企业应该考虑实施多层次的防火墙策略,以确保网络的安全。
多层次的防火墙策略可以包括在边界防火墙之外添加内部防火墙或入侵检测系统,以及部署虚拟专用网络(VPN)等技术来加密与远程用户的通信。
netscreen_OS_升级_详细步骤
Netscreen防火墙OS升级指导升级前的准备工作:1,一台PC,一条交叉网线,一条Console线缆;2,用交叉网线连接PC网卡和防火墙的MGT接口(没有MGT接口的连接到E1接口);3,指定PC的IP地址:192.168.1.200/24。
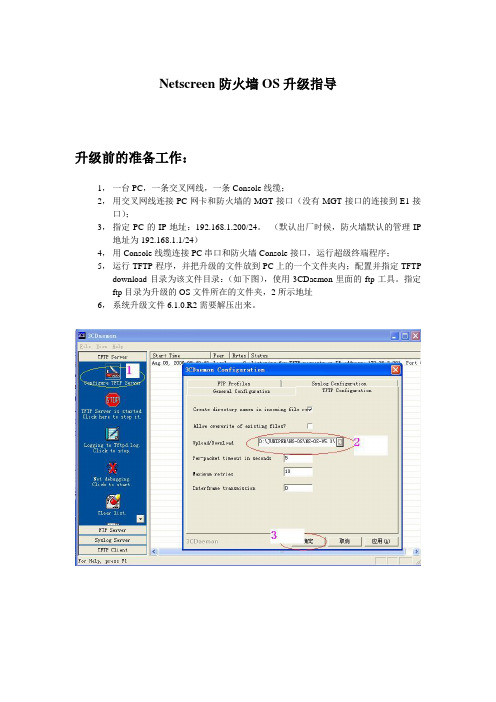
(默认出厂时候,防火墙默认的管理IP 地址为192.168.1.1/24)4,用Console线缆连接PC串口和防火墙Console接口,运行超级终端程序;5,运行TFTP程序,并把升级的文件放到PC上的一个文件夹内;配置并指定TFTP download目录为该文件目录:(如下图),使用3CDaemon里面的ftp工具。
指定ftp目录为升级的OS文件所在的文件夹,2所示地址6,系统升级文件6.1.0.R2需要解压出来。
单机升级ScreenOS (防火墙操作系统):1,Pc和防火墙MGT接口连接,确保防火墙启动后,可以用超级终端或者Telnet方式登录到防火墙系统(超级终端需要用RJ-45转USB连接防火墙consle口,初始密码为netscreen,或者为空);先get interface查看MGT接口IP是否已设置,没有的需要设置命令,MGT接口地址已经设置的话就无需再设置了。
1,确定PC网线连接好MGT口,在PC机上ping 192.168.1.1 是否畅通,或者防火墙上ping 192.168.1.200,是否能ping通交换机,如无法ping通证明mgt口与PC没有设置好。
2,在3CDeamon软件的TFTPServer上download目录中放置ScreenOS升级程序;3,在防火墙上输入:>save soft from tftp 192.168.1.200 nsISG2000.5.3.0r3.0 to flash 如下图:4,回车后开始升级:如下图5,防火墙从TFTP下载导入ScreenOS升级文件完成:如下图6,输入Reset 命令,重新启动防火墙,如下图:7,防火墙重新启动后,输入命令:get system检查是否升级成功,如下图:WEB界面升级在浏览器键入192.168.1.1,用户名和密码均为netscrenn点击,然后点击,以后会有几分钟停顿,这是在后台传输数据;设备自动重启,设备启动完成,ScreenOS升级成功;get system 验证升级后的版本号;系统丢失ScreenOS或者升级失败时候的ScreenOS升级方法:(Boot升级模式)1,升级前的准备工作和前面Loader程序升级前的相同;(PC网卡和防火墙MGT接口连接,串口线缆和防火墙Console接口相接,并运行超级终端程序)2,防火墙加电启动,注意观察超级终端的启动过程提示,再出现:Hit any key to load new firmware..后按任意键,进入ScreenOS升级模式,并输入升级得OS文件名,如下图如下图image?(y/[n]) yes确认;回车后开始运行升级的OS;5,启动系统后,get system检查是否升级成功;如下图6,升级完成。
Juniper NetScreen (ScreenOS)集成指南说明书

Integrating Juniper NetScreen (ScreenOS)AbstractThis guide provides instructions to configure Juniper NetScreen (ScreenOS) to send the syslog events to EventTracker.ScopeThe configurations detailed in this guide are consistent with EventTracker version 7.X and later, and Juniper NetScreen (ScreenOS) 5.2.0 and later.AudienceAdministrators who are assigned the task to monitor and manage Juniper NetScreen events using EventTracker.The information contained in this document represents the current view of EventTracker. on theissues discussed as of the date of publication. Because EventTracker must respond to changingmarket conditions, it should not be interpreted to be a commitment on the part of EventTracker,and EventTracker cannot guarantee the accuracy of any information presented after the date ofpublication.This document is for informational purposes only. EventTracker MAKES NO WARRANTIES,EXPRESS OR IMPLIED, AS TO THE INFORMATION IN THIS DOCUMENT.Complying with all applicable copyright laws is the responsibility of the user. Without limiting therights under copyright, this paper may be freely distributed without permission fromEventTracker, if its content is unaltered, nothing is added to the content and credit toEventTracker is provided.EventTracker may have patents, patent applications, trademarks, copyrights, or other intellectualproperty rights covering subject matter in this document. Except as expressly provided in anywritten license agreement from EventTracker, the furnishing of this document does not give youany license to these patents, trademarks, copyrights, or other intellectual property.The example companies, organizations, products, people and events depicted herein are fictitious.No association with any real company, organization, product, person or event is intended orshould be inferred.© 2017 EventTracker Security LLC. All rights reserved. The names of actual companies andproducts mentioned herein may be the trademarks of their respective owners.Table of ContentsAbstract (1)Overview (3)Prerequisites (3)Configuration (3)Configure Syslog logging (3)EventTracker Knowledge Pack (4)Categories (4)Alerts (5)Reports (5)Import Juniper NetScreen knowledge pack into EventTracker (7)Import Category (7)Import Alerts (8)Import Flex Reports (9)Import Template (10)Verify Juniper NetScreen knowledge pack in EventTracker (13)Verify Juniper NetScreen Categories (13)Verify Juniper NetScreen Alerts (13)Verify Juniper NetScreen Reports (15)Verifying Template (16)Sample Reports (17)OverviewThe Juniper Networks NetScreen Series Security Systems are ideally suited for large enterprise network backbones, including departmental or campus segmentation, Enterprise data centers for securing high-density server environments and carrier-based managed services or core infrastructure. Prerequisites∙EventTracker 7.x and later should be installed.∙Juniper ScreenOS 5.2.x and later should be installed on Juniper NetScreen.∙Administrative access on the EventTracker Enterprise and Juniper NetScreen.∙An exception should be added into Windows Firewall on EventTracker machine for syslog port 514.∙Port 514 should be opened on Juniper NetScreen (ScreenOS).ConfigurationTo monitor Juniper NetScreen in EventTracker, c onfigure Juniper NetScreen to send all events as Syslog to the EventTracker system.Configure Syslog logging1.Login into WebUI of Juniper NetScreen.2.Expand Configuration and select Report Settings, and then click Syslog.3.Check ’Enable Syslog Messages’ to enable Syslog.Figure 14.In the Syslog Host Name/Port field, type the IP address of the EventTracker Manager.5.Click Apply.EventTracker Knowledge PackOnce Juniper NetScreen events are enabled and Juniper NetScreen events are received in EventTracker, the Categories, Alerts and Flex based Reports can be configured in EventTracker.The following Knowledge Packs are available in EventTracker to support Juniper NetScreen monitoring. Categories∙NetScreen: Account management -This category based report provides information related to account management.∙NetScreen: Administration -This category based report provides information related to administration.∙NetScreen: All events -This category based report provides information related to all events of NetScreen.∙NetScreen: Antivirus - This category based report provides information related to antivirus.∙NetScreen: Firewall policy - This category based report provides information related to firewall policy.∙NetScreen: Firewall traffic allowed -This category based report provides information related to firewall traffic allowed.∙NetScreen: Firewall traffic denied -This category based report provides information related to firewall traffic denied.∙NetScreen: Intrusion detection - This category based report provides information related to Intrusion detection.∙NetScreen: Network services - This category based report provides information related to network services.∙NetScreen: Security device events -This category based report provides information related to security device events.∙NetScreen: System authentication -This category based report provides information related to system authentication.∙NetScreen: System services -This category based report provides information related to system services.∙NetScreen: URL allowed - This category based report provides information related to URL allowed.∙NetScreen: URL blocked - This category based report provides information related to URL blocked.∙NetScreen: User authentication -This category based report provides information related to user authentication.∙NetScreen: Virtual router - This category based report provides information related to virtual router.∙NetScreen: Virtual systems -This category based report provides information related to virtual systems.∙NetScreen: VPN - This category based report provides information related to VPN.∙NetScreen: Web filtering - This category based report provides information related to Web filtering. Alerts∙NetScreen: Authentication failure - This alert is generated when system or user related authentication fails.∙NetScreen: IDS intrusion detection -This alert is generated when attacks are detected through NetScreen.∙NetScreen: Security device error - This alert is generated when response to problems or processes that occur at the hardware or Screen OS level.∙NetScreen: Spam found - This alert is generated when spam found.∙NetScreen: System configuration erased - This alert is generated when system configuration gets erased.∙NetScreen: USB storage device attached/detached - This alert is generated when USB storage device is attached/detached.∙Juniper NetScreen-IP address conflict - This alert is generated when IP address conflict occurs.∙Juniper NetScreen-VPN service down -This alert is generated when VPN service is down. Reports∙Juniper NetScreen: User Logon Success Report: This report provides information related to user logon success for different logon types like SSH, Console, Telnet etc.∙Juniper NetScreen: User Logoff Report: This report provides information related to user logoff from different terminals.∙Juniper NetScreen: User Authentication Success Report: This report provides information related to authentication success done for different users from different source addresses.∙Juniper NetScreen: User Authentication Failed Report:This report provides information related to authentication failure for different users with what reasons.∙Juniper NetScreen: Intrusion Detection Report: This report provides information related with source IP and ports, destination IP and ports (victim details) and intrusion occurs in NetScreen firewall.∙Juniper NetScreen: Account Management Report:This report provides information related with creation, deletion and modification of user, group and account of NetScreen and by whom it is done.∙Juniper NetScreen: System Authentication Report: This report provides information related with MAC address of systems authenticated with NetScreen firewall.∙Juniper NetScreen: URL Allowed or Blocked Report: This report provides information related with URL blocked and allowed with source IP of system trying to access it.∙Juniper NetScreen: Firewall Policy Change Report: This report provides information related with changes in firewall policy component and by whom it is done.∙Juniper NetScreen: USB Storage Device Attached and Detached Report: This report provides information related with attached and detached of USB devices with NetScreen.∙Juniper NetScreen: Web Filtering Report: This report provides information about the changes in category and profiles of web filtering in NetScreen and by whom.∙Juniper NetScreen: Traffic allowed and blocked report: This report provides information related with what kind of traffic are allowed and blocked in NetScreen firewall.∙Juniper NetScreen: Administration: This report provides information related with the configuration changes happen and by whom it is done in NetScreen firewall.∙Juniper NetScreen-DHCP server operations - This report provides information related to DHCP server operations which include IP address, MAC address, status and reason from fields.∙Juniper NetScreen-VPN service status - This report provides information related to VPN service status which includes VPN name, source address and status from fields.Import Juniper NetScreen knowledge pack into EventTrackerunch EventTracker Control Panel.2.Double click Export Import Utility, and then click Import tab.Import Category/Alert/Flex Reports/Template as given below.Import Category1.Click Category option, and then click the browse button.Figure 12.Locate All Juniper NetScreen group of Categories.iscat file, and then click the Open button.3.To import categories, click the Import button.EventTracker displays success message.Figure 24.Click OK, and then click the Close button.Import Alerts1.Click Alerts option, and then click the browse button.Figure 32.Locate All Juniper NetScreen group of Alerts.isalt file, and then click the Open button.3.To import alerts, click the Import button.EventTracker displays success message.Figure 44.Click OK, and then click the Close button.Import Flex Reports1.Click Report option, and then click the browse button.Figure 62. Locate All Juniper NetScreen group of Report .issch file, and then click the Open button.3. To import flex report, click the Import button.EventTracker displays success messageFigure 74. Click OK, and then click the Close button.Import Template1.Logon to EventTracker Enterprise.2.Click the Admin menu and then click the Parsing rule.3.Click the Template tab.4.Click the Import button and it will open a new window.(Note: Make sure pop-up is enabled for EventTracker)Figure 85.Locate and select the .ETTD file and then click the Open button.Figure 96.Select the template that you want to upload.7.Click on the Import configuration button.Figure 10 EventTracker displays success message.Figure 11 8.Click OK and it will automatically close the window.Verify Juniper NetScreen knowledge pack in EventTrackerVerify Juniper NetScreen Categories1.Logon to EventTracker Enterprise.2.Click the Admin menu, and then click Categories.3.In Category Tree to view imported categories, scroll down and expand Juniper NetScreen groupfolder to view the imported categories.Figure 12Verify Juniper NetScreen Alerts1. Logon to EventTracker Enterprise.2. Click the Admin menu, and then click Alerts.3. In Search field, type ‘Juniper NetScreen’, and then click the Go button.Alert Management page will display all the imported Juniper NetScreen alerts.Figure 134. To activate the imported alerts, select the respective checkbox in the Active column.EventTracker displays message box.Figure 145. Click OK, and then click the Activate Now button.NOTE: You can select alert notifications such as Beep, Email, and Message etc. For this, select the respective checkbox in the Alert management page, and then click the Activate Now button.Verify Juniper NetScreen Reports1.Logon to EventTracker Enterprise.2.Click the Report Option and select Defined.3.In Report Group Tree, to view imported reports, scroll down and expand Juniper NetScreen reportgroup folder for the imported reports.Figure 15Verifying Template1.Logon to EventTracker Enterprise and go to Parsing rule.2.Click on Template tab.3.Check the template you have uploaded.Figure 16Sample Reports1.Junipter NetScreen: Account Management ReportFigure 172.Juniper NetScreen: Intrusion Detection ReportFigure 18。
Juniper防火墙升级指导书

Juniper防火墙升级指导书
神州数码2007-03-21
一、详细升级步骤
有两种升级方式,通过IE 或CLI 命令行。
下面将详细介绍:
1、登陆防火墙
输入帐号和密码
2、获取版本信息
A、输入get system获取现有防火墙的版本
如上所示,版本是5.0.0r9.2
IE 方式
3、备份防火墙的配置文件
通过Web打开防火墙的管理界面,在configuration->update->config file
并点击save to file按钮,通过Web方式将配置保存到本地电脑
1、将版本文件解压:将版本文件(如NS-ISG1000_5.0.0r10d.2.zip)拷贝到本地,同时通过
WinRAR软件将文件解压(如NS-ISG1000_5.0.0r10d.2)
2、通过Web升级:(Web方式和TFTP方式任选一个)
打开Web管理界面进入配置界面后,进入configuration->update->screenOS中,选择update screenOS version。
并在浏览里面输入已解压的文件和路径。
并点击apply
3、通过TFTP升级:
在本地电脑中启动TFTP软件,将版本文件拷贝到制定的TFTP目录中,进入防火墙的命令行,输入以下命令:
Save software from tftp 192.168.1.11 NS-ISG1000_5.0.0r10d.2 to flash
并重启防火墙,输入save和reset;
命令行中输入get system,确认防火墙是否已经升级成功
本次需要升级的版本。
juniper软件升级指南v1-junos

序号 1
修改内容 初始版本
修改时间 2010-8-30
修改人 闫东奎
备注
此文档假设 RE1 目前为 Backup 状态,请升级前根据现实情况适当调整
Juniper 路由器软件升级指南 v1
前期准备
Page 3 of 5 Dongkui Yan 2010/08/30
权限申请
操作时间(4 小时) 本地配置账号(登录备用 RE 时必须用) FXP0 管理接口 IP 地址 FTP 账号(上传下载配置文件和 JUNOS 安装软件)
当前 JUNOS 系统 >file copy /var/tmp/current-junos.tgz ftp://FTP-Server/filename.tgz
此文档假设 RE1 目前为 Backup 状态,请升级前根据现实情况适当调整
Juniper 路由器软件升级指南 v1
硬件信息
show chassis alarms show version invoke-on all-routing-engines show chassis hardware detail show chassis environment show chassis routing-engine show system storage show system snapshot show chassis fpc show chassis fpc pic-status show interface terse request support information | no-more
信息备份
配置文件
>config exclusive #run file copy /config/juniper.conf.gz /var/tmp/backup-date.gz #run file copy /config/juniper.conf.gz ftp://FTP-Server/backup-date.gz >quit configuration-mode >file show /config/juniper.conf.gz | no-more
ISG2000防火墙HA升级方案
ISG2000防火墙HA升级方案ISG2000防火墙升级方案防火墙双机热备在不中断业务的情况下升级设备过程:总体思路:在部署了双机热备的网络环境中升级软件版本,需要遵循主要原则是Active设备和Standby设备分别升级,先升级Standby设备,然后再升级Active设备,在升级过程中抢占功能必须关闭的,查看防火墙上的imagekey是否是新版版本,如果是旧版本需要加载新版本imagekey,否则会升级失败。
升级步骤:一、实施前准备1.1在主用防火墙上执行get session info 查看当前session数量,可作为升级后的比对参考;1.2在备用防火墙上执行exec nsrp sync global-config check-sum确认当前主备用防火墙配置同步(如果配置不同步,在备用防火墙上执行exec nsrp sync global-config save 同步防火墙配置),为升级后的主备同步比对参考;1.3备份主备防火墙的当前配置和OS,并保存在升级所使用的电脑终端上,为升级后的比对参考;(同时是为了回退需要);save config to tftp save software from flash to tftp x.x.x.x filename1.4在防火墙上,通过get envar确认防火墙的bootloader版本(ISG2000需要将bootload升级到Load2000v117.d版本),如果bootload的版本低,先进行升级,再升级OS;1.5将防火墙新OS版本(6.3.0r26)以及bootloader文件拷贝至升级所使用的电脑终端,开启tftp server;二、验证引导加载程序和ScreenOS固件1.检查已安装的图像密钥如果已安装imagekey,您将看到类似于以下的输出(非零值)。
如果输出显示全零(0),则表示没有安装的图像密钥。
注意:设备无法存储多个图像密钥。
Juniper升级os
1.升级前先保存配置文件,以免由于升级的过程导致配置不可用,一般情况下升级os是
不会修改配置的。
以防万一,先保存,如果有问题可以用保存的配置恢复。
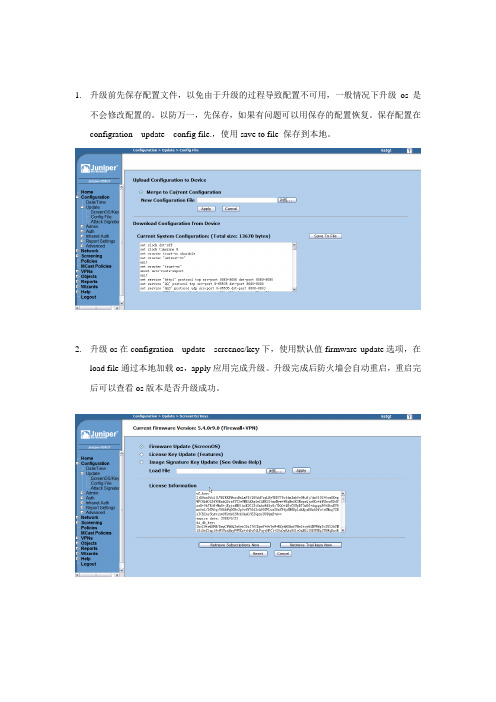
保存配置在configration---update---config file.,使用save to file 保存到本地。
2.升级os在configration---update---screenos/key下,使用默认值firmware update选项,在
load file通过本地加载os,apply应用完成升级。
升级完成后防火墙会自动重启,重启完后可以查看os版本是否升级成功。
恢复出厂方法
用console命令行输入unset all,提示yes或no时输入yes. 再输入reset,提示yes或no时输入no,接着会再提示输入yes或no选择yes,防火墙就重启了,也就恢复出厂了。
默认设备第一个接口地址为192.168.1.1,可以通过http://192.168.1.1 去管理,用户密码都是netscreen. 恢复出厂后第一次登陆时,会提示配置向导,选择最后一项直接进入用户名密码登陆界面,最后登陆设备进行配置。
新手教程5:Juniper防火墙升级ScreenOS

为什么要升级Juniper防火墙的OS?一般情况下是升级新版本取得新的功能,提高性能,运行更稳定。
还有一种情况是降级使用ScreenOS,新版本的os不稳定,可以降级到稳定的低版本。
升级ScreenOS的方法有两种,一是通过Web界面,二是通过命令行界面。
通过Web界面升级ScreenOS通过web登陆Juniper防火墙,在左边的导航栏依次找到configuration---update---ScreenOS/k ey 就可以看到下面的界面了。
浏览你要升级的ScreenOS文件,点击“apply”,升级好之后重启防火墙就可以了,升级Scre enOS就是这么简单。
需要注意的是通过Web界面升级OS时要谨慎,首先要查看相关OS的upgrade Release No tes。
一般来说,在跨大版本升级时,一定要分段升级。
例如,将一台Netscreen 50从3.0.1升级到5.4.0版本时,就一定要分段升级。
首先把版本升级到3.0.3r9a.1,重启防火墙,然后再升到4.0.0,重启防火墙,然后再升到4.0.3,重启防火墙,然后再升到5.0.0,重启防火墙,然后再升到5.2.0,重启防火墙,然后再升到5.4.0。
这样才能保证安全,否则将可能导致设备不可用。
升级ScreenOS如果版本跨度不是很大的话原有的配置还是会保留的,但是还是建议在升级ScreenOS前作一下配置的备份。
通TFTP使用CLI命令行界面升级固件通过console口升级,使用Console线和网线将防火墙与PC机连接起来。
使用超级终端(默认波特率9600bps,数据位8bit,无校验位,1bit停止位,无流控制)登陆防火墙的命令行界面。
打开TFTP软件,设置好软件的upload and download directory。
将防火墙的一个接口地址设为与PC机地址同一网段。
例如,将ethernet 1接口设为192.168.3.1/24,自己的PC机设为192.168.3.180/24。
Juniper NetsScreen设备ScreenOS升级指南
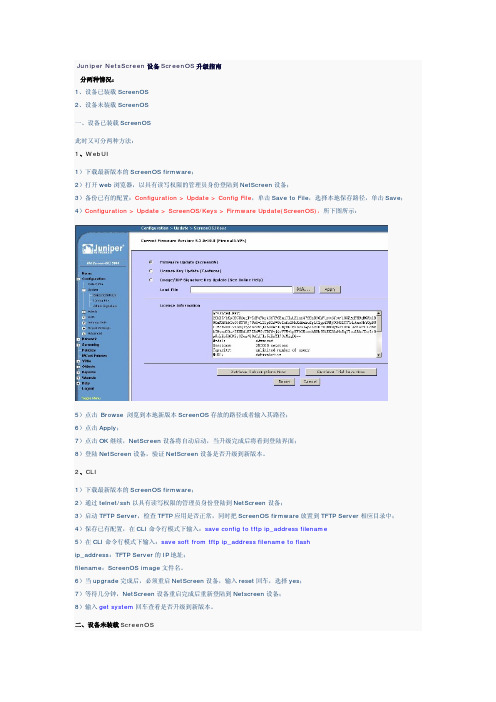
Juniper NetsScreen设备ScreenOS升级指南分两种情况:1、设备已装载ScreenOS2、设备未装载ScreenOS一、设备已装载ScreenOS此时又可分两种方法:1、WebUI1)下载最新版本的ScreenOS firmware;2)打开web浏览器,以具有读写权限的管理员身份登陆到NetScreen设备;3)备份已有的配置:Configuration > Update > Config File,单击Save to File,选择本地保存路径,单击Save;4)Configuration > Update > ScreenOS/Keys > Firmware Update(ScreenOS),所下图所示:5)点击 Browse 浏览到本地新版本ScreenOS存放的路径或者输入其路径;6)点击Apply;7)点击OK继续,NetScreen设备将自动启动,当升级完成后将看到登陆界面;8)登陆NetScreen设备,验证NetScreen设备是否升级到新版本。
2、CLI1)下载最新版本的ScreenOS firmware;2)通过telnet/ssh以具有读写权限的管理员身份登陆到NetScreen设备;3)启动TFTP Server,检查TFTP应用是否正常,同时把ScreenOS firmware放置到TFTP Server相应目录中;4)保存已有配置,在CLI命令行模式下输入:save config to tftp ip_address filename5)在CLI命令行模式下输入:save soft from tftp ip_address filename to flaship_address:TFTP Server的IP地址;filename:ScreenOS image文件名。
6)当upgrade完成后,必须重启NetScreen设备,输入reset回车,选择yes;7)等待几分钟,NetScreen设备重启完成后重新登陆到Netscreen设备;8)输入get system回车查看是否升级到新版本。
JuniperSRX防火墙通过bootloader升级junos
JuniperSRX防火墙通过bootloader升级junos通过boot loader升级junos实验设备:SRX240实验版本:10.0R2.10注意事项:在loader下贯入junos,会导致配置和日志全部丢失,因为这种操作相当于重新格式化硬盘。
操作步骤####先进入loader模式设置接口地址和tftp地址,这点与netscreen类似,只不过junoses需####要我们手工写环境变量。
其实也可以在u boot模式下设置环境变量(提示符为=>)Loading /boot/defaults/loader.conf/kernel data=0x90ca48+0xc6ac4 syms=[0x4+0x74470+0x4+0xa4910]Hit [Enter] to boot immediately, or space bar for command prompt.####按空格键进入loader模式Type '?' for a list of commands, 'help' for more detailed help.loader>####查看目前全局的环境变量设置loader> showLINES=24autoboot_delay=2autoload=nbaudrate=9600bf=bootoct bf480000 forceboot numcores=$(numcores)boot.btsq.len=0x00002000boot.btsq.start=0x003fa000boot.env.size=0x00002000boot.upgrade.loader=0xbfe00000boot.upgrade.uboot=0xbfc00000boot.ver=U-Boot 1.1.6 (Apr 9 2009 - 22:30:21)bootcmd=cp.b 0xbfe00000 0x100000 0x100000; bootelf 0x100000bootdelay=1bootfile=/kernel;/kernel.oldcomconsole_speed=9600console=comconsolecurrdev=disk0:env_addr=0xbfffe000env_size=0x2000ethact=octeth0ethaddr=00:26:88:0b:58:00flash_base_addr=0xbfc00000flash_size=0x400000gatewayip=192.168.168.99interpret=OKipaddr=192.168.168.114kernel=/kernelkernel_options=kernelname=/kernelloadaddr=0x20000000loaddev=disk0:=FreeBSD/MIPS U-Boot bootstrap loaderloader.version=0.1mac_ifoff=NOmodule_path=/boot//kernel;/boot/modulesnetmask=255.255.255.0numcores=4post.eeprom=PASSEDb=PASSEDprompt=loader>serverip=192.168.168.99stderr=serialstdin=serialstdout=serialuplinkSpeed=1G####更改环境变量设置loader> set ipaddr=192.168.1.2loader> set serverip=192.168.1.9loader> set netmask=255.255.255.0loader> save####注意不要更改默认的防火墙接口eth0,否则如果设置其他接口的话,就会挂死,就只有####重起设备了,说明目前防火墙和早期netscreen类似,只是接受eth0作为tftp客户端接####口####导入junos系统loader> install tftp://192.168.1.9/junos-srxsme-10.0R2.10-domestic.tgzocteth0: Up 1000 Mbps Full duplex (port 0)####此时tftp服务器还是不能ping通防火墙接口地址的####中间省略输出####直到出现如下字符时才可以ping通******* Working on device /dev/da0 *******Labeling Slice 1:bsdlabel: write to disk label supressed - label was as follows: # /dev/da0s1:8 partitions:####附上详细操作日志。
JuniperOS升级步骤

JuniperOS升级步骤JUNOS升级步骤版本 1.0.5日期: 2005年1月25日目录1.计划 (2)1.1. 选择正确的版本 (2)1.2. 中断时间的估计 (2)2.准备 (2)3.升级的步骤 (5)3.1. 备份RE的升级步骤 (6)3.1.1.在远程PC上,通过主RE登录备份RE (6)3.1.2.让现场工程师用串行线连接PC机到备份RE控制口 (6)3.1.3.备份FLASH当前JUNOS和配置到硬盘上 (6)3.1.4.升级软件 (7)3.1.5.启动这个RE以完成升级 (8)3.1.6.登录到这个刚才完成升级的RE并检查RE是否正常启动 (13)3.1.7.对硬盘进行重新分区 (13)3.1.8.恢复mirror-flash-on-disk配置(如果原来无此配置,请忽略此步骤) (16)3.1.9.在双RE系统上切换升级了的备份RE到主用状态 (16)3.1.10.确认现在作为主用的这个RE工作一切正常 (16)3.1.11.备份FLASH当前JUNOS和配置到硬盘上 (17)3.2. 现在的备份RE(即原先的主RE)的升级步骤 (17)3.3. 在双RE系统上去除“B ACKUP RE ACTIVE”告警 (17)4.备份和应急措施 (17)4.1. 如果需要退回到原先的版本 (17)4.2. 从FLASH启动失败 (18)4.3. RE切换不正常 (18)5.各种路由器的面板图 (19)5.1. M320 (19)5.2. M160 (20)5.3. M40E (21)5.4. M20 (22)5.5. T640/T320 (22)1.计划1.1.选择正确的版本软件升级用于提供BUG的修正及支持新的功能(比如新的硬件或软件功能)。
请查阅JUNOS Release Notes 以选择适当的JUNOS版本,并且检查Release Notes 中是否有关于该版本的特别的升级步骤。
- 1、下载文档前请自行甄别文档内容的完整性,平台不提供额外的编辑、内容补充、找答案等附加服务。
- 2、"仅部分预览"的文档,不可在线预览部分如存在完整性等问题,可反馈申请退款(可完整预览的文档不适用该条件!)。
- 3、如文档侵犯您的权益,请联系客服反馈,我们会尽快为您处理(人工客服工作时间:9:00-18:30)。
Juniper Netscreen防火墙HA升级OS
一.准备工作
.使用Tftp备份两台防火墙现有配置文件和OS系统文件。
二.升级OS
1.先升级备用设备后升级主用设备:
用笔记本电脑连接NS-B的Console口和MGT口,通过Web界面上对NS-B进行升级,并在Console口上观察升级过程。
3.NS-B升级后将自动重启,通过Console口观察重启过程。
启动后在console上输入:
get system命令,验证升级后的版本号。
get nsrp,验证此设备处于备机状态。
4.Session信息应该自动从主机上同步到备机。
为确保Session信息同步,在NS-B上执行exec nsrpsynrto all from peer,手工同步Session信息。
5.主备双机进行状态切换。
用笔记本接NS-A的Console口,输入exec nsrpvsd-group 0 mode backup命令,将状态切换。
使用get nsrp命令,验证设备状态已切换完成,此时NS-A为备机,NS-B为主机。
6.在Web界面上对NS-A进行升级,在Console口上观察升级过程。
7.NS-A升级后会自动重起,在Console口上观察重起过程。
启动后在console上输入:
get system验证升级后的版本号。
get license验证license信息是否满足升级需求。
get nsrp验证此台设备为备机状态。
8.恢复原先的主备状态(非必要,可跳过此步):
在NS-B上执行exec nsrpvsd-group 0 mode backup命令,将状态切换。
验证设备状态已切换完成,此时NS-A为主机,NS-B为备机。
9.在设备NS-A上执行exec nsrpsynvsd-group 0 global-config checksum,验证两台设备的配置同步。
如双机配置文件没有同步,请执行exec nsrpsynvsd-group 0
global-configsave手动进行配置同步。
10.观察两台防火墙的日志,验证是否存在异常告警信息。
