智能插座说明书
智能控制的家用智能插座使用说明书
智能控制的家用智能插座使用说明书一、简介智能控制的家用智能插座是一种能够通过手机APP进行远程控制的智能电器。
本插座能够提供更便捷、更高效的家居电器控制体验,为用户的生活带来更多便利。
本说明书将为用户提供详尽的使用指南,帮助用户正确、安全地使用智能插座。
二、产品特性1. 远程控制:用户可以通过手机APP远程控制家中插座的开关,无需亲自到现场操作,实现对家电的智能化控制。
2. 定时开关:用户可以根据需求设定插座的开关时间,实现自动化控制,节省能源并提升生活便利度。
3. 实时电量监测:插座内置电量监测器,用户可以随时通过手机APP查看插座所连接设备的电量使用情况,帮助合理安排家电使用时间。
三、使用步骤1. 下载手机APP:打开手机应用商店,搜索并下载“智能插座控制”APP,并安装到手机上。
2. 插座设置:将智能插座插入电源插座,确保插座顶部的指示灯亮起。
打开手机APP,按照提示注册新账号,并登录。
3. 添加设备:在APP主界面,点击“添加设备”,系统将自动搜索附近可连接的插座设备,点击对应插座设备进行连接。
4. 连接设置:根据系统提示,输入对应插座设备的Wi-Fi密码和名称,确保手机和插座在同一网络环境下,完成连接设置。
5. 设备管理:在APP主界面,长按已连接的插座设备图标,进入设备管理界面,可以对插座进行开关、定时、电量监测等操作。
6. 远程控制:用户可以通过手机APP,在任何WiFi环境下远程控制插座的开关状态,轻松实现对家电的智能化控制。
7. 定时设置:在设备管理界面,用户可根据需求设置定时开关时间,系统将按设定时间自动执行相应开关操作。
8. 电量监测:在设备管理界面,用户可以随时查看所连设备的电量使用情况,及时调整使用策略,合理利用电能。
四、使用注意事项1. 请确保智能插座与手机处于同一网络环境下,否则无法进行远程控制。
2. 插座的最大承载电流为x A,当连接高功率电器时,请确保不超过插座的额定电流,以免造成过载。
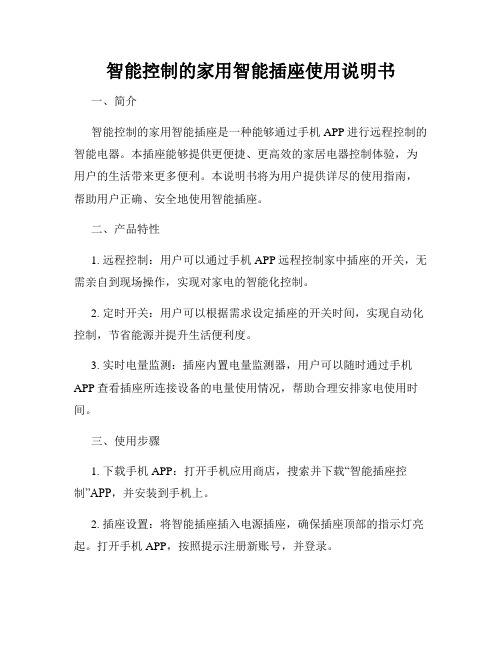
智能Wi-Fi插座HS100与HS110用户手册说明书
User’s Manual1910012261 REV 2.0.1Wi-Fi Smart Plug HS100Wi-Fi Smart Plug with Energy MonitoringHS110Copyright & TrademarksSpecifications are subject to change without notice. TP-Link is a registered trademark of TP-Link Technologies Co., Ltd. Other brands and product names are trademarks or registered trademarks of their respective holders.No part of the specifications may be reproduced in any form or by any means or used to make any derivative such as translation, transformation, or adaptation without permission from TP-Link Technologies Co., Ltd.© 2017 TP-Link. All rights reserved.CONTENTS4 Chapter 1. Introduction4 1.1 Product Overview4 1.2 Main Features5 1.3 Panel Layout7 Chapter 2. Quick Start8 Troubleshooting8 Frequently Asked Questions8 SupportChapter 1. Introduction1.1 Product OverviewWhat This Product DoesThe Wi-Fi Smart Plugs make it easy to control your lights or household electronic devices anywhere in the world with the TP-Link Kasa app on your smartphones or tablets.Schedule and Away ModeWith the Kasa’s Schedule and Away Mode, you can automate your lights or plugged-in appliances to turn on and off according to specific schedules, to simulate occupancy when you’re away from home. In addition, the countdown timer enhances safety by automatically switching off the running household appliances after a preset time.Compatible with Amazon EchoYou can pair the Smart Plugs with Amazon Echo for voice control. Compatible with Android, iOSThe free Kasa app lets you run them from any Android (5.0 and higher) or iOS (iOS 8 and higher) smartphone.Energy Conservation (for HS110 only)You can efficiently conserve energy and save money while using the Smart Plugs to control your space heaters and fans. The Smart Plug tracks your device’s power consumption in real-time, and has weekly and monthly summaries.1.2 Main Features•Control devices connected to the Smart Plug wherever you have Internet using the free Kasa app on yoursmartphone.•Schedule the Smart Plug to automatically power electronics on and off as needed, like setting lights to come on at dusk or turn off at sunrise.•Analyze your plugged-in device’s real-time and historical power* Image may differ from actual product due to different regional power specifications. Here we use the U.S. version as an example.Sta-tus Description(Settings /Press this button for 5 seconds or until the Wi-Fi LED blinks amber and green to initiate the app-config process.Press and hold for 10 seconds or until the Wi-Fi LED blinks amber rapidly to factory reset.Chapter 2. Quick Start1. Download Kasa for Mobile from the App Store or Google Play.ORscan QRcode2. Connect your mobile device to a 2.4GHz Wi-Fi network. Note: The Smart Plug only supports 2.4GHz networks.3. Launch Kasa and follow the app instructions to connect theSmart Plug to your network.TroubleshootingFrequently Asked Questions1. What devices can I control with the Smart Plug?You can control lights, electronics and small appliances such ashumidifiers, air purifiers, portable heaters and fans.2. What should I do when I can’t control the connected device?• Check that the connected device is switched to ON.• Make sure your mobile device and the Smart Plug are on the same Wi-Fi network.• Enable Remote Control to control the connected device from outside your home.3. What should I do when the Wi-Fi LED is lit red?A red LED light indicates no network connection.• Check your network connectivity.• Relocate the Smart Plug. Avoid placing the Smart Plug near potential sources of radio signal interference.• Repeat the app configuring process.• Factory reset the Smart Plug and try to add it again.4. How do I pair the Smart Plug with Amazon Echo?Visit /en/faq-944.html or within the Kasa Help section for pairing instructions.Support• Specifications can be found on the product page at • Our Technical Support and troubleshooting information can be found at /support.FCC StatementThis equipment has been tested and found to comply with the limits for a Class B digital device, pursuant to part 15 of the FCC Rules. These limits are designed to provide reasonable protection against harmful interference in a residential installation. This equipment generates, uses and can radiate radio frequency energy and, if not installed and used in accordance with the instructions, may cause harmful interference to radio communications. However, there is no guarantee that interference will not occur in a particular installation. If this equipment does cause harmful interference to radio or television reception, which can be determined by turning the equipment off and on, the user is encouraged to try to correct the interference by one or more of the following measures:• Reorient or relocate the receiving antenna.• Increase the separation between the equipment and receiver.• Connect the equipment into an outlet on a circuit different from that to which the receiver is connected.• Consult the dealer or an experienced radio / TV technician for help.This device complies with part 15 of the FCC Rules. Operation is subject to the following two conditions:1) This device may not cause harmful interference.2) This device must accept any interference received, including interference that may causeundesired operation.Any changes or modifications not expressly approved by the party responsible for compliance could void the user’s authority to operate the equipment.Note: The manufacturer is not responsible for any radio or TV interference caused by unauthorized modifications to this equipment. Such modifications could void the user’s authority to operate the equipment.FCC RF Radiation Exposure StatementThis equipment complies with FCC RF radiation exposure limits set forth for an uncontrolled environment. This device and its antenna must not be co-located or operating in conjunction with any other antenna or transmitter.“To comply with FCC RF exposure compliance requirements, this grant is applicable to only Mobile Configurations. The antennas used for this transmitter must be installed to provide a separation distance of at least 20 cm from all persons and must not be co-located or operating in conjunction with any other antenna or transmitter.”CE Mark WarningThis is a class B product. In a domestic environment, this product may cause radio interference, in which case the user may be required to take adequate measures.OPERATING FREQUENCY(the maximum transmitted power)2412MHz—2472MHz(20dBm)No restrictions exist in the use of radio frequencies or frequency bands in all EU member states and EFTA countries.EU declaration of conformityTP-Link hereby declares that the device is in compliance with the essential requirements and other relevant provisions of directives 2014/53/EU, 2009/125/EC and 2011/65/EU.The original EU declaration of conformity may be found at /en/ce.RF Exposure InformationThis device meets the EU requirements (2014/53/EU Article 3.1a) on the limitation of exposure of the general public to electromagnetic fields by way of health protection.The device complies with RF specifications when the device used at 20 cm from your body. Canadian Compliance StatementThis device complies with Industry Canada license-exempt RSSs. Operation is subject to the following two conditions:1) This device may not cause interference, and2) This device must accept any interference, including interference that may cause undesiredoperation of the device.Le présent appareil est conforme aux CNR d’Industrie Canada applicables aux appareils radio exempts de licence. L’exploitation est autorisée aux deux conditions suivantes :1) l’appareil ne doit pas produire de brouillage;2) l’utilisateur de l’appareil doit accepter tout brouillage radioélectrique subi, meme si lebrouillage est susceptible d’en compromettre le fonctionnement.Radiation Exposure StatementThis equipment complies with IC radiation exposure limits set forth for an uncontrolled environment. This equipment should be installed and operated with minimum distance 20cm between the radiator and your body.Déclaration d’exposition aux radiationsCet équipement est conforme aux limites d’exposition aux rayonnements IC établies pour un environnement non contrôlé. Cet équipement doit être installé et utilisé avec un minimum de 20 cm de distance entre la source de rayonnement et votre corps.Industry Canada StatementCAN ICES-3 (B)/NMB-3(B)Korea Warning Statements당해 무선설비는 운용중 전파혼신 가능성이 있음.NCC Notice注意! 依據 低功率電波輻射性電機管理辦法第十二條 經型式認證合格之低功率射頻電機,非經許可,公司、商號或使用者均不得擅自變更頻率、加大功率或變更原設計之特性或功能。
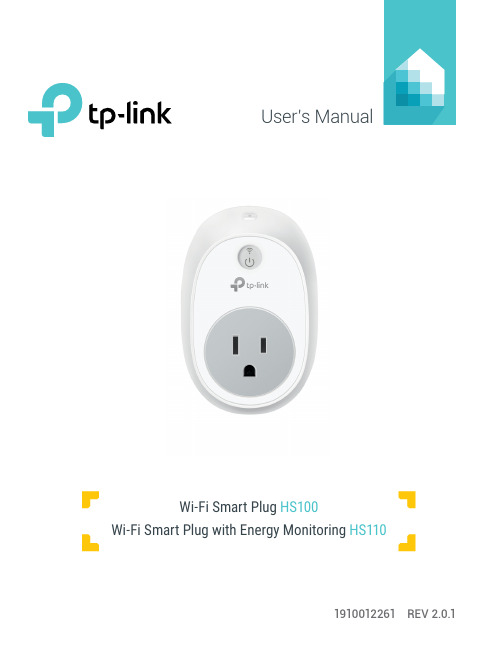
爱德马克智能插座说明书
Intelligent HomeA Smart Plug Switch is just the beginning. Add more Smart Plug products and bring your home to life in imaginative, inventive ways – it’s up to you. Our Smart Plug home management app can monitor, control and schedule all of the electronic devices connected to Smart Plug Switches around your home.The Edimax Smart Plug Switch connects people to their homes, and the things they use every day. Designed to make homes more dynamic, functional and work better for modern lifestyles, Smart Plug products give users intelligent control over all of their home electronics. The Smart Plug Switch plugs into any wall socket and enables you to switch or schedule a connected electronic device on/off from your smartphone. Just plug the device into the Smart Plug Switch and see how Smart Plug Switch can work for you and your home.Smart Plug SwitchIntelligent Home ControlControl, Check, ConvenienceSwitch on the lights, coffee machine, Xbox, or anything you want – from your smartphone. Check the status while you’re out and switch them on or off anywhere, anytime. Never worry about forgetting to turn something off when you go out again. Smart Plug is super-fast and stays connected 24/7.SP-1101WSchedule, SaveProgram intelligent schedules to make your home smarter and more energy efficient. Smart Plug switch was developed to suit your lifestyle. Schedule your lights so it’s light when you get home or when you wake up in the morning. Schedule your lamp or coffee machine if youlike – Smart Plug Switch can schedule anything in your home to work in better ways for you and your life. SOFTWARE FEATURES•Easily switch on/off via iPhone, iPad, Android•Manual or scheduled controls•Email notifications after switching on/off•Wireless installation using a smart phone/tablet ADVANTAGES•Save: Save time and power•Easy: Manage your home electronics anywhere / anytime •Smart: Control your appliances from your smartphone or tablet Intelligent Home ControlSP-1101WEasy Setup & Smart NotificationsSetup couldn’t be any easier and is all done on your smartphone or tablet. Once the Smart Plug is up and running, email notifications can keep you updated about which appliances and electronics are switched on/off. Get an email notification that somebody got home safely or that someone is playing Xbox instead of homework. Anything that’s handy for you to know about.Electrical Communication RF Output PowerOperating Voltage: 100–240VAC Power Frequency: 50–60Hz Max. Load Capacity:EU: 16A/230VAC;UK: 13A/240VAC AU: 10A/240VAC;US: 15A/120VAC Wireless IEEE 802.11b/g/nCoverage: Up to 10MFrequency Band: 2.4000 –2.4835GHzWi-Fi Security: WEP,WPA/WPA2,WPSProtocol: Client UDP, TCP/IP, HTTP11n: Up to 150Mbps(dynamic)11g: Up to 54Mbps(dynamic)11b: Up to 11Mbps(dynamic)Modulation Technology DBPSK,DQPSK, CCK, OFDM, 16-QAM, 64-QAMManagement Interface EnvironmentFirmware upgradable iPhone & iPad app Android appRemote access (Internet) Email notifications Schedule control LED Indicator: Power, Switch,NetworkButtons: Reset, Switch32°F–104°F (0°C–40°C)5–80%RH (non-condensing)Indoor use onlyDimensions Weight Certification 105mm (L) x 64mm (W) x 60mm (H) 184g CE, FCC, LVD SP-1101WTECHNICAL SPECIFICATIONSHARDWARE INTERFACEIntelligent Home ControlMaximum performance, actual data rates, and coverage will vary depending on network conditions and environmental factors. Product specifications and design are subject to change without notice. Copyright © 2017 Edimax Technology Co. Ltd. All rights reserved.Edimax Technology Europe B.V. Edimax Computer Company。
智能插座使用说明书

智能插座使用说明书尊敬的用户:感谢您选择我们的智能插座。
本使用说明书将为您详细介绍智能插座的功能、使用方法和注意事项,请您在使用前仔细阅读本说明书,并按照指南进行操作,以确保您能正确、安全地使用智能插座。
一、产品简介智能插座是一款集智能化控制、安全保护、定时开关等多种功能于一体的智能家居设备。
通过与智能手机连接,用户可以远程控制插座内的电器设备,实现智能化的电力管理。
二、产品特点1. 远程控制:用户可以通过手机APP实现对智能插座的开关控制,无论身在何处,只要手机联网,就能轻松控制家中电器。
2. 定时功能:智能插座提供定时开关功能,用户可根据需要设置插座的开关时间,自动控制电器的使用。
3. 安全保护:智能插座内置过载保护装置,当接入设备使用电流超过额定值时,插座会自动断电,保护电器和住宅安全。
4. 节能环保:通过智能插座的定时开关功能,用户能够更好地掌控电器的使用时间,避免不必要的能源浪费,起到节能环保的效果。
三、使用方法1. 扫描二维码:下载并安装智能插座APP,然后注册并登录您的账号。
2. 连接插座:将智能插座插入电源插座,指示灯闪烁表示插座已进入待机状态。
3. 添加设备:在APP中点击添加设备按钮,按照提示完成插座与手机的连接。
4. 命名插座:成功添加设备后,可为插座进行命名,方便快速识别不同插座的位置。
5. 远程控制:在APP首页,可以看到已添加的插座设备,通过点击开关按钮实现插座的远程开关控制。
6. 定时功能:在APP中可设置插座的定时开关时间,根据需求自由灵活地设置各个时间段的定时任务。
7. 安全保护:智能插座内置的过载保护装置会自动监测电器使用情况,对超过额定值的电流进行断电保护。
四、注意事项1. 请确保智能插座连接的电源稳定,电压范围在100-240V之间。
2. 请勿将智能插座暴露在潮湿、高温或火源附近。
3. 请勿在连接设备工作时随意拔插插座,以免损坏电器或电源插座。
4. 定期检查智能插座的外部和内部结构,如有损坏或异常情况,请及时联系售后服务。
Leviton 智能插座说明书
Leviton Manufacturing Co., Inc. Global Headquarters201 N. Service Rd. Melville, NY 11747-3138 Tech Line: 1-800-824-3005 Fax: 1-800-832-9538Leviton Manufacturing Co., Inc. Energy Management, Controls and Automation.4330 Michoud Blvd., New Orleans, LA, 70129 Tel: 1-504-736-9810 Fax: 1-504-253-2954Visit our Website at: /decorasmart©2017 Leviton Manufacturing Co., Inc. All rights reserved. Subject to change without notice.Plug-in Outlet with Wi-Fi Technologydecora smart ™P l u g -i n O u t l e t w i t h W i -F i T e c h n o l o g yAPPLICATIONSSchedule your plug-in lamps, holiday lighting or small appliances to turn on/off from anywhere. Installation is simple and requires no new wiring – simply plug in the device. Control connected loads and lights using the free My Leviton app for iOS and Android, no hub required. Simplify control of the residence - schedule lights and connected loads to turn on/off at specific times or based on sunrise/sunset, easily group smart devices into rooms, and create scenes to activate multiple loads at once.Integrate with IFTTT, utilize auto-shutoff feature as a countdown timer in closets, hallways and bathrooms; plus engage home vs. away to enact randomization of lighting control, providing a lived-in appearance.Ideal for any residential setting where remote ON/OFF switching of appliances, motor loads up to 1/2 HP, or freestanding lights, including LED, Incandescent, Inductive, Fluorescent or Compact Fluorescent loads is needed. Typical applications include switching of lamps, portable fans, kitchen appliances, indoor fountains and more.Reduce energy consumption, provide dramatic scene transitions, and utilize the affordable plug-in for wireless control of lamps, small appliances, holiday lighting and more.AMAZON ALEXA VOICE CONTROLCompatible with all products that support Amazon Alexa providing voice control of the load: “Alexa, turn on living room lights”. Alexa devices (including Echo, Dot, and Tap) sold separately.GOOGLE ASSISTANT VOICE CONTROL“Ok Google, turn [My Leviton device name] On”. Works with the Google Assistant. Google Home is a voice enabled speaker powered by the Google Assistant. Easily control smart devices around the home. (Google Assistant devices sold separately).BENEFITS• Control your lights from anywhere using the free My Leviton app for iOS and Android, no hub required.• Amazon Alexa products provide voice control: “Alexa, turn on living room lights”. (Echo, Tap, and Dot sold separately).• Works with Google Assistant including Google Home for voice control. “Ok Google, turn [Google room name] On”.• Integrate with IFTTT for additional third-party functionality• Simplify control of your home - schedule lights and connected loads to turn on/off at specific times or based on sunrise/sunset, easily group your smart devices into rooms, and create scenes to activate multiple lights at once.FEATURES• Quiet relay switching• Transient surge protection to IEC Level 4• ESD protection to IEC 1000 4-2 Level 4 to protect against damage • Indoor use• Green LED locator• Provides 15A, 120 VAC NEMA 5-15R grounding receptacle for use with a wide variety of lamps and appliances• Protected memory maintains ON/OFF status of loads and during minor power fluctuations• Button for ON/OFF manual controlSAT-10111REV JUL 2017Leviton Manufacturing Co., Inc. Global Headquarters201 N. Service Rd. Melville, NY 11747-3138 Tech Line: 1-800-824-3005 Fax: 1-800-832-9538Leviton Manufacturing Co., Inc. Energy Management, Controls and Automation.4330 Michoud Blvd., New Orleans, LA, 70129 Tel: 1-504-736-9810 Fax: 1-504-253-2954Visit our Website at: /decorasmart©2017 Leviton Manufacturing Co., Inc. All rights reserved. Subject to change without notice.PRODUCT DATADRAWING DW15ARATINGS• 120 VAC, 60 Hz• 1800W Incandescent • 5A LED/CFL• 1800VA Fluorescent • 15A Resistive • 1/2 HP MotorAGENCY STANDARDS AND COMPLIANCE • Complies with UL 917• CSA Certified (File #003413)• NOM-ANCE Certified • Wi-Fi CERTIFIED™• Complies with FCC Part 15, Class BWARRANTY INFORMATION • Five-Year Limited WarrantyORDERING INFORMATION。
Feit Electric智能外部双孔插座说明书

Smart Wi-Fi Dual Outdoor PlugFAQs and Trouble Shooting TipsHow do I set up and install the Outdoor Plug?1.Plug in the Outdoor Plug into a 120 volt power outlet.unch the Feit Electric app and enter a mobile number or email address then tap Continue.3.Create a password then tap Done.4.Tap + in the upper right corner.5.Tap Plugs and select Outdoor Plug.6.The blue indicator light on the Outdoor Plug must be rapidly blinking to connect. If notalready blinking, press and hold the power button for five seconds, then tap Confirm.7.After confirming that you are on a 2.4GHz Wi-Fi network, tap Confirm.I am having trouble connecting my Outdoor Plug to Wi-Fi.1.Make sure the Wi-Fi network is a2.4 GHz network. The Outdoor Plug will not connect to a 5GHz network. If your smart plug is already on the right frequency, make sure that your phone is not using a VPN app in the background.2.Test your Wi-Fi network with other devices such as your phone to make sure it is operatingproperly.3.The Wi-Fi connection may not have good coverage during set up. Try moving the OutdoorPlug closer to your Wi-Fi router. You may also need to improve your Wi-Fi network coverage by upgrading your router or adding a range extender.4.Your Wi-Fi network password is case sensitive, make sure you are entering it correctly.5.The Outdoor Plug must be blinking rapidly to connect. If it’s not blinking rapidly press andhold the power button for five seconds until it is blinking rapidly and in pairing mode.How do I access the Outdoor Plug smart features (schedule & timers)?From the My Home menu in the Feit Electric app press and hold the device icon for 2-3 seconds to access the control panel.What does it mean if my Outdoor Plug status is “offline” or the blue indicator LED is flashing?A power outage or router service interruption disconnected the Outdoor Plug from the network. Follow instructions in your user manual to reconnect.How do I reset the Outdoor Plug?To reset your Outdoor Plug, hold the reset button down for approximately 5 seconds. When the blue indicator LED starts blinking rapidly, it is ready for setup.Do I need to buy smart devices to be able to control them with the Outdoor Plug?The plug adds smart device control to whatever electronic device is plugged into the socket. They do not have to be smart devices.I’m not able to control devices plugged into the Outdoor Plug.Make sure any device plugged into the Outdoor Plug is powered on.Is it safe to use my Outdoor Plug outside even in bad weather?The Outdoor Plug is rated for use in wet locations. The outlet must be mounted in a vertical position with the outlets facing downward and at least 55 inches above ground level.Are the Outdoor Plugs HomeKit compatible?The Outdoor Plugs are not HomeKit compatible. But you can enable Siri shortcuts using the Smart Scenes feature in the Feit Electric App.How do I share my devices with another Feit app account?From the My Home menu in the Feit Electric app tap Profile and then Share Devices and Share Devices at the bottom of the screen. Select the device that you wish to share and tap Sharing in the upper right corner. Enter the new account mobile number or email address then tap Done. The account must be set up before sharing the device.How do I rename my Outdoor Plug?Press and hold the device icon for 2-3 seconds to access the control panel. Tap the pen icon in the top right corner and select Edit Device Name.What does the red indicator light mean?The red indicator light means that the Outdoor Plug is in the off position.Can I turn on/off my Outdoor Plug without the Feit Electric app?Yes, you can turn your Outdoor Plug on/off by pressing the power button on the unit.。
tcln2智能插座说明书
tcln2智能插座说明书一、产品简介TCLN2智能插座是一款集智能化、节能化、人性化于一身的新型家居插座。
本产品采用高品质材料制造,外观简约美观,性能稳定可靠,适用于家庭、办公室等各种场景。
通过智能化管理,帮助用户实现用电的便捷、安全与节能。
二、功能特点1.远程控制:支持手机APP远程控制,随时随地操控家中电器,实现用电的便捷管理。
2.定时功能:可根据需求设置定时开关,实现用电的智能化管理,节省能源。
3.一键遥控:配备一键遥控按钮,轻松实现远距离操控。
4.儿童保护:设有儿童安全保护功能,防止儿童误触电源,保障安全。
5.电流监测:实时监测电流,避免电器过载、短路等安全隐患。
6.节能设计:智能识别电器能耗,实现用电量的优化管理,降低能耗。
三、安装与使用1.安装:请遵循产品安装说明,确保插座安装稳固、可靠。
2.连接:将电器插头插入插座,确保插头与插座完全吻合。
3.下载APP:在手机应用商店下载对应APP,按照提示进行注册、绑定设备。
4.操控:通过APP或一键遥控按钮,实现电器的开启、关闭、定时等功能。
四、安全注意事项1.请勿将插座置于潮湿、高温、易受撞击的地方。
2.请勿使用损坏的插头或插座,以免发生危险。
3.请勿让儿童单独操作插座,防止误触电源。
4.用电过程中,如发现异常现象,请立即切断电源,排除故障后再使用。
五、故障处理与售后服务1.如遇故障,请先查看产品说明书,按照提示进行处理。
2.如无法自行解决问题,请联系售后服务人员,我们将竭诚为您服务。
3.保修期内,如有产品质量问题,可享受免费维修或更换服务。
通过TCLN2智能插座,让您的家居生活更智能、便捷、安全!。
LCDG-ZJ1-62610 WIFI智能插座使用说明书V1.01

LCDG-ZJ1-62610 WIFI 智能插座使用说明书
一、产品简介
LCDG-ZJ1-62610 WIFI 智能插座能够实现常规的电气转接功能,能够测量用电器(负载) 的电压、电流、功率、功率因数及计量负载的用电量和 CO 2 排量等参数,本产品具有 wifi 通讯接口,可以非常便捷的实现远程查询控制,方便直观地掌握电器的工作状态及耗电量。
请用户严格按照本说明书说明安装和使用本产品,以获得最佳使用效果。
安全须知
在试图安装、操作或维护此设备之前,请仔细阅读本手册,拿到它并逐步熟悉这种 仪表。以下特殊信息可能贯穿出现在本手册中或在设备上,用来。
附有这种安全标志示意周围存在着电力危险,假若未遵照一定的指令将会导致人身 伤害。
LCDG-ZJ1-62610 WIFI 智能插座 使用说明书
编制: bzf 校对: 批准:
序言
感谢您选用山东力创科技股份有限公司的 LCDG-ZJ1-62610 WIFI 智能插座。我们建议在 安装、操作或维护此设备之前,请仔细阅读本手册,并逐步熟悉这种插座。以下特殊信息可 能贯穿出现在本手册中或在设备上,用来警示潜在的危险或用于阐释和规定操作规程,请注 意。
© 2016 Shandong Lichuang Science & Technology Co.,Ltd 版权所有
本出版物中所包含的信息仅为所显示的目的而制作。 没有本公司的书面同意,本手册及随同 LCDG-ZJ1-62610 WIFI 智能插座设备一起提供的 其他文件不得被复制,不管是部分或全部。 用于描述设备的图纸及图片仅作为一般参考作用,而不能确保每个细节的完整性与准确 性.。 本手册对应的相关内容如有更改,恕不另行通知。订货前,请垂询本公司或当地经销商 以获悉本产品的最新规格。
SP-1101W智能插座快速使用指南说明书
SP-1101Wrmation sur le produit (3)I-1.Contenu de l'emballage (3)I-2. Panneau avant (3)I-3. État du voyant (4)I-4. Bouton d'état de l'interrupteur (4)I-5. Étiquette du produit (6)I-6. Réinitialisation (6)II.Installation du matériel (7)III.Configuration de la prise intelligente (8)III-1. iOS (9)III-1-1. Changer le nom et le mot de passe de la prise intelligente (11)III-1-2. Ajouter une prise intelligente existante à l'écran principal (12)III-2. Android (13)III-2-1. Changer le nom et le mot de passe de la prise intelligente (16)III-2-2. Ajouter une prise intelligente existante à l'écran principal (17)I. Information sur le produitI-1. Contenu de l'emballageI-2.Panneau avantVoyant réseauVoyantAlimentationBouton et voyant d'état de l'interrupteurBouton de réinitialisationPrise intelligente commutéeGuide d'installation rapideCD avec manuel de l'utilisateurI-3. État du voyantAprès al configuration, le voyant réseau doit être allumé et vert afin que l'application EdiPlug fonctionne à distance, c'est-à-dire à partir d'une connexion à Internet différente de celle de votre prise intelligente.I-4.Bouton d'état de l'interrupteurLe bouton d'état de l'interrupteur, situé en façade de votre prise intelligente (voir I-2.), permet de mettre en marche/arrêter la sortie d'alimentation de votre prise intelligente. Vous pouvez mettre en marche/arrêter n'importel'interrupteurAlimentationRéseauquel appareil raccordé à votre prise intelligente avec ce bouton. Le bouton s'allume en vert pour indiquer marche (voir I-3).I-5. Étiquette du produitL'étiquette du produit se trouve à l'arrière de la prise intelligente commutée et indique la puissance d'entrée/sortie, ainsi que le mot de passe par défaut de votre prise intelligente. Le mot de passe doit être modifié lorsque vous avez terminé l'opération d'installation pour des raisons de sécurité. Le mot de passe est nécessaire pour accéder à la prise intelligente commutée à distance.I-6. RéinitialisationSi vous rencontrez des problèmes avec votre prise intelligente, vous pouvez réinitialiser les paramètres d'usine par défaut de la prise intelligente. Celaréinitialise tous les paramètres, y compris le mot de passe de la prise intelligente, aux valeurs par défaut.1.Maintenez enfoncé le bouton deréinitialisation à l'avant de la priseintelligente pendant au moins 10 secondes2.Relâchez le bouton lorsque le voyantréseau clignote rapidement en rouge.3.Attendez que la prise intelligenteredémarre. La prise intelligente est prêtelorsque le voyant réseau clignotelentement en rouge pour indiquer le modeinstallation.II.Installation du matérielPour les instructions d'installation ci-dessous assurez-vous que votre prise intelligente est correctement branchée et prête pour la configuration.Si vous devez configurer plusieurs prises intelligentes, ne branchezet ne configurez qu'une seule prise intelligente à la fois.1.Branchez la prise intelligente dansune prise de courant.2.Patientez quelques instants que laprise intelligente démarre. La priseintelligente est prête pour laconfiguration lorsque le voyant réseauclignote lentement en rouge pourindique le mode installation.Si le voyant réseau de votre priseintelligente n'indique pas le modeinstallation, essayez deréinitialiser la prise intelligente(voir I-6).3.Lorsque vous voyez le voyant réseau de la prise intelligente indiquer lemode installation, passez à la section III. Configuration de la priseintelligente pour configurer votre prise intelligente à l'aide de l'application gratuite pour smartphone EdiPlug.III.Configuration de la prise intelligentePour configurer votre prise intelligente avec l'application pour smartphone EdiPlug, veuillez télécharger l'application EdiPlug et suivre les instructionsd'installation pour iOS ou Android. Après l'installation, vous pouvez utiliserl'application EdiPlug pour mettre en marche/arrêter votre prise intelligente à distance depuis n'importe quel smartphone avec une connexion à Internet, ainsi que configurer la planification automatique et les notifications par e-mail.1.Dans la boutique Apple App Store ou Google Play, recherchez « EdiPlug ».2.Téléchargez et installez l'application.3.Suivez les instructions appropriées ci-dessous pour iOS ou Android.III-1. iOSSuivez les instructions ci-dessous pour ajouter une nouvelle prise intelligente à l'application EdiPlug sur iOS :Vous devez vous trouver dans la portée Wi-Fi de la priseintelligente. Si vous disposez de plusieurs prises intelligentes, nebranchez et ne configurez qu'une seule prise à la fois.1.Recherchez et connectez-vous au réseau Wi-Fi appelé « EdiPlug.Setup »,comme indiqué ci-dessous :2.Ouvrez l'application EdiPlug et sélectionnez votre réseau Wi-Fi dans la liste,comme indiqué ci-dessous :3.Saisissez votre mot de passe Wi-Fi et touchez « OK ». L'écran suivantindiquera que la configuration est terminée !4.Votre prise intelligente sera maintenant affichée sur l'écran principald'EdiPlug. Faites glisser l'interrupteur pour mettre en marche ou arrêter votre prise intelligente (et tout appareil électrique qui y est branché).5.Le voyant réseau de la prise intelligente doit être allumé et vert pourindiquer une connexion réussie au réseau et au nuage. Vous pouvez utiliser l'application EdiPlug pour contrôler votre prise intelligente à distancedepuis n'importe quelle connexion à Internet.III-1-1. Changer le nom et le mot de passe de la prise intelligente1.Sélectionnez « Modifier »dans l'écran principal d'EdiPlug, puis sélectionnezla prise intelligente que vous voulez modifier dans la liste.2.Saisissez un nouveau nom et un nouveau mot de passe pour votre priseintelligente et touchez « Retour » pour revenir à l'écran principal. Votre prise intelligente sera maintenant affichée avec son nouveau nom.III-1-2. Ajouter une prise intelligente existante à l'écran principal 1.Dans l'écran principal d'EdiPlug, touchez l'icône « + » en haut à droite etsélectionnez une prise dans la liste.2.Saisissez le mot de passe de votre prise intelligente et touchez « OK ».Touchez l'icône « Retour » sur l'écran suivant pour terminer.III-2. AndroidSuivez les instructions ci-dessous pour ajouter une nouvelle prise intelligente à l'application EdiPlug sur Android :Vous devez vous trouver dans la portée Wi-Fi de la priseintelligente. Si vous disposez de plusieurs prises intelligentes, nebranchez et ne configurez qu'une seule prise à la fois.1.Ouvrez l'application EdiPlug et touchez l'icône « + » en haut à droite del'écran.2.Touchez « Installer une nouvelle prise » et sélectionnez votre réseau Wi-Fidans la liste, comme indiqué ci-dessous.3. Saisissez votre mot de passe Wi-Fi et touchez « OK ». L'écran suivantindiquera que la configuration est terminée !4. Votre prise intelligente sera maintenant affichée sur l'écran principald'EdiPlug. Faites glisser l'interrupteur pour mettre en marche ou arrêter votre prise intelligente (et tout appareil électrique qui y est branché).5.Le voyant réseau de la prise intelligente doit être allumé et vert pourindiquer une connexion réussie au réseau et au nuage. Vous pouvez utiliser l'application EdiPlug pour contrôler votre prise intelligente à distancedepuis n'importe quelle connexion à Internet.III-2-1. Changer le nom et le mot de passe de la prise intelligente1.Sélectionnez « Modifier »dans l'écran principal d'EdiPlug, puis sélectionnezla prise intelligente que vous voulez modifier dans la liste.2.Saisissez un nouveau nom et un nouveau mot de passe pour votre priseintelligente et touchez « Retour » pour revenir à l'écran principal. Votre prise intelligente sera maintenant affichée avec son nouveau nom.III-2-2.Ajouter une prise intelligente existante à l'écran principal1. Dans l'écran principal d'EdiPlug, touchez l'icône « + » en haut à droite etsélectionnez une prise dans la liste.2. Saisissez le mot de passe de votre prise intelligente et touchez « OK ».Touchez « Retour » sur l'écran suivant pour terminer.。
小米米家智能插座WiFi版说明书

使用产品前请仔细阅读本使用说明书,并妥善保管产品介绍包装清单:小米米家智能插座WiFi版 x 1, 说明书 x 1开关键短按:开/关长按:恢复出厂设置LED指示灯电源插孔郑重声明:本产品为精密电子产品,请勿在过度潮湿或可能会导致本产品进水的环境下使用;如使用导致本产品的故障,由此产生的产品使用问题及安全问题,我公司概不负责。
2. 售后服务与支持小米米家智能插座WiFi版产品保修条例:1. 自您签收次日起7日内,本产品出现《产品性能故障表》所列 性能故障的情况, 经由小米售后服务中心检测确定, 可免费 享受退货或换货服务;自您签收次日起8日-15日内,本产品出现《产品性能故障表》所列性能故障的情况,经由小米售后服务中心检测确定,可 免费享受换货或者维修服务;3. 自您签收次日起12个月内,本产品出现《产品性能故障表》所列性能故障的情况,经由小米售后服务中心检测确定,可免 费享受维修服务。
小米米家智能插座WiFi版产品售后服务严格依据《中华人民共和国消费者权益保护法》、《中华人民共和国产品质量法》实行售后三包服务,服务内容如下:非保修条例小米米家智能插座WiFi版性能故障1.产品通电后无法开机2.状态指示灯无效1. 未经授权的维修、误用、碰撞、疏忽、滥用、进液、事故、改动、不正确的使用非本转换器配件,或撕毁、涂改标贴、防伪标记;2. 已超过三包有效期;3. 因不可抗力造成的损坏;4. 不符合《产品性能故障表》所列性能故障的情况;5. 因人为原因导致转换器及其配件产生《产品性能故障表》所列性能故障。
3.无法正常连接网络4.无法恢复出厂设置5.其他硬件故障导致功能无法使用产品性能故障表基本参数产品名称:转换器产品型号:ZNCZ04CM规 格:10A MAX,250V~CMIIT ID:2018DP3791工作温度:0℃~ 40℃支持系统:Android4.4 或 iOS9.0及以上版本无线连接:Wi-Fi IEEE 802.11b/g/n 2.4GHz执行标准:GB2099.1&GB2099.3 GB1002委 托 方:小米通讯有限责任公司制 造 商:上海创米科技有限公司(小米生态链企业)地 址:中国(上海)自由贸易试验区盛夏路399弄1号908室 服务电话:400-100-5678服务网址:/service。
sv630ps2r8i说明书
sv630ps2r8i说明书一、产品概述SV630PS2R8i是一款专为家庭和办公室环境设计的智能电源插座。
它可以通过智能手机和其他智能设备远程控制和监控插座的电源,为用户带来更便捷、安全和节能的使用体验。
二、产品特点1.远程控制:通过智能手机的应用程序,用户可以远程控制插座的电源开关,随时随地控制电器的开关状态。
2.定时功能:用户可以设置定时任务,在指定的时间点自动开关电源,实现自动化的电器控制。
3.倒计时功能:用户可以设置倒计时任务,当倒计时结束时,电源会自动关闭,让用户无需担心电器被长时间开启。
4.节能模式:用户可以设定定时或倒计时任务,有效节约用电,降低能源消耗,为环保做出贡献。
5.实时监控:用户可以通过应用程序实时监控插座的用电状态,了解电器的耗电情况。
6.安全保护:插座具有过载保护功能,当电流超过额定值时,自动切断电源,保护电器安全。
三、产品使用方法2.注册账号:首次使用时,需要注册一个账号,并登录应用程序。
3.添加插座设备:登录应用程序后,点击添加设备按钮,在弹出的设备列表中选择"SV630PS2R8i",并按照提示操作完成插座设备的添加过程。
4.连接插座设备:将SV630PS2R8i插座设备插入电源插座,并确保设备中的Wi-Fi指示灯处于闪烁状态。
5.添加设备至应用程序:在应用程序中,点击设备按钮,应用程序将会自动到当前连接的设备,并显示在列表中。
点击设备名称,按照提示操作完成设备添加至应用程序的过程。
6.远程控制和监控:在应用程序中,用户可以通过点击相应设备的按钮来实现电源开关的控制,同时,用户还可以实时监控设备的用电状态。
四、注意事项1.插座设备只能在室内使用,不可暴露在高温、潮湿等环境下。
2.在连接设备或进行任何操作前,请务必确保电源已关闭,并按照操作手册进行操作。
4.请确保应用程序的版本是最新的,以获取更好的使用体验和更多的功能。
5.使用本产品时请遵守当地相关法律法规,并注意安全用电,防止火灾和其他意外事故的发生。
零火线智能墙壁连体开关插座说明书

零火线智能墙壁连体开关插座说明书 一,产品简介
本产品为零火线智能墙壁连体开关插座,是单个开关,插座的组合型,组合丰富,型式多样。
适用零线,火线布线方案,安装简单,产品采用CNC 铝材工艺,高贵气质。
广泛用于家庭,商业办公,酒店等场所。
二,详细参数
型号:组合
名称:零火线智能墙壁连体开关插座
尺寸:86×261×34/86×175×34∕261×86x34∕175×86×34
三,组合示意图
竖排列组合:基本单元HS610 HS920 HS921HS920AHS921A
横排列组合:基本单元HS610 HS620 HS630HS612 HS622 HS632HS920 HS921HS920AHS921A
基本单元任意组合:两个连体组合/三个连体组合
HS620 HS630HS612 HS622 HS632 基本单元任意组合: 两个连体组合/三个连体组合
HSS30÷HS630*HS630
四,安全事项
1,请勿带电安装,接线前断开供电
2,按组合单个产品标签定义,对应产品说明书正确连线3,完成接线,拧紧底盒螺丝,盖上面板,再通电
4,通电5秒后方可触摸使用
五,安装
1,暗盒请使用联装暗盒
2,断电后按组合排序,单元产品标签定义,对应产品说明书接线图接线
3,将将产品放入底盒,梢微拧紧螺丝,然后使用安装辅助工具对齐各单元产品,拧紧螺
安装辅助工具
4,盖上面板通电,5秒之后即可使用
面板背面缺口朝下。
对准凸台用力按下
六,配网
单元产品方法配网
七,声控
单元产品方法配置声控。
智能插座与功率计器 - Edimax说明书
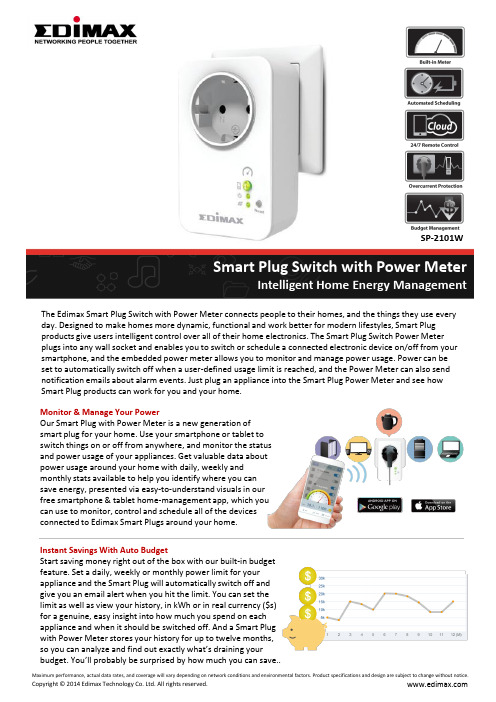
SP-2101WSmart Plug Switch with Power MeterIntelligent Home Energy Management The Edimax Smart Plug Switch with Power Meter connects people to their homes, and the things they use every day. Designed to make homes more dynamic, functional and work better for modern lifestyles, Smart Plug products give users intelligent control over all of their home electronics. The Smart Plug Switch Power Meter plugs into any wall socket and enables you to switch or schedule a connected electronic device on/off from your smartphone, and the embedded power meter allows you to monitor and manage power usage. Power can beset to automatically switch off when a user-defined usage limit is reached, and the Power Meter can also send notification emails about alarm events. Just plug an appliance into the Smart Plug Power Meter and see how Smart Plug products can work for you and your home.Monitor & Manage Your PowerOur Smart Plug with Power Meter is a new generation ofsmart plug for your home. Use your smartphone or tablet toswitch things on or off from anywhere, and monitor the statusand power usage of your appliances. Get valuable data aboutpower usage around your home with daily, weekly andmonthly stats available to help you identify where you cansave energy, presented via easy-to-understand visuals in ourfree smartphone & tablet home-management app, which youcan use to monitor, control and schedule all of the devicesconnected to Edimax Smart Plugs around your home.Instant Savings With Auto BudgetStart saving money right out of the box with our built-in budgetfeature. Set a daily, weekly or monthly power limit for yourappliance and the Smart Plug will automatically switch off andgive you an email alert when you hit the limit. You can set thelimit as well as view your history, in kWh or in real currency ($s)for a genuine, easy insight into how much you spend on eachappliance and when it should be switched off. And a Smart Plugwith Power Meter stores your history for up to twelve months,so you can analyze and find out exactly what’s draining yourbudget. You’ll probably be surprised by how much you can save..Intelligent Home Energy ManagementSP-2101W Helpful, Safe and EfficientBuild an intelligent, energy-efficient home with Smart Plugs,which are designed to make homes work better for modernlifestyles. A Smart Plug with Power Meter will keep youupdated with helpful email alarm notifications and budgetalerts, and can provide daily, weekly or monthly powerusage reports. And it offers peace of mind that your home issafe - you can check the status of appliances remotely whenyou’re out so you’ll never have to worry about leavingsomething switched on again. Save money, lead an energy-efficient life and stay connected to the things you every day.Easy Setup & Smart NotificationsSetup couldn’t be any easier and is all done on yoursmartphone or tablet. Once the Smart Plug is up and running,email notifications can keep you updated about alarmevents and which appliances and electronics are switchedon/off via the EdiLife app. Receive power usage reports andnotifications that usage is over your budget. Make sure yourintelligent home is working properly and keep track ofwhat’s going on in a busy, family home.SOFTWARE FEATURES•Switch on & off via iPhone, iPad & Android•Monitor & manage your power•Automated power usage reports & email alerts•Automatic budget control feature•Real time power data and history with daily, weekly &monthly stats•Wireless installation with a smartphone or tablet•No additional hardware requiredADVANTAGES•Save: Save time and power•Safe: Manage your home electronics anywhere/anytime•Smart: Control your appliances from your smartphone ortabletElectricalCommunicationWireless Standards and Data Rates Operating Voltage: 100–240VAC Power Frequency: 50–60Hz Max. Load Capacity:EU: 16A/230VAC; UK: 13A/240VAC AU: 10A/240VAC; US: 15A/120VAC Wireless IEEE 802.11b/g/n Coverage: Up to 10MFrequency Band: 2.4000 –2.4835GHz Wi-Fi Security: WEP,WPA/WPA2,WPS Protocol: Client UDP, TCP/IP, HTTP 11n: Up to 150Mbps(dynamic) 11g: Up to 54Mbps(dynamic) 11b: Up to 11Mbps(dynamic)ManagementPower MeterInterfaceFirmware upgradable iPhone & iPad App Android AppRemote access (Internet) Email notifications Schedule control Budget control Power information: Current, KW, KWHAccuracy: ±3% (PF 1.0)Data refresh: Every 5 secondsLED Indicator: Power, Switch, NetworkButtons: Reset, SwitchEnvironmentDimensions & WeightCertification 32℉–104℉ (0℃–40℃) 5–80%RH (non-condensing) Indoor use only105mm (L) x 64mm (W) x 60mm (H) EU Plug type: 170 g UK Plug type: 175 g US Plug type: 150 gCE, FCC, LVDHARDWARE INTERFACESP-2101WTECHNICAL SPECIFICATIONSManual Switch Device Power Reset NetworkCopyright © 2017 Edimax Technology Co. Ltd. All rights reserved.Maximum performance, actual data rates, and coverage will vary depending on network conditions and environmental factors. Product specifications and design are subject to change without notice.Intelligent Home Energy Management。
sgs16w1智能插座使用说明
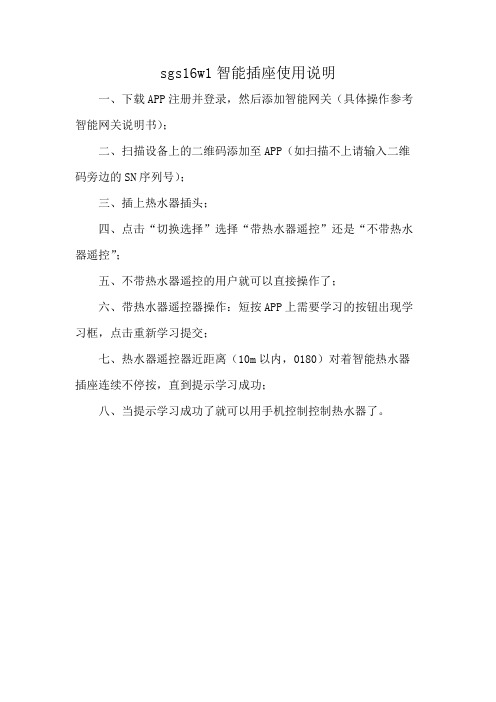
sgs16w1智能插座使用说明
一、下载APP注册并登录,然后添加智能网关(具体操作参考智能网关说明书);
二、扫描设备上的二维码添加至APP(如扫描不上请输入二维码旁边的SN序列号);
三、插上热水器插头;
四、点击“切换选择”选择“带热水器遥控”还是“不带热水器遥控”;
五、不带热水器遥控的用户就可以直接操作了;
六、带热水器遥控器操作:短按APP上需要学习的按钮出现学习框,点击重新学习提交;
七、热水器遥控器近距离(10m以内,0180)对着智能热水器插座连续不停按,直到提示学习成功;
八、当提示学习成功了就可以用手机控制控制热水器了。
萤石 智能插座-移动式插座 CS-T30-10A 使用说明书

版权所有©杭州萤石软件有限公司。
保留一切权利。
本手册的任何部分,包括文字、图片、图形等均归属于杭州萤石软件有限公司或其关联公司(以下简称“萤石”)。
未经书面许可,任何单位或个人不得以任何方式摘录、复制、翻译、修改本手册的全部或部分。
除非另有约定,萤石不对本手册提供任何明示或默示的声明或保证。
关于本产品本手册描述的产品仅供中国大陆地区销售和使用。
本产品只能在购买地所在国家或地区享受售后服务及维保方案。
关于本手册本手册仅作为相关产品的指导说明,可能与实际产品存在差异,请以实物为准。
因产品版本升级或其他需要,萤石可能对本手册进行更新,如您需要最新版手册,建议您定期更新查阅下载地址上的手册内容。
萤石建议您在专业人员的指导下使用本手册。
商标声明· 、 、 为萤石的注册商标。
·本手册涉及的其他商标由其所有人各自拥有。
责任声明·在法律允许的最大范围内,本手册以及所描述的产品(包含其硬件、软件、固件等)均“按照现状”提供,可能存在瑕疵或错误。
萤石不提供任何形式的明示或默示保证,包括但不限于适销性、质量满意度、适合特定目的等保证;亦不对使用本手册或使用萤石产品导致的任何特殊、附带、偶然或间接的损害进行赔偿,包括但不限于商业利润损失、系统故障、数据或文档丢失产生的损失。
·您知悉互联网的开放性特点,您将产品接入互联网可能存在网络攻击、黑客攻击、病毒感染等风险,萤石不对因此造成的产品工作异常、信息泄露等问题承担责任,但萤石将及时为您提供产品相关技术支持。
·使用本产品时,请您严格遵循适用的法律法规,避免侵犯第三方权利,包括但不限于公开权、知识产权、数据权利或其他隐私权。
您亦不得将本产品用于大规模杀伤性武器、生化武器、核爆炸或任何不安全的核能利用或侵犯人权的用途。
·如本手册内容与适用的法律相冲突,则以法律规定为准。
“萤石云”声明本产品部分功能(包括但不限于消息推送、远程管理、分享等功能)的实现将依赖于互联网、电信增值服务;您若希望实现以上功能,需在萤石云平台()完成用户注册,遵守《萤石服务协议》、《萤石隐私政策》等,并接入萤石设备,以实现对萤石设备的管理。
产品说明书智能插座
产品说明书智能插座一、产品简介智能插座是一种具备远程控制和定时开关功能的电器插座。
它适用于各类家居电器,如电视、电灯、电风扇等。
本产品具备以下特点和功能。
二、产品特点1. 远程控制:用户可以通过手机APP实现对插座的遥控操作,无需亲自靠近插座即可方便开关电器。
2. 定时开关:用户可以设置具体的开关时间,插座会自动按照设定的时间进行电器开关操作,提供更便捷的使用体验。
3. 电能监测:智能插座具备电能监测,用户可以通过手机APP查看电器的实时用电数据,帮助节约能源。
4. 安全保护:产品内置多重安全保护机制,可以有效防止过流、过载、过压等电器安全问题。
三、产品功能详解1. 远程控制通过手机APP与WiFi连接,用户可以随时随地远程控制插座开关。
无论用户是否在家,只要连接上互联网,即可通过手机实现对插座的远程遥控。
这意味着用户可以通过手机关闭未关闭的电器,避免长时间未关闭电器带来的安全隐患。
2. 定时开关智能插座可设置具体的开关时间,用户可以根据自己的日常需求,制定开关计划。
例如,可以在离家前定时关闭电视和灯光,以避免浪费电能,或者在到家前提前开启空调,保证舒适的室内环境。
定时开关功能可以根据用户的个人喜好和实际需求进行自由设置,实现智能化家居的便捷与舒适。
3. 电能监测智能插座内置电能监测芯片,通过手机APP可以实时查看电器的用电情况。
用户可以轻松了解家中各个电器的耗电量,从而合理调整用电习惯,达到节约能源的目的。
电能监测功能还可以统计每个月的电费消耗,为用户提供科学合理的用电建议。
4. 安全保护为了保障用户的安全使用,智能插座内置多重安全保护机制。
当插座检测到电器过流、过载或过压时,会自动切断电源,以防止电器损坏或引发火灾。
此外,智能插座还具备防雷击、防干扰等功能,保证稳定可靠的用电环境。
四、使用示范1. 下载并安装APP用户可以通过应用商店搜索并下载智能插座配套的APP,然后按照指导完成安装。
2. 连接WiFi和插座打开APP后,按照操作指引,将插座与手机连接到同一个WiFi网络下。
Minoston MP23W户外智能插座说明书
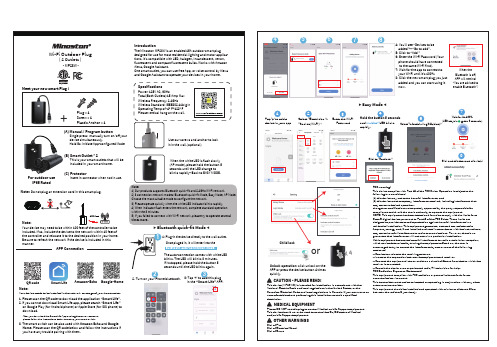
Note:Your device may need to be within 100 feet of the controller to be included. If so, include the device to the network within 10 feet of the controller and relocate it to the desired position in your home. Be sure to refresh the network if the device is included in this manner.ABCFor outdoor use IP65 RatedNote: Do not plug an extension cord in this smart plug.Use our screws and anchor to lock it in the wall.(optional)When the white LED is flash slowly (AP mode), please hold the button 5 seconds until the LED change to blinks rapidly--Back to EASY MODE.Note:Your device needs to be installed in the network coverage of your home router.1. Please scan the QR code to download the application “Smart Life ”.2. If you cannot download Smart Life app, please search “Smart Life ” on Google Play (for Android phone) or Apple Store (for iOS phone) to download.3. The smart switch can be also used with Amazon Echo and Google Home . Please scan the QR code below and follow the instructions if you have any trouble pairing with them.QR code Smart LifeAfter you download the Smart Life App and register a new account, please follow the instructions below to set up your smart switch.Amazon-Echo Google-HomeNote:1) Our products supports Bluetooth quick-fit and 2.4GHz Wi-Fi network.2) 3 connection network modes: Bluetooth quick-fit Mode, Easy Mode, AP Mode.Choose the most suitable mode to configure the network.3) Please operate quickly when the white LED indicator blinks rapidly.4) When indicator flash enters the network, complete standard operation within the 3 minutes.5) If you failed to connect with Wi-Fi network, please try to times more.▶ Bluetooth quick-fit Mode 21: Plug-in the device directly to the wall outlet.2. Turn on your Phone bluetooth. in the “Smart Life” APP.65Tap ‘+’ to add a device in your app123Hold the button 5 seconds until “white” LED blinks rapidly.4Enter the Wi-Fi PasswordSelect “Electrician ”- “Socket (Wi-Fi)”Click to “Continue ”▶ Easy Mode ◀100%845CAUTION - PLEASE READ!This device (MP23WD) is intended for installation in accordance with the National Electric Code and local regulations in the United States, or theCanadian Electrical Code and local regulations in Canada. If you are unsure or uncomfortable about performing this installation consult a qualified electrician.MEDICAL EQUIPMENTPlease DO NOT use this plug to control Medical or Life Support equipment. This device should never be used to control the On/Off status of Medical and/or Life Support equipment.FCC warning:This device complies with Part 15 of the FCC Rules. Operation is subject to the following two conditions:(1) this device may not cause harmful interference, and(2) this device must acceptany interference received, including interference that may cause undesired operation.changes or modifications not expressly approved by the party responsible for compliance could void the user's authority to operate the equipment.NOTE: This equipment has been tested and found to comply with the limits for a Class B digital device, pursuant to Part 15 of the FCC Rules. These limits are designed to provide reasonable protection against harmful interference in a residential installation. This equipment generates, uses and can radiate radiofrequency energy and, if not installed and used in accordance with the instructions, may cause harmful interference to radio communications. However, there is no guarantee that interference will not occur in a particular installation.If this equipment does cause harmful interference to radio or television reception, which can be determined by turning the equipment off and on, the user is encouraged to try to correct the interference by one or more of the following -- Reorient or relocate the receiving antenna.-- Increase the separation between the equipment and receiver.-- Connect the equipment into an outlet on a circuit different from that to which the -- Consult the dealer or an experienced radio/TV technician for Unlock operation : click unlock on the APP or press the device button 4 times quickly.orX 4Child lock7 (LED stays in green 3 seconds.)1。
智能移动插座 WS52x 用户手册说明书

智能移动插座WS52x用户手册安全须知为保护产品并确保安全操作,请遵守本使用手册。
如果产品使用不当或者不按手册要求使用,本公司概不负责。
严禁拆卸和改装本产品。
请将本产品安装在LoRaWAN®网关的信号范围内。
请勿将产品安装在金属物品及大型障碍物背后,否则可能影响无线信号传输。
插座中使用电器的功率不能超过智能插座的额定功率,否则可能导致插座损坏。
请勿将水或其它液体泼洒到产品上,否则可能导致触电危险。
请勿在强震动环境使用该设备,请勿砸摔该设备。
本产品仅限室内使用,请勿在室外、强磁场及已经超出产品工作温湿度的场所使用。
请在干净的环境下使用本设备,灰尘可能会影响设备的正常运行。
请使用干净的干布清洁设备,请勿使用强力的化学品或洗涤剂清洁设备外壳。
为了您的设备安全,请及时修改设备默认密码(123456)。
产品符合性声明WS52x系列符合CCC、CE,FCC和RoHS的基本要求和其他相关规定。
版权所有©2011-2023星纵物联保留所有权利。
如需帮助,请联系星纵物联技术支持:邮箱:*********************电话:************传真:************地址:厦门市集美区软件园三期C09栋文档修订记录日期版本描述2021.10.26V1.0第一版2022.1.11V1.1新增断电报警功能2022.1.12V1.2更新品牌Logo2023.1.9V1.3 1.新增D2D功能2.新增LoRaWAN®单通道模式3.新增插座自我保护机制2023.6.13V1.4 1.变更两级插孔为扁插目录一、产品简介 (5)1.1产品介绍 (5)1.2产品亮点 (5)二、产品结构介绍 (5)2.1包装清单 (5)2.2外观概览 (6)2.3产品尺寸 (6)2.4按键与指示灯 (6)三、产品配置 (7)3.1NFC配置 (7)3.2LoRaWAN®基本配置 (8)3.2.1LoRaWAN®基本参数 (8)3.2.2LoRaWAN®通信频段 (10)3.2.3组播参数 (11)3.3常用设置 (13)3.4Milesight D2D设置 (13)3.5维护 (14)3.5.1升级 (14)3.5.2备份 (15)3.5.3重置 (16)四、数据通信协议 (16)4.1设备信息 (16)4.2传感器数据 (17)4.3断电报警 (18)4.4下行指令 (18)一、产品简介1.1产品介绍WS52x 是星纵物联自主设计的一款智能移动插座,产品融合通断电控制与电量统计功能,实现智能管理电器,科学用电。
WeMo Switch智能插座操作指南说明书
Package‘magicLamp’October13,2022Type PackageTitle'WeMo Switch'Smart Plug UtilitiesVersion0.1.0Author Simon GarnierMaintainer Simon Garnier<****************>Description Set of utility functions to interact with'WeMo Switch',a smartplug that can be remotely controlled via wifi.The provided functions makeit possible to turn one or more'WeMo Switch'plugs on and off in ascriptable fashion.More information about'WeMo Switch'can be found at</us/p/P-F7C027/>.License GPL-3URL https:///swarm-lab/magicLampEncoding UTF-8LazyData trueImports httr(>=1.3.1),tibble(>=1.3.4)RoxygenNote6.0.1NeedsCompilation noRepository CRANDate/Publication2017-09-2109:04:42UTCR topics documented:wemo_OFF (2)wemo_ON (2)wemo_PORT (3)wemo_STATE (4)Index512wemo_ON wemo_OFF Turn WeMo Switch OFFDescriptionTurn WeMo Switch smart plugs offUsagewemo_OFF(ip)Argumentsip A characted string or vector of character strings representing the IP address(es) of WeMo Switch smart plug(s).ValueA tibble with two columns:ip The IP address of the WeMo Switch smart plugsuccess A logical indicating whether the WeMo Switch was successfully turned off.NA will be returned is no WeMo Switch is detected at this IP.Author(s)Simon Garnier,<****************>Examples##Not run:wemo_OFF("192.0.1.1")##End(Not run)wemo_ON Turn WeMo Switch ONDescriptionTurn WeMo Switch smart plugs on.Usagewemo_ON(ip)wemo_PORT3Argumentsip A characted string or vector of character strings representing the IP address(es) of WeMo Switch smart plug(s).ValueA tibble with two columns:ip The IP address of the WeMo Switch smart plugsuccess A logical indicating whether the WeMo Switch was successfully turned on.NA will be returned is no WeMo Switch is detected at this IP.Author(s)Simon Garnier,<****************>Examples##Not run:wemo_ON("192.0.1.1")##End(Not run)wemo_PORT WeMo Switch PortDescriptionAutomatically detects the port used by WeMo Switch smart plugs.Usagewemo_PORT(ip,timeout=0.1)Argumentsip A characted string or vector of character strings representing the IP address(es) of WeMo Switch smart plug(s).timeout Number of seconds to wait for a response until giving up.Can not be less than 1ms(default:0.1).ValueA tibble with two columns:ip The IP address of the WeMo Switch smart plug.port The port at which the WeMo Switch smart plug can be accessed.NA will be returned is no WeMo Switch is detected at this IP.4wemo_STATEAuthor(s)Simon Garnier,<****************>Examples##Not run:wemo_PORT("192.0.1.1")##End(Not run)wemo_STATE Check WeMo Switch StateDescriptionCheck the ON/OFF state of WeMo Switch smart plugs.Usagewemo_STATE(ip)Argumentsip A characted string or vector of character strings representing the IP address(es) of WeMo Switch smart plug(s).ValueA tibble with two columns:ip The IP address of the WeMo Switch smart plugstate’ON’if the WeMo Switch is turned on,’OFF’if it is turned off.NA will be returned is no WeMo Switch is detected at this IP.Author(s)Simon Garnier,<****************>Examples##Not run:wemo_STATE("192.0.1.1")##End(Not run)Indextibble,2–4wemo_OFF,2wemo_ON,2wemo_PORT,3wemo_STATE,45。