人脸识别核心算法及MATLAB代码
基于matlab的人脸识别源代码
function varargout = FR_Processed_histogram(varargin) %这种算法是基于直方图处理的方法%The histogram of image is calculated and then bin formation is done on the%basis of mean of successive graylevels frequencies. The training is done on odd images of 40 subjects (200 images out of 400 images)%The results of the implemented algorithm is 99.75 (recognition fails on image number 4 of subject 17)gui_Singleton = 1;gui_State = struct('gui_Name', mfilename, ...'gui_Singleton', gui_Singleton, ...'gui_OpeningFcn', @FR_Processed_histogram_OpeningFcn.,..'gui_OutputFcn',@FR_Processed_histogram_OutputFcn.,..'gui_LayoutFcn', [] , ... 'gui_Callback', []);if nargin && ischar(varargin{1}) gui_State.gui_Callback =str2func(varargin{1});endif nargout[varargout{1:nargout}] = gui_mainfcn(gui_State, varargin{:});elsegui_mainfcn(gui_State, varargin{:});end% End initialization code - DO NOT EDIT% -------------------------------------------------------------------------% --- Executes just before FR_Processed_histogram is made visible. function FR_Processed_histogram_OpeningFcn(hObjecte, ventdata, handles, varargin)% This function has no output args, see OutputFcn.% hObject handle to figure% eventdata reserved - to be defined in a future version of MATLAB % handles structure with handles and user data (see GUIDATA) % varargin command line arguments to FR_Processed_histogram (see VARARGIN)% Choose default command line output forFR_Processed_histogramhandles.output = hObject;% Update handles structure guidata(hObject, handles);% UIWAIT makes FR_Processed_histogram wait for user response(see UIRESUME)% uiwait(handles.figure1);global total_sub train_img sub_img max_hist_level bin_numform_bin_num;total_sub = 40;train_img = 200;sub_img = 10;max_hist_level = 256;bin_num = 9;form_bin_num = 29;% -------------------------------------------------------------------------% --- Outputs from this function are returned to the command line.function varargout = FR_Processed_histogram_OutputFcn(hObject, eventdata, handles)% varargout cell array for returning output args (see VARARGOUT);% hObject handle to figure% eventdata reserved - to be defined in a future version of MATLAB % handles structure with handles and user data (see GUIDATA)% Get default command line output from handles structurevarargout{1} = handles.output;% -------------------------------------------------------------------------% --- Executes on button press in train_button.function train_button_Callback(hObject, eventdata, handles)% hObject handle to train_button (see GCBO)% eventdata reserved - to be defined in a future version of MATLAB % handles structure with handles and user data (see GUIDATA)global train_processed_bin;global total_sub train_img sub_img max_hist_level bin_numform_bin_num;train_processed_bin(form_bin_num,train_img) = 0;K = 1;train_hist_img = zeros(max_hist_level, train_img);for Z=1:1:total_subfor X=1:2:sub_img %%%train on odd number of images of each subjectI = imread( strcat('ORL\S',int2str(Z), '\',int2str(X), '.bmp') ); [rowscols] = size(I);for i=1:1:rowsfor j=1:1:colsif( I(i,j) == 0 ) train_hist_img(max_hist_level, K)train_hist_img(max_hist_level, K) + 1;else train_hist_img(I(i,j), K) = train_hist_img(I(i,j), K) + 1;endendendK = K + 1;endend[r c] = size(train_hist_img);sum = 0;for i=1:1:cK = 1;for j=1:1:rif( (mod(j,bin_num)) == 0 )sum = sum + train_hist_img(j,i);train_processed_bin(K,i) = sum/bin_num; K = K + 1;sum = 0;elsesum = sum + train_hist_img(j,i);endendtrain_processed_bin(K,i) = sum/bin_num;enddisplay ('Training Done') save'train' train_processed_bin;% --- Executes on button press in Testing_button.function Testing_button_Callback(hObject, eventdata, handles)% hObject handle to Testing_button (see GCBO)% eventdata reserved - to be defined in a future version of MATLAB % handles structure with handles and user data (see GUIDATA) global train_img max_hist_level bin_num form_bin_num;global train_processed_bin;global filename pathname Iload 'train'test_hist_img(max_hist_level) = 0;test_processed_bin(form_bin_num) = 0;[rows cols] = size(I);for i=1:1:rowsfor j=1:1:colsif( I(i,j) == 0 )test_hist_img(max_hist_level)test_hist_img(max_hist_level) + 1;elsetest_hist_img(I(i,j)) = test_hist_img(I(i,j)) + 1;endendend[r c] = size(test_hist_img); sum = 0;K = 1;for j=1:1:cif( (mod(j,bin_num)) == 0 )sum = sum + test_hist_img(j); test_processed_bin(K) =sum/bin_num;K = K + 1;sum = 0;elsesum = sum + test_hist_img(j);endendtest_processed_bin(K) = sum/bin_num;sum = 0;K = 1;for y=1:1:train_imgfor z=1:1:form_bin_numsum = sum + abs( test_processed_bin(z) - train_processed_bin(z,y) );endimg_bin_hist_sum(K,1) = sum;sum = 0;K = K + 1;end[temp M] = min(img_bin_hist_sum);M = ceil(M/5);getString_start=strfind(pathname',S');getString_start=getString_start(end)+1;getString_end=strfind(pathname',\');getString_end=getString_end(end)-1;subjectindex=str2num(pathname(getString_start:getString_end));if (subjectindex == M)axes (handles.axes3)%image no: 5 is shown for visualization purposeimshow(imread(STRCAT('ORL\S',num2str(M),'\5.bmp')))msgbox ( 'Correctly Recognized');elsedisplay ([ 'Error==> Testing Image of Subject >>'num2str(subjectindex) ' matches with the image of subject >> 'num2str(M)])axes (handles.axes3)%image no: 5 is shown for visualization purposeimshow(imread(STRCAT( 'ORL\S' ,num2str(M),'\5.bmp')))msgbox ( 'Incorrectly Recognized');enddisplay('Testing Done')% -------------------------------------------------------------------------function box_Callback(hObject, eventdata, handles)% hObject handle to box (see GCBO)% eventdata reserved - to be defined in a future version ofMATLAB% handles structure with handles and user data (see GUIDATA)% Hints: get(hObject,'String') returns contents of box as text% str2double(get(hObject,'String')) returns contents of box as a double% -------------------------------------------------------------------------% --- Executes during object creation, after setting all properties.function box_CreateFcn(hObject, eventdata, handles)% hObject handle to box (see GCBO)% eventdata reserved - to be defined in a future version of MATLAB % handles empty - handles not created until after all CreateFcns called% Hint: edit controls usually have a white background on Windows.% See ISPC and COMPUTER.if ispc && isequal(get(hObject,'BackgroundColor'),get(0,'defaultUicontrolBackgroundColor'))set(hObject,'BackgroundColor','white');end% --- Executes on button press in Input_Image_button.function Input_Image_button_Callback(hObject, eventdata, handles) % hObject handle to Input_Image_button (see GCBO)% eventdata reserved - to be defined in a future version of MATLAB % handles structure with handles and user data (see GUIDATA) global filename pathname I[filename, pathname] = uigetfile('*.bmp', 'Test Image');axes(handles.axes1)imgpath=STRCAT(pathname,filename);I = imread(imgpath);imshow(I)% -------------------------------------------------------------------------% --- Executes during object creation, after setting all properties.function axes3_CreateFcn(hObject, eventdata, handles)% hObject handle to axes3 (see GCBO)% eventdata reserved - to be defined in a future version of MATLAB% handles empty - handles not created until after all CreateFcns called% Hint: place code in OpeningFcn to populate axes3%Programmed by Usman Qayyum。
Matlab中的人脸识别算法
Matlab中的人脸识别算法概述人脸识别技术在当今社会得到了广泛的应用,它不仅可以用于身份验证和安全管理,也可以用于人脸表情识别、年龄估计等领域。
在这个领域中,Matlab作为一种常见的工具,在人脸识别算法的研究和应用中发挥着重要的作用。
本文将介绍Matlab中的人脸识别算法,包括基本原理、常见算法以及实际应用。
一、基本原理人脸识别算法的基本原理是通过分析人脸图像的特征来实现对人脸的识别。
首先,需要对输入的人脸图像进行预处理,包括图像的灰度化、归一化、去噪等。
然后,从图像中提取出特征向量,这些特征向量可以表示人脸的形状、纹理等特征。
最后,使用分类器对特征进行分类,确定输入图像中的人脸类别。
二、常见算法1. 主成分分析(Principal Component Analysis, PCA)PCA是一种常见的线性降维算法,它通过对输入图像进行主成分分析,将高维的人脸图像降低到低维的特征向量。
在Matlab中,可以使用pca函数实现PCA算法的应用。
该函数将输入图像矩阵转换为特征向量矩阵,然后根据特征向量的重要程度进行排序,选择重要的特征向量作为输入图像的特征。
2. 线性判别分析(Linear Discriminant Analysis, LDA)LDA是一种常见的线性分类算法,它在PCA的基础上引入了类别信息,通过最大化类间散度和最小化类内散度来实现降维和分类。
在Matlab中,可以使用lda 函数实现LDA算法的应用。
该函数根据输入图像的类别信息构建类别矩阵,然后计算投影矩阵,最后根据投影矩阵将输入图像映射到低维空间。
3. 非负矩阵分解(Nonnegative Matrix Factorization, NMF)NMF是一种近年来发展起来的非负矩阵分解算法,它具有很好的稀疏性和局部性质,适用于人脸图像的特征提取。
在Matlab中,可以使用nmf函数实现NMF算法的应用。
该函数将输入图像矩阵分解为非负的权重矩阵和特征矩阵,其中特征矩阵表示人脸的特征。
如何使用Matlab进行人脸检测和人脸识别

如何使用Matlab进行人脸检测和人脸识别人脸检测和人脸识别是计算机视觉领域中的重要技术应用,可以广泛用于人脸识别系统、人脸支付、安全监控等众多领域。
本文将介绍如何使用Matlab进行人脸检测和人脸识别。
1. 背景介绍人脸检测和人脸识别技术的出现,为计算机系统实现对人脸的自动分析和识别提供了可能。
人脸检测是指从一幅图像或视频序列中确定是否存在人脸,并找出人脸的位置和大小。
而人脸识别则是在检测到的人脸图像上进行特征提取和模式匹配,以实现对人脸的身份识别。
2. 人脸检测在Matlab中,可以使用Viola-Jones算法进行人脸检测。
该算法通过构造Haar特征与Adaboost集成学习算法相结合,能够在较短的时间内实现高效的人脸检测。
具体操作如下:2.1 加载图像首先,在Matlab中加载需要进行人脸检测的图像。
可以使用imread函数进行图像加载,并将其转换为灰度图像进行处理。
例如:```Matlabimage = imread('face.jpg');gray_image = rgb2gray(image);```2.2 构建人脸检测器在Matlab中,可以使用vision.CascadeObjectDetector对象构建人脸检测器。
该对象可以通过Viola-Jones算法进行人脸检测。
具体代码如下:```MatlabfaceDetector = vision.CascadeObjectDetector();bbox = step(faceDetector, gray_image);```2.3 显示检测结果最后,可以使用insertObjectAnnotation函数将检测到的人脸位置在原始图像上标记出来。
代码示例如下:```Matlabdetected_image = insertObjectAnnotation(image, 'rectangle', bbox, 'Face');imshow(detected_image);```3. 人脸识别在Matlab中,可以使用基于人脸特征的Eigenface、Fisherface和LBPH等算法进行人脸识别。
人脸识别核心算法及MATLAB代码

人脸识别核心算法在检测到人脸并定位面部关键特征点之后,主要的人脸区域就可以被裁剪出来,经过预处理之后,馈入后端的识别算法。
识别算法要完成人脸特征的提取,并与库存的已知人脸进行比对,完成最终的分类。
我们在这方面的主要工作包括:∙基于LGBP的人脸识别方法问题:统计学习目前已经成为人脸识别领域的主流方法,但实践表明,基于统计学习的方法往往会存在“推广能力弱”的问题,尤其在待识别图像“属性”未知的情况下,更难以确定采用什么样的训练图像来训练人脸模型。
鉴于此,在对统计学习方法进行研究的同时,我们还考虑了非统计模式识别的一类方法。
思路:对于给定的人脸图像,LGBP方法首先将其与多个不同尺度和方向的Gabor滤波器卷积(卷积结果称为Gabor特征图谱)获得多分辨率的变换图像。
然后将每个Gabor特征图谱划分成若干互不相交的局部空间区域,对每个区域提取局部邻域像素的亮度变化模式,并在每个局部空间区域内提取这些变化模式的空间区域直方图,所有Gabor特征图谱的、所有区域的直方图串接为一高维特征直方图来编码人脸图像。
并通过直方图之间的相似度匹配技术(如直方图交运算)来实现最终的人脸识别。
在FERET四个人脸图像测试集合上与FERET97的结果对比情况见下表。
由此可见,该方法具有良好的识别性能。
而且LGBP方法具有计算速度快、无需大样本学习、推广能力强的优点。
参见ICCV2005表.LGBP方法与FERET'97最佳结果的对比情况∙基于AdaBoost的Gabor特征选择及判别分析方法问题:人脸描述是人脸识别的核心问题之一,人脸识别的研究实践表明:在人脸三维形状信息难以准确获取的条件下,从图像数据中提取多方向、多尺度的Gabor特征是一种合适的选择。
使用Gabor特征进行人脸识别的典型方法包括弹性图匹配方法(EGM)和Gabor特征判别分类法(GFC)。
EGM在实用中需要解决关键特征点的定位问题,而且其速度也很难提高;而GFC则直接对下采样的Gabor特征用PCA降维并进行判别分析,尽管这避免了精确定位关键特征点的难题,但下采样的特征维数仍然偏高,而且简单的下采样策略很可能遗漏了非常多的有用特征。
Matlab技术人脸检测与识别方法总结

Matlab技术人脸检测与识别方法总结人脸检测和识别是计算机视觉领域一个重要的研究方向,也是许多实际应用中的关键技术之一。
随着科学技术的快速发展和计算能力的提高,人脸检测与识别技术在安防系统、人机交互、医学图像处理等领域具有广阔的应用前景。
本文将总结一些Matlab技术在人脸检测与识别方面的方法,以帮助研究者和开发者更好地理解和应用这一领域的技术。
一、人脸检测方法总结人脸检测是人脸识别的基础,准确的人脸检测是后续人脸识别任务的前提。
在Matlab中,人脸检测方法主要分为以下几种。
1. Viola-Jones算法Viola-Jones算法是一种经典的人脸检测算法,其基本思想是将人脸检测转化为对图像中各个子区域进行特征提取和分类判断的问题。
通过训练一个强分类器,可以实现对人脸的快速检测。
Matlab提供了相应的函数和工具箱来实现Viola-Jones 算法,如vision.CascadeObjectDetector等。
2. Haar特征和积分图像Viola-Jones算法中的特征选择和计算采用了Haar特征和积分图像的方法,这种方法可以快速计算图像的特征值,从而加速人脸检测的速度。
Matlab中提供了计算积分图像的函数,可以方便地实现这一方法。
3. 基于深度学习的人脸检测近年来,深度学习在计算机视觉领域取得了重大突破,人脸检测也不例外。
通过搭建深度卷积神经网络,可以实现对人脸的高精度检测。
Matlab提供了Deep Learning Toolbox,可以方便地进行深度学习模型的搭建和训练。
二、人脸识别方法总结人脸识别是在经过人脸检测的基础上,对人脸图像进行特征提取和匹配,从而实现对人脸的身份识别。
在Matlab中,人脸识别方法主要分为以下几种。
1. 特征脸法特征脸法是一种经典的人脸识别方法,其基本思想是将人脸图像投影到一个低维空间中,然后通过计算投影后的特征向量之间的距离来进行人脸匹配。
Matlab提供了PCA等函数和工具箱来实现特征脸法。
(完整版)人脸识别MATLAB代码
1.色彩空间转换function [r,g]=rgb_RGB(Ori_Face)R=Ori_Face(:,:,1);G=Ori_Face(:,:,2);B=Ori_Face(:,:,3);R1=im2double(R); % 将uint8型转换成double型G1=im2double(G);B1=im2double(B);RGB=R1+G1+B1;row=size(Ori_Face,1); % 行像素column=size(Ori_Face,2); % 列像素for i=1:rowfor j=1:columnrr(i,j)=R1(i,j)/RGB(i,j);gg(i,j)=G1(i,j)/RGB(i,j);endendrrr=mean(rr);r=mean(rrr);ggg=mean(gg);g=mean(ggg);2.均值和协方差t1=imread('D:\matlab\皮肤库\1.jpg');[r1,g1]=rgb_RGB(t1); t2=imread('D:\matlab\皮肤库\2.jpg');[r2,g2]=rgb_RGB(t2); t3=imread('D:\matlab\皮肤库\3.jpg');[r3,g3]=rgb_RGB(t3); t4=imread('D:\matlab\皮肤库\4.jpg');[r4,g4]=rgb_RGB(t4); t5=imread('D:\matlab\皮肤库\5.jpg');[r5,g5]=rgb_RGB(t5); t6=imread('D:\matlab\皮肤库\6.jpg');[r6,g6]=rgb_RGB(t6); t7=imread('D:\matlab\皮肤库\7.jpg');[r7,g7]=rgb_RGB(t7); t8=imread('D:\matlab\皮肤库\8.jpg');[r8,g8]=rgb_RGB(t8);t9=imread('D:\matlab\皮肤库\9.jpg');[r9,g9]=rgb_RGB(t9);t10=imread('D:\matlab\皮肤库\10.jpg');[r10,g10]=rgb_RGB(t10);t11=imread('D:\matlab\皮肤库\11.jpg');[r11,g11]=rgb_RGB(t11);t12=imread('D:\matlab\皮肤库\12.jpg');[r12,g12]=rgb_RGB(t12);t13=imread('D:\matlab\皮肤库\13.jpg');[r13,g13]=rgb_RGB(t13);t14=imread('D:\matlab\皮肤库\14.jpg');[r14,g14]=rgb_RGB(t14);t15=imread('D:\matlab\皮肤库\15.jpg');[r15,g15]=rgb_RGB(t15);t16=imread('D:\matlab\皮肤库\16.jpg');[r16,g16]=rgb_RGB(t16);t17=imread('D:\matlab\皮肤库\17.jpg');[r17,g17]=rgb_RGB(t17);t18=imread('D:\matlab\皮肤库\18.jpg');[r18,g18]=rgb_RGB(t18);t19=imread('D:\matlab\皮肤库\19.jpg');[r19,g19]=rgb_RGB(t19);t20=imread('D:\matlab\皮肤库\20.jpg');[r20,g20]=rgb_RGB(t20);t21=imread('D:\matlab\皮肤库\21.jpg');[r21,g21]=rgb_RGB(t21);t22=imread('D:\matlab\皮肤库\22.jpg');[r22,g22]=rgb_RGB(t22);t23=imread('D:\matlab\皮肤库\23.jpg');[r23,g23]=rgb_RGB(t23);t24=imread('D:\matlab\皮肤库\24.jpg');[r24,g24]=rgb_RGB(t24);t25=imread('D:\matlab\皮肤库\25.jpg');[r25,g25]=rgb_RGB(t25);t26=imread('D:\matlab\皮肤库\26.jpg');[r26,g26]=rgb_RGB(t26);t27=imread('D:\matlab\皮肤库\27.jpg');[r27,g27]=rgb_RGB(t27);r=cat(1,r1,r2,r3,r4,r5,r6,r7,r8,r9,r10,r11,r12,r13,r14,r15,r16,r17,r18,r19,r20,r21,r22, r23,r24,r25,r26,r27);g=cat(1,g1,g2,g3,g4,g5,g6,g7,g8,g9,g10,g11,g12,g13,g14,g15,g16,g17,g18,g19,g20 ,g21,g22,g23,g24,g25,g26,g27);m=mean([r,g])n=cov([r,g])3.求质心function [xmean, ymean] = center(bw)bw=bwfill(bw,'holes');area = bwarea(bw);[m n] =size(bw);bw=double(bw);xmean =0; ymean = 0;for i=1:m,for j=1:n,xmean = xmean + j*bw(i,j);ymean = ymean + i*bw(i,j);end;end;if(area==0)xmean=0;ymean=0;elsexmean = xmean/area;ymean = ymean/area;xmean = round(xmean);ymean = round(ymean);end4. 求偏转角度function [theta] = orient(bw,xmean,ymean) [m n] =size(bw);bw=double(bw);a = 0;b = 0;c = 0;for i=1:m,for j=1:n,a = a + (j - xmean)^2 * bw(i,j);b = b + (j - xmean) * (i - ymean) * bw(i,j);c = c + (i - ymean)^2 * bw(i,j);end;b = 2 * b;theta = atan(b/(a-c))/2;theta = theta*(180/pi); % 从幅度转换到角度5. 找区域边界function [left, right, up, down] = bianjie(A)[m n] = size(A);left = -1;right = -1;up = -1;down = -1;for j=1:n,for i=1:m,if (A(i,j) ~= 0)left = j;break;end;end;if (left ~= -1) break;end;end;for j=n:-1:1,for i=1:m,if (A(i,j) ~= 0)right = j;break;end;end;if (right ~= -1) break;end;for i=1:m,for j=1:n,if (A(i,j) ~= 0)up = i;break;end;end;if (up ~= -1)break;end;end;for i=m:-1:1,for j=1:n,if (A(i,j) ~= 0)down = i;break;end;end;if (down ~= -1)break;end;end;6. 求起始坐标function newcoord = checklimit(coord,maxval) newcoord = coord;if (newcoord<1)newcoord=1;end;if (newcoord>maxval)newcoord=maxval;end;7.模板匹配function [ccorr, mfit, RectCoord] = mobanpipei(mult, frontalmodel,ly,wx,cx, cy, angle)frontalmodel=rgb2gray(frontalmodel);model_rot = imresize(frontalmodel,[ly wx],'bilinear'); % 调整模板大小model_rot = imrotate(model_rot,angle,'bilinear'); % 旋转模板[l,r,u,d] = bianjie(model_rot); % 求边界坐标bwmodel_rot=imcrop(model_rot,[l u (r-l) (d-u)]); % 选择模板人脸区域[modx,mody] =center(bwmodel_rot); % 求质心[morig, norig] = size(bwmodel_rot);% 产生一个覆盖了人脸模板的灰度图像mfit = zeros(size(mult));mfitbw = zeros(size(mult));[limy, limx] = size(mfit);% 计算原图像中人脸模板的坐标startx = cx-modx;starty = cy-mody;endx = startx + norig-1;endy = starty + morig-1;startx = checklimit(startx,limx);starty = checklimit(starty,limy);endx = checklimit(endx,limx);endy = checklimit(endy,limy);for i=starty:endy,for j=startx:endx,mfit(i,j) = model_rot(i-starty+1,j-startx+1);end;end;ccorr = corr2(mfit,mult) % 计算相关度[l,r,u,d] = bianjie(bwmodel_rot);sx = startx+l;sy = starty+u;RectCoord = [sx sy (r-1) (d-u)]; % 产生矩形坐标8.主程序clear;[fname,pname]=uigetfile({'*.jpg';'*.bmp';'*.tif';'*.gif'},'Please choose a color picture...'); % 返回打开的图片名与图片路径名[u,v]=size(fname);y=fname(v); % 图片格式代表值switch ycase 0errordlg('You Should Load Image File First...','Warning...');case{'g';'G';'p';'P';'f';'F'}; % 图片格式若是JPG/jpg、BMP/bmp、TIF/tif 或者GIF/gif,才打开I=cat(2,pname,fname);Ori_Face=imread(I);subplot(2,3,1),imshow(Ori_Face);otherwiseerrordlg('You Should Load Image File First...','Warning...');endR=Ori_Face(:,:,1);G=Ori_Face(:,:,2);B=Ori_Face(:,:,3);R1=im2double(R); % 将uint8型转换成double型处理G1=im2double(G);B1=im2double(B);RGB=R1+G1+B1;m=[ 0.4144,0.3174]; % 均值n=[0.0031,-0.0004;-0.0004,0.0003]; % 方差row=size(Ori_Face,1); % 行像素数column=size(Ori_Face,2); % 列像素数for i=1:rowfor j=1:columnif RGB(i,j)==0rr(i,j)=0;gg(i,j)=0;elserr(i,j)=R1(i,j)/RGB(i,j); % rgb归一化gg(i,j)=G1(i,j)/RGB(i,j);x=[rr(i,j),gg(i,j)];p(i,j)=exp((-0.5)*(x-m)*inv(n)*(x-m)'); % 皮肤概率服从高斯分布endendendsubplot(2,3,2);imshow(p); % 显示皮肤灰度图像low_pass=1/9*ones(3);image_low=filter2(low_pass, p); % 低通滤波去噪声subplot(2,3,3);imshow(image_low);% 自适应阀值程序previousSkin2 = zeros(i,j);changelist = [];for threshold = 0.55:-0.1:0.05two_value = zeros(i,j);two_value(find(image_low>threshold)) = 1;change = sum(sum(two_value - previousSkin2));changelist = [changelist change];previousSkin2 = two_value;end[C, I] = min(changelist);optimalThreshold = (7-I)*0.1two_value = zeros(i,j);two_value(find(image_low>optimalThreshold)) = 1; % 二值化subplot(2,3,4);imshow(two_value); % 显示二值图像frontalmodel=imread('E:\我的照片\人脸模板.jpg'); % 读入人脸模板照片FaceCoord=[];imsourcegray=rgb2gray(Ori_Face); % 将原照片转换为灰度图像[L,N]=bwlabel(two_value,8); % 标注二值图像中连接的部分,L为数据矩阵,N为颗粒的个数for i=1:N,[x,y]=find(bwlabel(two_value)==i); % 寻找矩阵中标号为i的行和列的下标bwsegment = bwselect(two_value,y,x,8); % 选择出第i个颗粒numholes = 1-bweuler(bwsegment,4); % 计算此区域的空洞数if (numholes >= 1) % 若此区域至少包含一个洞,则将其选出进行下一步运算RectCoord = -1;[m n] = size(bwsegment);[cx,cy]=center(bwsegment); % 求此区域的质心bwnohole=bwfill(bwsegment,'holes'); % 将洞封住(将灰度值赋为1)justface = uint8(double(bwnohole) .* double(imsourcegray));% 只在原照片的灰度图像中保留该候选区域angle = orient(bwsegment,cx,cy); % 求此区域的偏转角度bw = imrotate(bwsegment, angle, 'bilinear');bw = bwfill(bw,'holes');[l,r,u,d] =bianjie(bw);wx = (r - l +1); % 宽度ly = (d - u + 1); % 高度wratio = ly/wx % 高宽比if ((0.8<=wratio)&(wratio<=2))% 如果目标区域的高度/宽度比例大于0.8且小于2.0,则将其选出进行下一步运算S=ly*wx; % 计算包含此区域矩形的面积A=bwarea(bwsegment); % 计算此区域面积if (A/S>0.35)[ccorr,mfit, RectCoord] = mobanpipei(justface,frontalmodel,ly,wx, cx,cy, angle);endif (ccorr>=0.6)mfitbw=(mfit>=1);invbw = xor(mfitbw,ones(size(mfitbw)));source_with_hole = uint8(double(invbw) .* double(imsourcegray));final_image = uint8(double(source_with_hole) + double(mfit));subplot(2,3,5);imshow(final_image); % 显示覆盖了模板脸的灰度图像imsourcegray = final_image;subplot(2,3,6);imshow(Ori_Face); % 显示检测效果图end;if (RectCoord ~= -1)FaceCoord = [FaceCoord; RectCoord];endendendend% 在认为是人脸的区域画矩形[numfaces x] = size(FaceCoord);for i=1:numfaces,hd = rectangle('Position',FaceCoord(i,:));set(hd, 'edgecolor', 'y');end人脸检测是人脸识别、人机交互、智能视觉监控等工作的前提。
ICA人脸识别算法实例matlab源码
% 将其组成矩阵
S=[I1;I2;I3]; % 图片个数即为变量数,图片的像素数即为采样数
% 因此S_all是一个变量个数*采样个数的矩阵
b=((1-u)*t'*g*b+u*X*g)/SampleNum-mean(dg)*b;
% 核心公式,参见理论部分公式2.52
b=b-B*B'*b; % 对b正交化
%%%%%%%%%%%%%%%%%%%%%%%%%% 初始化 %%%%%%%%%%%%%%%%%%%%%%%%%%%%%%%%%%
clc%%%%%%%%%%% 读入原始图像,混合,并输出混合图像 %%%%%%%%%%%%%%%%%%
%%%%%%%%%%%%%%%%%%%%%%%%% PCA计算并构图 %%%%%%%%%%%%%%%%%%%%%%%%
[V,D]=eig(MixedS_cov);
Vtmp=zeros(size(V,1),1);
for j=1:2
for i=1:2
if D(i,i)
X=MixedS_white; % 以下算法将对X进行操作
[VariableNum,SampleNum]=size(X);
numofIC=VariableNum; % 在此应用中,独立元个数等于变量个数
Sweight=randn(size(S,1)); % 取一随机矩阵,作为信号混合的权矩阵
MixedS=Sweight*S; % 得到三个混合信号矩阵
% 将混合矩阵重新排列并输出
subplot(4,3,4),plot(MixedS(1,:)),title('混合信号1'),
如何在Matlab中进行人脸检测

如何在Matlab中进行人脸检测人脸检测技术是计算机视觉领域的重要研究方向,也是很多应用中必不可少的一环。
而在实际应用中,Matlab作为一款强大的数值计算软件,也提供了丰富的工具和函数库来实现人脸检测。
本文将详细介绍如何在Matlab中进行人脸检测的相关技术和方法。
1. 人脸检测的原理和概述人脸检测是指通过计算机程序在给定图像中找出人脸的位置和边界框。
人脸检测技术的核心在于设计有效的算法和模型,通过分析图像中的特征、纹理、颜色等信息来识别和定位人脸。
2. 使用Matlab进行人脸检测的基本流程在Matlab中进行人脸检测的基本流程包括以下几个步骤:2.1 图像预处理首先,需要对输入的图像进行预处理,以提高后续人脸检测的效果。
常见的预处理操作包括图像缩放、灰度化、直方图均衡化等。
Matlab提供了丰富的图像处理函数,可以方便地实现这些操作。
2.2 特征提取接下来,需要从预处理后的图像中提取出用于人脸检测的特征。
常见的特征提取方法包括Haar特征、LBP特征、HOG特征等。
Matlab提供了一些函数和工具箱,如vision.CascadeObjectDetector、extractHOGFeatures等,可以方便地提取这些特征。
2.3 人脸检测在完成特征提取后,可以利用先前提取的特征来进行人脸检测。
常用的人脸检测算法包括Viola-Jones算法、人工神经网络、卷积神经网络等。
在Matlab中,可以利用已有的函数和工具箱实现这些算法,如vision.CreateresnetFaceDetector、trainNetwork等。
2.4 结果展示最后,需要将检测到的人脸位置标记在原始图像中,并将结果进行展示。
Matlab提供了绘制图形和图像处理的函数,可以方便地实现这些操作。
可以利用rectangle函数绘制边界框,imshow函数显示图像,并将结果进行展示。
3. MatLab中的人脸检测算法和工具箱Matlab提供了多种用于人脸检测的算法和工具箱,以下是其中一些常用的算法和函数:3.1 Viola-Jones算法Viola-Jones算法是一种广泛应用于人脸检测的算法,基于Haar特征和级联分类器的思想。
Matlab中的人脸表情识别和表情生成技术
Matlab中的人脸表情识别和表情生成技术人脸表情是人类非常重要的一种非语言交流方式,表情可以传递信息、表达情感和沟通意图。
因此,人脸表情识别和生成技术在计算机视觉和人工智能领域具有重要意义。
在本文中,我们将探讨如何使用Matlab实现人脸表情识别和表情生成技术。
1. 人脸表情识别技术人脸表情识别是指从人脸图像中准确地识别出人脸所表达的情感状态。
在Matlab中,可以使用深度学习框架如Keras或TensorFlow来构建和训练人脸表情识别模型。
以下是在Matlab中使用深度学习实现人脸表情识别的简要步骤:1.1 数据准备首先,需要准备一个包含人脸表情图像的数据集。
可以使用公开的数据集,如FER2013或CK+。
这些数据集包含了多种表情,如喜悦、悲伤、愤怒等。
可以使用Matlab的图像处理工具箱来处理图像数据,提取有用的特征。
1.2 模型构建在数据准备完毕后,可以开始构建人脸表情识别模型。
可以使用深度学习中常用的卷积神经网络(CNN)架构。
在Matlab中,可以使用深度学习工具箱提供的函数来构建CNN模型。
根据数据集的大小和复杂程度,可以选择不同的CNN架构,如LeNet、AlexNet或VGG。
1.3 模型训练模型构建完成后,可以使用数据集进行模型训练。
训练时需要将数据集分为训练集和验证集,通过逐渐调整模型的参数和超参数来优化模型性能。
可以使用Matlab提供的训练函数来进行模型训练。
1.4 模型评估训练完成后,需要对模型进行评估,以了解其在新数据上的表现。
可以使用一些评估指标如准确率、召回率和F1-score来评估模型的性能。
可以使用Matlab提供的评估函数来计算这些指标。
2. 人脸表情生成技术人脸表情生成是指使用计算机生成具有特定情感的人脸图像。
在Matlab中,可以使用生成对抗网络(GAN)来实现人脸表情生成。
以下是在Matlab中使用GAN实现人脸表情生成的简要步骤:2.1 数据准备首先,需要准备一个包含人脸图像和对应表情标签的数据集。
(完整版)人脸识别MATLAB代码
1.色彩空间转换function [r,g]=rgb_RGB(Ori_Face)R=Ori_Face(:,:,1);G=Ori_Face(:,:,2);B=Ori_Face(:,:,3);R1=im2double(R); % 将uint8型转换成double型G1=im2double(G);B1=im2double(B);RGB=R1+G1+B1;row=size(Ori_Face,1); % 行像素column=size(Ori_Face,2); % 列像素for i=1:rowfor j=1:columnrr(i,j)=R1(i,j)/RGB(i,j);gg(i,j)=G1(i,j)/RGB(i,j);endendrrr=mean(rr);r=mean(rrr);ggg=mean(gg);g=mean(ggg);2.均值和协方差t1=imread('D:\matlab\皮肤库\1.jpg');[r1,g1]=rgb_RGB(t1); t2=imread('D:\matlab\皮肤库\2.jpg');[r2,g2]=rgb_RGB(t2); t3=imread('D:\matlab\皮肤库\3.jpg');[r3,g3]=rgb_RGB(t3); t4=imread('D:\matlab\皮肤库\4.jpg');[r4,g4]=rgb_RGB(t4); t5=imread('D:\matlab\皮肤库\5.jpg');[r5,g5]=rgb_RGB(t5); t6=imread('D:\matlab\皮肤库\6.jpg');[r6,g6]=rgb_RGB(t6); t7=imread('D:\matlab\皮肤库\7.jpg');[r7,g7]=rgb_RGB(t7); t8=imread('D:\matlab\皮肤库\8.jpg');[r8,g8]=rgb_RGB(t8);t9=imread('D:\matlab\皮肤库\9.jpg');[r9,g9]=rgb_RGB(t9);t10=imread('D:\matlab\皮肤库\10.jpg');[r10,g10]=rgb_RGB(t10);t11=imread('D:\matlab\皮肤库\11.jpg');[r11,g11]=rgb_RGB(t11);t12=imread('D:\matlab\皮肤库\12.jpg');[r12,g12]=rgb_RGB(t12);t13=imread('D:\matlab\皮肤库\13.jpg');[r13,g13]=rgb_RGB(t13);t14=imread('D:\matlab\皮肤库\14.jpg');[r14,g14]=rgb_RGB(t14);t15=imread('D:\matlab\皮肤库\15.jpg');[r15,g15]=rgb_RGB(t15);t16=imread('D:\matlab\皮肤库\16.jpg');[r16,g16]=rgb_RGB(t16);t17=imread('D:\matlab\皮肤库\17.jpg');[r17,g17]=rgb_RGB(t17);t18=imread('D:\matlab\皮肤库\18.jpg');[r18,g18]=rgb_RGB(t18);t19=imread('D:\matlab\皮肤库\19.jpg');[r19,g19]=rgb_RGB(t19);t20=imread('D:\matlab\皮肤库\20.jpg');[r20,g20]=rgb_RGB(t20);t21=imread('D:\matlab\皮肤库\21.jpg');[r21,g21]=rgb_RGB(t21);t22=imread('D:\matlab\皮肤库\22.jpg');[r22,g22]=rgb_RGB(t22);t23=imread('D:\matlab\皮肤库\23.jpg');[r23,g23]=rgb_RGB(t23);t24=imread('D:\matlab\皮肤库\24.jpg');[r24,g24]=rgb_RGB(t24);t25=imread('D:\matlab\皮肤库\25.jpg');[r25,g25]=rgb_RGB(t25);t26=imread('D:\matlab\皮肤库\26.jpg');[r26,g26]=rgb_RGB(t26);t27=imread('D:\matlab\皮肤库\27.jpg');[r27,g27]=rgb_RGB(t27);r=cat(1,r1,r2,r3,r4,r5,r6,r7,r8,r9,r10,r11,r12,r13,r14,r15,r16,r17,r18,r19,r20,r21,r22, r23,r24,r25,r26,r27);g=cat(1,g1,g2,g3,g4,g5,g6,g7,g8,g9,g10,g11,g12,g13,g14,g15,g16,g17,g18,g19,g20 ,g21,g22,g23,g24,g25,g26,g27);m=mean([r,g])n=cov([r,g])3.求质心function [xmean, ymean] = center(bw)bw=bwfill(bw,'holes');area = bwarea(bw);[m n] =size(bw);bw=double(bw);xmean =0; ymean = 0;for i=1:m,for j=1:n,xmean = xmean + j*bw(i,j);ymean = ymean + i*bw(i,j);end;end;if(area==0)xmean=0;ymean=0;elsexmean = xmean/area;ymean = ymean/area;xmean = round(xmean);ymean = round(ymean);end4. 求偏转角度function [theta] = orient(bw,xmean,ymean) [m n] =size(bw);bw=double(bw);a = 0;b = 0;c = 0;for i=1:m,for j=1:n,a = a + (j - xmean)^2 * bw(i,j);b = b + (j - xmean) * (i - ymean) * bw(i,j);c = c + (i - ymean)^2 * bw(i,j);end;b = 2 * b;theta = atan(b/(a-c))/2;theta = theta*(180/pi); % 从幅度转换到角度5. 找区域边界function [left, right, up, down] = bianjie(A)[m n] = size(A);left = -1;right = -1;up = -1;down = -1;for j=1:n,for i=1:m,if (A(i,j) ~= 0)left = j;break;end;end;if (left ~= -1) break;end;end;for j=n:-1:1,for i=1:m,if (A(i,j) ~= 0)right = j;break;end;end;if (right ~= -1) break;end;for i=1:m,for j=1:n,if (A(i,j) ~= 0)up = i;break;end;end;if (up ~= -1)break;end;end;for i=m:-1:1,for j=1:n,if (A(i,j) ~= 0)down = i;break;end;end;if (down ~= -1)break;end;end;6. 求起始坐标function newcoord = checklimit(coord,maxval) newcoord = coord;if (newcoord<1)newcoord=1;end;if (newcoord>maxval)newcoord=maxval;end;7.模板匹配function [ccorr, mfit, RectCoord] = mobanpipei(mult, frontalmodel,ly,wx,cx, cy, angle)frontalmodel=rgb2gray(frontalmodel);model_rot = imresize(frontalmodel,[ly wx],'bilinear'); % 调整模板大小model_rot = imrotate(model_rot,angle,'bilinear'); % 旋转模板[l,r,u,d] = bianjie(model_rot); % 求边界坐标bwmodel_rot=imcrop(model_rot,[l u (r-l) (d-u)]); % 选择模板人脸区域[modx,mody] =center(bwmodel_rot); % 求质心[morig, norig] = size(bwmodel_rot);% 产生一个覆盖了人脸模板的灰度图像mfit = zeros(size(mult));mfitbw = zeros(size(mult));[limy, limx] = size(mfit);% 计算原图像中人脸模板的坐标startx = cx-modx;starty = cy-mody;endx = startx + norig-1;endy = starty + morig-1;startx = checklimit(startx,limx);starty = checklimit(starty,limy);endx = checklimit(endx,limx);endy = checklimit(endy,limy);for i=starty:endy,for j=startx:endx,mfit(i,j) = model_rot(i-starty+1,j-startx+1);end;end;ccorr = corr2(mfit,mult) % 计算相关度[l,r,u,d] = bianjie(bwmodel_rot);sx = startx+l;sy = starty+u;RectCoord = [sx sy (r-1) (d-u)]; % 产生矩形坐标8.主程序clear;[fname,pname]=uigetfile({'*.jpg';'*.bmp';'*.tif';'*.gif'},'Please choose a color picture...'); % 返回打开的图片名与图片路径名[u,v]=size(fname);y=fname(v); % 图片格式代表值switch ycase 0errordlg('You Should Load Image File First...','Warning...');case{'g';'G';'p';'P';'f';'F'}; % 图片格式若是JPG/jpg、BMP/bmp、TIF/tif 或者GIF/gif,才打开I=cat(2,pname,fname);Ori_Face=imread(I);subplot(2,3,1),imshow(Ori_Face);otherwiseerrordlg('You Should Load Image File First...','Warning...');endR=Ori_Face(:,:,1);G=Ori_Face(:,:,2);B=Ori_Face(:,:,3);R1=im2double(R); % 将uint8型转换成double型处理G1=im2double(G);B1=im2double(B);RGB=R1+G1+B1;m=[ 0.4144,0.3174]; % 均值n=[0.0031,-0.0004;-0.0004,0.0003]; % 方差row=size(Ori_Face,1); % 行像素数column=size(Ori_Face,2); % 列像素数for i=1:rowfor j=1:columnif RGB(i,j)==0rr(i,j)=0;gg(i,j)=0;elserr(i,j)=R1(i,j)/RGB(i,j); % rgb归一化gg(i,j)=G1(i,j)/RGB(i,j);x=[rr(i,j),gg(i,j)];p(i,j)=exp((-0.5)*(x-m)*inv(n)*(x-m)'); % 皮肤概率服从高斯分布endendendsubplot(2,3,2);imshow(p); % 显示皮肤灰度图像low_pass=1/9*ones(3);image_low=filter2(low_pass, p); % 低通滤波去噪声subplot(2,3,3);imshow(image_low);% 自适应阀值程序previousSkin2 = zeros(i,j);changelist = [];for threshold = 0.55:-0.1:0.05two_value = zeros(i,j);two_value(find(image_low>threshold)) = 1;change = sum(sum(two_value - previousSkin2));changelist = [changelist change];previousSkin2 = two_value;end[C, I] = min(changelist);optimalThreshold = (7-I)*0.1two_value = zeros(i,j);two_value(find(image_low>optimalThreshold)) = 1; % 二值化subplot(2,3,4);imshow(two_value); % 显示二值图像frontalmodel=imread('E:\我的照片\人脸模板.jpg'); % 读入人脸模板照片FaceCoord=[];imsourcegray=rgb2gray(Ori_Face); % 将原照片转换为灰度图像[L,N]=bwlabel(two_value,8); % 标注二值图像中连接的部分,L为数据矩阵,N为颗粒的个数for i=1:N,[x,y]=find(bwlabel(two_value)==i); % 寻找矩阵中标号为i的行和列的下标bwsegment = bwselect(two_value,y,x,8); % 选择出第i个颗粒numholes = 1-bweuler(bwsegment,4); % 计算此区域的空洞数if (numholes >= 1) % 若此区域至少包含一个洞,则将其选出进行下一步运算RectCoord = -1;[m n] = size(bwsegment);[cx,cy]=center(bwsegment); % 求此区域的质心bwnohole=bwfill(bwsegment,'holes'); % 将洞封住(将灰度值赋为1)justface = uint8(double(bwnohole) .* double(imsourcegray));% 只在原照片的灰度图像中保留该候选区域angle = orient(bwsegment,cx,cy); % 求此区域的偏转角度bw = imrotate(bwsegment, angle, 'bilinear');bw = bwfill(bw,'holes');[l,r,u,d] =bianjie(bw);wx = (r - l +1); % 宽度ly = (d - u + 1); % 高度wratio = ly/wx % 高宽比if ((0.8<=wratio)&(wratio<=2))% 如果目标区域的高度/宽度比例大于0.8且小于2.0,则将其选出进行下一步运算S=ly*wx; % 计算包含此区域矩形的面积A=bwarea(bwsegment); % 计算此区域面积if (A/S>0.35)[ccorr,mfit, RectCoord] = mobanpipei(justface,frontalmodel,ly,wx, cx,cy, angle);endif (ccorr>=0.6)mfitbw=(mfit>=1);invbw = xor(mfitbw,ones(size(mfitbw)));source_with_hole = uint8(double(invbw) .* double(imsourcegray));final_image = uint8(double(source_with_hole) + double(mfit));subplot(2,3,5);imshow(final_image); % 显示覆盖了模板脸的灰度图像imsourcegray = final_image;subplot(2,3,6);imshow(Ori_Face); % 显示检测效果图end;if (RectCoord ~= -1)FaceCoord = [FaceCoord; RectCoord];endendendend% 在认为是人脸的区域画矩形[numfaces x] = size(FaceCoord);for i=1:numfaces,hd = rectangle('Position',FaceCoord(i,:));set(hd, 'edgecolor', 'y');end人脸检测是人脸识别、人机交互、智能视觉监控等工作的前提。
Matlab中的人脸识别与表情分析方法
Matlab中的人脸识别与表情分析方法人脸识别和表情分析是计算机视觉领域中的热门研究方向。
在这个信息爆炸的时代,人们对于自动化识别和分析人脸表情的需求越来越高。
Matlab作为一种功能强大的数值计算与可视化软件,提供了一些重要的工具和算法来实现人脸识别和表情分析。
本文将介绍Matlab中一些常用的人脸识别与表情分析方法。
首先,我们来介绍一下人脸识别的基本概念和方法。
人脸识别是指通过计算机技术来识别和验证人脸的身份。
常见的人脸识别方法包括主成分分析(PCA)、线性判别分析(LDA)和支持向量机(SVM)等。
在Matlab中,可以使用内置的人脸识别工具箱来实现这些方法。
其中,主成分分析是一种常用的降维方法,它通过对数据进行特征提取和投影变换,将高维数据映射到低维空间。
在人脸识别中,PCA可以用来提取脸部特征,并通过与已知人脸数据的比较来判断其身份。
在Matlab中,可以使用pca函数实现主成分分析。
另一种常用的人脸识别方法是线性判别分析。
LDA可以通过最大化类间散布和最小化类内散布的方式来找到最优的投影向量,从而实现有效的人脸分类。
Matlab提供了lda函数来实现线性判别分析。
此外,支持向量机也是一种常用的分类方法,它的基本思想是寻找一个最优的超平面来实现数据的最佳分类。
在人脸识别领域,SVM可以通过训练一组已知标记的人脸图像来建立分类模型,然后利用该模型来识别新的人脸图像。
Matlab中的svmtrain和svmclassify函数可以帮助我们实现这一过程。
除了人脸识别,表情分析也是一个引人注目的研究领域。
表情分析旨在从人脸图像中提取和解释情绪表达。
常见的表情分析方法包括基于特征提取的方法、基于神经网络的方法和基于统计模型的方法等。
在Matlab中,可以使用图像处理工具箱提供的函数来实现基于特征提取的表情分析。
这些函数包括人脸检测、特征检测和分类器训练等功能。
通过这些函数,我们可以提取脸部特征,如眼睛、嘴巴等,进而分析表情的特征,如笑容、愤怒等。
完整版)基于matlab程序实现人脸识别
完整版)基于matlab程序实现人脸识别Based on MATLAB program。
face n is implemented。
1.Face n Process1.1.1 Basic PrincipleXXX carried out based on the YCbCr color space skin color model。
It has been found that the skin color clustering n in the Cb-Cr subplane n of the YCbCr color space will be XXX different from the central n。
Using this method。
image XXX-faces。
1.1.2 FlowchartXXX:1.Read the original image2.Convert the image to the YCbCr color spacee the skin color model to binarize the image and perform morphological processing4.Select the white area in the binary image。
measure the area attributes。
and filter to obtain all rectangular blocks5.Filter specific areas (height-to-width。
een 0.6 and 2.eye features)6.Store the rectangular area of the face7.Filter special areas based on other n and mark the final face area2.Face n Program1) Face and Non-XXXn result = skin(Y,Cb,Cr)SKIN Summary of this n goes hereDetailed n goes herea=25.39;b=14.03;ecx=1.60;ecy=2.41;sita=2.53;cx=109.38;cy=152.02;xishu=[cos(sita) sin(sita);-sin(sita) cos(sita)];If the brightness is greater than 230.the major and minor axes are expanded by 1.1 timesif(Y>230)a=1.1*a;b=1.1*b;endXXXCb=double(Cb);Cr=double(Cr);t=[(Cb-cx);(Cr-cy)];temp=xishu*t;value=(temp(1)-ecx)^2/a^2+(temp(2)-ecy)^2/b^2;If the value is greater than 1.it is not skin color and returns。
在MATLAB中使用人脸识别算法的技巧

在MATLAB中使用人脸识别算法的技巧人脸识别是一种应用广泛的图像处理技术,它可以通过识别和比对人的面部特征,实现身份认证、人脸跟踪等功能。
MATLAB作为一种强大的科学计算软件,也提供了丰富的图像处理函数和工具箱,可以用于实现人脸识别算法。
本文通过介绍人脸识别算法的基本原理和MATLAB中的应用技巧,帮助读者更好地利用MATLAB进行人脸识别任务。
一、人脸识别算法的基本原理人脸识别算法的核心任务是从图像中提取人脸特征,并将其与数据库中的特征进行比对。
常见的人脸识别算法有Eigenface、Fisherface和LBPH等。
其中,Eigenface算法主要通过PCA(Principal Component Analysis)降维技术将高维的人脸图像转化为低维的特征向量,实现特征提取的目的;Fisherface算法则利用LDA (Linear Discriminant Analysis)方法将人脸样本映射到一个低维子空间,以实现类别判别和特征提取;LBPH(Local Binary Patterns Histograms)算法则是一种局部特征提取的方法,通过提取图像中人脸局部纹理特征来进行识别。
二、在MATLAB中实现人脸识别算法的准备工作在使用MATLAB进行人脸识别算法实现之前,需要准备一些必要的工作。
首先,需要使用MATLAB的`Image Processing Toolbox`工具箱,该工具箱提供了丰富的图像处理函数和工具,方便进行图像预处理和特征提取。
此外,还需要准备人脸图像数据库,用于训练和测试人脸识别算法。
三、图像预处理在进行人脸识别算法之前,需要对输入的图像进行预处理,以提高算法的准确性和鲁棒性。
常见的图像预处理操作包括人脸检测、图像裁剪和归一化等。
MATLAB的`vision.CascadeObjectDetector`对象可以用于进行人脸检测,通过调用其`step`方法,可以实现对图像中人脸的定位和检测。
基于某matlab程序实现人脸识别
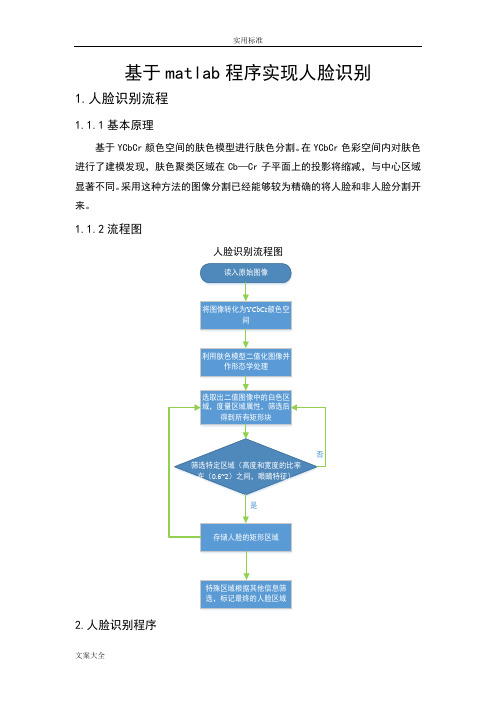
基于matlab程序实现人脸识别1.人脸识别流程1.1.1基本原理基于YCbCr颜色空间的肤色模型进行肤色分割。
在YCbCr色彩空间内对肤色进行了建模发现,肤色聚类区域在Cb—Cr子平面上的投影将缩减,与中心区域显著不同。
采用这种方法的图像分割已经能够较为精确的将人脸和非人脸分割开来。
1.1.2流程图人脸识别流程图读入原始图像将图像转化为YCbCr颜色空间利用肤色模型二值化图像并作形态学处理选取出二值图像中的白色区域,度量区域属性,筛选后得到所有矩形块否筛选特定区域(高度和宽度的比率在(0.6~2)之间,眼睛特征)是存储人脸的矩形区域特殊区域根据其他信息筛选,标记最终的人脸区域2.人脸识别程序(1)人脸和非人脸区域分割程序function result = skin(Y,Cb,Cr)%SKIN Summary of this function goes here% Detailed explanation goes herea=25.39;b=14.03;ecx=1.60;ecy=2.41;sita=2.53;cx=109.38;cy=152.02;xishu=[cos(sita) sin(sita);-sin(sita) cos(sita)]; %如果亮度大于230,则将长短轴同时扩大为原来的1.1倍if(Y>230)a=1.1*a;b=1.1*b;end%根据公式进行计算Cb=double(Cb);Cr=double(Cr);t=[(Cb-cx);(Cr-cy)];temp=xishu*t;value=(temp(1)-ecx)^2/a^2+(temp(2)-ecy)^2/b^2;%大于1则不是肤色,返回0;否则为肤色,返回1if value>1result=0;elseresult=1;endend(2)人脸的确认程序function eye = findeye(bImage,x,y,w,h)%FINDEYE Summary of this function goes here % Detailed explanation goes herepart=zeros(h,w);%二值化for i=y:(y+h)for j=x:(x+w)if bImage(i,j)==0part(i-y+1,j-x+1)=255;elsepart(i-y+1,j-x+1)=0;endendend[L,num]=bwlabel(part,8);%如果区域中有两个以上的矩形则认为有眼睛if num<2eye=0;elseeye=1;endend(3)人脸识别主程序clear all;%读入原始图像I=imread('face3.jpg');gray=rgb2gray(I);ycbcr=rgb2ycbcr(I);%将图像转化为YCbCr空间heighth=size(gray,1);%读取图像尺寸width=size(gray,2);for i=1:heighth %利用肤色模型二值化图像for j=1:widthY=ycbcr(i,j,1);Cb=ycbcr(i,j,2);Cr=ycbcr(i,j,3);if(Y<80)gray(i,j)=0;elseif(skin(Y,Cb,Cr)==1)%根据色彩模型进行图像二值化 gray(i,j)=255;elsegray(i,j)=0;endendendendse=strel('arbitrary',eye(5));%二值图像形态学处理gray=imopen(gray,se);figure;imshow(gray)[L,num]=bwlabel(gray,8);%采用标记方法选出图中的白色区域stats=regionprops(L,'BoundingBox');%度量区域属性n=1;%存放经过筛选以后得到的所有矩形块result=zeros(n,4);figure,imshow(I);hold on;for i=1:num %开始筛选特定区域box=stats(i).BoundingBox;x=box(1);%矩形坐标Xy=box(2);%矩形坐标Yw=box(3);%矩形宽度wh=box(4);%矩形高度hratio=h/w;%宽度和高度的比例ux=uint16(x);uy=uint8(y);if ux>1ux=ux-1;endif uy>1uy=uy-1;endif w<20 || h<20|| w*h<400 %矩形长宽的范围和矩形的面积可自行设定continueelseif ratio<2 && ratio>0.6 && findeye(gray,ux,uy,w,h)==1 %根据“三庭五眼”规则高度和宽度比例应该在(0.6,2)内;result(n,:)=[ux uy w h];n=n+1;endendif size(result,1)==1 && result(1,1)>0 %对可能是人脸的区域进行标记rectangle('Position',[result(1,1),result(1,2),result(1,3),result(1,4) ],'EdgeColor','r');else%如果满足条件的矩形区域大于1,则再根据其他信息进行筛选arr1=[];arr2=[];for m=1:size(result,1)m1=result(m,1);m2=result(m,2);m3=result(m,3);m4=result(m,4);%得到符合和人脸匹配的数据if m1+m3<width && m2+m4<heighth && m3<0.2*widtha=a+1;arr1(a)=m3;arr2(a)=m4;%rectangle('Position',[m1,m2,m3,m4],'EdgeColor','r');endend%得到人脸长度和宽度的最小区域arr3=[];arr3=sort(arr1,'ascend');arr4=[];arr4=sort(arr2,'ascend');%根据得到的数据标定最终的人脸区域for m=1:size(result,1)m1=result(m,1);m2=result(m,2);m3=result(m,3);m4=result(m,4);%最终标定人脸if m1+m3<width && m2+m4<heighth && m3<0.2*widthm3=arr3(1);m4=arr4(1);rectangle('Position',[m1,m2,m3,m4],'EdgeColor','r');endend(4)程序说明人脸识别程序主要包含三个程序模块,人脸识别主程序由三部分构成。
MATLAB人脸识别源代码
MATLAB人脸识别源代码% FaceRec.m %CQUPT% PCA 识别率88%% calc xmean,sigma and its eigen decompositionallsamples=[];%所有训练图片for i=1:40for j=1:5a=imread(strcat('e:\ORL\s',num2str(i),'\',num2str(j),'.pgm'));b=a(1:112*92); %b是行矢量1*N,N=10304,提取顺序是先列后行,%即从上到下,从左到右b=double(b);allsamples=[allsamples;b]; %allsamples是一个M*N矩阵,allsamples中每一行数据代%表一张图片,其中M=200endendsamplemean=mean(allsamples); %平均图片,1*N for i=1:200xmean(i,:)=allsamples(i,:)-samplemean; %allsamples是一个M*N矩阵,allsamples中每一行保存的数据是“每个图片数据—平均图片”end;%获取特征植及特征向量sigma=xmean*xmean'; % M* M矩阵[v d]=eig(sigma);d1=diag(d);%按特征值大小以降序排列dsort=flipud(d1);vsort=fliplr(v);%以下选择90%的能量dsum=sum(dsort);dsum_extract=0;p=0;while(dsum_extract/dsum<0.9) p=p+1;dsum_extract=sum(dsort(1:p)); endi=1;% (训练阶段)计算特征脸形成的坐标系base = xmean' * vsort(:,1:p) * diag(dsort(1:p).^(-1/2));%base是N*p阶矩阵,除以dsort(i) ^(-1/2))是对人脸图象的标准化(是其方差为1)% xmean' * vsort(:,1:p)是小矩阵的特征向量向大矩阵特征向量转换的过程%以下两行将训练样本对坐标系上进行投影,得到一个M*p子空间中的一个点,%即在子空间中的组合系数allcoor=allsamples*base;accu = 0; %下面的人脸识别过程中就是利用这些组合系数来进行识别%测试过程for i=1:40for j=6:10 %读入40 x 5 副测试图像a=imread(strcat('e:\ORL\s',num2str(i),'\',num2str(j),'.pgm'));b=a(1:10304);b=double(b);tcoor=b*base; %计算坐标,是1*p阶矩阵for k=1:200mdist(k)=norm(tcoor-allcoor(k,:)); end;%三阶近邻[dist,index2]=sort(mdist); class1=floor( (index2(1)-1)/5 )+1;class2=floor((index2(2)-1)/5)+1;class3=floor((index2(3)-1)/5)+1; if class1~=class2 && class2~=class3 class=class1;elseif class1==class2class=class1;elseif class2==class3class=class2;end;if class==iaccu=accu+1;end;end;end;accuracy=accu/200 % 输出识别率% FaceRec.m %CQUPT% PCA 识别率88%% calc xmean,sigma and its eigen decompositionallsamples=[]; %所有训练图片for i=1:40for j=1:5a=imread(strcat('e:\ORL\s',num2str(i),'\',num2str(j),'.pgm'));b=a(1:112*92); %b是行矢量1*N,N=10304,提取顺序是先列后行,%即从上到下,从左到右b=double(b);allsamples=[allsamples;b]; %allsamples是一个M*N矩阵,allsamples中每一行数据代%表一张图片,其中M=200endendsamplemean=mean(allsamples); %平均图片,1*Nfor i=1:200 xmean(i,:)=allsamples(i,:)-samplemean; %allsamples是一个M*N矩阵,allsamples中每一行保存 %的数据是“每个图片数据—平均图片” end;%获取特征植及特征向量sigma=xmean*xmean'; % M* M矩阵 [v d]=eig(sigma); d1=diag(d);%按特征值大小以降序排列dsort=flipud(d1); vsort=fliplr(v); %以下选择90%的能量dsum=sum(dsort);dsum_extract=0;p=0;while(dsum_extract/dsum<0.9) p=p+1;dsum_extract=sum(dsort(1:p)); endp=199;% (训练阶段)计算特征脸形成的坐标系base = xmean' * vsort(:,1:p) * diag(dsort(1:p).^(-1/2));%生成特征脸for(k=1:p)temp=reshape(base(:,k),112,92); newpath=[…e:\test\? int2str(k)….jpg?];imwrite(mat2gray(temp), newpath); end%将模型保存Save(…e:\ORL\model.mat? ,?base?, …samplemean?);%Reconstruct.m % CQUPTFunction[]=reconstruct() Load e:\ORL\model.mat;%计算新图片在特征子空间中的系数Img=?D:\test2\10.jpg?A=imread(img);b=a(1:112*92); % b是行矢量 1*N,其中N =10304 b=double(b);b=b-samplemean;c = b * base; % c 是图片 a在子空间中的系数, 是 1*p 行矢量 % 根据特征系数及特征脸重建图% 前15 个t = 15;temp = base(:,1:t) * c(1:t)'; temp = temp + samplemean';imwrite(mat2gray(reshape(temp, 112,92)),'d:\test2\t1.jpg');% 前50个t = 50;temp = base(:,1:t) * c(1:t)'; temp = temp + samplemean';imwrite(mat2gray(reshape(temp, 112,92)),'d:\test2\t2.jpg');% 前 100个t = 100;temp = base(:,1:t) * c(1:t)'; temp = temp + samplemean';imwrite(mat2gray(reshape(temp, 112,92)),'d:\test2\t3.jpg');% 前150个t = 150;temp = base(:,1:t) * c(1:t)'; temp = temp + samplemean';imwrite(mat2gray(reshape(temp, 112,92)),'d:\test2\t4.jpg');% 前199 个t = 199;temp = base(:,1:t) * c(1:t)'; temp = temp + samplemean';imwrite(mat2gray(reshape(temp, 112,92)),'d:\test2\t5.jpg');图片标准化通常是一个整体概念,要求把图片归一到均值为0,方差为1的情况下。
用matlab实现人脸识别
用matlab实现人脸识别最近一直在搞这个东西,从一开始什么都不会到现在的能在被人的基础之上改一些代码。
感觉有了不小的进步,现在把这些代码贴出来分享给大家。
先贴一个FLD的完整代码吧!load('orldata.mat');facenumber=length(orldata);for i=1:facenumber%载入人脸库facedatabase{i}=double(orldata{i});endnclass = 40;%类别数nsampleeachclass = 10; %每一类中人脸数neachtrain =4; %每类中选取的用于训练的样本数neachtest = nsampleeachclass-neachtrain; %每类中用于识别的样本数height = 112; %样本的高度width = 92; %样本的宽度for i=1:nclassfor j=1:neachtraingnd((i-1)*neachtrain+j,1)=i;endendfor k=1:20 %随机抽样20次a=rand(1,nsampleeachclass);[a,index]=sort(a);for i=1:nclass %把训练样本与识别样本的每一个点变成一个列向量for j=1:neachtraintrainSample((i-1)*neachtrain+j,:)=reshape(facedatabase{(i-1)* (nsampleeachclass)+index(j)},1,height*width);%reshape函数把图像矩阵转化为行向量;%trainX(:,:,(i-1)*neachtrain+j)=facedatabase{(i-1)*(nsampleea chclass)+index(j)};endfor j=1:neachtesttestSample((i-1)*neachtest+j,:)=reshape(facedatabase{(i-1)*(nsampleeachclass)+index(neachtrain+j)},1 ,height*width);%testX(:,:,(i-1)*neachtest+j)=facedatabase{(i-1)*(nsampleeach class)+index(neachtrain+j)};endendPCAoptions = [];PCAoptions.PCARatio = 0.98;[eigvector_PCA, eigvalue_PCA, meanData, new_X] =PCA(trainSample,PCAoptions);[Wlda, Xlda,r] = LDA1(new_X',gnd, nclass) ;vec=eigvector_PCA*Wlda;[a,b]=size(Wlda);for d=2:2:bnewTrainSample = trainSample*vec(:,1:d);newTestSample = testSample*vec(:,1:d);classification=classif(newTrainSample,newTestSample);suc(k,d/2) = success(classification, neachtrain, neachtest); %每次随机选训练样本对应不同d的成功率clear newTrainSample newTestSample classification;endclear trainSample testSample vec val;endavesuc=mean(suc);disp('Recognition rate:');avesuc其中函数LDA1的代码如下:%%%%%%%%%%%%%%%%%%%%%%%%%%%%%%%%%%%%%%%%%%%%%%%%%%%%%%%%%%%%%%%%%%%%% %%%%%%%%%%%%%function [Wlda, Xlda,r] = LDA1( X, XClass, classCount) %%%%%%%%%%%%%%%%%%%%%%%%%%%%%%%%%%%%%%%%%%%%%%%%%%%%%%%%%%%%%%%%%%%%% %%%%%%%%%%%%%%-input X 输入样本按列堆积的矩阵 d*n维% XClass 每一列所属的类别向量% classCount 样本类别总数%-output% Wlda 投影矩阵% Xlda X在Wlda上的投影系数% r 类间散布矩阵Sb的秩,即判别函数的个数???%%%%%%%%%%%%%%%%%%%%%%%%%%%%%%%%%%%%%%%%%%%%%%%%%%%%%%%%%%%%%%%%%%%%% %%%%%%%%%%%%%[d,n] = size( X ); % 样本维数d和个数nc = classCount; % 样本的类别数if d < cerror( 'the dimension of training sample must be not less than c!' ); end% 求总体均值及各类样本均值,m = zeros(d,1);m = mean(X,2); % 求总体样本均值,d维列向量XMean = zeros(d,c); % c类样本的均值矩阵for i = 1:ctempMatrix = X(:, find( XClass==i ) ); % 把属于第i类的所有样本储存到tempMatrix中XMean(:,i) = mean( tempMatrix, 2 ); % 计算第i类样本均值,存到XMean第i列end% 求类内散布矩阵SwY=X;for i = 1:nY(:,i) = Y(:,i) - XMean(:,XClass(i)); % 每个样本减去各自所属类的均值endSw = Y * Y.'; % 总类内散布矩阵,d*d维% 求类间散布矩阵SbSb = zeros(d,d);for i = 1:cNi = length( find( XClass == i ) ); % 计算第i类的样本的个数NiSb = Sb + Ni * (XMean(:,i) - m) * (XMean(:,i) - m).'; % 即Sb=N1*(m1-m)*(m1-m)'+...+Nc*(mc-m)*(mc-m)'end% % 也可以利用St=Sb+Sw 如下计算% % St = ( Xpca - kron( ones(1,N), m) ) * ( Xpca - kron( ones(1,N), m) ).'; % % Sb = St - Sw;% 求Sw^-1*Sb的特征值和特征向量% [V,D] = eig(Sw^(-1)*Sb),注意到 [V,D] = EIG(A,B)表示 A*V = B*V*D [V,D] = eig(Sb,Sw); % 即 [V,D] = eig(Sw^(-1)*Sb)Ddiag = diag(D); % 取特征值为列向量Ddiag = Ddiag.'; % 变为行向量[Ddiag, Index] = sort( Ddiag, 'descend' ); % 按降序排列特征值% 求Wlda,Xldar = rank( Sb ); % 求Sb的秩r(r<=c-1),非零的特征值只有r个,只需要求对应的r个特征向量Wlda = zeros( d, r );Xlda = zeros( r, n );Wlda = V(:,Index(1:r)); % 投影矩阵(d*r维)为前r个最大特征值对应的特征向量Wlda = Wlda ./ (ones(size(Wlda, 1), 1) * sqrt(sum(Wlda .^ 2, 1))); % 把投影矩阵的每一列都除以该列的 2-norm(也就是通常的所有元素的平方求和再开根号),即标准化Xlda = Wlda.' * X;。
- 1、下载文档前请自行甄别文档内容的完整性,平台不提供额外的编辑、内容补充、找答案等附加服务。
- 2、"仅部分预览"的文档,不可在线预览部分如存在完整性等问题,可反馈申请退款(可完整预览的文档不适用该条件!)。
- 3、如文档侵犯您的权益,请联系客服反馈,我们会尽快为您处理(人工客服工作时间:9:00-18:30)。
人脸识别核心算法在检测到人脸并定位面部关键特征点之后,主要的人脸区域就可以被裁剪出来,经过预处理之后,馈入后端的识别算法。
识别算法要完成人脸特征的提取,并与库存的已知人脸进行比对,完成最终的分类。
我们在这方面的主要工作包括:∙基于LGBP的人脸识别方法问题:统计学习目前已经成为人脸识别领域的主流方法,但实践表明,基于统计学习的方法往往会存在“推广能力弱”的问题,尤其在待识别图像“属性”未知的情况下,更难以确定采用什么样的训练图像来训练人脸模型。
鉴于此,在对统计学习方法进行研究的同时,我们还考虑了非统计模式识别的一类方法。
思路:对于给定的人脸图像,LGBP方法首先将其与多个不同尺度和方向的Gabor滤波器卷积(卷积结果称为Gabor特征图谱)获得多分辨率的变换图像。
然后将每个Gabor特征图谱划分成若干互不相交的局部空间区域,对每个区域提取局部邻域像素的亮度变化模式,并在每个局部空间区域内提取这些变化模式的空间区域直方图,所有Gabor特征图谱的、所有区域的直方图串接为一高维特征直方图来编码人脸图像。
并通过直方图之间的相似度匹配技术(如直方图交运算)来实现最终的人脸识别。
在FERET四个人脸图像测试集合上与FERET97的结果对比情况见下表。
由此可见,该方法具有良好的识别性能。
而且LGBP方法具有计算速度快、无需大样本学习、推广能力强的优点。
参见ICCV2005表.LGBP方法与FERET'97最佳结果的对比情况∙基于AdaBoost的Gabor特征选择及判别分析方法问题:人脸描述是人脸识别的核心问题之一,人脸识别的研究实践表明:在人脸三维形状信息难以准确获取的条件下,从图像数据中提取多方向、多尺度的Gabor特征是一种合适的选择。
使用Gabor特征进行人脸识别的典型方法包括弹性图匹配方法(EGM)和Gabor特征判别分类法(GFC)。
EGM在实用中需要解决关键特征点的定位问题,而且其速度也很难提高;而GFC则直接对下采样的Gabor特征用PCA降维并进行判别分析,尽管这避免了精确定位关键特征点的难题,但下采样的特征维数仍然偏高,而且简单的下采样策略很可能遗漏了非常多的有用特征。
摘要:针对上述问题,我们考虑如何对Gabor特征进行有效降维,将目前受到极大关注的AdaBoost算法创新性的应用于Gabor 特征的选择上来,用于提取对识别最有利的特征(我们称这些选择出来的Gabor特征为AdaGabor特征),并最终通过对AdaGabor特征的判别分析实现识别(称该方法为AGFC识别方法)。
在CAS-PEAL和FERET人脸图像库上的对比实验表明:AGFC方法不但可以大大降低Gabor特征的维数从而可以更加有效地避免“维数灾难问题”,降低了计算复杂度,同时识别精度也有了较大的提高。
将AGFC与EGM,GFC进一步比较可以看出:无论是EGM还是GFC,均是主观的选择若干面部关键特征点提取人脸的特征表示,而我们提出的AGFC方法则是通过机器学习的方法自动的选择那些对区分不同人脸具有关键作用的Gabor特征。
参见下图所示三者之间的区别与联系。
参见FG04,AMFG05三种不同的人脸建模方法比较示意图∙基于SV的Kernel判别分析方法sv-KFD摘要:支持向量机(SVM)和Kernel Fisher分析是利用kernel方法解决线性不可分问题的两种不同途径,我们将二者进行了有机结合。
我们首先证明了SVM最优分类面的法向量在基于支持向量的类内散度矩阵的前提下具有零空间性质,基于此定义了核化的决策边界特征矩阵(Kernelized Decision Boundary Feature Matrix,简写为KDBFM),最后利用基于零空间的Kernel Fisher方法计算投影空间。
我们还进一步提出了融合类均值向量差及KDBFM来构建扩展的决策边界特征矩阵(EKDBFM)的方法,并把这两种方法成功地应用到了人脸识别领域,在FERET和CAS-PEAL数据库的实验结果表明该方法比传统人脸识别算法具有更好的识别性能。
详见CVPR2005∙基于特定人脸子空间的人脸识别方法问题:Eigenface是人脸识别领域最著名的算法之一,本质上是通过PCA来求取人脸图像分布的线性子空间,该空间从最佳重构的角度反映了所有人脸图像分布的共性特征,但对识别而言,这样的特征却未必有利于识别,识别任务需要的是最大可能区分不同人脸的特征。
摘要:“特征脸”方法中所有人共有一个人脸子空间,而我们的方法则为每一个体人脸建立一个该个体对象所私有的人脸子空间,从而不但能够更好的描述不同个体人脸之间的差异性,而且最大可能地摈弃了对识别不利的类内差异性和噪声,因而比传统的“特征脸算法”具有更好的判别能力。
另外,针对每个待识别个体只有单一训练样本的人脸识别问题,我们提出了一种基于单一样本生成多个训练样本的技术,从而使得需要多个训练样本的个体人脸子空间方法可以适用于单训练样本人脸识别问题。
在Yale Face DatabaseB人脸库对比实验也表明我们提出的方法比传统的特征脸方法、模板匹配方法对表情、光照、和一定范围内的姿态变化具有更优的识别性能。
参见ICASSP2001,IJIST2003。
1、人体面貌识别技术的内容人体面貌识别技术包含三个部分:(1)人体面貌检测面貌检测是指在动态的场景与复杂的背景中判断是否存在面像,并分离出这种面像。
一般有下列几种方法:①参考模板法首先设计一个或数个标准人脸的模板,然后计算测试采集的样品与标准模板之间的匹配程度,并通过阈值来判断是否存在人脸;②人脸规则法由于人脸具有一定的结构分布特征,所谓人脸规则的方法即提取这些特征生成相应的规则以判断测试样品是否包含人脸;③样品学习法这种方法即采用模式识别中人工神经网络的方法,即通过对面像样品集和非面像样品集的学习产生分类器;④肤色模型法这种方法是依据面貌肤色在色彩空间中分布相对集中的规律来进行检测。
⑤特征子脸法这种方法是将所有面像集合视为一个面像子空间,并基于检测样品与其在子孔间的投影之间的距离判断是否存在面像。
值得提出的是,上述5种方法在实际检测系统中也可综合采用。
(2)人体面貌跟踪面貌跟踪是指对被检测到的面貌进行动态目标跟踪。
具体采用基于模型的方法或基于运动与模型相结合的方法。
此外,利用肤色模型跟踪也不失为一种简单而有效的手段。
(3)人体面貌比对面貌比对是对被检测到的面貌像进行身份确认或在面像库中进行目标搜索。
这实际上就是说,将采样到的面像与库存的面像依次进行比对,并找出最佳的匹配对象。
所以,面像的描述决定了面像识别的具体方法与性能。
目前主要采用特征向量与面纹模板两种描述方法:①特征向量法该方法是先确定眼虹膜、鼻翼、嘴角等面像五官轮廓的大小、位置、距离等属性,然后再计算出它们的几何特征量,而这些特征量形成一描述该面像的特征向量。
②面纹模板法该方法是在库中存贮若干标准面像模板或面像器官模板,在进行比对时,将采样面像所有象素与库中所有模板采用归一化相关量度量进行匹配。
此外,还有采用模式识别的自相关网络或特征与模板相结合的方法。
人体面貌识别技术的核心实际为“局部人体特征分析”和“图形/神经识别算法。
”这种算法是利用人体面部各器官及特征部位的方法。
如对应几何关系多数据形成识别参数与数据库中所有的原始参数进行比较、判断与确认。
一般要求判断时间低于1秒。
2、人体面貌的识别过程一般分三步:(1)首先建立人体面貌的面像档案。
即用摄像机采集单位人员的人体面貌的面像文件或取他们的照片形成面像文件,并将这些面像文件生成面纹(Faceprint)编码贮存起来。
(2)获取当前的人体面像即用摄像机捕捉的当前出入人员的面像,或取照片输入,并将当前的面像文件生成面纹编码。
(3)用当前的面纹编码与档案库存的比对即将当前的面像的面纹编码与档案库存中的面纹编码进行检索比对。
上述的“面纹编码”方式是根据人体面貌脸部的本质特征和开头来工作的。
这种面纹编码可以抵抗光线、皮肤色调、面部毛发、发型、眼镜、表情和姿态的变化,具有强大的可靠性,从而使它可以从百万人中精确地辩认出某个人。
人体面貌的识别过程,利用普通的图像处理设备就能自动、连续、实时地完成。
1.色彩空间转换function [r,g]=rgb_RGB(Ori_Face)R=Ori_Face(:,:,1);G=Ori_Face(:,:,2);B=Ori_Face(:,:,3);R1=im2double(R); % 将uint8型转换成double型G1=im2double(G);B1=im2double(B);RGB=R1+G1+B1;row=size(Ori_Face,1); % 行像素column=size(Ori_Face,2); % 列像素for i=1:rowfor j=1:columnrr(i,j)=R1(i,j)/RGB(i,j);gg(i,j)=G1(i,j)/RGB(i,j);endendrrr=mean(rr);r=mean(rrr);ggg=mean(gg);g=mean(ggg);2.均值和协方差t1=imread('D:\matlab\皮肤库\1.jpg');[r1,g1]=rgb_RGB(t1);t2=imread('D:\matlab\皮肤库\2.jpg');[r2,g2]=rgb_RGB(t2);t3=imread('D:\matlab\皮肤库\3.jpg');[r3,g3]=rgb_RGB(t3);t4=imread('D:\matlab\皮肤库\4.jpg');[r4,g4]=rgb_RGB(t4);t5=imread('D:\matlab\皮肤库\5.jpg');[r5,g5]=rgb_RGB(t5);t6=imread('D:\matlab\皮肤库\6.jpg');[r6,g6]=rgb_RGB(t6);t7=imread('D:\matlab\皮肤库\7.jpg');[r7,g7]=rgb_RGB(t7);t8=imread('D:\matlab\皮肤库\8.jpg');[r8,g8]=rgb_RGB(t8);t9=imread('D:\matlab\皮肤库\9.jpg');[r9,g9]=rgb_RGB(t9);t10=imread('D:\matlab\皮肤库\10.jpg');[r10,g10]=rgb_RGB(t10); t11=imread('D:\matlab\皮肤库\11.jpg');[r11,g11]=rgb_RGB(t11); t12=imread('D:\matlab\皮肤库\12.jpg');[r12,g12]=rgb_RGB(t12); t13=imread('D:\matlab\皮肤库\13.jpg');[r13,g13]=rgb_RGB(t13);t14=imread('D:\matlab\皮肤库\14.jpg');[r14,g14]=rgb_RGB(t14);t15=imread('D:\matlab\皮肤库\15.jpg');[r15,g15]=rgb_RGB(t15);t16=imread('D:\matlab\皮肤库\16.jpg');[r16,g16]=rgb_RGB(t16);t17=imread('D:\matlab\皮肤库\17.jpg');[r17,g17]=rgb_RGB(t17);t18=imread('D:\matlab\皮肤库\18.jpg');[r18,g18]=rgb_RGB(t18);t19=imread('D:\matlab\皮肤库\19.jpg');[r19,g19]=rgb_RGB(t19);t20=imread('D:\matlab\皮肤库\20.jpg');[r20,g20]=rgb_RGB(t20);t21=imread('D:\matlab\皮肤库\21.jpg');[r21,g21]=rgb_RGB(t21);t22=imread('D:\matlab\皮肤库\22.jpg');[r22,g22]=rgb_RGB(t22);t23=imread('D:\matlab\皮肤库\23.jpg');[r23,g23]=rgb_RGB(t23);t24=imread('D:\matlab\皮肤库\24.jpg');[r24,g24]=rgb_RGB(t24);t25=imread('D:\matlab\皮肤库\25.jpg');[r25,g25]=rgb_RGB(t25);t26=imread('D:\matlab\皮肤库\26.jpg');[r26,g26]=rgb_RGB(t26);t27=imread('D:\matlab\皮肤库\27.jpg');[r27,g27]=rgb_RGB(t27);r=cat(1,r1,r2,r3,r4,r5,r6,r7,r8,r9,r10,r11,r12,r13,r14,r15,r16,r17,r18,r19,r20,r21,r22,r23,r24,r25,r26,r27) ;g=cat(1,g1,g2,g3,g4,g5,g6,g7,g8,g9,g10,g11,g12,g13,g14,g15,g16,g17,g18,g19,g20,g21,g22,g23,g24,g 25,g26,g27);m=mean([r,g])n=cov([r,g])3.求质心function [xmean, ymean] = center(bw)bw=bwfill(bw,'holes');area = bwarea(bw);[m n] =size(bw);bw=double(bw);xmean =0; ymean = 0;for i=1:m,for j=1:n,xmean = xmean + j*bw(i,j);ymean = ymean + i*bw(i,j);end;end;if(area==0)xmean=0;ymean=0;elsexmean = xmean/area;ymean = ymean/area;xmean = round(xmean);ymean = round(ymean);end4. 求偏转角度function [theta] = orient(bw,xmean,ymean)[m n] =size(bw);bw=double(bw);a = 0;b = 0;c = 0;for i=1:m,for j=1:n,a = a + (j - xmean)^2 * bw(i,j);b = b + (j - xmean) * (i - ymean) * bw(i,j);c = c + (i - ymean)^2 * bw(i,j);end;end;b = 2 * b;theta = atan(b/(a-c))/2;theta = theta*(180/pi); % 从幅度转换到角度5. 找区域边界function [left, right, up, down] = bianjie(A)[m n] = size(A);left = -1;right = -1;up = -1;down = -1;for j=1:n,for i=1:m,if (A(i,j) ~= 0)left = j;break;end;end;if (left ~= -1) break;end;end;for j=n:-1:1,for i=1:m,if (A(i,j) ~= 0)right = j;break;end;end;if (right ~= -1) break; end;end;for i=1:m,for j=1:n,if (A(i,j) ~= 0)up = i;break;end;end;if (up ~= -1)break;end;end;for i=m:-1:1,for j=1:n,if (A(i,j) ~= 0)down = i;break;end;end;if (down ~= -1)break;end;end;6. 求起始坐标function newcoord = checklimit(coord,maxval)newcoord = coord;if (newcoord<1)newcoord=1;end;if (newcoord>maxval)newcoord=maxval;end;7.模板匹配function [ccorr, mfit, RectCoord] = mobanpipei(mult, frontalmodel,ly,wx,cx, cy, angle) frontalmodel=rgb2gray(frontalmodel);model_rot = imresize(frontalmodel,[ly wx],'bilinear'); % 调整模板大小model_rot = imrotate(model_rot,angle,'bilinear'); % 旋转模板[l,r,u,d] = bianjie(model_rot); % 求边界坐标bwmodel_rot=imcrop(model_rot,[l u (r-l) (d-u)]); % 选择模板人脸区域[modx,mody] =center(bwmodel_rot); % 求质心[morig, norig] = size(bwmodel_rot);% 产生一个覆盖了人脸模板的灰度图像mfit = zeros(size(mult));mfitbw = zeros(size(mult));[limy, limx] = size(mfit);% 计算原图像中人脸模板的坐标startx = cx-modx;starty = cy-mody;endx = startx + norig-1;endy = starty + morig-1;startx = checklimit(startx,limx);starty = checklimit(starty,limy);endx = checklimit(endx,limx);endy = checklimit(endy,limy);for i=starty:endy,for j=startx:endx,mfit(i,j) = model_rot(i-starty+1,j-startx+1);end;end;ccorr = corr2(mfit,mult) % 计算相关度[l,r,u,d] = bianjie(bwmodel_rot);sx = startx+l;sy = starty+u;RectCoord = [sx sy (r-1) (d-u)]; % 产生矩形坐标8.主程序clear;[fname,pname]=uigetfile({'*.jpg';'*.bmp';'*.tif';'*.gif'},'Please choose a color picture...'); % 返回打开的图片名与图片路径名[u,v]=size(fname);y=fname(v); % 图片格式代表值switch ycase 0errordlg('You Should Load Image File First...','Warning...');case{'g';'G';'p';'P';'f';'F'}; % 图片格式若是JPG/jpg、BMP/bmp、TIF/tif或者GIF/gif,才打开I=cat(2,pname,fname);Ori_Face=imread(I);subplot(2,3,1),imshow(Ori_Face);otherwiseerrordlg('You Should Load Image File First...','Warning...');endR=Ori_Face(:,:,1);G=Ori_Face(:,:,2);B=Ori_Face(:,:,3);R1=im2double(R); % 将uint8型转换成double型处理G1=im2double(G);B1=im2double(B);RGB=R1+G1+B1;m=[ 0.4144,0.3174]; % 均值n=[0.0031,-0.0004;-0.0004,0.0003]; % 方差row=size(Ori_Face,1); % 行像素数column=size(Ori_Face,2); % 列像素数for i=1:rowfor j=1:columnif RGB(i,j)==0rr(i,j)=0;gg(i,j)=0;elserr(i,j)=R1(i,j)/RGB(i,j); % rgb归一化gg(i,j)=G1(i,j)/RGB(i,j);x=[rr(i,j),gg(i,j)];p(i,j)=exp((-0.5)*(x-m)*inv(n)*(x-m)'); % 皮肤概率服从高斯分布endendendsubplot(2,3,2);imshow(p); % 显示皮肤灰度图像low_pass=1/9*ones(3);image_low=filter2(low_pass, p); % 低通滤波去噪声subplot(2,3,3);imshow(image_low);% 自适应阀值程序previousSkin2 = zeros(i,j);changelist = [];for threshold = 0.55:-0.1:0.05two_value = zeros(i,j);two_value(find(image_low>threshold)) = 1;change = sum(sum(two_value - previousSkin2));changelist = [changelist change];previousSkin2 = two_value;end[C, I] = min(changelist);optimalThreshold = (7-I)*0.1two_value = zeros(i,j);two_value(find(image_low>optimalThreshold)) = 1; % 二值化subplot(2,3,4);imshow(two_value); % 显示二值图像frontalmodel=imread('E:\我的照片\人脸模板.jpg'); % 读入人脸模板照片FaceCoord=[];imsourcegray=rgb2gray(Ori_Face); % 将原照片转换为灰度图像[L,N]=bwlabel(two_value,8); % 标注二值图像中连接的部分,L为数据矩阵,N为颗粒的个数for i=1:N,[x,y]=find(bwlabel(two_value)==i); % 寻找矩阵中标号为i的行和列的下标bwsegment = bwselect(two_value,y,x,8); % 选择出第i个颗粒numholes = 1-bweuler(bwsegment,4); % 计算此区域的空洞数if (numholes >= 1) % 若此区域至少包含一个洞,则将其选出进行下一步运算RectCoord = -1;[m n] = size(bwsegment);[cx,cy]=center(bwsegment); % 求此区域的质心bwnohole=bwfill(bwsegment,'holes'); % 将洞封住(将灰度值赋为1)justface = uint8(double(bwnohole) .* double(imsourcegray));% 只在原照片的灰度图像中保留该候选区域angle = orient(bwsegment,cx,cy); % 求此区域的偏转角度bw = imrotate(bwsegment, angle, 'bilinear');bw = bwfill(bw,'holes');[l,r,u,d] =bianjie(bw);wx = (r - l +1); % 宽度ly = (d - u + 1); % 高度wratio = ly/wx % 高宽比if ((0.8<=wratio)&(wratio<=2))% 如果目标区域的高度/宽度比例大于0.8且小于2.0,则将其选出进行下一步运算S=ly*wx; % 计算包含此区域矩形的面积A=bwarea(bwsegment); % 计算此区域面积if (A/S>0.35)[ccorr,mfit, RectCoord] = mobanpipei(justface,frontalmodel,ly,wx, cx,cy, angle);endif (ccorr>=0.6)mfitbw=(mfit>=1);invbw = xor(mfitbw,ones(size(mfitbw)));source_with_hole = uint8(double(invbw) .* double(imsourcegray));final_image = uint8(double(source_with_hole) + double(mfit));subplot(2,3,5);imshow(final_image); % 显示覆盖了模板脸的灰度图像imsourcegray = final_image;subplot(2,3,6);imshow(Ori_Face); % 显示检测效果图end;if (RectCoord ~= -1)FaceCoord = [FaceCoord; RectCoord];endendendend% 在认为是人脸的区域画矩形[numfaces x] = size(FaceCoord);for i=1:numfaces,hd = rectangle('Position',FaceCoord(i,:));set(hd, 'edgecolor', 'y');end人脸检测是人脸识别、人机交互、智能视觉监控等工作的前提。