实验一 Cisco交换机的基本配置命令
计算机通信技术实验1交换机的基本配置

计算机通信技术实验1交换机的基本配置电⼦信息学院实验报告书课程名:《计算机通信技术》题⽬:交换机的基本配置班级: xx1411学号: xxxxxxxxxx姓名: xx实验时间 4.14实验⼀交换机的基本配置⼀、实验⽬的1、理解和掌握通过控制台端⼝对交换机进⾏访问、设置和管理的⽅法;2、掌握交换机配置的基本命令、⽅法和步骤。
⼆、实验设备1、Cisco Catalyst 2950系列交换机2台,型号不限。
2、2台PC,操作系统为Windows系列,装有超级终端程序。
3、Console电缆和若⼲根直通线。
三、实验要求1、按实验内容进⾏交换机的配置,验证配置的正确性2、将本实验的实验⽬的、实验内容、实验结果和实验⼩结记录在实验报告纸上。
四、知识要点交换机是⼀种数据链路层设备,运⾏以太⽹通信协议。
Cisco交换机产品以“Catalyst”为标志,包含2900、2918、2940、2960、3560-E、3560、3750-E、3750、4500、4900、6500等众多系列。
1交换机的配置⽅式1)交换机的本地配置连接Cisco交换机上⼀般都有⼀个“Console”端⼝,它是专门⽤于对交换机进⾏本地配置和管理的。
通过Console端⼝连接并配置交换机,是配置和管理交换机必须经过的步骤。
2)利⽤Telnet虚拟终端配置Cisco交换机或路由器通过不同的配置模式来区分命令的执⾏权限(级别)。
在不同模式下,允许执⾏的命令不相同。
1)⽤户EXEC模式–该模式的权限最低,只能执⾏⼀组有限的命令,这些命令主要是查看系统信息的命令Show)、⽹络诊断调试命令(如ping.traceroute等)、终端登录( Telnet)以及进⼊特权模式的命令(enable)等。
–此时的命令⾏提⽰符为“>”,例如“Switch>”。
2)特权EXEC模式–⽤户EXEC模式下,执⾏enable命令,将进⼊到特权EXEC模式。
进⼈该模式后,就能执⾏IOS提供的所有命令。
Cisco2900交换机基本配置命令
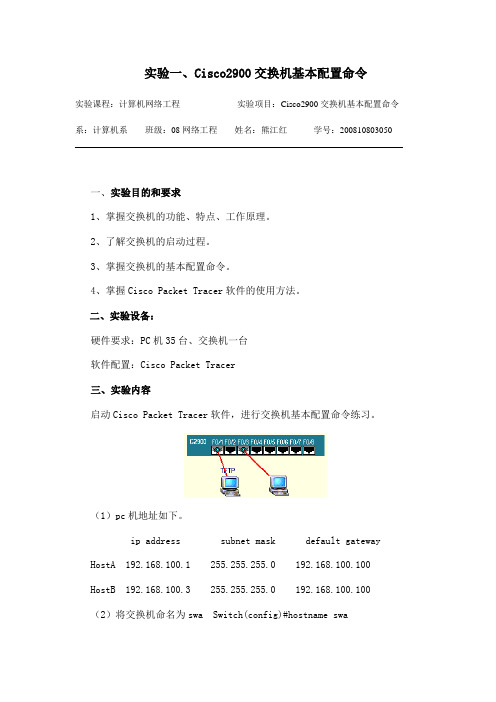
实验一、Cisco2900交换机基本配置命令实验课程:计算机网络工程实验项目:Cisco2900交换机基本配置命令系:计算机系班级:08网络工程姓名:熊江红学号:200810803050一、实验目的和要求1、掌握交换机的功能、特点、工作原理。
2、了解交换机的启动过程。
3、掌握交换机的基本配置命令。
4、掌握Cisco Packet Tracer软件的使用方法。
二、实验设备:硬件要求:PC机35台、交换机一台软件配置:Cisco Packet Tracer三、实验内容启动Cisco Packet Tracer软件,进行交换机基本配置命令练习。
(1)pc机地址如下。
ip address subnet mask default gateway HostA 192.168.100.1 255.255.255.0 192.168.100.100HostB 192.168.100.3 255.255.255.0 192.168.100.100(2)将交换机命名为swa Switch(config)#hostname swa(3)设置交换机的ip地址是192.168.100.5,子网掩码是255.255.255.0,缺省网关是192.168.100.100。
swa(config)#ip address 192.168.100.5 255.255.255.0swa(config)#ip default-gateway 192.168.100.100(4)设置交换机的secret密码为cisco。
swa(config)#enable secret cisco(5)设置交换机的console密码为cisco。
swa(config)#enable password cisco(6)设置交换机的vty密码为123。
swa(config)#line vty 0 15swa(config-line)#login% Login disabled on line 1, until 'password' is set% Login disabled on line 2, until 'password' is set% Login disabled on line 3, until 'password' is set% Login disabled on line 4, until 'password' is set% Login disabled on line 5, until 'password' is set% Login disabled on line 6, until 'password' is set% Login disabled on line 7, until 'password' is set% Login disabled on line 8, until 'password' is set% Login disabled on line 9, until 'password' is set% Login disabled on line 10, until 'password' is set% Login disabled on line 11, until 'password' is set% Login disabled on line 12, until 'password' is set% Login disabled on line 13, until 'password' is set% Login disabled on line 14, until 'password' is set% Login disabled on line 15, until 'password' is set% Login disabled on line 16, until 'password' is setswa(config-line)#password 123(7)配置完成后查看该交换机的配置情况、端口情况、与pc机的连通情况及pc之间的连通情况。
思科交换机的基本配置
思科交换机的基本配置随着Internet的高速发展,网络规模不断膨胀,对于从事网络专业的学生熟练掌握路由器和交换机的配置已显得十分重要。
接下来是小编为大家收集的思科交换机的基本配置方法,希望能帮到大家。
思科交换机的基本配置的方法一、交换机的基本配置Author:chenchao in ZJNU从本篇文章开始,将连载大概8-9篇自己学习交换与路由的实验报告,但是怕自己能力不行,会出现错误,所以,先载两篇文章,依次为:交换机的基本配置;路由器基本配置。
本篇为交换机的基本配置,使用的仿真软件是Cisco的一款免费软件:Cisco Packet Tracer。
想学习的可以在百度自行下载。
下面开始附上实验过程:实验环境:Cisco 2950交换机1台,Console电缆1根,PC机一台,网线1根。
连接如下图所示:实验步骤:一、交换机的带外配置;1、在用户模式、特权模式、全局模式、接口模式之间转换;Switch>enableSwitch#configure terminalEnter configuration commands, one perline. End with CNTL/Z.Switch(config)#interface FastEthernet 0/1Switch(config-if)#exitSwitch(config)#exitSwitch#%SYS-5-CONFIG_I: Configured from console byconsoleSwitch#exitSwitch con0 is now availablePress RETURN to get started.Switch>2、将交换机的名称改为“student”;Switch(config)#hostname studentstudent(config)#3、为交换机各个模式设置密码“cisco”;特权模式下的密码保护student#enablestudent#configure tEnter configuration commands, one perline. End with CNTL/Z.student(config)#enable password ciscostudent(config)#enable secret cisco1远程登录口令设置student#configure tEnter configuration commands, one perline. End with CNTL/Z.student(config)#line console 0student(config-line)#line vty 0 4student(config-line)#password cisco2student(config-line)#loginstudent(config-line)#student#4、为交换机制定一个IP地址10.10.10.X/24;student#configConfiguring from terminal, memory, ornetwork [terminal]?Enter configuration commands, one perline. End with CNTL/Z.student(config)#interface vlan 1student(config-if)#ip address 10.10.10.1255.0.0.05、开启交换机的Telnet服务功能,建立Telnet用户admin,口令cisco,并制定只能从10.10.10.y/24登录Telnet服务器;student#student#configure tEnter configuration commands, one perline. End with CNTL/Z.student(config)#user admin password 0 ciscostudent(config)#6、查看配置情况;student>enablePassword:student#show running-cBuilding configuration...hostname student!enable secret 5$1$mERr$q.MA2tj.WFptzvbifq/1i.enable password cisco!!username admin password 0 ciscointerface Vlan1ipaddress 10.10.10.1 255.0.0.0!!line con 0!line vty 0 4password cisco2loginline vty 5 15login!!End二、交换机的端口配置:1、配置接口的描述、关闭借口、启动接口、配置接口的速度为100Mbps、配置接口工作模式为全双工、配置接口的流程控制;student#configure terminalEnter configuration commands, one perline. End with CNTL/Z.student(config)#interface FastEthernet0/1student(config-if)#shutdown%LINK-5-CHANGED: Interface FastEthernet0/1,changed state to administratively down%LINEPROTO-5-UPDOWN: Line protocol onInterface FastEthernet0/1, changed state to down%LINEPROTO-5-UPDOWN: Line protocol onInterface Vlan1, changed state to downstudent(config-if)#student(config-if)#exitstudent(config)#interface FastEthernet0/1student(config-if)#no shutdown%LINK-5-CHANGED: Interface FastEthernet0/1,changed state to up%LINEPROTO-5-UPDOWN: Line protocol onInterface FastEthernet0/1, changed state to up%LINEPROTO-5-UPDOWN: Line protocol onInterface Vlan1, changed state to upstudent(config-if)#speed 100student(config-if)#duplex full%LINK-5-CHANGED: Interface FastEthernet0/1,changed state to down%LINEPROTO-5-UPDOWN: Line protocol onInterface FastEthernet0/1, changed state to down%LINEPROTO-5-UPDOWN: Line protocol onInterface Vlan1, changed state to downstudent(config-if)#2、配置接口FastEthernet0/10为Access口;student#student#configure terminalEnter configuration commands, one perline. End with CNTL/Z.student(config)#interface FastEthernet0/10student(config-if)#switchport mode accessstudent(config-if)#3、配置接口FastEthernet0/12为Trunk口;student#student#configure tEnter configuration commands, one perline. End with CNTL/Z.student(config)#interface fastethernet0/12student(config-if)#switchport mode Trunkstudent(config-if)#end4、查看配置情况;!interface FastEthernet0/1duplex fullspeed100!!interface FastEthernet0/9!interface FastEthernet0/10switchport mode access!interface FastEthernet0/11!interface FastEthernet0/12switchport mode trunk!student#show running-cBuilding configuration...Current configuration : 1275 bytes!version 12.1no service timestamps log datetime msecno service timestamps debug datetime msec no service password-encryption!hostname student!enable secret 5$1$mERr$q.MA2tj.WFptzvbifq/1i. enable password cisco!!username admin password 0 cisco!!duplex fullspeed 100!interface FastEthernet0/2 !interface FastEthernet0/3 !interface FastEthernet0/4 !interface FastEthernet0/5 !interface FastEthernet0/6 !interface FastEthernet0/7 !interface FastEthernet0/8 !interface FastEthernet0/9 !interface FastEthernet0/10 switchport mode access !interface FastEthernet0/11 !interface FastEthernet0/12 switchport mode trunk!interface FastEthernet0/13 !!interface FastEthernet0/15!interface FastEthernet0/16!interface FastEthernet0/17!interface FastEthernet0/18!interface FastEthernet0/19!interface FastEthernet0/20!interface FastEthernet0/21!interface FastEthernet0/22!interface FastEthernet0/23!interface FastEthernet0/24!interface GigabitEthernet1/1 !interface GigabitEthernet1/2 !interface Vlan1ipaddress 10.10.10.1 255.0.0.0 !!line con 0!line vty 0 4password cisco2loginline vty 5 15login!!end看了“思科交换机的基本配置”还想看:。
Cisco交换机基本配置命令及学习心得

Cisco交换机基本配置命令及学习⼼得1:配置登录⽤户,⼝令等Switch> //⽤户直⾏模式提⽰符Switch>enable //进⼊特权模式Switch# //特权模式(配置密码后必须输⼊密码才可进⼊特权模式)Switch#config terminal //进⼊全局配置模式Switch(config)# //配置模式提⽰符Switch(config)#hostname xxx //设置主机名成为xxx这⾥使⽤CISCO 2960GCISCO 2960G(config)#enable password xxx //设置使能⼝令为明⽂显⽰为xxxCISCO 2960G(config)#enable secret xxx //设置使能⼝令为密⽂显⽰为xxxCISCO 2960G(config)#line vty 0 15 //设置虚拟终端线,通过telnet⽅式登录允许0-15个⽤户同事登录CISCO 2960G(config-line)#login //设置远程telnet远程登录验证CISCO 2960G(config-line)#password xxx //设置telnet登录密码2:cisco2960 VLan设置CISCO 2960G> enable //进⼊特权模式CISCO 2960G#vlan database //进⼊vlan设置CISCO 2960G(vlan)#vlan 2 name xxx //创建vlan 2,并给vlan命名CISCO 2960G(vlan)#no vlan 2 v //删除vlan 2CISCO 2960G(vlan)#exit //回到特权模式下端⼝设置命令:CISCO 2960G(config)#interface fastethernet0/1 //进⼊⽹⼝1,简化命令 int f0/1 ,0/1指的是第⼀个插槽上的第⼀个⽹⼝CISCO 2960G(config-if)# //接⼝视图模式CISCO 2960G(config-if)#shutdown //关闭当前端⼝CISCO 2960G(config-if)#no shutdown //打开当前端⼝CISCO 2960G(config)#interface gigabyte0/1 //进⼊汇聚千兆⼝1,简化命令 int giga0/1指的是第⼀个插槽上的第⼀个汇聚⽹⼝CISCO 2960G(config-if)#CISCO 2960G(config-if)#duplex auto/full/half //设置端⼝⼯作模式为⾃适应/全双通/半双通CISCO 2960G(config-if)#switchport mode trunk //设置当前端⼝模式为汇聚⼝CISCO 2960G(config-if)#switchport mode access //设置当前端⼝模式为接⼊模式CISCO 2960G(config-if)#switchport trunk allowed vlan 1,2 //设置当前汇聚端⼝允许vlan1,2通过,vlan修剪,默认为all,全部允许CISCO 2960G(config-if)#switchport trunk vlan 2 //设置当前汇聚端⼝允许vlan 2通过,vlan修剪CISCO 2960G(config-if)#switchport access vlan 2 //将当前端⼝加⼊到vlan 2中CISCO 2960G(config-if)#switchport trunk encap dot1q //设置vlan中继将端⼝加⼊vlanCISCO 2960G(config)#interface fastethernet0/1CISCO 2960G(config-if)#switchport mode accessCISCO 2960G(config-if)#switchport access vlan 2将多个端⼝加⼊到VLAN中CISCO 2960G(config)#interface range f0/1 - 10CISCO 2960G(config-if-range)#switchport mode accessCISCO 2960G(config-if-range)#switchport access vlan 2CISCO 2960G#show vlan brief //⽤于查看配置后结果CISCO 2960G#show vlan //⽤于查看配置后结果3:设置VTP cisco专有的vlan终极协议也成为局域⽹⼲道协议,作⽤是⼗⼏台交换机在企业⽹中,配置VLAN⼯作量⼤,可以使⽤VTP协议,把⼀台交换机配置成VTP Server, 其余交换机配置成VTP Client,这样他们可以⾃动学习到server 上的VLAN 信息switch(config)#vtp domain xxxx //设置发vtp域名switch(config)#vtp password xxxx //设置发vtp密码switch(config)#vtp mode server //设置发vtp模式为 vtp服务器switch(config)#vtp mode client //设置发vtp模式为 vtp客户端4:交换机配置IP地址switch(config)#interface vlan 1 //进⼊vlan 1switch(config-if)#ip address 119.167.223.221 255.255.255.128 //设置交换机的管理ip地址switch(config)#ip default-gateway 119.167.223.254 //设置交换机的默认⽹关switch(config)#end //退出当前模式5:交换机保存设置命令switch#write //保存配置信息switch#copy running-config startup-config //将当前正在使⽤中的配置保存到交换机开机需要加载的配置⽂件⾥去。
CISCO交换机基本配置和使用概述
CISCO交换机基本配置和使用概述CISCO交换机是一种常用的网络设备,用于构建局域网(Local Area Network,LAN)。
它可以通过物理线路的连接,将多台计算机或其他网络设备连接到同一个网络中,实现数据的传输和共享。
CISCO交换机的基本配置包括IP地址的配置、VLAN的配置、端口配置、安全性配置等。
接下来,我们将对这些配置进行详细说明。
首先,IP地址的配置是CISCO交换机的基本操作之一。
通过配置IP地址,我们可以对交换机进行管理和监控。
具体的配置步骤如下:1. 进入交换机的配置模式。
在命令行界面输入"enable"命令,进入特权模式。
2. 进入全局配置模式。
在特权模式下输入"configure terminal"命令,进入全局配置模式。
3. 配置交换机的IP地址。
在全局配置模式下输入"interfacevlan 1"命令,进入虚拟局域网1的接口配置模式。
然后输入"ip address 192.168.1.1 255.255.255.0"命令,配置交换机的IP地址和子网掩码。
4. 保存配置并退出。
在接口配置模式下输入"exit"命令,返回到全局配置模式。
然后输入"exit"命令,返回到特权模式。
最后输入"copy running-config startup-config"命令,保存配置到闪存中。
其次,VLAN的配置是CISCO交换机的关键配置之一。
通过配置VLAN,我们可以将交换机的端口划分为不同的虚拟局域网,实现数据的隔离和安全。
1. 进入交换机的配置模式。
同样,在特权模式下输入"configure terminal"命令,进入全局配置模式。
2. 创建VLAN。
在全局配置模式下输入"vlan 10"命令,创建一个编号为10的VLAN。
1实验交换机的基本配置和操作
实验交换机的基本配置2、远程配置方式Telnet方式Telnet协议是一种远程访问协议,可以用它登录到远程计算机、网络设备或专用TCP/IP网络。
Windows 95/98及其以后的Windows系统、UNIX/Linux等系统中都内置有Telnet客户端程序,我们就可以用它来实现与远程交换机的通信。
在使用Telnet连接至交换机前,应当确认已经做好以下准备工作:·在用于管理的计算机中安装有TCP/IP协议,并配置好了IP地址信息。
·在被管理的交换机上已经配置好IP地址信息。
如果尚未配置IP地址信息,则必须通过Console端口进行设置。
·在被管理的交换机上建立了具有管理权限的用户帐户。
如果没有建立新的帐户,则Cisco交换机默认的管理员帐户为”Admin“。
连接交换机a.先启动交换机,等待OK灯不闪烁;b.点击“开始”——“运行”——输入“cmd”——输入“telnet 192.168.10*.10”,连接到不同的交换机上。
c.所需密码均为“cisco”。
在此步骤中思考以下问题:1、交换机的型号是什么?2、交换机的以太网地址是什么?3、交换机上有些什么样的端口?交换机配置模式及帮助交换机配置模式是用于不同级别的命令对交换机进行配置,同时提供了一定的安全性、规范性。
对于几种配置模式的学习,需要不断的使用才可掌握。
几种配置模式如下:普通用户模式:开机直接进入普通用户模式,在该模式下我们只能查询交换机的一些基础信息,如版本号(show version)。
提示信息:switch>特权用户模式:在普通用户模式下输入enable 命令即可进入特权用户模式,在该模式下我们可以查看交换机的配置信息和调试信息等等。
提示信息:switch#全局配置模式:在特权用户模式下输入configure terminal 命令即可进入全局配置模式,在该模式下主要完成全局参数的配置。
提示信息:switch(config)#接口配置模式:在全局配置模式下输入interface interface-list 即可进入接口配置模式,在该模式下主要完成接口参数的配置。
思科交换机路由基本配置命令
思科交换机路由基本配置命令常用命令1.配置接口:interface {interface_type} {interface_number}2.配置IP地址:ip address {IP_address} {subnet_mask}3.配置默认网关:ip default-gateway {default_gateway_IP}4.开启接口:no shutdown5.配置路由协议:router {routing_protocol}6.配置路由器ID:router-id {router_ID}7.配置路由信息:network {network_address} {subnet_mask}8.配置静态路由:ip route {destination_network} {subnet_mask}{next-hop_IP}9.配置动态路由:router {routing_protocol} {network_address}10.保存配置:copy running-config startup-config注意:上述命令仅作为参考,具体配置应根据实际环境和设备型号进行调整。
下面是一些基本的 Cisco 交换机路由配置命令:1.配置 hostname: hostname <name>2.配置 IP 地址: interface <interface> 后进入接口模式,再输入 ipaddress <ip address> <subnet mask>3.配置默认路由: ip route 0.0.0.0 0.0.0.0 <next hop IP>4.启用路由协议: router <protocol> (例如: router rip)5.配置路由连接: network <network address> (例如: network192.168.1.0)6.查看路由表: show ip routeCisco 交换机路由配置步骤1.进入配置模式:configure terminal2.配置 IP 地址和子网掩码:interface [interface-name] ; ip address[ip-address] [subnet-mask]3.配置默认路由:ip route 0.0.0.0 0.0.0.0 [next-hop-IP-address]4.启用路由协议:router [protocol-name] (如:router ospf)5.配置路由协议参数: [protocol-name] [process-id] (如:ospf 1)6.配置路由连接:network [network-address] [wildcard-mask] area[area-id] (如:network 192.168.1.0 0.0.0.255 area 0)7.保存配置:copy running-config startup-config8.退出配置模式:exit。
思科交换机的基本配置命令

思科交换机的基本配置命令网络技术知识其实也是弱电里面的一个难点,这个一般是在大学课程里面才能详细的学习,今天小编带来的是交换机的基本配置命令。
一、基本配置命令switch>用户模式1:进入特权模式enableswitch>enableswitch#2:进入全局配置模式configureterminalswitch>enableswitch#configureterminalswitch(conf)#3:交换机命名hostnameaptech2950以aptech2950为例switch>enableswitch#configureterminalswitch(conf)#hostnameaptch-2950aptech2950(conf)#4:配置使能口令enablepasswordcisco以cisco为例switch>enableswitch#configureterminalswitch(conf)#hostnameaptch2950aptech2950(conf)#enablepasswordcisco5:配置使能密码enablesecretciscolab以cicsolab为例switch>enableswitch#configureterminalswitch(conf)#hostnameaptch2950aptech2950(conf)#enablesecretciscolab6:设置虚拟局域网vlan1interfacevlan1switch>enableswitch#configureterminalswitch(conf)#hostnameaptch2950aptech2950(conf)#interfacevlan1aptech2950(conf-if)#ipaddress192.168.1.1255.255.255.0配置交换机端口ip和子网掩码aptech2950(conf-if)#noshut是配置处于运行中aptech2950(conf-if)#exitaptech2950(conf)#ipdefault-gateway192.168.254设置网关地址7:进入交换机某一端口interfacefasteher0/17以17端口为例switch>enableswitch#configureterminalswitch(conf)#hostnameaptch2950aptech2950(conf)#interfacefasteher0/17aptech2950(conf-if)#8:查看命令showswitch>enableswitch#showversion察看系统中的所有版本信息showinterfacevlan1查看交换机有关ip协议的配置信息showrunning-configure查看交换机当前起作用的配置信息showinterfacefastether0/1察看交换机1接口具体配置和统计信息showmac-address-table查看mac地址表showmac-address-tableaging-time查看mac地址表自动老化时间9:交换机恢复出厂默认恢复命令switch>enableswitch#erasestartup-configureswitch#reload10:双工模式设置switch>enableswitch#configureterminalswitch2950(conf)#hostnameaptch-2950aptech2950(conf)#interfacefasteher0/17以17端口为例aptech2950(conf-if)#duplexfull/half/auto有full,half,auto三个可选项11:cdp相关命令switch>enableswitch#showcdp查看设备的cdp全局配置信息showcdpinterfacefastether0/17查看17端口的cdp配置信息showcdptraffic查看有关cdp包的统计信息showcdpnerghbors列出与设备相连的cisco设备12:csico2950的密码恢复拔下交换机电源线。
Cisco交换机常用配置命令

Cisco交换机常用配置命令1交换机上设置主机名/系统名:switch(config)# hostname hostname2.交换机上设置登录口令:switch(config)# enable password level 1 password3.交换机上设置远程访问:switch(config)# interface vlan 1switch(config-if)# ip address ip-address netmaskswitch(config-if)# ip default-gateway ip-address4在交换机上启用和浏览CDP信息:switch(config-if)# cdp enableswitch(config-if)# no cdp enable为了查看Cisco邻接设备的CDP通告信息:switch# show cdp interface [type modle/port]switch# show cdp neighbors [type module/port] [detail] 5.交换机的端口描述:switch(config-if)# description description-string6.交换机上设置端口速度:switch(config-if)# speed{10|100|1000|auto}7在基于IOS的交换机上设置以太网的链路模式: switch(config-if)# duplex {auto|full|half}在交换机上设置以太网的链路模式:switch(enable) set port duplex module/number {full|half} 8.在交换机上创建VLAN并划入接口switch# configure teriminalswitch(config)# vlan configuration vlan-numswitch(config)# interface interface module/number switch(config-if)# switchport mode accessswitch(config-if)# switchport access vlan vlan-num switch(config-if)# endCisco交换机故障处理●检查端口状态up/downShow ip int brief●查看cpu负载是否过高show processes cpu●检查内存利用率是否过高show processes memory●检查路由表是否正确show ip route 查看系统日志Show log。
Cisco交换机的基本配置及启动命令
Cisco交换机的基本配置及启动命令sw1924_b#enable secret cisco设置加密密码sw1924_b#enable password level 1 cisco1设置等级密码(1最低)sw1924_b#enable password level 15 cisco15设置等级密码(15最高)sw1924_b#ip address 192.168.14.1 255.255.255.0 设置交换机的管理IP地址sw1924_b#ip default-gateway 192.168.198.2设置交换机的网关地址sw1924_b#ip domain-name 设置交换机所连域的域名sw1924_b#ip name-server 218.87.18.230设置交换机所连域的域名服务器IPsw1924_b#show ip查看上述设置环境sw1924_b#show version查看交换机的版本等信息sw1924_b#show running-config查看交换机的当前运行配置等全部信息sw1924_b#show int e0/1查看交换机的第1个端口信息2912交换机上配置sw2912_a#erase nvram全部清除交换机的所有配置sw2912_a#reload重新启动交换机(初始提示符为switch> )sw2912_a#int vlan 1进入vlan 1特殊接口配置模式sw2912_a#ip address 192.168.15.1 255.255.255.0 设置交换机的管理IP地址sw2912_a#ip default-gateway 192.168.198.2设置交换机的网关地址sw2912_a#ip domain-name 设置交换机所连域的域名sw2912_a#ip name-server 218.87.18.230设置交换机所连域的域名服务器IPsw2912_a#show int vlan 1查看交换机的VLAN 1特殊接口配置信息sw2912_a#show run查看交换机的当前运行配置等全部信息交换机的端口和MAC地址表的设置1924交换机配置端口属性sw1924_b#conf tsw1924_b#interface ethernet 0/1进入第1个端口sw1924_b#description sw1924_b-e0/1-pc1给端口写入注释信息sw1924_b#duplex auto/full/full-flow-control/half设置端口的工作模式sw1924_b#port secure启用端口安全性sw1924_b#port secure max-mac-count 1设置该端口允许对应的MAC地址数(默认132个) sw1924_b#sh mac-address-table security查看端口安全性2912交换机配置端口属性sw1912_a#conf t进入全局配置模式sw1912_a#interface fastethernet 0/1进入第1个端口sw1912_a#description sw2912_a-f0/1-pc1给端口写入注释信息sw1912_a#duplex auto/full/half设置端口的工作模式sw1912_a#port security启用端口安全性sw1912_a#port security max-mac-count 1设置该端口允许对应的MAC地址数(默认132个) sw1912_a#end返回特权模式sw1912_a#sh port security查看端口安全性配置和查看MAC地址表1924交换机配置MAC地址表sw1924_b#mac-address-table aging-time 600设置动态地址超时时间sw1924_b#mac-address-table permanent 0000.0cdd.5a4d e0/3定义永久MAC地址(绑定MAC地址)sw1924_b#mac-address-table restricted static 0000.0cdd.aaed e0/6 e0/7 定义受限MAC地址sw1924_b#address-violation disable/ignore/suspend定义地址安全违规sw1924_b#show mac-address-table查看上述配置sw1924_b#clear mac-addr restric static清除受限MAC地址表项2912交换机配置MAC地址表sw2912_a#mac-address-table aging-time 700设置动态地址超时时间sw2912_a#mac-address-table static 0000.0cdd.5a4d e0/3定义永久MAC地址(绑定MAC地址)sw2912_a#mac-address-table secure 00d0.f80d.3333 f0/3 vlan 1 定义受限MAC地址sw2912_a#port security action shutdown/trap定义地址安全违规sw2912_a#show port security查看上述配置配置VTP、VLAN、VLAN Trunk和STP配置VTPsw1924_a#conf tsw1924_a#vtp server定义VTP的工作模式sw1924_a#vtp domain cisco定义VTP的域名sw1924_a#trunk on启用干道sw1924_b#vtp domain cisco加入VTP域sw1924_b#vtp client定义VTP的工作模式sw1924_b#trunk on启用干道sw1924_a#show trunk bsw1924_a#show trunk b allowed-vlans查看干道信息配置VLANsw1924_a#vlan 10 dept1sw1924_a#vlan 20 dept2sw1924_a#vlan 30 dept3sw1924_a#vlan 40 dept4定义所需VLANsw1924_a#show vlan查看VLAN信息sw1924_b#show vlansw1924_b#show vtp查看VTP的信息sw1924_b#int e0/1sw1924_b#vlan-membership static 10 sw1924_b#int e0/2sw1924_b#vlan-membership static 20 sw1924_b#int e0/3sw1924_b#vlan-membership static 30 sw1924_b#int e0/4sw1924_b#vlan-membership static 40 把接口划入各自VLAN配置spanning treesw1924_b#spantree 1启用生成树协议sw1924_b#sh spantree 1 查看生成树信息sw1924_b#no spantree 1 关闭生成树协议sw1924_b#sh spantree 1 查看生成树信息。
2024版思科网络交换机配置命令详细总结归纳

VLAN间路由配置
01 02 03 04
使用`interface`命令进入三层接口配置模式,如`interface vlan 10`进入 VLAN 10的三层接口。
源端口和目的端口散列
同时考虑数据包的源端口和目的端口进行负载均衡。
配置负载均衡策略
在全局配置模式下使用`port-channel load-balance`命令进行配置。
端口聚合故障排除技巧
01
检查物理连接
确保所有参与聚合的物理端口都已 正确连接。
03
检查交换机配置
确认交换机的配置是否正确,包括 聚合模式、聚合组号等。
限制登录用户
指定允许通过SSH远程登录的用户或用户组。
交换机日志与审计功能启用
启用日志功能
将交换机操作记录到日志文件中,方便后续 审计和分析。
远程日志服务器
将日志文件发送到远程日志服务器进行集中 存储和管理。
配置日志级别
根据需要设置日志记录的详细程度(如信息、 警告、错误等)。
审计功能
启用审计功能,对特定操作进行实时监控和 记录。
思科网络交换机配置命令详细 总结归纳
目 录
• 交换机基本配置 • VLAN配置与管理 • 生成树协议(STP)配置与优化 • 端口聚合(EtherChannel)配置与应用 • 交换机安全性设置与加固 • 交换机性能监控与故障排除
01
交换机基本配置
交换机登录与访问控制
1 2
通过控制台端口登录 使用终端仿真软件通过控制台端口连接到交换机, 输入用户名和密码进行登录。
cisco交换机配置实验报告

Cisco交换机配置实验报告实验目的本实验旨在了解和掌握Cisco交换机的基本配置和操作方法,包括VLAN划分、端口配置、静态路由等。
实验环境•Cisco交换机(型号:XYZ)•一台计算机•Console连接线实验步骤步骤一:连接设备1.将计算机通过Console连接线与Cisco交换机的Console端口相连。
2.打开终端软件(如SecureCRT、PuTTY等),配置串口连接参数,如波特率、数据位、停止位等。
3.点击连接按钮,与Cisco交换机建立串口连接。
步骤二:进入特权模式1.在终端中输入用户名和密码,登录到Cisco交换机的用户模式。
2.输入enable命令,进入特权模式,需输入特权密码。
步骤三:配置主机名1.在特权模式下,输入configure terminal命令,进入全局配置模式。
2.输入hostname [名称]命令,设置Cisco交换机的主机名。
3.按下Ctrl+Z保存配置并退出。
步骤四:配置VLAN1.进入全局配置模式,输入vlan [VLAN编号]命令,创建VLAN。
2.输入name [VLAN名称]命令,为VLAN设置名称。
3.重复以上步骤,创建所需的所有VLAN。
4.按下Ctrl+Z保存配置并退出。
步骤五:配置端口1.进入全局配置模式,输入interface [端口编号]命令,进入端口配置模式。
2.输入switchport mode access命令,设置端口为访问模式。
3.输入switchport access vlan [VLAN编号]命令,将端口划分到对应的VLAN。
4.重复以上步骤,配置所有需要的端口。
5.按下Ctrl+Z保存配置并退出。
步骤六:配置静态路由1.进入全局配置模式,输入ip route [目标子网] [子网掩码] [下一跳地址]命令,添加静态路由。
2.重复以上步骤,配置所有需要的静态路由。
3.按下Ctrl+Z保存配置并退出。
步骤七:查看配置1.在特权模式下,输入show running-config命令,查看当前的运行配置。
思科交换机基本配置命令

思科交换机基本配置命令思科交换机基本配置命令大全CISCO交换机有什么基本配置命令呢?下面yjbys店铺为大家分享最新思科交换机配置命令大全,希望对大家学习思科认证有所帮助!CISCO交换机基本配置:Console端口连接用户模式hostname# ;特权模式hostname(config)# ;全局配置模式hostname(config-if)# ;交换机口令设置:switch>enable ;进入特权模式switch#config terminal ;进入全局配置模式switch(config)#hostname csico ;设置交换机的主机名switch(config)#enable secret csico1 ;设置特权加密口令switch(config)#enable password csico8 ;设置特权非密口令switch(config)#line console 0 ;进入控制台口switch(config-line)#line vty 0 4 ;进入虚拟终端switch(config-line)#login ;虚拟终端允许登录switch(config-line)#password csico6 ;设置虚拟终端登录口令csico6switch#exit ;返回命令交换机VLAN创建,删除,端口属性的设置,配置trunk端口,将某端口加入vlan中,配置VTP:switch#vlan database ;进入VLAN设置switch(vlan)#vlan 2 ;建VLAN 2switch(vlan)#vlan 3 name vlan3 ;建VLAN 3并命名为vlan3switch(vlan)#no vlan 2 ;删vlan 2switch(config)#int f0/1 ;进入端口1switch(config)#speed ? 查看speed命令的子命令switch(config)#speed 100 设置该端口速率为100mb/s(10/auto)switch(config)#duplex ? 查看duplex的子命令switch(config)#duplex full 设置该端口为全双工(auto/half)switch(config)#description TO_PC1 这是该端口描述为TO_PC1 switch(config-if)#switchport access vlan 2 ;当前端口加入vlan 2switch(config-if)#switchport mode trunk ;设置为trunk模式(access模式)switch(config-if)#switchport trunk allowed vlan 1,2 ;设置允许的vlanswitch(config-if)#switchport trunk encap dot1q ;设置vlan 中继switch(config)#vtp domain vtpserver ;设置vtp域名相同switch(config)#vtp password ;设置发vtp密码switch(config)#vtp server ;设置vtp服务器模式switch(config)#vtp client ;设置vtp客户机模式交换机设置IP地址,默认网关,域名,域名服务器,配置和查看MAC地址表:switch(config)#interface vlan 1 ;进入vlan 1switch(config-if)#ip address 192.168.1.1 255.255.255.0 ;设置IP地址switch(config)#ip default-gateway 192.168.1.6 ;设置默认网关switch(config)#ip domain-name 设置域名switch(config)#ip name-server 192.168.1.18 设置域名服务器switch(config)#mac-address-table? 查看mac-address-table 的子命令switch(config)#mac-address-table aging-time 100 设置超时时间为100msswitch(config)#mac-address-table permanent 0000.0c01.bbcc f0/3 加入永久地址在f0/3端口switch(config)#mac-address-table restricted static 0000.0c02.bbcc f0/6 f0/7 加入静态地址目标端口f0/6源端口f0/7 switch(config)#endswitch#show mac-address-table 查看整个MAC地址表switch#clear mac-address-table restricted static 清除限制性静态地址交换机显示命令:switch#write ;保存配置信息switch#show vtp ;查看vtp配置信息switch#show run ;查看当前配置信息switch#show vlan ;查看vlan配置信息switch#show interface ;查看端口信息switch#show int f0/0 ;查看指定端口信息switch#show int f0/0 status;查看指定端口状态switch#dir flash: ;查看闪存(1)模式转换命令用户模式----特权模式,使用命令"enable"特权模式----全局配置模式,使用命令"config t"全局配置模式----接口模式,使用命令"interface+接口类型+接口号"全局配置模式----线控模式,使用命令"line+接口类型+接口号"注:用户模式:查看初始化的信息.特权模式:查看所有信息、调试、保存配置信息全局模式:配置所有信息、针对整个路由器或交换机的所有接口接口模式:针对某一个接口的配置线控模式:对路由器进行控制的.接口配置(2)配置命令show running config 显示所有的配置show versin 显示版本号和寄存器值shut down 关闭接口no shutdown 打开接口ip add +ip地址配置IP地址secondary+IP地址为接口配置第二个IP地址show interface+接口类型+接口号查看接口管理性show controllers interface 查看接口是否有DCE电缆show history 查看历史记录show terminal 查看终端记录大小hostname+主机名配置路由器或交换机的标识config memory 修改保存在NVRAM中的启动配置exec timeout 0 0 设置控制台会话超时为0service password-encryptin 手工加密所有密码enable password +密码配置明文密码ena sec +密码配置密文密码line vty 0 4/15 进入telnet接口password +密码配置telnet密码line aux 0 进入AUX接口password +密码配置密码line con 0 进入CON接口password +密码配置密码bandwidth+数字配置带宽no ip address 删除已配置的IP地址show startup config 查看NVRAM中的配置信息copy run-config atartup config 保存信息到NVRAM write 保存信息到NVRAMerase startup-config 清除NVRAM中的配置信息show ip interface brief 查看接口的谪要信息banner motd # +信息 + # 配置路由器或交换机的描素信息description+信息配置接口听描素信息vlan database 进入VLAN数据库模式vlan +vlan号+ 名称创建VLANswitchport access vlan +vlan号为VLAN为配接口interface vlan +vlan号进入VLAN接口模式ip add +ip地址为VLAN配置管理IP地址vtp+service/tracsparent/client 配置SW的VTP工作模式vtp +domain+域名配置SW的VTP域名vtp +password +密码配置SW的密码switchport mode trunk 启用中继no vlan +vlan号删除VLANshow spamming-tree vlan +vlan号查看VLA怕生成树议2. 路由器配置命令ip route+非直连网段+子网掩码+下一跳地址配置静态/默认路由show ip route 查看路由表show protocols 显示出所有的被动路由协议和接口上哪些协议被设置show ip protocols 显示了被配置在路由器上的路由选择协议,同时给出了在路由选择协议中使用的定时器等信息router rip 激活RIP协议network +直连网段发布直连网段interface lookback 0 激活逻辑接口passive-interface +接口类型+接口号配置接口为被动模式debug ip +协议动态查看路由更新信息undebug all 关闭所有DEBUG信息router eigrp +as号激活EIGRP路由协议network +网段+子网掩码发布直连网段show ip eigrp neighbors 查看邻居表show ip eigrp topology 查看拓扑表show ip eigrp traffic 查看发送包数量router ospf +process-ID 激活OSPF协议network+直连网段+area+区域号发布直连网段show ip ospf 显示OSPF的进程号和ROUTER-IDencapsulation+封装格式更改封装格式no ip admain-lookup 关闭路由器的域名查找ip routing 在三层交换机上启用路由功能show user 查看SW的在线用户clear line +线路号清除线路3. 三层交换机配置命令配置一组二层端口configure terminal 进入配置状态nterface range {port-range} 进入组配置状态配置三层端口configure terminal 进入配置状态interface {{fastethernet | gigabitethernet} interface-id} | {vlan vlan-id} | {port-channel port-channel-number} 进入端口配置状态no switchport 把物理端口变成三层口ip address ip_address subnet_mask 配置IP地址和掩码no shutdown 激活端口例:Switch(config)# interface gigabitethernet0/2Switch(config-if)# no switchportSwitch(config-if)# ip address 192.20.135.21 255.255.255.0Switch(config-if)# no shutdown配置VLANconfigure terminal 进入配置状态vlan vlan-id 输入一个VLAN号, 然后进入vlan配态,可以输入一个新的VLAN号或旧的来进行修改。
Cisco交换机基本命令配置大全Word版

1.switch(config)# hostname hostname在基于CLI的交换机上设置主机名/系统名:switch(enable) set system name name-string2.在基于IOS的交换机上设置登录口令:switch(config)# enable password level 1 password在基于CLI的交换机上设置登录口令:switch(enable) set passwordswitch(enable) set enalbepass3.在基于IOS的交换机上设置远程访问:switch(config)# interface vlan 1switch(config-if)# ip address ip-address netmaskswitch(config-if)# ip default-gateway ip-address在基于CLI的交换机上设置远程访问:switch(enable) set interface sc0 ip-address netmask broadcast-address switch(enable) set interface sc0 vlanswitch(enable) set ip route default gateway4.在基于IOS的交换机上启用和浏览CDP信息:switch(config-if)# cdp enableswitch(config-if)# no cdp enable为了查看Cisco邻接设备的CDP通告信息:switch# show cdp interface [type modle/port]switch# show cdp neighbors [type module/port] [detail]在基于CLI的交换机上启用和浏览CDP信息:switch(enable) set cdp {enable disable} module/port为了查看Cisco邻接设备的CDP通告信息:switch(enable) show cdp neighbors[module/port] [vlan duplex capabilities detail] 5.基于IOS的交换机的端口描述:switch(config-if)# description description-string基于CLI的交换机的端口描述:switch(enable)set port name module/number description-string6.在基于IOS的交换机上设置端口速度:switch(config-if)# speed{10100auto}在基于CLI的交换机上设置端口速度:switch(enable) set port speed moudle/number {10100auto}switch(enable) set port speed moudle/number {416auto}7.在基于IOS的交换机上设置以太网的链路模式:switch(config-if)# duplex {auto full half}在基于CLI的交换机上设置以太网的链路模式:switch(enable) set port duplex module/number {full half}8.在基于IOS的交换机上配置静态VLAN:switch# vlan databaseswitch(vlan)# vlan vlan-num name vlaswitch(vlan)# exitswitch# configure teriminalswitch(config)# interface interface module/numberswitch(config-if)# switchport mode accessswitch(config-if)# switchport access vlan vlan-numswitch(config-if)# end在基于CLI的交换机上配置静态VLAN:switch(enable) set vlan vlan-num [name name]switch(enable) set vlan vlan-num mod-num/port-list9. 在基于IOS的交换机上配置VLAN中继线:switch(config)# interface interface mod/portswitch(config-if)# switchport mode trunkswitch(config-if)# switchport trunk encapsulation {isl dotlq}switch(config-if)# switchport trunk allowed vlan remove vlan-listswitch(config-if)# switchport trunk allowed vlan add vlan-list在基于CLI的交换机上配置VLAN中继线:switch(enable) set trunk module/port [on off desirable auto nonegotiate]Vlan-range [isl dotlq dotl0lane negotiate]10.在基于IOS的交换机上配置VTP管理域:switch# vlan databaseswitch(vlan)# vtp domain domain-name在基于CLI的交换机上配置VTP管理域:switch(enable) set vtp [domain domain-name]11.在基于IOS的交换机上配置VTP 模式:switch# vlan databaseswitch(vlan)# vtp domain domain-nameswitch(vlan)# vtp {sever cilent transparent}switch(vlan)# vtp password password在基于CLI的交换机上配置VTP 模式:switch(enable) set vtp [domain domain-name] [mode{ sever cilent transparent }][password password]2.12. 在基于IOS的交换机上配置VTP版本:switch# vlan databaseswitch(vlan)# vtp v2-mode在基于CLI的交换机上配置VTP版本:switch(enable) set vtp v2 enable13. 在基于IOS的交换机上启动VTP剪裁:switch# vlan databaseswitch(vlan)# vtp pruning在基于CL I 的交换机上启动VTP剪裁:switch(enable) set vtp pruning enable14.在基于IOS的交换机上配置以太信道:switch(config-if)# port group group-number [distribution {source destination}]在基于CLI的交换机上配置以太信道:switch(enable) set port channel moudle/port-range mode{on off desirable auto} 15.在基于IOS的交换机上调整根路径成本:switch(config-if)# spanning-tree [vlan vlan-list] cost cost在基于CLI的交换机上调整根路径成本:switch(enable) set spantree portcost moudle/port costswitch(enable) set spantree portvlancost moudle/port [cost cost][vlan-list]16.在基于IOS的交换机上调整端口ID:switch(config-if)# spanning-tree[vlan vlan-list]port-priority port-priority在基于CLI的交换机上调整端口ID:switch(enable) set spantree portpri {mldule/port}priorityswitch(enable) set spantree portvlanpri {module/port}priority [vlans]17. 在基于IOS的交换机上修改STP时钟:switch(config)# spanning-tree [vlan vlan-list] hello-time secondsswitch(config)# spanning-tree [vlan vlan-list] forward-time secondsswitch(config)# spanning-tree [vlan vlan-list] max-age seconds在基于CLI的交换机上修改STP时钟:switch(enable) set spantree hello interval[vlan]switch(enable) set spantree fwddelay delay [vlan]switch(enable) set spantree maxage agingtiame[vlan] 18. 在基于IOS的交换机端口上启用或禁用Port Fast 特征: switch(config-if)#spanning-tree portfastswitch(enable) set spantree portfast {module/port}{enable disable}19. 在基于IOS的交换机端口上启用或禁用UplinkFast 特征:switch(config)# spanning-tree uplinkfast [max-update-rate pkts-per-second]在基于CLI的交换机端口上启用或禁用UplinkFast 特征:switch(enable) set spantree uplinkfast {enable disable}[rate update-rate] [all-p rotocols off on]20. 为了将交换机配置成一个集群的命令交换机,首先要给管理接口分配一个IP地址,然后使用下列命令: switch(config)# cluster enable cluster-name21. 为了从一条中继链路上删除VLAN,可使用下列命令:switch(enable) clear trunk module/port vlan-range22. 用show vtp domain 显示管理域的VTP参数.23. 用show vtp statistics显示管理域的VTP参数.24. 在Catalyst交换机上定义TrBRF的命令如下:switch(enable) set vlan vlan-name [name name] type trbrf bridge bridge-num[s tp {ieee ibm}]25. 在Catalyst交换机上定义TrCRF的命令如下:switch (enable) set vlan vlan-num [name name] type trcrf{ring hex-ring-num decring decimal-ring-num} parent vlan-num26. 在创建好TrBRF VLAN之后,就可以给它分配交换机端口.对于以太网交换,可以采用如下命令给VLAN分配端口:switch(enable) set vlan vlan-num mod-num/port-num27. 命令show spantree显示一个交换机端口的STP状态.28. 配置一个ELAN的LES和BUS,可以使用下列命令:ATM (config)# interface atm number.subint multiointATM(config-subif)# lane serber-bus ethernet elan-name29. 配置LECS:ATM(config)# lane database database-nameATM(lane-config-databade)# name elan1-name server-atm-address les1-nsap-ad dressATM(lane-config-databade)# name elan2-name server-atm-address les2-nsap-ad dressATM(lane-config-databade)# name …30. 创建完数据库后,必须在主接口上启动LECS.命令如下:ATM(config)# interface atm numbervirus2009-08-15 13:42ATM(config-if)# lane config database database-nameATM(config-if)# lane config auto-config-atm-address31. 将每个LEC配置到一个不同的ATM子接口上.命令如下:ATM(config)# interface atm number.subint multipointATM(config)# lane client ethernet vlan-num elan-num32. 用show lane server 显示LES的状态.33. 用show lane bus显示bus的状态.34. 用show lane database显示LECS数据库可内容.35. 用show lane client显示LEC的状态.36. 用show module显示已安装的模块列表.37. 用物理接口建立与VLAN的连接:router# configure terminalrouter(config)# interface media module/portrouter(config-if)# description description-stringrouter(config-if)# ip address ip-addr subnet-maskrouter(config-if)# no shutdown38. 用中继链路来建立与VLAN的连接:router(config)# interface module/port.subinterfacerouter(config-ig)# encapsulation[isl dotlq] vlan-numberrouter(config-if)# ip address ip-address subnet-mask39. 用LANE 来建立与VLAN的连接:router(config)# interface atm module/portrouter(config-if)# no ip addressrouter(config-if)# atm pvc 1 0 5 qsaalrouter(config-if)# atm pvc 2 0 16 ilnirouter(config-if)# interface atm module/port.subinterface multipoint router(config-if)# ip address ip-address subnet-maskrouter(config-if)# lane client ethernet elan-numrouter(config-if)# interface atm module/port.subinterface multipoint router(config-if)# ip address ip-address subnet-namerouter(config-if)# lane client ethernet elan-namerouter(config-if)# …40. 为了在路由处理器上进行动态路由配置,可以用下列IOS命令来进行: router(config)# ip routingrouter(config)# router ip-routing-protocolrouter(config-router)# network ip-network-numberrouter(config-router)# network ip-network-number41. 配置默认路由:switch(enable) set ip route default gateway42. 为一个路由处理器分配VLANID,可在接口模式下使用下列命令:router(config)# interface interface numberrouter(config-if)# mls rp vlan-id vlan-id-num43. 在路由处理器启用MLSP:router(config)# mls rp ip44. 为了把一个外置的路由处理器接口和交换机安置在同一个VTP域中:router(config)# interface interface numberrouter(config-if)# mls rp vtp-domain domain-name45. 查看指定的VTP域的信息:router# show mls rp vtp-domain vtp domain name46. 要确定RSM或路由器上的管理接口,可以在接口模式下输入下列命令:router(config-if)#mls rp management-interface47. 要检验MLS-RP的配置情况:router# show mls rp48. 检验特定接口上的MLS配置:router# show mls rp interface interface number49. 为了在MLS-SE上设置流掩码而又不想在任一个路由处理器接口上设置访问列表:set mls flow [destination destination-source full]50. 为使MLS和输入访问列表可以兼容,可以在全局模式下使用下列命令:router(config)# mls rp ip input-acl51. 当某个交换机的第3层交换失效时,可在交换机的特权模式下输入下列命令:switch(enable) set mls enable52. 若想改变老化时间的值,可在特权模式下输入以下命令:switch(enable) set mls agingtime agingtime53. 设置快速老化:switch(enable) set mls agingtime fast fastagingtime pkt_threshold54. 确定那些MLS-RP和MLS-SE参与了MLS,可先显示交换机引用列表中的内容再确定:switch(enable) show mls include55. 显示MLS高速缓存记录:switch(enable) show mls entry友情提示:方案范本是经验性极强的领域,本范文无法思考和涵盖全面,供参考!最好找专业人士起草或审核后使用。
Cisco交换机配置的基本命令
Cisco交换机配置的基本命令1.不同的vlan不同vlan需要路由在路由的端⼝设置多个IP段交换机模拟器实验六2.查看端⼝名字SWA#sh vlandefault Active F0/1, F0/2, F0/3, F0/4, F0/5, F0/6, F0/7, F0/8f是端⼝名⼦default Active Gi/1, Gi0/2, Gi0/3, Gi0/4, Gi0/5, Gi0/6, Gi0/7, Gi0/8Gi是端⼝名字3.创建动态链路聚合Switch(config)#interface range g0/21-22Switch(config-if-range)#channel-group 1 mode activeSwitch(config-if-range)#exit4.创建端⼝的链路类型以太⽹端⼝有三种链路类型:Access、Hybrid、Trunk。
Access类型的端⼝只能属于1个VLAN,⼀般⽤于连接计算机的端⼝;Trunk 类型的端⼝可以属于多个VLAN,可以接收和发送多个VLAN的报⽂,⼀般⽤于交换机之间连接的端⼝;Hybrid类型的端⼝可以属于多个VLAN,可以接收和发送多个VLAN的报⽂,可以⽤于交换机之间连接,也可以⽤于连接⽤户的计算机。
Hybrid端⼝和Trunk端⼝的不同之处在于Hybrid 端⼝可以允许多个VLAN的报⽂发送时不打标签,⽽Trunk端⼝只允许缺省VLAN的报⽂发送时不打标签。
表1-9 设置以太⽹端⼝的链路类型操作命令设置端⼝为Access端⼝Switch(config)#interface range g0/21-22Switch(config)#switchport mode access设置端⼝为Hybrid端⼝Switch(config)#interface range g0/21-22Switch(config)#switchport mode hybrid设置端⼝为Trunk端⼝Switch(config)#interface range g0/21-22Switch(config)#switchport mode trunk恢复端⼝的链路类型为缺省的Access端⼝undo port link-type三种类型的端⼝可以共存在⼀台以太⽹交换机上,但Trunk端⼝和Hybrid端⼝之间不能直接切换,只能先设为Access端⼝,再设置为其他类型端⼝。
配置Cisco交换机启动及基本设置
•配置Cisco交换机启动及基本设置本实验是对Cisco Catalyst 1900系列交换机的启动和基本设置的操作。
本实验是对Cisco Catalyst 1900系列交换机的启动和基本设置的操作。
1.实验目的通过本实验,读者可以掌握以下技能熟悉交换机的开机界面;对交换机进行基本的设置;理解交换机的端口及其编号。
2.设备需求本实验需要以下设备:Cisco Catalyst 1900系列交换机1台,型号不限,企业版软件,本实验中使用了1912交换机;PC机1台,操作系统为Windows系列。
装有超级终端程序;Console电缆1条及相应的接口转换器。
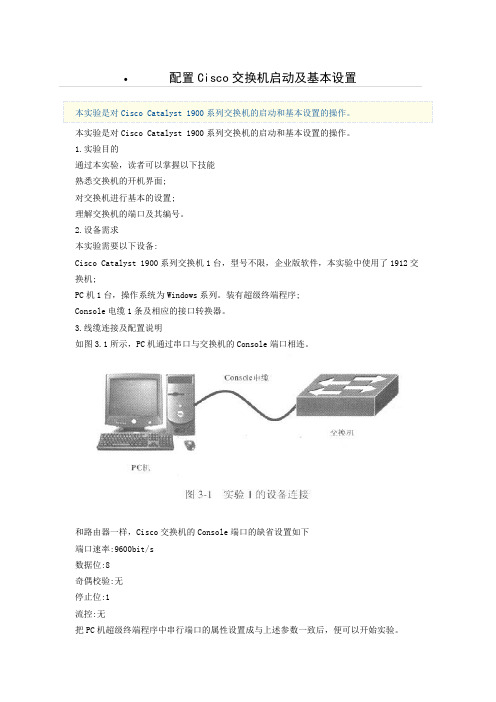
3.线缆连接及配置说明如图3.1所示,PC机通过串口与交换机的Console端口相连。
和路由器一样,Cisco交换机的Console端口的缺省设置如下端口速率:9600bit/s数据位:8奇偶校验:无停止位:1流控:无把PC机超级终端程序中串行端口的属性设置成与上述参数一致后,便可以开始实验。
4.实验配置及监测结果在PC机启动正常,PC机与交换机使用Console电缆连接起来,并且已经进入超级终端程序的情况下。
接通交换机电源。
由于交换机没有电源开关,接通电源即直接插上电源插头。
监测清单3.1记录了Catalyst 1912交换机启动的全过程。
监测清单3-1 Catalyst 1912交换机启动及基本配置第1段:交换机的启动Catalyst 1900 Management ConsoleCopyright (c) Cisco Systems, Inc. 1993-1999All rights reserved.Emter[rose Edotopm SoftwareEthernet Address: 00-04-DD-4E-9C-80PCA Number: 73-3122-04PCA Serial Number: FAB0503D0B4Model Number: WS-C1912-ENSystem Serial Number: FAB0503W0FAPower Supply S/N PHI044207FRPCB Serial Number: FAB0503D0B4,73-3122-041 user(s)now active on Management Console.User Interface Menu[M] Menus[K] Command Line[1] IP Configuration[P] Console PasswordEnter Selection:第2段:进行交换机基本配置Enter Selection: KCLI session with the switch is open.To end the CLI session, enter [Exit].>?Exec commands:enable Turn on privileged commandsexit Exit from the EXEChelp Description of the interactive help systemping Send echo messagessession Tunnel to moduleshow Show running system informationterminal Set terminal line parameters>enable##conftEnter configuration commands, one per line. End with CNTL/Z (config)#?Configure commands:address-violation Set address violation actionback-pressure Enable back pressurebanner Define a login bannerbridge-group Configure port grouping using bridge groupscdp Global CDP configuration subcommandscgroup Enable CGMPcluster Cluster configuration commandsecc Enable enhanced congestion controlenable Modift enable password parametersend Exit from configure modeexit Exit from configure modehelp Description of the interactive help systemhostname Set the system's network nameinterface Select an interface to configureip Global IP configureation subcommandsline Configure a terminal linelogin Configure options for logging inmac-address-table Configure the mac address tablemonitor-port Set port monitoring--More--mlilticast-store-and-forward Enables multicast store and forward network-port Set the network portno Negate a cominand or set its defaultsport-channel Configure Fast EtherChannelrip Routing information protocol configurationservice Configuration Commandsump-server Modify SNMP parametersspantree Spanning subsystemspantree-template Set bridge template parameterstorm-control Configure broadcast storm contfolpirameters switching-mode Set the switching modetacacs-server Modify TACACS query parameterstftp Configure TFTPuplink-fast Enable Uplink fastvlan VLAN configurationvlan-membership VLAN membership server configurationvtp Global VTP configuration commands(config)#SiostBiame SW1912SW1912(config)#enabSe password ?level Set exec level passwordSW1912(config)#enable password level 1 pass1SW1912(config)#enabSe password level 15 passl5SW1912(config)#enable secret CiscoSW1912#disableSW1912>SW1912>enEnter password: ***** ( 键入cisco )SW1912#conf tEnter configuration commands, one per line. End with CNTL/Z SW1912(config)#ip address 192.168.1.1255.255.255.0SW1912(config)#ip default-gateway 192.168.1.254SW1912(config)#ip domain-name ?WORD Domain nameSW1912(config)#ip domain-name SW1912(config)#ip name-server 200.1.1.1SW1912(config)#endSW1912#sh versionCisco Catalyst 1900/2820 Enterprise Edition Software Version V9.00,05 written from 192.168.000.005Copyright (c) Cisco Systems, Inc. 1993-1999SW1912 uptime is 0day(s)00hour(s)12minute(s)44secibd(s)cisco Catalyst 1900(486sxl)processor with 2048K/1024K bytes of memory Hardware board revision is 5Upgrade Status: No upgrade currently in progress.Config File Status: No configuration upload/download is in progress 15 Fixed Ethernet/IEEE802.3interface(s)Base Ethernet Address: 00-04-DD-4E-9C-80SW1912#show ipIP Address:192.168.1.1Subnet Mask:255.255.255.0Default Gateway:192.168.1.254Management VLANl: 1Domain name:Name server1:200.1.1.1HTTP server:EnabledHTTP port: 80RIP:EnabledSW1912#show running-configBuilding configuration...Current configuration:!tftp accepttftp server "192.168.0.5"tftp filename "catl900EN.9.00.05.bin"!hostname "SW1912"!ip address 192.168.1.1255.255.255.0ip default-gateway 192.168.1.254ip domain-name ""ip name-server 200.1.1.1!enable secret 5 $l$FMFQ$mlNHW7EzaJpG9uhKPWBvf/enable password level 1 "PASS 1"enable password level 15 "PASS 15"!interface Ethernet 0/1!interface Ethernet 0/2!interface Ethernet 0/3!interface Ethernet 0/4!interface Ethernet 0/5!interface Ethernet 0/6!interface Ethernet 0/7!interface Ethernet 0/8!interface Ethernet 0/9interface Ethernet 0/10!interface Ethernet 0/11!interface Ethernet 0/12!interface Ethernet 0/25!interface FastEthernet 0/26!interface FastEthernet 0/27!line consoleendSW1912#show int e0/lEthernet 0/1 is Suspended-no-linkbeat802.1 dSTP State: Forwarding Forward Transitions:1Port monitoring: DisabledUnknown unicast flooding: EnabledUnregistered multicast flooding: EnabledDescription:Duplex setting: Half duplexBack pressure: DisabledReceive Statistics Transmit StatisticsTotal good frames 0 Total frames 0Total octets 0 Total octets 0Broadcast/multicast frames 0 Broadcast/multicast frames 0Broadcast/multicast octets 0 Broadcast/multicast octets 0Good frames forwarded 0 Deferrals 0Frames filtered 0 Single collisions 0Runt frames 0 Multiple collisions 0No buffer discards 0 Excessive collisions 0Queue full discards 0Errors: Errors:第3段:重新启动交换机查看配置保持情况SW1912#reloadThis command resets the switch. All configured system parameters and static addresses will be retained. All dynamic addresses well be removed. Reset system, [Y]es or [N]o? YesCatalyst 1900 Management ConsoleCopyright (c) Cisco Systems, Inc. 1993-1999All rights reserved.Enterprise Edition SoftwareEthernet Address: 00-04-DD-4E-9C-80PCA Number: 73-3122-04PCA Serial Number: FAB0503D0B4Model Number: WS-C 1912-ASystem Serial Number: FAB0503W0FAPower Supply S/N: PH1044207FRPCB Serial Number: FAB0503DOB4,73-3122-04----------------------1 user(s) now active on Management Console.User Interface Menu[M]Menus[K]Command LineEnter Selection: KEnter password: *****CLI session with the switch is open.To end the CLI session, enter [Exit].SW1912>enableEnter password: ***** (键入cisco )SW1912#show running-config…(与第2段中配置清单相同,此处省略)(1)第1段是1912交换机加电后出现的显示内容,依次列出了版权信息、软件版本信息(企业版)、以太网地址(00.04,DD-4E-9C.80)以及各种序列号。
思科交换机基本配置命令

思科交换机基本配置命令目录1、基本概念介绍 (2)2、密码、登陆等基本配置 (2)3、CISCO设备端口配置详解 (4)4、VLAN的规划及配置 (6)4.1核心交换机的相关配置 (6)4.2接入交换机的相关配置 (8)5、配置交换机的路由功能 (9)6、配置交换机的DHCP功能 (9)7、常用排错命令 (10)1、基本概念介绍IOS: 互联网操作系统,交换机和路由器常用操作系统VLAN: 虚拟lanVTP: VLAN TRUNK PROTOCOLDHCP: 动态主机配置协议ACL:访问控制列表三层交换机:具有三层路由转发能力的交换机2、密码、登陆等基本配置本节介绍cisco路由器或者交换机的基本配置,本教程用的是cisco的模拟器做的介绍,一些具体的端口显示可能与实际的设备不符,但并不影响基本配置命令的执行。
Router># 显示稳定后,出现最初的提示符,提示符“>”表示目前所处的状态为用户模式。
Router>Router>en# 如果在当前状态下没有重复的命令,可以用“TAB”键来补齐命令Router>enable# 从用户模式(user mode)进入到特权模式(exec mode),提示符变为“#”Router#configure terminal#在特权模式下输入configure terminal进入全局配置模式(global configuration mode),在这之下输入的命令叫做全局命令,一旦输入,将对整个router产生即时影响。
*Mar 1 00:44:26.491: %SYS-5-CONFIG_I: Configured from console by console t # 在输入命令的过程中,IOS会出现一些即时提示。
Enter configuration commands, one per line. End with CNTL/Z.Router(config)#exit # 退出当前模式Router(config)#hostname test# 更改当前设备的名字,主要是为了便于区分设备。
(整理)思科交换机配置命令

switch(config-if)#sw a v 30
switch(config-if)#switchport access vlan 30
24
验证VLAN配置信息
验证VLAN配置信息
switch#sh vlan b
switch#show vlan brief
switch(config)#ip default-gateway 192.168.0.1
16
查看交换机的MAC地址表
查看交换机的MAC地址表
switch#sh mac-a
switch#show mac-address-table
17
查看思科交换机相邻设备的详细信息
查看思科交换机相邻设备的详细信息
switch#sh cdp nei de
benet(config)#
7
配置进入特权模式的明文口令
配置进入特权模式的明文口令
switch(config)#en pass 123
switch(config)#enable password 123
8
删除进入特权模式的明文口令
删除进入特权模式的明文口令
switch(config)#no ena pass
30
验证接口模式(检查中断端口允许的VLAN列表)
验证接口模式(检查中断端口允许的VLAN列表)
switch#sh int f0/15 switchp
switch#show interface f0/15 switchport
31
查看用过的命令
查看用过的命令
switch#sh hi
switch#show history
Cisco Packet Tracer实验1 交换机端口的基本配置
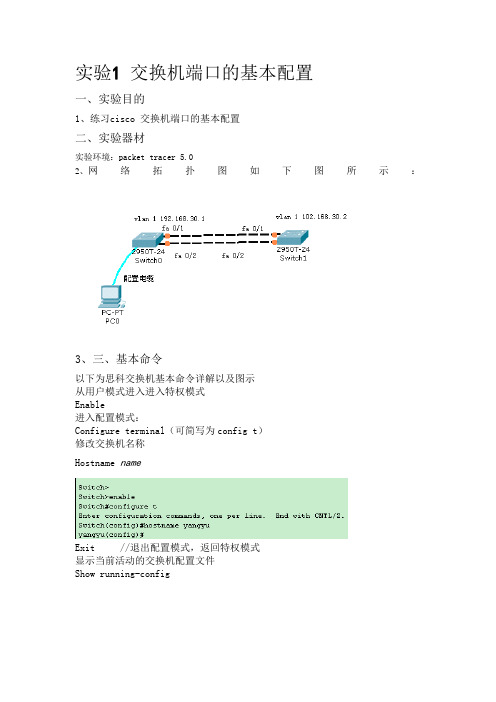
实验1 交换机端口的基本配置一、实验目的1、练习cisco 交换机端口的基本配置二、实验器材实验环境:packet tracer 5.02、网络拓扑图如下图所示:3、三、基本命令以下为思科交换机基本命令详解以及图示从用户模式进入进入特权模式Enable进入配置模式:Configure terminal(可简写为config t)修改交换机名称Hostname nameExit //退出配置模式,返回特权模式显示当前活动的交换机配置文件Show running-config下列命令可以用于显示接口1 的统计和状态信息Show interface f0/1查看vlan 信息Show vlan其中vlan1 是默认的管理vlan,未对交换机进行配置时所有的接口默认属于vlan1查看flash 缓存内容Show flash由上图可以看到flash 缓存中只有一个文件查看IOS 版本号以及系统硬件的配置情况、引导镜像等(注:IOS—cisco 网络设备的操作系统)从上图可以得知,IOS 版本为12.1,交换机已经运行25 分钟,共有24 个快速以太网接口,2 个千兆以太网接口。
恢复交换机到默认设置:Erase startup-config /删除备份配置文件Reload /重新启动交换机配置主机名称和控制端密码:Hostname snnumis0601Line console 0Passwod 123456LoginLine vty 0 15Password 123456Login为二层交换机设置管理vlan 与默认网关Interface vlan 1Ip add 192.168.30.1 255.255.255.0No shutdownExitIp default-gateway 192.168.30.254Exit查看配置后的默认vlan 虚接口信息Show interface vlan 1查看mac 地址表Show mac-address-tabletelnet进入路由器后想进入特权模式提示no password set?那是因为没有设置"enable password"先用console口登录路由器输入:2801a#config tEnter configuration commands, one per line. End with CNTL/Z.2801a(config)#enable password 0 cisco //配置特权模式密码为"cisco"明文显示(也可使用加密显示)2801a(config)#然后再telnet试试。
- 1、下载文档前请自行甄别文档内容的完整性,平台不提供额外的编辑、内容补充、找答案等附加服务。
- 2、"仅部分预览"的文档,不可在线预览部分如存在完整性等问题,可反馈申请退款(可完整预览的文档不适用该条件!)。
- 3、如文档侵犯您的权益,请联系客服反馈,我们会尽快为您处理(人工客服工作时间:9:00-18:30)。
实验一Cisco交换机的基本配置命令一.实验目的1.理解交换机基本配置的步骤和命令。
2.掌握配置交换机的常用命令。
二.实验器材及环境1.安装Windows 2000系统的主机一台;2.安装模拟软件Boson Netsim 5.31;3.模拟环境如下:图9-1 实验环境结构图三.实验理论基础1.Cisco IOS简介Cisco Catalyst系列交换机所使用的操作系统是IOS(Internetwork Operating System,互联网际操作系统)或COS(Catalyst Operating System),其中以IOS使用最为广泛,该操作系统和路由器所使用的操作系统都基于相同的内核和shell。
IOS的优点在于命令体系比较易用。
利用操作系统所提供的命令,可实现对交换机的配置和管理。
Cisco IOS操作系统具有以下特点:(1)支持通过命令行(Command-Line Interface,简称CLI)或Web界面,来对交换机进行配置和管理。
(2)支持通过交换机的控制端口(Console)或Telnet会话来登录连接访问交换机。
(3)提供有用户模式(user level)和特权模式(privileged level)两种命令执行级别,并提供有全局配置、接口配置、子接口配置和vlan数据库配置等多种级别的配置模式,以允许用户对交换机的资源进行配置。
(4)在用户模式,仅能运行少数的命令,允许查看当前配置信息,但不能对交换机进行配置。
特权模式允许运行提供的所有命令。
(5)IOS命令不区分大小写。
(6)在不引起混淆的情况下,支持命令简写。
比如enable通常可简约表达为en。
(7)可随时使用?来获得命令行帮助,支持命令行编辑功能,并可将执行过的命令保存下来,供进行历史命令查询。
四.实验内容1.搭建交换机实验环境;2.设置交换机的基本参数。
五.实验步骤1.搭建交换机配置环境在对交换机进行配置之前,首先应登录连接到交换机,这可通过交换机的控制端口(Console)连接或通过Telnet登录来实现。
(1)通过Console口连接交换机对于首次配置交换机,必须采用该方式。
对交换机设置管理IP地址后,就可采用Telnet登录方式来配置交换机。
对于可管理的交换机一般都提供有一个名为Console的控制台端口(或称配置口),该端口采用RJ-45接口,是一个符合EIA/TIA-232异步串行规范的配置口,通过该控制端口,可实现对交换机的本地配置。
交换机一般都随机配送了一根控制线,它的一端是RJ-45水晶头,用于连接交换机的控制台端口,另一端提供了DB-9(针)和DB-25(针)串行接口插头,用于连接PC机的COM1或COM2串行接口。
Cisco的控制线两端均是RJ-45水晶头接口,但配送有RJ-45到DB-9和RJ-45到DB-25的转接头。
通过该控制线将交换机与PC机相连,并在PC上运行超级终端仿真程序,即可实现将PC机仿真成交换机的一个终端,从而实现对交换机的访问和配置。
Windows系统一般都默认安装了超级终端程序,对于Windows 2000 Server系统,该程序位于【开始】菜单下【程序】中【附件】的【通讯】群组下面,若没有,可利用控制面板中的【添加/删除程序】来安装。
单击【通讯】群组下面的【超级终端】,即可启动超级终端。
首次启动超级终端时,会要求输入所在地区的电话区号,输入后将显示下图所示的连接创建对话框,在【名称】输入框中输入该连接的名称,并选择所使用的示意图标,然后单击确定按钮。
图9-2 超级终端连接创建对话框此时将弹出对话框,要求选择连接使用的COM端口,根据实际连接使用的端口进行选择,比如COM1,然后单击【确定】按钮.图9-3 设置COM1端口的属性交换机控制台端口默认的通讯波特率为9600bit/s,因此需将COM端口的通讯波特率设置为9600,数据流量控制选择无。
也可直接单击【还原为默认值】按钮来进行自动设置。
设置好后,单击【确定】按钮,此时就开始连接登录交换机了,对于新购或首次配置的交换机,没有设置登录密码,因此不用输入登录密码就可连接成功,从而进入交换机的命令行状态“Switch >”,此时就可通过命令来操控和配置交换机了。
图9-4 连接成功后的超级终端(2)通过Telnet连接交换机在首次通过Console控制口完成对交换机的配置,并设置交换机的管理IP地址和登录密码后,就可通过Telnet会话来连接登录交换机,从而实现对交换机的远程配置。
可在PC机中利用Telnet来登录连接交换机,也可在登录一台交换机后,再利用Telnet命令,来登录连接另一台交换机,实现对另一台交换机的访问和配置。
进入Windows的MS-DOS方式,这可利用windows开始菜单中的【运行】菜单项,通过执行command(Windows 9x系统)或cmd(Windows 2000)命令来实现。
然后在MS-DOS方式下执行“telnet 交换机IP地址”命令来登录连接交换机。
假设交换机的管理IP地址为192.168.168.3,利用网线将交换机接入网络,然后在DOS命令行输入并执行命令telnet 192.168.168.3,此时将要求用户输入telnet登录密码,密码输入时不会回显,校验成功后,即可登入交换机,出现交换机的命令行提示符。
图9-5 在DOS命令行telnet交换机若要退出对交换机的登录连接,执行exit命令。
对于华为交换机,则执行quit。
另外,也可在利用超级终端登入一台交换机后,再执行“telnet 192.168.168.3”命令,来登录和访问IP地址为192.168.168.3的交换机。
2.交换机的组成交换机相当于是一台特殊的计算机,同样有CPU、存储介质和操作系统,只不过这些都与PC 机有些差别而已。
交换机也由硬件和软件两部分组成。
软件部分主要是IOS操作系统,硬件主要包含CPU、端口和存储介质。
交换机的端口主要有以太网端口(Ethernet)、快速以太网端口(Fast Ethernet)、吉比特以太网端口(Gigabit Ethernet)和控制台端口。
存储介质主要有ROM(Read-Only Memory,只读储存设备)、FLASH(闪存)、NVRAM(非易失性随机存储器)和DRAM(动态随机存储器)。
其中,ROM相当于PC 机的BIOS,交换机加电启动时,将首先运行ROM中的程序,以实现对交换机硬件的自检并引导启动IOS。
该存储器在系统掉电时程序不会丢失。
FLASH是一种可擦写、可编程的ROM,FLASH包含IOS及微代码。
FLASH相当于PC机的硬盘,但速度要快得多,可通过写入新版本的IOS来实现对交换机的升级。
FLASH中的程序,在掉电时不会丢失。
NVRAM用于存贮交换机的配置文件,该存储器中的内容在系统掉电时也不会丢失。
DRAM是一种可读写存储器,相当于PC机的内存,其内容在系统掉电时将完全丢失。
3.交换机的基本命令Cisco IOS提供了用户EXEC模式和特权EXEC模式两种基本的命令执行级别,同时还提供了全局配置、接口配置、Line配置和vlan数据库配置等多种级别的配置模式,以允许用户对交换机的资源进行配置和管理。
(1)用户EXEC模式当用户通过交换机的控制台端口或Telnet会话连接并登录到交换机时,此时所处的命令执行模式就是用户EXEC模式。
在该模式下,只执行有限的一组命令,这些命令通常用于查看显示系统信息、改变终端设置和执行一些最基本的测试命令,如ping、traceroute等。
用户EXEC模式的命令状态行是:student1>其中的student1是交换机的主机名,对于未配置的交换机默认的主机名是Switch。
在用户EXEC模式下,直接输入?并回车,可获得在该模式下允许执行的命令帮助。
(2)特权EXEC模式在用户EXEC模式下,执行enable命令,将进入到特权EXEC模式。
在该模式下,用户能够执行IOS提供的所有命令。
特权EXEC模式的命令状态行为:student1#Student1>enablePassword:Student1#在前面的启动配置中,设置了登录特权EXEC模式的密码,因此系统提示输入用户密码,密码输入时不回显,输入完毕按回车,密码校验通过后,即进入特权EXEC模式。
若进入特权EXEC模式的密码未设置或要修改,可在全局配置模式下,利用enable secret 命令进行设置。
在该模式下键入?,可获得允许执行的全部命令的提示。
离开特权模式,返回用户模式,可执行exit或disable命令。
重新启动交换机,可执行reload命令。
(3)全局配置模式在特权模式下,执行configure terminal命令,即可进入全局配置模式。
在该模式下,只要输入一条有效的配置命令并回车,内存中正在运行的配置就会立即改变生效。
该模式下的配置命令的作用域是全局性的,是对整个交换机起作用。
全局配置模式的命令状态行为:student1(config)#student1#config terminalstudent1(config)#在全局配置模式,还可进入接口配置、line配置等子模式。
从子模式返回全局配置模式,执行exit命令;从全局配置模式返回特权模式,执行exit命令;若要退出任何配置模式,直接返回特权模式,则要直接end命令或按Ctrl+Z组合键。
例如,若要设交换机名称为student2,则可使用hostname命令来设置,其配置命令为:student1(config)#hostname student2student2(config)#若要设置或修改进入特权EXEC模式的密码为123456,则配置命令为:student1(config)#enable secret 123456或student1(config)#enable password 123456其中enable secret命令设置的密码在配置文件中是加密保存的,强列推荐采用该方式;而enable password命令所设置的密码在配置文件中是采用明文保存的。
对配置进行修改后,为了使配置在下次掉电重启后仍生效,需要将新的配置保存到NVRAM中,其配置命令为:student1(config)#exitstudent1#write(4)接口配置模式在全局配置模式下,执行interface命令,即进入接口配置模式。
在该模式下,可对选定的接口(端口)进行配置,并且只能执行配置交换机端口的命令。
接口配置模式的命令行提示符为:student1(config-if)#例如,若要设置Cisco Catalyst 2950交换机的0号模块上的第3个快速以太网端口的端口通讯速度设置为100M,全双工方式,则配置命令为:student1(config)#interface fastethernet 0/3student1(config-if)#speed 100student1(config-if)#duplex fullstudent1(config-if)#endstudent1#write(5)Line配置模式在全局配置模式下,执行line vty或line console命令,将进入Line配置模式。
