beAst音频小组内部教程_初级第二版
全新版大学英语(第二版)听说教程2(1-14单元)答案

全新版大学英语(第二版)听说教程2(1-14单元)答案-CAL-FENGHAI.-(YICAI)-Company One1全新版大学英语(第二版)听说教程2Unit OnePart A1. 172. 19633. 1.984. 2165. 19846. 19867. 30418. third9. 198710. 1988 11. four 12. ten 13. 1998 14. six 15. 1990s 16. 45 17. sixth18. 1998 19. 1999 20. five 21. 1999 22. 2001Part BExercise 11. d2. bExercise 21. Because she wants to enjoy good health. She also wants to stay in shape and look good2. Both Peter and Laura like cycling and swimming. Laura also plays tennis regularly Part C.1. d2. c3. d4. c5. bUnit TwoPart A.1. Yes2. No3. Yes4. No5. Yes6. No7. No8. NoPart BExercise 1.1. for a while2. plans, this Saturday3. have dinner, weekend4. Italian, too much food5. Chinese, JapaneseExercise 21. It uses natural flavors, not much oil or cream or heavy sauces1. They will have dinner on Saturday at either a Chinese or a Japanese restaurant Part C1. b2. c3. dUnit ThreePart A1. a. Fine and pleasant b. 18℃(64℉) c. cloudy with heavy showers moving in from the west2. a. It started around 8 p.m and lasted for about three hoursb. It caused foru deaths and serious damage including a widespread power failurePart BExercise 11. b2. a3. dExercise 21. They went to the department picnic but their fun was spoiled by the hot weather1. Because he thinks it'll only be a short shower that cools things off a littlePart C1. a2.b3. c4. d5. bUnit FourPart A.1. However; a2. Because; d3. Firstly; then, finally; c4. In short; bPart B.Exercise 12 4 5 10 12 13 16 17Exercise 21. b2. d3. c4. aPart C1. encouraged2. talent3. composed4. conquest5. steady6. enthusiastic7. investing8. her real breakthrough in America came when she was selected by Disney to sing the theme song of Beauty and the Beast9. In 1996 she performed at the opening ceremony of the 1996 Atlanta Olympic Games10. She sings the depth and the power of love in a great many of her hits such as “Love Can Move Mountains”, “Because You Loved Me”, “The Power of Love”Unit 5Part A1. c2. dPart BExercise 11. d2. d3. c4. dExercise 21. She has suffered from insomnia for several months and lately has had a lot ofindigestion1. He gave the patient some medicine for insomnia and indigestion. He alsoadvised the patient to have a proper diet and begin a regular exercise program Part C1. d2. b3. b4. a5. dUnit 6Part A1. They are probably business partners1. One is showing the other the building where her company has offices1. 2nd 8th 9th 1stintroduction history business marketsPart BExercise 11. They are discussing which candidate is more suitable for a vacant position inthe company1. Leader of a group1. Being dynamic1. Because he has no experience in leadership1. Because he has always been a follower, not a leaderExercise 2Loyal, twenty No experience Peterpersonnel management experience Joan Peter and CliveExperienced, solid reliable cautious, dynamic Peter and ClivePart C1. c2. c3. a4. d5. cUnit 7Part Aa medium-sized white T-shirt, a slogan on the front, a shop assistant in getting what he wantsPart BExercise 11. b2. c3. dExercise 21. interesting, handsome, successful, sporty, fashionable, fun1. great, terrible1. the high status group, taste and style, image1. brightens, good, face another day, energy1. high fashion, practical, the image, the realityPart C1. significant 2 relatively 3. concentrate 4. iberal 5. editor 6. ready-to-wear 7. expand8. Vera Wang herself is a very good skater and she had Olympic dreams too9. However, her love for the sport never ceased10. I don't know if designing costumes for Nancy has been good in terms of actual sales, but it has been tremendous for name recognitionUnit 8Part A1. Learn to like yourself1. Self-esteem grows out of achieving realistic goals1. Take occasional days of rest1. Exercise1. Get enoug sleep to feel rested1. Build close relationshipsPart BExercise 11. b2. d3. d4. b5. c6.dExercise 2millions, dream of swimming, one million, receive, $25000 to $40000, twenty, taxes, differentpursue their own interests, home, travel, their children's college education Mosta small number stay on their jobs security opportunities happinessPart C1. c2. b3. d4. dUnit 9Part A1. b2. c3. dPart BExercise 11. c2. b3. aExercise 21. His belief that one day he would become a movie star1. Parking cars for one of Hollywood's big restaurant1. No, his pay was only basic. But he got generous tips from guests driving intothe restaurant1. Larry parked the car of a famous film director and was able to introduce himselfto the man1. a. Many big film companies are interested in meb. Many big companies are pressing me to pay their billsPart C1. b2. d3. b4.aUnit 10Part A1. 1. earthquake2. three days ago3. Turkey4. 100005. 340002. 1. explosion 2. early this morning3. 1084. 385. 11Part BExercise 11. Three months ago2. In the middle of a jungle3. A terrible storm4. All on board the plane except the narrator5. One (the narrator)Exercise 21. It rolled and shook in the wind1. No. It arrived nine days later because it was raining heavily and the helicopterscouldn't fly in the heavy rain. To make the matter worse, the plane crashed in a swamp in the middle of a jungle.1. Yes. She was in terrible pain and couldn't move1. By drinking dirty floodwaterPart C1.c2. d3. a4. bUnit 11Part A1. Neutral2. Positive3. Positive, respectfulPart BExercise 11. a2. b3. d4. c5. aExercise 21. stockbroker2. retailing3. March 6, 19264. New York5. music school6. economics7. Commerce8. master's degree9. PhD10. Industrial 11. economic consulting 12. Federal GovernmentPart C1. Microsoft2. farewell3. software4. toughest5. legal6. long-term7. impactful 8. which is that the day-to-day work is fun and enjoyable9. So it's a special group of people who put so much into it10. There won't be a day of my life that I'm not thinking about Microsoft, and the great things that it's doing, and wanting to help.Unit 12Part A1. computer labs for the schools, poor rural1. cooperating, India, software professionals1. computer virus, attackPart BExercise 11. b2. b3. d4. b5. c6. aExercise 21. an ambulance crew1. had trouble breathing and moving1. the rescuers came to her help1 surfing the Net for fun3 the international, put a call through to the student's countryPart C1. c2. b3. b4. aUnit 13Part A1 f2 e 3. dPart BExercise 11. a2. c3. d4. a5. bExercise 258, unemployed, tire, suitcase, dropped, scene, picked up Next, TV, winner, return, keep prize conscience, return the money to its owner radio hundreds trickInto cash, 60 handed over expectation tearsPart C1. b2. d3. b4. dUnit 14Part A1893 kindergarten teachers studentsTitle Good children to greet their teacher1924 book of music added writer unknown1930s appeared movies radio shows permissionWon the copy right Happy Birthday to You different lyricsPublicly gets paidPart BExercise 11. parking space, grocery cart, in line1. Phone-In Drive-through Market1. drive-through convenience, banks, fast food, catalog shopping1. save time1. goods, ordered, good quality $1.5 each otherExercise 2in the item numbers of the goods you ordermakes a print-out of your listthe goods on your list in a warehousedrive up to the market, and punch your code into a terminalwrite a checkPart C1. b2. c3. c4. dTest OnePart A1. b2. c3. b4. c.5. b6. c7. a.8. bPart B9. d 10. b 11. d 12. c 13. c 14. b 15. dPart C16. stocks 17. exhibition 18. techniques 19. activities 20. research21. modem 22 software23. Delivery time for e-mail from Europe to the USA is about 10 seconds24. What's reallyextraordinary about the Internet is the aount and variety of information available25. Services are also available that allow you to do your banking, reserve airline tickets, and even shop for a Mother's Day giftPart D26. c 27. d 28. c 29. c 30. c 31. a 32. d 33. b 34. c 35. aTest TwoPart A.1. d2. c3. d4. c5. d6. b7. c8. aPart B9. d 10. d 11. a 12. b 13. c 14. b 15. cPart C16. forecast 17. unusual 18. Fortunately 19. extreme 20. rarely 21. global22. rush 23. People enjoy discussing the snow, complaining about the cold24. Contrary to popular opinion, it does not rain all the time25. Thanks to the rain, Britain has a rich countryside, which is famous for its deep green colorPart D26. a 27. d 28. b 29. b 30 a 31. c 32. c 33. a 34. d 35. b。
Native Instruments MASCHINE MK3 用户手册说明书

The information in this document is subject to change without notice and does not represent a commitment on the part of Native Instruments GmbH. The software described by this docu-ment is subject to a License Agreement and may not be copied to other media. No part of this publication may be copied, reproduced or otherwise transmitted or recorded, for any purpose, without prior written permission by Native Instruments GmbH, hereinafter referred to as Native Instruments.“Native Instruments”, “NI” and associated logos are (registered) trademarks of Native Instru-ments GmbH.ASIO, VST, HALion and Cubase are registered trademarks of Steinberg Media Technologies GmbH.All other product and company names are trademarks™ or registered® trademarks of their re-spective holders. Use of them does not imply any affiliation with or endorsement by them.Document authored by: David Gover and Nico Sidi.Software version: 2.8 (02/2019)Hardware version: MASCHINE MK3Special thanks to the Beta Test Team, who were invaluable not just in tracking down bugs, but in making this a better product.NATIVE INSTRUMENTS GmbH Schlesische Str. 29-30D-10997 Berlin Germanywww.native-instruments.de NATIVE INSTRUMENTS North America, Inc. 6725 Sunset Boulevard5th FloorLos Angeles, CA 90028USANATIVE INSTRUMENTS K.K.YO Building 3FJingumae 6-7-15, Shibuya-ku, Tokyo 150-0001Japanwww.native-instruments.co.jp NATIVE INSTRUMENTS UK Limited 18 Phipp StreetLondon EC2A 4NUUKNATIVE INSTRUMENTS FRANCE SARL 113 Rue Saint-Maur75011 ParisFrance SHENZHEN NATIVE INSTRUMENTS COMPANY Limited 5F, Shenzhen Zimao Center111 Taizi Road, Nanshan District, Shenzhen, GuangdongChina© NATIVE INSTRUMENTS GmbH, 2019. All rights reserved.Table of Contents1Welcome to MASCHINE (25)1.1MASCHINE Documentation (26)1.2Document Conventions (27)1.3New Features in MASCHINE 2.8 (29)1.4New Features in MASCHINE 2.7.10 (31)1.5New Features in MASCHINE 2.7.8 (31)1.6New Features in MASCHINE 2.7.7 (32)1.7New Features in MASCHINE 2.7.4 (33)1.8New Features in MASCHINE 2.7.3 (36)2Quick Reference (38)2.1Using Your Controller (38)2.1.1Controller Modes and Mode Pinning (38)2.1.2Controlling the Software Views from Your Controller (40)2.2MASCHINE Project Overview (43)2.2.1Sound Content (44)2.2.2Arrangement (45)2.3MASCHINE Hardware Overview (48)2.3.1MASCHINE Hardware Overview (48)2.3.1.1Control Section (50)2.3.1.2Edit Section (53)2.3.1.3Performance Section (54)2.3.1.4Group Section (56)2.3.1.5Transport Section (56)2.3.1.6Pad Section (58)2.3.1.7Rear Panel (63)2.4MASCHINE Software Overview (65)2.4.1Header (66)2.4.2Browser (68)2.4.3Arranger (70)2.4.4Control Area (73)2.4.5Pattern Editor (74)3Basic Concepts (76)3.1Important Names and Concepts (76)3.2Adjusting the MASCHINE User Interface (79)3.2.1Adjusting the Size of the Interface (79)3.2.2Switching between Ideas View and Song View (80)3.2.3Showing/Hiding the Browser (81)3.2.4Showing/Hiding the Control Lane (81)3.3Common Operations (82)3.3.1Using the 4-Directional Push Encoder (82)3.3.2Pinning a Mode on the Controller (83)3.3.3Adjusting Volume, Swing, and Tempo (84)3.3.4Undo/Redo (87)3.3.5List Overlay for Selectors (89)3.3.6Zoom and Scroll Overlays (90)3.3.7Focusing on a Group or a Sound (91)3.3.8Switching Between the Master, Group, and Sound Level (96)3.3.9Navigating Channel Properties, Plug-ins, and Parameter Pages in the Control Area.973.3.9.1Extended Navigate Mode on Your Controller (102)3.3.10Navigating the Software Using the Controller (105)3.3.11Using Two or More Hardware Controllers (106)3.3.12Touch Auto-Write Option (108)3.4Native Kontrol Standard (110)3.5Stand-Alone and Plug-in Mode (111)3.5.1Differences between Stand-Alone and Plug-in Mode (112)3.5.2Switching Instances (113)3.5.3Controlling Various Instances with Different Controllers (114)3.6Host Integration (114)3.6.1Setting up Host Integration (115)3.6.1.1Setting up Ableton Live (macOS) (115)3.6.1.2Setting up Ableton Live (Windows) (116)3.6.1.3Setting up Apple Logic Pro X (116)3.6.2Integration with Ableton Live (117)3.6.3Integration with Apple Logic Pro X (119)3.7Preferences (120)3.7.1Preferences – General Page (121)3.7.2Preferences – Audio Page (126)3.7.3Preferences – MIDI Page (130)3.7.4Preferences – Default Page (133)3.7.5Preferences – Library Page (137)3.7.6Preferences – Plug-ins Page (145)3.7.7Preferences – Hardware Page (150)3.7.8Preferences – Colors Page (154)3.8Integrating MASCHINE into a MIDI Setup (156)3.8.1Connecting External MIDI Equipment (156)3.8.2Sync to External MIDI Clock (157)3.8.3Send MIDI Clock (158)3.9Syncing MASCHINE using Ableton Link (159)3.9.1Connecting to a Network (159)3.9.2Joining and Leaving a Link Session (159)3.10Using a Pedal with the MASCHINE Controller (160)3.11File Management on the MASCHINE Controller (161)4Browser (163)4.1Browser Basics (163)4.1.1The MASCHINE Library (163)4.1.2Browsing the Library vs. Browsing Your Hard Disks (164)4.2Searching and Loading Files from the Library (165)4.2.1Overview of the Library Pane (165)4.2.2Selecting or Loading a Product and Selecting a Bank from the Browser (170)4.2.2.1[MK3] Browsing by Product Category Using the Controller (174)4.2.2.2[MK3] Browsing by Product Vendor Using the Controller (174)4.2.3Selecting a Product Category, a Product, a Bank, and a Sub-Bank (175)4.2.3.1Selecting a Product Category, a Product, a Bank, and a Sub-Bank on theController (179)4.2.4Selecting a File Type (180)4.2.5Choosing Between Factory and User Content (181)4.2.6Selecting Type and Character Tags (182)4.2.7List and Tag Overlays in the Browser (186)4.2.8Performing a Text Search (188)4.2.9Loading a File from the Result List (188)4.3Additional Browsing Tools (193)4.3.1Loading the Selected Files Automatically (193)4.3.2Auditioning Instrument Presets (195)4.3.3Auditioning Samples (196)4.3.4Loading Groups with Patterns (197)4.3.5Loading Groups with Routing (198)4.3.6Displaying File Information (198)4.4Using Favorites in the Browser (199)4.5Editing the Files’ Tags and Properties (203)4.5.1Attribute Editor Basics (203)4.5.2The Bank Page (205)4.5.3The Types and Characters Pages (205)4.5.4The Properties Page (208)4.6Loading and Importing Files from Your File System (209)4.6.1Overview of the FILES Pane (209)4.6.2Using Favorites (211)4.6.3Using the Location Bar (212)4.6.4Navigating to Recent Locations (213)4.6.5Using the Result List (214)4.6.6Importing Files to the MASCHINE Library (217)4.7Locating Missing Samples (219)4.8Using Quick Browse (221)5Managing Sounds, Groups, and Your Project (225)5.1Overview of the Sounds, Groups, and Master (225)5.1.1The Sound, Group, and Master Channels (226)5.1.2Similarities and Differences in Handling Sounds and Groups (227)5.1.3Selecting Multiple Sounds or Groups (228)5.2Managing Sounds (233)5.2.1Loading Sounds (235)5.2.2Pre-listening to Sounds (236)5.2.3Renaming Sound Slots (237)5.2.4Changing the Sound’s Color (237)5.2.5Saving Sounds (239)5.2.6Copying and Pasting Sounds (241)5.2.7Moving Sounds (244)5.2.8Resetting Sound Slots (245)5.3Managing Groups (247)5.3.1Creating Groups (248)5.3.2Loading Groups (249)5.3.3Renaming Groups (251)5.3.4Changing the Group’s Color (251)5.3.5Saving Groups (253)5.3.6Copying and Pasting Groups (255)5.3.7Reordering Groups (258)5.3.8Deleting Groups (259)5.4Exporting MASCHINE Objects and Audio (260)5.4.1Saving a Group with its Samples (261)5.4.2Saving a Project with its Samples (262)5.4.3Exporting Audio (264)5.5Importing Third-Party File Formats (270)5.5.1Loading REX Files into Sound Slots (270)5.5.2Importing MPC Programs to Groups (271)6Playing on the Controller (275)6.1Adjusting the Pads (275)6.1.1The Pad View in the Software (275)6.1.2Choosing a Pad Input Mode (277)6.1.3Adjusting the Base Key (280)6.1.4Using Choke Groups (282)6.1.5Using Link Groups (284)6.2Adjusting the Key, Choke, and Link Parameters for Multiple Sounds (286)6.3Playing Tools (287)6.3.1Mute and Solo (288)6.3.2Choke All Notes (292)6.3.3Groove (293)6.3.4Level, Tempo, Tune, and Groove Shortcuts on Your Controller (295)6.3.5Tap Tempo (299)6.4Performance Features (300)6.4.1Overview of the Perform Features (300)6.4.2Selecting a Scale and Creating Chords (303)6.4.3Scale and Chord Parameters (303)6.4.4Creating Arpeggios and Repeated Notes (316)6.4.5Swing on Note Repeat / Arp Output (321)6.5Using Lock Snapshots (322)6.5.1Creating a Lock Snapshot (322)6.5.2Using Extended Lock (323)6.5.3Updating a Lock Snapshot (323)6.5.4Recalling a Lock Snapshot (324)6.5.5Morphing Between Lock Snapshots (324)6.5.6Deleting a Lock Snapshot (325)6.5.7Triggering Lock Snapshots via MIDI (326)6.6Using the Smart Strip (327)6.6.1Pitch Mode (328)6.6.2Modulation Mode (328)6.6.3Perform Mode (328)6.6.4Notes Mode (329)7Working with Plug-ins (330)7.1Plug-in Overview (330)7.1.1Plug-in Basics (330)7.1.2First Plug-in Slot of Sounds: Choosing the Sound’s Role (334)7.1.3Loading, Removing, and Replacing a Plug-in (335)7.1.3.1Browser Plug-in Slot Selection (341)7.1.4Adjusting the Plug-in Parameters (344)7.1.5Bypassing Plug-in Slots (344)7.1.6Using Side-Chain (346)7.1.7Moving Plug-ins (346)7.1.8Alternative: the Plug-in Strip (348)7.1.9Saving and Recalling Plug-in Presets (348)7.1.9.1Saving Plug-in Presets (349)7.1.9.2Recalling Plug-in Presets (350)7.1.9.3Removing a Default Plug-in Preset (351)7.2The Sampler Plug-in (352)7.2.1Page 1: Voice Settings / Engine (354)7.2.2Page 2: Pitch / Envelope (356)7.2.3Page 3: FX / Filter (359)7.2.4Page 4: Modulation (361)7.2.5Page 5: LFO (363)7.2.6Page 6: Velocity / Modwheel (365)7.3Using Native Instruments and External Plug-ins (367)7.3.1Opening/Closing Plug-in Windows (367)7.3.2Using the VST/AU Plug-in Parameters (370)7.3.3Setting Up Your Own Parameter Pages (371)7.3.4Using VST/AU Plug-in Presets (376)7.3.5Multiple-Output Plug-ins and Multitimbral Plug-ins (378)8Using the Audio Plug-in (380)8.1Loading a Loop into the Audio Plug-in (384)8.2Editing Audio in the Audio Plug-in (385)8.3Using Loop Mode (386)8.4Using Gate Mode (388)9Using the Drumsynths (390)9.1Drumsynths – General Handling (391)9.1.1Engines: Many Different Drums per Drumsynth (391)9.1.2Common Parameter Organization (391)9.1.3Shared Parameters (394)9.1.4Various Velocity Responses (394)9.1.5Pitch Range, Tuning, and MIDI Notes (394)9.2The Kicks (395)9.2.1Kick – Sub (397)9.2.2Kick – Tronic (399)9.2.3Kick – Dusty (402)9.2.4Kick – Grit (403)9.2.5Kick – Rasper (406)9.2.6Kick – Snappy (407)9.2.7Kick – Bold (409)9.2.8Kick – Maple (411)9.2.9Kick – Push (412)9.3The Snares (414)9.3.1Snare – Volt (416)9.3.2Snare – Bit (418)9.3.3Snare – Pow (420)9.3.4Snare – Sharp (421)9.3.5Snare – Airy (423)9.3.6Snare – Vintage (425)9.3.7Snare – Chrome (427)9.3.8Snare – Iron (429)9.3.9Snare – Clap (431)9.3.10Snare – Breaker (433)9.4The Hi-hats (435)9.4.1Hi-hat – Silver (436)9.4.2Hi-hat – Circuit (438)9.4.3Hi-hat – Memory (440)9.4.4Hi-hat – Hybrid (442)9.4.5Creating a Pattern with Closed and Open Hi-hats (444)9.5The Toms (445)9.5.1Tom – Tronic (447)9.5.2Tom – Fractal (449)9.5.3Tom – Floor (453)9.5.4Tom – High (455)9.6The Percussions (456)9.6.1Percussion – Fractal (458)9.6.2Percussion – Kettle (461)9.6.3Percussion – Shaker (463)9.7The Cymbals (467)9.7.1Cymbal – Crash (469)9.7.2Cymbal – Ride (471)10Using the Bass Synth (474)10.1Bass Synth – General Handling (475)10.1.1Parameter Organization (475)10.1.2Bass Synth Parameters (477)11Working with Patterns (479)11.1Pattern Basics (479)11.1.1Pattern Editor Overview (480)11.1.2Navigating the Event Area (486)11.1.3Following the Playback Position in the Pattern (488)11.1.4Jumping to Another Playback Position in the Pattern (489)11.1.5Group View and Keyboard View (491)11.1.6Adjusting the Arrange Grid and the Pattern Length (493)11.1.7Adjusting the Step Grid and the Nudge Grid (497)11.2Recording Patterns in Real Time (501)11.2.1Recording Your Patterns Live (501)11.2.2The Record Prepare Mode (504)11.2.3Using the Metronome (505)11.2.4Recording with Count-in (506)11.2.5Quantizing while Recording (508)11.3Recording Patterns with the Step Sequencer (508)11.3.1Step Mode Basics (508)11.3.2Editing Events in Step Mode (511)11.3.3Recording Modulation in Step Mode (513)11.4Editing Events (514)11.4.1Editing Events with the Mouse: an Overview (514)11.4.2Creating Events/Notes (517)11.4.3Selecting Events/Notes (518)11.4.4Editing Selected Events/Notes (526)11.4.5Deleting Events/Notes (532)11.4.6Cut, Copy, and Paste Events/Notes (535)11.4.7Quantizing Events/Notes (538)11.4.8Quantization While Playing (540)11.4.9Doubling a Pattern (541)11.4.10Adding Variation to Patterns (541)11.5Recording and Editing Modulation (546)11.5.1Which Parameters Are Modulatable? (547)11.5.2Recording Modulation (548)11.5.3Creating and Editing Modulation in the Control Lane (550)11.6Creating MIDI Tracks from Scratch in MASCHINE (555)11.7Managing Patterns (557)11.7.1The Pattern Manager and Pattern Mode (558)11.7.2Selecting Patterns and Pattern Banks (560)11.7.3Creating Patterns (563)11.7.4Deleting Patterns (565)11.7.5Creating and Deleting Pattern Banks (566)11.7.6Naming Patterns (568)11.7.7Changing the Pattern’s Color (570)11.7.8Duplicating, Copying, and Pasting Patterns (571)11.7.9Moving Patterns (574)11.7.10Adjusting Pattern Length in Fine Increments (575)11.8Importing/Exporting Audio and MIDI to/from Patterns (576)11.8.1Exporting Audio from Patterns (576)11.8.2Exporting MIDI from Patterns (577)11.8.3Importing MIDI to Patterns (580)12Audio Routing, Remote Control, and Macro Controls (589)12.1Audio Routing in MASCHINE (590)12.1.1Sending External Audio to Sounds (591)12.1.2Configuring the Main Output of Sounds and Groups (596)12.1.3Setting Up Auxiliary Outputs for Sounds and Groups (601)12.1.4Configuring the Master and Cue Outputs of MASCHINE (605)12.1.5Mono Audio Inputs (610)12.1.5.1Configuring External Inputs for Sounds in Mix View (611)12.2Using MIDI Control and Host Automation (614)12.2.1Triggering Sounds via MIDI Notes (615)12.2.2Triggering Scenes via MIDI (622)12.2.3Controlling Parameters via MIDI and Host Automation (623)12.2.4Selecting VST/AU Plug-in Presets via MIDI Program Change (631)12.2.5Sending MIDI from Sounds (632)12.3Creating Custom Sets of Parameters with the Macro Controls (636)12.3.1Macro Control Overview (637)12.3.2Assigning Macro Controls Using the Software (638)12.3.3Assigning Macro Controls Using the Controller (644)13Controlling Your Mix (646)13.1Mix View Basics (646)13.1.1Switching between Arrange View and Mix View (646)13.1.2Mix View Elements (647)13.2The Mixer (649)13.2.1Displaying Groups vs. Displaying Sounds (650)13.2.2Adjusting the Mixer Layout (652)13.2.3Selecting Channel Strips (653)13.2.4Managing Your Channels in the Mixer (654)13.2.5Adjusting Settings in the Channel Strips (656)13.2.6Using the Cue Bus (660)13.3The Plug-in Chain (662)13.4The Plug-in Strip (663)13.4.1The Plug-in Header (665)13.4.2Panels for Drumsynths and Internal Effects (667)13.4.3Panel for the Sampler (668)13.4.4Custom Panels for Native Instruments Plug-ins (671)13.4.5Undocking a Plug-in Panel (Native Instruments and External Plug-ins Only) (675)13.5Controlling Your Mix from the Controller (677)13.5.1Navigating Your Channels in Mix Mode (678)13.5.2Adjusting the Level and Pan in Mix Mode (679)13.5.3Mute and Solo in Mix Mode (680)13.5.4Plug-in Icons in Mix Mode (680)14Using Effects (681)14.1Applying Effects to a Sound, a Group or the Master (681)14.1.1Adding an Effect (681)14.1.2Other Operations on Effects (690)14.1.3Using the Side-Chain Input (692)14.2Applying Effects to External Audio (695)14.2.1Step 1: Configure MASCHINE Audio Inputs (695)14.2.2Step 2: Set up a Sound to Receive the External Input (698)14.2.3Step 3: Load an Effect to Process an Input (700)14.3Creating a Send Effect (701)14.3.1Step 1: Set Up a Sound or Group as Send Effect (702)14.3.2Step 2: Route Audio to the Send Effect (706)14.3.3 A Few Notes on Send Effects (708)14.4Creating Multi-Effects (709)15Effect Reference (712)15.1Dynamics (713)15.1.1Compressor (713)15.1.2Gate (717)15.1.3Transient Master (721)15.1.4Limiter (723)15.1.5Maximizer (727)15.2Filtering Effects (730)15.2.1EQ (730)15.2.2Filter (733)15.2.3Cabinet (737)15.3Modulation Effects (738)15.3.1Chorus (738)15.3.2Flanger (740)15.3.3FM (742)15.3.4Freq Shifter (743)15.3.5Phaser (745)15.4Spatial and Reverb Effects (747)15.4.1Ice (747)15.4.2Metaverb (749)15.4.3Reflex (750)15.4.4Reverb (Legacy) (752)15.4.5Reverb (754)15.4.5.1Reverb Room (754)15.4.5.2Reverb Hall (757)15.4.5.3Plate Reverb (760)15.5Delays (762)15.5.1Beat Delay (762)15.5.2Grain Delay (765)15.5.3Grain Stretch (767)15.5.4Resochord (769)15.6Distortion Effects (771)15.6.1Distortion (771)15.6.2Lofi (774)15.6.3Saturator (775)15.7Perform FX (779)15.7.1Filter (780)15.7.2Flanger (782)15.7.3Burst Echo (785)15.7.4Reso Echo (787)15.7.5Ring (790)15.7.6Stutter (792)15.7.7Tremolo (795)15.7.8Scratcher (798)16Working with the Arranger (801)16.1Arranger Basics (801)16.1.1Navigating Song View (804)16.1.2Following the Playback Position in Your Project (806)16.1.3Performing with Scenes and Sections using the Pads (807)16.2Using Ideas View (811)16.2.1Scene Overview (811)16.2.2Creating Scenes (813)16.2.3Assigning and Removing Patterns (813)16.2.4Selecting Scenes (817)16.2.5Deleting Scenes (818)16.2.6Creating and Deleting Scene Banks (820)16.2.7Clearing Scenes (820)16.2.8Duplicating Scenes (821)16.2.9Reordering Scenes (822)16.2.10Making Scenes Unique (824)16.2.11Appending Scenes to Arrangement (825)16.2.12Naming Scenes (826)16.2.13Changing the Color of a Scene (827)16.3Using Song View (828)16.3.1Section Management Overview (828)16.3.2Creating Sections (833)16.3.3Assigning a Scene to a Section (834)16.3.4Selecting Sections and Section Banks (835)16.3.5Reorganizing Sections (839)16.3.6Adjusting the Length of a Section (840)16.3.6.1Adjusting the Length of a Section Using the Software (841)16.3.6.2Adjusting the Length of a Section Using the Controller (843)16.3.7Clearing a Pattern in Song View (843)16.3.8Duplicating Sections (844)16.3.8.1Making Sections Unique (845)16.3.9Removing Sections (846)16.3.10Renaming Scenes (848)16.3.11Clearing Sections (849)16.3.12Creating and Deleting Section Banks (850)16.3.13Working with Patterns in Song view (850)16.3.13.1Creating a Pattern in Song View (850)16.3.13.2Selecting a Pattern in Song View (850)16.3.13.3Clearing a Pattern in Song View (851)16.3.13.4Renaming a Pattern in Song View (851)16.3.13.5Coloring a Pattern in Song View (851)16.3.13.6Removing a Pattern in Song View (852)16.3.13.7Duplicating a Pattern in Song View (852)16.3.14Enabling Auto Length (852)16.3.15Looping (853)16.3.15.1Setting the Loop Range in the Software (854)16.4Playing with Sections (855)16.4.1Jumping to another Playback Position in Your Project (855)16.5Triggering Sections or Scenes via MIDI (856)16.6The Arrange Grid (858)16.7Quick Grid (860)17Sampling and Sample Mapping (862)17.1Opening the Sample Editor (862)17.2Recording Audio (863)17.2.1Opening the Record Page (863)17.2.2Selecting the Source and the Recording Mode (865)17.2.3Arming, Starting, and Stopping the Recording (868)17.2.5Using the Footswitch for Recording Audio (871)17.2.6Checking Your Recordings (872)17.2.7Location and Name of Your Recorded Samples (876)17.3Editing a Sample (876)17.3.1Using the Edit Page (877)17.3.2Audio Editing Functions (882)17.4Slicing a Sample (890)17.4.1Opening the Slice Page (891)17.4.2Adjusting the Slicing Settings (893)17.4.3Live Slicing (898)17.4.3.1Live Slicing Using the Controller (898)17.4.3.2Delete All Slices (899)17.4.4Manually Adjusting Your Slices (899)17.4.5Applying the Slicing (906)17.5Mapping Samples to Zones (912)17.5.1Opening the Zone Page (912)17.5.2Zone Page Overview (913)17.5.3Selecting and Managing Zones in the Zone List (915)17.5.4Selecting and Editing Zones in the Map View (920)17.5.5Editing Zones in the Sample View (924)17.5.6Adjusting the Zone Settings (927)17.5.7Adding Samples to the Sample Map (934)18Appendix: Tips for Playing Live (937)18.1Preparations (937)18.1.1Focus on the Hardware (937)18.1.2Customize the Pads of the Hardware (937)18.1.3Check Your CPU Power Before Playing (937)18.1.4Name and Color Your Groups, Patterns, Sounds and Scenes (938)18.1.5Consider Using a Limiter on Your Master (938)18.1.6Hook Up Your Other Gear and Sync It with MIDI Clock (938)18.1.7Improvise (938)18.2Basic Techniques (938)18.2.1Use Mute and Solo (938)18.2.2Use Scene Mode and Tweak the Loop Range (939)18.2.3Create Variations of Your Drum Patterns in the Step Sequencer (939)18.2.4Use Note Repeat (939)18.2.5Set Up Your Own Multi-effect Groups and Automate Them (939)18.3Special Tricks (940)18.3.1Changing Pattern Length for Variation (940)18.3.2Using Loops to Cycle Through Samples (940)18.3.3Using Loops to Cycle Through Samples (940)18.3.4Load Long Audio Files and Play with the Start Point (940)19Troubleshooting (941)19.1Knowledge Base (941)19.2Technical Support (941)19.3Registration Support (942)19.4User Forum (942)20Glossary (943)Index (951)1Welcome to MASCHINEThank you for buying MASCHINE!MASCHINE is a groove production studio that implements the familiar working style of classi-cal groove boxes along with the advantages of a computer based system. MASCHINE is ideal for making music live, as well as in the studio. It’s the hands-on aspect of a dedicated instru-ment, the MASCHINE hardware controller, united with the advanced editing features of the MASCHINE software.Creating beats is often not very intuitive with a computer, but using the MASCHINE hardware controller to do it makes it easy and fun. You can tap in freely with the pads or use Note Re-peat to jam along. Alternatively, build your beats using the step sequencer just as in classic drum machines.Patterns can be intuitively combined and rearranged on the fly to form larger ideas. You can try out several different versions of a song without ever having to stop the music.Since you can integrate it into any sequencer that supports VST, AU, or AAX plug-ins, you can reap the benefits in almost any software setup, or use it as a stand-alone application. You can sample your own material, slice loops and rearrange them easily.However, MASCHINE is a lot more than an ordinary groovebox or sampler: it comes with an inspiring 7-gigabyte library, and a sophisticated, yet easy to use tag-based Browser to give you instant access to the sounds you are looking for.What’s more, MASCHINE provides lots of options for manipulating your sounds via internal ef-fects and other sound-shaping possibilities. You can also control external MIDI hardware and 3rd-party software with the MASCHINE hardware controller, while customizing the functions of the pads, knobs and buttons according to your needs utilizing the included Controller Editor application. We hope you enjoy this fantastic instrument as much as we do. Now let’s get go-ing!—The MASCHINE team at Native Instruments.MASCHINE Documentation1.1MASCHINE DocumentationNative Instruments provide many information sources regarding MASCHINE. The main docu-ments should be read in the following sequence:1.MASCHINE Getting Started: This document provides a practical approach to MASCHINE viaa set of tutorials covering easy and more advanced tasks in order to help you familiarizeyourself with MASCHINE.2.MASCHINE Manual (this document): The MASCHINE Manual provides you with a compre-hensive description of all MASCHINE software and hardware features.Additional documentation sources provide you with details on more specific topics:▪Controller Editor Manual: Besides using your MASCHINE hardware controller together withits dedicated MASCHINE software, you can also use it as a powerful and highly versatileMIDI controller to pilot any other MIDI-capable application or device. This is made possibleby the Controller Editor software, an application that allows you to precisely define all MIDIassignments for your MASCHINE controller. The Controller Editor was installed during theMASCHINE installation procedure. For more information on this, please refer to the Con-troller Editor Manual available as a PDF file via the Help menu of Controller Editor.▪Online Support Videos: You can find a number of support videos on The Official Native In-struments Support Channel under the following URL: https:///NIsupport-EN. We recommend that you follow along with these instructions while the respective ap-plication is running on your computer.Other Online Resources:If you are experiencing problems related to your Native Instruments product that the supplied documentation does not cover, there are several ways of getting help:▪Knowledge Base▪User Forum▪Technical Support▪Registration SupportYou will find more information on these subjects in the chapter Troubleshooting.1.2Document ConventionsThis section introduces you to the signage and text highlighting used in this manual. This man-ual uses particular formatting to point out special facts and to warn you of potential issues. The icons introducing these notes let you see what kind of information is to be expected:This document uses particular formatting to point out special facts and to warn you of poten-tial issues. The icons introducing the following notes let you see what kind of information can be expected:Furthermore, the following formatting is used:▪Text appearing in (drop-down) menus (such as Open…, Save as… etc.) in the software and paths to locations on your hard disk or other storage devices is printed in italics.▪Text appearing elsewhere (labels of buttons, controls, text next to checkboxes etc.) in the software is printed in blue. Whenever you see this formatting applied, you will find the same text appearing somewhere on the screen.▪Text appearing on the displays of the controller is printed in light grey. Whenever you see this formatting applied, you will find the same text on a controller display.▪Text appearing on labels of the hardware controller is printed in orange. Whenever you see this formatting applied, you will find the same text on the controller.▪Important names and concepts are printed in bold.▪References to keys on your computer’s keyboard you’ll find put in square brackets (e.g.,“Press [Shift] + [Enter]”).►Single instructions are introduced by this play button type arrow.→Results of actions are introduced by this smaller arrow.Naming ConventionThroughout the documentation we will refer to MASCHINE controller (or just controller) as the hardware controller and MASCHINE software as the software installed on your computer.The term “effect” will sometimes be abbreviated as “FX” when referring to elements in the MA-SCHINE software and hardware. These terms have the same meaning.Button Combinations and Shortcuts on Your ControllerMost instructions will use the “+” sign to indicate buttons (or buttons and pads) that must be pressed simultaneously, starting with the button indicated first. E.g., an instruction such as:“Press SHIFT + PLAY”means:1.Press and hold SHIFT.2.While holding SHIFT, press PLAY and release it.3.Release SHIFT.Unlabeled Buttons on the ControllerThe buttons and knobs above and below the displays on your MASCHINE controller do not have labels.。
Black Box中文用户手册

Black Box中文用户手册前 言Black Box是M-Audio首次推出的第一款将放大器、效果器、鼓机和音频接口集于一身的电脑录音工具,它可用作独立的放大器和效果器模块,拥有12款最优秀的吉他放大逼真模拟,内建带计速器的99种鼓音型。
Black Box还与Roger Linn合作,采用AdrenaLinn™ DSP技术将效果器与鼓的节奏自动同步。
另外提供的话筒前置放大器可用于录制人声或声音乐器。
USB连接将音频内容输出到你喜爱的电脑录音软件中,并与Black Box的鼓和效果器保持同步。
Black Box提供了优秀的声音、全新的效果器、丰富的鼓节奏和电脑录音功能,以及便于携带的特性。
提示:设备的开关一定要按照顺序。
与音箱连接的功放,打开系统的时候,最后打开功放;在关闭系统的时候,最先关闭功放。
如果开着功放,插入别的设备将产生巨大的噪音,会损害您的听力和设备。
所以在插拔设备的时候,首先应该将功放或有源音箱。
这条法则有助于保护您的听力和设备安全。
所以在插拔设备的时候,首先应该关闭功放或有源音箱。
这条法则有助于保护您的听力和设备安全。
准 备 开 始在开始工作之前,请按照以下指示进行安装。
需要更多信息,请阅读此说明书的其他部分。
快速安装1.将一对有源音箱接入Black Box后部的主1/4”输出口,或在前面插入一副耳机。
2.将吉他接入Black Box的前部并调高吉他的音量。
3.将Black Box右上角的MIX旋钮旋转到到最左边。
4.开始弹奏并调高吉他输入电平旋钮直到过载灯刚好达到你弹奏的强度。
5.调高右上角的输出电平旋钮进行调试。
得到声音z使用Preset Up和Down按钮尝试不同的效果预设。
z按下Start/Stop按钮来试听鼓机。
z使用Drumbeat Up和Down按钮来选择不同节拍。
z使用Tap Tempo按钮来设置鼓机的节奏。
编改任何编辑预设的参数:Amp---- 按下Amp按钮,然后使用LCD显示屏下面的4个旋钮控制器来调整吉他专箱音色的设置。
bass初级教程

贝司教程(转)初步这是立足如何构造贝司乐句的系列课程的第一课.本系列的主要课程都假设读者已经具备了初级的音乐知识,懂得一些关于音和节拍的知识.也假设可以阅读TAB谱.这个预备课程就是来教那些不知道以上知识的人的.如果你懂得如何在贝司上找到C#,知道什么是四分之一休止符,并且可以阅读TAB,那么你可以跳过本课直接学习第一章.否则,请仔细阅读本课.音乐的片断是由一系列的音组成的.那些音是12个音集合中的元素组成的,这个集合被叫做八度音阶,并且每个音都有一个名字.如果你坐在钢琴前,你将会看到它有88个键:52个白键和36个黑键,并且每个键都能演奏出不同的音.白键都有一个字母的名字;左面的第一个(最低的音)叫A,下一个白键叫B,依此类推.第7个白键叫G,下一个白键(第八个)也叫A;从它开始了第二个八度音阶.第九个白键叫B,第十个叫C,依此类推,直到第52个(最后一个白键)叫C.黑键的命名是与靠近它的两个白键相关的,所以每个黑键都有两个名字.首先,它们可以被前面白键的"升":例如最低的黑键(A上面紧跟着的黑键)叫升A.B上面紧跟着的不是黑键;第二个黑键是C#,等等.其次,黑键也可能叫"降",用它后面的白键的名字:因此,最低音的黑键也可以叫降B,下面紧跟着的音是B.同样,在D和E之间的黑键可以叫升D或者降E.现在你可以用两个名字随便叫黑键了.一个八度音阶从A到G#,12个音(7个白键和5个黑键),然后这些名字在下一个八度音阶重复.事实上起点并不重要:任何在一排的12个音(总是包含7个白键和5个黑键)都可以叫作一个八度音阶.贝司弦被调成4个音:E,A,D和G(由粗到细).所以,如果你在钢琴上演奏E,和在贝司上弹奏E的空弦,它们的音是相同的(如果你从钢琴上选择右面的八度音阶也是一样的).在弦上向上移动一个音品就可以演奏出下一个高一点的音.同样,演奏出空弦A的音.将手指按在第一音品上可以演奏出升A或者降B.第二音品就是B.第三音品就是C(因为B后面没有黑键),第四音品是升C,第五音品是D,它与D弦的空弦音是一样的.一次类推整个指板.利用这种技术你会在贝司上找到两个或三个相同的音.例如,你可以在E弦的一品上弹出F,在D弦的三品,A 弦的八品,G弦的十品可以演奏出F(三品D和八品A是同一个八度音阶,一品E与十品G的音各属于一个八度音阶).确信你可以不耗很大力气就可以在贝司上找到给出的音,并且知道这个音的名字,同时可以在弦上演奏出来.最少可以演奏到12品.下一步讲一下歌曲的组成的部分-时间.歌曲被划分成小节:一个普通歌曲的长度大约有100小节.每个小节都是确定的拍长:几乎所有的现代音乐中,每小节都是4拍,当然一些其他长度的的小节也有用的.在歌曲中的每个音都有一定的时长,一个音持续4拍叫一个全音符.持续两拍的音叫半音符,两个半音符的长度等于一个全音符的长度.同样会有四分之一音符,八分之一音符,以及十六分之一音符.(在英格兰这些音符有不同的名字.本课程将以美国的习惯来命名.)每个四分之一音符是一拍,于是四分之一音符是节奏的基本构成时间块.8个八分之一音符组成一个四拍的小节,4个四分之一音符和16个十六分之一音符也一样.小节可以由长度不同的音组成,所以一个四分之一音符,一个半音符,和两个八分之一音符也可以构成一个小节.其他时长可以写成一个音的"符点":在标准记号中,在一个音的右面写一个点.加了符点的的音可以使它持续比平常时多出它本身的半个长的音.所以,一个四分之一音符持续两个八分之一音符长:一个符点的四分之一音符比原来长50%,所以它将持续三个八分之一音符.因此,两个四分之一音符的时长等于一个符点四分之一音符加一个八分之一音符.同样,一个符点半音符持续三个四分之一音符长:一个符点半音符和一个四分之一音符可以构成一个四拍小节.最后就是认识休止符,或者说当贝司不演奏的时间,它的命名也一样:全音休止符的意思是贝司不演奏一个小节.一个四分之一休止符的意思就是贝司不演奏一拍,依此类推八分之一休止符和二分之一休止符.在一些爵士和古典音乐中,有些四分之一音符不是一拍的长度.除此之外,大部分的音乐都是按照一个四分之一音符是一拍来演奏的.这里约定教程都是按照四分之一音符是一拍来讲的.尽管如此,你可能会演奏一些不同的音乐,可能有二分之一音符或者八分之一音符是一拍的音乐.我建议你暂时不要关心这些.最后一件事就是你需要知道如何阅读TAB.贝司谱,或者短的TAB,是用来记录贝司音乐的简单方法.这些是几个琴谱的不同版本,但是都包含的下面的特性.贝司谱写在四根直线上.在文本界面上那些线通常用虚线字符写.每行虚线相当于一根贝司弦:最低的线相当于贝司上的E弦,上一条是A弦,然后是D弦,最高的弦是G.线上的数字表示演奏时左手按的品位;所以在E弦上按3品演奏的G将如下所示:G------------------------------------D------------------------------------A------------------------------------E----3-------------------------------音是被从左向右演奏的;因此一个G大调上行音如下显示:G------------------------------------D-------------------2--4--5----------A----------2--3--5-------------------E----3--5----------------------------或者使用空弦,那么也可以记作如下:G-------------------------0----------D----------------0--2--4-------------A-------0--2--3----------------------E----3-------------------------------和弦可以写在一个竖行上.于是一个简单的A大和弦如下:G-----9------------------------------D-----11-----------------------------E------------------------------------上面的意思是同时演奏A弦空弦音,和D弦11品的C#以及G弦的9品音E.不同的指法技术可以很好地记录在TAB上.这可以由在音的后面写一个字符来完成.大部分常用的字符如下:h - 从上一个音符开始锤击(hammer-on)p - 从上一个音符开始钩脱(pull off)\ - 划到下面的音(slide up)b - 推弦使音弯曲(bend note)S - 用右手的拇指击出这个音(如果是左撇子则是左手)(slap)P - 用右手钩出这个音(同上)(pop)t - 用右手轻扣出这个音(同上)(tap)H - 泛音(harmonic)于是一段有趣的贝司乐句如下:G---------5P-7h-5p-------------------D------------------------3b----------A---0S\5-----------3S-5S----5S-5H---E------------------------------------哑音(不清楚的演奏出一个音)用x在弦上代替数字表示:G------------5--7--------------------D------------------------------------A---5--x--x--------5--x--5-----------E------------------------------------同样,休止符用r来指示(任何弦上都可以):G------------5--7--------------------D------------------------------------A---5--r--r--------5--r--5-----------E------------------------------------有些需要演奏特殊音的时候,可能在音的下面用数字标示是用哪个手指弹的(左撇子就是左手),1=食指,2=中指,3=无名指,4=小指,以及很少用的5=拇指:G---------5--7--5--------------------D------------------------------------A---0--5-----------------------------1 1 3流行的记法可以在每个音的上面用一个字母标记出音的时间:s=十六分之一音符,e=八分之一音符,q=4分之一音符,h=二分之一音符,w=全音符.也可能用正常音加一个点来表示符点音.另外,垂直线通常用来指示小节分界.TAB记录的这种方法参见下面的例子:w q s s e q h q. e e e s s e hG-----|----5--7--5-------|-------------5--7--7-|----在一些爵士和古典音乐中,有些四分之一音符不是一拍的长度.除此之外,大部分的音乐都是按照一个四分之一音符是一拍来演奏的.这里约定教程都是按照四分之一音符是一拍来讲的.尽管如此,你可能会演奏一些不同的音乐,可能有二分之一音符或者八分之一音符是一拍的音乐.我建议你暂时不要关心这些.最后一件事就是你需要知道如何阅读TAB.贝司谱,或者短的TAB,是用来记录贝司音乐的简单方法.这些是几个琴谱的不同版本,但是都包含的下面的特性.贝司谱写在四根直线上.在文本界面上那些线通常用虚线字符写.每行虚线相当于一根贝司弦:最低的线相当于贝司上的E弦,上一条是A弦,然后是D弦,最高的弦是G.线上的数字表示演奏时左手按的品位;所以在E弦上按3品演奏的G将如下所示:G------------------------------------D------------------------------------A------------------------------------E----3-------------------------------音是被从左向右演奏的;因此一个G大调上行音如下显示:G------------------------------------D-------------------2--4--5----------A----------2--3--5-------------------E----3--5----------------------------或者使用空弦,那么也可以记作如下:G-------------------------0----------D----------------0--2--4-------------A-------0--2--3----------------------E----3-------------------------------和弦可以写在一个竖行上.于是一个简单的A大和弦如下:D-----11-----------------------------A-----0------------------------------E------------------------------------上面的意思是同时演奏A弦空弦音,和D弦11品的C#以及G弦的9品音E.不同的指法技术可以很好地记录在TAB上.这可以由在音的后面写一个字符来完成.大部分常用的字符如下:h - 从上一个音符开始锤击(hammer-on)p - 从上一个音符开始钩脱(pull off)\ - 划到下面的音(slide up)b - 推弦使音弯曲(bend note)S - 用右手的拇指击出这个音(如果是左撇子则是左手)(slap)P - 用右手钩出这个音(同上)(pop)t - 用右手轻扣出这个音(同上)(tap)H - 泛音(harmonic)于是一段有趣的贝司乐句如下:G---------5P-7h-5p-------------------D------------------------3b----------A---0S\5-----------3S-5S----5S-5H---E------------------------------------哑音(不清楚的演奏出一个音)用x在弦上代替数字表示:G------------5--7--------------------D------------------------------------A---5--x--x--------5--x--5-----------E------------------------------------同样,休止符用r来指示(任何弦上都可以):G------------5--7--------------------D------------------------------------A---5--r--r--------5--r--5-----------E------------------------------------有些需要演奏特殊音的时候,可能在音的下面用数字标示是用哪个手指弹的(左撇子就是左手),1=食指,2=中指,3=无名指,4=小指,以及很少用的5=拇指:G---------5--7--5--------------------A---0--5-----------------------------E------------------------------------1 1 3流行的记法可以在每个音的上面用一个字母标记出音的时间:s=十六分之一音符,e=八分之一音符,q=4分之一音符,h=二分之一音符,w=全音符.也可能用正常音加一个点来表示符点音.另外,垂直线通常用来指示小节分界.TAB记录的这种方法参见下面的例子:w q s s e q h q. e e e s s e hG-----|----5--7--5-------|-------------5--7--7-|----在一些爵士和古典音乐中,有些四分之一音符不是一拍的长度.除此之外,大部分的音乐都是按照一个四分之一音符是一拍来演奏的.这里约定教程都是按照四分之一音符是一拍来讲的.尽管如此,你可能会演奏一些不同的音乐,可能有二分之一音符或者八分之一音符是一拍的音乐.我建议你暂时不要关心这些.最后一件事就是你需要知道如何阅读TAB.贝司谱,或者短的TAB,是用来记录贝司音乐的简单方法.这些是几个琴谱的不同版本,但是都包含的下面的特性.贝司谱写在四根直线上.在文本界面上那些线通常用虚线字符写.每行虚线相当于一根贝司弦:最低的线相当于贝司上的E弦,上一条是A弦,然后是D弦,最高的弦是G.线上的数字表示演奏时左手按的品位;所以在E弦上按3品演奏的G将如下所示:G------------------------------------D------------------------------------A------------------------------------E----3-------------------------------音是被从左向右演奏的;因此一个G大调上行音如下显示:G------------------------------------D-------------------2--4--5----------A----------2--3--5-------------------E----3--5----------------------------或者使用空弦,那么也可以记作如下:G-------------------------0----------D----------------0--2--4-------------A-------0--2--3----------------------E----3-------------------------------和弦可以写在一个竖行上.于是一个简单的A大和弦如下:G-----9------------------------------D-----11-----------------------------A-----0------------------------------E------------------------------------上面的意思是同时演奏A弦空弦音,和D弦11品的C#以及G弦的9品音E.不同的指法技术可以很好地记录在TAB上.这可以由在音的后面写一个字符来完成.大部分常用的字符如下:h - 从上一个音符开始锤击(hammer-on)p - 从上一个音符开始钩脱(pull off)\ - 划到下面的音(slide up)b - 推弦使音弯曲(bend note)S - 用右手的拇指击出这个音(如果是左撇子则是左手)(slap)P - 用右手钩出这个音(同上)(pop)t - 用右手轻扣出这个音(同上)(tap)H - 泛音(harmonic)于是一段有趣的贝司乐句如下:G---------5P-7h-5p-------------------D------------------------3b----------A---0S\5-----------3S-5S----5S-5H---E------------------------------------哑音(不清楚的演奏出一个音)用x在弦上代替数字表示:G------------5--7--------------------D------------------------------------A---5--x--x--------5--x--5-----------E------------------------------------同样,休止符用r来指示(任何弦上都可以):G------------5--7--------------------D------------------------------------A---5--r--r--------5--r--5-----------E------------------------------------有些需要演奏特殊音的时候,可能在音的下面用数字标示是用哪个手指弹的(左撇子就是左手),1=食指,2=中指,3=无名指,4=小指,以及很少用的5=拇指:G---------5--7--5--------------------D------------------------------------A---0--5-----------------------------E------------------------------------1 1 3流行的记法可以在每个音的上面用一个字母标记出音的时间:s=十六分之一音符,e=八分之一音符,q=4分之一音符,h=二分之一音符,w=全音符.也可能用正常音加一个点来表示符点音.另外,垂直线通常用来指示小节分界.TAB记录的这种方法参见下面的例子:w q s s e q h q. e e e s s e hG-----|----5--7--5-------|-------------5--7--7-|----在一些爵士和古典音乐中,有些四分之一音符不是一拍的长度.除此之外,大部分的音乐都是按照一个四分之一音符是一拍来演奏的.这里约定教程都是按照四分之一音符是一拍来讲的.尽管如此,你可能会演奏一些不同的音乐,可能有二分之一音符或者八分之一音符是一拍的音乐.我建议你暂时不要关心这些.最后一件事就是你需要知道如何阅读TAB.贝司谱,或者短的TAB,是用来记录贝司音乐的简单方法.这些是几个琴谱的不同版本,但是都包含的下面的特性.贝司谱写在四根直线上.在文本界面上那些线通常用虚线字符写.每行虚线相当于一根贝司弦:最低的线相当于贝司上的E弦,上一条是A弦,然后是D弦,最高的弦是G.线上的数字表示演奏时左手按的品位;所以在E弦上按3品演奏的G将如下所示:G------------------------------------D------------------------------------A------------------------------------E----3-------------------------------音是被从左向右演奏的;因此一个G大调上行音如下显示:G------------------------------------D-------------------2--4--5----------A----------2--3--5-------------------E----3--5----------------------------或者使用空弦,那么也可以记作如下:G-------------------------0----------D----------------0--2--4-------------A-------0--2--3----------------------E----3-------------------------------和弦可以写在一个竖行上.于是一个简单的A大和弦如下:G-----9------------------------------D-----11-----------------------------A-----0------------------------------E------------------------------------上面的意思是同时演奏A弦空弦音,和D弦11品的C#以及G弦的9品音E.不同的指法技术可以很好地记录在TAB上.这可以由在音的后面写一个字符来完成.大部分常用的字符如下:h - 从上一个音符开始锤击(hammer-on)p - 从上一个音符开始钩脱(pull off)\ - 划到下面的音(slide up)b - 推弦使音弯曲(bend note)S - 用右手的拇指击出这个音(如果是左撇子则是左手)(slap)P - 用右手钩出这个音(同上)(pop)t - 用右手轻扣出这个音(同上)(tap)H - 泛音(harmonic)于是一段有趣的贝司乐句如下:G---------5P-7h-5p-------------------D------------------------3b----------A---0S\5-----------3S-5S----5S-5H---E------------------------------------哑音(不清楚的演奏出一个音)用x在弦上代替数字表示:G------------5--7--------------------D------------------------------------A---5--x--x--------5--x--5-----------E------------------------------------同样,休止符用r来指示(任何弦上都可以):G------------5--7--------------------D------------------------------------A---5--r--r--------5--r--5-----------E------------------------------------有些需要演奏特殊音的时候,可能在音的下面用数字标示是用哪个手指弹的(左撇子就是左手),1=食指,2=中指,3=无名指,4=小指,以及很少用的5=拇指:G---------5--7--5--------------------D------------------------------------A---0--5-----------------------------E------------------------------------1 1 3流行的记法可以在每个音的上面用一个字母标记出音的时间:s=十六分之一音符,e=八分之一音符,q=4分之一音符,h=二分之一音符,w=全音符.也可能用正常音加一个点来表示符点音.另外,垂直线通常用来指示小节分界.TAB记录的这种方法参见下面的例子:w q s s e q h q. e e e s s e hG-----|----5--7--5-------|-------------5--7--7-|----在一些爵士和古典音乐中,有些四分之一音符不是一拍的长度.除此之外,大部分的音乐都是按照一个四分之一音符是一拍来演奏的.这里约定教程都是按照四分之一音符是一拍来讲的.尽管如此,你可能会演奏一些不同的音乐,可能有二分之一音符或者八分之一音符是一拍的音乐.我建议你暂时不要关心这些.最后一件事就是你需要知道如何阅读TAB.贝司谱,或者短的TAB,是用来记录贝司音乐的简单方法.这些是几个琴谱的不同版本,但是都包含的下面的特性.贝司谱写在四根直线上.在文本界面上那些线通常用虚线字符写.每行虚线相当于一根贝司弦:最低的线相当于贝司上的E弦,上一条是A弦,然后是D弦,最高的弦是G.线上的数字表示演奏时左手按的品位;所以在E弦上按3品演奏的G将如下所示:G------------------------------------D------------------------------------A------------------------------------E----3-------------------------------音是被从左向右演奏的;因此一个G大调上行音如下显示:G------------------------------------D-------------------2--4--5----------A----------2--3--5-------------------E----3--5----------------------------或者使用空弦,那么也可以记作如下:G-------------------------0----------D----------------0--2--4-------------A-------0--2--3----------------------E----3-------------------------------和弦可以写在一个竖行上.于是一个简单的A大和弦如下:G-----9------------------------------D-----11-----------------------------A-----0------------------------------E------------------------------------上面的意思是同时演奏A弦空弦音,和D弦11品的C#以及G弦的9品音E.不同的指法技术可以很好地记录在TAB上.这可以由在音的后面写一个字符来完成.大部分常用的字符如下:h - 从上一个音符开始锤击(hammer-on)p - 从上一个音符开始钩脱(pull off)\ - 划到下面的音(slide up)b - 推弦使音弯曲(bend note)S - 用右手的拇指击出这个音(如果是左撇子则是左手)(slap)P - 用右手钩出这个音(同上)(pop)t - 用右手轻扣出这个音(同上)(tap)H - 泛音(harmonic)于是一段有趣的贝司乐句如下:G---------5P-7h-5p-------------------D------------------------3b----------A---0S\5-----------3S-5S----5S-5H---E------------------------------------哑音(不清楚的演奏出一个音)用x在弦上代替数字表示:G------------5--7--------------------D------------------------------------A---5--x--x--------5--x--5-----------E------------------------------------同样,休止符用r来指示(任何弦上都可以):G------------5--7--------------------D------------------------------------A---5--r--r--------5--r--5-----------E------------------------------------有些需要演奏特殊音的时候,可能在音的下面用数字标示是用哪个手指弹的(左撇子就是左手),1=食指,2=中指,3=无名指,4=小指,以及很少用的5=拇指:G---------5--7--5--------------------D------------------------------------A---0--5-----------------------------E------------------------------------1 1 3流行的记法可以在每个音的上面用一个字母标记出音的时间:s=十六分之一音符,e=八分之一音符,q=4分之一音符,h=二分之一音符,w=全音符.也可能用正常音加一个点来表示符点音.另外,垂直线通常用来指示小节分界.TAB记录的这种方法参见下面的例子:w q s s e q h q. e e e s s e hG-----|----5--7--5-------|-------------5--7--7-|----D-----|------------------|-3--3--5--7----------|----A---0-|-5-----------8--5-|---------------------|-5--E-----|------------------|---------------------|----十分遗憾,直接就跳到了第4课,而且更遗憾的是这课居然没有结束.但我想还是要翻出来,既然开了头就不好半途而废,我想终究可能会有用一些.所以连夜翻了出来,现在好困呢!:)希望对大家能有帮助.----------第四课-大调音阶,调性,和弦转换,以及五声循环在最后一课,我们谈一谈关于基于歌曲和弦演奏而创建贝司和声的问题.在这一个课中,我们将讨论在一首歌曲中用哪个和弦以及和弦的次序,我们也给出一些常见歌曲的例子来阐述大调音阶以及一些常见和弦的转换.我们也将介绍大部分贝司手都熟悉的五声循环.掌握常见和弦的模式将使得脱离录音学习歌曲变得容易,因为它能让你精确地推断出贝司和声在哪里该如何进行,如果你愿意它也可以帮助你写歌.首先尽管有12个不同的音(A,降B,C,降D等等直到降A),大部分的歌曲都不会使用所有的音:事实上,大部分情况下只使用其中的7个音.一首歌使用哪些音是由它的调决定的,调的决定是由作曲者决定的(或者贝司手),这个调将指引他在这首歌中选择和弦以及音.并且,如果你知道一首个的调,那么它将帮助推算出这首歌的贝司和声,因为它很好地提示你这首歌使用了哪些音以及不使用哪些音.与给定调相关的音叫这个调的音阶.例如:我们可以准备写一首C大调的歌曲,并且如果我们只使用C大调音阶中的音.那么它的音阶就是:C,D,E,F,G,A,B,C;所有的这些音都是钢琴上的白键,没有黑键.你可以在钢琴上或者你的贝司上演奏那些音阶,记谱如下:G-----------------2--4--5--D--------2--3--5-----------A--3--5--------------------E--------------------------如果你演奏这些音阶,你将会注意到它们非常和谐,对这些声音很熟悉;那是因为大调音阶是音乐中广泛使用的音阶.选择C作为开始音不是什么神奇的事情:你可以选择任何一个喜欢的音作为大调音阶的开始,这个大调音阶是与它的音阶相关联的.一个确定的大调的音阶都包含7个音,并且它们除了第3个音和第4个音相距半音以外,其余的相邻音都差一个全音(第7个音与下一个八度音阶的第1个音也相距半音).因此你可以构造一个从D开始的D大调音阶:D,E,F#,G,A,B,C#,D.注意F#和G与C#和D相距半音,你可以在你的贝司上象这样演奏这些音阶:G-----------------4--6--7--D--------4--5--7-----------A--5--7--------------------E--------------------------注意这个范例完全与上面C大调音阶相同,只是都高了两个音品.事实上,这个相同的样例可以是从任何一个弦,任何一个音品开始.例如:F大调音阶如下:G--------------------------D-----------------0--2--3--A--------0--1--3-----------E--1--3--------------------从E弦第一品开始的这个音阶指法也是与C调相同的.用这七个音写成的歌就可以说成是F 大调的.如果你喜欢可以在指板上保留这些音,再一次开始新的一个F调音阶:你可以从循环第1个音循环到第8个音,第2个音到第9个音,等等.在F大调中,结果将如下:G-----------------------------2--3--5--7--9--10D-----------------0--2--3--5-------------------A--------0--1--3-------------------------------E--1--3----------------------------------------并且你可以看到第2个音和第9个音是两个G,第3个音与第10个音是A等等.有时G也会依赖具体环境被叫作第2品或者第9品.一旦你为歌曲定好调,你就可以开始选择歌曲中使用的和弦了.因为你现在只能从7个音中选择,和弦的个数也相应地减少.例如:假设你正在写一首C大调的歌,并且你要用一个以C 为根音的和弦.你不能使用C小和弦,因为它含有降E,而这个音不是C大调的音阶.无论如何,你可以使用C大调和弦,它的音是音阶中的第1,第3和第5音组成:C,E和G.如果你要用根音为D的和弦,你不能选择D大和弦(它含有升F),可以选择D小和弦,由D,F和A组成,即音阶中的第2,第4和第6音.所以,如果你在写一首C大调的歌曲,你用D小调和弦结束胜过用D大调和弦.如果你要用4个音并且G为根音的和弦,你将会用到G,B,D和F(第5,7,9和11音),所以你应该采用G7和弦.。
HP PageWide Pro MFP 477系列用户指南说明书

User GuideCopyright and License© 2016 Copyright HP Development Company, L.P.All rights reserved. Reproduction, adaptation, or translation of this material is prohibited without prior written permission of HP, except as allowed under copyright laws.The information contained in this document is subject to change without notice.The only warranties for HP products and services are set forth in the express warranty statements accompanying such products and services. Nothing herein should be construed as constituting an additional warranty. HP shall not be liable for technical or editorial errors or omissions contained herein.Edition 1, 2/2016Trademark CreditsAdobe®, Acrobat®, and PostScript® are trademarks of Adobe Systems Incorporated. Intel® Core™ is a trademark of Intel Corporation in the U.S. and other countries.Java™ is a US trademark of Sun Microsystems, Inc.Microsoft®, Windows®, Windows® XP, and Windows Vista® are U.S. registered trademarks of Microsoft Corporation.UNIX® is a registered trademark of The Open Group.ENERGY STAR and the ENERGY STAR mark are registered trademarks owned by the U.S. Environmental Protection Agency.Table of contents1 Product basics (1)Product features (2)Environmental features (3)Accessibility features (3)Product views (4)Front left view (4)Front right view (5)Back view (5)Cartridge door view (6)Power on and off (7)Turn the product on (7)Manage power (7)Turn the product off (8)Use the control panel (9)Control panel buttons (9)Control panel home screen (10)Control panel dashboard (11)Control panel application folders (11)Control panel shortcuts (12)Help features (12)Printer information (13)Help animations (13)Quiet Mode (14)To turn Quiet Mode on or off from the control panel (14)To turn Quiet Mode on or off from the EWS (14)2 Connect the product (15)Connect the product to a computer or a network (16)To connect the product using a USB cable (16)To connect the product to a network (17)Supported network protocols (17)Connect the product using a wired network (17)ENWW iiiConnect the product using a wireless network (wireless models only) (17)To connect the product to a wireless network using the Wireless SetupWizard (18)To connect the product to a wireless network using WPS (18)To connect the product to a wireless network manually (19)Use Wi-Fi Direct to connect a computer or device to the product (20)To turn on Wi-Fi Direct (20)To print from a wireless-capable mobile device (20)To print from a wireless-capable computer (Windows) (20)To print from a wireless-capable computer (OS X) (20)Install HP printer software for a wireless product already on the network (22)Open the printer software (Windows) (22)Manage network settings (22)View or change network settings (22)Set or change the product password (23)Manually configure TCP/IP parameters from the control panel (23)Link speed and duplex settings (23)3 Printer management and services (25)HP Embedded Web Server (26)About the EWS (26)About cookies (26)Open the EWS (27)Features (27)Home tab (27)Scan tab (28)Fax tab (29)Web Services tab (29)Network tab (29)Tools tab (29)Settings tab (30)Web Services (31)What are Web Services? (31)HP ePrint (31)Print apps (31)Set Up Web Services (31)Use Web Services (32)HP ePrint (32)Print apps (33)Remove Web Services (34)HP Web Jetadmin software (34)iv ENWWProduct security features (34)Security statements (35)Firewall (35)Security settings (36)Firmware updates (36)HP Printer Assistant in the printer software (Windows) (36)Open the HP Printer Assistant (36)Features (36)Connected tab (37)Print, Scan & Fax tab (37)Shop tab (37)Help tab (38)Tools tab (38)Estimated Levels tab (38)HP Utility (OS X) (38)AirPrint™ (OS X) (38)4 Paper and print media (39)Understand paper use (40)Supported media sizes (41)Supported paper and print media sizes (41)Supported envelope sizes (42)Supported card and label sizes (42)Supported photo media sizes (42)Supported paper types and tray capacity (43)Tray 1 (multipurpose) on left side of the product (43)Tray 2 (default tray) and Tray 3 (accessory tray) (44)Configure trays (44)Load media (45)Load Tray 1 (45)Load Tray 2 (46)Load optional Tray 3 (48)Load envelopes (49)Load letterhead or preprinted forms (51)Load the automatic document feeder (52)Load the scanner (53)Tips for selecting and using paper (55)5 Cartridges (56)HP PageWide cartridges (57)HP policy on non-HP cartridges (57)ENWW vManage cartridges (57)Store cartridges (58)Print with General Office mode (58)Print when a cartridge is at estimated end of life (58)Check the estimated cartridge levels (58)Order cartridges (59)Recycle cartridges (60)Replace cartridges (60)Tips for working with cartridges (62)6 Print (63)Print from a computer (64)To print from a computer (Windows) (64)To print from a computer (OS X) (65)To set up printing shortcuts (Windows) (66)To set up printing presets (OS X) (66)To adjust or manage colors (67)Choose a preset color theme for a print job (67)Adjust the color options for a print job manually (67)Match colors to your computer screen (68)Control access to color printing (69)Print from the control panel (69)Print using job storage (69)To enable job storage (69)Disable or enable job storage (Windows) (69)Disable or enable job storage (OS X) (69)To apply job storage to one or all print jobs (70)Apply job storage to one or all print jobs (Windows) (70)Apply job storage to one or all print jobs (OS X) (71)To print a job stored on the printer (71)To delete a job stored on the printer (71)Print from a USB device (72)Print with NFC (72)Print with HP ePrint (72)Print off site by sending an email with the HP ePrint app (32)Print from an on-site computer or mobile device (73)Print with AirPrint (OS X) (73)Tips for print success (74)Cartridge tips (74)Paper loading tips (74)vi ENWW7 Copy and scan (76)Copy (77)Copy settings (77)Adjust lightness or darkness for copies (77)Select a paper tray and paper size for copies (77)Reduce or enlarge a copy (77)Load and copy identification cards (78)Copy photos (79)Load and copy mixed-size originals (80)Copy on both sides automatically (80)Cancel a copy job (80)Scan (81)Scan to a USB drive (81)Scan to a computer (81)To set up scan to computer (81)Set up scanning to a computer (Windows) (82)Set up scanning to a computer (OS X) (82)To scan to a computer from the control panel (82)Scan to email (82)To set up scan to email (82)To scan a document or photo to email (83)Scan a document or photo to email from the control panel (83)Scan a document or photo to email from the printer software (83)To change account settings (83)Scan to a network folder (83)To set up scan to a network folder (84)Set up scan to a network folder in the EWS (84)Set up scan to a network folder in the HP Printer Assistant (84)To scan to a network folder (84)Scan to a network folder from the control panel (84)Scan to a network folder from the printer software (84)Scan to SharePoint (85)To set up scan to SharePoint (85)To scan to SharePoint (85)Scan using HP scanning software (85)Scan using other software (86)To scan from a TWAIN-compliant program (86)To scan from a WIA-compliant program (86)ENWW viiGuidelines for scanning documents as editable text (87)To scan a document to editable text (Windows) (88)To scan documents as editable text (OS X) (89)Tips for copy and scan success (90)8 Fax (91)Set up fax (92)Connect fax to a telephone line (92)Configure fax settings (92)To configure fax settings from the control panel (92)To configure fax settings using the HP Digital Fax Setup Wizard (Windows) (93)Set up HP Digital Fax (93)HP Digital Fax requirements (93)To set up HP Digital Fax (94)Set up HP Digital Fax (Windows) (94)Set up HP Digital Fax (OS X) (94)Set up HP Digital Fax in the EWS (94)To modify HP Digital Fax settings (94)Modify HP Digital Fax settings (Windows) (94)Modify HP Digital Fax settings (OS X) (94)Modify HP Digital Fax settings in the EWS (94)To turn off HP Digital Fax (95)Fax programs, systems, and software (95)Supported fax programs (95)Supported phone services - analog (95)Alternate phone services - digital (95)DSL (95)PBX (95)ISDN (96)VoIP (96)Set fax settings (96)Send-fax settings (96)Set pauses or flash hooks (96)Set a dialing prefix (97)Set tone-dialing or pulse-dialing (97)Set autoredial and the time between redials (97)Set the light/dark setting (98)Set the default resolution (98)Use cover-page templates (99)viii ENWWSet fax forwarding (99)Block or unblock fax numbers (100)Set the number of rings-to-answer (100)Set distinctive ring (101)Use autoreduction for incoming faxes (102)Set the fax sounds volume (102)Set stamp-received faxes (102)Send a fax (102)Send a fax from the control panel (103)Use speed dials and group-dial entries (103)Send a standard fax from the computer (103)Send a fax from the software (104)Send a fax using monitor dialing (105)Send a fax using printer memory (105)Receive a fax (106)Receive a fax manually (106)Fax memory (107)Reprint a fax (107)Delete faxes from memory (107)Use the phone book (107)Create and edit individual speed-dial entries (108)Create and edit group-dial entries (108)Delete speed-dial entries (108)Use reports (108)Print fax confirmation reports (109)Print fax error reports (110)Print and view the fax log (110)Clear the fax log (110)Print the details of the last fax transaction (111)Print a Caller ID Report (111)View the Call History (111)9 Solve problems (112)Problem-solving checklist (113)Check that the product power is on (113)Check the control panel for error messages (113)Test print functionality (113)Test copy functionality (114)Test the fax-sending functionality (114)Test the fax-receiving functionality (114)ENWW ixTry sending a print job from a computer (114)Test the plug-and-print USB functionality (114)Factors that affect product performance (114)Information pages (115)Factory-set defaults (116)Cleaning routines (116)Clean the printhead (117)Clean the scanner glass strip and platen (117)Clean the document feeder pick rollers and separation pad (118)Clean the touch screen (118)Jams and paper-feed issues (119)The product does not pick up paper (119)The product picks up multiple sheets of paper (119)Prevent paper jams (119)Clear jams (120)Jam locations (120)Clear jams from the document feeder (121)Clear jams in Tray 1 (multipurpose tray) (122)Clear jams in Tray 2 (122)Clear jams in optional Tray 3 (123)Clear jams in the left door (124)Clear jams in the output bin (125)Clear jams in the duplexer (126)Cartridge issues (127)Refilled or remanufactured cartridges (127)Interpret control panel messages for cartridges (127)Cartridge Depleted (127)Cartridge Low (128)Cartridge Very Low (128)Counterfeit or used [color] cartridge installed (128)Do not use SETUP cartridges (128)Genuine HP cartridge installed (128)Incompatible [color] (129)Incompatible cartridges (129)Install [color] cartridge (129)Non-HP cartridges installed (129)Printer Failure (130)Problem with Print System (130)Problem with Printer Preparation (130)Problem with SETUP cartridges (130)Use SETUP cartridges (130)x ENWWUsed [color] installed (131)Printing issues (131)The product does not print (131)The product prints slowly (132)Plug-and-print USB issues (132)The Memory Device Options menu does not open when you insert the USBaccessory (132)The file does not print from the USB storage device (132)The file that you want to print is not listed in the Memory Device Options menu (133)Improve print quality (133)Check for genuine HP cartridges (133)Use paper that meets HP specifications (133)Use the correct paper type setting in the printer driver (134)Change the paper type and size setting (Windows) (134)Change the paper type and size setting (OS X) (134)Use the printer driver that best meets your printing needs (134)Align the printhead (135)Print a print-quality report (135)Scan issues (135)Fax issues (136)Fax troubleshooting checklist (136)Change error correction and fax speed (137)Set the fax-error-correction mode (137)Change the fax speed (137)Fax logs and reports (137)Print individual fax reports (137)Set the fax error report (138)Fax error messages (138)Communication error. (138)Document feeder door is open. Canceled fax. (139)Fax is busy. Canceled send. (139)Fax is busy. Redial pending. (139)Fax receive error. (140)Fax Send error. (140)Fax storage is full. Canceling the fax receive. (141)Fax storage is full. Canceling the fax send. (141)No dial tone. (141)No fax answer. Canceled send. (142)No fax answer. Redial pending. (142)No fax detected. (142)Solve problems sending faxes (143)ENWW xiAn error message displays on the control panel (143)Document feeder paper jam (143)Scanner error (143)The control panel displays a Ready message with no attempt to send the fax. (143)The control panel displays the message "Receiving Page 1" and does not progressbeyond that message (144)Faxes can be received, but not sent (144)Unable to use fax functions from the control panel (144)Unable to use speed dials (144)Unable to use group dials (144)Receive a recorded error message from the phone company when trying to senda fax (145)Unable to send a fax when a phone is connected to the product (145)Solve problems receiving faxes (145)An error message displays on the control panel (145)The fax does not respond (145)Voice mail is available on the fax line (145)The product is connected to a DSL phone service (146)The product uses a fax over IP or VoIP phone service (146)Sender receives a busy signal (146)A handset is connected to the product (146)A phone line splitter is being used (146)Cannot send or receive a fax on a PBX line (146)Solve general fax problems (146)Faxes are sending slowly (146)Fax quality is poor (147)Fax cuts off or prints on two pages (147)Connectivity issues (147)Solve USB direct-connect problems (147)Solve network problems (148)Poor physical connection (148)The computer is using the incorrect IP address for the product (148)The computer is unable to communicate with the product (148)The product is using incorrect link and duplex settings for the network (149)New software programs might be causing compatibility problems (149)The computer or workstation might be set up incorrectly (149)The product is disabled, or other network settings are incorrect (149)Wireless network issues (149)Wireless connectivity checklist (149)The product does not print, and the computer has a third-party firewall installed (150)The wireless connection does not work after moving the wireless router or product (150)xii ENWWCannot connect more computers to the wireless product (150)The wireless product loses communication when connected to a VPN (151)The network does not appear in the wireless networks list (151)The wireless network is not functioning (151)Product software issues (Windows) (151)Product software issues (OS X) (153)The printer driver is not listed in the Print & Scan list (153)The product name does not appear in the product list in the Print & Scan list (153)The printer driver does not automatically set up the selected product in the Print & Scan list (153)A print job was not sent to the product that you wanted (153)When connected with a USB cable, the product does not appear in the Print & Scan list afterthe driver is selected. (153)You are using a generic printer driver when using a USB connection (154)10 Service and support (155)Customer support (156)HP limited warranty statement (157)UK, Ireland, and Malta (158)Austria, Belgium, Germany, and Luxemburg (158)Belgium, France, and Luxemburg (159)Italy (160)Spain (160)Denmark (161)Norway (161)Sweden (161)Portugal (162)Greece and Cyprus (162)Hungary (162)Czech Republic (163)Slovakia (163)Poland (163)Bulgaria (164)Romania (164)Belgium and the Netherlands (164)Finland (165)Slovenia (165)Croatia (165)Latvia (165)Lithuania (166)Estonia (166)Russia (166)ENWW xiiiAppendix A Technical information (167)Product specifications (168)Print specifications (168)Physical specifications (168)Power consumption and electrical specifications (168)Acoustic emission specifications (168)Environmental specifications (168)Environmental product stewardship program (170)Protecting the environment (171)Ozone production (171)Power consumption (171)European Union Commission Regulation 1275/2008 (171)Paper (171)HP PageWide printing supplies (171)Plastics (171)Electronic hardware recycling (172)Material restrictions (172)General battery information (172)Battery disposal in Taiwan (172)California Perchlorate Material Notice (172)EU Battery Directive (172)Battery notice for Brazil (173)Chemical substances (173)EPEAT (173)Disposal of waste equipment by users (173)Toxic and hazardous substance table (China) (174)Restriction on hazardous substances statement (Turkey) (174)Restriction on hazardous substances statement (Ukraine) (174)Restriction of hazardous substance statement (India) (174)China energy label for printer, fax, and copier (175)China SEPA Eco Label user information (175)Regulatory information (176)Regulatory notices (176)Regulatory model identification number (176)FCC statement (176)VCCI statement (Japan) (177)Power cord instructions (177)Power cord statement (Japan) (177)EMC statement (Korea) (177)Visual display workplaces statement for Germany (177)European Union Regulatory Notice (178)xiv ENWWEuropean Union Regulatory Notice (178)Wireless models only (178)Models with fax capability only (178)Additional statements for telecom (fax) products (179)New Zealand telecom statements (179)Additional FCC statement for telecom products (US) (179)Industry Canada CS-03 requirements (180)Notice to users of the Canadian telephone network (181)Australia wired fax statement (181)Notice to users of the German telephone network (181)Additional statements for wireless products (182)Exposure to radio frequency radiation (182)Notice to users in Brazil (182)Canadian statements (182)Japan statement (183)Notice to users in Korea (183)Taiwan statement (183)Mexico statement (183)Index (184)ENWW xvxvi ENWW1Product basics●Product features●Product views●Power on and off●Use the control panel●Quiet ModeENWW1Product featuresPageWide Pro MFP 477dnD3Q19A, D3Q19B, D3Q19C,D3Q19D Tray capacity (75 GSM or 20–lb Bond paper)●Tray 1: 50 sheets ●Tray 2: 500 sheets ●Optional Tray 3: 500 sheets ●Automatic Document Feeder(ADF): 50 sheets●Standard output bin: 300sheetsPrint ●Simplex speeds up to 40 pagesper minute (ppm) for both color and black with Professional quality●Duplex speeds up to 21 ppmfor both color and black with Professional quality●Up to 55 ppm in General Officemode●Walkup Plug-and-Print USBDevice port●Walkup printing of MS Officedocuments Copy ●Simplex speeds up to 40 ppm in black and color ●Single-pass, two-sided copying for speeds up to 26 ppm in black and color ●50-sheet ADF supports page sizes up to 356 mm (14.0 in) in length and 216 mm (8.5 in) in width Scan●Duplex speeds up to 26 ppm for both color and black ●Scan to walkup USB device, email address, network folder, or SharePoint site ●Glass supports page sizes up to 356 mm (14.0 in) in length and up to 216 mm (8.5 in) in width ●HP software enables scanning a document to a file that can be edited ●Compatible with TWAIN, WIA, and WS-Scan programs Fax●Fax to email address ornetwork folder●Fax from walkup control panelor from program on connected computer●Fax archive, fax log, junk-faxblocking, non-volatile fax memory, fax redirect featureConnectivity ●802.3 LAN (10/100) Ethernet port ●Host USB Type A and Type B ports (back)●USB 2.0 Device port (front)PageWide Pro MFP 477dw D3Q20A, D3Q20B, D3Q20C, D3Q20D Has the same features as the PageWide Pro MFP 477dn, and includes the following:●Embedded wireless capability ●802.11n 5GHz dual bandsupport●HP ePrint—send documents tothe product email address for printing●HP Wireless Direct support ●NFC-enabled (Near FieldCommunications); walkup printing from smart phones and tablets●Scan to smart phone 2Chapter 1 Product basics ENWWEnvironmental featuresFeature Environmental benefitDuplex printing Automatic duplex printing is available on all models of HP PageWide Pro MFP477dn/dw series. Duplex printing saves the environment and saves you money.Print multiple pages per sheet Save paper by printing two or more pages of a document side-by-side on onesheet of paper. Access this feature through the printer driver.Copies multiple pages per sheet Save paper by copying two pages of an original document side-by-side on onesheet of paper.Recycling Reduce waste by using recycled paper.Recycle cartridges by using the HP Planet Partners return process.Energy savings Sleep modes and timer options enable this product to quickly go into reducedpower states when not printing, thus saving energy. Accessibility featuresThe product includes several features that aid users with limited vision, hearing, dexterity or strength.●Online user guide that is compatible with text screen-readers.●Cartridges can be installed and removed using one hand.●All doors and covers can be opened using one hand.ENWW Product features3Product views●Front left view●Front right view●Back view●Cartridge door viewFront left viewLabel Description1USB device connection port2Cartridge door3Tray 1 extension4Tray 15Power button6Tray 2–main paper tray7Control panel8Scanner glass4Chapter 1 Product basics ENWWFront right viewLabel Description1Automatic document feeder (ADF) cover2Main output door3ADF paper guides4ADF loading area5ADF output bin6ADF output bin stop7Main output bin stop8Main output binBack viewLabel Description1Ethernet connection port2Fax connection ports3USB Type A and USB Type B ports4Power cord connectionENWW Product views5Label Description5Left door6DuplexerCartridge door viewLabel Description1Cartridge slots2Product serial number and product number3Cartridge part numbers6Chapter 1 Product basics ENWWPower on and offNOTICE:To prevent damage to the product, use only the power cord that is provided with the product.●Turn the product on●Manage power●Turn the product offTurn the product on1.Connect the power cord that is provided with the product to the connection port on the back of theproduct.2.Connect the power cord to a wall outlet with an adequate voltage rating.NOTE:Make sure that your power source is adequate for the product voltage rating. The product useseither 100-240 Vac or 200-240 Vac and 50/60 Hz.3.Press and release the power button on the front of the product.Manage powerHP PageWide Pro MFP 477dn/dw series printers include power-management features that can help reducepower consumption and save energy.●Sleep Mode puts the product in a reduced power-consumption state if it has been idle for a specificlength of time. You can set the length of time before the product enters Sleep Mode from the controlpanel.●Schedule On/Off enables you to turn the product on or off automatically at days and time that you setfrom the control panel. For example, you can set the product to turn off at 6 p.m. on Monday throughFriday.Set the Sleep Mode time1.Open the control panel dashboard (swipe the dashboard tab at the top of any screen downward, ortouch the dashboard area on the home screen).2.On the control panel dashboard, touch .ENWW Power on and off73.Touch Power Management, and then touch Sleep Mode.4.Select one of the time-interval options.The product switches into a reduced power-consumption state when it has been idle for the amount of timethat you select.Schedule the product to turn on or off1.Open the control panel dashboard (swipe the dashboard tab at the top of any screen downward, ortouch the dashboard area on the home screen).2.On the control panel dashboard, touch .3.Touch Power Management, and then touch Schedule Printer On/Off.4.Turn the Schedule On or Schedule Off option on.5.Select the Schedule On or Schedule Off options at the bottom of the screen, and then select the day andtime that you want to schedule.The product switches on or off at the time you select on the day you select.NOTE:The product cannot receive faxes when it is turned off. Faxes sent during a scheduled off interval willprint when the product is turned on.Turn the product offNOTICE:Do not turn off the product if a cartridge is missing. Damage to the product can result.▲Press and release the power button on the front of the product to turn off your HP PageWide Pro MFP 477dn/dw series printer.A warning message appears on the control panel if you attempt to turn the product off when one ormore cartridges are missing.NOTICE:To prevent print-quality problems, turn off the product by using the power button on the frontonly. Do not unplug the product, turn off the powerstrip, or use any other method.8Chapter 1 Product basics ENWWUse the control panel●Control panel buttons●Control panel home screen●Control panel dashboard●Control panel application folders●Control panel shortcuts●Help featuresNOTE:The small text on the control panel is not designed for prolonged viewing.Control panel buttonsButtons and indicator lights on the control panel of HP PageWide Pro MFP 477dn/dw series printers appear litwhen their function is available, and are darkened if their function is not available.1Home button.Touch to view the control panel home screen.2Wireless network indicator.Solid blue when the product is connected to a wireless network. Blinks when the product is searching for awireless connection. Off when the product is connected to a wired network or by a USB cable.3NFC (Near Field Communications) indicator.The product can be enabled for walkup printing from tablets and smart phones.4Back or Cancel button.Touch to return to the previous screen, or to cancel the current process.5Help button.Touch to view the Help menu options.ENWW Use the control panel9。
Behringer XENYX X1222USB 用户手册

Small Format MixersXENYX X2442USB / X2222USB X1832USB / X1622USB X1222USB / X1204USB / 1204USBXENYX—Premium Mixer with XENYX Mic Preamps & Compressors, British EQs, 24-Bit Multi-FX Processor and USB/Audio InterfacePremium ultra-low noise, You’ve got the talent. You’re brimming their own, even when compared to the high headroom analog mixerwith creativity. And you’re ready to get most expensive stand-alone mic preamps. your message out to the masses. But XENYX preamps offer a staggeri Inhaltszusammenfassung zur Seite Nr. 2 Page 2 of 17 One-knob Compression Recording Bliss XENYX X2442USB Ask professional sound engineers There was a time when the recording X2222USB / X1832USB what their favorite piece of external process called for lots and lots
RCR-650A iVD650 产品说明书
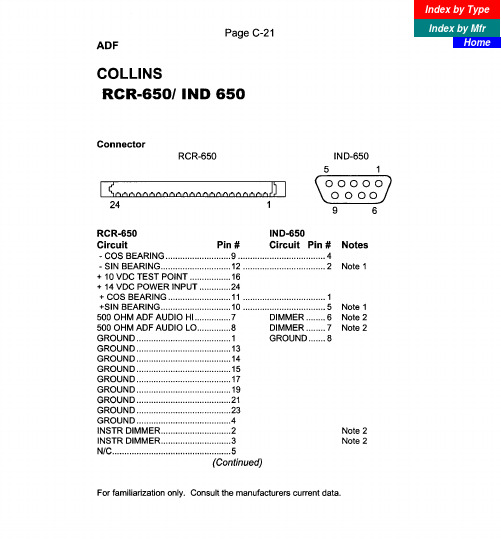
For familiarization only. Consult the manufacturers current data.
volts out 13 to voltage converter, 14 volts in 25. 4. For 14 volts, 48 to Dimmer, 20 ground. For 28 volts, 20 to Dimmer, 18 open.
Index by Type
Index by Mfr Home
N/C.. ..............................................
.6
SENSE ANTENNA ......................... 18
X LOOP ANTENNA.. ..................... .22
Y LOOP ANTENNA.. ..................... .20
20
N/C.. ...............................................
I
N/C.. ..............................................
.I0
N/C.. ..............................................
Notes 1. For top mount antenna, reverse 2. For 14 volts, 7 and 3 to Dimmer,
Dimmer, 7 and 3 open.
2 and 5. 6 and 2 to ground.
For 28 volts, 6 and 2 to
BELLHOP使用指南v2.2
BELLHOP 使用指南 V2.2
修改记录
1. 修改 V2.1 版本中第六章波形文件的波形文件的验证图。 2. 修改 V2.1 版本中第三章的“其他参数”。 3. 增加第六章中 BELLHOP 与射线模型的对比。 4. 增加第七章中 BELLHOP 的时变特性的改进。
-1-
BELLHOP 使用指南 V2.2
五、OPTIONS4 ................................................................................................................ - 12 1. 2. OPTIONS4(1)......................................................................................................... - 12 OPTIONS4(2)......................................................................................................... - 12 -
六、其他参数 ................................................................................................................. - 13 第四章 BELLHOP(Matlab_GUI)实例一 ......................................................................... - 15 一、准备工作 ................................................................................................................. - 15 -
b,box教程(共10篇)
b,box教程(共10篇)b,box教程(一): What"s inside them回答接单数还是复数课本有段对话:A:What are theseB :They"re boxes.B:What"s inside themB:Some eggs.对Some eggs 不太理解1.A:What are theseB :They"re boxes.2.A:What"s inside themB:Some eggs.第一句话是A看到了很多东西,就问B,那些是什么.其实A是看到了很多的,所以问B的时候用的是复数.第二句话的时候,A看不到箱子里面的东西,所以对里面的东西表示疑问.在英语中,对不确定的东西提问,一般来说都是用单数来表示.而B是知道里面的东西是一些鸡蛋,就可以用肯定的语气来用复数回答.b,box教程(二): beatbox世界排名第一是谁还有第二第三,还有中国的一二三回答不充分的没分哦!【b,box教程】这不能评判,各有风格,特色.但有一点可以说,最先看、接触,练习的不一定是最强的.但是一定留有影响从早的说Rahzel,the Roots,Kenny Muhammad还有Matisyahu.再如eksilp,RoxorLoops,beardyman,很多很多现在有reeps one,alem,zede,krnfx,dharni,Skiller ,pe4enkataalem他们各有风格,强项.同样,中国也不好分一二三.因为有些人到后面已经淡出.b box真的无法分强弱,只能说现今或以后风格是如何.谁更能发挥,创造更好.真要说中国的.有桂晶(这个不用说了,必须有)double,虫二,313,b头,各种相对于国外,中国缺乏自己的特色,毕竟和街舞一样,有限制性,总感觉慢外面一拍.还有以上排名不分先后.下面贴一个beatbox发展史给你看吧.1969年:John Mayall的“Room to Move”,Turning Point 专辑的这首歌有记录,在1:48-3.00部分,其特点是声乐打击乐独奏.1998年:韦斯·卡罗尔发明出“Mouth Drumming”(口击鼓),发布了第一个口技教学视频,很多beatboxers都是看了这个才学习到BBOX的 2023年:Gavin Tyte是第一个在互联网发布了自己文字教学和音频教学的人,然后在2023年,他又发布了自己的第一个教学视频.2023年:Humanbeatbox网站创立,并迅速成为世界各国beatboxers在一起交流的集中地.2023年:第一个国际BBOX聚会在伦敦举办,主办人主要有来自Humanbeatbox网站的Alex Tew,Gavin Tyte,和Mark Splinter,世界各地的beatboxer们齐集一堂,并分享各自的技巧.2023年:在德国莱比锡举办了第一届世界beatbox大赛,参加者包括Tom Thumb,Joel Turner(澳大利亚),White Noise(爱尔兰),RoxorLoops(比利时),Poizunus(加拿大)还有Faith SFX(英国),经过几轮的选拔和比赛,最终在RoxorLoops(比利时)和Joel Turner(澳大利亚)之间选择冠军,五名评委经过困难的抉择后最终选择了Joel Turner(澳大利亚)夺得最后的冠军. 连续两届加拿大冠军krnfx2023年第一届英国beatbox大赛由Faith SFX夺得冠军.同样是在2023年,beatbox Battle TV创建于2023年的9月,还有第一届世界比赛的策划者有:Bee Low,B-Film和Philibox.2023年7月,世界beatbox协会(简称WBA)创立,并着手组织第一届的美国和加拿大的beatbox锦标赛同样是在2023年,第二届世界beatbox大赛,其中有52位beatboxer,也包括一些女性参赛者,女子组的冠军得主是来自英国的Bellatrix,男子组的冠军是来自瑞士的ZeDe,组合赛的冠军是来自法国的团队UnderKontrol.2023年3月31日,第三届世界beatbox大赛在德国柏林举办,全球各地共有90位beatboxer参加此赛事男子组冠军是来自保加利亚的Skiller 亚军是来自法国的ALEM女子组冠军是来自保加利亚的pe4enkatabeatbox在如今流行的部分原因,要归功于一些beatbox艺术家,比如:Rahzel,the Roots,Kenny Muhammad还有Matisyahu,他们促进了在世界各地的发展.还有很多帮助人们提高技巧和认知的网站也有很大的贡献,比如:Humanbeatbox,swissbeatbox和beatbox Battle TV.b,box教程(三): 初一义务教科书英语5-9单元作文的题目有哪些七年级历史』初一历史下学期期末测试题免费试题·初一历史下学期期末测试题免费试题软件大小:未知授权方式:免费软件下载:41 推荐程度:『七年级历史』人教版[整理]-人教版七下历史期末测试题及参..·人教版[整理]-人教版七下历史期末测试题及参考答案软件大小:未知授权方式:免费软件下载:11 推荐程度:『七年级历史』义务教育课程标准实验教科书《中国历史》七..·义务教育课程标准实验教科书《中国历史》七年级下册(全部教案) 第一单元繁荣与开放的社会(1—9课) [知识与能力] 以教材中课文出现的基本人物,事件,时间和提示为对学生应掌握知识.软件大小:未知授权方式:免费软件下载:49 推荐程度:『七年级历史』中国历史七年级下册(北师大版)·【中国历史七年级下册(北师大版)】第一单元繁荣与开放的社会第3课气度恢弘的隆盛时代同步练习题 1,选择题:...问答:⑴杜甫的《忆昔》反映的历史背景是什么时候这一背景是.软件大小:未知授权方式:免费软件下载:34 推荐程度:『七年级历史』七年级(下学期)历史(下册)期中考试试卷·(60分钟,100分) 姓名( )班级( ) 一,选择题:(本大题36小题,每小题1分,计36分,答案务必填入卷子最后的表格里,否则不给分) 1,隋朝时开凿的南北大运河以为中心.软件大小:未知授权方式:免费软件下载:45;class_id=85『七年级生物』七年级下册期末考试生物学试卷免费试题·七年级下册期末考试生物学试卷免费试题软件大小:未知授权方式:免费软件下载:21 推荐程度:『七年级生物』人教版七年级生物上复习题·生物学是研究_和_的科学. 2,_和_构成了生物圈,它是所有生物共同的_. 3,生物的特征_,_,_,_,_. 4,可以按照形态结构特点,将生物归为_,_和_三大类,也可以按生活环.软件大小:未知授权方式:免费软件下载:34 推荐程度:『七年级生物』七年级生物课程标准三百选择题·1.水稻与稻株旁的稗草,水稻与水稻里的蝗虫,它们的关系依次是( ) A. 合作,捕食 B. 捕食,合作 C. 竞争,捕食...能把无机物合成为有机物 86.在阳光不足的地方生长的芒.软件大小:未知授权方式:免费软件下载:5 推荐程度:『七年级生物』七年级生物参考答案·一,填空:(每空1分共34分) 1,生长发育,新陈代谢,遗传变异等2,生物圈,生物,非生物因素,3非生物成分,生产者,消费者,分解者,4,400X,装片,左上方5,细胞膜,叶绿体,.软件大小:未知授权方式:免费软件下载:36 推荐程度:;class_id=76『七年级数学』七年级数学上下册试卷一(42份)北师大·七年级数学上下册试卷一(42份)北师大软件大小:未知授权方式:免费软件下载:11 推荐程度:『七年级数学』七年级试卷下试卷集(55份)北师大·七年级试卷下试卷集(55份)北师大软件大小:未知授权方式:免费软件下载:16 推荐程度:『七年级数学』北师大七年级下册数学期末复习试卷(附答案)..·北师大七年级下册数学期末复习试卷(附答案)软件大小:未知授权方式:免费软件下载:12 推荐程度:『七年级数学』七年级(下)数学期末复习试卷·七年级(下)数学期末复习试卷;class_id=67七年级下册语文期末模拟试卷软件大小:未知授权方式:免费软件下载:192 推荐程度:『七年级语文』新人教版初一下七年级下期末总复习完整资料..·新人教版初一下七年级下期末总复习完整资料1-新人教[全套]】软件大小:未知授权方式:免费软件下载:83 推荐程度:『七年级语文』七年级下学期期末复习综合试卷(北师大)·七年级下学期期末复习综合试卷(北师大)软件大小:未知授权方式:免费软件下载:49 推荐程度:『七年级语文』七年级下语文期末试题(语文版)·(时间:120分钟满分:120分) 一,基础知识及运用.(共18分) 1.给拼音写出汉字.(4分) jiǎo ( )洁jī( )...请设想一下,下列不同年龄,身份的人在这种情.软件大小:未知授权方式:免费软件下载:483 推荐程度:『七年级语文』人教版七年级下册语文期末练习卷·课内阅读 (一) 不必说碧绿的菜畦,光滑的石井栏,刘大的皂荚树,紫红的桑葚;了不必说鸣蝉在树叶里长吟,肥胖的...习字课完了,他又教了一堂历史.接着又教初级班拼他们的ba,be,b.软件大小:未知授权方式:免费软件下载:603;class_id=81『七年级英语』七年级英语期末测试·时间:90分钟,总分:100分) 一、听力.(2%) I、选出你所听到的单词或短语.(听两遍) ( )1.A.bags B.box C.boxes .软件大小:未知授权方式:免费软件下载:40 推荐程度:『七年级英语』新目标英语七年级下UNIT2试题·一.Complete the words according to the sentences and the first letters of the words.(1*7) 根.软件大小:未知授权方式:免费软件下载:55 推荐程度:『七年级英语』七年级下学期英语期中考试卷·听力部分(20分) 一,听句子,选择你所听到的单词.(5分) 1. A. shopping...七,完成句子,请根据所给的汉语完成英文句子,每空限填一词.(分) 1.有许多人在那儿.软件大小:未知授权方式:免费软件下载:23 推荐程度:『七年级英语』新目标英语七年级下复习资料·◆Unit 1.Wheres the post of fice 目标语言:ask for and give directions on the street 重点句型:Is ...在.软件大小:未知授权方式:免费软件下载:72 推荐程度:『七年级英语』七年级下学期英语Unit4-Six复习练习·五,将下列句子译成英语:(20) 1, 她的笔友Sam来自美国. __ 2,Tom 在日本有许多笔友. _______ 3,我最...七年级英语下Unit Seven单元测试题一. 软件大小:未知授权方式:免费软件下载:24 推荐程度:『七年级英语』新目标英语七年级下单元练习题·I. 语音.(5分) 选择下面各组单词划线部分的发音情况:A 一种 B 两种 C 三种 D 四种 ( ) 1. post phone across welcome ( ) 2. b.软件大小:未知授权方式:免费软件下载:29 推荐程度:『七年级英语』外研版英语七年级下学期期中笔试试卷·七.作文.(10分) "五一"假期(May Day)就快到了, 写一篇不少于50字的短文,介绍你和你的家人或朋友的假期活动...外研版英语七年级下学期期中笔试试卷2023.4 ★★.软件大小:未知授权方式:免费软件下载:21 推荐程度:『七年级英语』七年级下学期英语期中考试卷·满分100分时间 90分钟听力部分(15%) 一,选出你听到的句子 1. A. where is your pen pal from B. ...七.根据信息卡回答问题. (5.软件大小:未知授权方式:免费软件下载:8 推荐程度:『七年级英语』新目标英语七年级下单元过关练习题(unit1上..·I. 语音.(5分) 选择下面各组单词划线部分的发音情况:A 一种 B 两种 C 三种 D 四种 ( ) 1. post phone across welcome ( ) 2. b.看看吧,能有一些帮助的祝考试成功~~~~~~~参考资料:b,box教程(四): 幼儿园小班的英语教案是什么意思具体解释一下.可以的话,帮弄一份教案出来,简单就可以了.谢谢!幼儿园小班英语教案:苹果和桔子教师:屈老师活动目标:1、培养幼儿对于英语的兴趣,让幼儿乐意参与英语活动.2、在教师的带领下,让幼儿了解几种水果的英文名称.3、鼓励幼儿能模仿教师说英语.活动内容:认识水果apple、orange.由于该内容是幼儿日常生活中比较熟悉的,因此,学习的难度不是很大.在这个活动之前,教师可先复习“Head and shoulders”这首歌,边唱边做动作,从而让幼儿对五官有进一步的认识和巩固.然后通过教师的引导,认识apple和orange,并且初步理解Yes/No/I like …的含义.其中穿插摘果及品尝水果的游戏活动,让幼儿在快乐中学习.活动准备:盒子或小袋子一个,苹果、橘子实物及图片各若干,一幅画有一棵大树的画,刀、碟子、餐纸,磁带、录音机.1、热身运动.教师与幼儿一起欣赏“Head and shoulders”,边听边做动作,以达到课前的活动准备.2、输入单词.A、apple.教师把已装有苹果的盒子或袋子神秘的拿到幼儿面前,让幼儿有探索的欲望.T:Look!what’s thisC:盒子T:Yes.A box教师与幼儿一起边唱边做动作,以活跃课堂氛围.What’s in the boxwhat’s in the boxDo you know ,do you knowWho want to try ,let me tryDing ding dong (敲盒子),let me tryT:Ok,do you want to know(引导幼儿说出Yes或No)T:Who want to try(作举手状,并引导幼儿说出Let me try) 当幼儿拿出苹果之后,教师用英文输入:Oh(惊喜的),What’s thisC:苹果T:Yes,apple!(教师要抑扬顿挫的反复输入).B、orange教师用餐纸把橘子包起来,然后做示范闻一闻,在拿到幼儿面前给他们也闻一闻,并让他们猜出是什么东西.T:Hmm!(作闻的动作)The smell is good.然后拿到幼儿面前:Smell it!接着问幼儿:What’s thisC:橘子T:Yes.Orange(教师也要用抑扬顿挫的声调反复输入)3、幼儿辨认水果.教师把水果放在桌面.T:I’m hungry now.I want to eat some fruits,Who want to help me(作举手状)接着当幼儿上来时,教师说:I like apple/orange.看幼儿是否拿到正确的水果.如果拿错,可说:No,I don’t like orange.I like apple(手指apple).无论何种情况,记得说Thank you .第二种方法:教师把两种水果放在身后藏起来,突然拿出,跟幼儿一起说出其名称,让幼儿有兴奋感.4、摘果游戏.先把水果图片贴到大树上,让幼儿去摘自己想要的水果(可先请配班老师做示范.教师说I like orange,配班教师摘橘子;教师说I like apple ,配班教师摘苹果,然后请个别幼儿上来摘,摘到的就送给他作为奖励.并说:Oh,yes,this is apple/orange.Very good,thank you !第二步:教师再贴一些图片,让全体幼儿参与活动去摘水果,然后坐到位子上.接着教师引导幼儿辨认.T:Apple,stand up.Jump!(拿apple 的小朋友站起来跳一下)Orange,stand up!Jump!(拿 orange的小朋友站起来跳一下)5、品尝水果:教师可先做示范:拿一片橘子放入口中:Hmm!Sweet!T:Do you want to eat(继续引导二说出 Yes)C:YesT:OK,follow me!I like apples/oranges.接着教师发水果让幼儿品尝.(拿到幼儿面前时一定要鼓励幼儿大声说出“I like apples/oranges”,方可给他.人数太多可请配班老师帮忙.)6、唱英文歌“I like apple”.当幼儿在品尝时,可放此音乐,可让幼儿欣赏,也可做动作,活跃课堂气氛.Apple is red,apple is round,apple’s juicy,apple is sweet,Apple apple I like you ,apple’s juicy,I like to e at.7、结束.〈1〉复习巩固教师再出示一次水果让幼儿复习一遍〈2〉T:OK!We are so tired.Let’s have a rest.Let’s say good bye to the apple.C:Bye-bye,apple!T:Say good bye to the orange.C:Bye-bye,orange.活动反思:(1)在小班的英语活动中,实行全英文教育还是有一定的难度,在某种程度上还需中英相结合.(2)在教学活动中,教师的表情、动作一定要夸张,语音语调要抑扬顿挫,从而才能吸引幼儿.(3)在活动中,千万不要忽略胆怯、内向的幼儿,多给他们一点关爱和鼓励. (更多教案尽在:屈老师教案网)b,box教程(五): Unit 2 If a snake bites you, take a photo.一份英语教案,我要全英文的,有以下格式要求:1、标题(Title);2、教学内容(Contents):课本、单元、课目;3、教学目标(Teaching objectives):本次课要完成的任务、达到的目的和对学生的要求;Knowledge objectives\Ability objectives\Moral objectives4、教学重点(Teaching key points)5、教材难点(Teaching difficulties);6、教学方法(Teaching methods):7、教学设备(Teaching aids)8、教学步骤(Teaching procedures):实际教学中的程序和具体安排,是教案的主体;9、板书设计(Layout of the Bb):科学恰当利用黑板。
新视野大学英语读写教程(第二版)1-4册单词(不含专有名词和词组)
新视野大学英语读写教程(第二版)1-4册单词(不含专有名词和词组)abandonabilityabnormalaboardabortionabroadabruptabsenceabsentabsoluteabsolutelyabsorbabstractabundantabuseacademicacademyaccelerateaccentacceptanceaccessaccidentalaccidentallyaccommodationaccompanyaccomplishaccordanceaccordinglyaccountaccountantaccumulateaccuracyaccurateaccuratelyaccuseaccustomedachievementacidacknowledgeacquaintacquaintanceacquireacquisitionaction activist activityacuteadapt addition additional adequate adjust administration admission adopt adoption adult advanced advantage advertise advertisement advisable advocate affect affection afterwards agency agenda agent aggressive agonyaidaidsaircraft airline airliner alarmalbum alcoholalertalike alleviate alliance allowance ally alphabetalternative altitude aluminum amateur amaze ambassador ambition ambitious ambulance amid. amount amuse amusement analysis analyst analyze ancestor anchor ancient angle ankle anniversary annoy annualant anticipate antique anxiety anyhow anyway apart apartment apology apparent apparently appeal appear on appearance appetite applaud applause appliance applicableapplication applyapply to appointment appreciate arbitrary architect architecture argument arise arithmetic Arizona arouse arrange arrangement arrest arrow artificial artisticashaside aspect aspiration assemble assembly assert assess asset assignment assist assistance associate association assume assumption astonish atmosphere atmospheric atom atomic attach attendance attitudeattractive attribute auction audience audio authority automatic automatically automobile auxiliary available avenue avoidawait award awareawful awkward axe background backup backward bacon bacterium badge baggage balance balcony balloonbanband bandage bang bankrupt bannerbarbarberbarebarelybarkbarnbarrel barrierbasement Basque batter battery Baxter bay beam bean beard bearing beast beggar behalf behave behavior behavioral being belief beloved beneath beneficial benefit benign Bermuda bertha besides bet betray biasBiblebid billboard bind biologically biology blade Blake blank blast bleed blend bloody bloomblurboastboldboltbomb bomber bondboomboostbootborder borderline bore bounce bound boundary bowbowelbrake brandbrass breadth breakthrough breakup breast breed breeze bribe bribery bridebrief briefcase brilliant broodbrow bubblebudbudget buffalobugbuildupbulbbulkbulletin bump bunch bundle burden bureau buster butterflyby-linecab cabbage cabin cabinet cable calculate calculator calendar camel campaign campus canal cancel cancer candidate candycane capable capacity capital-driven capture carbon career cargo Caribbean carnation carol carpenter carriage carrier caseworker cash cashier cassavacastcasual category cautious ceedcellcement centigrade centimeter cereal ceremony certainty certificate certify cession challenge chamber champion channel chaoschap chapter character characteristic characterize charity Charles charmchart charter chase cheerful chemical chemist chesschew childhood chillchinchinachipchoke cholesterolchop Christian Christmas cigarcircuit circular circulate circumstance citecivilcivilian civilization civilize Claiborne claimclaimclapclash classic classical classification classify clauseclawclay cleanup clear-cut clickclientcliffclimate clingclipcloneclosetclue clumsy coach coarse Coca-Cola codcode collapse colleaguecollective collision Colombia colonial colonial colonialism colonize colony column combat combination combine comedy comic commander commence comment commerce commercial commission commissioner commit commitment committee communicate communication community commute commuter compact compactly comparable comparable comparison compass compatible compel compensate compensation compete competent competition competitivecomplaint complex complicated compose compound comprehension comprehensive compress comprise compute conceal concentrate concentration concept concern concerning concession conclude conclusion concrete condemn condense conduct conductor conference confess confidence confident confine confirm conflict confront confuse confusion congratulate congratulation congress connection conquer conquest conscious consciously consensusconsequence consequently consequently conservation conservative considerable considerably considerate consideration consist consistent consistently conspicuous conspicuously constant constantly constitute constitute construct constructive consult consultant consume consumption contact container contaminate contamination contemplate contend contest context continual continually continuity continuous continuously contract contradiction contrary contrast contribute contributioncontroversial controversy convenience convention conventional conversely convert conveyconvict conviction convince cooperate coordinatecopcopper copyrightcord corporation corps correspond correspondence correspondent corresponding corresponding corridorcostlycouchcouncil counsel counter countycourtcrackcraftcranecrashcrawlcreate creation creative creatively creaturecreepcrewless crime criminal cripple crisis critic critical criticism criticize crown crucial crude cruise crush crust crystal cube cue cultivate culture cupboard curiosity curl curly currency current curse curve cushion cute cuteness cutup cycle dairy dam damn darling dash data database daylight deadline deafdebt decade decay deceive decency decent deck declaration decline decorate decrease deduct deduction deer defect deficiency define definite definitely definition defy delegate delete deliberate delicate delicately delivery democracy democratic demonstrate denial dense density dental dentist denydeny depart departure dependent depict deport depositdepression deputy derive descend deserve desirable despair desperate despite. dessert destruction destructive detaildetect detection detective determination devicedevildevise diagnose diagnosis diagramdialdialect diameter Diane dickens dictatedietdifferdigest digestive digital dignitydim dimension dimensional dimly dinosaurdip diplomatic dirtdisappear disaster discard discharge discipline discount discourage disguise disgust disgusting disintegrate disk dislike dismiss disorder display disposal dispose dispute dissolve distinction distinctive distinguish distract distress distribute distribution disturb ditchdive diverse diversity divide division divorce dizzy document dolly domestic dominant dominate donation donkeydorm dormitory dosedot doubtful Dover down-scale downwards.. draftdragdrag dragon drain dramatic drawerdriftdripdrumdrunkductdumb dump durable duration duskdyeeagle earnest earthquake ease ecology economic economically economist economy editedition editor editorial educate educational educator effectiveefficiency efficientegoelaborate elapseelasticelbowelderlyelectelection electrical electron electronic elegant element elementary elevator eliminate elsewhere embarrass embassy emerge emergency emergency-room emissionemitemotion emotional emperor emphasis emphasize empire employee employer employment enable enclose encounter endanger endanger ending endless endurance endureenergetic enforce engage engine engineering enhance enlarge enlighten enormous enquiry enroll enrollment ensure enterprise entertainment entertainment enthusiasm entitleentry envious environment envy epidemic episode equality equate equation equip equivalent eraerect erosionerror essential establish establishment estate estimate eternal eternity ethics Ethiopia ethnic evaluateeve everyday evidence evident evidently evil evolution evolve exaggerate exceed exceedingly exception excess excessive exchange excitement exclaim exclude exclusive excursion execute executive exemplify exert exhaust exhaustion exhibit existence exit expand expansion expectation expel experimental expert explode exploit explore explosion explosive export expose exposure extendextension extensive extent exterior extinguish extinguisher extract extraordinary extreme eyebrow eye-liner eyesight fabric facility factor facultyfadefailurefaint faithful fame famine fancy fantastic fantasyfare fascinate fascinating fashion fastenfatalfatefatigue faulty favorable favoritefaxfaxfearful feasible feature federal feedback femalefertilizer festival fiber fiction fiercefilefile Filipino filter finally finance financial financially finding fireman fisherman fit flagstaff flame flee fleeting flesh flexible fling flock flour flourish fluctuate fluent fluid focusfogfolk following footstep forecast forehead foreigner forge formal formation former formulafortnight fortunately fossil foundation fraction fragment frame framework francfrank frankly fraud freckle freight Frenchfrog frontier frostfrown fruitful frustratefryfulfillfull-time function fundamental fund funeralfurfurnace furnish furthermore fuss futurist gallery gallon gamble ganggap garbage gardener garlicgasgaygaze gear gene generally generate generator generosity generous genetic genius genocide geometry germ gesture ghost giveback glimpse global globe gloomy glorious glory glove glowgluegolfgoon goon govern governor gown grab grace graceful gradual graduate grain gram grammar grand grandchild grantgraph grasp grateful gratitude grave graveyard gravity greedy greenhouse griefgrindgrip grocer groceries. groom gross growth guarantee guideline guiltguilty guitargulfgumguygymhaltham hammer handbag handful handle hand-rail handwriting handy hangover hangover Hanshin harbor harden hardship hardware harmharness harryharshhaste hatredhaulhayhazard head headline headquarters healheapheave hedgeheelheir helicopter hellhelpful helpless helplessly henhenceherdheroic herring hesitate highlight highly highwayhinthiphistoric historical holdout holdupholyhoney honeymoon hook hopeful hopelesshorizon horizontal horn horrible horror horsepower host.. hostile hostility household housewife housing humanity humble humor humorous Hungary Hungary hunthustlehut hydrogen ice-cream Idahoideal identification identify identityidle ignorance ignorant illegal illusion illustrate illustration image imaginary imagination imitate immense immensely immigrant immuneimpact impatient imperial imperialism implement implication implicit implyimport impose impress impression impressive impulse incase incase incident incompatible incorporate increasingly incredible independence independent indexIndiaIndian Indian indicate indication indifference indifferent indirect indispensable individual indoor induce inducement industrial industrialize inefficiency infantinfect infection inferinferior infertile inflation inflexible influence influential inform informal infrastructure ingredient inhabitant inherent inheritinitial initially initiative injection injureinjureinlineinninner innocent innocent innocently input inquire insect insect insecticide insensitive insert insight inspect inspiration inspire installation instance instant instinct instinctively institute institutioninstructor instrument insult insurance insureintact integrate integrity intelligence intend intense intensify intensity intensive intention intentionally interact interaction interactive intercom interfere interference interior intermediate internal internalize Internet interpret interpretation interrupt interval interview intimate intimately intimidate introduction invade invader invasion invention inventor invest investigateinvestigation investment investor invisible invitation involve inward inwardly Iran irrelevant Islam isolate isolation ItalianItalyItalyitemjailjamJanejarjawjazz jealous jeansjetjewelJoeJoejoint journal journalist judgment jungle juniorjuryjustice justification justifykeenkenkettle keyboard KFCkindergarten kindness kingdomkitknitknotlabel laboratory labor-saving ladlaglamb landlord lanelaplargely laser Latino latter laughter launch laundry lavatory lawnlayer layout layout leadership leakleanleaplease leather legal legend legislation leisure leisurely lemon lengthy lenslethalliableliberate liberty librarian license licklidlife-style lighten lightning likely likewise limb limitation limp liquid liquorliter literacy literally literary literature liver living-room loafloan lobby local locate location lodgeloglogic logical loop loose loosely loosen lorrylover lowerlow-literacy loyal loyaltylucrative luggagelumplungluxurylyric machinery magic magnet magnetic maid mainland maintain maintenance maize makeup makeup makeupmale mammal management manipulate manipulation mankind manner manual manufacture manufacturer margin marine marital markdown married marsh marshal marvelous massivematmate mathematician mature maturitymaxmaximum Maymayor means measurement mechanic mechanical mechanism medal medieval medium melt membership memorial merchant mercymere merrily merrymess messenger microphone microscope Microsoft mighty migratemildmildly militarymill millimeter minimum ministry minor minority minus miracle miserable miserably mislead missile missing missionmistmisunderstand mixture moanmobile mobility mode modem moderate modest modifymoist moisture molecule monoxide monster monthly monument moodmoral morality mosquito mostlymotemotion motivate motive mould.. mount moustache moviemudmugmultiple muscle museum mushroom musician mutual mysterious mysterymyth mythicalnagnamely napkin nasty nationality naturally naval navigation navynearby necessarily necessity negative neglect negotiate negotiation neighborhood nephew Netherlands network neutral nickelniece nineteen nitrogen nonfatal nonsense noodlenorm normally north northeast notebook noticeable notify nourish novel nowhere nuclear nucleus nuisance numerous nuptial nurseryoak objective objectively obligation oblige observation observe observer obstacle obtain obvious occasion occasional occasionally occupation occupy occurrence odd.offend offender offense offensiveold-fashioned Olympics omitonion online opening opera operational operator opponent opportunity opposeoptoptical optimistic option optionaloralorbit orchestral orderlyoreorgan organic organically organization organize origin original originally Orlando ornament ounce outcome outeroutlet outline outlook output outset outstanding outward ovaloven overall overcome overestimate overhead overlook overnight overseas overtake overwhelm owing owner ownership Oxford oxygen pace pacific package padpainful painter palmpanelpanicpantspants parachute parade parallel parcelParis parliament partial partially participate particle particularly partner passion passive passport pastepatpatch patience pavepaw payment peapeachpeak peculiar peculiarly.. peer penalty pendulum penetrate Pennsylvania pension pepper percentage perception perfection perfectionist performancepermanent permission permit persist personality personnel perspective persuasion persuasive pessimistic petrol petroleum phase phenomenon philosopher philosophy phoenix phone phrase physical physician physicist physiological Picasso pickup pickup pickup pierce pigeonpillpillarpillowpimppinchpinepintpistolpitpitch plague planet plantation plasticplausible pledge plentiful pliersplotplug plumber plunge plus pneumonia poetry poison poisonous policy Polish politician politics poll pollute pollution pondpoppope portable porter portion portion portly portrait pose pose positive possess possibility postage poster postman postpone potential potentially poverty powder powderedpox practically pray prayer precaution preceding precise precisely precision predict preface preferable preferably preference pregnant prejudice preliminary premarital prenuptial prescribe presence presentation presently pressure presumably prevail previous previously priest primarily primary prime primitive prince princess principal principally principle prior priority private privilege psychicpsychologist pub publication publicity publish pulse pump punch punctual pup purchase purple purse pursue putout putout puzzle qualification qualify quest queuequitquiverquiz quotation quote quotient rabbit racial racistrackradar radiation radical radonragrageraidrail railroad rainbow rallyrangerankratrateratio rational rawreact reaction reactor reader reading realistic realistically reality realmreap reasonable rebel recall receipt receiver recently reception recession reckon recognition recognize recommend recorder recovery recreation recruit recycle redefine reduce reduction reference refine reflect reflection reform refresh refreshing refugeeregarding. regardless regenerate region register regression regulate regulation reinforce reject rejection relate relativity relax release relevant reliable relief relieve religion religious reluctance reluctant remark remedy remote removal render renewrent repeatedly repetition replace replacement reporter represent repression republican reputation requirement rescue resemble resentreservation reserve reservoir residence resident resign resist resistance resistant resolution resolve resort resource respective respectively respond response responsible restless restlessly restore restrain restraint restrict resume retail retailer retainretire retired retreat reunion reveal revelation revenue reverse revise revolt revolutionary reward rhetoric rhetorical rhythmrib ribbonridridge ridiculous riflerigidriotripriskritual rivalroar roastrob robber robbery robot rocket rodroller romantic roomy rope rotate Rotterdam rouse route routine royalrubruderug rundown rural Russia rustsack sacrifice saddle saint sake salad salary。
Native Instruments MASCHINE MIKRO MK3用户手册说明书
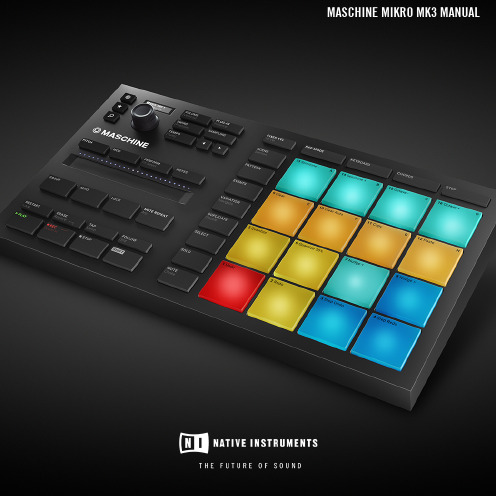
The information in this document is subject to change without notice and does not represent a commitment on the part of Native Instruments GmbH. The software described by this docu-ment is subject to a License Agreement and may not be copied to other media. No part of this publication may be copied, reproduced or otherwise transmitted or recorded, for any purpose, without prior written permission by Native Instruments GmbH, hereinafter referred to as Native Instruments.“Native Instruments”, “NI” and associated logos are (registered) trademarks of Native Instru-ments GmbH.ASIO, VST, HALion and Cubase are registered trademarks of Steinberg Media Technologies GmbH.All other product and company names are trademarks™ or registered® trademarks of their re-spective holders. Use of them does not imply any affiliation with or endorsement by them.Document authored by: David Gover and Nico Sidi.Software version: 2.8 (02/2019)Hardware version: MASCHINE MIKRO MK3Special thanks to the Beta Test Team, who were invaluable not just in tracking down bugs, but in making this a better product.NATIVE INSTRUMENTS GmbH Schlesische Str. 29-30D-10997 Berlin Germanywww.native-instruments.de NATIVE INSTRUMENTS North America, Inc. 6725 Sunset Boulevard5th FloorLos Angeles, CA 90028USANATIVE INSTRUMENTS K.K.YO Building 3FJingumae 6-7-15, Shibuya-ku, Tokyo 150-0001Japanwww.native-instruments.co.jp NATIVE INSTRUMENTS UK Limited 18 Phipp StreetLondon EC2A 4NUUKNATIVE INSTRUMENTS FRANCE SARL 113 Rue Saint-Maur75011 ParisFrance SHENZHEN NATIVE INSTRUMENTS COMPANY Limited 5F, Shenzhen Zimao Center111 Taizi Road, Nanshan District, Shenzhen, GuangdongChina© NATIVE INSTRUMENTS GmbH, 2019. All rights reserved.Table of Contents1Welcome to MASCHINE (23)1.1MASCHINE Documentation (24)1.2Document Conventions (25)1.3New Features in MASCHINE 2.8 (26)1.4New Features in MASCHINE 2.7.10 (28)1.5New Features in MASCHINE 2.7.8 (29)1.6New Features in MASCHINE 2.7.7 (29)1.7New Features in MASCHINE 2.7.4 (31)1.8New Features in MASCHINE 2.7.3 (33)2Quick Reference (35)2.1MASCHINE Project Overview (35)2.1.1Sound Content (35)2.1.2Arrangement (37)2.2MASCHINE Hardware Overview (40)2.2.1MASCHINE MIKRO Hardware Overview (40)2.2.1.1Browser Section (41)2.2.1.2Edit Section (42)2.2.1.3Performance Section (43)2.2.1.4Transport Section (45)2.2.1.5Pad Section (46)2.2.1.6Rear Panel (50)2.3MASCHINE Software Overview (51)2.3.1Header (52)2.3.2Browser (54)2.3.3Arranger (56)2.3.4Control Area (59)2.3.5Pattern Editor (60)3Basic Concepts (62)3.1Important Names and Concepts (62)3.2Adjusting the MASCHINE User Interface (65)3.2.1Adjusting the Size of the Interface (65)3.2.2Switching between Ideas View and Song View (66)3.2.3Showing/Hiding the Browser (67)3.2.4Showing/Hiding the Control Lane (67)3.3Common Operations (68)3.3.1Adjusting Volume, Swing, and Tempo (68)3.3.2Undo/Redo (71)3.3.3Focusing on a Group or a Sound (73)3.3.4Switching Between the Master, Group, and Sound Level (77)3.3.5Navigating Channel Properties, Plug-ins, and Parameter Pages in the Control Area.773.3.6Navigating the Software Using the Controller (82)3.3.7Using Two or More Hardware Controllers (82)3.3.8Loading a Recent Project from the Controller (84)3.4Native Kontrol Standard (85)3.5Stand-Alone and Plug-in Mode (86)3.5.1Differences between Stand-Alone and Plug-in Mode (86)3.5.2Switching Instances (88)3.6Preferences (88)3.6.1Preferences – General Page (89)3.6.2Preferences – Audio Page (93)3.6.3Preferences – MIDI Page (95)3.6.4Preferences – Default Page (97)3.6.5Preferences – Library Page (101)3.6.6Preferences – Plug-ins Page (109)3.6.7Preferences – Hardware Page (114)3.6.8Preferences – Colors Page (114)3.7Integrating MASCHINE into a MIDI Setup (117)3.7.1Connecting External MIDI Equipment (117)3.7.2Sync to External MIDI Clock (117)3.7.3Send MIDI Clock (118)3.7.4Using MIDI Mode (119)3.8Syncing MASCHINE using Ableton Link (120)3.8.1Connecting to a Network (121)3.8.2Joining and Leaving a Link Session (121)4Browser (123)4.1Browser Basics (123)4.1.1The MASCHINE Library (123)4.1.2Browsing the Library vs. Browsing Your Hard Disks (124)4.2Searching and Loading Files from the Library (125)4.2.1Overview of the Library Pane (125)4.2.2Selecting or Loading a Product and Selecting a Bank from the Browser (128)4.2.3Selecting a Product Category, a Product, a Bank, and a Sub-Bank (133)4.2.3.1Selecting a Product Category, a Product, a Bank, and a Sub-Bank on theController (137)4.2.4Selecting a File Type (137)4.2.5Choosing Between Factory and User Content (138)4.2.6Selecting Type and Character Tags (138)4.2.7Performing a Text Search (142)4.2.8Loading a File from the Result List (143)4.3Additional Browsing Tools (148)4.3.1Loading the Selected Files Automatically (148)4.3.2Auditioning Instrument Presets (149)4.3.3Auditioning Samples (150)4.3.4Loading Groups with Patterns (150)4.3.5Loading Groups with Routing (151)4.3.6Displaying File Information (151)4.4Using Favorites in the Browser (152)4.5Editing the Files’ Tags and Properties (155)4.5.1Attribute Editor Basics (155)4.5.2The Bank Page (157)4.5.3The Types and Characters Pages (157)4.5.4The Properties Page (160)4.6Loading and Importing Files from Your File System (161)4.6.1Overview of the FILES Pane (161)4.6.2Using Favorites (163)4.6.3Using the Location Bar (164)4.6.4Navigating to Recent Locations (165)4.6.5Using the Result List (166)4.6.6Importing Files to the MASCHINE Library (169)4.7Locating Missing Samples (171)4.8Using Quick Browse (173)5Managing Sounds, Groups, and Your Project (175)5.1Overview of the Sounds, Groups, and Master (175)5.1.1The Sound, Group, and Master Channels (176)5.1.2Similarities and Differences in Handling Sounds and Groups (177)5.1.3Selecting Multiple Sounds or Groups (178)5.2Managing Sounds (181)5.2.1Loading Sounds (183)5.2.2Pre-listening to Sounds (184)5.2.3Renaming Sound Slots (185)5.2.4Changing the Sound’s Color (186)5.2.5Saving Sounds (187)5.2.6Copying and Pasting Sounds (189)5.2.7Moving Sounds (192)5.2.8Resetting Sound Slots (193)5.3Managing Groups (194)5.3.1Creating Groups (196)5.3.2Loading Groups (197)5.3.3Renaming Groups (198)5.3.4Changing the Group’s Color (199)5.3.5Saving Groups (200)5.3.6Copying and Pasting Groups (202)5.3.7Reordering Groups (206)5.3.8Deleting Groups (207)5.4Exporting MASCHINE Objects and Audio (208)5.4.1Saving a Group with its Samples (208)5.4.2Saving a Project with its Samples (210)5.4.3Exporting Audio (212)5.5Importing Third-Party File Formats (218)5.5.1Loading REX Files into Sound Slots (218)5.5.2Importing MPC Programs to Groups (219)6Playing on the Controller (223)6.1Adjusting the Pads (223)6.1.1The Pad View in the Software (223)6.1.2Choosing a Pad Input Mode (225)6.1.3Adjusting the Base Key (226)6.2Adjusting the Key, Choke, and Link Parameters for Multiple Sounds (227)6.3Playing Tools (229)6.3.1Mute and Solo (229)6.3.2Choke All Notes (233)6.3.3Groove (233)6.3.4Level, Tempo, Tune, and Groove Shortcuts on Your Controller (235)6.3.5Tap Tempo (235)6.4Performance Features (236)6.4.1Overview of the Perform Features (236)6.4.2Selecting a Scale and Creating Chords (239)6.4.3Scale and Chord Parameters (240)6.4.4Creating Arpeggios and Repeated Notes (253)6.4.5Swing on Note Repeat / Arp Output (257)6.5Using Lock Snapshots (257)6.5.1Creating a Lock Snapshot (257)7Working with Plug-ins (259)7.1Plug-in Overview (259)7.1.1Plug-in Basics (259)7.1.2First Plug-in Slot of Sounds: Choosing the Sound’s Role (263)7.1.3Loading, Removing, and Replacing a Plug-in (264)7.1.4Adjusting the Plug-in Parameters (270)7.1.5Bypassing Plug-in Slots (270)7.1.6Using Side-Chain (272)7.1.7Moving Plug-ins (272)7.1.8Alternative: the Plug-in Strip (273)7.1.9Saving and Recalling Plug-in Presets (273)7.1.9.1Saving Plug-in Presets (274)7.1.9.2Recalling Plug-in Presets (275)7.1.9.3Removing a Default Plug-in Preset (276)7.2The Sampler Plug-in (277)7.2.1Page 1: Voice Settings / Engine (279)7.2.2Page 2: Pitch / Envelope (281)7.2.3Page 3: FX / Filter (283)7.2.4Page 4: Modulation (285)7.2.5Page 5: LFO (286)7.2.6Page 6: Velocity / Modwheel (288)7.3Using Native Instruments and External Plug-ins (289)7.3.1Opening/Closing Plug-in Windows (289)7.3.2Using the VST/AU Plug-in Parameters (292)7.3.3Setting Up Your Own Parameter Pages (293)7.3.4Using VST/AU Plug-in Presets (298)7.3.5Multiple-Output Plug-ins and Multitimbral Plug-ins (300)8Using the Audio Plug-in (302)8.1Loading a Loop into the Audio Plug-in (306)8.2Editing Audio in the Audio Plug-in (307)8.3Using Loop Mode (308)8.4Using Gate Mode (310)9Using the Drumsynths (312)9.1Drumsynths – General Handling (313)9.1.1Engines: Many Different Drums per Drumsynth (313)9.1.2Common Parameter Organization (313)9.1.3Shared Parameters (316)9.1.4Various Velocity Responses (316)9.1.5Pitch Range, Tuning, and MIDI Notes (316)9.2The Kicks (317)9.2.1Kick – Sub (319)9.2.2Kick – Tronic (321)9.2.3Kick – Dusty (324)9.2.4Kick – Grit (325)9.2.5Kick – Rasper (328)9.2.6Kick – Snappy (329)9.2.7Kick – Bold (331)9.2.8Kick – Maple (333)9.2.9Kick – Push (334)9.3The Snares (336)9.3.1Snare – Volt (338)9.3.2Snare – Bit (340)9.3.3Snare – Pow (342)9.3.4Snare – Sharp (343)9.3.5Snare – Airy (345)9.3.6Snare – Vintage (347)9.3.7Snare – Chrome (349)9.3.8Snare – Iron (351)9.3.9Snare – Clap (353)9.3.10Snare – Breaker (355)9.4The Hi-hats (357)9.4.1Hi-hat – Silver (358)9.4.2Hi-hat – Circuit (360)9.4.3Hi-hat – Memory (362)9.4.4Hi-hat – Hybrid (364)9.4.5Creating a Pattern with Closed and Open Hi-hats (366)9.5The Toms (367)9.5.1Tom – Tronic (369)9.5.2Tom – Fractal (371)9.5.3Tom – Floor (375)9.5.4Tom – High (377)9.6The Percussions (378)9.6.1Percussion – Fractal (380)9.6.2Percussion – Kettle (383)9.6.3Percussion – Shaker (385)9.7The Cymbals (389)9.7.1Cymbal – Crash (391)9.7.2Cymbal – Ride (393)10Using the Bass Synth (396)10.1Bass Synth – General Handling (397)10.1.1Parameter Organization (397)10.1.2Bass Synth Parameters (399)11Working with Patterns (401)11.1Pattern Basics (401)11.1.1Pattern Editor Overview (402)11.1.2Navigating the Event Area (404)11.1.3Following the Playback Position in the Pattern (406)11.1.4Jumping to Another Playback Position in the Pattern (407)11.1.5Group View and Keyboard View (408)11.1.6Adjusting the Arrange Grid and the Pattern Length (410)11.1.7Adjusting the Step Grid and the Nudge Grid (413)11.2Recording Patterns in Real Time (416)11.2.1Recording Your Patterns Live (417)11.2.2Using the Metronome (419)11.2.3Recording with Count-in (420)11.3Recording Patterns with the Step Sequencer (422)11.3.1Step Mode Basics (422)11.3.2Editing Events in Step Mode (424)11.4Editing Events (425)11.4.1Editing Events with the Mouse: an Overview (425)11.4.2Creating Events/Notes (428)11.4.3Selecting Events/Notes (429)11.4.4Editing Selected Events/Notes (431)11.4.5Deleting Events/Notes (434)11.4.6Cut, Copy, and Paste Events/Notes (436)11.4.7Quantizing Events/Notes (439)11.4.8Quantization While Playing (441)11.4.9Doubling a Pattern (442)11.4.10Adding Variation to Patterns (442)11.5Recording and Editing Modulation (443)11.5.1Which Parameters Are Modulatable? (444)11.5.2Recording Modulation (446)11.5.3Creating and Editing Modulation in the Control Lane (447)11.6Creating MIDI Tracks from Scratch in MASCHINE (452)11.7Managing Patterns (454)11.7.1The Pattern Manager and Pattern Mode (455)11.7.2Selecting Patterns and Pattern Banks (456)11.7.3Creating Patterns (459)11.7.4Deleting Patterns (460)11.7.5Creating and Deleting Pattern Banks (461)11.7.6Naming Patterns (463)11.7.7Changing the Pattern’s Color (465)11.7.8Duplicating, Copying, and Pasting Patterns (466)11.7.9Moving Patterns (469)11.8Importing/Exporting Audio and MIDI to/from Patterns (470)11.8.1Exporting Audio from Patterns (470)11.8.2Exporting MIDI from Patterns (472)11.8.3Importing MIDI to Patterns (474)12Audio Routing, Remote Control, and Macro Controls (483)12.1Audio Routing in MASCHINE (484)12.1.1Sending External Audio to Sounds (485)12.1.2Configuring the Main Output of Sounds and Groups (489)12.1.3Setting Up Auxiliary Outputs for Sounds and Groups (494)12.1.4Configuring the Master and Cue Outputs of MASCHINE (497)12.1.5Mono Audio Inputs (502)12.1.5.1Configuring External Inputs for Sounds in Mix View (503)12.2Using MIDI Control and Host Automation (506)12.2.1Triggering Sounds via MIDI Notes (507)12.2.2Triggering Scenes via MIDI (513)12.2.3Controlling Parameters via MIDI and Host Automation (514)12.2.4Selecting VST/AU Plug-in Presets via MIDI Program Change (522)12.2.5Sending MIDI from Sounds (523)12.3Creating Custom Sets of Parameters with the Macro Controls (527)12.3.1Macro Control Overview (527)12.3.2Assigning Macro Controls Using the Software (528)13Controlling Your Mix (535)13.1Mix View Basics (535)13.1.1Switching between Arrange View and Mix View (535)13.1.2Mix View Elements (536)13.2The Mixer (537)13.2.1Displaying Groups vs. Displaying Sounds (539)13.2.2Adjusting the Mixer Layout (541)13.2.3Selecting Channel Strips (542)13.2.4Managing Your Channels in the Mixer (543)13.2.5Adjusting Settings in the Channel Strips (545)13.2.6Using the Cue Bus (549)13.3The Plug-in Chain (551)13.4The Plug-in Strip (552)13.4.1The Plug-in Header (554)13.4.2Panels for Drumsynths and Internal Effects (556)13.4.3Panel for the Sampler (557)13.4.4Custom Panels for Native Instruments Plug-ins (560)13.4.5Undocking a Plug-in Panel (Native Instruments and External Plug-ins Only) (564)14Using Effects (567)14.1Applying Effects to a Sound, a Group or the Master (567)14.1.1Adding an Effect (567)14.1.2Other Operations on Effects (574)14.1.3Using the Side-Chain Input (575)14.2Applying Effects to External Audio (578)14.2.1Step 1: Configure MASCHINE Audio Inputs (578)14.2.2Step 2: Set up a Sound to Receive the External Input (579)14.2.3Step 3: Load an Effect to Process an Input (579)14.3Creating a Send Effect (580)14.3.1Step 1: Set Up a Sound or Group as Send Effect (581)14.3.2Step 2: Route Audio to the Send Effect (583)14.3.3 A Few Notes on Send Effects (583)14.4Creating Multi-Effects (584)15Effect Reference (587)15.1Dynamics (588)15.1.1Compressor (588)15.1.2Gate (591)15.1.3Transient Master (594)15.1.4Limiter (596)15.1.5Maximizer (600)15.2Filtering Effects (603)15.2.1EQ (603)15.2.2Filter (605)15.2.3Cabinet (609)15.3Modulation Effects (611)15.3.1Chorus (611)15.3.2Flanger (612)15.3.3FM (613)15.3.4Freq Shifter (615)15.3.5Phaser (616)15.4Spatial and Reverb Effects (617)15.4.1Ice (617)15.4.2Metaverb (619)15.4.3Reflex (620)15.4.4Reverb (Legacy) (621)15.4.5Reverb (623)15.4.5.1Reverb Room (623)15.4.5.2Reverb Hall (626)15.4.5.3Plate Reverb (629)15.5Delays (630)15.5.1Beat Delay (630)15.5.2Grain Delay (632)15.5.3Grain Stretch (634)15.5.4Resochord (636)15.6Distortion Effects (638)15.6.1Distortion (638)15.6.2Lofi (640)15.6.3Saturator (641)15.7Perform FX (645)15.7.1Filter (646)15.7.2Flanger (648)15.7.3Burst Echo (650)15.7.4Reso Echo (653)15.7.5Ring (656)15.7.6Stutter (658)15.7.7Tremolo (661)15.7.8Scratcher (664)16Working with the Arranger (667)16.1Arranger Basics (667)16.1.1Navigating Song View (670)16.1.2Following the Playback Position in Your Project (672)16.1.3Performing with Scenes and Sections using the Pads (673)16.2Using Ideas View (677)16.2.1Scene Overview (677)16.2.2Creating Scenes (679)16.2.3Assigning and Removing Patterns (679)16.2.4Selecting Scenes (682)16.2.5Deleting Scenes (684)16.2.6Creating and Deleting Scene Banks (685)16.2.7Clearing Scenes (685)16.2.8Duplicating Scenes (685)16.2.9Reordering Scenes (687)16.2.10Making Scenes Unique (688)16.2.11Appending Scenes to Arrangement (689)16.2.12Naming Scenes (689)16.2.13Changing the Color of a Scene (690)16.3Using Song View (692)16.3.1Section Management Overview (692)16.3.2Creating Sections (694)16.3.3Assigning a Scene to a Section (695)16.3.4Selecting Sections and Section Banks (696)16.3.5Reorganizing Sections (700)16.3.6Adjusting the Length of a Section (702)16.3.6.1Adjusting the Length of a Section Using the Software (703)16.3.6.2Adjusting the Length of a Section Using the Controller (705)16.3.7Clearing a Pattern in Song View (705)16.3.8Duplicating Sections (705)16.3.8.1Making Sections Unique (707)16.3.9Removing Sections (707)16.3.10Renaming Scenes (708)16.3.11Clearing Sections (710)16.3.12Creating and Deleting Section Banks (710)16.3.13Working with Patterns in Song view (710)16.3.13.1Creating a Pattern in Song View (711)16.3.13.2Selecting a Pattern in Song View (711)16.3.13.3Clearing a Pattern in Song View (711)16.3.13.4Renaming a Pattern in Song View (711)16.3.13.5Coloring a Pattern in Song View (712)16.3.13.6Removing a Pattern in Song View (712)16.3.13.7Duplicating a Pattern in Song View (712)16.3.14Enabling Auto Length (713)16.3.15Looping (714)16.3.15.1Setting the Loop Range in the Software (714)16.3.15.2Activating or Deactivating a Loop Using the Controller (715)16.4Playing with Sections (715)16.4.1Jumping to another Playback Position in Your Project (716)16.5Triggering Sections or Scenes via MIDI (717)16.6The Arrange Grid (719)16.7Quick Grid (720)17Sampling and Sample Mapping (722)17.1Opening the Sample Editor (722)17.2Recording Audio (724)17.2.1Opening the Record Page (724)17.2.2Selecting the Source and the Recording Mode (725)17.2.3Arming, Starting, and Stopping the Recording (729)17.2.5Checking Your Recordings (731)17.2.6Location and Name of Your Recorded Samples (734)17.3Editing a Sample (735)17.3.1Using the Edit Page (735)17.3.2Audio Editing Functions (739)17.4Slicing a Sample (743)17.4.1Opening the Slice Page (743)17.4.2Adjusting the Slicing Settings (744)17.4.3Manually Adjusting Your Slices (746)17.4.4Applying the Slicing (750)17.5Mapping Samples to Zones (754)17.5.1Opening the Zone Page (754)17.5.2Zone Page Overview (755)17.5.3Selecting and Managing Zones in the Zone List (756)17.5.4Selecting and Editing Zones in the Map View (761)17.5.5Editing Zones in the Sample View (765)17.5.6Adjusting the Zone Settings (767)17.5.7Adding Samples to the Sample Map (770)18Appendix: Tips for Playing Live (772)18.1Preparations (772)18.1.1Focus on the Hardware (772)18.1.2Customize the Pads of the Hardware (772)18.1.3Check Your CPU Power Before Playing (772)18.1.4Name and Color Your Groups, Patterns, Sounds and Scenes (773)18.1.5Consider Using a Limiter on Your Master (773)18.1.6Hook Up Your Other Gear and Sync It with MIDI Clock (773)18.1.7Improvise (773)18.2Basic Techniques (773)18.2.1Use Mute and Solo (773)18.2.2Create Variations of Your Drum Patterns in the Step Sequencer (774)18.2.3Use Note Repeat (774)18.2.4Set Up Your Own Multi-effect Groups and Automate Them (774)18.3Special Tricks (774)18.3.1Changing Pattern Length for Variation (774)18.3.2Using Loops to Cycle Through Samples (775)18.3.3Load Long Audio Files and Play with the Start Point (775)19Troubleshooting (776)19.1Knowledge Base (776)19.2Technical Support (776)19.3Registration Support (777)19.4User Forum (777)20Glossary (778)Index (786)1Welcome to MASCHINEThank you for buying MASCHINE!MASCHINE is a groove production studio that implements the familiar working style of classi-cal groove boxes along with the advantages of a computer based system. MASCHINE is ideal for making music live, as well as in the studio. It’s the hands-on aspect of a dedicated instru-ment, the MASCHINE hardware controller, united with the advanced editing features of the MASCHINE software.Creating beats is often not very intuitive with a computer, but using the MASCHINE hardware controller to do it makes it easy and fun. You can tap in freely with the pads or use Note Re-peat to jam along. Alternatively, build your beats using the step sequencer just as in classic drum machines.Patterns can be intuitively combined and rearranged on the fly to form larger ideas. You can try out several different versions of a song without ever having to stop the music.Since you can integrate it into any sequencer that supports VST, AU, or AAX plug-ins, you can reap the benefits in almost any software setup, or use it as a stand-alone application. You can sample your own material, slice loops and rearrange them easily.However, MASCHINE is a lot more than an ordinary groovebox or sampler: it comes with an inspiring 7-gigabyte library, and a sophisticated, yet easy to use tag-based Browser to give you instant access to the sounds you are looking for.What’s more, MASCHINE provides lots of options for manipulating your sounds via internal ef-fects and other sound-shaping possibilities. You can also control external MIDI hardware and 3rd-party software with the MASCHINE hardware controller, while customizing the functions of the pads, knobs and buttons according to your needs utilizing the included Controller Editor application. We hope you enjoy this fantastic instrument as much as we do. Now let’s get go-ing!—The MASCHINE team at Native Instruments.MASCHINE Documentation1.1MASCHINE DocumentationNative Instruments provide many information sources regarding MASCHINE. The main docu-ments should be read in the following sequence:1.MASCHINE MIKRO Quick Start Guide: This animated online guide provides a practical ap-proach to help you learn the basic of MASCHINE MIKRO. The guide is available from theNative Instruments website: https:///maschine-mikro-quick-start/2.MASCHINE Manual (this document): The MASCHINE Manual provides you with a compre-hensive description of all MASCHINE software and hardware features.Additional documentation sources provide you with details on more specific topics:►Online Support Videos: You can find a number of support videos on The Official Native In-struments Support Channel under the following URL: https:///NIsupport-EN. We recommend that you follow along with these instructions while the respective ap-plication is running on your computer.Other Online Resources:If you are experiencing problems related to your Native Instruments product that the supplied documentation does not cover, there are several ways of getting help:▪Knowledge Base▪User Forum▪Technical Support▪Registration SupportYou will find more information on these subjects in the chapter Troubleshooting.Document Conventions1.2Document ConventionsThis section introduces you to the signage and text highlighting used in this manual. This man-ual uses particular formatting to point out special facts and to warn you of potential issues.The icons introducing these notes let you see what kind of information is to be expected:This document uses particular formatting to point out special facts and to warn you of poten-tial issues. The icons introducing the following notes let you see what kind of information canbe expected:Furthermore, the following formatting is used:▪Text appearing in (drop-down) menus (such as Open…, Save as… etc.) in the software andpaths to locations on your hard disk or other storage devices is printed in italics.▪Text appearing elsewhere (labels of buttons, controls, text next to checkboxes etc.) in thesoftware is printed in blue. Whenever you see this formatting applied, you will find thesame text appearing somewhere on the screen.▪Text appearing on the displays of the controller is printed in light grey. Whenever you seethis formatting applied, you will find the same text on a controller display.▪Text appearing on labels of the hardware controller is printed in orange. Whenever you seethis formatting applied, you will find the same text on the controller.▪Important names and concepts are printed in bold.▪References to keys on your computer’s keyboard you’ll find put in square brackets (e.g.,“Press [Shift] + [Enter]”).►Single instructions are introduced by this play button type arrow.→Results of actions are introduced by this smaller arrow.Naming ConventionThroughout the documentation we will refer to MASCHINE controller (or just controller) as the hardware controller and MASCHINE software as the software installed on your computer.The term “effect” will sometimes be abbreviated as “FX” when referring to elements in the MA-SCHINE software and hardware. These terms have the same meaning.Button Combinations and Shortcuts on Your ControllerMost instructions will use the “+” sign to indicate buttons (or buttons and pads) that must be pressed simultaneously, starting with the button indicated first. E.g., an instruction such as:“Press SHIFT + PLAY”means:1.Press and hold SHIFT.2.While holding SHIFT, press PLAY and release it.3.Release SHIFT.1.3New Features in MASCHINE2.8The following new features have been added to MASCHINE: Integration▪Browse on , create your own collections of loops and one-shots and send them directly to the MASCHINE browser.Improvements to the Browser▪Samples are now cataloged in separate Loops and One-shots tabs in the Browser.▪Previews of loops selected in the Browser will be played in sync with the current project.When a loop is selected with Prehear turned on, it will begin playing immediately in-sync with the project if transport is running. If a loop preview starts part-way through the loop, the loop will play once more for its full length to ensure you get to hear the entire loop once in context with your project.▪Filters and product selections will be remembered when switching between content types and Factory/User Libraries in the Browser.▪Browser content synchronization between multiple running instances. When running multi-ple instances of MASCHINE, either as Standalone and/or as a plug-in, updates to the Li-brary will be synced across the instances. For example, if you delete a sample from your User Library in one instance, the sample will no longer be present in the other instances.Similarly, if you save a preset in one instance, that preset will then be available in the oth-er instances, too.▪Edits made to samples in the Factory Libraries will be saved to the Standard User Directo-ry.For more information on these new features, refer to the following chapter ↑4, Browser. Improvements to the MASCHINE MIKRO MK3 Controller▪You can now set sample Start and End points using the controller. For more information refer to ↑17.3.1, Using the Edit Page.Improved Support for A-Series Keyboards▪When Browsing with A-Series keyboards, you can now jump quickly to the results list by holding SHIFT and pushing right on the 4D Encoder.▪When Browsing with A-Series keyboards, you can fast scroll through the Browser results list by holding SHIFT and twisting the 4D Encoder.▪Mute and Solo Sounds and Groups from A-Series keyboards. Sounds are muted in TRACK mode while Groups are muted in IDEAS.。
刺猬响站(Naples)用户使用手册说明书

刺猬响站(Naples)用户使用手册目录1.目的 (12)2.适用范围 (12)3.产品介绍 (12)3.1.产品简介 (12)3.2.产品特色 (12)3.3.运行环境 (13)4.用户登录 (13)4.1.用户注册 (14)4.2.用户登录 (14)4.3.忘记密码 (14)4.4.主题选择 (15)5.账户中心 (17)5.1.常用操作 (18)5.2.网站基本设置、信息 (19)5.3.其他常用操作 (20)6.网站设计 (20)6.1.框架 (20)6.1.1.主导航菜单编辑区 (20)6.1.2.banner编辑区 (21)6.1.3.页面框架 (21)6.1.4.底部编辑区 (24)6.2.组件 (24)6.2.1.计算器 (26)6.2.2.文章滚动 (30)6.2.3.图文滚动 (32)6.2.4.拼图组件 (36)6.2.5.标题组件 (40)6.2.6.富文本组件 (42)6.2.7.间隔组件 (43)6.2.8.图片组件 (44)6.2.9.折叠组件 (47)6.2.10.横向标签组件 (50)6.2.11.纵向标签组件 (57)6.2.12.手风琴 (62)6.2.13.图标组件 (65)6.2.14.文本组件 (70)6.2.15.分隔线组件 (70)6.2.16.按钮组件 (73)6.2.17.搜索组件 (75)6.2.18.图片集组件 (76)6.2.19.幻灯片组件 (80)6.2.20.走马灯组件 (84)6.2.21.走马灯(图文)组件 (87)6.2.22.走马灯(展开)组件 (90)6.2.23.横向菜单 (93)6.2.24.纵向菜单 (96)6.2.25.单产品组件 (99)6.2.26.产品集组件 (103)6.2.27.文章组件 (108)6.2.28.高德地图 (111)6.2.29.百度地图 (114)6.2.30.Google地图 (118)6.2.31.flash组件 (118)6.2.32.文件组件 (120)6.2.33.视频链接组件 (122)6.2.34.本地视频 (124)6.2.35.代码组件 (127)6.2.36.留言本组件 (127)6.2.36.1.单行输入框 (130)6.2.36.2.多行输入框 (131)6.2.36.3.单选框 (133)6.2.36.4.下拉框 (135)6.2.36.5.复选框 (137)6.2.36.6.邮箱 (139)6.2.36.7.电话 (140)6.2.36.8.日历控件 (142)6.2.36.9.省市区控件 (144)6.2.36.10.文件控件 (145)6.2.37.投票组件 (147)6.2.38.问卷调查组件 (148)6.2.39.导航组件 (149)6.2.40.时间轴 (152)6.2.41.在线客服组件 (156)6.2.42.社交图标组件 (157)6.3.主题 (159)6.3.1.主题预览 (159)6.3.2.主题切换 (160)6.3.3.主题复制 (161)6.4.Logo编辑 (161)6.5.Banner编辑 (163)6.5.1.PC端banner编辑 (163)6.5.2.手机端banner管理 (165)6.6.主导航菜单编辑 (166)6.6.1.菜单文字设置 (167)6.6.2.子菜单样式设置 (168)6.6.3.子菜单数据编辑 (169)6.7.整站复制 (170)6.8.引导页编辑 (171)7.页面管理 (173)7.1.添加页面 (174)7.2.页面设置 (175)7.3.页面排序 (179)7.4.页面编辑 (181)7.5.页面复制 (181)7.6.页面删除 (182)7.7.导航锚点 (183)8.系统管理 (185)8.1.创建新系统 (186)8.2.产品系统 (187)8.2.1.新建产品 (187)8.2.2.产品批量上传 (189)8.2.3.产品列表 (190)8.2.4.新建产品分类 (192)8.2.5.产品分类列表 (192)8.2.6.产品标签描述 (193)8.2.7.产品关键词标签 (193)8.2.8.系统设置 (193)8.2.9.产品回收站 (197)8.3.文章系统 (198)8.3.2.文章列表 (201)8.3.3.新建文章分类 (202)8.3.4.文章分类列表 (203)8.3.5.系统设置 (203)8.3.6.文章回收站 (204)8.4.下载系统 (205)8.4.1.文件列表 (206)8.4.1.1.搜索文件 (206)8.4.1.2.新建文件 (206)8.4.1.3.文件批量上传 (207)8.4.1.4.编辑文件 (209)8.4.1.5.删除文件 (209)8.4.1.6.隐藏/显示文件 (209)8.4.1.7.置顶/取消置顶文件 (210)8.4.1.8.批量删除文件 (210)8.4.2.文件分类 (211)8.4.3.文件属性 (212)8.4.4.系统设置 (214)8.4.5.文件回收站 (215)8.5.FAQ系统 (216)8.5.1.FAQ列表 (216)8.5.3.系统设置 (220)8.5.4.FAQ回收站 (221)8.6.信息系统 (222)8.6.1.信息项管理 (222)8.6.2.内容列表 (224)8.6.3.系统设置 (225)8.6.4.信息回收站 (226)8.7.产品系统(表格型) (226)8.7.1.产品列表 (227)8.7.1.1.新建产品 (227)8.7.1.2.产品批量上传(导入excel文件) (228)8.7.1.3.批量修改产品分类 (230)8.7.1.4.产品列表 (230)8.7.2.产品分类 (231)8.7.2.1.新建分类 (231)8.7.2.2.分类列表 (232)8.7.3.产品属性 (232)8.7.3.1.新建/编辑属性 (232)8.7.3.2.属性列表 (233)8.7.4.系统设置 (235)8.7.5.产品回收站 (235)8.8.1.图文列表 (239)8.8.1.1.新建图文 (239)8.8.1.2.图文批量上传 (240)8.8.2.图文列表 (241)8.8.3.图文分类 (242)8.8.3.1.新建分类 (242)8.8.3.2.图文分类列表 (243)8.8.4.系统设置 (243)8.8.4.1.系统名称及框架设置 (243)8.8.4.2.图文列表设置 (244)8.8.4.3.图文详细设置 (245)8.8.5.图文回收站 (245)9.表单 (245)9.1.表单管理 (245)9.1.1.删除表单 (246)9.1.2.数据详情 (246)9.1.3.数据统计 (247)9.2.产品留言 (247)9.2.1.数据详情 (248)10.商城管理 (249)10.1.订单管理 (249)10.3.会员设置 (251)10.4.会员管理 (253)10.5.支付设置 (255)10.6.商城设置 (257)10.6.1 商城开关 (257)10.6.2 邮费设置 (258)10.6.3 会员邮件提醒 (258)10.6.4 会员相关设置 (258)10.7.登录设置 (259)11.资源 (260)11.1.资源管理 (260)11.2.标签管理 (262)11.3.水印管理 (262)11.4.回收站 (263)12.微信 (264)12.1.微信公众号绑定 (264)12.2.菜单设置 (264)12.3.欢迎语设置 (265)12.4.自动回复设置 (265)13.网站设置 (266)13.1.网站信息 (266)13.1.1.网站图标 (267)13.1.2.币种设置 (267)13.1.3.选择默认语言版本 (267)13.2.网站域名 (268)13.2.1.网站域名 (268)13.2.2.301重定向 (269)13.2.3.SSL证书 (269)13.3.邮件提示 (270)13.3.1.管理员邮箱 (271)13.3.2.邮箱设置 (271)13.4.SEO (272)13.5.统计代码 (274)13.6.站点设置 (275)13.6.1.悬浮广告管理 (275)13.6.2.背景音乐管理 (277)13.7.操作日志 (279)1.目的用户通过阅读本手册能了解刺猬响站的各项功能,掌握各种操作的使用,使用刺猬响站制作出完整的响应式网站。
白噪音说明书

PinkMonkey®Literature Notes on . . ./Sample MonkeyNotesNote: this sample contains only excerpts and does not represent the full contents of the booknote. This will give you an idea of the format and content.White NoisebyDon Delillo1985MonkeyNotes by PinkMonkey Staff/, Inc. Copyright ©2001, All Rights ReservedDistribution without the written consent of , Inc. is strictly prohibited.KEY LITERARY ELEMENTSSETTINGThe setting of this novel is Blacksmith, a small, liberal arts college town in Middle America. The college is aptly named College-on-the-Hill.CHARACTERSMajor CharactersJack Gladney - The founder and professor of Hitler Studies at College-on-the-Hill.Babette - The current wife of Jack; mother of Denise, Wilder, and Eugene.Heinrich - The son of Jack and Janet Savory; pseudo-philosopher and media fanatic.Denise - The daughter of Babette and Bob Pardee; works hardest to solve the Dylar problem of her mother. Steffie - (Stephanie Rose) daughter of Jack and Dana Breedlove.; the wilder and youngest of the children; son of Babette and Jack; never says anything but frequently is missing.Murray Jay Siskind - The professor interested in car crashes and Elvis; is seen most often in the grocery store.Minor CharactersHoward Dunlop - Jack’s German instructor.Dana Breedlove - Jack’s first and fourth wife and part-time spy……..CONFLICTThe real conflict in this novel is with death. Babette, Jack, Murray, and the rest all seem preoccupied with death and avoiding it. The manifestation of this conflict seems to come at the very end, when Jack confronts Willie and shoots him.Protagonist - Jack Gladney is the protagonist. Not only is he the narrator, but he is also……Antagonist - There is no formal antagonist, but if we define antagonist as the object of the protagonist’s struggle and conflict, then death is the antagonist. Jack’s constant fear of death and……Climax - The climax of the novel comes when Jack tries to kill Willie and in the process, he is shot himself. This moment leads to the hospital, where both men are saved, and the last vestige of……Outcome - In effect, the novel ends with a greater sense of foreboding as well as a simultaneous sense of hope. The "white noise" is expanding, but the one character to whom the others look as……SHORT PLOT / CHAPTER SUMMARY (Synopsis)The plot is rather simple: an Airborn Toxic Event strikes a small college town. After a rather chaotic evacuation, the Gladneys are eventually allowed to come home. During this event, Jack is exposed to Nyodene D, which is potentially deadly. SIMUVAC is not satisfied with the data from the event and decides that a simulation is needed to prepare the town. Babette has been secretly taking an experimental drug, Dylar, forwhich he provides sex to the drugs inventor, Minks. Jack eventually finds out and confronts her. In the end, Jack confronts Minks and is shot in the process.THEMEMain ThemeThe primary theme of this novel is that death underlies all aspects of popular culture. The glitz, packaging, and showiness of popular culture is an attempt to hide death beneath the surfaces, eventually allowing the people to forget or become dulled to death.Minor ThemesOne minor theme is that one cannot focus on death; one must live life and not "die slowly." Both the SIMUVAC computer person and Winnie present this belief to Jack.A second minor theme is that we as a culture cannot see reality. The "Most Photographed Barn…….MOODThe mood of the novel is ironic. This novel repeatedly makes irony of contemporary culture and life. All of the clichés and stereotypes about contemporary America are presented as……AUTHOR INFORMATION - BIOGRAPHYDon Delillo was born in New York in 1936. He is a contemporary American writer who has written numerous novels, including The Names, End Zone, Ratner’s Star, White Noise, Americana, Libra, Mao II, Great Jones Street, Running Dog,and Players. Most of his novels deal with contemporary American popular culture; at times they appear to critique contemporary culture while at others they seem to reveal in the kitsch. LITERARY/HISTORICAL INFORMATIONDelillo’s fiction should be considered as a literary version of Pop Art. He is conscious of this, even titling one of his novels, Mao II, after a silkscreen by Andy Warhol. Other novels of his focus on college football (End Zone) and the John F. Kennedy assassination conspiracy (Libra).As part of contemporary American fiction, White Noise explores the interaction of the media and popular culture with high art. Aspects of consumer culture are strewn throughout the narrative for no other reason than to simulate the constant presence of products and advertisements in our lives.CHAPTER SUMMARIES WITH NOTESPART 1: WAVES AND RADIATIONChapter 1SummaryA line of station wagons arrives with college students getting ready for the semester. Jack Gladney is watching them, noting the possessions that they bring with them. He also notes how similar the families, students, and possessions are. He also mentions that there is an insane asylum nearby as well as a freeway. He concludes by informing the reader that he is a professor of Hitler Studies and in fact started the field of Hitler studies itself. NotesThis first chapter establishes the setting, the small college town of Blacksmith. The setting is important because it is cliché Middle America. By setting the story here, Delillo effectively is saying, "this is America."We are also introduced to the protagonist, Jack Gladden, who is a professor of Hitler Studies. Hitler Studies is important to Jack because it is a neat packaging of death. Jack does not deal with the 6 million Jews, gypsies, disabled, homosexuals, etc that Hitler ordered killed; he focuses on the celebrity and the trivia. Unimaginable death is hidden behind the word "Hitler," which in turn is sanitized by being a field of intellectual pursuit (reality is made theoretical).Chapter 2SummaryThe second chapter is a description of Babette, Jack’s wife. She is upset because Jack forgot to remind her about the arrival of the station wagons. One of her activities is to read tabloids to an elderly gentleman named Treadwell.She and Jack have a brief discussion on how the rich experience death. Jack suggests that maybe it is merely a transference of documents. During this discussion, she asks where Wilder, their youngest child (and the only one that has both of them as its parents), has gone. Wilder is found, and the three other kids that live with them, Steffie, Denise, and Heinrich, all come downstairs. Steffie and Denise discuss Babette’s tendency to buy health food that she will not eat, thinking that if she buys it, she will feel compelled to eat it. There is a brief focus on the packaging and white noise surrounding them.NotesHere we are introduced to Babette who is again, a kind of cliché. The name itself suggests the unintelligent wife who merely looks pretty. We meet her and see that her actions are typically American: she is worried about death and she feels that all she has to do is buy the product (not use it) and its effects will be felt.The discussion between Babette and Jack about the rich and death is a way to describe death without making it personal. This allows the two of them security because it removes part of the fear of dying. Delillo is also making a statement about the degree to which death has disappeared in this culture: many of us no longer understand the physicality of death; for us it merely entails changing something in a computer file or filing papers.We are introduced to the rest of the children who live with Jack and Babette. Wilder’s disappearance foreshadows his later runaway.Chapter 3SummaryThis chapter returns to school campus. We are told that the Hitler Studies Department is in the same building as the Popular Culture Department. The one professor of popular culture, which Jack sees as being different (and he likes) is Murray Jay Siskind, who lectures on living icons. Murray lives in a rooming house with a number of odd types. Murray states that he is envious of the way that Jack has taken a figure and made a career out of him, in a way, making Hitler his own. Murray says that he wants to do the same thing with Elvis. Murray and Jack take a short trip to see "The Most Photographed Barn in America." There are five signs pronouncing it "The Most Photographed" along the highway. While they are there, they discuss the impossibility of seeing the barn through the aura surrounding it. The barn is a celebrity for the sake of being a celebrity.NotesThe irony here is that Hitler studies is not placed in the History building but in the Popular Culture Building.This is vital to the understanding of Jack’s work. He is not interested in understanding World War II better; he is interested in how one becomes a celebrity and how one packages death. Hitler was a superstar and sex idol in Germany in the later 1930s and early 1940s: he was Elvis, Marilyn Monroe, and John F. Kennedy rolled up in one. This is what Jack is most interested in. Murray, Jack’s one real professor friend, wants to make Elvis into the same kind of academic commodity that Jack has made Hitler into. He is attempting to redefine "greatness" and "worthiness of study.""The Most Photographed Barn in America" is an important scene because it reveals how we as participants in American culture are often more interested in the copy than the original (this idea is know as simulacra or hyper-reality). Those who photograph the barn participate in a group celebrity: they gain fame by……OVERALL ANALYSESCHARACTER ANALYSISThe characters are all rather superficial and stereotypical. No one extends beyond his/her role. Delillo’s characters do not achieve any kind of conscious enlightenment, but they do tend to progress slowly. Jack ultimately comes to see that focusing on death can itself be fatal. Babette moves towards a focus on Wilder. The rest do seem rather static.Characters provide the opportunity for Delillo, like Thomas Pynchon, to create allusions and references that expand the potential significance of a character, often to the point of absurdity. Heinrich, as an allusion to Himmler, the director the SS, Hitler’s information gathering police, seems…..PLOT STRUCTURE ANALYSISThe plot is insofar as Delillo needs events to occur so that he can have simulated events to supercede them. As far as the narrative is concerned, the plot is arbitrary. The characters interact with popular culture. What is relevant about the plot is that it occurs as a few well spaced dramatic and……THEMES - THEME ANALYSISThe themes in this novel revolve around popular culture and death. Therefore, one must look at those two things as being interchangeable. This is not to say that they always are, but that they sometimes are. By seeing the grocery store as a place where death is hidden behind the bright packaging, the culture takes on a much more ominous tone. Likewise, to see death as a media event, forces us to……STUDY QUESTIONS1) Do you think that Jack in his role as professor of Hitler Studies has an impact on his relationships,identities, and his sense of mortality?2) Does the family unit have an relationship to the novel and Jack's relations?……Copyright ©2001 , Inc.All Rights Reserved. Distribution without the written consent of , Inc. is prohibited.END OF SAMPLE MONKEYNOTES EXCERPTS/。
Good Vibes 分裂器说明书
GOOD VIBESAnalog ModulatorCongratulations on your purchase of the Good Vibes, a re-creation of classic 1960’s era Chorus/Vibrato! This circuit’s original foundation is preserved through the use of photocells and internally-boosted power-rails. The result is anything from wiggly vibrato, to subtle leslie and ultra-lush chorus that is out of this world! True Bypass and LED indication have also been added, along with an expression pedal input for selectable control over speed or intensity.WARNING: Your Good Vibes comes equipped with an Electro-Harmonix 9.6DC-200 power supply (same as used by Boss® & Ibanez®: 9.6 Volts DC 200mA). The Good Vibes requires up to 45mA at 9VDC with a center negative plug. Using the wrong adaptor may damage your unit and void the warranty. The Good Vibes does not accept batteries.VOLUME Knob – controls the output volume. Maximum setting is slightly above unity-gain.SPEED Knob – controls the speed of modulation. As you turn SPEED clockwise, the modulation rate increases. The LED to the left of the SPEED knob flashes at the modulation rate (even in bypass).INTENSITY Knob – allows you to set the depth of modulation sweep. As you turn INTENSITY clockwise, the modulation depth increases.CHORUS-VIBRATO Switch – when this switch is set to Vibrato, the Good Vibes delivers pure pitch-modulation. When this switch is set to Chorus, the Good Vibes delivers a lush, vibe-like chorus.FOOTSWITCH and LED – The Footswitch toggles the Good Vibes between effect and True Bypass mode. When the effect is engaged, the LED is lit.INPUT Jack –This ¼” jack is the audio input for the Good Vibes. The input impedance is 500kΩ.OUTPUT Jack –This ¼” jack is the effect output fo r the Good Vibes.EXP Jack –This ¼” EXPression jack accepts a TRS expression pedalconnector or a Tip-Sleeve 0-5V control voltage input. Some suggested Expression Pedals include: EHX Expression Pedal, M-Audio® EX-P, Roland®EV-5 or Boss® FV-500L. The polarity of the expression pedal’s plug mustconnect the Sleeve to the heel position, Ring connected to the toe position, and the Tip connected to the wiper. The nominal expression pedal impedance is 10kΩ, but it can accept impedances ranging from 6kΩ–100kΩ.EXP SPEED-INTENSITY Switch – when this switch is set to SPEED, theconnected expression source controls the speed of modulation (toe-down isfastest rate). When this switch is set to INTENSITY, the connected expression source controls the modulation depth (toe-down is maximum depth). Furthermore, the panel-knob of the selected function works in conjunction with the expression pedal to set the maximum sweep of the toe down position.9V Power Jack–Plug the output of the supplied AC adaptor into the 9Vpower jack located at the top of the Good Vibes. The Good Vibes draws up to 45mA at 9VDC with a center negative plug. The Good Vibes accepts Boss®and Ibanez® style AC Adaptors. Please do not exceed 10VDC at the 9V power jack!- WARRANTY INFORMATION -Please register online at /product-registration orcomplete and return the enclosed warranty card within 10 days of purchase.Electro-Harmonix will repair or replace, at its discretion, a product that fails to operate due to defects in materials or workmanship for a period of oneyear from date of purchase. This applies only to original purchasers who have bought their product from an authorized Electro-Harmonix retailer. Repaired or replaced units will then be warranted for the unexpired portion of the original warranty term.If you should need to return your unit for service within the warranty period, please contact the appropriate office listed below. Customers outside the regions listed below, please contact EHX Customer Service for information on *******************************+AandCanadian customers: please obtain a Return Authorization Number (RA#) from EHX Customer Service before returning your product. Include with your returned unit: a written description of the problem as well as your name, address, telephone number, e-mail address, and RA#; and a copy of your receipt clearly showing the purchase date.United States & CanadaEHX CUSTOMER SERVICEELECTRO-HARMONIXc/o NEW SENSOR CORP.47-50 33RD STREETLONG ISLAND CITY, NY 11101Tel: 718-937-8300Email:************EuropeJOHN WILLIAMSELECTRO-HARMONIX UK13 CWMDONKIN TERRACESWANSEA SA2 0RQUNITED KINGDOMTel: +44 179 247 3258Email:*********************************This warranty gives a purchaser specific legal rights. A purchaser may have even greater rights depending upon the laws of the jurisdiction within which the product was purchased.To hear demos on all EHX pedals visit us on the web at Email us at ************FCC COMPLIANCENote: This equipment has been tested and found to comply with the limits for a Class B digital device, pursuant to part 15 of the FCC Rules. These limits are designed to provide reasonable protection against harmful interference in a residential installation. This equipment generates, uses and can radiate radio frequency energy and, if not installed and used in accordance with the instructions, may cause harmful interference to radio communications. However, there is no guarantee that interference will not occur in a particular installation. If this equipment does cause harmful interference to radio or television reception, which can be determined by turning the equipment off and on, the user is encouraged to try to correct the interference by one or more of the following measures:•Reorient or relocate the receiving antenna.•Increase the separation between the equipment and receiver.•Connect the equipment into an outlet on a circuit different from that to which the receiver is connected.•Consult the dealer or an experienced radio/TV technician for help.Modifications not expressly approved by the manufacturer could void the user's authority to operate the equipment under FCC rules.。
黑狮子音频PG-2电源条件器说明书

to persons.
The lightning flash with an arrowhead symbol within an equilateral triangle is intended to alert the user to the presence of uninsulated “dangerous voltage” within the product’s enclosure that may be of sufficient magnitude to constitute a risk of electric shock
PG-2
Studio-grade power conditioner and surge protector
Owner’s Manual
IMPORTANT SAFETY INSTRUCTIONS
1. Read these instructions. 2. Keep these instructions 3. Heed all warnings. 4. Follow all instructions. 5. Do not use this apparatus near water. 6. Clean only with dry cloth. 7. Install in accordance with the manufacturer’s instructions. 8. Do not install near any heat sources such as radiators, heat regis-
The Black Lion Audio PG-2 complies with all applicable / RoHS/ WEEE European Union directives.
beAst音频小组内部教程_初级第一版

beAst 音频小组内部教程(初级第一版)小林制作2010.7.10beAst 音频小组内部教程(初级第一版)目 录前言 (3)一、国语音轨的来源 (3)1、正版音像制品中的国语音轨 (3)l ANYDVD (4)l DVD Decrypter (4)2、电视及网络译制片播放的国语录制音轨 (6)二、音轨与高清电影的匹配 (8)1、帧率转换 (8)2、时间轴校对 (13)三、国语与原音的完美融合——自混国语音轨 (18)1、前期准备 (19)l搜集资源 (19)l软件准备 (19)2、正式开始 (19)3、封装发布 (44)四、总结 (47)前言我们看电影离不开声音,声音是电影的灵魂,如果画面做的再好再清晰没有声音的话,也会毫无趣味, 国内制作的电影就不用说了,肯定是毫无障碍的母语发音。
但当我们看译制片的时候,问题就来了,是听原 声音轨看字幕还是听翻译成中文对白的电影呢,我想各有所好,但是一部好的译制电影能更好的让我们融入 电影,能更好的解放双眼来留意电影画面的细节,而且好的译制翻译能加入本土口语化特色的语言,让电影 对白更加生动。
我们都已迈入高清时代好几年了,国语译制电影大部分还是以 DVD 的形式发布,这就难以满足我们对 画面的需要,将国配音轨与高清电影的整合正是我们这些国配及高清爱好者的需要,所以才诞生了音频小组, 小组的工作就是满足大家和自己在这方面的需要。
闲话到此,下面开始正文。
一、国语音轨的来源国配来源基本可以分为两类:l正版发行音像制品中的国配音轨l电视及网络译制片播放的国语录制音轨其中第一个来源为主流,第二个来源为补充,掌握了这两条渠道,我们就能获得第一手的国配资源我们现在 开始逐一攻克。
1、正版音像制品中的国语音轨这一大类里面包含很多小类。
如正版蓝光中的国配,由于蓝光的容量很大,所以高配置的国配蕴含在里面,以华录的为首出现和一批 DTSHDma 次世代国配音轨,这也是国配搜集爱好者的终极追求。
Ghost Tone 电子吉他回声效果器说明书

on your purchase of Ghost Tone reverb, a sweet-sounding reverb for guitarists, wanting to bring their sound to life.Ghost Tone gives you incredible reverbs specially tuned for the elec-tric guitar. You can shape your reverb by controlling the decay time – and you can warp it to create all kinds of thick, layered sounds.Take a quick look at the overview of controls in this user manual to familiarize yourself with Ghost Tone and its surprising capabilities.CongratulationsYour Ghost Tone features five separate controls.The REVERBknob lets you adjust the amount of reverb you get, while the DECAY knob determines the length of your reverb trail. Turn these controls up to simulate a large concert hall or other large spaces, and roll down to get a smaller club or room effect.The LEVE L knob is used to set the overall output volume from your Ghost Tone pedal. At 12 o’clock your output is the same as your input volume.GHOST TONE CONTROLSThe Ghost Tone offers phenomenal-sounding Room , Hall and LFO modes controlled by the mode switch. We’ve even added a completely revamped Spring mode that will simply blow your mind. When the decay is set low in Spring mode, Ghost Toneemulates a short-spring reverb. Turn the decay up, and you get a killer long-spring reverb you just won´t hear anywhere else. The display shows, what mode you are using.T-REX WARRANTY CONDITIONST-Rex offers a 2-year warranty on all our products. In the unlikely event of a malfunction, please contact our technical support at ***********************************************************. Read more about warranty conditions at / serviceABOUT T-REXBased in Vejle, Denmark, T-Rex Engineering makes classic and sig-nature effects pedals for the world’s best musicians. Our approach blends hi-tech innovation with old-world craftsmanship – always in the service of killer tone.EU REGULATIONS • ENVIRONMENT PROTECTIONT-Rex accepts and follows the regulations and directives issued by the EU. We find these environment protecting regulations very good, and we are happy to follow them.REAChRoHS。
- 1、下载文档前请自行甄别文档内容的完整性,平台不提供额外的编辑、内容补充、找答案等附加服务。
- 2、"仅部分预览"的文档,不可在线预览部分如存在完整性等问题,可反馈申请退款(可完整预览的文档不适用该条件!)。
- 3、如文档侵犯您的权益,请联系客服反馈,我们会尽快为您处理(人工客服工作时间:9:00-18:30)。
beAst 音频小组内部教程(初级第二版)小林制作2010.7.10beAst 音频小组内部教程(初级第二版)目 录前言 (3)一、国语音轨的来源 (3)1、正版音像制品中的国语音轨 (3) ANYDVD (4) DVD Decrypter (4)2、电视及网络译制片播放的国语录制音轨 (6) BitControl.Digital TV Link 的安装过程 (6) BitControl.Digital TV Link 的设置 (8) 用 BitControl.Digital TV Link 录像 (10) 录像文件的提取 (12)二、音轨与高清电影的匹配 (14)1、帧率转换 (14)2、时间轴校对 (19)三、国语与原音的完美融合——自混国语音轨 (24)1、前期准备 (25) 搜集资源 (25) 软件准备 (25)2、正式开始 (25)3、封装发布 (50)四、总结 (53)前言我们看电影离不开声音,声音是电影的灵魂,如果画面做的再好再清晰没有声音的话,也会毫无趣味, 国内制作的电影就不用说了,肯定是毫无障碍的母语发音。
但当我们看译制片的时候,问题就来了,是听原 声音轨看字幕还是听翻译成中文对白的电影呢,我想各有所好,但是一部好的译制电影能更好的让我们融入 电影,能更好的解放双眼来留意电影画面的细节,而且好的译制翻译能加入本土口语化特色的语言,让电影 对白更加生动。
我们都已迈入高清时代好几年了,国语译制电影大部分还是以 DVD 的形式发布,这就难以满足我们对 画面的需要,将国配音轨与高清电影的整合正是我们这些国配及高清爱好者的需要,所以才诞生了音频小组, 小组的工作就是满足大家和自己在这方面的需要。
闲话到此,下面开始正文。
一、国语音轨的来源国配来源基本可以分为两类:l正版发行音像制品中的国配音轨l电视及网络译制片播放的国语录制音轨其中第一个来源为主流,第二个来源为补充,掌握了这两条渠道,我们就能获得第一手的国配资源我们现在 开始逐一攻克。
1、正版音像制品中的国语音轨这一大类里面包含很多小类。
如正版蓝光中的国配,由于蓝光的容量很大,所以高配置的国配蕴含在里面,以华录的为首出现和一批 DTSHDma 次世代国配音轨,这也是国配搜集爱好者的终极追求。
还有就是正版 D9,D5 中的国配,以泰盛,弘艺等厂家发行的为主, 国语配置高低不一, 涵盖 DTS、 杜比 AC3 5.1 及杜比 AC32.0 国配。
当然还有就是九区光碟,例如 DNA、TOP、全美及 YJ 等等,品牌很多。
九区光碟中的国配更加参差不齐,不但包含正版光碟中的国语音轨,有的还有草台班子的国配,质量高低不一,购买时也要注意。
这里还是建议大家有能力的在买自己喜爱影片的时候还是首选正版光碟,国语音轨品质有保证,而且正版更加有收藏价值。
下面谈谈这些光碟中国配的数字化提取以我近期购买的爱丽丝漫游仙境为例来简单介绍下 D9 国语音轨的提取。
首先是软件准备l ANYDVDANYDVD 是一种自动在后台解密 DVD 电影的驱动程序。
应用此软件后,这张 DVD 就变成没有加密保护与全区码了,这样我们才能够提取带有 CSS 加密保护的电影。
所以这个软件在破解正版 DVD 的时候必备,九区一般不需要使用。
这是他的界面,一般打开它就可以后台破解你光驱里面的 DVD 了。
l DVD Decrypter这个软件可以提取DVD 碟片中的视频,音轨及字幕文件,还可以破解一些加密简单的碟片,使用方便。
软件打开界面如下,把 DVD 放入光驱,在“模式”下拉菜单中选择 IFO 读取模式,如下图这样就可以看到此 DVD 碟片中的各个轨道的信息了,选择右侧“搜索媒体流”将“允许处理媒体流” 选中,这样下拉列表里面的媒体流文件我们就可以选取了。
这里包含了视频,音轨及字母文件,我们选择 Chinese音轨,其他的都勾选掉,然后将“demux”选中,点击左下角的按钮就可以提取了。
提取前我们也可 以设置保存路径,整个过程相当方便。
右侧这两个文件就是提取出来的原始音轨文件,根据国语的配置不同会是 AC3 或者 DTS 后缀的文件。
IFO 文件没有用,提取完成后我们可以把它删除了,将 AC3 文件重命名后就可以保存收藏了。
这里我们完成了国语音轨数字化提取的第一步,是不是很简单啊。
2、电视及网络译制片播放的国语录制音轨在电脑上录制电视节目的方法有很多种,大体上分为两种:录制模拟电视信号和录制数字电视信号。
录 制模拟电视信号有两种形式,一种是通过电视卡录制模拟全电视信号,另一种是通过数字电视机顶盒输出模 拟视频音频再通过视频采集卡进行录制。
录制数字电视信号根据数字电视的传播形式的不同分为三类,录制 地面数字电视、录制有线数字电视和录制卫星数字电视。
录制地面数字电视、录制有线数字电视需要配备支 持 DVBT和 DVBC 的电视卡或 USB 电视盒。
录制卫星数字电视需要配备支持 DVBS 或 DVBS2 的电视卡 或 USB 电视盒,也还可以使用 DM500S 来录制卫星数字电视。
录制数字电视和录制模拟电视相比,其优点是 可以将电视台传送的数字编码的视频音频原样不动的保存下来, 画质音质都是最佳的。
下面介绍使用DM500S 录制数字电视节目的方法。
BitControl.Digital TV Link 3.0 破解版软件有两个安装文件,一个是主程序bcDTVLink3.0.exe,第二个是 视频音频编解码软件。
l BitControl.Digital TV Link 的安装过程首先分别执行这两个安装程序 。
然后将 E48JY3ZLEWWCRFJJJEZP5G3EW.lic 和 X8BX6GRAW226AHVUT91YUAF36.lic复制到 C:\Program Files\Common Files\BitCtrl\Licenses 中,如下图所示。
接下来在安装 license文件,启动 License Manager。
点击“Install New”按钮,选择 Licenses 文件夹中的 E48JY3ZLEWWCRFJJJEZP5G3EW.lic 和 X8BX6GRAW226AHVUT91YUAF36.lic文件。
再点击 Activate All 按钮,进行软件激活。
l BitControl.Digital TV Link 的设置1. 点击 Configuration。
“STB“Address” 填入 DM500S 的 ip地址,2.在 Configuration对话框中选择 Plugins/DreamBox/Preferences。
Model”选择 DM500/DM600, “Streming Method”选择 TS, “Channels refresh interval”保持默认值即可。
3. 点击 Plugins/Recorder/Options 设置录像参数。
在“Filename”中点击 Browse按钮选择录像文件保存路 径。
在 Splitting Limits 中将 V olume和 Duration均设置成 ulimited,即不自动切分录像文件。
l用 BitControl.Digital TV Link 录像1. 首先将DM500S 卫星接收机通电,等待一分钟后再运行“开始/程序/bitcontrol/ Digital TV Link/ Digital TV Link” ,将启动 Windows Media Player,就可以在电脑上收看卫星电视节目了。
如果不喜欢Window Media Player 作为播放器,还可以使用其他支持流媒体的播放器,如KMP。
只需要 在媒体播放器中输入流媒体地址即可。
在任务栏右下角有 BitControl.Digital TV Link工具图标,用鼠标右边键点该图标后,弹出菜单,可以进行选电视频道、录制等操作。
2. 选择电视频道的方法是:点DreamBox 菜单,然后选择相应频道。
3. 录制电视节目的方法: 点 Record菜单后,即可将播放的电视节目保存到指定硬盘路径上。
l录像文件的提取数字电视视频编码为 MPEG2,音频编码为 mp2,文件格式为 MPEGTS 格式。
可以使用 tsMuxeR 或 TMPGEnc PLUS(俗称“小日本” )来分离视频和音频,再分别进行加工。
感谢 netfan提供此段录制音频教程经过上面两种办法,我们可以获得几乎100%的国语配音音轨,有的电影会同时存在好几版配音的现象, 例如公映国配、六区国配、央视重配及草台配音等等,这点大家在搜罗配音的时候也要注意加以标注,以便 日后查阅起来心中有数。
扩展阅读:DTS 简介DTS 公司(美国纳斯达克代码:DTSI)是一家专注于发展高品质娱乐体验的数码高科技公司。
目前,几乎所有的 5.1 声道环绕声处理器都使用了 DTS 的解码技术, 世界范围内也有数亿台消费电子产品使用了DTS 技术并通过了认证。
DTS 是“Digital Theatre System”的缩写,是“数字化影院系统”的意思,DTS 采用 CAC(Coherent AcousticsCoding,相干声学编码)方式工作,属于利用心理声学原理来对声轨进行编码的有损的数字压缩技术。
DTS 公司推出了多种声场技术,分别如下:a) DTS Digital Surround /DTS 5.1 数码环绕b) DTS ES / DTS 扩展环绕 6.1c) DTSNEO:6 立体声升级环绕技术d) DTSHD 高清格式e) DTSHD MasterAudioDTS 的优势:相对于杜比实验室的 AC3 杜比环绕声模式,DTS 系统不仅具有其横向定位环绕的功能, 更加强了纵深定位交叉效果。
DTS 具有更高的数据流量,重放音质的效果更好,加之采取高比特、高取 样率等措施,使之对原音重现的追求上更进一步,音色更加优美。
DTS 以 20bit 在 48kHz 的频率中工作,提供 6 声道信息,它所创造出的音域环绕声效果,能满足众多A V 发烧友最挑剔的要求。
听音者完全被这种气势所包围,真正体验 360 度数码环绕音响效果。
其震撼效果是 AC3 无法比拟的。
Dolby Digital 简介杜比环绕是由杜比实验室于 80 年代初研制成功的环绕声技术,先后有几种程式开发的是 Dolby Stereophonic System,它是为改善立体声质量而研制专业用系统,已在电影院中获得了极为广泛的 应用。
其后,杜比实验室又相继推出了 Dolby Surround System 和 Dolby Prologic Surround System, 作为家用视听环绕声系统打入市场,同样取得了巨大的成功。