上海绿茶 Win XP SP3 V12网吧专用加强版说明
青啤信息化系统升级I6PV12.0版本功能更新介绍
——青岛啤酒新扩建项目项目管理信息化系统升级
新中大济南分公司 2011.12.2
系统现状
• 硬件:现用服务器的内存、CPU以及硬盘空间都已严重不足, 已不能满足系统的正常运用。
• 软件:1、性能 随着系统使用项目数据的增加,在一个帐 套下建立多项目应用的处理模式导致数据全检索速度非常 慢。 2、数据筛选 目前系统中有在建及竣工项目共28个, 每个项目下都建有相关的目录树,包括所有在用以及过期 的资料,在系统中查找或者筛选的时候很不方便。
投资控制报表数据
• 报表数据全部从系统数据库中提取,生成的报表数据不能 进行随意的修改,以保证报表数据的准确严谨。
主要性能改进
数据资 料筛选
取ID机制
数据模式 录入调整
竣工管 理打开
附件上 传机制
谢谢
上传大附件
过程资料
• 竣工资料管理指的是在建项目在建设的过程中产生的工程资料
施工过程资料录入改造
➢提供一个结构化的表单(输出样式)自定义机制,可由用户 进行个性化定义 ,并建模应用,以方便进行施工过程中资料 的快速录入。
工程资料文 档模板
自定义表单 界面维护
施工资料文档 WORD界面维护
合同信息关联查看供方其他合同
兼职岗位是否更新角色权限由参数控制,可以选择更新和不更新。
附件上传机制改造
附件保存与单据 保存放在不同的 事务中,只有单 据保存成功才保 存附件,保证两
边数据一致
附件上传机制改造
➢已经存在的问题 • 附件保存二进制文件和单据保存是在一个事务内的,这样 附件比较大特别是外网用户时可能会长时间锁住某些表, 会导致程序卡死 • 存在事务嵌套可能(附件保存函数也要事务),如果附件更 新失败可能会导致已提交的数据无法回滚,出现数据不一 致
saitek x52 pro 安装手册说明书
The Profile Editor allows you to program the buttons on your controller to perform different actions within your games - this is especially useful if the game you are using does not have its own screen that allow s reconfiguring of your buttons.Getting Started1.Double-click on the Saitek Smart Technology icon the install left on your desktop.In the Profile Editor, choose the control to which you wish to assign a keyboard co mmand. You do this by left-clicking on 2.the control's cell in the control list on the right of the screen3.With the cursor flashing, type in the key commands and then click on the green tick mark when complete.Repeat this procedure for all the buttons you would like to program and then click File, Save at the top of the Profile Editor 4.window.5.Give the profile a name (it is recommended you name it after the game for which the profile is intended) and then click Save.To enable the profile either click the Profile Now icon at the top of the Profile Editor (it looks like a black and yellow 6.crosshair) or right-click on the controller icon in your taskbar and select the name of the profile from the pop-up list ofoptions.You will notice that when a profile is loaded that the controller icon in your task bar has a green square behind it, indicating 7.that a profile is currently loaded. If you wish to unload a profile simply right-cl i ck on the controller icon and click ClearProfile from the pop-up list of options.If you require more detailed assistance with using the SST Programming Software, cl i ck on Help at the top of the Profile Editor and then Manual.Technical SupportCan't get your controller to work - don't worry, we're here to help you!Nearly all the products that are returned to us as faulty are not faulty at all - t hey have just not been installed properly.If you experience any difficulty with this product, please first visit our website . The technical support area will provide you with all the information you need to get the most out of your product a nd should solve any problems you might have. If you do not have access to the internet, or if the website cannot answer your que stion, please contact your local Saitek Technical Support Team. We aim to offer quick, comprehensive and thorough technical support to all our users so, before you call, please make sure you have all the relevant information at hand.To find your local Saitek Technical Support Center, please see the Worldwide Suppor t link on the this disc.Conditions of WarrantyWarranty period is 2 years from date of purchase with proof of purchase submitted1.2.Operating instructions must be followed3.Specifically excludes any damages associated with leakage of batteriesNote: Batteries can leak when left unused in a product for a period of time, so it is advisable to inspect batteries regularly.Product must not have been damaged as a result of defacement, misuse, abuse, neglect, accident, destruction or 4.alteration of the serial number, improper electrical voltages or currents, repair, alteration or maintenance by any person or party other than our own service facility or an authorized service center, use or i n stallation of non-Saitek replacement parts in the product or the modification of this product in any way, or the incorporation of this product into any other products, or damage to the product caused by accident, fire, floods, lightning, or acts of God, or any use violative of instructionsfurnished by Saitek plc.Obligations of Saitek shall be limited to repair or replacement with the same or similar unit, at our option. To obtain repairs 5.under this warranty, present the product and proof of purchase (eg, bill or invoice) to the authorized Saitek TechnicalSupport Center (listed on the separate sheet packaged with this product) transporta tion charges prepaid. Any requirements that conflict with any state or Federal laws, rules and/or obligations shall not be enforceable in that particular territory and Saitek will adhere to those laws, rules, and/or obligations.When returning the product for repair, please pack it very carefully, preferably us ing the original packaging materials.6.Please also include an explanatory note.IMPORTANT: To save yourself unnecessary cost and inconvenience, please check carefully that you have read andfollowed the instructions in this manual.This warranty is in lieu of all other expressed warranties, obligations or liabilit ies. ANY IMPLIED WARRANTIES,OBLIGATIONS, OR LIABILITIES, INCLUDING BUT NOT LIMITED TO THE IMPLIED WARRANTIES OFMERCHANTABILITY AND FITNESS FOR A PARTICULAR PURPOSE, SHALL BE LIMITED IN DURATION TO THE DURATION OF THIS WRITTEN LIMITED WARRANTY. Some states do not allow limitations on how long an impliedwarranty lasts, so the above limitations may not apply to you. IN NO EVENT SHALL WE BE LIABLE FOR ANY SPECIAL OR CONSEQUENTIAL DAMAGES FOR BREACH OF THIS OR ANY OTHER WARRANTY, EXPRESS OR IMPLIED, WHATSOEVER. Some states do not allow the exclusion or limitation of special, incidental or consequential damages, so the above limitation may not apply to you. This warranty gives you specific legal r ights, and you may also have other rights which vary from state to state.This symbol on the product or in the instructions means that your electrical and el e ctronic equipment should be disposed at the。
VideoXpert Professional Eco 2 系列 快速入门指南说明书
VideoXpert Professional Eco2系列快速入门指南准备工作确保系统中每台电脑上(包括此服务器)的Microsoft操作系统已更新至最新版本,以解决已知的最新漏洞。
有关信息,可在上找到。
持续更新:l定期更新操作系统,以确保在补丁可用时立即修补新发现的漏洞。
l定期使用最新的补丁更新防病毒库。
初始系统配置您的视频管理系统(VMS)、VideoXpert Professional(VxPro)已安装所有驱动和软件,可以使用。
只要插入到您的系统,即可开始使用VxPro。
关于您的VxPro硬件和软件的更多信息,请转到/vxpro。
关于VxProl VxPro Server可记录视频、确定媒体路由、管理用户和权限,并执行您希望VMS执行的所有服务器侧操作。
l系统性能因环境而异(如:通道数量)。
l VxOpsCenter可在VxPro服务器上运行;但是,为获得更好的系统性能,请添加一个单独系统来运行VxOpsCenter客户机。
l VxToolbox是VxPro的管理应用程序;您可以通过VxToolbox配置VxPro服务器并查找摄像头。
设置您的系统1.打开服务器包装。
2.连接系统及其外设。
l将监视器连接至独立视频控制器(在定位后面板上的连接一节中的第10项);板载VGA已禁用。
l使用其中一个以太网端口将VxPro系统联网(在定位后面板上的连接一节中的第3项)。
l您也可以连接到iDRAC 端口(在定位后面板上的连接一节中的第55项),以远程配置和监控系统;但是,iDRAC端口将不会连接VxPro系统到网络。
3.将电源(在定位后面板上的连接一节中的第7项)连接到电气插座。
4.按下前面板上的电源按钮或使用iDRAC打开系统电源。
VxPro入门启动VxPro系统后,您将启动VxPro软件的完整功能60天试用版。
在60天期限到期之前,您必须安装许可证,以继续使用VxPro。
1.启动您的VxPro硬件。
Dell P2212H P2312H 显示器 用户指南说明书

Dell™ P2212H/P2312H 显示器用户指南将显示分辨率设置为 1920 x 1080(最大)的重要说明本文档中的信息会随时变更,恕不另行通知。
©2011 Dell Inc. 保留所有权利。
未经 Dell Inc. 书面许可,严禁以任何形式复制本文档之内容。
文中使用的商标:Dell和 DELL标志是 Dell Inc. 的商标;Microsoft 和 Windows 是 Microsoft Corporation 在美国及/或其他国家的商标或注册商标;Intel 是 Intel Corporation 在美国及其他国家的注册商标;ATI 是 Advanced Micro Devices, Inc. 的商标; ENERGY STAR是美国环保署的注册商标。
作为 ENERGY STAR 合作伙伴,Dell Inc. 认定本产品符合 ENERGY STAR 能效方面的标准。
本文中用到的其它商标和品牌名称均属其各自拥有人所有。
Dell Inc. 对于自己之外的商标和品牌名称没有任何专有利益。
型号 P2212Hb/P2312Ht2011 年 11 月 Rev. A01返回目录页设置显示器Dell™ P2212H/P2312H 显示器将显示分辨率设置为 1920 x 1080(最大)的重要说明要在使用 Microsoft® Windows®操作系统时获得最大显示性能,请按照以下步骤将显示分辨率设置为1920 x 1080像素:在 Windows XP 中:1. 右击桌面,然后单击属性。
2. 选择设置选项卡。
3. 按下鼠标左按钮将右移动移杆,将屏幕分辨率调整为 1920 x 1080。
4. 单击确定。
在 Windows Vista®或 Windows® 7 中:1. 在桌面上右击,单击个性化。
2. 单击更改显示设置。
3. 按下鼠标左按钮将右移动移杆,将屏幕分辨率调整为 1920 x 1080。
绿茶系统GHOSTXPSP32013V11终极纯净版
400pc系统声明本站收集的绿茶xp系统均来自绿茶官网通过xp系统原版制作,经过本站的安全验证,无商业广告验证,才提供给用户下载,可以放心使用。
一、绿茶系统更新提要:1、系统补丁更新到2011年11月16日2、Windows Media Player 升级为11.0;3、更新为flash_player_114、更新DirectX9.0C为最新版,更好的支持各类新游戏5、首次进入桌面智能判断并设置屏幕分辨率及智能开关NumLock数字小键盘6、自动判断识别并安装AMD双核CPU驱动及优化程序7、集成VB、VC++ 2005\2008运行库8、PE系统内核为Windows 2003(×86)简体中文企业版,内置了当今流行 SRS驱动Win2003(PE)环境内置工具(程序)如下:⑴、DiskGenius3.43分区及数据恢复⑵、GHOST映像浏览器⑶、WINDOWS系统引导修复⑷、VMware拖放支持⑸、WIN7-2008安装器⑹、安装PE到硬盘⑺、迷你虚拟光驱⑻、GdiskGUI大硬盘分区工具⑼、破解Windows登陆密码⑽、恢复XP到C盘(支持隐藏分区)⑾、手动GHOST⑿、自动恢复XP到C盘⒀、自动将硬盘分四区并恢复XP到C盘⒁、一键恢复XP自定义操作⒂、Recuva数据恢复⒃、磁盘分区医生PTDD3.5等等……三、绿茶系统版本特点:1、系统安装全过程约5分钟,部分机子可达3分钟,高效的装机过程!2、系统兼营性、稳定性、安全性较均强!完全无人值守自动安装。
3、系统通过微软正版认证系统在线认证,支持在线升级更新!4、集成了自2000-2011年流行的各种硬件驱动,首次进入系统即全部硬件已安装完毕。
5、通过数台不同硬件型号计算机测试安装均无蓝屏现象,硬件完美驱动!6、系统经过优化,启动服务经过仔细筛选,确保优化的同时保证系统的稳定,内存消耗低。
实用,反应迅速7、本光盘拥有强大的启动工具,包括一键恢复、GHOST、磁盘坏道检测、PQ、DM、XP密码重设等等,维护方便。
XP-329m中文说明书
表示 RECORD 按钮。
2
1. 使用须知
(3) 术语说明
本使用说明书中所用术语的含义如下。
“气味”
气味有“香气”和“臭气”之分,此处将“香气”和“臭气”合称为“气味”。
“清洁空气”
是指无气味的清洁空气。 选购件中有活性炭过滤器。
“基线调整”
是指测量之前吸取清洁空气,调整测量基准的基线。
3
1. 使用须知
6
2. 各部件的“名称”和“功能”
(2) 液晶显示
888
№
显示
内容
1
888
打开电源后进行 10 秒钟的仪器预热运转。
2 025(例) 以 3 位数值显示测量值。传感器输出低于零基时,显示负数值。(−025(例))
№
显示
内容
1
PEAK
显示峰值期间显示。
2
r.
向存储器中开始记录测量值时显示。正在记录时闪烁。
3
以条形图显示存储器余量。
PEAK
r .123
操作按钮
PEAK HOLD
PEAK HOLD
№
显示
1
内容 约 3 小时以上(新品电池时约 12 小时)
2
约 1 小时以上
电池余量
3
(大致可用时间※) 约 15 分钟以上
4 ※ 使用碱性干电池 (20℃) 时
约不足 15 分钟(电池图标框闪烁、蜂鸣器断断续续鸣响)
⑧
⑤
⑥
№
名称
①
排气过滤器 (吸取口)
② 排气口
③ 液晶显示部
④ POWER 按钮
⑤ PEAK HOLD 按钮 ⑥ RECORD 按钮 ⑦ 基线调整旋钮 ⑧ 电池盒
联想 Lenovo V17 G3 IAP 用户指南

用户指南Lenovo V17Gen3用前必读使用本文档及其支持的产品之前,请务必先阅读和了解以下信息:•《常规安全与合规性声明》•《安全与保修指南》•《设置指南》第一版(2022年3月)©Copyright Lenovo2022.有限权利声明:如果数据或软件依照美国总务署(GSA)合同提供,则其使用、复制或披露将受到GS-35F-05925号合同的约束。
目录关于本指南 (iii)第1章认识您的计算机 (1)前视图 (1)俯视图 (2)左视图 (3)右视图 (4)底视图 (5)功能部件和规格 (6)USB传输速率声明 (7)运行环境 (7)避免使身体持续接触特定发热部分 (8)第2章开始使用您的计算机 (9)使用Windows (9)Windows帮助信息 (10)Lenovo Vantage和联想电脑管家 (10)Novo按钮菜单 (10)打开Novo按钮菜单 (10)与计算机交互 (11)键盘热键 (11)数字小键盘 (12)第3章探索您的计算机 (13)管理电源 (13)检查电池状态 (13)为电池充电 (13)设置电源按钮行为 (13)电源计划 (13)设置性能模式 (14)更改UEFI/BIOS Setup Utility中的设置..14 UEFI/BIOS Setup Utility简介 (14)打开UEFI/BIOS Setup Utility (14)选择引导设备 (14)更改热键模式 (15)在UEFI/BIOS Setup Utility中设置密码..15密码类型 (15)设置管理员密码 (15)更改或删除管理员密码 (16)设置用户密码 (16)启用开机密码 (16)设置硬盘密码 (16)更改或删除硬盘密码 (17)第4章帮助和支持 (19)常见问题 (19)自助资源 (19)CRU是什么? (20)适用于您产品型号的CRU (21)致电Lenovo (22)联系Lenovo之前 (22)Lenovo客户支持中心 (22)购买附加服务 (23)附录A声明和商标 (25)©Copyright Lenovo2022iii用户指南关于本指南•本指南适用于下面列出的Lenovo产品型号。
XP372 使用手册

JX-300XP系统XP372使用手册浙江中控技术股份有限公司声 明⏹ 严禁转载本手册的部分或全部内容。
⏹ 在不经预告和联系的情况下,本手册的内容有可能发生变更,请谅解。
⏹ 本手册所记载的内容,不排除有误记或遗漏的可能性。
如对本手册内容有疑问,请与我公司联系,联系邮箱:SMS@ 。
商 标中控、SUPCON 、SPlant、 Webfield 、ESP-iSYS 、MultiF 、InScan 、SupField 以上商标或标识均是浙江中控技术股份有限公司已经注册或已经申请注册或正在使用的商标和标识,拥有以上商标的所有权,未经浙江中控技术股份有限公司的书面授权,任何个人及企业不得擅自使用上述商标,对于非法使用我司商标的行为,我司将保留依法追究行为人及企业的法律责任的权利。
文档标志符定义警告:标示有可能导致人身伤亡或设备损坏的信息。
WARNING : Indicates information that a potentially hazardous situation which, if not avoided, could result in serious injury or death.电击危险:标示有可能产生电击危险的信息。
RISK OF ELECTRICAL SHOCK: Indicates information that Potential shock hazard where HAZARDOUS LIVE voltages greater than 30V RMS, 42.4V peak, or 60V DC may be accessible.防止静电:标示防止静电损坏设备的信息。
ESD HAZARD: Indicates information that Danger of an electro-static discharge to which equipment may be sensitive. Observe precautions for handling electrostatic sensitive devices注意:提醒需要特别注意的信息。
beta3+V122a+音箱+使用说明书
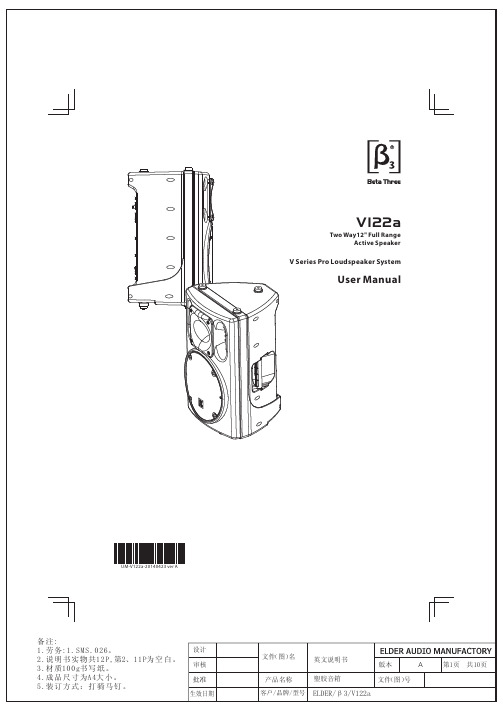
V122aTwo Way12" Full RangeActive SpeakerV Series Pro Loudspeaker SystemUser ManualUM-V122a-20140423 ver A备注:设计11. 2. 3. 4. 5. 6. 7. 8. 9. 10. Read the instruction first before using this product.Pay attention to all warnings.Obey all operating instructions.Do not expose this product to rain or moisture.Do not block any ventilation openings. Install according to instructions .Do not install this product near any heat source, such as , heater, burner, or any other equipment with heat radiation .Only use spare parts by manufacturer.Pay attention to the safety symbol on the of the cover.manual Please keep this manual for future reference Clean this equipment with a dry cloth.manufacturer's a supplied the outside SAFETY INSTRUCTIONSPLEASE READ THIS MANUAL FIRSTThank you for a buyin product. Read this manual first as it will help you operate the system properly. Please keep this manual for future reference.g WARNING:This product must be installed by professionals. When using hanging brackets or rigging other than those supplied withthe product, please ensure they comply with the local safety codes.The exclamation point within an equilateral triangle is intended to alert you to the presence of important operating and servicing instructions.ATTENTION: Don't refit the system or spare parts without being authorized as this will .void the warranty WARNING: Don't (such as candles) the equipment.place naked flames close toV122a2CONTENT4533334556667CONTENTFeatures Description Applications Frequency Response and THD Curve Curve AMPLIFIER MODULEINSTALLATIONMounting Accessories Installation Reference INTRODUCTIONTechnical Sheet2D DimensionTECHNICAL SPECIFICATIONAmplifier Module V Series Pro Loudspeaker SystemProduct information is subject to change without prior notification. Please visit for latest updates.V122a3V122aV Series Pro Loudspeaker SystemINTRODUCTIONApplicationsMultifunctional hallAuditorium Church Conference room Small performance Two Way12" Full Range Active SpeakerFeaturesDescriptionV122a V series is designed for portable and installed applications. The integrated polymer PVC cabinet design ensures durability and full natural high performance sound.β3 V122a is a full rang e active speaker wit h a 500W Class D amplifier module. The high powered 12" woofer delivers powerful low frequency and the 34mm Titanium compression driver delivers high definition mid/high frequencies. .Compact light weight design, versatile sound reinforcement.High output SPL and sensitivity.Built-in digital amplifier provides abundant energy.Heavy duty protective front grill.Pole mount socket for speaker stand.Suitable as a main system with or without sub speaker.4V122a100V-240V ~ 50/60HzRATED POWE R CONS UMP TION:100WONOFFElder Audio Manufacture Co.,Ltd.S/N:RoHSCAUTIONAC INPUTPOWER PEAKINPUT OUTPUTLINEMICMICLINE VOLUME BASSTREBLEINPUT SELECTOR8-15+15-15+15012" ACTIVE LOUDSPEAKERV122a1 3 42 5 678910116. Line/microphone selector7. Power supply input8. Treble control9. Line output10. Line/microphone input 11. Power ON/OFF switchl1. Bass control2. PEAK indicator3. Volume control4. Line input signal indicator5. Microphone input signal indicatorV Series Pro Loudspeaker SystemAMPLIFIER MODULEAmplifier Module6V122a20000100001000100502018010890100110120130S e n s i t i v i t y (d B )80Frequency (Hz )36-36-108-180V Series Pro Loudspeaker SystemTECHNICAL SPECIFICATIONSpecificationFrequency response(-3dB):Max.SPL:Transducer: Input:Connector:Input impedance(line):Input level:Input overloading level: Wire connection: Heat radiation: Power cable:55Hz-20kHz 128dB 1 12" Woofer×Channel one (Mic/Line) balanced inputXLR for input, XLR for output20Kohm balanced input, 10Kohm unbalanced input 0 dBV (0.775V rms, 1.0 V peak)Line-100Hz Maximum input level 8 V peakpin 1: ground; pin2: signal +; pin3: signal -Forced air-cooled drives IEC 3 pin power connector 085×750Dispersion(H ×V):1 34mm × Compression Driver Safety voltage range: Amplifier power output:Cabinet:Handle: Painting: Cabinet dimension(W D H): ××Packing dimension : (W ×D ×H)Net weight:Gross weight:AC 100V-240V~50Hz/60Hz 500WOne sidePowder coated grillFlying/ Mounting accessories :Hanging point,supporting seatPolypropylene injection mouldingRated impedance:8 OhmsFrequency response curve & THD curveFrequency Response THD17.0kg(37.4 lbs)19.5kg(42.9 lbs)415×385×629mm(16.3×15.2×24.8in)465×435×680mm(18.3×17.1×26.8in)415mm[16.3in]7629m m[24.8i n ]385m m[15.2i n ]V122aV Series Pro Loudspeaker SystemTop viewFront view Side view Back viewBottom view2D DimensionTECHNICAL SPECIFICATIONNotes:。
诺德尔系统表
V15-夏版 极速版 [2011-08-27]
SP3 V18夏版 [2011-08-14]
2011-200 极速版 [2011-07-04]
V17-夏版SP3 [2011-06-21]
V16-夏版(PRO) [2011-05-18]
诺德尔网吧整体解决方案 [2006-01-13]
新春正式版系统优化软件发布(集成最新软件)! [2005-12-20]
诺德尔网吧系统新体验! [2005-12-11]
影视系统黄金版重大升级公告! [2005-11-24]
诺德尔CS服务器正式版出炉 [2005-10-29]
2003 EE V2客户机版 [2009-04-16]
多用途V6 [2009-04-08]
2003 sp2 v2 [2009-03-25]
2003 se V2客户机版 [2009-03-25]
Home SP2 V25极速网吧版 [2009-03-19]
SP2 V2.5完美版 [2009-03-06]
多用途版V5 [2009-02-13]
SP3 V2.5 [2009-02-11]
Sp3仿Win7完美版 [2009-01-20]
春节放假通知 [2009-01-20]
HOME SP3 DX10 V2极速年度特别版 [2009-01-11]
SP3 V6网吧完美版 [2009-12-02]
多用途V7 [2009-11-18]
2003server sp2 V3 [2009-11-09]
SP3 V5极速版 [2009-10-17]
SP3 V5网吧完美版 [2009-09-18]
SP2 V4 网吧专用极速版 [2009-08-13]
WinCC V12 SP1 Update 5 产品说明书

Readme Runtime Advanced ReadmeWinCC V12 SP1 Update 5Siemens AGDivision Digital Factory Postfach 48 48 Order number: WinCC V12 SP1 Update 2Ⓟ 08/2015 Subject to changeCopyright © Siemens AG 2014.All rights reservedLegal informationWarning notice systemThis manual contains notices you have to observe in order to ensure your personal safety, as well as to preventdamage to property. The notices referring to your personal safety are highlighted in the manual by a safety alertsymbol, notices referring only to property damage have no safety alert symbol. These notices shown below aregraded according to the degree of danger.DANGERindicates that death or severe personal injuryindicates that death or severe personal injuryindicates that minor personal injury can result if proper precautions are not taken.If more than one degree of danger is present, the warning notice representing the highest degree of danger willbe used. A notice warning of injury to persons with a safety alert symbol may also include a warning relating toproperty damage.Qualified PersonnelThe product/system described in this documentation may be operated only by personnel qualified for the specifictask in accordance with the relevant documentation, in particular its warning notices and safety instructions.Qualified personnel are those who, based on their training and experience, are capable of identifying risks andavoiding potential hazards when working with these products/systems.Proper use of Siemens productsNote the following:Siemens products may only be used for the applications described in the catalog and in the relevant technicalTrademarksAll names identified by ® are registered trademarks of Siemens AG. The remaining trademarks in this publicationmay be trademarks whose use by third parties for their own purposes could violate the rights of the owner.Disclaimer of LiabilityWe have reviewed the contents of this publication to ensure consistency with the hardware and softwaredescribed. Since variance cannot be precluded entirely, we cannot guarantee full consistency. However, theinformation in this publication is reviewed regularly and any necessary corrections are included in subsequenteditions.Table of contents1 Validity (5)2 Improvements in Update 5 (7)3 Improvements in Update 2 (9)Readme Runtime AdvancedTable of contentsReadme Runtime AdvancedValidity 1 ValidityThis update is valid for the following products:●WinCC RT Advanced V12 SP1NoteIf you modify your system after installing the update with the product DVD, you will have toperform the update again.Readme Runtime AdvancedValidityReadme Runtime AdvancedImprovements in Update 5 2 Update 5 contains the following improvements and changes:Security improvementsSecurity improvements in the communication from the HMI system to the controller and thepassword memory in the project.For details, see Advisory:/innovation/pool/de/forschungsfelder/siemens_security_advisory_ssa-487246.pdf(/innovation/pool/de/forschungsfelder/siemens_security_advisory_ssa-487246.pdf)Readme Runtime AdvancedImprovements in Update 5Readme Runtime AdvancedImprovements in Update 2 3 Update 2 contains the following improvements and changes:System diagnostics performanceStability and resource consumption in Runtime have been improved.Readme Runtime AdvancedImprovements in Update 2Readme Runtime Advanced。
网吧免费上网攻略必备

现在总结一下,有些朋友会问我,我们学校的破机房或是学校附近的破网吧不是用的pubwin也不是用的万像,是用的其他杂牌记费软件比如说美萍记费软件,佳星网吧记费软件之类的。网管软件都是万变不离其宗,都有服务端客户端,反正都在一个局域网内,自己想想办法琢磨琢磨就应该会知道怎么搞了,比如说把局域网的收费机器给它妈的其他机器切断,用网络执法官或是网络剪刀手,这个大家都会用吧,不用我教了吧,不过这招有点狠,网吧老板和你没有什么深仇大恨你也没必要这样整人家,记得给自己留条后路,要不就把收费软件直接给他卸了试试,或者把自己的局域网协议关闭,让它不给吧台的机器通讯。方法多的是,自己怎么玩就要看自己摸索了。
现在说说第四种,不算是一种方法,可以配合我写出来的第二种方法来破,就是出现pubwinEP登陆界面的时候,如果有的网吧没有任务管理器的结束进程,给你禁用的话,用这个方法把他的登陆界面给他去掉,方法如下:输入法切换到智能ABC的状态下,然后输入V,这时按键盘上的这个键↑,然后在按delete ,之后回车,这个时候你会看到显示屏上会出现,~~~内存错误,pubwinep将关闭,点确定.OK了!这是利用微软的一个啥J8漏洞我也不知道,反正这漏洞一直存在,微软的人知道有这漏洞也没有补,可能是因为这破漏洞是天生存在的他们没那本事补。然后再按第二种方法找出pubwinEP目录删除那几个文件在禁用网络连接再注销再用空密码进去。就OK啦。。。
咱再说说第三种第四种破PubwinEP的方法,第三种是利用pubwin ep的注册和网吧在局域网管理上的漏洞进行破解,不知道这是哪个高人写出来的,这是我在网上查到的,我自己没有测试,好象这位大侠的方法拐弯抹角还死球麻烦。菜!有兴趣的朋友可以去试试,第方法如下:首先你要了解网吧的局域网的网段设置。譬如一个拥有主机300台的网吧。ip的设置以192.168.1开头的,每两百台进位。那么在第二百号机子的ip就是192.168.1.200 第201的ip就是192.168.2.1 大家都知到ip的规则是从192.168.0.0--192.168.0.255,那么就有55个ip端给大家空出来的。那么我们就用这些ip端进行破解。准备的东西就是一台断网安装pubwinep客户端后,相应文件夹下的全部文件,保存起来。你可以压缩起来保存到qq里。我用u盘保存的。好那么我现在开始破解。开机后在任务管理器中将pubwinep相应的任务结束掉(如果被屏蔽掉的话自己想办法)注意:这里以后的动作要快最好在3分钟内结束动作,要不然pubwinep的会将机子蓝屏关机的。打开网络连接,将本地连接停用,顺手将ip改掉成空于的ip端。在把你准备好的pubwinep的客户端文件随变复制到那,运行punwinep的运行文件,这时就会弹出pubwinep的管理界面。这时的用户名是admin,没有密码就可以登陆了。登陆后在管理项将pubwinep退出(这里还是没有密码的),将本地连接启用。这时还不能上网,要延迟几分钟后才可以pubwinep的客户端文件随变复制到那,运行punwinep的运行文件,这时就会弹出pubwinep的管理界面。这时的用户名是admin,没有密码就可以登陆了。登陆后在管理项将pubwinep退出(这里还是没有密码的),将本地连接启用。这时还不能上网,要延迟几分钟后才可以。
Philips EasyTouch Plus 1600W Garment Steamer说明书

Philips EasyTouch PlusGarment Steamer1600W, 32g/min3 steam settings1.6L Detachable tankGC514/36Easy crease removal every dayThanks to essential steaming solutionsPhilips EasyTouch Plus garment steamer is designed for easy crease removal every day.With a wide range of essential steaming solutions, it is a perfect appliance for quick touch-ups, delicate and difficult to iron clothes.More efficiency, less effort•Cover more in one stroke with 25% larger* steam plate•3 steam levels for different kinds of fabric•Adjustable pole for various height settings•Special garment hangerReliable and safe•Safe to use on all garments•Glove for extra protection during steaming•Easy de-calc function for longer product lifetimeEasy crease removal•Large detachable water tank for easy refill anytime•Powerful continuous steam for efficient wrinkle removalHighlights25% larger steam plate*This EasyTouch Plus steamer is equipped with 25% larger steam plate* compared to the predecessor models. This allows you to cover more fabric area in one stroke and therefore you can be more efficient in steaming your garment.3 steam levelsSet your preferred steam level for optimal results on different kinds of fabric.Adjustable poleIntegrated adjustable pole for hanging your garments while using the steamer. It is collapsible for easy storage.Special garment hanger Special garment hanger lets you easily hang your garments like shirts, dresses and trousers while using the steamer.Powerful continuous steamPowerful continuous steam is blown through the nozzles, enabling you to remove creases with only a few strokes.Large detachable water tankLarge, detchable, transparent water tanksuitable for a lond steaming sessions. Easy refill with large filling hole.Safe to use on all garmentsThe steamer is safe to use on all fabrics. It is a great solution for delicate fabrics like silk and cashmere.Easy de-calc functionProlong the lifetime of your appliance by using the Easy de-calc descaling function regularly.Glove for extra protectionIncluded is a glove that protects your hand during steaming.Issue date 2023-07-17 Version: 1.1.1EAN: 87 10103 83082 5© 2023 Koninklijke Philips N.V.All Rights reserved.Specifications are subject to change without notice. Trademarks are the property of Koninklijke Philips N.V. or their respective owners.SpecificationsConsumer Trade Item•Height:36.3•Width: 41.3•Length: 34.7•Net Weight: 2.946•Gross Weight: 4.419•GTIN: 8710103830825•Country of origin: CN•Harmonized system code: 851679Outer Carton•Height:36.3•Width: 34.7•Length: 41.3•Gross Weight: 4.419•GTIN: 18710103830822Easy to use•Safe on all ironable fabrics: Even delicates like silk •Water tank capacity: 1600 ml•Detachable water tank•Tap water suitable•Integrated power plug•Silicone steam hose Accessories included•Adjustable pole•Garment hanger•Glove for extra protectionGuarantee•2 year worldwide guaranteeFast crease removal•Power: 1600 W•Continuous steam: 32 g/min•Voltage: 220-240 V•Vertical steam•Ready to use: <1 minute(s)•Variable steam levels•Variable steam: 3 levelsGreen efficiency•Product packaging: 100% recycable•User manual: 100% recycled paperScale management•Descaling and cleaning: Easy De-calc*Compared to the predessesor model GC506。
V12 操作手册
旋钮↑↓ --↑使倍率变大 --↓使倍率变小
--↑↓在设置模式下:选择菜单项
旋钮↑↓带有按键功能 --↑向上调焦 --↓向下调焦 --轻按:切换调焦速度模式 --↑↓在设置模式下:选择菜单项
记忆 1/记忆 2 键 --轻按使显微镜到设定好的倍率上 --长按 2 秒(哔声确认)存入当前倍率值
记忆 1/记忆 2 键 --轻按使显微镜到设定好的焦距上 --长按 2 秒(哔声确认)存入当前焦距值
显微镜调整参考图 4.1 将样品摆放在圆形载物台中心(位置 3); 4.2 调整位于目镜上的调焦环到合适的位置(位置 2),否则将白色刻线对准“0”位置; 4.3 调整镜筒,选择合适的视高(位置 1),最大角度 120 度;找到合适的瞳距,你将会通过
目镜看到完全重叠的一个亮环; 注意:请确保目镜已正确插入镜筒。
4.4 握住镜筒调整视角,范围从 5 度到 45 度; 4.5 转动旋钮(位置 4)打开照相光圈; 4.6 首先,设定最小放大倍率(位置 5),以便找到样品位置; 4.7 转动调焦轮(位置 6)将感兴趣的样品部位调焦清晰; 4.8 设定到最大倍率(位置 5),在高倍情况下,原来清晰的部位可能模糊,中心位置也可能
请在 HIP 控制器上设定当前物镜。(参照本文后面部分) 5、 Human Interface Panel (HIP)控制器。
部件图 HIP 控制器可以用来操作显微镜(无 SYCOP 控制器情况下)。一个 HIP 控制器控制电 动调焦装置(部件 15),另一个控制镜体变倍(部件 17)。如果 SYCOP 控制器连接,那么 HIP 控制器就没有必要使用,只用于功能的延伸。 HIP 控制器显示屏上可以显示两条独立信息。 它上面有四个功能键:Mode(模式), (待机键),Mem1(记忆 1)和 Mem2(记忆 2)。 HIP 控制器上旋钮可以上下滑动以及按压。 有两个可选模式:Basic Mode(基本模式)用于显微镜操控,Setting Mode(设置模式)用于参 数设置。参考下图:
Push2TV 适配器用户指南说明书
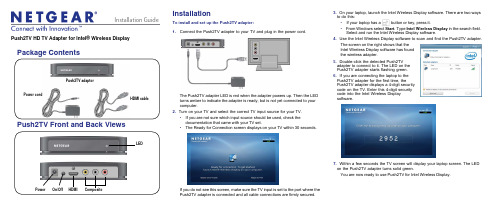
Installation GuideInstallationTo install and set up the Push2TV adapter:1.Connect the Push2TV adapter to your TV and plug in the power cord.The Push2TV adapter LED is red when the adapter powers up. Then the LED turns amber to indicate the adapter is ready, but is not yet connected to your computer.2. Turn on your TV and select the correct TV input source for your TV.• If you are not sure which input source should be used, check the documentation that came with your TV set.• The Ready for Connection screen displays on your TV within 30 seconds.If you do not see this screen, make sure the TV input is set to the port where the Push2TV adapter is connected and all cable connections are firmly secured.3. On your laptop, launch the Intel Wireless Display software. There are two ways to do this:• If your laptop has a button or key, press it.• From Windows select Start . Type Intel Wireless Display in the search field. Select and run the Intel Wireless Display software.4. Use the Intel Wireless Display software to scan and find the Push2TV adapter.The screen on the right shows that the Intel Wireless Display software has foundthe wireless adapter.5. Double-click the detected Push2TV adapter to connect to it. The LED on the Push2TV adapter starts flashing green. 6. If you are connecting the laptop to the Push2TV adapter for the first time, thePush2TV adapter displays a 4-digit security code on the TV. Enter this 4-digit security code into the Intel Wireless Displaysoftware.7. Within a few seconds the TV screen will display your laptop screen. The LED on the Push2TV adapter turns solid green.You are now ready to use Push2TV for Intel Wireless Display.Push2TV HD TV Adapter for Intel® Wireless DisplayPackage ContentsPush2TV Front and Back ViewsHDMI cablePush2TV adapterPower cordHDMI LEDPower On/Off CompositeNovember 2010©2010 by NETGEAR, Inc.. All rights reserved. NETGEAR and the NETGEAR logo are registered trademarks of NETGEAR, Inc. in the United States and/or other countries. Other brand and product names are trademarks or registered trademarks of their respective holders. Information is subject to change without notice.This symbol was placed in accordance with the European Union Directive 2002/96 on the Waste Electrical and Electronic Equipment (the WEEE Directive). If disposed of within the European Union, this product should be treated and recycled in accordance with the laws of your jurisdictionimplementing the WEEE Directive.Adjusting Your TV DisplayYou can adjust the image display on the TV screen:• To change how the image fits on the TV screen, on the Intel Wireless Display,click the Properties button. Then click the Resize TV picture button and adjust the picture using the plus or minus symbols.• To remove black bars displayed on the sides of your TV screen, open thegraphics properties and change the resolution to 1280x720. This might result in black bars on the laptop. If you want to get rid of those, open up the graphics properties and deselect the preserve aspect ratio option.FAQs1. Can I display different content on the TV while I’m using my laptop?Yes, you need to change your screen display setting to extend mode.2. Can I close the laptop lid and still use Intel Wireless Display?Closing the laptop lid may put the system to sleep or turn it off and, as a result, close the connection. To change this, from Windows select Start > Search , type Closing the lid in the search field, and change the settings to do nothing .3. Why can’t I play some DVD and Blu-ray discs?Many discs have copy protection mechanisms that prevent playback on Intel Wireless Display before software version v2.1.0.0. However, personal content you have burned to a disc will play.4. Can I mute my laptop and still watch videos with sound?Yes. Even if your laptop has sound muted, the sound for the media you are playing will play on your TV. 5. Why do text and graphics look blurry or fuzzy on the TV?If you are using composite cables, you might find it difficult to view text and some graphics. You should be able to view videos fairly well though. HD TV is recommended for the best viewing experience. 6. Which wireless routers is Intel Wireless Display compatible with?If you are connecting to the 5 GHz network, Intel Wireless Display will work only with Wireless WiFi Software version 14.0 or newer. Intel Wireless Display is compatible with any 2.4 GHz Wi-Fi Router. If your router supports both 2.4 and 5 GHz, and you are using an earlier software version, connect the laptop to the 2.4 GHz wireless network.7. How can I fix the delay in the cursor?You cannot change the delay, but you can turn off the cursor on the TV and use the laptop to navigate. To do this, connect to the adapter and click Properties . 8. What should I do if I get a Windows Firewall security alert?From Windows select Start > Search and type in the search field Allow a program through a Windows Firewall . Add WiDiApp and Wireless PAN DHCP Server to the list of allowed programs. Make sure both private andpublic check boxes are selected. If you are not using Windows Firewall, consult your firewall user’s manual.9. What should I do if the TV stops showing my laptop screen?Use Intel Wireless Display to check the wireless connection and reconnect to the Push2TV adapter if necessary. If the situation continues, try moving your laptop closer to the Push2TV adapter or place it in a location with a clear line of sight to the Push2TV adapter. Changing the channel of your Wi-Fi router might also help.For more information, launch Intel Wireless Display and select Help . 10. How can I restore factory settings to the Push2TV adapter?The Restore Factory Settings button is located on the bottom of the unit.Technical SupportThank you for selecting NETGEAR products.After installing your device, locate the serial number on the label of your product and use it to register your product at /register . Registration isrequired before you can use the telephone support service. Registration through the NETGEAR website is strongly recommended. Go to for product updates and Web support . For additional information about setting up, configuring, and using your Push2TV adapter, see the User Manual . For information about updating your Intel Wireless Display software, see /go/wirelessdisplayupdateFor complete DoC please visit the NETGEAR EU Declarations of Conformity website at: /app/answers/detail/a_id/11621/。
昂达三茗网络管加婆V2[1].0用户手册
![昂达三茗网络管加婆V2[1].0用户手册](https://img.taocdn.com/s3/m/b21dbb2de2bd960590c677f7.png)
昂达三茗网络管家婆V2.0用户使用手册西安三茗科技有限责任公司目录一昂达三茗网络管家婆V2.0 安装、使用注意事项 (3)安装使用前注意事项 (3)使用注意事项 (4)二昂达三茗网络管家婆V2.0功能介绍 (5)硬盘保护模块 (5)网络克隆模块 (6)网络管理模块 (7)三硬盘保护模块使用指南 (8)硬盘保护模块使用指南 (8)硬盘保护模块安装指南 (8)准备工作: (8)安装驱动程序: (9)安装底层保护软件: (9)硬盘保护模块维护指南 (14)“硬盘保护” 快捷键使用说明 (16)快速恢复数据 (16)快速保存数据 (17)CMOS数据的保存与还原 (17)四网络克隆模块使用指南 (19)Mar8040与8056网克引导方法 (19)普通克隆 (20)非保护状态下的网络克隆: (20)保护状态下的网络克隆: (21)普通克隆下的功能及设置: (23)开始克隆: (24)CMOS克隆 (28)IP分配克隆 (29)增量克隆 (31)网络克隆参数设置 (32)五网络管理模块使用指南 (34)昂达三茗网络管家婆V2.0的网络管理与监控(被控端) (34)昂达三茗网络管家婆V2.0的网络管理与监控(控制端) (37)网络管家婆V2.0 (38)网络功能 (40)系统管理 (46)查看 (49)帮助 (49)一昂达三茗网络管家婆V2.0 安装、使用注意事项安装使用前注意事项❑请确认您的计算机至少安装有一套Windows系列操作系统,并能正常运行;❑请确认在安装本产品前未曾安装使用同类产品,或已经彻底卸载其它同类产品;❑请在安装本产品前对硬盘各分区进行磁盘表面扫描及碎片整理;❑请将您的计算机硬盘内重要资料进行备份,避免操作失误给您带来的不必要的意外损失;❑如果您的计算机安装了多操作系统,并安装了其它多重引导程序(或软件),请谨慎使用本产品;❑“硬盘保护模块”仅对第一块启动的物理硬盘提供保护,如果您的计算机安装有多块物理硬盘,请暂时将其它不需要保护的硬盘卸载掉,待保护程序安装完毕后再挂起其它硬盘。
Philips 223V5 电子用户指南说明书

/welcome 223V5EN User manual 1 Customer care and warranty 26Troubleshooting & FAQs31T able of Contents1. Important (1)1.1 Safety precautions and maintenance (1)1.2 Notational Descriptions (2)1.3 Disposal of product and packingmaterial (3)2. Setting up the monitor (4)2.1 Installation (4)2.2 Operating the monitor (5)2.3 Remove Base Stand and Base (7)3. Image Optimization (9)3.1 SmartContrast (9)3.2 Philips SmartControl Lite (9)4. T echnical Specifications (16)4.1 Resolution & Preset Modes (18)5. Power Management (19)6. Regulatory Information (20)7. Customer care and warranty (26)7.1 Philips’Flat Panel Monitors PixelDefect Policy (26)7.2 Customer Care & Warranty (28)8. T roubleshooting & FAQs (31)8.1 Troubleshooting (31)8.2 General FAQs (32)1. ImportantThis electronic user’s guide is intended for anyone who uses the Philips monitor.T ake time to read this user manual before you use your monitor.It contains important information and notes regarding operating your monitor.The Philips guarantee applies provided the product is handled properly for its intended use, in accordance with its operating instructions and upon presentation of the original invoice or cash receipt,indicating the date of purchase,dealer’s name and model and production number of the product.1.1 Safety precautions and mainte-nanceWarningsUse of controls,adjustments or procedures other than those specified in this documentation may result in exposure to shock,electrical hazards and/or mechanical hazards.Read and follow these instructions when connecting and using your computer monitor. Operation• Please Keep the monitor out of direct sunlight, very strong bright lights andaway from any other heat source. Lengthy exposure to this type of environment may result in discoloration and damage to themonitor.• Remove any object that could fall into ventilation holes or prevent proper cooling of the monitor’s electronics.• Do not block the ventilation holes on the cabinet.• When positioning the monitor, make sure the power plug and outlet are easily ac-cessible.• If turning off the monitor by detaching the power cable or DC power cord, wait for 6 seconds before attaching the power cableor DC power cord for normal operation.• Please use approved power cord provided by Philips all the time. If your power cordis missing, please contact with your localservice center. (Please refer to CustomerCare Consumer Information Center)• Do not subject the monitor to severe vibration or high impact conditions duringoperation.• Do not knock or drop the monitor during operation or transportation. Maintenance• To protect your monitor from possible damage, do not put excessive pressure on the LCD panel. When moving your moni-tor, grasp the frame to lift; do not lift themonitor by placing your hand or fingers on the LCD panel.• Unplug the monitor if you are not going to use it for an extensive period of time.• Unplug the monitor if you need to clean it with a slightly damp cloth. The screen may be wiped with a dry cloth when the power is off. However, never use organic solvent, such as, alcohol, or ammonia-based liquids to clean your monitor.• T o avoid the risk of shock or permanent damage to the set,do not expose themonitor to dust,rain,water,or excessivemoisture environment.• If your monitor gets wet,wipe it with dry cloth as soon as possible.• If foreign substance or water gets in your monitor,please turn the power off immedi-ately and disconnect the power cord.Then,remove the foreign substance or water,and send it to the maintenance center.• Do not store or use the monitor in loca-tions exposed to heat,direct sunlight orextreme cold.• In order to maintain the best performance of your monitor and use it for a longer life-time, please use the monitor in a locationthat falls within the following temperatureand humidity ranges.• Temperature: 0-40°C 32-95°F • Humidity: 20-80% RHImportant information for Burn-in/Ghost image• Always activate a moving screen saverprogram when you leave your monitor unattended. Always activate a periodic screen refresh application if your monitor will display unchanging static content. Uninterrupted display of still or static images over an extended period may cause “burn in”, also known as “after-imaging” or “ghost imaging”, on your screen."Burn-in", "after-imaging", or "ghost imag-ing" is a well-known phenomenon in LCD panel technology. In most cases, the “burned in” or “after-imaging” or “ghost imaging” will disappear gradually over a period of time after the power has been switched off. WarningFailure to activate a screen saver, or a periodic screen refresh application may result in severe” burn-in” or “after-image” or “ghost image” symptoms will not disappear and cannot be repaired. The damage mentioned above is not covered under your warranty.Service• The casing cover should be opened onlyby qualified service personnel.• If there is any need for any document forrepair or integration, please contact with your local service center. (please refer to the chapter of "Consumer Information Center") • For transportation information, pleaserefer to "Technical Specifications". • Do not leave your monitor in a car/trunkunder direct sun light.NoteConsult a service technician if the monitor does not operate normally, or you are not surewhat procedure to take when the operating instructions given in this manual have been followed.1.2 Notational DescriptionsThe following subsections describe notational conventions used in this document. Notes, Cautions and WarningsThroughout this guide, blocks of text may be accompanied by an icon and printed in bold or italic type. These blocks contain notes, cautions or warnings.They are used as follows:Notetips that help you make better use of your computer system.CautionThis icon indicates information that tells you how to avoid either potential damage to hardware or loss of data.WarningThis icon indicates the potential for bodily harm and tells you how to avoid the problem.Some warnings may appear in alternate formats and may not be accompanied by an icon. In such cases, the specific presentation of the warning is mandated by the relevant regulatory authority.1.3 Disposal of product and packingmaterialWaste Electrical and Electronic Equipment-WEEEThis marking on the product or on its packaging illustrates that,under European Directive 2012/19/EU governing used electrical and electronic appliances,this product maynot be disposed of with normal household waste.Y ou are responsible for disposal ofthis equipment through a designated waste electrical and electronic equipment collection.T o determine the locations for dropping off such waste electrical and electronic,contact your local government office,the waste disposal organization that serves your household or the store at which you purchased the product.Y our new monitor contains materials that can be recycled and reused.Specialized companies can recycle your product to increase the amount of reusable materials and to minimize the amount to be disposed of.All redundant packing material has been omitted.We have done our utmost to make the packaging easily separable into mono materials. Please find out about the local regulations on how to dispose of your old monitor and packing from your sales representative.T aking back/Recycling Information for CustomersPhilips establishes technically and economically viable objectives to optimize the environmental performance of the organization's product, service and activities.From the planning,design and production stages,Philips emphasizes the important of making products that can easily be recycled. At Philips,end-of-life management primarily entails participation in national take-back initiatives and recycling programs whenever possible, preferably in cooperation with competitors, which recycle all materials (products and related packaging material) in accordance with all Environmental Laws and taking back program with the contractor company.Y our display is manufactured with high quality materials and components which can be recycled and reused.T o learn more about our recycling program please visit/sites/philipsglobal/ about/sustainability/ourenvironment/ productrecyclingservices.page2. Setting up the monitor2.1 InstallationPackage contents*VGA * DVI* Audio cablePower cable QuickStart* HDMI* Depends on the countryInstall base stand1. Place the monitor face down on softand smooth surface taking care to avoid scratching or damaging the screen.2. Attach/Slide the base column with themonitor until it clicks into position.3. Hold the monitor base stand with bothhands and firmly insert the base stand intothe base column.Connecting to your PC223V5LSB/223V5LSW/223V5LSB2A C power inputV GA inputD VI-D input (available for selected models)K ensington anti-theft lock223V5LHSB/223V5LHSW/223V5LHSB2A C power inputV GA inputH DMI inputHDMI Audio out(available for selected models)K ensington anti-theft lockConnect to PC1.Connect the power cord to the back ofthe monitor firmly.2.Turn off your computer and unplug itspower cable.3.Connect the monitor signal cable to thevideo connector on the back of yourcomputer.4.Plug the power cord of your computer andyour monitor into a nearby outlet.5.Turn on your computer and monitor.If themonitor displays an image, installation iscomplete.2.2 Operating the monitorFront view product description223V5L2. Setting up the monitorDescription of the On Screen Display What is On-Screen Display (OSD)?On-Screen Display (OSD) is a feature in all Philips LCD monitors. It allows an end user to adjust screen performance or select functions of the monitors directly through an on-screen instruction window. A user friendly on screen display interface is shown as below:223V5LHSB/223V5LHSW/223V5LHSB2:223V5LSB/223V5LSW/223V5LSB2:223V5LSB/223V5LSW/223V5LSB2 (for 1A model):Basic and simple instruction on the control keysIn the OSD shown above, you can press buttons at the front bezel of the monitorto move the cursor, and press OK button to confirm the choice or change.The OSD MenuBelow is an overall view of the structure of the On-Screen Display. Y ou can use this as a reference when you want to work your way around the different adjustments later on.Main menuSub menuPictureWide Screen, 4:30~1000~100Picture FormatBrightness Contrast OSD Settings0~1000~100Off, 1, 2, 3, 45s, 10s, 20s, 30s, 60s Horizontal Vertical Transparency OSD Time OutSetup0~100On, Off Yes, No0~1000~1000~100H. Position Auto V. Position Phase ClockResolution Notification ResetInformationLanguageEnglish,Español,Français,Deutsch,Italiano,Nederlands, Svenska, Suomi, Polski, Čeština 한국어, 日本語, Maryar, Українська, Português do Brazil,Ελληνική (προαιρετικός), 繁體中文(可選)Português,Русский,简体中文,Türkçe , Color6500K, 9300KRed: 0~100Green: 0~100Blue: 0~100Color TemperaturesRGB User DefineAudio0~100On, OffVolume Mute(available for selective models)(available for selective models)(available for selective models)(available for selective models)VGAHDMI DVI InputOn, Off SmartContrast On, Off Over scanResolution notificationThis monitor is designed for optimalperformance at its native resolution, 1920 × 1080 @ 60 Hz. When the monitor is powered on at a different resolution, an alert is displayed on screen: Use 1920 × 1080 @ 60 Hz for best results.Display of the native resolution alert can be switched off from Setup in the OSD (On Screen Display) menu. Physical FunctionTilt2.3 Remove Base Stand and BaseRemove the Base StandBefore you start disassembling the monitor base, please follow the instructions below to avoid any possible damage or injury.1. Place the monitor face down on a smoothsurface, taking care to avoid scratching ordamaging the screen.2. Press the locking clips to detach the basestand away from the base column.3. Press the release button to detach the basecolumn.NoteThis monitor accepts a 100mm x 100mm VESA-Compliant mounting interface.CautionFor use only with UL Listed Wall Mount Bracket with minimum weight/load 3.5Kg3. Image Optimization3.1 SmartContrastWhat is it?A unique technology that dynamically analyzes displayed content and automatically optimizes an LCD monitor's contrast ratio for maximum visual clarity and viewing enjoyment,stepping up backlighting for clearer,crisper and brighter images or dimming backlighting for clear display of images on dark backgrounds.Why do I need it?Y ou want the very best visual clarity and viewing comfort for every type of content. SmartContrast dynamically controls contrast and adjusts backlighting for clear,crisp,bright gaming and video images or displays clear, readable text for office work.By reducing your monitor's power consumption,you save on energy costs and extend the lifetime of your monitor.How does it work?When you activate SmartContrast,it will analyse the content you are displaying in real time to adjust colors and control backlight intensity.This function will dynamically enhance contrast for a great entertainment experience when viewing videos or playing games.3.2 Philips SmartControl LiteThe new SmartControl Lite software by Phillips allows you to control your monitor via an easy to use on-screen graphic interface. Complicated adjustments are a thing of the past as this user friendly software guides you through fine-tuning resolution,Color calibration,Clock/Phase adjustments,RGB White point adjustment,etc. Equipped with latest technology in core algorithm for fast processing and response,this Windows compliant eye catching animated Icon based software is ready to enhance your experience with Philips monitors!Installation• Follow the instruction and complete the installation.• Y ou can launch after installation iscompleted.• If you want to launch later,you can eitherclick the shortcut on desktop or toolbar.First launch -Wizard• The first time after installation ofSmartControl Lite,it will automatically goto Wizard for first time launch.• The wizard will guide you through adjusting your monitor performance step by step.• Y ou can go to Plug-in menu to launch wizard later on as well.• Y ou can adjust more options without wizard by Standard pane.Start with Standard pane:• Adjust Menu allow you to adjust Brightness, Contrast,Focus,Position and Resolution.• Y ou can follow the instruction and do the adjustment.• Cancel prompts user if you want to cancelinstallation.Color menu:• Refer to below table for sub-menu item base on your input.• Example for Color Calibration:1."Show Me" starts color calibration tutorial.2.Start - starts the 6-step color calibrationsequence.3.Quick View loads the before/after images.4.T o return to Color home pane,click theCancel button.5.Enable color calibration - by default is on.If unchecked,does not allow for colorcalibration to happen,dimes out start andquick view buttons.6.Must have patent info in calibration screen. First color Calibration Screen:• Previous button is disabled until the second color screen.• Next goes to the succeeding target (6-targets).• Final next goes File>Presets pane.• Cancel closes the UI and returns to the plug in page.Options>Preferences - Will only be active when selecting Preferences from the drop-down Options menu.On a non-supported display capable of DDC/CI,only the Help andOptions tabs are available.• Displays current preference settings.• A checked box enables the feature.The check box is a toggle.• Enable Context Menu on desktop is checked (On) by default.Enable Contextmenu displays SmartControl Lite selections for Select Preset and Tune Display in thedesktop right-click context menu.Disabled removes SmartControl Lite from the rightclick context menu.• Enable T ask Tray icon is checked (On) by default.Enable context menu shows thetask tray menu for SmartControl Lite.Aright click on the task tray icon displays the menu options for Help,T echnical Support,Check for Upgrade,About,and Exit.When Enable task tray menu is disabled,the tasktray icon will only display EXIT.• Run at Startup is checked (On) by default.When disabled,SmartControl Lite will not launch at start or be in the task tray.Theonly way to launch SmartControl Lite iseither from the desktop short cut or from the program file.Any preset set to runat startup will not load when this box isunchecked (Disabled).• Enable transparency mode (Windows 7/8, Vista,XP).Default is 0% Opaque. Options>Input - Will only be active when selecting Input from the drop-down Options menu.On a non-supported display capable of DDC/CI,only the Help and Options tabs are available.All other SmartControl Lite tabs are not available.• Display the Source instruction pane and current input source setting.• On single input displays,this pane will not be visible.Options>Audio - Will only be active when selecting Audio from the drop-down Options menu.On a non-supported display capable of DDC/ CI,only the Help and Options tabs are available.Help>User Manual - Will only be active when selecting User Manual from the drop-down Help menu.On a non-supported display capable of DDC/CI,only the Help and Options tabs are available.Help>Version - Will only be active when selecting Version from the drop- down Help menu.On a non-supported display capable of DDC/CI,only the Help and Options tabs are available.Context Sensitive menuThe Context Sensitive menu is Enabled by default.If Enable Context Menu has been checked in the Options>Preferences pane,thenthe menu will be visible.The Context Menu has three entries:• SmartControl Lite - When selected the About Screen is displayed.• Select Preset - Provides a hierarchical menu of saved presets for immediate use.A check mark shows the currently selectedpreset.Factory Preset can also be calledfrom the drop down menu.• Tune Display - Opens the SmartControl Lite control panel.T ask T ray Menu EnabledThe task tray menu can be displayed by right-clicking on the SmartControl Lite icon from the task tray.Left Click will launch the application.The task tray has five entries:• Help - Access to User Manual file:Open User Manual file using the default browserwindow.• T echnical Support - displays the tech support page.• Check for Update - takes the user to PDI Landing and checks the user’s versionagainst the most current available.• About - Displays detailed referenceinformation:product version,releaseinformation,and product name.• Exit - Close SmartControl Lite.T o run SmartControl Lite again either select SmartControl Lite from Program menu,double-click the desktop PC icon or restart the system.T ask T ray Menu DisabledWhen the T ask Tray is disabled in the preference folder,only the EXIT selection is available.T o completely remove SmartControl Lite from the task tray,disable Run at Startup in Options>Preferences.All the illustrations in this section are for reference only.SmartControl software version might be changed without notification.Please always check official Portrait websiteto download the latest version of SmartControl software.4. T echnical SpecificationsNote1.EPEAT Gold or Silver is valid only where Philips registers the product.for registration status in your country.2.This data is subject to change without notice.Go to /support to download thelatest version of leaflet.4.1 Resolution & Preset ModesMaximum Resolution1920 x 1080 @ 60 Hz (analog input)1920 x 1080 @ 60 Hz (digital input)Recommended Resolution1920 x 1080 @ 60 Hz (digital input)Notenative resolution of 1920 x 1080 @ 60Hz.For best display quality,please follow this resolution recommendation.If you have VESA DPM compliance display cardor software installed in your PC,the monitorcan automatically reduce its power consumptionwhen not in use.If an input from a keyboard,mouse or other input device is detected,the monitor will 'wake up' automatically.Thefollowing table shows the power consumptionand signaling of this automatic power savingfeature:The following setup is used to measure power consumption on this monitor.• Native resolution:1920 x 1080• Contrast:50%• Brightness:250 nits or 200 nits• Color temperature:6500k with full whitepattern6. Regulatory InformationLead-free ProductLead free display promotes environmentally sound recovery and disposal of waste from electrical and electronic equipment. T oxicsubstances like Lead has been eliminated and compliance with European community’s stringent RoHs directive mandating restrictions on hazardous substances in electrical and electronic equipment have been adhered to in order to make Philips monitors safe to use throughout its life cycle.Congratulations!This product is TCO Certified - for SustainableITTCO Certified is an international third party sustainability certification for IT products. TCO Certified.ensures that the manufacture, use and recycling of IT products reflect environmental, social and economic responsibility. Every TCO Certified product model is verified by an accredited independent test laboratory.This product has been verified to meet all the criteria in TCO Certified, including:• Corporate Social ResponsibilitySocially responsible production - working conditions and labor law in manufacturing country • Energy EfficiencyEnergy efficiency of product and power supply. Energy Star compliant, where applicable • Environmental Management SystemManufacturer must be certified according to either ISO 14001 or EMAS • Minimization of Hazardous SubstancesLimits on cadmium, mercury, lead & hexavalent chromium includingrequirements for mercury-free products, halogenated substances and hazardousflame retardants• Design for RecyclingCoding of plastics for easy recycling. Limit on the number of different plastics used. • Product Lifetime, Product T ake BackMinimum one-year product warranty. Minimum three-year availability of spare parts. Product takeback • PackagingLimits on hazardous substances in product packaging. Packaging prepared for recycling • Ergonomic, User-centered designVisual ergonomics in products with a display. Adjustability for user comfort(displays, headsets) Acoustic performance – protection against sound spikes (headsets) and fan noise (projectors, computers) Ergonomically designed keyboard (notebooks) • Electrical Safety, minimal electro-magneticEmissions Third Party T estingAll certified product models have been tested in an independent, accredited laboratory.A detailed criteria set is available for download at , where you can also find a searchable database of all TCO Certified IT products.TCO Development, the organization behind TCO Certified, has been an internationaldriver in the field of Sustainable IT for 20 years. Criteria in TCO Certified are developed in collaboration with scientists, experts, users and manufacturers. Organizations around the world rely on TCO Certified as a tool to help them reach their sustainable IT goals. We are owned by TCO, a non-profit organization representing office workers. TCO Development is headquartered in Stockholm, Sweden, with regional presence in North America and Asia. For more information, please visit Technology for you and the planet(Only for selective models)EPEAT()The EPEAT (ElectronicProduct EnvironmentalAssessment T ool) programevaluates computer desktops,laptops,and monitors based on 51 environmental criteria developed throughan extensive stakeholder consensus process supported by US EPA.EPEAT system helps purchasers in the public and private sectors evaluate,compare and select desktop computers,notebooks and monitors based on their environmental attributes.EPEAT also provides a clear and consistent set of performance criteria for the design of products,and provides an opportunity for manufacturers to secure market recognition for efforts to reduce the environmental impact of its products.Benefits of EPEATReduce use of primary materialsReduce use of toxic materialsAvoid the disposal of hazardous waste EPEAT’S requirement that all registered products meet ENERGY STAR’s energy efficiency specifications, means that these products will consume less energy throughout their life.CE Declaration of ConformityThis product is in conformity with the following standards• EN60950-1:2006+A11:2009+A1:2010+A12:2011 (Safety requirement ofInformation T echnology Equipment).• EN55022:2010 (Radio Disturbancerequirement of Information T echnologyEquipment).• EN55024:2010 (Immunity requirement of Information T echnology Equipment).• EN61000-3-2:2006 +A1:2009+A2:2009 (Limits for Harmonic Current Emission).• EN61000-3-3:2008 (Limitation of Voltage Fluctuation and Flicker) following provisions of directives applicable.• 2006/95/EC (Low Voltage Directive).• 2004/108/EC (EMC Directive).• 2009/125/EC (ErP Directive,EC No.1275/2008 Implementing Directivefor Standby and Off mode powerconsumption) and is produced by amanufacturing organization on ISO9000level.The product also comply with the following standards• ISO9241-307:2008 (Ergonomicrequirement,Analysis and compliance testmethods for electronic visual displays).• GS EK1-2000:2011 (GS mark requirement).• prEN50279:1998 (Low Frequency Electric and Magnetic fields for Visual Display).• MPR-II (MPR:1990:8/1990:10 LowFrequency Electric and Magnetic fields).• TCO CERTIFIED (Requirement forEnvironment Labeling of Ergonomics,Energy,Ecology and Emission,TCO:Swedish Confederation of Professional Employees)for TCO versions.Energy Star Declaration ()As an ENERGY STAR ® Partner, we have determined that this product meets the ENERGY STAR ® guidelines for energy efficiency.NoteWe recommend you switch off the monitor when it is not in use for a long time.Federal Communications Commission (FCC)Notice (U.S. Only)This equipment has been tested and found to comply with the limits for a Class B digital device, pursuant to Part 15 of the FCC Rules. These limits are designed to provide reasonable protection against harmful interference in a residential installation. This equipment generates, uses and can radiate radio frequency energy and, if not installed and used in accordance with the instructions, may cause harmful interference to radio communications.However, there is no guarantee that interference will not occur in a particular installation. If this equipment does cause harmful interference to radio or television reception, which can be determined by turning the equipment off and on, the user is encouraged to try to correct the interference by one or more of the following measures:• Reorient or relocate the receiving antenna.• Increase the separation between theequipment and receiver.• Connect the equipment into an outlet ona circuit different from that to which the receiver is connected.• Consult the dealer or an experiencedradio/TV technician for help.Changes or modifications not expressly approved by the party responsible for compliance could void the user's authority to operate the equipment.Use only RF shielded cable that was supplied with the monitor when connecting this monitor to a computer device.T o prevent damage which may result in fire or shock hazard, do not expose this appliance to rain or excessive moisture.THIS CLASS B DIGITAL APPARATUS MEETS ALL REQUIREMENTS OF THE CANADIAN INTERFERENCE-CAUSING EQUIPMENT REGULATIONS.FCC Declaration of ConformityDeclaration of Conformity for Products Marked with FCC Logo, United States OnlyThis device complies with Part 15 of the FCC Rules. Operation is subject to the following two conditions: (1) this device may not cause harmful interference, and (2) this device must accept any interference received, including interference that may cause undesired operation.Commission Federale de la Communication(FCC Declaration)Cet équipement a été testé et déclaré conforme auxlimites des appareils numériques de class B,aux termes de l'article 15 Des règles de la FCC. Ces limites sont conçues de façon à fourir une protection raisonnable contre les interférences nuisibles dans le cadre d'une installation résidentielle.CET appareil produit, utilise et peut émettre des hyperfréquences qui, si l'appareil n'est pas installé et utilisé selon les consignes données, peuvent causer des interférences。
绿茶系统GHOSTXPSP32013V11终极纯净版

400pc系统声明本站收集的绿茶xp系统均来自绿茶官网通过x p系统原版制作,经过本站的安全验证,无商业广告验证,才提供给用户下载,可以放心使用。
一、绿茶系统更新提要:1、系统补丁更新到2011年11月16日2、Windows MediaPlayer升级为11.0;3、更新为flash_pl ayer_114、更新DirectX9.0C为最新版,更好的支持各类新游戏5、首次进入桌面智能判断并设置屏幕分辨率及智能开关Num Lock数字小键盘6、自动判断识别并安装AM D双核CP U驱动及优化程序7、集成VB、VC++ 2005\2008运行库8、PE系统内核为Wind ows 2003(×86)简体中文企业版,内置了当今流行 SRS驱动Win2003(PE)环境内置工具(程序)如下:⑴、DiskGenius3.43分区及数据恢复⑵、GHOST映像浏览器⑶、WINDOWS系统引导修复⑷、VMware拖放支持⑸、WIN7-2008安装器⑹、安装PE到硬盘⑺、迷你虚拟光驱⑻、GdiskGUI大硬盘分区工具⑼、破解Windows登陆密码⑽、恢复XP到C盘(支持隐藏分区)⑾、手动GHOST⑿、自动恢复XP到C盘⒀、自动将硬盘分四区并恢复XP到C盘⒁、一键恢复XP自定义操作⒂、Recuva数据恢复⒃、磁盘分区医生PTDD3.5等等……三、绿茶系统版本特点:1、系统安装全过程约5分钟,部分机子可达3分钟,高效的装机过程!2、系统兼营性、稳定性、安全性较均强!完全无人值守自动安装。
3、系统通过微软正版认证系统在线认证,支持在线升级更新!4、集成了自2000-2011年流行的各种硬件驱动,首次进入系统即全部硬件已安装完毕。
- 1、下载文档前请自行甄别文档内容的完整性,平台不提供额外的编辑、内容补充、找答案等附加服务。
- 2、"仅部分预览"的文档,不可在线预览部分如存在完整性等问题,可反馈申请退款(可完整预览的文档不适用该条件!)。
- 3、如文档侵犯您的权益,请联系客服反馈,我们会尽快为您处理(人工客服工作时间:9:00-18:30)。
同样集成IE6和IE8可选模式(IE8最新稳定版)
补丁更新到2011年8月12日
默认集成IPX协议
默认关闭电源项设置为从不பைடு நூலகம்
保留了右下角任务栏提示。方便网吧用户实别状态。
加快开机进入桌面速度
解决某种情况下U盘、移动硬盘等无法出盘问题。
以往优化不再一一列表..
经过测试的网维软件:各种无盘软件,网维大师、迅闪2011、I8一点通、绿游、左轮、易游、快吧、ADDOL、远途、尚游、网维无忧、万象、
PUBWIN2009、雨人E卡通等...
无盘软件:锐起 网众 DOL 网维无盘 快吧无盘 信佑无盘 VHD等...
有盘/无盘通用!网吧首选优化系统!
集成相关软件如下:
此版集成RAID/SATA驱动。安装时间更短。
GHO密码:gtxp2newv12
DOS密码:
注:用onekey.exe安装的时候,Ghost映像所在路径(包括文件名)不能含有中文字符。
更多系统下载请登陆:
13,集成MAXDOS V8版。(GHOST11.2版本。方便网刻)
14,集成最新双核/多核补丁包.智能安装.
15,集成P2P管理工具2009加强版(禁用P2P软件).
16,集成微软至2011月8月12日最新安全补丁.
17,保留Task Scheduler服务用于加速开机预读功能。
18,集成C++ 2005/2008/2010补丁程序
8,集成绿茶网吧桌面壁纸包.
9,集成MSXML 3.0 (KB955069) MSXML 4.0 (KB954430) MSXML 6.0 (KB954459)
10,JAVE虚拟机(聊天室专用).
11,集成最新机器狗网址屏蔽.
12,集成最新Adobe Flash Player for IE 11,0,1,60 插件.
上海绿茶 Win XP SP3 V12网吧专用加强版
采用微软原版为蓝本.我们只对其进行优化和设置.权限归微软所有.
此版去除所有安装OEM和开机OEM信息。
以稳定为主。调整优化项。
更改安装系统时不集成驱动。安装好可以使用桌面驱动工具安装(非在线驱动)
默认屏蔽某些IE广告程序。
更新驱动为最新版驱动。支持更全。安装更准确。
19,集成附加软件可选一键安装(包括MICROSOFT .NET FRAMEWORK 2.0 、OFFCE 2003简化版、
远古2010播放器、REALPLAY10、搜狗拼音输入法网吧版).
其它更多设置和优化不再一一列表...
XP SP3 V12网吧专用加强版
补丁更新至2011年8月12日
1,REALPLAY10安全优化版(解决机器狗问题).可选安装
2,王码五笔86经典版.
3,保留ABC5.0
4,集成Windows Media Player11(集成最新补丁)
5,集成DX 2009最新版.VB VC(全集补丁)(更好的支持绿色游戏运行).
6,集成经典输入法补丁
7,集成WINRAR最新特别版.