路由器与交换机的配置代码
路由器与交换机的配置代码

路由器与交换机的配置代码首先,我们需要了解一下路由器和交换机的基本概念。
路由器和交换机是计算机网络中常用的两种设备,它们在网络中起到了不同的作用。
一、路由器路由器是一种网络设备,用于连接不同的网络,并根据网络包的目标地址来转发数据。
它在网络中的作用是将数据包从源网络传递到目标网络,实现不同网络之间的通信。
在路由器的配置代码中,我们通常会涉及以下几个方面:1. 确定路由器的接口设置路由器通常有多个接口,每个接口连接到不同的网络。
在配置代码中,我们需要确定每个接口的网络地址、子网掩码等信息。
例如,假设路由器有两个接口,接口1连接到192.168.1.0网络,接口2连接到192.168.2.0网络。
那么在配置代码中,我们可以使用以下命令来设置接口的IP地址:interface FastEthernet0/0ip address 192.168.1.1 255.255.255.0interface FastEthernet0/1ip address 192.168.2.1 255.255.255.02. 配置路由表路由表用于确定数据包的下一跳地址,即数据包应该通过哪个接口转发。
在配置代码中,我们需要添加路由表条目来告诉路由器应该如何转发数据包。
例如,如果我们希望将数据包从192.168.1.0网络传递到192.168.2.0网络,可以使用以下命令来配置路由表:ip route 192.168.2.0 255.255.255.0 192.168.1.2其中,192.168.2.0是目标网络的地址,255.255.255.0是目标网络的子网掩码,192.168.1.2是下一跳地址。
3. 启用路由器的路由功能路由器默认情况下可能并不会启用路由功能,因此在配置代码中,我们需要添加一些命令来启用路由器的路由功能。
例如,可以使用以下命令来启用路由器的静态路由功能:ip routing二、交换机交换机是一种网络设备,用于在局域网中转发数据包。
交换机路由器配置命令
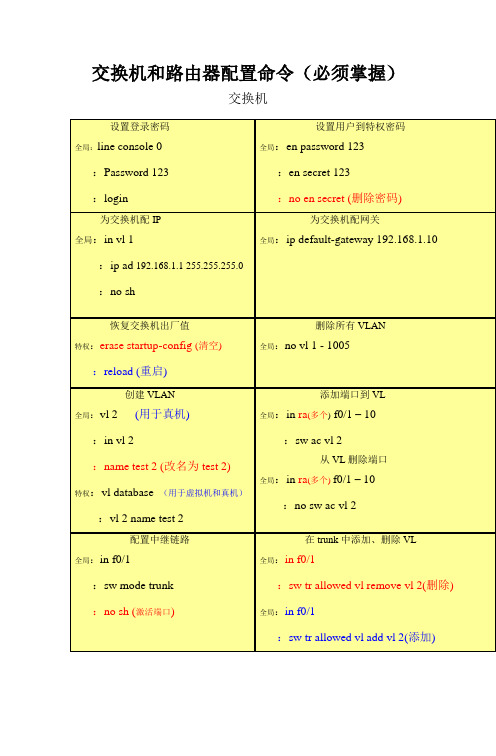
交换机和路由器配置命令(必须掌握)交换机设置登录密码全局:line console 0:Password 123:login设置用户到特权密码全局:en password 123:en secret 123:no en secret (删除密码)为交换机配IP全局:in vl 1:ip ad 192.168.1.1 255.255.255.0:no sh为交换机配网关全局:ip default-gateway 192.168.1.10恢复交换机出厂值特权:erase startup-config (清空):reload (重启)删除所有VLAN 全局:no vl 1 - 1005创建VLAN全局:vl 2 (用于真机):in vl 2:name test 2 (改名为test 2)特权:vl database (用于虚拟机和真机):vl 2 name test 2添加端口到VL 全局:in ra(多个) f0/1 – 10:sw ac vl 2从VL删除端口全局:in ra(多个)f0/1 – 10:no sw ac vl 2配置中继链路全局:in f0/1:sw mode trunk:no sh (激活端口)在trunk中添加、删除VL全局:in f0/1:sw tr allowed vl remove vl 2(删除) 全局:in f0/1:sw tr allowed vl add vl 2(添加)路由器以上命令是我认为学交换机和路由器必须要掌握的。
先就为大家收集这么多了,希望大家能好好学习。
当中可能会存在错误,如果大家发现请及时通知我。
谢谢~!SIT806——无敌精英班 班长留给路由器接口配IP全局:in f0/1:ip ad 192.168.2.2 255.255.255.0 :no sh配置单臂路由全局:in f0/0.1:encapsulation dot1q 1(VL1) :ip ad 192.168.1.1 255.255.255.0查看路由表特权:sh ip route关闭路由全局:no ip routing添加逻辑端口全局:int loopback 0配置默认路由全局:ip route 0.0.0.0 0.0.0.0 address(下一跳IP)配置静态路由 全局:ip route 192.168.1.0 255.255.255.0 192.168.2.1配置动态路由全局:router rip:network 172.25.0.0(所有直连网段)RIP V2的配置全局:router rip:version 2:no auto-summary (关闭汇总)设置远程管理全局:line vty 0 4(允许0到4,五个用户登录):login:pawwword 123全局:enable password 123。
华为路由器交换机配置命令大全
华为路由器交换机配置命令大全华为路由器交换机配置大全本文提供XXX路由器交换机的配置命令,包括计算机命令和交换机命令。
一、计算机命令以下是一些常用的计算机命令:shutdown-hnow;关机init 0;关机logout;用户注销login;用户登录ifconfig;显示IP地址ifconfig eth0 netmask;设置IP地址ifconfig eht0 netmask down;禁用IP地址route add 0.0.0.0 gw;设置网关route del 0.0.0.0 gw;删除网关route add default gw;设置网关route del default gw;删除网关route;显示网关ping;发ECHO包;远程登录二、XXX路由器交换机配置命令以下是一些常用的XXX路由器交换机配置命令:Quidway]dis cur;显示当前配置Quidway]display n;显示当前配置Quidway]display interfaces;显示接口信息Quidway]display vlan;显示vlan信息Quidway]display n;显示版本信息Quidway]super password;修改特权用户密码Quidway]sysname;交换机命名Quidway]XXX;进入接口视图Quidway]interface vlan x;进入接口视图Quidway-Vlan-interface x]ip address 10.65.1.1 255.255.0.0;配置VLAN的IP地址Quidway]Ip route-static 0.0.0.0 0.0.0.0 10.65.1.2;静态路由=网关Quidway]rip;rip协议Quidway]local-user ftpQuidway]user-interface vty 0 4;进入虚拟终端S3026-ui-vty0-4]n-mode password;设置口令模式首先,这篇文章需要进行重新排版和编辑,以便更清晰地传达信息。
路由与交换的配置命令
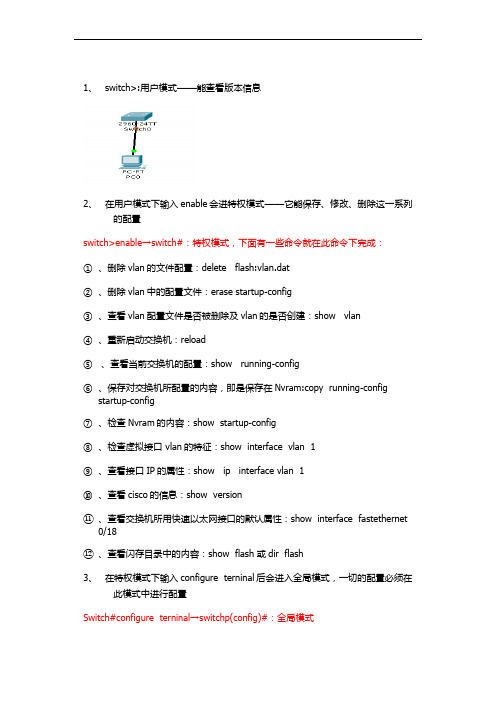
1、switch>:用户模式——能查看版本信息2、在用户模式下输入enable会进特权模式——它能保存、修改、删除这一系列的配置switch>enable→switch#:特权模式,下面有一些命令就在此命令下完成:①、删除vlan的文件配置:delete flash:vlan.dat②、删除vlan中的配置文件:erase startup-config③、查看vlan配置文件是否被删除及vlan的是否创建:show vlan④、重新启动交换机:reload⑤、查看当前交换机的配置:show running-config⑥、保存对交换机所配置的内容,即是保存在Nvram:copy running-configstartup-config⑦、检查Nvram的内容:show startup-config⑧、检查虚拟接口 vlan的特征:show interface vlan 1⑨、查看接口IP的属性:show ip interface vlan 1⑩、查看cisco的信息:show version⑪、查看交换机所用快速以太网接口的默认属性:show interface fastethernet 0/18⑫、查看闪存目录中的内容:show flash 或dir flash3、在特权模式下输入configure terninal后会进入全局模式,一切的配置必须在此模式中进行配置Switch#configure terninal→switchp(config)#:全局模式①、配置路由器设备的名字:switch(config)#hostname + 交换机的名字②、配置进入特权模式的密码,即使能密码:switch(config)#enable password +密码③、配置非明文密码:switch(config)#enable secret + 密码4、为交换机配置console口①、进入现成配置模式,即进入console口:switch(config)# line console 0②、设置密码(重新启动时需要此密码):switch(config-line)#password + 密码③、允许登录:switch(config-line)#login5、配置远程登录的密码:①、首先要配置使能密码②、允许让几个人登录:switch(config)#line vty 0 4(即允许五个登录)③、设置密码:switch(config-line)#password + 密码④、允许远程登录:switchp(config-line)#login6、在全局模式下的有关命令①对所有密码进行加密:switch(config)#service password-encryption②、不解析错误的命令:switch(config)#no ip domain-lookup7、创建vlan(2—1001,注vlan 1既不可以创建,也不可以删除)①、创建vlan :vlan + 要创建vlan的值②、给vlan取名:switch(config-vlan)#name + 名字(此步可以不要)③、把PC与交换机相连的端口添加到相应的vlan中:a、Switch(config)#interface + 端口b、Switch(config-if)#switchport access vlan + 相应vlan的值④、需要传递多个vlan信息就要打中继口,即trunka、switch(config)#interface + 交换机另一端口b、switch(config-if)#switchport mode trunk8、传统vlan 的通信(1)、router的配置①、为接口配置IP地址(该IP是相应vlan的PC网关)②、激活端口:no shutdown(2)、switch的配置①、创建vlan,将PC端口划入相应vlan②、将switch与router相连的端口划入相应的vlan(3) 、PC的配置:就是给PC配置IP,注PC的默认网关与router的IP相同,网关相同9、单臂路由实现vlan的通信(1)router配置①、添加子接口:interface f0/0.1(此处有多少个vlan就添加多少个子接口)②、将子接口封装到相应的vlan:encapsulation dot + 相应vlan的值③、将子接口配置IP:ip add +ip地址 + 子网掩码④、激活物理接口:no shutdown(2)、switch的配置①、创建 vlan,交PC的端口划入到相应vlan②、与router相连的端口打trunk(3)、配置PC的IP9、三层交换(1)、配置三层交换①、启用三层交换:(config)#ip routing②、创建vlan:(config)# vlan + 要创建vlan的值③、把相应的vlan配置IPa、指定一个vlan:(config)#interface vlan + vlan相应的值c、配置IP:(config-if)#ip add + ip + 子网掩码(2)、配置switch①、每个交换机创建vlan②、把端口划分到相应的vlan中③、打中继口(trunk)Show命令1、show version 这个命令可以查看IOS版本号,已启动时间,Flash中的IOS 的文件名,router里面共有什么端口,寄存器的值等等。
路由器和交换机基本配置命令

路由器和交换机基本配置命令网络1112900系列以上交换机设置IP地址(config)# interface vlan 1 (进入VLAN 1 接口) (config-if)# ip address [IP地址] [掩码](设置IP地址)(config-if)# no shutdown (打开该接口) (config-if)# exit (返回到全局模式) (config)#例:(config)# interface vlan 1(config-if)# ip address 192.168.1.253 255.255.255.0(config-if)# no shutdown(config-if)# exitRouter设置IP地址(config)# interface [接口名](进入接口)(config-if)# ip address [IP地址] [掩码](设置IP地址)(config-if)# no shutdown(打开该接口) (config-if)# exit (返回到全局模式) (config)#例:(config)# interface f0/0(config-if)# ip address 192.168.1.254 255.255.255.0(config-if)# no shutdown(config-if)# exit(config)#定义从用户模式进入特权模式的口令:(config)# enable password [口令](设置明文口令) (config)# enable secret [口令](设置密文口令)例:(config)#enable password 12345(config)#enable secret cisco定义Console接口的口令(config)# line con 0(进入控制接口)(config-line)# password [口令](设置口令)(config-line)# login (设置口令生效)(config-line)# exit(返回到特权模式)例:User Access VerificationPassword:___________ (Console接口的口令)s1>enablePassword:___________ (从用户模式进入特权模式的口令)s1#定义Telnet用户接口的口令(config)# line vty 0 4 (进入vty接口)(config-line)# password [口令](设置口令)(config-line)# login (设置口令生效)(config-line)# exit(返回到特权模式) (config)#[0 4] 是指最多允许5位用户对设备进行Telnet登陆)给设备定义时间、日期、年份:(config)# clock timezone [时区名称] [时区范围](设置时区) # clock set [时间] [日期] [月份(英文表示)] [年份] (设置时间)例:(config)# clock timezone beijing +8(config)# exit# clock set 19:30:00 24 may 2006## show clock19:31:17.059 beijing Wed May 24 2006#(config)# banner motd #(定义启动显示文本)例:(config)# banner motd #Enter TEXT message. End with the character '#'.********************* ** xxxx ** *********************#Router上的指令# show controller [串行接口编号](查看该接口连接的是DTE线缆还是DCE线缆)例:# show controller serial 0/0 ............... ......................V.35 DTE cable ...............# show controller serial 0/0 ............... ......................V.35 DCE cable ...............如果串行接口连接的是DCE线缆,则需要定义时钟> enable# conf t(config)# interface [串行接口编号] (进入串行接口) (config-if)# clock rate 64000(定义时钟频率) (config-if)# exit (返回到全局模式) (config)#例:(config)# interface serial 0/0(config-if)# clock rate 64000(config-if)# exit(config)## show interface [接口号]Serial0/0 is up, line protocol is up(代表该接口可以正常使用)Serial0/0 is up, line protocol is down(两端协议不匹配) HDLC ---------- PPP(串行DCE接口没有设置时钟)Serial0/0 is down, line protocol is down(线缆故障)(对端设备接口没有打开,或对端设备关闭电源)Serial0/0 is administratively down, line protocol is down (人为将接口关闭,通过指令可以打开)# show running-config (查看正在运行的配置文件)# show startup-config (查看启动配置文件)# erase startup-config(清空配置文件)# reload(重新启动)例:#erase startup-configErasing the nvram filesystem will remove all files! Continue? [confirm][OK]Erase of nvram: complete## reload(config)# no ip domain-lookup (关闭域名解析) (config)# ip host [主机名] [主机IP地址] (建立静态映射)例:Switch# conf t(config)# ip host pc1 192.168.1.249(config)# exitMAC地址表初始为空,当有数据帧到达时:首先,将数据帧中的源MAC地址与接收该数据帧的端口建立对应的关系,并将这种关系放置的MAC地址表中。
路由器和交换机命令配置大全
交换机基本状态:switch: ROM状态,switch> 用户模式(输入enable进入特权配置模式)switch# 特权配置模式(输入config terminal进入全局配置)switch(config)# 全局配置模式(输入interface fastEthernet端口号进入接口模式) switch(config-if)# 接口状态交换机的特权配置模式Switch#show version 基本配置的查看switch#show vlan ;查看vlan配置信息switch#show interface ;查看端口信息switch#dir flash: ;查看闪存switch#show interfaces vlan 1 查看有关IP协议信息和相关命令的设置是否己生效switch#show running-config 查看当前配置清单switch#show interface fastEthernet0/1 查看指定端口的具体配置和统计信息switch#erase startup-config 将交换机恢复为出厂黙认状态switch#sho run interface fastEthernet0/17 查看关于0/17端口的配置信息switch#sho mac-address-table aging-time 设置MAC地址表超时时间switch#show mac-address-table 查看整个MAC地址表使用CDP协议switch#show cdp 显示了设备的CDP全局配置信息switch#show cdp interface f0/17 显示了fo/17接口的CDP配置信息switch#show cdp traffic 显示有关CDP包的统计信息(CDP conters信息)switch#show cdp neighbors 列出与本设备相邻的设备在switch#sshow cdp entry 后面键入“*”号即可显示所有入项的细节设置端口双工模式switch(config)#duplex ? { autu full half }全局配置模式switch>enable;进入特权模式switch#config terminal 进入全局配置模式switch(config)#hostname xxx;设置交换机的主机名switch(config)#enable password xx ;设置使能口令switch(config)#enable secret xxx ;设置使能密码设置交换机的管理IP地址:switch(config)#interface vlan 1 ;(进入vlan 1)switch(config-if)#ip address 192.168.1.1 255.255.255.0 (设置IP地址和子网掩码)switch(config-if)#no shut (开启端口)switch(config-if)#exit (退出)switch(config)#ip default-gatew.02.1.1.1 202.1.1.2 (设置所使用的域名服务哭地址) switch(config)#line console 0 ;进入控制台口switch(config-line)#line vty 0 4 ;进入虚拟终端switch(config-line)#login ;允许登录switch(config-line)#password xx ;设置登录口令xx创建与删除VLAN方法(选删除端口后删除VLAN)方法一(enable模式下创建vlan)switch#vlan database 进入vlan数据库模式switch(vlan)#vlan 2 name test20 新建vlan 2及vlan 名为test20switch(vlan)#end 退出即生效switch#show vlan brief 查看vlan配置switch#copy running-config startup config 保存配置删除VLAN方法switch#vlan database 进入vlanswitch(vlan)#no vlan 2 删vlan 2方法二(conf t模式下创建vlan)Switch#conf t 进入全局配置模式Swintch(config)#vlan 2 新建vlan号为2Swintch(config-vlan)#name test20 名字命名为test20(可选)Swintch(config-vlan)#end 退出switch#copy running-config startup config 保存配置删除VLAN方法Switch#conf t 进入全局配置模式Swintch(config)#no vlan 2 删除vlan2在VLAN中添加端口switch#conf t 进行全局配置模式switch(config)#interface fastEthernet0/1 ;进入端口0/1switch(config-if)#switchport mode access 定义二层接入端口switch(config-if)#switchport access vlan 2 把端口分配给vlan 2在VLAN中删除端口switch#conf t 进行全局配置模式switch(config)#interface fastEthernet0/1 ;进入端口1switch(config-if)#no switchport access vlan 10 将端口0/1从vlan10中删除switch(config-if)#end 退出switch#show vlan brief 查看vlan配置交换机端口上配置Trunk中继switch#conf t 进行全局配置模式switch(config)#interface fastEthernet0/1 ;进入端口1switch(config-if)#switchport mode access ;设置端口为接入模式switch(config-if)#switchport mode trunk ;设置端口为中继模式switch(config-if)#switchport mode dynamic auto 自动协商是否成为中继端口switch(config-if)#switchport mode dynamic desirable 设置接口为主动尝试转换中继链路switch(config-if)#switchport mode nonegotiate 将接口设定为永久中继模式,但禁止接口产生DTP帧,要建立部继链路,就必须手工将邻接接口配置为中继接口switch(config-if)#end 退出switch#show interfaces 0/1 switchport 显示有关switchport的配置从Trunk中添加、删除vlanswitch#conf t 进行全局配置模式switch(config)#int f0/1 ;进入端口1switch(config-if)#switchport mode trunk ;设置为中继switch(config-if)#switchport trunk allowed vlan 1,2 ;设置允许的vlan switch(config-if)#switchport trunk encap dot1q ;设置vlan 中继Switch#write 保存配置信息路由器支持的命令:路由器显示命令:router#show run ;显示配置信息router#show interface ;显示接口信息router#show ip route ;显示路由信息router#show cdp nei ;显示邻居信息router#reload ;重新起动路由器口令设置:router>enable ;进入特权模式router#config terminal ;进入全局配置模式router(config)#hostname ;设置交路由器的主机名router(config)#enable secret xxx ;设置特权加密口令router(config)#enable password xxb ;设置特权非密口令router(config)#line console 0 ;进入控制台口router(config-line)#line vty 0 4 ;进入虚拟终端router(config-line)#password xx ;设置登录口令xxrouter(config-line)#login ;要求口令验证router(config)#(Ctrl+z) ;返回特权模式router#exit ;返回命令路由器配置:router(config)#int s0/0 ;进入Serail接口router(config-if)#no shutdown ;激活当前接口router(config-if)#clock rate 64000 ;设置同步时钟router(config-if)#ip address ;设置IP地址router(config-if)#ip address second ;设置第二个IProuter(config-if)#int f0/0.1 ;进入子接口router(config-subif.1)#ip address ;设置子接口IProuter(config-subif.1)#encapsulation dot1q ;绑定vlan中继协议router(config)#config-register 0x2142 ;跳过配置文件router(config)#config-register 0x2102 ;正常使用配置文件router#reload ;重新引导路由器文件操作:router#copy running-config startup-config ;保存配置router#copy running-config tftp ;保存配置到tftprouter#copy startup-config tftp ;开机配置存到tftprouter#copy tftp flash: ;下传文件到flashrouter#copy tftp startup-config;下载配置文件ROM状态:Ctrl+Break ;进入ROM监控状态rommon>confreg 0x2142 ;跳过配置文件rommon>confreg 0x2102 ;恢复配置文件rommon>reset ;重新引导rommon>copy xmodem: flash: ;从console传输文件rommon>IP_ADDRESS=10.65.1.2 ;设置路由器IPrommon>IP_SUBNET_MASK=255.255.0.0 ;设置路由器掩码rommon>TFTP_SERVER=10.65.1.1 ;指定TFTP服务器IP rommon>TFTP_FILE=c2600.bin ;指定下载的文件rommon>tftpdnld ;从tftp下载rommon>dir flash: ;查看闪存内容rommon>boot ;引导IOS静态路由:ip route ;命令格式router(config)#ip route 2.0.0.0 255.0.0.0 1.1.1.2 ;静态路由举例router(config)#ip route 0.0.0.0 0.0.0.0 1.1.1.2 ;默认路由举例动态路由:router(config)#ip routing ;启动路由转发router(config)#router rip ;启动RIP路由协议。
路由器交换机配置口令大全

一、路由器配置>Enable 进入特权模式#Ex IT返回上一级操作模式#del flash:config.text 删除配置文件(交换机及1700系列路由器)#erase startup-config 删除配置文件(2500系列路由器)#write memory 或copy running-config startup-config 保存配置#Configure terminal 进入全局配置模式(config)# hostname routerA 配置设备名称为routerA(config)#banner motd & 配置每日提示信息&为终止符(config)# enable secret star 或者:enable password star设置路由器的特权模式密码为star;secret 指密码以非明文显示,password指密码以明文显示查看信息#show running-config 查看当前生效的配置信息#show interface fastethernet 0/3 查看F0/3端口信息#show interface serial 1/2 查看S1/2端口信息#show ip interface brief 查看端口信息#show version 查看版本信息#show running-config 查看当前生效的配置信息#show controllers serial 1/2 查看该端口信息, 用于R2501#show ip route 查看路由表信息#show access-lists 1 查看标准访问控制列表1的配置信息远程登陆(telnet)(config)# line vty 0 4 进入线路0~4的配置模式,4为连续线路最后一位的编号,线路为0~4 (conifg-line)#login(config-line)#password star 配置远程登陆密码为star(config-line)#end 返回上层端口的基本配置(config)#Interface fastethernet 0/3 进入F0/3的端口配置模式(config)#interface range fa 0/1-2 进入F01至F0/2的端口配置模式(config-if)#speed 10 配置端口速率为10M,可选10,100,auto(config-if)#duplex full 配置端口为全双工模式,可选full(全双工),half(半双式),auto(自适应) (config-if)#no shutdown 开启该端口(config)# interface serial 1/2 进入端口S1/2的配置模式(config-if)# ip address 1.1.1.1 255.255.255.0 配置端口IP及掩码(config-if)# clock rate 64000 配置时钟频率(单位为K , 仅用于DCE端)(config-if)# bandwidth 512 配置端口带宽速率为512KB(单位为KB)(config-if)# no shutdown 开启该端口(config-if)#encapsulation PPP 定义封装类型为PPP,可选项:Frame-relay 帧中继Hdlc 高级数据链路控制协议lapb X.25的二层协议PPP PPP点到点协议X25 X.25协议路由协议(config)# ip route 172.16.1.0 255.255.255.0 172.16.2.1 配置静态路由注:172.16.1.0 255.255.255.0 为目标网络的网络号及子网掩码172.16.2.1 为下一跳的地址,也可用接口表示,如ip route 172.16.1.0 255.255.255.0 serial 1/2(172.16.2.0所接的端口)(config)# router rip 开启RIP协议进程(config-router)# network 172.16.1.0 申明本设备的直连网段信息(config-router)# version 2 开启RIP V2,可选为version 1(RIPV1)、version 2(RIPV2)(config-router)# no auto-summary 关闭路由信息的自动汇总功能(只有在RIPV2支持)(config)# router ospf 开启OSPF路由协议进程(针对1762,无需使用进程ID)(config)# router ospf 1 开启OSPF路由协议进程(针对2501,需要加OSPF进程ID)(config-router)# network 192.168.1.0 0.0.0.255 area 0申明直连网段信息,并分配区域号(area0为骨干区域)注意:如果是Rip Version1,那么在不连续的子网中,需要为中间网段的两个路由器都配置子接口!!!RA(config)#int serial0RA(config-if)#ip address 172.16.2.1 255.255.255.0 secondaryRB(config)#int serial0RB(config-if)#ip address 172.16.2.2 255.255.255.0 secondaryPAP路由器Ra为被验证方、Rb为验证方;两路由器用V.35线连接(串口线),分别配置各端口的IP及时钟频率后:Rb(config)# username Ra password 0 star 验证方配置被验证方的用户名,密码Rb(config)# intterface serial 1/2 进入S1/2端口Rb(config-if)# encapsulation ppp 定义封装类型为PPPRb(config-if)# ppp authentication pap PPP启用PAP认证方式Ra(config)# itnterface serial 1/2 进入S1/2端口Ra(config-if)# encapsulation ppp 定义封装类型为PPPRa(config-if)# ppp pap sent-username Ra password 0 star 设置用户名为ra 密码为star,用于发送到验证方进行验证#debug ppp authentication 可选命令:观察PAP验证过程(如果没看到验证消息,则将端口shutdown,然后再no shutdown,即可看到验证过程的相关信息)CHAP路由器Ra、Rb, 两路由器用V.35线连接(串口线),分别配置各端口的IP及时钟频率后:被验证方配置:Ra(config)# username Rb password 0 star 以对方的主机名作为用户名,密码和对方的路由器一致Ra(config)# interface serial 1/2 进入S1/2端口Ra(config-if)# encapsulation PPP 定义封装类型为PPP验证方配置:Rb(config)# username Ra password 0 star 以对方的主机名作为用户名,密码和对方的路由器一致Rb(config)# interface serial 1/2 进入S1/2端口Rb(config-if)# encapsulation PPP 定义封装类型为PPPRb(config-if)# ppp authentication chap PPP启用CHAP方式验证PAP与CHAP的区别:1. PAP:被验证方发送用户名、密码到验证方进行身份验证,所以需要在端口模式下设置Ra(config)#ppp pap sent-username Ra password 0 star;验证方需要定义用户和密码配对数据库记录,所以要定义命令:Rb(config)# username Ra password 0 star2. Chap:CHAP由验证方主动发起挑战,由被验证方应答进行验证(三次握手),所以验证方要配置命令:Rb(config-if)# ppp authentication chap。
三层交换机与路由器动态路由rip配置
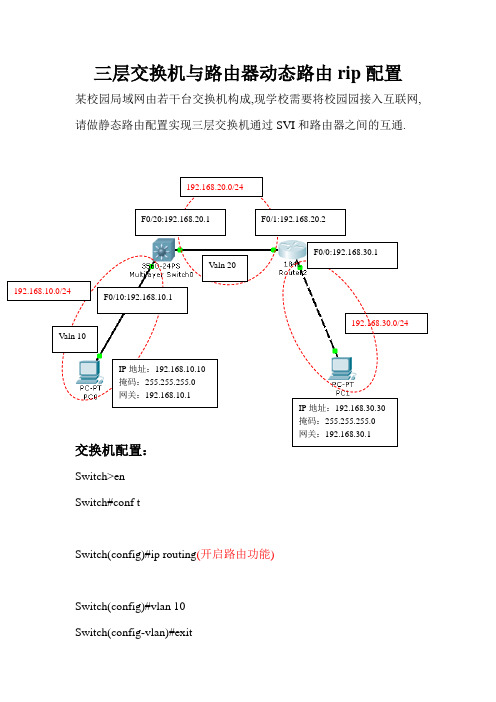
三层交换机与路由器动态路由rip配置某校园局域网由若干台交换机构成,现学校需要将校园园接入互联网,请做静态路由配置实现三层交换机通过SVI和路由器之间的互通.F0/20:192.168.20.1 F0/1:192.168.20.2F0/0:192.168.30.1Valn 20F0/10:192.168.10.1192.168.30.0/24 Valn 10IP地址:192.168.10.10掩码:255.255.255.0Switch>enSwitch#conf tSwitch(config)#ip routing(开启路由功能)Switch(config)#vlan 10Switch(config-vlan)#exitSwitch(config)#vlan 20Switch(config-vlan)#exitSwitch(config)#int f0/10(将端口分配给VLAN)Switch(config-if)#sw acc vlan 10Switch(config-if)#exitSwitch(config)#int f0/20(将端口分配给VLAN)Switch(config-if)#sw acc vlan 20Switch(config-if)#exit(配置三层交换机端口的路由功能)Switch(config)#int vlan 10Switch(config-if)#ip add 192.168.10.1 255.255.255.0 Switch(config-if)#no shutdownSwitch(config-if)#exitSwitch(config)#int vlan 20Switch(config-if)#ip add 192.168.20.1 255.255.255.0 Switch(config-if)#no shutdownSwitch(config-if)#exitSwitch(config)#router rip(配置动态路由rip协议) Switch(config-router)#network 192.168.10.0 Switch(config-router)#network 192.168.20.0 Switch(config-router)#end路由器配置:Router>enRouter#conf tRouter(config)#int f0/0(给端口分配IP地址)Router(config-if)#ip add 192.168.30.1 255.255.255.0 Router(config-if)#no shutdownRouter(config-if)#exitRouter(config-if)#int f0/1(给端口分配IP地址)Router(config-if)#ip add 192.168.20.2 255.255.255.0 Router(config-if)#no shutdownRouter(config-if)#exitSwitch(config)#router ripSwitch(config-router)#network 192.168.20.0Switch(config-router)#network 192.168.30.0 Switch(config-router)#end。
交换机和路由器配置命令

1.交换机支持的命令:交换机基本状态:switch: ;ROM状态,路由器是rommon> hostname> ;用户模式hostname# ;特权模式hostname(config)# ;全局配置模式hostname(config-if)# ;接口状态交换机口令设置:switch>enable ;进入特权模式switch#config terminal ;进入全局配置模式switch(config)#hostname ;设置交换机的主机名switch(config)#enable secret xxx ;设置特权加密口令switch(config)#enable password xxa ;设置特权非密口令switch(config)#line console 0 ;进入控制台口switch(config-line)#line vty 0 4 ;进入虚拟终端switch(config-line)#login ;允许登录switch(config-line)#password xx ;设置登录口令xx switch#exit ;返回命令交换机VLAN设置:switch#vlan database ;进入VLAN设置switch(vlan)#vlan 2 ;建VLAN 2switch(vlan)#no vlan 2 ;删vlan 2switch(config)#int f0/1 ;进入端口1switch(config-if)#switchport access vlan 2 ;当前端口加入vlan 2 switch(config-if)#switchport mode trunk ;设置为干线switch(config-if)#switchport trunk allowed vlan 1,2 ;设置允许的vlan switch(config-if)#switchport trunk encap dot1q ;设置vlan 中继switch(config)#vtp domain ;设置发vtp域名switch(config)#vtp password ;设置发vtp密码switch(config)#vtp mode server ;设置发vtp模式switch(config)#vtp mode client ;设置发vtp模式交换机设置IP地址:switch(config)#interface vlan 1 ;进入vlan 1switch(config-if)#ip address ;设置IP地址switch(config)#ip default-gateway ;设置默认网关switch#dir flash: ;查看闪存交换机显示命令:switch#write ;保存配置信息switch#show vtp ;查看vtp配置信息switch#show run ;查看当前配置信息switch#show vlan ;查看vlan配置信息switch#show interface ;查看端口信息switch#show int f0/0 ;查看指定端口信息2. 路由器支持的命令:路由器显示命令:router#show run ;显示配置信息router#show interface ;显示接口信息router#show ip route ;显示路由信息router#show cdp nei ;显示邻居信息router#reload ;重新起动路由器口令设置:router>enable ;进入特权模式router#config terminal ;进入全局配置模式router(config)#hostname ;设置交换机的主机名router(config)#enable secret xxx ;设置特权加密口令router(config)#enable password xxb ;设置特权非密口令router(config)#line console 0 ;进入控制台口router(config-line)#line vty 0 4 ;进入虚拟终端router(config-line)#login ;要求口令验证router(config-line)#password xx ;设置登录口令xx router(config)#(Ctrl+z) ;返回特权模式router#exit ;返回命令路由器配置:router(config)#int s0/0 ;进入Serail接口router(config-if)#no shutdown ;激活当前接口router(config-if)#clock rate 64000 ;设置同步时钟router(config-if)#ip address ;设置IP地址router(config-if)#ip address second ;设置第二个IProuter(config-if)#int f0/0.1 ;进入子接口router(config-subif.1)#ip address ;设置子接口IProuter(config-subif.1)#encapsulation dot1q ;绑定vlan中继协议router(config)#config-register 0x2142 ;跳过配置文件router(config)#config-register 0x2102 ;正常使用配置文件router#reload ;重新引导路由器文件操作:router#copy running-config startup-config ;保存配置router#copy running-config tftp ;保存配置到tftprouter#copy startup-config tftp ;开机配置存到tftprouter#copy tftp flash: ;下传文件到flashrouter#copy tftp startup-config;下载配置文件ROM状态:Ctrl+Break ;进入ROM监控状态rommon>confreg 0x2142 ;跳过配置文件rommon>confreg 0x2102 ;恢复配置文件rommon>reset ;重新引导rommon>copy xmodem: flash: ;从console传输文件rommon>IP_ADDRESS=10.65.1.2 ;设置路由器IP rommon>IP_SUBNET_MASK=255.255.0.0 ;设置路由器掩码rommon>TFTP_SERVER=10.65.1.1 ;指定TFTP服务器IPrommon>TFTP_FILE=c2600.bin ;指定下载的文件rommon>tftpdnld ;从tftp下载rommon>dir flash: ;查看闪存内容rommon>boot ;引导IOS静态路由:ip route ;命令格式router(config)#ip route 2.0.0.0 255.0.0.0 1.1.1.2 ;静态路由举例router(config)#ip route 0.0.0.0 0.0.0.0 1.1.1.2 ;默认路由举例动态路由:router(config)#ip routing ;启动路由转发router(config)#router rip ;启动RIP路由协议。
交换机路由器命令大全(结合配置实例)
交换机路由器命令大全(结合配置实例)交换机路由器命令大全(结合配置实例)交换机和路由器是计算机网络中常用的网络设备,用于实现数据包的转发和路由选择。
在实际应用中,我们需要使用命令来配置交换机和路由器的各项参数。
本文将给出交换机和路由器常用命令的大全,并结合实际配置示例进行说明。
一、交换机命令1. 查看交换机基本信息查看交换机型号、固件版本、序列号等基本信息:show version2. 配置交换机端口设置交换机接口的速率、全双工模式等参数:interface interface_namespeed speed_valueduplex {full | half}3. 查看交换机端口状态查看交换机端口的连接状态、速率、工作模式等信息:show interfaces status4. 配置交换机VLAN创建VLAN和端口关联,实现VLAN的隔离和管理:vlan vlan_idname vlan_nameinterface interface_name5. 查看交换机MAC表显示交换机学习到的MAC地址和对应的端口:show mac-address-table6. 配置交换机链路聚合将多个物理端口绑定为一个逻辑端口,提高带宽和冗余性:interface port-channel channel_numberdescription description_textswitchport mode trunk/access7. 交换机Spanning Tree配置配置交换机的Spanning Tree协议参数,避免网络环路:spanning-tree vlan vlan_idpriority priority_value二、路由器命令1. 查看路由表显示路由器的路由表,包括直连路由、静态路由和动态路由表项:show ip route2. 配置静态路由手动配置路由器的静态路由表,指定目的网络和下一跳信息:ip route destination_network subnet_mask next_hop_ip3. 配置路由器接口配置路由器的接口参数,包括IP地址、子网掩码、描述等:interface interface_nameip address ip_address subnet_maskdescription description_text4. 配置路由器OSPF协议配置路由器之间的OSPF动态路由协议,实现网络的动态路由选择:router ospf process_idnetwork network_address wildcard_mask area area_number5. 配置路由器ACL配置路由器的访问控制列表,用于控制数据包的流量:access-list access_list_number permit/deny source destination6. 配置路由器NAT配置路由器的网络地址转换功能,实现内网与外网的互通:interface interface_nameip nat inside/outside三、配置实例1. 配置交换机端口接口GigabitEthernet0/1配置为100Mbps全双工模式:interface GigabitEthernet0/1speed 100duplex full2. 配置交换机VLAN创建VLAN10,将接口GigabitEthernet0/1划分到VLAN10:vlan 10name VLAN10interface GigabitEthernet0/13. 配置路由器接口将接口GigabitEthernet0/0配置为192.168.1.1/24的IP地址:interface GigabitEthernet0/0ip address 192.168.1.1 255.255.255.0description LAN interface4. 配置静态路由配置路由器的静态路由表,将目的网络192.168.2.0/24指向下一跳192.168.1.2:ip route 192.168.2.0 255.255.255.0 192.168.1.25. 配置路由器ACL设置访问控制列表,允许源IP地址为192.168.1.0/24的流量通过:access-list 1 permit 192.168.1.0 0.0.0.2556. 配置路由器NAT设置路由器的NAT,将内部接口GigabitEthernet0/1地址转换为公网地址:interface GigabitEthernet0/1ip nat inside以上是交换机和路由器常用命令的大全以及配置实例。
交换机路由器命令

交换机路由器命令1、系统配置命令1.1 基本配置命令- 设定主机名称命令:hostname [名称]- 设定启动文件位置命令:boot system [文件名]1.2 接口配置命令- 进入接口配置模式命令:interface [接口编号]- 设定IP地质命令:ip address [IP地质]1.3 路由配置命令- 设定默认路由命令:ip route 0:0:0:0 0:0:0:0 [下一跳IP地质]- 设置静态路由命令:ip route [目的网络地质] [目的子网掩码] [下一跳IP地质]1.4 网络服务设置命令- 设置DNS服务器命令:ip name-server [DNS服务器IP地质]2、VLAN配置命令2.1 创建VLAN命令- 进入全局配置模式命令:vlan database- 创建VLAN命令:vlan [VLAN编号]2.2 接口VLAN设置命令- 进入接口VLAN模式命令:interface vlan [VLAN编号]- 设定IP地质命令:ip address [IP地质]3、交换机配置命令3.1 端口设置命令- 进入端口配置模式命令:interface [端口编号]- 设置接口类型命令:switchport mode [access/trunk] - 设置接口所属VLAN命令:switchport access vlan [VLAN编号]3.2 链路聚合命令- 创建聚合组命令:interface port-channel [组号]- 将端口加入聚合组命令:channel-group [组号] mode [active/passive]3.3 STP配置命令- 进入全局配置模式命令:spanning-tree mode [STP 模式]- 设定优先级命令:spanning-tree priority [优先级]4、路由器配置命令4.1 接口配置命令- 进入接口配置模式命令:interface [接口编号]- 设定IP地质命令:ip address [IP地质]4.2 OSPF配置命令- 进入全局配置模式命令:router ospf [进程ID]- 添加网络命令:network [网络地质] [反掩码] area [区域ID]附件:1、附件1:交换机路由器配置示例文件法律名词及注释:- IP地质:Internet Protocol Address,互联网协议地质,用于标识网络中的设备的唯一地质。
交换机与路由器的综合配置实验命令
VLAN划分Switch>enableSwitch#conf tSwitch(config)#vlan 10Switch(config-vlan)#exitSwitch(config)#vlan 20Switch(config-vlan)#exitSwitch(config)#interface range fastEthernet 0/1-10 Switch(config-if-range)#switchport access vlan 10 Switch(config-if-range)#exitSwitch(config)#interface range fastEthernet 0/11-20 Switch(config-if-range)#switchport access vlan 20 Switch(config-if-range)#exitSwitch(config)#interface fastEthernet 0/24Switch(config-if)#switchport mode trunkSwitch(config-if)#exit三层交换机配置Switch>enableSwitch#conf tSwitch(config)#vlan 10Switch(config-vlan)#exitSwitch(config)#vlan 20Switch(config-vlan)#exitSwitch(config)#vlan 30Switch(config-vlan)#exitSwitch(config)#vlan 40Switch(config-vlan)#exitSwitch(config)#interface fastEthernet 0/2Switch(config-if)#switchport mode trunkSwitch(config-if)#exitSwitch(config)#interface fastEthernet 0/3Switch(config-if)#switchport mode trunkSwitch(config-if)#exitSwitch(config)#ip routingSwitch(config)#interface vlan 10Switch(config-if)#ip address 192.168.1.1 255.255.255.0Switch(config-if)#no shutdownSwitch(config-if)#exitSwitch(config)#interface vlan 20Switch(config-if)#ip address 192.168.2.1 255.255.255.0 Switch(config-if)#no shutdownSwitch(config-if)#exitSwitch(config)#interface vlan 30Switch(config-if)#ip address 192.168.3.1 255.255.255.0 Switch(config-if)#no shutdownSwitch(config-if)#exitSwitch(config)#interface vlan 40Switch(config-if)#ip address 192.168.4.1 255.255.255.0 Switch(config-if)#no shutdownSwitch(config-if)#exitSwitch(config)#interface fastEthernet 0/1Switch(config-if)#no switchportSwitch(config-if)#ip address 192.168.0.2255.255.255.0 Switch(config-if)#no shutdownSwitch(config-if)#exitSwitch(config)#ip route 200.1.1.0 255.255.255.0 192.168.0.1 Switch(config)#ip route 222.1.1.0 255.255.255.0 192.168.0.1route1Router>enableRouter#conf tRouter(config)#hostname R1R1(config)#enable password 1234R1(config)#interface fastEthernet 0/0R1(config-if)#ip address 192.168.0.1 255.255.255.0R1(config-if)#no shutdownR1(config-if)#exitR1(config)#interface serial 1/0R1(config-if)#ip address 222.1.1.1 255.255.255.0R1(config-if)#no shutdownR1(config-if)#exitR1(config)#ip route 192.168.1.0 255.255.255.0 192.168.0.2 R1(config)#ip route 192.168.2.0 255.255.255.0 192.168.0.2 R1(config)#ip route 192.168.3.0 255.255.255.0 192.168.0.2 R1(config)#ip route 192.168.4.0 255.255.255.0 192.168.0.2 R1(config)#ip route 200.1.1.0 255.255.255.0 222.1.1.2route2Router>enableRouter#conf tRouter(config)#interface serial 1/0Router(config-if)#ip address 222.1.1.2 255.255.255.0 Router(config-if)#clock rate 64000Router(config-if)#no shutdownRouter(config-if)#exitRouter(config)#interface fastEthernet 0/0Router(config-if)#ip address 200.1.1.1 255.255.255.0 Router(config-if)#no shutdownRouter(config-if)#exitRouter(config)#ip route 0.0.0.0 0.0.0.0 222.1.1.1 HTTP服务器访问<br>201510513103<br>CaoJieACL访问控制列表Router>enableRouter#conf tRouter(config)#access-list 1 deny 192.168.4.0 0.0.0.255 Router(config)#accRouter(config)#access-list 1 perRouter(config)#access-list 1 permit anyRouter(config)#interRouter(config)#interface faRouter(config)#interface fastEthernet 0/0Router(config-if)#ip accRouter(config-if)#ip access-group 1 outRouter(config-if)#exitNAT网络地址动态转换Router>enableRouter#conf tRouter(config)#access-list 1 permit 192.168.0.0 0.0.255.255Router(config)#ip nat pool caojie 222.1.1.3 222.1.1.16 netmask 255.255.255.0 Router(config)#ip nat inside source list 1 pool caojieRouter(config)#interface serial 1/0Router(config-if)#ip nat outsidesRouter(config-if)#ip nat outsideRouter(config-if)#exitRouter(config)#interface f0/0Router(config-if)#ip nat insideRouter(config-if)#exitS1的Telnet远程登录(参考)Switch(config)#interface vlan 10Switch(config-if)#ip address 192.168.1.234 255.255.255.0Switch(config-if)#no shutdownSwitch(config-if)#exitSwitch(config)#enable password 1234Switch(config)#line vty 0 4Switch(config-line)#password ****Switch(config-line)#loginSwitch(config-line)#exitCommandPrompt(命令行)PC>ping 192.168.1.234PC>telnet 192.168.1.234。
交换机与路由器的配置
一、交换机的基本配置1. 配置enable口令、密码和主机名Switch> (用户执行模式提示符)Switch>enable (进入特权模式)Switch# (特权模式提示符)Switch#config terminal (进入配置模式)Switch(config)#enable password cisco (设置enable password为cisco) Switch(config)#enable secret cisco1 (设置enable secret为sisco1) Switch(config)#hostname C2950 (设置主机名为C2950)C2950(config)#end (退回到特权模式)C2950#2. 配置交换机IP地址、默认网关、域名和域名服务器C2950(config)#ip address 192.168.1.1 255.255.255.0 (设置交换机IP)C2950(config)#ip default-gateway 192.168.1.254 (设置默认网关)C2950(config)#ip domain-name (设置域名)C2950(config)#ip name-server 200.0.0.1 (设置域名服务器)C2950(config)#end3. 配置交换机的端口属性C2950(config )#interface fastethernet0/1 (进入接口0/1的配置模式)C2950(config-if)#speed ? (查看speed命令的子命令)C2950(config-if)#speed 100 (设置该端口速率为100Mbps)C2950(config-if)#duplex ? (查看duplex命令的子命令)C2950(config-if)#duplex full (设置该端口为全双工)C2950(config-if)#description TO_PC1 (设置该端口描述为TO_PC1)C2950(config-if)#^Z (返回到特权模式,同end)C2950#show interface fastethernet0/1 (查看端口0/1的配置结果)C2950#show interface fastethernet0/1 status (查看端口0/1的状态) 4. 配置和查看MAC地址表C2950(config)#mac-address-table ? (查看mac-address-table的子命令)C2950(config)#mac-address-table aging-time 100 (设置超时时间为100s)C2950(config)#mac-address-table permanent 0000.0c01.bbcc f0/3 (加入永久地址) C2950(config)#mac-address-table restricted static 0000.0c02.bbcc f0/3 f0/7(加入静态地址)C2950(config)#endC2950#show mac-address-table (查看整个MAC地址表)C2950#clear mac-address-table restricted static (清除限制性地址)二、配置和管理VLAN1. VLAN基础知识VLAN技术:把物理上直接相连的网络从逻辑上划分为多个子网。
华为路由器交换机配置命令大全
华为路由器交换机配置命令大全华为路由器交换机配置大全1XXX华为路由器交换机配置命令大全一、计算机命令#shutdown-hnow;关机#init 0;关机#logout;用户注销#login;用户登录#ifconfig;显示IP地址#ifconfig eth0 netmask;设置IP地址#ifconfig eht0 netmask down;禁用IP地址#route add 0.0.0.0 gw;设置网关#route del 0.0.0.0 gw;删除网关#route add default gw;设置网关#route del default gw;删除网关#route;显示网关#ping;发ECHO包#telnet;远程登录二、XXX路由器交换机配置命令:交换机命令[Quidway]dis cur;显示当前配置[Quidway]display current-configuration;表现当前配置[Quidway]display interfaces;显示接口信息[Quidway]display vlan;表现vlan信息[Quidway]display version;显示版本信息[Quidway]super password;修改特权用户密码[Quidway]sysname;交流机定名[Quidway]interface vlan x;进入接口视图[Quidway-Vlan-interfacex]ip address 10.65.1.1 255.255.0.0;配置VLAN的IP地址[Quidway]Ip route-static 0.0.0.0 0.0.0.0 10.65.1.2;静态路由=网关[Quidway]rip;rip协议[Quidway]local-user ftp[Quidway]user-interface vty 0 4;进入假造终端[S3026-ui-vty0-4]authentication-mode password;设置口令模式[S3026-ui-vty0-4]set authentication-mode password simple 222;设置口令[S3026-ui-vty0-4]user privilege level 3;用户级别[Quidway]vlan3;创建VLAN[Quidway]monitor-port;指定镜像端口[Quidway]port mirror;指定被镜像端口[Quidway]port mirror int_list observing-port int_type int_num;指定镜像和被镜像[Quidway]description string;指定VLAN描述字符[Quidway]description;删除VLAN描述字符[Quidway]display vlan[vlan_id];检察VLAN设置[Quidway]stp{enable|disable};设置天生树,默许封闭[Quidway]stp priority 4096;设置交换机的优先级[Quidway]stp root{primary|secondary};设置为根或根的备份[SwitchA-vlanx]isolate-user-vlan enable;设置主vlan所以设置PVID为所属vlanid,设置可以互通的vlan为untagged.3、XXX路由器交流机配置敕令:路由器敕令[Quidway]display version;表现版本信息[Quidway]display current-configuration;表现当前配置[Quidway]display interfaces;显示接口信息[Quidway]display ip route;表现路由信息[Quidway]sysname aabbcc;变动主机名[Quidway]super password ;设置口令[Quidway]interface serial0;进入接口华为路由器交换机配置大全3[Quidway-serial0]ip address;配置端口IP地址[Quidway-serial0]undo shutdown;激活端口[Quidway]link-protocol hdlc;绑定hdlc协议[Quidway]user-interface vty 0 4[Quidway-ui-vty0-4]authentication-mode password[Quidway-ui-vty0-4]set authentication-mode password simple 222[Quidway-ui-vty0-4]user privilege level 3[Quidway-ui-vty0-4]quit[Quidway]debugging XXX;显示所有信息[Quidway]debugging XXX;调试事件信息[Quidway]debugging XXX;表现包的信息四、XXX路由器交换机配置命令:静态路由:[Quidway]ip route-static{interfacenumber|nexthop}[value][reject|blackhole]例如:[Quidway]ip route-static 129.1.0.0 16 10.0.0.2[Quidway]ip route-static 129.1.0.0 255.255.0.0 10.0.0.2[Quidway]ip route-static 129.1.0.0 16 Serial2[Quidway]ip route-static 0.0.0.0 0.0.0.0 10.0.0.25、XXX路由器交流机配置敕令:静态路由:[Quidway]rip;设置静态路由[Quidway]rip work;设置工作允许[Quidway]ri pinput;设置入口允许[Quidway]rip output;设置出口允许[Quidway-rip]network 1.0.0.0;设置交换路由网络[Quidway-rip]network all;设置与所有网络交换[Quidway-rip]peer ip-address;[Quidway-rip]summary;路由聚合[Quidway]rip version 1;设置事情在版本1[Quidway]rip version 2 multicast;设版本2,多播体式格局[Quidway-Ethernet0]rip split-horizon;水平分隔[Quidway]XXX;配置路由器的ID[Quidway]ospf enable;启动OSPF协议[Quidway-ospf]import-routedirect;引入直联路由[Quidway-Serial0]ospf enable area;配置OSPF地区六、XXX路由器交换机配置命令:标准访问列表命令格式如下:acl[match-orderconfig|auto];默许前者按次婚配。
路由器和交换机命令大全
路由器和交换机命令大全路由器和交换机是计算机网络中常用的设备,它们在数据传输和网络管理中发挥着重要的作用。
掌握路由器和交换机的命令是网络管理和故障排除的基本要求。
本文将为您提供常见的路由器和交换机命令大全,以帮助您更好地理解和应用这些设备。
一、路由器命令1. show ip route:显示路由表中的所有路由信息。
2. show interfaces:显示接口的状态和统计信息。
3. show running-config:显示当前路由器的配置信息。
4. show version:显示路由器的硬件和软件版本信息。
5. configure terminal:进入全局配置模式。
6. interface interface-name:进入指定接口的配置模式。
7. ip address ip-address subnet-mask:为接口配置IP地址和子网掩码。
8. ip route destination-network subnet-mask next-hop:配置静态路由。
9. access-list access-list-number {deny | permit} source destination:配置访问控制列表。
10. clear arp-cache:清除路由器的ARP缓存。
11. debug {protocols | ip | interface}:启用某个调试功能来监控网络流量或接口状态。
二、交换机命令1. show interfaces:显示接口的状态和统计信息。
2. show mac-address-table:显示交换机的MAC地址表。
3. show running-config:显示当前交换机的配置信息。
4. show vlan:显示交换机的VLAN信息。
5. configure terminal:进入全局配置模式。
6. interface interface-name:进入指定接口的配置模式。
华为路由器、交换机配置命令大全
华为路由器、交换机配置命令大全华为路由器配置命令大全:一、登录华为路由器控制台1:使用PuTTY或其他SSH客户端登录到华为路由器:```ssh admin<路由器IP地址>```2:输入登录密码进行验证。
二、基本配置命令1:设置主机名:```sysname <主机名>```2:配置管理接口:```interface GigabitEthernet0/0/0ip address <IP地址> <子网掩码>```3:配置VLAN接口:```interface Vlanif <VLAN ID>ip address <IP地址> <子网掩码>```三、路由相关配置命令1:静态路由配置:```ip route-static <目标网络> <子网掩码> <下一跳地址> ```2:动态路由配置:```router ospf <进程ID>router-id <路由器ID>network <网络地址> <子网掩码> area <区域ID>3: BGP路由配置:```bgp <AS号码>router-id <路由器ID>peer <对端IP地址> as-number <对端AS号码>```四、安全配置命令1:配置防火墙规则:```acl number <ACL编号>rule <规则序号> permit source <源地址> destination <目的地址>rule <规则序号> deny source <源地址> destination <目的地址>```2:开启SSH服务:ssh server enable```3:配置AAA认证:```aaalocal-user <用户名> password irreversible-cipher <加密密码>authorization-attribute user-role network-admin```五、NAT配置命令1:配置静态NAT:```interface GigabitEthernet0/0/0nat outbound <内部接口> <外部接口>```2:配置动态NAT:nat address-group <地址组名>address <内部地址> <外部地址>```3:配置PAT:```interface GigabitEthernet0/0/0nat address-group <地址组名>```附件:1:示例配置文件(附件1)2:路由器接口图(附件2)法律名词及注释:1:主机名:路由器的标识名称。
交换机与路由器的配置
交换机与路由器的配置交换机与路由器的配置:一、前言本文档旨在介绍交换机和路由器的配置步骤,包括基本设置、接口配置、VLAN配置、静态路由配置等内容。
二、基本设置在配置交换机和路由器之前,需要进行基本设置,如设定管理IP地质、设置管理员密码、启用远程管理等。
以下是基本设置的步骤:1.进入设备终端,使用管理员权限登录。
2.设置设备的管理IP地质。
可以使用以下命令进行配置:ip address <IP地质> <子网掩码>3.设置管理员密码,以保护设备的管理权限。
以下是设置管理员密码的命令示例:enable password <密码>4.启用远程管理,以方便从远程位置对设备进行管理。
可以使用以下命令进行配置:line vty 0 15logintransport input telnet sshexit三、接口配置接口配置是指对交换机和路由器的物理接口进行设置,包括端口速率、双工模式、带宽控制等。
以下是接口配置的步骤:1.进入设备终端,使用管理员权限登录。
2.进入接口配置模式。
可以使用以下命令进入接口配置模式:interface <接口名称>3.配置接口的速率和双工模式。
以下是配置接口速率和双工模式的命令示例:speed <速率>duplex <双工模式>4.设置接口的带宽控制,以控制接口的传输速率。
以下是设置带宽控制的命令示例:bandwidth <带宽大小>四、VLAN配置VLAN配置是指对交换机进行虚拟局域网的划分和配置。
以下是VLAN配置的步骤:1.进入设备终端,使用管理员权限登录。
2.进入VLAN配置模式。
可以使用以下命令进入VLAN配置模式:vlan database3.创建VLAN。
以下是创建VLAN的命令示例:vlan <VLAN编号> name <VLAN名称>4.配置接口的VLAN成员关系。
路由器和交换机的配置命令的简写

那可多了~Cisco路由配置语句汇总启动接口,分配IP地址:router>router> enablerouter#router# configure terminalrouter(config)#router(config)# interface Type Portrouter(config-if)# no shutdownrouter(config-if)# ip address IP-Address Subnet-Maskrouter(config-if)# ^z配置RIP路由协议:30秒更新一次router(config)# router riprouter(config-if)# network Network-Number <——通告标准A,B,C类网——>router(config-if)# ^z配置IGRP路由协议:90秒更新一次router(config)# router igrp AS-Number <—— AS-Number范围1~65535——>router(config-if)# network Network-Number <——通告标准A,B,C类网——>router(config-if)# ^z配置Novell IPX路由协议:Novell RIP 60秒更新一次router(config)# ipx routing [node address]router(config)# ipx maximum-paths Paths <——设置负载平衡,范围1~512——>router(config)# interface Type Portrouter(config-if)# ipx network Network-Number [encapsulation encapsulation-type] [secondary] <——通告标准A,B,C类网——>router(config-if)# ^z配置DDR:router(config)# dialer-list Group-Number protocol Protocol-Type permit [list ACL-Number]router(config)# interface bri 0router(config-if)# dialer-group Group-Numberrouter(config-if)# dialer map Protocol-Type Next-Hop-Address name Hostname Telphone-Numberrouter(config-if)# ^z配置ISDN:router(config)# isdnth-typeth-Type <——配置ISDN交换机类型,中国使用basic-net3——>router(config-if)# ^z配置Frame Relay:router(config-if)# encapsulation frame-relay [cisco | ietf ]router(config-if)# frame-relay lmi-type [ansi | cisco | q933a ]router(config-if)# bandwidth kilobitsrouter(config-if)# frame-relay invers-arp [ Protocol ] [dlci ]<——配置静态Invers ARP表:router(config)# frame-relay Protocol Protocol-Address DLCI [ Broadcast ] [ ietf | cisco ] [ payload-compress | packet-by-packet ]——><——设置Keepalive间隔:router(config-if)# keepalive Number——><——为本地接口指定DLCI:router(config-if)# frame-lelay local-dlci Number——><——子接口配置:router(config-if)# interface Type Port.Subininterface-Number [ multipoint | point-to-point ]router(config-subif)# ip unnumbered Interfacerouter(config-subif)# frame-lelay local-dlci Number——>router(config-if)# ^z配置标准ACL:router(config)# access-list Access-List-Number [ permit | deny ] source [ source-mask ] <——Access-List-Number 范围:1~99标准ACL;100~199扩展ACL;800~899标准IPX ACL;900~999扩展IPX ACL;1000~1099 IPX SAP ACL;600~699Apple Talk ACL——>router(config)# interface Type Portrouter(config-if)# ip access-group Access-List-Number [ in | out ]router(config-if)# ^z配置扩展ACL:router(config)# access-list Access-List-Number [ permit | deny ] [ Protocol | Protocol-Number ] source source-wildcard [ Source-Port ] destination destination-wildcard [ Destination-Port ] [ established ]router(config)# interface Type Portrouter(config-if)# ip access-group Access-List-Number [ in | out ]router(config-if)# ^z配置命名ACL:router(config)# ip access-list [ standard | extended ] ACL-Namerouter(config [ std- | ext- ] nacl)# [ permit | deny ] [ IP-Access-List-Test-Conditions ]router(config [ std- | ext- ] nacl)# no [ permit | deny ] [ IP-Access-List-Test-Conditions ]router(config [ std- | ext- ] nacl)# ^zrouter(config)# interface Type Portrouter(config-if)# ip access-group [ACL-Name | 1~199 ] [ in | out ]router(config-if)# ^zywELinux联盟配置DCE时钟:router# show controllers Type Port <——确定DCE接口——>router(confin-if)# clock rate 64000 <——进入DCE接口设置时钟速率——>router(config-if)# ^z配置PPP协议:router(config)# username Name password Set-Password-Here <——验证方建立数据库——>router(config)# interface Type Portrouter(config-if)# encapsulation ppp <——启动PPP协议——>router(config-if)# ppp outhentication [ chap | chap pap | pap chap | pap ] <——选择PPP认证——>router(config-if)# ppp pap sent-username Name password Password <——发送验证信息——>router(config-if)# ^zPAP单向认证配置实例:验证方:router-server(config)# username Client password 12345 <——验证方建立数据库——>router-server(config)# interface serial 0router-server(config-if)# encapsulation ppprouter-server(config-if)# ppp authentication pap <——选择使用PAP实现PPP认证——>router-server(config-if)# ^z被验证方:router-client(config-if)# encapsulation ppprouter-client(config-if)# ppp pap sent-username Client password 12345 <——发送验证信息——>router-client(config-if)# ^zywELinux联盟PAP双向认证配置实例:路由器 A:routerA(config)# username B password 12345routerA(config)# interface serial 0routerA(config-if)# encapsulation ppprouterA(config-if)# ppp authentication paprouterA(config-if)# ppp pap sent-username A password 54321routerA(config-if)# ^z路由器 B:routerB(config)# username A password 54321routerB(config)# interface serial 1routerB(config-if)# encapsulation ppprouterB(config-if)# ppp authentication paprouterB(config-if)# ppp pap sent-username B password 12345 routerB(config-if)# ^zCHAP单向认证配置实例:验证方:router-server(config)# username router-client password 12345 router-server(config)# interface serial 0router-server(config-if)# encapsulation ppprouter-server(config-if)# ppp authentication chaprouter-server(config-if)# ^z被验证方:router-client(config-if)# encapsulation ppprouter-client(config-if)# ppp authentication chaprouter-client(config-if)# ppp chap hostname router-client router-client(config-if)# ppp chap password 12345router-client(config-if)# ^z CHAP双向认证配置实例:路由器 A:routerA(config)# username routerB password 12345routerA(config)# interface serial 0routerA(config-if)# encapsulation ppprouterA(config-if)# ppp authentication chaprouterA(config-if)# ppp chap hostname routerArouterA(config-if)# ppp chap password 54321routerA(config-if)# ^z路由器 B:routerB(config)# username routerA password 54321routerB(config)# interface serial 1routerB(config-if)# encapsulation ppprouterB(config-if)# ppp authentication chaprouterB(config-if)# ppp chap hostname routerBrouterB(config-if)# ppp chap password 12345routerB(config-if)# ^zywELinux联盟Telnet使用:routerA# terminal monitor <——可以传回在远端主机执行Debug命令的结果——>routerA# telnet IP-Address [ Router-Name ] <——Telnet到指定的地址或名字的主机——> routerB# [ exit | logout ] <——退出Telnet——>routerB# ++<6>再按 <——挂起Telnet——>routerA# show sessions <——显示当前所有Telnet的信息,包括Connect-Number ——>routerA# Connect-Number <——返回指定的Telnet连接——>routerA# disconnect IP-Address [ Router-Name ] <——断开指定地址或名字的主机的连接——> routerA# show user <——显示Telnet到本机的连接信息——>routerA# clear line [ 0 | 1 | 2 | 3 | 4 ] <——断开指定Telnet到本机的连接——>禁止任何Telnet到本机:router(config)# line vty 0 4router(config-line)# access-class ACL-Numberrouter(config)# ^z设置主机名:router(config)# hostname Set-Hostnamerouter(config)# ^zrouter(config)# ^z设置用户模式密码:router(config)# line console 0router(config-line)# loginrouter(config-line)# password Set-Passwordrouter(config-line)# ^zywELinux联盟设置Telnet密码:router(config)# line vty 0 4router(config-line)# loginrouter(config-line)# password Set-Passwordrouter(config-line)# ^z设置特权模式密码:router(config)# enable password Set-Password <——不加密的密码,明码——>router(config)# enable secret Set-Password <——经过加密的密码——>router(config)# ^z给所有密码加密:router(config)# service password-ancryption Set-Password-Hererouter(config)# no service password-ancryption <——取消加密——>router(config)# ^z设置登录Banner:router(config)# banner motd 分隔符 Set-Banner-InFORMation-Here 分隔符 <——前后分隔符一定要一致——>设置接口的描述信息:router(config-if)# description Set-Port-InFORMation-Hererouter(config)# ^zCDP的控制:router(config-if)# cdp enable <——在指定端口启用CDP,缺省——>router(config-if)# no cdp enable <——在指定端口关闭CDP——>router(config)# cdp run <——使所有端口启用CDP——>router(config)# no cdp run <——使所有端口关闭CDP——>Ping的使用:router# ping IP-Addressrouter# ping <——扩展Ping命令——>Protocol [ip]:[ Protocol-Type ] <——选择协议类型——>Target IP address:IP-Address <——输入测试地址——>Repeat count [5]: <——选择发送的ICMP包数量——>Datagram size [100]: <——选择每个包的大小——>Timeout in seconds [2]: <——设置每个包的超时时间——>Extended commands [n]:y <——使用扩展Ping命令——>Sweep range of sizes [n]:ywELinux联盟Tracke的使用:router# trace IP-Address [ Host-Name ]为Cisco 4000路由器指定媒体类型:router(config-if)# media-type 10baset <——使AUI(默认)失效,改为使用RJ-45——>router(config-if)# ^z更改路由器启动顺序:router(config)# boot system flash IOS-FileNamerouter(config)# boot system tftp IOS-FileName TFTP-IP-Addressrouter(config)# boot system romrouter(config)# ^z修改寄存器数值:router(config)# config-register value <——Cisco出厂默认value=0x2102,value范围:0x2100(进入ROM监视器),0x2101(使系统从ROM启动),0x2102~0x210F(使系统从NVRAM启动)。
交换机与路由代码
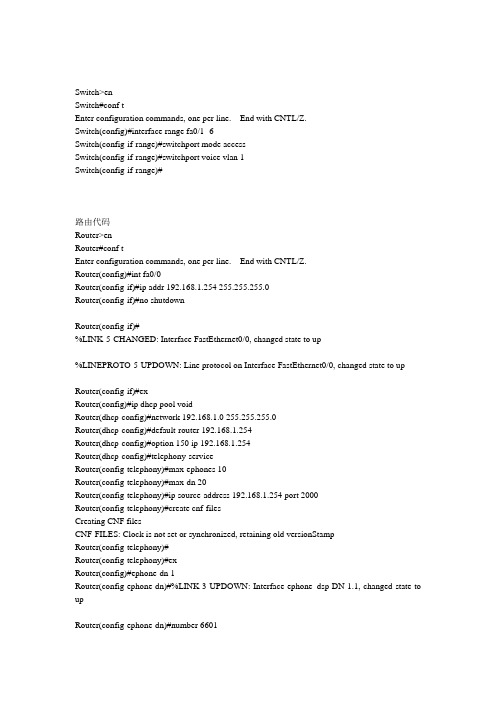
Switch>enSwitch#conf tEnter configuration commands, one per line. End with CNTL/Z.Switch(config)#interface range fa0/1 -6Switch(config-if-range)#switchport mode accessSwitch(config-if-range)#switchport voice vlan 1Switch(config-if-range)#路由代码Router>enRouter#conf tEnter configuration commands, one per line. End with CNTL/Z.Router(config)#int fa0/0Router(config-if)#ip addr 192.168.1.254 255.255.255.0Router(config-if)#no shutdownRouter(config-if)#%LINK-5-CHANGED: Interface FastEthernet0/0, changed state to up%LINEPROTO-5-UPDOWN: Line protocol on Interface FastEthernet0/0, changed state to upRouter(config-if)#exRouter(config)#ip dhcp pool voidRouter(dhcp-config)#network 192.168.1.0 255.255.255.0Router(dhcp-config)#default-router 192.168.1.254Router(dhcp-config)#option 150 ip 192.168.1.254Router(dhcp-config)#telephony-serviceRouter(config-telephony)#max-ephones 10Router(config-telephony)#max-dn 20Router(config-telephony)#ip source-address 192.168.1.254 port 2000Router(config-telephony)#create cnf-filesCreating CNF filesCNF-FILES: Clock is not set or synchronized, retaining old versionStampRouter(config-telephony)#Router(config-telephony)#exRouter(config)#ephone-dn 1Router(config-ephone-dn)#%LINK-3-UPDOWN: Interface ephone_dsp DN 1.1, changed state to upRouter(config-ephone-dn)#number 6601Router(config-ephone-dn)#exRouter(config)#ephone-dn 2Router(config-ephone-dn)#%LINK-3-UPDOWN: Interface ephone_dsp DN 2.1, changed state to upRouter(config-ephone-dn)#number 6602Router(config-ephone-dn)#exRouter(config)#ephone-dn 3Router(config-ephone-dn)#%LINK-3-UPDOWN: Interface ephone_dsp DN 3.1, changed state to upRouter(config-ephone-dn)#number 6603Router(config-ephone-dn)#exRouter(config)#ephone-dn 4Router(config-ephone-dn)#%LINK-3-UPDOWN: Interface ephone_dsp DN 4.1, changed state to upRouter(config-ephone-dn)#number 6604Router(config-ephone-dn)#exRouter(config)#ephone-dn 5Router(config-ephone-dn)#%LINK-3-UPDOWN: Interface ephone_dsp DN 5.1, changed state to upRouter(config-ephone-dn)#number 6605Router(config-ephone-dn)#exRouter(config)#ephone-dn 6Router(config-ephone-dn)#%LINK-3-UPDOWN: Interface ephone_dsp DN 6.1, changed state to upRouter(config-ephone-dn)#number 6606Router(config-ephone-dn)#exRouter(config)#ephone-dn 7Router(config-ephone-dn)#%LINK-3-UPDOWN: Interface ephone_dsp DN 7.1, changed state to upRouter(config-ephone-dn)#number 6607Router(config-ephone-dn)#exRouter(config)#exRouter#%SYS-5-CONFIG_I: Configured from console by consoleRouter#show ip dhcp bindingIP address Client-ID/ Lease expiration TypeHardware address192.168.1.1 000C.852A.B42A -- Automatic 192.168.1.2 0002.1605.7AB8 -- Automatic 192.168.1.3 00D0.FFD7.B71C -- Automatic 192.168.1.4 0001.6306.9B01 -- Automatic 192.168.1.6 00D0.BA59.869E -- Automatic 192.168.1.5 000A.F380.7394 -- Automatic 192.168.1.7 0090.2B16.CEDB -- Automatic Router#conf tEnter configuration commands, one per line. End with CNTL/Z.Router(config)#ephone 1Router(config-ephone)#mac-address 000C.852A.B42ARouter(config-ephone)#type cipcRouter(config-ephone)#button 1:1Router(config-ephone)#exRouter(config)#ephone 2Router(config-ephone)#mac-address 0002.1605.7ABBRouter(config-ephone)#type 7960Router(config-ephone)#button 1:2Router(config-ephone)#exRouter(config)#ephone 3Router(config-ephone)#mac-address 00D0.FFD7.B71CRouter(config-ephone)#type 7960Router(config-ephone)#button 1:3Router(config-ephone)#exRouter(config)#ephone 4Router(config-ephone)#mac-address 0001.6306.9B01Router(config-ephone)#type ataRouter(config-ephone)#button 1:4Router(config-ephone)#exRouter(config)#ephone 5Router(config-ephone)#mac-address 000A.F380.7394Router(config-ephone)#type cipcRouter(config-ephone)#button 1:5Router(config-ephone)#exRouter(config)#ephone 6Router(config-ephone)#mac-address 00D0.BA59.869ERouter(config-ephone)#type cipcRouter(config-ephone)#button 1:6Router(config-ephone)#exRouter(config)#ephone 7Router(config-ephone)#mac-address 0090.2B16.CEDBRouter(config-ephone)#type cipcRouter(config-ephone)#button 1:7Router(config-ephone)#%IPPHONE-6-REGISTER: ephone-7 IP:192.168.1.7 Socket:2 DeviceType:Phone has registered. %IPPHONE-6-REGISTER: ephone-4 IP:192.168.1.4 Socket:2 DeviceType:Phone has registered. %IPPHONE-6-REGISTER: ephone-6 IP:192.168.1.6 Socket:2 DeviceType:Phone has registered. %IPPHONE-6-REGISTER: ephone-5 IP:192.168.1.5 Socket:2 DeviceType:Phone has registered. %IPPHONE-6-REGISTER: ephone-1 IP:192.168.1.1 Socket:2 DeviceType:Phone has registered.。
- 1、下载文档前请自行甄别文档内容的完整性,平台不提供额外的编辑、内容补充、找答案等附加服务。
- 2、"仅部分预览"的文档,不可在线预览部分如存在完整性等问题,可反馈申请退款(可完整预览的文档不适用该条件!)。
- 3、如文档侵犯您的权益,请联系客服反馈,我们会尽快为您处理(人工客服工作时间:9:00-18:30)。
1.配置路由器的主机名和提示信息。
Router(config)#Router(config)#hostname R1R1(config)#banner motd %Enter TEXT message. End with the character '%'.2.配置enable密码、配置console和vty密码。
R1(config)#enable secret classR1(config)#line console 0R1(config-line)#password ciscoR1(config-line)#loginR1(config-line)#line vty 0 4R1(config-line)#password ciscoR1(config-line)#login3.配置接口(s0/0和f0/0),并显示接口信息。
R1(config)#interface FastEthernet0/0R1(config-if)#ip address 192.168.10.1 255.255.255.0R1(config-if)#no shutdown保存配置R1#copy running-config startup-configDestination filename [startup-config]?Building configuration...[OK]删除启动配置R1#erase startup-configErasing the nvram filesystem will remove all configuration files! Continue? [confirm] [OK]Erase of nvram: complete%SYS-7-NV_BLOCK_INIT: Initialized the geometry of nvram查看R1的cdp邻居R1#show cdp neighbors关闭R1接口下的cdpR1(config)#interface s0/0/0R1(config-if)#no cdp enable打开R1接口下的cdpR1(config)#interface s0/0/0R1(config-if)#cdp enableble4)关闭和打开整个路由的cdp关闭R1整个路由的cdpR1(config)#no cdp run打开R1整个路由的cdpR1(config)#cdp run关闭R2整个路由的cdpR2(config)#no cdp run打开R2整个路由的cdpR2(config)#cdp run5)在R1和R2上的s0/0上配置IP地址,以及enable密码和vty密码对R1进行配置R1(config)#interface s0/0/0R1(config-if)#ip address 192.168.1.1 255.255.255.0R1(config-if)#no shutdownR1(config)#enable secret classR1(config-line)#line vty 0 4R1(config-line)#password ciscoR1(config-line)#loginWrite)4)把IOS从路由器备份到TFTP服务器上。
Router#copy running-config tftp:Address or name of remote host []? 1.1.1.2Destination filename [Router-confg]? aa.bakWriting running-config...!![OK - 494 bytes]2)在各路由器上用rip进行配置R1:Router(config-router)#network 12.12.12.08)使用passive在Lo1接口上禁止rip发送信息Router(config-router)#passive-interface lo1Router(config-router)#RIP: received v1 update from 12.12.12.2 on Serial0/0/023.0.0.0 in 1 hops2)在各路由器上用ospf进行配置(进程号自定,单区域)R1:R1(config-router)#network 12.12.12.1 0.0.0.255 area 05)查看R1和R2上的f0/1链路谁是DR。
在R1上改变router-id,使得R1为DR(要执行clear ip ospf process)。
由上图的show ip ospf neighbor看出R2的优先级最高,所以R2是DR,R1为BDRR1(config)#router ospf 10R1(config-router)#router-id 10.1.1.1R1#clear ip ospf processReset ALL OSPF processes? [no]: yes6)在R2上用ip ospf 的f0/1改变ospf 优先级(ip ospf priority xxx)使得R又成为DR。
Router(config)#interface f0/1Router(config-if)#ip ospf priority 200Router#show ip ospf neighbor7)在R3配置ip route 0.0.0.0 0.0.0.0 3.3.3.254默认路由,模拟连接到Internet 上;在R3的ospf进程中用default-information originate命令;在R1、R2上查看是否有默认路由的产生。
R3进行配置:Router(config)#ip route 0.0.0.0 0.0.0.0 3.3.3.254Router(config)#rouRouter(config)#router osRouter(config)#router ospf 1Router(config-router)#deRouter(config-router)#default-information originateb)交换机各种密码的配置配置特权执行口令Switch(config)# enable secret ciscoSwitch(config)#配置控制台口令。
Switch(config)# line console 0Switch(config-line)# password classSwitch(config-line)# login配置虚拟线路口令Switch(config-line)# line vty 0 15Switch(config-line)# password ciscoSwitch(config-line)# logind)配置文件的保存、删除;查看flash信息、version信息。
文件的保存:Switch#wBuilding configuration...OK]Switch#文件的删除:Switch#delete ?WORD File to be deletedflash: File to be deleted4)vlan2和vlan3的创建,按照图中所示,把端口划分在相应的vlan中Switch(config)#vlan 2Switch(config-vlan)#name cisco1Switch(config-vlan)#exiSwitch(config-vlan)#exitSwitch(config)#vlan 3Switch(config-vlan)#name cisco2Switch(config-vlan)#exitSwitch(config)#intSwitch(config)#interface fa0/5Switch(config-if)#swSwitch(config-if)#switchport moSwitch(config-if)#switchport mode accSwitch(config-if)#switchport mode accessSwitch(config-if)#swSwitch(config-if)#switchport accSwitch(config-if)#switchport access vSwitch(config-if)#switchport access vlan 2Switch(config-if)#endSwitch#%SYS-5-CONFIG_I: Configured from console by consoleSwitch#Switch#conf tEnter configuration commands, one per line. End with CNTL/Z.Switch(config)#interface fa0/6Switch(config-if)#switchport mode accessSwitch(config-if)#switchport access vlan 2Switch(config-if)#endSwitch#%SYS-5-CONFIG_I: Configured from console by consoleSwitch#Switch#conf tEnter configuration commands, one per line. End with CNTL/Z.Switch(config)#interface fa0/7Switch(config-if)#switchport mode accessSwitch(config-if)#switchport access vlan 3Switch(config-if)#^ZSwitch#%SYS-5-CONFIG_I: Configured from console by consoleSwitch#Switch#Switch#conf tEnter configuration commands, one per line. End with CNTL/Z.Switch(config)#Switch(config)#interface fa0/8Switch(config-if)#switchport mode accessSwitch(config-if)#switchport access vlan 3Switch(config-if)#^ZSwitch#Switch(config)#interface vlan 99Switch(config-if)#ip adSwitch(config-if)#ip address 172.17.99.11 255.255.255.0Switch(config-if)#no shutSwitch(config-if)#exiSwitch(config-if)#exitSwitch(config)#inSwitch(config)#interface fa0/5Switch(config-if)#swSwitch(config-if)#switchport moSwitch(config-if)#switchport mode aSwitch(config-if)#switchport mode accessSwitch(config-if)#swSwitch(config-if)#switchport aSwitch(config-if)#switchport access vSwitch(config-if)#switchport access vlan 99% Access VLAN does not exist. Creating vlan 99Switch(config-if)#%LINK-5-CHANGED: Interface Vlan99, changed state to up%LINEPROTO-5-UPDOWN: Line protocol on Interface Vlan99, changed state to upSwitch#conf tEnter configuration commands, one per line. End with CNTL/Z.Switch(config)#interface vlan 99Switch(config-if)#ip address 192.168.1.11 255.255.255.0 Switch(config-if)#no shutSwitch(config-if)#exitSwitch(config)#interface fa0/7Switch(config-if)#switchport mode accessSwitch(config-if)#switchport access vlan 99Switch(config-if)#^ZSwitch#%SYS-5-CONFIG_I: Configured from console by consoleSwitch#Switch#Switch#conf tEnter configuration commands, one per line. End with CNTL/Z. Switch(config)#interface vlan 99Switch(config-if)#ip address 192.168.1.21 255.255.255.0 Switch(config-if)#no shutSwitch(config-if)#exitSwitch(config)#interface fa0/8Switch(config-if)#switchport mode accessSwitch(config-if)#switchport access vlan 99Switch(config-if)#^ZSwitch#%SYS-5-CONFIG_I: Configured from console by consoleSwitch#6)保存配置,假设密码遗忘,进行密码的恢复Switch#wBuilding configuration...[OK2)手工配置交换机之间链路为trunk:S1的配置S1(config)#interface fa0/1S1(config-if)#swS1(config-if)#switchport moS1(config-if)#switchport mode trS1(config-if)#switchport mode trunkS2的配置S2(config)#interface fa0/1S2(config-if)#swS2(config-if)#switchport mS2(config-if)#switchport mode tS2(config-if)#switchport mode trunkS2(config-if)#S2(config-if)#S2(config-if)#interface fa0/2S2(config-if)#switchport mode trunk3)在SW1/SW2/SW3上,配置VTP的名字为VTP-SZPT,密码为cisco。