艾本c-200A调频听力耳机
CROSSZONE CZ-1立体声耳机使用说明书
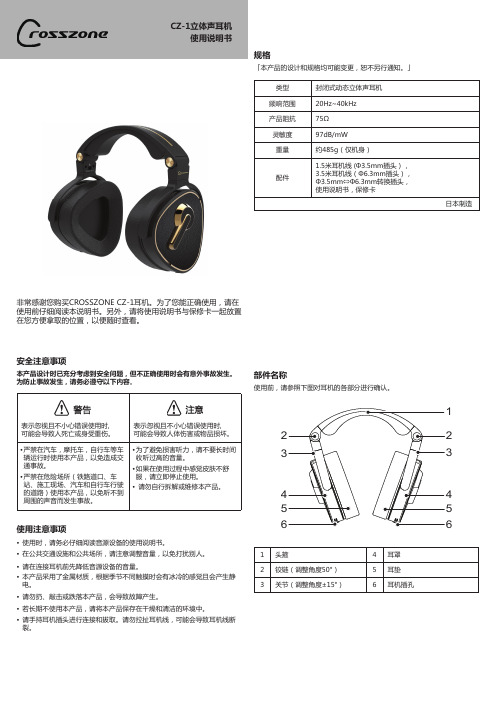
部件名称使用前,请参照下图对耳机的各部分进行确认。
1头箍4耳罩2铰链(调整角度50°)5耳垫3关节(调整角度±15°)6耳机插孔CZ-1立体声耳机使用说明书非常感谢您购买CROSSZONE CZ-1耳机。
为了您能正确使用,请在使用前仔细阅读本说明书。
另外,请将使用说明书与保修卡一起放置在您方便拿取的位置,以便随时查看。
安全注意事项本产品设计时已充分考虑到安全问题,但不正确使用时会有意外事故发生。
为防止事故发生,请务必遵守以下内容。
使用注意事项• 使用时,请务必仔细阅读音源设备的使用说明书。
• 在公共交通设施和公共场所,请注意调整音量,以免打扰别人。
• 请在连接耳机前先降低音源设备的音量。
• 本产品采用了金属材质,根据季节不同触摸时会有冰冷的感觉且会产生静电。
• 请勿扔、敲击或跌落本产品,会导致故障产生。
• 若长期不使用本产品,请将本产品保存在干燥和清洁的环境中。
• 请手持耳机插头进行连接和拔取。
请勿拉扯耳机线,可能会导致耳机线断裂。
规格「本产品的设计和规格均可能变更,恕不另行通知。
」类型封闭式动态立体声耳机频响范围20Hz~40kHz 产品阻抗75Ω灵敏度97dB/mW 重量约485g(仅机身)配件1.5米耳机线 (Φ3.5mm插头),3.5米耳机线(Φ6.3mm插头),Φ3.5mm ⇔Φ6.3mm转换插头,使用说明书,保修卡日本制造主要特点• 实现了ART(Acoustic Resonance Technology音响回响技术)自然头外定位(前方定位)通过搭载主音源播放用的2个扬声器装置(高音/低音),及播放逆频道音源的另一个专用扬声器装置,应用ADC(Acoustic Delay Chamber音响延迟室)技术,实现了不选择音源的自然音场。
• 实现了自然音质、音域的平衡通过对主音源播放用的2个扬声器装置(高音用23mm低音用40mm)振动板实施镀铍,及低音扬声器采用黄铜框架,实现了从低音到高音的自然音色播放。
英语听力考试专用耳机 四六级听力耳机 无线数字调频耳机

外语考试专用听力耳机——科普KP-808F科普KP-808F款耳机,是我厂今年主打产品耳机。
可折叠,真正液晶数字显示,带你体验更完美的听觉体验!本款耳机产品主要针对学校英语听力考试而设计,为广大考生量身打造,真正的满足考生听力上的各种需求,成为更懂你的耳机!我厂生产耳机是一条龙,一站式生产。
从筑缩成型到成品检验全部把关,步步检验,保证出厂产品的合格率和产品质量。
我们厂郑重承诺:大学四年内,如果出现非人为的质量问题,一律直接换新机!详情请咨询科普文教科技用品有限公司腾讯号:三零二九五七五六二一、技术指标:1、接收范围:调频:50-108MHz(可定制)音频:200-8000Hz红外线接收:(150KHz、2.1MHZ、2.8MHz选一)2、接收灵敏度:FM:≤8uV AF:≥10m3、频率响应:50-15000Hz4、输出功率:≥50mw5、电源:DC:3V 2节5号电池(AA)二、产品说明:1、KP808F是一款折叠式调频无线语言教学接收耳机,可应用于中考、高考、英语四、六级等听力训练。
2、微电脑软件只能控制:数字调频耳机的一次操作均由微处理器进行控制,它使用强大的数字信号处理技术(DSP),实现自动搜索。
3、高集成度,低耗电:本产品采用新一代CMOS技术,低漏电工艺的高集成度调频收音机芯片,内置功放,体积小,功耗低(待机0.01mA 工作20mA)比传统收音机大大省电。
4、高灵敏度:由于采用数字信号处理技术(DSP)和天线加感工艺使收音机的接收灵敏度大幅度提高。
5、高分离度,低失真:芯片强大的LOW-IF数字音频结构和重低音处理技术使音质更出色。
6、高清晰度,低噪声:本产品在收听语音节目(英语)时,收听效果明亮清晰。
7、高稳定度,高可靠性,低故障率:由于采用高稳定晶体作为系统的参考时钟脉冲,使接收机频率稳定,自动锁定永不炮台。
本产品无传统调频耳机的机械开关、双联可变电容、电位器等易磨损件。
全部功能与手机一样的按键控制,大大提高产品的可靠性,耐用性,大大降低返修率。
V-MODA M-200 ANC 动态噪声消除头戴耳机用户手册说明书

ACTIVE NOISE CANCELLING HEADPHONESIf serial number on the product, the manual cover or bottom of packaging is missing or defaced, please return to retailer immediately.Before using this product, carefully read the safety and warranty information in the booklets provided. Please then keep the documents where they can be available for immediate reference. To acquire a full printable version of the manual, pleasevisit /manualsWelcome to V-MODA, the ultimate referral point for the music lover’s lifestyle.We sincerely hope you enjoy our headphones, the perfect blend of timeless style, modern ergonomics, and state-of-the-art technology.M-200 ANC is our first headphone builtwith hybrid active noise cancellation whichputs you in complete control of your sound:take your music above the noise with vibrantV-MODA studio-quality sound and cutting-edge audio personalization.Download the V-MODA app to fully customize your audio experience. Choose the level of noise cancellation ideal for your surroundings and even customize your sound signature using the EQ tool:select the EQ preset perfect for whatever you’relistening to, or take matters into your own hands by customizingeach level to your liking.With smart features such as Voice In and built-in easy access to your favorite voice assistants, M-200 ANC is made to make your life flow seamlessly. With 20 hours of ANC-activated wireless listening on a single charge and customizable power off modes, get the most out of your day while M-200 ANC powers you through it.While soft to the touch with a 100% premium PU leather exterior, M-200 ANC is extremely durable thanks to a metal-build core and an adjustable headband. Large ear cups and replaceable magnetic memory foam cushions complete the M-200 ANC’s incredibly comfortable design to make it perfect for ‘all day, every day’ wear.Lightweight and featuring a CliqFold hinge, the M-200 ANC fold effortlessly into their protective Exoskeleton carry case (complete with a carabiner clip) so they’re ready to hit the road when you are.1. M-200 ANC Over-Ear Headphones2. Exoskeleton Carry Case3. Audio Only Cable4. USB-C Charging Cable5. Carabiner Clip6. Flight Adapter (Dual Plug)156234Push hair back, extend the earcups from headband until they fit comfortably on ear, creating a snug fit to ensure highest sound quality and comfortVery important: Place earcups on corresponding ear. “L” on left ear,“R” on right ear 12Hold the two ear cups lightly together, cushion to cushionPlace the heel of other hand on top of headband Push gently together to activate the CliqFold hinge Place the headphones in the Exoskeleton case, with the headband placed closest to the case’s hinge Insert any cables you wish in the extra space belowZip the Exoskeleton case to close 1234561354276 81 2 3 4 5 6 7 8You can also pair your headphones directly in the . Get the V-MODA app on Google Play or the App Store.It is recommended to charge the battery before using your headphones for the first time. 12345To turn headphones on, press and hold the Power button for 3 seconds The LED indicator will illuminate light blue if a device is pairedTo turn headphones off, press and hold the Power button for 3 seconds until you hear the Power Off sound Ensure M-200 ANC is switched off, charged and within 1m of the device Activate Bluetooth in the settings of your new devicePress and hold the Power button for 6 seconds until you hear the pairing sound to turn the headphones on and enter secondary pairing mode (sonar sound)132When appears in the “new Bluetooth devices” section on your device, select it to pair4Note: M-200 ANC’s memory can hold up to 2 devices. You will only need to re-paira device if M-200 ANC is reset or if you pair a 3rd device. Pairing a 3rd device willoverwrite the first device paired.Ensure that the first pairing and secondary pairing procedures have beencompletedTo switch between devices via multipoint, ensure that both of your paireddevices have Bluetooth activatedTurn the headphones off and then on againSelect in the Bluetooth settings of the device you want to play audio fromPress “Play” to play audio from your selected deviceM-200 ANC will now switch its active connection to your selected device.You may only listen to audio from one device at a timePress oncePress and hold for 1-2 seconds then release Press once Press twice Press three timesPress and hold for three secondsPress + button Press – buttonPress and hold "+" and "-" at the same timefor 5 seconds6Press the ANC button to turn noise cancellation on and offDownload and open the V-MODA app to adjust your level of active noise cancellation8Connect the USB-C charging cable to charge headphones.To prevent malfunction or equipment failure, turn the volume down and turn the headphone off before connecting to a power source.Power button red LED with 2 beepsPower button fading red LEDPower button solid light blue LED1011Plug in audio cable to activate wired mode. Press and hold Volume Up and Volume Down for 5 seconds until you hear the reset soundThe Power button LED will blink light blue to confirm the reset9Cover the sensor on the lower part of the left earcup to momentarily lower the audio volume.If you are experiencing trouble with your headphones, please refer to the troubleshooting guidelines below. If the problem persists, please contactthe V-MODA Six Star Service at or Press and hold the Power button for 3 seconds to turn headphones on Enable Bluetooth connection on the device Press and hold the Power button for 3 seconds to enter pairing mode 1Perform the "Reset paired device history" procedureTurn headphones off and on againTry to pair with another device to makesure that both the headphones and yourBluetooth device are working properly 2Press and hold the Power button for3 seconds to turn headphones onPress ANC button to turn ANC onGo to the V-MODA app and set the levelof the ANC in the ANC settings menu3Press and hold the Power button for3 seconds to turn headphones onCharge the headphonesMake sure the audio source is playingMake sure the volume on the device isnot muted or turned downMake sure left ear cup is not coveredCheck that the audio device or the audio fileyou are listening to do not have any issuesGo the V-MODA app and set your EQpreference in the Sound settings menuReboot the source / deviceTurn headphones off and on againReset paired devices history of the headphonesTry streaming from another device or select another trackMove the device closer to the headphonesMove away from any possible interference (wireless routers, other Bluetooth devices, microwaves etc.)Close any application on your device that is not in use and disable Wi-Fi4Try streaming from another device orselect another track / file5Make sure the audio device and theheadphone jack are free of debris andthat the cable is securely connected6Make sure the audio device and theheadphone jack are free of debris andthat the cable is securely connected7Make sure the charging cable isfunctioning properly or try a different oneMake sure the charging source isfunctioning properly or try a different oneMake sure both USB plugs are firmlyconnected into their socketsMake sure your computer's USB port isactivated and turn on your computer8Perform a hardware reset / factory reset9©2021 V-MODA. All rights reserved.V, V-MODA and the V-MODA logo are registered trademarks of V-MODA, LLC.Patents: roland.cm/patentsThe Bluetooth® word mark and logos are registered trademarks owned by Bluetooth SIG, Inc.and any use of such marks by V-MODA is under license.Qualcomm aptX is a product of Qualcomm Technologies, Inc. and/or its subsidiaries. Qualcomm is a trademark of Qualcomm Incorporated, registered in the United States and other countries. aptX is a trademark of Qualcomm Technologies International, Ltd., registered in the United States andother countries.Apple and the Apple logo are trademarks of Apple Inc., registered in the U.S. and other countries.Google Play and the Google Play logo are trademarks of Google LLC.Other trademarks and trade names are those of their respective owners.V-MODA LLC5100 S. Eastern Ave, Los Angeles, CA 90040For any issues relating to your V-MODA product, please contact our Support Team directly./support******************+1 888.866.3252REGISTER NOW AT。
黑沿线C710 C720 USB有线蓝牙耳机用户指南说明书
Blackwire® C710™/C720™有線 USB 耳機搭載 Bluetooth®使用者指南目錄歡迎使用 3包裝盒內容 4耳機功能 5配件/備用零件 6使用耳機 7線路控制 7配戴耳機 8連接、充電與撥打行動電話通話 9連接耳機至 PC 9為耳機充電 9撥打行動電話通話 9撥打 PC 電話 12進階功能 14Plantronics Spokes 軟體 18有用的秘訣 21疑難排解 22歡迎使用恭喜您購買新的 Plantronics 產品。
本使用者指南內含 Blackwire C710/C720 Bluetooth 耳機的設定與使用說明。
在安裝或使用本產品前,請參考另附的安全說明,以瞭解重要的產品安全資訊。
Blackwire C710/C720 新一代技術。
採用的重點特色與 Smart Sensor™ 技術:• 戴上耳機即自動接聽來電。
• 在行動電話及耳機之間自動轉接通話。
• 軟體電話狀態可以自動更新。
• 整合式 A2DP (適用於 Bluetooth 的進階音訊散佈定義) 讓您聆聽媒體音訊。
• 語音提示會通知電源開啟/關閉、電池電量、連線狀態和其他資訊。
系統需求電腦• 支援的作業系統:Windows XP®SP3 或更新版本、Windows Vista® SP1 或更新版本、建議使用 Windows® 7 SP1 或更新版本、MAC OS X 10.6.8 或更新版本• 處理器:400 MHz Pentium® 處理器或同等產品 (最低);1 GHz Pentium 處理器或同等產品 (建議)• 記憶體:96 MB (最低);256 MB (建議)• 硬碟:280 MB (最低);500 MB (建議)瀏覽器• 使用者的系統必須採用 Internet Explorer® V6 或更新版本 (必要)技術協助請造訪我們的網站/support以取得技術支援,包括常見問題、相容性及協助工具資訊。
Sennheiser SC 660 USB ML USB双面声音头戴子说明书
Century TM - SC 660 USB MLSC 660 USB MLSC 660 USB ML is a premium dual-sided USB stereo headset optimized for Microsoft Lync. It is specifically designed for quality-conscious contact center and office professionals requiring outstanding sound performance.Sound leadershipWith Sennheiser HD voice clarity and ultra-noise cancelling microphone,SC 660 USB ML optimizes speech intel-ligibility in noisy contact center and office environments.Quality designDesigned to manage calls seamlessly through the call control unit, SC 660 USB ML offers great functionality and conveni-ence when connected to Microsoft Lync. Stainless steel and brushed aluminum parts with a unibody headband construc-tion create an iconic, high-end design that enhances strength and robustness.User focusFeatures include sound-enhancement technology for voice clarity, with leath-erette ear-pads for powerful sound andwearing comfort. A metal reinforcedheadband maintains a perfect fit and isnumbered for easy accurate adjustment.Incorporating ActiveGard® acoustic shockprevention, SC 660 USB ML is optimizedfor all-day users who require maximumcall handling flexibility and durable high-end performance in busy Unified Commu-nications environments.Features and Benefits:O ptimized for Microsoft Lync – withintegrated call control and USB connectorS ennheiser HD voice clarity – widebandsound for a natural listening experienceU ltra noise canceling microphone forperfect speech transmissionS ound-enhancement profiles – perfectfor communication and musicH igh-quality neodymium speaker foroutstanding HD audio qualityA ctiveGard® technology protects usersfrom acoustic shock and sudden soundsurgesS tainless steel hinge on speaker joint formaximum strengthB rushed aluminum parts for strong andlightweight designU nibody headband construction formaximum strength at stress pointsK evlar® reinforced cable for extremedurabilityL arge leatherette ear-pad for exceptionalwearing comfort and powerful soundU ltra sonic welded microphone housingfor maximum durabilityE xtension headband with numberindications for accurate adjustment90 degree turnable speaker-housing forspace saving storage and transportU ltra sonic welded ergonomic callcontrol unit is strong and compactU nique magnetic holder for one-touchuse of call control unitC all control unit allows for easy answer/end a call, volume up/ down, microphonemute and redial last outgoing call3 years international warranty*Kevlar® is a trademark of DuPont.Product InformationSC 660 USB ML50455340 44155 08344 66 15104 23697 4MicrophoneSpeakerGeneral DataPackagingSpare parts50456040 44155 08351 4 6 15104 23716 250456240 44155 08353 8 6 15104 23723 050454540 44155 08336 1 6 15104 23682 050459240 44155 08884 7 6 15104 24846 550459540 44155 08887 8 6 15104 24849 650459440 44155 08886 1 6 15104 24848 950459740 44155 08889 2 6 15104 24851 950456140 44155 08352 1 6 15104 23721 650456340 44155 08354 5 6 15104 23727 850459340 44155 08885 4 6 15104 24847 2entertainment.protection./ccoPlease visit us at:/cco。
得胜ESC-80A有源可控指向音柱说明书

1
2
(4). 延时界面 1. 直观的显示所有通道的延时参数状况图。 2. 可以调整所有通道的延时参数,调整范围是0-625ms,分别有毫秒、米、英寸单位切换显示。
1
2
(5). 输出界面
1
2
3
45 6
1. 选择”Mag”界面可以调整输出通道的参量均衡和高低切曲线,选择Phase界面可以调整当
络影音设施、广播和录音系统。它继承了CobraNet与EtherSound的所有优点,如无压缩的 数字音频信号,保证了良好的灵敏度可调。 ● 输入通道处理部分包括噪声门、增益、静音、相位、压缩/限幅器、连动调节等功能。 ● 输出通道处理部分包括分频、6段参量均衡、增益、静音、相位、延迟、连动调节等功能。 ● 所有通道的PEQ增益、带宽、频率连续可调。类型可选择:参量均衡、高架滤波、低架滤 波、低切、高切、1阶移向,2阶移向。 ● 所有高切、低切滤波器的类型可选择:巴特沃斯、林奎瑞利、贝塞尔,斜率在-6db--- 24dB可选。 ● 输入通道噪声门的门限值,时间连续可调。输出通道的压缩/限幅器的阀值,比率,时间, 拐点值可调。 ● 所有输出通道的延时模块具有高达625ms的延时时间。 ● 可通过Dante双网口控制,连接PC软件时自动搜寻同网段的所有IP地址,然后进行一键式连 机使得用户的操作更简易、快捷。 ● 30个用户预设,整机状态和每个预设都可以单独储存和调用,还具有密码锁保护功能,使设 备更安全。
01
ESC-80A 有源可控指向音柱
■ 前言
尊敬的用户: 感谢您选购得胜ESC-80A有源可控指向音柱,为了您能够更好的了解及使用本产品,建议您
黑色线型C210 C220耳机说明书

USER GUIDEBlackwire ™ C210Blackwire C220Table of ContentsWelcomeWelcome to the Plantronics family of headset products. Plantronics provides a wide range of products from mission-critical and business-critical applications to personal communications and entertainment. For additional information visit our web site at , where you can visit our 24/7 support, browse through our knowledge base, chat live or ask a question. We also feature a variety of installation tutorials to make set up quick and easy. Please refer to the safety information found in the Quick Start Guide for important product safety information prior to installation or use of the product.FeaturesPackage ContentsWARNING Do not use headphones/headsets at high volumes for an extended/healthandsafety for more information on headsets and hearing.with your Unified Communications application from the inline control. Go to/support and click the Software Downloads tab. Follow the instructions to download and install the software.Registering your product online 2Technical assistance 2Package contents 3Features 3Powering on4Installing Plantronics software 4Headset features 5Using the headset 6Media Manager 7Troubleshooting8Registering Your Product OnlineVisit /productregistration to register your product online so that we can provide you with the best possible service and technical support.Technical AssistanceVisit our web site at /support for technical support including frequently asked questions, compatibility and accessibility information. The Plantronics Technical Assistance Center (TAC) is also ready to assist you.Installing Plantronics softwareFor the ability to remotely detect and answer/end a call from your softphone application via the headset call control button install Plantronics Unified Runtime Engine provided with the Plantronics product or download from a convenient web site.1. If a Plantronics CD is provided, insert the CD and follow the installation instructions.2. Or, you may download the latest version of this software from the /software page.3. Your softphone may require you to choose which audio device you wish to use. Please refer to softphone documentation for details.Configuration and statusThe Plantronics Control Panel is included in a Typical Install option. Start the Plantronics Control Panel from the Windows Start Programs menu. The Plantronics Control Panel screen will let you view status, change device parameters, set preferences, etc.Software Update ManagerAll software for your Plantronics device can be remotely updated if and when updates are available. Start Plantronics Update Manager from Windows Start Programs menu to change settings such as automatic or manual check for updates.Powering OnPowering on the Blackwire C210 and C220The USB headset is automatically powered on when inserted into the USB port of thecomputer.Headset Features12.1 The foam cushionsshould sit comfortably over the centre of your ears.2ReceiverEar Cushion3. Adjust the Boom and Microphone3.1 Rotate the boom so it is aligned with your mouth.3.2 Shorten or lengthen the microphone so it is approximately two finger widthsfrom the corner of your mouth.3Using Your HeadsetAnswering/Ending/Making Calls with Plantronics Software on SoftphoneTo make a call , simply dial the number via your softphone application.To answer or end a call, press the answer/end button.For softphones not compatible with Plantronics software Check the Plantronics softphone compatibility list at /software for the most current information.If your softphone is not currently supported by Plantronics software, remote detection and answer/end via the headset does not function. Pressing the call control button on the headset will not function; you must answer the call from the softphone.from supported media players when a call comes in and when it ends. The Media Player feature is in the Preferences tab of the Plantronics Control Panel. Select Start Menu>Programs>Plantronics>Plantronics Control Panel.ProblemSolutionI cannot hear caller.• The USB headset is not set as the default audio device. Use the Audio settings in Windows under Sounds and Audio Devices to select “Blackwire C210/C220” as the audio device.• Listening volume is too low. Press the volume up button on the headset.Callers cannot hear me.• Headset is muted. Press the mute button on headset to unmute the microphone. • Headset microphone boom alignedincorrectly. Align the headset boom with your mouth.• The USB headset is not set as the default Voice device. Use the Voice settings in Windows under Sounds and Audio Devices to select “Blackwire C210/C220” as the voice device.Sound in headset is distorted. I can hear echo in headset.• Lower the listen volume on yoursoftphone until the distortion disappears.• Adjust volume on headset.The other headset I was using to listen to music does not work any more.• The USB headset will set itself as the default audio device in Windows. Use the Audio settings in Windows under Sounds and Audio Devices to change the device used for audio.My headset stops responding to button presses.• When a PC goes into standby orhibernation, the USB headset no longer is powered on. Be sure your PC is in an active state.My headset does not work with the headset I am using on my PC. (I cannot answer or disconnect from the headset call button).• Check compatibility list on/software to ensure your softphone is compatible for remote answer and disconnect.• When a PC goes into standby orhibernation, the USB headset is no longer powered on. Be sure your PC is in an active state.• Be sure Plantronics software is installed and running.Troubleshooting©2010 Plantronics, Inc. All rights reserved. Plantronics, the logo design, Blackwire, and Sound Innovation aretrademarks or registered trademarks of Plantronics, Inc. Windows is a registered trademark of Microsoft Corporation in the United States and other countries. All other trademarks are the property of their respective owners.Patents US D540777; D540778Plantronics, Inc.345 Encinal Street Santa Cruz, CA 95060United States Tel: For product support contact us at /support.。
BackBeat FIT 3200系列耳机使用指南说明书

BackBeat FIT 3200-Serie BedienungsanleitungInhaltÜberblick über die Steuerungen3Einschalten, paaren und laden4Etui einschalten4Erstmalige Paarung4Paarungsmodus4Laden4Passform und Klangqualität6App installieren7Grundmerkmale8Kopfhörer ein-/ausschalten8Lautstärke einstellen8Audio wiedergeben oder anhalten8Titelauswahl8Anrufe tätigen/annehmen/beenden9Verwendung von Siri, Google Now9DeepSleep-Modus9Steuerungen umschalten für besseres Audio9Support10Rechts Primärer Kopfhörer (Paarung mit Telefon)Wiedergabe/Pause * 1-mal klicken Nächster Titel * 2-mal klickenVorheriger Titel * 3-mal klickenAnruf annehmen/beenden 1-mal klickenSiri/Google NowKlicken und zwei Sekunden halten Einschalten Klicken und 2 Sekunden haltenAusschalten Klicken und 4 Sekunden haltenPaaren Bei ausgeschaltetem Kopfhörer klicken und vier Sekunden haltenMit linkem Kopfhörer erneut verbinden Dreimal auf jeden Kopfhörer tippenLinks Sekundärer Kopfhörer (Verbindung mit rechtem Kopfhörer)Lautstärke erhöhen Zur Steigerung der Lautstärke tippen (Berührungssensor)Lautstärke verringern Berühren und haltenEinschalten Klicken und 2 Sekunden haltenAusschalten Klicken und 4 Sekunden haltenMit rechtem Kopfhörer erneut verbinden Dreimal auf jeden Kopfhörer tippenHINWEIS *Funktionen können je nach Anwendung variieren. Kann evtl. nicht mit webbasierten Anwendungen verwendet werden.Überblick über die SteuerungenIhr Ladeetui wird im DeepSleep-Modus ausgeliefert, um Energie zu sparen. Schalten Sie das Ladeetui ein, um Ihre Kopfhörer für die erste Nutzung einzuschalten.Klicken Sie auf die Taste am Ladeetui und halten Sie sie zwei Sekunden gedrückt, um das Etui einzuschalten.Die LEDs des Ladeetuis leuchten auf.Wenn Sie die Kopfhörer zum ersten Mal aus dem Ladeetui nehmen, beginnt der Paarungsprozess automatisch.1Nehmen Sie die Kopfhörer aus dem Etui. Die LED auf dem rechten Kopfhörer blinkt rot und weiß,um den Paarungsmodus anzuzeigen.2Aktivieren Sie auf Ihrem Smartphone Bluetooth ® und suchen Sie darüber nach neuen Geräten.•iPhone Einstellungen > Bluetooth > Ein*•Android ™Einstellungen > Bluetooth: Ein > Suche nach Geräten*HINWEIS * Menüs können je nach Gerät unterschiedlich sein.3Wählen Sie …PLT BBFIT31XX Series“.Nach erfolgreicher Paarung hören Sie …Paarung erfolgreich“ und die LED am Kopfhörer hört auf zu blinken.Halten Sie bei ausgeschaltetem Headset den rechten Kopfhörer gedrückt, bis Sie …Paarung“ hören.Legen Sie die Kopfhörer zum Laden in das Ladeetui. Laden Sie das Etui auf, indem Sie es an einenComputer oder ein USB-Ladegerät anschließen. Für schnelles Laden an Wandsteckdose anschließen.Einschalten, paaren und ladenEtui einschaltenErstmalige PaarungPaarungsmodusLadenHINWEIS Wenn das Ladeetui entladen ist, laden Sie es bitte zunächst separat auf und laden Sie anschließend die Kopfhörer auf.EinKopfhörer werdengeladenEtui wird geladen BlinktAusKopfhörer vollständiggeladenEtui vollständig geladen AusPassform und KlangqualitätFür eine optimale Klangqualität ist ein guter Sitz im Gehörgang wichtig. Probieren Sie die dreiOhrstöpsel in unterschiedlichen Größen an, um herauszufinden, welche Ihnen am besten passen.Eventuell sind auch unterschiedlich große Ohrstöpsel für jedes Ohr für Sie optimal.1Ohrstöpsel abnehmen Drücken Sie den Ohrstöpsel nach innen und drehen Sie ihn nach links, umihn zu entriegeln.2Ohrstöpsel austauschen Richten Sie den Ohrstöpsel aus und drehen Sie ihn nach rechts, bis ereinrastet.3Testen Stecken Sie die Ohrstöpsel in die Ohren und stellen Sie sicher, dass der Stabilisierungsbügelsicher und stabil im Ohr sitzt.Testen Sie die einzelnen Ohrstöpsel mit Ihrer Lieblingsmusik und wählen Sie die aus, die denbesten Sitz und Klang bieten.App installierenSchöpfen Sie das Potenzial Ihres Kopfhörers mit unserer kostenlosen BackBeat-App für iOS/Android voll aus.Mit dieser App haben Sie die folgenden Möglichkeiten:•Playlisten streamen, die Stoppuhr nutzen, die Lautstärke anpassen und mehr über IhrenKopfhörer (My Tap)•Spracheinstellung des Kopfhörers ändern•Einstellungen ein-/ausschalten•Steuerung der Kopfhörer von rechts auf links wechseln•Find MyHeadset•Anzeigen des BenutzerhandbuchsSie können die Kopfhörer automatisch oder manuell ein-/ausschalten.•Automatisch Beim Herausnehmen aus dem Etui werden die Kopfhörer automatisch eingeschaltet.Ebenso werden sie beim Zurücklegen in das Etui automatisch ausgeschaltet und der Ladevorgang beginnt.•Manuell Halten Sie die Taste an den Kopfhörern 2 Sekunden gedrückt, um die Kopfhörer manuell einzuschalten. Halten Sie die Taste 4 Sekunden gedrückt, um die Kopfhörer auszuschalten.HINWEIS Beim Ausschalten des rechten Kopfhörers wird auch der linke Kopfhörer ausgeschaltet.Das Einschalten der Kopfhörer erfolgt einzeln.Leistungsübertragung Wenn der rechte Kopfhörer entladen ist, werden alle Funktionen und die Audiowiedergabe an den linken Kopfhörer übertragen.Der linke Kopfhörer verfügt über eine Taste mit Berührungssensor. Sie müssen sie nur leicht berühren.1Tippen Sie zum Erhöhen der Lautstärke auf den linken Kopfhörer.2Tippen und halten Sie zum Reduzieren der Lautstärke den linken Kopfhörer.Klicken Sie auf den rechten Kopfhörer.HINWEIS Funktionen können je nach Anwendung variieren.Klicken Sie doppelt auf den rechten Kopfhörer, um zum nächsten Titel zu springen, oder klicken Siedreimal auf den rechten Kopfhörer, um zum vorherigen Titel zurückzukehren.HINWEIS Funktionen können je nach Anwendung variieren. Kann evtl. nicht mit webbasierten Anwendungen verwendet werden.GrundmerkmaleKopfhörer ein-/ausschaltenLautstärke einstellenAudio wiedergeben oder anhaltenTitelauswahlAnnehmen und Beenden von Anrufen Klicken Sie auf den rechten Kopfhörer.Zweiten Anruf annehmen Klicken Sie zuerst auf den rechten Kopfhörer, um den aktuellen Anruf zu beenden. Klicken Sie dann erneut auf den rechten Kopfhörer, um den neuen Anruf anzunehmen.Ihr Headset unterstützt VPAs (Virtual Personal Assistants) wie Siri und Google Now.Klicken und halten Sie den rechten Kopfhörer zwei Sekunden, um den VPA Ihres Geräts zu nutzen.Wenn Ihr Kopfhörer eingeschaltet ist, sich aber außerhalb der Reichweite des gepaarten Geräts befindet, wechselt er nach 120 Minuten in den DeepSleep-Modus und schaltet sich nach 7 Tagen aus, um Energie zu sparen.Gehen Sie wie folgt vor, um den DeepSleep-Modus zu verlassen:•Schalten Sie nach 120 Minuten beide Kopfhörer ein.•Setzen Sie das Gerät nach 7 Tagen zurück, indem Sie es aus- und wieder einschalten.Die beste Bluetooth-Leistung erzielen Sie, wenn sich Ihr Telefon auf derselben Körperseite wie IhrHauptkopfhörer befindet.Standardmäßig ist der rechte Kopfhörer der Hauptkopfhörer. Er kann mit Ihrem Telefon/Audiogerät gepaart werden; der linke Kopfhörer wird automatisch mit dem rechten verbunden.Wenn Sie Ihr Telefon/Audiogerät lieber auf der linken Körperseite tragen, können Sie über die Funktion …Hauptkopfhörer umschalten“ in der BackBeat-App den linken Kopfhörer alsHauptkopfhörer festlegen. Dadurch werden die Bluetooth-Verbindung und die Hauptsteuerungen auf den linken Kopfhörer verlagert, die Lautstärkeregelung und die My Tap-Funktion auf den rechten Kopfhörer.Anrufe tätigen/annehmen/beenden Verwendung von Siri,Google NowDeepSleep-ModusSteuerungen umschalten für besseres AudioSupportBENÖTIGEN SIE WEITERE HILFE?plantronics.de/supportPlantronics, Inc.Plantronics B.V.345 Encinal Street Santa Cruz, CA 95060 United States Scorpius 171 2132 LR Hoofddorp Netherlands© 2019Plantronics, Inc. BackBeat und Plantronics sind Marken von Plantronics, Inc., registriert in den USA und anderen Ländern. Plantronics Hub ist eine Marke von Plantronics, Inc. Bluetooth ist eine eingetragene Marke von Bluetooth SIG, Inc. Jegliche Verwendung dieser Marke von Plantronics, Inc. findet unter Lizenz statt. Alle weiteren Marken sind Eigentum ihrer jeweiligen Rechtehalter.Patente angemeldet.215737-04 (08.19)。
艾本c-200A调频听力耳机的使用方法
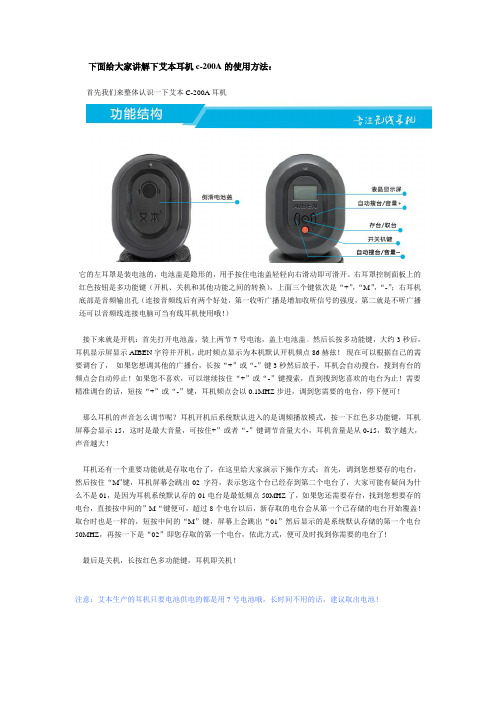
下面给大家讲解下艾本耳机c-200A的使用方法:首先我们来整体认识一下艾本C-200A耳机它的左耳罩是装电池的,电池盖是隐形的,用手按住电池盖轻轻向右滑动即可滑开。
右耳罩控制面板上的红色按钮是多功能键(开机、关机和其他功能之间的转换),上面三个键依次是“+”,“M”,“-”;右耳机底部是音频输出孔(连接音频线后有两个好处,第一收听广播是增加收听信号的强度,第二就是不听广播还可以音频线连接电脑可当有线耳机使用哦!)接下来就是开机:首先打开电池盖,装上两节7号电池,盖上电池盖。
然后长按多功能键,大约3秒后,耳机显示屏显示AIBEN字符并开机,此时频点显示为本机默认开机频点86赫兹!现在可以根据自己的需要调台了,如果您想调其他的广播台,长按“+”或“-”键3秒然后放手,耳机会自动搜台,搜到有台的频点会自动停止!如果您不喜欢,可以继续按住“+”或“-”键搜索,直到搜到您喜欢的电台为止!需要精准调台的话,短按“+”或“-”键,耳机频点会以0.1MHZ步进,调到您需要的电台,停下便可!那么耳机的声音怎么调节呢?耳机开机后系统默认进入的是调频播放模式,按一下红色多功能键,耳机屏幕会显示15,这时是最大音量,可按住+”或者“-”键调节音量大小,耳机音量是从0-15,数字越大,声音越大!耳机还有一个重要功能就是存取电台了,在这里给大家演示下操作方式:首先,调到您想要存的电台,然后按住“M”键,耳机屏幕会跳出02 字符,表示您这个台已经存到第二个电台了,大家可能有疑问为什么不是01,是因为耳机系统默认存的01电台是最低频点50MHZ了,如果您还需要存台,找到您想要存的电台,直接按中间的”M“键便可,超过8个电台以后,新存取的电台会从第一个已存储的电台开始覆盖!取台时也是一样的,短按中间的“M”键,屏幕上会跳出“01”然后显示的是系统默认存储的第一个电台50MHZ,再按一下是“02”即您存取的第一个电台,依此方式,便可及时找到你需要的电台了!最后是关机,长按红色多功能键,耳机即关机!注意:艾本生产的耳机只要电池供电的都是用7号电池哦,长时间不用的话,建议取出电池!。
Poly 电话中心耳机与 Amazon Connect 适配器的配件说明书

Premium wireless DECT headset system with deskphones, computer, and smartphone/tablet connection
Ultra secure wireless DECT headset system with deskphones and computer connection
• Comfortable design
• Noise cancelling microphone
• Aircraft grade aluminium joints for reliability
• USB-A and USB-C • Conference
on the same cable on up to two
Premium wireless DECT headset system
Ultra secure wireless DECT headset system
Bluetooth wireless headset enabling connection with computer and smartphone/tablet
• Simple and intuitive design minimizes disruptions
• Easy-to-access switch allows seamless call management from different sources
• Mute button with visual status makes it easy to silence calls with confidence
• Intelligent headset recognition
阿尔卡特朗讯 AH80 蓝牙耳机用户手册说明书

AH80 蓝牙耳机用户手册法律告知本文件由上海贝尔企业通信有限公司制作,您对于本文件的任何阅读和使用即表示同意遵守下列条款。
若不同意遵守这些条款,请勿阅读和使用本文件。
上海贝尔企业通信有限公司保留未经通知随时更新、更正、修改下列条款的权利,这些更新将同样也约束您。
商标声明阿尔卡特朗讯(Alcatel-Lucent)的名称和商标均由诺基亚(Nokia)授权上海贝尔企业通信有限公司使用。
版权声明本文件提供的任何内容(包括但不限于数据、文字、图表、图象、声音或录像等)的版权均属于上海贝尔企业通信有限公司或相关权利人。
未经上海贝尔企业通信有限公司或相关权利人事先的书面许可,您不得以任何方式擅自复制、再造、传播、出版、转帖、改编或陈列本文件的内容。
任何未经授权使用本文件的行为都将违反《中华人民共和国著作权法》和其他法律法规以及有关国际公约的规定。
免责声明在努力核实本文件所载信息的完整性和准确性的同时,本文件按“原样”提供,即提供方对该等文件的准确性和完整性,包括但不限于对该等文件适销性或针对特定用途的适用性,未做任何明示或暗示的陈述或担保。
为了继续开发产品,上海贝尔企业通信有限公司保留在任何时候对本文件及其所描述的产品进行改进的权利,无需通知或承担任何责任。
无论在任何原因下,通过使用本文件所载信息所导致的损失或损害(包括直接、间接、特别或后果性的损失或损害),责任均由使用者自行承担。
在法律许可的范围内,上海贝尔企业通信有限公司拥有最终解释权。
目录1. 欢迎 (4)2. 耳机概览 (5)3. 包含的附件 (6)4. 如何连接 (7)5. 如何佩戴 (8)6. 如何充电 (9)7. 如何使用 (10)7.1 处理来电 (10)7.1.1 接听/拒接来电 (10)7.1.2 结束/保持通话 (10)7.1.3 静音键功能 (11)7.1.4 切换状态灯 (11)7.1.5 处理多个来电 (12)7.2 唤醒语音助手 (12)7.3 音乐模式 (13)7.4 耳机设置 (13)7.4.1 降噪/透传模式 (13)7.4.2 切换语言 (14)7.4.3 恢复出厂设置 (14)7.5 电量播报 (15)8. 指示灯含义 (16)9. 支持 (18)10. 如何保养耳机 (19)11. 警告 (20)1. 欢迎感谢您使用Alcatel-Lucent Enterprise AH80 头戴式蓝牙耳机。
BOYA 充电盒及耳机配套说明书

感谢您选择BOYA!- 充电盒- 领夹式迷你型发射器- 便携式接收器- MFi 认证Lightning音频转接头- 3.5mm TRS 音频转接头、- 3.5mm TRRS音频转接头;- 防风海绵- 防风毛套- 30cm Type-C 转 USB-A C充电线- 充电盒- 领夹式迷你型发射器- 便携式接收器- Type-C音频转接头- 3.5mm TRS 音频转接头、- 3.5mm TRRS音频转接头;- 防风海绵- 防风毛套- 30cm Type-C 转 USB-A C充电线1. 内置麦克风2. 电源&配对指示灯3. 电源键4. +/-按键5. 背夹6. 充电触点注意:为获得最佳收音效果, 请勿将手覆盖在发射器 顶部。
15. TRRS转接头凹槽16. MFi Lightning转接头凹槽17. TRS转接头凹槽18. 防风棉凹槽19. 发射器凹槽20. 接收器凹槽21. 配对键22. 打开键23. 电量指示灯24. 卡扣25. 充电口(直流电 5V)26. 防风棉27. 防风毛套28. 30cmType-C充电线15. TRRS转接头凹槽16. Type-C转接头凹槽17. TRS转接头凹槽18. 防风棉凹槽19. 发射器凹槽20. 接收器凹槽21. 配对键22. 打开键23. 电量指示灯24. 卡扣25. 充电口(直流电 5V)26. 防风棉27. 防风毛套28. 30cmType-C充电线7. 电源&配对指示灯8. 触点9. 电源键10. 充电触点11. MFi Lightning转接头 - For iPhone, iPad, iPod 12. 触点13. TRRS转接头- 适配手机,笔记本,平板14. TRS转接头- 适配单反,摄像机, 录音笔发射器发射器充电盒接收器7. 电源&配对指示灯8. 触点9. 电源键10. 充电触点11. Type-C转接头12. 触点13. TRRS转接头- 适配手机,笔记本,平板14. TRS转接头- 适配单反,摄像机, 录音笔1) 方式1:自动配对1. 将发射器和接收器放入充电盒,合上上盖;2. 重新打开充电盒盖子,自动开启接收器和 接收器电源;3. 发射器和接收器指示灯由蓝灯快闪变为 蓝灯常亮表示配对成功。
得胜PH200手机麦克风说明书

手机麦克风
耳机
耳机
第一只PH200
K歌手机
第二只PH200
音频线
四、电脑手机同步直播 1.按手机K歌的方法将相关的设备连接好; 2.通过MicroUSB数据线将⻨克⻛与电脑USB接口连接,电脑将自动识别⻨克 ⻛并完成驱动安装;
电脑
K歌手机
08
手机麦克风
3.将电脑的系统喇叭“播放”及“录制”设备“TAKSTARPH200”设置为默 认设备;
手机麦克风
中文目录………………………………………………………………………1-15 Content………………………………………………………………………15-37
前言…………………………………………………………………………………2 产品特性……………………………………………………………………………2 产品配置……………………………………………………………………………2 系统要求……………………………………………………………………………2 适用范围……………………………………………………………………………3 技术参数……………………………………………………………………………3 综合参数………………………………………………………………………3 电池参数………………………………………………………………………3 接口详情………………………………………………………………………3 功能示意……………………………………………………………………………4 ⻨克⻛使用方法……………………………………………………………………5 一、软件下载…………………………………………………………………5 二、手机直播/K歌……………………………………………………………6 三、连⻨K歌/直播…………………………………………………………7 四、电脑手机同步直播……………………………………………………8 五、音响K歌…………………………………………………………………9 六、“电音”使用说明……………………………………………………10 七、iOS兼容模式…………………………………………………………10 八、充电说明………………………………………………………………11 故障处理…………………………………………………………………………12 安全警示………………………………………………………………………13 关于图标含义解释………………………………………………………………14 关于本说明书……………………………………………………………………14 环保说明…………………………………………………………………………14
锚点音频耳机7500肯尼迪朗声系统说明书

170See Consumer Alert on page 175regarding Wireless Microphone Systems.Honesty and Valuesince 1971RTABLE LINE ARRAYage of a line array system with an enclosure that eliminates theneed for a stand. Includes three 8" woofers and an array of eight4" mid-range speakers that deploy up to a height of 6'. Provides a120° pattern for 500' of coverage – allowing you to cover the areaable, 9.0AH batteries (7hrs to fully recharge). Units carry a 6-yearM PRICE150W AC, 125W DC ........................................1868.00....................................2052.00...............................2052.00wireless receivers, no mic ..............................2235.00...............................2235.00.............................2419.00RTABLEdeal for reaching crowds of up to 2,000+. Features true AC/DC operation, a 110/220 power supply, heavy-duty lead-acid batteries with built-in charger, and a durable injection-molded case. Controls include volume, bass and treble and speech projection switch. It has 2 - XLR/1/4" combo input jacks, and a 1/4" Perfect for sound projection in indoor or outdoor settings and playing music during school activities for crowds up to 800 people. Rapid charger circuitry replenishes drained battery in as little as 60 minutes, and there is an LED display for battery level & charge state. Controls t t has 2 XLR/1/4" combo input jacks, (w/12V phantom power), 2 1/4" line outputs, and a 4-pole Speakon output. Has true AC/DC, a 110/220 power supply M N, LIBERTY, AND PRICE 332.00250.0082.00 82.0082.0082.00105.00WH6000WB6000Will reach crowds up to 400 people. XLR mic/line input, RCA and 1/4" line inputs, RCA line out for recording or daisy chaining, 1/4" external speaker power output (for AN1001X), magnetically shielded, treble and bass controls. Units carry M ALTO MIXPACK SERIES PO RTABLEPA SYSTEMS All 3 MIXPACK systemsboast impressive frequency responseand wide dynamic range, and providesuperior clarity when compared to other all-in-one portable PA systems. All models feature a 7-band graphic EQ, DSP, onboard 24bit digital effects, soft start, thermal protection, limiters/compressors, as well as XLR, line and RCA inputs. The MIXPACK and MIXPACK-PRO add an integrated sub-woofer and speaker stands. The lightweight, 3-piece designs allow easy transport. Each system ships with 2 speaker cables, power cord and 2 microphone cables.ITE M DESCRIPTION PRICEMIXPACK-EXPRESS ...7-channel mixer, 2x10", 350W, 65Hz-20kHz ...............................499.00MIXPACK ...................10-channel mixer, 12" sub + 2x 6.5", 600W, 55Hz-20kHz ..........799.00MIXPACK-PRO ...........10-channel mixer, 15" sub + 2x 6.5", 1000W, 45Hz-20kHz ........999.00EXPRESSN E W ! AN130 Just 8.5 pounds, 30W of amplification, ed carbon fiber speaker, has 1/4" mic and instrument jacks and RCA stereo line input jacks. Units carry a 6-year manufacturer’s warranty.171BO SE L1 PO RTABLE LINE ARRAYSYSTEM Exceptional amplified tonefrom any voice or instrument. Wide, uni-form sound coverage helps fill the venuewith sound in a way no ordinary speaker can.A complete system that delivers clear, powerfulsound across the stage and throughout the audience. The L1™Model I system projects sound across the stage and throughoutthe audience with very little change in tone or level. I/O includes2 combi XLR-1/4" (Ch 1-2), 2 1/4" line (Ch 3-4), 2 XLR out (Ch1-2), 2 TRS inserts, Neutrik NL4 bass module out, 1/4" bass lineout, digital data in and digital data out. The L1™ Model II systemprovides smooth and the most consistent sound coverage. Add theT1 ToneMatch™ audio engine, and you get access to powerful newtone-shaping technologies available only from Bose. I/O is 1/4"TRS in, 1/4" TRS Bass line out, Neutrik NL4 bass moduleout and tone match port for optional T1 ToneMatchaudio engine. The T1 ToneMatch is a multichannel audiodevice designed for use with L1 Model I and Model II systems, containing a largelibrary of presets, proprietary zEQ and a complete suite of studio-class effects. I/O is2 combi XLR-1/4" (Ch 1-3), 2 1/4" line (Ch 4-5), 1/4" TRS out, 1/4" TRS aux out, and1/4"TRS preamp out (Ch 1-3). The L1™ Compact system features an integrated bassspeaker in power stand, compact extensions, two ToneMatch™ channels with fixedpresets (handheld mic, acoustic guitar), and weighs only 29lbs.ITE DESCRIPTION PRICEpact line array speaker, powerstandw/integrated bass speaker & slip-cover, carry bag ...............999.00L1-BASIC-I......................Line array speaker, powerstand, carry bag ..........................1699.00L1-SINGLE-BASS-I ..........Line array speaker, B1 bass module,powerstand, carry bag .........................................................1998.00L1-SINGLE-BASS-II.........Model II line array speaker and powerstand,B1 bass module, carry bag..................................................2499.00L1-SINGLE-BASS-II-T1....Model II line array speaker and powerstand,B1 bass module, T1 audio engine, carry bag ......................2998.00L1-DOUBLE-BASS-I.........Line array speaker, 2- B1 bass modules,powerstand, carry bag .........................................................2297.00L1-DOUBLE-BASS-II........Model II line array speaker and powerstand,2- B1 bass modules, carry bag ...........................................2798.00L1-DOUBLE-BASS-II-T1...Model II line array speaker and powerstand,2- B1 bass modules, carry bag ...........................................3297.00T1-TONEMATCH...............Tone match audio engine, cover, carry bag,18' digital cable, speaker mount...........................................499.00B1-BASS-MODULE...........B1 bass module only .............................................................299.00L1-SINGLE-BASS-IT1Rtures a lightweight Class “D” amplifier, 5.25" full-rangeneodymium driver, 3-channel mixer with 3-band EQ, 2mic preamps w/phantom power, 1 instrument input (noline switch for linking more B205Ds. It can be mountedon a mic stand, and is housed in an impact-resistantThese modelsin the Passport line are much lighter, have updatedreverb, improved speaker voicing, improved mixer layout,control, recessed LEDS and 1-1/3" speaker pole mounts.The 150-PRO features a 150W @ 4ohms Class ‘D’ amp,5.25" woofers, 2.75" tweeters, 4 channels with 2 XLR micins, 2x 1/4" line ins, 2 stereo 1/8" and 1/4" (L/R) ins, reverband a 1-1/3" speaker pole mount. The 300-PRO features a 300W @8ohms Class ‘D’ amp, 8" woofers, 1.2" horn loaded tweeter, 6 channelswith 4 XLR mic ins, 4x 1/4" line ins, 2 stereo 1/8" and 1/4" (L/R) ins, reverb, 1/4" sub150-PROFENDER PRO A/V PASSPORT EXECUTIVE PORTABLEAbout the size of a small briefcase, this easy to useportable PA delivers 100 watts of clear stereo sound throughNXT flat-panel speaker technology. It includes a 16-channelfrequency agile UHF wireless belt pack transmitter/headset mic system, built-inThe Passport®P10 is a 27W battery powered portable unit, withrechargeable battery and charger. The P10 may run forrooms, paging, or tour guide applications. It comes witha strap and mic stand adapter. The P10WE system has ater. Both models feature a 5-year manufacturer’s warranty.BEHRINGER EPA-SERIESRTABLE PA SYSTEMSThese compact systems are greating centers. All include a mixer (w/phantom power,cables, and an XM1800S mic w/cable. Each model is aPRICEEPA900FISHMAN SA220 SO LO PERFO RMANCE SYSTEMDesigned for singer/songwriters, the SA220 provides excep-tional sound quality and coverage in a variety of venues. 220Wof clean power drives a line array of 6 custom 4" high-excur-sion speakers and 1" neodymium soft dome tweeter. Thisunique combination delivers full sound, ultra-wide disper-sion and deep sonic penetration. Features 2 mic/instrumentchannels, phantom power, 3-band EQ, 4 digital reverb effectswith master level, effect loop, XLR DI outputs for channels andmain mix, aux stereo input, feedback-fighting phase and notchfilters. Stand and padded carry bag w/wheels included.ITEM DESCRIPTION PRICESA220.................Portable line array/guitar amp ..........................999.95CLOSEUPOF THEFRONT PANEL172AS-TV8 FRONTAS-TV8CT2** REARRM-CDAS-TVTX AS-TVBMPAS-TVREC AS-TV5 FRONT AS-TV5 REARGALAXY AUDIO AS-TV5/AS-TV8 TRAVELER PO RTABLE PA SYSTEMS These are portable, battery-operated PA systems The AS-TV5 features a 5" full range speaker, 30W power amp,and has a 1/4" mic input, and 1/8" aux input and output. Its internal battery may run 4-6 hours before needing recharging. It is customizable to have up to 2 wireless mic receivers or a USB/MP3 player installed. The larger AS-TV8 base model features an 8" woofer, 1" horn, 50W amplifier. The standard AS-TV8 fea-tures 2 inputs (XLR/1/4" combo with its own volume control and a dual RCA), 2-band EQ, & a master volume. Audio outputs include a dual RCA line out and a 1/4" speaker output to power an additional speaker. I ncludes universal power supply/battery charger. Optional upgrades/modules include a CD/MP3 player, an echo/delay unit, up to 2 wireless receivers (with handheld, headset, & lapel mic options), an Audio Link to wirelessly transmit the signal to another Traveler. Since all the modules are internally wired, no external patching is necessary. (NOTE: items marked with * require a specific choice of mic transmitter. Options are handheld mic, headset mic or lavalier mic.)ORDERING INFO:(Note: only on models with UHF receivers built-in) OPERATES IN THIS RANGE:Default 'K9' band, TVCH 42-46 640.000-660.000MHzITE M DESCRIPTION PRICE Traveler Packages AS-TV5 ...........5" portable PA system, 30W RMS/50W max, 1/4" mic input, 1/8" aux input/output, internal battery w/charger, switching power supply ..........................................................................299.99AS-TV51* .......AS-TV5 w/1 receiver & choice of 1 mic transmitter ................................599.99AS-TV52** .....AS-TV5 w/2 receivers & choice of 2 mic transmitters .............................949.99AS-TV52U** ...As AS-TV52**, but adds USB & SD card player option .........................1099.99AS-TV8 ...........8" portable PA system, 50W RMS/80W max, 95dB/112dB max, 20Hz-20kHz, XLR/1/4" combo inputs, internal battery w/charger, switching power supply ..........................................................................649.99AS-TV81* .......AS-TV8 w/1 receiver & choice of 1 mic transmitter ................................999.99AS-TV82** .....AS-TV8 w/2 receivers & choice of 2 mic transmitters ...........................1299.99AS-TV8C .........AS-TV8 w/CD player ................................................................................849.99AS-TV8C1* .....AS-TV8 w/CD player, 1 receiver & choice of 1 mic transmitter .............1199.99AS-TV8C2** ...AS-TV8 w/CD player, 2 receiver & choice of 2 mic transmitters ...........1499.98Traveler Wireless Speakers – have AS-TVTX UHF audio link transmitter built-in AS-TV8CT .......AS-TV8 w/CD player and audio link transmitter....................................1049.99AS-TV8CT1 .....AS-TV8 w/CD player and audio link transmitter, 1 receiver w/choice of 1 mic transmitter ..............................................1399.99AS-TV8CT2** .AS-TV8 w/CD player and audio link transmitter, 2 receivers w/choice of 2 mic transmitter ............................................1649.98AS-TVWS ........AS-TV8 w/AS-TVTX built-in – requires AS-TVTX in base unit to work ......799.99Traveler System Upgrades/AccessoriesAS-TVEC .........Echo module w/adjustable repeat & delay times, w/2 XLR mic inputs .....99.99RM-CD ............CD/MP3 module upgrade ........................................................................199.99AS-TVTX ..........Audio link transmitter module ................................................................179.99AS-TVREC .......UHF wireless mic receiver, 96 channels, LCD display .............................199.99AS-TVMBP ......UHF bodypack transmitter w/unidirectional headset mic .......................169.99AS-TVHH .........UHF handheld transmitter only, dynamic ................................................179.99See Consumer Alert on page 175regarding Wireless Microphone Systems.Honesty and Valuesince 1971MACKIE SRM150 COMPACT ACTIVE PA SYSTEM This extremely portable system features a 3-channel mixer with 3-band active EQ, 2 mic/line preamps with 48V phantom power, instrument ready input, dedicated stereo channel for keyboards, CD, MP3, and iPods, and a XLR thru for linking multiple SRM150’s or a direct send to the main PA. It has a 5.35" neo-dymium driver, system protection with built-in limiter, built-in top carry handle, mic stand integration system, and a tough impact-resistant polypropylene enclosure.ITE M DESCRIPTION PRICESRM150.....................5" active PA system, 150W, 100Hz-17.5kHz ................................249.99MIPR O P O RTABLE M O DULAR PA SYSTEMS Mipro’s PA systems range in power output from 50W RMS to 180W RMS and can be supple-mented with an optional CD/USB player or up to 2 (4 on the 808 model) wireless mic receivers (w/16 scannable UHF frequen-cies). The MA-705, MA-707, and MA-708 feature 8" full-range speakers, while the MA-808 features a 1.5" titanium compression driver and a 10" neodymium 180W woofer. All models feature master controls, built-in rechargeable batteries, XLR and 1/4" mic inputs, line in and outs (RCA on 705, 708, & 808, 1/4" on 707), AC and battery power sources (plus DC input on MA-707, MA-708, & MA-808). The MA-708, & MA-808 also feature voice-over priority, an active limiter, echo control, and the ability to transmit audio from one model to others via the MTM90. Audio options listed below.ORDERING INFO:(Note: only on wireless receivers/transmitters) OPERATES IN THIS RANGE:Band 6A, TVCH 39-42 620.000-644.000MHz Band 6B, TVCH 43-46 644.000-668.000MHz Band 6C, TVCH 47-50 668.000-692.000MHz ITE M DESCRIPTION PRICE MA705PA ...................50W RMS Class AB PA w/8" full-range speaker, handle .............349.95MA705EXP .................Passive expansion speaker for MA705 ........................................199.00MA707PA ...................70W RMS Class AB PA w/8" full-range speaker, transmitters compartment, wheels, retractable handle ..............459.95MA707EXP .................Passive expansion speaker for MA707 ........................................239.00MA708PA ...................As MA707PA, but 120W RMS, Class D, and adds voice priority feature ...................................................790.20MA708PAD ................As MA708, comes with 8CD0024 CD module ............................1230.00MA708EXP .................Passive expansion speaker for MA708, w/30’ cable ....................526.80MA808PAMK3 ............180W RMS bi-amped PA, Class AB+D, w/1.5" comp. driver & 10" woofer .............................................2049.95MA808EXP .................Passive expansion speaker for MA808 ......................................1049.95MTM90 ......................Transmitter for receivers in MA708 & MA808PAMK3 ...................187.85MRM70 ......................Wireless plug-in receiver, 16 Chnl ................................................99.958CD0022 ...................CD/USB player for MA707 ............................................................316.208CD0023 ...................CD/USB player for MA705, MA808PAMK3 ....................................316.208CD0024 ...................CD player for MA708 & MA808PAMK3 .........................................316.207AE018......................Cassette player for MA707 ..........................................................145.00ACT707HE .................Wireless condenser handheld transmitter ...................................159.95ACT707TE ..................Wireless beltpack transmitter .....................................................129.95MU55L .......................Omni-directional lavalier (For ACT707TE) .....................................51.38MU53HN ....................Cardioid lavalier (for ACT707TE) ...................................................57.97allowing integration into different audio environ-ments. I t has two 10" 2-way powered loudspeakers,one with a detachable 8-channel powered mixerand one with a storage compartment. It also has a1" neodymium compression driver. I ncludes pair ofunshielded speaker cables and a power cord. 33lbs total weight.ITE M DESCRIPTION PRICEEON-210P .................Portable, self-powered 10" 2-way PA system, 300Watts ............999.00EXPERIENCED TECHNICIANS S174 This package includes one PVI4B powered mixer, speakers, two speaker stands, two 100 dynamic cardioid mics, andDESCRIPTION PRICE RT® Includes 2 speakers (w/10" woofers and piezo horns), a 5-channel 150W stereo mixer amp with 2 and 5-band graphic EQ with FLS (Feedback Locator System). Also comes with 2 speaker stands, 1 wired mic, and two 25' speaker cables. All in an easily transportable case SHOWN WITH OPTIONAL STAND See Consumer Alert on page 175regarding Wireless Microphone Systems.Honesty and Valuesince 1971Versatile and portable, the ged, high-quality 6.5" coaxial 2-way speaker with stereo preamp. The CM-30 is ideal for home-studio and wide-ranging monitoring applications, but it can be used for live monitoring onstage as well. Features a 6.5" coaxial, 2-way speaker with stereo preamp and 30W output. Three input channels, with one XLR input for mic/line and 2 additional Aux inputs. Stereo Link function for stereo connection between two units, for a total of up to 8 stereo inputs and 2 mono mic/line inputs. ROLAND BA-330 PORTABLE STEREO DIGITAL PA SYSTEM All-in-one for small music venues, conferences, & more. A digital t offers built-in effects such as EQ, reverb, delay, & wide (on/off per channel) and Advanced t has 2 channels for mics/instruments, plus 2 channels for stereo inputs and the stereo aux input has ers (1" treble, 5" woofer) and 56W (40W RMS) of audiooutput via a class D amplifier. A USB port and SD cardslot allows you to play mp3s, while an LCD displayshows mp3 track and status info. Runs continuously forup to 8 hours on one charge. The unit also features abuilt-in charger, level controls, and battery meter for the ACT202T transmitter. Will M E W !RTABLE 30W WIRELESS deal for speech applications within of up to 330ft, and can be carried by hand, shoulder strap or mounted to a mic stand. Can be powered by rechargeable battery (8hrs per PEAVEY ELECTRONICS TRIFLEXII PO RTABLE 3-WAY AUDIO SYSTEM Through one 15" subwoof-er and two 2-way satellite speakers with 10" woofers and 1.4" titanium compression drivers, the TriFlex®I I provides its user with 1000W ofpeak power (500W continuous). The system's chassis is housed in the subwoofer enclosure and includes dual XLR-1/4" inputs, a 2-ch preamp, 3 power amps (250W @ 8ohms continuous for sub, 125W @ 4ohms continuous for each speaker), and XLR thru outputs. Max. SPL is 127 dB. The amplifier's outputs and satellite speakers' inputs feature 4-pin twist lock connectors. The satellite speakers are pole-mountable or can be used as floor monitors. Transports easily on its built-in 3" casters. Includes a cover for the whole system and two 15 ft. cables. Speaker stands sold separately.ITE M DESCRIPTION PRICE TRIFLEX-II ......Portable 3-way audio system w/(2) 10" speakers, (1) 15" subwoofer ....899.9903011200.......Speaker stand ...........................................................................................37.98SHOWN WITH OPTIONAL SPEAKER STANDS175YAMAHA STAGEPAS 300/500 PO RTABLE PA SYSTEMThe STAGEPAS series has all the power and high-qualitysound you need to fill a small performance space,yet it’s small and light enough to bring wherever youneed it. Combining a built-in powered mixer and PAspeakers, it’s also incredibly easy to use – letting youset up and play in a matter of minutes! The STAGEPAS300 features a 4 mic + 2 stereo line input mixerand boasts 150W into each channel. The 2-way bassreflex speakers are suitable as mains or monitors.The STAGEPAS 500 adds another stereo inputchannel, 2-channel built-in compressor/limiting, phantom power and 250W + 250Wpower output.ITE DESCRIPTION PRICESTAGEPAS-300..........2x 150W, 8-channel portable PA system .........................................CALLSTAGEPAS-500..........2x 250W, 10-channel portable PA system .......................................CALLYBSP300 ...................Soft rolling case for STAGEPAS300 system......................................CALLADP138 .....................Stand mount for STAGEPAS speaker (each).....................................CALLBMS10A.....................Mic stand adapter for mixer ............................................................CALLTRAYN O R TVM50 BATTERYPOWERED AMPLIFIER A 50W 2-chan-nel design allows quick connection toany microphone, instrument and CD/MP3 player. I ndividual volume controlas well as separate tone controls onthe input channels makes it a completeultra-compact PA system. Channel Oneis tuned for vocals with an XLR/TRS combi-jack input for low or high impedance mics.A single sweepable tone control boosts intelligibility and overall presence with aminimum of tweaking. A 1/4" input on Channel Two handles any instrument sourceincluding acoustic or electric guitars and keyboards. The amplifier’s wedge monitorshape projects to an audience from ground level. An integrated stand adapter allowsit to be mounted on any speaker stand when used as a small announcement PA orbackground music source.ITE DESCRIPTION PRICETVM50.......................50W battery powered amp w/battery, charger, stand adapter ....295.20*CONSUMER ALERT*Most users do not need a license to operate these wireless micro-phone systems. Nevertheless, operating these microphone systemswithout a license is subject to certain restrictions: the systems maynot cause harmful interference; they must operate at a low powerlevel (not in excess of 50 milliwatts); and they have no protectionfrom interference received from any other device.Purchasers should also be aware that the FCC is currently evalu-ating use of wireless microph one systems, and th ese rules aresubject to change.For more information, call th e FCC at 1-888-CALL-FCC (TTY:1-888-TELL-FCC) or visit the FCC’s wireless microphone websiteat /cgb/wirelessmicrophonesEXPERIENCED TECHNICIANS S RTABLECompact with dual2-way speakers, 8-channel mixerand 300W amplifier. Practicaldesign allows all pieces to fit intoa single case. System features anRTABLE PA WITHship, and more. Offers dual 2-way speakers,quency drivers, detachable 10-channel mixer,and a 500W (2 x 250) Class “D” amplifier. Hasan integrated iPod dock, 24bit digital effects, &phantom power. Transports easily, just slidethe speakers together and lock the mixer onPRICEIPOD NOTINCLUDEDIPOD NOTINCLUDEDREARXP401W。
Alfatron ALF-CMB201 手机耳机麦克风用户手册说明书

Alfatron ALF-CMB201 Speaker MicrophoneUser ManualALFATRON ELECTRONICS GmbHPackaging contentsPlease check the packaging contents carefully after receiving products.Function DisplayOn/offVolume downAnswer/End buttonStatus lightVolume upMute buttonMode switch/Bluetooth pairUserManualHow to use On/OffNotes: Status Light DescriptionThe blue light indicates bluetooth mode.The purple light indicates AUX mode.The green light indicates USB mode.Long press “ ” for 2 seconds to turn on or offHow to connectConnect the computer to ALF-CMB201 with a USB cableUSB AUX ResetPress the “ ” for 3 seconds,the status light is blue when pairing.Turn on bluetooth on the mobile phone or PC and select ALF-CMB201 from the devices list to connect.Connect ALF-CMB201 via BluetoothWhen multiple sound sources are connected, you can select therequired source by pressing the“ ”button.Connect ALF-CMB201 with an AUX audio cableA LF-C MB 201ALF-CMB201 Speaker MicrophoneLimited warranty in respect of Alfatron Products Only1.1 This limited warranty covers defects in materials and workmanship in this product.1.2 Should warranty service be required, proof of purchase must be presented to the Company. The serial number on the product must be clearly visible and not have been tampered with in any way whatsoever.1.3 This limited warranty does not cover any damage, deterioration or malfunction resulting from any alteration, modification, improper or unreasonable use or maintenance, misuse, abuse, accident, neglect, exposure to excess moisture, fire, improper packing and shipping (such claims must be presented to the carrier), lightning, power surges, or other acts of nature. This limited warranty does not cover any damage, deterioration or malfunction resulting from the installation or removal of this product from any installation, any unauthorized tampering with this product, any repairs attempted by anyone unauthorized by the Company to make such repairs, or any other cause which does not relate directly to a defect in materials and/or workmanship of this product. This limited warranty does not cover equipment enclosures, cables or accessories used in conjunction with this product.This limited warranty does not cover the cost of normal maintenance. Failure of the product due to insufficient or improper maintenance is not covered.1.4 The Company does not warrant that the product covered hereby, including, without limitation, the technology and/or integrated circuit(s) included in the product, will not become obsolete or that such items are or will remain compatible with any other product or technology with which the product may be used.1.5 Only the original purchaser of this product is covered under this limited warranty. This limited warranty is not transferable to subsequent purchasers or owners of this product.1.6 Unless otherwise specified, the goods are warranted in accordance with the manufacturer’s product specific warranties against any defect attributable to faulty workmanship or materials, fair wear and tear being excluded.1.7 This limited warranty only covers the cost of faulty goods and does not include the cost of labor and travel to return the goods to the Company’s premises.1.8 In the event of any improper maintenance, repair or service being carried out by any third persons during the warranty period without the Company’s written authorization, the limited warranty shall be void.1.9 A 7 (seven) year limited warranty is given on the aforesaid product where used correctly according to the Company’s instructions, and only with the use of the Company’s components.1.10 The Company will, at its sole option, provide one of the following three remedies to whatever extent it shall deem necessary to satisfy a proper claim under this limited warranty: 1.10.1 Elect to repair or facilitate the repair of any defective parts within a reasonable period of time, free of any charge for the necessary parts and labor to complete the repair and restore this product to its proper operating condition.; or1.10.2 Replace this product with a direct replacement or with a similar product deemed by the Company to perform substantially the same function as the original product; or1.10.3 Issue a refund of the original purchase price less depreciation to be determined based on the age of the product at the time remedy is sought under this limited warranty. 1.11 The Company is not obligated to provide the Customer with a substitute unit during the limited warranty period or at any time thereafter.1.12 If this product is returned to the Company this product must be insured during shipment, with the insurance and shipping charges prepaid by the Customer. If this product is returned uninsured, the Customer assumes all risks of loss or damage during shipment. The Company will not be responsible for any costs related to the removal or reinstallation of this product from or into any installation. The Company will not be responsible for any costs related to any setting up this product, any adjustment of user controls or any programming required for a specific installation of this product.1.13 Please be aware that the Company’s products and components have not been tested with competitor’s products and therefore the Company cannot warrant products and/or components used in conjunction with competitor’s products.1.14 The appropriateness of the goods for the purpose intended is only warranted to the extent that the goods are used in accordance with the Company’s installation, classification and usage instructions.1.15 Any claim by the Customer which is based on any defect in the quality or condition of the goods or their failure to correspond with specification shall be notified in writing to the Company within 7 days of delivery or (where the defect or failure was not apparent on reasonable inspection by the Customer) within a reasonable time after discovery of the defect or failure, but, in any event, within 6 months of delivery.1.16 If delivery is not refused, and the Customer does not notify the Company accordingly, the Customer may not reject the goods and the Company shall have no liability and the Customer shall pay the price as if the goods had been delivered in accordance with the Agreement.1.17 THE MAXIMUM LIABILITY OF THE COMPANY UNDER THIS LIMITED WARRANTY SHALL NOT EXCEED THE ACTUAL PURCHASE PRICE PAID FOR THE PRODUCT.。
黑戈3200系列有线耳机使用指南说明书
Blackwire 3200 系列有線耳機,具備線路通話控制使用指南目錄概觀3設定4載入軟體4舒適5調整頭帶5放置吊桿5調整吊桿5使用線路控制6撥打/接聽/結束通話6音量6靜音6疑難排解7耳機7支援8通話按鈕呈綠色閃爍來電持續亮綠燈通話中調高音量按鈕提高收聽音量調低音量按鈕調低收聽音量靜音按鈕持續亮紅燈耳機靜音連接至電腦或行動裝置,即可開啟耳機電源。
有 2 種方法連接耳機:1透過 USB-A/USB-C 接頭附註耳機通話控制功能可能會因行動裝置而異。
2透過 3.5 公釐接頭*附註無法使用耳機通話控制功能。
* Blackwire 3215/3225 才有 3.5 公釐接頭。
透過 Poly Lens 桌面應用程式的進階設定和選項來自訂您的裝置行為。
部分軟體電話需要安裝 Poly 博詣軟體才能啟用裝置通話控制 (接聽/結束通話和靜音) 功能。
下載︰/lens 。
附註也可透過 Plantronics Hub 桌面應用程式進行裝置設定。
更新您的 Poly 博詣裝置讓韌體及軟體維持在最新狀態以改善效能,並為 Poly 博詣裝置增加新功能。
使用具備 Poly Lens 桌面應用程式 的電腦來更新裝置。
請至 /lens 下載。
更新時:•在更新完成之前,請勿使用您的 Poly 博詣裝置。
•請勿透過第二個裝置啟動第二次更新。
•請勿串流媒體。
•請勿接聽或撥打電話。
載入軟體調整頭帶的長短,直到頭帶舒適貼合。
耳墊應舒適地置於您雙耳的中央。
這款耳機可以配戴在任一邊的耳朵上。
旋轉吊桿使其對準您的嘴部。
注意為了防止折斷吊桿,僅能向上旋轉超過 180°。
輕輕地將吊桿向內或向外彎曲,使其與您的嘴角保持約兩指寬的距離。
調整頭帶放置吊桿調整吊桿耳機通話控制是軟體功能,且因兼容的軟體電話而異。
若您尚未安裝 Poly Lens 桌面應用程式 (/lens ) 或沒有相容的軟體電話,請先按下耳機通話按鈕,接著再使用軟體電話應用程式撥打/接聽/結束通話。
耳机实习报告

篇一:调频耳机的组装与调测实习总结调频耳机的组装与调测实习总结实习的两个星期很快就过去了,其中的过程有艰辛也有欢笑,它让我学到了许多课本上没有的知识,丰满了专业技术的羽翼,让我在动手能力及处理事情的能力方面有了很大程度的提高。
实习是工科大学生至关重要的实践性教学环节。
其目的是使学生理论联系实际掌握电子元器件的主要产品及其结构、性能和焊接安装工艺、调试等的实践知识,通过实习巩固和加深课堂里所学的基本理论和基础专业知识,将理论与实践相结合,提高解决和处理问题的能力,提高学生动手能力。
并且通过实习全面了解本专业范围内的主要产品、生产工艺、技术状况以及工厂里工程师和技术员如何利用专业知识解决生产中的技术问题等,为本科生实现由学校到社会的过渡打下基础。
本次实习大概分为三个阶段:练焊、正式焊接、通电检查及调试。
现分别从这三个阶段具体陈述下本次实习的心得体会:一、练焊“万丈高楼平地起”,练习焊接的过程看似枯燥无味,实际是电子工艺实习中最重要的一个部分。
没有牢固的焊接技能,是不可能焊好每一块电路板的,当然也就不可能完全实现它的功能。
练习焊接的一天半时间,教会我的是对待事情的认真态度和耐心。
一滴滴的焊锡滴上去,要精准的恰到好处。
少锡就不能盖满焊盘,造成虚焊,进而断路。
多锡又容易堆满焊盘,造成器件的短路,所以要焊好焊盘并不是一件容易的事情,开始的时候没有掌握要领,前几行并不理想,后来时刻提醒自己不要急躁,逐渐掌握了焊接技术的要领,焊的比以前又快又好了,到最后终于焊出了一排一排亮闪闪的焊珠。
也许这些技术并不需要太多的脑力劳动,导致自己容易产生忽视它的情绪,实际上它却培养了自己以后学习和生活中一个很重要的品质,那就是对待事情的态度。
每一件事情都认真对待,每一次都努力做到最好,不要因小失大,造成不必要的损失。
二、正式焊接清点元件教会了我要细心,贴片电阻和电容都只有很小的物理体积,所以很容易弄丢。
以前处理事情的时候总是大大咧咧的,这次在老师的再三叮嘱下,认真清点好了每一个器件。
黑铅笔 Blackwire C510-M C520-M 无线 USB 耳机使用说明书

Blackwire™ C510-M/C520-M Schnurgebundenes USB-HeadsetBedienungsanleitungInhaltWillkommen3Systemvoraussetzungen3Benötigen Sie weitere Hilfe?3Lieferumfang4Grundlagen5Headset tragen6Anpassen des Headsets6Tägliche Benutzung7Anschließen an den PC und Anrufen7Eingehende/ausgehende Anrufe7Headset-Lautstärke anpassen8Mute a Call8Optionale Software Plantronics Spokes9Plantronics Control Panel9Registerkarte …Applications“ (Anwendungen)9Registerkarte …Einstellungen“10Registerkarte …Info“10Plantronics Update Manager11Fehlerbehebung12Headset12Verwenden von Microsoft Lync/Office Communicator13Smart Sensors14Vielen Dank, dass Sie sich für den Kauf eines Plantronics Produkts entschieden haben. Dieses Benutzerhandbuch enthält Anweisungen zur Installation und Verwendung des Blackwire C510-M/C520-M Headset..Lesen Sie vor der Installation oder Verwendung des Produkts die wichtigen Sicherheitsinformationen in der Kurzanleitung zu diesem Thema durch.Computer•Unterstützte Betriebssysteme: Windows ® 7, Windows ® 8, Windows XP ®, Windows Vista ®•Prozessor: Pentium ®-Prozessor mit 400 MHz oder gleichwertig (mindestens); Pentium-Prozessor mit 1 GHz oder gleichwertig (empfohlen)•RAM: 96 MB (mindestens); 256 MB (empfohlen)•Festplatte: 280 MB (mindestens); 500 MB oder mehr (empfohlen)•Microsoft Windows XP-Service Pack 3 (SP3) oder höher (empfohlen) Microsoft Windows Vista-Service Pack 1 (SP1) oder höher (empfohlen)Display•Mindestens 800 x 600, 256 Farben •1024 x 768 High Color, 32 Bit (empfohlen)Browser•Internet Explorer ®V6 oder besser muss auf dem System des Benutzers installiert sein (erforderlich)Besuchen Sie unsere Website /support , um technischen Support sowie Zugriff auf Antworten auf häufig gestellte Fragen und Informationen zur Kompatibilität bzw.Verfügbarkeit zu erhalten.WillkommenSystemvoraussetzungenBenötigen Sie weitereHilfe?Blackwire C510M Headset mit Inline-Steuerung (monaural)Blackwire C520M Headset mit Inline-Steuerung (Stereo)LieferumfangTaste zur Gesprächsannahme/-beendigungNimmt Anrufe entgegen oder beendet sieEingehender Anruf Blinkt grün Laufendes Gespräch Leuchtet grün aufTaste zum Erhöhen der LautstärkeHörlautstärke erhöhenTaste zum Verringern der LautstärkeHörlautstärke verringernTaste zum Stummschalten/Beenden der StummschaltungSchaltet das Mikrofon stumm/beendetdie StummschaltungLeuchtet bei Stummschaltung rot aufSmart Sensor ™-TechnologieSensoren ermitteln, ob Sie das Headset aufgesetzt haben oder nicht. Sensoren befinden sich in der Lautsprecherkapsel auf der Seite des Mikrofonarms.Automatische AnrufannahmeWenn Sie Ihr Headset nicht tragen und auf Ihrem PC ein Anruf eingeht, wird dieser automatisch angenommen,sobald Sie das Headset aufsetzen. Sie müssen nicht auf die Taste zur Gesprächsannahme/-beendigung drücken.Eingehender Anruf Blinkt grünGrundlagen1Schieben Sie den Kopfbügel so, dass er auf beiden Ohren angenehm sitzt.2Stellen Sie den Kopfbügel für einen höheren Tragekomfort weiter, falls er zu fest sitzt.3Optimale Stimmwiedergabe erzielen Sie, indem Sie den Mikrofonarm nahe am MundHeadset tragenAnpassen des Headsets1Überprüfen Sie, ob Microsoft Lync auf Ihrem PC ausgeführt wird.2Verbinden Sie das Headset mit dem USB-Anschluss am Computer. Das Headset wird3Überprüfen Sie Ihre Audioeinstellungen. Stellen Sie sicher, dass die Kopfhörer- undMikrofoneinstellungen Ihres PC-Softphones auf Plantronics C510/C520 eingestellt sind.•PC-Audioeinstellungen für Windows 7 und Windows 8Öffnen Sie …Systemsteuerung“ -> …Sound“ -> Registerkarte …Wiedergabe“ und legen Sie das Plantronics C510/C520-Gerät als Standardgerät für die Kommunikation fest.•PC-Audioeinstellungen für Windows XPÖffnen Sie …Systemsteuerung“ -> …Sound- und Audiogeräte“ und legen Sie auf der Registerkarte …Audio“ Plantronics C510/C520-Gerät als Standardgerät für die Soundwiedergabe fest.4Führen Sie einen Anruf über die Microsoft Lync-Software durch.1Tätigen eines AnrufsWählen Sie eine Nummer mithilfe von Microsoft Lync/Office Communicator.2Annehmen eines Anrufs•Setzen Sie zum Annehmen eines Anrufs mittels Smart Sensor-Technologie das Headset auf oder,•falls Sie das Headset bereits tragen, drücken Sie die Gesprächstaste.3Beenden eines AnrufsDrücken Sie kurz auf die Gesprächstaste.Tägliche BenutzungAnschließen an den PCund AnrufenEingehende/ausgehendeAnrufeHörlautstärke1Drücken Sie an der Inline-Regelung des Headsets auf die Taste zum Erhöhen der Lautstärke (),um die Lautstärke zu erhöhen.2Drücken Sie an der Inline-Regelung des Headsets auf die Taste zum Verringern der Lautstärke (), um die Lautstärke zu verringern.1During a call, press the mute button on the headset inline control to mute the microphone.When mute is on, the mute LED is solid red (you will still be able to hear the caller).2To turn mute off, press the mute button again.Headset-LautstärkeanpassenMute a CallUm auf Plantronics Control Panel zugreifen zu können, muss die optionale Software Plantronics Spokes heruntergeladen sein. Besuchen Sie/software zum Herunterladen und Installieren der Spokes Software und klicken Sie auf die Download-Schaltfläche.Starten Sie dieses Dienstprogramm, indem Sie auf …Start > Programme > Plantronics >Plantronics Control Panel“ klicken.In der Registerkarte …Applications“ (Anwendungen) wird der Status des Plantronics Support füreine Vielzahl von Anwendungen wie Softphones und Media Player angezeigt.Optionale Software Plantronics SpokesPlantronics Control PanelRegisterkarte …Applications“(Anwendungen)Hier können Sie folgende Einstellungen festlegen:•Media Player Anrufsteuerung: Pause, Wiedergabe, Stummschaltung oder keine Aktion •Allgemeine Verwendung•Anwesenheitsstatus bei Lync je nach Verwendung des Headsets (abhängig von Softphone-Kompatibilität) Wenn das Headset auf- oder abgesetzt wird, ändern der Präsenz zu: Anwesend,Beschäftigt, Bitte nicht stören, Gleich wieder da oder Offline.Hier erhalten Sie Online-Zugriff auf die Bedienungsanleitung und auf den Support. Außerdemwerden die Systeminformationen Ihres Headsets angezeigt.Registerkarte …Einstellungen“Registerkarte …Info“Plantronics Update ManagerMit dem Plantronics Update Manager können Sie neue Software- und Firmware-Versionenherunterladen, sobald diese verfügbar sind. Um Einstellungen zur automatischen Suche undInstallation von Updates zu ändern, öffnen Sie …Startmenü“ > …Programme“ > …Plantronics“ >…Plantronics Update Manager“.Automatisch nach Aktualisierungen suchenAktivieren Sie die Option "Automatisch nach Aktualisierungen suchen", und Sie werdenautomatisch informiert, sobald neue Software- und Firmware-Versionen verfügbar sind.Manuell nach Aktualisierungen suchenSuchen Sie jederzeit nach neuen Software- und Firmware-Versionen, indem Sie auf dieSchaltfläche "Jetzt nach Aktualisierungen suchen" klicken.Updates installierenSobald neue Updates nach einer automatischen oder manuellen Suche vorhanden sind, klickenSie auf die Schaltfläche "Gefundene Aktualisierungen installieren", um die Installation zubeginnen.Ich kann den Anrufer nicht hören.Die Hörlautstärke ist zu niedrig. Drücken Sie auf dem Headsetauf die Lautstärketaste, um die Lautstärke zu erhöhen.Das USB-Headset ist nicht als Standard-Audiogerät eingerichtet.Verwenden Sie die Audioeinstellungen Ihres Betriebssystems, umdas Headset von Plantronics als Standard-Audiogeräteinzustellen.Windows XP-Betriebssystem•Gehen Sie zu …Systemsteuerung“ > …Sound- und Audiogeräte“ >…Audio“.•Wählen Sie Ihr Headset als Standardgerät zur Audiowiedergabeaus.Windows Vista- und Windows 7-Betriebssysteme•Gehen Sie zu …Systemsteuerung“ > …Sound“.•Markieren Sie das Headset, wählen Sie …Als Standard“ >…Standardgerät für die Kommunikation“ und klicken Sie auf …OK“.Mac OS X•Öffnen Sie das Apple-Menü > …Systemeinstellung“ > …Sound“ >…Wiedergabe“.•Wählen Sie Ihr Headset im Fenster …Gerät zur Audiowiedergabeauswählen“.Anrufer können mich nicht hören.Das Headset ist stummgeschaltet. Drücken Sie dieStummschaltung, um die Stummschaltung des Mikrofonsaufzuheben.Der Headset-Mikrofonarm befindet sich in der falschen Position.Richten Sie den Headset-Mikrofonarm zu Ihrem Mund hin aus.Das USB-Headset ist nicht als Standard-Sprachgeräteingerichtet. Verwenden Sie die Audioeinstellungen IhresBetriebssystems, um das Aufnahmegerät zu ändern.Windows XP-Betriebssystem•Gehen Sie zu …Systemsteuerung“ > …Sound- und Audiogeräte“ >…Audio“.•Wählen Sie Ihr Headset als Standardgerät zur Audioaufnahmeaus.Windows Vista- und Windows 7-Betriebssysteme•Gehen Sie zu …Systemsteuerung“ > …Sound“ > …Aufnahme“.•Markieren Sie das Headset, wählen Sie …Als Standard verwenden“,und klicken Sie auf …OK“.Mac OS X•Öffnen Sie das Apple-Menü > …Systemeinstellung“ > …Sound“ >…Aufnahme“.•Wählen Sie Ihr Headset im Fenster …Gerät zur Audioaufnahmeauswählen“.Die Audiowiedergabe über das Headset ist verzerrt.Ich kann im Headset ein Echo hören.Reduzieren Sie die Hörlautstärke an Ihrem Softphone, bis die Verzerrung nicht mehr zu hören ist.Passen Sie die Lautstärke am Headset an.FehlerbehebungHeadsetDas andere Headset, mit dem ich Musik gehört habe, funktioniert nicht mehr.Das USB-Headset richtet sich selbsttätig als Standard-Audiogerät in Windows ein. Verwenden Sie die Audioeinstellungen Ihres Betriebssystems, um das Audiogerät zu ändern.Windows XP-Betriebssystem•Gehen Sie zu …Systemsteuerung“ > …Sound- und Audiogeräte“ >…Audio“.•Passen Sie unter …Stimmwiedergabe“ die Standardeinstellungen vom Headset an das Gerät Ihrer Wahl an.Windows Vista- und Windows 7-Betriebssysteme•Gehen Sie zu …Systemsteuerung“ > …Sound“ > …Aufnahme“.•Wählen Sie das entsprechende Gerät, klicken Sie auf …Als Standard“ und dann auf …OK“.Mac OS X•Öffnen Sie das Apple-Menü, wählen Sie …Systemeinstellung“ und klicken Sie auf …Sound“.•Klicken Sie auf …Wiedergabe“ und wählen Sie anschließend …Interner Lautsprecher“ oder das gewünschte Gerät.Mein Headset reagiert nicht auf das Drücken von Tasten.Wenn der PC in den Standby-Modus oder den Ruhezustand übergeht, ist das USB-Headset nicht mehr eingeschaltet.Überprüfen Sie, ob der PC eingeschaltet und aktiv ist.Ich kann nichts hören.Vergewissern Sie sich, dass das Blackwire C510/C520 inWindows als Standardwiedergabegerät festgelegt ist.Vergewissern Sie sich, dass das Blackwire C510/C520 inMicrosoft Lync/Office Communicator als Audiogerät festgelegtist.Stellen Sie sicher, dass die Einstellungen für Windows undAudiogeräte in Microsoft Lync/Office Communicator nicht zuniedrig festgelegt sind.Ich werde nicht gehört.Vergewissern Sie sich, dass das Blackwire C510/C520 inWindows als Standardgerät zur Audioaufnahme festgelegt ist.Vergewissern Sie sich, dass das Blackwire C510/C520 inMicrosoft Lync/Office Communicator als Audiogerät festgelegtist.Stellen Sie sicher, dass die Einstellungen für Windows undAudiogeräte in Microsoft Lync/Office Communicator nicht zuniedrig festgelegt sind.Mein Headset funktioniert nicht mit Microsoft Lync/Office Communicator.Vergewissern Sie sich, dass das Headset verbunden ist.Drücken Sie auf die Gesprächstaste an der Inline-Steuerung. Stellen Sie die Hörlautstärke mit den Lautstärketasten an der Inline-Steuerung ein.Wenn die Lautstärke immer noch zu niedrig eingestellt ist, passen Sie die Hörlautstärke am PC mithilfe von Microsoft Lync/ Office Communicator an.Verwenden von MicrosoftLync/OfficeCommunicatorEs sind verzerrte Töne oder ein Echo im Headset zu hören.Verringern Sie die Sprechlautstärke am PC mithilfe von Microsoft Lync/Office Communicator.Drehen Sie das Mikrofon zu Ihrem Kinn.Ist der Empfang weiterhin verzerrt, verringern Sie die Lautstärke über die Taste zum Verringern der Lautstärke ( – ).Die Option …Automatische Anrufannahme“ funktioniert nicht.Überprüfen Sie, ob Sie das Headset korrekt aufgesetzt haben und sich das Ohrkissen nahe genug an Ihrem Ohr befindet.Smart SensorsBENÖTIGEN SIE WEITERE HILFE? /supportPlantronics Inc.Plantronics BVGildenweg 7 50354 Hürth USA Southpoint, Building C Scorpius 1402132 LR Hoofddorp Niederlande© 2013 Plantronics, Inc. Alle Rechte vorbehalten. Der Name Plantronics, das Logo und Blackwire sind Marken oder eingetragene Marken von Plantronics, Inc. Alle anderen Markennamen sind Eigentum ihrer jeweiligen Besitzer. Apple, iTunes und Mac sind Marken von Apple Inc., eingetragen in den USA und anderen Ländern. Microsoft, Vista, Windows und XP sind Marken der Microsoft Corporation in den USA und anderen Ländern. Pentium ist eine Marke der Intel Corporation in den USA und/oder anderen Ländern. Skype ist eine Marke von Skype Limited und wird mit der Genehmigung von Skype Limited verwendet.200219-04 (03.13)。
- 1、下载文档前请自行甄别文档内容的完整性,平台不提供额外的编辑、内容补充、找答案等附加服务。
- 2、"仅部分预览"的文档,不可在线预览部分如存在完整性等问题,可反馈申请退款(可完整预览的文档不适用该条件!)。
- 3、如文档侵犯您的权益,请联系客服反馈,我们会尽快为您处理(人工客服工作时间:9:00-18:30)。
一、产品导读:艾本C-200A校园数码教学无线耳机专门应用于四六级考试、A-B级、托福、高考、雅思外语听力考试使用,是四六级听力耳机、雅思听力耳机中最好的产品!该款调频耳机接收频率低至50MHZ,采用DSP数字信号处理芯片,并且耳机采用内置天线,外观时尚!可外接天线使用,信号更稳定!
二、艾本C-200A数码教学无线耳机10大优点:
1、全按键设计,完美操作体验,四个按键轻松完成强大功能
2、一键存取电台,8个存台数量人性化设计
3、音量电子调节,数字显示
4、LCD液晶显示,SMT贴片工艺
5、侧滑电池盖设计,时尚操作
6、全罩式皮质耳罩设计,佩戴舒适
7、品牌LOGO雕刻设计,凸显品牌权威
8、折叠和可伸缩头环设计,携带方便
9、高音质电脑耳麦,一机两用
10、开机品牌LOGO显示,原厂正品保证
三、艾本C-200A数码调频耳机技术参数:
1. 频率范围:FM 50-108MHZ
2. LCD显示:有
3. 灵敏度:FM 优于8dbµv
AF≥10m
4. 输出功率:≥2*10MW
5. 存储电台数:8个
6. 静态电流:调频(FM)≦35MA
待机电流≦65µA
7. 扬声器规格:Φ30MM 32Ω250MW
8. 供电方式:2节7号电池(2xAAA)
艾本/aiben主营,教学耳机,蓝牙无线耳机,四六级听力耳机,电视无线耳机,调频耳机,电脑无线耳机欢迎大家到我们官网进行选购,我们一定用最好的产品、最完善的服务满足大家的需求!诚招各地代理,欢迎电话咨询!。