旋转视窗使用说明
海洛斯操作手册(说明书)
HIROSS恒温恒湿机房精密空调操作手册HIMOD系列北京****科技有限公司技术部2009年01月01日目录第一章HIMOD系列海洛斯空调概述 (2)型号多 (3)控制技术先进 (3)制冷系统 (3)送风系统 (3)加湿系统 (3)加热系统 (4)1.7其它 (4)第二章HIMOD系列海洛斯空调型号含义 (4)第三章有关空调的一些资料 (5)气流组织方式(详见下图) (5)盖板纽开启方式(详见下图) (5)空调重量(单位:Kg) (5)机组尺寸及维护空间 (6)第四章制冷循环管路示意图 (7)风冷却(A型) (7)水冷却(W型) (8)双冷源(D型) (9)单系统(C型) (10)双系统(C型) (10)第五章调速风机调速接线示意图 (11)第六章MICROF ACE概述 (12)概述 (12)面板简介液晶显示屏 (13)液晶显示屏介绍 (13)第七章MICROF ACE面板的操作 (13)第八章控制器的使用 (14)控制器(HIROMATIC)概述 (14)控制器的操作 (15)菜单结构 (17)第九章日常维护及特殊维护 (18)日常维护 (18)特殊维护 (19)第十章常见报警及处理 (20)低压报警 (20)高压报警 (21)加湿报警 (21)失风报警 (21)电加热过热报警 (22)显示器发黑 (22)空调不制冷 (22)附录1:参数列表 (22)附录2:报警内容列表 (26)附录3:各菜单项含义: (28)第一章HIMOD系列海洛斯空调概述HIMOD系列海洛斯空调(HIMOD空调)是当今世界上最先进的机房专用恒温恒湿机房专用精密空调。
随着IT业的突飞猛进的发展,各种布局、面积差别很大的机房如雨后春笋般纷纷出现了,使用环境也不一而同。
为适应各种不同要求的机房,新开发的海洛斯HIMOD系列空调应运而生。
她是在保留她的前一代产品HIRANGE系列机房空调的优点,又应用了当今世界上提高了的制冷技术及制冷部件制造工艺,使用当今最先进的模块化设计理念生产出来的高科技机房空调产品。
海视威士姆2MP网络IR全景快速旋转摄像头说明书
DS-2DF8225IX-AEL(T5)2 MP 25 × Network IR Speed DomeHikvision DS-2DF8225IX-AEL(T5) 2MP 25× Network IR Speed Dome adopts 1/1.8" progressive scan CMOS chip. With the 25× optical zoom lens, the camera offers more details over expansive areas.This series of cameras can be widely used for wide ranges of high-definition, such as the rivers, forests, roads, railways, airports, ports, squares, parks, scenic spots, stations and large venues, etc.⏹1/1.8" Progressive Scan CMOS⏹High quality imaging with 2 MP resolution⏹Excellent low-light performance with DarkFighter technology⏹25× optical zoom and 16× digital zoom provide close up views over expansive areas⏹Expansive night view with up to 400 m IR distance⏹Water and dust resistant (IP67) and vandal resistant (IK10)⏹Supports face capture to detect, capture, grade, and select faces in motion⏹Supports road traffic to detect vehicles⏹DORIThe DORI (detect, observe, recognize, identify) distance gives the general idea of the camera ability to distinguish persons or objects within its field of view.It is calculated based on the camera sensor specification and the criteria given by EN 62676-4: 2015.DORI Detect Observe Recognize IdentifyDefinition25 px/m63 px/m125 px/m250 px/m Distance (Tele)2034.5 m (6674.9 ft)807.3 m (2648.6 ft)406.9 m (1335.0 ft)203.4 m (667.3 ft)⏹SpecificationCameraImage Sensor 1/1.8" progressive scan CMOSMin. Illumination Color: 0.002 Lux @ (F1.5, AGC ON), B/W: 0.0002 Lux @ (F1.5, AGC ON), 0 Lux with IR Shutter Speed 1/1 s to 1/30,000 sDay & Night IR cut filterZoom 25x optical, 16x digitalMax. Resolution 1920 × 1080LensFocus Auto, semi-auto, manual, rapid focusFocal Length 5.9 mm to 147.5 mmZoom Speed Approx. 4.8 s (optical, wide-tele)FOV Horizontal field of view: 59.8° to 3.3° (wide-tele), Vertical field of view: 33.7° to 1.9° (wide-tele), Diagonal field of view: 65° to 3.8° (wide-tele)Aperture Max. F1.5IlluminatorSupplement Light Type IRSupplement Light Range Up to 400 mSmart Supplement Light YesPTZMovement Range (Pan) 360°Movement Range (Tilt) -20° to 90° (auto flip)Pan Speed Pan speed: configurable from 0.1° to 210°/s; preset speed: 280°/s Tilt Speed Tilt speed: configurable from 0.1° to 150°/s, preset speed 250°/s Proportional Pan YesPresets 300Patrol Scan 8 patrols, up to 32 presets for each patrolPattern Scan 4 pattern scans, record time over 10 minutes for each scan Power-off Memory YesPark Action Preset, pattern scan, patrol scan, auto scan, tilt scan, random scan, frame scan, panorama scan3D Positioning Yes PTZ Status Display Yes Preset Freezing YesScheduled Task Preset, pattern scan, patrol scan, auto scan, tilt scan, random scan, frame scan, panorama scan, dome reboot, dome adjust, aux outputVideoMain Stream 50 Hz: 25 fps ( 1920 × 1080, 1280 × 960, 1280 × 720) 60 Hz: 30 fps (1920 × 1080, 1280 × 960, 1280 × 720)Sub-Stream 50 Hz: 25 fps (704 × 576, 640 × 480, 352 × 288) 60 Hz: 30 fps (704 × 480, 640 × 480, 352 × 240)Third Stream 50 Hz: 25 fps (1920 × 1080, 1280 × 960, 1280 × 720, 704 × 576, 640 × 480, 352 × 288) 60 Hz: 30 fps (1920 × 1080, 1280 × 960, 1280 × 720, 704 × 480, 640 × 480, 352 × 240)Video Compression Main stream: H.265+/H.265/H.264+/H.264 Sub-stream: H.265/H.264/MJPEGThird stream: H.265/H.264/MJPEGH.264 Type Baseline Profile/Main Profile/High ProfileH.265 Type Main profileScalable Video Coding (SVC) H.264 and H.265 encodingRegion of Interest (ROI) 8 fixed regions for each streamAudioAudio Compression G.711alaw, G.711ulaw, G.722.1, G.726, MP2L2, PCMAudio Bit Rate 64 Kbps (G.711)/16 Kbps (G.722.1)/16 Kbps (G.726)/32 to 192 Kbps (MP2L2) NetworkProtocols IPv4/IPv6, HTTP, HTTPS, 802.1x, Qos, FTP, SMTP, UPnP, SNMP, DNS, DDNS, NTP, RTSP, RTCP, RTP, TCP/IP, DHCP, PPPoE, UDP, IGMP, ICMP, BonjourAPI ISUP, ISAPI, Hikvision SDK, Open Network Video Interface (Profile S, Profile G, Profile T) Simultaneous Live View Up to 20 channelsUser/Host Up to 32 users. 3 levels: Administrator, Operator and UserSecurity Password protection, complicated password, HTTPS encryption, 802.1X authentication (EAP-TLS, EAP-LEAP, EAP-MD5), watermark, IP address filter, basic and digest authentication for HTTP/HTTPS, RTP/RTSP over HTTPS, control timeout settings, security audit log, TLS 1.3, host authentication (MAC address)Client HikCentral, iVMS-4200, Hik-ConnectWeb Browser IE11, Chrome 57.0+, Firefox 52.0+, Safari 11+ ImageImage Settings Saturation, brightness, contrast, sharpness, gain, and white balance adjustable by client software or web browserImage Enhancement BLC, HLC, 3D DNRWide Dynamic Range (WDR) 140 dB WDRImage Stabilization Yes. Built-in gyroscope to improve EIS performance.Regional Exposure YesRegional Focus YesPrivacy Mask Up to 24 masks, polygon region, mosaic mask, mask color configurable InterfaceEthernet Interface 1 RJ45 10M/100M self-adaptive Ethernet port; Hi-PoEOn-board Storage Built-in memory card slot, support MicroSD/MicroSDHC/MicroSDXC, up to 256 GB Alarm 7 inputs, 2 outputsAudio 1 input (line in), max. input amplitude: 2-2.4 vpp, input impedance: 1 KΩ ± 10%; 1 output (line out), line level, output impedance: 600 ΩVideo Output 1.0V[p-p]/75Ω, PAL, NTSC, BNC connectorRS-485 HIKVISION, Pelco-P, Pelco-D, self-adaptiveEventBasic Event Motion detection, video tampering alarm, alarm input and output, exceptionSmart Event Line crossing detection, region entrance detection, parking detection, unattended baggage detection, object removal detection, intrusion detection, region exiting detection, vandal-proof alarm, audio exception detectionSmart Tracking Manual tracking, auto-trackingAlarm Linkage Alarm actions, such as Preset, Patrol Scan, Pattern Scan, Memory Card Video Record, Trigger Recording, Notify Surveillance Center, Upload to FTP/Memory Card/NAS, Send Email, etc.Deep Learning FunctionFace Capture Detects up to 30 faces simultaneously. Supports detecting, tracking, capturing, grading, selecting of face in motion, and output the best face picture of the facePerimeter Protection Line crossing, intrusion, region entrance, region exitingSupport alarm triggering by specified target types (human and vehicle)Road Traffic and Vehicle DetectionRoad Traffic Support vehicle detection (license plate number,vehicle model, and vehicle color recognition)GeneralGeneral Function Mirror, password protection, watermark, IP address filterPower 24 VAC (Max. 60 W, including max. 18 W for IR and max. 6 W for heater), Hi-PoE (Max.50 W, including max. 18 W for IR and max. 6 W for heater)Operating Condition Temperature: -40°C to 70°C (-40°F to 158°F), Humidity: ≤ 95% Dimension ⌀ 266.6 mm × 410 mm (⌀ 10.50" × 16.14")Weight Approx. 8 kg (17.64 lb.)Language 33 languages: English, Russian, Estonian, Bulgarian, Hungarian, Greek, German, Italian, Czech, Slovak, French, Polish, Dutch, Portuguese, Spanish, Romanian, Danish, Swedish, Norwegian, Finnish, Croatian, Slovenian, Serbian, Turkish, Korean, Traditional Chinese, Thai, Vietnamese, Japanese, Latvian, Lithuanian, Portuguese (Brazil), UkrainianApprovalEMC FCC SDoC (47 CFR Part 15, Subpart B);CE-EMC (EN 55032: 2015, EN 61000-3-2: 2019, EN 61000-3-3: 2013+A1:2019, EN 50130-4: 2011 +A1: 2014);RCM (AS/NZS CISPR 32: 2015);IC VoC (ICES-003: Issue 7);KC (KN 32: 2015, KN 35: 2015)Safety UL (UL 62368-1)CB (IEC 62368-1:2014+A11);CE-LVD (EN 62368-1:2014+A11:2017),BIS (IS 13252(Part 1):2010/ IEC 60950-1: 2005); LOA (IEC/EN 60950-1)Environment CE-RoHS (2011/65/EU); WEEE (2012/19/EU); Reach (Regulation (EC) No 1907/2006)ProtectionIP67 (IEC 60529-2013), IK10 (IEC 62262:2002), Lightning Protection, Surge Protection and Voltage Transient Protection, ±6kV Line to Gnd, ±3kV Line to Line⏹Typical ApplicationHikvision products are classified into three levels according to their anti-corrosion performance. Refer to the following description to choose for your using environment.This model has NO SPECIFIC PROTECTION.LevelDescriptionTop-level protectionHikvision products at this level are equipped for use in areas where professional anti-corrosion protection is a must. Typical application scenarios include coastlines, docks, chemical plants, and more.Moderate protectionHikvision products at this level are equipped for use in areas with moderate anti-corrosion demands. Typical application scenarios include coastal areas about 2 kilometers (1.24 miles) away from coastlines, as well as areas affected by acid rain.No specific protectionHikvision products at this level are equipped for use in areas where no specific anti-corrosion protection is needed.⏹Dimension⏹Available Model DS-2DF8225IX-AEL (T5)⏹Accessory⏹OptionalDS-1604ZJ-pole DS-1667ZJ DS-1604ZJ-corner DS-1604ZJ DS-1604ZJ-boxDS-1663ZJ DS-1661ZJ DS-1604ZJ-BOX-CORNERDS-1660ZJ DS-1662ZJDS-1603ZJ DS-1604ZJ-BOX-POLEDS-1619ZJ。
Proximity Series QV Quick-View 旋转位置指示器 开关说明说明书

Proximity Series QV Quick-View ®Rotary Position Indicators/Switches are produced with up to four individual mechanical or proximity switches. Instructions below include installation, as well as adjustment procedures for direct drive and lever drive models.INSTALLATION1. Mounting kits, when provided include couplers, lever arms and screws for mounting the position indicator to a valve or actuator. A position indicator is mount-ed using direct drive hardware for quarter turn applications (rotational) and lever drive hardware for converting linear motion to rotary. Tubular spacers are also pro-vided for some installations.2. For direct drive models, attach appropriate drive yoke or solid block onto the two pins, using a #6-32 X 1/4˝ screw provided. Do not attempt to fabricate your own yokes since this a special spring-tempered material. For direct drives, with the actuator shaft rotated to its counterclockwise position, spread the driving yoke and slip it down onto the square (or rectangular) shaft of the actuator. Attach bracket with two hex cap screws. Before tightening screws, operate control slowly with a wrench or power, and observe that drive shaft and drive yoke are concentric and perpendicular throughout the complete stroke. Adjust position as required and tighten all mounting screws. Check concentricity and perpendicularity.3. For lever drive models, attach the appropriate driving lever onto the shaft. Do not tighten. Attach switch and bracket to actuator, making sure that the lever is free to rotate over the entire range of the actuator stroke. Attach the driving pin or bolt through the lever arm if slotted, or on the driving side of the lever. (It may be nec-essary to loosen or remove the bracket mounting to accomplish this connection on some actuators.) Operate the actuator very slowly and observe movement of all pins and levers to be sure there are no interferences. Slide lever up or down on switch shaft to the most desirable position. When all motions are made and clear-ances are adequate, tighten clamp screw on lever that was left loose above. Now tighten all the mounting screws. Re-check the travel of all levers and pins for prop-er clearance throughout the complete stroke of the actuator.4. Push cover down, then turn it counterclockwise and lift straight up to remove.Remove inner cover window. Remove the indicator drum.5. Switches are set at the factory in the counterclockwise position listed below:2 Switch Unit #1 Open #2 Closed 4 Switch Unit #1,3 Open #2,4 Closed90° rotational travel will reverse all of the above positions.[77.79]1st Code (1st X) Number of Switches 0None+1One Switch+2Two Switches+3Three Switches+4Four Switches+2nd Code (2nd X) Switch Type 0No Switches+110A Mechanical Snap Switch 20.1A Mechanical Gold Contacts 32A Proximity Reed Switch+45-25 VDC Namur Sensor 510-30 VDC Inductive Sensor 610A Mechanical Snap Switch 4th Code (4th X) Driving Style 1Direct Drive+2Lever Drive+3Namur Drive+5th Code (5th X) Lighting Option 0None+128 VDC Lights6th Code (6th X) Visual Indication 0None1Standard (Open Closed)+2Upside Down (Open Closed)+7th Code (7th X) Additional Options EX Class I, Div. II, Groups A, B, C & D.Class II, Div. II Groups F & G.QV Model Number Prefix3rd Code (3rd X)0QV 2 1 0 1 0 1 - Example Popular Model Number + EX, Explosion-proof option available.QUICK-VIEW ®COMPLETE MODEL CHART SPECIFICATIONSMinimum Rotation Travel – Switches only:5°Maximum Rotation Travel – Switches only: 360°Temperature Limits: -40 to 180°F (-40 to 82°C).Switch Type:SPDT.Electrical SPDT Switch Ratings:QV-X1XXXX: 10A@125/250VAC;0.5A125VDC;********************.QV-X2XXXX: 1A@125VAC;*******************.QV-X3XXXX:2A@125VAC;*******************.QV-X4XXXX:5-25 VDC NAMUR sensor.QV-X5XXXX:10-30 VDC INDUCTIVE sensor.QV-X6XXXX:10A 125/250 VAC mech. switch.Lighting Supply Voltage:24-28 VDC.Enclosure Material: Polycarbonate housing and conduit.Conduit Entrance: One 3/4˝ NPT.Enclosure Rating: NEMA 4, 4X. Optional explosion-proof, rated: Class I, Groups A, B, C, D; Class II, Groups F & G; Div. 2.Maximum Altitude:2000 m (6560 ft).。
LED视窗用户操作手册
LED视窗图文编辑系统用户使用手册二〇一五年三月目录一、概述 (1)1.1、简介 (1)1.2、主要功能特点 (1)二、安装 (2)2.1、运行环境 (2)2.2、安装及卸载 (2)三、制作节目 (3)3.1、界面介绍 (3)3.1.1、软件界面 (3)3.1.2、菜单 (3)3.1.3、工具栏 (6)3.1.4、节目管理 (7)3.1.5、属性信息设置 (9)3.1.6、模拟显示窗口 (9)3.2、系统参数设置 (10)3.3、节目制作流程 (12)3.3.1、新建、编辑工程 (12)3.3.2、新建、编辑节目 (13)3.3.3、添加分区内容 (14)3.3.4、设置节目流水边框 (28)3.3.5、设置节目属性 (28)3.3.6、发送工程到显示屏 (29)四、其他功能 (30)4.1、亮度设置 (30)4.2、定时开关机及校准 (30)4.3、强制开、关机 (31)五、多机通讯模式 (31)5.1 设置网络多机通讯模式 (32)5.2 设置群信息 (32)5.3 修改显示屏名称,设置所属群信息 (34)5.4 针对每个群设置工程配置信息,节目内容 (34)5.5发送信息到显示屏 (35)一、概述1.1、简介LED视窗图文编辑系统软件专为吉星图文控制器配套设计,自2007年投放市场,历经几代产品的更新发展,功能日臻完善,操作简单,深受广大用户喜爱。
这款最新推出的LED视窗2011版本是我们在多年从事LED异步控制器研发基础上,通过对大量用户使用习惯调研的基础上,提出的一套最完善的整体解决方案。
该编辑软件从功能和使用上都有了很大的改进。
LED通用图文控制卡应用国际最新32位嵌入式技术,使脱机操作更加稳定、方便的同时,带来了硬件指标的全面提升,彻底消除了超长显示模式下显示内容抖动问题,同时的精良设计,使该控制系统硬件使用效率非常高,外围元件大大减少,带来成本大幅度降低,通过电源及232通信部分增加了保护设计,消除了带电作业对板卡损伤的隐患,从而大幅提高系统的安全可靠型。
EasyN 多视窗软件使用手册
软件版本:3.0.1.9日期:2014年8月前 言感谢您使用本公司的产品。
网络摄像机客户端用于实现对前端所有网络视频监控设备(包括网络视频服务器、网络摄像机)的集中监视、存储、管理和控制。
该管理软件可最大同时管理96个前端网络监控设备;可对任一设备进行设置和控制,远程升级等功能;支持1/4/6/8/9/16/25/36画面单屏显示,以及双向语音对讲、日志检索、报警控制、远程回放等功能。
功能强大、界面友好、操作简便,方便用户实现大型远程网络监控系统的组网应用。
声明:本手册的所描述的内容可能与您现使用的版本有区别,如果您按照本手册使用时遇到有无法解决的问题,请与本公司技术支持部或产品供应商联系。
本手册内容将不定期更新,公司有保留不另行通知的权利。
目 录1.安装说明 (4)1.1.安装要求 (4)1.2.安装步骤 (4)2.客户端详细说明 (5)2.1.登录与说明 (5)2.2.软件界面说明 (6)2.3.设备管理 (8)2.3.1.设备添加 (8)2.3.2分组管理 (10)2.4.图像预览 (12)2.4.1非循切预览 (13)2.5.云台控制 (14)2.5.1.云台控制 (14)2.5.2.预置点设置 (14)2.6.录像管理 (15)2.6.1.计划录像 (15)2.6.2手动录像 (17)2.7.本地录像回放 (17)2.7.1. 时间搜索回放 (17)2.7.2.搜索文件回放 (18)2.7.3.参数设置 (18)2.7.4.用户管理 (19)2.7.5.添加用户 (20)2.7.6.删除用户 (20)2.7.7.修改用户权限 (20)2.7.8.修改用户密码 (20)2.8.日志 (21)2.8.1.日志保存时间 (21)2.8.2.日志查询 (21)2.8.3.日志备份 (21)2.9.其它设置 (22)2.9.1.通道管理 (23)1.安装说明1.1.安装要求硬件环境:1、奔腾Pentium IV系列,CPU主频2.0G以上2、内存2G以上3、硬盘120G或更高4、显示器 1024×768或更高的分辨率软件环境:Windows2000/WindowsXP/Windows2003/WindowsVista/Windows7/ Windows8,推荐使用Windows XP1.2.安装步骤解压安装包,弹出如下界面:点击3.0.1.9安装弹出如下界面:选择安装路径后,点“下一步”后即安装完毕。
LED视窗软件用户手册V2.0
LED视窗编辑软件使用手册二〇一〇年五月目录一、概述 (1)1.1、简介............................................................................................................. 错误!未定义书签。
1.2、主要功能特点 (1)二、安装 (1)2.1、运行环境 (1)2.2、安装及卸载 (1)三、制作节目 (2)3.1、界面介绍 (2)3.1.1、软件界面 (2)3.1.2、菜单 (3)3.1.3、工具栏 (5)3.1.4、节目管理 (6)3.1.5、属性信息设置 (7)3.1.6、模拟显示窗口 (8)3.2、系统参数设置 (8)3.3、节目制作流程 (12)3.3.1、新建、编辑工程 (12)3.3.2、新建、编辑节目 (13)3.3.3、改变分区类型 (14)3.3.4、添加分区内容 (15)3.3.5、设置节目属性 (21)3.3.6、设置流水边框 (22)3.3.7、发送工程到显示屏 (22)四、其他功能 (23)4.1、亮度设置 (23)4.2、定时开关机及校准 (24)4.3、强制开、关机 (24)附件一 LED控制卡接线示意图 (25)一、概述主要功能特点●支持所有(室内、户外)单元板,单色和双基色。
●直接支持16扫、1/8扫、1/4扫、1/2扫和静态驱动模式。
●最多可存储6万多字的信息。
●支持可以显示万国字符。
●显示屏控制卡带16M存储容量。
●支持多分区。
●支持真正的表格图形文字混合文件。
●带流水边框功能。
●可定时休眠显示屏。
●有单元板检测功能,卡上带检测功能按钮。
●200级亮度调节。
●每个节目可以实现时间段播放。
●系统自动查找显示屏,无需设置通信接口。
二、安装2.1、运行环境操作系统基于WIN98/WIN2000/WINXP下的集成环境;硬件配置CPU: Pentium 300MHz以上内存:64M以上相关软件Microsoft office(推荐)2.2、安装及卸载LED视窗系统作为绿色软件,不需要安装程序,只要将程序拷贝到计算机的硬盘,直接运行就可以,卸载直接在系统中删除就可以,安装和卸载都不会对系统造成任何影响。
flwinlab使用说明中文
flwinlab使用说明中文
1、就你的全站仪先安装好,架在三脚架上取下镜头盖,盖好全站仪的箱子。
2、将全站仪连同三脚架架在您需要测点的标准的位置上,打开对准激光,对准地面上的点。
3、接下来的操作是粗平,可以看到全站仪器水泡时起居中对平哦,可以通过操作三个焦点的螺旋。
4、有视线精品可以看到,镜头下面也有一个水平,要要调整角螺旋视线调平,可以90度旋转旋转仪来精平。
5、清平以后我们可以调整粗准焦螺旋,对准你想测量的物体哦。
6、对于细部对准的调节,我们可以通过细准焦螺旋来实现哦,调整好以后就可以测量了。
W2014如何开启屏幕智能旋转功能
Last Update date : 2014.04.18
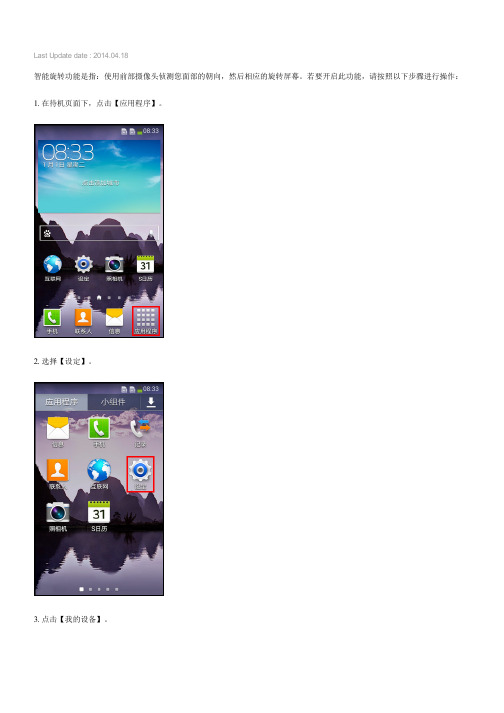
智能旋转功能是指:使用前部摄像头侦测您面部的朝向,然后相应的旋转屏幕。
若要开启此功能,请按照以下步骤进行操作:1. 在待机页面下,点击【应用程序】。
2. 选择【设定】。
3. 点击【我的设备】。
4. 选择【智能屏幕】。
5. 点击【智能旋转】。
注:若此时无法选择该选项,请您下拉屏幕顶帘,确保【屏幕旋转】已开启。
6. 屏幕上显示智能旋转的使用说明,点击【确定】即可勾选。
同时,屏幕右上方也会显示“小眼睛”图标,代表已开启。
注意:
1. 此功能仅可通过内部屏幕使用。
2.智能旋转在以下条件下运行效果最佳:
(1)设备保持稳定且直立时。
(2)设备处于清晰光源环境,但是屏幕未直接受光时。
(3)前置摄像头未由其他应用程序使用时。
更多内容
W2014屏幕上有个眼睛图标,能否取消?
W2014如何将内置的铃声设为手机卡1和卡2的来电铃声?
W2014如何将内置的铃声设为手机卡1和卡2的短信铃声?
W2014如何通过手机卡1和卡2发送短信?
W2014如何通过手机卡1和卡2拨打电话?
相关型号信息
SM-W2014IDACTC。
HUAWEI华为 MateView SE 旋转升降支架 用户指南

用户指南目 录关于本手册快速上手外观和接口介绍2显示器的安装、拆卸3显示器连接至计算机等设备5调整显示器的俯仰角度和高度6垂直旋转显示器7显示设置(OSD)调整显示器的显示效果(亮度、色温等)8护眼模式10更多功能情景模式,增强游戏体验12恢复出厂设置12查看显示器的 S/N 号13安全信息法律声明关于本手册使用设备前请仔细阅读本手册。
手册中展示的组件可能未包含在设备内,您需要单独购买;手册中描述的功能可能需要与其他组件配合,才能使用;手册中的图形、界面可能和实际有差异,所有图示仅供参考,请以实际产品为准。
选项。
显示器的安装、拆卸安装显示器底座、支架•安装底座支架前,请确保显示器背部安装支架处无铁件等物件吸附,否则可能造成电路短路。
•部分型号显示器为圆形底座,请以实际产品为准。
1打开纸箱包装,将整机和缓冲泡沫一起取出,建议在桌面上摆放软质物料(如显示器自带的包装袋),然后将显示器屏幕面朝桌面、水平放置在桌面上。
2请在包装盒的标签上,确认您所购买的显示器配置,按照对应的步骤安装底座支架。
•若您购买的配置是 SSN-CAR/SSN-CARBZ/SSN-CARXZ ,从缓冲泡沫中取出底座后,将显示器立柱稍微向上抬起,然后将底座安装到立柱下端,听到咔哒声表示已安装好。
•若您购买的配置是 SSN-CBR/SSN-CBRBZ/SSN-CBRXZ ,从缓冲泡沫中取出底座、支架后,先将支架底部的配合槽位对齐底座凸台,拧紧螺丝将底座和支架连接在一起,再将底座支架上端倾斜插入显示器背部的卡槽,然后向下按压,听到咔哒声表示已安装好。
3双手托起组装好的显示器,立在平整的桌面上。
拆卸显示器底座、支架•若您购买的配置是 SSN-CAR/SSN-CARBZ/SSN-CARXZ ,将显示器平放在桌面上(显示器屏幕面朝桌面,桌面上建议摆放软质物料),一只手向内拨动底座的快拆拨片,同时另一只手握住立柱向外顶出底座,即可拆卸底座。
显示器连接至计算机等设备通过 HDMI/DP/VGA 线缆将显示器连接至计算机等设备,接通显示器电源,向上短按五向遥杆按键开机。
Lorex 2K 全景旋转摄像头说明书

View your world from every angle with advanced pan-tilt-zoom capabilities and full 2K resolution with double the detail of 1080p. Color Night Vision™ delivers full color nighttime video for clearer identification in low light conditions. Control the camera’s movement remotely to view the entire scene from your NVR, or from a connected smartphone, tablet or computer. With its ability to pan left and right, tilt up and down, and zoom in incredibly close thanks to a 12× optical zoom lens, this PTZ camera can do it all. See in complete darkness with up to 330ft IR night vision range.•Super High definition 4MP image sensor delivers double the detail of 1080p 1•Powerful 12× optical zoom and 16× digital zoom to focus in on even the finest details•4MP Super HD video recording provides superior quality for reviewing fine details in heightened resolution •Color Night Vision™ delivers color nighttime video for improved recognition of objects in low light conditions 2 •IR night vision range up to 330ft (100m) in total darkness 3•ClearNight imaging for improved low light performance and improved recording efficiency 3•360° continuous panning rotation for complete area coverage. Up to 200° per second panning speed•Control PTZ camera movement and transmit video and power (PoE+ / 802.3at) over a single network cable •Program preset viewing points and tours when connected to a NVR•Remote control of the PTZ camera using a smartphone or tablet when connected to a NVR•Day/Night mode: picture automatically switches to B&W delivering better clarity in low light conditions •Weatherproof (IP66-rated) camera with extreme temperature performance (-40° ~ 158°F / -40° ~ 60°C) 4 •Wall mount bracket & 100ft (31m) extension cable included for installation flexibilityFeatures:SEE IT ALL WITH OUTSTANDING 4MP RESOLUTION4MP SUPER HD12× PTZ IP DOME CAMERALNZ44P12B 4MPSuper High Definition12XOptical Zoom360°RotationSpecificationsProduct Information1× 100ft (31m) CAT5e Ethernet Cable, 1× Mounting Kit, Quick Setup GuidesImage Sensor 4MP , 1/3” CMOS Video Format NTSC / PAL Effective Pixels 2592(H) x 1520(V)Resolution 4MP (2592×1520) @ 30fpsRange Pan: 0° ~ 360° endless; Tilt: -15° ~ 90°, Auto Flip: 180°Pan/Tilt Speed Manual Speed — Max 200°/Sec Pan; Max 120°/Sec Tilt Preset Speed — Max 240°/Sec Pan; Max 200°/Sec Tilt Zoom 12x Optical Zoom & 16x Digital Zoom Scan System Progressive Sync SystemInternal S/N Ratio >50dB (AGC Off)IrisDC Auto Iris w/Hall-effect AES Shutter Speed 1/1s~1/30,000sMin. Illumination ***********(Color)withoutIR ************(B/W)withIR Video OutputIP AudioN/ALens / Lens Type 5.3mm ~ 64mm, F1.6 ~ F4.4 / Zoom Module Field of view (Horizontal)54°~4°Termination RJ45 10/100Mbps Ethernet Night Vision Range 330ft/100m, 850nm Day / Night Yes Color Night Vision™YesPower Requirement PoE+ (802.3at); 12V DC (Optional)Power Consumption 3.0AOperating Temp. Range -40°F ~ 158°F / -40°C ~ 70°C Operating Humidity Range <90% RHEnvironmental Rating IP66 (Indoor / Outdoor) 4Dimensions Camera Only (Dia. × H)6.3” × 11.6” / 160 × 295mmDimensions with Wall Mount (D × W × H)9.9” × 6.3” × 14.3” / 251mm × 160mm × 363mm Weight 6.6lbs / 3kg (camera only)8.6lbs / 3.9kg (with wall mount)Vandal RatingN/A1. Compatible with select Lorex NVRs. For the most up-to-date list of compatible recorders, visit /compatibility2. Full color nighttime video typically switches to black & white IR night vision below 1 lux to ensure optimal low-light image quality.3. Stated IR illumination range is based on ideal conditions in typical outdoor night time ambient lighting and in total darkness. Actual range and image clarity depends on installation location, viewing area, and light reflection / absorption level of object. In low light, the camera will switch to black and white.4. Not intended for submersion in water. Installation in a sheltered location recommended.Disclaimers© 2018 Lorex TechnologyAs our product is subject to continuous improvement, Lorex T echnology & subsidiariesreserve the right to modify product design, specifications & prices without notice and withoutincurring any obligation. E&OE. 1-07052018 (18-0719-LOR)Lorex Technology250 Royal Crest Court Markham, Ontario,Canada L3R 3S1Dimensions。
晓青科技45°倾斜感应360度旋转感应开关说明书

● FUNCTIONS1. 45° Tilt Detecting within a 360° radius2. Up-Side Down Detecting● APPLICATIONS1. Automatically shut off for home appliances2. Wake up systems for power saving, such like remote controllers3. Anti-theft / Anti-tamper devices4. Rotation Detection for monitor5. Alarm system6. Earthquake detecting7. Automatically shut off for Sporting equipment8. Entertainment device: video game consoles, toys● FEATURES1. Both suitable for horizontal and vertical PCB.2. Switch state: Normal close.3. RBS070500T are resistant to magnetization.4. Housing made of high insulation plastic material, free from electric conduction andrust problem.5. Gold-plated ball and terminals, low possibility of oxidization.6. All plastic materials subject to industrial purpose, resist high temperature and meetfireproof function.7. Simple ON and OFF signals, easy for design.8. RoHS compliance, an ideal substitute for mercury switch.9. A more economical tilt and rotation detection option than IC design solution.10. All made in Taiwan and examined before shipment.● PATENTS1. Taiwan Patent No. M 4372462. Taiwan Patent No.I 5103563. Taiwan Patent No. I310951(RBS0705/0706)4. U.S.A. Patent No. US 6,518,523 B15. U.S.A. Patent No. US 7,256,360 B16. U.S.A. Patent No. US 9,058,945 B27. U.S.A Patent No. US7,446,272 B28. China Patent No. 201220308500.89. China Patent No. 201220079187.510. C hina Patent No. 20120218323.911. C hina Patent No. 200610091095.8(RBS0705/0706)● DIMENSIONS / OPERATION / P.C.B. LAYOUT (Unit: mm, Tolerance: ±0.25mm)Fig. 1● Current/Voltage Suggested● ELECTRICAL CHARACTERISTICS● RELIABLE TEST ITEMSReliable Test for RBS070500T● SOLDERING CONDITIONFollowing soldering conditions are for reference only, please use soldering information that solder paste manufacturer recommends.< Table of classification Reflow profile >Fig. 2● PACKAGE※Package shown as below for reference.※Package shown as below for reference.PE Bag Inner boxInner boxTape & reel CartonCarton● NOTE1. Suggestion for usage: For vibration usage or application, we suggest to addhysteresis for IC; if vibration is heavy, optical type of sensor switch is recommended.2. For the continued product improvement as one of the company policy, specificationsmay change or update without notice. The latest information can be obtained through our sales offices. Normally, all products are supplied under our standard conditions.3. If buyer’s products will stay in power supply for a long time which needs very highstability, optical sensor switch is strongly recommended.● PRECAUTIONS FOR USE1. If the products is intended to be used for other endurance equipment requiringhigher safety and reliability such as life support system, space and aviation devices, disaster and safety system, it’s necessary to make verification of conformity or contact us for the details before using.2. Do not try to clean the switch with a solvent or similar substance after the solderingprocess.3. Use water-soluble flux may damage the switch.4. If soldering temperature exceeds our specification, sensor switch could get apart.5. Do not use switch in the environment of high humidity, because such an environmentmay cause the leakage current between the terminals.6. Please do not exceed the rated load as there will be a risk of disabling the productfunction.7. In the circuit, switch should not be near or directly connected with the magneticcomponent solder joints (for example: relays, transformers, etc.).。
Ergotron StyleView HD监视器搭载旋转辅助设备说明书

User's GuideStyleView HD Monitor Accessorywith Monitor PivotThese symbols alert users of a safety condi-tion that demands attention. All users shouldbe able to recognize and understand thesignifi cance of the following Safety Hazardsif encountered on the product or within thedocumentation. Children who are not ableto recognize and respond appropriately toSafety Alerts should not use this product with-out adult supervision!Hazard SymbolsReviewSafetyImportant! You will need to adjust this product after installation is complete. Make sure all yourequipment is properly installed on the product before attempting adjustments. This product shouldmove smoothly and easily through the full range of motion and stay where you set it. If movementsare too easy or diffi cult or if product does not stay in desired positions, follow the adjustmentinstructions to create smooth and easy movements. Depending on your product and the adjustment,it may take many turns to notice a diff erence. Any time equipment is added or removed from thisproduct, resulting in a change in the weight of the mounted load, you should repeat these adjustmentsteps to ensure safe and optimum operation.Warning: To avoid the potential to pinch cables it is important to follow the cablerouting instructions in this manual. Failure to follow these instructions mayresult in equipment damage or personal injury.If combined LCD and CPU weight is greater than 27lbs (10.4kg) then the CPU must be mounted to the rear of the cartCaution: Use of this accessory allows the cart to be confi gured with a high center ofgravity. Do not exceed the maximum capacity of 24lbs.Warning: When the height adjustment and assemblyare at maximum height this creates a tipping hazard.Lower work surface before moving cart. Failure tofollow these instructions may result in equipmentdamage or personal injury.14lbs. - 24lbs.(6.3 kg - 10.8 kg)19.6°Features & Specifi cationsCAUTION: DO NOT EXCEED MAXIMUM LISTED WEIGHT CAPACITY. SERIOUS INJURY OR PROPERTY DAMAGE MAY OCCUR!Total weight of monitor when mounted needs to be 14 lbs - 24 lbs (6.3 kg - 10.8 kg)Range of Motion:Monitor Weight:ComponentsTools NeededArm2Remove LCD PivotRemove Arm3Attach Lift46b 13aAdjustment Stepproperly installed on the product before attempting adjustments. This product should move smoothly and easily through the full range of motion and stay where you set it. If movements are too easy or diffi cult or if product does not stay in desired positions, follow the adjustment instructions to create smooth and easy movements. Depending on your product and the adjustment, it may take many turns to notice a diff erence. Any timeequipment is added or removed from this product, resulting in a change in the weight of the mounted load, you should repeat these adjustment steps to ensure safe and optimum operation.Monitor Pivot - Up and Downc14mm (9/16")d10mm Increase Lift StrengthIf the mounted weight is too heavy or this product does not stay up when raised, then you'll need to increase Lift Strength:Decrease Lift StrengthIf the mounted weight is too light or this product does not stay down when lowered, then you'll need to decrease Lift Strength:Cart Lift - Up and Down.Increase Lift StrengthIf the mounted weight is too heavy orthis product does not stay up whenraised, then you'll need to increaseLift Strength:Decrease Lift StrengthIf the mounted weight is too light orthis product does not stay down whenlowered, then you'll need to decreaseLift Strength:Monitor Lift - Up and Down11 of 12 888-98-045-G-00 rev. E • 08/1912 of 12888-98-045-G-00 rev. E • 08/19© 2016 Ergotron, Inc. All rights reserved. | USA: 1-800-888-8458 | Europe: +31 (0)33-45 45 600 | China: 400-120-3051 |Japan:*************************NOTE: When contacting customer service, reference the serial number.For local customer care phone numbers visit: For Service visit: For Warranty visit: /warranty Learn more about ergonomic computer use at: /ergonomics。
maxell投影仪遥控器说明书
maxell投影仪遥控器说明书
1、除了与一般电视遥控器都有着不少同样的按钮,开关按钮、多向的选择键、确定/退出按钮、信号输入按钮、菜单按钮、调节声音的按钮:有一些遥控器上面还有播放等功能按钮。
2、投影仪遥控器上面有着四个关于投影仪功能的按钮,ZOOM 按钮,是调整画面缩放模式,可以用来调整图像大小,还可以调整常用的缩放模式比如说16:9/4:3/AUTO这几种模式,选择不用的比例模式,画面显现效果有些差异。
3、ZOOM键用于调整图像大小,由于投影是通过投射光线到投影幕上面,有不少投影仪需要按一下调焦按钮才可以调整到正确的焦距,投射出清晰的画面。
4、FLIP指的是画面旋转键,选择该键,画面可以进行上下翻转,左右翻转等。
有时投影仪要吊装或者倒装,投出来的画面就需要进行上下翻转,才能保证观看时为正常画面。
5、FREEZE按钮是冻结画面键,有点像视频的暂停键,可以冻结当前的画面。
旋转操作详解
“旋转”操作详解“旋转”即通过指定的点(即基点)来旋转选取的对象,是最常用的修改编辑操作之一。
旋转操作步骤:1. 启动旋转操作(命令:Rotate);2. 选择对象: 选择对象,可选择多个对象,直到按 ENTER 键结束选择。
3. 指定基点: 指定一个点。
4. 指定旋转角度或 [复制(C)/参照(R)]:到第4步时,如果选择不同选项,可实现以下多种不同的旋转效果。
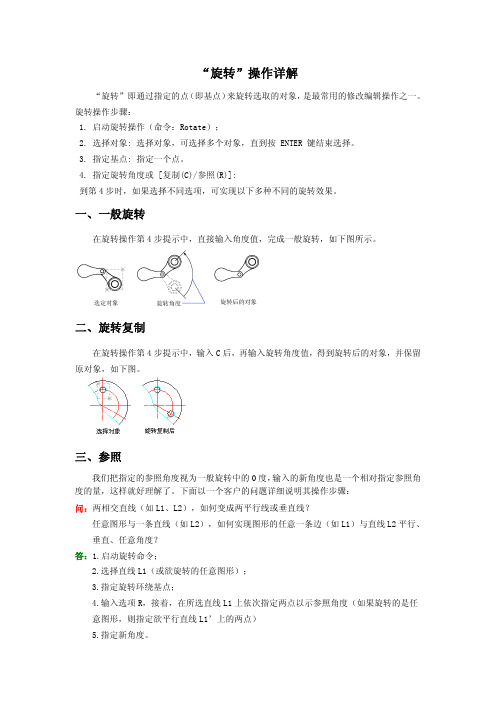
一、一般旋转在旋转操作第4步提示中,直接输入角度值,完成一般旋转,如下图所示。
二、旋转复制在旋转操作第4步提示中,输入C后,再输入旋转角度值,得到旋转后的对象,并保留原对象,如下图。
三、参照我们把指定的参照角度视为一般旋转中的0度,输入的新角度也是一个相对指定参照角度的量,这样就好理解了。
下面以一个客户的问题详细说明其操作步骤:问:两相交直线(如L1、L2),如何变成两平行线或垂直线?任意图形与一条直线(如L2),如何实现图形的任意一条边(如L1)与直线L2平行、垂直、任意角度?答:1.启动旋转命令;2.选择直线L1(或欲旋转的任意图形);3.指定旋转环绕基点;4.输入选项R,接着,在所选直线L1上依次指定两点以示参照角度(如果旋转的是任意图形,则指定欲平行直线L1’上的两点)5.指定新角度。
平行:请先将光标移到目标直线L2上,稍作停留,使平行导航标识显示并成为平行导航追踪点后,再将光标移动到与基点所成角度和目标直线L2角度大约相等的位置附近,当程序自动显示从基点引出与直线L2平行的导航虚线时,在平行导航虚线上单击鼠标左键,即完成新角度的指定。
如下图垂直:移动光标到目标直线L2上,找到基点在直线L2上的垂足点,单击鼠标左键即可。
如下图任意角度:不可以一步到位。
因为旋转只能以某一个为参照输入角度,平行和垂直都是在输入角度时,利用了程序对另一对象的平行或垂直等比较特殊的导航功能实现了特殊角度的输入,此时无法输入相对于另一对象的任意夹角角度值。
led视窗操作教程1

led视窗操作教程1Led视窗(2011自由分区版本带网口版本)控制卡操作软件教程(此软件不用安装,直接打开使用)注意:1、先打开显示屏电源、确定显示屏能正常使用。
2、如果是数据线连接信号的话,要先确定数据线一头插在显示屏控制卡的"COM上"、另一头插在电脑主机的“com口上”。
(COM口也叫串口,一共9个针。
竖着一排4个针、一排5个针)3、(专业人士须知COM口焊接是235、235对接)一般用户不用管这一项。
首先修改显示屏参数:1、打开“Led视窗(2011自由分区版本带网口版本)”操作软件。
(没解压的话、先解压) (1)选择打开“”文件夹;2、进入操作软件页面后,点击“”输入登录密码“168”;(1)弹出(2)根据自己需要选择“显示屏高度”“显示屏宽度”单元板数量,其他选项不用调。
(3)选择完需要的单元板数量后,如果使用的是“USB口控制卡”直接点击“保存屏参”。
就可以。
(4)如果使用的是“COM口控制卡”也就是“数据线或者信号线”连接的控制卡,就点击“加载屏参到显示屏”。
这里请注意:点击后如果该按键马上弹起,说明信号工作正常,直接点击关闭按钮就可以。
(5)如果始终出现“”该对话框,又弹出“”该对话框。
那就说明信号线路不通。
(5)信号线路不通一般有两种情况:第一种:请查看操作软件页面正下方红线圈内“串口”选项,有几个串口。
选择一个“COM”串口重新点击“加载屏参到显示屏”,如果此选项里就一个,或者每个都已经试过,还是出现屏地址<1>可能没有连接到控制卡或通讯线接触不好此对话框。
那么就证明了你所使用的信号线有问题,请检查线路。
第二种情况:显示屏电源没打开、信号线没插好、COM口是否焊接的是“235、235对接”, COM口(连接电脑主机串口头)焊接的235头是否脱落。
其次新建节目、建立文本打字、或数字时钟3、点击“保存屏参”或者“加载屏参到显示屏”正常工作后、关闭“硬件配置”窗口。
LED视窗用户操作手册
LED视窗图文编辑系统用户使用手册二〇一五年三月目录一、概述 (1)1.1、简介 (1)1.2、主要功能特点 (1)二、安装 (2)2.1、运行环境 (2)2.2、安装及卸载 (2)三、制作节目 (3)3.1、界面介绍 (3)3.1.1、软件界面 (3)3.1.2、菜单 (3)3.1.3、工具栏 (6)3.1.4、节目管理 (7)3.1.5、属性信息设置 (9)3.1.6、模拟显示窗口 (9)3.2、系统参数设置 (10)3.3、节目制作流程 (12)3.3.1、新建、编辑工程 (12)3.3.2、新建、编辑节目 (13)3.3.3、添加分区内容 (14)3.3.4、设置节目流水边框 (28)3.3.5、设置节目属性 (28)3.3.6、发送工程到显示屏 (29)四、其他功能 (30)4.1、亮度设置 (30)4.2、定时开关机及校准 (30)4.3、强制开、关机 (31)五、多机通讯模式 (31)5.1 设置网络多机通讯模式 (32)5.2 设置群信息 (32)5.3 修改显示屏名称,设置所属群信息 (34)5.4 针对每个群设置工程配置信息,节目内容 (34)5.5发送信息到显示屏 (35)一、概述1.1、简介LED视窗图文编辑系统软件专为吉星图文控制器配套设计,自2007年投放市场,历经几代产品的更新发展,功能日臻完善,操作简单,深受广大用户喜爱。
这款最新推出的LED视窗2011版本是我们在多年从事LED异步控制器研发基础上,通过对大量用户使用习惯调研的基础上,提出的一套最完善的整体解决方案。
该编辑软件从功能和使用上都有了很大的改进。
LED通用图文控制卡应用国际最新32位嵌入式技术,使脱机操作更加稳定、方便的同时,带来了硬件指标的全面提升,彻底消除了超长显示模式下显示内容抖动问题,同时的精良设计,使该控制系统硬件使用效率非常高,外围元件大大减少,带来成本大幅度降低,通过电源及232通信部分增加了保护设计,消除了带电作业对板卡损伤的隐患,从而大幅提高系统的安全可靠型。
