ODI安装配置V1.0
ODI代理设置文档
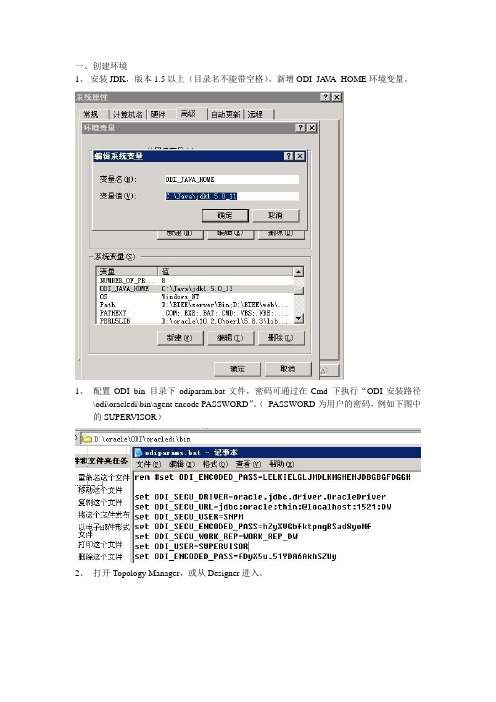
一、创建环境
1、安装JDK,版本1.5以上(目录名不能带空格)。
新增ODI_JA V A_HOME环境变量。
1、配置ODI bin 目录下odiparam.bat文件,密码可通过在Cmd 下执行“ODI安装路径
\odi\oracledi\bin\agent encode PASSWORD”。
(PASSWORD为用户的密码,例如下图中的SUPERVISOR)
2、打开Topology Manager,或从Designer进入。
新建代理,并配置信息
3、将方案应用到包,并配置代理以及相关参数
端口20999)
Windows中代理做成服务。
指令:agentservice.bat -i -s agent_winsun 20999
也可以通过命令删除原有的代理服务。
指令:agentservice.bat -r -s agent_winsun
在服务中查看是否创建成功,并确定服务已开启
二、测试
如果需要做测试可在第四步骤设置就近的时间,然后查看代理是否运行(例如:执行改成“每天”,时间改为当前时间的后几分钟做测试)
当时间已越过执行时间查看代理的“计划信息”
选择包含测试时间的区域(例如:“计划自”选择当前时间前一日)。
Linux下Oracle及ODI的安装手册
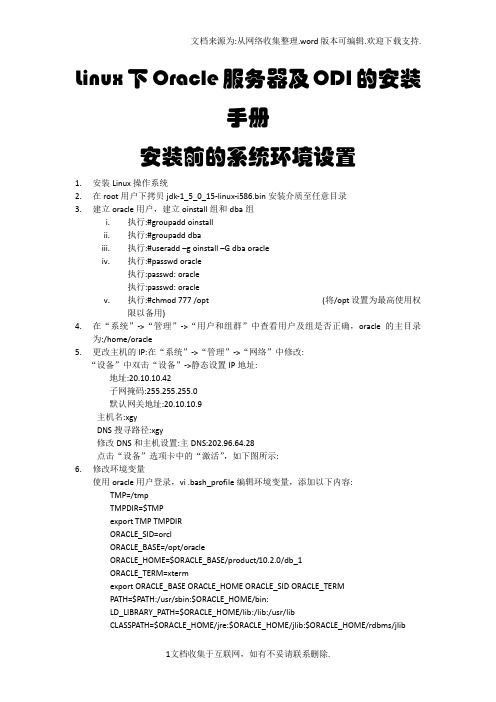
Linux下Oracle服务器及ODI的安装手册安装前的系统环境设置1.安装Linux操作系统2.在root用户下拷贝jdk-1_5_0_15-linux-i586.bin安装介质至任意目录3.建立oracle用户,建立oinstall组和dba组i.执行:#groupadd oinstallii.执行:#groupadd dbaiii.执行:#useradd –g oinstall –G dba oracleiv.执行:#passwd oracle执行:passwd: oracle执行:passwd: oraclev.执行:#chmod 777 /opt (将/opt设置为最高使用权限以备用)4.在“系统”->“管理”->“用户和组群”中查看用户及组是否正确,oracle的主目录为:/home/oracle5.更改主机的IP:在“系统”->“管理”->“网络”中修改:“设备”中双击“设备”->静态设置IP地址:地址:20.10.10.42子网掩码:255.255.255.0默认网关地址:20.10.10.9主机名:xgyDNS搜寻路径:xgy修改DNS和主机设置:主DNS:202.96.64.28点击“设备”选项卡中的“激活”,如下图所示:6.修改环境变量使用oracle用户登录,vi .bash_profile编辑环境变量,添加以下内容:TMP=/tmpTMPDIR=$TMPexport TMP TMPDIRORACLE_SID=orclORACLE_BASE=/opt/oracleORACLE_HOME=$ORACLE_BASE/product/10.2.0/db_1ORACLE_TERM=xtermexport ORACLE_BASE ORACLE_HOME ORACLE_SID ORACLE_TERMPATH=$PATH:/usr/sbin:$ORACLE_HOME/bin:LD_LIBRARY_PATH=$ORACLE_HOME/lib:/lib:/usr/libCLASSPATH=$ORACLE_HOME/jre:$ORACLE_HOME/jlib:$ORACLE_HOME/rdbms/jlibexport PATH LD_LIBRARY_PATH CLASSPATHODI_HOME=/opt/oraclediODI_JAVA_HOME=/jdk1.5.0_15PATH=$PATH:$ODI_HOME/bin:$JAVA_HOME/bin:$JRE_HOME/binJRE_HOME=/jdk1.5.0_15/jreJAVA_HOME=/jdk1.5.0_15export ODI_HOME ODI_JAVA_HOME PATH JRE_HOME JAVA_HOME执行:. ./.bash_profile运行环境变量ODI安装记录一.安装前的系统环境设置1.打补丁包:此ODI安装时,用到libXp.so.6,下载一个软件包(文件名是:libXp-1.0.0-8.i386.rpm)/stat/4/idpl/3418392/com/libXp-1.0.0-8.i386.rpm.html所以要在安装前要给linux操作系统打上libXp-1.0.0_8.i386.rpm和openmotif21-2.1.30-14.i386.rpm补丁包:使用root用户登录执行:#rpm –ivh libXp-执行:#rpm –Uvh openmotif21-2.上传介质:使用root用户登录,将介质上传至:/root/Desktop/setup/目录下3.解压介质:在root用户下将介质拷贝至/home/oracle/setup_ODI/目录下执行:cpio –i <odi_linux_x86_101340.cpio 将介质解压到本目录下切换到oracle用户下检查被解压的介质是否为可读。
DediProg 1.0 专用编程器指南说明书
Table of ContentsI.Introduction (3)II.Conditions and Limitations (3)III.How to start (3)mand List (4)V.Revision History (6)Important notice:This document is provided as a guideline and must not be disclosed without consent of DediProg. However, no responsibility is assumed for errors that might appear.DediProg reserves the right to make any changes to the product and/or the specification at any time without notice. No part of this document may be copied or reproduced in any form or by any means without prior written consent of DediProg.--device arg (Work with all Basic Switches)- 1: Activate only the programmer connected to USB1- n: Activate only the programmer connected to USBnNote: If '--device' is not used, the command will be executed on allconnected programmer.--fix-device arg Fix programmer serial number with programmer sequence.- Instructions must be enclosed in double quotation marks("")Example:dwcmd --fix-device "1 SPU000001"--list-device-id arg - 0 : List all programmers’ ID from USB1 to USBn (Default)Note: The sequence is assigned by OS during USB plug-in.- 1: Prompt the device ID of programmer connected to USB1.- n: Prompt the device ID of programmer connected to USBn. Miscellaneous options:-t [ --timeout ] arg (=600) Timeout value in seconds-i [ --silent ] Suppress the display of real-time timer counting- Used when integrating with 3rd-party tools(e.g. IDE)--log arg Write operation result into a file(Default is located underC:\DediLog\dwcmd-xxxxx.log)Example:dwcmd --usb-prj d:\test.dprj --log d:\result.txtNote:Windows Command Line does not support ProgMaster series.Usage Examples:1. dwcmd -d file.dprj -rDownload project file to StarProg and run it.2. dwcmd -rRun project from the StarProg embedded SD card.3. dwcmd --usb-prj file.dprjExecute project file via USB.4. dwcmd --usb-prj file.dprj --device 1Execute Programmer 1 project file.5. dwcmd -d file.dprj --device 1Download project file to programmer 16. dwcmd -r --device 1Execute project file7. dwcmd -d file.dprj -r --device 2Download project file to StarProg and run the project file on programmer 2.8. dwcmd -d file.dprj -r --log d:\result.txtDownload project file to StarProg and save the operation result to d:\result.txt.V.Revision HistoryDate Version Changes05/11/2016 1.0 Initial releaseDediProg Technology Co., Ltd- Taiwan Headquarter TEL: 886-2-2790-7932FAX: 886-2-2790-79164F., No.7, Ln. 143, Xinming Rd., Neihu Dist., Taipei City 114, Taiwan- Shanghai Office TEL: 86-21-5160-0157 FAX: 86-21-6126-3530Room 503, Block E, No.1618, Yishan Road, Shanghai, ChinaTechnical Support:support@Sales Support:sales@Information furnished is believed to be accurate and reliable. However, DediProg assumes no responsibility for the consequences of use of such information or for any infringement of patents or other rights of third parties which may result from its use. Specifications mentioned in this publication are subject to change without notice.This publication supersedes and replaces all information previously supplied.All rights reservedPrinted in Taiwan.。
ODI安装步骤及使用
ODI安装步骤及使用前提条件:1)安装Oracle ODI2)安装Oracle XE数据库3)创建数据库用户odi/apps, odi_work/apps, odi_ess/apps, odi_obj/apps4)在odi_ess与odi_obj(源数据与目标数据存储位置)创建数据库表cux_users/cux_sites 建表脚本为:create table cux_users(user_id NUMBER,username VARCHAR2(20),email VARCHAR2(20),phone VARCHAR2(20));create table cux_sites(site_id NUMBER,user_id NUMBER,site_use_code VARCHAR2(20),address1 VARCHAR2(100));5)在odi_ess下的cux_users/cux_sites中添加数据1、创建主存储库(开始菜单–所有程序–Oracle Data Integrator–Oracle Data Integrator–Repository Management–Master Repository Creation,创建主存储库)ODI所有模块的信息都保存在一个叫做Master Repository的中心知识库中。
Master Repository通过Master Repository Creation Wizard创建,这也是安装完ODI后应该做的第一个任务。
除了Master Repository,还需要为不同的任务创建Work Repository。
Work Repository中的信息包括模块信息,项目信息和运行期信息。
2、连接主存储库(开始菜单–所有程序–Oracle Data Integrator–Oracle Data Integrator–Topology Manager)1)选择新建2)登录名可以随意,用户和密码必须为:SUPERVISOR/SUNOPSIS,主存储库选择第1步中创建的主存储库点击测试测试连接是否成功,如果成功,确定登录进Topology Manager。
ODI安装及配置同步详细步骤
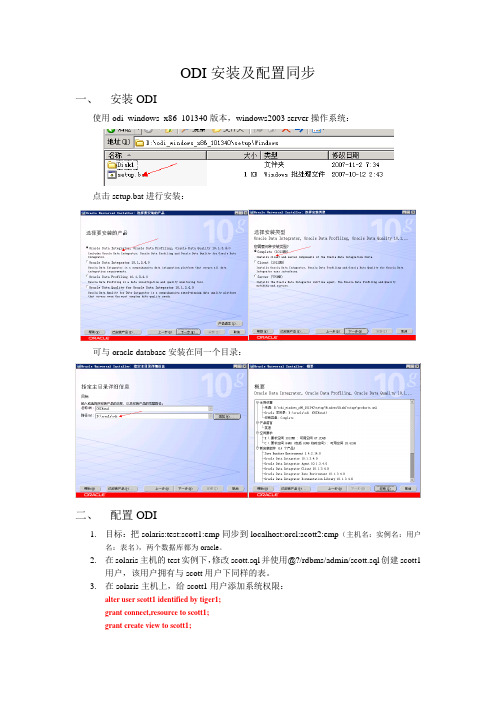
ODI安装及配置同步一、安装ODI使用odi_windows_x86_101340版本,windows2003 server操作系统:点击setup.bat进行安装:可与oracle database安装在同一个目录:二、配置ODI1.目标:把solaris:test:scott1:emp同步到localhost:orcl:scott2:emp(主机名:实例名:用户名:表名),两个数据库都为oracle。
2.在solaris主机的test实例下,修改scott.sql并使用@?/rdbms/admin/scott.sql创建scott1用户,该用户拥有与scott用户下同样的表。
3.在solaris主机上,给scott1用户添加系统权限:alter user scott1 identified by tiger1;grant connect,resource to scott1;grant create view to scott1;4.在localhost主机上,创建scott2用户,并给用户添加权限,以及创建表结构:create user scott2 identified by tiger2 default tablespace users;grant connect,resource to scott2;grant create database link to scott2;grant create synonym to scott2;create table scott2.emp(EMPNO NUMBER(4) not null,ENAME V ARCHAR2(10),JOB V ARCHAR2(9),MGR NUMBER(4),HIREDATE DATE,SAL NUMBER(7,2),COMM NUMBER(7,2),DEPTNO NUMBER(2));5.在solaris主机上,创建Master Repository用户,并给用户添加权限:create user snpm identified by snpm default tablespace users;grant connect, resource to snpm;6.在localhost主机上,创建Master Repository用户,并给用户添加权限:create user snpw identified by snpw default tablespace users;grant connect, resource to snpw;7.创建Master Repository“开始”—“所有程序”—“Oracle”—“Oracle Data Integrator”—“Repository Management”—“Master Repository Creation”。
Oracle ODI 安装手册v0.1
Oracle Data Integrator安装手册2012-12-10版本号:v0.1撰写人:林耀飞1. ODI 下载与安装1.1.ODI 安装程序下载从Oracle官方网站如下链接下载ODI 11g 版本:/technetwork/middleware/data-integrator/downloads/index.html 1.2.ODI 参考资料下载可以从如下网站找到ODI 相应版本的官方参考资料,包括安装手册及教程等:/technetwork/middleware/data-integrator/documentation/i ndex.html1.3.ODI 安装Step1:解压下载后的ODI 安装文件,包含如图所示两个文件夹:Step2:如果系统为64位进入Disk1\install\win64文件夹,运行setup.exe:Step3: 进入安装界面,点击下一步:Step4: 选择安装类型,勾选中如下图所示选项,点击下一步:Step5: 进行先决条件检查,点击下一步:Step6: 指定ODI的安装目录,点击下一步:Step7: 先跳过资料库配置,将在ODI 安装完成后再对资料库进行配置,点击下一步:的数字, 并且不应由任何其他进程使用,点击下一步:Step10: 这里可以忽略指定安全更新的选项,点击下一步:Step11: 点击安装,开始执行安装过程:Step12: 安装进度结束后,点击下一步:Step13: 点击完成,结束安装:2. 资料库创建与配置2.1.概念解释ODI 中的资料库(Repository)分为主资料库和工作资料库两种,通常资料库由一个主资料库和几个工作资料库组成,这些资料库可以创建在任何关系型数据库管理系统。
通俗的来说,资料库中存储的就是各种元数据。
主资料库就是存储ODI 下的IT架构的配置信息、公用配置信息,比如创建的ODI用户信息,有几个工作资料库等等。
工作资料库是项目被存储的地方,比如每个ETL 项目,通常都会需要单独创建一个工作资料库。
ODIS系统安装、更新及蓝牙匹配
59
ODIS的post-setup安装
安装完成,进入系统
60
目录
1 ODIS的安装 2 ODIS的更新 3 蓝牙的匹配 4 ODIS卸载
61
启动自动更新
1、在线更新 2、本地安装包更新
在软件启动时出现
62
手动更新设置
2、点击连接
1、点击管理
4、输入和安装postsetup相同的ULR
17
使用eShop申请ODIS证书流程
得到硬件识别号后点击“确定”
18
使用eShop申请ODIS证书流程
在此处“粘贴”
19
使用eShop申请ODIS证书流程
此处填写单位缩写和诊断仪型号, 例如:“百联沪东 6150B”
20
使用eShop申请ODIS证书流程
点击“转到订购”
21
使用eShop申请ODIS证书流程
26
使用eShop申请ODIS证书流程
27
目录
1 ODIS的安装
1. 开通并分配eShop权限 2. 使用eShop申请ODIS证书流程 3. 安装setup文件 4.安装post-setup文件
2 ODIS的更新
3 蓝牙的匹配
4 ODIS卸载
28
ODIS安装包下载
打开浏览器在地址栏输入本站的IP地址
73
设置 —— 5054a的匹配
1. 建立与VAS 5054A的连接 将VAS 5054A连接到车上后, 右击桌面右下角蓝牙标志, 点击Add a Device
74
设置 —— 5054a的匹配
75
设置 —— 5054a的匹配
76
设置 —— 5054a的匹配
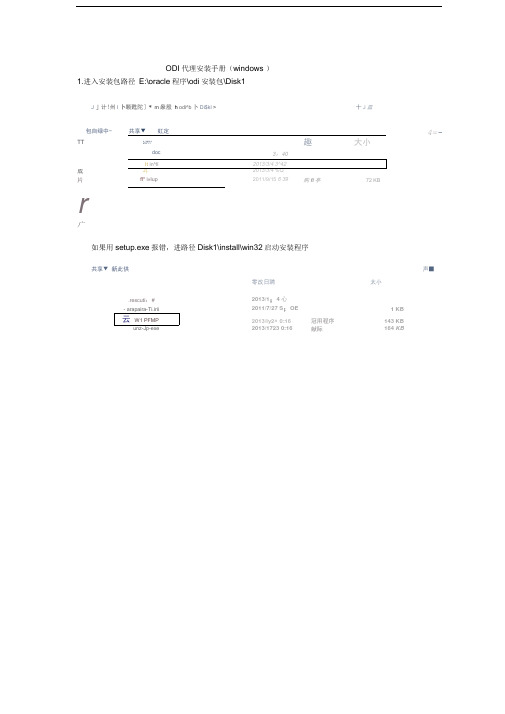
ODI代理安装手册
- arapaira-Ti.irii
2011/7/27 S;OE
1 KB
云W1 PFMP
2013/ly2^ 0:16
冠用程序
143 KB
unz-Jp-exe
2013/1723 0:16
献际
164KB
[er;u^i9V
Orade Fusian Middleware 11g OraceData Integrator安肇-步芸7/12
&
。亩&皿)
\^ 13 7T29V
安装完成后进入程序安装目录
D:\oracle\product\11.1.1\Oracle_ODI_1\oracledi\agent\bin
该路径下有三个需要修改的文件,分别是
agent_agent_zf.bat--启动代理,名称默认与安装的时候命名一致
odiparams.bat-嗷据库连接配置文件,密码需要加密
p;x>d;xoraclexpradu€tM1»1»1xOracle_ODI_l\oracledi^gient\Jtiinxagent «ba€ -NAHE=^c|fe
nt^f
OracleOI:
右击
EEM
EEM
et
et
# depository Connection InforiD^tioti
301_JtA£TFR_D刘7ER=A:rmc:lE. MbdCr
」m"匕THRUHLTdhf:aracE:thiB
££1
=eL
di王享用户名(非加密)
教据库键密url
1111UAHHR UMEKFXHNM知匹
ODI1IASTFR ENCQDED_FASS="却成至074jf;aCpL彼皿即
ODIS常见问题及解决办法V1-20150706

ODIS常见问题及解决办法版本信息V1 2015.07.06使用对象经销商技术经理主机厂现场技术经理、技术支持工程师一汽-大众售后技术服务部服务技术开发组目录一、安装与配置概述 (2)二、常见问题及解决办法 (5)1、license无效1 (5)2、license无效2 (6)3、找不到新版基础盘 (7)4、“Framework”错误 (8)5、unable to determine the hardware id for the computer (9)6、无法恢复系统 (10)7、找不到新的升级数据 (11)8、安装数据盘时,网址栏变红,无法载入 (12)9、ODS9004E (13)10、ODS9007E (14)11、ODS9011E (15)12、ODS9013E (16)13、ODS9014E (17)14、ODS9018E (18)15、ODS8031E (19)16、卡在“删除中间存储的报告”,无法进入系统 (20)17、ODS6501E (21)18、ODS4009E (22)19、ODS6105E (23)20、ODS9212E (24)21、ODS1007E (25)22、EXCEPTION_ERROR (26)三、版本更新说明 (27)一、安装与配置概述⏹证书申请1、到FTP空间下载注册器,在诊断仪上运行,填写服务代码,在联网状态下点击“申请/下载license”进行申请,如下图。
2、等待3到5个工作日,再次在这台诊断仪上运行注册器,点击“申请/下载license”,即可得到安装证书license.dat 。
⏹基础盘安装1、到MS/2下载最新版基础盘,如下图。
2、在诊断仪上运行基础盘,按照提示操作即可,出现下图时表示完成安装。
⏹数据盘安装1、运行已安装的基础盘,在下图界面中输入MS/2地址/dav 后,点击箭头进行数据盘安装,如下图。
2、进度条走完后表明完成安装。
⏹在线配置1、安装从FTP空间下载的客户证书和信托证书即可,如下图所示。
成都天软信息技术有限公司 T10A-D1 智能车载 4G 终端安装使用说明书

T10A-D1智能车载4G终端安装使用说明书V1.0成都天软信息技术有限公司版权声明本手册版权属于成都天软信息技术有限公司,任何人未经我公司书面同意复制、引用或者修改本手册都将承担法律责任。
一、产品介绍 (3)1.1包装内容 (3)1.2接口说明 (3)1.2.1 正面 (3)1.2.2 背面 (4)1.3线束说明 (5)1.3.1 Smart接口标准线束 (5)1.3.2 电源/CAN线束(定制接口,非标准) (5)1.4尺寸图 (6)二、安装方式 (6)2.1产品安装位置 (6)2.2固定方式 (7)2.2.1 支架式安装(推荐) (7)2.2.2 扎带式安装 (8)2.3天线连接及安装方式 (8)2.3.1 天线连接方式 (8)2.3.2 天线安装位置 (9)2.4SIM卡安装方式 (10)2.5电源线安装方式 (10)三、指示灯状态 (10)一、产品介绍本产品为成都天软信息技术有限公司研发的一款用于物流车辆远程管理的车载通信设备。
T10A-D1支持GPS定位、碰撞检测、4G传输等功能,同时客户可以通过集成扩展不同的外围设备,例如门磁、视频监控、温湿度传感器、RFID读写器等,实现对司机、车辆、货物、交通等多个维度的信息状态监控。
1.2接口说明1.2.1 正面1.3线束说明1.3.2 电源/CAN线束(定制接口,非标准)1.4尺寸图二、安装方式2.1产品安装位置本产品为车辆后装终端产品,供电方式为车载保险盒取电,因此建议的最佳安装位置为车辆驾驶室内以方便供电线路部署。
⚠注意事项本产品禁止安装在以下位置:×车辆发动机舱内×暴露在车身外部×其他可能导致设备损坏的位置2.2固定方式本产品为标准壳体,设备外壳螺孔尺寸及相对位置参数为固定值(具体位置参数请参考本文档第一章1.4中的产品尺寸图),客户可根据实际安装需求采取适合的安装方式进行安装,以下提供两种可行的安装方案。
ODI安装手册-Windows

ODI安装1前提条件ODI客户端图形化软件、ODI Agent的安装文件是一个ODI Metadata Navigator的安装文件是另一个安装ODI客户端图形化软件需要JVM1.4.2或以上版本以及JDK1.4.2或以上版本支持安装ODI Agent需要JVM1.3.1或以上版本以及JDK1.4或以上版本支持。
安装ODI Metadata Navigator需要兼容JSP1.2和Servlet2.3的Web Server,例如Tomcat;需要JDK1.4或以上版本2安装JDK1.53安装Tomcat5.54ODI客户端图形化软件和ODI Agent安装步骤4.1 安装运行setup.exe或者sh ./setup.bin5JDBC/JMS驱动安装步骤对于安装了ODI客户端图形化软件或者ODI Agent的机器来讲,添加任何JDBC/JMS驱动,将驱动包(.zip或者.jar)拷贝到ODI安装路径\drivers下对于安装了ODI Metadata Navigator的机器,将驱动包(.zip或者.jar)拷贝到ODI Metadata Navigator安装路径\WEB-INF\lib下6ODI客户端图形化软件和ODI Agent配置步骤6.1 资料库存储空间建议为资料库设立单独存储空间6.2 创建资料库用户创建两个用户:主资料库用户和工作资料库用户在Oracle数据库上创建的语句如下:create user snpm(主资料用户) identified by oracle(主资料用户口令)grant connect,resource to snpmcreate user snpw(工作资料用户) identified by oracle(工作资料用户口令)grant connect,resource to snpw6.3 创建主资料库Oracle Data Integrator > Repository Management >Master Repository Creation然后填入相应信息:Driver:oracle.jdbc.driver.OracleDriverURL:jdbc:oracle:thin:@localhost:1521:orclUSER:上一步创建的主资料库用户Password:上一步创建的主资料库用户口令Technology:资料库所在的数据库类型Language:主资料库使用的语言点击“OK”创建主资料库等待主资料库的创建,直至创建成功:6.4 连接主资料库Oracle Data Integrator > Topology Manager 创建新的主资料库连接:填入相应信息Login Name:oracle_master_repUser:SUPERVISOR(必须是此用户名)Password:SUNOPSIS(必须是此口令)主资料库连接信息:USER:上一步创建的主资料库用户Password:上一步创建的主资料库用户口令Driver:oracle.jdbc.driver.OracleDriver URL:jdbc:oracle:thin:@localhost:1521:orcl6.5 创建工作资料库Topology -> Repositories -> Work repositories新建工作资料库:填写下述工作资料库连接信息:Name:工作资料库连接名称Technology:资料库所在数据库类型Instance/dblink(Data Server):Oracle DB Service Name User:4.2步骤中创建的工作资料库用户Password:4.2步骤中创建的工作资料库用户口令Tab JDBC -> JDBC Driver:Tab JDBC -> URL JDBC:点击“OK”点击“OK”以后,出现工作资料库定义框:ID:注意不同的工作资料库的ID不能重复Type:选择下拉菜单中的一项Name:工作资料库名称Password:进入此工作资料库的口令,可以不设置“OK”以后等待工作资料库的创建6.6 连接工作资料库Oracle Data Integrator > Designer新建工作资料库连接:填入连接信息Login Name:自定义的工作资料库连接名称User:SUPERVISORPassword:SUNOPSIS(如果在Topology中修改了口令,需要填入修改后的口令)填入主资料库信息User:4.2步骤中创建的主资料库用户Password:4.2步骤中创建的主资料库用户Driver:URL:填入工作资料库信息Work Repository Name:工作资料库名称“OK”后,进入Designer模块7ODI Scheduler Agent 7.1 改变odiparams.bat文件文件在ODI安装路径\oracledi\bin下将文件中的下属部分加上REMrem set SNP_SECU_DRIVER=org.hsqldb.jdbcDriverrem set SNP_SECU_URL=jdbc:hsqldb:hsql://localhostrem set SNP_SECU_USER=sarem set SNP_SECU_ENCODED_PASS=rem set SNP_SECU_WORK_REP=WORKREPrem set SNP_USER=SUPERVISORrem set SNP_ENCODED_PASS=LELKIELGLJMDLKMGHEHJDBGBGFDGGH复制并改为如下:set SNP_SECU_DRIVER=oracle.jdbc.driver.OracleDriver(资料库所使用数据库的JDBC Driver,Topology->存储库->Master Repository定义框->连接对话框中JDBC Driver)set SNP_SECU_URL=jdbc:oracle:thin:@localhost:1521:orcl (资料库所使用数据库的JDBC URL,Topology->存储库->Master Repository定义框->连接对话框中JDBC URL)set SNP_SECU_USER=snpm(Master Repository User)set SNP_SECU_ENCODED_PASS=set SNP_SECU_WORK_REP=WORKREP1(工作资料库名称)set SNP_USER=SUPERVISOR(资料库管理员)set SNP_ENCODED_PASS=其中两行PASS的值是通过“ODI安装路径\oracledi\bin\agent encode oracle”得到的值(oracle是snpm的登录密码)8ODI Metadata Navigator安装步骤8.1 先安装Web Server先安装兼容JSP1.2和Servlet2.3的Web Server如Tomcat,注意Tomcat的安装路径中不要有中文、空格等。
odi的用法

ODI(Oracle Data Integrator)是Oracle公司推出的一款ETL(Extract-Transform-Load)工具,它支持多种数据源,包括Oracle、MySQL、DB2、Informix等,同时也支持多种数据接口,如JDBC、Oracle SQL*Net、Sybase Open Client等。
ODI的主要用法包括以下步骤:1.安装ODI:首先,您需要在您的计算机上安装ODI。
您可以从Oracle的官方网站下载最新版本的ODI安装程序,并按照安装指南进行安装。
2.创建新ODI应用程序:在ODI中,您可以创建一个新的应用程序来引入ODI平台,或者从旧的ODI中提取并在新应用中进行使用。
3.连接源和目标实体:使用ODI的源系统管理功能连接源实体,并使用接受系统管理功能连接目标实体。
4.创建数据模型:在ODI中,数据模型是一个核心的概念,它描述了数据的结构、属性和关系。
您可以使用ODI的数据建模工具创建一个新的数据模型,或者从现有的数据源中提取数据模型。
5.编写业务逻辑:在ODI中,业务逻辑是一组规则和条件,用于定义数据的转换和映射规则。
您可以使用ODI的图形化界面编写业务逻辑,或者使用ODI提供的脚本语言(如JavaScript、PL/SQL等)编写业务逻辑。
6.运行和监控任务:在ODI中,任务是一个可重复执行的流程,用于实现特定的数据处理任务。
您可以使用ODI的图形化界面运行和监控任务,或者使用ODI提供的命令行工具运行和监控任务。
7.输出结果:在ODI中,输出结果是一个重要的环节,用于展示数据处理的结果。
您可以使用ODI提供的图形化界面查看输出结果,或者使用ODI提供的命令行工具导出输出结果。
以上是ODI的主要用法,希望能对您有所帮助。
ODI安装手册
Oracle® Data Integrator Installation Guide10g Release 3 (10.1.3)December 2008Oracle® Data Integrator Installation Guide, 10g Release 3 (10.1.3)Copyright © 2006, Oracle. All rights reserved.The Programs (which include both the software and documentation) contain proprietary information; they are provided under a license agreement containing restrictions on use and disclosure and are also protected by copyright, patent, and other intellectual and industrial property laws. Reverse engineering, disassembly, or decompilation of the Programs, except to the extent required to obtain interoperability with other independently created software or as specified by law, is prohibited.The information contained in this document is subject to change without notice. If you find any problems in the documentation, please report them to us in writing. This document is not warranted to be error‐free. Except as may be expressly permitted in your license agreement for these Programs, no part of these Programs may be reproduced or transmitted in any form or by any means, electronic or mechanical, for any purpose.If the Programs are delivered to the United States Government or anyone licensing or using the Programs on behalf of the United States Government, the following notice is applicable:U.S. GOVERNMENT RIGHTS Programs, software, databases, and related documentation and technical data delivered to U.S. Government customers are ʺcommercial computer softwareʺ or ʺcommercial technical dataʺ pursuant to the applicable Federal Acquisition Regulation and agency‐specific supplemental regulations. As such, use, duplication, disclosure, modification, and adaptation of the Programs, including documentation and technical data, shall be subject to the licensing restrictions set forth in the applicable Oracle license agreement, and, to the extent applicable, the additional rights set forth in FAR 52.227‐19, Commercial Computer Software‐‐Restricted Rights (June 1987). Oracle USA, Inc., 500 Oracle Parkway, Redwood City, CA 94065.The Programs are not intended for use in any nuclear, aviation, mass transit, medical, or other inherently dangerous applications. It shall be the licenseeʹs responsibility to take all appropriate fail‐safe, backup, redundancy and other measures to ensure the safe use of such applications if the Programs are used for such purposes, and we disclaim liability for any damages caused by such use of the Programs.Oracle, JD Edwards, PeopleSoft, and Siebel are registered trademarks of Oracle Corporation and/or its affiliates. Other names may be trademarks of their respective owners.The Programs may provide links to Web sites and access to content, products, and services from third parties. Oracle is not responsible for the availability of, or any content provided on, third‐party Web sites. You bear all risks associated with the use of such content. If you choose to purchase any products or services from a third party, the relationship is directly between you and the third party. Oracle is not responsible for: (a) the quality of third‐party products or services; or (b) fulfilling any of the terms of the agreement with the third party, including delivery of products or services and warranty obligations related to purchased products or services. Oracle is not responsible for any loss or damage of any sort that you may incur from dealing with any third party.Table Of ContentsDocument Structure (1)Installation Overview (3)Component Details (3)Installation Process (4)Before installation (5)System Requirements (5)Java Configuration (8)Installing JDBC / JMS drivers (8)Pre-installation Tasks for Oracle Data Quality Products (9)Installation Procedure (11)Installing and Uninstalling Oracle Data Integrator and Oracle Data Quality Products (11)Installing Metadata Navigator (14)Installing Lightweight Designer (15)Installing the Oracle Data Integrator Public Web Services (18)Creating repositories (19)Oracle Data Integrator Repositories (19)Creating Repository Storage Spaces (19)Creating the Master Repository (21)Connecting to the Master Repository (21)Creating a Work Repository (22)Connecting to a Work Repository (23)Administering Oracle Data Quality Products (25)Managing Metabases and Repositories (25)Managing Loader Connections (29)Other Administrative Tasks (32)Upgrading Sunopsis to Oracle Data Integrator (35)Important Notes (35)Step 1: Preparing to Upgrade (35)Step 2: Upgrade the Installed Components (37)Step 3: Upgrade the Master Repository (38)Step 4: Upgrade the Work Repositories (39)Step 5: Import the New Objects (39)Step 6: Finalize the Upgrade (42)Upgrading Oracle Data Integrator (43)Important Notes (43)Step 1: Preparing to Upgrade (43)Step 2: Upgrade the Oracle Data Integrator Modules (44)Step 3: Upgrade the Master Repository (45)Step 4: Upgrade the Work Repositories (46)Oracle Data Integrator Installation GuideStep 5: Import the new Technologies and Knowledge Modules (46)Step 6: Finalize the Upgrade (47)Appendices (49)Contents of the Oracle Data Integrator Installation Directory (49)Manual Installation of Oracle Data Integrator (50)Running an Agent as a Windows Service (51)Run Oracle Data Integrator with Windows 95/98 (55)Installing the Java Agent on iSeries and AS/400 (55)This guide contains instructions for installing and upgrading Oracle Data Integrator, Oracle Data Profiling and Oracle Data Quality for Oracle Data Integrator on any platform. It is intended for administrators installing or upgrading Oracle Data Integrator.Document StructureThis document is structured as follows:•Chapter 1 - Installation Overview contains general guidelines for setting up Oracle Data Integrator.•Chapter 2 - Before Installation describes system requirements and actions to carry out before setting up Oracle Data Integrator.•Chapters 3 through 6 explain how to set up and upgrade Oracle Data Integrator components.Installation Overview Oracle Data Integrator delivers unique next-generation Extract Load and Transform (E-LT) technology that improves performance and reduces data integration costs, even across heterogeneous systems. Oracle Data Integrator offers the productivity of a declarative design approach, as well as the benefits of an active integration platform for seamless batch and real-time integration.The Data Integrator package includes Oracle Data Profiling and Oracle Data Quality for Data Integrator:•Oracle Data Profiling is a data investigation and quality monitoring tool. It allows business users to assess the quality of their data through metrics, to discover or infer rules based on this data, and to monitor the evolution of data quality over time.•Oracle Data Quality for Data Integrator is a comprehensive award-winning data quality platform that covers even the most complex data quality needs. Its powerful rule-based engine and its robust and scalable architecture places data quality and name & address cleansing at the heart of an enterprise data integration strategy.Oracle Data Profiling and Oracle Data Quality for Data Integrator are also referred to asOracle Data Quality Products.Component DetailsOracle Data IntegratorOracle Data Integrator is made up of the components described below:• The modular Repository, made up of a Master Repository and of one or several Work Repositories. These repositories can be installed on any database engine that supports ANSI ISO 89 syntax.•The graphical interface modules (Topology Manager, Designer, Security Manager, Operator) and the execution agents (Agent). These are entirely built with Java components that give access to the Repository in client/server mode.•Metadata Navigator, a Servlet/JSP application that enables access to the Repository througha Web interface.•Lightweight Designer, a web application to view and edit objects in the repository through a Web browser.•Oracle Data Integrator Public Web Services are web services that enable users to leverage Oracle Data Integrator features in a service-oriented architecture (SOA).Oracle Data ProfilingOracle Data Profiling is made up of the following components:• The Metabase Server contains the profiling data and metadata.• The Scheduler Server handles profiling jobs.• The Oracle Data Quality User Interface is the client interface common to Oracle Data Profiling and Oracle Data Quality.Oracle Data Integrator Installation Guide• The Oracle Data Quality ODBC Adapter is used to connect ODBC data sources. This optional component can be installed on Windows platforms only.Oracle Data Quality for Data IntegratorOracle Data Quality for Data Integrator uses the same components as Oracle Data Profiling and in addition includes.• The Data Quality Server is the run-time server running data quality projects.Note: Optional country-specific directories, used for Name and Address cleansing projects with Oracle Data Quality can be purchased separately from Trillium Software. To purchase these directories, please contact Trillium Software. You will be asked to provide the following OEM key: "ODQ020207"Installation ProcessBefore installationIf you are upgrading from a previous version of Oracle Data Integrator refer to the topic: Upgrading Oracle Data Integrator.Before installing Oracle Data Integrator, the following points should be taken into account: •Check that the systems comply with system requirements. For more information, refer to the System Requirements and Java Configuration sections.•If you wish to access data servers using Oracle Data Integrator, requirements regarding connectivity must be taken into consideration. For more information, refer to the Installing JDBC/JMS drivers section.•If you install Oracle Data Profiling or Oracle Data Quality for Data Integrator,: perform the Pre-installation Tasks for Oracle Data Quality Products.Installation ProcedureFollow the procedure in the Installing Oracle Data Integrator and Oracle Data Quality Products topic to install Oracle Data Integrator, Oracle Data Profiling and Oracle Data Quality for Data Integrator software components on your client and server machines•If using Oracle Data Integrator, you need to create the repositories. Refer to the Oracle Data Integrator Repositories topic for more information.•You can also configure the application server components, including Metadata Navigator, Lightweight Designer, and the Public Web Service.•To use Oracle Data Profiling or Oracle Data Quality for Data Integrator, you need to create Metabases and Loader Connections.Before installation System RequirementsConfiguration for Oracle Data IntegratorThe minimal configuration recommended pour Data Integrator is as follows:Oracle Data Integrator ClientIn order to use Oracle Data Integrator graphical modules (Designer, Topology Manager, Security Manager, Operator), your computer must meet the following minimum system requirements. Minimum System Requirements:256 MB RAM150 MB free disk space on your hard driveAn operating system with graphical capabilities (such as Microsoft Windows, Linux, HP-UX, or Solaris) and supporting a Java Virtual Machine 1.4.A Java Virtual Machine 1.4. To use Web Services with Oracle Data Integrator a JavaDevelopment Kit (SDK) 1.5 is required.A TCP/IP networkHowever, in order to take advantage of all the advanced features of Oracle Data Integrator, we highly recommend the following configuration.Recommended System Requirements:512 MB RAM300 MB free disk space on your hard driveAn operating system with graphical capabilities (such as Microsoft Windows, Linux, HP-UX, or Solaris) and supporting a Java Virtual Machine 1.5.A Java Development Kit (SDK) 1.5.A TCP/IP network.Oracle Data Integrator AgentIn order to run an Agent, your computer must meet the following minimum system requirements. Minimum System Requirements:256 MB RAM150 MB free disk space on your hard driveAn operating system supporting a Java Virtual Machine 1.3.1A Java Virtual Machine 1.3.1. To use Web Services with Oracle Data Integrator a JavaDevelopment Kit (SDK) 1.5 is required.A TCP/IP network.However, in order to take advantage of all the advanced features of Agent, we highly recommend the following configuration.Oracle Data Integrator Installation GuideRecommended System Requirements:512 MB RAM200 MB free disk space on your hard driveAn operating system supporting a Java Virtual Machine 1.5.A Java Development Kit (SDK) 1.5A TCP/IP network.Oracle Data Integrator RepositoryThe Repository can be installed on any relational database engine supporting ANSI ISO 89 syntax, such as Oracle, Microsoft SQL Server, Sybase AS Enterprise, IBM DB2 UDB, IBMDB2/400, etc.You can also use for evaluation purposes the demo repository provided with Oracle Data Integrator. This repository is based on an Hypersonic SQL Database. and requires no particular installation.The storage space requirements for repositories are the following:•Master Repository: 30 Mb of storage space.•Work Repository: 40 Mb of storage space. Note that the storage space required may vary depending on the size of your models and projects, and on the volume of execution logs you keep in this repository.Metadata Navigator/Lightweight DesignerIn order to run a Metadata Navigator or Lightweight Designer, your computer must meet the following minimum system requirements.Minimum System Requirements:256 MB RAM50 MB free disk space on your hard driveAn operating system supporting a Java Development Kit (SDK) 1.5J2EE 1.4 compliant application server, such as OC4J 10.1.3 and above.A Java Development Kit (SDK) 1.5.A TCP/IP network.However, in order to take advantage of all the advanced features, we highly recommend the following configuration.Recommended System Requirements:512 MB RAM100 MB free disk space on your hard driveAn operating system supporting a Java Development Kit (SDK) 1.5J2EE 1.4 compliant application server, such as OC4J 10.1.3 and above.A Java Development Kit (SDK) 1.5.A TCP/IP network.Configuration for Oracle Data Quality Products.Before installation The minimal configuration recommended pour Oracle Data Profiling and Oracle Data Qualityfor Data Integrator is as follows:Oracle Data Quality ClientIn order to use Oracle Data Quality, your computer must meet the following minimum system requirements.Minimum System Requirements:512 MB RAM200 MB free disk space on your hard driveOperating Systems: Microsoft Windows 2000 Professional/Server with SP4, Microsoft Windows XP Professional with SP2, Microsoft Windows Server 2003 Standard Edition, SP1(32 bit).Internet Explorer v5.5 or greater.A 10 Mbps TCP/IP network.However, in order to take advantage of all the advanced features of Oracle Data Quality, we highly recommend the following configuration.Recommended System Requirements:1 GB RAM400 MB free disk space on your hard driveOracle Data Profiling and Data Quality ServerIn order to use Oracle Data Quality products, your computer must meet the following minimum system requirements.Minimum System Requirements:This configuration is typically for 2 Oracle Data Profiling/Quality users and an overnight data quality processing load.2 GB RAMDisk space depends on the data processes, we recommend 1,5 GB plus 2 to 5 times the size of the data sources.Operating Systems:UNIX:AIX 5L (v5.1, 5.2, and 5.3)Solaris 8, 9 or 10HP-UX 11.i V1 (PA RISC), HP-UX 11.i V2 (IA64)Linux Red Hat Enterprise Linux 2.1 and aboveLinux Suse Version 9.2 Professional and aboveThe Inetd component (XInetd for Linux) must be installed on the UNIX machine.Windows:Windows: Windows 2000 Server with SP 3Windows Server 2003 Standard Edition with SP 1 (32 bit)A 100 MB TCP/IP network.7Oracle Data Integrator Installation Guide 8However, in order to take advantage of all the advanced features of Oracle Data Quality products, we highly recommend the following configuration.Recommended System Requirements:This configuration is typically for 5 Oracle Data Profiling/Quality users and a moderate daytime data quality processing load.4 GB RAM (8 GB for a power server - For 10 users and a normal daytime load)Disk space depends on the data processes, we recommend 1,5 GB plus 2 to 5 times the size of the data sources. A 1 GB TCP/IP network.Java ConfigurationOracle Data Integrator requires a Java Virtual Machine (JRE) or Software Development Kit (SDK). The Oracle Data Integration Suite setup program includes a Java Runtime Environment. If you want to use your own Java machine, you need to install it.The installation differs depending on your operating system, but the general procedure is to:1. Check whether the Java Virtual Machine is already present on your workstation and whether itis a version supported by Data Integrator. Open a command line prompt and type: java -version .2. Install the Java environment, by referring to your operating system documentation. Note : The Oracle Data Integrator execution agent can work with older versions of the Java Machine (1.3.1 and 1.4). It is recommended that you use the JVM 1.5.x for all Oracle Data Integrator client installations. All clients should have identical JVMs.Note : Using Web Services with Oracle Data Integrator requires a Java Development Kit (SDK)1.5. The SDKs are not provided in the setup programs, and should be installed separately. You must download them from the Sun web site, or contact your OS vendor.Installing JDBC / JMS driversTo connect to different data servers, Oracle Data Integrator uses the JDBC (Java DataBaseConnectivity) standard for databases, JNDI (Java Naming and Directory Interface) and JMS (Java Message Service) for MOM (Message Oriented Middleware).Oracle Data Integrator does not include any third-party driver licenses.Oracle Data Integrator requires the drivers for your different technologies to be installed in the /drivers sub-directory if they are not already referenced in the Java classpath.To add a new driver for Oracle Data Integrator:Follow these steps to add a new driver for Oracle Data Integrator.1. Copy the driver packages (.zip or .jar files) to the/drivers sub-directory under the OracleData Integrator installation folder. Oracle Data Integrator will automatically detect the driver the next time it starts and will add these packages to the classpath. This must be done on each machine executing an Oracle Data Integrator component.2. If the driver is used to connect a repository and you wish to use Metadata Navigator toconnect to this repository, then copy the driver's packages in the /WEB-INF/lib sub-directory of the Metadata Navigator installation folder, then restart the application server.Before installationRefer to the driver's documentation for specific setup operations.Drivers added to Oracle Data Integrator do not automatically appear in the list of drivers and URL in the Oracle Data Integrator GUI. The URL and drivers must be typed in manually in the appropriate fields, using the syntax provided in the drivers' documentations.Caution: The automatic detection of the drivers does not work on certain systems, including Windows 95 and 98. For these systems, you must add the driver's file in theODI_ADDITIONAL_CLASSPATH path parameter in the odiparams file.Note: A list of all the JDBC drivers available is maintained on the Sun Microsystems Web site. Pre-installation Tasks for Oracle Data Quality ProductsIdentify Available PortsDuring installation, Oracle Data Quality asks for at least 2 port numbers that are accessible from the client to the server and not blocked. These port numbers are used for the two following services:•The Oracle Data Quality Scheduler requires a port called Scheduler Port.•The Oracle Data Profiling and Quality Metabase Repository requires a port called Repository Port.To find available port numbers, on the server, you should:•On UNIX, inspect the services file, located at: /etc/services•On Windows, type the netstat -an command to identify ports that have applications listening on them.Select two available ports and make note of them for the setup procedure.Note: The port numbers should be greater than 1000 and not exceed 65535, and for easy reference, should be consecutive numbers. (For example, 7600 for the Repository Port and 7601 for the Scheduler Port.)Note: If you are planning to use ODBC datasources from a Windows-based server, you need optionally to reserve a third port for the Oracle Data Quality ODBC Adapter.9Installation Procedure Installing and Uninstalling Oracle Data Integrator and Oracle Data Quality ProductsInstalling Oracle Data Integrator and Oracle Data Quality ProductsThe Oracle Data Integrator installation program includes three products and gives you four installation options depending on the solution you want to install:•The complete installation includes Oracle Data Integrator, Oracle Data Profiling and Oracle Data Quality for Oracle Data Integrator.•Oracle Data Integrator is a comprehensive data integration platform that covers all data integration requirements.•Oracle Data Profiling is a data investigation and quality monitoring tool.•Oracle Data Quality for Oracle Data Integrator is a comprehensive award-winning data quality platform that covers even the most complex data quality needs.To install Oracle Data Integrator and Oracle Data Quality Products:1. Open the directory containing the Oracle Data Integrator setup.2. Start Oracle Universal Installer as follows:On... Do This...UNIX/Linux Enter the following command at the operating system prompt:./runInstallerWindowsDouble-click setup.bat.The Welcome screen appears.5. Click Next.The Select Product To Install screen appears.6. Select the product to install.7. Click Next.The Select Installation Type screen appears.8. Select the installation Type•C lient: Installs the client components for the product you have specified in step 6.•S erver : Installs the server components for the product you have specified in step 6.•C omplete: Installs both client and server components of Oracle Data Integrator andOracle Data Quality products you have specified in step 6.9. Click Next.10. In the Home Details screen select the Oracle home name and directory path where you wantto install the products.11Oracle Data Integrator Installation Guide 1211. Click Next .If you are installing Oracle Data Profiling and / or Oracle Data Quality for Oracle Data Integrator you will be asked to configure the Metabase servers and to define for the client the Metabase you will connect to. Ignore this step if you do not install Oracle Data Profiling or Oracle Data Quality for Oracle Data Integrator .Depending on the installation type specified in step 8 the following screens appear:a. The Metabase Connection screen appears if you have selected the Client installationtype . This screen configures the client to connect to a specific Metabase and repository. Specify the Metabase connection as follows:Hostname : Name of the host where the Oracle Data Profiling or Oracle DataQuality for Data Integrator server components are installed. If you are installingthese components on the same machine, enter localhost .Scheduler Port : Port for the Oracle Data Quality scheduler. Default is 7601.Repository Port : Port for the Metabase Repository. Default is 7600.Repository Name : Name of the Repository.b. The Metabase Configuration screen appears if you have selected the Sever installationtype .Define the Metabase configuration as follows:Repository Port : Port for the Metabase repository. Default is 7600.Scheduler Port: Port for the Oracle Data Quality scheduler. Default is 7601.Administrator Name : Metabase administrator name. Default is madmin .Administrator Password: Metabase administrator password.12. Click Next .The Oracle Data Quality ODBC Adapter Configuration screen appears only if you have chosen the server or complete installation type for Oracle Data Profiling. In this case define theAdapter Configuration as described below. If not, skip this step.Set the ODBC Adapter port as follows:ODBC Port: 760213. Click Next .The Summary screen appears.14. Click Install .The Installation Progress screen appears.The installer automatically executes each configuration assistant in sequence, displaying the progress in the Status column. No action is required on this screen.When installation completes, the End of Installation screen appears with information for your review.13. Click Exit and confirm when prompted.14. On UNIX platforms add the following environment variables for the user who has installedOracle Data Integrator:•ODI_JAVA_HOME=<ODI_HOME>/jre/1.4.2 •TS_QUALITY=<ODI_HOME>/oracledq/quality_server/tsq11r5s/Software • LD_LIBRARY_PATH=<ODI_HOME>/oracledq/quality_server/tsq11r5s/Softwa re/binThis completes the installation procedures.Installation Procedure 13 Note: Oracle Data Integrator can be installed as a standalone component without running the setup program in specific cases (platform not supported by the setup program). Refer to the Manual Installation of Oracle Data Integrator and installing the Java Agent on iSeries and AS/400 topics for more details.Uninstalling Oracle Data Integrator and Oracle Data Quality ProductsTo uninstall Oracle Data Integrator and Oracle Data Quality Products:1. Open the directory containing the Oracle Data Integrator setup.2. Start Oracle Universal Installer as follows: On...Do This... UNIX/LinuxDouble-click setup.sh or enter the following command at the operating system prompt: ./runInstaller WindowsDouble-click setup.bat .The Welcome screen appears.5. Click Installed Products....6. Select the products to remove from the Installed Products window.7. Select the Remove button.Removing the Oracle Data Quality Services on UNIXIn order to successfully uninstall the Oracle Data Quality server, you may need to remove various directories and also entries from several files on certain UNIX platforms.1. Verify that there are no users logged on to the Metabase Server.2. Log on to the UNIX server as Root.3. Stop the scheduler server1. Change directories to <ODI_HOME>/oracledq/metabase_server/metabase/bin2. Type the command: ./scheduler -stop4. Delete the data quality information1. Change directories to <ODI_HOME>/oracledq2. Type the command: rm -R /metabase_server3. Type the command: rm -R /metabase_data .Note that this command deletes all therepository and metabase data.5. Remove the services1. Make a backup copy of the /etc/services file.2. Open this file for editing and go to the end of the file.3. Here you will see two lines referring to services you have created for the metabase serverand scheduler.4. Delete these two lines from the services file.5. Save your changes and close the file.Oracle Data Integrator Installation Guide6. Remove the inetd configuration the entry corresponding to the metabase server.1. Make a backup copy of the /etc/inetd.conf file. Open this file for editing, then find init the entry referring to the metabase serve, then remove it and save the file.2. If using Linux, you must remove instead the /etc/xinetd.d/TSDiscovery file.7. Restart inetd.Installing Metadata NavigatorMetadata Navigator is a Servlet/JSP application that enables access to the Repository through a Web interface. This application requires a Web server with a Servlet/JSP container such as Jakarta Tomcat or Oracle Container for Java (OC4J).Deploying Metadata NavigatorNote: To deploy Metadata Navigator, refer to the documentation of your application server to find the recommended method for deploying a web application from a web application resource (WAR) file or from a set of JSP pages.To install Metadata Navigator:1. Insert the Oracle Data Integrator CD-ROM in your CD-ROM drive.2. To install Metadata Navigator, you may either:•Use the web application deployment feature of the application server with the oracledimn.war file located in the /setup/manual/ directory on the CD. Thissolution is recommended for OC4J (Use the Deploy button in the Applications tab).•if the application server allows it, copy the /oracledimn directory from the CD to the application server's web applications directory (Webapps for Tomcat).3. Restart the web server hosting the application.Install the JDBC driverMetadata Navigator uses the JDBC connectivity to access the database server hosting the Repository to explore. It is necessary to configure the JDBC connectivity on the machine where Metadata Navigator is installed.The Java classes of the JDBC driver must be copied in the /WEB-INF/lib sub-directory of the Metadata Navigator installation folder, and must have the .jar extension. Rename the file extension to .jar if necessary (e.g., from .zip to .jar). Refer to the installation documentation for the JDBC driver provided with your database for more information.Configure Metadata Navigator ConnectionsMetadata Navigator is installed with default connections. It is necessary to configure the connections to your repositories in the web application.To configure Metadata Navigator connections:1. Configure the connection to the work repository in Designer.2. Go to your Oracle Data Integrator installation folder's /bin sub-directory.14。
ODI安装手册

ODI安装手册目录1引言 (2)1.1编写目的 (2)1.2服务对象 (2)1.3安装环境 (2)1.4参考资料 (2)1.5术语与缩写解释 (2)2安装ODI客户端图形化软件 (3)2.1安装客户端图形化软件 (3)2.2JDBC/JMS驱动的安装 (7)3安装ODI存储库 (7)3.1创建存储库用户 (7)3.2创建主存储库 (8)3.3连接主存储库 (9)3.4创建工作存储库 (10)3.5连接工作存储库 (14)4其它 (16)1引言1.1编写目的本文档的编写主要介绍ODI客户端软件的安装及设置过程。
通过本文档的阅读,实施人员可以以此为依据,在现场安装ODI集成开发环境。
1.2服务对象本文档一般读者为:数据集成项目实施人员、设计及开发者、相关的测试人员等。
1.3安装环境安装ODI客户端软件需要先安装JDK,并安装oracle,以存储主存储库和工作存储库。
操作系统:WINDOWS 2000 SERVER或WINDOWS 2003 SERVER内存:至少1 GB,以运行Oracle数据库和ODI客户端图形化软件硬盘:至少2 GBCPU:P4 2.4GHZ及以上数据库:Oracle 10gJDK:JDK1.4.2及以上版本1.4参考资料1.5术语与缩写解释2安装ODI客户端图形化软件ODI需要在java环境下运行,在安装ODI之前,首先要安装JDK1.5。
2.1安装客户端图形化软件这里安装的版本是Oracle DI 10.1.3.2.0版本。
运行setup.exe。
至此,ODI的安装已经完成。
2.2JDBC/JMS驱动的安装对于已安装ODI客户端软件的机器,若需要添加JDBC/JMS驱动,将驱动包(.zip或者.jar)拷贝到ODI安装路径\drivers下。
3安装ODI存储库ODI需要创建两个存储库——主存储库和工作存储库。
主存储库用于保存已创建的数据源的架构信息,工作存储库用于保存创建的数据模型、项目的信息。
兰德华L-A1.0软件使用说明
L-A1.0软件使用说明为了能够使您尽享本系统操作的方便快捷,请您详细阅读本说明:一、 系统安装说明:打开您的电脑,启动操作系统之后,将本系统光盘放入光驱,打开我的电脑,打开光盘,会显示带有软件名称的文件夹,双击打开该文件夹,点击运行SETUP 文件,您就可以根据中文提示安装本系统了。
注:如软件安装过程中出现如下提示,请直接点击取消按钮。
此操作不影响软件的正常安装使用。
若您使用的是通过USB 口传输的巡检器,请您在安装完本软件系统后再安装USB 驱动,详细的安装程序请参考USB 驱动安装说明。
二、 软件操作说明:(一)软件登录、注销1、登录双击巡更管理系统图标,软件起动后,会出现以下登录界面,选择权限,然后输入相对应的密码,系统管理员初始密码为333;操作员密码为222;浏览者密码为111。
只要输入正确,便可登录成功;登录界面如下图:2、注销 操作员的注销,即更换操作员,使新的操作员用新的权限登录。
注销方法(如下图),选择菜单“操作员 用户注销”来实现。
(二)资源设置 资源设置分五部分组成:人员钮设置、地点钮设置、事件设置、棒号设置、系统设置,每一部分的设置如下:1、系统设置:在第一次进入软件后,应首先对系统进行设置。
系统设置分为基本信息写入和权限用户密码管理。
如下图,在此可输入公司名称、选择的串口号,并可在此对权限密码进行修改。
修改完毕点击保存即可。
注:巡检器与电脑是用串口进行数据传输的,默认使用的串口号为COM1,巡检器与电脑是用USB 口传输的,默认使用的串口号为COM3(具体情况可到设备管理器中查询),在系统设置完毕后请重新登录巡更系统。
2、棒号设置: 在使用巡检器之前需要将巡检器的棒号输入到软件中,以便识别。
点击“资源设置—>棒号设置”。
将巡检器与计算机连接好,并且将巡检器打开。
点击采集数据,会出现如下图所示:1140为该棒号码。
巡检器属性可以根据需要进行填写,也可以不填。
3、人员钮设置: 此选项用来对巡检人员进行设置,以便用于日后对巡检情况的查询。
某网公司某系统硬件和系统软件部署方案V1.0

某网公司某系统硬件和系统软件部署方案〔V1.0〕2014年07月目录1.概述 (4)1.1.编写目的 (4)1.2.适用范围 (4)1.3.系统物理部署拓扑图 (4)1.4.软硬件列表 (4)2.通用设计 (7)2.1.命名规则 (7)2.2.IP地址规划 (8)2.2.1.IP地址分配 (8)2.3.应用端口需求 (10)2.3.1.营销基础数据平台 (10)2.4.网络连接要求 (10)2.5.负载均衡器接入设计 (11)2.5.1.网络连接 (11)2.5.2.配置要求 (11)2.5.3.负载均衡策略 (12)2.5.4.虚拟ip规划 (13)2.6.NTP设计 (13)2.7.DNS设计 (14)2.8.存储规划设计 (14)2.8.1.存储配置概况 (14)2.8.2.各服务器对存储需求 (14)2.9.操作系统安装基本要求 (16)2.9.1.AIX操作系统 (16)2.9.2.LINUX操作系统 (20)2.9.3.WINDOWS操作系统 (23)2.10.NBU基本安装配置 (24)2.10.1.备份架构 (24)2.10.2.备份软件安装说明 (24)2.10.3.NBU安装在client端的规划要求 (25)2.10.4.备份策略设计 (25)3.营销基础数据平台软硬件安装规划 (26)3.1.数据库服务器规划 (26)3.1.1.数据库主机系统规划 (26)3.1.2.数据库系统安装配置规划 (27)3.1.3.数据库实例规划 (27)3.1.4.ODI规划 (30)3.1.5.OGG规划 (32)3.2.应用服务器规划 (40)3.2.1.应用主机系统规划 (40)3.2.2.应用服务器安装配置规划 (42)3.3.缓存服务器 (47)3.3.1.安装要求: (48)3.3.2.安装过程 (48)3.4.日志服务器 (49)3.4.1.安装要求: (49)3.4.2.安装过程 (49)附录1 (52)1. 概述本文档提供XXX营销基础数据平台项目的部署方案,包括数据库服务器、BI 服务器、应用服务器等。
ODI部署方案及操作指南
Copyright © 2000 by Wiscom System Co.,Ltd. All rights reserved. 版权所有(C) 2000 金智科技股份有限公司,保留所有权利。
WISCOM-SDB-Wxxxx校园信息化建设数据集成ODI部署方案及操作指南文件编号〈WISCOM-SDB-Wxxxx〉版本号〈1.0〉发布时间〈2007-08-24〉编写人〈陈锋〉文件审核表Copyright © 2000 by Wiscom System Co.,Ltd. All rights reserved. 版权所有(C) 2000 金智科技股份有限公司,保留所有权利。
修订纪录Copyright © 2000 by Wiscom System Co.,Ltd. All rights reserved. 版权所有(C) 2000 金智科技股份有限公司,保留所有权利。
目录WISCOM-SDB-Wxxxx (1)目录 (4)1引言 (5)1.1 编写目的 (5)1.2 服务对象 (5)2产品部署 (5)2.1 部署方案 (5)2.2 部署约定 (6)2.3 ODI的安装和配置 (7)2.3.1 ODI的安装 (7)2.3.2 ODI的配置 (11)3 ODI操作流程 (20)3.1 ODI全量抽取的操作流程 (20)3.1.1 一个源到一个目标(1 V 1) (20)3.1.2 多个源到一个目标(n V 1) (57)3.2 ODI增量抽取的操作流程 (61)3.2.1 利用触发器作增量抽取 (61)3.2.2 利用标志位作增量抽取 (67)4 数据库的JDBC及访问权限 (71)4.1 连接数据库的JDBC及其URL (71)4.2 访问权限 (73)5 ODI Metadata Navigator的配置 (74)5.1 Metadata Navigator的安装 (74)5.2 Metadata Navigator配置 (74)6 常见错误及解决方法 (74)Copyright © 2000 by Wiscom System Co.,Ltd. All rights reserved.版权所有(C) 2000 金智科技股份有限公司,保留所有权利。
ODIS许可订购与安装操作手册 V1.0

用户手册ODIS许可订购与安装版本 1.0目录1.文档版本 (3)2.概述 (4)3.正文 (4)3.1.E S HOP订购流程 (4)3.1.1.登录eShop (4)3.1.2.选择产品 (5)3.1.3.输入硬件密钥和邮箱 (10)3.1.4.生成订单 (13)3.2.ODIS安装流程 (15)3.2.1.准备安装文件 (15)3.2.2.安装ODIS (15)3.2.3.更新ODIS (21)3.3.ODIS配置流程 (22)3.3.1.VAS 5054A诊断头配置 (22)3.3.2.集团公司系统设置 (32)3.3.3.镜像服务器2设置 (33)3.3.4.支持邮箱配置 (34)3.3.5.McAfee设置 (39)1. 文档版本2. 概述这篇文档主要介绍如何从ODIS eShop上订购安装许可证以及ODIS的安装与配置过程。
3. 正文3.1. eShop订购流程3.1.1. 登录eShop1) 经销商在浏览器上输入portal的网址http://portal.cpn.vwg/,输入全球用户名和密码,点击【发送】按钮。
2) 在Portal界面选择ODIS eShop选项,进入eShop操作界面。
3.1.2. 选择产品1) 经销商首次登陆eShop时需要先注册才能订购license,点击“Home page”。
2) 在HomePage操作界面右侧,点击图标,进入eShop注册界面。
3) 选择语言“Chinese”,点击【Register】按钮。
4) 在eShop操作界面左侧选择“Products”选项,进入产品订购操作界面。
5) 在产品订购界面,点击“ODIS大众品牌数据”后的按钮将产品放入购物车。
6) 在购物车界面,点击【To the Products】回到产品订购界面。
7) 在产品订购界面,点击“ODIS大众商用车品牌数据”后的按钮将产品放入购物车。
8) 在购物车界面,点击【To the Products】回到产品订购界面9) 在产品订购界面,点击“ODIS售后服务诊断信息系统”后的按钮将产品放入购物车。
ODI代理安装手册

O D I代理安装手册(w i n d o w s)
1.进入安装包路径E:\oracle程序\odi安装包\Disk1
如果用setup.exe报错,进路径Disk1\install\win32启动安装程序
代理名称和端口自定义
安装完成后进入程序安装目录
该路径下有三个需要修改的文件,分别是
agent_agent_zf.bat--启动代理,名称默认与安装的时候命名一致
odiparams.bat--数据库连接配置文件,密码需要加密
encode.bat--加密工具
cmd进入命令界面,切换到代理相应的盘符
首先执行确认是否有问题,如有如下报错,右击agent_agent_zf.bat编辑
去掉双引号,然后再执行,出现如下界面,说明该bat已经正常
右击odiparams.bat编辑,找到下图几段配置文档,修改
在命令窗口执行encode.bat
将加密后的密文复制到配置文件中
进入odi页面
此时测试还是会报错
双机代理
这样说明代理启动成功(由于是本机测试,上图报一些装的版本与之前的用的odi版本不一致的警告,忽略)
到odi界面上测试,代理成功,至此,安装结束。
ODI(一)安装配置
ODI10134安装1前提条件ODI客户端图形化软件、ODI Agent的安装文件是一个ODI Metadata Navigator的安装文件是另一个安装ODI客户端图形化软件需要JVM1.4.2或以上版本以及JDK1.4.2或以上版本支持安装ODI Agent需要JVM1.3.1或以上版本以及JDK1.4或以上版本支持。
安装ODI Metadata Navigator需要兼容JSP1.2和Servlet2.3的Web Server,例如Tomcat;需要JDK1.4或以上版本2ODI客户端图形化软件和ODI Agent安装步骤Password: oracle3JDBC/JMS驱动安装步骤对于安装了ODI客户端图形化软件或者ODI Agent的机器来讲,添加任何JDBC/JMS驱动,将驱动包(.zip或者.jar)拷贝到ODI安装路径\drivers下对于安装了ODI Metadata Navigator的机器,将驱动包(.zip或者.jar)拷贝到ODI Metadata Navigator安装路径\WEB-INF\lib下4ODI客户端图形化软件和ODI Agent配置步骤4.1 资料库存储空间建议为资料库设立单独存储空间4.2 创建资料库用户创建两个用户:主资料库用户和工作资料库用户在Oracle数据库上创建的语句如下:create user snpm(主资料用户) identified by oracle(主资料用户口令)grant connect,resource to snpmcreate user snpw(工作资料用户) identified by oracle(工作资料用户口令)grant connect,resource to snpw4.3 创建主资料库(最好使用oracle)在开始中打开Oracle Data Integrator > Repository Management > Master Repository Creation 然后填入相应信息:Driver:选择”oracle JDBC Driver”URL:选择”jdbc:oracle:thin:@<host>:<port>:<sid>”,并修改主机、端口和sidUSER:上一步创建的主资料库用户(snpm)Password:上一步创建的主资料库用户口令Technology:资料库所在的数据库类型,选择oracle点击“OK”创建主资料库等待主资料库的创建,直至创建成功:4.4 连接主资料库在开始中打开Oracle Data Integrator > Topology Manager 创建新的主资料库连接:填入相应信息Login Name:自定义的名称User:SUPERVISOR(必须是此用户名)Password:SUNOPSIS(必须是此口令)主资料库连接信息:USER:上一步创建的主资料库用户(snpm)Password:上一步创建的主资料库用户口令Driver List:选择”oracle JDBC Driver”URL:选择”jdbc:oracle:thin:@<host>:<port>:<sid>”,并修改主机、端口和sid Default Connection:选中,设置为默认测试通过后点击:”ok”4.5 创建工作资料库选择”存储库”选项卡,右击”工作存储库”选择”插入工作存储库”,弹出新窗口如下图:输入名称,sid,用户名和密码,并选择JDBC,测试通过后点击”应用”,弹出新窗口,如下图:输入ID,名称,点击”确定”完成工作存储库的配置4.6 连接工作资料库Programs > Sunopsis > Sunopsis > Designer新建工作资料库连接:填入连接信息Login Name:自定义的工作资料库连接名称User:SUPERVISORPassword:SUNOPSIS(如果在Topology中修改了口令,需要填入修改后的口令)填入主资料库信息User:4.2步骤中创建的主资料库用户Password:4.2步骤中创建的主资料库用户Driver:URL:填入工作资料库信息Work Repository Name:工作资料库名称“OK”后,进入Designer模块5ODI Scheduler Agent 5.1 改变odiparams.bat文件将文件中的下属部分加上REMrem set ODI_SECU_DRIVER=org.hsqldb.jdbcDriver rem set ODI_SECU_URL=jdbc:hsqldb:hsql://localhost rem set ODI_SECU_USER=sarem set ODI_SECU_ENCODED_PASS=rem set ODI_SECU_WORK_REP=WORKREPrem set ODI_USER=SUPERVISORrem set ODI_ENCODED_PASS=LELKIELGLJMDLKMGHEHJDBGBGFDGGH复制并改为如下:set ODI_SECU_DRIVER=org.hsqldb.jdbcDriverset ODI_SECU_URL=jdbc:hsqldb:hsql://localhostset ODI_SECU_USER=snpmset ODI_SECU_ENCODED_PASS= c6yHnXKAlBN6KSkPCGB5cQksset ODI_SECU_WORK_REP=WORKREP1set ODI_USER=SUPERVISORset ODI_ENCODED_PASS= a7ypcAZmpntyHfrmJcu5H6Nhp其中两行PASS的值是通过“ODI安装路径\oracledi\bin\agent encode PASSWORD”得到的值agentscheduler “-PORT=XXXX”“-NAME=Physical Agent Name”“-V=5”6ODI Metadata Navigator安装步骤6.1 先安装Web Server先安装兼容JSP1.2和Servlet2.3的Web Server如Tomcat,注意Tomacat的安装路径中不要有中文、空格等。
- 1、下载文档前请自行甄别文档内容的完整性,平台不提供额外的编辑、内容补充、找答案等附加服务。
- 2、"仅部分预览"的文档,不可在线预览部分如存在完整性等问题,可反馈申请退款(可完整预览的文档不适用该条件!)。
- 3、如文档侵犯您的权益,请联系客服反馈,我们会尽快为您处理(人工客服工作时间:9:00-18:30)。
ODI安装配置目录第一章引言 (3)1.1编写目的 (3)1.2项目背景................................... 错误!未定义书签。
1.3术语说明 (3)1.4读者对象 (3)1.5参考资料 (3)第二章安装概述.................................... 错误!未定义书签。
2.1目标....................................... 错误!未定义书签。
2.2运行环境................................... 错误!未定义书签。
第三章安装ODI .. (4)3.1 ODI描述 (4)3.1.1 ODI GUI构架 (4)3.1.2 ODI Web模块 (5)3.2安装 (5)3.2.1 ODI安装............................. 错误!未定义书签。
3.2.2 JDK 1.5安装......................... 错误!未定义书签。
3.2.3 Apache Tomcat 5.5 安装............... 错误!未定义书签。
3.2.4 Apache Axis2 安装(Web Service服务) .. 错误!未定义书签。
3.2.5 ODI Web Model安装................... 错误!未定义书签。
第4章 ODI开发环境配置 (9)4.1创建主知识库 (9)4.2创建工作知识库 (10)4.3 配置物理模型和代理 (14)4.4 创建工程 (19)4.5 增加知识模块(KM) (21)4.6 创建模型 (22)第一章引言1.1编写目的描述Oracle ODI工具的安装及配置。
1.3术语说明ODI—Oracle Data Integrator(译:Oracle数据集成)1.4读者对象本文档的阅读对象ODI系统管理员及维护员1.5参考资料Oracle ODI产品文档《The Oracle Data Integrator Architecture》《Oracle Data Integrator Installation Guide》第三章安装ODI3.1 ODI描述3.1.1 ODI GUI构架ODI是Oracle Data Integrator的简称,中文翻译为Oracle数据集成工具,ODI GUI界面包括四个部分:1.Topology Manager 主要功能用于定义物理和逻辑基础结构,如数据库服务、代理服务,这部分信息主要存储在Master Repository(主知识库)中,用于工程创建等2.Security Manager 管理用户的信息、访问权限,适于安全管理员操作3.Designer 定义模型、工程、数据抽取规则,开发人员使用4.Operator 管理和监控工程产品运行操作日志,适于开发员开5.Repository 知识库有两种类型,一种是Master Repository(主知识库),另外一种是Work Repository(工作知识库)。
主知识库存储物理和逻辑基础结构,代理,安全等信息,工作知识库存储工程、执行过程、模型等信息。
其技术架构图如下:3.1.2 ODI Web模块ODI还包括三个Web应用:1.Metadata Navigator J2EE Web应用程序,用于浏览知识库中的元数据。
2.Oracle Data Integrator LightWeight Designer J2EE Web应用程序,用于浏览、编辑工作知识库中的对象数据。
3.Oracle Data Integrator Web Service Model 远程调用的Web Service模块,用于通过远程WebService调用工作知识库中的场景(方案)。
3.2 ODI安装1.启动安装程序,在ODI安装介质目录:odi_windows_x86_101340\setup\Windows\Disk1\install下双击setup.exe 应用(Linux下安装请参考《Oracle Data Integrator Installation Guider》的Linux部分),启动界面如下:2.点击下一步,进入选择安装产品页面,如下图3.选择第一个选项,完全安装,点击下一步,进入选择安装类型界面,如下图路径上选择您要安装的目录,如:D:\OracleODI,如下图Configuration这部分是数据质量分析工具,填上密码,其他默认,如下图界面,在Hostname中填写:localhost,其他默认,如下图7.点击下一步,进入ODBC Adapter Port界面,端口号默认,如下图8.点击下一步,进入安装概述页面,如下图9.点击安装,正式确认安装ODI工具,安装完毕10.配置环境变量,在系统中增加以下变量:ODI_HOME=d:/OracleODIODI_JAVA_HOME=%ODI_HOME%/jre/1.4.2TS_QUALITY=%ODI_HOME%/oracledq/quality_server/tsq11r0s/Software/b inLD_LIBRARY_PATH=%ODI_HOME%/oracledq/quality_server/tsq11r0s/Softw are/bin第4章 ODI开发环境配置4.1创建主知识库1.在ODI_HOME/oracledi/bin目录下,运行repcreate.bat(Linux下repcreate.sh),启动创建主知识库的GUI界面,填写Driver,URL,User等参数值,如下图2.点击OK,程序开始连接到数据库上创建主知识库。
4.2创建工作知识库1.启动Topolog 程序,在ODI_HOME/oracledi/bin目录下,启动topology.bat(Linux下为topology.sh),进入登陆页面,如下图2.点击新建按钮,创建一个新的登陆名,填写必要的参数,如下图,在OracleData Integrator Connection 选项中的User和Password系统默认值为:SUPERVISOR和SUNOPSIS3.选中Default Connection 选项,点击OK,进入上一个页面,如下图4.点击OK,进入Topolog管理页面,如下图5.选择左边的Repository,然后在Work Repositories上单击右键,选择InsertWork Repository,如下图6.进入Data Server:New设置页面,填写必要的参数,如下图7.点击OK,进入Work Repository:New界面,填写必要参数值,如下图8.点击OK,开始创建工作知识库,工作知识库创建完毕4.3 配置物理模型和代理1.进入Topolog管理器,选择左边的Physical Architecture,展开Technologies节点,在Oracle节点上单击右键选择Insert Data Server,如下图2.进入Data Server:New对话框,填写必要参数,如下图3.点击OK,进入Physical Schema:OracleDB :Schema对话框,填写必要参数,如下图4.点击OK,创建数据库物理构架完毕。
在Agent节点上单击右键选择InsertAgent,如下图5.进入Agent:New对话框,填写必要的参数,如下图6.点击OK,创建Agent完毕。
在左边的面板选择Logical Architecture面板,展开Technologies节点在Oracle上右键单击,选择Insert Logical Schema7.进入Logical Schemal:New对话框,填写名字,选择对应的物理构架8.点击OK,创建逻辑构架完毕。
在Agent节点上右键单击选择Insert LogicalAgent,如下图所示9.进入Logical Schema:Agent对话框,填写名字,选择对应的物理Agent,如下图所示10.单击OK,创建逻辑Agent完毕4.4 创建工程1.启动Designer,在ODI_HOME/oracledi/bin目录下,启动designer.bat(Linux下为designer.sh),进入登陆页面,如下图2.点击新建,进入新建登陆信息页面,如下图,在Oracle Data IntegratorConnection 选项中的User和Password系统默认值为:SUPERVISOR和SUNOPSIS3.点击选择Default Connection选项,点击OK,进入登陆页面,如下图4.点击OK,进入Designer界面,界面如下5.在左边的面板选择Projects,右键点击选择Insert Project,如下图6.进入Project:New界面,填写必要参数,如下图7.点击OK,工程创建完毕4.5 增加知识模块(KM)1.在Designer界面,选择Demo工程下的Knowledge Modules的Reverse-engineering,右键单击,选择Import Knowledge Modules,如下图2.确定后,弹出导入KM对话框,点击后面的按钮,选择路径:<ODI_HOME>/oracledi/impexp,确定系统加载ODI预先定义的KM(知识模块),选择如下的KMCKM OracleIKM Oracle Incremental Update(MERGE)JKM Oralce 10g Consistent(LOGMINER)LKM Oracle to OracleLKM SQL to OracleRKM OracleSKM Oracle3.点击Ok确定,所有Oracle相关的KM都已经导入工程4.6 创建模型1.进入Designer操作界面,在左边面板中选择Models选项,在空白处单击右键选择,Insert Model,如下图所示2.进入Model:New对话框界面,填写必要的参数,选择对应的选项,如下面几张图所示3.点击Apply按钮,创建模型完毕。
点击Reverse按钮,讲物理模型的数据模型用逆向工程导出到Model中,弹出Execution对话框,保留默认选项,单击OK,系统开始执行逆向工程4.在工具条上点击刷新Model,系统加载刚逆向工程导入Model元数据,如下图所示,创建Model完毕注:由于此文档描述的是在Windows平台下安装、配置ODI的,所以在Linux 下安装、配置ODI有所不同,在Linux平台下安装、配置ODI请参考官方ODI 文档,文档内容如下《Oracle Data Integrator Installation Guider》。
