Alfresco OpenLDAP CAS SSO v1
单点登录CAS与LDAP整合的实现

单点登录CAS与LDAP整合的实现单点登录(Single Sign-On,SSO)是一种身份验证和访问控制机制,允许用户使用一组凭据(如用户名和密码)登录到一个应用程序,然后在登录后访问其他应用程序而无需再次提供凭据。
这种机制的实现需要集成不同的身份验证系统,例如,CAS(Central Authentication Service)与LDAP(Lightweight Directory Access Protocol)。
CAS是一种基于Web的身份验证协议,它提供了一种单点登录解决方案,允许用户在一次登录后访问多个Web应用程序,并且不需要再次输入凭据。
CAS通过提供一个认证服务器来实现这一功能,该服务器负责验证用户的凭据,并生成一个票据(Ticket)以表示用户的身份。
LDAP是一种用于访问和维护分布式目录信息服务(Directory Information Services)的协议。
目录服务用于存储和组织用户和组的信息,包括用户名、密码和其他属性。
LDAP提供了一种标准化的方式来查找、添加、修改和删除目录条目,提供了对用户身份信息的集中存储和访问。
要将CAS和LDAP整合,首先需要配置CAS服务器以使用LDAP作为其用户存储和验证机制。
下面是实现此集成的步骤:1. 配置LDAP服务器:首先,需要在LDAP服务器上创建一个目录以存储用户和组的信息。
可以使用开源的LDAP服务器,如OpenLDAP或Microsoft的Active Directory。
2.配置LDAP属性映射:CAS需要将LDAP中的用户属性映射到CAS的用户模型中。
这些属性包括用户名、密码、姓名、角色等。
需要根据LDAP服务器的架构和CAS的用户模型进行正确的属性映射。
3.配置LDAP身份验证器:CAS使用一个或多个身份验证器来验证用户的凭据。
应该配置一个LDAP身份验证器来使用LDAP服务器进行用户身份验证。
4.配置CAS服务器:在CAS服务器上,需要配置CAS以使用LDAP身份验证器进行用户身份验证。
Alfresco 安装与配置图解
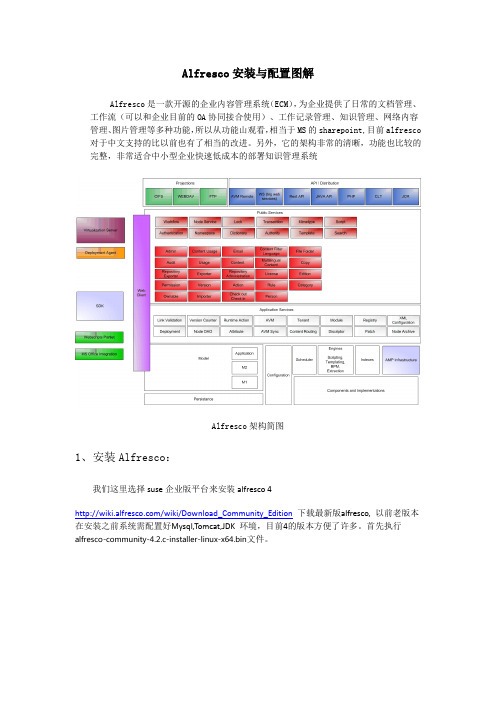
Alfresco安装与配置图解Alfresco是一款开源的企业内容管理系统(ECM),为企业提供了日常的文档管理、工作流(可以和企业目前的OA协同接合使用)、工作记录管理、知识管理、网络内容管理、图片管理等多种功能,所以从功能山观看,相当于MS的sharepoint,目前alfresco 对于中文支持的比以前也有了相当的改进。
另外,它的架构非常的清晰,功能也比较的完整,非常适合中小型企业快速低成本的部署知识管理系统Alfresco架构简图1、安装Alfresco:我们这里选择suse企业版平台来安装alfresco 4/wiki/Download_Community_Edition下载最新版alfresco, 以前老版本在安装之前系统需配置好Mysql,Tomcat,JDK 环境,目前4的版本方便了许多。
首先执行alfresco-community-4.2.c-installer-linux-x64.bin文件。
开始使用,打开浏览器访问:http://localhost:8080/alfresco可以看到alfresco的主页,使用admin用户及前面设定的密码能够正常登陆/opt/alfresco-4.0.a/manager-linux-x64.run在启动tomcat时候出现"tomcat could not be started"我们需要输入下面命令#rm /opt/alfresco-4.0.a/tomcat/temp/catalina.pid2、汉化配置/projects/zh-package/下载相应版本的汉化包unzip language_Pack.zipchmod +x install_language_pack.sh./ install_language_pack.shVim/opt/alfresco/tomcat/webapps/alfresco/WEB-INF/classes/alfresco/web-client-config.xml添加登陆页面的中文语言选项,然后找到<languages> 节点,再添加一行:<language locale="zh_CN">Chinese (Simplified)</language> 最后保存退出。
CAS客户端服务器端配置步骤
CAS客户端服务器端配置步骤CAS(Central Authentication Service)是一种Web单点登录协议,允许用户在一次登录后访问多个应用程序。
CAS客户端和服务器端的配置步骤通常包括以下几个方面:一、CAS客户端配置步骤:1.引入CAS客户端依赖。
首先需要在应用程序的构建配置文件中引入CAS客户端的依赖关系,以便在应用程序中使用CAS客户端的功能。
2.配置CAS客户端。
在应用程序的配置文件中添加CAS客户端的相关配置项,包括CAS服务器的地址、端口、协议类型等。
3.设置应用程序的登录认证方式为CAS客户端。
通过配置应用程序的认证方式为CAS客户端,可以将用户的登录认证转交给CAS服务器处理。
4.配置CAS客户端认证过滤器。
CAS客户端通常会提供一个认证过滤器,用于拦截用户的请求并进行认证处理。
配置认证过滤器的URL模式以及其他参数,以确保认证过程正确执行。
5.编写CAS客户端回调处理逻辑。
当用户在CAS服务器上成功登录后,CAS服务器会将用户重定向回客户端应用程序,并在URL中添加一个包含用户信息的票据参数。
客户端应用程序需要编写相应的回调处理逻辑,以解析该票据参数并进行相关的用户信息处理。
二、CAS服务器端配置步骤:1.安装和配置CAS服务器。
首先需要在服务器上安装CAS服务器,并使用CAS服务器提供的配置文件对服务器进行配置。
配置项包括CAS服务器的地址、端口、协议类型等。
2.配置CAS服务器的用户认证源。
CAS服务器通常需要与一个或多个用户认证源(如LDAP、数据库等)进行集成,以验证用户的用户名和密码。
配置CAS服务器与用户认证源的相关参数,确保用户可以被正确认证。
3.配置CAS服务器的服务清单。
在CAS服务器上配置服务清单,即允许用户访问的应用程序列表。
可以指定应用程序的URL地址、安全策略等信息。
4.配置CAS服务器的票据生成和验证方式。
CAS服务器会生成一个票据(Ticket)并返回给客户端应用程序,客户端应用程序在后续请求中需要解析和验证该票据。
cas 解决方案

cas 解决方案
《CAS 解决方案:实现单点登录和跨域访问控制》
在当今互联网时代,随着企业应用的多样化和复杂化,用户需要频繁地登录各种不同的应用系统,这不仅增加了用户的操作负担,也增加了企业管理的难度。
为了解决这一问题,CAS (Central Authentication Service,中央认证服务)应运而生。
CAS 是一种开源的认证解决方案,它利用单点登录(SSO)
技术,使用户只需登录一次,就能访问所有经过 CAS 认证的
应用系统。
CAS 还提供了跨域访问控制的能力,可以有效地
保护用户的隐私和数据安全。
CAS 解决方案的主要特点包括:
1. 单点登录:CAS 实现了统一认证和访问控制,用户只需登
录一次,就可以访问所有经过 CAS 认证的应用系统。
这大大
增加了用户的便利性和操作效率。
2. 跨域访问控制:CAS 可以在不同的域之间实现安全的用户
认证和访问控制,保护用户的隐私和数据安全。
3. 开放源代码:CAS 是一个开源的项目,可以根据企业的实
际需求进行定制和扩展,适用性广泛。
在实际应用中,CAS 解决方案已经被广泛应用于教育、金融、医疗、电子商务等各个行业,为用户提供了便利的应用访问体验,同时也提高了企业的管理效率和数据安全。
可以说,CAS 解决方案已成为企业实现数字化转型和信息化建设的关键技术之一。
总的来说,CAS 解决方案不仅满足了用户和企业的需求,还
推动了互联网领域的技术创新和发展。
相信随着互联网和移动互联网的不断发展,CAS 解决方案将会在更多领域得到应用,为用户和企业带来更多的价值和便利。
Alfresco介绍

Alfresco能做什么呢?Alfresco说自己是一个“全集成的解决方案”基本内容:•资料管理(Document Management)•Web内容管理(Web Content Management)•合作与协作(Collaboration)•内容平台和仓库(Content Platform and Repository)•Content Management Interoperability Services (内容管理互操作服务-CMIS)•Records 管理•Image Management资料管理(Document Management)一些很贵的也很复杂的企业资料管理系统(ECM)已经不少了。
不过人们往往更习惯使用那些每天都用的简单的熟悉的工具Alfresco 资料管理(Document Management)在对内容的接受,共享和存储方面,可以更好的让用户使用自己常用的工具容易的建立自己的内容应用,包括检索和版本化管理等重要功能。
共享驱动器(Shared drive)Alfresco的资料库和一个共享在网络上的驱动器一样。
你可以保留使用任何你知道的或者喜欢的编辑工具来编辑资料。
从Microsoft Office 到Open Office, Dreamweaver 或者 AutoCAD,而不用安装其他的程序或者需要重新学习。
无论是自己还是公司需要的功能都可以满足,包括存储,版本化管理,共享,检索和审计。
对MS Office的集成(Integration with Microsoft Office)Alfresco集成了MS Office 和 Open Office。
所以你可以一如既往的使用你自己的office环境,在不需要再学习的情况下,你和你的公司就可以得到存储,版本化管理,共享,检索和很简单的就集成了工作流的审计功能。
为资料应用建立各种规则(Rules for content applications)Alfresco把简单共享的驱动器放到一个虚拟的文件系统中,在这里,你用简单的向导就可以创建一个你需要的资料管理应用。
Alfresco内容管理仓库连接与操作说明说明书

Package‘alfr’October12,2022Type PackageTitle Connectivity to'Alfresco'Content Management RepositoriesVersion1.2.1Author Roy Wetherall<********************>Maintainer Roy Wetherall<********************>Description Allows you to connect to an'Alfresco'content management repository and interact with its contents using simple and intuitive functions.You will be able to establish a connec-tion session to the'Alfresco'repository,read and upload content and manage folder hierarchies.For more details on the'Alfresco'con-tent management repositorysee<https:///ecm-software/document-management>.Depends R(>=3.5.0)License GPL-3|file LICENSEURL https:///rwetherall/alfr,https://rwetherall.github.io/alfr/BugReports https:///rwetherall/alfr/issuesEncoding UTF-8LazyData trueRoxygenNote6.1.1Imports httr,jsonlite,magrittr,stringrSuggests devtools,httptest,roxygen2,testthat,knitr,rmarkdown,covr,remotes,spelling,fsVignetteBuilder knitrSystemRequirements Alfresco Content Repository(Community orEnterprise)Language en-USNeedsCompilation noRepository CRANDate/Publication2019-07-1904:30:04UTC12alfr R topics documented:alfr (2)alf_node (3)alf_node.delete (4)alf_node.new (5)alf_session (7)alf_session.invalidate (8)alf_session.is_valid (9)Index10 alfr alfr:A package for connecting with AlfrescoDescriptionThe alfr package provides a way to connect to Alfresco and interact with the contents of the repository.Session•alf_session-connection session to an Alfresco repository•alf_session.is_valid-determine whether the session connection to an Alfresco repository is still valid•alf_session.invalidate-invalidates a session so it can no longer use used to connect to an Alfresco repositoryNodes•alf_node-get the details of a folder or content node•alf_node.new-creates a new folder or content node•alf_node.delete-deletes a folder or content nodeAuthor(s)Roy Wetherall<********************>alf_node3 alf_node Get Alfresco nodeDescriptionGets the details of an Alfresco repository node matching node_id or,if provided,the node at relative_path relative to node_id.Usagealf_node(session,node_id="-root-",relative_path=NULL)Argumentssession valid Alfresco repository sessionnode_id node id,defaults to-root-relative_path relative path from node_id to required node,defaults to NULLValueNode detailsExamples#try to establish a connection to the alfresco content repositorymy_session<-tryCatch(alf_session("http://localhost:8080","admin","admin"),error=function(e)NULL)if(!is.null(my_session)){#create documentmy_new_document<-alf_node.new(my_session,node_id="-root-",list(name="example.txt",nodeType="cm:content",relativePath="example"))#upload contentmy_new_document$content$update(system.file("extdata","sample.txt",package="alfr"))#get details of document nodemy_document<-alf_node(my_session,relative_path="example/example.txt")#output the name of the documentprint(my_document$name)4alf_node.delete #output the details of documents contentprint(my_document$content$mime_type)print(my_document$content$mime_type_name)print(my_document$content$size)print(my_document$content$encoding)#read document contentmy_content_file<-file(my_document$content$as.file(),"r")my_content<-readLines(my_content_file)close(my_content_file)print(my_content)#upload new contentmy_updated_document<-my_document$content$update(system.file("extdata","modified_sample.txt",package="alfr"))#print updated content sizeprint(my_updated_document$content$size)#delete documentalf_node.delete(my_session,my_document$id)}alf_node.delete Deletes an Alfresco nodeDescriptionDeletes an Alfresco node identified by node_id.If the node is a folder then all the delete recurses through the primary children.Usagealf_node.delete(session,node_id,permanent=FALSE)Argumentssession valid Alfresco repository sessionnode_id node id to deletepermanent indicates whether the node is permanently deleted or places in the trashcan where where it can be recovered from.FALSE by default.Examples#try to establish a connection to the alfresco content repositorymy_session<-tryCatch(alf_session("http://localhost:8080","admin","admin"),error=function(e)NULL)if(!is.null(my_session)){#create documentmy_new_document<-alf_node.new(my_session,node_id="-root-",list(name="example.txt",nodeType="cm:content",relativePath="example"))#upload contentmy_new_document$content$update(system.file("extdata","sample.txt",package="alfr"))#get details of document nodemy_document<-alf_node(my_session,relative_path="example/example.txt") #output the name of the documentprint(my_document$name)#output the details of documents contentprint(my_document$content$mime_type)print(my_document$content$mime_type_name)print(my_document$content$size)print(my_document$content$encoding)#read document contentmy_content_file<-file(my_document$content$as.file(),"r")my_content<-readLines(my_content_file)close(my_content_file)print(my_content)#upload new contentmy_updated_document<-my_document$content$update(system.file("extdata","modified_sample.txt",package="alfr"))#print updated content sizeprint(my_updated_document$content$size)#delete documentalf_node.delete(my_session,my_document$id)}alf_node.new Create a new Alfresco nodeDescriptionCreates a new Alfresco repository node as a child of node_id.Usagealf_node.new(session,node_id,node_details)Argumentssession valid Alfresco repository sessionnode_id node idnode_details details of new nodeValuenode detailsExamples#try to establish a connection to the alfresco content repositorymy_session<-tryCatch(alf_session("http://localhost:8080","admin","admin"),error=function(e)NULL)if(!is.null(my_session)){#create documentmy_new_document<-alf_node.new(my_session,node_id="-root-",list(name="example.txt",nodeType="cm:content",relativePath="example"))#upload contentmy_new_document$content$update(system.file("extdata","sample.txt",package="alfr"))#get details of document nodemy_document<-alf_node(my_session,relative_path="example/example.txt") #output the name of the documentprint(my_document$name)#output the details of documents contentprint(my_document$content$mime_type)print(my_document$content$mime_type_name)print(my_document$content$size)print(my_document$content$encoding)#read document contentmy_content_file<-file(my_document$content$as.file(),"r")my_content<-readLines(my_content_file)close(my_content_file)print(my_content)alf_session7 #upload new contentmy_updated_document<-my_document$content$update(system.file("extdata","modified_sample.txt",package="alfr"))#print updated content sizeprint(my_updated_document$content$size)#delete documentalf_node.delete(my_session,my_document$id)}alf_session Get connection session to Alfresco content repositoryDescriptionValidates authentication details with Alfresco content repository,returning ticket,server details and endpoints if successful.Usagealf_session(server,username,password)Argumentsserver Alfresco server URLusername user namepassword passwordValueConnection session to Alfresco repositoryExamples#try to establish a connection to the alfresco content repositorymy_session<-tryCatch(alf_session("http://localhost:8080","admin","admin"),error=function(e)NULL)if(!is.null(my_session)){#output session informationprint(paste("Session:[ticket=",my_session$ticket,",server=",my_session$server,"]",sep=""))#verify that the session is validif(alf_session.is_valid(my_session))print("Session verified as valid.")#invalidate the session so that it can no longer be usedalf_session.invalidate(my_session)}alf_session.invalidateInvalidates a session.DescriptionInvalidates a valid session so it can no longer be used to connect to an Alfresco repository.Usagealf_session.invalidate(session)Argumentssession sessionValueTRUE if session has been successfully invalidated,FALSE if session was already invalid.Examples#try to establish a connection to the alfresco content repositorymy_session<-tryCatch(alf_session("http://localhost:8080","admin","admin"),error=function(e)NULL)if(!is.null(my_session)){#output session informationprint(paste("Session:[ticket=",my_session$ticket,",server=",my_session$server,"]",sep="")) #verify that the session is validif(alf_session.is_valid(my_session))print("Session verified as valid.")#invalidate the session so that it can no longer be usedalf_session.invalidate(my_session)}alf_session.is_valid Determine whether a session is valid.DescriptionDetermines whether a given session is still valid or not.Usagealf_session.is_valid(session)Argumentssession sessionValueTRUE if the session is valid,FALSE otherwiseExamples#try to establish a connection to the alfresco content repositorymy_session<-tryCatch(alf_session("http://localhost:8080","admin","admin"),error=function(e)NULL)if(!is.null(my_session)){#output session informationprint(paste("Session:[ticket=",my_session$ticket,",server=",my_session$server,"]",sep="")) #verify that the session is validif(alf_session.is_valid(my_session))print("Session verified as valid.") #invalidate the session so that it can no longer be usedalf_session.invalidate(my_session)}Indexalf_node,2,3alf_node.delete,2,4alf_node.new,2,5alf_session,2,7alf_session.invalidate,2,8alf_session.is_valid,2,9alfr,2alfr-package(alfr),210。
alfresco知识库管理系统用户使用手册

alfresco知识库管理系统用户使用手册目录【名词解释】 21、alfresco知识库管理系统 22、站点 23、文档 34、知识 35、内容 36、标记 3【其它说明】 41、查找内容的3个主要方法 4一、管理系统登陆 41、系统登录 42、界面简介 5二、个人档案管理 61、编辑个人档案 62、更改密码 7三、站点使用说明 81、访问站点 82、”站点“界面简介 83、”文档库“功能说明 94、”维基“功能说明 10四、存储库使用说明 12五、搜索使用说明 131、快速搜索 132、条件搜索 133、关键词组合搜索 14【名词解释】1、alfresco知识库管理系统Alfresco是一款开源的企业内容管理系统,可以为企业提供文档和知识管理的版本控制、移动访问、协同工作等多种功能。
Alfresco支持全文检索,用户使用简单,Alfresco是目前应用最广泛的开源企业知识管理系统,先后有超过500万次的下载,7.4万个社区成员。
我们的财务共享中心知识库管理系统,就是用该软件搭建的。
2、站点站点是存放企业内容的基础。
我们把站点视为仓库,内容视为物资,不同的物资存放在不同的仓库中,比如我们把粮食放在一个仓库中,把矿石放在另外一个仓库中。
站点的作用就是存放特定的内容,并限定访问的用户。
比如目前我们财务知识库的3个站点中,SSC知识库就是存放财务中心的内容,财务中心员工可以访问这些内容;其它2个站点存放的是地市州财务人员相关的内容。
3、文档包括数据库中的信息、企业的各种文档、报表、账单、网页、图片、传真,甚至多媒体音频、视频等等各种电子信息载体。
在我们的知识库系统中,”文档“具体指存放在站点下的”文档库“中的文件。
4、知识知识通常指通过学习、实践或探索所获得的认识、判断或技能。
在我们的知识库系统中,”知识“具体指存放在站点下的”维基“中的文件。
”知识“是基于文档提炼、总结的精华经验,可以通过查看”知识“文章来更快、更好地获取相关信息。
alfresco流程设计

alfresco流程设计
Alfresco的流程设计可以通过以下步骤完成:
1.定义流程:根据业务需求,定义所需的业务流程,可以使用Alfresco的流程设计工具进行可视化设计,也可以通过编写代码的方式实现。
2.创建任务节点:在流程中创建任务节点,并为每个任务节点分配相应的责任人或角色。
3.设置流转规则:根据流程的逻辑关系,设置流程的流转规则,包括前一个任务节点的结束条件、后一个任务节点的触发条件等。
4.配置表单:为每个任务节点配置相应的表单,表单的内容可以根据实际需求进行定制。
5.部署流程:将设计好的流程部署到Alfresco服务器上,并启动流程实例。
6.测试流程:通过模拟实际业务场景,测试流程是否符合预期,并对不符合预期的地方进行调整和优化。
7.发布流程:经过测试和验证后,将流程正式发布到生产环境中,供实际业务使用。
Alfresco支持LDAP验证

Alfresco支持LDAP验证这里说的活动目录指的是公司内的AD服务器。
希望能通过AD账户来访问Alfresco网站并设置相应的权限。
根据alfresco的官方做法,需要配置一个验证链。
首先用alfrescoNtlm来提供Ntlm验证功能;其次用passthru子系统把用户提供的用户名和密码转交给AD服务器进行验证;最后加上一个ldap-ad在alfresco和AD其同步账户。
创建子系统配置文件这里有三个子系统,分别是alfrescoNtlm,passthru和ldap-ad。
验证链首先要在alfresco-global.properties里声明验证链验证链的声明格式如下:authentication.chain=id1:type1,id2:type2......idn:typen所以需要加入以下验证链:authentication.chain=alfrescoNtlm1:alfrescoNtlm,passthru1: passthru,ldap1:ldap-ad验证链的第一个一定要声明alfrescoNtlm,后面两个一个用来验证的,一个是用来同步的,所以顺序没有关系。
配置文件新建以下三个目录tomcat/webapps/alfresco/WEB-INF/classes/alfresco/extension/subsystems/Authentication/afres coNtlm/alfrescoNtlm1tomcat/webapps/alfresco/WEB-INF/classes/alfresco/extension/subsystems/Authentication/pass thru/passthru1tomcat/webapps/alfresco/WEB-INF/classes/alfresco/extension/subsystems/Authentication/ldap -ad/ldap1再把相应验证子系统中的properties文件拷贝到目录里,tomcat/webapps/alfresco/WEB-INF/classes/alfresco/extension/subsystems/Authentication# ls -R.:alfrescoNtlm ldap-ad passthru./alfrescoNtlm:alfrescoNtlm1./alfrescoNtlm/alfrescoNtlm1:alfresco-authentication.properties ntlm-filter.properties./ldap-ad:ldap1./ldap-ad/ldap1:ldap-ad-authentication.properties./passthru:passthru1./passthru/passthru1:ntlm-filter.properties passthru-authentication-context.propertiesalfrescoNtlmntlm-filter.propertiesntlm.authentication.sso.enabled=falsentlm.authentication.mapUnknownUserToGuest=falsentlm.authentication.browser.ticketLogons=truealfresco-authentication.propertiesalfresco.authentication.allowGuestLogin=falsealfresco.authentication.authenticateCIFS=falsepassthruntlm-filter.propertiestlm.authentication.sso.enabled=false^Mntlm.authentication.mapUnknownUserToGuest=false^Mntlm.authentication.browser.ticketLogons=truepassthru-authentication-context.propertieseLocalServer=falsepassthru.authentication.domain= passthru.authentication.servers=192.168.1.5passthru.authentication.guestAccess=falsepassthru.authentication.defaultAdministratorUserNames=2023 #Timeout value when opening a session to an authentication server, in milliseconds passthru.authentication.connectTimeout=5000 #Offline server check interval in seconds passthru.authentication.offlineCheckInterval=300passthru.authentication.protocolOrder=NetBIOS,TCPIP passthru.authentication.authenticateCIFS=truepassthru.authentication.authenticateFTP=trueldap-adldap-ad-authentication.properties# This flag enables use of this LDAP subsystem for authentication. It may be# that this subsytem should only be used for synchronization, in which case# this flag should be set to false.ldap.authentication.active=false## This properties file brings together the common options for LDAP authentication rather than editing the bean definitions #ldap.authentication.allowGuestLogin=false#How to map the user id entered by the user to taht passed through to LDAP# In Active Directory, this can either be the user principal name (UPN) or DN.# UPNs are in the form @domain and are held in the userPrincipalName attribute of a usererNameFormat=%**************# The LDAP context factory to useldap.authentication.java.naming.factory.initial=com.sun.jndi. ldap.LdapCtxFactory# The URL to connect to the LDAP serverldap.authentication.java.naming.provider.url=ldap://192.168 .1.5:389# The authentication mechanism to use for password validationldap.authentication.java.naming.security.authentication=sim ple# Escape commas entered by the user at bind time# Useful when using simple authentication and the CN is part of the DN and contains commasldap.authentication.escapeCommasInBind=false# Escape commas entered by the user when setting the authenticated user# Useful when using simple authentication and the CN is part of the DN and contains commas, and the escaped \, is # pulled in as part of an LDAP sync# If this option is set to true it will break the default home folder provider as space names can not contain ldap.authentication.escapeCommasInUid=false# Comma separated list of user names who should beconsidered administrators by defaultldap.authentication.defaultAdministratorUserNames=admin istrator# This flag enables use of this LDAP subsystem for user and group# synchronization. It may be that this subsytem should only be used for# authentication, in which case this flag should be set to false.ldap.synchronization.active=true# The authentication mechanism to use for synchronization ldap.synchronization.java.naming.security.authentication=si mple# The default principal to bind with (only used for LDAP sync). This should be a UPN or DNldap.synchronization.java.naming.security.principal=adminis *******************# The password for the default principal (only used for LDAP sync)ldap.synchronization.java.naming.security.credentials=pass word# If positive, this property indicates that RFC 2696 paged results should be# used to split query results into batches of the specified size. This# overcomes any size limits imposed by the LDAP server.ldap.synchronization.queryBatchSize=1000# If positive, this property indicates that range retrieval should be used to fetch# multi-valued attributes (such as member) in batches of the specified size.# Overcomes any size limits imposed by Active Directory.ldap.synchronization.attributeBatchSize=1000# The query to select all objects that represent the groups to import.ldap.synchronization.groupQuery=(objectclass\=group)# The query to select objects that represent the groups to import that have changed since a certain time.ldap.synchronization.groupDifferentialQuery=(&(objectclas s\=group)(!(modifyTimestamp<\={0})))# The query to select all objects that represent the users to import.ldap.synchronization.personQuery=(&(objectclass\=user)(u serAccountControl\:1.2.840.113556.1.4.803\:\=512))# The query to select objects that represent the users to import that have changed since a certain time.ldap.synchronization.personDifferentialQuery=(&(objectclas s\=user)(userAccountControl\:1.2.840.113556.1.4.803\:\=512)(!(modif yTimestamp<\={0})))# The group search base restricts the LDAP group query to a sub section of tree on the LDAP server.ldap.synchronization.groupSearchBase=DC\=Domain,DC\=l ocal# The user search base restricts the LDAP user query to a sub section of tree on the LDAP server.erSearchBase=DC\=Domain,DC\=lo cal# The name of the operational attribute recording the last update time for a group or user.ldap.synchronization.modifyTimestampAttributeName=modifyTimestamp# The timestamp format. Unfortunately, this varies between directory servers.ldap.synchronization.timestampFormat=yyyyMMddHHmms s'.0Z'# The attribute name on people objects found in LDAP to use as the uid in AlfrescoerIdAttributeName=sAMAccountNa me# The attribute on person objects in LDAP to map to the first name property in AlfrescoerFirstNameAttributeName=givenN ame# The attribute on person objects in LDAP to map to the last name property in AlfrescoerLastNameAttributeName=sn# The attribute on person objects in LDAP to map to the email property in AlfrescoerEmailAttributeName=mail# The attribute on person objects in LDAP to map to the organizational id property in AlfrescoerOrganizationalIdAttributeName=c ompany# The default home folder provider to use for people created via LDAP importldap.synchronization.defaultHomeFolderProvider=userHom esHomeFolderProvider# The attribute on LDAP group objects to map to the authority name property in Alfrescoldap.synchronization.groupIdAttributeName=cn# The attribute on LDAP group objects to map to the authority display name property in Alfrescoldap.synchronization.groupDisplayNameAttributeName=dis playName# The group type in LDAPldap.synchronization.groupType=group# The person type in LDAPldap.synchronization.personType=user# The attribute in LDAP on group objects that defines the DN for its membersldap.synchronization.groupMemberAttributeName=membe r# If true progress estimation is enabled. When enabled, the user query has to be run twice in order to count entries.ldap.synchronization.enableProgressEstimation=true注意事项•所有的配置更改后都必须重启服务•ldap-ad中的验证功能必须关闭,否则和passthru冲突•AD的UPN是%**************。
Alfresco安装手册
此文档以Alfresco Community Edition 4.2.f + MySQL 5.5.38为例以图解的方式向您说明了如何安装Alfresco。
一、环境介绍✧Windows 7 旗舰版64位操作系统✧alfresco-community-4.2.f-installer-win-x64.exe✧mysql-5.5.38-winx64.exe✧Navicat_for_MySQL_10.1.7.exe二、Alfresco安装1、下载Alfresco安装程序,这里我们选择下载的是alfresco-community-4.2.f-installer-win-x64.exe安装程序;☞下载地址为:/projects/alfresco/files/2、点击如下图所示的Alfresco安装程序;3、在下图所示的引导安装界面中选择安装语言,这里我们选择“Simplified Chinese- 简体中文”,然后点击“OK”按钮,进入到下一步:4、在下图所示的引导安装界面中点击“前进 >”按钮,进入到下一步:5、在下图所示的引导安装界面中选择“高级”,然后点击“前进 >”按钮进入到下一步:6、在下图所示的引导安装界面中取消选中PostgreSQL选项,然后点击“前进 >”按钮,进入到下一步:7、在下图所示的引导安装界面中将C:\Alfresco改为C:\AlfrescoCE4.2.f,然后点击“前进 >”按钮进入到下一步:8、在下图所示的引导安装界面中依次输入以下内容,然后点击“前进 >”按钮进入到下一步:JDBC URL:jdbc:mysql://localhost:3306/alfrescoce4.2.f?useUnicode=yes& characterEncoding=UTF-8JDBC驱动程序:org.gjt.mm.mysql.Driver数据库名称:alfrescoce4.2.f用户名:root密码:root验证:root9、在下图所示的引导安装界面中点击“前进 >”按钮进入到下一步:10、在下图所示的引导安装界面中点击“前进 >”按钮进入到下一步:11、在下图所示的引导安装界面中点击“前进 >”按钮进入到下一步:12、在下图所示的引导安装界面中输入“管理密码”和“确认密码”,例如123456,然后点击“前进 >”按钮进入到下一步:13、在下图所示的引导安装界面中点击“前进 >”按钮进入到下一步:14、在下图所示的引导安装界面中点击“前进 >”按钮进入到下一步:15、在下图所示引导安装界面中点击“前进 >”按钮进入到下一步:16、在下图所示的引导安装界面中点击“前进 >”按钮进入到下一步:17、最后静静地等待Alfresco安装完成:18、但也不要忘了将MySQL JDBC Driver拷贝到C:\Alfrescoce4.2.f\tomcat\lib目录下。
辛普西亚商务端云端门户用户指南说明书
Scholastic Oracle Cloud Supplier Portal User GuideTable of ContentsIntroduction to the Supplier Portal (3)What is the Supplier Portal? (3)Navigating the Supplier portal (3)Logging in (3)Homepage Navigation (4)Notifications (5)Overview Menu (6)Summary Tab (6)Orders Tab (7)Schedules (8)Negotiations Tab (9)Request for Quote (RFQ) (10)Receiving an Invite for a Negotiation (10)Viewing the RFQ (10)Creating a Response (12)Award Decision (18)Purchase Orders (PO) (20)PO Notification (20)Review PO Details (21)Acknowledge a PO (22)Enter/Revise a Promised Ship Date for a Schedule (24)Manage Schedules (26)Order Life Cycle (27)Invoices (29)Create and Submit an Invoice (29)Miscellaneous Charges (33)Create Invoice without PO (34)View Invoices (36)View Payments (37)Supplier Preferences (39)Introduction to the Supplier PortalWhat is the Supplier Portal?The Scholastic Supplier Portal is a secure, web-based workspace that provides our vendors with full visibility to Scholastic transactions, including request for quotations (RFQ), purchase orders, and invoices.The Supplier Portal plays a key role in Scholastic’s Or acle ERP transformation, as this tool helps improve communication with our suppliers by automating and streamlining the source-to settleprocess.Navigating the Supplier portalLogging inOnce your password has been set, click on the “Oracle Fusion Prod” icon to reach the Supplier Portal home page.Once your password has been set, log in on the home pageHomepage NavigationOn the home page, click on the Supplier Portal icon to open the “Overview” page.NotificationsAt the top right corner of the home page, a bell icon will display your pending notifications. This includes new purchase orders pending acknowledgement as well as invitations to a negotiation.Note: Clicking on the notification brings you to the PO or Negotiation in questionOverview MenuThe overview page provides a snapshot into Scholastic’s most recent transact ions as well as anything requiring attention.Summary TabWorklist: A list of all pending notifications sent to the current supplier user. These are the same notifications found in the bell at the top of the page. Please note that most notifications willalso be sent via email.Watch list: Contains a set of saved searches which display counts of urgent or recenttransactions, possibly requiring action, such as Orders Pending Acknowledgment. Clicking awatch list entry navigates direct to the screen so that user can begin working on the transactions immediately.Contains the header detail of our purchase orders. The header contains the PO issued date andthe total $ amount ordered. The item level detail, quantity, and ship-to locations can be foundin “Schedules”.Orders with Recent Activity: A list of orders that have been Opened, Changed, or Canceledwithin the last week. This date can be manually changed to display more or less orders. Indicates an orderhas been cancelledA purchase order “Schedule” contains the quantity, ship-to location, and promised ship date.An order with a ship date in the past is highlighted with an alert. Schedules must be kept up todate. The promised ship dates that you provide are visible for everyone at Scholastic.At the bottom, “Recent Receipts” will list all purchase order schedules received within the lastweek.Indicates a promisedship date is past dueNegotiations TabRequest for Quotation (RFQ) transactions that the supplier is involved in or is invited to by Scholastic. It provides a quick summary to easily monitor the status and responses.Request for Quote (RFQ)Receiving an Invite for a NegotiationThe Scholastic Sourcing group has the ability to invite vendors to bid on projects through theSupplier Portal. If your organization is invited to a negotiation, you will receive an email as well as a notification in the Supplier Portal.The email invitation will include a PDF overview of the project. There is also a link that will take you directly to the RFQ in the Supplier Portal.Viewing the RFQYou can view the RFQ by clicking on the link the email notification. Another option is to go to the Supplier Portal and navigate to the Negotiations tab. Click on the negotiation number inquestion.This will bring up the RFQ cover page with the time remaining to respond displayed. On the left hand side of the RFQ, you will see links to the different components of the RFQ.Click on the Overview link. This will bring up the Overview page, which has key dates tied to the RFQ. On the right hand side, you will find attachments to the RFQ. The attachment will have the requirements for the RFQ along with instructions, quantities, and any other relevant information.Click on the Lines link. This will bring up the line items tied to the RFQ. In some cases, due to complex requirements, there will be one placeholder line visible with the advanced requirements included in an attachment.Creating a ResponseWhen you decide to bid on an RFQ, you must first acknowledge that you will participate. You can do this from the Negotiations dashboard by scrolling to the “Open Invitations” section. Highlight the negotiation, and click on the Acknowledge Participation button.This will bring up the Acknowledge Participation popup. You can select Yes or No, and enter a comment to the Scholastic buyer.At this point, if you refresh the Negotiations dashboard, you will see YES listed in the ‘Will Participate’ column. You can create your response by highlighting the Negotiation and clicking on the Create Response button.Another way to create a response is to open the RFQ and click on the Create Response button on the upper right hand sideThis will bring up the response page. Enter the quote expiration date, an internal quote number if you have one, and any notes to the buyer. You can also attach any correspondence by clicking on the + sign next to Attachments.You can attach more than one file by clicking on the + sign.Once you attach a file, it will show up on the main screen. You can remove the attachment by clicking on the X next to the file name. Hit Save and then Next.This will bring you to the “Lines” screen. Enter unit costs for the lines along with a Promised Ship Date.For most negotiations, the Scholastic buyer will give the supplier an option to create your own line by clicking on the + sign under Create Alternate. This is especially useful if you want to incorporate a unique idea or proposal.On the Alternate Line screen, you are required to enter a description, response price, and response quantity. You can enter a note to the buyer and also attach files to the alternate line.After hitting Save and Close, the alternate line will be added to the RFQ response.Hit Save and Next. This will bring you to the Review screen, where you can view the response as a whole. There are tabs for the Overview and Lines. When you are ready to submit the response to Scholastic, hit Submit.You will receive confirmation that the response was submitted.Award DecisionAfter the Scholastic buyer receives all bids, they will award either the whole job, or part of the job.If you are selected, you will receive an email notification as well as an Oracle notification confirming which lines of the negation were awarded to you. If you are not selected, it’s up to the Scholastic buyer if they want to inform the suppliers systematically that were not selected. You would receive a similar alert, but t he awarded lines amount will be “0”.Clicking on the notification will bring up the award decision. In the screenshot below, one line was awarded.Here is a screenshot of an award decision where nothing was awarded:Another way to view the outcome of the RFQ is to go to the Negotiations home screen. Scroll down to Completed Negotiations. The little green circle with a check mark indicates that the bid was awarded, while the note “No award” in the amount signifies that your bid was not accepted.Purchase Orders (PO)PO NotificationWhen a Scholastic purchase order is issued, you will receive an email notification with a PDFattachmentIf an acknowledgment is required, the email subject will include “Requires Acknowledgment”. A notification alert will also be displayed at the top of Supplier Portal to note an action is required.When a “R evised” PO is received, the email subject will include the “Revision #”Review PO DetailsOpen the attachment in the email to view a PDF of the purchase order. Additionally, on the “Orders” overview tab in the Supplier Portal, all recent PO’s will be listed under “Opened”. You will have the option of viewing a PDF, opening the order for acknowledgment, as well as updating the order with a confirmed promised ship date.Acknowledge a POSome Scholastic POs will require a supplier acknowledgment within the Portal. The PO will not be considered “open” until the Supplier completes the acknowledgment process. If a PO requires acknowl edgment, the email subject will note “Requires Acknowledgement”. You can acknowledge the PO from the link in the email or log into the supplier portal and click on the “Pending Acknowledgment” link in the Watch list.Note: A notification alert will pop-up as well as a task in the “Work list”. While both of these serve as links to the PO, it is suggested to acknowledge an order by using the link in the “Watch List”, as this method is most efficient.A “Manage Orders” screen will be displayed with all orders pending acknowledgement. Click on an order #.The PO header and details will be displayed. At the top right of the screen, select the “Acknowledge PO” button.You may need to acknowledge both the order (under “Terms”) and each Schedule line. You are given the option to “Accept” or “Reject”. Please only “Accept” the PO using this process. If there is something wrong with the order, please reach out to your Scholastic buyer via email or phone.In the top right hand corner, hit “Submit”Then hit “OK” and “Done” to close out of the order.The acknowledgment has been sent back to Scholastic and the order status is now “Open”.Enter/Revise a Promised Ship Date for a ScheduleOn every order, we send a “Requested Ship Date”. We expect that every supplier will respond with a “Promised Ship Date” confirming when you can ship. These dates are loaded into the Scholastic system for reporting purposes, so it’s i mportant that they are populated for every order and kept up to date.From the “Orders” or “Schedules” tab, select an order to edit:This brings you to the PO screen. The top part contains the PO header information with your supplier information. The “Lines” and Schedules” tabs at the bottom contain the PO detail.In the previous screenshot, the requested ship date is 4/26/18. However, the promised ship date is blank. In order to enter a new promised ship date or revise an existing promised ship date, click the “Actions” button on the top right of the screen and select “Edit”.A warning message pops up to confirm that any action will create a change order. Click “Yes”.In the “Schedules” tab, enter a new promised ship date and a change reason if applicable.Enter a description of the change order you made at the top o f the PO and then hit “Submit”.Note: Hitting “Save” will save your work, but will not send the updated date back to Scholastic. You must select “Submit”.After hitting “submit”, a popup message confirms that your changes have been sent to Scholastic. We will reach out to you with any questions.Manage SchedulesTo search and view all orders and schedules, select the task button while in the Overview screen in the supplier portalIt opens up a tab on the right side with a number of options. Under “Orders”, select “Manage Schedules”.The Manage Orders screen allows you to search all PO Schedules, open or closed. The default search is “All”, but you can search using a number of parameters, as well as setup custom searches. You can also easily tell which schedules don’t have a “Promised Ship Date” by sorting the field. In fact, all of the fields are sortable.Order Life CycleWhen you select a PO to view or edit, the “Order Life Cycle” graph can be found on the top right of the screen. It is a graphical view of the dollar amount ordered, received, delivered, and invoiced. Select “View Details” for additional information.The Order Life Cycle now displays a complete order summary including in-transit shipment information (pulled in from our OTM module), receipt dates, and invoice status.InvoicesCreate and Submit an InvoiceThe Scholastic Supplier Portal allows you to submit invoices directly to Scholastic. Processing your invoices through the supplier portal will increase the speed that your payment isprocessed. In the task list, select “Create Invoice”.In the “Create Invoice” section, s elect an order from the “Identifying PO” drop down list. This will populate most of the fields. Then enter y our internal “Invoice Number” and today’s date.In the “Items” section, hit the “Select and add” button to choose the PO lines you’d like to add to the invoice.Select the line(s) and hit “Apply”.Then hit “OK”. The item(s) has been added to the invoice.In the quantity field, enter the shipped quantity.Note: This version of Oracle Cloud does not allow overage to be invoiced. Theinvoiced quantity cannot exceed the order quantity. We are working with Oracle to correct this in a future release. For now, please work with the buyer to revise the PO when the shipped quantity exceeds the ordered amount, or add the overage amount as a miscellaneous cost under “Shipping and Handling” at the bottom of the invoice.In the Location of Final Discharge, enter the tax Province to capture the correct tax code.Once all the line items have been added to the Invoice, click on the Calculate Tax Button. Your taxes should now be calculated on the Invoice.Note: if you calculate tax after only one line item is picked, it will not work on anysubsequent line items.Miscellaneous ChargesHit the “Add” button under “Shipping and Handling” and select “Miscellaneous”. Enter an amount and descriptionNote: Freight is not a viable option as all of our shipments should route through the Scholastic Logistics group via the OTM system.Hit “Submit” to send the invoice to ScholasticA pop-up message will confirm that the invoice has been submittedCreate Invoice without POFor services completed where a Scholastic PO wasn’t issued, please submit an invoice using the “Create Invoice without PO”.On the invoice header, enter your invoice number, today’s date, and attach any pertinent documents. You must also enter the email address of the buyer at Scholastic who will receive and approve the invoice.Must be TODAYS DATEFor the invoice details, hit the + icon to add a line. Select a ship to and Location of Final Discharge, enter an amount and a description of the services provided.To add taxes, hit the “Calculate Tax” button.Note: Location of Final Discharge much be populated in order to calculate taxes on the invoice.Add miscellaneous charges at the bottom under “Shipping and Handling”.Hit “Submit” at the top of the screen and you’ll receive a confirmation message that your invoice has been submitted.To search for all submitted invoices, o n the Task Menu, select “View Invoices”Select your “Supplier” name, and hit search. You can use the fields to narrow your search as well as create custom searches. You can see the Invoice Status, as well as a Payment Number to confirm that a payment has been made against your invoice. Please note that all of these columns can be sorted.To search for invoice payment status, on the Task Menu, select “View Payments”Select your “Supplier” name, and hit search. You can use the fields to narrow your search as well as create custom searches. You can also see the payment status to confirm that a payment has been made. Select a “Payment Number” to see the complete detai ls of the payment.Complete payment detail will be displayedSupplier PreferencesOn the home page, select “Set Preferences”Select “Regional” in the General Preferences list to review the option to update your date and time format, preferred number format, primary currency, and time zone.Select “Save and Close” when finished.Select “Language” to change the primary language of the website. The default is “American English”。
CAS整合LDAP实现单点登录学习笔记

SJTUCrushing Blow ——CAS整合LDAP实现单点登录学习笔记Solomon leo********************8/15/2010目录Contents目录 (1)1单点登录 (2)2 CAS (3)2.1 JA-SIG(CAS)的设计愿景 (3)2.2 CAS1.0服务架构实现 (3)2.3 CAS服务的具体实现 (4)2.4代理认证Proxy Authentication (6)2.5 CAS2.0代理认证流程 (6)2.6 CAS2.0凭证 (7)3 LDAP (8)4 CAS整合LDAP配置过程 (9)4.1说明 (9)4.1 LDAP安装(A) (9)4.2 配置服务器(A) (10)4.3 配置客户端(B,业务服务器) (15)4.4关于CASTestClient和cas的说明 (16)5参考目录 (19)1单点登录什么是SSO(Single Sign On)单点登录?所谓单点登录是指基于用户/会话认证的一个过程,用户只需一次性提供凭证(仅一次登录),就可以访问多个应用。
目前单点登录主要基于Web的多种应用程序,即通过浏览器实现对多个B/S架构应用的统一账户认证。
2 CAS2.1 JA-SIG(CAS)的设计愿景CAS(Central Authentication Service – 中心认证服务)的目的就是使分布在一个企业内部各个异构系统的认证工作集中在一起,通过一个公用的认证系统统一管理和验证用户的身份。
在CAS上认证的用户将获得CAS颁发的一个证书,使用这个证书,用户可以在承认CAS证书的各个系统上自由穿梭访问,不需要再次的登录认证。
打个比方:对于加入欧盟的国家而言,在他们国家中的公民可以凭借着自己的身份证,在整个欧洲旅行,不用签证。
对于企业内部系统而言,CAS就是这个颁发欧盟认证的系统,其它系统都是加入欧盟的国家,它们要共同遵守和承认CAS的认证规则。
ssocas 原理
ssocas 原理
SSO(Single Sign On)即单点登录,是一种企业业务整合的解决方案,允许用户在多个应用系统中只需登录一次,就可以访问所有相互信任的应用系统。
CAS(Central Authentication Service)是一款为Web应用提供单点登录的开源框架。
CAS包含两个主要部分:
1.CAS Server:负责完成对用户的认证工作,需要独立部署,并处理用户名、密
码等凭证(Credentials)。
2.CAS Client:负责处理对客户端受保护资源的访问请求,当需要对请求方进行
身份认证时,它会重定向到CAS Server进行认证。
一旦认证成功,CAS Server会将用户名和密码放到session中,并添加一个证据,然后跳转到系统的主界面。
此后,客户端应用不再接受任何的用户名密码等Credentials。
CAS最基本的协议过程如下:
1.第一次登录系统,用户打开浏览器,通过地址请求受保护的资源。
2.CAS客户端会把请求自动的重定向到CAS服务器端。
3.CAS服务器端发现没有证据,就直接把CAS服务器的登录界面转到浏览器,
呈现给用户。
4.用户输入用户名和密码进行验证。
5.验证成功,CAS服务器会把用户名和密码放到session中,并添加一个证据,
然后跳转到系统的主界面。
通过这种方式,CAS实现了单点登录功能,简化了用户在多个系统之间的登录过程,提高了效率和便利性。
请注意,以上内容仅供参考,如需更详细的信息,建议查阅相关文献或咨询专业技术人员。
Alfresco使用教程
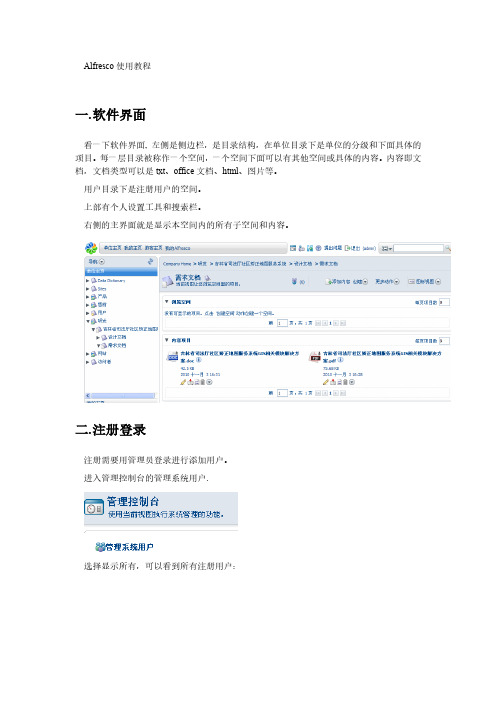
Alfresco使用教程一.软件界面看一下软件界面, 左侧是侧边栏,是目录结构,在单位目录下是单位的分级和下面具体的项目。
每一层目录被称作一个空间,一个空间下面可以有其他空间或具体的内容。
内容即文档,文档类型可以是txt、office文档、html、图片等。
用户目录下是注册用户的空间。
上部有个人设置工具和搜索栏。
右侧的主界面就是显示本空间内的所有子空间和内容。
二.注册登录注册需要用管理员登录进行添加用户。
进入管理控制台的管理系统用户.选择显示所有,可以看到所有注册用户:其中名称是显示名,用户名是登录名,主空间是用户空间,限额是自己空间的最大容量限制。
选择右上角的创建用户填入相应内容和限额,点右上角的下一步。
填入用户登录的用户名密码,空间名称,点击结束,一个用户就添加完毕了。
三.添加空间和内容1.添加空间如果此用户有在此空间下添加空间的权限,在创建里就会有这两项点击高级创建空间向导,选择从头开始。
选择文件夹空间在详细信息里输入空间名称,标题和描述,选择一个图标,点击结束。
一个空间就建立了。
如果直接点击创建空间,就会弹出上面的画面,默认建立的是文件夹空间。
如果新建的是论坛空间,在下面可以建立论坛论坛里可以新建主题和发表回复。
2.创建内容在线输入内容并保存。
四.添加内容注意,添加的所有内容会自动加入到版本管理里。
五.离线编辑文档1.在界面文档的按钮里选择“离线编辑”2.系统会弹出下载界面,并且自动弹出下载窗口。
把文档下载到本地。
3.在本地编辑文件并保存。
4.在工作界面,会看到此文件的工作副本文件,选择上传新版本。
5.然后选择结束编辑,Alfresco会自动把工作副本作为原文件的最新版本。
并且可以选择版本号。
这是编辑过的文件:6.如果想要查看版本,可以在详细信息的版本控制里查看:如果要恢复以前的版本,请下载相应的版本后选择右侧的更新,把此版本作为最新版本上传。
六.内容规则可以用内容规则对文档进行详细控制,这里不做介绍。
ldap 认证过程 -回复

ldap 认证过程-回复LDAP(Lightweight Directory Access Protocol)是一种轻量级目录访问协议,它用于在网络上访问和管理分布式目录服务。
LDAP常用于实现用户认证和授权,以及管理组织中的用户和资源。
LDAP认证过程是指用户使用LDAP协议来验证其身份的过程。
下面将一步一步地回答关于LDAP认证过程的问题,以帮助我们更好地理解。
第1步:建立连接首先,客户端需要使用LDAP API连接到LDAP服务器。
LDAP服务器通常使用标准的LDAP端口(389)进行监听。
客户端可以使用LDAP URL (例如ldap:example:389)来指定要连接的服务器地址和端口。
第2步:身份识别在建立连接后,客户端需要向服务器发送绑定请求,以提供其身份信息进行身份验证。
绑定请求包括以下信息:- 绑定DN(Distinguished Name):一个唯一标识用户的LDAP路径(例如uid=johndoe,ou=users,dc=example,dc=com)。
- 绑定密码:与绑定DN关联的密码。
第3步:认证验证服务器接收到绑定请求后,在LDAP目录中查找与提供的DN匹配的条目,并比较提供的密码与存储在目录中的密码是否匹配。
如果密码匹配,服务器将返回一个绑定成功的响应,并将客户端标识为已经通过身份验证的用户。
第4步:访问授权一旦用户通过身份验证,服务器将根据用户的身份和权限对其进行授权。
在LDAP目录中,授权通常使用访问控制列表(ACLs)来定义,ACLs定义了用户或用户组对特定目录条目的访问权限。
第5步:执行操作绑定成功后,客户端可以使用LDAP协议执行各种操作,如搜索(查询)目录、添加、修改或删除目录项等。
每个操作都需要提供相应的身份验证信息,以确保用户具有执行该操作所需的适当权限。
第6步:终止连接当客户端完成操作后,或不再需要与LDAP服务器进行通信时,它可以使用LDAP API关闭连接并终止与服务器的通信。
OpenLdap使用手册

OpenLdap使用手册一、文档概述 (2)二、LDAP简介 (3)2.1 LDAP介绍 (3)2.2 LDAP优劣 (3)2.3 LDAP协议 (4)2.4 LDAP服务器 (4)2.5LDAP使用权限 (5)2.6 LDAP目标 (5)三、安装配置 (6)3.1 软件安装 (6)3.2 软件配置 (6)3.3 软件运行 (7)3.4 初始数据 (8)四、LDAP应用 (10)4.1LDAP常用属性 (10)4.2LDAP Schema语法 (11)五、LDAP客户端 (11)5.1 增加目录属性 (12)5.2 删除目录属性 (13)5.3 修改目录属性 (13)5.4 增加目录 (14)5.5 修改目录 (14)5.6 删除目录 (15)六、应用举例 (16)附录: (17)X.500 (17)一、文档概述本文从介绍ldap入手,讲述了ldap的使用场合,并进一步的指导用户进行openldap安装与配置。
是新手入门的一个教程。
二、LDAP简介2.1 LDAP介绍LDAP的英文全称是Lightweight Directory Access Protocol,它是基于X.500标准的,但是简单多了并且可以根据需要定制。
与X.500不同,LDAP支持TCP/IP,这对访问Internet是必须的。
LDAP的核心规范在RFC 中都有定义,所有与LDAP相关的RFC都可以在LDAPman RFC网页中找到。
LDAP目录中可以存储各种类型的数据:电子邮件地址、邮件路由信息、人力资源数据、公用密匙、联系人列表,等等。
通过把LDAP目录作为系统集成中的一个重要环节,可以简化员工在企业内部查询信息的步骤,甚至连主要的数据源都可以放在任何地方。
2.2 LDAP优劣目录服务的数据类型主要是字符型,为了检索的需要添加了BIN(二进制数据)、CIS(忽略大小写)、CES(大小写敏感)、TEL(电话型)等语法(Syntax),而不是关系数据库提供的整数、浮点数、日期、货币等类型,同样也不提供象关系数据库中普遍包含的大量的函数,它主要面向数据的查询服务(查询和修改操作比一般是大于10:1),不提供事务的回滚(rollback)机制,它的数据修改使用简单的锁定机制实现All-or-Nothing,它的目标是快速响应和大容量查询并且提供多目录服务器的信息复制功能。
open cascade 基础

Open Cascade 基础1. 介绍在当今的工程设计和制造行业中,三维建模和仿真技术被广泛应用,而开源的 CAD/CAM/CAE 评台 Open Cascade 作为一种强大的工具,在这一领域中表现出了巨大的潜力。
本文将重点探讨 Open Cascade 的基础知识和应用,以便读者能够更好地理解并运用这一技术。
2. Open Cascade 的概述Open Cascade 是一种开源的三维 CAD/CAM/CAE 开发评台,它提供了一整套的软件组件、工具和库,用于构建各种涉及三维建模、几何处理、网格生成、可视化和仿真的应用程序。
Open Cascade 基于C++ 开发,并提供了丰富的 API,用户可以在其基础上进行二次开发和定制化。
3. Open Cascade 的核心模块Open Cascade 的核心模块包括几何建模内核、数据交换模块、可视化模块、网格处理模块等。
其中,几何建模内核是 Open Cascade 最重要的组成部分之一,它包含了丰富的几何算法和数据结构,可以对各种几何实体进行建模、计算和分析。
4. Open Cascade 的应用领域Open Cascade 在工程设计、制造和仿真领域有着广泛的应用。
它可以用于快速原型制作、产品设计、模具设计、数值控制加工、有限元分析等方面。
由于其开源的特性,Open Cascade 还在学术研究领域中被广泛应用,许多大学和研究机构都在利用 Open Cascade 进行各种研究项目。
5. 个人观点和理解在我看来,Open Cascade 提供了一种非常便捷和灵活的方式,让工程师和研究人员可以更好地应用三维建模和仿真技术。
通过学习和掌握 Open Cascade,我们能够更好地理解和把握三维几何建模的原理和方法,并且能够更自由地进行定制化开发,满足不同应用场景的需求。
6. 总结和回顾通过本文的介绍,我们对 Open Cascade 的基础知识有了更深入的了解。
CAS整合LDAP实现单点登录学习笔记

SJTUCrushing Blow ——CAS整合LDAP实现单点登录学习笔记Solomon leo********************8/15/2010目录Contents目录 (1)1单点登录 (2)2 CAS (3)2.1 JA-SIG(CAS)的设计愿景 (3)2.2 CAS1.0服务架构实现 (3)2.3 CAS服务的具体实现 (4)2.4代理认证Proxy Authentication (6)2.5 CAS2.0代理认证流程 (6)2.6 CAS2.0凭证 (7)3 LDAP (8)4 CAS整合LDAP配置过程 (9)4.1说明 (9)4.1 LDAP安装(A) (9)4.2 配置服务器(A) (10)4.3 配置客户端(B,业务服务器) (15)4.4关于CASTestClient和cas的说明 (16)5参考目录 (19)1单点登录什么是SSO(Single Sign On)单点登录?所谓单点登录是指基于用户/会话认证的一个过程,用户只需一次性提供凭证(仅一次登录),就可以访问多个应用。
目前单点登录主要基于Web的多种应用程序,即通过浏览器实现对多个B/S架构应用的统一账户认证。
2 CAS2.1 JA-SIG(CAS)的设计愿景CAS(Central Authentication Service – 中心认证服务)的目的就是使分布在一个企业内部各个异构系统的认证工作集中在一起,通过一个公用的认证系统统一管理和验证用户的身份。
在CAS上认证的用户将获得CAS颁发的一个证书,使用这个证书,用户可以在承认CAS证书的各个系统上自由穿梭访问,不需要再次的登录认证。
打个比方:对于加入欧盟的国家而言,在他们国家中的公民可以凭借着自己的身份证,在整个欧洲旅行,不用签证。
对于企业内部系统而言,CAS就是这个颁发欧盟认证的系统,其它系统都是加入欧盟的国家,它们要共同遵守和承认CAS的认证规则。
- 1、下载文档前请自行甄别文档内容的完整性,平台不提供额外的编辑、内容补充、找答案等附加服务。
- 2、"仅部分预览"的文档,不可在线预览部分如存在完整性等问题,可反馈申请退款(可完整预览的文档不适用该条件!)。
- 3、如文档侵犯您的权益,请联系客服反馈,我们会尽快为您处理(人工客服工作时间:9:00-18:30)。
Alfresco OpenLDAP CAS SSO
Arcko Duan (http://about.me/arcko) This blog will show you how to setup alfresco to work with CAS Single-Sign-On, with the backend
using OpenLDAP for user account managment.
Here we use Alfresco Community Edition 4.0.d, OpenLDAP and Ubuntu 10.04 LTS server.
0. Download and install Alfresco
Refer to /wiki/Download_and_Install_Alfresco
1. Configure Apache2 SSL
First install apache2 and openssl
apt-get install apache2 openssl
vi /etc/apache2/mods-enabled/ssl.conf
add following lines to the end of conf file:
SSLVerifyClient optional
SSLCACertificateFile /etc/ssl/certs/cacert.pem
# Keeping SSLCACertificatePath causes the browser to go into a loading loop,
# so use the above SSLCACertificateFile instead
# SSLCACertificatePath /etc/ssl/certs
SSLOptions +StdEnvVars +ExportCertData
</IfModule>
a2enmod ssl
/etc/init.d/apache2 restart
2. Install OpenLDAP
apt-get install slapd ldap-utils
ldapadd -Y EXTERNAL -H ldapi:/// -f /etc/ldap/schema/cosine.ldif
ldapadd -Y EXTERNAL -H ldapi:/// -f /etc/ldap/schema/nis.ldif
ldapadd -Y EXTERNAL -H ldapi:/// -f /etc/ldap/schema/inetorgperson.ldif
cd ~/openldap
mv back_hdb back_
ldapadd -Y EXTERNAL -H ldapi:/// -f backend.ldif
ldapadd -x -D cn=admin,dc=sample,dc=com -W -f front.ldif
ldapsearch -xLLL -b "dc=sample,dc=com" uid=john sn givenName cn
apt-get install ldapscripts
sh -c "echo -n 'sample' > /etc/ldapscripts/ldapscripts.passwd"
3. Build and deploy Jasig CAS server
Download and build alfresco customized cas server following instructions from Alfresco wiki page : Alfresco With mod auth cas Step 4: Configure, Build and Install Jasig CAS Server
cd /root
mkdir -p custom-cas-server/src/main/webapp/WEB-INF/classes
cd custom-cas-server
apt-get install maven2
mvn -Dmaven.test.skip=true package install
cp target/cas.war /opt/alfresco-4.0.d/tomcat/webapps/erts
4. Configure apache and alfresco tomcat to work together through mod jk.
First install libapache2-mod-jk
apt-get install libapache2-mod-jk
vi /etc/apache2/mods-enabled/jk.conf
<IfModule mod_jk.c>
JkWorkersFile "/opt/alfresco-4.0.d/tomcat/conf/jk/workers.properties"
JkLogFile "/opt/alfresco-4.0.d/tomcat/logs/mod_jk.log"
JkOptions +ForwardKeySize -ForwardDirectories
JkLogLevel debug
JkMountCopy On
JkMount /alfresco* default
JkMount /share* default
JkMount /examples* default
</IfModule>
/opt/alfresco-4.0.d/tomcat/conf/jk/workers.properties
5. Build and install latest version of mod_auth_cas
According to https:///display/CASC/mod_auth_cas
wget /Jasig/mod_auth_cas/zipball/master
Jasig-mod_auth_cas-v1.0.9.1-98-g0d20c79.zip
cd Jasig-mod_auth_cas-0d20c79/
apt-get install apache2-threaded-dev autoconf automake check libapr1-dev libaprutil1-dev libcurl4-openssl-dev make pkg-config
compile https:///Jasig/mod_auth_cas
./configure; make; make install
mkdir /tmp/cas
chown www-data:www-data /tmp/cas
chmod 0700 /tmp/cas
/etc/apache2/mods-available/mod_auth_cas.load
/etc/apache2/mods-available/mod_auth_cas.conf
a2enmod mod_auth_cas
/etc/init.d/apache2 restart
Now when you access alfresco through http://sample.server/alfresco, browser will redirect you to https://sample.server/cas/login?service=https%3a%2f%2fsample.server%2falfresco%2f to process
cas login. You could custom the look and feel of your cas login page like.。
