第11章 其它编程经验
第11章代码优化

四元式相应的DAG
编 译 原 理 代 码 优 化
(1)A:= op B 1型
首页
结束
编 译 原 理 代 码 优 化
首页
结束
基本块的DAG构造算法
该算法只对如下三种四元式构造DAG:
编 译 原 理 代 码 优 化
0型
l型 2型
A:=B
A:=op B A:=B op C
op是双目运算符还可以是=[]或[]=。
首页
结束
根据优化所涉及的程序范围分成:
编 译 原 理 代 码 优 化
局部优化:基本块范围内的优化:合并已知量 消除公共子表达式,削减计算强度和删除无用 代码 循环优化:主要是基于循环的优化,包括循环 不变式外提,归纳变量删除,计算强度削减。 全局优化:主要是在整个程序范围内进行的优 化。 因为程序段是非线性的,因此需要分析程 序的控制流和数据流,处理比较复杂。
编 译 原 理 代 码 优 化
1.如果NODE(B)无定义,则构造一标记为B的叶结 点并定义NODE(B)为这个结点;
如果当前四元式是0型,则记NODE(B)的值为n,转4。 如果当前四元式是1型,则转2.(1)。 如果当前四元式是2型,则: (I) 如果NODE(C)无定 义,则构造一标记为C的叶结点并定义NODE(C) 为这 个结点; (II) 转2.(2)
首页 结束
基本块的DAG构造算法
2.(合并已知量)
编 译 原 理 代 码 优 化
(1)如果NODE(B)是标记为常数的叶结点 ,则转 2(3),否则转3.(1)。 (2)如果NODE(B)和NODE(C)都是标记为常数的叶 结点,则转2.(4),否则转3.(2)。 (3)执行op B(即合并已知量),令得到的新常数 为P。如果NODE(B)是处理当前四元式时新构造出来 的结点,则删除它。如果NODE(P)无定义,则构造 一用P做标记的叶结点n。置NODE(P)=n,转4。 (4)执行B op C(即合并已知量),令得到的新常 数为P。如果NODE(B)或NODE(C)是处理当前四元 式时新构造出来的结点,则删除它。如果NODE(P) 无定义,则构造一用P做标记的叶结点n。置 NODE(P)=n,转4。
Java 2实用教程课件(第3版第11章)PPT教学课件
2020/12/09
11
服务器端的套接字对象
服务器必须建立一个等待接收客户的套接字的ServerSocket 对象。ServerSocket的构造方法是:
ServerSocket(int port)
port是一个端口号。port必须和客户呼叫的端口号相同。
当服务器的ServerSocket对象server_socket建立后,就可
URL对象通常包含最基本的三部分信息: 协议、地址、资源 .
2020/12/09
3
URL的构造方法
public URL(String spec) throws MalformedURLException
try { url=new URL("");
} catch(MalformedURLException e)
2020/12/09
5
11.3 显示URL资源中的html文件
Javax.swing包中的JEditorPane容器可以 解释执行html文件,也就是说,如果你把 html文件读入到JEditorPane,该html文 件就会被解释执行,显示在JEditorPane容 器中,这样程序就看到了网页的运行效果。
网络中的数据压缩与传输
UDP数 据 报 广播数据报
2020/12/09
2
11.1 使用URL
URL类是对统一资源定位符(Uniform Resource Locator)的抽象,使用URL创 建对象的应用程序称作客户端程序,一个 URL对象存放着一个具体的资源的引用, 表明客户要访问这个URL中的资源,利用 URL对象可2/09
14
11.8 UDP数 据 报
基于UDP的通信和基于TCP的通信不同,基于 UDP的信息传递更快,但不提供可靠性保证。也 就是说,数据在传输时,用户无法知道数据能否 正确到达目的地主机,也不能确定数据到达目的 地的顺序是否和发送的顺序相同。
ly_新标准C++程序设计教材1120章课后题答案

新标准C++程序设计教材11-20章课后题答案第11章:1.简述结构化程序设计有什么不足,面向对象的程序如何改进这些不足。
答案:结构化程序设计的缺点:(1)用户要求难以在系统分析阶段准确定义,致使系统在交付使用时产生许多问题。
(2)用系统开发每个阶段的成果来进行控制,不适应事物变化的要求。
(3)系统的开发周期长。
面向对象的程序设计如何改进这些不足:面向对象程序设计技术汲取了结构忧程序设计中好的思想,并将这些思想与一些新的、强大的理念相结台,从而蛤程序设计工作提供了一种全新的方法。
通常,在面向对象的程序设计风格中,会将一个问题分解为一些相互关联的子集,每个子集内部都包含了相关的数据与函数。
同时会以某种方式将这些子集分为不同等级,而一个对象就就是已定义的某个类型的变量。
2.以下说怯正确的就是( )。
A、每个对象内部都有成员函数的实现代码B、一个类的私有成员函数内部不能访问本类的私有成员变量C、类的成员函数之间可以互相调用D、编写一个类时,至少要编写一个成员函数答案:C3.以下对类A的定义正确的就是( )。
A.class A{B.class A{private: int v; int v; A * next;public: void Func() {} void Func() {}} };C.class A{ D、class A{int v; int v;public: public:void Func(); A next;}; void Func() {}A::void Func() { } };答案:B4.假设有以下类A:class A{public:int func(int a) { return a * a; }};以下程序段不正确的就是( )。
A.A a; a、func(5);B.A * p = new A; p->func(5);C.A a; A&r =a ; r、func(5);D.A a,b; if(a!=b) a、func(5);答案:D5.以下程序段不正确的就是(A)。
ly_新标准C++程序设计教材11-20章课后题答案
新标准C++程序设计教材11-20章课后题答案第11章:1.简述结构化程序设计有什么不足,面向对象的程序如何改进这些不足。
答案:结构化程序设计的缺点:(1)用户要求难以在系统分析阶段准确定义,致使系统在交付使用时产生许多问题。
(2)用系统开发每个阶段的成果来进行控制,不适应事物变化的要求。
(3)系统的开发周期长。
面向对象的程序设计如何改进这些不足:面向对象程序设计技术汲取了结构忧程序设计中好的思想,并将这些思想与一些新的、强大的理念相结台,从而蛤程序设计工作提供了一种全新的方法。
通常,在面向对象的程序设计风格中,会将一个问题分解为一些相互关联的子集,每个子集内部都包含了相关的数据和函数。
同时会以某种方式将这些子集分为不同等级,而一个对象就是已定义的某个类型的变量。
2.以下说怯正确的是( )。
A.每个对象内部都有成员函数的实现代码B.一个类的私有成员函数内部不能访问本类的私有成员变量C.类的成员函数之间可以互相调用D.编写一个类时,至少要编写一个成员函数答案:C3.以下对类A的定义正确的是( )。
A.class A{ B.class A{private: int v; int v; A * next;public: void Func() {} void Func() {}} };C.class A{ D. class A{int v; int v;public:public:void Func(); A next;}; void Func() {}A::void Func() { } };答案:B4.假设有以下类A:class A{public:int func(int a) { return a * a; }};以下程序段不正确的是( )。
A.A a; a.func(5);B.A * p = new A; p->func(5);C.A a;A&r =a ; r.func(5);D.A a,b; if(a!=b) a.func(5);答案:D5.以下程序段不正确的是(A)。
C编程思想答案解析第十一章其他章节点击用户名找thinkinginCannotatedsolutionguide(charpter11)

[ Viewing Hints ] [ Book Home Page ] [ Free Newsletter ][ Seminars ] [ Seminars on CD ROM ] [ Consulting ]Annotated Solution GuideRevision 1.0for Thinking in C++, 2nd edition, Volume 1by Chuck Allison©2001 MindView, Inc. All Rights Reserved.[ Previous Chapter ] [ Table of Contents ] [ Next Chapter ] Chapter 1111-1Turn the “bird & rock”code fragment at the beginning of this chapter into a C program (using struct s for the data types), and show that it compiles. Now try to compile it with the C++ compiler and see what happens.(Left to the reader)11-2Take the code fragments in the beginning of the section titled “References in C++”and put them into a main( ). Add statements to print output so that you can prove to yourself that references are like pointers that are automatically dereferenced.(Left to the reader)11-3Write a program in which you try to (1) Create a reference that is not initialized when it is created. (2) Change a reference to refer to another object after it is initialized. (3) Create a NULL reference.(Left to the reader)11-4Write a function that takes a pointer argument, modifies what the pointer points to, and then returns the destination of the pointer as a reference.(Left to the reader)11-5Create a class with some member functions, and make that the object that is pointed to by the argument of Exercise 4. Make the pointer a const and make some of the member functions const and prove that you can only call the const member functions inside your function. Make the argument to your function a reference instead of a pointer.(Left to the reader)11-6Take the code fragments at the beginning of the section titled “Pointer references”and turn them into a program.(Left to the reader)11-7Create a function that takes an argument of a reference to a pointer to a pointerand modifies that argument. In main( ), call the function.(Left to the reader)11-8Create a function that takes a char& argument and modifies that argument. In main( ), print out a char variable, call your function for that variable, and print it out again to prove to yourself that it has been changed. How does this affect program readability?Solution://: S11:CallByRef.cpp#include <iostream>void nextc(char& c) {static char letter = 'a';c = letter++;}int main() {using namespace std;char c = 'z';cout << "c == " << c << endl;nextc(c);cout << "c == " << c << endl;nextc(c);cout << "c == " << c << endl;}/* Output:c == zc == ac == b*////:~A C programmer will find it very strange indeed that c is changed in main( ), since a pointer wasn’t passed. Pass-by-reference semantics have side effects and should be used sparingly. A good example is istream::get(char&c). Since stream functions return a reference to the stream itself so you can immediately test it for end-of-file, the character extracted from the input stream is stored via the reference argument c.11-9Write a class that has a const member function and a non-const member function. Write three functions that take an object of that class as an argument; the first takes it by value, the second by reference, and the third by const reference. Inside the functions, try to call both member functions of your class and explain the results.(Left to the reader)11-10(Somewhat challenging) Write a simple function that takes an int as an argument, increments the value, and returns it. In main( ), call your function. Now discover how your compiler generates assembly code and trace through the assembly statements so that you understand how arguments are passed and returned, and how local variables are indexed off the stack.(Left to the reader)11-11Write a function that takes as its arguments a char, int, float, and double. Generate assembly code with your compiler and find the statements that push the arguments on the stack before a function call.(Left to the reader)11-12Write a function that returns a double. Generate assembly code and determine how the value is returned.(Left to the reader)11-13Produce assembly code for PassingBigStructures.cpp. Trace through and demystify the way your compiler generates code to pass and return large structures.(Left to the reader)11-14Write a simple recursive function that decrements its argument and returns zero if the argument becomes zero, otherwise it calls itself. Generate assembly code for this function and explain how the way that the assembly code is created by the compiler supports recursion.(Left to the reader)11-15Write code to prove that the compiler automatically synthesizes a copy-constructor if you don’t create one yourself. Prove that the synthesized copy-constructor performs a bitcopy of primitive types and calls the copy-constructor ofuser-defined types.Solution://: S11:AutoCopy.cpp#include <iostream>using namespace std;class Inner {double x;public:Inner(double x) {this->x = x;}Inner(const Inner& i2) {x = i2.x;cout << "Inner::Inner(const Inner&)\n";}double getX() const {return x;}};class Outer {Inner m;int n;public:Outer(double x, int i) : m(x), n(i) {}void print() {cout << '(' << m.getX() << ',' << n << ")\n";}};int main() {Outer o1(10.0, 20);o1.print();Outer o2(o1);o2.print();}/* Output:(10,20)Inner::Inner(const Inner&)(10,20)*////:~Class Outer contains an instance of class Inner and an int, but it has no copy constructor, so the compiler will build one for us. Class Inner has a copy constructor that announces itself so you can see that it executes, and the subsequent call to Outer::print( ) also reveals that the int member was copied correctly.11-16Write a class with a copy-constructor that announces itself to cout. Now create a function that passes an object of your new class in by value and another one that creates a local object of your new class and returns it by value. Call these functions to prove to yourself that the copy-constructor is indeed quietly called when passing and returning objects by value.Solution://: S11:TraceCopies.cpp#include <iostream>using namespace std;class Trace {int n;public:Trace(int n) {cout << "Trace::Trace(" << n << ")\n";this->n = n;}Trace(const Trace& t) {cout << "Trace::Trace(const Trace&)\n";n = t.n;}int getN() const {return n;}};void f(Trace t) {cout << "f(" << t.getN() << ")\n"; }Trace g() {Trace t(2);return t;}Trace h(int n) {return n;}int main() {Trace t1 = 1;f(t1);Trace t2 = g();Trace t3 = h(3);}/* Output:* Compiler A:Trace::Trace(1)Trace::Trace(const Trace&)f(1)Trace::Trace(2)Trace::Trace(const Trace&)Trace::Trace(const Trace&)Trace::Trace(3)Trace::Trace(const Trace&)* Compiler B:Trace::Trace(1)Trace::Trace(const Trace&)f(1)Trace::Trace(2)Trace::Trace(const Trace&)Trace::Trace(3)*////:~Simply define a copy constructor that announces itself. Remember that if you define any constructor at all (including a copy constructor), the compiler will not synthesize a default constructor for you, so I needed to define some constructorother than the copy constructor so I can create Trace objects. I chose to take an int argument so I can better trace through the hidden operations.Compiler A performs no optimizations so you can see all the possible operations. The first line is the creation of t1, and the next two are the call that passes t1 to f( ). The call to g( ) invokes two calls to the copy constructor: one to create the return value, and another to initialize t2 with that value. Notice that h( ) returns a Trace object by value, but instead of using the copy constructor it uses the single-arg constructor that takes an int. That’s because we’re asking the compiler to create a Trace object from an int. The bottom line is, whenever an object is created, some constructor is called; which one depends on the context.Compiler B is a lot smarter than Compiler A when it comes to creating copies.11-17Create a class that contains a double*. The constructor initializes the double* by calling new double and assigning a value to the resulting storage from the constructor argument. The destructor prints the value that’s pointed to, assigns that value to -1, calls delete for the storage, and then sets the pointer to zero. Now create a function that takes an object of your class by value, and call this function in main( ). What happens? Fix the problem by writing a copy-constructor.Solution://: S11:ShallowCopy.cpp#include <iostream>using namespace std;class HasPointer {double* p;public:HasPointer(double x) {p = new double(x);}~HasPointer() {cout << "~HasPointer()\n";delete p;}void print() {cout << *p << endl;}};void f(HasPointer hp){hp.print();}int main() {HasPointer hp(5);f(hp);}/* Output:5~HasPointer()~HasPointer()<access violation error...!!!>*////:~(As a side note, notice that you can use constructor syntax to initialize built-in types in new expressions, as in the constructor for HasPointer.)When you call f(hp), a copy of hp is passed to f( ), the destructor of which executes when that copy is no longer needed. Problem is, the destructor deletes p, so when the destructor runs again to destroy hp as main( ) completes, it tries to delete p asecond time! The solution is to have the compiler perform a deep copy of HasPointer objects via an appropriate copy constructor, such as:HasPointer(const HasPointer& rhs) {p = new double(*rhs.p);}As a rule, a class with a pointer member probably needs a copy constructor (and as you’ll see in the next chapter, an appropriate assignment operator too).11-18Create a class with a constructor that looks like a copy-constructor, but that has an extra argument with a default value. Show that this is still used as thecopy-constructor.Solution://: S11:ExtraArgs.cpp#include <iostream>using namespace std;class HasPointer {double* p;public:HasPointer(double x) {p = new double(x);}HasPointer(const HasPointer& rhs, bool b = true) { p = new double(*rhs.p);if (b)cout << "copied a " << *p << endl;}~HasPointer() {cout << "~HasPointer()\n";delete p;}void print() {cout << *p << endl;}};void f(HasPointer hp){hp.print();}int main() {HasPointer hp1(5);f(hp1);HasPointer hp2(hp1, false);}/* Output:copied a 55~HasPointer()~HasPointer()~HasPointer()*////:~This is just the previous exercise modified to take an optional second argument in its copy constructor. Notice that I don’t get a trace for hp2, since I explicitly passed a false to the copy constructor.11-19Create a class with a copy-constructor that announces itself. Make a second classcontaining a member object of the first class, but do not create a copy-constructor. Show that the synthesized copy-constructor in the second class automatically calls the copy-constructor of the first class.Solution:This was already illustrated in Exercise 15.11-20Create a very simple class, and a function that returns an object of that class by value. Create a second function that takes a reference to an object of your class. Call the first function as the argument of the second function, and demonstrate that the second function must use a const reference as its argument.Solution://: S11:RefToTemp.cpp//=M @echo compile RefToTemp.cpp by hand#include <iostream>class Simple {int i;public:Simple() : i(1) {}int getI() const {return i;}void setI(int n) {i = n;}};Simple f() {return Simple();}void g(Simple& s) {using namespace std;cout << "before: " << s.getI() << endl;s.setI(2);cout << "after: " << s.getI() << endl; }int main() {g(f());}///:~This should fail to compile unless you define the signature of g as g(const Simple& ). The reason is that a non-const reference may alter the contents of its argument, so it needs writable storage connected to it. A temporary like the return from f( ) is destroyed as soon as it is no longer needed (i.e., at the end of its containing expression), hence trying to write to such temporary storage is a mistake. Some compilers still allow this, unfortunately.11-21Create a simple class without a copy-constructor, and a simple function that takes an object of that class by value. Now change your class by adding aprivate declaration (only) for the copy-constructor. Explain what happens when your function is compiled.(Left to the reader)11-22This exercise creates an alternative to using the copy-constructor. Create a classX and declare (but don’t define) a private copy-constructor. Make a public clone( ) function as a const member function that returns a copy of the object that is created using new. Now write a function that takes as an argument a const X& and clones a local copy that can be modified. The drawback to this approach is that you are responsible for explicitly destroying the cloned object (using delete) when you’re done with it.(Left to the reader)11-23Explain what’s wrong with both Mem.cpp and MemTest.cpp from Chapter 7. Fix the problem.(Left to the reader)11-24Create a class containing a double and a print( ) function that prints the double. In main( ), create pointers to members for both the data member and the function in your class. Create an object of your class and a pointer to that object, and manipulate both class elements via your pointers to members, using both the object and the pointer to the object.Solution://: S11:MemPtr.cpp#include <iostream>using namespace std;class HasDouble {public:double x;HasDouble(double x) {this->x = x;}void print() {using namespace std;cout << x << endl;}};int main() {HasDouble h(3);HasDouble* hp = &h;// Define pointers-to-members:double HasDouble::* px = &HasDouble::x;void (HasDouble::*pmf)() = &HasDouble::print;// Call via object:cout << h.*px << endl;(h.*pmf)();// Call via pointer-to-object:cout << hp->*px << endl;(hp->*pmf)();}/* Output:3333*////:~Things to remember:•Wherever you would normally put a * in a regular pointer declaration, use C::* instead, where C is your class name.•Wherever you would normally use & to get a pointer, use &C:: instead.•Use parentheses around the pointer-to-member function expression, both in the call as well as in the declaration.11-25Create a class containing an array of int. Can you index through this array using a pointer to member?Yes, you can. The declaration of the pointer is a little tricky, though. It has to do with the fact that pointers to arrays are different than pointers to objects. In the following example, pa is a pointer-to-member that refers to an array of 5 int s.Solution://: S11:PointerToMemArray.cpp#include <iostream>class HasArray {public:enum {LEN = 5};int a[LEN];HasArray() {for (int i = 0; i < LEN; ++i)a[i] = i;}};int main() {using namespace std;HasArray h;int (HasArray::* pa)[5] = &HasArray::a;for (int i = 0; i < HasArray::LEN; ++i)cout << (h.*pa)[i] << ' ';cout << endl;}/* Output:0 1 2 3 4*////:~If I had defined a as an int* and allocated its space dynamically in the HasArrayconstructor, then the program would look like the following://: S11:PointerToMemArray.cpp#include <iostream>#include <cstddef> // For size_tclass HasArray {size_t siz;public:int* a;HasArray(size_t siz) {a = new int[siz];for (size_t i = 0; i < siz; ++i)a[i] = i;this->siz = siz;}~HasArray() {delete a;}size_t size() const {return siz;}};int main() {using namespace std;HasArray h(5);int* HasArray::* pa = &HasArray::a;for (size_t i = 0; i < h.size(); ++i)cout << (h.*pa)[i] << ' ';cout << endl;}/* Output:0 1 2 3 4*////:~11-26Modify PmemFunDefinition.cpp by adding an overloaded member function f( ) (you can determine the argument list that causes the overload). Now make a second pointer to member, assign it to the overloaded version of f( ), and call the function through that pointer. How does the overload resolution happen in this case?(Left to the reader)11-27Start with FunctionTable.cpp from Chapter 3. Create a class that contains a vector of pointers to functions, with add( ) and remove( ) member functions to add and remove pointers to functions. Add a run( ) function that moves through the vector and calls all of the functions.(Left to the reader)11-28Modify the above Exercise 27 so that it works with pointers to member functions instead.(Left to the reader)[ Previous Chapter ] [ Table of Contents ] [ Next Chapter ]Last Update:06/27/2002。
《汇编语言》王爽版 学习笔记(精辟的第十一章总结完毕)
《汇编语言》王爽版学习笔记(精辟的第十一章总结完毕)Nisy总坛主UID2198精华69威望8662在线时间2615 小时最后登录2010-12-10《汇编语言》王爽版学习笔记(精辟的第十一章总结完毕)&&&&&&&&&&&&&&&&&&&&&&&&&&&&&&&&&&&&&&&&&&&&&&&&&&&&&&&&&&前言:汇编语言,这个东西我是自学的,所以理解上也是很皮毛,这里简单写下读书写得,文中如有出错之处,还望多多指正。
我把这本书分成两部分:前11章为第一部分。
后几章涉及到中断等16位操作系统的知识,这儿就不写了,我们只关心前一部分。
汇编语言。
我是这样理解的:首先他是一套指令集,学习ASM可以站到一个“如何设计处理器、代码如何执行的角度”来看待这套指令集,或者说我们如何通过学习汇编语言来构建一个数据自己涉及的虚拟机平台;期中包括了寄存器的设置、如何将程序模块化==>堆栈思想的引用等等。
程序,就是内存中的一段数据我们可以将其当做代码也可以当做数据也可以作堆栈来使用所以内存的这些数据如何使用决定权在我们如何去定义我们如何让内存的数据与处理器产生联系并去实现程序员的目的作为要写一本教程,首先要考虑如何将知识讲授给对方。
这就是一个将知识系统化并条理化展开的一个过程。
前言上有两句话:一个是循序渐进后边的知识后边再讲。
这句话很厉害这个思想代表了作者的逻辑,第二句话是编程的平台不是操作系统而是硬件。
高质量CC++编程(完整)
5。
2 CONST 与#DEFINE的比较5.3 常量定义规则5。
4 类中的常量第6章函数设计6。
1 参数的规则6。
2 返回值的规则6.3 函数内部实现的规则6。
4 其它建议6.5 使用断言6。
6 引用与指针的比较第7章内存管理7。
1内存分配方式7。
2常见的内存错误及其对策7。
3指针与数组的对比7。
4指针参数是如何传递内存的?7.5 FREE和DELETE把指针怎么啦?7.6 动态内存会被自动释放吗?7。
7 杜绝“野指针”7。
8 有了MALLOC/FREE为什么还要NEW/DELETE ? 7。
9 内存耗尽怎么办?7.10 MALLOC/FREE 的使用要点7。
11 NEW/DELETE 的使用要点7。
12 一些心得体会第8章C++函数的高级特性8.1 函数重载的概念8。
2 成员函数的重载、覆盖与隐藏8.3 参数的缺省值8。
4 运算符重载8。
5 函数内联8.6 一些心得体会第9章类的构造函数、析构函数与赋值函数9.1 构造函数与析构函数的起源9。
2 构造函数的初始化表9。
3 构造和析构的次序9。
4 示例:类STRING的构造函数与析构函数9。
5 不要轻视拷贝构造函数与赋值函数9.6 示例:类STRING的拷贝构造函数与赋值函数9。
7 偷懒的办法处理拷贝构造函数与赋值函数9.8 如何在派生类中实现类的基本函数9.9 一些心得体会第10章类的继承与组合10。
1 继承10.2 组合第11章其它编程经验11。
1 使用CONST提高函数的健壮性11.2 提高程序的效率11。
3 一些有益的建议参考文献附录A :C++/C代码审查表附录B :C++/C试题附录C :C++/C试题的答案与评分标准前言软件质量是被大多数程序员挂在嘴上而不是放在心上的东西!除了完全外行和真正的编程高手外,初读本书,你最先的感受将是惊慌:“哇!我以前捏造的C++/C程序怎么会有那么多的毛病?”别难过,作者只不过比你早几年、多几次惊慌而已.请花一两个小时认真阅读这本百页经书,你将会获益匪浅,这是前面N—1个读者的建议。
Ch11 文件操作与编程技术

Directory中的所有方法都是静态的,而DirectoryInfo的方法则不是静 态的。
注意:File和FileInfo类只能进行磁盘文件的管理,不能读写文件中的内容。
11.1.1 文件I/O与流
File类
方法名称
CreateText 、 AppendText 、 OpenText
Open、Create Copy、Delete Move
Exists OpenRead、
OpenWrite GetAttributes、
2.流类的继承结构
11.1.2 读写文本文件
用StreamWriter创建写入文件
StreamWriter以指定的字符编码(默认为UTF-8)方式将数据写入文本 文件 。
用StreamWriter创建文件的过程
用StreamWriter创建文本文件
利用StreamWriter的Write和Writeline方法可以将数据写入文本文件中,其区 别在于Write写入数据后不换行,而WriteLine写入数据后分自动插入回车换 行符。
源代码见教材
11.2.3 FolderBrowseDialog控件
该控件位于System.Windows.Forms命名空间中,是从基类 CommonDialog派生出来的,用来提示用户浏览、创建并最 终选择一个文件夹。当只允许用户选择文件夹而非文件,则 可使用此控件。注意,该控件只能选择文件系统中的物理文 件夹,不能选择虚拟文件夹。
C#高级编程《第7版》读书笔记(10-12章)

第十章 集合集合理解集合接口和类型理解集合接口和类型 使用列表使用列表、、队列和栈队列和栈 使用链表和有序表使用链表和有序表 使用字典和集使用字典和集 使用位数组和位矢量使用位数组和位矢量评估性能评估性能对象类型的集合位于System.Collections 命名空间;泛型集合类位于System.Collections. Generic 命名空间;专用于特定类型的集合类位于System.Collections.Specialized 命名空间; 线性安全的集合位于System.Collections.Concurrent 命名空间。
集合可以根据集合类执行的接口组合为列表列表列表、集合集合集合和字典字典字典集合和列表非常重要的接口及其方法和属性如表 接 口 方法和属性 说 明IEnumerable , IEnumerable<T>GetEnumerator()如果将foreach 语句用于集合,就需要接口IEnumerable 。
这个接口定义了方法GetEnumerator(),它返回一个实现了IEnumerator 的枚举。
泛型接口IEnumerable<T>继承了非泛型接口IEnumerable ,定义了一个返回Enumerable<T>的GetEnumerator 方法。
因为这两个接口具有继承关系,所以对于每个需要IEnumerable 类型参数的方法,都可以传送Enumerable<T>对象 ICollectionCount,IsSynchronized, SyncRoot, CopyTo()接口ICollection 由集合类实现。
对于实现了这个接口的集合,可以获得元素个数,把集合复制到数组中接口ICollection<T>扩展了接口IEnumerable的功能ICollection<T> Count,IsReadOnly,Add(),Clear(),Contains(),CopyTo()Remove() ICollection<T>接口是ICollection接口的泛型版本。
《Python编程:从入门到实践》课后习题及答案—第11章

《Python编程:从⼊门到实践》课后习题及答案—第11章第11章测试代码11-1 城市和国家:编写⼀个函数,它接受两个形参:⼀个城市名和⼀个国家名。
这个函数返回⼀个格式为City, Country 的字符串,如Santiago, Chile 。
将这个函数存储在⼀个名为city_functions.py的模块中。
创建⼀个名为test_cities.py的程序,对刚编写的函数进⾏测试(别忘了,你需要导⼊模块unittest 以及要测试的函数)。
编写⼀个名为test_city_country() 的⽅法,核实使⽤类似于'santiago' 和'chile' 这样的值来调⽤前述函数时,得到的字符串是正确的。
运⾏test_cities.py ,确认测试test_city_country() 通过了。
city_functions.pydef city_country(city_name, country_name):return city_name + " , " + country_nametest_cities.pyimport unittestfrom city_functions import city_countryclass NameTestCase(unittest.TestCase):def test_city_country_1(self):name = city_country("santiago", "chile")self.assertEqual(name, "santiago , chile")unittest.main()11-2 ⼈⼝数量:修改前⾯的函数,使其包含第三个必不可少的形参population ,并返回⼀个格式为City, Country - population xxx 的字符串,如Santiago, Chile - population 5000000 。
C++第11章习题解答

第十一章标准模板库(STL)习题一. 基本概念与基础知识自测题11.1填空题11.1.1 STL大量使用继承和虚函数是(1)(填对或错)。
因为(2)。
答案:(1)错(2)它使用的是模板技术,追求的是运行的效率,避免了虚函数的开销11.1.2 有两种STL容器:(1)和(2)。
STL不用new和delete,而用(3)实现各种控制内存分配和释放的方法。
答案:(1)第一类容器(2)近容器(3)分配子(allocator)11.1.3 五种主要迭代子类型为(1)、(2)、(3)、(4)和(5)。
STL算法用(6)间接操作容器元素。
sort算法要求用(7)迭代子。
答案:(1)输入(InputIterator)(2)输出(OutputIterator)(3)正向(ForwardIterator)(4)双向(BidirectionalIterator)(5)随机访问(RandomAccessIterator)(6)迭代子(7)随机访问(RandomAccessIterator)11.1.4 三种STL容器适配器是(1)、(2)和(3)。
答案:(1)stack(栈)(2)queue(队列)(3)priority_queue(优先级队列)11.1.5 成员函数end()得到容器(1)的位置,而rend得到容器(2)的位置。
算法通常返回(3)。
答案:(1)最后一个元素的后继位置(2)引用容器第一个元素的前导位置。
实际上这是该容器前后反转之后的end()(3)迭代子11.1.6 适配器是(1),它依附于一个(2)容器上,它没有自己的(3)函数和(4)函数,而借用其实现类的对应函数。
答案:(1)不独立的(2)顺序(3)构造函数(4)析构函数11.1.7 返回布尔值的函数对象称为(1),默认的是(2)操作符。
答案:(1)谓词(predicate)(2)小于比较操作符“<”11.1.8C++标准库中给出的泛型算法包括(1)种算法。
C++(谭浩强)笔记(第11章)
继承与派生在面向对象基础中了解了面向对象程序设计的两个重要特征——抽象和封装。
但是面向对象程序设计主要有4个特点:抽象、封装、继承和多态,要较好地进行面向对象的程序设计还必须了解继承和多态。
继承性是面向对象程序设计最重要的特征,面向对象强调软件的可重用性。
C++语言提供了类的继承机制,解决了软件重用问题。
一个类中包含了若干个数据成员和成员函数。
在不同类中,数据成员和函数成员是不同的。
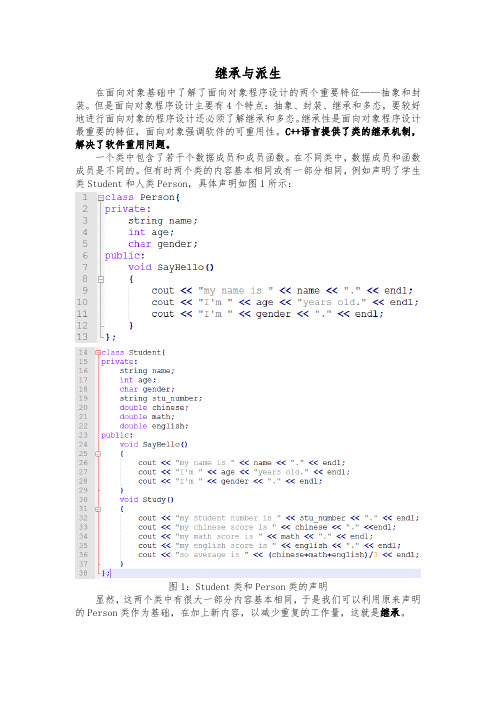
但有时两个类的内容基本相同或有一部分相同,例如声明了学生类Student和人类Person,具体声明如图1所示:图1:Student类和Person类的声明显然,这两个类中有很大一部分内容基本相同,于是我们可以利用原来声明的Person类作为基础,在加上新内容,以减少重复的工作量,这就是继承。
一、继承与派生的概念在C++中所谓继承就是在一个已存在的类的基础上建立一个新的类。
已存在的类称为基类或父类(base class or father class),新建立的类称为派生类或子类(derived class or son class)。
一个新类从已有的类那里获得其已有特性的现象称为类的继承。
通过继承,一个新建子类从父类那里获得父类的特性。
换个角度说,从已有类产生一个新的子类称为类的派生。
类的继承是利用已有的类来建立专用类的编程技术。
派生类继承了基类的所有数据成员和函数成员(不包括构造函数和析构函数),并对成员做必要的增加或调整。
一个基类可以派生出多个派生类。
每一个派生类又可以继续派生出新的派生类,这样派生下去就形成了类的继承层次结构。
图1中的例子是最简单的情况,一个派生类只从一个基类派生,这种继承称为单继承(single inheritance)。
一个派生类有两个基类或者多个基类,这种继承称为多重继承(multiple inheritance)。
图2:单继承(single inheritance) 和多重继承(multiple inheritance)二、派生类的声明方式图1中声明的两个类之间显然可以建立继承关系,最简单的继承方式如图3所示:图3:派生类Student类的声明方式声明派生类的一般形式为class 派生类名:[继承方式] 基类名{派生类新增成员;};其中继承方式包括public,private,protected,继承方式可选,如果不写默认为private。
【VIP专享】java第十一章课后习题答案
11.1、线程的概念:Thread 每个正在系统上运行的程序都是一个进程。
每个进程包含一到多个线程。
进程也可能是整个程序或者是部分程序的动态执行。
线程是一组指令的集合,或者是程序的特殊段,它可以在程序里独立执行。
也可以把它理解为代码运行的上下文。
所以线程基本上是轻量级的进程,它负责在单个程序里执行多任务。
通常由操作系统负责多个线程的调度和执行。
多线程的概念:多线程是为了同步完成多项任务,不是为了提高运行效率,而是为了提高资源使用效率来提高系统的效率。
线程是在同一时间需要完成多项任务的时候实现的。
多线程的优点:使用线程可以把占据长时间的程序中的任务放到后台去处理用户界面可以更加吸引人,这样比如用户点击了一个按钮去触发某些事件的处理,可以弹出一个进度条来显示处理的进度·11.2、答:一个线程从创建到不再有用称为线程的生命周期。
线程的生命周期可以分为4个状态:①创建(new)状态;②可运行(runnable)状态;⑧不可运行(not runnable)状态;④消亡(dead)状态。
创建状态是指创建一个线程所对应的对象的过程。
Java系统中,这些对象都是从java. lang包内一个称为Thread的类用关键字new创建的。
刚创建的线程不能执行,必须向系统进行注册、分配必要的资源后才能进入可运行状态,这个步骤是由start操作完成的。
而处于可运行状态的线程也未必一定处于运行中,它有可能由于外部的I/O请求而处于不可运行状态。
进入消亡状态后,此线程就不再存在了。
答:一个线程创建之后,总是处于其生命周期的4个状态之一中。
线程的状态表明此线程当前正在进行的活动,而线程的状态是可以通过程序来进行控制的,就是说,可以对线程进行操作来改变状态。
这些操作包括启动(start)、终止(stop)、睡眠(sleep)、挂起(suspend)、恢复(resume)、等待(wait)和通知(notify)。
每一个操作都对应了一个方法,这些方法是由软件包ng提供的。
JAVA入门教程 第11章 File IO

Chapter 11Saving and Loading InformationWhat is in This Chapter ?In computer science, all data eventually gets stored onto storage devices such as hard drives, diskettes, USB flash drives, CDs, DVDs, etc... This set of notes explains how to save information from your program to a file that sits on one of these backup devices. It also discusses how to load that information back into your program. The saving/loading of data from files can be done using different formats. We discuss here the notion of text vs. binary formats. Note as well that the techniques presented here also apply to sending and receiving information from Streams (e.g., networks). We will look at the way in which Stream objects are used to do data I/O in JAVA. We will also look at how to use ObjectStreams to read/write entire objects easily and finally investigate the File class which is useful for querying files and folders on your computer.COMP1005/1405 – Saving and Loading Information Fall 2009 11.1 Introduction to Files and StreamsFile processing is very important since eventually, all data must be stored externally from the machine so that it will not be erased when the power is turned off. Here are some of the terms related to file processing:In JAVA, we can store information from our various objects by extracting their attributes and saving these to the file. To use a file, it must be first opened. When done with a file, it MUST be closed. We use the terms read to denote getting information from a file and write to denote saving information to a file. The contents of a file is ultimately reduced to a set of numbers from 0 to 255 called bytes.In JAVA, files are represented as Stream objects. The idea is thatdata “streams” (or flows) to/from the file … similar to the idea ofstreaming video that you may have seen online. Streams areobjects that allow us to send or receive information in the form ofbytes. The information that is put into a stream, comes out in thesame order.It is similar to those scrolling signs where the letters scroll from rightto left, spelling out a sentence:- 319 -COMP1005/1405 – Saving and Loading Information Fall 2009 Streams are actually very general in that they provide a way to send or receive information to and from:•files•networks•different programs•any I/O devices (e.g., console and keyboard)When we first start executing a JAVA program, 3 streams are automatically created:•System.in // for inputting data from the keyboard•System.out // for outputting data to the screen•System.err // for outputting error messages to the screenIn fact, there are many stream-related classes in JAVA. We will look at a few and how they are used to do file I/O. The various Streams differ in the way that data is “entered into” and “extracted from” the stream. As with Exceptions, Streams are organized into different hierarchies. JAVA contains four main stream-related hierarchies for transferring data as binary bytes or as text bytes:Binary Text (e.g., ASCII)It is interesting to note that there is no common Stream class from which these main classes inherit. Instead, these 4 abstract classes are the root of more specific subclass hierarchies.A rather large number of classes are provided by JAVA to construct streams with the desired properties. We will examine just a few of the common ones here.Typically I/O (i.e., input/output) is a bottleneck in many applications. That is, it is very time consuming to do I/O operations when compared to internal operations. For this reason, buffers are used. Buffered output allows data to be collected for output before it is actually sent to the output device. Only when the buffer gets full does the actual data get sent. This reduces the amount of actual output operations, but each output operation would usually send more data.- 320 -COMP1005/1405 – Saving and Loading Information Fall 2009 (Note: The flush() command can be sent to buffered streams in order to empty the buffer and cause the data to be sent "immediately" to the output device. Input data can also be buffered.)By the way, what is System.in and System.out exactly ? We can determine their respective classes with the following code:System.out.print("System.in is an instance of ");System.out.println(System.in.getClass());System.out.print("System.out is an instance of ");System.out.println(System.out.getClass());This code produces the following output:System.in is an instance of class java.io.BufferedInputStreamSystem.out is an instance of class java.io.PrintStreamSo we have been using these streams for displaying information and getting information from the user through the keyboard. We will now look at how the classes are arranged in the different stream sub-hierarchies.11.2 Reading and Writing Binary DataFirst, let us examine a portion of JAVA's OutputStream sub-hierarchy:- 321 -COMP1005/1405 – Saving and Loading Information Fall 2009 The streams in this sub-hierarchy are responsible for outputting binary data. That is, data which is in the form of bytes or data types. OutputStreams have a write() method that allows us to output a single byte of data at a time.To open a file for binary writing, we can create an instance of FileOutputStream using one of the following constructors:new FileOutputStream(String fileName);new FileOutputStream(String fileName, boolean append);The first constructor opens a new file output stream with that name. If one exists already with that name, it is overwritten (i.e., erased). The second constructor allows you to determine whether you want an existing file to be overwritten or appended to. If the file does not exist, a new one with the given name is created. If the file already exists prior to opening then the following rules apply:•if append = false the existing file's contents is discarded and the file will be overwritten.•if append = true the new data to be written to the file is appended to the end of the file. We can output simple bytes to a FileOutputStream by using the write() method, which takes a single byte (i.e., a number from 0 to 255) as follows:FileOutputStream out;out = new FileOutputStream("myFile.dat");out.write('H');out.write(69);out.write(76);out.write('L');out.write('O');out.write('!');out.close();This code outputs the characters HELLO! to a file called "myFile.dat". The file will be created (if not existing already) in the current directory/folder (i.e., the directory/folder that your JAVA program was run from). Alternatively, you can specify where to create the file by specifying the whole path name instead of just the file name as follows:FileOutputStream out;out = new FileOutputStream("F:\\My Documents\\myFile.dat");Notice the use of "two" backslash characters within the String constant (because the backslash character is a special character which requires it to be preceded by a backslash ... just like \nis used to create a new line).- 322 -COMP1005/1405 – Saving and Loading Information Fall 2009- 323 -Using this strategy, we can output either characters or positive integers in the range from 0 to 255. Notice in the code that we closed the file stream when done. This is important to ensure that the operating system (e.g., Windows 7) releases the file handles correctly). When working with files in this way, two exceptions may occur:• opening a file for reading or writing may generate a java.io.FileNotFoundException •reading or writing to/from a file may generate a java.io.IOExceptionYou should handle these exceptions with appropriate try /catch blocks:import java.io.*;public class FileOutputStreamTestProgram { public static void main(String args[]) { try {FileOutputStream out;out = new FileOutputStream("myFile.dat"); out.write('H'); out.write(69); out.write(76); out.write('L'); out.write('O'); out.write('!'); out.close();} catch (FileNotFoundException e) {System.out.println("Error: Cannot open file for writing"); } catch (IOException e) {System.out.println("Error: Cannot write to file"); } } }Since all streams are a part of the java.io package we need to import them.The code above allows us to output any data as long as it is in byte format. This can betedious. For example, if we have the integer 7293901 and we want to output it, we have a few choices:• break up the integer into its 7 digits and output these digits one at a time (very tedious) •output the 4 bytes corresponding to the integer itself (recall that an int is stored as 4 bytes)Either way, these are not fun. Fortunately, JAVA provides a DataOutputStream class which allows us to output whole primitives (e.g., ints , floats , doubles ) as well as whole Strings to a file! Here is an example of how to use it to output information from a BankAccount object …COMP1005/1405 – Saving and Loading Information Fall 2009- 324 -import java.io.*;public class DataOutputStreamTestProgram { public static void main(String args[]) { try {BankAccount aBankAccount; DataOutputStream out;aBankAccount = new BankAccount("Rob Banks"); aBankAccount.deposit(100);out = new DataOutputStream(new FileOutputStream("myAcc.dat")); out.writeUTF (aBankAccount.getOwner());out.writeInt (aBankAccount.getAccountNumber()); out.writeFloat (aBankAccount.getBalance()); out.close();} catch (FileNotFoundException e) {System.out.println("Error: Cannot open file for writing"); } catch (IOException e) {System.out.println("Error: Cannot write to file"); } } }The DataOutputStream acts as a “wrapper” class around the FileOutputStream . It takes care of breaking our primitive data types and Strings into separate bytes to be sent to the FileOutputStream .There are methods to write each of the primitives as well as Strings :writeUTF (String aString) writeInt (int anInt)writeFloat (float aFloat) writeLong (long aLong)writeDouble (double aDouble)writeShort (short aShort) writeBoolean (boolean aBool) writeByte (int aByte) writeChar (char aChar)The output from a DataOutputStream is not very nice to look at (i.e., it is in binary format). The myAcc.dat file would display as follows if we tried to view it with Windows Notepad:Rob Banks † BÈThis is the binary representation of the data, which usually takes up less space than text files. The disadvantage of course, is that we cannot make sense of the data if we try to read it with our eyes as text. However, rest assured that the data is saved properly.Let us now examine how we could read that information back in from the file with a different program. To start, we need to take a look at the InputStream sub-hierarchy as follows …COMP1005/1405 – Saving and Loading Information Fall 2009Notice that it is quite similar to the OutputStream hierarchy. In fact, its usage is also very similar. We can read back in the byte data from our file by using FileInputStream now as follows:import java.io.*;public class FileInputStreamTestProgram{public static void main(String args[]) {try {FileInputStream in = new FileInputStream("myFile.dat");while(in.available() > 0)System.out.print(in.read() + " ");in.close();} catch (FileNotFoundException e) {System.out.println("Error: Cannot open file for reading");} catch (EOFException e) {System.out.println("Error: EOF encountered, file may be corrupt"); } catch (IOException e) {System.out.println("Error: Cannot read from file");}}}Notice that we now use read() to read in a single byte from the file. Notice as well that we can use the available()method which returns the number of bytes available to be read in from thefile (i.e., the file size minus the number of byte as already read in).Also, notice now that we are forced to handle an EOFException which can occur if the file is corrupted and the end of the file character is reached before the number of available bytes has been read in.- 325 -COMP1005/1405 – Saving and Loading Information Fall 2009 Recall that the order in which you catch your exceptions is important! Catch the most specific ones first. Since IOException is a superclass of EOFException, it must go afterwards.The code reads the data back in from our file (i.e., the characters HELLO! ) and outputs their ASCII (i.e., byte) values to the console:72 69 76 76 79 33Try changing in.read() to (char)in.read() (i.e., type-cast the byte to a char) and see what happens...That was fairly simple ... but what about getting back those primitives ? You guessed it! Wewill use DataInputStream:import java.io.*;public class DataInputStreamTestProgram {public static void main(String args[]) {try {BankAccount aBankAccount;DataInputStream in;in = new DataInputStream(new FileInputStream("myAccount.dat"));String name = in.readUTF();int acc = in.readInt();float bal = in.readFloat();aBankAccount = new BankAccount(name, bal, acc);System.out.println(aBankAccount);in.close();} catch (FileNotFoundException e) {System.out.println("Error: Cannot open file for reading");} catch (EOFException e) {System.out.println("Error: EOF encountered, file may be corrupt"); } catch (IOException e) {System.out.println("Error: Cannot read from file");}}}Notice that we re-create a new BankAccount object and "fill-it-in" with the incoming file data. Note, that in order for the above code to compile, we would need to write a public constructorfor the BankAccount class that takes an owner name, balance and account number (i.e., previously, in our BankAccount class, we had no way of specifying the accountNumbersince it was set automatically) …- 326 -COMP1005/1405 – Saving and Loading Information Fall 2009- 327 -BankAccount(String initName, float initBal, int num) { ownerName = initName; accountNumber = num; balance = initBal; }As with the output streams, there are methods to read in the other primitives:String readUTF() int readInt()float readFloat() long readLong()double readDouble()short readShort()boolean readBoolean() int readByte() char readChar()11.3 Reading and Writing Text DataHere is the Writer class sub-hierarchy which is used for writing text data to a stream:Notice that there are 3 main classes we will use for writing characters , lines of characters and general objects to a text file. When objects are written to the text file, the toString() method for the object is called and the resulting String is saved to the file.We can output (in text format) to a file using simply the print() or println() methods with the PrintWriter class as follows …import java.io.*;public class PrintWriterTestProgram{public static void main(String args[]) {try {BankAccount aBankAccount;PrintWriter out;=new BankAccount("Rob Banks");aBankAccountaBankAccount.deposit(100);out = new PrintWriter(new FileWriter("myAccount2.dat"));out.println(aBankAccount.getOwner());out.println(aBankAccount.getAccountNumber());out.println(aBankAccount.getBalance());out.close();} catch (FileNotFoundException e) {System.out.println("Error: Cannot open file for writing");} catch (IOException e) {System.out.println("Error: Cannot write to file");}}}Wow! Outputting text to a file is as easy as outputting it to the console window ! But what does it look like ? If we opened the file with Windows Notepad, we would notice that the result is a “pleasant looking” text format:Rob Banks100000100.0In fact, we can actually write any object using the println() method. JAVA will use thatobject's toString() method. So if we replaced this code:out.println(aBankAccount.getOwner());out.println(aBankAccount.getAccountNumber());out.println(aBankAccount.getBalance());with this code:out.println(aBankAccount);we would end up with the following saved to the file:Account #100000 with $100.0- 328 -- 329 -So it actually does behave just like the System.out console. We would need to be careful though, because you will notice that the BankAccount’s toString() method in the example above did not display the owner’s name. So the file does not record that owner’s name and therefore we could never read that name back in again … it would be lost forever. Notice as well how the PrintWriter wraps the FileWriter class just as the DataOutputStream wrapped the FileOutputStream . It is also easy to read back in the information that was saved to a text file. Here is the hierarchy of classes for reading text files ÆNotice that we can only read in characters and lines ofcharacters from the text file, but NOT general objects. We will see later how we can re-build read-in objects.use of the BufferedReaderclass by using theimport java.io.*;public class BufferedReaderTestProgram {public static void main(String args[]) { try {BankAccount aBankAccount; BufferedReader in;in = new BufferedReader(new FileReader("myAccount2.dat")); String name = in.readLine();int acc = Integer.parseInt(in.readLine()); float bal = Float.parseFloat(in.readLine());aBankAccount = new BankAccount(name, bal, acc); System.out.println(aBankAccount); in.close();} catch (FileNotFoundException e) {System.out.println("Error: Cannot open file for reading"); } catch (EOFException e) {System.out.println("Error: EOF encountered, file may be corrupt"); } catch (IOException e) {System.out.println("Error: Cannot read from file"); } } }Note the use of "primitive data type" wrapper classes to read data types. We could have usedthe Scanner class here to simplify the code:import java.io.*;import java.util.*; // Needed for use of Scanner and NoSuchElementException public class BufferedReaderTestProgram2{public static void main(String args[]) {try {BankAccount aBankAccount;Scanner in = new Scanner(new FileReader("myAccount2.dat"));String name = in.nextLine();int acc = in.nextInt();float bal = in.nextFloat();aBankAccount = new BankAccount(name, bal, acc);System.out.println(aBankAccount);in.close();} catch (FileNotFoundException e) {System.out.println("Error: Cannot open file for reading");} catch (NoSuchElementException e) {System.out.println("Error: EOF encountered, file may be corrupt");}catch (IOException e) {System.out.println("Error: Cannot read from file");}}}Notice here that we now catch a NoSuchElementException instead of an EOFException.This is how the Scanner detects the end of the file. The main advantage of using thisScanner class is that we do not have to use any wrapper classes to convert the input stringsto primitives.11.4 Reading and Writing Whole ObjectsSo far, we have seen ways of saving and loading bytes and characters to a file. Also, wehave seen how DataOutputStream/DataInputStream and PrintWriter/BufferedReaderclasses can make our life simpler since they deal with larger (more manageable) chunks ofdata such as primitives and Strings. We also looked at how we can save a whole object (i.e.,a BankAccount) to a file by extracting its attributes and saving them individually.Now we will look at an even simpler way to save/load a whole object to/from a file using the ObjectInputStream and ObjectOutputStream classes:- 330 -These classes allow us to save or load entire JAVA objects with one method call, instead of having to break apart the object into its attributes. Here is how we do it:import java.io.*;public class ObjectOutputStreamTestProgram{public static void main(String args[]) {try {BankAccount aBankAccount;ObjectOutputStream out;new BankAccount("Rob Banks");=aBankAccountaBankAccount.deposit(100);out = new ObjectOutputStream(new FileOutputStream("myAcc.dat")); out.writeObject(aBankAccount);out.close();} catch (FileNotFoundException e) {System.out.println("Error: Cannot open file for writing");} catch (IOException e) {System.out.println("Error: Cannot write to file");}}}Wow! It is VERY easy to write out an object. We simply supply the object that we want to save to the file as a parameter to the writeObject() method. Notice that the ObjectOutputStream class is a wrapper around the FileOutputStream. That is because ultimately, the object is reduced to a set of bytes by the writeObject() method, which are then saved to the file. The process of breaking down the object into bytes is called serialization. Thus, when an object is saved to a file, it is automatically de-constructed into bytes, thesebytes are then saved to a file, and then the bytes are read back in later and the object is re-constructed again. This is all done automatically by JAVA, so we don’t have to be too concerned about it.In order to be able to save an object to a file using the ObjectOutputStream, the object must be serializable (i.e., able to be serialized…or reduced to a set of bytes). To do this, we needto inform JAVA that our object implements the java.io.Serializable interface as follows …- 331 -public class BankAccount implements java.io.Serializable {...}This particular interface does not actually have any methods within it that we need to implement. Instead, it merely acts as a “flag” that indicates your permission for this object to be serialized. It allows a measure of security for our objects (i.e., only serializable objects are able to be broken down into bytes and sent to files or over the network).Most standard JAVA classes are serializable by default and so they can be saved/loadedto/from a file in this manner. When allowing our own objects to be serialized, we must make sure that all of the “pieces” of the object are also serializable. For example, assume that our BankAccount is defined as follows:public class BankAccount implements java.io.Serializable {owner;Customerfloat balance;int accountNumber;...}In this case, since owner is not a String but a Customer object, then we must make sure that Customer is also Serializable: Array public class Customer implements java.io.Serializable{...}We would need to then check whether Customer itself uses otherobjects and ensure that they too are serializable … and so on.To understand this, just think of a meat grinder. If some hardmarbles were placed within out meat, we cannot expect it to comeout through the grinder since they cannot be reduced to a smallerform. Similarly, if we have any non-serializable objects in our original object, we cannot properly serialize the object.So what does a serialized object look like anyway ? Here is what the file would look like fromour previous example if opened in Windows Notepad:alanceL ownert¬í sr BankAccount“ÈSòñúä I accountNumberF bLjava/lang/String;xp † BÈ t Rob Banks- 332 -Weird … it seems to be a mix of binary and text. As it turns out, JAVA saves all the attribute information for the object, including their types and values, as well as some other information. It does this in order to be able to re-create the object when it is read back in.The object can be read back in by using the readObject() method in the ObjectInputStream class as follows:import java.io.*;public class ObjectInputStreamTestProgram {public static void main(String args[]) {try {BankAccount aBankAccount;ObjectInputStream in;aBankAccount=new BankAccount("Rob Banks");aBankAccount.deposit(100);in = new ObjectInputStream(new FileInputStream("myAcc.dat")); aBankAccount = (BankAccount)in.readObject();System.out.println(aBankAccount);in.close();} catch (ClassNotFoundException e) {System.out.println("Error: Object'c class does not match");} catch (FileNotFoundException e) {System.out.println("Error: Cannot open file for writing");} catch (IOException e) {System.out.println("Error: Cannot read from file");}}}Note, that the ObjectInputStream wraps the FileInputStream. Also, notice that once read in, the object must be type-casted to the appropriate type (in this case BankAccount). Also, if there is any problem trying to re-create the object according to the type of object that we are loading, then a ClassNotFoundException may be generated, so we have to handle it. Finally, in order for this to work, you must also make sure that your object (i.e., BankAccount) has a zero-parameter constructor, otherwise an IOException will occur when JAVA tries to rebuild the object. Although not shown in our example above, you may also make use of the available() method to determine whether or not the end of the file has been reached.Although this method is extremely easy to use, there is a potentially disastrous disadvantage. The object that is saved to the file using this strategy is actually saved in binary format which depends on the class name, the object’s attribute types and names as well as the method signatures and their names. So if you change the class definition after it has been saved to the file, it may not be able to be read back in again !!! Some changes to the class do not cause problems such as adding an attribute or changing its access modifiers.- 333-So as a warning, when saving objects to a file using this strategy, you should always keep a backed-up version of all of your code so that you will be able to read these files with this backed-up code in the future.Supplemental Information (Disguising Serialized Data)You can actually write your own methods for serializing your objects. Onereason for doing this may be to encrypt some information beforehand (such as a password). You can decide which parts of the object will be serialized and which parts will not. You can declare any object attribute as being transient (which means that it will not be serialized) as follows:transient String password;This will tell JAVA that you do not want the password saved automatically upon serialization. That way you can write your own method to encrypt it before it is serialized.To do this, you would need to write two methods called writeObject(ObjectOutputStream) and readObject(ObjectInputStream). These methods will automatically be called by JAVA upon serialization and they override the default writing behavior. In fact, there are defaultWriteObject() and defaultReadObject() methods which do the default serialization behavior (i.e., the serializing before you decided to do your own). Here are examples of what you can do:void writeObject(ObjectOutputStream out) throws IOException {out.defaultWriteObject();// ... do extra stuff here to append to end of fileout.writeObject(myField.encrypt());}void readObject(ObjectInputStream in) throws IOException,ClassNotFoundException { in.defaultReadObject();// ... do extra stuff here to read from end of filemyField = ((myFieldType)in.readObject()).decrypt();}11.5 Saving and Loading the AutoshowLet us now consider a real example that shows how to save and load information from the Autoshow example that we implemented earlier in the course. We will save the autoshow’s information in a text file so that we can print it out or read it easily. So, we will be using the PrintWriter and BufferedReader classes. We need to decide how to format the text in the file.- 334 -。
《C++ Primer》 第11章学习笔记
《C++ Primer》第11章学习笔记第11章:泛型算法——标准库提供一组不依赖特定的容器类型的算法作用在不同类型的容器和不同类型的元素上。
@学习摘录113:算法重要性质——算法也许会改变存储在容器中的元素的值,也许会在容器内移动元素。
——但是,算法从不直接添加或删除元素。
如果需要添加或删除元素,则必须使用容器操作。
第二节:初窥算法——#include <algorithm> // 使用泛型算法——#include <numeric> // 泛化的算术算法(generalized numeric algorithm)@学习摘录114:迭代器实参类型——大多数算法(前两个参数指定范围):——通常:泛型算法都是在标记容器(或其他序列)内的元素范围的迭代器上操作的。
——标记范围的两个实参类型必须精确匹配,而迭代器本身必须标记一个范围:——它们必须指向同一个容器中的元素(或者超出容器末端的下一位置),——并且如果两者不相等,则第一个迭代器通过不断地自增,必须可以到达第二个迭代器。
——有些算法(带有两对迭代器参数)——每对迭代器中,两个实参的类型必须精确匹配,但不要求两对之间的类型匹配。
——当元素存储在不同类型的序列中时,只要这两个序列中的元素可以比较即可。
第三节:再谈迭代器——C++语言还提供了另外三种迭代器@学习摘录115:三种容器的简单介绍——插入迭代器(insert iterator):这类迭代器与容器绑定在一起,实现在容器中插入元素的功能。
——iostream迭代器(iostream iterator):这类迭代器可与输入或输出流绑定在一起,用于迭代遍历所关联的IO流。
——反向迭代器(reverse iterator):这类迭代器实现向后遍历,而不是向前遍历。
@学习摘录116:三种插入迭代器——这里有三种插入器,其差别在于插入元素的位置不同:——1. back_inserter, 创建使用push_back实现插入迭代器——2. front_inserter, 使用push_front实现插入。
CPrimer 第11章泛型算法课后习题答案
第11章-泛型算法1.algorithm头文件定义了一个名为count的函数,其功能类似于find。
这个函数使用一对迭代器和一个值做参数,返回这个值出现的次数的统计结果。
编写程序读取一系列int型数据,并将它们存储到vector对象中然后统计某个指定的值出现了多少次。
// 11.17_11.1_int_to_vector_count.cpp : 定义控制台应用程序的入口点。
//#include"stdafx.h"#include<vector>#include<iostream>#include<algorithm>using namespace std;int _tmain(int argc, _TCHAR* argv[]){cout << "\tInput some int numbers ( ctrl + z to end):\n\t ";vector<int> iVec;int iVal;while ( cin >> iVal )iVec.push_back( iVal );cout << "\n\tInput a num to search in the iVec: ";cin.clear();cin >> iVal;int iCnt = 0;if ( iCnt = count( iVec.begin(), iVec.end(), iVal )){cout << "\n\tThe value " << iVal << " occurs " << iCnt << " times." << endl;}system("pause");return 0;}2.重复前面的程序,但是,将读入的值存储到一个string类型的list对象中。
CC经典教程(十一)
CC经典教程(十一)C C经典教程(十一).txt本文由2012shijiebei贡献doc文档可能在WAP端浏览体验不佳。
建议您优先选择TXT,或下载源文件到本机查看。
伍亿人才招聘网—人才基地,企业动力,群英汇聚在伍亿!C++/C 经典教程(十一)经典教程(第十一章其它编程经验11.1 使用 const 提高函数的健壮性看到 const 关键字,C++程序员首先想到的可能是 const 常量。
这可不是良好的条件反射。
如果只知道用 const 定义常量,那么相当于把火药仅用于制作鞭炮。
const 更大的魅力是它可以修饰函数的参数、返回值,甚至函数的定义体。
const 是 constant 的缩写,“恒定不变”的意思。
被const 修饰的东西都受到强制保护,可以预防意外的变动,能提高程序的健壮性。
所以很多 C++程序设计书籍建议:“Use const whenever you need”。
11.1.1 用 const 修饰函数的参数如果参数作输出用,不论它是什么数据类型,也不论它采用“指针传递”还是“引用传递”,都不能加 const 修饰,否则该参数将失去输出功能。
const 只能修饰输入参数: u u 如果输入参数采用“指针传递”,那么加 const 修饰可以防止意外地改动该指针,起到保护作用。
例如 StringCopy 函数: void StringCopy(char *strDestination, const char *strSource); 其中 strSource 是输入参数,strDestination 是输出参数。
给 strSource 加上 const 修饰后,如果函数体内的语句试图改动 strSource 的内容,编译器将指出错误。
uu如果输入参数采用“值传递”,由于函数将自动产生临时变量用于复制该参数,该输入参数本来就无需保护,所以不要加 const 修饰。
例如不要将函数 void Func1(int x) 写成 void Func1(const int x)。
学习笔记711
C#学习笔记71、面向过程-----> 面向对象面向过程:面向的是完成这件事儿的过程,强调的是完成这件事儿的动作。
把大象塞进冰箱里1、打开冰箱门2、把大象塞进去,亲下大象的屁股3、关闭冰箱门如果我们用面向过程的思想来解决这件事儿,当执行这件事的人的不同的时候,我们需要为每个不同的人量身定做解决事情的方法。
面向对象:找个对象帮你做事儿。
把大象塞进冰箱里我们把冰箱作为对象:1、冰箱门可以被打开2、大象可以被塞进冰箱里3、冰箱门可以被关闭面向对象:意在写出一个通用的代码,屏蔽差异。
关门面向过程:关门面向对象:关门门可以被关闭理解属性与方法我们在代码中描述一个对象,通过描述这个对象的属性和方法.对象必须是看得见摸得着的我们把这些具有相同属性和相同方法的对象进行进一步的封装,抽象出来类这个概念.类就是个模子,确定了对象应该具有的属性和方法。
对象是根据类创建出来的。
类就是一个盖大楼的图纸对象就是盖出来的大楼。
2、类语法:[public] class 类名{字段;//可以有这些成员属性;方法;}写好了一个类之后,我们需要创建这个类的对象,那么,我们管创建这个类的对象过程称之为类的实例化。
使用关键字new. this:表示当前这个类的对象。
类是不占内存的,而对象是占内存的。
类中要包含两个部分,属性和方法。
Person sunQuan = new Person();sunQuan._name = "Sunquan";sunQuan._age = 23;sunQuan._gender = 'M';3、属性(Crrl+R+E 快速新建属性)属性的作用就是保护字段、对字段的赋值和取值进行限定。
写在类中。
属性在整个过程中是没有被赋值的。
过渡对字段再处理作用。
一个字段就写一个属性。
public string Name{get {return _name; }set { _name = value; }}属性的本质就是两个方法,一个叫get()一个叫set()。
- 1、下载文档前请自行甄别文档内容的完整性,平台不提供额外的编辑、内容补充、找答案等附加服务。
- 2、"仅部分预览"的文档,不可在线预览部分如存在完整性等问题,可反馈申请退款(可完整预览的文档不适用该条件!)。
- 3、如文档侵犯您的权益,请联系客服反馈,我们会尽快为您处理(人工客服工作时间:9:00-18:30)。
const只能修饰输入参数:
u 如果输入参数采用“指针传递”,那么加const修饰可以防止意外地改动该指针,起到保护作用。
例如StringCopy函数:
void StringCopy(char *strDestination, const char *strSource);
其中strSource是输入参数,strDestination是输出参数。给strSource加上const修饰后,如果函数体内的语句试图改动strSource的内容,编译器将指出错误。
第11章 其它编程经验.txt机会就像秃子头上一根毛,你抓住就抓住了,抓不住就没了。我和你说了10分钟的话,但却没有和你产生任何争论。那么,我们之间一定有个人变得虚伪无比!过错是短暂的遗憾,错过是永远的遗憾。相遇是缘,相知是份,相爱是约定,相守才是真爱。11.1 使用const提高函数的健壮性
看到const关键字,C++程序员首先想到的可能是const常量。这可不是良好的条件反射。如果只知道用const定义常量,那么相当于把火药仅用于制作鞭炮。const更大的魅力是它可以修饰函数的参数、返回值,甚至函数的定义体。
class Stack
{
public:
void Push(int elem);
int Pop(void);
int GetCount(void) const; // const成员函数
private:
int m_num;
int m_data[100];
};
int Stack::GetCount(void) const
如下语句将出现编译错误:
char *str = GetString();
正确的用法是
const char *str = GetString();
u 如果函数返回值采用“值传递方式”,由于函数会把返回值复制到外部临时的存储单元中,加const修饰没有任何价值。
例如不要把函数int GetInt(void) 写成const int GetInt(void)。
const是constant的缩写,“恒定不变”的意思。被const修饰的东西都受到强制保护,可以预防意外的变动,能提高程序的健壮性。所以很多C++程序设计书籍建议:“Use const whenever you need”。
11.1.1 用const修饰函数的参数
如果参数作输出用,不论它是什么数据类型,也不论它采用“指针传递”还是“引用传递”,都不能加const修饰,否则该参数将失去输出功能。
u 对于非内部数据类型的参数而言,象void Func(A a) 这样声明的函数注定效率比较底。因为函数体内将产生A类型的临时对象用于复制参数a,而临时对象的构造、复制、析构过程都将消耗时间。
为了提高效率,可以将函数声明改为void Func(A &a),因为“引用传递”仅借用一下参数的别名而已,不需要产生临时对象。但是函数void Func(A &a) 存在一个缺点:“引用传递”有可能改变参数a,这是我们不期望的。解决这个问题很容易,加const修饰即可,因此函数最终成为void Func(const A &a)。
任何不会修改数据成员的函数都应该声明为const类型。如果在编写const成员函数时,不慎修改了数据成员,或者调用了其它非const成员函数,编译器将指出错误,这无疑会提高程序的健壮性。
以下程序中,类stack的成员函数GetCount仅用于计数,从逻辑上讲GetCount应当为const函数。编译器将指出GetCount函数中的错误。
[Summit] Steve Summit, C Programming FAQs, Addison-Wesley, 1996
u 如果输入参数采用“值传递”,由于函数将自动产生临时变量用于复制该参数,该输入参数本来就无需保护,所以不要加const修饰。
例如不要将函数void Func1(int x) 写成void Func1(const int x)。同理不要将函数void Func2(A a) 写成void Func2(const A a)。其中A为用户自定义的数据类型。
对于非内部数据类型的输入参数,应该将“值传递”的方式改为“const引用传递”,目的是提高效率。例如将void Func(A a) 改为void Func(const A &a)。
对于内部数据类型的输入参数,不要将“值传递”的方式改为“const引用传递”。否则既达不到提高效率的目的,又降低了函数的可理解性。例如void Func(int x) 不应该改为void Func(const int &x)。
l 【规则11-2-6】不要追求紧凑的代码,因为紧凑的代码并不能产生高效的机器码。
11.3 一些有益的建议
2 【建议11-3-1】当心那些视觉上不易分辨的操作符发生书写错误。
我们经常会把“==”误写成“=”,象“||”、“&&”、“<=”、“>=”这类符号也很容易发生“丢1”失误。然而编译器却不一定能自动指出这类错误。
以此类推,是否应将void Func(int x) 改写为void Func(const int &x),以便提高效率?完全没有必要,因为内部数据类型的参数不存在构造、析构的过程,而复制也非常快,“值传递”和“引用传递”的效率几乎相当。
问题是如此的缠绵,我只好将“const &”修饰输入参数的用法总结一下,如表11-1-1所示。
[Maguire] Steve Maguire, Writing Clean Code(编程精粹,姜静波 等译),电子工业出版社,1993
[Meyers] Scott Meyers, Effective C++, Addison-Wesley, 1992
[Murry] Robert B. Murry, C++ Strategies and Tactics, Addison-Wesley, 1993
u 函数返回值采用“引用传递”的场合并不多,这种方式一般只出现在类的赋值函数中,目的是为了实现链式表达。
例如
class A
{…
A & operate = (const A &other); // 赋值函数
};
A a, b, c; // a, b, c 为A的对象
…
2 【建议11-3-14】如果可能的话,使用PC-Lint、LogiScope等工具进行代码审查。
参考文献
[Cline] Marshall P. Cline and Greg A. Lomow, C++ FAQs, Addison-Wesley, 1995
[Eckel] Bruce Eckel, Thinking in C++(C++ 编程思想,刘宗田 等译),机械工业出版社,2000
同理不要把函数A GetA(void) 写成const A GetA(void),其中A为用户自定义的数据类型。
如果返回值不是内部数据类型,将函数A GetA(void) 改写为const A & GetA(void)的确能提高效率。但此时千万千万要小心,一定要搞清楚函数究竟是想返回一个对象的“拷贝”还是仅返回“别名”就可以了,否则程序会出错。见6.2节“返回值的规则”。
程序的时间效率是指运行速度,空间效率是指程序占用内存或者外存的状况。
全局效率是指站在整个系统的角度上考虑的效率,局部效率是指站在模块或函数角度上考虑的效率。
l 【规则11-2-1】不要一味地追求程序的效率,应当在满足正确性、可靠性、健壮性、可读性等质量因素的前提下,设法提高程序的效率。
表11-1-1 “const &”修饰输入参数的规则
11.1.2 用const修饰函数的返回值
u 如果给以“指针传递”方式的函数返回值加const修饰,那么函数返回值(即指针)的内容不能被修改,该返回值只能被赋给加const修饰的同类型指针。
例如函数
const char * GetString(void);
l 【规则11-2-2】以提高程序的全局效率为主,提高局部效率为辅。
l 【规则11-2-3】在优化程序的效率时,应当先找出限制效率的“瓶颈”,不要在无关紧要之处优化。
l 【规则11-2-4】先优化数据结构和算法,再优化执行代码。
l 【规则11-2-5】有时候时间效率和空间效率可能对立,此时应当分析那个更重要,作出适当的折衷。例如多花费一些内存来提高性能。
2 【建议11-3-5】当心变量发生上溢或下溢,数组的下标越界。
2 【建议11-3-6】当心忘记编写错误处理程序,当心错误处理程序本身有误。
2 【建议11-3-7】当心文件I/O有错误。
2 【建议11-3-8】避免编写技巧性很高代码。
2 【建议11-3-9】不要设计面面俱到、非常灵活的数据结构。
2 【建议11-3-2】变量(指针、数组)被创建之后应当及时把它们初始化,以防止把未被初始化的变量当成右值使用。
2 【建议11-3-3】当心变量的初值、缺省值错误,或者精度不够。
2 【建议11-3-4】当心数据类型转换发生错误。尽量使用显式的数据类型转换(让人们知道发生了什么事),避免让编译器轻悄悄地进行隐式的数据类型转换。
{
++ m_num; // 编译错误,企图修改数据成员m_num
Pop(); // 编译错误,企图调用非const函数
return m_num;
}
const成员函数的声明看起来怪怪的:const关键字只能放在函数声明的尾部,大概是因为其它地方都已经被占用了。
