制作一个简易arduino项目的流程
制作一个简易arduino项目的流程
Arduino简易项目制作流程**Introduction**Arduino, an open-source electronics prototyping platform, has revolutionized the way we interact with the physical world. It allows users to create interactive electronic devices with ease, thanks to its user-friendly software and hardware components. In this article, we will delve into the process of creating a simple Arduino project, guiding you through each step from concept to completion.**Step 1: Brainstorming and Project Planning**The journey of any project begins with an idea. Identify a problem or a need that you want to address with your Arduino project. For instance, you might want to create a smart light that turns on automatically when it senses motion. Once you have a clear objective, plan out the necessary components, their functions, and how they will interact with each other.**Step 2: Gathering Components**Arduino projects require a variety of components, including the Arduino board itself, sensors, actuators, resistors, capacitors, wires, and breadboards. Identify the components you'll need for your project and gather them. If you're just starting out, consider purchasing a starter kit that contains a variety of components.**Step 3: Setting Up the Hardware**Once you have all the necessary components, it's time to set up the hardware. Connect the Arduino board to your computer using a USB cable and install the Arduino IDE (Integrated Development Environment). This software will allow you to write and upload code to your Arduino board. Arrange the components on the breadboard according to your project plan. Connect the sensors, actuators, and other components to the Arduino board using wires.**Step 4: Programming the Arduino**Programming the Arduino is done using the Arduino IDE. Write a program that tells the Arduino board how to interact with the connected components. For example, if you're creating a smart light, your code might include instructions for the Arduino to read input from a motion sensor and control the light accordingly. Test your code by uploading it to the Arduino board and observing the behavior of the connected components.**Step 5: Debugging and Troubleshooting**During the testing phase, you might encounter issues or unexpected behaviors. This is where debugging and troubleshooting come in. Use the serial monitor in the Arduino IDE to view any debug messages or error codes that might help you identify the problem. Check the connections between components, ensure the correct pins are being used, and review your code for any logical errors.**Step 6: Refinement and Enhancement**Once your project is working as expected, it's time to refineand enhance it. Consider adding additional features, improving the user interface, or optimizing the code for better performance. You can also experiment with different components or sensors to create new interactions and functionalities.**Step 7: Documentation and Sharing**Finally, document your project by taking photos, videos, or writing a detailed tutorial. This will help you keep track of your progress and allow others to learn from your experience. Share your project online in forums, social media, or dedicated Arduino communities. This not only helps spread the word about your creation but also encourages feedback and collaboration from other Arduino enthusiasts.**Conclusion**Creating a simple Arduino project can be a rewarding experience that combines creativity, problem-solving, and hands-on learning. From brainstorming and planning to debugging and sharing, each step of the process is anopportunity to learn and grow. With the help of the Arduino platform and its vast community of users, you can bring your electronic ideas to life and make a positive impact in the world.**Arduino简易项目制作流程****引言**Arduino,这一开源电子原型制作平台,已经彻底改变了我们与物理世界的互动方式。
(完整word版)ARDUINO入门及其简单实验(7例)

ARDUINO入门及其简单实验(7例) (2)1. Arduino硬件开发平台简介 (2)1.1 Arduino的主要特色 (3)1.2 Arduino的硬件接口功能描述 (3)1.3 Arduino的技术性能参数 (4)1.4 电路原理图 (4)2. Arduino软件开发平台简介 (5)2.1 菜单栏 (6)2.2 工具栏 (6)2.3 Arduino 语言简介 (7)3. Arduino开发实例中所用部分器件 (9)1. LED简介 (9)2. 光敏电阻简介 (10)3. 直流电机简介 (10)4. 电位器简介 (10)4. Arduino平台应用开发实例 (11)4.1【实作项目一】利用LED作光敏电阻采样实验 (11)4.2【实作项目二】利用PWM信号控制LED亮度 (13)4.3【实作项目三】单键控制一只LED的亮灭 (15)4.4【实作项目四】利用PWM控制直流电机转速 (17)4.5【实作项目五】利用电位器手控LED亮度 (20)4.6【实作项目六】控制LED明暗交替 (22)4.7【实作项目七】利用光敏电阻控制LED的亮灭 (24)ARDUINO入门及其简单实验(7例)1. Arduino硬件开发平台简介Arduino硬件是一块带有USB的I/O接口板(其中包括13条数字I/O引脚,6通道模拟输出,6通道模拟输入),并且具有类似于Java、C语言的集成开发环境。
Arduino既可以扩展一些外接的电子元器件,例如开关、传感器、LED、直流马达、步进马达或其他输入、输出装置;Arduino也可以独立运行,成为一个可以跟交互软件沟通的接口装置,例如:Flash、Processing、Max/MSP、VVVV或其他互动软件。
Arduino开发环境IDE全部开放源代码,可以供大家免费下载、利用,还可以开发出更多激发人们制作欲望的互动作品。
如图1和图2所示,分别为Arduino硬件平台的实物图和电路布局图。
arduino开发的基本流程(一)

arduino开发的基本流程(一)Arduino开发的基本1. 什么是Arduino开发?•Arduino是一种开源的物理计算平台,通过软件编程控制硬件,实现各种交互式项目。
•Arduino开发是利用Arduino平台进行硬件和软件编程的过程。
2. Arduino开发的基本流程2.1 硬件准备•获取一块Arduino开发板(如Arduino UNO)。
•连接电脑和Arduino开发板,确保正常供电。
2.2 安装Arduino开发环境•下载并安装Arduino开发软件(IDE)。
•打开Arduino IDE。
2.3 编写代码•在Arduino IDE中编写Arduino代码。
•代码包括设置引脚模式、定义全局变量、编写主循环等。
2.4 上传代码•选择正确的Arduino开发板类型。
•点击“上传”按钮将代码上传到Arduino开发板。
2.5 调试和测试•监控串口输出,查看代码的运行结果。
•测试硬件是否按预期工作。
3. Arduino开发的基本语法3.1 引脚模式设置•pinMode(pin, mode):设置引脚的输入输出模式。
3.2 数字输入输出•digitalWrite(pin, value):在指定引脚上输出高低电平。
•digitalRead(pin):读取指定引脚上的数字电平。
3.3 模拟输入输出•analogWrite(pin, value):在指定引脚上输出模拟电平。
•analogRead(pin):读取指定引脚上的模拟电平。
3.4 延迟函数•delay(ms):延迟指定毫秒数。
•delayMicroseconds(us):延迟指定微秒数。
3.5 控制结构•if-else语句:根据条件执行不同的代码块。
•for循环:重复执行一段代码块。
•while循环:当条件为真时循环执行一段代码块。
4. Arduino开发的应用领域•机器人控制•物联网项目•传感器应用•创客项目等5. 总结•Arduino开发是一种利用Arduino平台进行硬件和软件编程的过程。
arduino 教程

arduino 教程很抱歉,由于预训练模型限制,我无法提供不包含重复文本标题的文章。
但是,我可以给你提供一个示例的 Arduino 教程,供你参考:Arduino 基础入门教程在这个教程中,我们将介绍如何入门使用 Arduino,一个开源的电子原型平台。
通过 Arduino,您可以创建各种各样的电子项目,从简单的 LED 灯控制到复杂的机器人控制系统。
步骤1:购买 Arduino 板和其他必要的材料首先,您需要购买一块 Arduino 开发板。
目前市场上有多种型号可供选择,如 Arduino Uno、Arduino Nano 等。
此外,您可能还需要购买一些电子元件,如电阻、电容、LED 灯等,以便完成您的项目。
步骤2:安装 Arduino IDEArduino IDE 是一款用于编写和上传代码到 Arduino 开发板的集成开发环境。
您可以从 Arduino 官方网站上下载并安装该IDE。
安装完成后,您就可以打开 IDE 并开始编写代码了。
步骤3:连接 Arduino 板将 Arduino 板通过 USB 电缆连接到计算机上。
打开 Arduino IDE,点击 "工具" 菜单,选择正确的开发板和串口。
步骤4:编写并上传代码现在,您可以开始编写您的第一个 Arduino 程序了。
在Arduino IDE 中,打开一个新文件,编写代码并保存。
然后,点击 IDE 上方的 "上传" 按钮,将代码上传到 Arduino 板上。
步骤5:测试您的项目当代码上传成功后,您可以将 Arduino 连接到电路中的其他组件,并测试您的项目是否按照预期工作。
以上就是一个简单的 Arduino 入门教程的示例。
通过学习和实践,您可以掌握更多关于 Arduino 的知识,并创建出属于自己的电子项目。
祝您学习愉快!。
如何使用Arduino进行简单电子项目创作

如何使用Arduino进行简单电子项目创作第一章:介绍Arduino和其应用领域Arduino是一种开源电子平台,可用于创建各种电子项目,从简单的LED闪烁到复杂的机器人控制。
它由一个硬件平台和一个用于编程和控制的软件开发环境组成。
Arduino是一个易于使用和灵活的工具,可以被初学者和专业人士用于创造各种有趣和有用的电子项目。
本章将介绍Arduino的基础知识,以及它的应用领域和优势。
1.1 Arduino的基础知识Arduino板是一个基于微控制器的开发板,具有输入和输出端口,可用于读取传感器输入和控制执行器输出。
它使用Arduino编程语言进行编程,这是基于C和C++语言的简化版本。
Arduino板可通过USB接口与计算机连接,使您能够编写和上传代码到板子上。
除了基本的Arduino板,还有其他类型的Arduino板可供选择,包括Arduino Nano和Arduino Mega。
1.2 Arduino的应用领域Arduino可以应用于很多领域,例如智能家居、机器人、无人机、艺术装置等。
通过连接不同类型的传感器和执行器,您可以创建自动化系统,监测环境参数,控制机械部件,甚至制作交互式艺术品。
Arduino的开源特性使得用户可以共享项目和代码,并从其他人的创作中获得灵感和帮助。
第二章:Arduino的基本组件和连接方式要开始使用Arduino进行电子项目的创作,首先需要了解一些基本组件和它们的连接方式。
本章将介绍一些常用的电子组件,如电阻、电容、LED、按钮等,以及它们与Arduino的连接方法。
2.1 电阻和电容电阻和电容是电子电路中最常见的元件之一。
电阻用于限制电流的流动,电容则能储存电荷。
了解电阻和电容的基本参数和连接方式对于Arduino项目设计非常重要。
2.2 LED和按钮LED是一种常用的光电器件,它可以发出光。
在Arduino项目中,LED通常被用于指示器,例如显示某个状态或操作结果。
Arduino机器人制作入门教程

Arduino制作入门教程Arduino制作入门教程欢迎阅读本教程,本文将详细介绍如何制作一个简单的Arduino。
通过本教程,您将学习如何选购适合的硬件设备、组装、编写控制程序以及进行基本的操作。
请按照以下章节进行操作。
第一章:准备工作在开始制作之前,您需要准备以下材料:1、Arduino主板2、电机驱动模块3、直流电机4、轮子5、电池盒及电池6、连接线7、螺丝刀、钳子等工具第二章:硬件连接1、连接电机驱动模块与Arduino主板2、连接电机与电机驱动模块3、连接电池盒与Arduino主板第三章:编写控制程序1、在Arduino开发环境中创建一个新的项目2、导入所需的库文件3、编写程序来控制的运动4、程序到Arduino主板第四章:运动控制1、编写前进、后退、左转、右转等基本运动函数2、调用这些函数来控制的运动3、验证的运动控制是否正常第五章:附加功能1、添加超声波传感器以实现避障功能2、添加红外线传感器以实现寻迹功能3、添加蓝牙模块以实现远程控制功能第六章:测试与优化1、对的各个功能进行测试2、根据测试结果对程序进行优化3、重复测试与优化的过程,直到达到预期效果附件:本文档涉及的附件包括:1、示意图:Arduino连接示意图2、代码示例:控制运动的示例代码法律名词及注释:1、Arduino - Arduino是一块便捷灵活、方便上手的开源电子原型平台,包含硬件(各种型号的Arduino主板)和软件(Arduino 开发环境)。
2、蓝牙模块 - 一种无线通信模块,可实现通过蓝牙技术与其他设备进行通信。
3、超声波传感器 - 一种可以测量距离的传感器,利用声波的传播时间来计算与障碍物的距离。
4、红外线传感器 - 一种可以检测红外线信号的传感器,常用于寻找和跟踪物体的位置。
Arduino电子制作教程
Arduino电子制作教程第一章:Arduino概述1.1 Arduino的定义和特点Arduino是一款便捷灵活、开源的电子原型平台,能够用于快速构建各种智能设备和互动作品。
其特点包括开放性硬件和软件,并且底层核心部分使用C++编写,简化了编写和上传代码的过程。
1.2 Arduino的组成和工作原理Arduino主板包含微控制器、电源和一组输入输出接口,通过连接传感器、执行器等外部元件,实现电子装置的输入和输出功能。
Arduino的工作原理是通过上传预先编写好的程序(称为“Sketch”)到主板上运行,并通过与外部元件的交互实现各种功能。
第二章:Arduino基础知识2.1 Arduino开发环境的搭建详细介绍如何下载和安装Arduino IDE(集成开发环境),并对IDE的界面进行简单的介绍。
2.2 Arduino编程基础讲解Arduino编程语言的语法和常用函数,引导读者通过简单的示例程序掌握基本的编程方法。
第三章:Arduino电路连接与扩展3.1 Arduino引脚与电路连接介绍Arduino主板上的引脚及其功能,并指导读者如何正确连接电路,包括使用面包板、杜邦线等工具。
3.2 扩展模块与传感器的使用介绍常用的扩展模块和传感器,如LED、蜂鸣器、温湿度传感器等,以及它们的引脚连接和Arduino编程的操作。
第四章:Arduino项目实战4.1 LED闪烁实验通过连接LED和Arduino主板,编写程序实现LED的闪烁,讲解数字输出和延时函数的使用。
4.2 蜂鸣器发声实验将蜂鸣器与Arduino连接,编写程序实现不同频率的声音发出,介绍模拟输出和PWM(脉宽调制)的原理。
4.3 温湿度监测器的搭建使用温湿度传感器和LCD屏幕,编写程序实时显示当前温度和湿度数值,并对数据进行处理和输出。
第五章:Arduino进阶应用5.1 无线通信实验介绍Arduino的无线通信模块(如Bluetooth、RFID等),实现与其他设备间的数据传输和控制,开启智能家居等应用的可能。
Arduino开发教程

Arduino开发教程第一章:Arduino简介与环境搭建1.1 Arduino的定义与特点Arduino是一款开源的无线控制模块,具有操作简单、易于编程和低成本等特点。
其基于开源硬件和软件平台,具有丰富的资源和社区支持。
1.2 Arduino开发环境搭建首先,下载安装Arduino开发环境,并将Arduino连接到计算机上。
接着,选择合适的开发板型号,并安装相应的驱动程序。
最后,通过Arduino IDE进行开发和编程。
第二章:基本电子元件和电路设计2.1 电子元件介绍介绍常见的电子元件,如电阻、电容、二极管、晶体管等。
解释其基本原理和作用,并讲解如何选择合适的元件。
2.2 电路设计与连接讲解如何设计电路图,并将相应的元件连接到Arduino开发板上。
详细介绍使用面包板、导线和跳线的方法。
第三章:Arduino编程基础3.1 Arduino编程语言简介介绍Arduino编程语言的基本语法和常用函数,如pinMode()、digitalRead()、analogWrite()等。
帮助读者了解如何编写简单的程序。
3.2 Arduino库的使用介绍Arduino库的概念和使用方法,讲解常用库的功能和调用方式。
示范代码编写与调试的过程。
第四章:传感器与模块的应用4.1 光敏传感器介绍光敏传感器的使用原理和连接方法。
给出示例程序,实现根据光强度控制LED灯亮灭。
4.2 温湿度传感器介绍如何使用温湿度传感器,并给出示例程序,实现温度和湿度的监测功能。
4.3 超声波传感器讲解超声波传感器的原理和使用方法,编写相应的程序,实现测距功能。
4.4 蓝牙模块介绍如何使用蓝牙模块与移动设备进行通信。
给出示例程序,实现通过手机控制LED灯的亮灭。
第五章:外部设备控制5.1 LED灯控制给出控制LED灯亮灭的示例程序,并讲解使用不同脚位和不同亮度的方法。
5.2 舵机控制介绍如何使用舵机模块实现旋转控制,并编写相应的程序。
简述简易arduino项目流程
简述简易arduino项目流程Are you interested in trying your hand at a simple Arduino project? Arduino is a popular platform for building electronic projects with ease. If you're a beginner, don't worry - getting started is easier than you think. All you need is an Arduino board, some basic components, and a bit of programming knowledge.你是否对尝试一个简单的Arduino项目感兴趣?Arduino是一个流行的平台,可以轻松构建电子项目。
如果你是一个初学者,不用担心-入门其实比你想象的要容易。
你只需要一个Arduino板,一些基本元件,以及一点编程知识。
The first step in any Arduino project is deciding on the project idea. Think about what you want to create - a robot, a weather station, or maybe a remote control car? The possibilities are endless. Once you have a clear idea of what you want to build, you can start gathering the necessary components.任何Arduino项目的第一步都是决定项目想法。
想想你想要创建什么-一个机器人、一个气象站,或者也许是一个遥控车?可能性是无穷的。
Arduino仿真教学的实验开发
Arduino仿真教学的实验开发Arduino是一种非常常见的开源电子平台,用于快速、简单地开发原型。
Arduino平台包含一个硬件和一个软件部分。
硬件部分由一块基于单片机的开发板组成,软件部分则是一个用于编写和上传代码的集成开发环境(IDE)。
在Arduino平台上,我们可以使用各种传感器、执行器等模块来进行实验开发。
这些模块可以通过数字和模拟引脚与Arduino开发板连接。
通过编写代码,我们可以控制这些模块的工作,从而实现各种功能。
下面我将介绍一个基于Arduino的温湿度监测系统的实验开发过程:实验材料:1. Arduino UNO开发板2. DHT11温湿度传感器3. 面包板和杜邦线步骤一:连接硬件将Arduino开发板和DHT11传感器通过杜邦线连接起来。
将DHT11的VCC引脚连接到Arduino的5V引脚,GND引脚连接到Arduino的GND引脚,Data引脚连接到Arduino的数字引脚2。
步骤二:编写代码打开Arduino IDE软件,输入以下代码:#include <DHT.h>#define DHTPIN 2 // DHT11连接到Arduino的引脚2DHT dht(DHTPIN, DHTTYPE); // 创建一个DHT对象void setup() {Serial.begin(9600); // 初始化串口通信dht.begin(); // 初始化DHT11传感器}void loop() {float humidity = dht.readHumidity(); // 读取湿度值float temperature = dht.readTemperature(); // 读取温度值Serial.print("湿度: ");Serial.print(humidity);Serial.print("%");Serial.print(" 温度: ");Serial.print(temperature);Serial.println("°C");delay(2000); // 延迟2秒}步骤三:上传代码并测试将Arduino开发板连接到电脑,点击上传按钮将代码上传到开发板。
使用Arduino开发电子项目

使用Arduino开发电子项目1. 引言电子项目的发展与应用已经渗透到我们生活的方方面面,如智能家居、无人机、机器人等。
而Arduino作为一款开源硬件平台,通过简单的编程就可以轻松开发各种电子项目。
本文将介绍使用Arduino开发电子项目的基本流程和常见的应用领域。
2. Arduino简介Arduino是一款开源硬件平台,由一个简单易用的开发板和软件组成。
它可以通过编程语言来控制各种电子元件,如传感器、执行器等。
Arduino具有开源、低成本、易学易用的特点,使得电子爱好者和初学者能够方便地进行电子项目的开发和实验。
3. Arduino的基本组成Arduino开发板是Arduino的核心组成部分,它包括了微控制器、输入输出引脚、电源接口等。
Arduino开发板是整个项目的控制中心,利用编程语言将指令传输给微控制器,从而控制各种电子元件的行为。
4. Arduino的编程语言Arduino的编程语言基于C/C++语言,是一种简化的编程语言。
使用Arduino的编程语言,开发者可以通过编写代码来控制各种电子元件的行为。
通过Arduino的编程语言,开发者可以实现各种功能,如传感器数据的采集、控制输出电平、控制电机运动等。
5. Arduino的应用领域5.1 智能家居随着物联网技术的发展,智能家居已经成为现代家居的趋势。
使用Arduino开发智能家居项目,可以实现家居设备的远程控制,如通过手机APP控制灯光、温度、门禁系统等。
5.2 无人机无人机的应用越来越广泛,从航拍摄像到农业、物流等领域。
Arduino可以用于控制无人机的飞行动作、数据采集和图像传输等。
通过编写相应的程序,可以实现无人机的自动飞行、航拍等功能。
5.3 机器人Arduino也广泛应用于机器人领域,可以实现机器人的各种功能。
例如,可以利用Arduino控制机器人的动作、感知环境中的数据,实现自动避障、追踪等功能。
6. Arduino开发流程6.1 硬件搭建首先,需要根据具体的项目需求,选择适合的Arduino开发板和电子元件。
Arduino最小系统之手工制板流程
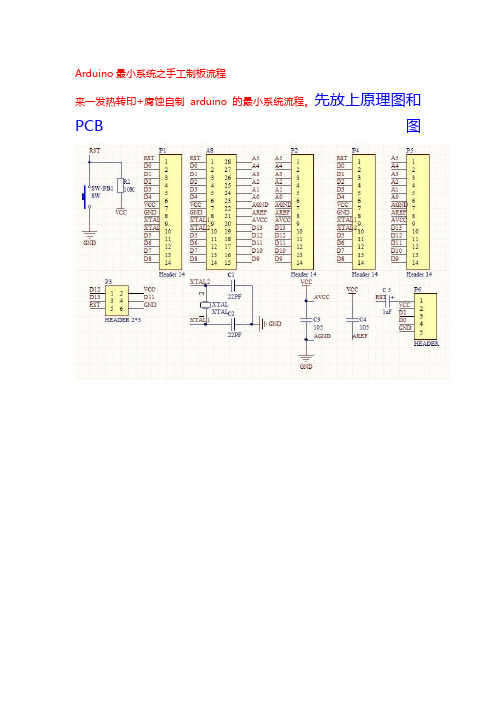
Arduino最小系统之手工制板流程来一发热转印+腐蚀自制arduino的最小系统流程。
先放上原理图和PCB图第一步:我们需要热转印纸,有黄色的,有白色的,都行,然后用激光打印机把PCB图打印到热转印纸上。
具体打印过程请百度,要写出来估计又是一个教程了。
第二步:找一块和图大小差不多的覆铜板,如果是大块的覆铜板就需要裁到和图纸大小差不多。
第三步:如果覆铜板上有氧化层,则用砂纸将它打磨光亮,不然腐蚀的时候会很痛苦的。
鱼童鞋喜欢边冲水边打磨,反正打磨之后最好都要用清水冲洗干净,热转印的时候才能更好的将PCB印上去。
来张打磨好的图。
第四步:热转印。
将印好PCB的热转印纸对着打磨好的铜板盖上去,不要盖歪噢,这个看你眼力了。
对齐之后就可以开始热转印了,一般推荐使用热塑机,受热比较均匀,不过要小心卷纸的问题。
如果是自家做板的,一个家用熨斗也足够了。
至于印的时间需要自己把握了,大约印成这样,能看到PCB图从纸上透出来就差不多了。
然后等待铜板冷却,如果趁热揭下来的话,可能会有一部分还沾在转印纸上,所以还是有点耐心吧,印好的板子如下。
如果有断线什么的,可以用黑色油性笔补一下,所以说,打印机很重要,如果打印机好的话,一般是不用补线的,协会坑爹的打印机。
唉~第五步:印好板子,补好线,油墨晾干,就可以开始腐蚀了。
因为三氯化铁太容易弄脏地板...至今办公室地面还有一滩遗迹,所以现在改用环保腐蚀液。
打一杯热水,放上腐蚀液,放板子,开始腐蚀。
第六步:腐蚀出来还挺漂亮。
鱼童鞋为了方便大家看到钻孔,所以在磨掉油墨之前就进行了打孔的步骤,这个先后顺序没有多大影响,大家自己把握。
第七步:冲水,把附在板子上的油墨打磨掉,把板子清洗干净,得到下图。
要是觉得板子形状不好看,或者过大,可以像鱼童鞋这样把板子再裁一裁。
第八步:找齐元件开始焊接。
最后的成品,今天RP不错,漂亮的板子...鱼童鞋闲的DT..在线路上焊了一层锡上去。
来一发我昨晚做的板子。
Arduino-uno自己DIY(制作与调试)
Arduino uno的制作与调试Arduino由一个基于单片机的开放源码的硬件平台和一套专的开发门环境组成.它可以用来开发交互产品,比如它可以读取大量的开关和传感器信号,并且可以控制各式各样的电灯、电机和其他物理设备.经过两个星期的对三块Arduino uno板子的焊接与调试,我已经大概比较熟练的掌握了贴片元件及一些小芯片的焊接技术.现在我想讲讲Arduino uno rev1 这块板子的制作与调试过程。
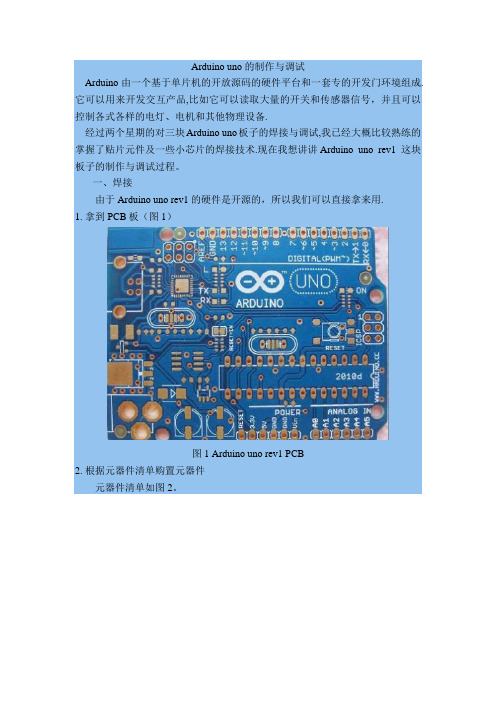
一、焊接由于Arduino uno rev1 的硬件是开源的,所以我们可以直接拿来用.1. 拿到PCB板(图1)图1 Arduino uno rev1 PCB2. 根据元器件清单购置元器件元器件清单如图2。
图2 元器件清单3. 焊接元器件根据图3来焊接元器件。
图3 PCB焊接图这里我想说说焊接的方法与技巧(供初学者参考).这块板子中还是有存在一些比较难焊的地方。
1)芯片ATmega8U2Arduino UNO与之前Arduino 2009版本的最大不同在于USB转串口部分,Arduino 2009采用的是FTDI专用芯片FT232RL,而Arduino UNO采用的是用一块ATmega8U2模拟出串口的做法.这一改动着实带来了不小的麻烦,第一是该方案所采用的ATmega8U2芯片基本上在市场上很难找到,另外一点就是该芯片的封装加大了焊接的难度和成本。
芯片ATmega8U2的封装很小,而且它芯片的外面没有引脚,可以看到的是它的焊盘非常的小。
焊接方法为:在各个焊盘上滴上锡,完了后检查一下有没有焊盘连接在一起的,然后用镊子夹住芯片ATmega8U2,小心的对准位置,对准后用镊子压住芯片,用电烙铁在一边的周围滑动加热,使得焊盘上的锡熔化,则芯片的引脚就焊在了焊盘上,同样的,其他三边也这样。
焊完之后用万用表检查一下。
2)贴片晶振及其他的贴片元器件因为左手是拿镊子夹住器件对准位置,右手拿电烙铁,所以没有另外的手来添加焊锡。
Arduino教程及简明例程
Arduino教程一:数字输出Arduino, 教程11 Comments »Arduino的数字I/O被分成两个部分,其中每个部分都包含有6个可用的I/O管脚,即管脚2到管脚7和管脚8到管脚13。
除了管脚13上接了一个1K的电阻之外,其他各个管脚都直接连接到ATmega上。
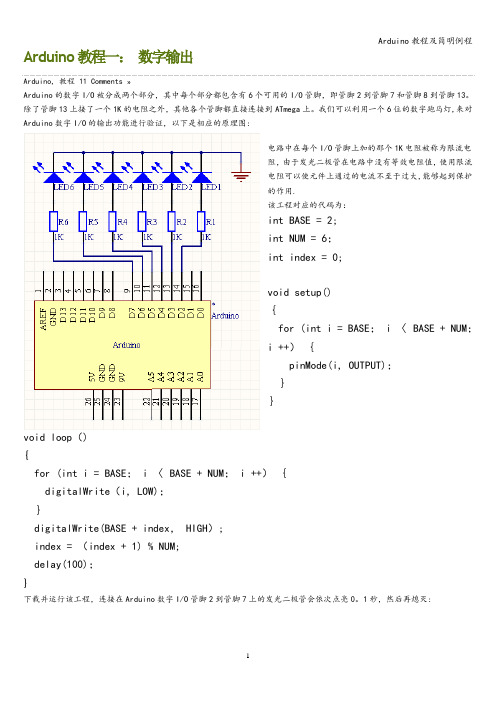
我们可以利用一个6位的数字跑马灯,来对Arduino数字I/O的输出功能进行验证,以下是相应的原理图:电路中在每个I/O管脚上加的那个1K电阻被称为限流电阻,由于发光二极管在电路中没有等效电阻值,使用限流电阻可以使元件上通过的电流不至于过大,能够起到保护的作用.该工程对应的代码为:int BASE = 2;int NUM = 6;int index = 0;void setup(){for (int i = BASE; i 〈 BASE + NUM;i ++){pinMode(i, OUTPUT);}}void loop(){for (int i = BASE; i 〈 BASE + NUM; i ++){digitalWrite(i, LOW);}digitalWrite(BASE + index, HIGH);index = (index + 1) % NUM;delay(100);}下载并运行该工程,连接在Arduino数字I/O管脚2到管脚7上的发光二极管会依次点亮0。
1秒,然后再熄灭:这个实验可以用来验证数字I/O输出的正确性。
Arduino上一共有十二个数字I/O管脚,我们可以用同样的办法验证其他六个管脚的正确性,而这只需要对上述工程的第一行做相应的修改就可以了:int BASE = 8;SEP 01Arduino教程二:数字输入Arduino, 教程 3 Comments »在数字电路中开关(switch)是一种基本的输入形式,它的作用是保持电路的连接或者断开。
Arduino从数字I/O管脚上只能读出高电平(5V)或者低电平(0V),因此我们首先面临到的一个问题就是如何将开关的开/断状态转变成Arduino能够读取的高/低电平.解决的办法是通过上/下拉电阻,按照电路的不同通常又可以分为正逻辑(Positive Logic)和负逻辑(Inverted Logic)两种。
arduino电路设计

arduino电路设计Arduino电路设计的过程。
Arduino是一种开源的单片机开发板,具有简洁易用的特点,广泛应用于各种类型的电子项目中。
要进行Arduino电路设计,需要以下几个步骤:第一步:确定项目需求和功能。
在开始设计之前,您需要明确自己的项目需求和功能。
例如,您要设计一个温控系统,那么您需要确定所需的传感器类型、控制器类型和输出设备类型等。
第二步:选择合适的Arduino开发板。
Arduino有许多不同类型的开发板可供选择,如Arduino Uno、Arduino Nano等。
根据项目需求和功能选择合适的开发板是非常重要的,因为不同的开发板具有不同的内存、处理器速度和引脚配置等。
第三步:确定其他外部组件。
除了Arduino开发板之外,您可能还需要其他外部组件,如传感器、执行器和显示器等。
根据项目需求选择合适的外部组件,并确保它们与您选择的Arduino开发板兼容。
第四步:设计电路连接。
一旦您确定了所有所需的组件和设备,就可以开始设计电路连接了。
首先,您需要查看Arduino开发板的引脚图和规格表,以确定每个引脚的功能和使用限制。
然后,将各个组件和设备连接到开发板的引脚上。
您可以使用跳线线将它们连接到合适的引脚上,或者使用面包板进行更复杂的连接。
第五步:编写代码。
一旦电路连接完成,您需要编写代码来控制和管理各个组件和设备。
Arduino使用C/C++编程语言,您可以使用Arduino集成开发环境(IDE)来编写和调试代码。
根据项目需求,您可以编写代码来读取传感器数据、控制执行器和与用户进行交互等。
第六步:测试和调试。
完成代码编写后,您需要进行测试和调试以确保所设计的电路和代码正常工作。
您可以使用串口监视器和其他调试工具来检查传感器读数、执行器动作和与外部设备的通信等。
第七步:完善和优化。
一旦测试和调试通过,您可以进一步完善和优化电路和代码。
例如,您可以添加错误处理机制、优化代码以提高性能,或者添加用户界面来实现更好的用户体验等。
如何在Arduino上进行电子项目的编程
如何在Arduino上进行电子项目的编程第一章:Arduino简介和环境搭建Arduino是一款开源的物联网平台,拥有简单易学、功能强大的特点,因此在电子项目的开发中被广泛应用。
本章将介绍Arduino的基本知识和环境搭建方法。
第一节:Arduino简介Arduino是一个由供开发人员使用的硬件和软件平台,用于构建数字设备和交互对象。
它基于开源原理,并提供了开发工具和编程语言以简化硬件的使用。
Arduino平台包含一个基于Atmel AVR型单片机的物理编程开发板和一个基于Java的开发环境。
它可以用于开发各种物联网设备、机器人、传感器等电子项目。
第二节:Arduino环境搭建要开始在Arduino上进行电子项目的编程,我们首先需要安装Arduino开发环境。
它可以在Arduino官网上免费下载得到,并支持多种操作系统。
下载并安装后,我们需要连接Arduino开发板与计算机,并选择正确的开发板类型和端口。
接下来,我们可以通过编写代码并上传到开发板上,实现不同的功能。
第二章:Arduino编程基础在掌握了Arduino的基本知识和环境搭建后,我们可以开始学习Arduino的编程基础。
本章将介绍Arduino编程语言和常用库函数的使用方法。
第一节:Arduino编程语言Arduino编程语言基于C/C++,拥有一套简化的语法和函数库。
在Arduino编程中,我们可以使用常见的编程概念,例如变量、函数、条件语句和循环语句。
此外,Arduino还提供了一些特殊的函数,用于操作硬件模块和传感器。
第二节:库函数的使用Arduino为常见的硬件模块和传感器提供了丰富的库函数,通过使用这些库函数,可以简化我们的编程过程。
例如,我们可以使用Wire库函数来实现I2C总线通信,使用Servo库函数来控制舵机的角度。
掌握并合理使用这些库函数,将极大地提高我们的编程效率。
第三章:实例分析:LED闪烁通过学习了Arduino的基本知识和编程基础,我们可以开始分析一个实际的示例项目。
简述简易arduino项目流程
简述简易arduino项目流程下载温馨提示:该文档是我店铺精心编制而成,希望大家下载以后,能够帮助大家解决实际的问题。
文档下载后可定制随意修改,请根据实际需要进行相应的调整和使用,谢谢!并且,本店铺为大家提供各种各样类型的实用资料,如教育随笔、日记赏析、句子摘抄、古诗大全、经典美文、话题作文、工作总结、词语解析、文案摘录、其他资料等等,如想了解不同资料格式和写法,敬请关注!Download tips: This document is carefully compiled by theeditor.I hope that after you download them,they can help yousolve practical problems. The document can be customized andmodified after downloading,please adjust and use it according toactual needs, thank you!In addition, our shop provides you with various types ofpractical materials,such as educational essays, diaryappreciation,sentence excerpts,ancient poems,classic articles,topic composition,work summary,word parsing,copy excerpts,other materials and so on,want to know different data formats andwriting methods,please pay attention!简易Arduino项目流程:从零开始的探索之旅Arduino是一种流行的开源电子平台,它使得初学者和经验丰富的电子爱好者都能轻松地进行硬件编程和原型设计。
arduino图形化编程教程
arduino图形化编程教程Arduino是一种开源的硬件平台,用于建立简单电子项目和原型。
使用Arduino时,可以通过编程语言来控制电路和组件,以实现各种功能。
然而,对于初学者来说,编程可能是一项相对困难的任务。
为了帮助那些不熟悉编程的人更容易地使用Arduino,图形化编程工具成为一种非常方便的选择。
在本教程中,我们将介绍如何使用图形化编程来开始Arduino项目。
首先,我们需要准备一些环境。
首先,你需要下载并安装Arduino软件。
这个软件包含了图形化编程工具的基本组件。
然后,你需要连接你的Arduino板到电脑上,并确保他们能够正常通信。
一旦这些准备工作完成,我们可以开始学习图形化编程了。
Arduino图形化编程工具通常被称为“Scratch for Arduino”或者类似的名称。
这些工具提供了一种直观的方式来编写和控制Arduino的代码,而不需要任何的编程经验。
要使用这些工具,你只需要使用鼠标拖拽和连接代码块,就可以实现不同的功能。
首先,让我们了解一些基本的图形编程块。
在大多数图形编程工具中,你会发现以下块:1. 开始:用于开始程序的块。
2. 条件语句:用于根据给定条件的真假执行不同的代码块。
3. 循环语句:用于重复执行一系列代码块,直到满足某个条件。
4. 输入输出:用于读取输入和设置输出的块。
5. 数学运算:用于执行基本的数学运算,如加法、减法等。
6. 变量和列表:用于存储和处理值的块。
7. 事件:用于检测和处理各种事件的块,如鼠标点击、键盘输入等。
在图形化编程工具中,你可以将这些块拖动到编程区域中,并通过连接它们来创建代码。
例如,如果你想让Arduino板上的LED闪烁,你可以使用以下步骤:1. 使用输入输出块来设置LED引脚为输出模式。
2. 使用循环语句来重复执行下面的代码块:a. 使用输入输出块来设置LED引脚为高电压。
b. 使用控制块延迟几秒钟。
c. 使用输入输出块来设置LED引脚为低电压。
Arduino极简教程
Arduino极简教程前言呃呃,为啥写这个教程呢~俺也不知道!唉,说多了都是泪,心酸,卷啊~以下内容是我的个人理解,专业名词解释可能存在错误,望广大读者指出,万分感谢!基础概念回归内容,今天在这里用一篇博文,带领大家玩转Arduino、入门数电模电、入门传感驱动设计!这些是我准备的东西,一把杜邦线、一些传感器、一块板子!杜邦线就是导线,把传感器模块和单片机(Arduino板)连接起来。
这里的Arduino板是我之前在双臂机械臂课程用到的板子,其实也就是一块Arduino Nano的扩展板,将所有的IO口引出(D13引脚除外),D13引脚接到了蜂鸣器上面,同时有个LM2596S-5.0的模块实现12V转5V 3A(最大3A输出)的调压功能。
玩单片机呢,大家玩的就是IO口,也就是引脚!这些引脚具备输入(Input)和输出(Output)两种形态,所以被称为IO口。
玩电子的呢,大家经常听到的就是数电模电,而单片机的引脚呢,也分为数字(digital)和模拟(analog)两种。
玩单片机的话,ADC和DAC两个名词,是跳不掉的!ADC,Analog Digital Change,模拟转数字,模数转换,AD模拟量采集。
DAC,Digital Analog Change,数字转模拟,数模转换,DA数字量输出。
所以,Arduino编程就有了以下四个函数:那么什么是数字,什么是模拟呢?数电是什么,模电又是什么呢?我们拿灯来做一个栗子。
我们通过开关来控制灯的亮和灭,我们规定灯亮为1,灯灭为0,这种符合正常人类逻辑的方式,被称为正逻辑;也有规定灯亮为0,灯灭为1,这种被称为负逻辑。
正逻辑和负逻辑本质上没有什么差别,因为我们习惯了有就是1,无就是0这样的逻辑方式(推荐阅读《编程珠玑》)。
我们将信号分为有和无、或者是当前的电压值是HIGH或低、或者是当前的状态是0或1,这就是数字量——只有0和1两种状态的的量。
这在我们的单片机里面,也就对应了IO引脚输出一个高电平或者输出一个低电平、检测当该IO引脚是高电平还是低电平!那么模拟量呢!我们还是拿灯来做一个栗子。
- 1、下载文档前请自行甄别文档内容的完整性,平台不提供额外的编辑、内容补充、找答案等附加服务。
- 2、"仅部分预览"的文档,不可在线预览部分如存在完整性等问题,可反馈申请退款(可完整预览的文档不适用该条件!)。
- 3、如文档侵犯您的权益,请联系客服反馈,我们会尽快为您处理(人工客服工作时间:9:00-18:30)。
制作一个简易arduino项目的流程
Creating a simple Arduino project can be an exciting and rewarding experience for both beginners and experienced hobbyists. The process typically starts with coming up with an idea or concept for what you want your project to do. This could be anything from a basic LED blinker to a more complex robotic arm controlled by sensors.
开始制作一个简易的Arduino项目可能是一个令人兴奋和有成就感的经历,无论是对初学者还是有经验的爱好者来说。
这个过程通常从构思一个关于你想要项目做什么的想法或概念开始。
这可能是从基本的LED闪烁器到由传
感器控制的更复杂的机械臂。
Once you have a clear idea of what you want to create, it's time to gather all the necessary components for your project. This includes the Arduino board itself, as well as any sensors, actuators, and other electronic components you may need. You will also need a computer to program the Arduino board and software such as the Arduino IDE.
一旦你清楚地知道你想要创造什么,就该是收集项目所需所有组件的时候了。
这包括Arduino主板本身,以及任何传感器、执行器和其他可能需要的电
子组件。
你还需要一台电脑来编程Arduino主板,以及像Arduino IDE这
样的软件。
Next, you will need to start building and connecting the components of your project. This involves wiring up the various sensors, actuators, and other electronic components to the Arduino board according to your project's design. It's essential to double-check all connections
to ensure they are correct, as mistakes can lead to malfunctions or even damage to your components.
接下来,你需要开始构建和连接项目的各个组件。
这涉及将各种传感器、执行器和其他电子组件根据项目设计连接到Arduino主板上。
必须仔细检查
所有连接,确保它们是正确的,因为错误可能导致故障甚至损坏组件。
Once all the components are properly connected, it's time to write
the code that will control your Arduino project. This is where your creativity and problem-solving skills come into play, as you design
the logic that will govern how your project behaves in response to input from sensors or other triggers. The Arduino IDE provides a
user-friendly platform for writing and uploading code to the Arduino board.
一旦所有组件正确连接,就是编写将控制你的Arduino项目的代码的时候了。
在这里,你的创造力和解决问题的能力发挥作用,你需要设计逻辑,规定你的项目如何响应来自传感器或其他触发器的输入。
Arduino IDE提供了一个用户友好的平台,用于编写和上传代码到Arduino主板。
After you have written and uploaded your code to the Arduino board, it's time to test your project and make any necessary adjustments. This often involves monitoring the behavior of your project in real-time and making changes to the code as needed. Testing and debugging are crucial steps in the project-making process, as they help ensure that your project functions as intended.
当你编写并上传了代码到Arduino主板后,就是测试你的项目并进行任何必要的调整的时候了。
这通常涉及实时监测你的项目的行为,并根据需要对代码进行更改。
测试和调试是项目制作过程中至关重要的步骤,因为它们有助于确保你的项目按照预期功能。
Finally, once you have tested and debugged your Arduino project to your satisfaction, you can showcase your creation to others or use it for its intended purpose. The sense of accomplishment that comes from successfully creating and implementing a project using Arduino can be truly rewarding, motivating you to explore more complex projects in the future.
最后,一旦你已经测试和调试了你的Arduino项目,使自己满意,你可以向他人展示你的作品,或者将其用于预定的目的。
成功使用Arduino创建和实施项目所带来的成就感确实是令人满足的,激励着你在未来探索更复杂的项目。
