Ref_06_ABC_Hospital_Core_Non-Exempt_Competency_Model
社会医疗保险管理信息系统医院前台接口说明(V3.0)

社会医疗保险管理信息系统医院前台接口说明(V3.0)创智和宇2012.02.27目录社会医疗保险管理信息系统 0医院前台 0接口说明(V3.0) 0创智和宇 01运行环境说明 (1)2函数功能 (1)2.1函数说明 (1)2.1.1long newinterface() (1)2.1.2long newinterfacewithinit(char *Addr, int Port, char *Servlet) (1)2.1.3long init(Interface *p_inter, char *Addr, int Port, char *Servlet) (1)2.1.4destoryinterface(Interface *p_inter) (1)2.1.5long start(Interface *p_inter, char *FUNC_ID) (2)2.1.6long put(Interface *p_inter, long row, char *p_name, char *p_value) (2)2.1.7long putcol(Interface *p_inter, char * p_name, char *p_value) (2)2.1.8long run(Interface *p_inter) (2)2.1.9long setresultset(Interface *p_inter, char * result_name) (2)2.1.10int nextrow(Interface *p_inter) (3)2.1.11int prevrow(Interface *p_inter) (3)2.1.12int firstrow(Interface *p_inter) (3)2.1.13int lastrow(Interface *p_inter) (3)2.1.14int getbyname(Interface *p_inter, char *p_name, void *p_value) (3)2.1.15int getbyindex(Interface *p_inter, int index, void *p_name , void *p_value) (4)2.1.16long getmessage(Interface *p_inter, char *err) (4)2.1.17long getexception(Interface *p_inter, char *exception) (4)2.1.18long getrowcount(Interface *p_inter) (4)2.1.19long set_ic_commport(Interface *p_inter, int comm) (5)2.1.20long encode64(char *pSrc, int nSize, char *pDest) (5)2.1.21long decode64(char *pSrc, int nSize, char *pDest) (5)2.1.22long encodesize( int nSize) (5)2.1.23long decodesize( int nSize) (5)2.1.24long decode64_tofile(char *pSrc, int nSize, char *filename) (5)2.1.25int setdebug(Interface *pinter,integer flag,char * direct) (6)2.2函数调用说明 (6)2.2.1接口函数调用顺序 (6)2.2.2接口函数调用时指针的用法说明 (7)2.2.3接口函数调用时数据类型的说明 (7)2.2.4接口函数调用时的用法说明 (7)2.3程序中接口函数定义 (11)2.3.1在PB中定义函数程序 (11)2.3.2在Delphi中定义函数程序 (12)2.3.3在VB中定义函数程序 (13)2.4函数调用样例 (14)2.4.1在PB中调用接口函数程序 (14)2.4.2在Delphi中调用接口函数程序 (16)2.4.3在VB中调用接口函数程序 (17)3功能编号及功能描述 (19)3.1系统登录(0) (19)3.1.1登录到中心(0) (19)3.1.2修改登录密码(BIZC000001) (19)3.2普通门诊业务(1311XX) (20)3.2.1普通门诊业务费用录入 (20)3.3普通住院业务(1312XX) (38)3.3.1住院入院登记 (38)3.3.2提取在院业务信息 (46)3.3.3住院费用录入 (50)3.3.4住院出院结算 (58)3.3.5提取普通住院业务结算信息(BIZC200101) (61)3.3.6提取工伤住院业务结算信息(BIZC200111) (62)3.4异地就医住院业务(Remote_1312XX) (64)3.4.1异地就医住院入院登记 (64)3.4.2提取异地就医在院业务信息 (72)3.4.3异地就医住院费用录入 (75)3.4.4异地就医住院出院结算 (81)3.4.5提取异地住院业务结算信息(Remote_BIZC200101) (83)3.5门诊特殊病业务(1311XX) (85)3.5.1门诊特殊病业务费用录入(含改费) (85)3.6工伤住院医嘱管理 (102)3.6.1医嘱管理 (102)3.7公有业务(200XXX) (106)3.7.1读IC卡(BIZC200900) (106)3.7.2提取业务或费用信息(BIZC200301) (107)4业务功能调用描述 (111)4.1普通门诊调用流程 (112)4.2住院调用流程 (112)4.2.1普通住院调用流程 (113)4.2.2异地就医住院调用流程 (114)4.3门诊特殊病调用流程 (115)5附录 (115)5.1biz_type-业务类型对照表 (115)5.2treatment_type——待遇类别对照表 (116)5.3fund_id-基金类别对照表 (116)5.4medi_item_type-药品项目类型对照表 (117)5.5stat_type——费用统计类别 (117)5.6staple_flag-药品性质类型对照表 (118)5.7official_code-公务员级别对照表 (118)5.8pers_type-人员类别对照表 (118)1运行环境说明本接口采用VC编写,它心须在以下软件的支持下运行:●win98第二版以上●IE6.0(允许使用cookie)●MFC4.2●MSXML3.0(winxp以下需安装)2函数功能2.1 函数说明2.1.1long newinterface()该函数建立一个新的接口实例,但这个函数没有初始化接口,必须再调用init函数初始化接口,此函数返回接口指针p_inter,它将作为其他函数入口参数。
bea tuxedo
BEA TUXEDO Application AdministrationTUX-A11-XX-01Lab ExercisesBEA Systems, Inc.Educational ServicesCopyright © 2001, BEA Systems, Inc. All Rights Reserved.Restricted Rights LegendThis software and documentation is subject to and made available only pursuant to the terms of the BEA Systems License Agreement and may be used or copied only in accordance with the terms of that agreement. It is against the law to copy the software except as specifically allowedin the agreement. This document may not, in whole or in part, be copied photocopied, reproduced, translated, or reduced to any electronic medium or machine readable form without prior consent, in writing, from BEA Systems, Inc.Use, duplication or disclosure by the U.S. Government is subject to restrictions set forth in the BEA Systems License Agreement and in subparagraph (c)(1) of the Commercial Computer Software-Restricted Rights Clause at FAR 52.227-19; subparagraph (c)(1)(ii) of the Rights in Technical Data and Computer Software clause at DFARS 252.227-7013, subparagraph (d) of the Commercial Computer Software--Licensing clause at NASA FAR supplement 16-52.227-86; or their equivalent.Information in this document is subject to change without notice and does not represent a commitment on the part of BEA Systems. THE SOFTWARE AND DOCUMENTATION ARE PROVIDED "AS IS" WITHOUT WARRANTY OF ANY KIND INCLUDING WITHOUT LIMITATION, ANY WARRANTY OF MERCHANTABILITY OR FITNESS FOR A PARTICULAR PURPOSE. FURTHER, BEA Systems DOES NOT WARRANT, GUARANTEE, OR MAKE ANY REPRESENTATIONS REGARDING THE USE, OR THE RESULTS OF THE USE, OF THE SOFTWARE OR WRITTEN MATERIAL IN TERMS OF CORRECTNESS, ACCURACY, RELIABILITY, OR OTHERWISE.Trademarks or Service MarksBEA, BEA eLink, BEA Jolt, Distributed Application Framework, and Enterprise Middleware Solutions are trademarks of and are developed and licensed by BEA Systems, Inc., Sunnyvale, California. TUXEDO is a registered trademark of Novell, Inc., exclusively licensed to BEA Systems, Inc.OpenView is a registered trademark of Hewlett-Packard Company. SunNet Manager and Solstice are trademarks of Sun Microsystems, Inc. in the United States and other countries. IBM and NetView are registered trademarks of International Business Machines Corporation. Oracle is a registered trademark of Oracle Corporation. Informix is a registered trademark of Informix. Cabletron Spectrum is a trademark of Cabletron Systems, Inc. UNIX is a registered trademark in the United States and other countries, licensed exclusively through X/Open Company Limited.All other company names may be trademarks of the respective companies with which they are associated.BEA Tuxedo Application AdministrationDocument Edition Part Number Date Software Version Comment1.0 Sep 2001 BEA Tuxedo 6.5, 7.1,8..0 Initial Labs VersionContentsGeneral Lab Instructions (3)Lab Instructions (3)Environment Variables (3)Lab Directories (5)INSTL–Lab Installation and Verification (7)Part 1 – Copying the Lab Files (8)Part 2 – Viewing the Tuxedo Documentation (10)Part 3 – Verifying the Lab Machine Environment (10)Part 4 – Building Tuxedo Programs for the Lab Workshops..11 DEPL–Deploying a Basic Tuxedo Application (13)CONF–Configuring Application Servers (17)ADAC–Administration and Additional Configuration (21)CLNT–Configuring /WS Support (25)SECU–Configuring Tuxedo Security (29)MMC–Multiple Machine Configuration (33)SRVG–Server Groups and Data Dependent Routing (37)TRAN–Configuring Transactions (41)CQUE–Administering Queues (45)MIBS–Accessing MIBs (51)PERF–Performance Considerations (55)DOMS–Multiple Domains (59)General Lab InstructionsThis guide contains general instructions for the lab workshop exercises for the BEA Tuxedo Application Administration course. The course lab exercises can be performed on a system with either BEA Tuxedo 6.5, 7.1, or 8.0 software installed.The lab exercises can be performed in a variety of classroom environments, both public classrooms and on-site customer locations. The lab exercises are supplied for two generic platform types – UNIX (Sun, HP, other versions) and Microsoft WindowsNT/Windows2000. The lab machine/s used should have been previously set up for the class; the BEA Tuxedo product and a C compiler should be installed. On Windows systems, the only C compiler tested with the labs is Microsoft Visual C++ 6.0.The lab exercises are labeled with the same abbreviated module name used for a particular Module in the student material, for example INSTL. Each exercise describes the objective and the steps for performing the exercise. Consider the time suggested for each lab as a “guideline” and not a requirement. Your instructor will end the lab session when it is appropriate.Lab InstructionsInstructions for each lab are usually common for both Windows and UNIX and any differences are noted in the instructions.The first set of actions that you will perform for any lab is common to all labs and are:1. Open a Windows/DOS command window or UNIX shell window.2. Change directory to the lab exercises directory – the lab refers to the <xyz> lab directory:[Windows]: cd<root-directory>\exercises\<xyz>[ UNIX]: cd<root-directory>/exercises/<xyz>3. Edit the setenv command script file that sets the environment variables:[Windows]: setenv.cmd[ UNIX]: setenv.ksh4. Execute the setenv command script file:[Windows]: setenv[ UNIX]: . setenv.ksh(Note the <space> between . and setenv.ksh)Environment VariablesYou should make sure that the environment variables shown below are set. In Windows, you can edit your system environment variables through the Control Panel so that these are always set when you startup a DOS or shell command prompt. The actual paths may differ for your system, for example Tuxedo might be installed in D:\ instead of C:\ as the table below suggests.Set environment variables according to your computer-specific installation directories. For the PATH environment variables, we suggest that you add the paths listed in the table below to thebeginning of the variable because you might have other software installed that may interfere. Ifyou choose not to change the environment variables and use the provided setenv.bat orsetenv.ksh file, you may need to edit this file to reflect your actual installation folders.For Windows systems:Env. Variable Windows Example DescriptionTUXDIR C:\tuxedo Tuxedo installation directory TUXCONFIG C:\tuxa11\exercises\depl\tuxconfig LocationofTUXCONFIGPATH %TUXDIR\bin;%PATH% Path should include theTuxedo bin directoryTUXDIR should be set on supported Windows platforms when Tuxedo 6.5 or 7.1 is installed.Tuxedo 8.0 installation does not set these environment variables and they have to be set either inthe Settings-> Control Panel-> System->Environment control panel or before executing aTuxedo program. In the lab exercises, we will usually set them for each lab exercise.For UNIX systems:Env. Variable UNIX Example Description TUXDIR /opt/tuxedo71 Tuxedo installation directory TUXCONFIG /home/stu01/exercises/abcs/tuxconfig LocationofTUXCONFIGPATH .:$TUXDIR/bin:$PATH/opt/.. or /usr/.. Path should include these Tuxedo related directories…… and any C compiler directories…<include directory path> $TUXDIR/include Usually specified in thecompile commandLD_LIBRARY_PATH (SVR4, Solaris)SHLIB_PATH (HP-UX)LIBPATH (AIX) $TUXDIR/lib:$LD_LIBRARY_PATH$TUXDIR/lib:$SHLIB_PATH$TUXDIR/lib:$LIBPATHAdd the Tuxedo librarydirectory to the library searchpathLANG CorEn_US If you get Tuxedo catalog errors, you may need to reset this to “C” instead of En_US; check which of these two directories has been installed under the $TUXDIR/locale directoryTUXDIR– obtain the directory name where Tuxedo has been installed on the UNIX system from the Instructor or the UNIX Administrator.Lab DirectoriesThe parent directory for the lab exercises contains files used to build the lab exercises. It also contains the exercises and s olutions s ub-directories. Each lab exercise directory is under the exercises directory in a different lab-specific sub-directory (this directory will be the application directory, APPDIR). A lab exercise directory is named to match the corresponding module name, for example DEPL but the lab directory name is in lower-case as in “depl”.Each lab exercise directory contains the files required for the lab exercise described. These files include template files (that you need to complete) or completed files:- a template configuration file named UBBconfig.template- a template file, setenv.cmd.template (Windows) or setenv.ksh.template (UNIX), for setting the environment variables- client and/or server source program template files, <name>.template- completed client or server programs, <name>.c, or executables, <name> in UNIX or <name>.exe in Windows.The UBBconfig.template configuration file requires the following information to be filled for each lab:machine name The configured system name for this machineTUXDIR The directory where the Tuxedo product is installedAPPDIR Application directory, which is the current lab exercise directory TUXCONFIG The TUXCONFIG file in the <APPDIR> directoryYou will need to change the value of these parameters to the appropriate values and complete any other lab-specific directions.You can obtain the machine name from the %COMPUTERNAME% environment variable or from the Network control panel [Windows], or [UNIX] by ‘uname –n’ or ‘hostname’. Note that for Windows systems, the machine name specified in a Tuxedo configuration file should always be in upper case – example, GUMBY and not gumby.A corresponding lab directory in the solutions sub-directory contains the UBBCONFIG configuration solution files for the lab exercise. You should try to avoid using the solution files unless you are really stuck or the Instructor is busy with other students. The Instructor is there to help you !Each lab solution directory contains solution configuration files for Windows and UNIX for each lab exercise, generically represented by the lab directory <labname> below. These solution files use the following values for the above information in the solutions:machine name The node name for the system: NODE1TUXDIR Tuxedo install directory:[Windows] c:\tuxedo[UNIX] /opt/tuxedoAPPDIR Application directory, the current lab directory:c:\tuxa11\solutions\<labname>[Windows][UNIX] /home/student/tuxa11/solutions/<labname> TUXCONFIG The TUXCONFIG file in the <APPDIR> directory:%APPDIR%\tuxconfig[Windows][UNIX] $APPDIR/tuxconfigTo use a lab solution, copy the solution files to the equivalent lab exercise directory; replace the above values in the solution files with values appropriate for your lab machine and follow the instructions to run the lab exerciseINSTL–Lab Installation and VerificationReference Course Section(s): INSTL, Lab Guide: Getting Started Suggested Time: 40 minutesObjectiveThe objective of this exercise is to install the labs and make you familiar with the lab exercise environment.DescriptionYou will install the lab exercises from the Student CD supplied with your course materials and become familiar with the lab machine environment. Installing the labs consists of two main tasks – copying the labs from the Student CD and then compiling the C source programs to generate the client and server executable programs for the platform being used for the lab exercises.You will also become familiar with the Tuxedo documentation layout on the Student CD. Finally, you will follow some simple instructions to verify that Tuxedo has been installed on your machine.SummaryThere is no lab exercise directory or files associated with this lab exercise. You will need the Student CD packaged with your course materials.• Copy the labs from the CD-ROM to your lab machine• View the Tuxedo documentation with a browser• Verify that Tuxedo is installed on the lab machine• Build the client and server executable programs for use in the other lab exercisesStepsPart 1 – Copying the Lab Files(This step may already have been done for the class – check with the Instructor.)1. All the code and template files that you need to accomplish the Lab Workshop exercises aresupplied on the Student CD-ROM that is bundled with the course Student Materials. This CD is in a PC format and may not be readable on most UNIX machines.• On a Windows system, load the Student CD.• On a UNIX system, the tar file containing the lab exercise files may have already been copied from the CD to a directory on the system – check with the Instructor.2. Install the Lab Workshop exercise files:To install the lab exercises on a WindowsNT/Windows2000 system• Create a <lab root directory> such as C:\tuxA11 on your student machine.• Copy the contents (directories and files) from the labs directory on the student CD to this <lab root directory>on the Windows system: select all files and directories, and drag and drop them into the newly-created labs directory.• The files copied to your lab directory will be copied as read-only. To change the read-only attributes, open a DOS/Command window and change directory to your lab root directory.Type the following command to change the read-only attributes on all the files: > attrib –r *.* /S• In the DOS/Command window, verify that the Microsoft Visual C++ 6.0 compiler is installed by typing “cl”, the command to run the compiler; if it is installed, the banner heading from the compiler will be printed in the window.• If the previous command fails, try to find and execute the following command file to set the correct system environment. This file is typically located in:C:\Program Files\ Microsoft Visual Studio\vc98\bin\Vcvars32.bat Try the previous step again. If this still fails, the Visual C++ compiler may not be installed on the PC you are using. Notify the Instructor.To install the lab exercises on a UNIX system• If the System Administrator has already transferred the tar file from the Student CD to the UNIX system, make a copy of the tar file in your lab root directory using the cp command: > cp \…\TUX-A11-XX-01-labs.tar .• If not, transfer the labs\UNIX\TUX-A11-XX-01-labs.tar file from the student CD to the student’s <lab root directory>on the UNIX system being used. You can useFTP binary mode to transfer the file. An example of <lab root directory> is/home/student01.• Use tar to uncompress the TUX-A11-XX-01-labs.tar file:> tar xvf TUX-A11-XX-01-labs.tar3. This completes the copy of the lab files to your directory.For both Windows and UNIX systems, the previous steps will create a directory structure underneath the <lab root directory> containing the lab directories corresponding to the Modules in the Student Guide. The root directory should contain the following sub-directories plus some other command files that will be used to build the client and server programs:The formats for directory names are (using the Windows path name convention): • Exercises described in the lab guide: <root-directory>\exercises\ <xyz>• Solutions to exercises in the lab guide: <root-directory>\solutions\<xyz>where <root-directory> represents the root directory where the labs were installed, and <xyz> and <XYZ> are the lab directory name and the associated module name respectively.There is another step to be done before the lab exercises can be performed – build the client and server program executables to be used for each lab exercise. This is described later in this lab exercise.4. This completes the copying of the lab files to your machine.Part 2 – Viewing the Tuxedo Documentation5. We will now examine the Tuxedo documentation supplied on the Student CD. [If the courseis being delivered on a UNIX platform, the Tuxedo docs may have been transferred to aUNIX directory.] Using Windows Explorer or other File Manager, move to the following directory on the Student CD :[Student-CD] \Tuxedo Docs\ xxxwhere xxx is either v6_5, v7_1, or v8_0 depending on whether Tuxedo release 6.5, 7.1, or 8.0 respectively is being used in the class.6. Double-click on the index.htm file in the above directory. This will start-up a browserprogram and bring up the Tuxedo documentation index page. The display will be different for the different Tuxedo releases but there will be common displayed items, including a link to the (ATMI) Reference section.Click on the Reference link. Under Reference Topics, you should see several sections such as Command Reference – Section 1. The Tuxedo reference documentation is organized into sections very much like UNIX man pages.7. In the course slides you will see references to items such as tmadmin(1). This means thatthe reference information for the Tuxedo command tmadmin is in Section 1 of the reference documentation. The Tuxedo file formats are in Section 5. Click on this link.The displayed page shows all the BEA Tuxedo File Formats, Data Descriptions, MIBs, and System Processes listed in alphabetical order.8. Click on one of the topics, such as UBBCONFIG(5), displayed in the left column. Thedisplayed page shows the details of the Tuxedo Configuration file format including all the required and optional parameters.Part 3 – Verifying the Lab Machine Environment9. Open a DOS/Command or Shell window. Display the current environment variables:• On Windows type:set | more• On UNIX: env | more10. Check the listed variables to see if the TUXDIR variable is set. If not, set it – (if needed, askyour Instructor for the location of the Tuxedo directory on your PC or UNIX system): [ On Windows] set TUXDIR=<Tuxedo installed directory>[On UNIX (ksh)] export TUXDIR=<Tuxedo installed directory>11. If necessary, add the Tuxedo bin directory to your command execution path:[ Windows] set PATH=%TUXDIR%\bin;%PATH%[UNIX (ksh)] export PATH=$TUXDIR/bin:$PATHAlso, set and export the LIBRARY PATH as appropriate (see theUNIX Environment Table for information on some UNIX systems)to include $TUXDIR/lib.12. Type the Tuxedo administration command tmadmin with the –v option :tmadmin –vThis should print out the Tuxedo license information such asIf a message similar to the one above was printed on your console, your environmentvariables were set correctly and Tuxedo is installed on your machine.13. If you get Tuxedo catalog message errors, you may also need to set (and export) theenvironment variable that defines the locale, for example:LANG=C [for US English]14. This completes the initial lab installation.Part 4 – Building Tuxedo Programs for the Lab WorkshopsYou will now build all client and server executable programs to be used in the lab exercises. These programs need to be built as the lab exercises can be run on a number of platforms, using different versions of operating system and C compiler. The next step requires that the environment is suitably setup - Tuxedo must be installed, the Tuxedo Software Development (SDK) license installed must be valid, and a C compiler must be installed. 15. After installing the lab files, to compile all C programs in the solutions directories and buildthe executable programs:- cd to the <root-directory> that contains the exercises and solutions sub-directories- edit the appropriate buildlabs script file[Windows] buildlabs.bat[UNIX] buildlabs.kshto set the environment variables identified there- In the <root-directory>, run the appropriate buildlabs script (examples are below): [Windows]: Note that you have to supply the root directory name if you did notset it in the buildlabs.bat file.buildlabs [<root-directory>][UNIX]: Note the {space} between {. } and {buildlabs.ksh}. buildlabs.kshWindows Example: cd c:\tuxa11(In a DOS Window)[Edit/set the appropriate environment variables in the buildlabs.bat file; run the bat file as shown below.]buildlabs c:\tuxa11 [Note that the root lab directory name isrequired as a parameter if not set inbuildlabs.bat]UNIX Example: cd /home/student01(ksh)[Edit/set the appropriate environment variables in the buildlabs.ksh file; in the command line below note the <space> between “.” andbuildlabs.ksh)]. buildlabs.ksh16. When the build command script is successfully completed, verify that it has built the clientand server executables by looking at the files in a lab directory such as ‘adac” under the exercises subdirectory. There should be some executable program files (*.exe in Windows, executable files in UNIX). If necessary, you can re-run the buildlabs command file again at any time.17. This completes the lab installation and familiarization. Review the notes in the General LabInstructions section at the beginning of this Lab Guide to become familiar with thegeneralized instructions for the rest of the Lab Workshop exercises.DEPL–Deploying a Basic Tuxedo ApplicationReference Course Modules: DEPLSuggested Time: 20 minutesObjectiveYou will be following instructions to make you familiar with the computer and lab exercise environment, and to configure and run a basic sample application to verify the successful installation of the Tuxedo product. In doing so, you will also be deploying a simple Tuxedo application. You will be performing some of these instructions in this lab without fully knowing the details, such as the configuration file, that will be explained later. An important objective of this lab exercise is to make you comfortable with the lab environment and begin to use some of the basic Tuxedo commands.DescriptionThe configuration for this lab is a basic single machine (SHM mode) application with one client and one server. This basic application, which is shipped with the BEA Tuxedo product, is called simpapp. It consists of the simpcl client that sends a text string, supplied by the user, to the TOUPPER service implemented in the simpserv server. The TOUPPER service converts the text string to uppercase and returns the resultant text string to the client for display to the user.The following files are provided• command script files to set the appropriate environment variables (setenv.cmd for Windows, setenv.ksh for UNIX)• a template Tuxedo configuration file, UBBconfig.template• a client source program, simpcl.c (that you will copy from the Tuxedo product directory)• a server source program, simpserv.c (that you will copy from the Tuxedo product directory)Steps1. The working directory for this lab is depl in the lab exercises directory.• Open a [Windows] DOS command or [UNIX] shell window and “cd” to this directory.2. Edit the appropriate setenv command file replacing the remarks within <> with appropriatevalues for TUXDIR, APPDIR, TUXCONFIG :[Windows] setenv.cmd[UNIX, Korn shell] setenv.kshSet the environment variables using:[Windows] >setenv [Note: Runs the setenv.cmd file][UNIX, Korn shell]$. setenv.ksh[Note: <space> between “.” & “setenv.ksh”] 3. Copy or rename the UBBconfig.template file to UBBconfi g.[Note: This configuration file is almost identical to the one supplied with the simpappapplication, except that we are using the configuration file name convention that we will use for the rest of the lab exercises.]4. Edit the UBBconfig file:• set appropriate values for IPCKEY, TUXDIR, TUXCONFIG, APPDIR, and for the machine name in the MACHINES section.5. Build the TUXCONFIG file using the command:tmloadcf -y UBBconfigIgnore the warning message “WARN: Missing SERVICES section”. If you encounter any other errors, edit the configuration file and correct the errors. Re-build the TUXCONFIG file.6. Copy the client and servers programs, simpcl.c and simpserv.c, from the TUXEDOsample applications directory into the lab directory (depl):[Tuxedo 6.x]copy %TUXDIR%\apps\simpapp\simpcl.*Windows:UNIX: cp $TUXDIR/apps/simpapp/simpcl.* .[Tuxedo 7.1, 8.0]copy %TUXDIR%\samples\atmi\simpapp\simpcl.*Windows:UNIX:cp $TUXDIR%/samples/atmi/simpapp\simpcl.* .Repeat the appropriate command above to copy simpserv.* to the current directory.7. Build the client program executable using the buildclient command:buildclient -v -f simpcl.c -o simpclThis builds a Tuxedo client executable, simpcl, from the C source file, simpcl.c.8. Build the server program executable using the buildserver command:buildserver -v -f simpserv.c -o simpserv -s TOUPPERThis builds a Tuxedo server executable, simpserv, from the C source file, simpserv.c, that will provide a service called TOUPPER when it is started. This server is defined in the Tuxedo configuration file.9. Boot the application using the Tuxedo command:tmboot -y10. Run the Tuxedo administration command line utility program, tmadmin:• Use the printserver subcommand to view the active servers• Use the printservice subcommand to view the information on services• Exit from tmadmin with the quit subcommand11. At the command line prompt, run the client and observe the input text string returned as anuppercase string:simpcl “hello tuxedo”12. Re-run the tmadmin program, and run the same sub-commands as before to observe anydifference in the statistics printed. (Hint: We submitted a request for the TOUPPER service that was completed successfully and was performed by the SIMPSERV server). Exit the tmadmin program.13. Shut down the Tuxedo application system:tmshutdown -y14. Tuxedo messages are logged in a file called the userlog or ULOG file. The file is namedULOG.mmddyy where mmddyy are the two-digit month, day, and year respectively. For example, the file for August 9, 2001 would be named ULOG.080901. We will cover the details of the ULOG file later; for now, be aware that this log file exists and contains valuable error and information messages logged by the Tuxedo system.The ULOG file is a text file and you can examine it with any text editor or with commands such as type or more.Windows: type ULOG* | moreUNIX: more ULOG*Look up the details of some of the logged messages (such as the LIBTUX_CAT:262 message) in the Messages section of the Tuxedo documentation on the Student CD.CONF–Configuring Application ServersReference Course Chapter: CONFSuggested Time: 30 minutesObjectiveThis lab exercise is intended to provide experience in configuring a functional basic application consisting of essential configuration components and to observer the synchronous client-server communication mechanism.DescriptionThis lab utilizes an SHM configuration with one client and three servers.The clientdb program calls a service (specified on the command line) and then prints out information when it receives a reply back from the server. It operates in a synchronous mode – it sends a request for the service and then waits for the response before sending the next request. The three servers provided are SvrInq, SvrUpdate, and SvrDelete and the services each provides simulate the inquiry, update, and delete operations to a database in a typical application.The following files are provided:• template command script files to set the appropriate environment variables (setenv.cmd for Windows, setenv.ksh for UNIX)• template Tuxedo configuration file, UBBconfig.template• application executables (one client and 3 servers): clientdb; servers SvrInq, SvrUpdate, and SvrDelete。
fortran常见错误

FAQ之常见错误2014-02-02 13:45:35 来源:Fcode研讨团队评论:2点击:4419本文从编译错误,链接错误,运行时错误,计算结果错误等四个方面介绍了常见的错误及解决思路。
适合初学者阅读。
首先应该明确:错误有哪几种?我们当前遇到的是何种错误?阐述这些问题前,我们先讨论一下常规的应用程序开发的过程:1>>编写代码,使用一个或多个源代码文件。
2>>对第一步的每一个源代码文件执行编译操作。
得到一个或若干个目标代码。
3>>将目标代码,运行时库(Run-time Library)和其他使用到的函数库链接起来。
得到一个可执行文件(EXE 或其他)4>>编写程序的说明书,必要的(输入)数据文件5>>将上述得到的结果发布给用户。
(发布的方式可以是刻录成光盘,销售,放在网站上供别人下载,或者其他)6>>用户得到程序后,运行,输入数据,得到计算结果。
对于很多 Fortran 程序员来说,可能用户就是自己,也可能仅仅是自己教研室的同事同学。
所以第4,5,6步骤很多时候不明显。
而如果使用集成开发环境(IDE)进行开发,第1,2,3步骤又可以一键完成。
因此,很多初学者就认为,写程序就是:输入代码,运行,得到结果。
这样的理解太狭义。
不管我们面对什么使用者来写代码,程序开发应该是上述的过程。
我们的编译器,编译环境,也是为这个过程而设计的。
于是,我们将错误分为四种:一. 编译错误(发生在第2步)编译错误,一般是源代码书写格式不正确,不符合语法要求。
二. 链接错误(发生在第3步)链接错误,一般是源代码结构不完整,运行时库或函数库使用不合理。
三. 运行时错误(发生在第6步)运行时错误,一般是执行代码时,遇到了事先未料及的错误。
比如内存不足了,磁盘空间不够了,输入文件格式不对了,输出文件写入失败了等等。
四. 计算结果不符合预期(程序代码不规范,或不符合你的设想)计算结果不符合预期,可能性就很多了。
如何使用IFERROR和IFNA函数在Excel中进行错误处理和空值处理
如何使用IFERROR和IFNA函数在Excel 中进行错误处理和空值处理Excel是一款非常强大的电子表格软件,广泛应用于数据分析、商务管理、科研等各个领域。
在处理大量数据时,我们经常会遇到数据中存在错误值或空值的情况。
为了保证数据的准确性和完整性,我们需要使用Excel提供的IFERROR和IFNA函数来进行错误处理和空值处理。
本文将详细介绍如何使用这两个函数来优化Excel数据处理的流程。
一、IFERROR函数的使用IFERROR函数是Excel中常用的错误处理函数,它可以用于处理公式计算中可能出现的各种错误。
IFERROR函数的基本语法如下:IFERROR(value, value_if_error)value表示待检测的数值或公式,value_if_error表示如果value出现错误时的返回值。
IFERROR函数的常见应用情景有以下几种:1. 处理除0错误在Excel中,除数为0将导致错误的发生。
但是通过在除法运算的分母位置使用IFERROR函数,我们可以避免出现错误值。
例如,我们需要计算A1单元格除以B1单元格的结果,可以使用以下公式:=IFERROR(A1/B1, 0)这样,如果B1单元格的值为0,计算结果将返回0,避免了错误值的出现。
2. 处理公式错误值在进行复杂的数据计算时,有可能会出现各种错误,如#DIV/0!、#VALUE!、#NAME?等。
使用IFERROR函数可以将这些错误值替换为我们指定的返回值。
例如,我们需要计算A1单元格乘以B1单元格的结果,可以使用以下公式:=IFERROR(A1*B1, "计算错误")这样,如果出现错误值,单元格中将显示"计算错误"。
3. 处理VLOOKUP函数的错误VLOOKUP函数是Excel中非常常用的查找函数,但是在没有匹配结果时,它将返回#N/A错误。
通过使用IFERROR函数,我们可以将这个错误处理得更友好一些。
Microsoft VBScript 错误大全

MicrosoftVBScript语*错误(0x800A0419)-->在属性声明中缺少 Let , Set 或 Get
MicrosoftVBScript语*错误(0x800A041A)-->缺少 'Property'
MicrosoftVBScript语*错误(0x800A0421)-->指定 'Default' 时必须同时指定 'Public' "
MicrosoftVBScript语*错误(0x800A0422)-->只能在 Property Get 中指定 'Default'
MicrosoftVBScript 运行时错误(0x800A0005)-->无效的过程调用或参数
MicrosoftVBScript语*错误(0x800A041E)-->属性的 set 或 let 必须至少有一个参数
MicrosoftVBScript语*错误(0x800A041F)-->错误的 'Next'
MicrosoftVBScript语*错误(0x800A0420)-->'Default' 只能在 'Property' , 'Function' 或 'Sub' 中指定
MicrosoftVBScript语*错误(0x800A0414)-->调用子程序时不能使用括号
MicrosoftVBScript语*错误(0x800A0415)-->缺少文字常数
MicrosoftVBScript语*错误(0x800A0416)-->缺少 'In'
又解决一个问题:“在位置0处没有任何行”(“Thereisnorowatposition0.”)
⼜解决⼀个问题:“在位置0处没有任何⾏”(“Thereisnorowatposition0.”)使⽤Content Deployment API做导出的时候,遇到如下错误:message: System.IndexOutOfRangeException: 在位置 0 处没有任何⾏。
在 System.Data.RBTree`1.GetNodeByIndex(Int32 userIndex)在 System.Data.RBTree`1.get_Item(Int32 index)在 System.Data.DataRowCollection.get_Item(Int32 index)在 Microsoft.SharePoint.Deployment.ObjectHelper.RetrieveDataFromDatabase(ExportObject exportObject)在 Microsoft.SharePoint.Deployment.FolderObjectHelper.RetrieveData(ExportObject exportObject)在 Microsoft.SharePoint.Deployment.ExportObjectManager.GetObjectData(ExportObject exportObject)在 Microsoft.SharePoint.Deployment.ExportObjectManager.MoveNext()在 Microsoft.SharePoint.Deployment.ExportObjectManager.ExportObjectEnumerator.MoveNext()在 Microsoft.SharePoint.Deployment.SPExport.SerializeObjects()在 Microsoft.SharePoint.Deployment.SPExport.Run()在 .SH.Program.Main(String[] args) 位置 C:\Workspace\TestQuery\SH\Program.cs:⾏号 1828在 System.Data.RBTree`1.GetNodeByIndex(Int32 userIndex)在 System.Data.RBTree`1.get_Item(Int32 index)在 System.Data.DataRowCollection.get_Item(Int32 index)在 Microsoft.SharePoint.Deployment.ObjectHelper.RetrieveDataFromDatabase(ExportObject exportObject)在 Microsoft.SharePoint.Deployment.FolderObjectHelper.RetrieveData(ExportObject exportObject)在 Microsoft.SharePoint.Deployment.ExportObjectManager.GetObjectData(ExportObject exportObject)在 Microsoft.SharePoint.Deployment.ExportObjectManager.MoveNext()在 Microsoft.SharePoint.Deployment.ExportObjectManager.ExportObjectEnumerator.MoveNext()在 Microsoft.SharePoint.Deployment.SPExport.SerializeObjects()在 Microsoft.SharePoint.Deployment.SPExport.Run()在 .SH.Program.Main(String[] args) 位置 C:\Workspace\TestQuery\SH\Program.cs:⾏号 1828代码如下://临时⽬录string temp_path = "d:\\export";SPExportObject exportObject = new SPExportObject();exportObject.Id = contextWeb.ID;exportObject.IncludeDescendants = SPIncludeDescendants.None;exportObject.Type = SPDeploymentObjectType.Web;SPExportSettings settings = new SPExportSettings();settings.IncludeVersions = stMajor;settings.SiteUrl = contextWeb.Site.Url;settings.ExportMethod = SPExportMethodType.ExportAll;settings.FileLocation = temp_path;settings.FileCompression = false;mandLineVerbose = true;settings.ExcludeDependencies = false;settings.OverwriteExistingDataFile = true;settings.HaltOnNonfatalError = false;settings.HaltOnWarning = false;//settings.IncludeSecurity = SPIncludeSecurity.All;settings.Validate();settings.ExportObjects.Add(exportObject);List<string> workflowasses = new List<string>();//导出列表和某个folder itemSPExportObject e1 = new SPExportObject();SPList theList01 = contextWeb.Lists["我的列表"];e1.Id = theList01.ID;e1.IncludeDescendants = SPIncludeDescendants.None;e1.Type = SPDeploymentObjectType.List;settings.ExportObjects.Add(e1);SPExportObject eo = new SPExportObject();SPListItem item = theList01.GetItemById(185);eo.Id = item.UniqueId;eo.Type = SPDeploymentObjectType.Folder;settings.ExportObjects.Add(eo);SPExport export = new SPExport(settings);export.Run();在⽹上搜索也没有发现可⽤的信息,⾮常困惑,使⽤codeplex上的开源⼯具“SPDeploymentWizard_Beta2.7_Exe”也出现⼀样的错误,估计和我的⽤法基本类似,反编译Microsoft.SharePoint.Deployment也没看出太多头绪,经过反复尝试,发现问题出在Item上,因为⽼的Item可以,新的Item就有问题,⽽且是在同⼀个列表同⼀个⽂件夹下,怀疑是和关联的属性相关,于是逐个把属性删光,结果问题依旧。
Excel高级函数使用IFNA和IFERROR处理VLOOKUP和HLOOKUP错误
Excel高级函数使用IFNA和IFERROR处理VLOOKUP和HLOOKUP错误Excel是一款功能强大的电子表格软件,广泛应用于数据处理和数据分析工作中。
在使用Excel进行数据查询和处理时,我们经常会使用到VLOOKUP和HLOOKUP函数。
然而,这两个函数在查询过程中可能会出现一些错误。
本文将介绍如何使用Excel的高级函数IFNA和IFERROR来处理VLOOKUP和HLOOKUP函数的错误,以提高数据查询的准确性和有效性。
一、VLOOKUP函数简介VLOOKUP函数是一种常用的垂直查找函数,用于在数据表格中查找指定的值并返回相关的数值。
其基本语法如下:VLOOKUP(lookup_value, table_array, col_index_num, range_lookup)其中,lookup_value为要查找的值;table_array为待查找的范围;col_index_num为返回值所在范围的列号;range_lookup为是否进行模糊匹配。
二、HLOOKUP函数简介HLOOKUP函数是一种常用的水平查找函数,与VLOOKUP函数类似,区别在于查找的范围不同。
其基本语法如下:HLOOKUP(lookup_value, table_array, row_index_num, range_lookup)其中,lookup_value为要查找的值;table_array为待查找的范围;row_index_num为返回值所在范围的行号;range_lookup为是否进行模糊匹配。
三、VLOOKUP和HLOOKUP函数的错误情况在使用VLOOKUP和HLOOKUP函数进行数据查询时,可能会出现以下两种错误情况:1. 找不到匹配的值:在查找表格中找不到与lookup_value匹配的值时,函数将返回#N/A错误。
2. 返回值所在列或行超出范围:当col_index_num或row_index_num参数的值超出table_array的范围时,函数将返回#REF!错误。
OfficeScan常见问题解决方案
OfficeScan常见问题解决方案解决方案65945officescan 8.0在WEB登入控制台问题描述: 在IE里面出现http://{officescan server ip}/officescan/console/cgi/cgiwebupdate.exe解决方案: 1,停止以下的服务OfficeScan Master ServiceIIS Admin Service2、打开Program Files\Trend Micro\OfficeScan\PCCSRV\Web_OSCE\Web_console\HTML\ClientInstall文件夹检查以下的文件是否为0字节,如果是0字节,请从其他运行正常的officescan服务器端上获取NTsetup0.htmNTsetup1.htmNTsetup2.htmNTsetup3.htmNTsetup4.htmNTsetup4e.htm3、打开\Program Files\Trend Micro\OfficeScan\PCCSRV\Admin文件夹,检查tsc.ptn文件是否存在,如不存在,从运行正常的officescan上拷一个过来4、开启步骤一中停止的两个服务5、进入C盘\Windows 文件夹,右击temp文件夹,属性,把IUSR_帐号加入,并且给与读写权限6、再次进行安装解决方案65549Officescan 8.0 通过Web方式安装客户端出现空白页面。
问题描述: Officescan 8.0 通过Web方式安装客户端出现空白页面。
解决方案: 请尝试在Officescan服务器进行下面的操作:1. 点击运行,输入cmd然后回车。
2. 输入以下命令netsh winsock reset解决方案65890officescan master service无法自动启动问题描述: officescan master service无法自动启动,可以手动启动。
Excel错误代码含义
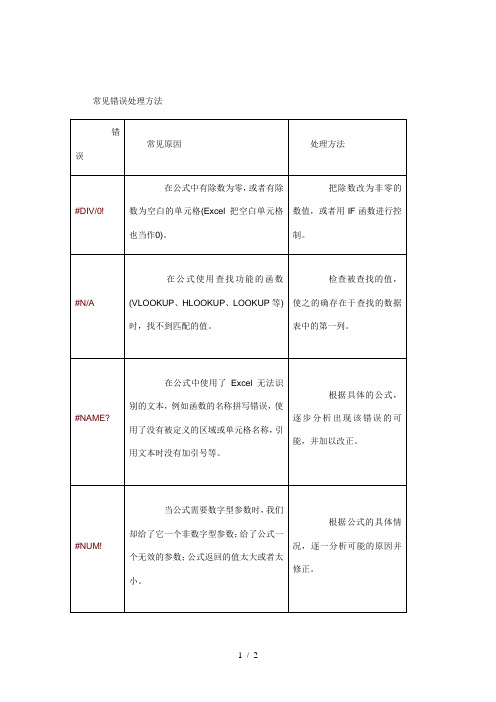
在公式中使用了Excel无法识别的文本,例如函数的名称拼写错误,使用了没有被定义的区域或单元格名称,引用文本,并加以改正。
#NUM!
当公式需要数字型参数时,我们却给了它一个非数字型参数;给了公式一个无效的参数;公式返回的值太大或者太小。
常见错误处理方法
错误
常见原因
处理方法
#DIV/0!
在公式中有除数为零,或者有除数为空白的单元格(Excel把空白单元格也当作0)。
把除数改为非零的数值,或者用IF函数进行控制。
#N/A
在公式使用查找功能的函数(VLOOKUP、HLOOKUP、LOOKUP等)时,找不到匹配的值。
检查被查找的值,使之的确存在于查找的数据表中的第一列。
#REF!
公式中使用了无效的单元格引用。通常如下这些操作会导致公式引用无效的单元格:删除了被公式引用的单元格;把公式复制到含有引用自身的单元格中。
避免导致引用无效的操作,如果已经出现错误,先撤销,然后用正确的方法操作。
#NULL!
使用了不正确的区域运算符或引用的单元格区域的交集为空。
改正区域运算符使之正确;更改引用使之相交。
根据公式的具体情况,逐一分析可能的原因并修正。
#VALUE
文本类型的数据参与了数值运算,函数参数的数值类型不正确;
函数的参数本应该是单一值,却提供了一个区域作为参数;
输入一个数组公式时,忘记按Ctrl+Shift+Enter键。
更正相关的数据类型或参数类型;
提供正确的参数;
输入数组公式时,记得使用Ctrl+Shift+Enter键确定。
EVS_EN_16454_2015_en_preview
© 2015 CEN All rights of exploitation in any form and by any means reserved worldwide for CEN national Members.
Ref. No. EN 16454:2015 E
EENVS1-6E4N5146:240541:520(1E5)
This document is a preview generated by EVS
EUROPEAN STANDARD NORME EUROPÉEN240.60
EN 16454
September 2015
Supersedes CEN/TS 16454:2013
Euroopa standardi EN 16454:2015 ingliskeelset consists of the English text of the European
teksti.
standard EN 16454:2015.
Standard on jõustunud sellekohase teate This standard has been endorsed with a
EUROPEAN COMMITTEE FOR STANDARDIZATION COMITÉ EUROPÉEN DE NORMALISATION EUROPÄISCHES KOMITEE FÜR NORMUNG
CEN-CENELEC Management Centre: Avenue Marnix 17, B-1000 Brussels
This document is a preview generated by EVS
Contents
Page
IIS应用程序池由服务器引起常见错误号的原因分析及解决方法
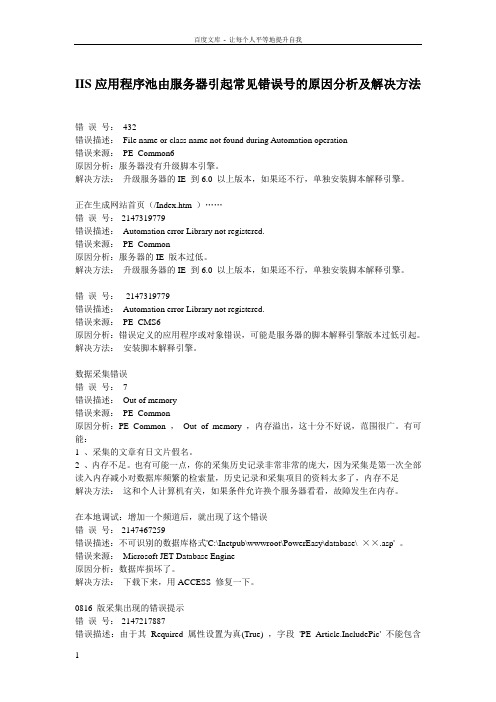
IIS应用程序池由服务器引起常见错误号的原因分析及解决方法错误号:432错误描述:File name or class name not found during Automation operation错误来源:PE_Common6原因分析:服务器没有升级脚本引擎。
解决方法:升级服务器的IE 到6.0 以上版本,如果还不行,单独安装脚本解释引擎。
正在生成网站首页(/Index.htm )……错误号:-2147319779错误描述:Automation error Library not registered.错误来源:PE_Common原因分析:服务器的IE 版本过低。
解决方法:升级服务器的IE 到6.0 以上版本,如果还不行,单独安装脚本解释引擎。
错误号:-2147319779错误描述:Automation error Library not registered.错误来源:PE_CMS6原因分析:错误定义的应用程序或对象错误,可能是服务器的脚本解释引擎版本过低引起。
解决方法:安装脚本解释引擎。
数据采集错误错误号:7错误描述:Out of memory错误来源:PE_Common原因分析:PE_Common ,Out of memory ,内存溢出,这十分不好说,范围很广。
有可能:1 、采集的文章有日文片假名。
2 、内存不足。
也有可能一点,你的采集历史记录非常非常的庞大,因为采集是第一次全部读入内存减小对数据库频繁的检索量,历史记录和采集项目的资料太多了,内存不足解决方法:这和个人计算机有关,如果条件允许换个服务器看看,故障发生在内存。
在本地调试:增加一个频道后,就出现了这个错误错误号:-2147467259错误描述:不可识别的数据库格式'C:\Inetpub\wwwroot\PowerEasy\database\ ××.asp' 。
错误来源:Microsoft JET Database Engine原因分析:数据库损坏了。
Fusion Engraver 产品说明书

Menu Short Cut PageThere are multiple menus in the Fusion Engraver. This document will provide you with a quick reference guide to locating the information that you need in the Fusions menu system.Two different indicators are used at any of the Primary menu headings. These indicators are used to let you know that additional menu items are available from this menu heading.The Two indicators are:Carets: This indicator is only used in the Focus menu to denote that this menu item has two submenus.Two Black Diamonds: This indicates that a Double Center Click of the Keyboards Joystick willaccess the Menu items Sub MenuJOB:No Sub Menus are available for this menu heading.FOCUS:Two Menu Sub Headings or options are available from this heading.Macro Mode: Double Carets mean that the machines table is in Marco Mode. This allows forrapid or large incremental movement of the table up or down.Micro Mode: Single Caret means that the machines table is in Micro Mode. This allows for veryslow or small incremental movement of the table up or down.The Double Black Diamonds indicate that a Double Center Click is needed to access the FOCUSSub Menu shown below.Double Diamond MenuTo select the menu heading move the Joy stick in the direction indicated by the arrow.GO: Moves the table to the “Zero” location that has been set in the machine.SET: Sets the tables “0” location.MOVEOUT: Moves the lens carriage out to the traditional manual focus location.RESTORE: Restores the table the factory default “0” location.JOG:The Jog menu has only one sub menu which is indicated by the Double Diamonds to the right.By Center Double Clicking, you can access this menu. The Menu is shown below.Double Diamond MenuTo select the menu heading move the joy stick in the direction indicated by the arrow.GO: Resets the lens carriage to either the Default factory home position, or to a temporary home that you may have set.SET: Sets a temporary home position for the engraver.EXIT: Exits the JOG sub menu.Restore: Restores the lens carriage back to the factory default location.SPEED:JOB: Laser TestRS=000% * VS=000%Speed MenuThe Speed menu has no Sub Menus.The Asterisk is a place holder separating the Raster speed from the Vector Speed. It performs no function.At this time, neither the Raster speed nor the Vector Speed is adjustable “on the fly”. This may change in the future.POWER:JOB: Laser TestRP=000% * VP=000%Power MenuThe Power Menu has no Sub Menus.The Asterisk is a place holder separating the Raster Power from the Vector Power.At this time, neither the Raster Power not the Vector power is adjustable “on the fly”. This may change in the future.Config:This is the configuration menu. There are many headings in this menu. They are explained below.Restore Home: Center click to restore the factory default home position.Restore Table Home: Center Click to restore the table to the factory default table position.X-Home: This heading is where the X-Home is set. To change these values, center click on the Joy Stick and move the joystick up to increase the number and move the lens carriage to the left. Or move thejoystick down (toward the front of the machine) to reduce the number and move the lens carriage to theright. Each number represents approximately 0.001 of an inch.Y-Home: This heading is where the Y-Home is set. To change these values, center click on the Joy Stick and move the joystick up to increase the number and move the X-axis assembly to the rear of the machine.Or move the joystick down (toward the front of the machine) to reduce the number and move the X-axisassembly to the front of the machine.Table Home: This is where the table “Home” is set. This header sets the default location for the table.Vector Grid Home: This is the home position for the Vector grid assembly.Jog Laser PWR: The Laser Jog Power is adjusted by center clicking the joy stick. An underscore willappear beneath the Number value in this heading. Move the joy stick up to increase the power, move thejoystick down to lower the power, center-click the joystick again to save the power level in the machine.Quick Table Home: This menu heading reestablishes the Tables home location. This is done when thetable has lost track of its location (up and down) in the machine. To initiate the Quick Table home, center-click the joystick.Serial Number: This is the machines serial number.I.P. Address: This is the IP address for the machine. Refer to the machines owner’s manual for informationon setting up the local area network.Subnet Mask: This will be the machines subnet mask. Refer to the machines owner’s manual forinformation on setting up the local area network.Gateway: This is the machines Gateway. Refer to the machines owner’s manual for information on setting up the local area network.Laser Installed: This is set at the factory based on the laser type installed and will be one of the following: Co2 or Fiber. This heading cannot be changed.Vector Grid: Will be either “Yes” or “No”. Center-Click and then move the Joy stick up or down tochange this selection.Air A Raster: This setting turns off or on the Air Assist in Raster Mode. Center-Click the Joy stick and move the Joy stick up or down to change the selection.Air A Vector: This setting turns off or on the Air Assist in Vector Mode. Center-Click the Joy stick and move the joy stick up or down to change the selection.Laser Match: This setting is used for laser Match. Center-Click the Joy stick to and move the Joy stick up or down to change this selection.Set X/Y Home: At this heading, you can center-click the Joy stick to set a new home position.Set Table Home: Center click the Joy stick to set a new Table Home position.Go X/Y Home: Center-Click the Joy stick to move the lens carriage to the last set home position or the factory default home position.Go Table Home: Center-Click the Joy stick to move the table to its last set home position or the factory default table home position.X-Scale Adjust: Use this setting to adjust the scaling of the X-Axis. Center-Click the Joy stick to access the number, center-click again to save the new value. Increasing the number increases the size of the image, reducing the number will make the image slightly smaller. This is most frequently used when cutting items that must be an exact size, like rulers and such. To adjust, create a 10 inch box and run the job. If the image is smaller than 10 inches, increase the number. If the image is less than 10 inches, reduce the number.Y-Scale Adjust: This works in the same manner as the X-Scale adjust, only for the Y-Axis. Setting this value is the same as setting the X-Scale. Center-Click the Joy stick to access the number, center-click again to save the new value. Increasing the number increases the size of the image, reducing the number will make the image slightly smaller. This is most frequently used when cutting items that must be an exact size, like rulers and such. To adjust, create a 10 inch box and run the job. If the image is smaller than 10 inches, increase the number. If the image is less than 10 inches, reduce the number.Laser T.I.: This heading is a simplified version of our previous Laser T.M. and T.I. settings. They have been rolled in to one value setting. If the laser does not fire first thing in the morning, increase this value by one point. The machine will need to set idle over night to see if the change in value has had an impact on the machine performance.Pulse Stretch: This setting is used to “stretch” the pulse time slightly. This setting is used when you have an object like a comma (,) that has a small tail that will not engrave. By increasing the Pulse Stretch, the laser “sees” the tail of the comma giving the laser a little more time to respond. This is most commonly used on the 120 Watt lasers, but can be used on all models.Bed Size: This is self-explanatory. This the table size of the machine. Center-click and then move the Joy stick up or down to change this setting.System Unit: This is where you would change the unit of measurement in the Fusion machines. Center-click and move the Joy stick up or down to change this setting.Full Table Home: This feature is used to establish the full range of table movement in the Fusion engraver. Center-click the Joy stick to start the full table home routine. This should be done anytime a Table motor is replaced or when the Table measurement displayed on the LCD is 0.00. This indicates that the table has lost track of its location.Calibrate Joy Stick: This feature is used to recalibrate the joy stick on the display of the Fusion engraver. Center-click and follow the on screen instructions to complete the calibration process.Rotary installed: This menu heading tells the operator if the Rotary device is installed the machine. This is triggered by the installation of the Rotary device and cannot be changed manually.System Version: This is the version level of the software that is currently loaded in the Fusion engraver. This will update anytime that the machines operating code is updated.。
non-ascii character
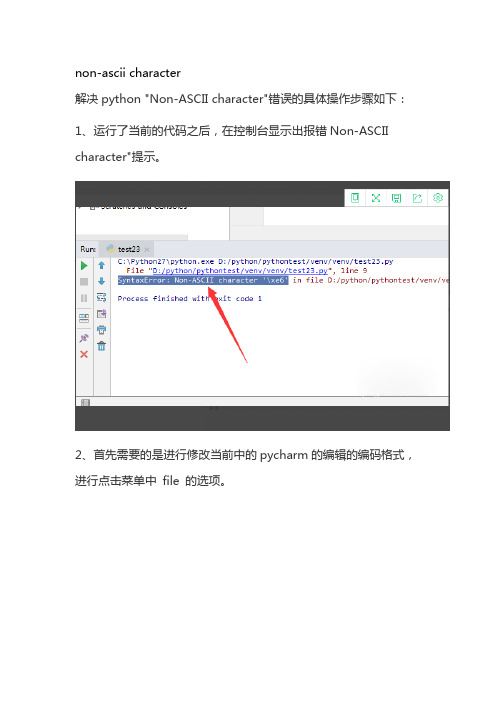
non-ascii character
解决python "Non-ASCII character"错误的具体操作步骤如下:1、运行了当前的代码之后,在控制台显示出报错Non-ASCII character"提示。
2、首先需要的是进行修改当前中的pycharm的编辑的编码格式,进行点击菜单中file 的选项。
3、弹出了下拉菜单中选中settings 的选项,进行settings窗口之后,进行选中为file encodings 的选项,进行把global encoding 和project encoding进行改为utf-8即可。
4、然后进行再代码的编辑界面,进行选中代码的顶部位置。
5、然后在顶部的选中位置中,进行输入#encoding:utf-8 即可。
6、然后在运行当前的代码之后,可以看到的输出的结果,可以看到是输出中文的信息,即代表解决python "Non-ASCII character"错误了。
疫苗接种错误应急处置流程脚本
疫苗接种错误应急处置流程脚本英文回答:Emergency response procedures for vaccineadministration errors are crucial in order to ensure the safety and well-being of individuals who may have been affected. When a vaccine administration error occurs, it is important to act swiftly and effectively to minimize any potential harm. The following is a step-by-step script for handling vaccine administration errors:1. Assess the situation: First and foremost, it is important to assess the severity of the error and the potential risks involved. Determine whether immediate medical attention is required or if the situation can be resolved on-site.2. Notify the appropriate authorities: Contact the relevant healthcare professionals, such as doctors or nurses, who can provide guidance and assistance in handlingthe error. Inform them about the specific details of the error and any symptoms or reactions observed.3. Isolate the affected individual: If necessary, isolate the individual who received the incorrect vaccine or dosage to prevent further exposure or contamination. Ensure their safety and comfort while waiting for further instructions from healthcare professionals.4. Provide immediate medical care: If the error poses an immediate health risk, provide any necessary medical care or interventions. This may include administering medication to counteract potential side effects or seeking emergency medical attention.5. Investigate the cause: Once the immediate situation has been addressed, it is important to investigate the cause of the error. This may involve reviewing the vaccine administration process, identifying any procedural gaps or human errors, and implementing corrective measures to prevent future occurrences.6. Communicate with the affected individual: Maintain open and transparent communication with the individual who received the incorrect vaccine or dosage. Provide them with clear and accurate information about the error, itspotential consequences, and any necessary follow-up actions.7. Monitor and document: Continuously monitor the affected individual for any adverse reactions or symptoms. Document all relevant information, including the details of the error, the actions taken, and the individual's response to the error.8. Follow-up and support: Offer ongoing support to the affected individual, including any necessary medicalfollow-up appointments, counseling, or resources to address any physical or emotional effects of the error.9. Report and learn from the error: Report the vaccine administration error to the appropriate regulatory authorities or organizations as required. Use the incident as an opportunity for learning and improvement, implementing changes to prevent similar errors in thefuture.中文回答:疫苗接种错误的应急处置流程至关重要,以确保受影响的个体的安全和福祉。
医务质控工作总结模板ppt

PA R T. 0 3
疫情防控工作
(一)高度重视,精心组织
1.成立领导小组 2.出台应急工作方案 3.广泛宣传。
(二)强化责任,做好防控 (三)加强值班值守,强化人员调度 (四)其他防疫措施
1.严格落实核酸采样工 2.强化疫情防控培训。
1.严格闭环管理
1.门诊预检分诊管理。
2.成立临时隔离病房
2.分时段预约诊疗和互联网诊疗
1. 加强院科二级管理,设公示“黑榜”,必要约谈科主任。 2. 加强培训和重点整治:督查病区学习医疗核心制度,特别
要加强医疗核心制度的执行力度;加大考核力度,明确 各级医生的职责。加强对科室相关制度的培训,加强临 床科室自身的二次培训,使科室人员对相关制度(特别 是核心制度)烂熟于心。 3. 督促科室质控员加强科室内部医疗质量管理的自查工作 4. 质控办加强对临床科室医疗质量管理的督查,实行定期 和不定期抽查,及时发现医疗活动中的问题。
PA R T. 0 4
目标计划 始终围绕“安全、质量、效率”为核心
以加强医疗质量管理、提升医疗服务水平和医疗服务效率为重点,严格执行医保政策,确保重点时段保障任务, 继续现行各项质控管理常规工作,在现有基础,针对2022年医疗质量检查不规范问题
服务宗旨
“以质量为核心,以病人为中心”
一、质量管理培训
2022年拟定指标
ZLHIS常见问题总结

7、门诊医生给一卡通病人开完医嘱后病人到医 技科室无法扣款
8、门诊挂号时明明挂号安排中有某位医生,但 挂号时就是看不到该医生。
• 问题分析:挂号安排中的时间设置有问题,从而造成找不到医生,如下 图:
• 解决办法:修改时间安排即可解决。
9、新开药品医嘱时明明有库存,但就是无法开立
• 问题分析:查询药品库存发现由于该药品已经到失效期,所以导致该 药品无法开立,如下图:
6、回退医嘱时提示该记录在病人医嘱附费中已经使 用,不能删除或修改
• 问题分析:该医嘱是发往医技科室的医嘱,医技科室在这条医嘱下补 记了一条费用,继而造成该医嘱无法回退,提示如下图:
• 解决办法:在医技工作站中将这条补记费用删除即可。如下图:
• 问题分析:门诊病人办理就诊卡并到达到门诊医生站后医生没有用就 诊卡给病人挂号,而是直接输入病人信息重新挂的号,这样导致病人 的消费单据没有和就诊卡关联从而造成医技科室无法完成扣款。 • 解决办法:将原先开的医嘱作废,重新用就诊卡挂号并开立医嘱。
• 解决方法:换一种规格或者换一种同等药效的药品。
10、在开立护理等级医嘱后想要作废该医嘱时提示 产生了其他变动记录,不能作废该医嘱。
• 问题分析:在病入出管理中查询该病人的变动记录后发现护理等级医 嘱执行后又执行了一个变动操作,导致护理等级无法作废,如下图:
• 解决方法:在病人入出管理或者护士工作站中右键选中该病人,撤 销最后一次变动记录后即可作废护理等级医嘱
5、病人在办理入科并产生数据后如何撤销入院
• (1)将产生的费用全部销账,保证该病人的账面上都是0;(特别要注 意预交金要退完) • (2)将该病人的所有医嘱全部作废。 • (3)查看该病人的电子病历、护理数据、病历,将所有记录全部删除。 • (4)将该病人撤销到待入科状态后由住院处撤销入院即可。
非中选药品限制科室弹窗提示内容

非中选药品限制科室弹窗提示内容
非中选药品限制科室弹窗提示内容可以包括以下信息:
1. 提示:该药品为非中选药品,存在限制使用的科室。
2. 说明:该药品由于某种原因,只能在特定的科室内使用。
3. 科室限制:明确列出所限制的科室名称,例如:内科、外科、儿科等。
4. 原因解释:简要解释为什么该药品有科室限制,例如:专业知识要求、操作技术要求等。
5. 提示操作:建议用户咨询医生或药师,以了解该药品是否适合在自己的科室内使用。
6. 警示:强调不要擅自在非限制科室内使用该药品,以免对患者造成不良影响。
7. 安全提示:提示用户遵循相应的医疗规范和标准,确保患者安全。
8. 联系方式:提供医院或药品提供商的联系方式,以便用户进一步咨询或获取相关信息。
以上提示内容旨在为用户提供准确的药品使用信息,确保医疗行为的规范性和安全性。
一个去除Aspose.Cells生成的EXCEL2007格式中EvaluationWarn。。。
一个去除 Aspose.Cells生成的 EXCEL2007格式中 EvaluationWarn。 。 。
EXCEL2007格式是Open XML格式,可以利用这一点直接把那个“Evaluation Warning”去掉。
第一步,将xlsx文件解开到一个目录。 第二步,修改里面的XML文件: 1、将\xl\workbook.xml 文件中<sheet name="Evaluation Warning" sheetId="2" r:id="rId2" />这一节去掉。这里可以根据Evaluation Warning 这个sheet名字找到sheet的id,也就是r:id="rId2" 2、 将\xl\_rels\workbook.xml.rels中的<Relationship Id="rId2" Type="/officeDocument/2006/relationships/worksheet" Target="worksheets/sheet2.xml" />去掉。这里我 们根据sheet的ID(Id="rId2")找到worksheets/sheet2.xml 3、将\[Content_Types].xml 文件中<Override PartName="/xl/worksheets/sheet2.xml" ContentType="application/vnd.openxmlformatsofficedocument.spreadsheetml.worksheet+xml" />这一节删除。 4、把\xl\worksheets\sheet2.xml删除。
- 1、下载文档前请自行甄别文档内容的完整性,平台不提供额外的编辑、内容补充、找答案等附加服务。
- 2、"仅部分预览"的文档,不可在线预览部分如存在完整性等问题,可反馈申请退款(可完整预览的文档不适用该条件!)。
- 3、如文档侵犯您的权益,请联系客服反馈,我们会尽快为您处理(人工客服工作时间:9:00-18:30)。
Competency:Technical/Clinical Knowledge
Definition:
Uses technical/clinical knowledge to improve quality and individual and organizational performance
Willingly responds to direction provided by supervisor to provide assistance to others
Completes own work; is appropriately responsive to coworkers' requests for assistance when asked
Shows genuine interest in and concern for customer needs
Listens actively and seeks to understand and meet their needs
Understands and accommodates customer preferences (e.g. preferred name, minor scheduling adjustments)
Provides the highest level of care and/or service to customers, including patients, families, physicians, other associates and all for whom we provide service
Encourages others to show respect and appreciation for the value and diversity of individual contributions
Competency:Effective Use of Resources
Definition:
Continues to be courteous under somewhat adverse conditions
Exhibits positive nonverbal communication including facial expressions, tone of voice and body language
Is an effective communicator and observant of the needs of coworkers
Makes good decisions regarding prioritization of work
Works within the team where help is needed most
Analyzes alternatives for meeting customer needs and consistently chooses the most cost-effective and time-efficient method
Plans own work to maximize efficiency
Carries out basic work routines or procedures so that work is completed according to expectations for quality and timeliness
Maintains safe practices
Continually improves performance of basic work routines or procedures
Considers how own actions may impact others
Consistently maintains a positive attitude and influences others to actively support team and department goals
Practices preventive maintenance
Can discern essential resources from those nice to have
Willingly assists others with technical or clinical questions or issues
Readily learns and applies new information and concepts
Incorporates quality improvement measures in daily work
Accepts opportunities for cross-training and helps out in other areas when needed
Changes own behavior or approach to adapt to the situation
Motivates individuals through example, discussion or helping them work through situations to adapt to change
Recognizes situations requiring non-routine solutions and uses other people as resources for finding the best solution
Assesses non-routine situations from a variety of perspectives, considers several alternatives and chooses the best course of action
Addresses some non-routine situations with little intervention from others
Identifies when it is appropriate to go outside of regular procedures and does so when necessary
Shows respect for customers by making eye contact, addressing by name, greeting them pleasantly
Maintains customer confidentiality
Responds to customer requests promptly and courteously
ABCHospital
Non-Exempt Competencies
List of Competencies
1.Technical/Clinical Knowledge
2.Customer Service
3.Flexibility/Adaptability to Change
4.Teamwork
5.Effective Use of Resources
Participates in addressing non-routine situations
Anticipates needs of customers and meets those needs before customer asks for help
Consistently follows-up to ensure customer satisfaction
Explains processes and procedures to customer
Refers non-routine situations to appropriate person
Works collaboratively and involves customers to resolve their needs
Demonstrates awareness of larger goals and priorities by balancing the accomplishment of own work with pro-actively assisting others to meet larger goals and priorities
has a general awareness of what things cost
Normally does the task right their first time and minimizes rework or duplication
Prudently uses resources available
Shows respect and appreciation for the value and diversity of individual contributors
Is an exemplary team player and leads others in working cooperatively by example
Understands and relays the "big picture"
Competency:Teamwork
Definition:
Works with others to achieve org own goals and priorities
Looks for new information and applies it to improve work processes
Develops other by showing them better ways to do things