奔驰E200音响改装
汽车音响改装最常用的5种改装方案

汽车音响改装最常用的5种改装方案1.更换车载音响主机:更高级的音响主机可以提供更好的音质和功能。
车载音响主机包括收音机、CD/DVD播放器、多媒体播放器、导航系统等。
车主可以根据自己的需求选择合适的主机,安装后可以获得更好的音质和更多的功能,例如蓝牙连接、USB接口、语音控制等。
2.更换喇叭:车载喇叭是音响系统中最重要的组成部分,它直接影响音质的表现。
一般来说,原厂喇叭的音质和功率都比较一般,所以车主可以考虑更换高品质的喇叭。
常见的喇叭类型包括高音喇叭、低音喇叭、中音喇叭等。
喇叭的选择需要考虑音质、功率和匹配度等因素。
3.加装功放:汽车音响系统功放是提升音质的重要组成部分。
原厂的功放功率一般较低,无法满足对音响系统的高功率需求。
所以车主可以加装功放来增加输出功率,并提供更好的音质。
功放的选择要考虑功率、稳定性和匹配度等因素。
4.加装低音炮:低音炮是汽车音响系统中重要的低频响应元件,它能够提供更加浑厚的低音效果。
低音炮的选择需要考虑尺寸、功率和音质等因素。
车主可以选择加装一个或多个低音炮来增强底音效果,提升听觉享受。
5.良好的隔音处理:车内的噪音对音响系统的影响较大,会降低音质的表现,所以进行良好的隔音处理也是一种改装方案。
可以使用隔音材料对车门、地板、天窗等部位进行隔音处理,减少外界噪音的干扰,提升音响系统的表现。
除了上述5种改装方案,还有一些其他一些改装方案的细节可以考虑,例如增加一些音频信号处理器,如均衡器和调音器,来进一步优化声音效果。
此外,根据个人需求和预算,还可以考虑更复杂的多扬声器系统,使用高端音响配件等。
需要注意的是,进行汽车音响改装时应选择正规的改装店或专业的改装师傅进行改装,以确保改装操作的安全和质量。
此外,改装后的音响系统也需要进行合理的调试和调校,以获得更好的音质效果。
EAW 音箱技术参数
Avalon -- 娱乐场所系列DC系列DC 系列是为舞厅、夜总会等娱乐场所扩声而度身定制的高水准固定安装型扬声器系统。
低频部分采用双重或四重低音单元设计,产生了激荡轰鸣、震撼人心的节奏和效果,充分拓展并彰显了厚重的低音;中高频部分采用性能卓著的中频和高频单元,呈现同样出色的中高音音质,确保在整个中高频段、最大长期声压级情况下纯净、自然、水晶般清澈透明的音色。
DCS子系列为装载有号筒的超低频扬声器系统,用来强有力地增强低音效果.DCT子系列为用来进一步增强高音效果的超高频扬声器系统。
DC1全频三分频扬声器系统;4x15”低频单元, 10”号筒中频单元,2 ”高频单元;非对称下倾式涵盖;包括3/8”-16螺纹安装/吊装点;双路功放驱动 (采用数字信号处理)频响范围: . . . . . . 46Hz-16 kHz覆盖角度 : . . . . . 90°x 40°(+10°- -30°垂直) 功率/最大长期声压级/阻抗低频1: . . . . . . . . 1600W/129dB/4Ω低频2: . . . . . . . . 1600W/129dB/4Ω低频1+ 低频2: . .3200W/135dB/2Ω中频/高频: . . . . .350 W/133dB/8Ω连接: . . . . . . . . . . NL4和NL8 Speakon尺寸(mm): . . . . . 1016高x1770前/1133后宽x652深重量(kg): . . . . . . .182.3产品编号: . . . . . . .999968选件DC1系统悬吊杆将低频部分与中/高频部分固定为一体 , 每一DC1系统需要2个产品编号 . . . . . . . 179114DC2全频三分频扬声器系统;2x15”低频单元, 10”号筒中频单元,1.4 ”高频单元;配有3/8”-16螺纹安装/吊装点; 双路功放驱动 (采用数字信号处理)频响范围: . . . . . . 45 Hz - 18 kHz覆盖角度 : . . . . . .90° x 40°功率/最大长期声压级/阻抗低频: . . . . . . . . . 1600W/132dB/4Ω中频/高频: . . . . 350 W/133dB/8Ω连接: . . . . . . . . . . NL4 Speakon尺寸(mm): . . . . . 572前高/489后高x1449宽x483 深重量(kg): . . . . . . 86.4产品编号 . . . . . . . 999969DC3全频三分频扬声器系统;2x12”低频单元, 8”号筒中频单元,1”高频单元;配有3/8”-16螺纹安装/吊装点;双路功放驱动 (采用数字信号处理)频响范围: . . . . . . 50 Hz - 18 kHz覆盖角度 : . . . . . 90°x 40°功率/最大长期声压级/阻抗低频: . . . . . . . . . 800W/128dB/4Ω中频/高频: . . . . 250W/128dB/8Ω连接: . . . . . . . . . . NL4 Speakon尺寸(mm): . . . . . 476前/406后高x 1321宽 x406 深重量(kg): . . . . . . 54.5产品编号 . . . . . . .999970DC4全频三分频扬声器系统;2x12”低频单元, 8”中频单元1 ”高频单元;配有3/8”-16螺纹安装/吊装点;双路功放驱动 (采用数字信号处理)频响范围: . . . . . . . 45 Hz - 17.5kHz覆盖角度 : . . . . . . 90° x 40°功率/最大长期声压级/阻抗低频: . . . . . . . . . . .800W/128dB/4Ω中频/高频: . . . . . .220W/120dB/8Ω连接: . . . . . . . . . . . NL4 Speakon尺寸(mm): . . . . . . 486前/354后高 x959宽 x 508 深重量(kg): . . . . . . . .45产品编号 . . . . . . . . 999937DC5全频二分频扬声器系统;12”低频单元;1.4 ”高频单元;配有3/8”-16螺纹安装/吊装点;单路功放驱动频响范围: . . . . . . . .50 Hz - 18 kHz覆盖角度 : . . . . . . .90°x 45°功率/最大长期声压级/阻抗全频: . . . . . . . . . . 500W/124dB/8Ω连接: . . . . . . . . . . . NL4 Speakon尺寸(mm): . . . . . . 395前/306后高 x 762宽 x 346深重量(kg): . . . . . . . .29.5产品编号 . . . . . . . . 999972DC6全频二分频扬声器系统;2x8”低频单元, 1”高频单元;包括3/8”-16螺纹安装/吊装点;单路功放驱动频响范围: . . . . . . .50 Hz - 19 kHz覆盖角度 : . . . . . . 90° x 60°功率/最大长期声压级/阻抗全频: . . . . . . . . . . . 400W/121dB/4Ω连接: . . . . . . . . . . . NL4 Speakon尺寸(mm): . . . . . . 270前高/189后高x762宽x297深重量(kg): . . . . . . . .25.5kg产品编号 . . . . . . . . 997207D C S 系列EAW工程师发现,现代舞厅音乐的频谱具有这样一个特点:50Hz至60Hz低频段的声压级要比其他频段高出10-20dB。
吹毛求疵
吹毛求疵作者:云九来源:《音响改装技术》2016年第03期配置清单前声场:以色列摩雷意钛能602两分频套装后声场:以色列摩雷听宝6两分频套装卡罗拉的车主平常爱听流行音乐,注重音乐的品质以及其原汁原味的感觉。
这就对我们的音响器材有了一个很大的要求,车主寻遍了市场上大大小小的品牌,最后锁定以人声而著称的以色列摩雷喇叭。
此次音响改装,酷车旋律的改装师傅向车主推荐了摩雷意钛能 602两分频套装和听宝6两分频套装,并建议用摩雷意钛能 602两分频套装来升级前声场,听宝6两分频套装用以升级后声场。
车主在店内试音室试听后,很满意这两个套装喇叭发挥出的音响效果,对喇叭被安装上车后的效果更期待不已。
说到摩雷意钛能,不得不提到广受欢迎的摩雷意蕾旗舰版喇叭,其有着高解析力、高清晰度、高持续功率的“三高”和精准定位的“一精”,还有着独特的EVC(外置音圈)内磁结构,最好地匹配了电频信号与声波信号的转换,再现精准音乐。
而摩雷意钛能则是在意蕾的基础上加以创新的一款喇叭,可谓是意蕾的升级版。
意钛能与意蕾最大的区别在于音圈的材质,意钛能采用了摩雷最新研发的钛音圈,其有着极强的韧性,质轻而不易变形。
音圈堪称喇叭的心脏,其性能的优良极大地影响了喇叭的声压频率特性、失真、瞬态特性等多方面因素。
打开网罩,我们可以看到丝膜材质的圆球顶高频单元,其上面还有一层摩雷独特专利技术的阿克弗勒手工涂层。
阿克弗勒是一种特殊的化学材料,可以确保拥有良好的阻尼系数,降低失真度及去除多余的谐振,让单元发挥出最佳的声音效果。
搭配特殊通风腔设计,以及摩雷国际专利技术的莲花网罩,让高频单元更加清脆靓丽且柔和不刺耳。
而且你不要小看莲花网罩上那大小不一,形状不同的犹如莲花花瓣般排列的孔洞,它可额对音质有着很强的改善作用。
中低音喇叭和高音喇叭安装好后,在配备MXT280分频器,让音乐更加具有层次感。
编辑点评:一项项的专利技术成就了以色列摩雷在车主心中改装器材的首选,同样地,佛山酷车旋律每一个改装的小小细节都使之成为车主最放心的汽车音响改装店。
好马配好鞍,太原别克新君威汽车音响改装案例
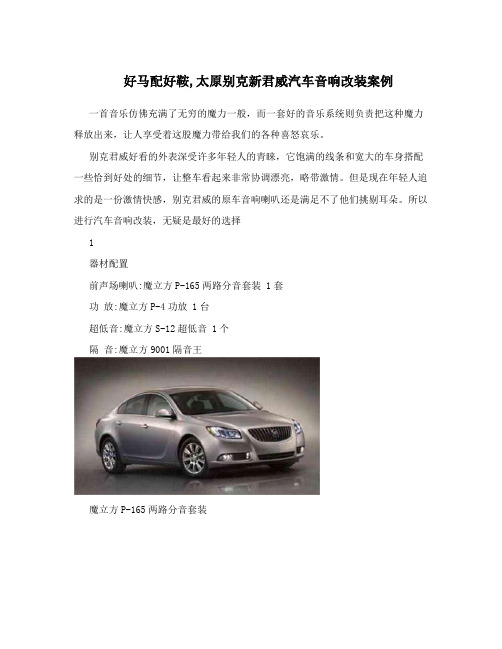
好马配好鞍,太原别克新君威汽车音响改装案例一首音乐仿佛充满了无穷的魔力一般,而一套好的音乐系统则负责把这种魔力释放出来,让人享受着这股魔力带给我们的各种喜怒哀乐。
别克君威好看的外表深受许多年轻人的青睐,它饱满的线条和宽大的车身搭配一些恰到好处的细节,让整车看起来非常协调漂亮,略带激情。
但是现在年轻人追求的是一份激情快感,别克君威的原车音响喇叭还是满足不了他们挑剔耳朵。
所以进行汽车音响改装,无疑是最好的选择1器材配置前声场喇叭:魔立方P-165两路分音套装 1套功放:魔立方P-4功放 1台超低音:魔立方S-12超低音 1个隔音:魔立方9001隔音王魔立方P-165两路分音套装魔立方P-4功放魔立方S-12超低音samples if possible first enters the processing ... Sterilization containers: from plastic bags to sterilized gallon paint bucket, can be used to have a sharp edge products such as crab, shrimp, and so on. Sampling tools: sampling tool including: a teaspoon, spoon, needle-nosed pliers, angle fovceps tongs beakers and beaker, tool type is generally decided by the sample products. All sampling and date of sterilization of the container should be checked and sterilization time should beindicated on the label and packaging of equipment facilities, some facilities can be purchased at a local laboratory sterilization or disinfection equipment, laboratory and sterilization of instruments and facilities can be kept on the ground for at least two months, expired facilities must be sterilized again. Sterile gloves: sterile gloves must not be enabled in a sample, if a product is in the process of sample collection must be contacted to do it's best to let the factory production line workers (workers processed products), in the sample into a collection container, since the workers in the production process to reach the product, so we cannot think of their products and have the additional pollution. When the gloves must be a way to avoid contamination, wear, gloves must be fit to work needs. No bacteria cotton swab child: General for swab take instrument facilities and factory environment regional, using cotton swab child General has aright of program, open cotton swab child stripping off epidermal, then must carefully of put in tube head Shang, note don't contaminated cotton swab childliquid to dissolve in liquid. Often referred to as solvent of liquid components in the solution ...AVolume of water solution. 6. the titre (t) titer is the solution concentration is another method. It has two meanings, said on its per milliliter of solution of solute in grams or milligrams. Titration of sodium hydroxide solution NaoH =0.0028g/mL=2.8m g/mL for t, second per ml of solution corresponds to the measured substance grams or milligrams. If titre of reagent T=3.5 card, 1mL card reagent is equivalent to 3.5 grams of water content, and whenthe determination of silver nitrate and sodium chloride, says there are two concentrations of silver nitrate: AgNO3 t t NaCl =1.84mg/mL, =1mg/mL, 1mg, indicating a 1mL solution containing silver nitrate, which represents the 1mL solution 1.84mg of sodium chloride, NaCl t =1.84 said, Known titre multiplied by the number of volume consumed in the titration of the standard solution, can be worked out of components to be measured, quite easy to calculate. Worth noting is that there are a lot of booksor reagent also follows the concept of normality in the directory indicated by n, such as hydrochloric acid concentration is 0.1Nindicates 1L hydrochloric acid solution containing 0.1 equivalent, also called volume parts per million. Was one of the original international concentration, is based on the equivalent law. Now with the new concept of "amount of substance, such as rules" instead of the equivalent law,so equivalent concentrations are no longer applied. On the relationship between n and m, the equivalent relation between concentration and Molarity, is not the same for different substances. Such as sulfuric acid: 1M h 2 SO 4 =2N h 2 SO 4, General writing m (1/2H 2 SO4)=0.1000mol/L, and potassium permanganate: 1M KMhO4 =5N KMnO 4, General writing m (1/5KMnO4) =0.1000mol/L. Third, the solution has not been made and saved (a) preparation of standard solution method车门内外层隔音,有效的防止噪音侵入倒模垫圈,专业级的木质喇叭框架,是保障音质必不可少,顺便装上中低音喇叭功放安装在后尾厢的车板上。
手把手教你做音箱分频器

手把手教你做音箱分频器1.电感骨架依据电感线圈的要求,选择合适的非金属骨架,如焊锡丝、密封用生料带的塑料骨架以及其它木质、胶质骨架等。
2.漆包线选用粗细合适、质量上乘的漆包线若干。
3.阻容件根据电路要求选择容量、阻值和功率合适的电容、电阻,分频电容最好选用进口或国产优质CBB电容,电阻以大功率水泥电阻为首选。
4.粘合剂此剂可选用市售“立得牢”等强粘度胶。
5.硬币、螺栓螺栓选择直径4mm左右的铜质品,其长度则根据电感骨架的高度而定。
6.敷铜板根据分频元器件的多少,选择大小合适的优质敷铜板,线路走向则根据设计要求用美工刀刻制。
7.透明胶带一盘制作1.绕电感将粘合剂瓶顶、底中间各钻一直径略大于漆包线的小孔(因液体粘稠,故不会从孔中流出),在两孔各穿一段塑料胶管之后,把漆包线从两胶管中穿过,以保漆包线通过两孔时不被刮伤,然后一人将漆包线一端拉紧,另一人就可拿漆包线的另一端在骨架上绕线,绕时双手不可接触漆包线,因漆包线在通过粘合剂时已均匀地敷上了一层粘合剂,可用手捏住骨架两端使之旋转,待电感圈数绕足之后,将多余的漆包线剪掉,固定好外引出线,待线上的粘合剂凝固以后,用透明胶带在线圈上紧绕几层。
2.元器件安装根据电感线圈及阻容件在板上的位置,用小钻在板上打好孔,在硬币中间钻一比铜螺栓直径略大的孔,将铜螺栓依次穿过硬币、线圈和电路板,然后再垫上弹簧垫片,用螺母紧固,将线圈、电容和电阻的引线刮净上锡后焊在相应的位置上,最后在板上焊接好进出线。
经过以上操作,一只质优价廉的分频器便制作完工,剩下的就是你体验成功的喜悦了。
分频器电感接线有讲究音箱分频器中电感线圈的接法对音质音色影响极大。
使用的一对倒相式音箱,电感线圈接法是外圈入里圈出音色均衡圆润。
曾使用里圈入外圈出接法,结果低音全无。
质量分频器的业余制作方法高保真的音箱多数都是由两只或两只以上的扬声器单元构成,要高质量的还原20Hz~20kHz全频段的音频信号,必须借助优质分频器的协助。
汽车音响改装5种方案
汽车音响改装5种方案对于一部普通的家用轿车来说,动辄上万元的改装费用显然并不是每位车主都乐于接受的。
这时,简单、实用的音响改进方案就变得平易近人了。
如果搜索一下目前市场上主流的经济型车内音响改进方法,就会发现主要集中在以下几种:更换CD主机、加装MP3播放器、更换MD机头、外挂MP3转换器、改进扬声器等,其中投资从几十元到几百元也各不相同。
改进CD主机现在越来越多的汽车在出厂时就已配置了CD主机,然而在中低档车的行列,卡带机头还是占据着相当大的份额。
这里,我们就为那些不满足爱车音响系统的车主介绍一个千元以下的主机改良方案。
优点:能彻底改变爱车的音响效果,机头的显示面板做工精细,目前在这个价位的机头能够有这样的音质也算上品了。
缺点:除了播放CD外,没有其它任何功能。
加装MP3播放器如果数数眼下最流行的音乐播放装备,那非小巧灵活的MP3播放器莫属了。
由于具有体积小、容量大,还可以按自己的习惯播放编辑歌曲的特点,所以可算是当前最炙手可热的音乐玩意儿了。
其实,要想让兜里的MP3走进汽车并不难,目前国内已经有许多汽车音响制造商推出了可以直接接驳MP3的汽车CD主机,只需到专业的音响改装店去置换一套新型的音响装备就可以让爱车欣然接纳MP3了。
优点:大幅提升了爱车的音响便利度。
缺点:功能多了音质自然差了不少,而且线路改装比较麻烦,需到有专业资质的音响店进行改装。
更换MD机头对于那些喜欢自己动手制造些动静的车主来说,没有什么比一套车载MD更适合他们了。
MD是一种数码录音格式的光盘,享有高质的反复录音性,极大程度地方便了编制个人音乐等特殊用途。
优点:可将录制的音乐、会议、课堂记录、现场音乐等及时在车内播放出来,还能编辑所有心爱的歌曲于一张MD碟并享受数码音质。
缺点:价格高昂,只适合少数发烧友。
加装MP3转换器对于既有MP3播放器,又已经安装好CD机头的消费者来说,要两者“通联”算是车主最大的愿望了。
别急,早有人看到了这块市场的巨大,于是一种叫MP3的车内音响转换器(也叫接收器)的装备应运而生了。
15款奔驰E260E200激活原厂导航

北京奔驰14款及15款E260运动版激活原厂导啦!E260的2.0升涡轮增压211马力运动版与豪华版在硬性的动力方面都是一样的,最明显的配置区别是一样的中控台彩色大屏豪华版配有原厂导航,而运动版却空有屏幕。
在后装市场上,基本有两类后加导航产品:1、加解码器、导航盒及触摸板实现导航,一般是凯立德地图。
优点:可触摸,凯立德地图使用简单,地图更新频繁。
缺点:属于国产适配型产品,在链接原车系统时经过转换盒,有延迟及抖屏现象,不能使用原车按扭操控并且不支持方向盘的语音按键.2、原厂导航:所谓原厂导航,说简单就是跟豪华版的原车导航一样功能,一样使用.有车主反应,因为是Command按扭操作,感觉不方便,其实是习惯成自然,熟练是王道.操作体验不好,只能说明刚刚用奔驰原厂导航哦!年款区别:E260也经历了小改款,13-14年2月出厂的车辆,简单从外观区别就是排气管,改款前排气管在左边,这个年款的车辆激活原厂导航,只需要加入天线+激活码+地图+电脑调节仪表显示。
改款后的左驰及15款新款的E260E200原车增加了电折镜及360全景摄像头,但在原厂导航方面却简化了陀螺仪配置,等于再激活原厂导航,需要植入原厂陀螺仪天线+激活码+地图+电脑调节仪表显示。
作业开始:1、这是未开工前的照片,可以看到屏幕界面只有“音频”“电话”“视频”“系统”四个选项。
2、通过正常的工程模式激活出“导航”选项,此时仪表也会同步显示主屏信息“正在启动导航系统。
3、由于原车系统硬盘里并无地图数据,所以当我们进入“导航”选项时,系统会提示“地图数据库与comad不匹配,请插入正确的地图数据DVD。
4、插入地图光盘或Sd卡,系统提示是否更新,点“是”系统会再次提示输入“验证码”,这个码是奔驰厂家授权的地图数据升级的通行证,没有这个码是不能进行地图拷贝的,需要提供完整的车架号厂家才能提供相应此车架号的地图验证码。
5、输入正常的地图升级“验证码”我们静等地图数据拷入原车硬盘即可,期间要按屏幕提示进行碟片或SD卡的更换。
IT运维技术支持及售后服务方案

前言 (2)1.总体服务目标 (2)2.方案设计原则 (2)第一章技术支持方案 (3)1.设备技术参数说明 (3)第二章项目实施保障 (51)2.1质量保障体系 (51)2.2质量保证流程 (51)2.3项目质量控制方法 (53)2.4项目人员配置安排 (54)技术人员配置表 (54)第三章售后服务保障措施 (55)3.1 服务质量管理 (55)3.2服务保障方案 (57)3.2.1信息化设备服务范围 (57)3.2.2信息化设备维护 (57)3.2.3软件系统维护 (58)3.2.4 音响系统维护 (59)3.2.5设备日常保养及维修 (60)3.2.6第三方维修管理 (61)3.2.7客户端防病毒升级软件 (63)3.2.8信息资产巡检 (63)第四章运维服务方案 (65)4.1运维服务准备 (65)签定必要的协议和约定 (65)人员准备 (65)工具准备 (65)4.2项目人员组织 (66)4.2.1人员结构 (66)4.2.2人员职责与岗位要求 (67)4.3服务计划 (68)服务时间 (68)进场初始阶段 (68)第一个服务阶段 (69)第二个服务阶段 (70)服务总结和延续阶段 (70)第五章应急服务方案 (70)5.1应急措施总则 (70)5.2大型灾难紧急行动方案 (71)5.2.1发生水害、火害等自然灾害时报警措施: (71)5.2.2防雷措施 (71)5.2.3断电处理措施 (71)5.2.4设备入水措施 (72)5.3成立应急小组 (73)5.4应急处理过程 (73)5.5应急处理结果评估 (74)第六章服务水平质量承诺及服务管理 (75)6.1服务水平体系 (75)报告服务 (75)管理类服务 (75)主动式服务 (76)响应式服务 (76)6.2服务承诺 (77)服务级别承诺 (77)服务质量承诺 (78)6.3服务管理总则 (79)6.4服务台支持管理 (79)6.5事件管理 (81)问题管理 (82)知识库管理 (82)服务记录管理 (83)前言1.总体服务目标我公司提供硬件、系统软件的安装、调试,应用软件的开发维护等一系列IT服务。
都说汽车音响改装要上大功率,多少功率才够?

都说汽车音响改装要上大功率,多少功率才够?作者:来源:《汽车之友》2016年第24期不少车主在改装汽车音响的时候,过于相信店家所说的大功率,片面感觉原车主机功率不足需要添加功放模块,并且功率至上动辄几百瓦。
其实除非打算把自己车辆调试成移动迪厅,要不没有必要花费巨额钞票大动干戈。
单从声压的角度来看,如果不是推超低音,一个声道只需10-15瓦以上的功率,扬声器的效率不低于90DB,就可以满足绝大部分人在车上听音的需求。
事实上即使经过改装,多数人在开车听音响时所用到的功率,每声道也不足10瓦。
从这个角度看,甚至原车主机的功放部分,都足以推动。
所以是否上大功率应该先从自己改装车辆音响的主要用途入手。
原车音响只有前部扬声器,是否需要改装时添加更多的扬声器——左旋坤十堰要说原汁原味的音乐质量,最佳音源实为两声道,也就是常说的左右声道立体声。
现在大部分高品质原音CD仍然坚持双声道就是这个原因。
以喇叭数量作为衡量音质标准并不科学,车用音响为了照顾后排,弥补低频的不足,往往会增加后门喇叭,其实这反而有可能会破坏整个声场。
作为以自驾为主的家用车,应该把更多的资金放在前声场的改装上,后声场大可沿用原车喇叭,甚至舍弃不用。
在前声场改装良好的情况下,后排乘客同样能听到很好的音质,当然如果本身期望让爱车成为移动影院,享受环绕立体声效果,那么5.1是起码的标配,只是建议坐在全车正中的皇帝位来聆听未必每个司机都能做到。
买了台老猎豹,后悬挂是钢板弹簧,能否改螺旋弹簧令乘坐更舒适?——刘青河池猎豹Q6的悬架采用前双横臂式,后钢板弹簧式非独立悬架。
作为一款带有“大梁”的硬派越野车,这样的悬架无可厚非。
钢板弹簧的好处是比螺旋弹簧更为结实耐用并适合高负重,非承载式车身设计注定了其开发设计时更多考虑到的是越野性能,而非如轿车般主打舒适性,若想将后悬挂的钢板弹簧改成螺旋弹簧势必大动干戈,理论上对于舒适性并无大的改善,更有可能引起在车辆高负重情况下,因为更改所造成的安全隐患,强烈不建议做此种改装。
大众途观全车隔音改装 给您意想不到的惊喜

大众途观全车隔音改装给您意想不到的惊喜
今天店里就迎来了一辆途观,车主是我们的老客户,之前有进行过音响改装,车主反映车内噪音过大,跑长途感觉很是疲劳。
所以让我们昆明道声帮他解决这个问题。
通过工作人员的一番检查,发现该车的前声场和隔音处都出现了问题。
为此,我们工作人员将为该车进行以下改装。
系统改装配置单:
前声场:劲浪165CA1 套装
隔音:全车隔音(隔音材料:大能止振极、大能低频王、超级温莎)
改装店家:昆明道声专业汽车音响改装旗舰店
音响改装要达到好的效果,必须对全车进行隔音。
只有在车内无噪音的情况下,音响才能发挥最好的性能。
隔音第一步,打开并拆开原车车门
里面空荡荡的,什么也没有
拆开擦干净之后,师傅们就开始对车子进行隔音了。
由于师傅们操作的快所以只拍下了隔音的部分图片。
双层隔音是在车门内侧和外侧分别贴上纯天然丁基橡胶材质的隔音止振材料,这种材料是集隔音、隔热、止振、防水为一体的。
做完隔音后,使得整个车门更加坚固,“抵抗力”大大增强!同时,四门双层隔音还使得车门形成一个箱体,让喇叭能在这个坚固的箱体中表现更加出众,提升喇叭音质效果。
接下来是对车底板进行隔音,该隔音可以有效减少路面石子撞击底盘以及胎躁等噪音通过地板的传入。
更能够大量隔除通过地板向车内传递的热量,节省能耗。
接下来就是后尾箱部分的隔音了,首先是两侧翼子板部分隔音,减少胎躁路躁。
后尾箱地板部分,连同车底板隔音,彻底地将来自下方的噪音挡在车外。
奔驰E200改装导航和倒车后视

帖子用户第一改装网›改装作业› 影音导航改装› 查看内容奔驰E200改装导航和倒车后视DIY详细作业2012-1-11 21:42| 发布者: 书生| 查看: 2345| 评论: 0|原作者: 未知摘要: 之前看过许多同学的DIY帖子,决定自己也动手DIY一翻,成功后写下详细作业,与大家一起分享!补充更新:1、GPS天线第二种免拆安装方法:利用原车GPS预留线+带FAKRA卡扣的GPS天线!2、倒车后...热门标签:后视倒车改装奔驰作业更多>>-之前看过许多同学的DIY帖子,决定自己也动手DIY一翻,成功后写下详细作业,与大家一起分享!补充更新:1、GPS天线第二种免拆安装方法:利用原车GPS预留线+带FAKRA卡扣的GPS天线!2、倒车后视的第二种安装方法:将原车GPS预留线改插为视频预留线,故倒车后视摄像头视频线只需放到后排右座处即可对接,免去了“一直要放到中控台主机处”等工作。
GPS 天线还是在主机侧外加SMB接头天线。
一、材料准备(购于淘宝网)GPS天线(30元)SMB型插头(一定要买此型号插头的GPS天线)通用型后视摄像头(220元,号称SONY CCD芯片,建议大家一定要买CCD摄像头,增强夜视功能。
不要买CMOS摄像头)5米视频延长线和电源线等(摄像头附带,5米视频线长度正好,稍多余20厘米;电源线可能要自己再加长。
另外下图中的黑盒子为继电器盒,红线为+12V ACC电源线,如果摄像头电源采用继电器接法则用到,如果采用稳压模块接法则不用。
)视频线主机侧莲花型插头要更换为SMB型插头(5元,买已做头带线的SMB型插头,方便与视频线对接)对接好的视频线一头是莲花头,另一头是SMB头。
(视频线芯线与SMB头芯线对接包好,屏蔽层铜网丝再对接再包好,红线没用!)12V直流稳压模块和若干扎带(18元,稳压模块输入12-24V,输出12V)梅花头螺丝刀(拆主机固定螺丝的专用工具),还有万用表一只。
从理想走进现实

从理想走进现实作者:刘秀虹来源:《汽车与运动》2010年第05期猜想这次试驾的可能是一款奔驰燃料电池车,走到车前才发现是E200CGI。
想想也是,低碳计划最现实、见效最快的做法就是提升传统内燃机的效率,也把思绪从梅赛德斯一奔驰可持续发展交通蓝图上拉回到现实。
优化传统内燃机是梅赛德斯-奔驰BlueEFFICIENCY(蓝色效能)环保战路中最务实的一步。
虽然奔驰的新能源开发和利用已取得了飞跃式的发展,但是在未来想当长的一段时间里,高效内燃机依然是汽车动力发展的主流方向。
奔驰的做法是让发动机排量降低、缸数减少,而效率要提高。
正是在这样的理念指导下,新E级车型的3.0L v6发动机变成1.8L带增压的直列4缸发动机,全新E200优雅型、E260时尚型和E260双门轿跑车因此问世,它们共用一款名为M271 Evo CGI缸内直喷汽油发动机。
与奔驰E300相比,花48.8万元买E200CG感觉更合算,少花13万元购车款不说,由于做了一整套节能减排技术,E200 CGI综合油耗比E300下降了17.6%。
购车和使用成本都降下来,这是大好事。
但是,天上会掉馅饼吗?车的性能是否也降了呢?节能减排的研发费用也是要花不少银子的,用户要为此担当多少呢?这些疑问都想要通过这次试驾活动找到答案。
环顾车内,E200 CGI车内一如E300的豪华、安静和舒适。
奔驰在E300车上配备的驾驶员注意力警示系统,E200 CGI也有。
变化在于内饰中少了多疤胡桃木板,变速器由7速换成T5速,方向盘上也少了换挡拨片。
其他的大体相同。
起步时,油门反应略有延迟,如果转速上到1800~2000 rpm时,会有一股强大的推力涌出,这是涡轮增压车型的典型表现。
抛开了机械增压选择涡轮增压,奔驰在动力研发上换了思路。
这款发动机是奔驰研制出的第二代汽油直喷发动机,CGI是可控压缩汽油喷射(C0nt rolled Comp ressed Gasolinelnjection)的缩写,严格上说是CCGI,简化为CGl。
奔驰E200L

北京奔驰E200L优雅型于上海车展前夕上市,售价46.5万。
其实北京奔驰E260L和E300L已于2010年上市,取得了一定的成绩,但是由于产品线不够丰富,使北京奔驰加长E级一直腰板都不太硬气,这次北奔E200L上市,补全了加长E级的产品线。
但他是否能够肩负起阻击宝马和奥迪入门行政级的责任呢?北奔E200L的外观跟E260L、E300L一样,长宽高以及轴距都跟E260L、E300L也保持一直,达到了5012mm*1855mm*1464mm,轴距达到了3014mm。
四个楔形大灯较前一个版本的四眼圆灯更加时尚大气,整个车头运用更多的硬朗线条,使整个车头显的更加立体饱满。
一字的LED日间行驶灯位于车头下方,亮度很好,十分现眼。
从车身侧面看,E200L并没有因为加长而显得有丝毫的不协调。
略微上扬的腰线与下面的防擦条完美融合,给人一种向前服从之势。
车尾部的相对车头及车身来说相对平庸了些,但红白相间的LED尾灯与楔形头灯起到了相互辉映的作用。
在动力方面北奔E200L采用第二代CGI缸内直喷涡轮增压发动机,采用了和进口E200相同的1.8T低增压发动机,这款发动机可以说是当今优秀发动机的代表,缸内直喷、缸内直喷及涡轮增压等先进的技术悉数用到了这款发动机上。
E200L虽然只有1.8L的排气量,但它的最大功率、扭矩分别为135kw/5250rpm、270Nm/1800~4600rpm,可是说是高效低能的代表了,并不会有小马拉大车的感觉。
变速箱使用的是跟进口E200相同的5AT变速箱。
E200L在配置上并没有简配,同进口版短轴距E200比,增大后排空间,新增加了倒车影响,大大方便了驾驶员的安全倒车,对后排乘客而言,副驾驶座椅后排的电动调节和遮阳帘提高了后排的舒适性和私密性。
虽然E200L没有采用真皮材质的座椅,但并不是我开始以为的植绒材质,而是仿皮材质。
在安全配置上也保持了E级车的一贯作风,Pre-safe,智能照明系统,九安全气囊,自动防眩目后视镜都在,相比E300L都没有缩水,这点确实值得肯定。
汽车音响改装走线施工方案

汽车音响改装走线施工方案一、材料与工具准备在进行汽车音响改装前,首先需准备好所需的材料和工具,包括但不限于:音响设备(如扬声器、功放、音频处理器等)音响线(根据不同需求选择合适的规格和材质)电源线(确保安全并符合车辆电气系统要求)线束接头、绝缘胶带、热缩管等辅助材料剥线钳、螺丝刀、扳手、焊接工具等施工工具二、确定音响设备位置根据车辆内部结构和音响设备的特点,合理规划音响设备的安装位置。
确保设备能够稳定放置且不影响车辆的正常使用。
同时,考虑到音响效果的最大化,应合理布局扬声器等关键设备。
三、安装车内音响线缆在车内部进行线缆的铺设,确保线缆走向合理、美观且不影响车辆功能。
对于扬声器线缆,应根据扬声器位置进行布线,并使用适当的固定措施,确保线缆不会松动或产生噪音。
四、安装车外音响线缆车外音响线缆的安装需特别注意防水和防腐蚀措施。
在布线时,应尽量避免线缆受到机械损伤和外部环境的影响。
对于需要穿越车身的金属部分,应使用适当的保护措施,如加装保护套或进行绝缘处理。
五、音频信号线布线音频信号线的布线应遵循尽量短、少弯曲的原则,以减少信号衰减和失真。
在布线过程中,应避免将信号线与电源线等强电线路放在一起,以减少电磁干扰。
六、电源线布线电源线布线应考虑到电流承载能力和安全性。
在布线时,应遵循车辆电气系统的要求,选择合适的电源线和线径。
同时,应做好电源线的固定和绝缘处理,防止短路和火灾等安全隐患。
七、接地处理良好的接地是保证音响系统稳定运行的重要因素。
在进行接地处理时,应选择车辆合适的接地点,并确保接地电阻符合要求。
接地线应使用专用材料,并与其他线路保持一定距离,防止干扰和安全隐患。
八、线路保护与固定为确保音响系统的稳定运行和使用安全,应对线缆进行必要的保护和固定。
在布线过程中,应使用适当的保护措施,如加装保护套、使用绝缘胶带等,防止线缆受到损伤和老化。
同时,对于布置好的线缆,应使用固定夹、扎带等工具进行固定,防止线缆松动和产生噪音。
2014款奔驰E200启动困难

2014款奔驰E200启动困难作者:河南刘昌来源:《汽车维修与保养》 2017年第9期故障现象一辆2014 年生产的奔驰E200,底盘代码为212.134,装配274920 型发动机,722.9 型7 速自动变速器,行驶里程为55 633km。
该车一直正常使用,并按规范进行保养维护,在一次胎压报警进店检查中,维修人员发现该车需要点火较长时间才能启动,且仪表台上的发动机故障灯常亮。
车主不了解仪表台上报警指示灯的含义,所以也就没在意这个问题,只是觉得发动机启动时跟原来不太一样。
故障诊断与排除接车后首先向车主询问了一些关于车辆平时使用的问题。
据了解该车一直固定加油站加油,之前没有出现过动力方面的问题,发动机跟之前比也没有特别不一样的地方。
只是仪表台上不知什么时候亮起了发动机故障报警灯,也不清楚是从什么时候开始需要较长时间点火才能启动。
因仪表台上有故障灯亮起,首先用专用电脑对车辆进行了快速检测,发现在“N3/10- 内燃机M274”的“发动机电子设备MED40(ME 发动机电子设备)”中有以下两个故障代码:P001685- 进气凸轮轴( 汽缸列1) 的位置与曲轴位置相比不可信,有一个信号高于允许的极限值;状态为S,已存储故障,并已导致发动机亮起故障灯。
P119012-“进气压力”传感器对正极短路,状态为已存储。
因是已存储故障,为了验证故障现象,进行了删除故障码上路试车。
每次启动发动机大约需要点火5s 左右,偏高于正常启动所需时间。
启动后发动机故障报警灯便亮起。
上路试车辆动力无明显异常。
回厂后重新读取故障代码,只发现了“P001685”一个故障码。
影响发动机启动所需时间的因素一般有:燃油压力、发动机机械部分( 正时、缸压)、发动机电控( 传感器、电脑控制)。
因每次删除故障码重新启动车辆后都出现同一故障代码P001685,所以将故障点锁定在发动机正时上,并进行故障码引导,引导结果让检查发动机正时。
按照图2 所示的方法检查正时系统,发现进气凸轮轴正时的实际位置已经发生了偏移,由此基本可以判断此车的故障原因正是进气凸轮轴正时发生位移所致。
奔驰E200_GOMAND系统自动关机
维修实例Maintenance Cases栏目编辑:胡凯溶 ****************** 76·March-CHINA奔驰E200 COMAND系统自动关机◆文/河南 王志力故障现象一辆搭载271发动机的奔驰E200轿车,行驶里程20000km。
车主报修一周前发动车辆后仪表上有安全系统报警的字样,COMAND系统(奔驰研发的独立影音控制系统)闪烁,不能使用,同时喇叭不响,远光灯也不能使用,之后无法开启,一周后该车又出现了COMAND系统自动关闭的情况。
故障诊断与排除技师接车后,首先验证故障现象,发动机顺利启动且有力。
检查喇叭和灯光正常,打开收音机也没发现COMAND系统自动关机。
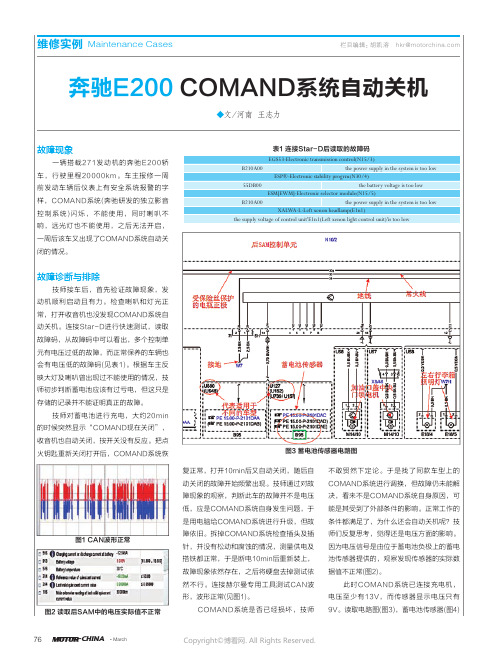
连接Star-D进行快速测试,读取故障码,从故障码中可以看出,多个控制单元有电压过低的故障,而正常保养的车辆也会有电压低的故障码(见表1)。
根据车主反映大灯及喇叭曾出现过不能使用的情况,技师初步判断蓄电池应该有过亏电,但这只是存储的记录并不能证明真正的故障。
技师对蓄电池进行充电,大约20min的时候突然显示“COMAND现在关闭”,收音机也自动关闭,按开关没有反应。
把点火钥匙重新关闭打开后,COMAND系统恢复正常,打开10min后又自动关闭,随后自动关闭的故障开始频繁出现。
技师通过对故障现象的观察,判断此车的故障并不是电压低,应是COMAND系统自身发生问题,于是用电脑给COMAND系统进行升级,但故障依旧。
拆掉COMAND系统检查插头及插针,并没有松动和腐蚀的情况,测量供电及搭铁都正常,于是断电10min后重新装上,故障现象依然存在,之后将硬盘去掉测试依然不行。
连接赫尔曼专用工具测试CAN波形,波形正常(见图1)。
COMAND系统是否已经损坏,技师不敢贸然下定论。
于是找了同款车型上的COMAND系统进行调换,但故障仍未能解决,看来不是COMAND系统自身原因,可能是其受到了外部条件的影响。
正常工作的条件都满足了,为什么还会自动关机呢?技师们反复思考,觉得还是电压方面的影响。
JBL Cinema SB200 功放音箱快速入门指南说明书

CINEMA SB200powered soundbar speakerquICk-StArt guIdEthANk You For ChooSINg thIS JBL®ProduCtThe JBL Cinema SB200 powered soundbar speaker is a complete, integrated sound system that will dramatically improve the sound of programs you watch on your television. It can mount on a wall or sit on a shelf and includes all of the cables you need to connect it to your TV and your cable/satellite tuner or disc player. We’re confident that this JBL system will provide every noteof enjoyment that you expect – and that when you think about purchasing additional audio equipment for your home, car or office, you will once again choose JBL products.This quick-start guide contains all the information you need to set up, connect and adjust your new speaker system. For more in-depth information, go to our Web site: .INCLudEd ItEMS2ConnectorEQ switch: Use this switch to adjust the soundbar’s bass for either wallor table mounting. If you’re mounting the soundbar on a wall with theincluded wall-mount bracket, set the EQ switch to the “Wall” positionfor the most natural-sounding bass performance. If you are placing thesoundbar on a table, set the EQ switch to the “Table” position for themost natural-sounding bass performance.Optical Input connector (digital): If your TV, disc player or cable/satellite tuner has an optical digital output, use the included opticalcable to connect it here.NOTE: You can connect different source components to the analog anddigital connections.Aux Input connection (analog): Use the included stereo 3.5mm tostereo RCA audio cable to connect the stereo analog outputs of yourTV, disc player or cable/satellite tuner here.Power switch: Set this switch to the “On” position to activate thesoundbar. In normal operation, this switch will be left in the “On”position. See Turning the Soundbar On and Off, on page 5, for moreinformation.Power Cord connector: Connect the included power cord here. SeePower Connections, on page 5, for more information.IMPORTANT: Do not connect the power cord to an AC outlet until youhave made and verified all other connections.If you will not be using the soundbar for an extended period – forinstance, if you’re going on vacation – set the Power switch to the “Off”position.ButtonsButton Button ButtonButtonVolume ButtonsSurround ModeButtonPower Button Mute ButtonBass BoostButtonSource ButtonPower button: To turn the soundbar on when it is in the Standbymode, press the Power button on either the soundbar or the remote.(The Power indicator will turn white.) To put the soundbar in theStandby mode, press either Power button while the system is on.(The Power indicator will turn amber.) If you do not press the Powerbutton, the soundbar will automatically go into the Standby modeapproximately 10 minutes after the audio signal ceases.NOTE: If you put the soundbar into the Standby mode by pressingthe Power button, you must manually turn it on by pressing the Powerbutton again.Mute button (remote control only): Press the Mute button to mutethe soundbar. (The Volume +/– indicators both illuminate white.) Whilethe system is muted, press the Mute button again or either Volumebutton to restore the sound.NOTE: Pressing both of the soundbar’s Volume buttons at the sametime while the system is on will mute the system. Pressing eitherVolume button while the system is muted will restore the sound.Surround Mode button: This button turns the soundbar’s HARMANDisplay Surround processing on and off. The Surround button indicatorturns amber when HARMAN Display Surround is active, and turns whitewhen HARMAN Display Surround is not active (normal stereo sound).See Surround Mode Buttons, on page 6, for more information.Volume Up/Down buttons: Press the “+” button to increase thevolume; press the “–” button to decrease the volume. The buttonsilluminate white for a few seconds after being pressed.Source Selector button: This button switches between the sourcesconnected to the Aux (analog) and Optical (digital) inputs. When the Auxinput is active, the Source indicator turns white; when the Optical inputis active, the Source indicator turns amber.Bluetooth button (soundbar only): Press this button to play theaudio stream from a paired Bluetooth device through the soundbar.(The button LED will illuminate blue when a paired Bluetooth device isthe active source.) Press and hold this button to force the soundbar intothe Bluetooth pairing mode. See Bluetooth Operation, on page 5, formore information.Bass Boost button (remote control only): Press the remote’sBass Boost button to enhance low-frequency performance. Pressingthe Bass Boost button again will return the soundbar’s normal low-frequency performance.SOUNDBAR REAR-PANEL CONTROLS ANDCONNECTIONSSOUNDBAR TOP-PANEL CONTROLS ANDREMOTE CONTROL 3SouNdBAr PLACEMENtPLACING THE SOUNDBAR ON A TABLEIf your TV is placed on a table, you can place the soundbar on the table directly in front of the TV stand, centered with the TV screen. As long as the surface of the table is flat, the soundbar will rest on its rubber bumpers.• S et the soundbar’s EQ switch in the “Table” position. See Soundbar Rear-Panel Controls and Connections,on page 2.WALL-MOUNTING THE SOUNDBARIf your TV is attached to a wall, you can use the included wall-mount bracket to mount the soundbar on the wall directly below the TV screen.1. D etermine the location for the soundbar on the wall. Make sure that the top of the soundbar will not block your view of the TV screen when it is mounted on the wall.2. H old the bracket against the wall as a template and mark thelocations of the soundbar wall-mount bracket holes on the wall. The three holes should be evenly spaced 7-1/16" (18cm) apart, and the bracket slots are designed to accept 4mm screws. Make sure thatthe holes are at the same height. See the illustration below.Mark Three Bracket Hole Locations3. M aking sure that the bracket’s flat side is against the wall, attach the wall-mount bracket to the wall at the locations you marked, using hardware that is appropriate for the wall’s construction and materials. Note that the soundbar weighs 7.5 lb (3.4kg). Be sure touse hardware that can support this weight.4. A fter reading the Connections section on page 4, connect all cables to the soundbar.IMPORTANT: Do NOT plug the soundbar’s power cord into an AC outlet at this time.• S et the soundbar’s EQ switch in the “Wall” position, and set the soundbar’s Power switch in the “On” position. See Soundbar Rear-Panel Controls and Connections, on page 2.5. A ttach the soundbar to the bracket by sliding the bracket’s upper tabs into the slots on the back of the soundbar. The soundbar’s slots allow you to adjust the soundbar’s angle on the wall to ensure that itis level.CoNNECtIoNSSOURCE CONNECTIONSAnalog: Use the supplied stereo audio cable to connect the soundbar’s Aux (analog) input to your TV’s stereo audio output. If your TV has two sets of audio output jacks, use the set that has a fixed (not variable) output level. This will let you turn your TV’s speakers all the way off while the TV still supplies a constant audio signal to the soundbar. Digital: If your disc player, cable tuner or satellite tuner has an optical digital output, you can use the supplied optical digital audio cable to connect it to the soundbar’s Optical (digital) input. NOTE: If your disc player, cable tuner or satellite tuner does not have an optical digital output, you can connect its analog audio output to your TV. The TV will send its audio signal to the soundbar through the analogconnection described above.4POWER CONNECTIONSAfter verifying that all of the source connections have been made properly, plug the supplied power cord into the soundbar’s Power Cord connector, and plug the other end into an active, unswitched AC outlet. Do NOT plugthis cord into the accessory outlet found on some audio components.uSINg Your SouNdBAr SYStEMTURNING THE SOUNDBAR ON AND OFFSet the soundbar’s Power switcn to the “On” position.Press the Power button on either the soundbar or the remote to turn the soundbar on. To put the soundbar in the Standby mode, press either Power button while the soundbar is on.Power ButtonIf you do not press the Power button, the soundbar will automatically go into the Standby mode approximately 10 minutes after the audio signal ceases. NOTE: If you have put the soundbar into the Standby mode by pressing the Power button, you must manually turn it on by pressing the Power button again. If the soundbar has automatically gone into the Standby mode 10 minutes after the audio signal has ceased, it will automatically turn itself on when it receives an audio signal at either input connection.If you will be away from home for an extended period of time, or ifyou will not be using the soundbar for an extended period, set the soundbar’s Power switch to the “Off” position.BLUETOOTH OPERATIONTo wirelessly stream audio to the soundbar from a Bluetooth-enabled device:1. C onfirm that the soundbar is in the Bluetooth pairing mode (theBluetooth button LED will be flashing blue). If the LED is not flashingblue, press and hold the Bluetooth button until its LED begins toflash blue.2. P lace the device in the pairing mode. Use the device’s Bluetoothpairing menu to pair it with the soundbar. (The soundbar will appearas “SB200” in the device’s menu.) If the device requires a passcode,use 0000.3. W hen the soundbar’s Bluetooth button LED illuminates constantly,it is paired with the device and you can stream audio via Bluetoothfrom the device to the soundbar.To disconnect the Bluetooth device, press and hold the soundbar’s Bluetooth button until the LED begins flashing. To pair the soundbarwith a different Bluetooth-enabled device, repeat Steps 1 – 3 with thenew device.Notes on Bluetooth operation:• Y ou can manually switch sources to the paired Bluetooth device bypressing the soundbar’s Bluetooth button.• I f you switch the soundbar to a different source while a pairedBluetooth device is streaming to the soundbar, the soundbar willsend a Stop command and the Bluetooth device will stop streaming.SWITCHING SOURCESPress the soundbar’s or remote’s Source button to switch betweenthe devices you connected to the Aux input and Optical input and adevice streaming audio via Bluetooth. When the Aux input is active the soundbar’s Source indicator will illuminate white; when the Optical inputis active the soundbar’s Source indicator will illuminate amber.SourceButton56ADJUSTING THE SYSTEM’S VOLUMEPress the soundbar’s or remote’s Volume + and – buttons to raise and lower the system’s volume one step at a time. Hold down the buttons to continuously raise or lower the volume.Volume ButtonsFor the best sound, we recommend turning your TV’s built-in speakers off. Consult your TV’s owner’s manual to find out how to do this. MUTING THE SYSTEMMomentarily press both of the soundbar’s Volume buttons at the same time, or press the remote’s Mute button to mute the system. (Both Volume indicators illuminate.) Momentarily press either of the soundbar’s Volume buttons or press the remote’s Mute button again to un-mute the system. (The Volume indicators turn off.)Both Volume ButtonsMute CHANGING THE SURROUND MODEPress the soundbar’s or remote’s Surround Mode indicator to switch the sound between normal stereo (the Surround Mode indicator lights white) and HARMAN Display Surround (the Surround Mode indicator lights amber). The HARMAN Display Surround setting will produce a complete surround-sound experience for anyone sitting in front of and several feet away from the soundbar. Although it is particularly effective when watching movies, you can also try the HARMAN Display Surround setting for music.BooStINg thE BASSPress the remote’s Bass Boost button to enhance low-frequency performance, resulting in bass with more impact, which you mayprefer while watching movies or listening to music. There is no harm in experimenting with this control. Pressing the Bass Boost button again will return the soundbar’s normal low-frequency performance.Bass Boost ButtonLEArNINg Your tV rEMotE’S VoLuME ANd MutE CoMMANdSYou can program the soundbar so it will respond to your TV remote’s volume up, volume down and mute commands. This will let you control both the soundbar and your TV with a single remote. Before you begin to program the soundbar, have your TV remote in hand.1. P ress and hold the soundbar’s Surround button until the buttonbegins flashing amber.Press and Hold Until Button Flashes Amber2. H old your TV’s remote approximately 12” (30cm) from the front of thesoundbar and aim the remote directly at the soundbar:• P ress the TV remote’s volume up button while pressing and holding the soundbar’s Volume + button. If the programming was successful the soundbar’s Surround button will change from amber to solidwhite for one second, then will return to flashing amber.A) H old Down Soundbar’s Volume Up Button 7• P ress the TV remote’s volume down button while pressing and holding the soundbar’s Volume – button. If the programming was successful the soundbar’s Surround button will change from amberto solid white for one second, then will return to flashing amber.A) H old Down Soundbar’s B) • P ress the TV remote’s mute button while pressing and holding the soundbar’s Volume + and Volume – buttons at the same time. If the programming was successful the soundbar’s Surround button will change from amber to solid white for one second, then will return toflashing amber.A) H old Down Soundbar’s Mute Button3. W hen you’re finished, press and hold the soundbar’s Surround button until the button stops flashing amber.The soundbar will now respond to your TV remote’s volume and mute commands.SPECIFICAtIoNSCINEMA SB200 POWERED SOUNDBAR SPEAkER Low-frequency transducer:One 3-1/2" (89mm) cone per channel High-frequency transducer:One 1" (25mm) dome per channel Amplifier power:60 watts peak per channel Frequency response:55Hz – 23kHz (-6dB)Power requirement:100V – 240V, 50Hz/60Hz, 60W Power consumption:<0.5W (standby); 60W (maximum)Dimensions (H x W x D):4-9/16" x 35-1/2" x 4-1/16" (116mm x 901mm x 103mm)Weight (shipping):11.5 lb (5.1kg)HARMAN International Industries, Incorporated8500 Balboa Boulevard, Northridge, CA 91329 USA© 2012 HARMAN International Industries, Incorporated. All rights reserved. JBL is a trademark ofHARMAN International Industries, Incorporated, registered in the United States and/or other countries.The Bluetooth word mark and logo are registered trademarks and are owned by the Bluetooth SIG,Inc., and any use of such marks by HARMAN International Industries, Incorporated, is under license.All Rights Reserved. Features, specifications and appearance are subject to change without notice.Part No. 950-0471-001 Rev: A 。
- 1、下载文档前请自行甄别文档内容的完整性,平台不提供额外的编辑、内容补充、找答案等附加服务。
- 2、"仅部分预览"的文档,不可在线预览部分如存在完整性等问题,可反馈申请退款(可完整预览的文档不适用该条件!)。
- 3、如文档侵犯您的权益,请联系客服反馈,我们会尽快为您处理(人工客服工作时间:9:00-18:30)。
奔驰E200音响改装
奔驰E200舒适性相比别的品牌是很大的优越,在自家品牌里面也只有外形要特别的有优越,每个人所欣赏的角度都不一样,所以一个品牌有多种车型。
在众多车型里面,奔驰的车音响算是比较不错,不过对于部分车友可能要求比较高,原车音响不能满足,有部分车友需要改装车的音响。
一般在改装汽车音响的时候需要考虑外形的大小,品牌,从自己喜欢听哪种风格的音乐去选择音响。
在一般的改装店很少会问到很详细的,他们只会推荐比较贵的音响,不考虑车主享受音乐的风格。
选好音响后还需要配件,像隔音、电容、碟机和线材等等都会影响听歌时候的效果。
下面借用E200音响改装案例让各车友参考一下是怎样改装的。
奔驰E200音响改装配置:
碟机:欧迪臣Bit one
前声场:曼斯特MS6508A
后声场:曼斯特SV6509
功放1:诗丽雅RA220X
功放2:来福T500-1BD
低音:曼斯特W10
线材:镀银线
电容:来福RFC10HB
奔驰E200音响改装过程图释:
高音倒模安装--不损坏原车任何饰件、并且外形精美、声场定位好,绝对是完美的工艺品
前门喇叭安装---原位安装,牢固可靠、木垫做防水处理、外加德乐专利产品“喇叭罩“,能明显提升音效。
改装后看不出有任何改动过的痕迹
曼斯特W.10 双音圈低音效果非凡、占用极小空间,重量较轻,有效减少车辆的负载
诗丽雅功放体积较小,两台功放并排安装在低音箱上面尺寸刚刚好,
尾厢工艺简洁实用、安装设计巧妙,仅占用不到1/10的位置,对于正常使用没有任何影响
欧迪臣的处理器与来福T500-1BD功放安装在备胎侧面,空间的利用悄到好处
资料来源:德乐汽车音响。