索贝E7 2.0入门教程1
索贝E7 2.0入门教程2
第5章 E7 2.0的时间线编辑编辑工作可以说是视频程序的驱动力量。
通过认真地组合音频和视频剪辑,可以控制激动、紧张和兴致盎然的气氛。
E7 2.0通过多样的功能和编辑工具组合在一起,构建了一个强大的工作环境,令我们的工作不再是枯燥无味和令人厌烦的过程,而是充满了创造性、逻辑性和有价值的过程。
5.1 基本编辑概念和工具我们编辑一个节目,就是在将不同的剪辑组合到一起的过程,这样的过程主要在两个主要区域中进行:时间线窗口和时间线回放窗口。
时间线窗口提供了可视的项目概观。
只要将剪辑从素材管理器中拖拽到时间线中,就可以开始进行粗略的编辑了。
使用时间线窗口的各种工具,可以按照逻辑顺序组织剪辑。
工作时,通过时间线回放窗口观察效果,可以调整时间线窗口的剪辑以达到需要的效果。
当然,通过更多的编辑技术(例如覆盖编辑、插入编辑、三点以及四点编辑、提升、提取等)可以进一步对剪辑进行细微的调整编辑。
毋庸置疑,工作时,会逐渐养成适合所创建产品类型的习惯。
例如,通过快捷键操作可以提高效率等。
5.2 素材管理器的使用移动时码区绿色游标,到目标画面,拖动窗口中画面捕捉器(绿框)到目标画面,此时蓝框移动或者调整大小,时码区游标处都会自动添加一个关键帧,用这种方法依次锁定其他画面,设置入出点后,选择窗口下部的保存按钮对关键帧进行保存,选择HD>SD按钮进行被抓取画面的生成。
引出的特技模板目录下应包含如下目录:提供四种搜索类型:按素材信息搜索、按素材来源搜索、按文件信息搜索、按时间搜索。
点击CG按钮,进入模板管理器窗口。
新建文件夹。
模板库内新建一个文件夹。
第二步:5.3 时间线的使用时间线编辑窗口如下图所示,它的结构与其他非线性编辑软件大致相同。
有过其他非编使用经验的使用者在一般的操作上应该都没有什么问题,但是具体的使用可能就不甚了解了,下面将对时间线编辑窗口的每一个区域、每一个图标逐个讲解,让使用者能够尽快上手。
起始时码:设定时间线的起始时码。
索贝使用说明书(E1)
目录目录 (1)前言 (6)第一章Editma1软件介绍 (7)1) 设备准备 (7)2) 系统设臵 (8)3) 主要功能模块介绍 (10)4) 基本编辑流程 (22)第二章素材采集 (30)1. 素材采集窗口简介 (30)2. 采集参数设臵 (32)3. 采集方式 (33)1) 手动直接采集 (33)2) 三点编辑采集 (33)3) 批采集 (34)第三章素材管理 (36)1. 素材库窗口简介 (37)2. 引入素材 (38)3. 删除素材 (39)4. 查看素材信息 (39)第1 页共97 页5. 素材库窗口中的右键操作 (40)第四章素材编辑 (41)1. 素材编辑窗口简介 (41)2. 定义素材入出点 (43)3. 素材转场 (44)4. 素材上线 (44)1) 覆盖到入出点加特技 (44)2) 覆盖到入出点 (45)3) 覆盖到游标 (45)4) 插入到游标 (45)5) 替换选中素材 (45)第五章编辑时间线 (47)1. 时间线编辑窗口/节目编辑窗口简介 (48)2. 节目编辑窗口的操作 (51)1) 切换显示模式 (51)2) 时间线同期录音 (51)3. 时间线素材的操作 (52)1) 素材选取 (52)2) 素材拖动 (53)3) 素材删除 (53)4) 素材成组解组 (54)5) 素材复制 (54)6) 素材对齐操作 (54)第2 页共97 页7) 素材剪切 (55)4. 时间线窗口的操作 (55)1) 时间线的移动 (55)2) 时间线的缩放 (55)3) 轨道的可预览性操作 (55)4) 轨道锁定操作 (55)5) 改变上线目标轨道的操作 (56)6) 定义关键点 (56)5. 时间线上右键的操作 (56)6. 时间线实时预监输出 (57)第六章特技编辑操作 (59)1. 特技编辑窗口 (59)2. 在特技编辑窗口制作特技 (61)1) 添加特技 (61)2) 删除特技 (62)3. 使用特技库添加特技 (62)4. 入出点间添加特技 (63)5. V轨过渡特技 (63)6. 自定义特技库 (64)7. 时间线上右键中的特技操作 (64)8. 软特技 (65)第七章音频操作 (69)1. 设臵音频过渡方式 (69)第3 页共97 页2. 音量调节 (70)3. 调音台 (70)4. 音频输出设臵 (71)1) 单声 (72)2) 立体声1 (73)3) 立体声2 (73)第八章字幕制作 (75)1. 唱词制作 (75)1) 文本区编辑区的使用 (76)2) 模板调用 (77)3) 唱词字幕的使用 (77)2. 通告制作 (79)3. 文字对象 (80)4. 滚屏字幕制作 (81)1) 滚屏字幕的制作 (82)2) 滚屏文件的修改 (82)5. 底行游动字幕制作 (85)6. 几何图形制作 (86)7. 符号图形制作 (87)8. 引入图片 (87)9. 引入动画 (88)10. 引入字幕工程 (89)11. 字幕清屏 (90)第4 页共97 页12. 综合页 (90)第九章节目生成 (91)1. 时间线上快速生成 (91)2. 生成多种格式的AVI文件 (92)3. 片断导出 (93)第十章节目下载 (95)1. 文件下载 (95)2. 节目下载 (96)第5 页共97 页前言感谢您使用索贝公司的Editmax1非线性编辑系统。
E7 v2.2 新版本发布说明

要点: 推荐应用环境 安装前准备工作 新增功能 更新内容 使用注意事项 附录一:E7 软件安装说明
2 / 19
索贝数码科技股份有限公司 中国事业本部 桌面产品事业部
一,推荐应用环境:
部件 整机 CPU 内存 型号 HP z800 专业图形工作站 Intel(R) Xeon(R) E5520 2.26GHz/1333MHz/8MB L2 Cache x 2 4GB DDR3 1333MHz ECC 160GB 7200RPM SATA DVD+/-RW 刻录光驱 板载双千兆以太网卡 板载 Realtek ALC262 High Definition Audio Controller 板载 1394 接口/PCI 1394 卡(VIA 芯片) Nvidia Geforce GTS250 1GB Sobey MG1500E 专业视音频接口卡(PCI-E) Sobey MG3500E 专业视音频接口卡(PCI-E) Declink Sudio 视音频接口卡 数据硬盘 显示器 音箱 附件 名称 Windows7 中文版 WindowsXP 中文版 显卡驱动 500GB 7200RPM SATAII x 4 22“ LCD x 2 专业监听音箱 LightBoxII For E7 索贝专业视音频素材库 版本 专业版/旗舰版 32 位 专业版 SP2 32 位 Nvidia Display Driver 195.62_WHQL_win7 MG1500E Sobey_MG_Series_10.0209(0209 版) MG3500E Sobey_MG3500E_Series_23.9.26.3500(0301 版) Matrox DSX LE 500 Matrox 5.0 sp1 E7 2.2 安装程序 支持老用户使 用 Windows XP 系统直接升级安装 E7 2.2 IO 板卡驱动 备注 E7-180 E7-500S 备注 本部分配置由 HP 公司提供 CPU 可用选配配置提升性能 (请见选配件明细) HP 公司可能在不告知的情况 下更改设备配置, 未免除出现 配置选择错误, 请提前向桌面 产品事业部咨询
sobey e7 2.0发布说明
、[ E7 2.0 版本发布说明][ 索贝数码科技股份有限公司/ 新媒体产品部]2008发布文档目录E7 2.0 版本重要更新 (4)E7 2.0 新增功能列表 (5)E7 2.0 版本修正BUG 列表 (9)E7 2.0 安装使用注意事项 (10)安装步骤 (10)安装包 (10)安装包新增插件及驱动 (10)E7 2.0 版本与1.2X 版本系统兼容说明 (11)补充....................................................................................... (12)转码工具文件格式说明 (12)DVD 刻录说明 (12)任务栏无法显示处理方法 (12)受外设限制不能完成的功能 (12)当前版本暂不修改的部分 (12)上下载注意事项 (12)XP 系统支持3G 内存设置 (13)3 / 13光盘目录光盘1;E7 2.0 高清DEMO 工程文件Part.1........................光盘1 光盘2E7 2.0 高清DEMO 工程文件Part.2..........................光盘2 光盘3E7 2.0 标清DEMO 工程文件................................光盘3 光盘4E7 2.0 入门教程........................................................光盘4E7 2.0 如何新建节目快速剪辑E7 2.0 如何自定义特技、按钮、快捷键E7 2.0 如何渲染时间线E7 2.0 如何添加FX 特技E7 2.0 如何添加CG 字幕E7 2.0 如何使用蓝光、P2、Infinity 上下载E7 2.0 如何处理音频E7 2.0 DEMO 制作高级教程.............................................光盘4E7 2.0 DEMO工程导入..................................................00:00E7 2.0 基本特技调整..................................................02:11E7 2.0 跟踪效果......................................................14:32E7 2.0 颜色校正......................................................25:02E7 2.0 过渡特技......................................................32:10E7 2.0 Key轨道与拖尾特技.............................................34:17E7 2.0 曲线变速..................................................... 38:27光盘5E7 2.0 PDB错误跟踪文件................................................光盘5E7 2.0 安装包请到公司ftp 进行下载。
E-Net2.0审片软件操作手册051028

E-Net2.0审片软件操作手册051028E-Net2.0 ENE非线性编辑软件操作手册目录目录 (1)前言 (2)审片软件操作指南 (3)1. 系统登录 (3)2. 节目管理 (3)1)打开节目 (4)2)刷新 (6)3)退出 (6)3. 节目审看 (7)1)播放节目 (7)2)记录审查意见 (8)3)节目处理 (8)4. 退出系统 (9)前言感谢您选用成都索贝数码科技股份有限公司(Sobey Digital TechnologyCo., Ltd)的E-Net 2.0 ENE编辑网络系统。
索贝E-Net是索贝公司全力打造的制播一体化网络新产品,是一个具有新闻共享、制作、播出、小媒资管理和网络管理的全数字环境的智能化新闻节目制播网络系统。
ENE是索贝E-Net系统中的制作部分,它能支持电视台新闻业务的运作,并承担电视台大部分新闻节目生产任务。
系统实现收录和自采新闻节目素材的全台共享,充分利用计算机多媒体技术和网络技术,全面提高电视台新闻节目的制作水平和播出效率。
索贝E-Net非线性编辑网络系统是我公司自主开发的一套全中文的非线性广播级节目制作系统,它能广泛地适用于广播电视单位,各种电视教育以及各类广告的制作。
E-Net非编系统采用数字视频技术发展方向的MPEG2压缩方式,将编辑、字幕、节目包装“三位一体”化,并以完善的素材、节目管理机制全面兼容ENC网络,是索贝公司为新开发的新一代全新的非线性编辑系统。
本手册适用于系统操作人员、电视台编辑、记者。
本手册的主要目的是对E-Net2.0审片软件的实际操作提供指南。
E-Net2.0 ENE非线性编辑软件操作手册审片软件操作指南1. 系统登录在进入E-Net审片系统进行审片之前,用户必须具有审片相应的权限,权限可以在网管软件中进行设置。
具体操作见《网络管理工作站操作手册》。
启动E-Net审片系统,将出现下面登录窗口,如图1-1-1:图1-1-12. 节目管理本模块主要用于在节目列表中选择需要进行审看的节目。
Ecube服务器_V1.0_用户手册_20110902
Ecube 制作应急引擎版本:1.0用户手册索贝数码科技股份有限公司高新区新加坡工业园新园南二路2号四川,成都中国声明版权所有© 2010 Sobey Corporation. 保留所有权利。
未经本公司书面许可,任何个人和单位不得摘抄或者复制本手册内容的部分或者全部,并不得以任何形式进行传播。
由于产品版本升级或其它原因,本手册内容会不定期更新,恕不另行通知。
本手册仅作为使用指导,本手册中的内容不构成任何明示或暗示的担保。
本手册所包含的商标都属各自所有人所有。
关于本手册本手册适用于所有Ecube制作应急引擎产品的用户,并作为用户配置和使用该软件模块的标准指导手册。
本手册作为Ecube制作应急引擎产品的组成部分,全面介绍了各项功能及其使用方法,提供了由易到难的面向用户的任务向导型描述。
目录第1章概述 (1)第2章ECUBE服务器操作 (2)2.1运行与退出E CUBE服务器 (2)2.1.1 运行 (2)2.1.2 退出 (3)2.2代理元数据 (4)2.3拷贝媒体文件 (5)2.4回灌数据 (7)2.4.1 回灌素材 (8)2.4.2 回灌串联单 (9)第3章定期检测方式 (10)3.1应急步骤 (10)3.2检测方式 (10)第1章概述感谢您选用Sobey公司的Ecube制作应急引擎产品,以下简称Ecube。
Ecube产品中文名称为“制作应急引擎”,英文译为Emergency Edit Engine,首字母正好为“3个E”组成E的立方(cube为立方意思),故取名Ecube。
设计开发Ecube产品能够快速稳定保证电视核心制播业务的可持续性,具备制作完成最近一档30分钟新闻节目的能力。
可提供一定规模的网络共享制作、编辑稿件/串联单、网络化送播等应急状态下的最佳用户体验。
实现系统整体应急方式,填补当前制播网络系统中无低成本、易维护、用户体验良好的整体应急措施空白。
Ecube产品主要通过高度集成部署索贝已有网络产品中后台服务软件模块,组成最小化、集中部署的,但满足必备功能的后台服务软件模块。
索贝E7 2.0入门教程3

第3部分 E7 2.0的字幕和图形字幕与图形,即我们常说的CG图文字幕,可以帮助从白天到黑夜、从黑夜到白天、从夏到秋、从秋到冬进行转换。
如果能够有效地使用作品开头的字幕,可以让观众有所期待,引入主题、调动情绪,而且还可以提供作品本身的题目。
在视频作品中,字幕可以提供片断之间的过渡,可以帮助介绍说话人和地点,或者显示名称。
加入图形一起使用的字幕可以帮助传达统计信息,地理位置和其他技术信息。
在作品的末尾,可以使用滚屏字幕来列出参与创作作品的工作人员名单。
这一大部分将详细介绍如何创建和使用图文字幕达到我们需要的效果。
第6章将介绍如何创建字幕,第7章将介绍如何设置参数使创建的字幕达到需要的效果。
第6章创建图文字幕物件在时间线工具栏中选择按钮,弹出字幕添加菜单,如下图:选择一种字幕方式,这时系统弹出添加字幕设置窗口,如下图:设置字幕上线方式、长度、上线轨道等参数后按“确定”,打开“字幕编辑窗口”,如下图:激活,格式刷可以将某一字幕属性保存,并将该属性快速应用于其他字幕当中。
变化。
若当前操作已达最后一步,该选项无效。
下一步。
执行该操作,步骤改变,界面(比如时间线比例)不发生变化。
若当前操作已达最后一步,该选项无效。
CG重置6.1 标题字在时间线工具菜单栏中选择“标题字”或在“字幕编辑窗口”中按下,在制作区域拖拽一个区域并输入标题字,在左侧参数编辑区域可以进行字体以及颜色的设置,如设置字体、宽高度、渲染方式、输入方式、对齐方式、外形、面色、影色、边色、立体边等,也可以在预制中使用系统预制字幕模板。
标题字设置如下图名字:显示当前标题字的内容。
渲染方式:有“单独”和“整体”两个可选项。
选择“单独”选项,字幕编辑状态下,可以对同一个字幕对象制作出整体不同的效果。
鼠标框选字幕对象的部分元素并赋值,就能实现同一字幕对象的不同效果,如下图6.2 唱词在时间线工具栏菜单中选择“唱词”或在“字幕编辑窗口”按下,弹出“唱词属性”窗口,窗口中可逐行输入唱词,按回车换行,如下图:按下“唱词属性”窗口左上角的按钮,窗口切换到文本编辑模式,可以调入TXT 文本。
现代索娜塔2.0车电气系统挡风玻璃除冰器4
2012 > G 2.0 DOHC > 车身电气系统
检查
1.使用GDS检查挡风玻璃除冰器开关输入。
2.选择选项"车身控制模块",检查挡风玻璃除冰器开关的输入值。
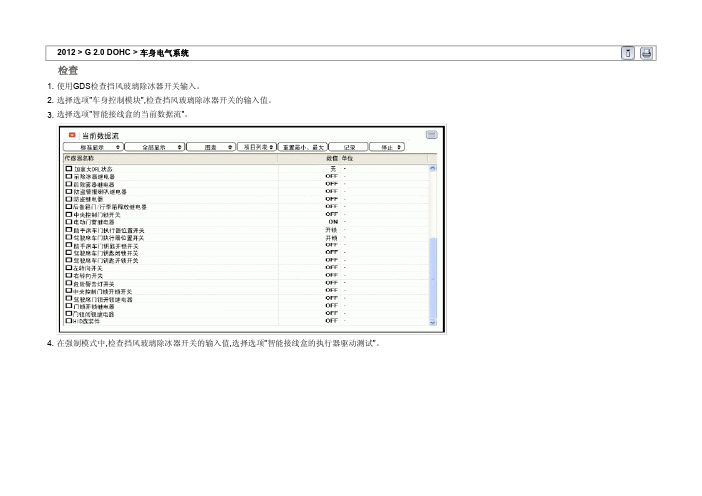
3.选择选项"智能接线盒的当前数据流"。
4.在强制模式中,检查挡风玻璃除冰器开关的输入值,选择选项"智能接线盒的执行器驱动测试"。
拆卸
1.分离蓄电池负极端子。
2.拧下固定螺钉后,拆卸中央仪表板装饰板(A)。
(参考BD部分-"仪表板")
3.分离加热器控制模块连接器(A)。
4.从中央仪表板上拆卸暖风控制模块包含挡风玻璃除冰器开关。
安装
1.安装暖风控制模块。
2.安装中央仪表板。
3.安装仪表板装饰板。
索贝入门手册
索贝入门手册索贝入门手册注意:用于提示用户需要注意的一般性信息。
重要:用于提示用户需要记忆的重要信息。
警告:用于防止用户产生破坏性误操作时的警示性文字。
第一章基础部分第一节SobeyNet新闻网络系统的优势SobeyNet应用于新闻节目制作的优势:提供从文稿、素材上载/收录、条目编辑、节目串编、审片到播出(含延时插播)、存档的全套解决方案。
真正体现节目资料共享、设备资源共享、协同制作和集中管理等非线性网络工作模式的优点。
以人为本,适用于多种编辑。
支持卫星收录、外拍、演播室直接上载等多种节目来源;支持“先上载后编辑”和“边上载边编辑”、“声配画”和“画配声”等多种互补的编辑模式;支持下载录播和网络直播等多种播出方式;多种专业工作站可根据具体工作流程和节目制作量任意组合搭配。
第二章网络工作流程我们把新闻节目的制作分为四个步骤:首先是将素材编辑成为一条可以向人们描述事件的新闻条目,称之为“条目编辑部分”。
这其中又因素材来源的不同而分为“卫星节目收录制作”及“自拍素材节目制作”。
而在“自拍素材节目制作”中,又因声音及画面的编辑顺序不同分为“根据声音配画面”及“根据画面配声音”两部分。
其次再把若干条目编辑成为一个可供播出的新闻节目,称之为“节目编辑部分”。
第三是“领导审片部分”。
最后是“节目播出部分”,因节目播出形式的不同分为“录播”及“直播”。
第三章如何使用SobeyNet新闻网络系统在本章,我们将按新闻节目制作的基本工作流程——即从上载、配音、预编辑、串编到录卫星节目;并考虑到记者对传统设备操作比较熟悉,而特别设计了串编上载功能,它模拟一台录机,可通过传统编辑控制器控制放机进行素材的搜索、打点及上载素材,并模拟传统的操作思路实现了“声配画”、“画配声”的功能。
第一节进入串编工作站1、与服务器连接:重要:若工作站与服务器及素材盘之间未建立连接,则工作站将不能上载及使用素材。
当工作站开机后,登录进入NT操作系统时,会出现“还原网络连接”提示,若网络连接还原失败,则工作站与服务器及素材盘之间便未建立连接。
opp2000使用手册

如需在DSW 再去检查其他的菜单,这时 需要再按ESC键等待DSW 出现黑色.
当DSW 变黑后按下ENT键会出现如图 画面,这时按上下键,选择合适的选项
当我们选择的BIO时看 见在BIO后的1010
30 %
45 %
满 载 开 关
超 载 开 关
安 全 触 板
门 光 电 开 关
空 调 水 位
未 定 义
OPP2000使用方法
Torin-Samil Eltec.
当OPP与主板接通后, 在OPP上会出现samil图标,表示OPP已 经开始和主板通讯。
确定键及进入菜单键
可变Menu窗口
按此键2秒后进入 Category Menu
当按ENT键2秒后出现此画面.
进入MODE内的画面
当做完以下各项模式必须进入AUTO才 可恢复正常 使用OPP控制快车运行
--减速已接近平层
--平层停车开门
--停在G楼方向指上
Thanks
同样步骤按ESC键使 BIO变黑再按ENT键 进入选择项内,用上下 键选择。
当选择PLS可见由地下至 4楼总共有425280个编码 器脉冲输入.
--opp2000与主板显示灯比较
由于已经进入了一个平层探测器,所以DRV出 现Creep Speed
--opp2000与主板显示灯比较 平层开门
--快車向下行
层高学习参数 马达学习参数
--进入可变MENU窗
按ESC键2秒出现
--进入可变MENU窗
当DAT变黑后再按ENT键,这时 会出现一下拉菜单,用上下箭头 键选择合适的参数,再按ENT键 即可进入.
--進入可變MENU窗
用上下键选择DSW 菜单.
DSW是主板的DIP SW
施耐德SoMachineBasic软件使用培训手册(精)资料

Modicon Easy M 200&M100 PLC培训手册Schneider ElectricSoMachine Basic培训手册[软件篇]施耐德电气不做任何关于本手册的陈述或保证,并在法律赋予的最大限度内,明确限制其在手册更换中隐含的违约责任。
另外,施耐德电气保留在任何时候修订本手册而不对任何修订相关人员履行告知义务的权利。
本文件提供的信息包括文件所述产品性能的概述和/或技术特点。
本文件不可替代用户手册,也不能用于确定这些产品对具体用户应用的适用性或可靠性。
任何用户或集成商有义务对该产品就相关的具体应用及其使用进行适当而完整的风险分析、评估和测试。
施耐德电气及其任何附属机构或子公司均不对手册信息的误用承担责任。
如有任何改进或修正建议,或发现该手册中有错误,敬请告知。
在安装和使用本产品时必须遵守各相关州、地区和地方安全规定。
基于安全原因,也为了帮助确保与存档的系统数据相符,仅制造商可以执行零部件维修。
当装置用于对技术安全有特定要求的应用场合时,必须遵循相关指示。
如不搭配使用施耐德电气的软件或经认可的软件可能导致人员受伤、设备损害或运行异常。
拒不遵守本信息可能导致人员受伤或设备损坏。
@2013施耐德电气保留所有权利。
本手册内容属施耐德电气专有财产。
施耐德电气保留所有权利,包括版权。
未征得施耐德电气明确的书面许可,不得以任何形式或通过任何方式,不论是电子或机械形式(包括影印,复制本文件的任何部分。
SoMachine Basic培训手册介绍和法律公告购买SoMachine Basic培训手册的用户即享有参加SoMachine Basic培训课程的权利。
必须通过课程测验,方可获得施耐德电气的培训课程结业证书。
对依据本培训手册做出的行为,施耐德电气不承担任何责任。
商标施耐德电气已尽最大努力提供有关本手册中提及的公司名称、产品和服务的商标信息。
以下显示的商标来自不Microsoft Windows、Windows XP、Windows Vista、Windows 7、Windows 8、Microsoft Office 和Microsoft Excel 是Microsoft公司在美国和®/或其它国家的注册商标或商标。
非线性编辑 索贝系统E5培训
非编提纲整理:乐专一、新建节目、非编素材库1、新建节目时一定要选择栏目,否则在节目管理中按栏目查找节目是看不到这条节目的,在素材库中按栏目查找素材也找不到在这个节目下上载的素材。
2、按F2进入非编库中,自己的素材放在我的文件夹里,分为当前节目素材、我上载的素材、常用素材三项。
当前节目素材存放的是在这个节目下上载的素材,我上载的素材里存放的是约传、非编上载、媒资库回迁、引入的素材。
常用素材库里存放的是自己设置的常用素材。
3、若要查找别人的素材,则在公共素材库中选择素材查询(可按栏目、来源、节目名、素材名、作者等查找)、很多时候找不到想要的素材是范围选择的不恰当,查找时可适当将范围选择的宽一些。
4、节目素材库(上载时按节目存放),是节目素材的一览表,也可在这里查找所需要的素材。
5、一些素材维护的功能都有中文说明、素材直接入媒资是需要权限的。
很多时候只能对自己的素材做维护而不能对公用素材做维护是因为权限的限制。
6、保存节目模版、特技模版时有时候找不到,也是因为新建节目时没有选择栏目。
二、节目管理1、打开自己的节目或做完一条节目换另一条节目时,可按节目管理选项查找你需要的节目并打开进行编辑。
如果权限允许,你还可以打开同部门或栏目的节目进行编辑。
2、在一条节目中想引用另一条节目,可按打开节目文件—>到游标位置或替换整条时间线。
也可打开配音节目或整个串联单到时间线上。
如果只想引用其中一部分,可直接拷贝需要的时间线片段进行复制粘贴。
3、引用别人的节目是需要权限的、操作和引用自己的节目一样。
如果没有权限也可以打开临时保存文件,直接调用别人的zpgm文件。
4、如果文稿被自己删除的,就再也没有了,但节目信息还是存在的(只有有删除节目信息权限的人才可以删除节目信息),这时可以新建一篇稿件,然后将原来节目的zpgm文件引过来用。
如果文稿是被其他人例如主编删除的,在我的回收站里可以找回来,但还是要在21中重新引入zpgm文件。
朗姆2.0电琴系统用户指南说明书
Stereo Triggered Sampler - FirmwaresHow do I know what version I have?Using a computer:Put your microSD card into your computer. Open up the __Sample List__.html file. At the top it will say "Firmware version XXX".Without a computer:1) Go into System Mode (hold both Reverse, both Play, REC and REC Bank buttons down for a few seconds).2) Press and hold the Edit button. Look at the colors of Reverse buttons:Left Reverse = White, Right Reverse = Green ==> 1.5.x (latest version)Left Reverse = White, Right Reverse = Yellow ==> 1.4Left Reverse = White, Right Reverse = Orange ==> 1.3Left Reverse = White, Right Reverse = Red ==> 1.2Left Reverse = Orange, Right Reverse = Orange ==> 1.0 or 1.1 (see note below)3) If the Reverse buttons stay Orange, then you have v1.0 or 1.1. To tell the difference between v1.0 and v1.1, press and hold just the left Reverse button in System Mode. If both Reverse buttons turn White, then you have v1.1. If they remain Orange, you have v1.0.Change log:v1.5.2bReleased: October 14, 2022Download:Firmware v1.5.2bImprovements:Bug Fixes:Start Pos would not go back to 0: With longer sample files, adjusting Start Pos up and then back to 0 would sometimes set the start position such that the first few milliseconds of audio were truncated. Fixed.Clicking when re-triggering a sample with long Fade settings: With longer Fade Up/Down Envelope times, re-triggering an already playing sample would prioritize low latency over the fade-down envelope, causing a click. In v1.5.2b the fade-down envelope is accelerated, adding a little bit of latency when re-triggering but removing the click. Setting the Fade Up/Down envelope time to fast removes the latency and clicking.Looping broken for very short samples when Perc Env is off: When Percussive Envelope was turned off, setting the sample length to be very short could make it not loop. Bug introduced in 1.5.2. Fixed.v1.5.2Released: October 8, 2022Improvements:Smaller firmware update files: The size of the firmware file has been reduced, making the firmware update .wav file smaller by about 57% (from 5:55 to 3:22).Bug Fixes:Long Fade In/Out Envelope times caused clicking in audio under certain circumstances: When the Fade In/Out Envelope Time was set longer than the Trigger Delay Time, firing a play trigger into a channel that's already playing audio would cause the audio to re-start before the fade out had completed, causinga pop or click in the audio. Another circumstance was if the Fade In/Out Envelope Time or PercussiveEnvelope Time was set longer than time between Start Pos and the actual start of sample data, playing a sample in reverse would result in extra silence or glitchy audio. Bug appeared in v1.5, fixed in v1.5.2.Recording Sample Rate not presevered across reboots: The Recording Sample Rate can be set in System Mode up to 96kHz. However, the next time the STS started up, the rate would be set back to44.1kHz, yet the System Mode lights would indicate it was still in 96kHz. One symptom was that sampleswould play back at the wrong pitch. Bug fixed in v1.5.2.v1.5.1bReleased: June 28, 2022New Features:Force Reload SD Card: Hold down four buttons: Bank 1, Bank 2, Rec Bank and Rec, for about 2seconds. Release the buttons when the startup sequence of lights displays.Bug Fix:Unrelated sample file played in certain circumstances: When Start Pos was high, within 0.5s of the end of the file, and Length was just under 50% (Percussive mode) but high enough such that a percussive burst longer than 0.5s was to be played, then the STS would overrun the sample data and play unrelated data (usually a previously played sample). Bug appeared in v1.5, fixed in v1.5.1b.(Note: v1.5.1a was not released)v1.5Released: June 6, 2022Download:Firmware v1.5New Features:Looping Fade Time: The STS can make a longer crossfade between the end and start of a loop(adjustable from 0.36ms to 250ms). This results in a smoother, click-free loop.LED Color Adjustment: You can now adjust the red, green, and blue amounts of each button, letting you match the colors between buttons. All new units ship pre-calibrated.Maximum Recording Rate: You can now record up to 96kHz.Auto Increment Sample Slot on Record: You can enable a mode that moves to the next sample slot each time you finish a recording that was started with the Rec Trigger jack.REC button flashes when you change sample slots: The REC button flashes red or white when you turn the REC Sample knob to indicate if the slot is full or empty.Bug Fix:PLAY button stayed dim red after a recording into an active slot: Fixed. The PLAY button nowindicates the selected sample slot is full immediately after recording into a previously empty slot.STS hangs on boot in some circumstances: Fixed. An issue where the STS could hang on boot while searching for missing sample files is now fixed.v1.4gReleased: August 4, 2020Download:Firmware v1.4gBug Fix:Sequencing Start Pos Glitch Fixed: Using a sequenced CV into Start Pos with gates/triggers into Play Trig would sometimes play the wrong start position if Length was < 50% and triggers were fired fast enough. Fixed.Intermediate versions:(1.4f released June 17, 2020. Improved performance of start-up sequence, and more types of "extended" wav file formats supported)v1.4eReleased: October 20, 2017Download: (not available, please use v1.4g)New Features:Reduced latency by pre-loading each sample file in a bank the first time each sample is played.Latency from trigger until audio output as low as 0.7ms (with Trigger Delay turned to 0, see below)The first time a sample is played after the bank is changed, latency is typically 5ms (may be moredepending on wav file's sampling rate and bit depth). Subsequent times the sample is triggered thelatency is 0.7msVariable "Trigger Delay": Edit + REC Sample knobCompensates for slew/lag when using a CV Sequencer with the Play Trig jack and the either theSample CV or 1V/oct jackThis feature also allows for latency reduction compared to prior firmware versions, which had a built-in delay of about 14msAfter receiving a trigger on the Play jack, the STS will wait the specified delay period before reading the 1V/oct and Sample CV jacks.To use: Press Edit and turn Rec Sample knob. The knob's numbers (1-10) correspond to a delayamount:PCB v1.0a: ranges from 0ms delay (knob at 1) to 14.3ms delay (knob at 10)PCB v1.1: ranges from 0ms delay (knob at 1) to 1.9ms delay (knob at 8), and extra-long delays of 4.1ms (knob at 9) and 8.2ms (knob at 10)Note: If upgrading to v1.4 causes your sequencer and STS to not play well together, set the Trigger Delay to "8" or higherMonitoring on/off per channel: Left and right channels can monitor the inputs separately.Pressing PLAY on one channel while monitoring is on will turn monitoring off for just that channel.Only works in Mono mode.Monitor LED blinks to indicate split monitoring.Typical use would be to patch Right OUT -> Left IN, then Left OUT -> mixer. Then record the right channel's playback.Start-up banks: Can set the default bank to be loaded at start-up.Hold down Edit + Bank 1 + Bank 2 + left PLAY (Save) for 1 second. Current bank selection will be saved as the default after power on.Envelopes can be turned off: Both percussive envelope and longer playback fade in/out envelopeTwo types of envelopes can be turned on or off:Percussive Envelopes: this is the decay-only envelope applied to playback when Length < 50% (actually an attack-only envelope when Reverse is on)Fade In/Out envelope: this is a very short envelope applied to any sample that's played withLength > 50%. It reduces clicks when starting, stopping, or looping playback.In System Mode, left channel Reverse button sets the envelope settings:Orange: Both envelopes enabled (default)Red: Percussive envelope disabledYellow: Fade In/Out envelopes disabledOff: Both envelopes disabledTurning off all envelopes is recommended when playing CV sample files (wav files with clocks/gates, sequencer CV, or slow LFO waveshapes, etc).Turning off Percussive Envelopes is interesting when doing "Granular" patches (see User Manual for example patches)Can toggle Percussive Envelope mode by turning left side Length to 0, and holding left side Reverse for 2 seconds: Reverse button will flash/flickerCan toggle Fade In/Out Envelope mode by turning left side Length to 100%, and holding left side Reverse for 2 seconds: Reverse button will flash/flickerAfter exiting System Mode, right side Length was set to 0, until the knob was moved. Fixed.Intermediate versions: (1.4beta-1 released October 13, 2017) (1.4beta-2 released October 17, 2017: changed Length behavior) (1.4c fixed sticky right length knob when exiting system mode) (1.4d fixed bugs that appeared in v1.4beta2) (1.4e fixed bugs that appeared in v1.3) (1.4f more filtering on 1V/oct jacks, and quantized mode plays better with tracking comp setting)v1.3Released: (beta released Sept 26, 2017)Download:Firmware v1.3 WAV fileNew Features:Drag-and-dropping WAV files to SD card works better:Adding WAV files to an existing folder now adds the files to the bank if there are empty slots.If there are no empty slots, the files can be added using Edit + Next File.On boot, the STS will try to fill empty slots in banks by searching in the bank's folder:If the bank contains files from multiple folders, the lowest-numbered sample file's folder is used.Adjust 1V/OCT jack offsetHold down Bank 1 + Bank 2 + Edit while tapping either REC or REC Bank button.REC shifts downwards, REC Bank shifts upwards.Settings are saved in memory (save using Edit + Save after making necessary adjustments).If there is a difference in pitch between the audio being monitored and playback, or a difference inplayback pitch between channels, then this may need to be adjusted. All units are calibrated in thefactory, but variations in power supplies and grounding configurations of cases may cause DC offsetto appear in a user's system.Fixes:Creating a folder with an exact color name in all lowercase added the folder twice. Fixed.Edit+Next File while in an empty slot now searches in the folder of the first filled slot.Released: (released Sept 8, 2017)Download:Firmware v1.2 WAV fileNew Features:Quantize 1V/oct jack added to System Mode. Each channel can be on/off seperately. Quantization is to semitones (12 notes per octave).In System Mode, tap Bank button for either channel to toggle state.Blue = On (jack is quantized to semitones)Orange = Off (jack is not quantized)Only effects 1V/oct jack, not the Pitch knobSetting is saved in settings file on microSD cardReset tracking compensaion to 1.0000Holding Edit+Rec+RecBankUpdating from v1.0 or v1.1 to v1.2 or later automatically sets tracking to 1.0000 the first time it isloaded (this is necessary because tracking is calculated differently in v1.2 and later)Auto Stop When Sample Changes: "Always keep playing" mode added. There are now three Auto Stop modes. The modes determine what happens when the sample is changed while a sample is being played.Red = Always Stop: The sample instantly stops playing. If looping is on, the new sample startsplaying immediately.Blue = Change When Looping: The sample keeps playing normally -- unless it's looping, in whichcase it stops immediately and the new sample starts.Green = Always Keep Playing: The sample keeps playing normally. If it's looping then the newsample begins when the previous sample reaches the end.Fixes:1V/octave tracking is tighter, +/-0.4 cents over C0-C3Changes:Faster entry into System Mode (2 seconds, instead of 4)Pitch knob's plateau around the center detent is larger, and gradually slopes away from center to make it easier to tune to other sourcesReleased: August 28, 2017Download:Firmware v1.1 WAV fileChanges:On boot, color of lights while index file is loading shows minor version numberIn System Mode, holding down Reverse displays firmware version on Reverse buttons (White, White =1.1)Fixes:Tapping Reverse after changing Channel Volume prematurely updated the Start Pos setting. Fixed.Scrub End setting for samples was not loaded after reboot until Edit button was pushed. Fixed.v1.0Released: August 10, 2017Initial ReleaseFeatures for future firmware versions:Allow for internally patching OUTs to INs for self-recordingSupport AIFF filesWrite index file in background, for faster boot time and "Edit+Save" time。
索贝EDITMAX 1非线性编辑系统简介

EDITMAX 1非线性编辑系统简介一、产品简述:1.1产品主要特征:EDITMAX 1,简称E1,是我们即将推出的非线性编辑产品,是CY21/E5系列的替代产品,其主要特征如下:■使用业已成熟的CPU+GPU核心技术■采用MG系列广播级IO卡作为输入输出手段■采用新一代PCI-E高性能计算机平台1.2产品总体简介:E1是替代CY21/E5的非线性单机产品,依靠目前在国内领先的CPU+GPU技术以及基于媒体网关技术的MG系列高性能广播级IO卡,E1虽然不再使用MATROX的DTV/LX非线性编辑板卡,但是在功能和性能上完全超越了CY21/E5,并具有更高的性能价格比;软件界面和操作流程继承了CY21/E5系列的易于学习、易于掌握的特点;稳定性和可靠性比CY21/E5系列有了大幅度的提高。
E1除了单机产品之外,将会具有不同类型的网络版本,其中,E-NETv2.0将在春节之后开始采用EN1系列网络非线性工作站,EN1系列将由多种不同用途的工作站变形,以适应E-NET中的无卡编辑、有卡编辑、上下载、合成输出、配音等多种不同规格的分级应用。
在sobeyNET中,也将开始应用E1的网络版本,具体的sobeyNET网络版本E1的详细情况将由网络产品事业部向大家介绍。
二、产品主要定位:E1既然是用来替代CY21/E5系列的产品,其市场定位与CY21/E5基本一致,但由于其性能的提高和价格的降低,将可以覆盖更大的目标市场,其主要目标市场如下:■标清广播级常规节目编辑(大、中、小电视台新闻、专题节目的制作,包括单机和网络运用))■标清广播级常规包装制作(各级电视台的栏目和专题节目的节目简单包装,比如添加一些2D/3D多层特技、AE插件特效)■标清行业视频应用(企业、政府、军队等行业用户的视频节目制作)■标清高端教育视频应用(比较有实力的教育系统的电化教育应用)■标清互联网视频内容制作(网站、WEB内容提供商的视频节目制作)■E1将只支持标清制作,对高清和HDV的支持将在E7系列产品中提供三、产品主要功能特点:E1虽然没有使用MATROX的DTV/LX板卡,但是在信号指标、实时性能、软件功能上完全超过了DTV/LX平台上的CY21/E5,严格地说,E1完全适应严格的广播级应用的需求,以下是E1的一些功能和性能特点的概要(不排除正式发布E1产品的时候,会有少量调整)■全面的A V接口,根据使用的MG卡的不同,支持以下接口MG1000A卡---- 复合、分量模拟视频接口平衡、非平衡模拟音频接口MG1000D卡---- SDI数字视频接口复合、分量模拟视频接口平衡、非平衡模拟音频接口AES/EBU数字音频接口SDI嵌入数字音频接口■支持专业光盘设备通过以太网接口上下载,30-50倍速低码率上载、2-4倍速高码率上载通过1394接口上下载,可直接浏览光盘素材,选择性上载所需素材直接编辑MXF格式完成的节目可通过以太网络或1394接口以MXF文件方式写回专业光盘■实时多格式混编,支持多种格式在同一时间线上进行任意混合编辑,包括以下格式: 无压缩MPEG-2 I帧(最高50Mbps)IMX(30、40、50Mbps)DV/DVCAM格式DVCPRODVCPRO 50MPEG-2 ibp(matrox格式的avi和wav,不支持MPG格式)WmvMPEG-4(sony和sobey自己的格式,avi和wav,不包括divx等格式)即将支持MXF和MPEG-TS流直接编辑将来可能支持更多的可编辑格式■支持通过1394接口上下载DV/DVCAM格式通过1394接口可以以文件方式上载DV/DVCAM/DVCPRO,DVCPRO50的上载也将会支持通过1394接口,可以以文件方式下载节目到DV/DVCAM录像机■完整的多层实时特技编辑完全实现DTV/LX+MAX的所有实时特技,包括所有CY21/E5的2D/3D特技、键特技、模糊和马赛克等凹凸贴图特技,质量上完全达到DTV/LX+MAX一样的水平,特技类型和调整方式完全与CY21/E5相兼容增强的色彩校正特技,色彩校正效果大大提升动态遮罩特技正在开发平滑的快慢动作,在效果上大大超越DTV板卡的快慢动作与CY21/E5相同的上千种特技模板以上系统特技均可实现4层以上实时编辑,在VGA上可以实时预监和调整,并可通过MG卡实时输出到监视器,与DTV+MAX和T3K+K2 相比,每一层都可以是任意的2D或3D特技,而不会限制只有一层实时的3D特技,性能上大大高于原有的CY21/E5。
索贝-E7 2.0讲稿

5. 更专业、丰富、实用编辑功 ➢广播级抠像能
➢桌面快速编辑 独特的专业编辑功能
➢自动技术审查/标记点文字批注/多母版本保存 ➢时间线和特技编辑图文创作画布的无极缩放 ➢对素材可实时进行摄像机般推拉摇移及分辨率的转换 ➢轨道独立的Alpha键 —方便的处理图文、视频、动画序列 ➢突破实时层数和复杂包装精确调整的利器——容器
支持3D立体模板特技,实时真实三维空间视频特技 火焰字,体积光,文本特效,粒子,纸飞机等独特的实时特技 三维爆炸,三维转场等全新的GPU实时特技,特技支持多种实时光晕 调节
E7 2.0 主要特点
1. 最新的硬件平台 2. 支持全面的高标清格式混编 3. 超强的全实时引擎 4. 提升至广播级的特级处理质量 5. 更专业、丰富、实用编辑功能
5. 更专业、丰富、实用编辑功 能 专业的色彩处理
独特的专业编辑功能
APAF人性化设计
音频功能的全面提升
CG图文功能的更新
丰富的特技
5. 更专业、丰富、实用编辑功 能
独特的专业编辑功能
5. 更专业、丰富、实用编辑功 能
APAF人性化设计
音频功能的5全. 面更提专升业、丰富、实用编辑功 国际标准化能调音台
时间线自动增益调整
广播级音频的均衡器、变调、降噪
CG图文功能5的. 更更新专业、丰富、实用编辑功
能 自由描绘字幕比划,轻松完成手写字效果,运动速率可任意定义
3D玻璃体材质,轻松制作优美图文效果
实时预监字幕图文动画编辑最终合成效果
EXCEl导入轻松演绎各种图表演示
丰富的特技5. 更专业、丰富、实用编辑功 能 超过170余种特技,所有特技实时预监
43.. 超提强升的至全广实播时级引的擎特级处理质量 5. 更专业、丰富、实用编辑功能 6. 国际级的产品检验和体特方便的服务
eFlo 2.0 快速入门指南说明书
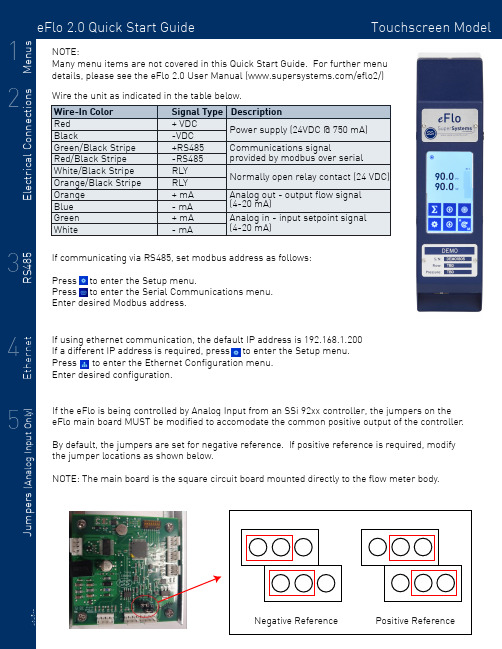
eFlo 2.0 Quick Start Guide Touchscreen Model Signal Type Description + VDC -VDC +RS485-RS485RLY RLY + mA - mA + mA - mA Power supply (24VDC @ 750 mA)Communications signal provided by modbus over serial Normally open relay contact (24 VDC)Analog out - output flow signal (4-20 mA)Analog in - input setpoint signal (4-20 mA)If communicating via RS485, set modbus address as follows:Press to enter the Setup menu. Press to enter the Serial Communications menu.Enter desired Modbus address.Many menu items are not covered in this Quick Start Guide. For further menu details, please see the eFlo 2.0 User Manual (/eflo2/)Positive ReferenceWire the unit as indicated in the table below.Apply gas pressure to the flow meter. Press to enter the Setup menu.Press to enter the Process Variables menu.Hold for two seconds to enter manual mode. Fully close the motor valve by holding the down arrow until the motor drive icon displays .Press to complete the zero tare. Hold to return to auto mode.SSi recommends all flow meters have a zero tare performed for optimal accuracy and control and to equalize the output signal of the differential sensor .If control is unstable or false flow values are indicated when it has been verfied that no gas is passing through the meter, a zero tare may be required.To perform a zero tare:If the meter will be used in Valve mode, a max tare MUST be performed to set the max valve position. To perform a max tare:For additional information, troubleshooting, or other help, see the eFlo 2.0 Quick Reference Guide,the eFlo 2.0 Operations Manual, or contact SSi at 513.772.0060.Apply gas pressure to the flow meter. Press to enter the Setup menu.Press to enter the Process Variables menu.Hold for two seconds to enter manual mode. Hold the Up Arrow until desired max flow is displayed.Press to complete the zero tare. Hold to return to auto mode.Press to enter the Setup menu.Press to enter the Basic Configuration menu.Set altitude to desired level IN FEET.。
KATronic KATflow200 快速入门指南说明书

•Avoid installation of sensors in the vicinity of deformations and pipe defects,near welding seams or where deposits could have accumu-lated.•Select a measuring point with sufficient straight pipe to obtain ac-curate measurements.Please consult the manual for the recom-mended distances from sources of disturbance.•For a horizontal pipe,mount the sensors on the side of the pipe.For a vertical pipe,mount the sensors at a location where the liquid flows upwards (Pic.1).•Mount the sensors in the direction of the flow (Pic.2).•Clean the pipe at the measurement point.Remove loose paint and rust with a wire brush or file.•Apply coupling paste to the face of the clamp-on sensors before attaching them to the pipe.Select Setup Wizard to set up the flow-meter for measurement.If the sensors are recognised,the serial number will be shown.If not,the type can be selec-ted.1.Mounting points2.Flow directionSensor MountingConfigurationReflection ModeThe flowmeter uses an even number of passes.This is the most conveni-ent mounting arrangement,as the transducer separation distance can be measured very easily and the sensors can be accurately e whenever possible (Pic.3).Reflection mode (from above)Diagonal ModeSignal travels on an odd number of passes through the pipe.A single pass can be used for larger pipes and for dirty/aerated liquids where greater signal attenuation can occur.The sensor distance on this moun-ting configuration can be negative (sensors overlapping)(Pic.4).Step 3:Quick Start Menu and Setup WizardAt first power on and the boot se-quence,the Main Menu is e the UP and DOWN cursor keys to select Quick Start and confirm by pressing ENTER.Enter the fluid temperature using the keypad.Confirm by pressing ENTER .Use UP key as a backspace to correct for entry errors.Select fluid using cursor keys.Con-firm by pressing ENTER .Enter pipe wall thickness using the keypad and confirm with ENTER .Use UP key as a backspace to correct for entry errors.Enter the outer pipe diameter us-ing the keypad and confirm with ENTER .Use UP key as backspace to correct for entry errors.If "0"is entered and confirmed,an additional screen appears that allows entry of the circumference.Press ENTER to confirm.Select the pipe material using the cur-sor keys and confirm with ENTER .Select the main measurement unit using the cursor keys and confirm with ENTER .This unit will be diplayed in the middle of the measurement screen.Selecting OFF deactivates the measurement channel.•Show NEXT (1)available item •Q ON (2)=Start totaliser function •Show next DISP lay (3)•Q OFF (8)=Stop totaliser function •DIRECT (9)access to trend plot •Move menu/selection item UP •Move menu/selection item DOWN •ESC ape entry without saving Switch device OFF (press >2sec.)•ENTER selection with saving Switch device ON (press >2sec.)Step 1:Measurement Point and Pipe Preparation4.Diagonal mode (from above)•The flowmeter can be prepared for measurement with the Setup Wizard as found in the Quick Start menu.Step 2:KeyboardFamiliarisationSelect pipe liner material using cursor keys and confirm by pressing ENTER .If a liner material is chosen,an additi-onal screen appears that allows entry of liner thickness.Measurement ScreenThe main measurement unit is dis-played when first entering the meas-urement screen.Press NEXT to see up to three units displayed with the main one in the middle.Two further measurement units can be assigned to this screen by going to Main Menu -Output -Display.TotaliserThe totaliser is shown when in meas-urement mode after pressing NEXT twice.It can also be assigned to the three line display,datalogger or pro-cess outputs by selecting a quantity as the unit.Internal Datalogger•The datalogger is reached via Main Menu -Output .It is activated in Datalogger -Interval by entering and confirming a non-zero value and selecting units to be recorded.•Enter "0"and confirm to disable the logger.Up to ten measu-rement units can be selected for logging under Datalogger -Selection .•Use the cursor keys to highlight a unit and press ENTER to select it.Press "0"to deselect it.•An activated datalogger is indicated by a “document”symbol in the top left corner of the display.On start of measurement (mea-surement screen displayed)the logger records the selected mea-surement units.•A blinking “document”symbol indicates a recording datalogger.Separation markers are set by the datalogger whenever a sesion begins.•Leave the measurement screen by pressing ESC to stop recor-ding.•The recording interval can be changed in Datalogger -Interval .The datalogger is cleared using Datalogger -Log Erase .Ensure all required data has been downloaded.Wall thickness gauge (WTG)(optional)Optional sensor probes to measure pipe wall thickness are available.En-sure the correct pipe material is se-lected.Connect to the sensor input and select Start Measurement.•The totaliser function is started with Q ON when in measurement mode (measurement screen displayed).Pressing Q +resets the total in positive flow direction.Pressing Q -resets the total in negative flow direction.The totaliser function can be stopped with Q OFF .•Pressing Q ON again will reset the positive,negative and overall totaliser.Change displays without resetting the totaliser by pressing DISP or NEXT .1:1pass (diagonal mode)2:2passes (reflection mode)3:3passes (diagonal mode)4:4passes (reflection mode)etc.Select Start Measurement and con-firm with ENTER to start the sensor positioning procedure.Sensor Positioning Screen•Mount the transducers with the suggested spacing between the sensor heads.This distance has been determined by the flowmeter on the basis of the entered parameters.•Use the displayed number of passes to install the sensors on the correct side of the pipe (see pictures 3and 4).•Observe the upper bar (signal-to-noise ratio)and lower bar (signal quality).These should be both filled to about the same level with a filling level of around 1/3or more desired.•Even number of passes:Both sensors on same side of pipe (see Pic.3).•Odd number of passes:Sensors on opposite sides (see Pic.4).Con-firm with ENTER .Step 3:Quick Start Menu and Setup Wizard (continued)•Use the moving mark between the two signal bars for the fine adjust ment of the sensor position.With correct pipe parameters entered and the sensors mounted at the suggested spacing,the mark should be near the central indication line (see three lines below the bottom signal bar).•If the mark is to the left-hand side of the central indication line,the sensors are too close to each other.If the mark is to the right,the sen-sors are too far apart.Slide one sensor carefully along the pipe to bring the mark into a more central position.Measurements can be obtained when the mark is between the left and right indication line.Press ENTER to start measurement.5.Sensor positioning screen•Select number of sound passes (sound paths)using cursor keys.•Auto :Selection by flowmeter according to entered parameters (num-ber of passes shown later on Sensor Positioning Screen ).•The flowmeter will recognise the probe and display the measure-ment screen.Wall thickness will be shown when the sensor is in good acoustic contact with the pipe.Apply coupling paste to the face of the sensor.。
- 1、下载文档前请自行甄别文档内容的完整性,平台不提供额外的编辑、内容补充、找答案等附加服务。
- 2、"仅部分预览"的文档,不可在线预览部分如存在完整性等问题,可反馈申请退款(可完整预览的文档不适用该条件!)。
- 3、如文档侵犯您的权益,请联系客服反馈,我们会尽快为您处理(人工客服工作时间:9:00-18:30)。
索贝Editmax7 2.0 高标清一体化非线性编辑系统入门教程目录第1部分 E7 2.0入门.......................................................................................................................................................第1章索贝E7 2.0概述..........................................................................................................................................1.1 索贝E72.0简介..........................................................................................................................................1.2 E72.0工作界面...........................................................................................................................................1.3 E72.0编辑工作流程...................................................................................................................................1.4 E72.0的功能...............................................................................................................................................第2章 E7 2.0系统与项目设置...............................................................................................................................2.1 管理一个项目................................................................................................................................................2.1.1 创建一个新项目................................................................................................................................2.1.2 项目的管理........................................................................................................................................2.2 管理一个节目................................................................................................................................................2.2.1 创建一个新节目................................................................................................................................2.2.2 节目的管理........................................................................................................................................2.3 系统配置........................................................................................................................................................2.4 项目设置........................................................................................................................................................项目管理................................................................................................................................................第2部分 E7 2.0的编辑技术...........................................................................................................................................第3章采集素材........................................................................................................................................................3.1 从录像带采集................................................................................................................................................3.1.1 从I/O卡采集....................................................................................................................................3.1.1.1 界面与按钮............................................................................................................................3.1.1.2 采集窗口按钮、状态与参数的含义 ....................................................................................3.1.1.3 如何开始采集........................................................................................................................3.1.2 从DV1394采集..................................................................................................................................3.1.2.1 界面与按钮............................................................................................................................3.1.2.2 采集窗口按钮、状态与参数的含义 ....................................................................................3.1.2.3 如何开始采集........................................................................................................................3.1.3 重采集................................................................................................................................................3.1.3.1 时间线重采集........................................................................................................................3.1.3.2 素材重采集............................................................................................................................3.1.3 从蓝光设备采集................................................................................................................................3.1.3.1进入“蓝光设备管理”.........................................................................................................3.1.3.2装载蓝光.................................................................................................................................3.1.3.3素材浏览.................................................................................................................................3.1.3.4上载.........................................................................................................................................3.1.3.5 场景........................................................................................................................................3.1.3.6 其它菜单和相关设置............................................................................................................3.1.3.7 格式支持................................................................................................................................3.1.4 从P2卡采集......................................................................................................................................3.1.4.1 P2的装载...............................................................................................................................3.1.4.2 素材浏览................................................................................................................................3.1.4.3 上载........................................................................................................................................3.1.4.4 其它菜单和相关设置............................................................................................................第4章导入素材........................................................................................................................................................4.1 从本地盘导入素材........................................................................................................................................4.2 从CD或DVD抓轨..........................................................................................................................................4.2.1 CD抓轨...............................................................................................................................................4.2.2 DVD抓轨.............................................................................................................................................4.3 从Media Box导入素材................................................................................................................................4.3.1 MEDIABOX的装载...............................................................................................................................4.3.2 素材浏览............................................................................................................................................4.3.3 上载....................................................................................................................................................第5章 E7 2.0的时间线编辑....................................................................................................... 错误!未定义书签5.1 基本编辑概念和工具........................................................................................................ 错误!未定义书签5.2 素材管理器的使用............................................................................................................ 错误!未定义书签1.素材管理器菜单............................................................................................................ 错误!未定义书签新建文件夹................................................................................................................ 错误!未定义书签新建节目.................................................................................................................... 错误!未定义书签添加素材.................................................................................................................... 错误!未定义书签输入............................................................................................................................ 错误!未定义书签输出............................................................................................................................ 错误!未定义书签清除垃圾文件............................................................................................................ 错误!未定义书签清空回收站................................................................................................................ 错误!未定义书签最大化........................................................................................................................ 错误!未定义书签最小化........................................................................................................................ 错误!未定义书签关闭............................................................................................................................ 错误!未定义书签2.新建文件夹.................................................................................................................... 错误!未定义书签3.新建节目........................................................................................................................ 错误!未定义书签4.采集................................................................................................................................ 错误!未定义书签5.外界设备管理................................................................................................................ 错误!未定义书签6.飞行窗............................................................................................................................ 错误!未定义书签7.下载................................................................................................................................ 错误!未定义书签8.设置................................................................................................................................ 错误!未定义书签a.删除设置................................................................................................................ 错误!未定义书签b.资源多路径设置.................................................................................................... 错误!未定义书签c.最近使用................................................................................................................ 错误!未定义书签d.清除垃圾文件........................................................................................................ 错误!未定义书签9.引入/引出.................................................................................................................... 错误!未定义书签a.引出素材................................................................................................................ 错误!未定义书签b.引入素材................................................................................................................ 错误!未定义书签c.引出节目................................................................................................................ 错误!未定义书签e.引出特技模板........................................................................................................ 错误!未定义书签f.引入特技模板........................................................................................................ 错误!未定义书签g.引出字幕模板........................................................................................................ 错误!未定义书签h.引入字幕模板........................................................................................................ 错误!未定义书签i.引出预制................................................................................................................ 错误!未定义书签j.引入预制................................................................................................................ 错误!未定义书签k.引出项目................................................................................................................ 错误!未定义书签l.引入项目................................................................................................................ 错误!未定义书签10.搜索............................................................................................................................ 错误!未定义书签11.模板管理器................................................................................................................ 错误!未定义书签a.模板管理器按钮.................................................................................................... 错误!未定义书签b.模板........................................................................................................................ 错误!未定义书签c.特技........................................................................................................................ 错误!未定义书签12.排列............................................................................................................................ 错误!未定义书签13.项目切换栏................................................................................................................ 错误!未定义书签14.项目树状结构图........................................................................................................ 错误!未定义书签5.3 时间线的使用.................................................................................................................... 错误!未定义书签1.时间线编辑窗口功能菜单............................................................................................ 错误!未定义书签保存............................................................................................................................ 错误!未定义书签另存为........................................................................................................................ 错误!未定义书签时间线搜索................................................................................................................ 错误!未定义书签添加............................................................................................................................ 错误!未定义书签节目设置(时间线设置)........................................................................................ 错误!未定义书签时间线属性................................................................................................................ 错误!未定义书签音频工具.................................................................................................................... 错误!未定义书签自定义........................................................................................................................ 错误!未定义书签打开时间线回放窗口................................................................................................ 错误!未定义书签打开故事板................................................................................................................ 错误!未定义书签帮助............................................................................................................................ 错误!未定义书签最大化........................................................................................................................ 错误!未定义书签最小化........................................................................................................................ 错误!未定义书签关闭............................................................................................................................ 错误!未定义书签2.时间线按钮工具栏........................................................................................................ 错误!未定义书签3.轨道控制区.................................................................................................................... 错误!未定义书签时间线容器的操作.................................................................................................... 错误!未定义书签TRIMMING编辑........................................................................................................... 错误!未定义书签时间线上快慢动作和静帧的制作............................................................................ 错误!未定义书签3.素材右键菜单................................................................................................................ 错误!未定义书签故事板模式........................................................................................................................ 错误!未定义书签5.4 素材编辑窗口的使用........................................................................................................ 错误!未定义书签1.素材编辑窗口功能菜单................................................................................................ 错误!未定义书签清除列表.................................................................................................................... 错误!未定义书签清除画面:................................................................................................................ 错误!未定义书签创建子素材................................................................................................................ 错误!未定义书签反向帧匹配................................................................................................................ 错误!未定义书签场景检测.................................................................................................................... 错误!未定义书签标记点........................................................................................................................ 错误!未定义书签时间线属性................................................................................................................ 错误!未定义书签自定义........................................................................................................................ 错误!未定义书签合并时间线回放窗口................................................................................................ 错误!未定义书签帮助............................................................................................................................ 错误!未定义书签最小话........................................................................................................................ 错误!未定义书签最大化........................................................................................................................ 错误!未定义书签关闭............................................................................................................................ 错误!未定义书签2.TC/CTL码显示区........................................................................................................... 错误!未定义书签3素材时码显示区............................................................................................................. 错误!未定义书签4.素材切换列表................................................................................................................ 错误!未定义书签5.素材画面显示区............................................................................................................ 错误!未定义书签6.显示比例缩放滑杆........................................................................................................ 错误!未定义书签7.音频第2路开关............................................................................................................ 错误!未定义书签8.音频第1路开关............................................................................................................ 错误!未定义书签9.音频开关........................................................................................................................ 错误!未定义书签10.视频开关.................................................................................................................... 错误!未定义书签11.按钮快捷栏.................................................................................................................. 错误!未定义书签快捷栏按钮介绍........................................................................................................ 错误!未定义书签12.删除入点按钮.............................................................................................................. 错误!未定义书签13.删除出点按钮.............................................................................................................. 错误!未定义书签14.前一帧.......................................................................................................................... 错误!未定义书签15.后一帧.......................................................................................................................... 错误!未定义书签16.设置入点...................................................................................................................... 错误!未定义书签17.播放按钮...................................................................................................................... 错误!未定义书签18.设置出点...................................................................................................................... 错误!未定义书签19.添加标记点.................................................................................................................. 错误!未定义书签20.删除标记点.................................................................................................................. 错误!未定义书签21.插入上线...................................................................................................................... 错误!未定义书签22.覆盖上线...................................................................................................................... 错误!未定义书签23.游标.............................................................................................................................. 错误!未定义书签24.时码.............................................................................................................................. 错误!未定义书签25.素材入点...................................................................................................................... 错误!未定义书签26.素材出点...................................................................................................................... 错误!未定义书签5.5 时间线回放窗口的使用.................................................................................................... 错误!未定义书签1.时间线回放窗口功能菜单............................................................................................ 错误!未定义书签清除列表.................................................................................................................... 错误!未定义书签保存............................................................................................................................ 错误!未定义书签另存为........................................................................................................................ 错误!未定义书签撤销/恢复.................................................................................................................. 错误!未定义书签恢复............................................................................................................................ 错误!未定义书签清空当前Undo列表.................................................................................................. 错误!未定义书签剪切到SV................................................................................................................... 错误!未定义书签复制到SV................................................................................................................... 错误!未定义书签从SV中粘贴过来...................................................................................................... 错误!未定义书签标记点........................................................................................................................ 错误!未定义书签添加标记点................................................................................................................ 错误!未定义书签添加描述.................................................................................................................... 错误!未定义书签删除标记点................................................................................................................ 错误!未定义书签标记点列表................................................................................................................ 错误!未定义书签时间线属性................................................................................................................ 错误!未定义书签自定义........................................................................................................................ 错误!未定义书签合并素材编辑窗口.................................................................................................... 错误!未定义书签帮助............................................................................................................................ 错误!未定义书签最小化........................................................................................................................ 错误!未定义书签最大化........................................................................................................................ 错误!未定义书签关闭............................................................................................................................ 错误!未定义书签2.TC/CTL码显示区........................................................................................................... 错误!未定义书签3.节目时码显示区............................................................................................................ 错误!未定义书签4.节目切换列表................................................................................................................ 错误!未定义书签5.节目画面显示区............................................................................................................ 错误!未定义书签6.显示比例缩放滑杆........................................................................................................ 错误!未定义书签7.Tab/Rel按钮................................................................................................................. 错误!未定义书签8.拍照按钮........................................................................................................................ 错误!未定义书签文件名称.................................................................................................................... 错误!未定义书签文件路径.................................................................................................................... 错误!未定义书签图片格式.................................................................................................................... 错误!未定义书签素材入库.................................................................................................................... 错误!未定义书签素材名称.................................................................................................................... 错误!未定义书签素材路径.................................................................................................................... 错误!未定义书签9.展开按钮........................................................................................................................ 错误!未定义书签10.标记点列表按钮........................................................................................................ 错误!未定义书签11.安全框按钮.................................................................................................................. 错误!未定义书签12.节目入点...................................................................................................................... 错误!未定义书签13.节目出点...................................................................................................................... 错误!未定义书签14.时码.............................................................................................................................. 错误!未定义书签15.按钮快捷栏.................................................................................................................. 错误!未定义书签快捷栏按钮介绍........................................................................................................ 错误!未定义书签16.删除入点按钮.............................................................................................................. 错误!未定义书签17.删除出点按钮.............................................................................................................. 错误!未定义书签18.前一帧.......................................................................................................................... 错误!未定义书签19.后一帧.......................................................................................................................... 错误!未定义书签20.设置入点...................................................................................................................... 错误!未定义书签。
