HP Designjet 100 120 130 500 800系列绘图仪中文维修故障代码
HP绘图仪解密卡安装方法
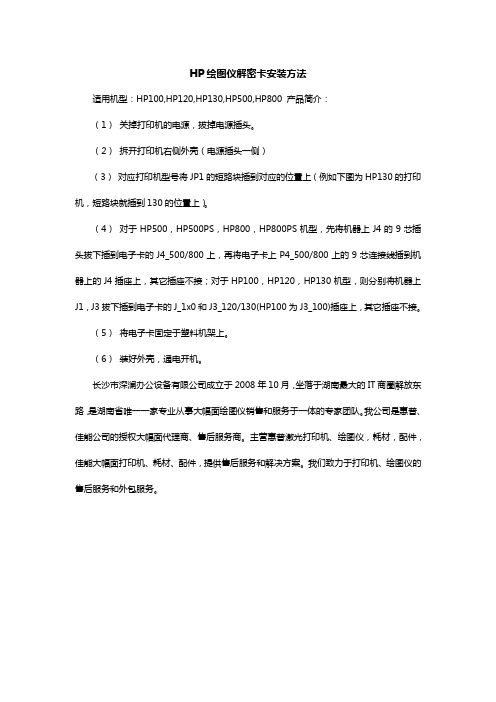
HP绘图仪解密卡安装方法
适用机型:HP100,HP120,HP130,HP500,HP800 产品简介:
(1)关掉打印机的电源,拔掉电源插头。
(2)拆开打印机右侧外壳(电源插头一侧)
(3)对应打印机型号将JP1的短路块插到对应的位置上(例如下图为HP130的打印机,短路块就插到130的位置上)。
(4)对于HP500,HP500PS,HP800,HP800PS机型,先将机器上J4的9芯插头拔下插到电子卡的J4_500/800上,再将电子卡上P4_500/800上的9芯连接线插到机器上的J4插座上,其它插座不接;对于HP100,HP120,HP130机型,则分别将机器上J1,J3拔下插到电子卡的J_1x0和J3_120/130(HP100为J3_100)插座上,其它插座不接。
(5)将电子卡固定于塑料机架上。
(6)装好外壳,通电开机。
长沙市深澜办公设备有限公司成立于2008年10月,坐落于湖南最大的IT商圈解放东路,是湖南省唯一一家专业从事大幅面绘图仪销售和服务于一体的专家团队。
我公司是惠普、佳能公司的授权大幅面代理商、售后服务商。
主营惠普激光打印机、绘图仪,耗材,配件,佳能大幅面打印机、耗材、配件,提供售后服务和解决方案。
我们致力于打印机、绘图仪的售后服务和外包服务。
HP100绘图仪维修手册
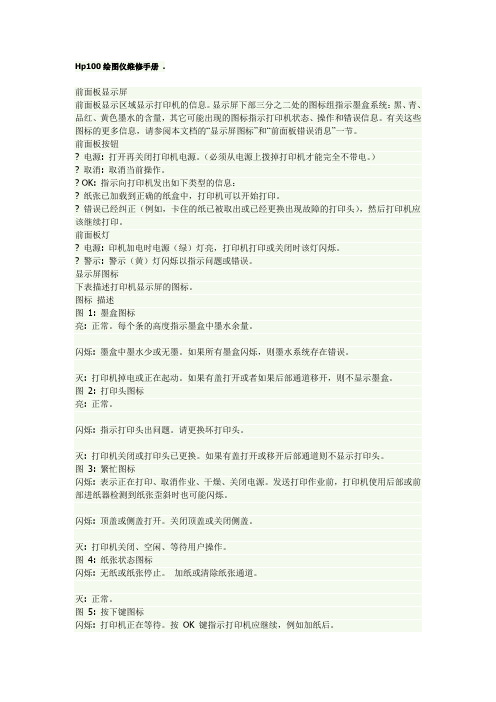
Hp100绘图仪维修手册 .前面板显示屏前面板显示区域显示打印机的信息。
显示屏下部三分之二处的图标组指示墨盒系统:黑、青、品红、黄色墨水的含量,其它可能出现的图标指示打印机状态、操作和错误信息。
有关这些图标的更多信息,请参阅本文档的“显示屏图标”和“前面板错误消息”一节。
前面板按钮? 电源: 打开再关闭打印机电源。
(必须从电源上拨掉打印机才能完全不带电。
)? 取消: 取消当前操作。
? OK: 指示向打印机发出如下类型的信息:? 纸张已加载到正确的纸盒中,打印机可以开始打印。
? 错误已经纠正(例如,卡住的纸已被取出或已经更换出现故障的打印头),然后打印机应该继续打印。
前面板灯? 电源: 印机加电时电源(绿)灯亮,打印机打印或关闭时该灯闪烁。
? 警示: 警示(黄)灯闪烁以指示问题或错误。
显示屏图标下表描述打印机显示屏的图标。
图标描述图1: 墨盒图标亮: 正常。
每个条的高度指示墨盒中墨水余量。
闪烁: 墨盒中墨水少或无墨。
如果所有墨盒闪烁,则墨水系统存在错误。
灭: 打印机掉电或正在起动。
如果有盖打开或者如果后部通道移开,则不显示墨盒。
图2: 打印头图标亮: 正常。
闪烁: 指示打印头出问题。
请更换坏打印头。
灭: 打印机关闭或打印头已更换。
如果有盖打开或移开后部通道则不显示打印头。
图3: 繁忙图标闪烁: 表示正在打印、取消作业、干燥、关闭电源。
发送打印作业前,打印机使用后部或前部进纸器检测到纸张歪斜时也可能闪烁。
闪烁: 顶盖或侧盖打开。
关闭顶盖或关闭侧盖。
灭: 打印机关闭、空闲、等待用户操作。
图4: 纸张状态图标闪烁: 无纸或纸张停止。
加纸或清除纸张通道。
灭: 正常。
图5: 按下键图标闪烁: 打印机正在等待。
按OK 键指示打印机应继续,例如加纸后。
灭: 正常。
图6: 卡纸图标闪烁: 卡纸,纸张延迟,墨盒延迟。
清除卡住的纸。
灭: 正常。
图7: 纸张未对齐图标闪烁: 纸张未对齐必须重新加载以打印。
重新装纸。
灭: 正常。
HP Designjet 用户参考指南说明书

file:///D|/hydra/ug_loc/fDesignjet WebAccess tool, for information aboutfile:///D|/hydra/ug_loc/ffile:///D|/hydra/ug_loc/fOn/Off Power LED(red when instandby)StandbyMessage Displayfile:///D|/hydra/ug_loc/ffile:///D|/hydra/ug_loc/ffile:///D|/hydra/ug_loc/ffile:///D|/hydra/ug_loc/ffile:///D|/hydra/ug_loc/ffile:///D|/hydra/ug_loc/ffile:///D|/hydra/ug_loc/ffile:///D|/hydra/ug_loc/ffile:///D|/hydra/ug_loc/ffile:///D|/hydra/ug_loc/ffile:///D|/hydra/ug_loc/ffile:///D|/hydra/ug_loc/ffile:///D|/hydra/ug_loc/ffile:///D|/hydra/ug_loc/ffile:///D|/hydra/ug_loc/ffile:///D|/hydra/ug_loc/ffile:///D|/hydra/ug_loc/ffile:///D|/hydra/ug_loc/ffile:///D|/hydra/ug_loc/ffile:///D|/hydra/ug_loc/ffile:///D|/hydra/ug_loc/ffile:///D|/hydra/ug_loc/ffile:///D|/hydra/ug_loc/ffile:///D|/hydra/ug_loc/ffile:///D|/hydra/ug_loc/fNote: If the short menu isfile:///D|/hydra/ug_loc/ffile:///D|/hydra/ug_loc/ffile:///D|/hydra/ug_loc/ffile:///D|/hydra/ug_loc/ffile:///D|/hydra/ug_loc/ffile:///D|/hydra/ug_loc/ffile:///D|/hydra/ug_loc/ffile:///D|/hydra/ug_loc/ffile:///D|/hydra/ug_loc/ffile:///D|/hydra/ug_loc/fCore adaptorsfile:///D|/hydra/ug_loc/ffile:///D|/hydra/ug_loc/fand then B as indicated below.The media roll may be very long, rest the spindlehorizontally on a table and load the media on the table.file:///D|/hydra/ug_loc/froll, turn it 180 degrees and slide it back on to the spindle.file:///D|/hydra/ug_loc/ffile:///D|/hydra/ug_loc/f2.T rim the leading edge of the media roll only if it is notstraight. If the amount of media was printed at the end offile:///D|/hydra/ug_loc/ffile:///D|/hydra/ug_loc/fMedia can be loaded with the window up or down.file:///D|/hydra/ug_loc/fCarefully insert the roll media edge as shown below.file:///D|/hydra/ug_loc/ffile:///D|/hydra/ug_loc/ffile:///D|/hydra/ug_loc/ffile:///D|/hydra/ug_loc/f。
HP500_800绘图仪故障诊断方法
否
自检通不过
开始
86:01 否
是
是否卡纸 是 清除卡纸
否
在这种情况下直 接拔掉电源线
笔架是否停 在服务站外面 是
否
能否把笔架 从服务站中拉出 是
否
更换 服务站
81:01 否
是
是否卡纸 是 清除卡纸
否
重新开机 是否正常 是 结束
否
笔架移动是否自由
更换电子 模块(注1) 否
是
光栅是否清洁 或是破损 是 否 清洁/更 换皮带
更换损坏的附件卡
是
更换服务站
有具体的 提示信息
无
如果是无法读懂的 信息特殊情况处理
是
重插/更换格 式化卡(800only) GL/2卡(500only)
FW版本是否 高于A.02.04 否 升级FW到最新的 版本
是
察看打印机信息中寿 命终结的备件并更换之
根据具体提示处理
是
检查Y轴是否有障碍 检查更换笔架/裁纸刀
Y轴是否有明 显的障碍 否 清洁润滑Y轴 后是否正常 是 结束
是
清除障碍
否
更换Y轴马 达或笔架
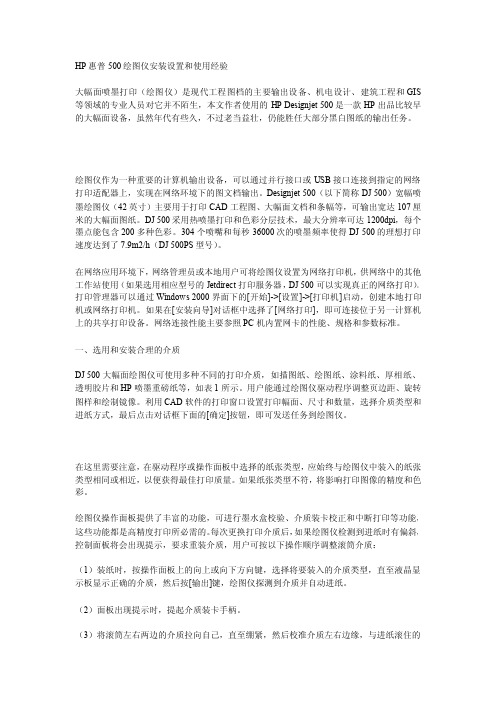
几个常见报错代码的特殊处理
加电无 任何反应
是否有附件卡
是
去掉所有的 附加卡后重 新加电
能否加电 否
能
重新安装附件卡 以确认是否其的确 损坏
更换损坏的 附件卡
附加卡上 的灯亮不亮 不 亮
亮 更换电子模块
无
电源线是否 插好(此电源线 插到其他机器 是否正常) 否
是
更换电子模块 或者是电源模块(注1)
依 然 无 法 加 电 打印机无问题 结束 正常加电自检
更换电子模块 how using GL/2 card(500) or formatter card(800) LEDS to troubleshoot
HP Designjet 500绘图仪使用经验

HP Designjet 500绘图仪使用经验大幅面喷墨打印(绘图仪)是现代工程图档的主要输出设备、机电设计、建筑工程和GIS等领域的专业人员对它并不陌生,本文作者使用的HP Designjet 500是一款HP出品比较早的大幅面设备,虽然年代有些久,不过老当益壮,仍能胜任大部分黑白图纸的输出任务。
绘图仪作为一种重要的计算机输出设备,可以通过并行接口或USB接口连接到指定的网络打印适配器上,实现在网络环境下的图文档输出。
Designjet 500(以下简称DJ 500)宽幅喷墨绘图仪(42英寸)主要用于打印CAD工程图、大幅面文档和条幅等,可输出宽达107厘米的大幅面图纸。
DJ 500采用热喷墨打印和色彩分层技术,最大分辨率可达1200dpi,每个墨点能包含200多种色彩。
304个喷嘴和每秒36000次的喷墨频率使得DJ 500的理想打印速度达到了7.9m2/h(DJ 500PS型号)。
在网络应用环境下,网络管理员或本地用户可将绘图仪设置为网络打印机,供网络中的其他工作站使用(如果选用相应型号的Jetdirect打印服务器,DJ 500可以实现真正的网络打印)。
打印管理器可以通过Windows 2000界面下的[开始]->[设置]->[打印机]启动,创建本地打印机或网络打印机。
如果在[安装向导]对话框中选择了[网络打印],即可连接位于另一计算机上的共享打印设备。
网络连接性能主要参照PC机内置网卡的性能、规格和参数标准。
一、选用和安装合理的介质DJ 500大幅面绘图仪可使用多种不同的打印介质,如描图纸、绘图纸、涂料纸、厚相纸、透明胶片和HP喷墨重磅纸等,如表1所示。
用户能通过绘图仪驱动程序调整页边距、旋转图样和绘制镜像。
利用CAD软件的打印窗口设置打印幅面、尺寸和数量,选择介质类型和进纸方式,最后点击对话框下面的[确定]按钮,即可发送任务到绘图仪。
在这里需要注意,在驱动程序或操作面板中选择的纸张类型,应始终与绘图仪中装入的纸张类型相同或相近,以便获得最佳打印质量。
HP Design Jet大幅面绘图仪的故障剖析

HPDesignJet大幅面绘图仪的故障剖析作者:王旭辉来源:《电脑知识与技术》2008年第34期摘要:在建筑勘察设计行业,总少不了跟大幅面绘图仪打交道。
绘图仪相关的故障各形各色,该文从理论上把这些问题归归类。
它对当前建筑勘察设计行业所使用的主流大幅面绘图仪进行了软硬件故障方面的剖析。
关键词:大幅面绘图仪;故障;剖析中图分类号:TH761文献标识码:A文章编号:1009-3044(2008)34-1900-04HP Design Jet Large Format Plotter of the Breakdown AnalysisWANG Xu-hui(Main Computer Room, Lianyungang Architectural Design and Research Institute, Lianyungang 222000, China)Abstract: The survey and design in the construction industry,The need to deal with the large format plotter.Graphics-related failures Gexinggese,here in theory these issues to the classification.Its current construction industry survey and design used by the mainstream of large format plotter of the hardware and software for the analysis of failure.Key words: large format plotter; breakdown; analysis1 引言在建筑勘察设计行业,总少不了跟绘图仪打交道。
HP惠普500的使用经验 绘图仪安装设置
五、其它惠普 hp 绘图仪常见故障及报错说明:
1、 HP DJ2500 报 system error 020004 000000003,服务站坏; 2、 HP2500 报 Incorrect ink system 不正确的供墨系统;unknown ink system 不知道的供墨 系统 hp Designjet 100 /120/130/500/800 打印机系列中文维修手册 错误消息解释指导 错误数字 描述 0x:yy
合作编辑:丰胸产品哪种好 : 防辐射服哪个牌子好: 哪种减肥药效果好 丰胸精油:
绘图仪作为一种重要的计算机输出设备,可以通过并行接口或 USB 接口连接到指定的网络 打印适配器上,实现在网络环境下的图文档输出。Designjet 500(以下简称 DJ 500)宽幅喷 墨绘图仪(42 英寸)主要用于打印 CAD 工程图、大幅面文档和条幅等,可输出宽达 107 厘 米的大幅面图纸。DJ 500 采用热喷墨打印和色彩分层技术,最大分辨率可达 1200dpi,每个 墨点能包含 200 多种色彩。304 个喷嘴和每秒 36000 次的喷墨频率使得 DJ 500 的理想打印 速度达到了 7.9m2/h(DJ 500PS 型号)。
(3)在[纸张尺寸]标签页中点击[应用程序页面尺寸]下拉列表框,选定适当的页面尺寸。或 者点击[更多尺寸]按钮,手动输入自定义的页面尺寸。
要打印长幅面图档时,首先确定要打印的长幅面(缩放至页面尺寸)的尺寸和比例,然后计 算出保持此比例时,CAD 应用程序所允许的最大页面尺寸。如果应用程序未说明,则最大 的自定义尺寸宽度为 107 厘米。然后,在[纸张尺寸]标签页中点击[更多尺寸]按钮,输入以 上计算出的尺寸。
HP DesignJet 100 120维修代码及维修方法
HP DesignJet 100 120维修代码及维修方法作者:不详来源于:维修家园发布时间:2007-4-15 13:45:59HP DJ100/120错误代码及维修方法之101:10Electronics Module failureSee Contact HP at the bottom of this document01:12The Electronics Module failed during the firmware upgrade or during initializationTry the following: 1. If the Electronics Module failed during initialization, perform an electronics test to determine the cause of the failure. 2. If the Electronics Module failed during a firmware upgrade, first perform an emergency firmware upgrade. 3. If an emergency firmware upgrade is not possible or did not work, See Contact HP at the bottom of this documentHP DJ100/120错误代码及维修方法之202:10Carriage failureSee Contact HP at the bottom of this document04:13Generic firmware error (network card)Unplug the power cable from the printer and wait a few seconds. Plug in the power cable again and check if the error code has disappeared. If the error code continues, refer to the service manual and service notes for the HP Jetdirect card08:11Front Panel cannot be detectedReconnect the Front Panel11:10Trailing Cable failureSee Contact HP at the bottom of this documentHP DJ100/120错误代码及维修方法之311:11Trailing cable error Adjust manually (reconnect)See Contact HP at the bottom of this document21:10Service Station failureSee Contact HP at the bottom of this document22:10Ink Supply Station failureReplace the Ink Supply Station.27x:00(Warning) Printhead error, Color x printhead error (270: black; 271: cyan; 272: magenta; 273: yellow; 275: light cyan; 275: light magenta) Replace Printhead35:01No Cleanout Assembly detected while loading mediaTry the following: Remove the Cleanout Assembly, and then install it again correctly. Or See Contact HP at the bottom of this documentHP DJ100/120错误代码及维修方法之437:01Automatic roll motor shutdownProcedure: clear paper jam, if it exists. If there is no paper jam or recovering a paper jam does not resolve the problem, then See Contact HP a t the bottom of this document37:10Automatic roll home position errorSee Contact HP at the bottom of this document42:10Carriage Motor failure (short-circuit)See Contact HP at the bottom of this documentSystem errorProblem descriptionCorrective actionHP DJ100/120错误代码及维修方法之56:10Error during the calibration of the Line-feed Motor/Encoder system or a problem finding the zero position on the Encoder DiscSee Contact HP at the bottom of this document56:13Error during the calibration of the Line-feed Motor/Encoder systemUnplug the power cable from the printer and wait a few seconds. Plug in the power cable again and check if the error code has disappeared58:10Color sensor error Replace color sensor ( the sensor is part of the carriage assemblyProblem detected is the color sense system. See Contact HP at the bottom of this document61:05Language interpreting error Upgrade computer software(Warning) This is usually an error produced while parsing a file. There is probably an incompatibility between the driver and the firmware. Upgr ade the driverHP DJ100/120错误代码及维修方法之662:04, 63:04, 64:04, and 65:04I/O module error: 62 = parallel 63 = Network 64 = USBTry the following: 1. Unplug the power cable from the printer and wait a few seconds. Plug in the power cable again and check if the error co de has disappeared. 2. If the error code reappears, check for a new firmware release. Otherwise, perform normal troubleshooting steps to find cau se.71:03Memory management error (out of memory)Try the following: 1. Unplug the power cable from the printer and wait a few seconds. Plug in the power cable again and check if the error co de has disappeared. 2. If the error code reappears, check for a new firmware release. Otherwise, perform normal troubleshooting steps to find cause.71:14Memory management error (out of memory during firmware upgrade)Try the following: 1. Unplug the power cable from the printer and wait a few seconds. Plug in the power cable again and check if the error co de has disappeared. 2. If the error code reappears, perform an emergency firmware upgrade.72:04Generic firmware error (expected)Try the following: 1. Unplug the power cable from the printer and wait a few seconds. Plug in the power cable again and check if the error co de has disappeared. 2. If the error code reappears, check for a new firmware release. Otherwise, perform normal TS steps to find cause.System errorProblem descriptionCorrective action74:12Firmware upgrade error (memory size check failed during firmware upgrade)See Contact HP at the bottom of this document79:04Generic firmware error (unexpected)Try the following: 1. Unplug the power cable from the printer and wait a few seconds. Plug in the power cable again and check if the error co de has disappeared. 2. If the error code reappears, check for new firmware release. Otherwise, perform normal troubleshooting steps to find caus e.HP DJ100/120错误代码及维修方法之781:01Paper-Axis shutdown. Usually a paper-jam caused by a blockage of the Paper-Axis system.Try the following: If this error code was caused by a paper jam, unplug the power cable and clear the blockage. Plug in the power cable again and check if the error cord has disappeared. If error continues, see Contact HP at the bottom of this document81:12Media advance errorThis error usually appears during the paper-advance calibration. Retry the paper-advance calibration.83:10Sheet feeding failureSee Contact HP at the bottom of this document85:10Paper-Axis encoder errorTry the following: Make sure that the Encoder Sensor cable is connected correctly. If not See Contact HP at the bottom of this documentHP DJ100/120错误代码及维修方法之886:10Scan-Axis shutdown. Usually a paper-jam caused by a blockage of the Scan-Axis system.Try the following: 1. Check that there are no obstacles in the Scan-Axis that stops the carriage from moving freely. 2. Lubricate the Slider Rod.3. If the Carriage is stuck at the right side of the printer and cannot be moved out to the center of the Print Platen, it is because the Service Station cannot uncap the printheads. In this case, the Service Station assembly needs to be replaced, contact HP.4. Check that the belt is correctly installed and that it is not damaged. 5. Check that the Turnaround Pulley is correctly installed.See Contact HP at the bottom of this documentSystem errorProblem descriptionCorrective actionHP DJ100/120错误代码及维修方法之96:11Scan-Axis shutdown during initialization. Typically, this error occurs when the printer detects an incorrect lengthIf the Carriage stopped on the right side of the printer, try the following: 1. Check that the foam packing material that secures the Carriage has been removed. 2. Check that the Carriage latch is closed properly. 3. Check that the Carriage moves freely and does not bump into the Service Station. If the Carriage stopped in the middle of the print zone, try the following: 1. Check that the Trailing Cable is properly attached. 2. Chec k that the Trailing Cable clip is properly installed. If the cutter is present, make sure it is able to go back and forth smoothly.94:02Coated paper calibration obsolete or missingThe user selected Coated media and Best mode or High Resolution mode, but the color calibration profile was obsolete or missing for Coated pa per and that combination of print quality settingHP DJ100/120错误代码及维修方法之1094:12Glossy paper calibration obsolete or missingThe user selected Glossy media and Best mode or High Resolution mode, but the color calibration profile was obsolete or missing for Glossy pa per and that combination of print quality setting94:22Photo paper calibration obsolete or missingThe user selected Photo media and Best mode or High Resolution mode, but the color calibration profile was obsolete or missing for Photo pape r and that combination of print quality setting94:32Heavy weight paper calibration obsolete or missingThe user selected Heavy Weight media and Best mode or High Resolution mode, but the color calibration profile was obsolete or missing for H eavy weight paper and that combination of print quality settingHP DJ100/120错误代码及维修方法之1194:42Semi-Gloss paper calibration obsolete or missingThe user selected Semi-Gloss media and Best mode or High Resolution mode, but the color calibration profile was obsolete or missing for Semi-Gloss paper and that combination of print quality setting95:00Alignment error Replace part (printhead?)Printhead alignment failed because the correction for a printhead failed. The most probable cause is poor performances of a printhead. The cross mark helps to identify which printhead could be causing the problem.95:02Alignment error Perform automated troubleshooting procedure (image quality troubleshooting process)Printhead alignment failed because the printer did not detected enough boxes printed. This should usually be a print quality issue caused by theperformance of a printhead.HP DJ100/120错误代码及维修方法之1295:04Alignment Error Upgrade firmwarePrinthead alignment error in a control point of the firmware. It should never happen; If it does, firmware should be upgraded.。
HP Designjet T1120 SD-MFP 組裝說明说明书
17 To access the scan area, you need to open the scanner lid. Push the touch screen so it twists backwards on its arm until it rests in its “service” position.
Caution: do not use abrasives, acetone, benzene, or fluids that contain these chemicals. Do not spray liquids directly onto the scanner glass plate or anywhere else in the scanner.
18 There are 2 lid release buttons at the back of the scanner. Simultaneously press the buttons inwards with your fingers until you feel them unlock.
19 Retain pressure on the lid release buttons and your grip on the lid edge, and pull the lid backwards towards your body. Open the scanner lid all the way back.
4 Fasten the foot using 4 M5x14 screws. Insert all 4 screws loosely and then tighten using the Torx screwdriver.
惠普墨盒型号对照表----C系列

HP Designjet CP 染料墨水系统(C1806A)适用机型:HP2000CP、2500CP、3000CP、3500CP绘图仪(室内)打印规格墨盒颜色黑白兼容墨水类型基于染料尺寸/重量/保修包装尺寸(宽x 深x 高)353 x 111 x 826 毫米包装重量0.74 千克___________________________________________________________________________________________________ HP Designjet CP 染料墨水系统(C1807A)适用机型:HP2000CP、2500CP、3000CP、3500CP绘图仪(室内)概述与特性HP Designjet CP 墨水系统是专业设计人员和专业服务机构的理想选择,可提供高质量、产品说明大幅面彩色打印。
青色打印规格墨盒颜色青色兼容墨水类型基于染料尺寸/重量/保修包装尺寸(宽x 深x 高) 353 x 111 x 826 毫米包装重量0.74 千克____________________________________________________________________________________________________HP Designjet CP 染料墨水系统(C1808A)适用机型:HP2000CP、2500CP、3000CP、3500CP绘图仪(室内)概述与特性HP Designjet CP 墨水系统是专业设计人员和专业服务机构的理想选择,可提供高质量、产品说明大幅面彩色打印。
品红色打印规格墨盒颜色品红色兼容墨水类型基于染料尺寸/重量/保修包装尺寸(宽x 深x 高) 353 x 111 x 826 毫米包装重量0.74 千克____________________________________________________________________________________________________HP Designjet CP 染料墨水系统(C1809A)适用机型:HP2000CP、2500CP、3000CP、3500CP绘图仪(室内)概述与特性HP Designjet CP 墨水系统是专业设计人员和专业服务机构的理想选择,可提供高质量、产品说明大幅面彩色打印。
绘图仪ip配置

下面列出了可配置的参数,以及使用前控制面板为每类打印机设置TCP/IP 参数的步骤。
注:某些型号(如Designjet 10ps、20ps 和50ps 打印机)无法使用前控制面板配置打印服务器。
对于本文中没有列出其他的型号,可以假定它没有该功能。
另外,下列链接提供了固件升级的下载、创建打印队列和配置Jetdirect 打印服务器的信息。
可配置的TCP/IP 参数使用打印机的前控制面板可配置下列基本TCP/IP 参数。
参见下面具体的打印机型号标题,了解如何更改这些参数。
∙BootP= (Yes/No)。
使用BOOTP 或DHCP 可从网络上自动下载配置数据。
默认设置为“YES”,以使用BOOTP 或DHCP 进行配置。
要使用前控制面板配置,必须将该参数改为“No”。
∙DHCP=(Yes/No)。
对于J6057A 615n、J7934A 620n 和J4169A 或J4167A 610n 卡.使用DHCP 可从网络上自动下载配置数据。
默认设置为“YES”,以使用DHCP 进行配置。
要使用前控制面板配置,必须将该参数改为“No”。
∙IP 地址(四个字节)。
前控制面板上通常显示为“IP BYTE” 示例:如果IP 地址为192.0.0.192,则IP byte 1 = 192,IP byte 2= 0,IP byte 3 = 0,IP byte 4 = 192。
∙子网掩码(四个字节)。
前控制面板上通常显示为“SM BYTE” 示例:如果子网掩码地址为255.255.255.0,则IP byte 1 = 255,IP byte 2= 255,IP byte 3 = 255,IP byte4 = 0。
∙系统日志服务器IP 地址(四个字节)。
前控制面板上通常显示为“LG BYTE” 示例:如果系统日志IP 地址为192.30.40.192,则IP byte 1 = 192,IP byte 2= 30,IP byte3 = 40,IP byte4 = 192。
HP Designjet 打印机设置指南说明书
1. Make sure that the printer is on and connected to a working Ethernet network, and that all computers in the network are on and connected (including hubs and routers).2.Print your HP Designjet printer information pages by pressing the OK key (upper right key on the front panel) four times while holding down the Power button, then releasing the Power button. Note the mDNS Service Name of your printer, in the TCP/IP section on the first page. Also check the version number of your Jetdirect firmware: this should be at least x.25.00 (where x can be anything), otherwise Rendezvous will not work.3.Open the Print Center or Printer Setup Utility, as follows:a. Select the Finder icon on your desktop.b. Click the Applications icon in the top right corner of the Finder window.c. Select ‘Utilities’ from the list of applications.d. Select ‘Print Center’ or ‘Printer Setup Utility’ from the list of utilities.4. Click the Add button. The Printer List dialog box is displayed. Ensure that Rendezvous is selected in this dialog box.5.Click on the name of the printer. If you cannot identify the printer by name (if there is more than one printer with the same name), use the mDNS Service Name that you noted in step 2.6.The connection is configured automatically. Your printer is now available on the network.2. Network connectionOS X – Rendezvous1.Make sure that the printer is on and connected to a working Ethernet network, and that all computers in the network are on and connected (including hubs and routers).2. Print your HP Designjet printer information pages by pressing the OK key (upper right key on the front panel) four times while holding down the Power button, then releasing the Power button. Note the Appletalk name and zone of your printer.3. Make sure that the AppleTalk protocol is Active. 4. Select ‘Chooser’ from the Apple menu. 5. Click the HP Inkjet icon in the Chooser.6. If the message “Do you wish to also scan for TCP/IP network printers?” appears, click ‘No’.7. If you use Appletalk zones, select the AppleTalk zone where your printer is located from the Appletalk Zones list.8. Select your printer from the ‘Select an HP Inkjet Printer’ list. If you do not know thename of your printer, check the AppleTalk name on the printer's information page. You should select a printer that has the AppleTalk icon next to its name.9. Click the Setup button in the Chooser to set up the printer, and specify whether it has a Roll Feeder installed.10. Confirm your configuration by clicking the OK button.11. Close the Chooser. A new printer icon will appear on your desktop.2. Network connectionOS 9 – Appletalk1. Driver installationOS X & OS 91. Connect the cable from your computer or network to the printer.2. Insert the HP Designjet Software Setup CD into your CD drive, open the CD icon on your screen, and look for these icons:• ‘OS X HP Designjet 1xx plus series setup’ (for Mac OS X Native)• ‘OS 9 HP Designjet 1xx plus series setup’ (for Mac OS X Classic or Mac OS 9)3.Double-click the appropriate icon for your operating system to launch the installer, and then follow the on-screen instructions.Note: We recommend that you select ‘Easy Install’ to install all elements.4. When the installation has finished, remove the CD from the CD drive.5.If you are connecting your printer directly to your computer with a USB cable, see ‘USB connection’ for OS X or OS 9 below.If you are connecting your printer to a network, see ‘Network connection’ for OS X or OS 9 below.For other network configurations or further details, please refer to the ‘Using Your Printer’ CD.HP Designjet 100plus/110plus/110plus nrSetting up and connecting your printerMac OS2. USB connectionOS X1.When your printer is connected to your computer by a USB cable, and the printer is turned on, a printer icon will automatically be added to your list of printers in the Print Center or Printer Setup Utility.2. USB connectionOS 91. Ensure that the printer is connected to your computer by a USB cable, and that the printer is turned on.2. Select ‘Chooser’ from the Apple menu.3. Click the HP Inkjet icon in the Chooser.4. From the ‘Select an HP Inkjet Printer’ panel, select your HP Designjet printer.5. Click the Setup button in the Chooser to set up the printer, and specify whether it has a Roll Feeder installed.6. Confirm your configuration by clicking the OK button.7.Close the Chooser. A new printer icon will appear on your desktop.。
惠普800绘图仪IP设置方法
xx800绘图仪IP设置方法:hp800xxid设置问题在前面板上,使用箭头按钮突出显示打印机图标并按ENTER。
按向上箭头按键,直到“I/O Setup”出现。
按ENTER。
按向下箭头按键,出现“Card Setup”后按ENTER。
突出显示“Configuration”,然后按ENTER。
前控制面板显示消息“Cfg Network=No”后,按ENTER。
按向上箭头按键将设置改为“Yes”。
按ENTER。
按向上箭头按键,直到“Cfg TCP/IP=No”出现。
按ENTER。
按向上箭头按键将设置改为“Yes”。
按ENTER。
按向上箭头按键,直到“BOOTP=Yes”出现。
按ENTER。
按向上箭头按键将设置改为“No”。
按ENTER。
注:如果“BOOTP=Yes”,打印机已配置为从BOOTP、RARP或DHCP服务器在网络中检索其TCP/IP参数。
如果“BOOTP=NO”,打印机已配置为接受前面板的TCP/IP参数。
在固件版本L.20.04或更高的HP Jetdirect打印服务器上,按向上箭头按键,直到“DHCP=yes”出现。
按ENTER。
按向上箭头按键将设置改为“No”。
按ENTER。
按向上箭头按键,直到“IP Byte1=xxx”出现。
若要更改“IP byte”,请执行下列操作步骤:按ENTER。
按向上或向下箭头按键更改数字。
按ENTER。
按向上箭头按键继续进入“IP Byte2=xxx”。
按ENTER。
用相同的方式配置IP地址剩余的字节。
用相同的方式配置子网掩码字节(SM)、系统日志服务器IP地址(LG)、默认网关(GW)和超时(TIMEOUT)。
注:为HP Jetdirect打印服务器配置系统日志服务器IP地址后,它可生成系统日志消息并将该消息发送到该日志服务器。
如果网络上没有系统日志服务器,可跳过该设置。
TIMEOUT参数的默认值是90秒。
最多可以配置为3,600秒。
如果设置为零,则禁用HPJetdirect打印服务器的超时特性-- TCP/IP连接将保持打开状态,直到服务器关闭它为止。
[VIP专享]HP Jetdirect 打印服务器
![[VIP专享]HP Jetdirect 打印服务器](https://img.taocdn.com/s3/m/caa1c366f111f18583d05a6f.png)
HP Jetdirect 打印服务器-HP Jetdirect 基本故障排除清除过程排除网络故障的策略依清除过程而定。
清除过程应当将问题范围缩小到下述三种基本组成部分之一。
如果网络拓扑结构复杂,可以先从确认打印机到网络的连接方面入手,然后是计算机到网络的连接;最后处理复杂的网络连接。
排除HP Jetdirect 打印服务器的故障包括三组常见组成部分:1.试图打印到HP Jetdirect 打印服务器或试图配置HP Jetdirect 打印服务器的计算机。
2.将计算机连接到HP Jetdirect 打印服务器的网络硬件。
其中包括电缆、集线器、交换机、网桥、路由器或服务器。
3.打印机和HP Jetdirect 打印服务器。
简介打印配置页可用的最佳故障排除工具之一就是HP Jetdirect 配置页,有时候也称为自测页。
配置页可以使用打印机的控制面板或者外置或LIO 打印服务器的Test 按钮打印出来。
从控制面板打印配置页打印机种类繁多,打印机控制面板的类型至少有两种-“Classic”和“Flex”。
Classic 控制面板通常具有Menu 和Item 按钮;Flex 控制面板具有复选标记按钮及箭头按钮和/或数字键盘。
更为复杂的是各类惠普打印机处于同一环境下,此时可以使用以下基本导航概念:HP Jetdirect Configuration 是计算机的I/O 端口,因此通常可以在Information菜单中找到,配置菜单一般在I/O 或EIO 菜单中。
有些打印机可以打印Menu Map,以显示可用的内容。
在Classic 菜单中:Figure 1: Classic 控制面板(按钮布局根据打印机型号不同而各有不同)1.使用前面板上的MENU 键,转到Information 、Test 或PCL Test 菜单。
2.按下ITEM 键,转到Print Configuration 、Print EIO Configuration 、PCLConfiguration Page 或Self Test 。
HP Designjet 500 机器常见问题及问题维修排除方法
HP Designjet 500 机器常见问题及问题维修排除方法友情提醒: 技术资料和软件都是网上收集整理,只做参考!机器出现故障请勿自行修理,请找专业维修工程师修理。
HP 500PS绘图仪是2003年公司为了适应市场的需要而购进的,保修期为一年。
绘图仪买进后,为我公司的发展做出了较大的贡献。
一开始主要用于测量图纸的打印工作,随后使用范围不断扩大,许多报告附图及一些重要项目材料均用绘图仪进行打印。
据统计,目前已在城门山补勘工程、武山设计、张家畈设计、山达克设计及菲尔普斯"道奇公司接待材料等项目上打印了近千张图纸,工作量比较大。
由于绘图仪打印的质量高,所以,我们公司制作的图纸已经多次受到业主的好评。
绘图仪属于高精密高科技的设备,对其保养、维护要求比较高,此次发生故障的绘图仪部件是服务站(也就是我们常说的打印头)。
在平时打印过程中,容易堵纸,造成机器故障。
下面针对这次故障进行分析。
一、故障产生的经过2005年9月21日,城门山铜矿的杨国才主任到我公司打印城门山勘测界线图,五点10分左右开始用绘图仪打印,打开绘图仪电源,启动,绘图仪进行初始化操作,到快结束时,出现“系统故障,错误代码21:10,请致电HP技术中心”的字样,无法进入主菜单,绘图仪启动失败。
因此,无法完成打印操作。
二、故障处理出现错误故障信息后,我马上检查了绘图仪的数据线,电源线等部分,确认无误后,又根据提示的错误信息,到惠普公司网站上进行技术咨询。
经查找,惠普公司网站的技术论坛上有一用户与我公司绘图仪故障一致,惠普公司认为可能是服务站内部弹簧松动、卡纸或打印计数到了极限,建议把服务站拆下来清洗,如若不行,就更换新的。
根据惠普公司网站上留下的江西维修商电话,我与惠普南昌维修中心——江西佳尔创公司进行了联系,据该公司维修工程师介绍,这种故障原因一般为:服务站内弹簧松动或堵纸。
三、绘图仪以往使用情况绘图仪自2003年买时后,先摆放在宗辉办公室,主要是用于测量、地质图件的打印。
HP Designjet 30 90 130 系列打印机的颜色校准指南说明书

HP LF Printing Knowledge CenterCalibrate my printer:Printer: HP Designjet 30/90/130 series Software: EFI Designer Edition for HP Operating System: Mac OS X1.Load your paper into the printer and launch the EFI Designer Edition software.The color calibration must be performed whenever:• A printhead is changed.• A new combination of paper type and print mode is loaded which has not been previously calibrated, see note.•The environmental conditions change (for example, temperature or humidity)•You note deterioration in the quality of prints.Note: To check if your media type and print mode have already been calibrated: Preferences > Printer > Calibration.2.To start the calibration process, first, go to Preferences > Color:•Paper name: Select the paper type that is loaded on the printer and print quality in which you are going to print.•Print Resolution: Select the quality in which you are going to print.3.Go to Preferences > Printer > Calibration, and click New....4.The printer will print and measure the linearization target. If you see a checkmark at the bottom ofthe page, the calibration was successful.For more information on HP Designjet products/go/designjet© 2005 Hewlett-Packard Development Company, L.P. The information containedherein is subject to change without notice. The only warranties for HP products andservices are set forth in the express warranty statements accompanying suchproducts and services. Nothing herein should be construed as constituting anadditional warranty. HP shall not be liable for technical or editorial errors oromissions contained herein.Adobe Photoshop and PostScript are trademarks of Adobe Systems Incorporated.PANTONE is Pantone, Inc.'s check-standard trademark for color.Rev. 1.3, 02/2005。
更自由、更准确、更实用——惠普推出HP DesignJet 120宽幅面专业级图像打印机
更自由、更准确、更实用——惠普推出HP DesignJet 120
宽幅面专业级图像打印机
佚名
【期刊名称】《现代广告》
【年(卷),期】2003(000)006
【摘要】2003年4月15日.在北京香格里拉大饭店,全球著名计算与影像解决方案供应商惠普公司发动了一场彩色风暴。
【总页数】1页(P93)
【正文语种】中文
【中图分类】F276.44
【相关文献】
1.更自由、更准确、更实用——HP DesignJet120新品发布 [J],
2.惠普推出HP DesignJet120宽幅面专业级图像打印机 [J],
3.效率品质安全三箭齐发,惠普再续大幅面打印传奇——HP DesignJet
T1200/T770/T620大幅面打印机同步推出 [J],
4.惠普推出DesignJet 120宽幅面专业级图像打印机 [J],
5.惠普推出HP DesignJet l20宽幅面专业级图像打印机 [J],
因版权原因,仅展示原文概要,查看原文内容请购买。
- 1、下载文档前请自行甄别文档内容的完整性,平台不提供额外的编辑、内容补充、找答案等附加服务。
- 2、"仅部分预览"的文档,不可在线预览部分如存在完整性等问题,可反馈申请退款(可完整预览的文档不适用该条件!)。
- 3、如文档侵犯您的权益,请联系客服反馈,我们会尽快为您处理(人工客服工作时间:9:00-18:30)。
HP Designjet 100 120 130 500 800系列打印机中文维
修故障代码
错误消息解释指导
错误数字描述
0x:yy
1x:yy
2x:yy
3x:yy
4x:yy
5x:yy 这通常指向导致问题的设备。
按恢复操作说明进行操作。
6x:yy 文件处理和固件输入/输出模块有问题。
如果通讯配置正确,则这些错误通常指示软件或固件有问题。
通常需要固件修复。
7x:yy 通常固件存在问题。
通常需要固件修复。
8x:yy
9x:yy 存在复杂机械系统问题。
问题原因尚不清楚,有必要进一步解决这些错误。
xx:1y 应由惠普客户支持或在惠普客户支持帮助下执行操作。
xx:0y 用户应执行操作。
xx:y0 更换部件。
xx:y1 执行手动操作(应在服务手册中解释)。
xx:y2 执行自动操作(应在服务手册中解释)。
xx:y3 关闭打印机。
xx:y4 升级固件(如果新固件可用)。
xx:y5 升级系统软件(如果新版本可用)。
0x:yy and 1x:yy 错误消息
电子元件错误
错误码
01:10 电子模块错误。
更换电子模块。
通常是电子模块错误。
更换电子模块。
01:12 电子模块错误
执行自动拔除故障过程(固件升级、电子测试、电子配置)。
(错误)
固件升级过程中检测到内存问题,遇到陌生的电子模块错误。
有时故障固件升级可以解决问题,但很可能需要更换电子模块。
(警告)
电子模块EEPROM 标志显示为空,必须使用笔架EEPROM的内容升级,但是笔架也标志为空。
未执行备份。
这是加工或修复过程中错误的结果。
必须重新配置电子模块。
02:10 笔架错误。
更换笔架。
通常笔架电子元件发生错误。
更换笔架。
04:13 网卡错误。
电源关闭。
网卡常见错误。
关闭打印机,然后再打开。
08:11 前面板错误。
手动调节未检测到前面板。
重新连接前面板。
11:10 笔架跟踪电缆错误。
更换笔架跟踪电缆(笔架跟踪电缆是笔架装置的一部分)。
检测到笔架和主PCA 之间通过笔架跟踪电缆的通讯错误。
这通常意味着笔架跟踪电缆有缺陷。
11:11 笔架跟踪电缆错误。
手动调整。
测试故障笔架跟踪电缆的电气连续性,重新连接笔架跟踪电缆。
2x:yy and 3x:yy 错误消息
部件错误
错误码常见说明详细说明
21:10 服务站错误。
更换服务站。
控制服务站移动的服务关闭。
这意味着服务站未使梭器提升。
更换服务站。
22:10 供墨站错误。
更换供墨站。
打印机无法找到ISS 编码器的主位置。
这可能是传感器或机械的问题。
更换ISS。
27x:00 颜色x 打印头错误(270: 黑; 271: 青; 272: 红; 273: 黄)。
更换打印头。
(警告)
打印头错误。
更换打印头。
35:01 清洗部件错误。
重新安装清洗部件。
加载纸张时未检测到清洗部件,重新安装清洗部件。
4x:yy-5x:yy 错误消息
部件错误
错误码一般说明详细说明
42:10 扫描轴线马达错误。
更换轴线马达错误。
扫描轴线马达检测到发生短路。
更换扫描轴线马达。
56:10 进纸卷筒编码器传感器错误。
更换进纸卷筒编码器传感器。
在调整进纸马达/编码器系统时检测到问题或尝试在编码器盘上查找零。
这通常是编码器传感器的问题。
更换编码器传感器。
56:13 进纸卷筒编码器传感器错误。
电源关闭。
在调整进纸马达/编码器系统时检测到问题。
58:10 颜色传感器错误。
更换颜色传感器(传感器是笔架设置的一部分)。
颜色传感器系统中检测到问题。
更换笔架。
6x:yy 错误消息
通讯错误
错误码常见解释详细说明
61:05 语言翻译错误。
升级计算机软件。
(警告)
这通常是分析文件时产生的错误。
在驱动程序和固件之间可能存在不兼容性。
升级驱动程序(如果新驱动程序可用)。
62:04
63:04
64:04
65:04 I/O 模块错误(62: 并行; 63: 网络; 64: USB)。
升级固件。
固件I/O 模块错误。
升级固件(如果新版本可用)。
7x:yy 错误消息
固件错误
错误码常见说明详细说明
71:03 内存管理错误。
电源关闭。
可能发生内存溢出错误,因此,理论上不可能再发生。
但是,如果再发生,则关闭打印机然后
再打开应该能解决问题。
71:14 内存管理错误。
升级固件(在HP 技术支持的帮助下)。
固件升级过程中发生内存溢出错误。
这种错误很少见。
故障固件升级可能解决问题。
72:04 一般固件错误。
升级固件。
固件控制点上发生固件损坏。
这种错误从不会发生。
如果发生,是硬件缺陷。
74:12 固件升级错误。
执行自动故障解决步骤(特定固件升级)。
固件升级过程中内存尺寸检查失败。
应该是固件缺陷导致升级过程失败。
需要生产部门提供的特殊固件升级文件。
79:04 常见固件错误。
升级固件。
固件损坏。
此错误从不会发生;如果发生,是硬件缺陷
8x:yy 错误消息
驱动马达错误
错误码一般说明详细说明
81:01 印材进纸错误。
手动清除(纸张通道)。
(错误)
纸张轴线关闭。
通常表示卡纸。
(警告)
打印头对齐或调整失败。
由于检测到印材进纸问题。
确保打印机可以向后进纸以扫描对齐或调整。
81:12 印材进纸错误。
执行自动调整(印材进纸调整)。
印材进纸错误。
通常在印材进纸调整中发生错误。
重新尝试印材进纸调整。
86:01 笔架移动错误。
手动清洁(笔架通道)。
扫描轴线关闭。
它通常指示卡纸。
86:11 笔架移动错误。
手动清洁笔架通道,遵循惠普下列说明。
扫描轴线关闭。
通常不是卡纸。
初始化过程中笔架移动被阻止。
可能存在以下原因:
如果笔架停在右侧:
- 设置时未卸下泡沫包装。
- 笔架栓未正确关闭。
- 服务站延迟了笔架。
如果笔架停在打印区中央:
- 未正确连接笔架跟踪电缆。
9x:yy 错误消息
写入系统功能错误
错误码一般解释详细解释
95:00 对齐错误。
更换元件。
由于打印头纠错失败导致打印头对齐失败。
最可能的原因是打印头性能不良。
十字标志有助于判断导致问题的打印头。
95:02 对齐错误。
执行自动故障排除过程(图像质量故障排除过程)打印头对准失败,因为打印机检测不到已经打印了足够的盒子。
这应该是打印头性能导致的打印质量问题。
95:04 对齐错误。
升级固件。
固件控制点打印头定位错误。
应该不发生此类错误,如有发生,则应该升级固件。