JMS配置样例
Websphere JMS配置
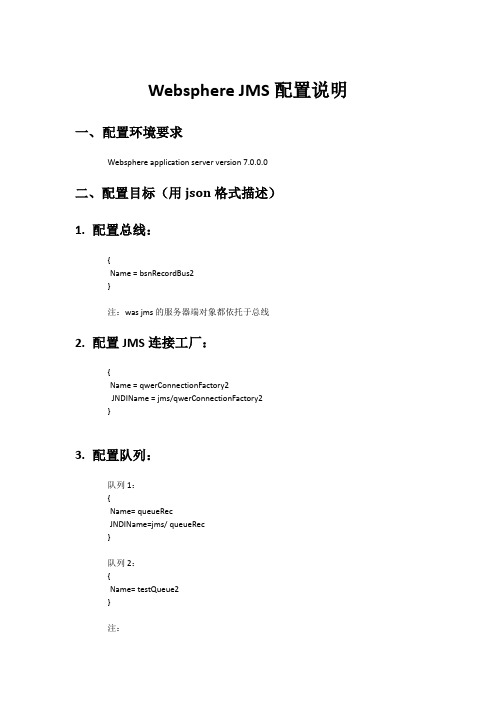
Step2: 修改摘要,点击“完成”
Step3: 点击 “保存到主配置” 使之生效
Step4: 添加总线成员:服务集成——》总线——》进入刚才建立的总线,点击 “拓扑”栏下 的 “总线成员”,添加一个,都走默认配置,保存到主配置 ,使之生效
2. 配置连接工厂:
Step1: 资源——》JMS——》连接工厂——》新建
Step2: 将主题通过 jndi 发布: 资源——》jms——》主题——》新建——》直到 主题属性设置页面 输入名称和 jndi 名称,选择刚才建立的总线,和总线里面的目标主题空间
确定,保存到主配置
6. 配置主题 2
{ Name= testTopic } 步骤同 5 的配置主题 1 的 step1 中所述
7. 重启 WAS 服务。
Step2: 将队列通过 jndi 发布: 资源——》jms——》队列——》新建——》直到 队列属性设置页面 输入名称和 jndi 名称,选择刚才建立的总线,和总线里面的目标队列
确定,保存到主配置。
4. 配置队列 2
{ Name= testQueue2
} 步骤同 3、配置队列 1 的 step1
4. 配置主题:
主题 1: { Name= topicRec JNDIName=jms/ topicRec }
主题 2: { Name= testTopic }
二、配置过程
1. 配置总线
Step1: 服务集成——》总线——》新建——》输入总线名称,点 “下一步” 勾掉 “总线安全性”(如果不需要的话)
5. 配置主题 1
{ Name= topicRec JNDIName=jms/ topicRec } Step1: 创建队列 点击进入刚才建立的总线:bsnRecordBus2——》目标资源——》目标——》新建——》 选“主题空间”,进入 主题空间属性设置页,输入标识,下一步一直到完成,保存到主 配置,使之生效。
JMS应用的简单例子
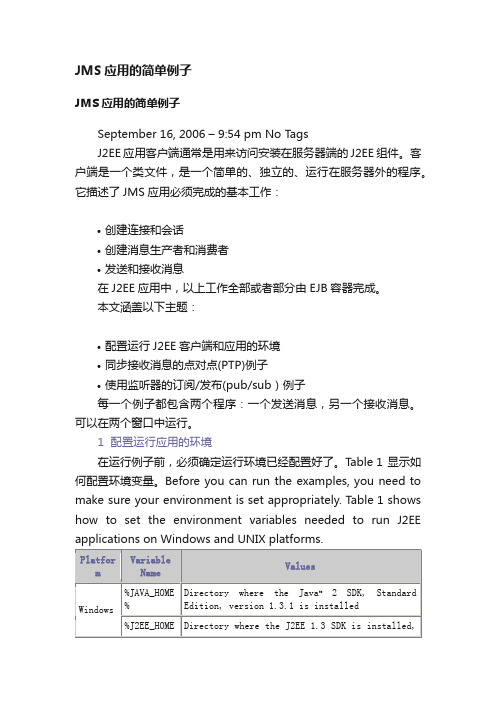
JMS应用的简单例子JMS应用的简单例子September 16, 2006 – 9:54 pm No TagsJ2EE应用客户端通常是用来访问安装在服务器端的J2EE组件。
客户端是一个类文件,是一个简单的、独立的、运行在服务器外的程序。
它描述了JMS应用必须完成的基本工作:•创建连接和会话•创建消息生产者和消费者•发送和接收消息在J2EE应用中,以上工作全部或者部分由EJB容器完成。
本文涵盖以下主题:•配置运行J2EE客户端和应用的环境•同步接收消息的点对点(PTP)例子•使用监听器的订阅/发布(pub/sub)例子每一个例子都包含两个程序:一个发送消息,另一个接收消息。
可以在两个窗口中运行。
1 配置运行应用的环境在运行例子前,必须确定运行环境已经配置好了。
Table 1显示如何配置环境变量。
Before you can run the examples, you need to make sure your environment is set appropriately. Table 1 shows how to set the environment variables needed to run J2EE applications on Windows and UNIX platforms.2 一个简单的PTP例子本节描述了PTP客户端程序怎样发送、接收消息步骤:•编写PTP客户端程序•编译PTP客户端•运行JMS提供者(一般指JMS服务器)•创建JMS管理对象•运行PTP客户端•删除队列2.1 编写 PTP客户端程序消息发送程序SimpleQueueSender.java完成以下任务:1.用JNDI查找队列连接工厂(QueueConnectionFactory)和消息队列(Queue)2.创建连接(connection)和会话(session)3.创建消息发送者(QueueSender)3.创建消息(T extMessage)5.发送消息到队列6.发送控制消息表明消息末尾7.在finally代码块中关闭连接(connection),关闭连接则自动关闭会话和消息发送消息接收程序SimpleQueueReceiver.java完成以下任务:1.通过JNDI查找队列连接工厂(QueueConnectionFactory )和队列(queue)2.创建连接(connection )和会话(session)3.创建消息接收者(QueueReceiver)4.开始连接,传送消息5.从队列中接收消息,直至消息接受完毕6.在finally代码块中关闭连接,关闭连接则自动关闭消息接收有几种方式调用receive方法实现消息同步接收。
jms部署说明-详细
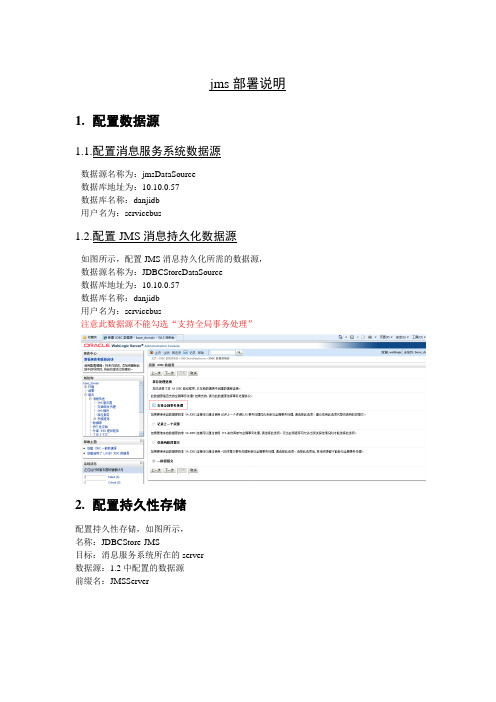
jms部署说明1.配置数据源1.1.配置消息服务系统数据源数据源名称为:jmsDataSource数据库地址为:10.10.0.57数据库名称:danjidb用户名为:servicebus1.2.配置JMS消息持久化数据源如图所示,配置JMS消息持久化所需的数据源,数据源名称为:JDBCStoreDataSource数据库地址为:10.10.0.57数据库名称:danjidb用户名为:servicebus注意此数据源不能勾选“支持全局事务处理”2.配置持久性存储配置持久性存储,如图所示,名称:JDBCStore-JMS目标:消息服务系统所在的server数据源:1.2中配置的数据源前缀名:JMSServer_3.配置JMS服务器名称:JMSServer-0持久性存储:第2点中配置的持久性存储。
目标:为jms服务系统所在同一个应用server上。
4.配置JMS模块名称为:SystemModule-Sinosig描述符文件名、域里的位置不用填写5.配置子部署点击【JMS模块】菜单,找到第4点中创建的子模块,点击进入此子模块的详细信息,并选择【子部署】tab页,选择【新建】,子部署名称为:SubModule-Sinosig6. 配置连接工厂进行在第4点中配置的JMS 模块,在【配置】tab 页,在【资源概要】下选择【新建】按钮,选择【连接工厂】radio域,并点击【下一步】,连接工厂的名称为:ConnectionFactory_Sinosig,JNDI名称为:ConnectionFactory_Sinosig。
点击【下一步】,选择【高级定位】。
【子部署】选择第5点中定义的子部署,点击【完成】即可。
7.需要重启下server8.配置错误队列与第6点中的连接工厂的配置类似,其中队列的名称为:Queue-Error,jndi名称为:Queue-Error。
9.配置电销同步核保状态队列与第6点中的连接工厂的配置类似,其中队列的名称为:Queue-TMUndwrtSync,JNDI名称为:Queue-TMUndwrtSync。
jms标准测试用例
jms标准测试用例JMS(Java Message Service,Java消息服务)是一种用于在分布式应用程序中发送和接收消息的规范。
以下是一些标准的JMS测试用例:1. 测试发送和接收消息:-创建一个JMS生产者,发送消息到队列或主题。
-创建一个JMS消费者,从队列或主题接收消息。
-验证发送的消息是否被正确接收。
2. 测试消息持久性:-发送一条消息到队列或主题。
-关闭生产者和消费者,模拟应用程序崩溃。
-重新启动生产者和消费者,验证之前发送的消息是否被正确接收。
3. 测试消息顺序:-发送一系列消息到队列或主题。
-验证消费者是否按发送顺序接收消息。
4. 测试消息过滤:-发送多条消息到队列或主题,其中一些消息包含特定属性。
-创建一个消息选择器,根据特定属性过滤消息。
-验证消费者是否仅接收符合过滤条件的消息。
5. 测试并发访问:-创建多个消费者实例,同时从队列或主题接收消息。
-验证消息是否被正确分配给各个消费者实例。
6. 测试消息大小限制:-发送不同大小的消息到队列或主题。
-验证生产者和消费者是否根据配置的消息大小限制进行操作。
7. 测试生产者和消费者故障转移:-创建一个备用生产者或消费者,以防主要生产者或消费者发生故障。
-模拟生产者或消费者故障,验证备用生产者或消费者是否能接管消息处理。
8. 测试集群功能:-创建一个集群,包含多个生产者和消费者实例。
-验证消息是否在集群内部均匀分布。
9. 测试安全性:-配置JMS安全策略,确保只有授权用户可以访问消息。
-验证未经授权的用户是否无法访问消息。
10. 测试性能:-发送和接收大量消息,记录生产者和消费者的处理速度。
-分析性能数据,优化消息处理过程。
以上测试用例可以帮助您确保JMS应用程序的正确性和稳定性。
在实际测试过程中,您可能需要根据具体需求调整测试用例。
JMS配置说明
JMS配置说明(acitvemq5.2)陕西汉瑞科技信息有限公司2009年8月目录1.ActiveMQ安装 (3)1.1简介 (3)1.2 安装ActiveMQ (4)1.3改动缺省端口号 (6)2ActiveMQ配置 (13)2.1消息队列配置 (13)2.2JMS连接参数配置 (14)2.3监听器配置 (15)3.服务器端配置 (15)3.1 需要的类库 (15)3.2 服务器端applicationContext_activemq.xml配置 (16)3.3 启动 (20)4 WE B配置说明 (20)4.1配置要求 (20)4.2 myapplicationContext_rmi.xml配置 (20)5.客户端应用程序配置 (21)5.1 客户端安装 (21)5.2 客户端applicationContext_activemq.xml配置 (21)5.3 启动 (25)6.API接口说明 (25)6.1 JmsSender (25)6.2 JmsReciever (25)6.3 在W eb程序中调用 (26)7.定时任务 (26)7.1 job.xml定义 (26)7.2 ScheduleList.xml定义 (28)7.3 cronExpression定义 (29)1.ActiveMQ安装1.1简介ActiveMQ 是一个完全支持JMS1.1和J2EE 1.4规范的JMS Provider实现,尽管JMS规范出台已经是很久的事情了,但是JMS在当今的J2EE应用中间仍然扮演着特殊的地位。
特性列表多种语言和协议编写客户端。
语言: Java, C, C++, C#, Ruby, Perl, Python, PHP。
应用协议: OpenWire,Stomp REST,WS Notification,XMPP,AMQP。
完全支持JMS1.1和J2EE 1.4规范(持久化,XA消息,事务)对Spring的支持,ActiveMQ可以很容得内嵌到使用Spring的系统里面去,而且也支持Spring2.0的特性通过了常见J2EE服务器(如Geronimo,JBoss 4, GlassFish,WebLogic)的测试,其中通过JCA 1.5 resource adaptors的配置,可以让ActiveMQ可以自动的部署到任何兼容J2EE 1.4 商业服务器上支持多种传送协议:in-VM,TCP,SSL,NIO,UDP,JGroups,JXTA支持通过JDBC和journal提供高速的消息持久化从设计上保证了高性能的集群,客户端-服务器,点对点支持Ajax支持与Axis的整合可以很容易得调用内嵌JMS provider,进行测试ActiveMQ的竞争者1,其他开源JMS provider(资料来自) :jbossmq(jboss 4)jboss messaging (jboss 5)joram 2006-09-22openjmsmantamqubermqSomnifugiJMS开源的JMS Provider大部分都已经停止发展了,剩下的几个都是找到了东家,和某种J2EE 服务器挂钩,比如jboss mq 与jboss,joram与jonas(objectweb组织),ActiveMQ 与Geronimo(ASF APACHE基金组织),而在这3个之间,从网络底层来看,只有ActiveMQ使用了NIO,单从这个角度来看ActiveMQ在性能上会有一定的优势。
JMS使用说明
JMS的使用中科软科技股份有限公司2009年1月目录1JMS简介 (4)简介 (4)优缺点 (4)1)优点 (4)2)缺点 (5)适用范畴 (5)2工程说明 (5)3配置说明 (5)配置jndi模板 (5)连接工厂 (6)目标配置 (7)JMS模板配置 (8)监听配置 (9)4MQ服务器配置 (10)Jboss-4.0.5版 (10)Jboss-eap-4.3版 (11)5使用详解 (12)关于本文档说明:类型-创建(C)、修改(U)、删除(D)、增加(A);1JMS简介简介JMS(Java Message Service,Java消息服务)是一组Java应用程序接口(Java API),它提供创建、发送、接收、读取消息的服务。
由Sun公司和它的合作伙伴设计的JMS API定义了一组公共的应用程序接口和相应语法,使得Java程序能够和其他消息组件进行通信。
JMS是一种与厂商无关的API,用来访问消息收发系统。
JMS 使您能够通过消息收发服务(有时称为消息中介程序或路由器)从一个JMS 客户机向另一个JML 客户机发送消息。
消息收发系统是异步的,也就是说,JMS 客户机可以发送消息而不必等待回应。
Java消息服务支持两种消息模型:Point-to-Point消息(P2P)和发布订阅消息(Publish Subscribe messaging,简称Pub/Sub)。
JMS规范并不要求供应商同时支持这两种消息模型,但开发者应该熟悉这两种消息模型的优势与缺点。
P2P消息模型是在点对点之间传递消息时使用。
如果应用程序开发者希望每一条消息都能够被处理,那么应该使用P2P消息模型。
与Pub/Sub消息模型不同,P2P消息总是能够被传送到指定的位置。
Pub/Sub模型在一到多的消息广播时使用。
如果一定程度的消息传递的不可靠性可以被接受的话,那么应用程序开发者也可以使用Pub/Sub消息模型。
换句话说,它适用于所有的消息消费程序并不要求能够收到所有的信息或者消息消费程序并不想接收到任何消息的情况。
JMS内部简介和教材
Jms简介和教材(内部)一. JMS简介1. JMS基本概念JMS(Java Message Service)是访问企业消息系统的标准API,它便于消息系统中的Java应用程序进行消息交换,并且通过提供标准的产生、发送、接收消息的接口简化企业应用的开发。
2. JMS基本功能JMS是用于和面向消息的中间件相互通信的应用程序接口。
它既支持点对点(point-to-point)的域,又支持发布/订阅(publish/subscribe)类型的域,并且提供对下列类型的支持:经认可的消息传递,事务型消息的传递,一致性消息和具有持久性的订阅者支持。
JMS还提供了另一种方式来对您的应用与旧的后台系统相集成。
3. WebLogic JMS Server介绍WebLogic Server8.1符合JAVA规范,并通过Sun Microsystems J2EE 1.3认证.作为WebLogic的一部分,当然WebLogic JMS Server也完全遵从JMS规范,还支持集群,并可以应用于实际企业系统.下图是WebLogic JMS Server体系结构.图中可以看到WebLogic JMS Server主要组件有: WebLogic JMS servers(用于消息通信),Java客户端,JNDI(用于域名查找), 后备存储(用于持久消息存储,基于文件或者JDBC数据库).二. WebLogic JMS特性1. 消息通信模型JMS 支持两种消息通信模型:点到点(point-to-point)(PTP)模型和发布/订阅(Pub/Sub)模型。
除了下列不同之外,这两种消息通信模型非常地相似:PTP 模型规定了一个消息只能有一个接收者;Pub/Sub 模型允许一个消息可以有多个接收者。
2. 消息组成消息传递系统的中心就是消息。
一条 Message 分为三个组成部分:? 头(header)是个标准字段集,客户机和供应商都用它来标识和路由消息。
JMS在WebLogic配置JMS图解
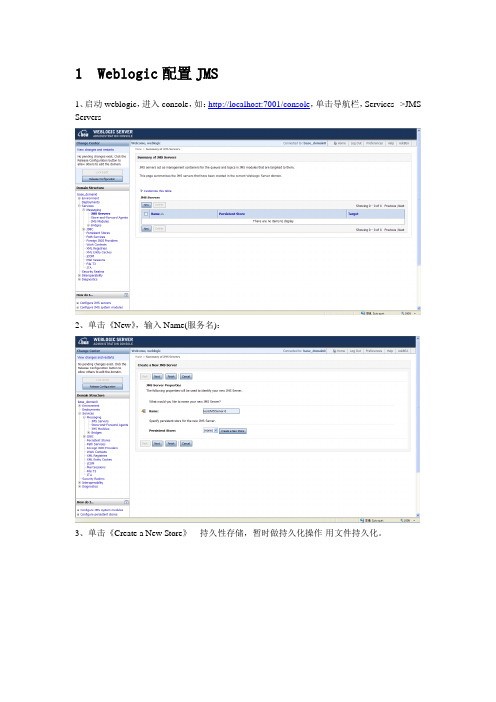
1 Weblogic配置JMS1、启动weblogic,进入console,如:http://localhost:7001/console,单击导航栏,Services-->JMS Servers2、单击《New》,输入Name(服务名):3、单击《Create a New Store》---持久性存储,暂时做持久化操作-用文件持久化。
4、输入,Name,单击finish5、Persistent Store 选中new 的store6、单击《next》7、单击《finish》8、在左侧导航栏,单击Services—>Messaging JMS Modules9、单击《New》,10、输入名称,单击《next》11、选中server,单击《next》12、单击《finish》13、单击new的JMS Module14、单击《New》15、选中connection factory,单击《next》16、填写Name,JNDI Name--- gt3.esb.jms.con.ESBConnectionFactory,单击《next》17、单击《next》18、单击《Finish》19、单击《New》20、选中Queue,单击《next》21、单击《next》21、填写name,jndi name---gt3.esb.jms.mdb.BaseQueueAsynMDBean 单击《next》22、单击《Create a new Subdeployment》23、单击《ok》24、选中JMS Server 单击《finish》25、单击《Activate Change》以上步骤成功配置如下:gt3.esb.jms.con.ESBConnectionFactory 连接工厂gt3.esb.jms.mdb.BaseQueueAsynMDBean 队列JNDI名。
同理创建同步队列,队列名为:gt3.esb.jms.mdb.BaseQueueSynMDBean。
配置JMS
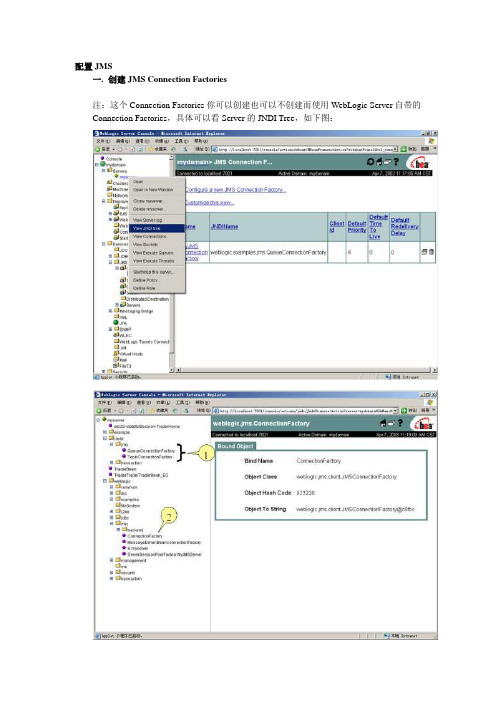
配置JMS
一.创建JMS Connection Factories
注:这个Connection Factories你可以创建也可以不创建而使用WebLogic Server自带的Connection Factories,具体可以看Server的JNDI Tree,如下图:
自建Connection Factory的过程如下:
二..配置JMS服务器
1.打开WebLogic Server Console,点击左边一栏JMS下的Server项,出现如图所示:
2.点击Confi gure a new JMSServer…,出现如图所示:
3.在Name栏中输入要建立的JMS Server的名称,点Create钮。
4.把Targets中Server下的Target选为指定的Server,即可。
如图所示:
三.创建JMS目的
(以创建一个名为MessageTopic的JMS主题为例)
4.打开WebLogic Server Console,将左边一栏JMS下Server展开,选中一个JMS服务器,如图所示:
5.点击Destination项,出现如图所示:(这时可以根据你的JMS类型选择你想要创建的JMS消息池,是Queue类型的还是Topic类型的)
6.点击Configure a new JMS Topic…出现如图所示:
7.在JNDI栏中输入MessageTopic,点击create钮即可。
JMS入门之实例
JMS入门之实例JMS入门之实例JMS是一个由AS提供的Message服务。
它能接受消息产生者(Message Provider)所发出的消息,并把消息转发给消息消费者(Message Consumer)。
2、JMS提供2种类型的消息服务:(1)Queue,即点对点,每个消息只转发给一个消息消费者使用。
(2)Topic,即发布和订阅,每个消息可以转发给所有的订阅者(消费者)。
3、WEBLOGIC 8下的JMS配置:(1)配置JMS Connection Factory(2)配置JMS File Store(目前所找到的文档都是配置File Store,其实在具体的应用中,可能JMS JDBC Store更广泛,但暂时没有找到资料)(3)配置JMS Server(4)在JMS Server的destinations中配置JMS Queue或者JMS Topic其中提供给消息产生者和消息消费者使用的是JMS Connection Factory的JNDI和JMS Queue或者JMS Topic的JNDI。
4、消息产生者向JMS发送消息的步骤:(1)使用JNDI查询对象JMS ConnectionFactory和Destination(JMS Queue/Topic)(2)使用管理对象JMS ConnectionFactory建立连接Connection(3)使用连接Connection 建立会话Session(4)使用会话Session和管理对象Destination创建消息生产者MessageSender(5)使用消息生产者MessageSender发送消息一个消息发送者的例子:package myjms;import java.util.*;import javax.naming.*;import javax.jms.*;public class MessageProducter {public static void main(String[] args) {String queueConnectionFactoryName = "myjmsconnectionfactory"; //JMS Connection Factory的JNDIString queueName = "myjmsqueue"; //JMS Queue或者JMS Topic的JNDIboolean transacted = false;//transaction模式int acknowledgementMode = Session.AUTO_ACKNOWLEDGE;//acknowledgement模式String message="Message need to send";//模拟需要发送的消息Properties properties = new Properties();properties.put(Context.INITIAL_CONTEXT_FACTORY,"weblogic.jndi.WLInitialContextFactory");properties.put(Context.PROVIDER_URL, "t3://localhost:7001");try {Context context = new InitialContext(properties);Object obj = context.lookup(queueConnectionFactoryName);QueueConnectionFactory queueConnectionFactory = (QueueConnectionFactory) obj;//JMS Connection Factory的获得obj = context.lookup(queueName);Queue queue = (Queue) obj;//JMS Queue或者JMS Topic的获得QueueConnection queueConnection=queueConnectionFactory.createQueueConnection();//产生连接queueConnection.start();QueueSession queueSession = queueConnection.createQueueSession(transacted, acknowledgementMode);TextMessage textMessage = queueSession.createTextMessage();textMessage.clearBody();textMessage.setText(message);QueueSender queueSender = queueSession.createSender(queue);queueSender.send(textMessage);if (transacted) {mit();}if (queueSender != null) {queueSender.close();}if (queueSession != null) {queueSession.close();}if (queueConnection != null) {queueConnection.close();}}catch(Exception ex){ex.printStackTrace();}}}5、消息消费者从JMS接受消息的步骤:(1)使用JNDI查询对象JMS ConnectionFactory和Destination(JMS Queue/Topic)(2)使用管理对象JMS ConnectionFactory建立连接Connection(3)使用连接Connection 建立会话Session(4)使用会话Session和管理对象Destination创建消息消费者MessageReceiver(5)使用消息消费者MessageReceiver接受消息,需要用setMessageListener将MessageListener接口绑定到MessageReceiver消息消费者必须实现了MessageListener接口,需要定义onMessage事件方法。
JMS配置
• 单个JMS会话期间,如果需要使用事务 性操作,则可以使用事务性会话,但其 它资源如数据库、EJB操作等却不能参与 到事务性会话中的事务,所以如果存在 这种情况,我们要考虑使用JTA全局事务
利用JTA处理事务
• 示例
JMS服务器的异常监听
• 只有当JMS服务器正常运行时候,JMS客 户端才能正常收发消息 • JMS服务器出现异常,JMS客户端无法收 到异常信息 • 为了对JMS服务器异常进行处理,JMS提 供了一种异常监听机制
JMS服务器配置
高扬
Weblogic中配置PTP
• • • • • 持久化存储 JMS服务器 配置JMS模块 为JMS模块添加子部署 为JMS模块添加资源
JBoss中配置PTP
• 配置消息目的地
JMS API使用
• • • • • • 通过JNDI获取连接工厂 取得连接 创建Sesson会话 创建消息生产者(消息者) 创建消息(接收消息) 将消息发送到消息目的地(从消息目的 地接收消息) • 关闭JMS资源
• 消息体 • 重用消息对象
JMS消息传递方式和有效时间
• sender.setDeliveryMode(......); • sender.setTimeToLive(); • mp.send(Message msg,int deliveryMode,int priority,long timeToLive)
• 应用服务器配置 • 消息的生产与消费
– 生产者发布消息,每个消费者都可以收到消 息进行消费 – 消息消费者如果处理离线状态将无法收到消 息
• 可靠的JMS订阅
– 客户端提供一个唯一的标识符
JMS消息
• 标准消息头(p254) • 消息属性
JMS基础教程实例(内部)
JMS基础示例教程需求分析在很多实际应用中,不只是简单地要求用户需要注册登录。
还要求不同的用户对不同资源拥有不同的权限。
某单位的新闻部门的某些人才拥有对外发布新闻的权限;每个部门只有对自己部门内部资源才拥有创建、修改权限,对于其他部门创建的资源如网页等只有浏览的权限。
这些复杂的用户权限验证需要可以总结为如下几点:∙用户资料管理系统:对用户的注册资料进行管理。
可进行用户资料的新增修改,能够查询获取丢失的密码。
∙权限的验证和授权:拦截所有访问受保护资源的请求,检查该用户是否被授权访问该资源。
∙可控制的资源限制访问:对于系统的资源,无论是数据或行为动作,对确定的一组用户都有限制访问。
例如对于有的用户只允许读操作,不能进行写操作;有些资源只有创建者才可以访问和操作等。
这3种需求适合大部分应用系统,通过它们的实现,可以形成一个用户安全管理方面的组件框架,并且能够重复地在不同的应用系统中使用。
2架构设计实现一个完整的用户安全管理框架,可以有两种实现途径。
在J2EE出现以前,大部分是由应用系统本身实现。
因此,很多有经验的软件商都拥有自己成熟的用户安全管理系统,但是缺点也是比较明显,自己设计的用户安全管理系统可重用性低,有的和具体应用程序过分紧密地绑定在一起,无法移植到其他系统上。
但是,随着业务量上升,应用系统的不断增加,会出现不同应用系统拥有不同的用户登录验证体系,很显然,这给用户访问带来了不方便,用户不可能为每个系统注册一套用户和密码,定制一套用户角色。
因此,整个服务器群中需要统一的用户权限验证体系。
而J2EE容器的用户安全管理框架再辅助以LDAP或数据库系统,可以很方便地达到这个目标。
2.1角色J2EE容器的用户安全框架是基于RBAC(Roled-Based Access Control,相关网址:/rbac/)设计模型建立的,这是一个基于角色的访问权限控制模型。
首先必须了解角色的含义,在RBAC中角色Role的定义是:Role是明确表达访问控制(Aceess Control)策略的一种语义构建词。
JMS入门小例子+weblogic的安装及在weblogic中配置JMS服务
JMS入门小例子+weblogic的安装及在weblogic中配置JMS服务JMS是一个由AS提供的Message服务。
它能接受消息产生者(Message Provider)所发出的消息,并把消息转发给消息消费者(Message Consumer)。
以下是接收端和发送端的详细布署步骤,适用于初学者的学习接收端需要的包:commons-logging-1.1.1.jarjettison-1.0.jarjms-1.1.jarlog4j-1.2.15.jarspring.jarspring-asm-3.0.5.RELEASE.jarspring-beans-3.0.5.RELEASE.jarspring-context-3.0.5.RELEASE.jarspring-core-3.0.5.RELEASE.jarspring-expression-3.0.5.RELEASE.jarspring-jms-2.5.6.jarspring-transaction-3.0.5.jarspring-web-3.0.5.RELEASE.jarweblogic.jarxml-apis.jar发送端需要的包:commons-logging-1.1.1.jarjettison-1.0.jarjms-1.1.jarlog4j-1.2.15.jarspring-asm-3.0.5.RELEASE.jarspring-beans-3.0.5.RELEASE.jarspring-context-3.0.5.RELEASE.jarspring-core-3.0.5.RELEASE.jarspring-expression-3.0.5.RELEASE.jarspring-jms-2.5.6.jarspring-jms.jarspring-transaction-3.0.5.jarweblogic.jarxml-apis.jar一、新建一个工程用做接收端本例名为jmsMessageReceive1、在Web.xml文件中添加如下内容:<!-- 加载多个spring配置文件--><context-param><param-name>contextConfigLocation</param-name><param-value>classpath:spring-jms.xml</param-value></context-param><listener><listener-class>org.springframework.web.context.ContextLoaderListener</listener-class> </listener><listener><listener-class>org.springframework.web.util.Log4jConfigListener</listener-class></listener><context-param><param-name>log4jConfigLocation</param-name><param-value>classpath:log4j.properties</param-value></context-param><context-param><param-name>log4jRefreshInterval</param-name><param-value>60000</param-value></context-param>2、在src文件夹下新建spring-jms.xml文件,内容如下:<?xml version="1.0" encoding="UTF-8"?><beans xmlns="/schema/beans"xmlns:xsi="/2001/XMLSchema-instance"xmlns:aop="/schema/aop"xmlns:tx="/schema/tx"xmlns:jaxws="/jaxws"xsi:schemaLocation="/schema/beans/schema/beans/spring-beans-2.0.xsd/schema/aop/schema/aop/spring-aop-2.0.xsd/schema/tx/schema/tx/spring-tx-2.0.xsd/jaxws /schemas/jaxws.xsd"> <bean id="jkJndiTemplate"class="org.springframework.jndi.JndiTemplate"><property name="environment"><props><prop key="java.naming.factory.initial">weblogic.jndi.WLInitialContextFactory</prop><prop key="java.naming.provider.url">t3://localhost:7001</prop><prop key="java.naming.security.principal">weblogic</prop><prop key="java.naming.security.credentials">weblogic</prop></props></property></bean><bean id="jkJndiConnectionFactory"class="org.springframework.jndi.JndiObjectFactoryBean"><property name="jndiTemplate" ref="jkJndiTemplate"></property><property name="jndiName" value="JKFC"></property></bean><bean id="jkConnectionFactory"class="org.springframework.jms.connection.CachingConnectionFactory"><property name="targetConnectionFactory"ref="jkJndiConnectionFactory"></property><property name="sessionCacheSize" value="1"></property></bean><bean id="destinationResolver" class="org.springframework.jms.support.destination.JndiDestinationResolver"><property name="jndiTemplate" ref="jkJndiTemplate"></property><property name="cache" value="true"></property><property name="fallbackToDynamicDestination" value="false"></property> </bean><bean id="jkListener" class="com.ylw.jms.JmsMessageListener"></bean><bean id="jkMsgListener" class="org.springframework.jms.listener.adapter.MessageListenerAdapter"><constructor-arg ref="jkListener"/><property name="defaultListenerMethod" value="onMessage"/></bean><bean id="jkJmsContainer" class="org.springframework.jms.listener.DefaultMessageListenerContainer"><property name="connectionFactory" ref="jkConnectionFactory"></property><property name="destinationResolver" ref="destinationResolver"></property><property name="concurrentConsumers" value="1"></property><property name="destinationName" value="JKTP"></property><property name="messageListener" ref="jkMsgListener"></property></beans>3、在src下新建包com.ylw.jms在jms包下新建class文件JmsMessageListener.java,内容如下:package com.ylw.jms;import javax.jms.JMSException;import javax.jms.Message;import javax.jms.MessageListener;import javax.jms.TextMessage;/**** 项目名称:jmsMessageReceive* 类名称:JMSMessageListener* 类描述:JMS消息监听* 创建人:ylw* 创建时间:2012-3-2 下午03:47:00* 修改人:ylw* 修改时间:2012-3-2 下午03:47:00* 修改备注:* 版本:**/public class JmsMessageListener implements MessageListener {/* (non-Javadoc)* @see javax.jms.MessageListener#onMessage(javax.jms.Message) */public void onMessage(Message message) {System.out.println("监听成功...");String msg = "";System.out.println( "Message: " + message.toString() );try {msg = ((TextMessage)message).getText();} catch (JMSException e) {// TODO Auto-generated catch blocke.printStackTrace();System.out.println("传入的msg内容为: ");System.out.println(msg);}}除此之外,还要在src文件夹下新建log4j.properties文件,这里为了避免初学者到处找所以加入内容,如下:#'rootLogger' Never expunge! We need it when error!log4j.rootLogger=info, stdout, R.zephyr.validate.dao=info, R.zephyr.idsrv.services.impl=info, R#.zephyr.idsrv.util.ProperiesHelper=info, stdout, R#.zephyr.cis.task.SxccbReadCisPkgTask=debug,stdout,R.hibernate=errorlog4j.appender.stdout=org.apache.log4j.ConsoleAppenderyout=org.apache.log4j.PatternLayout# Pattern to output the caller's file name and line number.yout.ConversionPattern=%-5p [%t] (%F:%L) - %m%nlog4j.appender.console=org.apache.log4j.ConsoleAppenderyout=org.apache.log4j.PatternLayoutyout.ConversionPattern=%d{ISO8601}:%6r:%p:%m%nlog4j.appender.R=org.apache.log4j.DailyRollingFileAppenderlog4j.appender.R.File=logs/imageproserver.log#log4j.appender.R.File=C:\\bits-ios.loglog4j.appender.R.MaxFileSize=10MB# Keep one backup filelog4j.appender.R.MaxBackupIndex=10yout=org.apache.log4j.PatternLayoutyout.ConversionPattern=%d: at %l%n [%t] %-p - %m%n到这里JMS接收端完成。
JBOSS建立JMS应用实例
JBOSS建立JMS应用实例
JBOSS创建JMS应用程序实例
环境配置描述
Jboss4.2.3 Java ee 5 MySql5.0
安装jdk,我的目录是C:\\Sun\\SDK安装jboss。
我的目录是D:\\jboss4.2.3安装mysql
配置环境变量JBOSS_HOME D:\\jboss4.2.3配置环境变量JA V A_HOME C:\\Sun\\SDK\\jdk
JBOSS JMS配置
由于没有使用集群,JBOSS的默认应用程序就足够了。
1.配置MySQL 数据库的JNDI
将MySQL数据库驱动程序复制到默认\\lib JBOSS没有自己的MySQL数据库驱动程序。
在D: \ \ JBoss 4.2.3 \ \ DOCS \ \示例\ \ JCA 下的文件夹下,有许多数据源定义模板被不同的数据库引用。
将mysql-ds.xml文件复制到您正在使用的服务器,如D: \ \ JBoss 4.2.3 \ \服务器\ \默认\ \部署。
修改mysql-ds.xml文件的内容,以便它可以通过JDBC正确访问您的mysql数据库,如下所示:。
Weblogic配置jms服务文档
weblogic提供jms消息服务的中间件,功能性能都说得过去,下面是在配置jms服务中注意的问题,以及详细步骤,仅供参考:单机配置一、基于点对点的方式配置(QUEUE)1.先配置持久化存储:例如:c:\sss(必须提前建好该目录)2. 配置JMS服务器3. 配置JMS模块4. 配置子部署5. 创建队列(JNDI唯一程序段靠JNDI NAME 来获取工厂类和队列)6. 创建工厂注:在同一个JMS Module中创建不同的subdeployment,然后ConnectionFactory和Queue 要配给不同的subdeployment,ConnectionFactorytarget到你的server,Queue target到JMS Server。
二、基于发布者/订阅者方式的配置(TOPIC)步骤基本同上,只不过配置jms模块的时候添加topic资源。
注:消息类型:简单文本 (TextMessage)、可序列化的对象 (ObjectMessage)、属性集合 (MapMessage)、字节流 (BytesMessage)、原始值流 (StreamMessage),还有无有效负载的消息 (Message)。
注:1.订阅模式接受消息时分为两种情况,一种是同步接收,用receive()方法来接收消息,即阻塞式接收消息;第二种是异步接收消息,用s etMessageListener(TopicSubscriber)方法来给监听消息,同时改接收类实现MessageListener接口,实现其中的onMessage 方法来处理接收的消息。
整个接收消息的过程是非阻塞的。
2. 发布/订阅模型在可靠性上提供的2种方式:持久订阅模式和非持久订阅模式非持久订阅模式:只有当客户端处于激活状态,也就是和JMS 服务器保持连接的状态下,才能接收到发送到某个Topic的消息,而当客户端处于离线状态时,则这个时间段发到Topic的消息将会永远接收不到。
JMS 配置多实体指南说明书

JMS Configuration Multi Entity Guide Oracle Banking Digital ExperiencePatchset Release 21.1.5.0.0Part No. F40800-01May 2022JMS Configuration Multi Entity GuideMay 2022Oracle Financial Services Software LimitedOracle ParkOff Western Express HighwayGoregaon (East)Mumbai, Maharashtra 400 063IndiaWorldwide Inquiries:Phone: +91 22 6718 3000Fax:+91 22 6718 3001/financialservices/Copyright © 2006, 2022, Oracle and/or its affiliates. All rights reserved.Oracle and Java are registered trademarks of Oracle and/or its affiliates. Other names may be trademarks of their respective owners.U.S. GOVERNMENT END USERS: Oracle programs, including any operating system, integrated software, any programs installed on the hardware, and/or documentation, delivered to U.S. Government end users are “commercial computer software” pur suant to the applicable Federal Acquisition Regulation and agency-specific supplemental regulations. As such, use, duplication, disclosure, modification, and adaptation of the programs, including any operating system, integrated software, any programs installed on the hardware, and/or documentation, shall be subject to license terms and license restrictions applicable to the programs. No other rights are granted to the U.S. Government.This software or hardware is developed for general use in a variety of information management applications. It is not developed or intended for use in any inherently dangerous applications, including applications that may create a risk of personal injury. If you use this software or hardware in dangerous applications, then you shall be responsible to take all appropriate failsafe, backup, redundancy, and other measures to ensure its safe use. Oracle Corporation and its affiliates disclaim any liability for any damages caused by use of this software or hardware in dangerous applications.This software and related documentation are provided under a license agreement containing restrictions on use and disclosure and are protected by intellectual property laws. Except as expressly permitted in your license agreement or allowed by law, you may not use, copy, reproduce, translate, broadcast, modify, license, transmit, distribute, exhibit, perform, publish or display any part, in any form, or by any means. Reverse engineering, disassembly, or decompilation of this software, unless required by law for interoperability, is prohibited.The information contained herein is subject to change without notice and is not warranted to be error-free. If you find any errors, please report them to us in writing.This software or hardware and documentation may provide access to or information on content, products and services from third parties. Oracle Corporation and its affiliates are not responsible for and expressly disclaim all warranties of any kind with respect to third-party content, products, and services. Oracle Corporation and its affiliates will not be responsible for any loss, costs, or damages incurred due to your access to or use of third-party content, products, or services.Table of Contents1.Preface .............................................................................................................................................. 1–1 1.1Intended Audience ...................................................................................................................... 1–1 1.2Documentation Accessibility ....................................................................................................... 1–1 1.3Access to Oracle Support ........................................................................................................... 1–1 1.4Structure ..................................................................................................................................... 1–11.5Related Information Sources ...................................................................................................... 1–12.Objective and Scope......................................................................................................................... 2-1 2.1Background .................................................................................................................................. 2-12.2Objective and Scope.................................................................................................................... 2-13.JMS Step 1: Create foreign server in a weblogic server............................................................... 3-13.1Introduction and Definitions ......................................................................................................... 3-14.JMS Step 2 - How to Create a Simple JMS Queue in Weblogic Server ...................................... 4–1 4.1Introduction and Definitions ........................................................................................................ 4–1Preface1. Preface 1.1 Intended AudienceThis document is intended for the following audience:∙Customers∙Partners1.2 Documentation AccessibilityFor information about Oracle's commitment to accessibility, visit the Oracle Accessibility Program website at /pls/topic/lookup?ctx=acc&id=docacc.1.3 Access to Oracle SupportOracle customers have access to electronic support through My Oracle Support. For information, visit/pls/topic/lookup?ctx=acc&id=info or visit/pls/topic/lookup?ctx=acc&id=trs if you are hearing impaired.1.4 StructureThis manual is organized into the following categories:Preface gives information on the intended audience. It also describes the overall structure of the User Manual.The subsequent chapters describes following details:∙Introduction∙Preferences & Database∙Configuration / Installation.1.5 Related Information SourcesFor more information on Oracle Banking Digital Experience Patchset Release 21.1.5.0.0, refer to the following documents:∙Oracle Banking Digital Experience Installation ManualsObjective and Scope2. Objective and Scope 2.1 BackgroundJMS (Java Message Service) is an API that provides the facility to create, send and read messages.It provides loosely coupled, reliable communication. Messaging enables distributed communication that is loosely coupled. A component sends a message to a destination, and the recipient can retrieve the message from the destination. However, the sender and the receiver do not have to be available at the same time in order to communicate. In fact, the sender does not need to know anything about the receiver; nor does the receiver need to know anything about the sender. The sender and the receiver need to know only which message format and which destination to use.JMS configuration is required to send message (request) to external system and receive processed message (response) from external system.2.2 Objective and ScopeDefine a common set of messaging concepts and facilities. The scope of this document is toprovide steps to configure foreign server for connecting external system using JNDI provider and configure JMS queue to receive data from external system. Foreign server is used to sendmessage to external system with help of JNDI Initial, JNDI connection url, JNDI connectionfactory and JNDI destination. To configure JMS receiver queue in web logic we have to createJMS server and JMS module. Where JMS module include creation of JMS connection factory,JMS queue and SubDeployment.Home3. JMS Step 1: Create foreign server in a weblogicserver3.1 Introduction and DefinitionsA Foreign Server represents a JNDI provider that is outside WebLogic server. It containsinformation that allows a local WebLogic Server instance to reach a remote JNDI provider,thereby allowing for a number of foreign connection factory and destination objects to bedefined on one JNDI directory.3.1.1 Create a JMS Module∙Services > Messaging > JMS Modules∙Select New∙Name: HostSystemModule∙Leave the other options empty∙Targets: obdx_server∙Press Next∙Leave “Would you like to add resources to this JMS system module” unchecked and press Finish .3.1.2 Create a foreign Server∙Services > Messaging > JMS Modules∙Select HostSystemModule and press New∙Select Foreign Server and Next∙Name: ForeignServer (Once you create a foreign server, you cannot rename it. Instead, you must delete it and create another one that uses the new name) and Click Next to proceed tothe targeting page or click Finish to create the foreign server.3.1.3 To configure additional properties for the new foreign server∙Services > Messaging > JMS Modules∙Select HostSystemModule∙Click on ForeignServer∙On the Configuration> General tab∙Enter Following details.JNDI Initial: enter the name of the class that must be instantiated to access the JNDI provider. For example (weblogic.jndi.WLInitialContextFactory)JNDI Connection URL: enter the URL that WebLogic Server uses to contact the JNDI provider. (http://IP:port)∙Click Save.3.1.4 Create foreign connection factories∙Services > Messaging > JMS Modules∙Select HostSystemModule∙Click on ForeignServer∙On the Configuration> Connection Factories tab press New∙Enter Following detailsName: enter a name for the foreign connection factory.Local JNDI Name: specify the name that the remote object will be bound to in the local server's JNDI tree and is used to look up the object on the local server.Remote JNDI Name: specify the name of the remote object that will be looked up in the remote JNDI directory.∙Click Ok.3.1.5 Create foreign destinations∙Services > Messaging > JMS Modules∙Select HostSystemModule∙Click on ForeignServer∙On the Configuration>Destination tab press New∙Enter Following detailsName: enter a name for the foreign destination.Local JNDI Name: specify the name that the remote object will be bound to in the local server's JNDI tree and is used to look up the object on the local server.Remote JNDI Name: specify the name of the remote object that will be looked up in the remote JNDI directory.∙Click Ok.HomeJMS Step 2 - How to Create a Simple JMS Queue in Weblogic Server 4. JMS Step 2 - How to Create a Simple JMS Queue inWeblogic Server4.1 Introduction and DefinitionsA JMS queue in Weblogic Server is associated with a number of additional resources:JMS ServerA JMS server acts as a management container for resources within JMS modules. Some of itsresponsibilities include the maintenance of persistence and state of messages and subscribers. A JMS server is required in order to create a JMS module.JMS ModuleA JMS module is a definition which contains JMS resources such as queues and topics. A JMSmodule is required in order to create a JMS queue.SubdeploymentJMS modules are targeted to one or more WLS instances or a cluster. Resources within a JMSmodule, such as queues and topics are also targeted to a JMS server or WLS server instances. A subdeployment is a grouping of targets. It is also known as advanced targeting.Connection FactoryA connection factory is a resource that enables JMS clients to create connections to JMSdestinations.JMS QueueA JMS queue (as opposed to a JMS topic) is a point-to-point destination type. A message iswritten to a specific queue or received from a specific queue.The objects used in this example are:1. Configuration Steps-The following steps are done in the WebLogic Server Console,beginning with the left-hand navigation menu.Create Persistent store-∙Here you have to Create a new persistent store (Once the persistent store is created that can be used for both sender and receiver serever. Hence there is no nedd to create a different persistent store for two different servers.) Hence Before creating a JMS server you need to create the Persistent store if its not already created. Follow the steps shown below for creatinga persistent store.∙Select Services > Persistent Stores.First Select Lock & Edit as shown-∙Select new and the select create FileStore from the list as shown below-∙Give the name of the filestore. Example- EndPointFS and the Directory location, example /scratch/obdx/wls. Directory location field is optional and the path given above is just an example , it may vary according to the server.∙Click Next.∙Select the target server as shown in following snapshot-∙Click Finish.4.1.1 Create a JMS ServerServices > Messaging > JMS Servers∙Select New.∙Name: Give name as for example-ExtxfaceReceiverServer .∙ After naming the server Click next as shown in following example screenshot.∙Persistent Store: Select the name Persistent store from the dropdown list which was created in the previous step. Example-EndPointFS.∙Click Next.∙Target: Target should Point to the Weblogic server cluster as in this case target is set to obdx_server1 cluster. (Or any other available cluster).∙Click Finish.The JMS server should now be visible in the list.4.1.2 Create a JMS Module∙Services > Messaging > JMS Modules.∙Select New.∙Name: Provide name for JMS Module.∙Leave the other options empty.∙Click Next.∙Targets: Obdx_Cluster (or choose any other clusters available).∙Press Next.Leave “Would you like to add resources to this JMS system module” unchecked and press Finish .4.1.3 Create a SubDeploymentA subdeployment is not necessary for the JMS queue to work, but it allows you to easily targetsubcomponents of the JMS module to a single target or group of targets. We will use the subdeployment in this example to target the following connection factory and JMS queue to the JMS server we created earlier.∙Services > Messaging > JMS Modules.∙Select ExtxfaceReceiverModule.∙Select the Subdeployments tab and click New.∙Subdeployment Name: give subdeployment name. example- ExtxfaceReceiverSubDep∙Press Next.∙Here you can select the target(s) for the subdeployment. You can choose either Servers (i.e.WebLogic managed servers, such as the obdx_server) or JMS Servers such as the JMS Server created earlier. As the purpose of our subdeployment in this example is to target a specific JMS server, we will choose the JMS Server option.Select the ExtxfaceReceiverServer created earlier.∙Press Finish.4.1.4 Create a Connection Factory∙Services > Messaging > JMS Modules∙Select ExtxfaceReceiverModule and press New.∙Select Connection Factory and click Next.∙Name: Give name of the connection factory example- ExtxfaceReceiverQCF.JNDI Name: ExtSystemReceiverQCF.∙Click Next.∙Select Default Targeting Enabled and Press Finish∙The connection factory should be listed on the following page with Default Targeting as Subdeployment and WebLogic cluster as the target.4.1.5 Create a JMS Queue∙Services > Messaging > JMS Modules∙Select ExtxfaceReceiverModule and Click New.∙Select Queue and Click Next.∙Name: Provide name of the message queue. example- ExtxfaceReceiverQueue.JNDI Name: Provide JNDI name. example- ExtSystemReceiverQueue.Template: None.∙Press Next.∙Subdeployments: Give the name of the sub-deployment name in which Queue is supposed to be added. Example- ExtxfaceReceiverSubDep.∙Select the Target as ExtxfaceReceiverServerClick Finish.ExtxfaceReceiverSubDep and target as ExtxfaceReceiverServer.navigate to Services > Messaging > JMS Modules then select ExtxfaceReceiverModuleYou should see the following resources-The JMS queue is now complete and can be accessed using the JNDI names ExtSystemReceiverQCF And ExtSystemReceiverQueue..Note: Repeat the above process from the step 4.1 i.e Create File-Store to create the JMS Configuration for Sender module. Separate JMS Server , Module and Queues would get created for Sender.Home。
weblogic10在控制台下配置jms消息服务
weblogic下配置jms步骤:一.先配置持久化存储:1.服务> jdbc>持久化存储选择FileStore,然后如下:如上配置持久化名称,制定持久化目录,然后点击确定。
二.配置JMS服务器1.服务>消息传递>JMS服务器,选择新建2.JMS服务器的名称可以默认,也可以自行设置,持久化存储选择你刚才创建的持久化名称。
3.单击下一步,选择目标:AdminServer4.点击完成按钮,完成JMS服务器的配置。
三.配置JMS模块1.服务>消息传送>JMS模块,点击新建2.模块名称可以默认,也可以自行设置,点击下一步,选择目标服务器:3.点击下一步,完成。
四.配置子部署:1.服务>消息传送>JMS模块,点击进去你刚才创建的模块-选择子部署:2.选择新建-设置子部署的名称-下一步-选择子部署的目标服务器,选择你刚才创建的JMS服务器注意不要选AdminServer。
3.点击完成,如图子部署成功五.创建队列1. 点击服务>消息传送>JMS模块-点击进去你刚才创建的JMS模块(WssbSystemModule),选择新建-队列(Queue):点击新建:2.点击下一步,设置JMS目标属性:名称可以默认,但是JNDI必须唯一,因为在创建项目时,需要根据JNDI查找消息目的。
在这里我是把名称和JNDI名称设置为一样(具体对应的项目的时候需要根据实际情况设置Queue的JNDI名称)。
3.点击下一步,选择你刚才创建的子部署。
4.点击完成。
六.创建连接工厂1.服务>消息传送>JMS模块,点击进去你刚才创建的JMS模块(WssbSystemModule),选择新建-连接工厂(ConnectionFactory)-下一步-设置工厂名称和JNDI名称(唯一):在这里我是把名称和JNDI名称设置为一样,(具体对应的项目的时候需要根据实际情况设置ConnectionFactory的JNDI名称)2.点击下一步,完成。
JMS-基本应用篇
协同使用spring,jms
• 接收端配置:
安装activeMQ
• 安装要求: • 部署需要jdk1.5及以上,编译需要jdk1.5( java5)及以上 • Java的环境变量(JAVA_HOME)必须设置, 即jdk安装的目录,比如c:\Program Files\jsdk.1.6 • 下载ActiveMQ: /download.html 解压,运行bin文件夹下的activemq.bat
2、发布-订阅消息传递模式:使用topic(主题)
在发布-订阅消息传递模式中,消息会被发送给一个主题。像 使用队列一样,可以让多个接收者监听一个主题。但是,与 队列不同的是消息不再被只投递给一个接受者,所有主题订 阅者都会收到消息。
协同使用spring,jms
• 发送客户端配置:
协同使用spring,jms
JMS-基本应用篇
后台-童文欢 2012-10
JMS简介
• Java Message Service(JMS) 是一种应用于异步消息传递 的标准API。 • 异步消息传递是一种程序向其他程序间接发送消息的方法 ,使用这种方法不必等待响应。
JMS应用的组成
• JMS客户端:发送和接收的客户端 java程序 • 消息:JMS应用中在不同客户端传 递的信息 • JMS服务器:实现JMS的消息系统, 并提供管理和控制功能。 如:active MQ服务器
activeMQ负载均衡
• ActiveMQ可以实现多个mq之间进行路由, 假设有两个mq,分别为brokerA和brokerB, 当有一条消息发送到brokerA的队列test中, 有一个客户端连接到brokerB上,并且要求 获取test队列的消息时,brokerA中队列test 的消息就会路由到brokerB上,反之brokerB 的消息也会路由到brokerA。 静态路由配置,brokerA不需要特别的配置 ,brokerB需要配置networkConnectors节点 ,具体配置如下:
生产管理系统接口消息服务配置手册
Weblogic JMS消息服务配置说明Weblogic消息服务主要有两个方式,分别是队列消息,主题订阅消息。
JMS服务的配置现在以队列配置方式说明Weblogic JMS 消息服务本置步骤:首先我开始消息配置的第一个环节即建立一个JMS 消息服务。
一、如图(1)点击左边的“Services”进入消息Weblogic服务管理配置页面。
图(1)二、点击Weblogic管理菜单下的“Messaging”进入消息管理页面。
如图(2)图(2)三、点击“Messaging”管理菜单下的“Jms Services”进入Jms 消息管理页面。
然后点击左侧的”Lock&Edit”按钮进入可编辑状态,再点击右边界面的“New”按钮进入消息服务的建立。
如图(3)图(3)四、如图(4)所示接下来只需要在“Name”栏在填入消息服务的名称,再点击“Next”即可。
图(4)五、接下来是一个比较重要的步骤,在配置的时候千万不要忘了。
如图(5)所示在“Target”选项目当中不能让它默认选中“none”一定要选中当前服务器的名称如示例的是“AdminServer”,然后点击“Finish”完成消息服务的配置。
图(5)六、在消息服配置完成后,会有如图(6)所示的界面,现在还是没有真正完成消息的配置。
必须点击如图(6)所示的“Activate Changes”按钮,在没有错误提示的情况下,至此消息务配置完成。
如图(7)图(6)图(7)消息模块的配置模块的配置一、点击“Messaging”菜单下的“JMS Modules”进入消息模块的页面,然后点击左侧的”Lock&Edit”按钮进入可编辑状态,再点击右边界面的点击“New按钮进入消息模块的配置。
如图(8)图(8)二、接下来我们在“Name”一栏中填入模块的名称,其它不需要再填直接点“Next”按钮进入下一个页面配置。
如图(9)图(9)三、接下来如图(10)所示,我们必须在“Targets”中“Serves”栏中选中当前的服务的名称“AdminiSever”,点“Next”进入下一个页面。
