wincc 远程管理
西门子 wincc runtime advanced sm@rtserver 远程访问指南说明书

Remote Access toWinCC RuntimeAdvancedSm@rtServer,SIMATIC WinCC Runtime Advanced SiemensIndustryOnlineWarranty and LiabilityS i e m e n s A G 2018 A l l r i g h t s r e s e r v e dWarranty and LiabilityNoteThe Application Examples are not binding and do not claim to be complete regarding the circuits shown, equipping and any eventuality. The Application Examples do not represent customer-specific solutions. They are only intended to provide support for typicalapplications. You are responsible for ensuring that the described products are correctly used. These Application Examples do not relieve you of the responsibility of safely and professionally using, installing, operating and servicing equipment. When using these Application Examples, you recognize that we cannot be made liable for anydamage/claims beyond the liability clause described. We reserve the right to makechanges to these Application Examples at any time without prior notice. If there are any deviations between the recommendations provided in this Application Example and other Siemens publications – e.g. Catalogs – the contents of the other documents have priority.We do not accept any liability for the information contained in this document.Any claims against us – based on whatever legal reason – resulting from the use of the examples, information, programs, engineering and performance data etc., described in this Application Example shall be excluded. Such an exclusion shall not apply in the case of mandatory liability, e.g. under the German Product Liability Act ("Produkthaftungsgesetz"), in case of intent, gross negligence, or injury of life, body or health, guarantee for the quality of a product, fraudulent concealment of a deficiency or breach of a condition which goes to the root of the contract("wesentliche Vertragspflichten"). However, claims arising from a breach of a condition which goes to the root of the contract shall be limited to the foreseeable damage which is intrinsic to the contract, unless caused by intent or gross negligence or based on mandatory liability for injury of life, body or health. The above provisions do not imply a change of the burden of proof to your detriment. It is not permissible to transfer or copy these Application Examples or excerpts of them without first having prior authorization from Siemens AG in writing.Security informa-tionSiemens provides products and solutions with industrial security functions that support the secure operation of plants, systems, machines and networks.In order to protect plants, systems, machines and networks against cyber threats, it is necessary to implement – and continuously maintain – a holistic, state-of-the-art industrial security concept. Siemens' products and solutions constitute one element of such a concept.Customers are responsible for preventing unauthorized access to their plants, systems, machines and networks. Such systems, machines and components should only beconnected to an enterprise network or the internet if and to the extent such a connection is necessary and only when appropriate security measures (e.g. firewalls and/or network segmentation) are in place.For additional information on industrial security measures that may be implemented, please visit /industrialsecurity .Siemens' products and solutions undergo continuous development to make them more secure. Siemens strongly recommends that product updates are applied as soon as they are available and that the latest product versions are used. Use of product versions that are no longer supported, and failure to apply the latest updates may increase customer's exposure to cyber threats.To stay informed about product updates, subscribe to the Siemens Industrial Security RSS Feed at /industrialsecurity .Table of ContentsS i e m e n s A G 2018 A l l r i g h t s r e s e r v e dTable of ContentsWarranty and Liability ................................................................................................. 2 1 Task ..................................................................................................................... 4 2Solution............................................................................................................... 5 2.1 Overview............................................................................................... 5 2.2 Hardware and software components ................................................... 6 2.2.1 Validity .................................................................................................. 6 2.2.2 Components used ................................................................................ 6 3Principle of Operation (8)3.1 Sm@rtServer ........................................................................................ 8 3.2 Application example ............................................................................. 8 4Installation and Startup (9)4.1 Installing the software ........................................................................... 9 4.2 Startup .................................................................................................. 9 4.2.1 Sample project ..................................................................................... 9 4.2.2 Project library ..................................................................................... 11 4.2.3 Transferring the license ...................................................................... 11 4.2.4 Operator panel settings ...................................................................... 12 4.2.5 Sm@rtServiceMonitor ........................................................................ 14 4.2.6 Sm@rtClient app ................................................................................ 16 4.2.7 Sm@rtClient application ..................................................................... 17 4.2.8 Sm@rtClient control ........................................................................... 19 4.2.9 Internet Explorer ................................................................................. 19 5Operation of the Application (20)5.1 Overview............................................................................................. 20 5.2 Sample project ................................................................................... 20 5.3 Sm@rtServiceMonitor (22)6 Additional Notes .............................................................................................. 247 Links & Literature ............................................................................................ 25 8History (25)S i e m e n s A G 2018 A l l r i g h t s r e s e r v e d1 TaskRemote access is used to its full extent when you can use the same functions as if you were standing right in front of the operator panel. Using existing hardware such as your smartphone, tablet or standard notebook enables you to achieve the greatest possible flexibility.Apart from all the advantages remote access provides, you still need to be aware of the hazards such an intervention may involve.In most cases, the user remotely accessing the plant cannot see what is happening in the plant at the moment of access. The intervention must not put the staff on site or the plant at risk. To this end, it is important that you lock certain functions (e.g., manual control of a gripper) for the remote maintenance user. In addition, the staff on site should be informed of an intervention and be able to stop it at any time if necessary.2.1 Overview2 Solution2.1 OverviewDiagrammatic representationThe diagrammatic representation below shows the most important components ofthe solution:–The Sm@rtClient Viewer enables you to access the Sm@rtServer from a programmer or another standard PC.–The Sm@rtClient View WinCC control enables you to access theSm@rtServer via a WinCC Runtime Advanced station.–Internet Explorer enables you to access the Sm@rtServer from any PC.∙The operator panel layout is represented by the Sm@rtClient app and the Sm@rtClient Viewer and you can use, for example, keyboards∙Up to four Sm@rtClients per WinCC Runtime Advanced station are possible simultaneously (number depends on the device, see \5\)∙Operator actions are displayed on the device on site; i.e., an employee on site can follow your operator steps∙Wide range of possible applications (see scenarios in the "General information"document)© S i e m e n s A G 2018 A l l r i g h t s r e s e r v e d∙ Checking the incoming connections using "Sm@rtServiceMonitor"∙Increased security through a VPN connectionScopeThis application does not include a description of ∙ the basics of configuring with WinCC (TIA Portal)∙setting up a VPN connection; information on this topic can be found in the "VPN connection" document.2.2Hardware and software components2.2.1ValidityThis application is valid for ∙WinCC Runtime Advanced PC stationsNoteStarting with TIA Portal V15, the "Sm@rtServiceMonitor" tool for SIMATIC Comfort Panels was fully integrated into the "SIMATIC HMI Option+" tool. For more information on SIMATIC HMI Option+, use the following link: https:///cs/ww/en/view/109754400NoteWith TIA Portal V14 or higher, Sm@rtServer is also available for SIMATIC HMI Basic Panels. The "Sm@rtServiceMonitor" tool can only be used with WinCC Runtime Advanced.2.2.2 Components usedThe application was created with the following components:Hardware componentsTable 2-1S i e m e n s A G 2018 A l l r i g h t s r e s e r v e dSoftware components and licensesTable 2-2Configuring and using the VPN connection requires more components. Details can be found in the "VPN connection" document.Sample files and projectsThe following list contains all files and projects that are used in this example.Table 2-33 Principle of Operation 3.1 Sm@rtServerS i e m e n s A G 2018 A l l r i g h t s r e s e r v e d3Principle of Operation3.1Sm@rtServerThe WinCC Sm@rtServer option enables operator control and monitoring of operator panels via the intranet/internet. The Sm@rtServer provides its user*******************************************************@rtClient,for example a standard PC, a smartphone or another SIMATIC HMI Panel. The Sm@rtClient concept is not only used for operator control and monitoring when performing service jobs, it can also be used for large, geographically distributed machines and plants. The mobile end use option makes this solution also suitable for commissioning as you can move around the entire plant, regardless of the operator panel's place of installation.3.2 Application exampleSm@rtServiceMonitorThe "Sm@rtServiceMonitor" tool is used to check the Sm@rtClient connections to a WinCC Runtime Advanced PC station. The IP addresses and the number of devices accessing the operator panel are stored in internal WinCC tags for further processing (VncClient1, VncClient2, VncClient3, VncClient4 and VncConnectionCount).SOAP web serviceThe SOAP (Simple Object Access Protocol) web service is used for writing the tags. The operator panel provides this service via the integrated web server. It can be used to access the HMI Runtime tags from external applications. Using theSOAP service requires a web user with the appropriate permission on the operator panel (see chapter 4.2.4 Operator panel settings ).Sample projectIn the event of a value change of one of the tags, "VncClient1", "VncClient2", "VncClient3" or "VncClient4", the "CheckConnections" script is called. This script first checks what has changed compared to the previous cycle. If a user is logged in to the operator panel on site and a new Sm@rtClientconnects, a message appears on the operator panel. This message is displayed for a defined time and enables the operator on site to directly terminate the incoming connection. (see chapter 5.2 Sample project ). The remote operator cannot access WinCC Runtime Advanced until this time has elapsed. In the sample project, the default setting for this time is 10 seconds; however, you can change this setting (see chapter 6 Additional Notes ).As long as (at least) one Sm@rtClient connection to the operator panel is active, this is indicated by a flashing button. Clicking this button allows you to terminate the connections at any time.4.1 Installing the software© S i e m e n s A G 2018 A l l r i g h t s r e s e r v e d4Installation and Startup4.1Installing the softwareTo use this application example, at least the SIMATIC WinCC Comfort software must be installed on your programmer.4.2 StartupThe application example can be started up in different ways. ∙First, establish a VPN connection between the WinCC Runtime Advanced PC *******************************************************"VPN connection" document.∙Depending on whether you want to use the project contained in this entry or include the functionality in your own project, follow the steps described in chapter 4.2.1 Sample project or 4.2.2 Project library .∙ Then transfer, if not yet available, the Sm@rtServer license to the operator panel as described in chapter 4.2.3 Transferring the license .∙Make the necessary Sm@rtServer and web server settings as described in chapter 4.2.4 Operator panel settings and then configure the tool following the steps in chapter 4.2.5 Sm@rtServiceMonitor .∙Depending on the Sm@rtClient you are using, follow the instructions in chapter 4.2.6 Sm@rtClient app , 4.2.7 Sm@rtClient application , 4.2.8 Sm@rtClient control or 4.2.9 Internet Explorer .4.2.1 Sample projectTable 4-14.2 StartupS i e m e n s A G 2018 A l l r i g h t s r e s e r v e dIf you are using a different SIMATIC IPC, right-click the device and select "Change device / version".Select the operator panel you are using.Download the project to the device.S i e m e n s A G 2018 A l l r i g h t s r e s e r v e d4.2.2 Project libraryTable 4-2Open the "Libraries" tab on the right-hand side of TIA Portal.Click the icon to open a global library and open the library of the application example.Then open the "RuntimeAdvanced" folder.Use drag and drop to move the "Task_Change_User" task to the task scheduler.4.2.3 On the WinCC Runtime Advanced PC station, open the Automation License Manager and use drag and drop to move the "Sm@rtServer for WinCC Runtime Advanced" license from the license data medium to the PC.NoteWith TIA Portal V14 SP1, the Sm@rtServer in conjunction with WinCC Runtime Advanced no longer requires a license.S i e m e n s A G 2018 A l l r i g h t s r e s e r v e d4.2.4 Operator panel settingsTable 4-3 WinCC Runtime Advanced :Open the PC's Control Panel and select "WinCC Runtime Advanced Internet".Go to the "Remote" tab.Check "Start automatically after booting" if you want the Sm@rtServer to start with the operator panel and not later with Runtime. Check "Close with Runtime" if you want the Sm@rtServer to close with Runtime. Click the "Change settings" button.In Password 1 and Password 2, enter secure passwords for access of theSm@rtClients and check the "View only" check box if you want a Sm@rtClient to only monitor the operator panel with this password.If you are using an operator panel with a version lower than V13, always change the default passwords.S i e m e n s A G 2018 A l l r i g h t s r e s e r v e d3).Click the "User Administration" button.Create a new user, "SoapUser", and assign a password to this user. Click the "Apply" button.Go to the "Authorizations" tab and enable the "SoapUser" authorization for this user.Close the open dialogs.S i e m e n s A G 2018 A l l r i g h t s r e s e r v e d4.2.5 Sm@rtServiceMonitorTable 4-4 unzip the zip folder.Start the "SetPasswordTool.exe" tool.In the file browser, select the "SmartServiceMonitor.ini" file.Enter the password of the "SoapUser" user and press Enter to confirm. Repeat this step.S i e m e n s A G 2018 A l l r i g h t s r e s e r v e dClose the "SetPasswordTool" by pressing any button.To use the tool on a WinCC Runtime Advanced PC, copy the files to the Runtime PC and manually start the "SmartServiceMonitor.exe" or add a shortcut to this file to the PC's Startup folder.S i e m e n s A G 2018 A l l r i g h t s r e s e r v e d4.2.6 Sm@rtClient appTable 4-5 Download the "SIMATIC WinCC Sm@rtClient" app to your smartphone or tablet and install it. You can find the app in \3\ (iOS), \4\ (Android) or using the following QR code.Start the NCP VPN Client app and establish a connection to the automation cell. document.Start the SIMATIC WinCC Sm@rtClient app and either manually add a new connection or use automatic Sm@rtServer detection to search for the desired SIMATIC HMI operator panel.Password protect both the device and the app to prevent unauthorized persons **************************************,donotsavethepasswordalong with the connection settings, but enter it manually when prompted.S i e m e n s A G 2018 A l l r i g h t s r e s e r v e d4.2.7 Sm@rtClient applicationIf WinCC Runtime Advanced is installed on the PC, the Sm@rtClient application is also installed. Otherwise, you can copy it from the "Support\SmartClient" folder of the WinCC product DVD or from another PC from the "...\Siemens\Automation\WinCC RT Advanced" folder.Table 4-6 document.Select "Start > All Programs > Siemens Automation > Runtime Systems > WinCC Runtime Advanced > Sm@rtClient" to start the Sm@rtClient Viewer.Enter the Sm@rtServer's IP address and, if necessary, change the settings in "Options".Click the "Connect" button.Enter a Sm@rtClient password and click "OK".S i e m e n s A G 2018 A l l r i g h t s r e s e r v e dYou can save the connection settings and therefore automatically save the Sm@rtClient application without user input.Table 4-7 Sm@rtClient application.Select "Save connection info as...".Select a storage location and a file name and click "Save". The following warning appears:Confirm the message with "Yes" only if you can ensure that no unauthorized person can access this file.Using command prompt or a batch file, you can then open the Sm@rtClientS i e m e n s A G 2018 A l l r i g h t s r e s e r v e d4.2.8 Sm@rtClient controlTable 4-8Insert the "Sm@rtClient view" control into a screen.In "Properties > General", enter the IP address or device name, port and, if necessary, other settings.In "Properties > Scaling", you can set whether the display will be scaled when4.2.9 Internet ExplorerTable 4-9Note More information on the Java security settings can be found here: /WW/view/en/1019775115 Operation of the Application 5.1 OverviewS i e m e n s A G 2018 A l l r i g h t s r e s e r v e d5Operation of the Application5.1OverviewFigure 5-15.2 Sample projectFigure 5-2The items included in the screen are part of the "Template_Topic_001" template. Field 1, "New connected client:", displays the IP address of the Sm@rtClient last ******************************************************@rtClientsso that the operating staff on site can immediately decide whether unauthorized users are accessing the plant.Button 2 flashes blue/yellow while one or more Sm@rtClients are accessing the *******************************************@rtClientisconnected.Clicking the button disconnects all connected Sm@rtClients.Button 3 allows you to log in a user. The sample project contains the following users:1 2 345.2 Sample projectS i e m e n s A G 2018 A l l r i g h t s r e s e r v e dTable 5-1Field 4 displays the user name of the logged in user. Logging in a user is necessary for the following function.Figure 5-3If a user has logged in to the operator panel and a Sm@rtClient connects to the Sm@rtServer, this user interface appears.A ten-second time window starts, in which the user can decide whether the connection may be established. An I/O field (1) displays the remaining time. The time can be set in the WinCC project. For details, see the Additional Notes chapter.The "Cancel" (2) button allows you to terminate the connection. Clicking the button disconnects all connected Sm@rtClients.The I/O field (3) displays the IP address of the newly connected client so that the operator on site can decide whether this client gains access.To allow the connection and to be able to access the operator panel, wait until the time expires. Then the previous screen is activated and the locally logged in user is logged out.123S i e m e n s A G 2018 A l l r i g h t s r e s e r v e dFigure 5-4This screen displays the IP addresses and the number of currently connected Sm@rtClients (1).TodisconnecttheconnectedSm@rtClients,*******************************Sm@rtServer does not start correctly, you can use the button (2) to start it manually.5.3 Sm@rtServiceMonitorIf you are using the tool on a PC, you can copy a shortcut to the tool to the PC's Startup folder.As can be seen in the screenshot below, the icon bordered in red in the Comfort Panel's/PC's taskbar indicates whether the tool has been started.Figure 5-512S i e m e n s A G 2018 A l l r i g h t s r e s e r v e dDouble-clicking the icon opens the diagnostic window. It allows you to check whether the "Sm@rtServiceMonitor" tool works correctly.Figure 5-6If the "Auto Scroll" check box (1) is checked, the most recent messages areautomatically displayed. However, you can also use the scroll bar (2) to search for old entries.The "Hide" (3) button closes the diagnostic window. The "Close" (4) button exits the tool.123 46 Additional NotesS i e m e n s A G 2018 A l l r i g h t s r e s e r v e d6 Additional NotesThe time until the remote maintenance user gains access to the operator panel can be set in the WinCC (TIA Portal) project.To do this, open the "Screen_User_Access" screen. Open the "Properties >Events" of the screen. Change the cycle of the "SimulateTag" system function with the "LogoutLocalUser" tag. The value corresponds to a multiple of 200 ms, i.e., for example, 50 for 10 seconds.Figure 6-1Open the "Tags_SmartClient" tag table. For the "Logout_Time" tag, set the desired time in seconds as the start value.Figure 6-27 Links & LiteratureS i e m e n s A G 2018 A l l r i g h t s r e s e r v e d7 Links & LiteratureTable 7-18 HistoryTable 8-1。
WINCC常用功能

WINCC常用功能1.数据采集和监控:WINCC可以通过与各种设备和传感器的接口通信,实时采集和监控自动化系统中的数据。
用户可以定义采集周期和数据存储方式,并通过界面直观地展示实时数据、趋势图和历史数据。
2.报警和事件管理:WINCC支持自动化系统中的报警和事件管理。
用户可以定义报警规则和优先级,并接收实时报警通知。
此外,WINCC还提供了报警事件的记录和统计功能,以帮助用户分析和改善系统的正常运行。
3.图形设计和操作界面:WINCC提供了丰富的图形设计和操作界面的工具,用户可以根据自己的需要创建各种按钮、指示灯、曲线图等,通过界面直观地监控和控制自动化系统。
此外,WINCC还支持多语言界面的设计,以满足不同用户的需求。
4.数据分析和报表生成:WINCC提供了丰富的数据分析和报表生成功能,用户可以通过界面轻松地生成各种统计报表,如运行时间、能耗分析等。
此外,WINCC还支持数据导出和共享,以便用户在其他软件中进行更进一步的分析。
5.远程访问和控制:WINCC支持远程访问和控制自动化系统。
用户可以通过网络连接到系统,并实时监控和控制系统运行状态。
此外,WINCC还提供了安全认证和权限管理功能,以确保远程访问的安全性和可控性。
6.故障诊断和维护:WINCC可以实时监测自动化系统的运行状态,并通过报警和事件通知用户任何故障和异常情况。
此外,WINCC还支持故障诊断和维护功能,用户可以根据故障的类型和位置,快速定位和修复故障的根本原因。
7.系统集成和扩展:WINCC是开放式的软件平台,可以与其他系统和软件进行集成。
用户可以通过定义接口和协议,实现与其他系统的数据交换和通信。
此外,WINCC还支持插件和扩展的开发,以满足用户不断变化的需求。
总之,WINCC作为一款功能强大的HMI软件平台,提供了丰富的功能和工具,用于设计、监控和控制自动化系统。
这些常用功能包括数据采集和监控、报警和事件管理、图形设计和操作界面、数据分析和报表生成、远程访问和控制、故障诊断和维护,以及系统集成和扩展。
WINCC连接远程SQL
WINCC连接远程SQL
前端时间帮朋友用WINCC实现一个功能,需要用到连接远程SQL数据库的地方,本来以为会很简单的,把连接SQL数据库的脚本改成远程计算机的名称或者IP地址就好了,在家里用虚拟机测试的时候,发现没那么简单,最后折腾了大半天,才终于给搞好了。
把折腾的步骤总结测试一下,这里给以后需要用到的朋友参考一下吧。
其实主要还是SQL服务器需要开启远程访问功能,一边搜索一边测试,才弄好的。
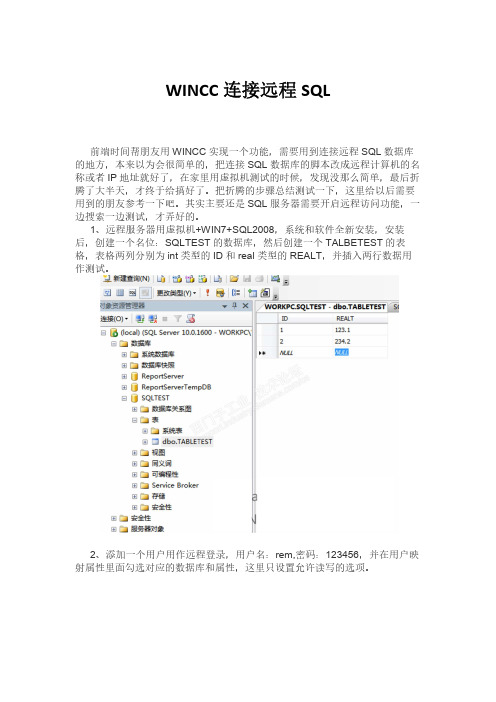
1、远程服务器用虚拟机+WIN7+SQL2008,系统和软件全新安装,安装后,创建一个名位:SQLTEST的数据库,然后创建一个TALBETEST的表格,表格两列分别为int类型的ID和real类型的REALT,并插入两行数据用作测试。
2、添加一个用户用作远程登录,用户名:rem,密码:123456,并在用户映射属性里面勾选对应的数据库和属性,这里只设置允许读写的选项。
3、开始菜单-SQL Server文件夹-配置工具下打开SQL Server配置管理
器,开启TCP/IP远程访问,并设置远程访问端口。
里面的服务配置里面启用TCPIP协议:
IPALL就可以了。
4、防火墙设置。
如果在远程电脑使用ssms测试连接不上,那就需要设置一下WIN7的防火墙了,在防火墙的高级设置里面,入站规则和出站规则,分别加入1433的端口允许,下图以出站规则为例。
你也可以直接关闭防火墙,
这样就不用设置了
访问类型选择端口,点下一步
端口根据上面设置的,这里是1433,然后点下一步
操作里面选择允许连接,然后点下一步
配置文件全选,点下一步
这里随便起个名字,然后点击完成,就设置好了。
远程IO模块

使用WinCC 实现远程网络IO 控制
网络远程IO控制器ZLAN6042是一个通过以太网进行远程输入(DI)、输出(DO)控制和模拟量输入(AI)采集的控制器。
其中DI 可以也可以是一个干节点(开关量)或者湿节点(电压量)。
DO 是一个继电器通断量,提供5A@AC250V/DC30V 的驱动能力。
AI 模拟量可以是电压,比如0~5V、0~10V 等,也可以是电流比如4~20mA,也可以是电阻性的传感器,比如温度传感器等。
ZLAN6042 包含有4 个DI、4 个DO 和2 个AI。
本文主要介绍使用西门子的WinCC软件来进行ZLAN6042的集成化的控制的步骤和方法。
WinCC 的使用基本上包含两个大的步骤:一、设置变量的属性,比如设置DI 和DO 变量,设置他们的IP 地址和寄存器地址等。
二、设计图形界面,然后将界面元素和设置好的变量关联起来。
接下来就按照步骤进行解说: 1. 首先使用ZLVircom 配置工具,将ZLAN6042 配置为“Modbus TCP 转RTU”转化协议模式。
这样就可以使用标准的Modbus TCP对ZLAN6042 N6042 进行控制。
2. 运行wincc 程序.
3. 使用项目管理器创建一个单用户项目
12. 最后设置的属性如下,然后点击确定。
h。
wincc客户机服务器
wincc客户机服务器WinCC客户机服务器范本一.介绍1.1 目的本文档提供了关于WinCC客户机服务器的详细信息和使用指南,旨在帮助用户正确地安装、配置和管理WinCC客户机服务器。
1.2 范围本文档适用于使用WinCC客户机服务器的系统管理员和终端用户。
它包括了有关WinCC客户机服务器的整体架构、功能、要求等信息,并提供了操作指南和最佳实践。
二.WinCC客户机服务器概述2.1 定义WinCC客户机服务器是一种软件组件,可用于将WinCC服务器功能部署到多个终端客户机上,以实现集中控制和监视。
它允许用户通过网络远程访问和操作WinCC服务器。
2.2 架构WinCC客户机服务器采用分布式架构,包括一个中央服务器和多个客户机。
中央服务器负责数据存储和处理,而客户机提供用户界面和操作功能。
2.3 功能WinCC客户机服务器具有以下主要功能:- 远程访问:允许用户通过网络远程访问WinCC服务器,并实时查看和操作数据。
- 多用户支持:支持多个用户同时访问和操作WinCC服务器,提高工作效率。
- 数据同步:自动同步中央服务器和客户机之间的数据,确保数据一致性。
- 告警和通知:提供实时告警和通知功能,帮助用户及时处理异常情况。
- 安全性:采用强大的安全机制,保护系统免受未经授权的访问和攻击。
三.安装与配置3.1 硬件需求在安装WinCC客户机服务器之前,必须满足以下最低硬件需求:- 操作系统:Windows Server 2012或更高版本- 处理器:2 GHz或更高- 内存:4 GB或更高- 存储空间:至少20 GB的可用空间3.2 软件安装按照以下步骤安装WinCC客户机服务器:1. WinCC客户机服务器安装文件。
2. 运行安装文件,按照安装向导的指示进行操作。
3. 在安装过程中选择所需的组件和功能。
4. 等待安装完成。
3.3 配置在成功安装WinCC客户机服务器后,需要进行以下配置步骤:1. 启动WinCC客户机服务器控制台。
通过wincc远程监控plc
八.电脑组态软件远程监控本章节所描述的功能仅对具有3G上网功能的GRM400G系列有效。
网络结构:1.GRM400和PLC通过485连接,GRM400通过插入的手机卡3G上网。
2.远程电脑只需能上网,即可,不需要固定IP,不需另外的服务器3.远程电脑上需安装OPCSERVER,然后登陆对应模块的序号和密码。
4.组态软件是通过OPC接口从OPCSERVER访问远程的PLC数据。
完成远程监控的需要的硬件:1.GRM400G一台(插入开通3G的SIM卡)2.GRM400G下载线及24V电源3.可以上网的电脑一台完成远程监控需要的软件:1.GRM400工程配置软件GRM Dev32.巨控GrmOpcServer软件包,请从巨控公司网站上下载。
3.巨控组态软件GiantView V3.5 GRM专用版,请从巨控公司网站上下载。
也可使用组态王等任意组态软件。
完成远控的方法:1.使用GRM400工程配置软件GRMDev3完成GRM400G的工程开发和下载,如配置需要远程监控的变量,及对应的PLC寄存器地址。
2.GRM400G开发下载完毕后,插入SIM卡,使之登陆到云监控服务器。
等待数码管显示”一”3.使用巨控GrmOpcServer软件包中的GRM OPC管理器(GrmOpcMgr.exe),“添加GRM设备”后,并点击“刷新全部GRM设备”。
4.使用组态软件开发工程,将组态软件的变量关联到对应的OPC寄存器。
5.运行组态软件,即完成开发。
6.若任何时候GRM400G的变量有修改,增加,需重复1-5的步骤。
注意:使用前请开通插入短信模块的SIM卡的3G包月服务,详情请咨询SIM卡运营商(中国移动拨打10086,中国联通拨打10010)。
配置GRM网络选项在GRM 的开发工具GRMDeveloper中打开工程选项,看到如下所示网络选项对话框。
服务器地址:云监控服务器地址,除非自己搭建服务器,一般情况请勾选使用默认服务器。
WINCC服务器客户机联网通讯
一、普通服务器与客户机通讯设置:软件环境与运行条件:一.服务器预装Microsoft Windows 2003 Server系统,客户机预装Windows XP 系统即可。
(SP2)二.均装配WINCC6.2 SP2三.服务器允许远程控制,并配备密码。
四.服务器,客户机在同一局域网内,IP无冲突。
五.防火墙关闭。
步骤:1.服务器WINCC,新建一个“多用户项目”,打开“用户管理器”,选择“远程激活”,“远程组态”。
2.在“Administrator group”右键“添加用户”。
名称与客户机名称一致,这是将来客户机远程启动服务器画面的条件。
3.在服务器WINCC内“计算机”,“添加新计算机”,名称与客户机名称一致4.在服务器上完成WINCC画面的设计,完成后,在“服务器数据”右键“创建”,生成新的服务器数据。
5.在客户机上,新建一个WINCC“客户机项目”,在“服务器数据”右键“装载”以导入服务器数据。
6.为客户机选择一个运行WINCC时的起始画面:“计算机”,“属性”,“图形运行系统”,“起始画面”栏“浏览”选择服务器上创建的画面为起始画面。
7.除了可以在客户机上直接运行服务器画面以外,还可以在客户机项目内创建新的画面,连接到服务器的变量,也是采用服务器上的变量。
8.可以在客户机“资源管理器”的“Simatic Shell”目录下选择服务器画面,右键“远程激活”,输入用户名和密码以激活服务器画面。
二、OPC接口通讯设置软件环境与运行条件跟上面一样。
本环节主要在客户机上操作。
步骤:1.确保服务器的WINCC项目中,组态有一个“有符号16位数”数据类型的内部变量,并且服务器WINCC项目在激活状态下。
2.在客户机建立一个单用户项目,在“变量管理”内,右键,“添加新的驱动程序”,“opc.chn”。
在“OPC Groups”右击,打开“系统参数”。
在“工作组”,查找所要连接的OPC服务器。
3.选择好服务器名称,在显示的列表中选择“OPCserver.WINCC”,单击“浏览服务器”,过滤标准对话框显示。
基于WinCC之OPC通信在远程生产管理中的应用
关 键 词 :( ) P C;通 讯 组 态 ;远 程 维 护 中 图 分 类 号 :T P 8 9 文 献 标 识 码 :B
0 引 言
为 了能 实 现远程 工 程 中以 区域指 挥 中心 为客 户 端 的远程 维护 模式 , 需 将 现 场 工艺 监 控 画 面 和工 艺 参 数 采 集 到值 班 室服 务器 中 , 通 过 骨干 网远 传 到指 挥 中心 。 本 文提 出一 种基 于 0P C的制 氧生 产远 程 监控 方案 , 通 过 自动 采集 压力 、 温度、 流量等参数 , 集 中计 算 并 远 程 传送 的方式 , 实现 了系统监 控 、 统计 分 析 、 优化 调制 , 达 到 了合 理 、 准确 、 高效 维护 生产 系统 的 目的 。 1 OP C简介 OP C( OL E f o r P r o c e s s C o n t r o 1 ) 是 一 个 软 件 总 线, 其软 件体 系结 构 为 “ 服 务 器 一客 户 端 ( 0P C S e r v — e r / C l i e n t ) ” 模式 , 它 为基 于 Wi n d o ws的应 用 程序 和现 场过 程控 制应 用架 设 了桥梁 。 因现 场设 备种 类 繁多 , 且产 品不 断 升级 , 系统集 成 商 和开发 商急 切需 要一 种具 有高 效性 、 开放 性 、 可靠 性 和互 操作 性 的 即 插 即 用 的 设 备 驱 动 程 序 。OP C 通 过 提供 一套 标准 的 0L E / C OM 接 口完成 定 制 。 OP C采 用 基 于 微 软 的 D C OM 安 全 机 制 运 行 , 而 D C OM 安全 机制 又 较 严 密 , 因 此 在 OP C通 讯 时 应 进
Wincc、ifix、intouch、组态王做服务器,OPC远程访问设置教程
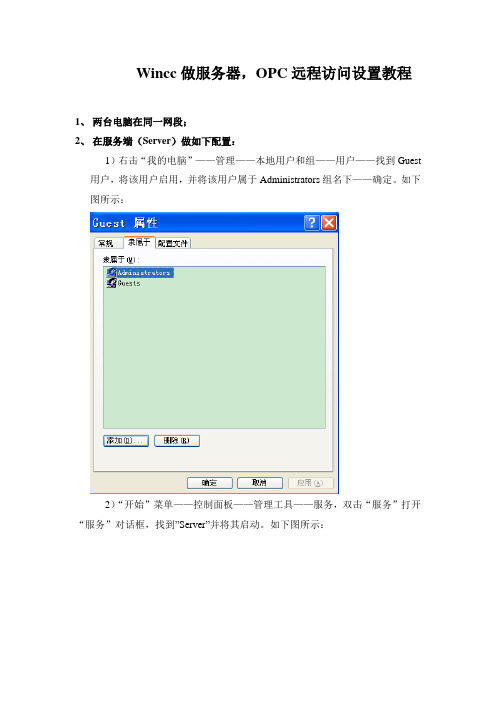
Wincc做服务器,OPC远程访问设置教程1、两台电脑在同一网段;2、在服务端(Server)做如下配置:1)右击“我的电脑”——管理——本地用户和组——用户——找到Guest 用户,将该用户启用,并将该用户属于Administrators组名下——确定。
如下图所示:2)“开始”菜单——控制面板——管理工具——服务,双击“服务”打开“服务”对话框,找到”Server”并将其启动。
如下图所示:3)在“运行”中输入GPEDIT.MSC运行组策略.计算机配置——WINDOWS 设置——安全设置——本地策略——安全选项中,找到网络访问.选择经典.如下图所示:4)DCOM配置:在“开始”菜单——运行中输入dcomcnfg——Enter,如下图(1),图(1)在弹出的对话框找到DCOM配置如下图(2);图(2)在DCOM配置中找到OpcServer.Wincc如下图(3);图(3)右击“属性”打开对话框,在“常规”选项中,将身份验证级别设置为“无”如图(4);(OpcEnum常规为“默认”)图(4)在“位置”选项中选中“在数据所在计算机上运行应用程序(D)”如图(5);图(5)在“安全”选项中将“启动和激活权限”选择“自定义”——编辑,将各用户的所有权限都允许,“访问权限”和“配置权限”也做相同设置,如图(6);图(6)在“标识”选项中选中“下列用户”并将具有最高权限的“Administrator”用户选中及设置密码,如图(7)所示。
图(7)电脑登录需要设置密码,且上图密码与登录密码一致。
(需提前设置)3、在客户端做如下配置:按第4)步进行DCOM配置(和服务端一样),两台电脑的登录用户名和密码都一样。
wincc服务器客户机设置

wincc服务器客户机设置WinCC服务器客户机设置本文档将详细介绍WinCC服务器客户机设置的步骤和配置要求。
通过该文档,您将能够正确地设置WinCC服务器和客户机之间的通信,并获得服务器的远程访问权限。
⒈硬件要求⑴服务器:一台或多台WinCC服务器,具备足够的处理能力和存储空间。
⑵客户机:用于远程访问服务器的计算机,需要具备WinCC客户机软件和足够的网络带宽。
⒉WinCC服务器设置⑴安装WinCC服务器软件:根据安装向导,将WinCC服务器软件安装在服务器上。
⑵配置通信:打开WinCC服务器软件的配置工具,根据实际情况配置服务器与PLC或其他设备之间的通信。
⑶设置远程访问权限:通过配置工具设置服务器的远程访问权限,包括IP地质、端口号和访问密码等。
确保服务器只允许授权的客户机进行访问。
⒊WinCC客户机设置⑴安装WinCC客户机软件:根据安装向导,将WinCC客户机软件安装在客户机上。
⑵配置通信:打开WinCC客户机软件的配置工具,配置客户机与服务器之间的通信参数,包括服务器IP地质和端口号等。
⑶远程访问设置:通过WinCC客户机软件的设置界面,输入服务器的IP地质和访问密码,确保客户机可以远程连接服务器。
⒋远程访问WinCC服务器⑴启动WinCC客户机软件:在客户机上启动WinCC客户机软件,并输入正确的服务器IP地质和访问密码。
⑵可视化界面:通过客户机软件,您可以访问服务器上的WinCC可视化界面,实时监控和控制PLC或其他设备。
⒌附件本文档无涉及附件。
⒍法律名词及注释本文档无涉及法律名词及注释。
用WinCC实现S7-200控制系统的远程监控
信息化工业DOI:10.16660/ki.1674-098X.1910-9898-1911用WinCC实现S7-200控制系统的远程监控①郝娟芳 张润怀(包头钢铁职业技术学院 内蒙古包头 014030)摘 要:PLC自动控制系统是目前工业自动化应用的主流, 西门子S7-200 PLC在小型PLC控制系统中应用非常广泛。
WinCC是SIEMENS与Microsoft公司合作开发的开放的过程可视化系统,WinCC可以实现S7-300和S7-400控制系统的远程监控,但不能与S7-200进行直接通信。
为了让S7-200也能与WinCC通信,西门子开发了专门用于S7-200 PLC的OPC服务器(server)软件PC Access, S7-200 PLC可以通过PC Access与WinCC通信。
本文以一个“楼宇高位水箱水位PLC控制系统”实际应用的简单实例,详细介绍了用WinCC实现对S7- 200控制系统的远程监控。
关键词:S7- 200 PC Access WinCC 远程监控 控制系统中图分类号:TP273 文献标识码:A 文章编号:1674-098X(2020)08(a)-0001-05Remote Monitoring of S7-200 Control System with WinCCHAO Juanfang ZHANG Runhuai(Baotou Iron&Steel Vocational Technical College, Baotou, Inner Mongolia Autonomous Region, 014030China)Abstract: PLC automatic control system is the mainstream of industrial automation application at present, and siemens S7-200 PLC is widely used in small PLC control system. WinCC is an open process visualization system jointly developed by SIEMENS and Microsoft. WinCC can realize remote monitoring of S7-300 and S7-400 control systems, but cannot communicate directly with S7-200. In order to make S7-200 communicate with WinCC , Siemens developed OPC server (Server) software PC Access, which is specially used for S7-200 PLC. S7-200 PLC can communicate with WinCC through PC Access.This paper introduces in detail the operation process of remote monitoring of S7-200 control system with WinCC with a simple example of practical application of "PLC control system for high water level of building".Key Words: S7- 200; PC Access; W inCC; Remote monitor and control; Control system①作者简介:郝娟芳(1971—),女,汉族,内蒙古包头人,硕士,高级讲师,主要从事工业电气自动化研究。
Wincc、ifix、intouch、组态王做服务器,OPC远程访问设置教程

Wincc做服务器,OPC远程访问设置教程1、两台电脑在同一网段;2、在服务端(Server)做如下配置:1)右击“我的电脑”——管理——本地用户和组——用户——找到Guest 用户,将该用户启用,并将该用户属于Administrators组名下——确定。
如下图所示:2)“开始”菜单——控制面板——管理工具——服务,双击“服务”打开“服务”对话框,找到”Server”并将其启动。
如下图所示:3)在“运行”中输入GPEDIT.MSC运行组策略.计算机配置——WINDOWS 设置——安全设置——本地策略——安全选项中,找到网络访问.选择经典.如下图所示:4)DCOM配置:在“开始”菜单——运行中输入dcomcnfg——Enter,如下图(1),图(1)在弹出的对话框找到DCOM配置如下图(2);图(2)在DCOM配置中找到OpcServer.Wincc如下图(3);图(3)右击“属性”打开对话框,在“常规”选项中,将身份验证级别设置为“无”如图(4);(OpcEnum常规为“默认”)图(4)在“位置”选项中选中“在数据所在计算机上运行应用程序(D)”如图(5);图(5)在“安全”选项中将“启动和激活权限”选择“自定义”——编辑,将各用户的所有权限都允许,“访问权限”和“配置权限”也做相同设置,如图(6);图(6)在“标识”选项中选中“下列用户”并将具有最高权限的“Administrator”用户选中及设置密码,如图(7)所示。
图(7)电脑登录需要设置密码,且上图密码与登录密码一致。
(需提前设置)3、在客户端做如下配置:按第4)步进行DCOM配置(和服务端一样),两台电脑的登录用户名和密码都一样。
wincc oa操作手册
wincc oa操作手册
WinCC OA(Operational Excellence)是由西门子公司开发的一款用于监控和控制系统的软件平台。
它被广泛应用于工业自动化领域,用于监控和管理复杂的生产过程和设备。
WinCC OA操作手册通常包括以下内容:
1. 系统概述,介绍WinCC OA的基本功能、系统架构和适用范围。
2. 安装和配置,包括安装软件、配置系统环境、创建项目和设置参数等内容。
3. 用户界面,介绍WinCC OA的用户界面,包括各种工具栏、菜单、窗口和操作方法。
4. 数据采集和处理,介绍如何配置数据采集、数据处理和数据存储功能,包括数据连接、数据传输和数据处理算法等内容。
5. 监控和控制,介绍如何使用WinCC OA进行实时监控和远程控制,包括监控界面的设计、报警处理、事件记录和控制指令发送
等内容。
6. 系统维护和优化,包括系统备份、恢复、性能优化和故障排除等内容。
7. 扩展开发,介绍如何使用WinCC OA的扩展开发工具进行定制化开发,包括界面设计、功能扩展和报表生成等内容。
在操作手册中,通常还会包括大量的实例和案例分析,帮助用户更好地理解和掌握WinCC OA的应用技巧和最佳实践。
此外,操作手册还会不断更新,以适应软件版本更新和用户需求变化。
建议用户在使用WinCC OA操作手册时,结合实际操作进行学习,加深对软件功能和操作流程的理解和掌握。
wincc与云端的应用原理

WinCC与云端的应用原理简介WinCC是西门子公司推出的一款用于人机界面(HMI)和超级自动化软件应用项目的集成开发环境。
它提供了强大的功能,可用于监控和控制工业自动化系统。
同时,云计算技术的兴起使得云端应用成为了越来越受欢迎的解决方案。
本文将探讨WinCC与云端的应用原理。
WinCC与云端应用的基本原理WinCC与云端的应用原理是通过将WinCC与云计算技术结合,实现对WinCC 系统的远程访问和管理。
具体而言,以下是WinCC与云端应用的基本原理:1.数据采集与传输:WinCC通过连接到工控设备,实时采集设备的状态和数据。
通过预设的通讯协议将这些数据传输到云端服务器,确保数据的安全传输。
2.云端存储与处理:云端服务器接收到WinCC传输的数据后,将数据存储到数据库中,以便后续进行分析和处理。
同时,云端服务器还可以根据用户的需要对数据进行处理,例如数据清洗、数据分析等。
3.远程访问与监控:通过互联网或内网,用户可以远程访问云端服务器,实时监控设备状态和数据。
用户可以使用WinCC提供的图形化界面来查看数据,进行远程操作和控制。
4.报警与通知:云端服务器可以实时监测设备状态,一旦发生异常情况或报警,可以立即向用户发送通知。
用户可以通过手机、电子邮件等方式接收到报警信息,及时采取措施。
5.数据分析与优化:云端服务器收集到的历史数据可以用于进行数据分析和优化。
通过对历史数据进行统计分析,可以帮助用户发现潜在问题,并提供改进建议。
WinCC与云端应用的优势•实时监控和远程访问:通过云端应用,用户可以随时随地通过互联网访问和监控WinCC系统,无需局限于现场。
这提高了生产管理的灵活性和便捷性。
•报警和通知:通过云端应用,用户可以及时接收到设备异常和报警信息,从而快速响应问题,并采取相应措施。
避免因延迟而导致的损失。
•数据存储和分析:云端应用可以存储大量的历史数据,并通过云计算技术对数据进行分析,提供全面的统计信息和指标。
wincc的基本授权
wincc的基本授权WinCC 基本授权体系WinCC(Windows Control Center)是由西门子公司开发的工业自动化软件,用于监控和控制工业过程。
WinCC 授权体系旨在保护软件免遭未经授权的使用,并确保只有授权用户才能访问其功能。
授权类型WinCC 提供多种授权类型,每种类型都赋予用户不同的访问权限和功能。
最常见的授权类型包括:运行时授权:允许用户运行 WinCC 应用程序,但无法对其进行修改。
工程组态授权:允许用户工程组态和修改 WinCC 应用程序。
服务授权:允许用户访问特殊服务功能,例如远程访问或诊断工具。
授权级别每个授权类型还分为不同的级别,以进一步限制用户对特定功能的访问。
例如,工程组态授权可能具有以下级别:基础级:基本工程组态功能,例如创建项目和添加对象。
标准级:扩展工程组态功能,例如脚本和趋势分析。
高级级:全面的工程组态功能,例如版本控制和用户管理。
授权管理WinCC 授权管理由授权工具(License Manager)执行。
该工具负责生成、安装和管理所有 WinCC 授权。
授权工具可以:创建授权:生成新的授权文件,指定授权类型和级别。
安装授权:将授权文件应用到目标计算机,使授权对 WinCC 应用程序可用。
管理授权:查看、修改和吊销授权,以及跟踪授权使用情况。
获取授权WinCC 授权可以通过西门子授权合作伙伴或直接从西门子公司购买。
授权的成本取决于授权类型、级别和数量。
授权注意事项每个授权只能安装在一台计算机上。
授权不能转移到其他计算机。
未经授权使用 WinCC 是非法的,并且可能会导致法律后果。
定期更新 WinCC 授权以确保合规性和访问最新功能非常重要。
结论WinCC 授权体系对于保护软件免遭未经授权的使用和确保只有授权用户才能访问其功能至关重要。
通过理解不同的授权类型、级别和管理工具,用户和管理员可以维护一个安全且合规的 WinCC 环境。
基于wincc的几种数据处理方法的讨论和应用
基于wincc的几种数据处理方法的讨论和应用WinCC是西门子公司开发的一款人机界面软件,用于监控和控制生产过程。
在WinCC中,有很多数据处理方法可以应用于不同场景。
1. 数据存储和分析:WinCC可以将实时数据存储在数据库中,如SQL Server或Oracle,方便后续分析和报表生成。
这种方法适用于对历史数据进行分析,以便了解生产过程中的趋势和异常情况。
2. 报警管理和处理:WinCC支持报警管理功能,可以设置报警阈值,并在超过阈值时触发报警。
同时,还可以记录报警的时间、类型和级别等信息,并在界面上进行展示和处理。
这种方法适用于监控和管理生产过程中的异常情况。
3. 批处理和配方管理:WinCC提供了批处理和配方管理功能,可以对生产过程进行批处理控制和配方参数管理。
可以通过WinCC界面定义和管理不同的产品配方,包括原料用量、生产步骤和设备参数等。
这种方法适用于灵活的生产过程和多品种生产的环境。
4. 数据传输和远程监控:WinCC支持与其他系统的数据传输和通信,如ERP系统、MES系统等。
可以通过网络连接将实时数据传输到其他系统进行监控和分析。
同时,还可以通过远程访问功能实现对生产过程的远程监控和控制。
这种方法适用于跨地区或跨部门的远程管理需求。
5. 数据可视化和报表生成:WinCC可以将实时数据以图表、曲线等形式展示在界面上,方便用户直观地观察生产过程的变化。
同时,还可以生成报表,如日报、月报等,提供给管理层进行决策分析。
这种方法适用于生产过程监控和管理的可视化需求。
综上所述,基于WinCC的数据处理方法多种多样,并且可以根据实际需求进行灵活应用。
无论是对实时数据进行存储和分析,还是进行报警管理和远程监控,WinCC都能提供相应的功能和工具。
WinCC 远程通讯VPN
Page 4
Intelligent & Green Plant Workshop 2016
SIMATIC WinCC 远程通讯 配置
网络组态
SINEMA RC Client 客户端软件
Page 5
Intelligent & Green Plant Workshop 2016
SIMATIC WinCC 远程通讯 配置
SIMATIC WinCC 远程通讯 设备
WinCC远程通讯解决方案
本例中采用SCALANCE M874-3 建立VPN通道 SCALANCE M874-3 (3G-HSPA+) 6GK5874-3AA00-2AA2
SCALANCE M874-3 是用于通过第三代移动无线网络(UMTS)经济而安全地连接以 太网子网和自动化设备的移动无线路由器,此路由器支持 HSPA+ (高速分组接入)。 它可在下行链路上实现高达 14.4 Mbit/s 的传输速率,在上行链路上实现高达 5.76 MBit/s 的传输速率(具体速率取决于移动无线提供商的基础设施)。
SIMATIC WinCC 远程通讯 配置
客户端项目设置
保证客户端能PING通服务器的IP地址 浏览加载服务器数据包
Page 11
Intelligent & Green Plant Workshop 2016
SIMATIC WinCC 远程通讯 结论
客户端运行结果
直接显示变量值 画面窗口显示换面 断线重连功能 建议采用分布式系统 多用户项目打开时会出现 “Server not available”错误。
Page 12
Intelligent & Green Plant Workshop 2016
对WinCC的远程ODBC连接

自动化系统 > SIMATIC HMI人机界面 > HMI 软件 > SCADA 系统 SIMATICWinCC > SIMATICWinCC > 编程(API) > 常问问题对WinCC的远程ODBC连接订货号:6AV637..WINCC SIMATIC HMI SOFTWARE6AV638..WINCC SIMATIC HMI SOFTWARE 26ES7650..SIMATIC PCS7 COMPACT SYSTEM, GENERAL6ES7658..SIMATIC PCS 7, SOFTWARE问题:WinCC V5.1版本的标准设置中,不可以设置ODBC连接。
它被用来通过MS Access, MS Query等访问WinCC数据库。
需要注意哪些设置?解答:z WinCC 站方面的准备 (如果要访问运行系统的数据库,必须启动WinCC 运行系统)。
打开“Sybase Central”,确定WinCC的数据库名。
图 1:启动“Sybase Central”选择菜单选项“工具 > 连接”。
在打开的掩码中按以下输入用户 ID:dba口令:sql图 2:登录到数据库在Sybase窗口中,可看到WinCC站名在窗口左边。
点击 + 图标放大画面。
现在可看到2个数据库。
记住想要进行远程访问的数据库名。
以 RT 结尾的数据库为运行系统数据库,其它的为CS数据库。
图 3a: 确定数据库名鼠标右键点击所要数据库的属性,也可以选择数据库名并将它复制到剪贴板。
如果这样做并将名字储存在文本文件中,可以避免符号使用中的错误。
(图 3b)。
图 3b:复制数据库名到剪贴板z远程站上的必要设置(另一台计算机)。
从控制面板中启动“数据源(ODBC)” (Windows NT)或通过“启动 > 程序 > ODBC数据管理器” (Windows 2000)启动。
图 4:ODBC窗口中的设置切换到“系统DSN”标签并选择“添加”(在此需注意“用户DSN”与“系统DSN”间的不同。
WINCC OA远程UI组态步骤

远程UI组态步骤1.在局域网中,设置服务器及远程客户端的IP地址。
2.服务器(PC name:hsd01-pc)(IP:192.168.0.250)客户端(PC name:hsd02-pc)(IP:192.168.0.251)3.以两台计算机为例,修改两台计算机的hosts 文件:该文件位于Windows 安装目录\system32\drivers\etc (在运行命令中键入start system32,弹出的文件drivers\etc)下,用记事本打开修改,在该文件中加入对方计算机的IP和所对应的计算机名称。
4.例中:新建标准项目,实际可创建其他项目。
5.在标准项目中,建立参数变量、画面、趋势、报警等。
6.画面创建完成后,在“Panel Topology”中完成画面拓扑结构组态,如下图所示。
首次运行“Panel Topology”拓扑结构设置时,会弹出“ScreenConfiguration”对话框,如有多个显示器,可在这里为每个显示器设置各自的显示模板、分辨率和起始画面。
本例中使用的是单显示器,“Number of Screen”处设置为1。
显示模板“Default template”选为“TEMPLATE1”。
7.选中“Start Panel”,点击“Proportion”按钮,选择一副已有的画面作为“Start Panel”的显示画面。
设置完毕后,返回“Panel Topology”对话框,保存设置。
8.在Windows资源管理器中共享Wincc OA项目文件夹,使指定用户在客户端可以访问该文件夹。
本例中项目名CS。
9.在hsd01-pc(服务器端)的运行命令中,键入如下命令:net user guest /active:yes(命令将Guest账号激活)net user guest 123456 (命令将Guest用户密码设置为123456)10.通过局域网,连接hsd01-pc(服务器端),网络用户名为Guest,密码为12345611.客户端与服务器连接后,在客户端创建冗余项目。
- 1、下载文档前请自行甄别文档内容的完整性,平台不提供额外的编辑、内容补充、找答案等附加服务。
- 2、"仅部分预览"的文档,不可在线预览部分如存在完整性等问题,可反馈申请退款(可完整预览的文档不适用该条件!)。
- 3、如文档侵犯您的权益,请联系客服反馈,我们会尽快为您处理(人工客服工作时间:9:00-18:30)。
3.配置web服务器
1)在项目管理器中,右键单击“web navigator”,选择“web检视发布程式”,选择所有画面,单击下一步,直至完成;
2)在项目管理器中,右键单击“web navigator”,选择“web规划程式”,在“internet网址”处,选择本机ip地址,单击完成;
4.激活项目;
四.完成
五.备注:激活项目后如弹出关于inetinfo.exe内存无法读取的错误提示,应重新启动计算机后,再次激活项目。
三.项目恢复
1.通过wincc打开“服务器wincc”项目;
2.配置opc连接
1)右键单击“变量管理器àopcàopc groups(opchn uint #1)àopcserver_wincc”,选择“属性”;
2)在弹出对话窗口的“常规”选项卡中,选择“属性”;
3)在弹出对话窗口的“在另一台计算机上运行服务器”栏中,添入前置机的计算机名或其ip地址,确定;
incc web服务器配置
一.软件安装
1.安装windБайду номын сангаасws2000 (服务器版sp4中文版);
2.安装wincc v5.1 asia及以上版本;
3.安装wincc web navigator组件;
二.网络地址设置
服务器需与前置机的tcp/ip地址处于同一网段,否则无法建立opc连接。
