DDS.JMS-v1.0
DDS模块使用说明
DDS模块使用说明DDS(Data Distribution Service)是一种用于实时数据交换的标准通信协议,请教如何使用DDS模块的使用说明。
总结来说,DDS模块的使用可以分为以下几个步骤:1. 定义数据类型:首先,你需要定义你要传输的数据类型。
这可以通过使用IDL(Interface Definition Language)进行定义。
IDL是一种与编程语言无关的接口描述语言,用于定义数据结构和操作接口的语法和语义。
2.生成代码:一旦你定义好了数据类型,你需要使用IDL编译器生成与所用编程语言相关的代码。
这些代码将帮助你创建和管理DDS实体,如数据读取器和数据写入器。
3. 创建DDS实体:使用生成的代码,你可以创建DDS实体。
DDS实体包括数据读取器和数据写入器,以及DDS域和主题。
域(Domain)是一个逻辑分区,用于简化数据交换的可靠性和可定制性。
主题(Topic)定义了数据的名称和类型。
4.发布和订阅数据:一旦你创建了DDS实体,你可以使用数据写入器来发布数据,使用数据读取器来订阅数据。
数据写入器将数据发送到相应的主题,而数据读取器将从相应的主题接收数据。
5. 配置QoS策略:DDS提供了一系列的QoS(Quality of Service)策略,用于控制数据传输的可靠性、实时性、带宽消耗等方面。
你可以根据你的需求配置这些策略,以满足你的应用程序的要求。
6.启动DDS实体:一旦你完成了DDS实体的配置和数据发布/订阅设置,你可以使用DDS运行时库来启动你的应用程序。
DDS运行时库将负责管理DDS实体之间的通信和数据传输。
下面是一个简单的使用DDS模块的例子,以C++语言为例:```cpp// step 1: 定义数据类型struct SensorDatastring sensor_id;float temperature;float humidity;};// step 2: 生成代码// step 3: 创建DDS实体DDSDomainParticipant *participant = DDSDomainParticipantFactory::get_instance(->create_participant 0,DDS_PARTICIPANT_QOS_DEFAULT,NULL,DDS_STATUS_MASK_NONEDDSDataWriter *data_writer = participant->create_datawritertopic,data_writer_qos,NULL,DDS_STATUS_MASK_NONEDDSDataReader *data_reader = participant->create_datareader topic,data_reader_qos,NULL,DDS_STATUS_MASK_NONE// step 4: 发布和订阅数据SensorData data;data.sensor_id = "sensor1";data.temperature = 25.0;data.humidity = 50.0;DDS_InstanceHandle_t handle = data_writer->register_instance(data);data_writer->write(data, handle);SensorData received_data;DDS_SampleInfo info;data_reader->take_next_sample(received_data, info);// step 5: 配置QoS策略DDS_PublisherQos publisher_qos;participant->get_default_publisher_qos(publisher_qos);publisher_.ensure_length(1, 1);publisher_[0] = "Sensors";DDS_Publisher *publisher = participant->create_publisherpublisher_qos,NULL,DDS_STATUS_MASK_NONE// step 6: 启动DDS实体DDSDomainParticipantFactory::get_instance(->delete_participant(participant);```以上是关于DDS模块的简要使用说明。
DDS Server 操作手册说明书
Operation manualVer. 42016/10/06Operation manualDDS ServerThank you for using the product of BlueEyes Technology.The manual will introduce the product of BlueEyes Technology. Please read the manual before you start using the product.Though the information in the manual has been verified before publish, the actual specification should be based on the actual shipment. Blu eEyes Technology doesn’t have to guarantee, proclaim or declare for the content, along with other purpose. In addition, the product specification and information that mentioned in the manual is for reference only. The content might be update at any time without notice. If there is any mistake of the information, including software, firmware, and hardware that mentioned in the manual BlueEyes Technology has no responsibility for the mistake.Please reach BlueEyes website to get the upgrade of the product specification, our company will not notice you. If you want to get the latest product information, operation manual, firmware, or you have any question to the products of BlueEyes Technology, please contact your local agent or go to the official website of BlueEyes Technology for further information.It is not allowed to copy/ use the content or to change the information and publishing of the manual without BlueEyes Technology’s written consent.Copyright 2016 BlueEyes Technology Inc. All Rights Reserved.BlueEyes Technology Corp.Add: 7F-3, No.200, Sec. 4, Wenxin Rd., North District,TaichungCity 40462, TaiwanTEL: +886 4 2297 0977 / +886 982 842 977Fax: +886 4 2297 0957E-mail:********************.twWebsite: Index1. Introduction (3)1.1 About the manual (3)1.2 Intellectual Property Rights (3)1.3 About the manual (3)2. Install VM (4)2.1 VMware player (4)2.2 Setup VMware player (9)2.3 Database Management Interface (17)3. Admin (18)3.1 Information (18)3.2 Account Management (19)4. Company (20)4.1 Information (20)4.2 Scrolling Text Management (21)4.3 Instant message Management (22)4.4 Content Management (23)4.5 DDS PRO Management (26)4.6 URL Management (26)4.7 Location Management (29)4.8 Player Management (31)4.9 Player Status (34)4.10 Server Settings (35)5. Q&A (36)Q1: What is default account and password for admin? (36)Q2 How to I know connection for DDS PRO? (36)Q3: Can I send Instant message to specific DDS PRO? (36)Q4: Show insufficient capacity while updating? (36)1. Introduction1.1 About the manualThe manual can help you understand the function and operation methods of DDS playerThe company suggested you that if you store all written records of important information, in some cases, it may cause data loss and change in the electrical storage. Therefore the company is not responsible for the data loss that is caused by improper use, maintenance, defects, expire or any other reason.The company is not responsib le for the economy loss that is caused by the third party or other function, such as the DIY firmware, the information loss or change.The pictures of operation manual may be different from the actual product, this is because of the software version changes.If there are changes of the information in the manual, we would not notice you. Please go to the official website of BlueEyes Technology.The company would not be responsible for the information downloaded from the website.1.2 Intellectual Property RightsAccording to the Intellectual Property Rights, the copy, changes, or usage of copyrighted pictures and music are only for personal or private use. If the user does not have a wider range of copyright or not explicit consent of the copyright owner and unauthorized copying, change or use the copies of this way to change or make or amendment, then it would be viewed as violating copyright laws. The copyright owner is entitled to claim for loss. For this reason, do not illegally use copyrighted materials.1.3 About the manualPlease read the instructions carefully before use, our company is not responsible for the artificial problems caused by incorrect use of the product.Read and keep instructions properly. Operate according to instructions in the operation manual.The pictures on the manual may be different from the pictures on the monitor. This is because the software version is different.2. Install VM2.1 VMware playerStep One、Download VMware playerDownload address:/DDSServer_download.phpStep Two、Unzip fileUnzip VMware-player-6.0.6-2700073.zipStep Three、ProcessClick VMware-player-6.0.6-2700073.exeStep Four、VMware playerClick “next” buttonChoose “I accept the terms in the license agreement”and click “next” button.Click “next” button.Click “Continue” button.Please wait while and Program installationClick “Finish” button then Setup completeAfter install VMware Player successfully, the VMware Player application icon as below display on desktop.2.2 Setup VMware player Click Open a Virtual Machine.Browser and select DDSserver.vmxPlay virtual machine.Click in the virtual screen to send keystrokes. Fill in the default account and password (user name: root and password: 27507522)Fill in “ifconfig” command to get the ip addressYour IP address are as below red rectangle.F ill in“vi /etc/network/interfaces” and press Enter.Press [ I ] can insert the textFill in below command and press [Esc] to leave the edit page. auto eth0iface eth0 inet staticaddress 192.168.1.225netmask 255.255.255.0gateway 192.168.1.1Press [ shift ]+[:] and fill in “wq” command and press [Enter]Fill in vim /var/www/blueeyes/global_var.php and press [Enter].Press [ I ] can insert the text. Edit address as below red rectangle. Press [ shift ]+[:] and fill in “wq” command and press [Enter]When you finish setting, you can use the website.Ex:Ubuntu server IP:http://192.168.1.225/blueeyes/2.3 Database Management InterfaceUse browser to link :http://192.168.1.225/phpmyadminFill in phpmyadmin root login company username and password(user name: root and password:27507522)3. AdminKey in the user name and password, please click Login button to login the Digital Signage Management Server:Admin User name:rootAdmin password: 275075223.1 InformationPC information panel shows current status includes CPU Usage Rate、RAM Usage Rate (Free/Total MB)、HD Usage Rate (has already used %)、System on time(More than days)3.2 Account ManagementClick Account Management button the left side to create new account, you can create accounts for different companies, groups.For example:●Name:blueeyes_Test●Company Username:blueeyes●Password:blueeyes●Permission:Company or AdminAfter submit, you’ll see the created account item in below, please click the Edit or Delete button.4. CompanyKey in the user name and password you created4.1 InformationPC information panel shows current status includes CPU Usage Rate、RAM Usage Rate (Free/Total MB)、HD Usage Rate (has already used %)、System on time(More than days).4.2 Scrolling Text ManagementClick Scrolling Text Management button in the left side. Scrolling Text Management allows you to manage the scrolling text name, scrolling text content(or upload text file as utf-8 format),Scrolling speed ,Polling time(1~100 min) , text style, text color, text size, text position, text play type.After submit, you’ll see the created Scrolling item in below. If you want to change the content or delete it, please click the Edit or Delete button.4.3 Instant message ManagementClick Instant message Management button in the left side.Instant message Management allows you to manage the scrolling text name, scrolling text content(or upload text file as utf-8 format),Transparent ,Display second(1~100 sec) , text color, text size. For example:After submit, you’ll see the created Instant message item in below.If you want to change the content or delete it, please click the Edit or Delete button.If you want to play Instant message, please select message name then click submit button, Time of last send will display time of send.4.4 Content ManagementContent Management allows you to add the photo or video content.Step One、UploadBrowser and select the file you want to upload. Please note that the content file is limited to 4GB and can only upload photo in jpg, jpeg, png file and Video in mp4, mwv, mpg, mpeg, avi file.After submit, you’ll see the created content in below. If you want to remove content, please click the Delete button.Step Two、Play List ManagementSelect the contact file, if you want to play multi files, please click the “Add Content” button on the top to select new content file. You can click Remove button to delete the extra content.The photo can set play time Sec(1~99). The video playback depend on Video length.●Play List name: key in the playlist name(Letters, numbers, and underscores onlyplease), for example: play151104●Play List type: support Normal type (Limited 4GB) and Break type (Limited in 100MB).●Orientation:Support Landscape and Portrait.Step Three、DoneAfter submit, you’ll see the created Play List item in below. If you want to change the Play List item or delete it, please click the Edit or Delete button.*Please note that you can only edit the content file, but can’t change the Play List name and Play List type.4.5 DDS PRO ManagementClick DDS PRO Management button in the left side.DDS PRO Management allows you to add the DDS file, add DDS content:●Upload file: select the DDS file you want to upload.●Play List type: support Normal type(limited to 4GB) and Break type (limited to100MB).After submit, you’ll see the created the DDS list in below. If you want to delete DDS file, please click the Delete button.4.6 URL ManagementClick URL Management button in the left side. URL Management allows you to add the URL website.Step One、Add URL●URL Name:key in the URL name (Letters, numbers, and underscores only please)for example: BlueEyes●URL Path:key in the URL Path, for example: /After submit, you’ll see the created the URL list in below. If you want to change the URL item or delete it, please click the Edit or Delete button.Step Two、Add Play ListClick Play List button in the up side. Play List allow you to manage the play URL content and order that you would like to play on DDS PRO.Select the URL name, if you want to play multi URL, please click the “Add Content”button on the top to select new URL name and Sec(10~65535). You can click Remove button to delete the extra URL.●Play List name: key in the playlist name, for example: play151104, (Letters,numbers, and underscores only please)●Play List type: support Normal type and Break type.●Orientation:support Landscape and Portrait.Step Three、DoneAfter submit, you’ll see the cr eated Play List item in below. If you want to change the Play List item or delete it, please click the Edit or Delete button. Please note that you can only edit the content file, but can’t change the Play List name ,Play List type and Orientation.4.7 Location ManagementClick Location Management button in the left side. Location Management enables user to create a location and corresponding playlist content and play schedule.●Location name: key in the location name.●Marquee: select the Scrolling Text.(Support play content and URL)●Check type: End play(DDS content default 10 min)、xx minutes(1~100) or xxo’clock.●Schedule: enable you to set up the play time and play content (you canchoose one of content、DDS、URL).For example2016/05/30 16:00~2016/05/30 17:00 play [Playlist]BlueEyes.zip2016/05/30 17:00~2016/05/30 18:00 hibernation2016/05/30 18:00~2016/05/30 19:00 play[HTML5] BlueEyes.zipCommercial Break Content for Routines ScheduleFor exampleStart date:2016/05/30End date:2016/05/30Start time:17:30End time:18:00The content will play [Playlist]NEWS.zip at 17:30~18:00 on 2016/05/10After submit, you’ll see the created location item in below. If you want to change the location item or delete it, please click the Edit or Delete button.4.8 Player ManagementClick Player Management button in the left side. Player management enable user to manage the players in different location and player device.Excel File Input:Excel file input: User can download csv sample file to edit and upload batch data to manage the players at one time.Click the Download button and save the csv file in PC, the file name is player_example. We edit the csv file as below for example.Browser the edited csv file and submit, you’ll see the created player items in below.If you want to change the player item or delete it, please click the Edit or Delete button.Single Input:●Location Name: select the location you created, for example: taichung●Device Name: key in devices name, for example: taichung 1●Setting Mode: support Location mode or Manual mode. Location mode: Afterselecting the location Name, the value will show automatically according to the location management you set up before. If you want to change, just select manual item to edit.When the device connect ,the status will show “MAC(ex:000ffdab2701)”.If you want to change the player item or make it disconnect, please click the Edit or Cancel active button .The active device can’t be deleted.When the device disconnect, the status will show “Inactive”.If you want to change the player item or delete it, please click the Edit or Delete button .4.9 Player StatusYou can see all players’ working status in the status page. The server will check the status of each player device per interval time.For example:If the status is green(log is 200), it means the player is playing the media content.Click the Show log Code button, you’ll see the meaning of any status as below.4.10 Server SettingsClick Server settings button in the left side.Server settings enable user to manage the players limit the number of player to download.Download unlimited number of devices in the same time when limit the number of player to download as Off.Download limited number of devices(1~999) in the same time when limit the number of player to download as On.5. Q&AQ1: What is default account and password for admin? 【Answer】Default account is root. Default password is 27507522.Q2 How to I know connection for DDS PRO?【Answer】Go to Player status to check DDS PRO connection.Q3: Can I send Instant message to specific DDS PRO?【Answer】No.Instant message will send to all DDS PRO.Q4: Show insufficient capacity while updating?【Answer】Unzip archive need twice the capacity. If your archive is 2GB, DDS PRO require 4GB storage space when updating via internet. Therefore, youneed to ensure the capacity of archive which DDS PRO is playing plustwice the capacity of archive which you are going to updating is lessthan 5GB.© 2016 BlueEyes Technology Corporation. All rights reserved. PRINTED IN TAIWAN This paper is for informational purposes only. BlueEyes is registered trademarks or trademarks of BlueEyes Technology Corporation. Other。
DDS模块使用说明

DDS模块使用说明DDS(Data Distribution Service)是一种用于构建分布式系统的中间件解决方案。
DDS模块是DDS中的一个重要组成部分,提供了一种数据分发和数据订阅的机制。
本文将详细介绍DDS模块的使用方法。
1.安装DDS模块2.配置DDS模块在安装完成后,我们需要进行一些配置工作。
首先,打开DDS的配置文件,修改其中的一些参数,如数据传输协议、最大带宽等。
这些参数的具体含义和设置方法可以在DDS的官方文档中找到。
3.创建DDS域DDS模块是基于域(Domain)的概念进行工作的。
我们需要先创建一个DDS域,然后在该域中进行数据的分发和订阅。
在创建域时,我们需要为其指定一个唯一的域标识符(Domain Identifier),以便其他节点可以加入该域。
4.定义数据类型在DDS中,我们需要先定义数据的类型,然后才能进行数据的分发和订阅。
数据类型的定义可以使用IDL(Interface Definition Language)来进行,它是一种用于描述数据结构的语言。
在定义数据类型时,我们需要指定数据的名称、字段和字段类型等信息。
5.发布数据发布数据是指将数据发送到DDS域中,以便其他节点可以进行订阅。
在发布数据之前,我们需要创建一个数据发布者(Data Publisher),然后通过该发布者来发布数据。
发布数据的过程包括创建一个数据消息,给该消息设置值,然后通过发布者将消息发送出去。
6.订阅数据订阅数据是指从DDS域中接收数据,以便我们可以对数据进行处理。
在订阅数据之前,我们需要创建一个数据订阅者(Data Subscriber),然后通过该订阅者来接收数据。
订阅数据的过程包括创建一个数据监听器(Data Listener),然后通过订阅者注册该监听器。
当有数据到达时,监听器将会被调用,并将数据传递给我们的应用程序进行处理。
7.进行数据过滤在DDS中,我们可以通过数据过滤机制来选择性地接收数据。
evtool ver 1.0 取扱説明書

Oscillator
X’tal / CR / X’tal (External) Fs Available
LSI
File Layout
9
ROM Copyright 2002 AREX Co. Ltd.
Continuous
...
Boundary Unit ...
Boundary Unit
8 Mbit ROM / 16 Mbit ROM / 32 Mbit ROM
ROM
ROM
ROM
hex
xxx1.hex xxx2.hex xxx3.hex ...
Granular Noise Reduction ROM
Sine Wave Frequency Sine Wave Level
Parameter Set ADPCM
Sine Wave Level
…
ADPCM ADPCM
PCM PCM
23
Enable Global
File Copyright 2002 AREX Co. Ltd.
Save As…
ADPCM
HEX .hex
ROM Size
ROM
256 Kbit ROM / 512 Kbit ROM / 1 Mbit ROM / 2 Mbit ROM / 4 Mbit ROM /
20
Copyright 2002 AREX Co. Ltd.
Phrase
Edit
Undo […]
…
30
30
File Edit Edit Edit Edit Edit View
New Cut Delete Clear All Insert Blank Line Add User No. Sort
JMS手册

引言JMS:Java Message Service Java消息服务JMS是设计分布式应用程序的常用技术,基于JMS实现的程序可以运行在不同的JVMJMS是SUN在统一各种MOM系统接口的规范,它包含点对点(Point to Point,PTP)和发布/订阅(Publish/Subscribe,pub/sub)两种消息模型,提供可靠消息传输、事务和消息过滤等机制。
JMS提供者JMS的实现需要JMS Server 支撑。
支持SUN JMS的中间件(JMS Server)有:opnerJMS、activeMQ、WebLogic、JBoss等activemq下载地址:/activemq-410-release.htmlJMS优点使用JMS API不仅使通信耦合降低,而且它还使通信变得:●异步:JMS提供者将到来的消息发送给客户,客户不用发送请求接收消息。
●可靠:JMS API确保消息传送一次而且只传送一次。
可靠性差的应用程序可能会丢失消息或者重复接收消息JMS实现1、java程序通过JMS的api接口来访问JMS消息服务器,如WebLogic。
而访问JMS消息服务器,则需要通过JNDI查询获得消息服务器的引用。
2、如果需要提供消息事务支持,则要求通过JTA接口实现。
3、消息的持久性存储可以是文件或是数据库JMS消息构成1、消息头:包括消息的识别信息和路由信息。
有以下预定字段JMSSDestination-指出消息发送的目的地名字JMSDeliveryMode-指定消息是一个持久性消息还是非持久性消息JMSExpiration-定义一个消息何时过期,默认值为0表示永不过期JMSPriority-指定消息的优先级JMSMessageId-默认情况下由消息服务器产生,也可程序生成,唯一标识消息的字符串JMSReplyTo-指定消息响应的目的地JMSType-指出消息的类型JMSRedelivered-消费者无法得到消息时,是否需要重新传递JMSTimestamp-消息服务器接收消息的时间2、 消息属性3、 消息体JMS 程序实现组成1、 生产者:创建和发送消息的程序2、 消费者:接收消息的程序3、 消息服务器:管理消息并在生产者和消费者之间传递JMS 消息机制JMS 消息传递提供了两种模式:点对点和发布/订阅点到点式 PTP(Point-to-Porint)消息机制如图消息生产者1发送消息发送消息消息生产者1 消息消费者1消息消费者2生产者与消费者之间的消息数据由‘消息队列’管理,一旦消费者接收了生产者的消息,此消息数据即被JMS 从消息队列中删除发布/订阅式Pub/Sub(Publish-and-Subscribe)消息机制图消息订阅者2确 接认 收发送消息 确认消息订阅者1消息生产者 接收JMS Provider 消息队列JMS Provider消息主题多个消息生产者可以向同一主题发送消息,多个消息消费者可以从同一主题订阅消息。
opendds使用手册
opendds使用手册
OpenDDS是一个开源的分布式实时数据分发系统,它使用DDS(Data Distribution Service)规范来实现数据分发。
以下是OpenDDS的使用手册:
1. 获取学习资料:可以在网上搜索中文资料,了解OpenDDS的基本概念
和原理。
同时,可以在OpenDDS官网上下载OpenDDS软件包和开发者
指南,以便更深入地了解OpenDDS的使用和开发方法。
2. 环境搭建:根据所使用的操作系统和开发环境,配置必要的软件和依赖关系。
OpenDDS需要使用Java和C++语言进行开发,因此需要安装相应的开发工具和库。
3. 为我所用:首先创建一个OpenDDS应用程序的工程目录结构,然后在
工程目录中创建所需的源文件和配置文件。
需要注意的是,在配置文件中指定了应用程序的运行参数和配置选项。
4. 打包DDS库文件:将DDS库文件打包成可执行文件或库文件,以便在
应用程序中引用。
可以使用静态链接或动态链接的方式将DDS库文件与应
用程序进行链接。
5. 求助渠道:如果在使用OpenDDS过程中遇到问题,可以通过搜索引擎、论坛、社区等渠道寻求帮助。
同时,也可以参考OpenDDS的官方文档和
示例代码,以便更好地理解和使用OpenDDS。
总之,OpenDDS的使用手册包括获取学习资料、环境搭建、为我所用、打包DDS库文件和求助渠道等方面。
通过认真阅读和理解这些内容,可以更好地使用OpenDDS进行应用程序的开发和部署。
软件说明
欢迎使用本程序并反馈问题致support@
如果你在使用中遇到问题,请提交未脱壳的程序给我们,能提供该程序的加壳工具更好,提交方法将程序发送到support@。
超级巡警:彻底查杀各种木马,全面保护系统安全。
yzpack v1.1 v2.0
spack method1 spack method2
naked packer v1.0
upolyx v0.51
stealthPE v1.01 stealthPE v2.2
mslrh v0.31 v0.32
!epack v1.0 !epack v1.4
bjfnt v1.2 v1.3
mew5 mew v1.0 v1.1
packman v1.0
PEDiminisher v0.1
pex v0.99
petite v1.2 v1.3 v1.4 v2.2 v2.3 All Version
exe32pack v1.42
kbys v0.22 v0.28 / 网友称涛涛压缩器
yoda's protector v1.02 v1.025 v1.03.2
yoda's crypt v1.1
yoda's crypt v1.2 v1.3 v1.xModify / 网友修改版
mslrh v0.2 == [G!X]'s Protect
morphine v1.3 morphine v1.6 morphine v2.7
rlpack full edition
..\TestFils 目录中有几个测试样例文件。
V1.1 改动:
1.修正一些不稳定的因素,更简单易用,去除了一些暂时不稳定的壳支持。
openDDS
openDDS 文档文档公司名称法律公告目录前言 (4)第一章简介 (5)第二章入门 (16)2.1DCPS 的使用 (16)2.1.1定义数据类型 (16)2.1.2处理IDL (17)2.1.3一个简单消息发布者 (19)2.1.3.1参与者的初始化 (20)2.1.3.2注册数据类型和创建一个主题 (21)2.1.3.3创建一个发布方 (21)2.1.3.4创建数据写入器并等待订阅方 (22)2.1.3.5样本出版 (23)2.1.4设置订阅方 (24)2.1.4.1初始化参与者 (24)2.1.4.2注册数据类型和创建一个主题 (25)2.1.4.3 创建订阅方 (25)2.1.4.4 创建一个数据读取器和一个监听 (25)2.1.5 数据读取器监听的实现 (26)2.1.6 OpenDDS客户中的清理 (28)2.1.7运行示例 (29)第三章服务质量 (30)3.2.6持久服务 (41)3.2.7资源限制 (42)3.2.8分区 (42)3.2.9期限 (43)3.2.10寿命 (44)3.2.11用户数据 (44)3.2.12主题数据 (44)3.2.13数组 (45)3.2.14传输优先级 (45)3.2.16实体工厂 (48)3.2.17呈现策略 (49)3.2.18目标顺序 (50)3.2.19读生命周期 (50)3.2.20写生命周期 (50)第四章条件与监听 (47)第五章内容订阅配置 (48)第六章内建主题 (49)第七章配置openDDS (50)7.1配置方法 (50)7.2 常见的配置选项 (52)7.3发现配置 (54)7.3.1域配置 (55)7.3.2 DCPSInfoRepo配置应用 (58)7.3.2.1 多DCPSInfoRepo实例的配置 (61)7.3.3 DDSI-RTPS发现配置 (63)7.3.4 静态发现配置 (65)7.4 传输配置 (68)7.4.1 概述 (69)7.4.1.1 传输概念 (69)7.4.1.2 OpenDDS如何选择传输 (69)7.4.2 配置文件示例 (70)7.4.2.1 单个传输配置 (70)7.4.2.3 使用多种配置 (71)7.4.3 传输注册示例 (72)7.4.4 传输配置选项 (73)7.4.5 传输实例选项 (74)7.4.5.1 其他常见传输选项 (74)7.4.5.2 TCP/IP传输配置选项 (75)7.4.5.3 UDP/IP传输配置选项 (76)7.4.5.4 IP组播传输配置选项 (76)7.4.5.5 RTPS_UDP传输配置选项 (79)7.4.5.6 共享内存传输配置选项 (80)7.5 日志 (80)7.5.2 传输层日志 (81)第八章OpenDDS IDL 选项 (82)8.1 opendds_idl命令行选项 (82)第九章DCPS信息仓库 (85)9.1 DCPS信息仓库选项 (85)9.2仓库集合 (87)第十章openDDS的java绑定 (88)第十一章openDDS的建模SDK (89)第十二章openDDS的录制和重放 (90)前言第一章简介OpenDDS is an open source implementation of the OMG Data Distribution Service (DDS) for Real-Time Systems Specification v1.4 (OMG Document formal/2015-04-10)and the Realtime Publish-Subscribe Wire Protocol DDS Interoperability Wire ProtocolSpecification (DDSI-RTPS) v2.2 (OMG Document formal/2014-09-01). OpenDDS issponsored by Object Computing, Inc. (OCI) and is available at /.This developer’s guide is based on the version 3.7 release of OpenDDS.OpenDDS是OMG 实时系统数据分发服务(DDS) 规范1.4版(OMG Document formal/2015-04-10) 和实时发布订阅线上协议- DDS 互操作线上协议(DDSI-RTPS)规范2.2版(OMG Document formal/2014-09-01)的开源实现. OpenDDS 由ObjectComputing, Inc. (OCI) 资助开发,且可以从/获取到. 本开发人员指南是基于OpenDDS 3.7的。
RTI Connext DDS User's Manual Version 2.3.3说明书

RTI Code Generator for RTI Connext DDSUser's ManualVersion2.3.3Copyrights©2016Real-Time Innovations,Inc.All rights reserved.Printed in U.S.A.First printing.April2016. TrademarksReal-Time Innovations,RTI,NDDS,RTI Data Distribution Service,DataBus,Connext,Micro DDS,the RTI logo,1RTI and the phrase,“Your Systems.Working as one,”are registered trademarks,trademarks or service marks of Real-Time Innovations,Inc.All other trademarks belong to their respective owners. Copy and Use RestrictionsNo part of this publication may be reproduced,stored in a retrieval system,or transmitted in any form (including electronic,mechanical,photocopy,and facsimile)without the prior written permission of Real-Time Innovations,Inc.The software described in this document is furnished under and subject to the RTI software license agreement.The software may be used or copied only under the terms of the license agreement.Technical SupportReal-Time Innovations,Inc.232E.Java DriveSunnyvale,CA94089Phone:(408)990-7444Email:***************Website:https:///Chapter1Introduction1 Chapter2Paths Mentioned in Documentation2 Chapter3Command-Line Arguments for rtiddsgen5 Chapter4Generated Files13 Chapter5Customizing the Generated Code17 Chapter6Boosting Performance with Server Mode20Chapter1IntroductionRTI Code Generator creates the code needed to define and register a user data type with Connext ing Code Generator is optional if:l You are using dynamic types(see Managing Memory for Built-in Types(Section3.2.7)in the RTI Connext DDS Core Libraries User’s Manual1).l You are using one of the built-in types(see Built-in Data Types(Section3.2)in the RTIConnext DDS Core Libraries User’s Manual).To use Code Generator,you will need to provide a description of your data type(s)in an IDL or XML file.You can define multiple data types in the same type-definition file.For details on these files,see the RTI Connext DDS Core Libraries User’s Manual(Sections3.3and3.4).1This document is provided with Connext DDS.You can also access it from the RTI Community’sDocumentation page.Chapter2Paths Mentioned inDocumentationThe documentation refers to:l<NDDSHOME>This refers to the installation directory for Connext DDS.The default installation paths are:l Mac OS X systems:/Applications/rti_connext_dds-versionl UNIX-based systems,non-root user:/home/your user name/rti_connext_dds-versionl UNIX-based systems,root user:/opt/rti_connext_dds-versionl Windows systems,user without Administrator privileges:<your home directory>\rti_connext_dds-versionl Windows systems,user with Administrator privileges:C:\Program Files\rti_connext_dds-version(for64-bits machines)orC:\Program Files(x86)\rti_connext_dds-version(for32-bit machines)You may also see$NDDSHOME or%NDDSHOME%,which refers to an environment variable set to the installation path.Wherever you see<NDDSHOME>used in a path,replace it with your installation path.Note for Windows Users:When using a command prompt to enter a command that includes the path C:\Program Files(or any directory name that has a space),enclose the path inquotation marks.For example:“C:\Program Files\rti_connext_dds-version\bin\rtiddsgen”or if you have defined the NDDSHOME environment variable:“%NDDSHOME%\bin\rtiddsgen”l RTI Workspace directory,rti_workspaceThe RTI Workspace is where all configuration files for the applications and example files are located.All configuration files and examples are copied here the first time you run RTI Launcher or any script in<NDDSHOME>/bin.The default path to the RTI Workspace directory is: l Mac OS X systems:/Users/your user name/rti_workspacel UNIX-based systems:/home/your user name/rti_workspacel Windows systems:your Windows documents folder\rti_workspaceNote:'your Windows documents folder'depends on your version of Windows.For example,on Windows7,the folder is C:\Users\your user name\Documents;onWindows Server2003,the folder is C:\Documents and Settings\your username\Documents.You can specify a different location for the rti_workspace directory.See the RTI Connext DDS Core Libraries Getting Started Guide for instructions.l<path to examples>Examples are copied into your home directory the first time you run RTI Launcher or any script in <NDDSHOME>/bin.This document refers to the location of these examples as<path to examples>.Wherever you see<path to examples>,replace it with the appropriate path.By default,the examples are copied to rti_workspace/version/examplesSo the paths are:l Mac OS X systems:/Users/your user name/rti_workspace/version/examplesl UNIX-based systems:/home/your user name/rti_workspace/version/examplesl Windows systems:your Windows documents folder\rti_workspace\version\examplesNote:'your Windows documents folder'is described above.You can specify that you do not want the examples copied to the workspace.See the RTI Connext DDS Core Libraries Getting Started Guide for instructions.Chapter3Command-Line Arguments forrtiddsgenOn Windows systems:Before running rtiddsgen,run VCVARS32.BAT in the same command prompt that you will use to run rtiddsgen.The VCVARS32.BAT file is usually located in<Visual Studio Installation Directory>/VC/bin.Alternatively,run rtiddsgen from the Visual Studio Command Prompt under the Visual Studio Tools folder.If you are generating code for Connext DDS,the options are:rtiddsgen[-help][-autoGenFiles<architecture>][-create<typefiles|examplefiles|makefiles>][-convertToIdl|-convertToXML|-convertToXsd][-D<name>[=<value>]][-d<outdir>][-disableXSDValidation][-dllExportMacroSuffix<suffix>][-enableEscapeChar][-example<architecture>][-express][-I<directory>][[-inputIdl]<IDLInputFile.idl>|[-inputXml]<XMLInputFile.xml>|[-inputXsd<IDLInputFile.idl>]][-language<Ada|C|C++|C++03|C++11|C++/CLI|C#|Java>][-namespace][-noCopyable][-notypecode][-obfuscate][-package<packagePrefix>][-platform<architecture>][-ppDisable][-ppPath<path to preprocessor>][-ppOption<option>][-reader][-replace][-sequenceSize<unbounded sequences size>][-sharedLib][-stringSize<unbounded strings size>][-U<name>][-unboundedSupport][-update<typefiles|examplefiles|makefiles>][-use42eAlignment][-use52CKeyhash][-use52JavaKeyhash][-V<name<[=<value>]][-verbosity[1-3]][-version][-writer]If you have RTI CORBA Compatibility Kit,you can use the above options,plus these: [-corba[CORBA Client header file]][-dataReaderSuffix<suffix>][-dataWriterSuffix<suffix>][-orb<CORBA ORB>][-typeSequenceSuffix<suffix>]If you are generating code for RTI Connext DDS Micro,the options are:rtiddsgen[-help][-create<typefiles|examplefiles|makefiles>][-convertToIdl|-convertToXML][-D<name>[=<value>]][-d<outdir>][-enableEscapeChar][-I<directory>][[-inputIdl]<IDLInputFile.idl>|[-inputXml]<XMLInputFile.xml>][-language<C|C++>][-micro][-namespace][-ppDisable][-ppPath<path to preprocessor>][-ppOption<option>][-reader][-replace][-sequenceSize<unbounded sequences size>][-stringSize<unbounded strings size>][-U<name>][-update<typefiles|examplefiles|makefiles>][-V<name<[=<value>]][-verbosity[1-3]][-version][-writer]Table3.1Options for rtiddsgen describes the options.Table3.1Options for rtiddsgenTable3.1Options for rtiddsgen8Table3.1Options for rtiddsgen9Table3.1Options for rtiddsgen10Table3.1Options for rtiddsgen11Table3.1Options for rtiddsgenNote:Before using a makefile created by Code Generatorto compile an application,make sure the ${NDDSHOME}environment variable is set as described in the RTI Connext DDS Core Libraries Getting Started Guide.12Chapter4Generated FilesThe following tables show the files that Code Generator creates for an example IDL file called Hello.idl.l Table4.1C,C++,C++/CLI,C#Files Created for Example“Hello.idl”l Table4.2Java Files Created for Example“Hello.idl”l Table4.3Ada Files Created for Example“Hello.idl”Table4.1C,C++,C++/CLI,C#Files Created for Example“Hello.idl”13Table4.1C,C++,C++/CLI,C#Files Created for Example“Hello.idl”Table4.2Java Files Created for Example“Hello.idl”14Table4.2Java Files Created for Example“Hello.idl”Table4.3Ada Files Created for Example“Hello.idl”15Table4.3Ada Files Created for Example“Hello.idl”16Chapter5Customizing the GeneratedCodeCode Generator allows you to customize the generated code for different languages by changing the provided templates.This version does not allow you to create new output files.You can load new templates using the following command in an existing template,where<pathToTemplate>is relative to the<NDDSHOME>/resource/app/app_support/rtiddsgen/templates folder:#parse(“<pathToTemplate>/template.vm”)If that template.vm file contains macros,you can use it within the original template.If template.vm contains just plain text without macros,that text will be included directly in the original file.You can customize the behavior of a template by using the predefined set of variables provided with Code Generator.For more information,see the tables in RTI_rtiddsgen_template_ variables.xlsx.This file contains two different sheets:Language-Templates and Template variables.The Language-Template sheet shows the correspondence between the Velocity Templates used and the generated files for each language.If,for example,we want to add a method in C in the Hello.c file, we would need to modify the template typeBody.vm under the templates/c directory.The scope of a template can be:l type:If we generate a file with that template for each type in the IDL file.For example inJava,where we generate a TypeSupport file for each type in the IDL.l file:If we generate a file with that template for each IDL file.For example in C,we generatea single plugin file containing all the types Plugin information.17l lastTopLevelType:If we generate a file with that template for the last top-level type in the IDL file.This is commonly used for the publisher/subscriber examples.l module:If we generate a file with that template for each module in the IDL file.This is used inAda,where there are files that contain all the types of a module.l topLevelType:if we generate a file with that template for each type in the idl file.This is used in ADA where the publisher/subscriber files are only generated for top level typesThe table also shows the top_level variables that can be used for that templates.These variables are explained in the sheet Template variables.For example in Java,the main unit of variables are the constructMap which is a hashMap of variables that represent a type.In C,we will have as the main unit the constructMapList,which is a List of constructMap.In the Template variables sheet,we can see which variables are contained in each constructMap,the constructKind or type that it is applicable to and the value that it contains depending on the language we use.One important variable that contains the constructMap for a type is the memberFieldMapList.This list represent the members contained within the type.Each member is also represented as a hashMap whose variables are also described in the Template variables sheet.Apart from that there are environmental or general variables that are not related with the types that are defined within a hashMap called envMap.Let’s see how to use these variables with an example.Suppose we want to generate a method in C that prints the members for a structure and,if it is an array or sequence,its corresponding size.For this IDL: module Mymodule{struct MyStruct{long longMember;long arrayMember[2][100];sequence<char,2>sequenceMember;sequence<long,5>arrayOfSequenceMember[28];};};We want to generate this:void MyModule_MyStruct_specialPrint(){printf("longMember\n");printf("arrayMember is an array[2,100]\n");printf("sequenceMember is a sequence<2>\n");printf("arrayOfSequenceMember is an array[28]is a sequence<5>");}The code in the template would look like this:##We go through all the list of types#foreach($node in$constructMapList)##We only want the method for structs#*--*##if($node.constructKind.equals(“struct”))void${node.nativeFQName}_specialPrint(){18##We go through all the members and call to the macros that check if they are array or sequences#*----*##foreach($member in$node.memberFieldMapList)print("$#isAnArray($member)#isASeq($member)\n");#*----*##end}#*--*##end#endThe isAnArray macro checks if the member is an array(i.e,has the variable dimensionList)and in that case,prints it:#macro(isAnArray$member)#if($member.dimensionList)is an array$member.dimensionList#end#endThe isASeq macro checks if the member is an sequence(i.e,has the variable seqSize)and in that case, prints it:#macro(isASeq$member)#if($member.seqSize)is a sequence<$member.seqSize>#end#endYou can add new variables to the templates using the-V<name<[=<value>]command-line option when starting Code Generator.This variable will be added to the userVarList hashMap.You can refer to it in the template as$ or$.equals(value).For more information on velocity templates,see /engine/releases/velocity-1.5/user-guide.html.19Chapter6Boosting Performance withServer ModeIf you need to invoke Code Generator multiple times with different parameters and/or type files, there will be a performance penalty derived from loading the JVM and compiling the velocity templates.To help with the above scenario,you can run Code Generator in server mode.Server mode runs a native executable that opens a TCP connection to a server instance of the code generator that is spawned the first time the executable is run,as depicted below:When Code Generator is used in server mode,JVM is loaded a single time when the server is started;the velocity templates are also compiled a single time.To invoke Code Generator in server mode,use the script rtiddsgen_server(.bat),which is in the scripts directory.The Code Generator server will automatically stop if it is not used for a certain amount of time. The default value is20seconds;you can change this by editing the rtiddsgen_server script and adjusting the value of the parameter,-n_servertimeout.20。
dds的java实现
dds的java实现DDS(Data Distribution Service)是一种用于实时系统的数据分发和集成的通信协议。
它提供了一种高效、可靠、实时的数据传输机制,广泛应用于物联网、工业自动化、航空航天等领域。
在Java中,我们可以使用DDS的Java API来实现DDS的功能。
首先,我们需要引入DDS的Java API库。
在Java中,DDS的Java API库提供了一系列的类和接口,用于实现DDS的功能。
我们可以通过在项目中引入相应的jar包来使用这些类和接口。
接下来,我们需要创建一个DDS的域(Domain)。
域是DDS中的最高级别的概念,它代表了一个独立的DDS系统。
在Java中,我们可以通过调用DDS的Java API提供的方法来创建一个域。
例如,我们可以使用以下代码创建一个域:```javaDomainParticipant participant =DomainParticipantFactory.createParticipant();```然后,我们需要创建一个DDS的主题(Topic)。
主题是DDS中的数据类型,它定义了数据的结构和语义。
在Java中,我们可以通过调用DDS的Java API提供的方法来创建一个主题。
例如,我们可以使用以下代码创建一个主题:```javaTopic topic = participant.createTopic("MyTopic", MyDataType.class);```在上面的代码中,"MyTopic"是主题的名称,MyDataType是主题的数据类型。
接下来,我们需要创建一个DDS的发布者(Publisher)。
发布者用于发布数据到DDS中。
在Java中,我们可以通过调用DDS的Java API提供的方法来创建一个发布者。
例如,我们可以使用以下代码创建一个发布者:```javaPublisher publisher = participant.createPublisher();```然后,我们需要创建一个DDS的数据写入器(DataWriter)。
dds协议的partition分区机制

dds协议的partition分区机制下载温馨提示:该文档是我店铺精心编制而成,希望大家下载以后,能够帮助大家解决实际的问题。
文档下载后可定制随意修改,请根据实际需要进行相应的调整和使用,谢谢!并且,本店铺为大家提供各种各样类型的实用资料,如教育随笔、日记赏析、句子摘抄、古诗大全、经典美文、话题作文、工作总结、词语解析、文案摘录、其他资料等等,如想了解不同资料格式和写法,敬请关注!Download tips: This document is carefully compiled by the editor. I hope that after you download them, they can help you solve practical problems. The document can be customized and modified after downloading, please adjust and use it according to actual needs, thank you!In addition, our shop provides you with various types of practical materials, such as educational essays, diary appreciation, sentence excerpts, ancient poems, classic articles, topic composition, work summary, word parsing, copy excerpts, other materials and so on, want to know different data formats and writing methods, please pay attention!DDS(Digital Data Storage)协议是一种用于分区机制的通信协议,广泛应用于各种存储设备中。
DDS原理及实现

DDS原理及实现DDS(Data Distribution Service)是一种基于发布-订阅模式的消息传递中间件,用于构建分布式系统中的数据通信。
DDS提供高效、可靠的实时数据传输,并支持灵活的数据交换模式,同时具备自适应性和可扩展性,使得它在嵌入式系统、工业控制、航空航天和军事等领域得到广泛应用。
DDS的基本原理是通过定义数据的发布和订阅,实现数据的传输和交互。
DDS系统由三个主要组件组成:发布者(Publisher)、订阅者(Subscriber)和中间件(Middleware)。
发布者负责将数据发布到中间件,订阅者从中间件中获取订阅的数据。
中间件负责实现数据的传输和分发。
在DDS系统中,数据传输是基于主题(Topic)的。
主题定义了一组相关数据的类型和结构,发布者和订阅者通过订阅特定的主题来进行数据交换。
DDS支持多种数据交换模式,包括点对点模式、发布-订阅模式和请求-回应模式。
发布者可以通过发布主题将数据发送到中间件,订阅者可以通过订阅主题接收数据。
DDS中间件会根据订阅者的需求和负载情况,选择合适的数据传输方式和频率,以保证数据的实时性和可靠性。
DDS实现数据传输的方式主要有两种:直接通信和间接通信。
直接通信是指发布者和订阅者直接进行数据传输,中间件只提供基础的通信功能;间接通信是指发布者和订阅者通过中间件进行数据交互,中间件负责数据的传输和分发。
DDS支持两种方式的混合使用,可以根据系统需求选择合适的通信方式。
DDS还提供了一些高级特性,增强系统的灵活性和可靠性。
其中包括:1.数据过滤:通过定义过滤条件,发布者和订阅者可以选择接收特定的数据;2.可靠性保证:DDS提供了多种机制,确保数据的可靠传输,包括故障检测和恢复、数据重传和顺序保证等;3.优先级控制:DDS支持对数据进行优先级排序和传输控制,保证关键数据的及时处理;4.发布者和订阅者的自适应:DDS可以根据系统负载和性能情况,自动调整数据发布和订阅的速率,以适应实时需求和资源约束。
dds的操作规程

dds的操作规程DDS(Data Distribution Service)是一种用于分布式系统中的数据通信协议,它提供了实时数据传输和发布/订阅机制的支持。
以下是DDS操作规程的一般概述,以确保系统的正确运行和数据通信的可靠性:1. 配置和初始化:- 安装和配置DDS软件包。
- 配置DDS实例的参数,如域ID、网络设置等。
- 初始化DDS实例,并启动DDS服务。
2. 创建和定义数据类型:- 使用数据类型描述语言(IDL)定义需要在DDS系统中传输的数据类型。
- 生成编译器将IDL文件编译为特定编程语言的接口代码。
- 在应用程序中包含接口代码,以便能够使用定义的数据类型。
3. 创建发布者和订阅者:- 创建发布者实例,并设置相应的参数,如QoS策略、通信协议等。
- 创建订阅者实例,并设置相应的参数,如QoS策略、通信协议等。
4. 创建话题:- 使用定义的数据类型创建话题。
- 将话题注册到发布者和订阅者中。
- 设置话题的QoS策略,如可靠性、优先级等。
5. 数据发布和订阅:- 在发布者中创建数据样本,并填充数据。
- 发布数据样本到指定的话题。
- 在订阅者中创建数据监听器,并订阅感兴趣的话题。
- 接收和处理从发布者发送的数据样本。
6. 负载均衡和可靠性:- 配置DDS实例的负载均衡策略,以确保数据分发的效率和可靠性。
- 设置相应的数据持久性策略,以确保数据的可靠存储和传输。
7. 错误处理和故障恢复:- 监测系统中可能发生的错误,如网络断连、通信超时等。
- 实施适当的错误处理机制,如重试发送数据、重新连接等。
- 在系统故障后进行恢复,如重新建立DDS实例、重新注册话题等。
8. 安全性和权限管理:- 配置DDS实例的安全策略,包括认证、加密等。
- 设置访问控制规则,以限制对数据的访问和传输。
- 制定权限管理策略,确保只有授权的用户可以发布和订阅数据。
9. 日志记录和监控:- 启用DDS实例的日志记录功能,记录重要的系统事件和数据操作。
DDS插件安装与使用
DDS插件安装与使用
安装DDS插件:
3.定位到游戏引擎的插件文件夹。
不同的游戏引擎安装位置和插件文
件夹位置可能不同,可以在游戏引擎的安装目录下找到插件文件夹。
4.将解压后的DDS插件文件夹复制到游戏引擎的插件文件夹中。
使用DDS插件:
1.启动游戏引擎。
DDS插件通常会在游戏引擎的插件列表中显示出来。
2.打开DDS插件。
可以通过在游戏引擎菜单中找到DDS插件,点击打开。
1.支持多种图像格式。
DDS插件支持多种游戏引擎所使用的图像格式,包括常见的PNG、JPG、BMP等,以及特定于游戏引擎的格式。
3.轻松实现图像格式转换。
DDS插件可以方便地将不同格式的贴图和
纹理进行互相转换,以满足游戏开发的需求。
4.丰富的滤镜效果。
DDS插件提供了各种滤镜效果,如模糊、锐化、
亮度调整等,可以增强贴图和纹理的效果。
5.支持批量处理。
DDS插件可以同时处理多个贴图或纹理,提高开发
效率。
总结:。
dds的java实现1

dds的java实现1在正式开始回答问题前,请允许我解释一下这个题目的意思。
根据所给的题目“dds的java实现1”,我可以理解为需要讨论关于DDS (Data Distribution Service)在Java语言中的实现方式。
DDS是一种用于实时通信的协议标准,常用于分布式系统中。
下面将详细介绍DDS 在Java中的实现方法。
一、Java语言对DDS的支持Java语言提供了对DDS的支持,通过使用相应的DDS库,可以在Java平台上实现DDS的功能。
以下是Java语言中实现DDS的步骤:1. 下载并安装DDS库首先,需要从相关网站下载DDS库,并按照提供的安装说明进行安装。
2. 配置开发环境将DDS库引入到Java开发环境中,确保能够正确地进行编译和运行。
3. 创建DDS实例通过在Java代码中创建DDS实例,可以进行数据的发布与订阅。
DDS实例包括发布者(Publisher)和订阅者(Subscriber)两个角色。
4. 定义DDS数据类型在创建DDS实例之前,需要定义DDS数据类型。
可以使用IDL (Interface Definition Language)来定义数据类型的结构。
5. 发布数据通过发布者角色,将数据发布到DDS中。
可以将数据序列化为DDS支持的格式,并指定相关的QoS(Quality of Service)参数。
6. 订阅数据通过订阅者角色,从DDS中接收已发布的数据。
可以根据需要设置过滤条件,只接收感兴趣的数据。
7. 处理数据在接收到数据后,可以在应用程序中对数据进行处理。
可以根据数据的类型和内容执行相应的操作。
二、DDS的优势和应用场景DDS作为一种实时通信协议,具有以下优势和适用场景:1. 高度可靠性DDS提供了丰富的QoS参数配置,可以根据不同的应用需求进行定制。
可靠性是DDS的一个重要特点,能够确保数据在通信过程中的完整性和一致性。
2. 实时性和低延迟DDS使用发布-订阅模式进行通信,能够满足实时性要求较高的应用场景。
cyclonedds使用手册
CycloneDDS使用手册一、引言CycloneDDS是一款开源的实时数据分发系统,旨在满足高性能、真实时间和可靠性的要求。
本使用手册旨在向读者介绍CycloneDDS的基本概念、安装和配置过程以及常见问题和解决方案。
二、基本概念1.1 DDS(Dynamic Data Service)概念DDS是一种用于实时数据分发和集成的规范,旨在满足分布式嵌入式和实时系统的要求。
DDS系统包括数据发布者、数据订阅者和主题,通过DDS引擎进行数据的发布和订阅。
1.2 CycloneDDS特点CycloneDDS是一款符合OMG标准的开源DDS实现,具有以下特点:- 高性能:采用零拷贝技术,提高数据传输效率。
- 真实时间:支持实时数据传输,满足实时系统的要求。
- 可靠性:提供数据冗余和故障恢复机制,保证数据传输的可靠性。
三、安装和配置2.1 系统要求- 操作系统:支持Linux、Windows和MacOS等常见操作系统。
- 内存:建议至少2GB内存。
- 存储空间:建议至少100MB的存储空间。
2.2 安装步骤步骤一:从CycloneDDS冠方全球信息站下载最新版本的安装包。
步骤二:解压安装包到指定目录。
步骤三:根据冠方文档执行安装命令。
2.3 配置过程- 配置网络参数:根据实际网络环境修改配置文件。
- 设置安全策略:根据安全需求配置权限控制策略。
- 配置数据发布者和订阅者:根据系统需求配置数据发布者和订阅者的相关参数。
四、常见问题和解决方案3.1 运行异常问题描述:CycloneDDS运行时出现异常,无法正常发布和订阅数据。
解决方案:检查网络连接、权限设置和配置文件,确保相关配置正确。
3.2 性能优化问题描述:CycloneDDS在高负载情况下性能下降明显。
解决方案:调整网络参数、增加硬件资源或者使用集裙部署方式,以提高系统性能。
3.3 故障恢复问题描述:CycloneDDS系统出现故障,无法自动恢复。
解决方案:配置故障恢复策略,定期进行系统备份,并及时处理系统异常情况。
DDS配置手册
DDS配置手册方正国际系统软件有限公司2009年9月目录1 准备工作 (3)1.1 创建IStream DDS操作用户 (3)1.2 用户的环境变量要求 (3)1.2.1 源端文件夹 (3)1.2.2 目标端文件夹 (3)1.3 安装用户环境变量 (4)1.3.1 源端的环境变量 (4)1.3.2 目的端的环境变量 (5)1.4 创建源端和目的端的oracle连接用户 (6)1.4.1 创建角色(源端和目的端均需创建) (6)1.4.2 创建源端用户并赋权限 (6)1.4.3 创建源端监控视图 (6)1.4.4 修改数据库参数,开启附加日志功能 (6)1.4.5 创建目的端用户并赋权限 (7)2 安装IStream DDS (7)2.1 安装DDS (7)2.2 创建源端参数目录及文件 (7)2.3 创建目的端参数目录及文件 (10)3 启动运行停止进程 (12)3.1 启动源端进程 (12)3.2 启动目的进程 (12)3.3 停止源端复制进程 (12)3.4 停止目的端复制进程 (12)3.5 清除复制缓存目录 (13)4 执行复制 (13)4.1 编写全复制脚本 (13)4.2 执行全复制脚本 (13)5 DDS维护部分 (13)5.1 新增同步的表 (13)5.2 机器重启时的DDS维护 (15)5.2.1 重启前的操作 (15)5.2.2 重启后的操作 (16)5.3 意外宕机时的操作 (16)1准备工作1.1创建IStream DDS操作用户注意:需要具有访问ORACLE数据库权限的用户,可以使用用安装oracle的用户;创建用户脚本:1.2用户的环境变量要求创建DDS_HOME为IStream DDS执行程序路径;创建DDS_DA TA为IStream DDS配置文件和缓存程序路径;1.2.1源端文件夹1.2.2目标端文件夹1.3.1源端的环境变量以安装oracle的用户(oracle)为例。
DDS插件安装与使用

DDS插件安装与使用DDS(Direct Digital Synthesizer)是微软DirectX特有的纹理格式,它是以2的n次方算法存储图片,如果将bmp、jpg、tga、png等图片做纹理贴图,在打开VRP文件时,需要在显存中进行处理做加载格式转换,所以以DDS格式存储的文件,在打开时加载速度最快。
DDS格式具有以下特点:优点:显存占用少缺点:贴土精度底建议:大贴图时采用DDS插件的安装以下将针对Photoshop CS版的安装进行介绍,其操作步骤如下:(1)将Potoshop plugins目录下的dds.8bi和NormalMapFilter.8bf拷到“X:\ProgramFiles\Adobe\Photoshop CS\增效工具\滤镜”目录下(2)再将msvcp71.dll文件拷到Photoshop CS安装的根目下安装结束。
(提示:如果安装时没有关闭Photoshop CS软件,在需要编辑DDS图片前要重新启动一下Photoshop CS 软件。
)DDS插件的使用当为Photoshop CS软件安装了DDS插件之后,就可以用Photoshop CS软件打开DDS格式的图片了,其操作步骤如下:(1)单击【文件】∣【打开】,找到需要编辑的DDS图片,这时会弹出一个“Mip Maps”对话框,单击“否”打开图片。
如下图所示:(提示:Mip-mapping的核心特征是根据物体的景深方向位置发生变化时,Mip映射根据不同的远近来贴上不同大小的材质贴图,比如近处贴512x512的大材质,而在远端物体贴上较小的贴图。
这样不仅可以产生更好的视觉效果, 同时也节约了系统资源。
)(2)编辑完成后直接Ctrl+S保存图片,在弹出的“NVIDIA dds Format”对话框中直接单击“Save”按钮保存图片。
如下图所示:(提示:由于DDS格式的图片是以2的n次方算法存储的,所以在编辑时,还必须保证当前的图片尺寸仍然为2的n次方,如果将图片的尺寸改变了,不是2的n次方,存储图片时,对话框里的“Save”按钮为灰色不可选的。
基于PC端DDS数据转换方法和系统与制作流程

图片简介:本技术提供了基于PC端DDS数据转换方法和系统,属于数据转化技术领域,该基于PC端DDS数据转换方法,包括以下步骤:S1,打开DDS Converter转换工具。
S2,设置输入目录、输出目录,设置输入格式、输出DDS编码以及通道质量。
本技术通过结合了DirectXTex 工具,一个共享的资源库,用于读取和写入DDS文件,并执行各种纹理内容处理操作,包括调整大小,格式转换,等其他操作,保证项目的转换及纠错时间,同时缩短了传统转换工具只能去现场主机转换的时间,降低转换难度节约了大量制作成本及时间工期,解决了原本因为Photoshop等软件转换时间过慢和转换错误图片现场不可读取,并带来的巨大冗余数据过多,且图像信息不准确的问题,同时节约了项目的制作成本大大增加了制作的效率。
技术要求1.基于PC端DDS数据转换方法,其特征在于,包括以下步骤;S1,打开DDS Converter转换工具。
S2,设置输入目录、输出目录,设置输入格式、输出DDS编码以及通道质量。
S3,读取设置信息,后台运行CMD将读取到的数据信息输入给DirectXTex_texconv.exe。
S4,通过DirectXTex_texconv.exe进行图片转换操作并输出转换信息到CMD窗口。
S5,转换完成,导出文件。
2.根据权利要求1所述的基于PC端DDS数据转换方法,其特征在于,所述步骤S2中,设置输入格式为jpg、png、bmp和dds任一种。
3.根据权利要求1所述的基于PC端DDS数据转换方法,其特征在于,所述步骤S3中,设置输入目录、输出目录,设置输入格式、输出DDS编码以及通道质量的同时,也可按照文件数量生成文件夹工具进行文件分组。
4.基于PC端DDS数据转换方法的系统,应用于权利要求1-3所述的基于PC端DDS数据转换方法,其特征在于,包括数据产生模块(100)和数据后处理模块(200);数据产生模块(100),所述数据产生模块(100)用于接收相应的数据,并对数据进行分组和判定处理后传输至所述数据后处理模块(200);数据后处理模块(200),所述数据后处理模块(200)用于接收所述数据产生模块(100)处理的数据,并对数据读取和转换处理后导出预览文件。
浪潮服务器、存储断电恢复
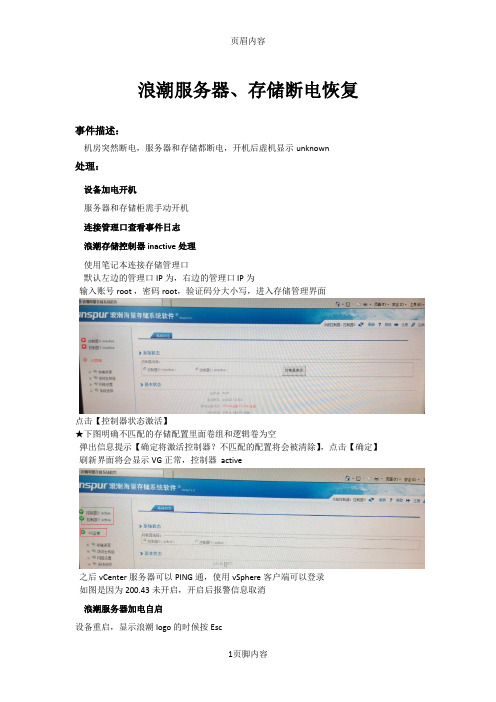
浪潮服务器、存储断电恢复事件描述:机房突然断电,服务器和存储都断电,开机后虚机显示unknown处理:设备加电开机服务器和存储柜需手动开机连接管理口查看事件日志浪潮存储控制器inactive处理使用笔记本连接存储管理口默认左边的管理口IP为,右边的管理口IP为输入账号root ,密码root,验证码分大小写,进入存储管理界面点击【控制器状态激活】★下图明确不匹配的存储配置里面卷组和逻辑卷为空弹出信息提示【确定将激活控制器?不匹配的配置将会被清除】,点击【确定】刷新界面将会显示VG正常,控制器active之后vCenter服务器可以PING通,使用vSphere客户端可以登录如图是因为200.43未开启,开启后报警信息取消浪潮服务器加电自启设备重启,显示浪潮logo的时候按Esc自检完成后弹窗提示选Setup Utility确认进入bios界面Advanced-Chipset Configuration-After G3 On(其中S0为加电自启,S5为加电不自启)F10保存退出服务器前置面板报警检查如图所示红色标注为网口为服务器管理口,将笔记本网口与该管理口使用网线连接服务器管理口IP为,设置笔记本网口IP为,掩码为使用浏览器打开输入用户名密码admin admin如图所示进入服务器管理界面,查看监控信息,查看异常信息,如图所示该异常为电源模块未加电,该NF8460M3三个电源模块必须全部加电,加电后报警消失双路电源接入(提醒了才做的哟,电工还不知道哪路是市电,哪路是UPS的电,不知道接的正确否)现场走线(电源线、网线、光纤线)凌乱,整了整实在是没心整了小插曲:电工在操作双路电源的时候直接将电源拔掉了,以为之后又要给存储操作一遍激活控制器,但是启动起来后发现存储控制器没有出现问题,可以正常进vCenter server,影响到了服务,不过因为之前连续两天断电的前科,软件方已经不觉得这算事了,已经很绝望了。
- 1、下载文档前请自行甄别文档内容的完整性,平台不提供额外的编辑、内容补充、找答案等附加服务。
- 2、"仅部分预览"的文档,不可在线预览部分如存在完整性等问题,可反馈申请退款(可完整预览的文档不适用该条件!)。
- 3、如文档侵犯您的权益,请联系客服反馈,我们会尽快为您处理(人工客服工作时间:9:00-18:30)。
X-Types
DDS
DDS
2010
ISO-C++ PSM
2010
Java5 PSM
DDS Standard Evolution
2008 2008
Copyright 2010, PrismTech – All Rights Reserved.
UML4DDS
DDS
§ § § § §
Copyright 2010, PrismTech – All Rights Reserved.
DDS Standard Evolution
App
2004
Standard API
App
2004
DDS
2006
Promotes Hub and Spoke Architectures Fully distributed architectures are possible but complicated by some use cases
¨
¨
Copyright 2010, PrismTech – All Rights Reserved.
§ Interoperable Security Architecture § Pluggable Policy / Labeling and Tagging
X-Types
DDS
DDS
2010
ISO-C++ PSM
2010
Java5 PSM
DDS Standard Evolution
2008 2008
of
UML4DDS
App
2004
Standard API
App
2004
DDS
2006
DDS
2006
DDSI/RTPS
network
DDSI/RTPS
Interoperable Wire Protocol
DDS Standard Evolution
2008 2008
Copyright 2010, PrismTech – All Rights Reserved.
UML4DDS
Standard API
2011
App
Web-DDS
2004 2010
AppWeb-DΒιβλιοθήκη S2011 2010 2004
X-Types
2011
2011
ULS-DDSI
network
ULS-DDSI
§ Ultra-Large Scale Extensions to the DDSI/RTPS wireprotocol § New Discovery § Support for TCP, etc.
UML4DDS
App
DDS-RMI
2010 2012 2011 2012
App
DDS-RMI
2012 2012
Standard API
Web-DDS
Security
Security
X-Types
2011
2011
ULS-DDSI
network
ULS-DDSI
Interoperable Wire Protocol
UML4DDS
UML4DDS
Standard API
2012 2011 2012
App
Web-DDS Security
2004 2010
App
Web-DDS Security
2011 2010 2004
X-Types
2011
2011
ULS-DDSI
network
ULS-DDSI
Interoperable Wire Protocol
Establishes connection with the Broker
Session
Publisher
Subscriber
Gives access to a DDS Domain Destination Consumer
DataWriter Topic DataReader
Pub/Sub
Producer
X-Types
DDS
DDS
2010
Java5 PSM
Copyright 2010, PrismTech – All Rights Reserved.
UML4DDS
§ Java 5 DDS PSM § Simple, Safe, Efficient, Elegant and Ergonomic API
network
DDSI/RTPS
Interoperable Wire Protocol
X-Types
DDS
DDS
2010
DDS Standard Evolution
2008
App
2004 2010
Standard API ISO-C++ PSM
2010
App
2004
X-Types
2006
2006
¨
2004
JMS Standard v1.1
¨
2001
Programming Language Independent API for DataCentric Pub/Sub Interoperable WireProtocol (DDSI/RTPS)
Java Messaging API (Pub/ Sub + PTP) portable across messaging implementations
Angelo Corsaro, Ph.D.
Chief Technology Officer! OMG DDS Sig Co-Chair
PrismTech
angelo.corsaro@!
Standards Scopes
Standards Compared
DDS Standard v1.2
DDS Standard
Standardization " Activity
JMS
¨
The JMS standard has not been evolving after the v1.1 released in 2002
Copyright 2010, PrismTech – All Rights Reserved.
DDS
2006
DDSI/RTPS
network
DDSI/RTPS
Interoperable Wire Protocol
§ High Performance § Interoperable Wire Protocol
Copyright 2010, PrismTech – All Rights Reserved.
¨
Copyright 2010, PrismTech – All Rights Reserved.
Standards Compared
¨ ¨
Copyright 2010, PrismTech – All Rights Reserved.
UML4DDS
UML4DDS
Standard API
App
2004 2010
App
2004
X-Types
2006
2006
DDSI/RTPS
§ Extensible/Evolvable Type System § Dynamic Topic Types, Data Readers & Writers § Encoding Negotiation
JMS
Connection
Connection
DDS
Copyright 2010, PrismTech – All Rights Reserved.
2008
UML4DDS
DDS Standard Evolution
2008 2008
Copyright 2010, PrismTech – All Rights Reserved.
UML4DDS
UML4DDS
Standard API
2011
App
DDSI/RTPS
network
DDSI/RTPS
Interoperable Wire Protocol
X-Types
DDS
DDS
Copyright 2010, PrismTech – All Rights Reserved.
UML4DDS
§ ISO C++ DDS PSM § Simple, Safe, Efficient, Elegant and Ergonomic API
X-Types
DDS
DDS
2010
ISO-C++ PSM
Java5 PSM
Web-DDS
2011
2004
2010
2010
2004
Copyright 2010, PrismTech – All Rights Reserved.
§ Remote Method Invocations over DDS § Synchronous, Asynchronous and one ways RMI
UML4DDS
Mapping JMS to DDS
JMS
Connection
Connection
DDS
Copyright 2010, PrismTech – All Rights Reserved.
Domain Participant