Informix 11.5 Installation on Ubuntu 8.10 server
AIX上Informix的安装过程
AIX上Informix的安装过程操作系统:AIX 4.3.3数据库产品:IBM Informix Cl IE ntSDK 2.70CU1(32位/64位)IBM Informix Dynamic Server 9.21系统配置:数据库服务器为IBM小型机。
IBM Informix数据库软件安装在机器内置硬盘上,划分出1G的文件系统挂在根文件系统的/informix目录下,每次机器启动时自动将此文件系统自动mount。
确保硬盘有足够剩余空间,至少剩余6G。
1 IBM Informix数据库产品的安装过程注::1.以下安装过程中,在命令行中出现 '$'的为informix用户登录,出现 '# ' 为root用户登录。
2.确认系统ROOT 的 PP SIZE,执行$lsvg rootvg可以查看到该项参数值。
1.1 设置AIX Unix环境(5和6步可以不做)1. 以root 登录。
使用 AIX 中的系统管理工具smitty。
2. 建立一个文件系统,该文件系统挂在根目录的informix目录下,不要创建该目录,在创建该文件系统时指明挂在/informix系统自动会创建该目录,文件系统要有1G大小。
#smitty/System Storage Management/File Systems/ Add File Systems/Journaled File System/Add a Journaled File Syste/Add a Standard Journaled File System选择rootvg设置SIZE of file system等于1000兆×1024K×2BLOCK=2048000BLOCK设置MOUNT POINT为/Informix设置Mount AUTOMATICALLY at system restart?为yes#mount /informix3. 创建用户组informix。
实战:informix11.5版本安装、配置HDR容灾节点

IBM Informix Dynamic Server Version 11.50.FC9 -- Updatable (Sec) -- Up 00:04:27 -- 19633840 Kbytes
◆三个节点配置的CM启用了负载均衡,如下:
11:41:35 SLA qxgl redirect SQLI client from 10.19.65.139 to rmsdb_sds 10.19.65.164.9977
11:41:36 SLA qxgl redirect SQLI client from 10.19.65.139 to rmsdb_sds 10.19.65.164.9977
11:51:16 SLA qxgl redirect SQLI client from 10.19.65.139 to rmsdb_sds 10.19.65.164.9977
可见SLA qxgl分配到了不同的数据库server,实现了负载均衡的效果。再看刚才的log:
rmsdb_sds@sdwgpm2:/opt/IBM/informix/tmp>tail -f cm_rmsdb.log
IBM Informix Dynamic Server Version 11.50.FC9 -- On-Line (Prim) -- Up 4 days 18:53:50 -- 19633840 Kbytes
rmsdb_sds@sdwgpm2:/u1/informix>onstat -
IBM Informix Dynamic Server Version 11.50.FC9 -- Updatable (SDS) -- Up 4 days 18:52:27 -- 19633840 Kbytes
Informix 11

注意:此配置文档仅当需手动配置Informix参数时使用,且onmonitor数据配置实质是对/home/informix/etc 下的onconfig.icdep 文件进行修改。
所以,当不需要手动配置时,可直接将onmonitor配置文件夹下的onconfig.icdep 和sqlhosts 文件进行替换,替换之后直接执行初始化命令oninity –ivy 对Informix进行初始化,注意此命令将删除所有数据。
无论是手动配置还是替换文件,都需要进行第3步,对/etc/services下的服务器端口开放的设置。
目录1、检查数据库是否安装成功: (2)2、sqlhosts文件配置: (2)3、服务器端口开放: (2)4、进行数据配置: (3)Informix的onmonitor属性配置1、检查数据库是否安装成功:在软件安装好之后,在Informix用户下使用命令onmonitor 检查是否安装成功,如果出现以下界面则表示安装成功。
2、sqlhosts文件配置:sqlhosts文件位于/home/informix/etc下,在文件中添加如下代码:icdep onsoctcp 172.21.72.20 icdep3、服务器端口开放:在root用户下,在/etc/services 文件中加入如下代码(6666为端口号):icdep 6666/tcp4、进行数据配置:在informix用户下,执行命令onmiontor进入配置界面:在此进行数据配置,具体的配置信息如下:(A-B 表示,进入A,在A下选择B进行相关信息配置)Parameters-Initialize:Parameters- Shared-Memory:Parameters- perFormance:Parameters- data-Replication:Parameters- diaGnostics:Parameters-pdQ:(此图为onconfig.icdep文件中数据)Dbspace-Info:Dbspace-Info具体如下:。
Informix安装步骤
Informix安装步骤./ids_install -javahome /usr/bin/java1.前言本文主要描述的是在linux环境下的informix的安装配置步骤,且本实例采用的Cook File作为Chunk文件。
2.安装前准备(release文件首先得解压IDS安装包之后在解压的目录中find . –name“ids_mach*”)2.1.确认Informix所需的系统补丁通过查看$INFORMIXDIR/release/en_us/0333目录下的ids_machine_notes_11.50.txt文件得知需要安装以下的包:libaio-0.3.106libgcc-4.1.1libstdc++-4.1.1ncurses-5.5pam-0.99.6.2采用如下指令,查看本机是否安装了上面系统补丁页脚内容1rpm –qa | grep <rpm name>2.2.确认Informix所需的内核参数查看文件$INFORMIXDIR/release/en_us/0333/ids_machine_notes_11.50.txt,确认该平台下Informix所需的内核参数配置。
SHMMAX: 33554432SHMMIN: 1SHMMNI: 128SHMSEG: 128SHMALL: 4194304SEMMNI: 128SEMMSL: 250SEMMNS: 32000SEMOPM: 32SHMBASE 0x44000000L请参考如下步骤进行内核参数修改:以root的身份登录页脚内容2修改文件/etc/sysctl.conf执行“sysctl –p”,使更改生效2.3.确认DISK剩余空间充足请确保磁盘剩余空间>1G,由于本实例采用cook file作为chunk文件,所以建议至少大于2G的磁盘空间2.4.创建Informix用户及组以root用户执行如下指令,创建所需的user和groupgroupadd informix;useradd informix –g informix3.安装informix软件3.1.创建安装环境在/home/informix目录下创建install目录,并将informix的安装包放在其目录下3.2.解压安装包tar -xvf IDS.11.50.FC5.Linux.x86.CZ5IZEN.tar3.3.执行安装指令页脚内容3su – rootexport INFORMIXDIR=/home/informix/ids1150 安装目录cd /home/informix/install/./ids_install下面出现的是安装过程中需要选择的一些信息:是否选用图形界面安装Do you want to run installer in GUI mode [y/n] : n 确认安装选项1. Release Notes2. Installation Guide3. Launch Information Center4. Begin InstallationPlease select one of these options [4] 4确认继续执行安装页脚内容4Press 1 for Next, 3 to Cancel or 4 to Redisplay [1] 1确认安装版本Welcome to the InstallShield Wizard for IBM Informix Dynamic Server Version 11.50 BundleThe InstallShield Wizard will install IBM Informix Dynamic Server Version 11.50 Bundle on your computer.To continue, choose Next.Press 1 for Next, 2 for Previous, 3 to Cancel or 4 to Redisplay [1] 1确认接受使用许可协议并继续Press Enter to continue viewing the license agreement, or, Enter "1" to accept the agreement, "2" to decline it or "99" to go back to the previous screen, "3" Print, "4" Read Non-IBM Terms.1Press 1 for Next, 3 to Cancel or 4 to Redisplay [1] 1确认安装目录继续页脚内容5IBM Informix Dynamic Server Version 11.50 Bundle Install Location Please specify a directory or press Enter to accept the default directory. Directory Name: [/home/informix/ids1150]Press 1 for Next, 3 to Cancel or 4 to Redisplay [1] 1确认安装的产品并继续Select the products you would like to install:To select/deselect a product or to change its setup type, type its number: Product Setup Type------------------------------------------------ ------------------------1. [ ] IBM Informix IConnect Version 3.502. [x] IBM Informix Client-SDK Version3.50 Typical3. [x] IBM Informix Dynamic Server Version 11.50 Typical4. [x] IBM Informix JDBC Driver Version 3.50Other options:0. Continue installingEnter command [0]页脚内容6Press 1 for Next, 2 for Previous, 3 to Cancel or 4 to Redisplay [1] 1确认是否进行角色分离Do you want to enable role separation for auditing procedures? [ ] 1 - Yes[X] 2 - NoTo select an item enter its number, or 0 when you are finished: [0]If you enable role separation, you can assign existing groups of users to specific roles.If you do not enable role separation, the database server administrator performs all administration tasks.Press 1 for Next, 2 for Previous, 3 to Cancel or 4 to Redisplay [1] 1确认是否建立IDS示范数据库服务器实例并继续Do you want to create an IDS demonstration database server instance? [ ] 1 - Yes[X] 2 - No页脚内容7To select an item enter its number, or 0 when you are finished: [0]You can use a demonstration database server instance to verify that IDS is installed correctly and that the hardware is configured correctly. You can also configure the demonstration database server instance to use it as a production instance.Press 1 for Next, 2 for Previous, 3 to Cancel or 4 to Redisplay [1] 1确认安装信息并继续IBM Informix Dynamic Server Version 11.50 Bundle will be installed in the following location:/home/informix/ids1150with the following features:IBM Informix Client-SDK Version 3.50IBM Informix Dynamic Server Version 11.50IBM Informix JDBC Driver Version 3.50for a total size:446.5 MB页脚内容8Press 1 for Next, 2 for Previous, 3 to Cancel or 4 to Redisplay [1] 1开始安装Installing IBM Informix Client-SDK Version 3.50. Please wait...0 % complete10 % complete20 % complete30 % complete40 % complete50 % complete60 % complete70 % complete80 % complete90 % complete100 % complete……确认是否读安装文本并继续页脚内容9Press ENTER to read the text [Type q to quit] qPress 1 for Next, 3 to Cancel or 4 to Redisplay [1] 1确认成功安装The InstallShield Wizard has successfully installed IBM Informix Dynamic Server Version 11.50 Bundle. Choose Next to continue the wizard.Press 1 for Next, 3 to Cancel or 4 to Redisplay [1] 11. Release Notes2. Installation Guide3. Launch Information Center4. Finish InstallationPlease select one of these options [4] 4Finishing installation...Press 3 to Finish or 4 to Redisplay [3]rmix实例配置4.1.环境变量的设置页脚内容10su – Informix 切换至informix用户vi setenv1150 建立一个脚本写环境变量INFORMIXSERVER=pc100_ids1150INFORMIXDIR=/home/informix/ids1150 INFINFORMIXSQLHOSTS=$INFORMIXDIR/etc/sqlhostsONCONFIG=onconfig.$INFORMIXSERVERPATH=$INFORMIXDIR/bin:$PATHexport INFORMIXSERVER INFORMIXDIR INFORMIXSQLHOSTS ONCONFIG PATH 将脚本写到.bash_profile中. /home/informix/setenv1150执行. ./.bash_profile4.2.配置SQLHOSaobTS文件页脚内容114.3.配置ONCONFIG文件页脚内容124.4.建立chunk目录并建立文件4.5.初始化实例oninit –i5.日志的移动5.1.分别建立一个物理的和逻辑的chunk文件并更改权限页脚内容13touch llogdbs.chkchmod 660 plogdbs.chkchmod 660 llogdbs.chk5.2.分别建立物理和逻辑的dbspaceonspaces -c -d plogdbs -p /home/informix/ids1150/chunk/plogdbs.chk -o 0 -s 50000onspaces -c -d llogdbs -p /home/informix/ids1150/chunk/llogdbs.chk -o 0 -s 500005.3.移动物理日志将物理日志从rootdbs下移动到plogdbsonparams -p -s 49000 -d plogdbs5.4.逻辑日志的增加onparams -a -d llogdbs -s 5000注意:此操作执行10次,但是在最后一次的时候会报错,是因为空间已经不够了。
NEPL安装程序
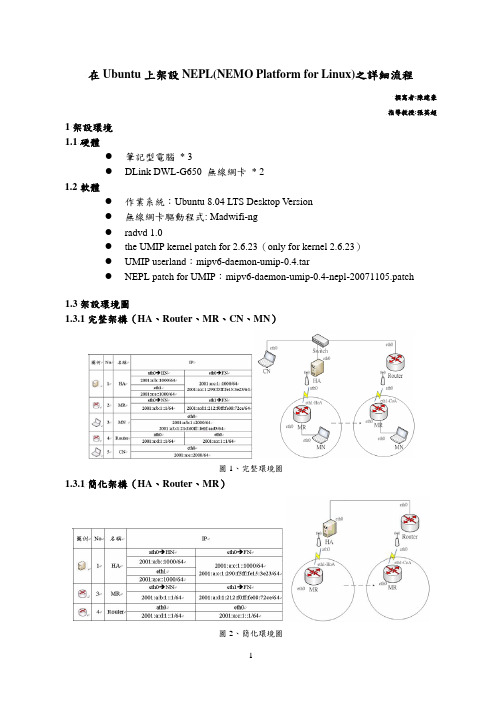
在Ubuntu上架設NEPL(NEMO Platform for Linux)之詳細流程撰寫者:陳建豪指導教授:張英超1架設環境1.1硬體z筆記型電腦 * 3z DLink DWL-G650 無線網卡 * 21.2軟體z作業系統:Ubuntu 8.04 LTS Desktop Versionz無線網卡驅動程式: Madwifi-ngz radvd 1.0z the UMIP kernel patch for 2.6.23(only for kernel 2.6.23)z UMIP userland:mipv6-daemon-umip-0.4.tarz NEPL patch for UMIP:mipv6-daemon-umip-0.4-nepl-20071105.patch1.3架設環境圖1.3.1完整架構(HA、Router、MR、CN、MN)圖1、完整環境圖1.3.1簡化架構(HA、Router、MR)圖2、簡化環境圖2安裝Ubuntu 8.04 LTS作業系統Ubuntu 8.04 LTS Desktop Version 需要至少256MB以上記憶體以及 4 GB 的硬碟空間,硬體配備若不足此需求,可以選擇Ubuntu 8.04 LTS Server Version安裝。
選擇Ubuntu作為系統平台的原因有二:首先,近來Ubuntu非常盛行,網路資源充裕,再來是官方網站曾對Ubuntu發行安裝套件,以供使用者輕鬆上手,在之後的流程裡,也會使用到官方網站所發行的安裝套件。
由Ubuntu正體中文站下載好Ubuntu 8.04 LTS的光碟ISO檔(下載網址: /Linux/Ubuntu/ubuntu-cd/hardy/ubuntu-8.04.2-desktop-i386.iso),將ISO檔燒錄進空白CD片,放入電腦的CD-ROM並且重開機之後,進入BIOS選擇由CD-ROM讀取開機,進入Ubuntu安裝畫面。
Informix11.5 for windows 安装配置

Informix 11.50 for Windows安装配置一、测试环境
操作系统:Windows Server 2008 64bit
Informix版本:Informix Ultimate Edition 11.5 for Windows 64
二、安装
1.解压iif.11.50.FC9TL.win2003.zip文件,双击运行setup.exe进行安装。
2.选项需要安装的组件包(这里使用了默认的IDS,DBDK,CSDK)
3.点击Next继续执行
4.阅读并接受协议,点击Next
5.选择Typical方式进行安装
6.选择安装目录,这里安装路径设置为“E:\informix11.5”。
7.设置informix 用户密码
8.确认安装信息,点击“Next”
9.等待IDS安装结束,点击“Finish”。
10.自动加载DBDK安装程序
11.点击Next执行安装
12.设置DBDK安装目录
13.点击Done完成DBDK安装
14.自动加载CSDK安装程序
15.选择接受许可协议
16.设置本地信息,默认Windows用户
17.选择Custom进行安装
18.为Client-SDK设置路径
19.点击Next后,进行安装
20.完成CSDK 安装
21.全部完成安装后,程序组里增加了IDS,DBDK,CSDK 三组,在IDS 的程序组里:以数据库服务名(ids1150)为标题的链接可视为informix 的console 接口,server instance manager 可以管理instance,modifyinstallation 可以管理informix 安装组件。
installation用法
installation用法一、介绍本文档将介绍in st al l at io n的使用方法和常见问题解答,帮助用户正确使用in st al lat i on。
二、安装2.1下载在官方网站下载i nst a ll at io n的安装包,安装包支持W ind o ws、M a c和Li nu x系统。
2.2执行安装根据系统类型,选择对应的安装包并执行安装。
安装过程中根据提示完成相关设置和选择。
2.3添加环境变量为了能够在任意路径下使用i ns ta ll at io n命令,需要将i n st al la ti on的安装路径添加到系统的环境变量中。
具体操作如下:1.打开系统的环境变量设置界面。
2.找到系统的P AT H变量,点击编辑。
3.在编辑框中添加in s ta ll at io n安装路径,确保路径正确无误。
4.点击确定保存设置。
三、常见问题解答3.1安装失败解决方法如果在安装过程中遇到安装失败的情况,可以尝试以下解决方法:-确保下载的安装包完整且未被破坏。
-检查系统是否满足i n st al la ti on的最低系统要求。
-关闭杀毒软件等安全软件,以避免其对i ns ta ll at io n的干扰。
-以管理员身份运行安装程序,以获得足够的权限。
3.2命令行使用安装完成后,可以通过命令行方式使用in s ta ll at io n。
以下是一些常用的命令:-`in st al la ti on ini t`:初始化i ns tal l at io n项目。
-`in st al la ti on bui l d`:编译i ns ta ll a ti on项目。
-`in st al la ti on run`:运行i ns ta ll at i on项目。
3.3卸载如需卸载已安装的in s ta ll at io n,可以通过以下步骤进行操作:1.打开系统的控制面板。
2.进入程序和功能(或卸载程序)界面。
INFORMATICA(LINUX)安装配置文档

CLASSPATH=$ORACLE_HOME/jre/1.4.2/lib/rt.jar:$ORACLE_HOME/jlib:$ORACLE_HOME/netw ork/jlib:$ORACLE_HOME/rdbms/jlib:$ORACLE_HOME/plsql/jlib:$ORACLE_HOME/assistant s/jlib export CLASSPATH TNS_ADMIN=$ORACLE_HOME/network/admin export TNS_ADMIN EDITOR=vi; export EDITOR PATH=$ORACLE_HOME/bin:$PATH:/usr/bin:/etc:/usr/ccs/bin:/usr/lbin:/usr/sbin:/usr /local/bin:/usr/ucb:$HOME/bin:/usr/bin/X11:/sbin:. export PATH
ODBC 配置 [ODBC Data Sources] dBase=DataDirect 5.1 dBaseFile(*.dbf) FoxPro3=DataDirect 5.1 dBaseFile(*.dbf) Informix Wire Protocol=DataDirect 5.1 Informix Wire Protocol SQLServer Wire Protocol=DataDirect 5.1 SQL Server Wire Protocol
广州市连线科技有限公司 -2-
INFA 测试服务器安装配置文档
QuotedId=No [AIS_S001_080420] Driver=/home/infa/Informatica/PowerCenter8.1.1/ODBC5.1/lib/DWmsss21.so Description=DataDirect 5.1 SQL Server Wire Protocol Address=10.33.1.94, 1433 AlternateServers= AnsiNPW=Yes ConnectionRetryCount=0 ConnectionRetryDelay=3 Database=AIS_S001_080420 LoadBalancing=0 LogonID=programmer Password=programmer QuotedId=No IANAAppCodePage=113 ReportCodePageConversionErrors=0
UDM Runtime 8 安装手册说明书
INSTALLATION MANUAL UDM Runtime 8Installing an OpenJDK 8 JavaVM on WindowsAugust 2022ImprintMathias JankeDiebold NixdorfSystems Group Retail Products Wohlrabedamm 3113629 Berlin********************************Revision historyContentsIntroduction (5)Installation (6)Product installer variants (6)Installation requirements (6)Supported operating systems (7)Interactive installation (7)Silent installation (9)Unattended installation (10)Update installation (10)Upgrade installation (10)Uninstallation (11)Interactive uninstallation (11)Silent uninstallation (11)Logging (12)Installation log (12)Uninstallation log (12)Command line parameters (13)IntroductionDN UDM Runtime 8 provides a Java runtime for DN tools, middleware, and application-related software layers, which cannot be operated via the Java runtime of the application. It is based on OpenJDK 8 and limited to Windows based operating systems as the DN WNLPOS (Linux) based operating systems already provides an OpenJDK based Java runtime.The UDM Runtime 8 is not tested and released for operation with customer application.The current product installer is based on Inno Setup1, providing the default CLI parameter and options for silent and unattended installations.1/isinfo.phpInstallationThe UDM Runtime 8 product installer can run in interactive mode as well as in silent mode. It also provides the possibility of performing so-called unattended installations based on an initial master installation.Product installer variantsThe installer are available as 32-bit and 64-bit versions for Windows based operating systems and should be selected accordingly the process architecture of the used application. This means that e.g., when using a 32-bit application on a 64-bit operating system, the 32-bit UDM Runtime installer needs to be used.The provided product installers follow the naming scheme:•DN-UDM-Runtime-MAJOR.MINOR.BUILD-x64.exe•DN-UDM-Runtime-MAJOR.MINOR.BUILD-x86.exeExample:DN-UDM-Runtime-8u222dn.0.13-x86.exeInstallation requirementsThe conditions described in this chapter apply to the installation process only.Note:The installation of UDM Runtime requires administrator permissions.Supported operating systemsUDM Runtime 8 supports and is released for the following Windows based operating systems: •Windows 10 IoT Enterprise (x86/x64)•Windows 10 Professional (x86/x64)•Windows 8.1 Industry Embedded (x86/x64)•Windows 8.1 Professional (x86/x64)•Windows POSReady 7 (x86/x64)•Windows 7 Professional (x86/x64)Interactive installationThe product installer provides a interactive mode, which will guide the end user through the setup. Example: Interactive installationNote:The setup can be cancelled on each step by clicking the [Cancel] button. If the setup is already in the step of copying files, then the installation abort will roll back the changes doneto the system. Before this step, nothing will have happened to your system. By clicking the[Back] button, you can go a step back in the setup if needed.After launching the UDM Runtime 8 installer, one of the following welcome screens will appear Dialog: Welcome to Setup Wizard➢Click the [Next] button to go on with the setup.Dialog: License Agreement➢Choose [I accept the agreement] after reading.➢Click the [Next] button.Dialog: Ready to InstallThe installer is ready to proceed with the installation and provides an installation summary.➢Click the [Install] button.Dialog: InstallingThis dialog shows you the current installation step and the overall progress of the installation. Please wait until the installer finishes this step, except you want to cancel the installation (click the [Cancel] button if so).Dialog: Completing the Setup If no error had been encountered and everything had been finished successfully, you are going to see a last dialog, informing you that the installation is complete and providing the possibility to perform prepared post installation actions.➢ Click [Finish] to end the installation. Silent installationA silent installation of UDM Runtime 8 is possible. For this, the product installer must be called with the /SILENT parameter via the command line.During a silent installation, the wizard and other background windows are not displayed. However, a window showing the progress of the installation is displayed.If this window is not to be displayed, you should use the completely silent installation mode with the /VERYSILENT parameter.Unattended installationAs with silent installation, an unattended installation with command line parameters is also possible.To do this, a supervised installation on a system must be executed with the parameter/SAVEINF="pathToFile" in the first step. The following installation must be carried out with all necessary specifications and settings. These settings and changes to the setup are stored in the specified file. With this file, the product installer, and the setup parameters /LOADINF="pathToFile" as well as/SILENT or /VERYSILENT, this recorded installation can now be run automatically, still, and unattended on other systems.Update installationAn already installed UDM Runtime 8 may be updated with a newer version if the major version number between installed version and update does not differ.Upgrade installationThere is no upgrade mechanism for older UDM Runtime installations like UDM Default Runtime 1 available. Therefore, it is recommended to remove all preceding UDM Runtime versions before the installation of UDM Runtime 8.UninstallationThe product uninstaller will remove all components, previously installed by the product installer, even if the profile has been changed by subsequent installation attempts. See Inno Setup documentation2 for details.Interactive uninstallationThere are two possibilities offered to run the uninstallation of the product interactively: •direct call of the uninstaller unins000.exe located under the directory <UDM Runtime installation-directory>\Uninstall-DN UDM OpenJDK Runtime•or use the Windows system tool with Control Panel > Add or Remove ProgramsNote:It is recommended not to call the uninstaller directly from the Windows Explorer, as the uninstallation log will not be created (see chapter Uninstallation log for more details).Silent uninstallationLike for the installation, it is also possible to execute the uninstaller silently by applying the command line argument /SILENT or /VERYSILENT.Example:"C:\Program Files\DN UDM OpenJDK Runtime\8u222dn.0.13\Uninstall-DN UDM OpenJDK Runtime\unins000.exe" /LOG="C:\temp\uninstall_UDM.log" /SILENT Note:Unlike the installation, the uninstallation log is not activated by default, and therefore, it is recommended to call the uninstaller with the /LOG=”PathToLogFile” switch also (see chapterUninstallation log for more details).2/ishelp/LoggingInstallation logThe logging for the installation process is always activated. If the installer is not called with the parameter /LOG="filename", the setup logging file will be stored in the %TMP% directory3 with a unique filename based on the current date according to the pattern Setup Log yyyy-mm-dd #<number>.txt.Example:Setup Log 2019-04-16 #002.txtUninstallation logThe logging feature for the uninstallation process cannot be generally activated as it is for the installation process. Therefore, and to activate logging for the uninstallation process, the parameter/LOG="filename" has to be appended to the uninstaller call.The uninstallation logging has the following limitations:•If the uninstaller is called directly (and without giving the /LOG option), then no uninstallation log is created.•The uninstaller cannot append a counter to the log file name as the installer can. Therefore, only one uninstallation log per defined name is possible. If the product has been installed/uninstalled multiple times, the uninstallation log will always be re-written.Note:We recommend using the product version number as well as the date and/or the time within the log file name (e.g., /LOG=%TMP%/Uninstall_<UDM Runtime>-<Version>.<Build>.%DATE%.log).3 defined as system and/or user environment variableCommand line parametersBelow you will find a short list of the most important command line parameters supported by the product installer derived from the Inno Setup installer runtime.This list is non-exhaustive and shows only the important command switches. For a complete list, please refer to the Inno Setup official help4./SILENTThe setup will run silent without displaying the wizard and the background window. However, the installation progress window is shown as well as error messages during the installation./VERYSILENTThe setup will run silent without displaying the wizard, the background window, and the progress windows. Only error messages during the installation are shown./LOADINF="filename"The installer will load the settings from the specified file after having checked the command line. This file can be prepared using the /SAVEINF= parameter as explained below./SAVEINF="pathToFile"The installer will save the installation settings to the specified file. Do not forget to use quotes if the filename contains spaces and always use the absolute path to the file./LOGThe installer will create a log file in the user's TEMP directory detailing file installation and [Run] actions taken during the installation process. This can be a helpful debugging aid. For example, if you suspect a file is not being replaced when you believe it should be (or vice versa), the log file will tell you if the file was really skipped, and why.The log file will be created with a unique name based on the current date. (It will not overwrite or append to existing files.)The information contained in the log file is technical in nature and therefore not intended to beunderstandable by end user. Nor is it designed to be machine-parse able. The format of the file is subject to change without notice./LOG="filename"Same as /LOG, except it allows specifying a fixed path/filename to be used as log file. If a file with the specified name already exists, it will be overwritten and if the file cannot be created, the installer will abort with an error message.4/InnoSetup_Switches_ExitCodes.html。
安装Ubuntu系统

本文档内容来自Ubuntu之家!安装重点本文旨在为初学者提供一篇详细步骤(step-by-step) 的安装手册,但对老手或曾安装旧Ubuntu/Kubuntu/Xubuntu/Lubuntu 的朋友可能过份冗长。
所以这节列出安装的基本程序和要点,让有经验的用户可以立即安装Ubuntu/Kubuntu/Xubuntu/Lubuntu 11.10。
∙用BT 下载Ubuntu 11.10 桌面安装光盘ISO 档,并烧成光盘或U 盘。
∙Vista/7 使用者请先用Vista/7 提供的Disk Management Console缩小分割区。
∙如硬盘有一些重要的资料,请先备份。
∙用桌面安装光盘开机。
∙先选择『中文(繁体)』或『中文(简体)』作为安装语言,并按『安装Ubuntu』(Install Ubuntu)。
∙确认您计算机有不少于3GB 的磁盘空间安装Ubuntu,有接上电源(不是使用电池) 和有连接至因特网(使用有线较佳),并选取『安装此第三方软件』(Install this third-party software)让安装程序自动安装Flash 播放器和各专利音乐/影片格式的译码器等。
然后按『下一步』(Forward)。
∙因应您计算机的情况,选择安装Ubuntu 的方案:∙硬盘有超过3GB 未分割的空间可以安装Ubuntu/Kubuntu/Xubuntu/Lubuntu,可以选使用最大的连续可用空间(use the largest continuous free space)。
∙整个硬盘已被另一个仍需要运作操作系统(包括其他GNU/Linux 或Windows 98/ME/2000/XP) 佔用,可以选将Ubuntu 11.10 与作业系统安装在一起(Install Ubuntu 11.10 alongside OS)把Ubuntu/Kubuntu/Xubuntu/Lubuntu 和它们安装在同一硬盘,并让您在开机时选取启动那个(即所谓dual-boot)。
ids_machine_notes_11.50

b. The GSKit installation directory must have 25 MB of free disk space.
c. One of the following packages must be installed on your system:
- Asianux 2.0 (Kernel: 2.6.9, Glibc: 2.3.4). The following packages
have to be installed:
libaio-0.3.103
libgcc-3.4.3
libstdc++-3.4.3
ncurses-5.4
pam-0.77
- Ubuntu Server Edition 6.06.1 LTS (Kernel: 2.6.15, Glibc: 2.3.6).
The following packages have to be installed:
bc 1.06
libaio1 0.3.104
libgcc 4.0.3
libncurses 5.5
libpam 0.79
- Debian 4.0 (Kernel: 2.6.18, Glibc: 2.3.6). The following packages
disabled. The minimum version of libaio is 0.3.103.
6. The High Performance Loader utilities, onpload and ipload, require a
minimum of 35 MB of memory and 70 MB of swap space in order to run.
Informix11安装手册

目录1、创建组,用户: (2)2、更改Informix环境变量: (2)(可以直接将onmonitor配置文件夹中的.profile文件拷贝到/etc/informix下,替换原有的.profile文件) (2)3、将安装包导入解压: (4)4、执行安装程序: (4)4.1、选择4 Begin Installation (4)4.2、输入1,选择NEXT,Enter 继续。
(或者直接Enter) (4)4.3、输入1 ,选择NEXT,Enter 继续。
(或者直接Enter) (5)4.4、输入1,选择Accept the agreement,Enter 继续。
(5)4.5、输入1,选择NEXT,Enter继续。
(或者直接Enter) (5)4.6、输入软件安装路径,Enter继续。
(这里我安装路径为/home/informix ) (6)4.7、输入1,选择NEXT,Enter继续。
(或者直接Enter) (6)4.8、输入2,取消选择IBM Informix Client-SDK Version 3.00,Enter继续。
(6)4.9、输入1,Deselect 'IBM Informix Client-SDK...,Enter继续。
(或直接Enter).. (6)4.10、输入4 ,取消选择IBM Informix JDBC Driver Version 3.10,Enter继续。
(7)4.11、输入0 ,选择Continue installing ,Enter继续。
(或直接Enter) (7)4.12、输入0,选择NEXT,Enter继续。
(或直接Enter) (7)4.13、输入2,选择NO ,Enter继续。
(8)4.14、输入0,Enter继续。
(或者直接Enter) (8)4.15、输入0,Enter继续。
(或者直接Enter) (8)4.16、输入1,选择Use the default configuration file.,Enter继续。
Informix11.5_for_linux安装
Informix12.1 for linux 安装一、软件包下载下载安装包:iif.12.10.FC1IE.linux-x86_64.tar二、安装1.创建informix用户和组[root@informix ~]# groupadd informix[root@informix ~]# useradd -g informix -m informix[root@informix ~]# passwd informix[root@informix ~]# id informix[root@informix ~]# chown informix:informix /oracle2.将安装包上传到服务器使用infomix用户将iif.12.10.FC1IE.linux-x86_64.tar上传到服务器:/oracle下。
3.解压软件[root@informix informix]# tar xvf iif.12.10.FC1IE.linux-x86_64.tar /oracle4.设置INFORMIXDIR和DISPLAY变量.bash_profile添加如下内容exportLANG=zh_CN.GB2312exportPATHunsetUSERNAME exportINFORMIXDIR=/oracle exportPATH=$PATH:$INFORMIXDIR/bin exportINFORMIXSERVER=info exportONCONFIG= exportDBDATE=y4md;5.安装软件过程以root用户执行:1)进入软件目录执行安装程序ids_install [root@informix ~]# cd /usr/informix [root@informix informix]# ./ids_installEnter1EnterEnterEnterEnterEnterEnter1EnterEnterEnter三、配置IDS(以下使用informix用户登陆)1. 设置环境以informix 用户身份登录[root@informix informix]# su - informix2. 编辑环境文件ids.env(1)新建一个名为ids.env 的环境文件[informix@informix ~]$ vi ids.envexport INFORMIXDIR=/oracleexport INFORMIXSERVER=infoexport PATH=$INFORMIXDIR/bin:$PATH保存文件并退出编辑器。
浪潮服务器安装SUSE Linux 11.x系统配置步骤

浪潮服务器安装SUSE Linux11.x系统配置步骤目录1、光盘引导,加载RAID卡驱动 (2)2、基本设置 (4)3、分区设置 (8)4、软件包选择 (15)1、光盘引导,加载RAID卡驱动RAID卡驱动一般是iso格式,可以将驱动通过UltraISO工具写入到软盘,如果没有软盘可以用浪潮U盘(带虚拟软驱功能),如果也没有浪潮U盘,可以将驱动ISO文件刻成光盘。
1)光盘引导后出现如下安装界面。
把光标移动到Installation上,按F6键,选择Yes,在Installation上回车,开始安装。
如下图:2、基本设置3)选择安装时的键盘和语言。
4)选择全新安装,点下一步5)选择时区6)选择安装到物理机7)选择expert(专家)自定义安装,接下来需要设置的选项有partitioning(分区)、booting(引导),以及software(软件包)。
3、分区设置7-1)点击partitioning进行分区设置。
如下图,选择CustomPartitioning(自定义),点击Next下一步。
在磁盘上点右键选择add partition(新建分区)一般只需要创建一个根分区/和一个交换分区swap就可以了,当然也可以根据实际需要进行设置。
首先创建根分区,这里分区类型选择Primary Partition(主分区)填写分区大小文件系统选择Ext3,挂载点选择/Swap交换分区和其它分区创建方法类似。
7-2)点击booting进行引导设置。
点击Boot Loader Installation选项卡,Boot Loader选择Grub,Boot LoaderLocation保持默认即可。
特别注意:如果用U盘安装系统,请选择BootLoader Installation Details,务必本地磁盘调整为第一位,以免将Grub安装到U盘上导致系统无法启动。
4、软件包选择7-3)点击Software进行软件包设置。
Informix11.5 for linux安装
Informix11.5 for linux 安装一、软件包下载下载安装包:iif.11.50.UC2TL.Linux-RHEL4.tar二、安装1.创建informix用户和组[root@informix ~]# groupadd informix[root@informix ~]# useradd -g informix -m informix[root@informix ~]# passwd informix[root@informix ~]# id informix[root@informix ~]# mkdir /usr/informix[root@informix ~]# chown informix:informix /usr/informix2.将安装包上传到服务器使用infomix用户将iif.11.50.UC2TL.Linux-RHEL4.tar上传到服务器:/usr/informix下。
3.解压软件[root@informix informix]# tar xvf iif.11.50.UC2TL.Linux-RHEL4.tar /usr/informix 4.设置INFORMIXDIR和DISPLAY变量export INFORMIXDIR=/usr/informix5.安装软件过程以root用户执行:1)进入软件目录执行安装程序ids_install[root@informix ~]# cd /usr/informix[root@informix informix]# ./ids_installDo you want to run installer in GUI mode [y/n] : yEntering GUI Mode.2)单击next3)单击next4)选择目录位置/usr/informix(默认),单击next........三、配置IDS(以下使用informix用户登陆)1. 设置环境以informix 用户身份登录[root@informix informix]# su - informix2. 编辑环境文件ids.env(1)新建一个名为ids.env 的环境文件[informix@informix ~]$ vi ids.envexport INFORMIXDIR=/usr/informixexport INFORMIXSERVER=ochefexport PATH=$INFORMIXDIR/bin:$PATH保存文件并退出编辑器。
Informix+Dynamic+Server+11.50+的+HDR+环境搭建最佳实践

Informix Dynamic Server 11.50 的HDR 环境搭建最佳实践作者:袁红涛, 软件工程师, IBM简介: Informix Dynamic Server(IDS)的 HDR 技术就是一种成熟的内置在 IDS 数据库引擎中的容灾恢复技术,它通过两个远程结点的实时双机备份,把逻辑日志从主服务器中传输到辅助服务器,使得两台服务器的状态时刻保持一致,从而提供快速的灾难恢复能力。
本文以一个 HDR 配置实例为基础,详细描述了在 IDS 11.5 环境下搭建 HDR 高可用性环境的步骤、技术细节以及需要注意的问题,相信一定会对读者有所帮助。
发布日期: 2010 年 3 月 04 日级别:初级平均分(共6 个评分)概述随着 IDS 在电信、银行、保险等各行业应用的发展,IDS 数据库灾备系统尤其是异地灾备系统的建设显得越发重要。
大家知道,HDR 技术是非常方便、高效、实用的异地容灾备份系统解决方案。
因而,我们这里将针对 IDS 的使用者,详细介绍 IDS 11.5 中的 HDR 技术,从搭建 HDR 实例讲起,包括一些常见的服务器状态转移场景、典型的 HDR 灾难恢复以及 11.5 相比 9.4 的 HDR 新功能等。
本文包含了我们对 IDS 11.5 HDR 相关官方文档的解读,也是我们搭建实际 HDR 环境最佳实践的总结报告。
回页首IDS 11.5 中 HDR 的完整功能介绍在 11.5 中 HDR 的功能已经相当完善,这里做一个简要介绍:∙灾难发生时应用程序可以在等待一个超时时间以后,自动平滑过渡到可用的辅助服务器,不需要人工干预,大大提高了应用程序的可用性,避免的更多的经济损失。
∙辅助服务器不仅可进行读操作还可以完成写操作(update/delete/insert),大大提高了硬件的利用率。
∙提供了新的连接管理器(Connection Manager) 组件,用于提供服务器集群中状态的自动转换协调、静态的负载平衡、动态的负载平衡。
Linux下安装INFORMIX 11.7

Linux下安装INFORMIX 11.7在/opt下建立安装目录informix。
2,启动安装切换到root 用户下,运行安装文件中ids_install文件。
IDS产品套件包含多个产品,可以同时安装所有产品,也可以分别安装。
,安装脚本会安装IDS服务器以及相同目录中的其他相关产品。
installserver命令只安装IDS服务器,忽略其他产品。
安装过程启动。
默认为控制台安装模式(其他模式参见补充说明)。
安装过程会自动识别到安装目录/opt/informix 。
根据提示输入安装选项。
这个不用多说了,很简单的。
看到IBM Informix JDBC Driver: Successful提示时说明成功安装了。
注意:运行安装脚本需要根不熟悉的最好选择典型安装,如需图形化安装则用命令./ids_install -gui 补充:其他安装模式? GUI模式:当在安装命令中指定�Cgui选项时,进入这种模式。
GUI模式与控制台模式相似,但是使用一个Java图形界面与安装程序交互。
安装命令的示例: installserver-gui? 静默模式:这种模式支持非交互式安装。
静默模式使用一个.ini文件提供响应信息,这些信息在控制台模式和GUI模式中是通过键盘或鼠标提供的。
IDS提供两个默认的.ini文件,您也可以创建自己的.ini文件。
在交互式安装期间,在安装命令中指定-record选项,就可以自动地创建.ini文件。
示例:installserver-recordmyresponses.ini要想使用自己创建的.ini文件,必须在安装命令中指定-options选项。
示例:install_ids-silent-optionsmyresponses.ini如果使用默认的.ini文件(bundle.ini或server.ini),必须在安装命令中指定�Cacceptlicense=yes选项;否则,安装不会成功。
示例:installserver-silent-acceptlicense=yes在安装期间还可以指定其他选项,包括:? -javahome,使用已经安装的JRE? -PinstallLocation=,指定不同的安装目录 ? -log,指定非默认的日志文件名可以在同一个系统上同时存在IDS的多个版本。
windows系统下Informix_11.7安装手册
windows系统下Informix 11.7安装手册1. 概述Informix在windows系统下的安装过程与Linux下的有些不同,这里通过实际操作,详细描述了Informix在windows系统下的安装,创建实例,配置数据库的过程.2. 安装环境超级用户:informix 密码:informix一般用户:XYRZ 密码:XYRZ实例名:ol_informix1170端口:9088数据库名:xydb3 informix软件安装得到Informix 11.7 developer edition在windows32位系统下的安装包iif.11.70.TC5DE.win2003,大小约为498MB,安装包为.zip的压缩文件。
因Informix软件需要使用Informix账户进行管理,所以在安装之前需要创建Informix用户。
如果系统中没有预先创建Informix账户,则Informix Server的安装过程中将自动创建该用户,下面以没有预先创建Informix账户的环境为例,详细介绍安装过程。
1)将得到的安装包解压到合适的位置。
2)双击启动安装程序ids_install.exe,得到如下图所示安装界面,单击next按钮进入下一步3)得到如下安装界面。
阅读并单击“我接受许可协议中的全部条款”单选按钮。
然后单击“next”按钮。
4)单击next按钮后得到如下安装界面。
选择合适的安装位置来安装Informix Server,默认为:C:\Program Files\IBM\Informix\11.70。
这里选择e盘下的Informix文件夹作为安装位置(e:\Informix),在地址栏里输入e:\Informix。
也可以通过点击“choose”按钮来选择安装位置或点击“Restore Default Folder”来重新使用默认安装路径。
然后单击“next”按钮。
5)单击next按钮进入下一步,在这里可以选择安装的类型。
- 1、下载文档前请自行甄别文档内容的完整性,平台不提供额外的编辑、内容补充、找答案等附加服务。
- 2、"仅部分预览"的文档,不可在线预览部分如存在完整性等问题,可反馈申请退款(可完整预览的文档不适用该条件!)。
- 3、如文档侵犯您的权益,请联系客服反馈,我们会尽快为您处理(人工客服工作时间:9:00-18:30)。
深夜里看着一串串的 …successed 真爽
informix@ubuntu:~$ onstat -i
IBM Informix Dynamic Server Version 11.50.UC3 — On-Line — Up 00:44:43 — 144676 Kbytes
onstat>
DBSERVERALIASES info_dbs_tcp
NETTYPE ipcshm,1,50,CPU
NETTYPE soctcp,1,50,NET
TAPEDEV /dev/null
LTAPEDEV /dev/null
6. 初始化数据库
informix@ubuntu:~$ oninit -ivy
ox0spy@ubuntu:/opt/informix$ sudo ./ids_install
下面根据提示就可以搞定
5. 配置
我是以 文本模式安装的,下面开始配置
1) 在/etc/services中添加两行,如下:
informix@ubuntu:~$ grep sqlexe /etc/services
2. 环境变量设置
ox0spy@ubuntu:~$ tail /etc/profile
# add for informix
INFORMIXDIR=/opt/informix
INFORMIXSERVER=info_dbs
INFORMIXSQLHOSTS=$INFORMIXDIR/etc/sqlhosts
5) 配置$INFORMIXDIR/etc/onconfig.std文件
ROOTNAME rootdbs
ROOTPATH $INFORMIXDIR/dbs/rootdbs
MIRRORPATH $INFORMIXDIR/dbs/rootdbs_mirror
SERVERNUM 0
DBSERVERNAME info_dbs
sqlexe 8887/tcp # informix
sqlexec 8888/tcp # informix
2) 修改/etc/hosts
informix@ubuntu:~$ grep ‘ubuntu’ /etc/hosts
192.168.43.128 ubuntu
3) 配置$INFORMIXDIR/etc/sqlhosts
ONCONFIG=onconfig.std
DBDATE=Y4MD*
LD_LIBRARY_PATH=$INFORMIXDIR/lib:$INFORMIXDIR/lib/esql:$LD_LIBRARY_PATH
export INFORMIXDIR INFORMIXSERVER ONCONFIG LD_LIBRARY_PATH
Informix 11.5 Installation on Ubuntu 8.10 server
1. 用户、组创建
ox0spy@ubuntu:~$ sudo groupadd informix
ox0spy@ubuntu:~$ sudo useradd -g informix -d /opt/informix -m -s /bin/bash informix
PATH=$PATH:$INFORMIXDIR/bin
export PATH
3. 解压安装文件
以informix用户登陆系统
将C1P6NEN.tar放到/opt/informix下
解压缩:
informix@ubuntu:~$ tar xvf C1P6NEN.tar
4. 安装
以root的权限安装
informix@ubuntu:~$ cat $INFORMIXDIR/etc/sqlhosts | grep -E ‘^[^#]‘
info_dbs onipcshm ubuntu sqlexe
info_dbs_tcp onsoctcp ubuntu sqlexec
4) 建立空间
informix@ubuntu:~$ mkdir dbs && cd dbs && touch rootdbs rootdbs_mirror && chmod 660 *
到此,数据库安装工作就完成
