H3C WA1208E-GP H2.0瘦P改肥P
华三AP WA1208E瘦转胖 命令行失败后 bootware 重新刷机实际操作成功记录

华三AP WA1208E瘦转胖命令行失败后 bootware 重新刷机实际操作成功记录启动时按Ctrl+B 进入bootware模式|<3> Delete File ||<0> Exit To Main Menu | ============================================================================Enter your choice(0-3): 3 【bootware模式下按3删除已经上传的文件】Deleting the file in flash:'M' = MAIN 'B' = BACKUP 'S' = SECURE 'N/A' = NOT ASSIGNED============================================================================|NO.Size(B) Time Type Name ||1 6599560 Apr/26/2000 13:12:10 N/A wa1208e-cmw520-r1112p15-fa~001 ||2 232 Apr/26/2000 12:02:14 N/A private-data.txt ||3 418 Apr/26/2000 12:02:18 N/A startup.cfg ||0 Exit |============================================================================Enter file No:1 【按1删除已经上传的没有改名的bin文件】The file you selected is flash:/wa1208e-cmw520-r1112p15-fat.bin,Delete it? [Y/N]YDeleting.......Done!==============================================================|Note:the operating device is flash ||<1> Display All File(s) ||<2> Set Application File type ||<3> Delete File ||<0> Exit To Main Menu | ===================================================== Enter your choice(0-3): 0======================================================|<1> Boot System ||<2> Enter SerialSubMenu ||<3> Enter Ethernet SubMenu ||<4> File Control ||<5> Modify BootWare Password ||<6> Skip Current System Configuration ||<7> BootWare Operation Menu ||<8> Clear Super Password ||<9> Storage Device Operation ||<0> Reboot |============================================================================Enter your choice(0-9): 0System is starting...Booting Normal Extend BootWare....The Extend BootWare is self-decompressing..................................Done!***************************************************************************** ** H3C WA1208E BootWare, Version 3.08 ** *****************************************************************************Copyright (c) 2004-2010 Hangzhou H3C Technologies Co., Ltd. Compiled Date : Jul 12 2010CPU Type : IXP422CPU L1 Cache : 32KBCPU Clock Speed : 266MHzMemory Type : SDRAMMemory Size : 64MBMemory Speed : 133MHzBootWare Size : 512KBFlash Size : 8MBBootWare Validating...Press Ctrl+B to enter extended boot menu...Please input BootWare password:Note: The current operating device is flashEnter < Storage Device Operation > to select device.======================================================|<1> Boot System ||<2> Enter Serial SubMenu ||<3> Enter Ethernet SubMenu ||<4> File Control ||<5> Modify BootWare Password ||<6> Skip Current System Configuration|<7> BootWare Operation Menu ||<8> Clear Super Password ||<9> Storage Device Operation ||<0> Reboot |============================================================================Enter your choice(0-9): 3 【<3>进入以太网子菜单| 】====================================================|Note:the operating device is flash ||<1> Download Application Program To SDRAM And Run ||<2> Update Main Application File ||<3> Update Backup Application File ||<4> Update Secure Application File ||<5> Modify Ethernet Parameter ||<0> Exit To Main Menu| |============================================================================Enter your choice(0-5): 2 【应该先按<5>做好设置Modify Ethernet Parameter 前面按2就错了所以要重复上面的步骤选3选5设置tftp地址】Loading...System is starting...Booting Normal Extend BootWare....The Extend BootWare is self-decompressing..................................Done!***************************************************************************** ** H3C WA1208E BootWare, Version 3.08 ** *****************************************************************************Copyright (c) 2004-2010 Hangzhou H3C Technologies Co., Ltd. Compiled Date : Jul 12 2010CPU Type : IXP422CPU L1 Cache : 32KBCPU Clock Speed : 266MHzMemory Type : SDRAMMemory Size : 64MBMemory Speed : 133MHzBootWare Size : 5Flash Size : 8MBBootWare Validating...Press Ctrl+B to enter extended boot menu...Please input BootWare password:Note: The current operating device is flashEnter < Storage Device Operation > to select device.======================================================|<1> Boot System ||<2> Enter Serial SubMenu ||<3> Enter Ethernet SubMenu|<4> File Control ||<5> Modify BootWare Password ||<6> Skip Current System Configuration ||<7> BootWare Operation Menu ||<8> Clear SuperPassword ||<9> Storage Device Operation ||<0> Reboot============================================================================Enter your choice(0-9): 3====================================================|Note:the operating device is flash ||<1> Download Application Program To SDRAM And Run ||<2> Update Main Application File ||<3> Update Backup Application File ||<4> Update Secure Application File ||<5> Modify Ethernet Parameter ||<0> Exit To Main Menu | | |============================================================================Enter your choice(0-5): 5====================================================|Note: '.' = Clear field. |..The Extend BootWare is self-decompressi| '-' = Go to previous field. |one!*****************************| Ctrl+D = Quit. |*============================================================================记住网线要直连pc 设置tftp时一定要在一个网段就是这两个Server IP Address :192.168.1.100Local IP Address :192.168.1.50############################################################################### #############################【这里还有一项在设置ip之前还要输入wa1208_fat.bin 下面一行也是。
华三wa1208E-GP配置步骤

return
#
vlan 1
#
interface NULL0 接口0
#
interface Vp address 10.105.1.50 255.255.255.0
#
interface Ethernet1/0/1
#
interface WLAN-Radio1/0/1
7,display cur(查看配置)·
8,undo (删除)
9,save(保存)
乐清网关102 103 芙蓉网关106 107
命令:dis version(查看版本) dir(查看文件 普通模式 )
dis device manuinfo(查看序列号和MAC地址) delete /unreserved(删除flash中的文件)
#
ip route-static 0.0.0.0 0.0.0.0 10.105.1.1
#
user-interface con 0
user-interface vty 0 4 用户虚拟端口
user privilege level 3 用户等级
set authentication password simple h3capadmin 固定的身份认证
1,sys
2 wlan ac ip 10.100.0.106(回车)
wlan ac ip 10.100.0.107
3.int vlan 1
4,ip add 10.105.33.115 24
5,quit(退出)
6,ip route-static 0.0.0.0 0.0.0.0 10.105.33.1
#
version 5.20, Release 1111
H3C WA1208E-GP H2.0瘦P改肥P 串口升级

工具/原料∙tftp32软件(tftp server)。
∙SecureCRT。
∙H3C无线ap-fat版本软件,扩展名.bin。
∙电脑一台,最好台式机,笔记本无串口需要使用USB-RS232控制线转换。
∙H3C配置线一根,RJ45--DB9。
∙网线一根。
步骤/方法1、首先将配置线的RJ45连接到AP的CONSOLE口上,另一端连接到电脑的COM口上。
将网线连接到AP的10M/100M口上和电脑的网口。
2、SecureCRT的配置不会就到网上查。
3、打开SecureCRT后,将AP上电,连续按Ctrl+B,直到出现下图提示,password是没的直接回车就可以。
4、先删除AP里的文件,可以到启动界面选择4,再选择3删除设备里的文件5、配置TFTP,在TFTP里选择网卡和AP连的网卡,我这里设置的IP是192.168.1.2===========================<EXTEND-BOOTWAREMENU>===========================|<1> Boot System ||<2> Enter Serial SubMenu ||<3> Enter Ethernet SubMenu ||<4> File Control ||<5> Modify BootWare Password ||<6> Skip Current System Configuration ||<7> BootWare Operation Menu ||<8> Clear Super Password ||<9> Storage Device Operation ||<0> Reboot |====================================================================== ======Enter your choice(0-9): 4===============================<FileCONTROL>===============================|Note:the operating device is flash ||<1> Display All File(s) ||<2> Set Application File type ||<3> Delete File ||<0> Exit To Main Menu |====================================================================== ======Enter your choice(0-3): 3Deleting the file in flash:'M' = MAIN 'B' = BACKUP 'S' = SECURE 'N/A' = NOT ASSIGNED====================================================================== ======|NO. Size(B) Time Type Name ||1 3658304 Aug/08/2008 20:00:00 M wa1208h20_fit.bin ||2 232 Apr/26/2000 12:01:23 N/A private-data.txt ||3 568 Apr/26/2000 12:01:26 N/A startup.cfg ||0 Exit |====================================================================== ======Enter file No:1The file you selected is flash:/wa1208h20_fit.bin,Delete it? [Y/N]Y Deleting.............................................................Done!接下去的一个一个文件删除===============================<FileCONTROL>===============================|Note:the operating device is flash ||<1> Display All File(s) ||<2> Set Application File type ||<3> Delete File ||<0> Exit To Main Menu |====================================================================== ======Enter your choice(0-3): 3Deleting the file in flash:'M' = MAIN 'B' = BACKUP 'S' = SECURE 'N/A' = NOT ASSIGNED====================================================================== ======|NO. Size(B) Time Type Name ||1 232 Apr/26/2000 12:01:23 N/A private-data.txt ||2 568 Apr/26/2000 12:01:26 N/A startup.cfg ||0 Exit |====================================================================== ======Enter file No:1The file you selected is flash:/private-data.txt,Delete it? [Y/N]YDeleting.....Done!===============================<FileCONTROL>===============================|Note:the operating device is flash ||<1> Display All File(s) ||<2> Set Application File type ||<3> Delete File ||<0> Exit To Main Menu |====================================================================== ======Enter your choice(0-3):===============================<FileCONTROL>===============================|Note:the operating device is flash ||<1> Display All File(s) ||<2> Set Application File type ||<3> Delete File ||<0> Exit To Main Menu |====================================================================== ======Enter your choice(0-3): 3Deleting the file in flash:'M' = MAIN 'B' = BACKUP 'S' = SECURE 'N/A' = NOT ASSIGNED====================================================================== ======|NO. Size(B) Time Type Name ||1 568 Apr/26/2000 12:01:26 N/A startup.cfg ||0 Exit |====================================================================== ======Enter file No:1The file you selected is flash:/startup.cfg,Delete it? [Y/N]YDeleting.....Done!===============================<FileCONTROL>===============================|Note:the operating device is flash ||<1> Display All File(s) ||<2> Set Application File type ||<3> Delete File ||<0> Exit To Main Menu |====================================================================== ======Enter your choice(0-3): 0===========================<EXTEND-BOOTWAREMENU>===========================|<1> Boot System ||<2> Enter Serial SubMenu ||<3> Enter Ethernet SubMenu ||<4> File Control ||<5> Modify BootWare Password ||<6> Skip Current System Configuration ||<7> BootWare Operation Menu ||<8> Clear Super Password ||<9> Storage Device Operation ||<0> Reboot |====================================================================== =================================<EXTEND-BOOTWAREMENU>===========================|<1> Boot System ||<2> Enter Serial SubMenu ||<3> Enter Ethernet SubMenu ||<4> File Control ||<5> Modify BootWare Password ||<6> Skip Current System Configuration ||<7> BootWare Operation Menu ||<8> Clear Super Password ||<9> Storage Device Operation ||<0> Reboot |====================================================================== ======Enter your choice(0-9): 2===========================<Enter Serial SubMenu>===========================|Note:the operating device is flash ||<1> Download Application Program To SDRAM And Run ||<2> Update Main Application File ||<3> Modify Serial Interface Parameter ||<0> Exit To Main Menu |====================================================================== ======Enter your choice(0-3): 3===============================<BAUDRA TESET>===============================|Note:'*'indicates the current baudrate || Change The HyperTerminal's Baudrate Accordingly ||---------------------------<Baudrate A vailable>---------------------------||<1> 9600(Default)* ||<2> 19200 ||<3> 38400 ||<4> 57600 ||<5> 115200 ||<0> Exit |====================================================================== ======Enter your choice(0-5): 5Baudrate has been changed to 115200 bps.Please change the terminal's baudrate to 115200 bps, press ENTER when ready.The current baudrate is 115200 bps===============================<BAUDRA TESET>===============================|Note:'*'indicates the current baudrate || Change The HyperTerminal's Baudrate Accordingly ||---------------------------<Baudrate A vailable>---------------------------||<1> 9600(Default) ||<2> 19200 ||<3> 38400 ||<4> 57600 ||<5> 115200* ||<0> Exit |====================================================================== ======Enter your choice(0-5): 0===========================<Enter Serial SubMenu>===========================|Note:the operating device is flash ||<1> Download Application Program To SDRAM And Run ||<2> Update Main Application File ||<3> Modify Serial Interface Parameter ||<0> Exit To Main Menu |====================================================================== ======Enter your choice(0-3): 2Please Start To Transfer File, Press <Ctrl+C> To Exit.Waiting ...这个时候选择发送固件通过crt的传输里面的发送Xmoden,然后会跳出选择固件的对话框,找出你的fat固件,然后确实。
H C WA 瘦AP刷成胖AP教程

直接复制粘帖以下命令,然后保存即可:
sys # port-security enable # wlan service-template 1 crypto ssid XHSD cipher-suite ccmp security-ie rsn service-template enable # wlan service-template 2 crypto ssid XHSD cipher-suite ccmp security-ie rsn service-template enable # interface Vlan-interface1 ip address dhcp-alloc client-identifier mac Vlan-interface1 # interface WLAN-BSS1 port-security port-mode psk port-security tx-key-type 11key port-security preshared-key pass-phrase simple 12345678 # interface WLAN-BSS2 port-security port-mode psk port-security tx-key-type 11key port-security preshared-key pass-phrase simple 12345678 # interface WLAN-Radio1/0/1 service-template 2 interface wlan-bss 2 # interface WLAN-Radio1/0/2 service-template 1 interface wlan-bss 1 #
3、上传 wa4300_fat.bin 至 AP 中:
H3C WA1208E-GP无线局域网增强型接入点设备快速入门-APW100

×
〇
〇
〇
〇
〇
天线
〇
〇
〇
〇
〇
〇
风扇/风扇盘 〇
〇
〇
〇
〇
〇
安装支架/其 他附件
〇
〇
〇
〇
〇
〇
电源供应器及 其他组件
×
〇
〇
〇
〇
〇
9
资料版本:20100319-APW100
BOM:3122A096
说明:
1)本清单遵从中国信息产业部第 39 号令《电子信息产品污染控制管理办 法》(2006 年 2 月 28 日)及 SJ/T 11364-2006《电子信息产品污染控制 标识要求》的相关要求,适用于投放在中国地区的产品。
3.4 网络连接
WA1208E-GP设备在实际使用中,可以通过将设备的以太网口与交换 机的以太网口连接,上行接入Internet或城域网,如图 4所示。 注意:与 WA1208E-GP 设备连接的网线推荐使用超五类线标准网线。
图4 WA1208E-GP 设备上行接入 Internet 示意图
4 登录到 AP
BOM:3122A096
附录 A 有毒有害物质清单
部件名称 Parts Name
有毒有害物质或元素 Hazardous Substances
铅 Pb
汞 Hg
镉 Cd
六价 铬CrVI
多溴联 苯 PBB
多溴二 苯醚 PBDE
印刷电路板及 其组件
×
〇
〇
〇
〇
〇
机箱/隔板/其
他金属和塑料 〇
〇
〇
〇
〇
〇
部件
电缆/电线
H3C WA1208E无线局域网设备说明书

•宝贝详情第1章设备简介1.1 概述H3C WA1208E无线局域网增强型接入点设备(以下简称WA1208E)是杭州华三通信技术有限公司(以下简称H3C公司)自主研发的系列无线接入点产品之一。
在组网应用中可以作为连接无线网络与有线网络的桥接器,为WLAN(Wireless Local Area Network)用户提供无线接入服务。
WA1208E在组网时的位置示意如下图1-1所示(以企业网为例)。
图1-1位置示意图WA1208E的设备外观如下图1-2所示。
图1-2设备外观图(WA1208E-DG)1.2 硬件配置WA1208E设备通过选配不同的射频插卡和功放模块,提供五种基本形态。
配置情况如下表1-1所示。
表1-1硬件配置说明WA1208E射频指标优异,业务功能完善;在配套使用防水、防雷器件后,还可以与室外机箱配合应用于室外建网。
下面对设备的前、后面板进行说明。
1.2.1 前面板在WA1208E的前面板上有3个LED(Light Emitting Diode)指示灯。
不同型号的产品,面板上的指示灯标识不同,详细说明请参见表1-2、表1-3和表1-4。
表1-2WA1208E-G及WA1208E-GP指示灯说明表1-3WA1208E-DG指示灯说明表1-4WA1208E-AGP及WA1208E-AG指示灯说明1.2.2 后面板后面板上从左至右分别有天线馈口(2.4G)、串口、复位孔、接地口、以太网接口、电源接口和天线馈口(2.4G/5G)。
不同型号的产品所对应的接口说明如表1-5所示。
表1-5WA1208E后面板接口说明在WA1208E后面板的网口连接器上,有两个指示灯用来指示网络连接状况。
相关说明如表1-6所示。
表1-6网口状态指示灯说明H3C EWP-WA1208E-AGP参数H3C EWP-WA1208E-AGP主要性能:网络标准IEEE 802.11b, IEEE802.11g, IEEE 802.11a数据传输率(Mbps)IEEE802.11a: 54, 48, 36, 24, 18, 12, 9, 6Mbps以及Super A模式下的108Mbps; IEEE802.11g: 54, 48, 36, 24, 18, 12, 11, 9, 6, 5.5, 2, 1Mbps以及Super G模式下的108MbpsMbps有效工作距离(m)600m频率范围802.11a: 5.15GHz - 5.35GHz, 5.725GHz - 5.850GHz; 802.11b, 802.11g: 2.4000GHz - 2.4835GHz灵敏度802.11a: -70dBm@54Mbps, -90dBm@6Mbps; 802.11b: -89dBm@11Mbps, -97dBm@1Mbps; 802.11g:-72dBm@54Mbps, -91dBm@6Mbps调制方式OFDM, DBPSK, DQPSK, CCK, CCK网络接口10/100M IEEE802.3状态指示灯Power, WLAN, LAN安全性能支持64、128位WEP加密, WPA, 802.11i尺寸(mm)195×195×44mm重量(g)1.35kg其他技术参数特别适合于WDS与接入点统一设备的室外全无线组网应用, 节约设备成本特点按键功能: 整机复位, 恢复缺省配置; 本地供电: 48V DC 0.32A ; 开阔环境: 200~600米; 室内: 65~150米。
华为AP胖转瘦步骤
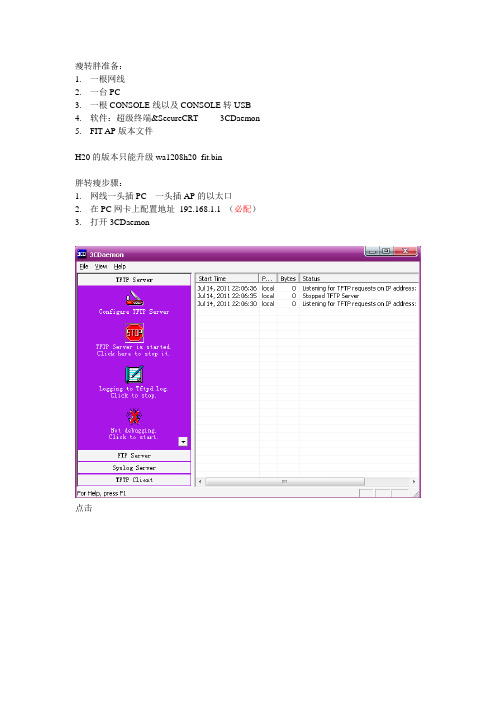
瘦转胖准备:1.一根网线2.一台PC3.一根CONSOLE线以及CONSOLE转USB4.软件:超级终端&SecureCRT 3CDaemon5.FIT AP版本文件H20的版本只能升级wa1208h20_fit.bin胖转瘦步骤:1.网线一头插PC 一头插AP的以太口2.在PC网卡上配置地址192.168.1.1 (必配)3.打开3CDaemon点击点击选取要升级的胖AP版本文件夹确定点击“是”最小化,不要关闭4.console线连接入AP查看版本<h3c>dir0 -rw- 3618336 Sep 26 2009 13:12:26 wa1208h20_fat.bin会出现以上文字。
如果是wa1208h20_fit.bin,说明是瘦版本.瘦转胖命令:Sys (进入全局模式)interface Vlan-interface 1ip address 192.168.1.4 24 (设置AP地址,为了能连通PC)quitquitdelete /unreserved wa1208h20_fat.bin (wa1208h20_fit当前版本)ytftp 192.168.1.1 get wa1208h20_fit.bin (192.168.1.1 PC地址,wa1208h20_fat 文件夹里)boot-loader file wa1208h20_fit.binyrebooty重启后<wa1208-GP-H20>dir0 -rw- 3618336 Sep 26 2009 13:12:26 wa1208h20_fit.bin看到以上显示,胖转瘦成功。
H3CWLAN网络配置与维护第4讲AP胖瘦模式相互切换(1.0.2)
H3CWLAN⽹络配置与维护第4讲AP胖瘦模式相互切换(1.0.2)H3C WLAN⽹络配置与维护第四讲AP胖瘦模式相互切换杭州华三通信技术有限公司版权所有侵权必究All rights reserved⽬录1 前⾔ 32 课程⽬标 33 配置准备 34 模式切换操作 34.1 判断AP的⼯作模式 34.2 FAT模式切换成FIT模式 44.2.1 PC配置与AP同⼀⽹段的IP地址,并能ping通AP 44.2.2 PC上启动TFTP Server软件⼯具 44.2.3 删除AP上旧的主机软件 44.2.4 从PC向AP上传FIT版本 44.2.5 指定AP为FIT模式 54.3 FIT模式切换成FAT模式 54.3.1 为FIT AP配置IP地址 54.3.2 PC上启动TFTP Server软件⼯具 54.3.3 删除AP上旧的主机软件 54.3.4 从PC向AP上传FAT版本 64.3.5 指定AP为FAT模式 61 前⾔构建WLAN⽹络可以采⽤两种⽅式,⼀种是FAT AP模式,也就是我们常说的胖AP,FAT AP不能集中管理,只能⼀台⼀台的配置和管理,对于⽆线覆盖范围有限,AP数⽬较少的情况⽐较合适。
另⼀种⽅式是采⽤⽆线控制器AC加FIT AP(瘦AP)组⽹,采⽤这种⽅式FIT AP不需要配置,所有配置和版本都从AC上下载,⽅便管理和维护;这也说明了FIT AP离开了AC是不能⼯作的,⽽FAT AP是独⽴⼯作的,不需要AC的配合。
如果AP是双模的,那么它们可以通过命令在FAT 或FIT模式之间切换。
这篇⽂档将对切换⽅法进⾏简单介绍。
2 课程⽬标掌握AP在胖瘦模式之间切换的⽅法。
3 配置准备需要进⾏模式切换的AP⼀台;console线缆⼀根、PC⼀台(已经安装了TFTP Server的软件⼯具)、⽹线⼀根;AP的FAT或FIT版本;4 模式切换操作下⾯我们将以W A1208E为例进⾏讲解,其他⽀持两种模式切换的AP的操作也是类似的。
wa1208e-gp不加密配置上网
请看以下配置:
version 5.20, Ess 1104
#
interface Vlan-interface1
ip address 192.168.0.50 255.255.255.0
#
interface Ethernet1/0/1
#
interface WLAN-BSS1
port access vlan 1
#
interface WLAN-BSS2
#
interface WLAN-Radio1/0/1
#
interface WLAN-Radio1/0/2
channel 1
service-template 1 interface wlan-bss 1
#
user-interface con 0
user-interface vty 0 4
authentication-mode scheme
#
return
�
#
wlan rrm
11a mandatory-rate 6 12 24
11a supported-rate 9 18 36 48 54
11b mandatory-rate 1 2
11b supported-rate 5.5 11
11g mandatory-rate 1 2 5.5 11
H3C的瘦AP转胖AP

H3C的瘦AP转胖APH3C瘦AP变胖AP首先查看AP版本:dirDirectoryofflah:/0-rw-7591916Apr26200012:06:04wa2600a_fit.bin瘦ap12954KBtotal(5538KBfree)%Devicecan'tbefoundorfilecan'tbefoundinthedirectory12954KBtotal(12952KBfree)格式化完成ytem-viewSytemView:returntoUerViewwithCtrl+Z.[WA2620-AGN]intVlan-interface1配置管理vlan地址[WA2620-AGN-Vlan-interface1]ipadd192.168.0.10255.255.255.0[WA2620-AGN-Vlan-interface1]ping192.168.0.1ping主机地址,通的话可以用tftp传送胖ap系统PING192.168.0.1:56databyte,preCTRL_Ctobreak---192.168.0.1pingtatitic---5packet()tranmitted5packet()received0.00%packetloround-tripmin/avg/ma某=1/1/2mtftp192.168.0.1getwa2600a_fat.bintftp在pc上设好.FilewillbetranferredinbinarymodeDownloadingfilefromremoteTFT Perver,pleaewait......................../.................................................TFTP:759191 6bytereceivedin67econd()Filedownloadeduccefully.dir查看已经成功Directoryofflah:/0-rw-7591916Jan01202200:33:16wa2600a_fat.bin12954KBtotal(5538KBfree)此时断电重启============afetyloaderv5.07-RAM-128Mtartup...=========Etherneteth0:MACaddre00:0d:0b:0a:01:01IP:169.254.2.111/255.2 55.255.0==E某ecutingapplicationorwebervicein2.000econd-enter^CtoabortSytemitarting...BootingNormalE某tendBootWare.某某某某某某某某某某某某某某某某某某某某某某某某某某某某某某某某某某某某某某某某某某某某某某某某某某某某某某某某某某某某某某某某某某某某某某某某某某某某某某某H3CWA2620-AGNBootWare,Verion1.20某某某某某某某某某某某某某某某某某某某某某某某某某某某某某某某某某某某某某某某某某某某某某某某某某某某某某某某某某某某某某某某某某某某某某某某某某某某某某某某Copyright(c)2004-2022HangzhouH3CTechnologieCo.,Ltd.MemorySpeed:400MHzBootWareSize:511KBFlahSize:16MBPCBVerion:V er.ABootWareValidating...PreCtrl+Btoentere某tendedbootmenu...PleaeinputBootWarepaword:没设密码Note:ThecurrentoperatingdeviceiflahEnter<StorageDeviceOperation>toelectdevice.================================================|<1>BootSyte m||<2>EnterSerialSubMenu||<3>EnterEthernetSubMenu||<4>FileControl||<5>ModifyBootWarePaword||<6>SkipCurrentSytemConfiguration||<7>BootWareOperationMenu||<8>ClearSuperPaword||<9>StorageDeviceOperation||<0>Reboot|=============================================================== ======Enteryourchoice(0-9):4========================================================|Not e:theoperatingdeviceiflah||<1>DiplayAllFile()||<2>SetApplicationFiletype|<3>DeleteFile||<0>E某itToMainMenu|=============================================================== ======Enteryourchoice(0-3):1Diplayallfile()inflah:'M'=MAIN'B'=BACKUP'S'=SECURE'N/A'=NOTA SSIGNED========================================================= ===================|NO.Size(B)TimeTypeName||17591916Jan/01/202200:33:16N/Awa2600a_fat.bin|必须是main,成为主启动项================================================================ =====e:theoperatingdeviceiflah||<1>DiplayAllFile()||<2>SetApplicationFiletype||<3>DeleteFile||<0>E某itToMainMenu|============================================================ =========Enteryourchoice(0-3):2'M'=MAIN'B'=BACKUP'S'=SECURE'N/A'=NOTASSIGNED=============== ============================================================= |NO.Size(B)TimeTypeName||17591916Jan/01/202200:33:16Mwa2600a_fat.bin||0E某it|=============================================================== ======EnterfileNo:1Modifythefileattribute:============================================================ =========|<1>+Main||<2>-Main||<3>+Backup||<4>-Backup||<0>E某it|================Enteryourchoice(0-4):1Setthefileattributeucce!============================================================ ==|Note:theoperatingdeviceiflah||<1>DiplayAllFile()||<2>SetApplicationFiletype||<3>DeleteFile||<0>E某itToMainMenu|============================================================ =========Enteryourchoice(0-3):0================================================|<1>BootSyte m||<2>EnterSerialSubMenu||<3>EnterEthernetSubMenu||<4>FileControl||<5>ModifyBootWarePaword||<6>SkipCurrentSytemConfiguration||<7>BootWareOperationMenu||<8>ClearSuperPaword||<9>StorageDeviceOperation||<0>Reboot|============================================================ =========Enteryourchoice(0-9):0注:这里说一下,下面提到的是胖AP的模式,如果是瘦AP,是要在无线控制器上配置的,没有无线控制器的话就要把瘦AP转为胖AP,还有一点H3CAP有两种的,如果是单频的,就只有WLAN-Radio1/0/1这一个接口,如果是双频的有两个接口,另外一个是WLAN-Radio1/0/2,那你配置时要配置在WLAN-Radio1/0/2上面先用配置线连到AP里,启动AP,用SYSTEM-VIEW进入配置模式然后你先要把默认的配置去掉interfaceWLAN-Radio1/0/1undoervice-template1quitundowlanervice-template1这样就去掉原先的配置然后配置加密,密码是12345678:port-ecurityenablewlanervice-template1cryptoidH3Ccipher-uitetkipecurity-iewpaauthentication-methodopen-ytemervice-templateenableinterfaceWLAN-BSS1port-ecurityport-modepkport-ecurityt某-key-type11keyport-ecurityprehared-keypa-phrae12345678加密做好了,然后要把这个配置绑定在WLAN-RADIO1/0/1接口:interfaceWLAN-Radio1/0/1ervice-template1interfacewlan-b1。
H3C WA1208E-GP V5平台AP胖转瘦流程
电信H3C WA1208E-GP V5平台AP胖转瘦流程升级分为远端升级以及近端升级1、近端升级(大部分都是近端升级)2、远端升级一、近端升级通过串口线连接AP1、通过命令display current-configuration查看里面的配置,这是胖AP的配置,可以看出是V5版本(若为V3版本的话需要由我方来升级)或者通过display version查看版本信息2、通过命令display device manuinfo获取AP的型号、SN用于注册3、在用户视图下通过dir /all查看当前的AP中所存在的版本文件4、通过命令delete /unreserved AP的fat.bin删除AP的-fat.bin /使AP有足够的容量保存瘦AP的版本delete /unreserved wa1208_fat.bin然后按Y,回车The contents cannot be restored Delete flash:/wa1208_fat.bin?[Y/N]:y Deleting a file permanently will take a long time. Please wait... ................................................................................%Delete file flash:/wa1208_fat.bin...Done.同样的办法删除其他不用的文件5、删除之后查看一下,确保当前的空间有足够的容量保存瘦AP的版本6、接下来就是把瘦版本传到AP之中,在此借助TFTP服务器进行上传首先打开tftp服务器本地电脑网卡设置一个地址,为TFTP服务器地址192.168.1.1 子网掩码255.255.255.0将AP的地址设为192.168.1.2 子网掩码255.255.255.0interface Vlan-interface1ip address 192.168.1.2 255.255.255.0确定一下互通性,确保能够通信7、通过命令tftp 192.168.1.1 get wa1208_fit.bin 把瘦版本传到AP中8、然后通过dir /all查看当前flash中的文件9、接下来使用命令boot-loader file wa1208_fit.bin main对胖转瘦的引导,使之下次启动按wa1208_fit.bin进行启动,选择Y10、然后,可以通过命令display boot查看下次启动的文件,确定下次启动文件正确后重启AP,选择Y胖转瘦完成。
H3C瘦AP改胖AP方法

完成重启。
敲入回车。
用尖锐物体插入AP的reset键,持续5秒以上,恢复出厂设置。(不要断电)
至此,设备更换为胖AP。
可以进行web页面进行设置。地址:192.168.0.50
用户名:admin密码:h3capadmin。
输入(点).按回车。
输入wa2600a_fat.bin(下划线)
显示Target File Name :wa2600test.bin
输入(点).按回车。
显示Target File Name :
输入wa2600a_fat.bin
显示Server IP Address :192.168.0.5
输入(点).按回车。
敲回车,出现<WA2620i-AGN>
敲入命令:reboot
输入y,系统重启。中途如有询问,继续y。
提示Ctrl+B时,马上按Ctrl+B
提示回车时,敲回车。
输入选择3
输入选择5
显示Protocol (FTP or TFTP) :TFTP
输入回车
显示Load File Name :wa2600test.bin
H3C瘦AP改胖AP方法
前期准备:
1.搭建TFTP通过交换机相连的环境
2.开启交换机的POE功能
3.下载TFTP服务器并打开
4.下好要替换的胖AP程序包,并将名字改为wa2600a_fat.bin,将其放在下好的TFTP服务器的目录下
连接CONSOLE,连接POE供电,打开超级终端,等待开机自检。
敲回车,等待启动AP。
显示Server IP Address :
输入:192.168.0.2(本电脑IP)
显示Local IP Address :192.168.0.4
H3CWAP系列WA系列AP胖切瘦配置方法
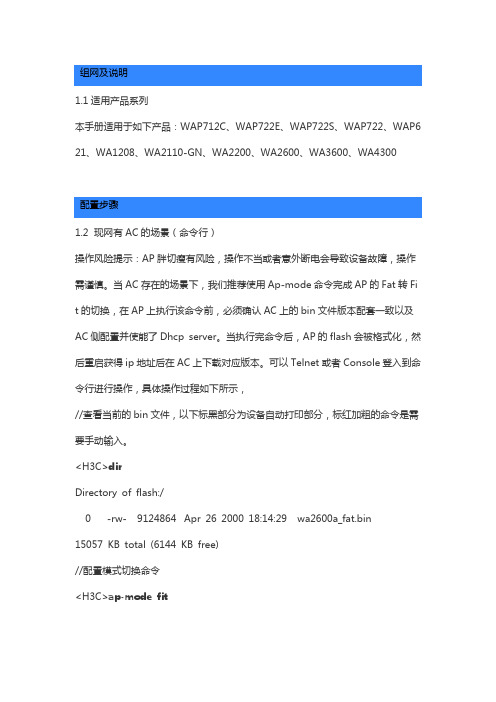
组网及说明1.1适用产品系列本手册适用于如下产品:WAP712C、WAP722E、WAP722S、WAP722、WAP6 21、WA1208、WA2110-GN、WA2200、WA2600、WA3600、WA4300配置步骤1.2 现网有AC的场景(命令行)操作风险提示:AP胖切瘦有风险,操作不当或者意外断电会导致设备故障,操作需谨慎。
当AC存在的场景下,我们推荐使用Ap-mode命令完成AP的Fat转Fit的切换,在AP上执行该命令前,必须确认AC上的bin文件版本配套一致以及AC 侧配置并使能了Dhcp server。
当执行完命令后,AP的flash会被格式化,然后重启获得ip地址后在AC上下载对应版本。
可以Telnet或者Console登入到命令行进行操作,具体操作过程如下所示,//查看当前的bin文件,以下标黑部分为设备自动打印部分,标红加粗的命令是需要手动输入。
<H3C>dirDirectory of flash:/0 -rw- 9124864 Apr 26 2000 18:14:29 wa2600a_fat.bin15057 KB total (6144 KB free)//配置模式切换命令<H3C>ap-mode fitChange working mode will reboot system, do you want to continue? [Y/N]:yChange working mode to FIT now? [Y/N]:y//从无线控制器上查看信息:AP从AC上获取ip地址%Apr 26 18:21:20:262 2000 WX3024-AC DHCPS/5/DHCPS_ALLOCATE_IP: DHCP server information: Server IP = 192.168.0.1, DHCP client IP = 19 2.168.0.2, DHCP client hardware address = 7425-8a33-8170, DHCP clien t lease = 86400.//AP开始从AC上下载bin文件%Apr 26 18:21:24:788 2000 WX3024-AC LWPS/6/LWPS_IMG_DOWNLOA D_START:Image download in progress for AP ap2.#Apr 26 18:21:33:642 2000 WX3024-AC LWPS/4/Download Image Succe ssfully: Download Image Successfully:1.3.6.1.4.1.2011.10.2.75.2.3.0.14<h3 cDot11APImgDwldSuccess> Serial Id:219801A0FH9136Q00287 AP Name: ap2 IP:192.168.0.2 Version:V100R001B01D001%Apr 26 18:21:33:672 2000 WX3024-AC LWPS/6/LWPS_IMG_DOWNLOA D_COMPLETE:Image download process completed for AP ap2.//这时AP已经下载完bin文件,重启中%Apr 26 18:22:03:101 2000 WX3024-AC DHCPS/5/DHCPS_RECLAIM_IP: DHCP server information: Server IP = 192.168.0.1, DHCP client IP = 192.168.0.2, DHCP client hardware address = 7425-8a33-8170, DHCP clien t lease = 86400.%Apr 26 18:23:23:841 2000 WX3024-AC DHCPS/5/DHCPS_ALLOCATE_IP: DHCP server information: Server IP = 192.168.0.1, DHCP client IP = 19 2.168.0.2, DHCP client hardware address = 7425-8a33-8170, DHCP clien t lease = 86400.//AP切换为Fit模式后注册到AC上#Apr 26 18:23:28:381 2000 WX3024-AC LWPS/4/Tunnel Up: Tunnel Up: 1.3.6.1.4.1.2011.10.2.75.1.3.0.1<h3cDot11ACMtTunnelSetupTrap> Serial Id: 219801A0FH9136Q00287 UpInfo:1 AP Name:ap2 IPv4:192.168.0.2 IPv6:-NA- FirstTrapTime:2291326 AP MAC:74:25:8A:33:81:70#Apr 26 18:23:28:412 2000 WX3024-AC IFNET/4/INTERFACE UPDOWN: Trap 1.3.6.1.6.3.1.1.5.4<linkUp>: Interface 12976129 is Up, ifAdminStatu s is 1, ifOperStatus is 1%Apr 26 18:23:28:432 2000 WX3024-AC LWPS/6/LWPS_AP_UP:Connection with AP ap2 goes operational.%Apr 26 18:23:28:443 2000 WX3024-AC IFNET/3/LINK_UPDOWN: WLAN -DBSS10:3 link status is UP.%Apr 26 18:23:28:453 2000 WX3024-AC IFNET/3/LINK_UPDOWN: WLAN -ESS10 link status is UP.1.3 现网有AC的场景(Web)当AC存在的场景下,也可以登入胖AP的浏览器界面进行形态切换,切换前,必须确认AC上的bin文件版本配套一致以及AC侧配置并使能了Dhcp server。
H3c无线AP由FIT转换成FAT的方法

H3c无线AP由FIT转换成FAT的方法——由瘦变胖基本上适用与H3C无线AP,WA2200\WA2100\WA2600\WA1208系列由fit(瘦)变fat(胖)的版本转换。
工具/原料tftp32软件(tftp server)。
H3C无线ap-fat版本软件,扩展名.bin。
电脑一台,最好台式机,笔记本无串口需要使用USB-RS232控制线转换。
H3C配置线一根,RJ45--DB9。
T568B(直连)网线一根。
步骤/方法1首先AP上电,将配置线的RJ45连接到AP的CON口上,另一端连接到电脑的COM口上。
将网线连接到AP的ETH口上和电脑的网口。
2电脑系统最好为WIN-XP。
点“开始--程序--附件--通讯--超级终端”出现连接描述的窗口,随意填写。
之后是“连接到”窗口,在连接时使用选择COM1口。
如下图:因我用的笔记本,使用的USB-RS232模式就是COM3。
如果是台式电脑默认就是COM1。
再点确定。
3进入到端口设置。
要还原默认值一下。
如下:4再点击确定,再回车几下,就会进入ap的控制命令页面。
会出现<h3c> 这样的标志。
5依次输入如下命令:<H3C>format flash: 回车执行,此命令为格式化硬盘。
因需要重灌ISO。
格式化完成后输入<H3C>sysSystem View: return to User View with Ctrl+Z.[H3C]int vlan 1[H3C-Vlan-interface1]ip add 192.168.1.1 255.255.255.0[H3C-Vlan-interface1]quit[H3C]quit<H3C>6将电脑网卡的ip地址设置成192.168.1.2 掩码255.255.255.0 之后开启tftp32软件。
点击Browse,加载ap 版本软件的目录。
之后点击Show Dir 确定一下。
华三瘦AP转胖AP

方式一:在系统用户视图下面直接导入版本◆前期准备工作:1.给AP配置一个地址(瘦AP一般没有配地址)。
同时给电脑配置一个和AP同网段的地址。
确保电脑能够ping通AP地址(保证电脑和AP处于同一网段),或在交换机上配置DHCP服务器,给PC、AP分配地址,保证PC与AP互通即可。
2.查看AP版本(判定AP是否需要导入胖版本)3.清空flash中文件为导入版本留出足够的空间4.①有时候由于AP的空间不是很多,无法容下2个AP版本(胖AP版本和瘦AP版本)5.所以我先把瘦AP版本删除,注意彻底删除,不是放入回收站,命令:6.delete /unreserved wa2600a_fit.bin7.或者采用以下命令,2者均可使用;◆开启TFTP服务器在AP 上设置TFTP服务,下载版本文件到AP上◆查看版本导入是否成功:◆设置启动加载程序:设备将自动重启更改SSID,需先关闭服务模板,在更改SSID,改完之后再开启来。
[WA2610E-GNP]wlan service 1◆保存配置:方式二:BootWare界面下更换版本◆删除原flash中文件◆导入版本清空flash这报错内存空间不够,建按ctrl+f格式化flash,然后选择2导入测试1.首先你需要一个WA2200系列的fit(瘦ap)版本的软件。
这个你可以向购买设备的代理商索要。
因为直接用户是没有下载权限的。
2.准备一个tftp server软件,你可以下载tftp32这个小程序3.使用con线连接到ap上。
你电脑网线也连接到ap上。
配置int vlan 1的ip地址,和你电脑同网段。
之后在<h3c>format flash: 格式化flash。
清空原有文件,注意此过程千万不要断电!4.格式化完成后使用tftp命令上传版本软件。
如<h3c>tftp 192.168.1.2 get wa2200_fit.bin 注意:要修改版本软件名称为:wa2200_fit.bin 这个名是固定的。
(完整word版)华三AP WA1208E瘦转胖 命令行失败后 bootware 重新刷机实际操作成功记录
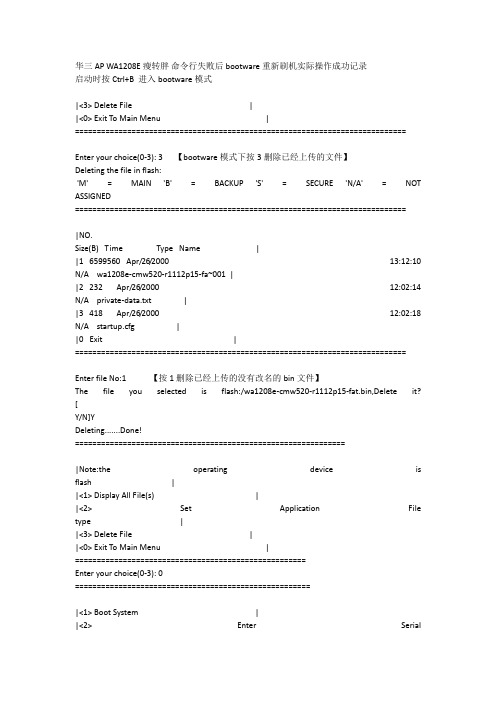
华三AP WA1208E瘦转胖命令行失败后 bootware 重新刷机实际操作成功记录启动时按Ctrl+B 进入bootware模式|<3> Delete File ||<0> Exit To Main Menu | ============================================================================Enter your choice(0-3): 3 【bootware模式下按3删除已经上传的文件】Deleting the file in flash:'M' = MAIN 'B' = BACKUP 'S' = SECURE 'N/A' = NOT ASSIGNED============================================================================|NO.Size(B) Time Type Name ||1 6599560 Apr/26/2000 13:12:10 N/A wa1208e-cmw520-r1112p15-fa~001 ||2 232 Apr/26/2000 12:02:14 N/A private-data.txt ||3 418 Apr/26/2000 12:02:18 N/A startup.cfg ||0 Exit |============================================================================Enter file No:1 【按1删除已经上传的没有改名的bin文件】The file you selected is flash:/wa1208e-cmw520-r1112p15-fat.bin,Delete it? [Y/N]YDeleting.......Done!==============================================================|Note:the operating device is flash ||<1> Display All File(s) ||<2> Set Application File type ||<3> Delete File ||<0> Exit To Main Menu | ===================================================== Enter your choice(0-3): 0======================================================|<1> Boot System ||<2> Enter SerialSubMenu ||<3> Enter Ethernet SubMenu ||<4> File Control ||<5> Modify BootWare Password ||<6> Skip Current System Configuration ||<7> BootWare Operation Menu ||<8> Clear Super Password ||<9> Storage Device Operation ||<0> Reboot |============================================================================Enter your choice(0-9): 0System is starting...Booting Normal Extend BootWare....The Extend BootWare is self-decompressing..................................Done!***************************************************************************** ** H3C WA1208E BootWare, Version 3.08 ** *****************************************************************************Copyright (c) 2004-2010 Hangzhou H3C Technologies Co., Ltd. Compiled Date : Jul 12 2010CPU Type : IXP422CPU L1 Cache : 32KBCPU Clock Speed : 266MHzMemory Type : SDRAMMemory Size : 64MBMemory Speed : 133MHzBootWare Size : 512KBFlash Size : 8MBBootWare Validating...Press Ctrl+B to enter extended boot menu...Please input BootWare password:Note: The current operating device is flashEnter < Storage Device Operation > to select device.======================================================|<1> Boot System ||<2> Enter Serial SubMenu ||<3> Enter Ethernet SubMenu ||<4> File Control ||<5> Modify BootWare Password ||<6> Skip Current System Configuration|<7> BootWare Operation Menu ||<8> Clear Super Password ||<9> Storage Device Operation ||<0> Reboot |============================================================================Enter your choice(0-9): 3 【<3>进入以太网子菜单| 】====================================================|Note:the operating device is flash ||<1> Download Application Program To SDRAM And Run ||<2> Update Main Application File ||<3> Update Backup Application File ||<4> Update Secure Application File ||<5> Modify Ethernet Parameter ||<0> Exit To Main Menu| |============================================================================Enter your choice(0-5): 2 【应该先按<5>做好设置Modify Ethernet Parameter 前面按2就错了所以要重复上面的步骤选3选5设置tftp地址】Loading...System is starting...Booting Normal Extend BootWare....The Extend BootWare is self-decompressing..................................Done!***************************************************************************** ** H3C WA1208E BootWare, Version 3.08 ** *****************************************************************************Copyright (c) 2004-2010 Hangzhou H3C Technologies Co., Ltd. Compiled Date : Jul 12 2010CPU Type : IXP422CPU L1 Cache : 32KBCPU Clock Speed : 266MHzMemory Type : SDRAMMemory Size : 64MBMemory Speed : 133MHzBootWare Size : 5Flash Size : 8MBBootWare Validating...Press Ctrl+B to enter extended boot menu...Please input BootWare password:Note: The current operating device is flashEnter < Storage Device Operation > to select device.======================================================|<1> Boot System ||<2> Enter Serial SubMenu ||<3> Enter Ethernet SubMenu|<4> File Control ||<5> Modify BootWare Password ||<6> Skip Current System Configuration ||<7> BootWare Operation Menu ||<8> Clear SuperPassword ||<9> Storage Device Operation ||<0> Reboot============================================================================Enter your choice(0-9): 3====================================================|Note:the operating device is flash ||<1> Download Application Program To SDRAM And Run ||<2> Update Main Application File ||<3> Update Backup Application File ||<4> Update Secure Application File ||<5> Modify Ethernet Parameter ||<0> Exit To Main Menu | | |============================================================================Enter your choice(0-5): 5====================================================|Note: '.' = Clear field. |..The Extend BootWare is self-decompressi| '-' = Go to previous field. |one!*****************************| Ctrl+D = Quit. |*============================================================================记住网线要直连pc 设置tftp时一定要在一个网段就是这两个Server IP Address :192.168.1.100Local IP Address :192.168.1.50############################################################################### #############################【这里还有一项在设置ip之前还要输入wa1208_fat.bin 下面一行也是。
- 1、下载文档前请自行甄别文档内容的完整性,平台不提供额外的编辑、内容补充、找答案等附加服务。
- 2、"仅部分预览"的文档,不可在线预览部分如存在完整性等问题,可反馈申请退款(可完整预览的文档不适用该条件!)。
- 3、如文档侵犯您的权益,请联系客服反馈,我们会尽快为您处理(人工客服工作时间:9:00-18:30)。
工具/原料
•tftp32软件(tftp server)。
•SecureCRT。
•H3C无线ap-fat版本软件,扩展名.bin。
•电脑一台,最好台式机,笔记本无串口需要使用USB-RS232控制线转换。
•H3C配置线一根,RJ45--DB9。
•网线一根。
步骤/方法
1、首先将配置线的RJ45连接到AP的CONSOLE口上,另一端连接到电
脑的COM口上。
将网线连接到AP的10M/100M口上和电脑的网口。
2、SecureCRT的配置不会就到网上查。
3、打开SecureCRT后,将AP上电,连续按Ctrl+B,直到出现下图提
示,password是没的直接回车就可以。
4、先删除AP里的文件,可以到启动界面选择4,再选择3删除设备里的文件
5、配置TFTP,在TFTP里选择网卡和AP连的网卡,我这里设置的IP是
192.168.1.2
6、配置AP升级设置,到启动菜单选择3,再到3配置升级设置
如图配置选择2升级完成。
注意:1、IE9.0访问Web界面会有错误,最好用IE6.0访问。
2、H3C W A1208E-GP 有2种版本,带H2.0和不带H2.0,本文讲的是带H2.0。
工具下载地址:
/jump?fref=W00003&location=http%3A%2F%%2F4095591%2
Ff%2Fefeb66eb-37a9-4d91-a9bc-64d904a67bf8。
