MPIO Users Guide For Windows Server 2012
sophos安装指南

5.22015 3目录1 关于本指南 (4)2 安装什么 (4)3 哪些是主要步骤 (5)4 下载 Enterprise Console 安装程序 (6)5 检查系统要求 (6)5.1 硬件和操作系统 (6)5.2 Microsoft 系统软件 (7)5.3 端口要求 (7)6 您需要的帐户 (8)6.1 数据库帐户 (8)6.2 更新管理器帐户 (8)7 做好安装准备 (9)8 安装 Enterprise Console (9)9 加强数据安全 (10)10 下载保护和加密软件 (11)11 创建计算机组 (12)12 设置安全策略 (12)12.1 设置防火墙策略 (12)13 查找计算机 (13)14 保护计算机的准备 (13)14.1 删除第三方软件的准备 (14)14.2 检查您是否有可用于安装软件的帐户 (14)14.3 准备安装防病毒软件 (14)15 保护计算机 (15)15.1 自动保护Windows 计算机 (15)15.2 手动保护Windows 或 Mac 计算机 (16)15.3 保护 Linux 计算机 (17)216 在计算机上安装加密软件 (17)16.1 预订加密软件 (17)16.2 准备安装加密软件 (18)16.3 自动安装加密软件 (19)16.4 手动安装加密软件 (20)16.5 安装后首次登录 (20)17 检查网络的健康状况 (21)18 故障排除 (22)19 就通常的任务获得帮助 (22)20 技术支持 (23)21 法律声明 (23)3Sophos Enterprise Console1关于本指南本指南将告诉您怎样使用 Sophos 安全软件保护您的网络。
本指南可供您使用 如果■您是首次安装这些软件。
■您将安装保护和加密功能 加密功能是选项 。
如果您要进行升级 请参见Sophos Enterprise Console 升级指南。
您可能需要的其它文件如果您具有非常大的网络 您可能会考虑Sophos Enterprise Console 高级安装指南中说明的各种安装选项。
统信服务器操作系统企业版V20安装手册说明书

统信服务器操作系统企业版V20安装手册统信软件技术有限公司2020年07月目录1.概述 (1)1.1.支持的硬件 (1)1.1.1.支持的体系 (1)1.1.2.多处理器的支持 (2)1.1.3.图形卡的支持 (2)1.1.4.外围设备的支持 (3)1.1.5.存储系统的支持 (3)1.2.需要固件的设备 (3)1.3.避免专有或封闭的硬件 (4)1.4.安装介质 (5)1.4.1.U盘 (5)1.4.2.CD-ROM/DVD-ROM (6)1.4.3.网络 (6)2.安装准备 (7)2.1.备份数据 (7)2.2.硬件环境 (7)2.3.网络设置 (8)2.4.系统分区 (8)2.5.最低配置要求 (10)2.6.获取镜像 (10)2.7.制作安装介质 (10)2.7.1.光盘刻录 (11)2.7.2.U盘制作 (11)2.8.PXE安装配置 (12)2.8.1.概述 (12)2.8.2.网络图 (12)2.8.3.服务器要求 (13)2.8.4.客户机要求 (14)2.8.5.服务器软件安装 (14)2.8.6.NFS安装配置 (14)2.8.7.TFTP安装配置 (15)2.8.8.Dnsmasq安装配置 (17)2.9.相关设置 (19)2.9.1.BIOS设置菜单的使用 (20)2.9.2.选择引导设备 (20)2.9.3.具有UEFI固件的系统 (21)2.9.4.需要留心的硬件问题 (22)3.安装过程 (23)3.1.虚拟机安装 (23)3.1.1.统信操作系统 (23)3.1.2.Windows或其它操作系统 (23)3.2.安装引导 (23)3.2.1.U盘启动 (24)3.2.2.光盘启动(CD/DVD) (24)3.2.3.网络引导启动 (24)3.3.引导界面 (25)3.3.1.Install UOS Server Enterprise20(Graphic) (25)3.3.2.Check ISO md5sum (26)3.4.执行安装 (27)3.4.1.图形方式安装 (27)4.系统配置 (34)4.1.选择时区 (35)4.1.1.地图选择 (35)4.1.2.列表选择 (36)4.1.3.时间设置 (36)4.2.创建用户 (37)4.2.1.创建用户 (37)4.2.2.选择键盘布局 (38)4.3.网络设置 (39)4.4.登录系统 (40)5.使用系统 (42)5.1.激活系统 (43)5.2.更新系统 (44)5.3.关闭系统 (45)1.概述本文档主要讲述的是64-bit设备,统信服务器操作系统企业版V20的安装及相关配置。
微软系统软件正版化工作学习手册全解

软件正版化工作学习手册操作系统软件正版化常见问题现在市面上大部分PC机操作系统使用的都是美国微软公司的WINDOWS系列操作系统,这里主要说明的是WINDOWS系列操作系统的正版化常见问题。
目前PC机WINDOWS操作系统软件产品常见有三种授权方式,分别为预装授权(OEM/COEM)、零售版协议、开放式许可协议授权。
(一)预装授权(OEM/COEM)的定义预装授权(OEM/COEM)是Microsoft 随机版产品,随电脑系统,由电脑及服务器生产厂商、装机商、翻新商或者计算机系统软件预装商预装于电脑中,同电脑一起销售给客户。
用户将同时获得随机提供的正版标签(COA)。
预装授权(OEM/COEM)与安装的计算机主板绑定,安装激活后不可移机使用。
预装授权(OEM/COEM)在同一台计算机上(绑定主板,硬盘、内存、CPU等可以升级更换)不限制激活次数(信息由微软客服电话800-820-3800激活中心提供),可以反复安装激活。
附注1:COA:Certificate of Authenticity,COA中文名称:正版标签。
(详见附图一)附注2:预装类产品(OEM/COEM)必须与PC一同购买,不能用于已购PC正版化。
如果购买预装类产品(OEM/COEM)用于对已购PC版正版化,将被视为错误许可。
图1: WIN7 PRO版操作系统正版标签(二)预装授权(OEM/COEM)的使用要点和鉴定方法1、机身上带有正版标签(COA)。
品牌机大多都在出厂时就预装了windows 操作系统。
鉴定品牌机是否携带了正版的windows操作系统,只能通过计算机是否携带了正版标签(COA)来辨别,正版标签(COA)一般黏贴在主机机箱一侧,没有黏贴正版标签(COA)的,都需要找经销商确认该机器是否具有预装授权(OEM/COEM)。
2、正版标签(COA)的正版验证除了查看防伪金属条和材质外,还可以到微软网站上验证,验证的网址为/china/genuine/consumer/howtotell.aspx 也可以通过电话验证,电话号码为座机:8008203800;手机:40082038003、正版标签(COA)的版本为家庭(HOME)版操作系统的,视为错误授权,需更换授权。
Windows 云服务器运维手册说明书

【版权声明】©2015-2016 腾讯云版权所有本文档著作权归腾讯云单独所有,未经腾讯云事先书面许可,任何主体不得以任何形式复制、修改、抄袭、传播全部或部分本文档内容。
【商标声明】及其它腾讯云服务相关的商标均为腾讯云计算(北京)有限责任公司及其关联公司所有。
本文档涉及的第三方主体的商标,依法由权利人所有。
【服务声明】本文档意在向客户介绍腾讯云全部或部分产品、服务的当时的整体概况,部分产品、服务的内容可能有所调整。
您所购买的腾讯云产品、服务的种类、服务标准等应由您与腾讯云之间的商业合同约定,除非双方另有约定,否则,腾讯云对本文档内容不做任何明示或模式的承诺或保证。
文档目录文档声明 (2)登录Windows云服务器 (4)Windows机器登录有公网IP的Windows云服务器 (4)控制台VNC登录Windows云服务器 (7)外网登录无公网IP的Windows云服务器 (10)Windows格式化数据盘 (13)Windows云服务器数据盘分区和格式化 (13)Linux重装为Windows后读取原EXT类型数据盘 (40)Windows环境配置 (42)安装配置IIS及PHP (42)配置高性能电源管理 (67)正版激活 (69)系统更新 (72)更新 Virtio 网卡驱动 (76)关机相关 (79)WIndows恢复模式 (82)Windows2003系统续用 (84)Windows 云服务器修改SID操作说明 (87)Windows程序安装 (89)上传文件到Windows云服务器 (89)登录Windows云服务器Windows机器登录有公网IP的Windows云服务器1. 获取云主机管理员帐号及初始密码登录到云服务器时,需要使用管理员帐号和对应的密码。
用户购买云服务器后,会通过消息中心的通知消息,告知用户管理员账号及初始密码。
管理员账号:服务器的操作系统不同,管理员帐号也会不一样,如下所示:SUSE/CentOS/Debian:rootWindows:Administratorubuntu:ubuntu初始密码:初始密码由系统随机分配,一个订单对应的服务器有一个初始密码,请及时修改密码。
统信服务器操作系统产品手册

统信服务器操作系统V20产品手册目录目录 (I)一、基本操作 (1)1.1登录 (1)1.1.1图形登录 (1)1.1.2远程登录 (2)1.2锁屏 (2)1.3注销(登出) (4)1.3.1图形登录方式注销 (4)1.3.2远程登录注销 (5)1.4系统关机重启 (5)1.5启动级别(切换) (6)1.6分辨率配置 (8)二、系统管理 (11)2.1首页介绍 (11)2.1.1标题栏 (12)2.2账户设置 (12)2.2.1创建新帐户 (13)2.2.2更改头像 (13)2.2.3修改密码 (14)2.2.4自动登录 (14)2.2.5无密码登录 (14)2.2.6设置指纹密码 (15)2.2.7删除帐户 (15)2.3云同步 (15)2.4显示设置 (16)2.4.1单屏设置 (17)2.4.2多屏设置 (18)2.5默认程序设置 (19)2.5.1设置默认程序 (20)2.5.2添加默认程序 (20)2.5.3删除默认程序 (21)2.6个性化设置 (21)2.6.1设置窗口主题 (22)2.6.2更改活动用色 (22)2.6.3调节透明度 (23)2.6.4开启窗口特效 (23)2.6.5设置图标主题 (23)2.6.6设置光标主题 (23)2.6.7更改系统字体 (24)2.7网络设置 (24)2.7.1有线网络 (24)2.7.2无线网络 (25)2.7.3无线热点 (26)2.7.4移动网络 (26)2.7.5拨号网络 (26)2.7.6VPN (27)2.7.7系统代理 (27)2.7.8更改默认程序 (27)2.7.9应用代理 (28)2.7.10网络详情 (28)2.8声音设置 (28)2.8.1扬声器 (29)2.8.2麦克风 (29)2.8.3高级设置 (30)2.8.4系统音效 (30)2.9蓝牙设置 (30)2.9.1修改蓝牙名称 (31)2.9.2连接蓝牙设备 (31)2.10日期和时间 (32)2.10.1修改时区 (32)2.10.2添加时区 (33)2.10.3删除时区 (33)2.10.4修改时间和日期 (33)2.11电源管理 (33)2.11.1开启节能模式 (34)2.11.2唤醒时需要密码 (35)2.11.3设置显示器关闭时间 (35)2.11.4设置电脑待机时间 (35)2.11.5设置自动锁屏时间 (35)2.12鼠标和触控板 (35)2.12.1通用设置 (36)2.12.2鼠标设置 (36)2.12.3触控板设置 (37)2.12.4指点杆设置 (38)2.13数位板 (38)2.14键盘和语言 (38)2.14.1键盘属性 (39)2.14.2键盘布局 (39)2.14.3系统语言 (41)2.14.4快捷键 (42)2.15系统更新 (43)2.15.1更新和升级 (44)2.15.2检测系统源 (44)2.15.3自动下载更新 (45)2.15.4智能镜像源 (45)2.16系统信息 (45)2.16.1查看系统信息 (46)2.16.2查看系统协议 (46)2.17通用设置 (47)2.17.1设置启动菜单 (47)2.17.2设置启动延时 (47)2.17.3修改默认启动项 (48)2.17.4更改启动菜单背景 (48)2.18用户体验计划 (48)2.19系统监视器 (48)2.19.1 概述 (48)2.19.2操作介绍 (49)2.19.3进程管理 (50)2.19.4主菜单 (55)2.20系统修复工具 (57)2.20.1 概述 (58)2.20.2基本操作 (58)2.20.3主菜单 (64)2.21显卡驱动管理器 (64)2.21.1操作介绍 (67)2.21.2主菜单 (72)2.22备份还原工具 (73)2.22.1 概述 (73)2.22.2操作介绍 (73)2.22.3主菜单 (79)三、桌面的使用与配置 (81)3.1 桌面 (82)3.1.1新建文件夹/文档 (83)3.1.2设置排列方式 (84)3.1.3调整图标大小 (85)3.1.4设置显示器 (85)3.1.5更改壁纸 (85)3.1.6设置屏保 (86)3.2任务栏 (87)3.2.1认识任务栏图标 (87)3.2.2切换显示模式 (88)3.2.3设置任务栏位置 (88)3.2.4调整任务栏高度 (88)3.2.5显示/隐藏任务栏 (89)3.2.6显示/隐藏插件 (89)3.2.7查看通知 (89)3.2.8进入关机界面 (90)3.2.9查看日期时间 (91)3.2.10回收站 (91)3.3启动器 (91)3.3.1切换模式 (91)3.3.2排列应用 (92)3.3.3查找应用 (93)3.3.4设置快捷方式 (93)3.3.5安装应用 (94)3.3.6运行应用 (95)3.3.7卸载应用 (95)3.4窗口管理器 (96)3.4.1打开工作区 (96)3.4.2添加工作区 (96)3.4.3切换工作区 (97)3.4.4删除工作区 (97)3.4.5退出工作区 (97)3.4.6查看所有窗口 (97)3.4.7移动工作区窗口 (98)3.4.8切换桌面窗口 (98)四、常用软件 (100)4.1 终端 (100)4.1.1 概述 (100)4.1.2使用入门 (101)4.1.3基本操作 (102)4.1.4窗口操作 (105)4.1.5工作区操作 (108)4.1.6远程服务器管理 (110)4.1.7 主菜单 (116)一、基本操作1.1登录1.1.1图形登录启动计算机后进入UOS 界面,如图1.1.1 所示。
EYEwin20系统简易使用手册剖析

保存配置 增加节点机记录 删除节点机记录
网络状态刷新 外挂模块调用方式配置
单击“网络配置”,单击 按钮,自动生成第一个节点机列表(为空),序号为 1。在该行中“节点名”一列填写一台计算机在网络中的名称,名称可以不是计算 机的名称。如起名为“jk5”,表示 5#监控机。“A 网地址”列中填写该计算机第 一块网卡的 IP 地址,如“172.20.22.223”;“B 网地址”列中填写该计算机第 二块网卡的 IP 地址,如“172.21.22.223”。如该计算机并非通过双网连接而仅 有一块网卡,则用户可在“A 网地址”或“B 网地址”中填写“-1”,表示无该 网 IP。“主控机”列是一个选择项,默认为否。该项含义为该节点计算机在运行 中是否可成为服务器(具体含义为是否运行EYEwin.exe 程序)。单击该栏,出现如 图所示下拉列表框,有“是”和“否”可供选择。 如该机将作为服务器使用(不分主备,系统运行时主控程序自动选优判别),则用 户需单击“是”;如该机将作为客户机使用,则用户保持默认“否”选项不变。 “前置机”列仍然是一个选择项,默认为否。该项含义为该节点计算机在运行中是 否启动前置程序(具体含义为是否运行 PremNet.exe 程序)。单击该栏,同样出 现下拉列表框,有“是”和“否”可供选择。如该机需要启动前置程序,则用户需 单击“是”,如该机不需启动前置程序,则用户保持默认“否”选项不变。一旦选 择“否”,即使以后再手工启动前置程序,服务器依然会认为其非法,不与之连接 通信。一般情况下,成为服务器的节点计算机都应启动前置程序。
注意:字符串中的逗号应为英文字符的逗号。
遥控:选择遥信点对应的遥控点。单击遥控区域,弹出遥控点列表对话框 ,遥控在 遥信子系统中定义,不需要在遥控子系统中再定义,定义好的遥控点可以在遥控子 系统中显示出来 在遥控点列表对话框中,选择遥控点所在的站,该站的 遥控点显示在下面的列表中(列表中的遥控点为没有与 任何遥信点相对应的遥控点,以保证遥控点与遥信点一 一对应) 单击报警声属性区域,弹出对话框,选择监控系统目录 中的Media 文件夹,在Media 文件夹中选择声音文件
laugesoft N P100 服务器伯图 users 指南说明书

尊敬的浪潮英信服务器用户NP100服务器的技术特性与系统的设置有本手册介绍了浪潮英信NP100服务器助于您更详细地了解和便捷地使用浪潮英信以利于污染预防浪潮集团有限公司拥有本手册的版权任何单位和个人不得以任何形式复制本用户手册本手册中的内容如有变动恕不另行通知请向浪潮集团有限公司垂询"英信"是浪潮集团有限公司的注册商标Windows是微软公司的注册商标其他商标分别属于其相应的注册公司声 明 在您正式使用浪潮英信NP100服务器之前只有您阅读了以下声明并且同意以下条款后如果您对以下条款有任何疑问如您未向我们就以下条款提出疑问并开始使用浪潮英信NP100服务器1在任何时候您不要修改浪潮英信NP100服务器主板BIOS中的任何其他参数在您使用的浪潮英信NP100服务器出现任何硬件故障时或您希望对硬件进行任何升级时 服务器是十分精密的仪器3CPUCPU散热片CPU支架网卡都是特殊规格的4我们希望您首先和相应软件的提供商联系以方便我们沟通对于如数据库运行问题5请先仔细阅读我们的快速使用指南请联系我们的技术服务中心我们特别提醒您注意对您的数据进行必要的备份本手册中涉及之各软硬产品的标示8"我们"指代浪潮集团有限公司 本服务器主板配备可更换锂电池在更换过程中只允许使用与制造商提供的同类或等效类型的替换件 关 于 本 手 册本手册专为浪潮英信NP100服务器的最终用户而写浪潮英信NP100服务器用户手册为您提供一些必要的技术支持使其安全高效的运行第一章 如何连接安装第二章第三章第四章仅适用于RAID系统第五章第六章我们建议您在使用浪潮英信NP100服务器之前仔细阅读本手册由于我们的水平有限希望您能够包涵技术服务电话86-531-8514355网 址中国济南市山大路224号浪潮集团有限公司邮 编 sv_serv@langchao.com.cn 目 录第一章 开始使用浪潮英信服务器...........................1.1 开始使用浪潮英信NP100服务器.......................1.2 浪潮英信服务器随机资料.............................1.3 浪潮英信服务器外观.................................1.4 连接NP100服务器...................................1.5 NP100服务器技术特性................................第二章 系统设置.........................................2.1 系统CMOS跳线......................................2.2 POST...............................................2.3 系统BIOS...........................................第三章 系统硬件.........................................3.1 安装处理器.........................................3.2 安装内存...........................................3.3 安装硬盘...........................................3.4 安装板卡...........................................第四章 RAID系统.........................................4.1 进入RAID控制器BIOS设置...........................4.2 Auto Setup(自动设置查看磁盘分配创建阵列删除阵列重建阵列第五章 安装操作系统.....................................5.1 安装Windows NT4.0..................................5.2 安装Windowqs 2000 Server...........................5.3 安装RedHat linux 8.0...............................5.4 Novell Netware 6.0的安装...........................5.5 SCO UnixWare 7.1.3的安装...........................5.6 SCO OpenServer 5.0.7的安装.........................5.7 主板集成RAID配置下安装RedHar Linux 8.0............第六章 疑难解答.........................................6.1 常见故障解决.......................................6.2 技术支持信息.......................................第一章 开始使用浪潮英信服务器1.1开始使用浪潮英信NP100服务器1小包装箱中是显示器配件盒首先用裁纸刀把大包装箱的封条打开把主机从包装箱中抬出您购买的浪潮英信NP100服务器就展现在您的面前2 确信电源接地良好 方便从电源和电源插座上插拔电源线 环境干净无尘 通风良好并且远离热源 远离强电磁区域和由空调大电动机电视台发射塔1.2浪潮英信服务器随机资料1浪潮蓝海豚导航软件光盘1张1NP100 用户可以根据所安装的操作系统2您需要在安装前制作所需的驱动程序软盘在菜单中选择选择要制作的部件驱动程序点击制作驱动程序可以插入RAID卡或SCSI卡驱动随机光盘 浪潮英信服务器的随机软件建议您妥善保存对于这些随机软件1.3浪潮英信服务器外观1高度:428mm宽度:210 mm深度:470 mm前侧空间要求:250 mm (吸入气流温度<355232图1-1浪潮英信NP100服务器前面板示意图1复位按钮 3电源状态指示灯 5软驱 75.25"扩展槽 9NP1003电源接口 2鼠标接口 4USB接口1串口1 7千兆网卡接口 9百兆网卡接口 11并口 13将主机键盘 2连接好键盘网线45 3 4系统的连接完成最大支持4GB* 支持ECC Unbuffer内存* 支持DDR 400MHz/333MHz/266MHz 内存* 可以使用双通道或者单通道内存* 主板集成Promise PDC20378 RAID控制器* 支持IDE RAID* 支持SATA RAID (最多可支持两块SATA硬盘做RAID)* IED RAID和SATA RAID一块可以支持RAID 01.44MB* 标准IDE CD-ROM处理器内存RAID键盘和辅助设备扩展槽硬盘光驱NP100* ATI显卡第一章67第二章 系统设置前言BIOS设置又称CMOS设置可以利用专门的设置程序对系统参数和硬件参数进行调整内存容量COMS存储器要求电源功率很小备用电池为CMOS存储器提供电源随着硬件种类的增多和更新换代的加速由于BIOS对系统的运转和启动有重大影响设置了不当的参数后可能会引起硬件资源之间的冲突因此如果没有特殊的需要不要随意改变BIOS 只有合格的技术人员才可以对主板跳线进行设置 系统电源开关系统上有8mA的伺服电流必须拔下系统交流电源电缆 系统外接设备否则可能会对人员或设备造成意外伤害 静电释放和静电释放保护措施硬盘英信NP100永不停顿的浪潮英信服务器和系统的其它部件造成损害最好在防静电环境下进行操作人员必须佩带防静电手环 静电释放和板卡持拿持拿板卡必须小心当板卡暂时不用时芯片朝上放在接地工作平台上 机箱盖在系统上电前一定要安装机箱盖跳线可用于在系统的两个或多个选项之间选择可以改变跳线的功能请参考以下常用的跳线的解释说明造成不必要的错误向您介绍这款英信服务器的跳线设置情况可以清除系统CMOS值拔掉电源线2) 在JP3的pin2和pin3上加跳线除去跳线连接电源线在提示下按<DEL>进入BIOS设置Load Op-timized Defaults89图2-1 CMOS跳线设置2.2 POST系统在开始引导时上电自检检测服务器的主板闪存鼠标和其它已经安装的设备POST可以显示被访问的内存容量POST检测的结果存储在闪存里1POST开始运行检测完内存Press <DEL> to SETUP or <TAB> to POST如果您此时按下<DEL>键正常状态COMS清零英信NP100永不停顿的浪潮英信服务器2.3 系统BIOS2.3.1 如何进入BIOS设置当系统开始引导时 Press <DEL> to SETUP or <TAB> to POST按下<DEL>键进入系统BIOS设置BIOS的设置主要有><><键用于选择上一个菜单或值键用于选择下一个菜单或值 键用于选择左边的菜单键用于选择右边的菜单Enter键可用于激活它Enter键可用于显示选项列表可用于选定子字段用此键可撤销显示ESC键用于退出选项或在任意子菜单下时若在任意主菜单下增加菜单中设置的数字值或改变菜单设置值在Setup菜单按F1可启动帮助窗口F5键用来保存当前CMOS值1011注释这只是提供给用户的信息Press Enter按< Enter >键菜单选项栏进入BIOS之后其功能如下表所示仅对Setup菜单中各子菜单的选择项有效按下F10会显示如下Y"键后按键如输入Enter不会影响现有的字段值菜单选项Standard CMOS FeaturesAdvanced BIOS FeaturesAdvanced Chipset FeaturesIntegrated PeripheralsPower Management SetupPNP/PCI ConfigurationPC Health StatusFrequency/Voltage Control描述该菜单用于一些基本的系统设置日期等该菜单用于主板集成设备的一些特殊设置如果您的系统支持PnP/PCI设备的话显示该菜单该菜单用于频率/电压控制12英信NP100永不停顿的浪潮英信服务器Standard CMOS Features菜单菜单选项Load Fail-safe DefaultLoad Optimized DefaultSet Supervisor/User passwordSave & Exit SetupExit Without Saving描述该选项用于加载系统最稳定该选项用于加载系统最佳性能的BIOS默认值该菜单用于保存改动到CMOS并退出BIOS设置菜单描 述设置系统日期显示系统检测到的IDE设备选择软盘类型设置当系统启动时检测到错误时是否停止不可修改But Keyboard; AllBut Disk/Key13Advanced BIOS Features菜单描 述是否为IDE硬盘引导扇区保护提供报警设置只有CPU支持超线程时才显示该项设置成时设置成时不支持超线程参见后面的Boot Sequence一项Enabled如果芯片组和键盘控制器可以控制GateA20时当设置成时当设置成时在OS/2和Windows系统下将该项设置为时BIOS所执行的密码的类型设置用户进入Setup提示输入密码用户每次开机和进入Setup均提示输入密码在Win NT3.52选择1.1Win2000和Win XP下选择1.4Post时特 征Virus WarningCPU L1 & L2 CacheHyper-ThreadingTechnologyQuick Power On SelfTestBoot SequenceBoot Up NumLockGate A20 OptionSecurity OptionAPIC ModeMPS Version Control For OSHDD S.M.A.R.T Capabil-ity Small Logo(EPA)Show选 项Enabled; DisabledEnabled; DisabledEnabled; DisabledDisabled;EnabledEnabled; DisabledFast; NormalSetup14英信NP100永不停顿的浪潮英信服务器根据实际情况设置所检测到的硬盘的启动顺序各设备的引导顺序设置Enabled允许BIOS 的内存缓存使用F0000h-FFFFFh地址但是如果任何程序向该地址写数据选择时这样可以提升系统性能系统将会产生报错外部监视设备将会允许延迟该项所选择的一段时间当内存为Non-ECC类型时特 征System BIOSCacheableVideo BIOSCacheableDelay Prior to ThermalDRAM DataIntegrity Mode选 项Enabled; DisabledEnabled; Disabled4Min;8Min;16Min;32MinECC; Non-ECC15Integrated Peripherals菜单此主菜单下共有三项子菜单按<Enter>键进入子菜单Onboard Device 按<Enter>键进入子菜单 OnChip IDE Device子菜单描 述选择"Enabled"时IDE硬盘控制器采用块传输模式IDE硬盘采用标准传输模式选择"Enabled"时主板所支持的四个IDE设备的PIO(可编程输入/输出口)模式的设置Mode4成功提升了系统性能系统自动给每个设备分派一个最好的PIO模式该项设置为如果您要在不做RAID的IDE硬盘上装RedHat Linux时Disabled如果要在没有做RAID的SATA硬盘上装RedHat LinuxCombined ModeSATA 端口0/1模式设置英信NP100永不停顿的浪潮英信服务器Super IO Device子菜单描 述USB控制器和USB外部设备使能设置USB键盘使能设置Promise RAID使能设置支持RAID功能特 征USB ControllerUSB 2.0 ControllerUSB Keyboard SupportUSB Mouse SupportOnboard Promise RAID CtrlCSA LAN (GbE LAN)选 项Enabled; DisabledEnabled; DisabledEnabled; DisabledEnabled; DisabledEnabled; DisabledEnabled; Disabled描 述主板集成FDC控制器使能设置可以将该项设置成第二个串口IR Mode的设置IR 传输延迟使能设置LPT端口配置主板上I/O芯片IR传输模式设置Hi; HiHi; Lo1617Power Management Setup菜单描 述电源ACPI功能使能设置电源节能类型设置该项设置系统在暂停模式下是否关闭监视器所设置的中断将会使系统唤醒在其他设备还处于活动状态时该项设置当CPU温度达到预先设置的温度后请看下面Power ON Setup表中的各项子菜单特 征ACPI FunctionRun VGABIOS ifS3 ResumePower ManagementOptionVideo Off MethodVideo Off In SuspendSuspend TypeMODEM Use IRQHDD Power DownCPU THRM-Throt-tlingPower ON SetupReload GlobalTimer Events选 项Enabled; DisabledS1(POS)Use Define; MinSaving; Max SavingBlank Screen;Screen DPMS;V/H SYNC+Blank;Yes; NoStop Grant; PWRonSuspend3; 4; 5; 7; 9; 10;11; N/ADisabled;1 ̄15Min25%;50%18英信NP100永不停顿的浪潮英信服务器电源开关功能设置项电源开关作为一个普通的开关按钮当您按下电源开关时当按键时间超过4秒的时候该项设置当系统接受到PCI卡子上的PME发出的信号时该项设置当Modem拨号时系统是否被唤醒该项设置当USB键盘来信号时系统是否被唤醒电源开关键的一些功能设置该项才有效当POWER ON Function设置为Hot Key时选择您要设置的热键F1F1219Enabled0/1设备将会唤醒系统Enabled0/1设备将会唤醒系统EnabledFDD端口将会唤醒系统Enabled将会唤醒系统COM时子将会产生严重的冲突而使系统不能启动时时色寄存器20英信NP100永不停顿的浪潮英信服务器PC Health Status菜单Frequency/Voltage Control菜单Load Fail-Safe/Optimized Defaults菜单当您选择Load Fail-Safe Defaults菜单时描 述当CPU温度超过该项所设置温度的上限值时这些项显示了系统检测到的硬件设备系统温度以及各种风扇速度等当处理器温度达到该项设置的温度值时特 征CPU Warning Tem-peratureCurrent CPU/ SystemTemperature......Shutdown Tempera-ture选 项Disabled; 50/127;56/140;63/151;70/140;65/158;75建议使用默认设置当设置"Enabled"时该项是减少EMI影响使能设置建议使用默认设置DRAM频率设置Max22Auto; DefaultEnabled;DisabledEnabled166MHzAuto by SPD; DDR33;DDR400; Auto 按下"Y"键将会加载系统最稳定当您选择Load Optimized Defaults菜单时按下"Y"键将会加载系统最佳性能的BIOS出厂默认值将会出现下图所示的提示注意根据提示重新输入密码并按<Enter>键确认密码您也可以在提示您输入密码时仅按<Enter>键清除您设置的密码如果您将Advanced BIOS Features菜单中的"Security Option"项设置成"Sys-tem"时如果该项设置成"Setup"时输入超级用户密码可以进入Setup菜单并可改变菜单中各项的设置但是不能改变菜单中各项的值21英信NP100永不停顿的浪潮英信服务器Save & Exit Setup菜单当您选择该菜单时 Save to CMOS and EXIT (Y/N)? Y按下键后系统将保存对BIOS各项设置所作的改动并退出SETUP程序Quit without Saving菜单当你选择该项菜单时Quit without saving (Y/N)? Y按下键后系统将忽略对BIOS各项设置所作的改动并退出SETUP程序2223第三章 系统硬件本章将指导用户如何安装系统硬件 静电释放可能损坏服务器组件对静电释放进行防护是必要的一定要按照以下方法进行手腕上戴一个接地的防静电环用手持拿板卡时,注意只拿板卡的边沿3请放回各自的防静电袋持拿处理器时一定不要直接用手接触处理器的引脚1断开交流电电缆2支持MPGA478 ZIF封装的处理器 当安装处理器时把处理器的引脚和主板上的Socket 对准注意一定不要用力放注 意24英信NP100永不停顿的浪潮英信服务器置合适后如图3.1.2所示将散热片放在CPU上如图3.1.325图3.1.35 将其插在主板的CPU风扇电源插座上如图3.1.4所示否则将影响处理器的散热图3.1.4英信NP100永不停顿的浪潮英信服务器6将机箱安装好请使用经过我们测试认证的相应型号产品在安装内存条的时候否则会损坏内存或主板的内存插槽关闭系统电源2如图3.2.1所示Array把内存条垂直插入内存槽中轻轻按下内存条注意把两边的卡销卡上3.2.3所示2627图3.2.34将机箱盖及面板安装好如果您要扩展此类设备推荐使用经过我们测试认证过的相应型号的产品1断开交流电源线缆打开机箱 正确设置ATA-133/100/66 IDE硬盘的ID跳线用螺丝固定 连接硬盘数据线缆以及电源电缆3.3.128英信NP100永不停顿的浪潮英信服务器4将机箱盖及面板安装好1断开交流电源线缆打开机箱 SATA硬盘不需要跳线用螺丝固定 连接硬盘数据线缆以及电源电缆4将机箱盖及面板安装好在扩展安装PCI接口的扩展卡时1断开交流电电缆打开机箱 移走与要使用的插槽对应的后挡片 将板卡插入主板的扩展槽 用螺丝钉固定5将机箱盖及面板安装好图3.4.129英信NP100永不停顿的浪潮英信服务器第四章 RAID系统本章是专门针对主板集成的RAID系统而写的,如果您的系统是非主板集成RAID系统,可以不参阅本章开机启动检测2屏幕显示如下图[ 3 ]Delete Array[ 5 ][Key Available] Press 1...5 to Select Option [ESC] Exit304.2自动设置按键进入Auto Setup菜单FastBuild (tm) Utility 2.xx (c) 2002-2005 Promise Technology, Inc.[Auto Setup Options Menu ]Optimize array for 2Array Disk Capacity (size in MB)82217 [Keys Available][(] Up [(] Down [(, ?, Space] Change Option [ESC] Exit [Ctrl-Y] Save菜单中[Auto Setup Options Menu]为可设置部分阵列创建步骤如下 设置阵列类型选中项或空格键各参数表示意义如下 Security3132英信NP100永不停顿的浪潮英信服务器23如果是创建RAID1,保存设置后将提示N选择创建 然后按任意键重新启动机器在阵列创建后4.3查看磁盘分配按 键进入菜单Channel:ID CapacityModeDo you want the disk image to be duplicated toanother? (Yes/No)Y - Create and duplicateN - Create OnlyArray has been created.<Press any key to reboot >注 意4.4创建阵列 按键进入菜单菜单如下]Up [1下箭头键选择Array *进入下图所示菜单MBOFF[Drives Assignments]Channel : ID Drive Model Capacity(MB)1 :Mas xxxxxxxx 411102 :Mas xxxxxxxx 41110Any Key to Continue3334英信NP100永不停顿的浪潮英信服务器4.5删除阵列4删除已经存在的阵列1下箭头键选择要删除的阵列 按[Del]键3按[Ctrl - Y]键删除阵列按[ESC]键FastBuild (tm) Utility 2.xx (c) 2002-2005 Promise Technology, Inc.[Delete Array Menu]Array No RAID Mode Total Drv Capacity(MB) StatusArray 1 Stripe 1 82217 FunctionalArray 2 --------- --------- --------- ---------Array 3 --------- --------- --------- ---------Array 4 --------- --------- --------- ---------[Key Available][]Down [ESC]Exit [Del] DeleteAre you sure you want to delete this array?Press Ctrl - Y to Delete354.6重建阵列可以在该菜单中实现磁盘数据的重新存储工作重建阵列步骤如下 启动机器2 查看故障硬盘所处的通道和ID号 关闭机器新换的硬盘和故障硬盘容量相同5按<Ctrl-F>进入RAID主设置菜单 在主菜单中按键进入Rebuild Array菜单7按回车键继续在[Select Drive for Rebuild]列表中选择新更换的磁盘按回车键继续系统将开始重建阵列并显示进度按照提示重新启动机器]Up [英信NP100永不停顿的浪潮英信服务器第五章 安装操作系统本章为非RAID配置下操作系统的安装指南请从蓝海豚导航光盘中根据每个系统安装前的准备提示制作相应操作系统的驱动请根据SCSI卡或RAID卡手册里操作系统的安装部分安装系统 主板集成RAID功能支持的操作系统为Win-dows NT 4.0RedHat Lniux 8.0Windows NT 4.0的安装方法可以参照第五章前两节安装Windows NT 4.0和安装Windows 2000 Server部分的步骤RedHat Linux7.3的安装方法与其类似5.1 安装Windows NT 4.0本安装过程为Windows NT 4.0 (中文版)的基本安装步骤如果您的系统是非主板集成RAID系统具体如何设置有关选项如果系统配置了RAID卡或SCSI卡5.1.1 安装前的准备安装Windows NT 4.0操作系统前需要准备 Windows NT 4.0 安装光盘36键继续按<Enter>继续,开始加载驱动程序37英信NP100永不停顿的浪潮英信服务器继续安装 安装程序开始加载文件欢迎使用安装程序提示以下选项 在安装前如果想多了解Windows NT的安装过程请按Enter 修复在上次安装时损坏的4.0中文版Windows NT请按F3按<Enter>继续屏幕显示IDE CD-ROM (ATAPI 1.2) /PCI IDE ControllerWinNT Promise FastTrak 376/378 (tm) ControllerCD-ROM驱动器及特殊磁盘控制器请按S 如果您没有制造厂商提供的大容量存储设备的驱动软盘请按ENTER我们不再加载其他的驱动程序继续安装 显示按<Enter>键9或计算机已经安装了一个与Windows NT无法并存的操作系统请按C在启动硬盘上的任何数据将永久的丢失 退出安装程序38在此我们按C继续安装系统显示按<Page Down>键浏览协议按<F8>键接受协议内容系统加载信息文件安装程序检测出计算机内含有下列硬件和软件组件显示器键盘布局在此我们采用系统检测的信息Enter12使用上请按Enter 在未分区空间上创建一新的磁盘分区请按D可以先删除旧的分区或直接将NT装在旧的分区上并且分区最大不得超过4GB创建一个新的分区输入要创建分区的大小13新的按<En-ter>继续可选择的文件系统格式将显示出来 使用FAT文件系统格式化此磁盘分区下箭头键选择 15系统会显示一个黄色进度条39英信NP100永不停顿的浪潮英信服务器16如果要改变建议的位置然后键入想要安装Windows NT 的目录名按<Enter>键继续 系统提示 允许安装程序在硬盘上执行这种检测请按 ESC按<Enter>键开始检测硬盘检测完硬盘后系统会显示一个黄色进度条如果您的系统是RAID配置,在此系统需要加载RAID驱动程序根据提示将驱动软盘插入软驱中系统不会出现提示而自动加载驱动程序所有文件复制完成后按<Enter>键重新启动系统如果选择了 NTFS 文件系统格式转换完成后22依照提示重新插入 Windows NT ServerCD-ROM 光盘23用鼠标单击<确定>按钮以继续安装程序复制文件Windows NT安装程序点击<下一步>继续在提示准备安装后单击<下一步>继40续注册10位数字27单击<下一步>继续请先选择每服务器模式但只能进行一次反之不可更改输入计算机名称并且该名称在网络中是唯一的单击<下一步>继续选择服务器类型 主域控制器 独立的服务器按照您的需要选择30不多于14个字符单击<下一步>继续创建紧急修复磁盘是,创建一张紧急修复盘这是很重要的一个步骤32根据您的实际需要来选择组件33安装 Windows NT 网络单击<下一步>继续选择本计算机与网络的连接方式在此我们选择35安装Microsoft Internet Information Server41英信NP100永不停顿的浪潮英信服务器推荐选择安装36点击单击NIC1 Driver for WindowsNT 4.0点击<确定>继续屏幕显示选择OEM选项对话框IntelPRO/100 FamilyAdapterIntelPRO/1000 Family Adapter单击<确定>继续选中R选中R40NWLink IPX/SPX兼容传输然后单击<下一步>继续显示系统将安装下列服务的对话框 RPC 配置 工作站请单击<从列表中选择>单击要安装的网络服务单击<下一步>继续 Windows NT准备安装选定的和其他系统所需的网络组件,单击42<下一步>继续稍后提示Intel PROAdapter diskette 2将软盘插入软驱NIC1和NIC2软盘插入过程会反复几次43根据实际情况选择是否使用DHCP44您的网络配置有多个适配器要更改吗45分别为每个适配器指定IP地址46使用该页禁止网络绑定或重排计算机查找网络信息的顺序采用默认设置47Windows NT准备启动网络以完成网络安装48则提示必须提供主域控制器将要管理的域的名称根据实际情况输入域名提示49系统将显示安装对话框单击<确定>50下列目录不存在可以选择是或否本安装过程选择<是>51发行目录继续安装安装程序询问要创建吗43英信NP100永不停顿的浪潮英信服务器择53没有为该机器声明的Internet域名必须通过网络控制面板应用程序配置Internet域名54然后单击<确定>继续设置时间和日期/时区点击时区标签设置正确的时区为重庆然后单击<关闭>继续在以及对话框57在此过程中系统提示制作紧急修复磁盘按照提示将格式化好的软盘插入软驱推荐制作紧急修复磁盘58已经成功安装Windows NT4.0取出 WindowsNT CD-ROM 光盘及软盘59按<Ctrl+Alt+Del>登录60欢迎使用Windows NT单击<关闭>按钮将蓝海豚导航软件光盘插入光驱选择常用工具下拉菜单中的按照提示安装service pack 6补丁程序重新启动系统安装显卡驱动程序,系统重新启动后自动引导到安装界面依次在下拉菜单中选择NP100操作系统4445部件型号按照屏幕提示安装显卡驱动程序系统重新启动完成Windows NT server 4.0的基本安装过程可以作为安装参考请省略安装步骤3 到6 中的RAID驱动加载过程需要用户根据自己的实际情况而定操作系统的安装请参考RAID卡或SCSI卡手册中的相应内容 蓝海豚导航软件光盘非主板集成RAID系统不用制作该软盘)5.2.2安装步骤1将安装光盘插入光驱2在系统提示时系统将从光盘上启动Windows 2000安装程序 在提示。
InstallShield 2020 产品说明书
InstallShield 2020为 Windows®构建值得信赖的安装程序并轻松创建 MSIX 包您精心构建了用户青睐的出色软件产品。
何必要冒安装出错和客户体验糟糕的风险呢?使用 Revenera 的 InstallShield®,可实现安全运行。
它是开发人员创建 Windows 桌面、服务器、虚拟和云平台安装程序的行业标准。
主要优势:•我们秉承在 5 亿多台 PC 和服务器上执行安装的丰富经验,为可靠安装设立了新标杆。
•更多开发人员选择我们来构建 MSI 和 EXE 安装程序并创建 UWP 和WSA 应用包。
支持桌面、服务器、云和虚拟环境。
•我们内置支持 35 种语言的本地安装程序。
•根据团队大小、机器数量和地理位置,灵活选择许可选项。
您是否在准备采用 MSIX?InstallShield 已准备就绪。
超过 10 万家应用程序制作商选择使用 InstallShield 来开发 EXE 和 MSI 安装程序,构建应用包并实现应用虚拟化。
无论您身处敏捷开发团队还是传统开发团队,无论要创建独立产品还是复杂套件,无论要部署到 Windows 应用商店还是 Nano Server,我们都能满足您的需求。
凭借 InstallShield 2020,您可以快速适应行业变化,更快地将产品投入市场并提供参与度更高的客户体验。
此外也能为微软最新的部署类型— MSIX 做好准备。
效果如何?您的工作效率将得到提升。
额外的脚本编写/编码/返工工作量则大幅减少。
这是我们又一次致力于提升安装程序的标准。
主要产品功能MSIX 支持只需点击几下,即可利用简便的 MSIX 软件包创建功能或现有 MSI 工程的平稳迁移功能来轻松使用 Microsoft MSIX。
使用新的 MSIXBundle Utility 创建捆绑包,并获得安装和运行 Windows 服务的服务支持。
Docker 中的简化版本借助将项目构建到 Docker 容器中的附加支持,将 InstallShield 集成到 Dev-Ops 流程中。
Windows Server 2012 R2 快速入门指南说明书
For more information about the installation options, what is included with each option, how to switch between them, and related features such as the Minimal Server Interface and Features on Demand, see Windows Server Installation Options at /fwlink/p/?LinkId=242140.
Automated Installation You can automate Windows Server installation by using the tools and documentation in the Windows Assessment and Deployment mating deployment eliminates the need for any user interaction during installation. In addition, you can configure different options within the operating system, such as Internet Explorer settings and network settings.
The two installation options are available for most Windows Server editions. Not all server roles and features are available in all editions. For details about the roles and features available in each Windows Server edition, see /fwlink/p/?LinkId=251499
浪潮存储平台InPath for Windows用户手册说明书
浪潮存储平台InPath for Windows用户手册文档版本 2.4发布日期2022-01-10适用版本InPath_for_Windows_V3.2.0及以上尊敬的用户:衷心感谢您选用浪潮存储!浪潮存储秉承“云存智用运筹新数据”的新存储之道,致力于为您提供符合新数据时代需求的存储产品和解决方案。
本手册用于帮助您更详细地了解和便捷地使用本存储,涉及的截图仅为示例,最终界面请以实际设备显示的界面为准。
由于产品版本升级或其他原因,本手册内容会不定期进行更新,如有变动恕不另行通知。
除非另有约定,本手册仅作为使用指导,本手册中的所有陈述、信息和建议不构成任何明示或暗示的担保。
浪潮拥有本手册的版权,保留随时修改本手册的权利。
未经浪潮许可,任何单位和个人不得以任何形式复制本手册的内容。
如果您对本手册有任何疑问或建议,请向浪潮电子信息产业股份有限公司垂询。
技术服务电话:4008600011地址:中国济南市浪潮路1036号浪潮电子信息产业股份有限公司邮编:250101在您正式使用本存储之前,请先阅读以下声明。
只有您阅读并且同意以下声明后,方可正式开始使用本存储。
如果您对以下声明有任何疑问,请和您的供货商联系或直接与我们联系。
如您在开始使用本系统前未就以下声明向我们提出疑问,则默认您已经同意了以下声明。
1.请不要自行拆卸本存储的机箱及机箱内任何硬件设备。
在本存储出现任何硬件故障或您希望对硬件进行任何升级时,请您将机器的详细硬件配置反映给我们的客户服务中心。
2.请不要将本存储的设备与任何其他型号的相应设备混用。
本存储的内存、CPU、CPU散热片、风扇、硬盘托架、硬盘等都是特殊规格的。
3.在使用本存储时遇到任何软件问题,请您首先和相应软件的提供商联系。
由提供商和我们联系,以方便我们共同沟通和解决您遇到的问题。
对于数据库、网络管理软件或其他网络产品的安装、运行问题,我们尤其希望您能够这样处理。
4.上架安装本存储前,请先仔细阅读相关产品手册中的快速安装指南。
Windows 2008R2 Native MPIO 存储多路径软件详解与应用
Windows Native MPIO存储多路径软件详解与应用介绍在Windows Server 2008和Windows Server 2008 R2中开始支持Native Multipathing(MPIO)软件作为操作系统的一个组件存在。
EMC旗下的存储阵列都支持MPIO。
本文将介绍MPIO和它饿安装与配置,以及如何使用Windows Server Native MPIO连接存储的方法和注意事项。
更多信息安装与配置Windows Native MPIO:Native MPIO在Windows Server 2008和Windows Server 2008 R2内是一个可选安装项目,用户需要手动启动该功能才能开始使用Native MPIO软件。
具体的方式是:1. 打开Server Manager Management Console2. 选择Features > Features Summary > Add Features , 打开Add Features Wizard3. 点击Next选择“MultiPath I/O“、安装4. 重启Windows使用Native MPIO连接EMC VPLEX、Symmetrix、DMX、VNX和CLARiiON存储系统的时候需要进行适当配置,用户可以通过两个方法完成特定存储系统的连接配置。
方法1:手动输入Vender和Device ID(建议优先使用这种方法,如果所有的存储阵列没有被初始化连接,可以避免连续重启)∙使用MPIO Properties控制面板程序中的MPIO-ed Devices标签∙选择Add然后输入vender和product ID(vender ID为8位字符,不满8位的用空格补全,product ID为16位,不满16位的用空格补全)∙比如在MPIO中claim VNX系列和CLARiiON的Raid 1的LUN,输入字符为compliant∙对于DMX、V MAX、VPLEX阵列会显示在Others中Multipath I/O多路径管理:MPIO提供了几种Load Balance Policy,它们的作用如下:∙Failover Only:这个模式简单来说就是当一条连接到外部存储的链路检测到不能用的时候,MPIO 会自动寻找到其他的可用链路继续进行Failover。
Microsoft Learning Solutions 卷式许可客户指南说明书

Microsoft Volume LicensingAdministrator GuideHow to Activate and Launch Microsoft Learning SolutionsThe Microsoft Learning Solutions Administrator Guide is your reference for activating and launching Microsoft E-Learning and MCP Exam Vouchers within your organization. The guide also includes frequently asked questions and support for administrators. We invite you to refer to this guide as needed to enjoy all the benefits of Microsoft Learning Solutions Online Service.—The Microsoft Learning TeamAccessing Microsoft Learning SolutionsE-LearningGetting started with access to Microsoft Learning Solutions-E-LearningStep 1 - To get started with service activation, please visit the Volume Licensing Service Center (VLSC) website at https:///licensing/servicecenter/. Once you are on the VLSC home page, click the Sign In button in the upper right hand corner or in the ‘Sign In’ box on the page.Step 2 & 3 - On the sign in page, enter your Windows Live ID email address and password and click the Sign In button. NOTE: If you have not been provided access to the VLSC website or have not registered on the VLSC website previously, you can find resources on ‘How to Register’, ‘Requesting and Approving User Permissions’, and much more here: /licensing/existing-customers/manage-my-agreements.aspxStep 4– After a successful sign in, you arrive on the VLSC home page. To view and manage your Microsoft Learning Solutions, click on the Online Services tab.Step 5– Click on the link to your Online Services Agreement ListStep 6 – Select the agreement number that was used to purchase your Microsoft Learning SolutionsStep 6Click on the Agreement number toaccess the Online Services summaryscreenStep 7 – Click on the service name to activate your Microsoft Learning Solutions - E-LearningNot all Microsoft Learning Solutions require activation. The Microsoft Learning Solutions that require activation are:∙ Technical E-Learning Library ∙Desktop E-Learning LibraryFor all other Microsoft Learning Solutions online services, an email will be sent to the individual that purchased the Microsoft Learning Solutions online services or the individual agreed upon with your Microsoft Account Manager.Step 7Click on the Microsoft Learning Solutions online service you wish to activate.NOTE: Available Microsoft Learning Solutions offers include the following:∙Technical E-Learning Library ∙Desktop E-Learning Library ∙MCP Exam Vouchers ∙E-Reference IT Professional Library ∙E-Reference Developer Library ∙E-Reference Desktop Library ∙E-Reference Combination LibraryStep 8 – Choose a subscription contact personOnce you have selected a Microsoft Learning Solutions online service, you must enter a Subscription Contact name. The Subscription Contact will receive an email with details on how to administer the Microsoft Learning Solutions online service.NOTE Contact to have access to e-learning reports in the Business Administration Center (BAC) – https:// , you must provide access to VLSC. To find out how to provide access to VLSC, please reference one or more of the following resources:∙ Demo: /licensing/existing-customers/media/VLSC-Requesting-and-Approving-User-Permissions.aspx∙ VLSC User Guide (download) - /downloads/details.aspx?FamilyID=d75e4c02-e38c-4a22-b7f7-69f9706c5240&displayLang=enFor each Microsoft Learning Solutions online service you wish to activate, you must enter a Subscription Contact. This Subscription Contact will receive an email to administer the service, but will not receive access to VLSC.Step 9 – Enter Domain Name(s)In order for your employees to utilize the Microsoft Learning Solutions E-Learning Library online services, you must first enter the appropriate domain name(s) for your organization. This is a critical step because if all the domains are not listed, the users on those domains will not be able to complete the authentication process.Note: Be sure to include any sub-domains that your employees may use. For example, you *********************************,@, etc.Note: You can also remove domains if they are no longer used.Step 1 – Enter the domain name(s) for your organization. This will be used to validate only employees from your organization can access e-learning.Step 2 – Click AddMicrosoft Learning SolutionsAdministrator GuideStep 10 - Service Activation EmailThe Service Activation Email is sent to the Subscription Contact and includes the Program Code (also known as the Access Code) that your employees will use to activate the online service.Microsoft Learning SolutionsAdministrator GuideMicrosoft Learning Solutions MCP Exam VouchersEach MCP Exam Voucher allows an individual to register for one MCP exam. The exam must be taken prior to the expiration date on the voucher. The expiration date on the voucher is determined by the Online Services purchase type and date of purchase. For more details on online services purchases, please contact your Microsoft Partner or Microsoft Account Manager.After your order has been placed, the identified purchase contact will receive an email similar to the following:Ready – Set – Learn!Your Microsoft Learning Solutions Access Codes are ready to activate.<Contact Name><Company Name>Agreement # <Agreement Number>Thank you for your recent order of Microsoft Learning Solutions Certification Exam Vouchers. We are nowproviding you with those access codes as well as step-by-step instructions for distribution to users in yourorganization.In order to maximize your use of this valuable learning resource, please note that the subscription end date for your Certification Exam Voucher codes is <insert Last License Coverage End Date>. Any codes not redeemed prior to your subscription end date will expire.For your convenience, you will find instructions to forward to end-users within your organization.Voucher Redemption IssuesIf you encounter any problems during registration, please first contact Prometric at the appropriate contact center:o Prometric -/ContactUs/TestTakers/default.htmIfyoustillhaveissuesinregisteringforyourexamwiththevoucher,*********************************with the following information:o Voucher numbero Date You are Trying to Register to Take an Examo Exam Number you are Trying to register foro Country in Which You are Trying to Register to Take the Examo Someone will get back to you in 7-10 days.Sincerely,Microsoft LearningPlease see attached document with access codes.Also, please see instructions below regarding delivery of access codes to your end users/employees.Redeem your Certification Exam VoucherYOU ARE REQUIRED TO USE THE ATTACHED EMAIL TEMPLATE OR TO COPY AND PASTE THE INFORMATION BELOW IN ITS ENTIRETY, TO SEND THE VOUCHER CODES TO YOUR EMPLOYEES. THE EMAIL TEMPLATE / TEXT BELOW CONTAINS CRITICAL PROGRAM INFORMATION THAT MUST BE PROVIDED TO EACH EMPLOYEE TO WHOM YOU PROVIDE A VOUCHER. PLEASE FILL IN THE NECESSARY INFORMATION AND SEND IT TO YOUR EMPLOYEE.IN ORDER FOR YOU TO RECEIVE DETAILED REPORTING ON YOUR VOUCHER, PLEASE REPLY TO THIS EMAIL WITH THE FOLLOWING TEXT TO CONFIRM DELIVERY OF THE VOUCHERS TO YOUR END USERS/EMPLOYEES: I guarantee that all vouchers will be distributed using the attached email template or text.EMAIL TEXTThis mail is being sent to provide you an Exam voucher to take a Microsoft Certification (not includingMicrosoft Office Specialist or Microsoft Dynamics (aka Microsoft Business Solutions or Navision)).IMPORTANT PRIVACY NOTICE FROM MICROSOFT: By using the voucher number provided through this volume licensing arrangement with your company, you understand and agree that Microsoft may share exam results and information with the company providing your voucher number. If you do not wish to have your exam results and information shared, do not use this voucher number. Privacy StatementVoucher Number: <insert voucher number here>Voucher Expiration Date: <insert contract expiration date here>Once you have received your exam vouchers, we recommend you either appoint one person to manage and distribute the vouchers or that you place the spreadsheet of vouchers on a shared location. It is very important to track which vouchers have already been distributed so that the same voucher number is not sent out more than once.If your employee schedules an exam and needs to change the date, time, location, or exam they have scheduled, they may reschedule the exam online or via phone, but the exam must be rescheduled for a date that occurs prior to the expiration date of the voucher.Frequently Asked QuestionsQ. Where can I find a list of available MCP exams?A. The list of available MCP exams is found here:/Manager/Catalog.aspx?qry=70&nav=trainingtype%3aExam&btn=1Q. What courses are available in the Microsoft E-Learning Technical Library versus the Desktop Library?A. You may view and search for available courses here: /learning/sa-vl-catalog/savldefault.aspx Q. Can I download and host any of the Microsoft E-Learning courses within my own Learning Management System (LMS)?A. No. Many of the courses contain labs that are unable to be hosted on an LMS. Your employees may download the courses to be consumed offline, but they must connect online to update their course progress for reporting and tracking purposes.Redeem your certification exam voucherOnce you are ready to take a Microsoft Certification exam, go to/learning/mcpexams/register/. You may register online, via phone, or in person. During registration, you have the ability to enter your certification exam voucher code.Note : Exam voucher codes can only be used once, although exams can be rescheduled if necessary. See specific rules regarding exam delivery at /microsoft . Detailed registration instructions are also attached.For helpful preparation tips for certification exams, please see the Microsoft Learning Six Steps toCertification Web page at /learning/mcp/sixsteps.mspx .Good luck with your studies!If you choose not to use this voucher, please reply to this email at let us know that you will not be utilizing the voucher number.herein may be the trademarks of their respective owners.Q. What is required of my employees to register to take e-learning courses?A. Employees are required to have a Windows Live ID and the e-learning access code you provide them. An employee may create a Windows Live ID here: https:///signup.aspx. Users may download the User Guide or watch the video on how to get registered.User Guide:∙XPS file - /download/C/9/4/C943436F-4228-453A-9731-1CE4C6942488/MS_SA_VL_End_User_Guide.xps∙PDF file - /download/C/9/4/C943436F-4228-453A-9731-1CE4C6942488/MS_SA_VL_End_User_Guide.pdfVideo:∙/learning/_silverlight/vl/vl.htmNOTE: Some organizations experience technical problems when multiple number of users attempt to register Windows Live Accounts from your IP Address in short period. To prevent this issue, you can contact our Microsoft Learning Regional Service Centers /learning/en/us/help/assisted-support.aspx and request that they register your organization’s IP address with Microsoft Live ID to allow simultaneous Live ID account creation. Be prepared to provide your corporate IP address range and subnet mask ID (if you need help finding this information, please contact your IT department). The request typically takes 48-72 hours to complete-The following information is required:o IP or IP Range (x.x.x.x – x.x.x.x) – find this, go here: o Subnet Mask (x.x.x.x)o Expiration DateQ. What is required of my employees to register to take an MCP exam?A. Employees will be required to create a profile by providing information such as First Name, Last Name, address and email address (which will serve as their username).Q. Where can I find information on the results and progress of my employees on their MCP exams and e-learning courses?A. Reports are available to the VLSC Online Services Manager as follows:∙MCP Exams – please request reports from your Microsoft Account Manager∙E-Learning course progress – access the Business Administration Center (BAC)Video: /learning/_silverlight/bac/bac.htmNOTE: If you are not a designated VLSC Online Services Manager, you may request access, by following the instructions in this video - /licensing/existing-customers/media/VLSC-Requesting-and-Approving-User-Permissions.aspxWe hope you enjoy your Microsoft Learning Solutions Online Services. --The Microsoft Learning Team。
Windows中MPIO配置
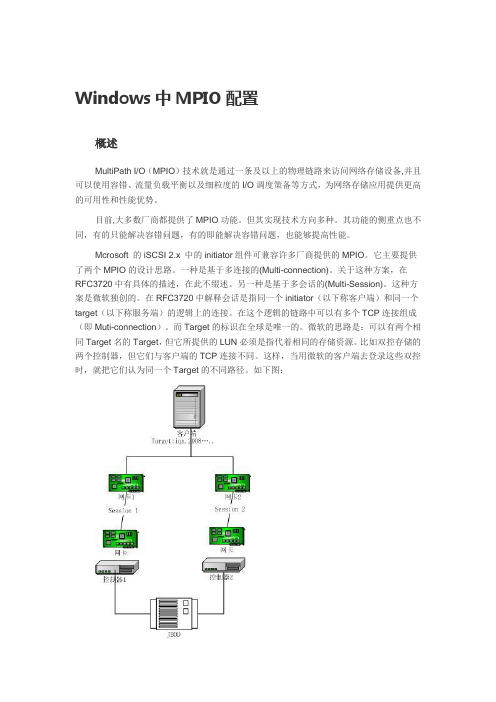
在Windows Server 2008和Windows Server 2008 R2中开始支持Native Multipathing(MPIO)软件作为操作系统的一个组件存在。EMC旗下的存储阵列都支持MPIO。本文将介绍MPIO和它的安装与配置,以及使用Windows Server Native MPIO连接存储的方法和注意事项。
目前,大多数厂商都提供了MPIO功能。但其实现技术方向多种。其功能的侧重点也不同,有的只能解决容错问题,有的即能解决容错问题,也能够提高性能。
Mcrosoft的iSCSI 2.x中的initiator组件可兼容许多厂商提供的MPIO。它主要提供了两个MPIO的设计思路。一种是基于多连接的(Multi-connection)。关于这种方案,在RFC3720中有具体的描述,在此不缀述。另一种是基于多会话的(Multi-Session)。这种方案是微软独创的。在RFC3720中解释会话是指同一个initiator(以下称客户端)和同一个target(以下称服务端)的逻辑上的连接。在这个逻辑的链路中可以有多个TCP连接组成(即Muti-connection)。而Target的标识在全球是唯一的。微软的思路是:可以有两个相同Target名的Target,但它所提供的LUN必须是指代着相同的存储资源。比如双控存储的两个控制器,但它们与客户端的TCP连接不同。这样,当用微软的客户端去登录这些双控时,就把它们认为同一个Target的不同路径。如下图:
比如在MPIO中claim VNX系列和CLARiiON的Raid 1的LUN,输入字符为DGC*****RAID*1********(*这里表示为空格)
下表显示EMC存储阵列的Vender ID和Product ID:
方法2:使用MPIO程序自动Discover、Claim和管理已经连接上的阵列。如果Windows系统可以接受连续重启可以选择这种配置方式。但要注意的是只有当阵列通过最少两条链路连接到windows主机,才会在被程序识别并且列出。对于不同的存储阵列出来的结果也会有所不同:
适用于 Dell PowerEdge 系统的 Microsoft Windows Server 20

适用于 Dell™ PowerEdge™系统的 Microsoft® Windows Server® 2008(含 SP2)重要信息w w w.d e l l.c o m|s u p p o r t.d e l l.c o m关于注和小心注:“注”表示可以帮助您更好地使用计算机的重要信息。
小心:“小心”表示可能会损坏硬件或导致数据丢失,并说明如何避免此类问题。
____________________本说明文件中的信息如有更改,恕不另行通知。
©2009Dell Inc.版权所有,翻印必究。
未经 Dell Inc. 书面许可,严禁以任何形式复制这些材料。
本文中使用的商标:Dell、DELL 徽标和PowerEdge是 Dell Inc. 的商标;Intel和Xeon是Intel Corporation 在美国和其它国家和地区的注册商标;Adaptec是 Adaptec Inc. 的注册商标;Microsoft、Windows Server、Hyper-V、Windows NT 和 Windows是Microsoft Corporation 在美国和/或其它国家和地区的商标或注册商标。
本说明文件中述及的其它商标和产品名称是指拥有相应商标和产品名称的公司或其制造的产品。
Dell Inc. 对本公司的商标和产品名称之外的其它商标和产品名称不拥有任何专有权。
2009 年 4 月Rev. A00目录概览 (7)BIOS、系统固件和RAID 控制器驱动程序最低支持版本 (7)已知问题 (11)iSCSI 上的 Windows Server 2008 SP2安装卸载失败 (11)使用两个 PERC 控制器的设置过程中蓝屏 (11)NIC 卸下状态信息未更新至 msinfo32 报告 (12)创建多个廉价磁盘冗余阵列 (RAID) 卷时,无法安装 WindowsServer 2008 SP2 操作系统 (12)加载 Java 时,无法使用 Internet Explorer 7.0打开 XML 文件 (12)可移动存储介质 (RSM) 工作队列视图的图标无法显示任何详细信息 (13)无法使用 Windows Server Backup 工具在PowerVault™ RD1000 可移动磁盘驱动器上执行计划的备份 (13)页面文件大小不正确时,事件查看器日志显示红色感叹号标志 (13)Windows Server Core 的系统信息屏幕中没有提供网络信息 (14)Dell IT Assistant 无法显示 WindowsServer 2008 SP2 操作系统中网络适配器驱动程序文件的完整路径 (14)与 Dell 39320A SCSI Ultra320 引导控制器卡连接时,Dell PowerVault 124T DLT VS160自动装填器未显示在设备管理器中 (14)目录3当系统运行 Windows Server 2008 SP2 时,无法登录到 Dell IT Assistant 8.2 (15)在首次恢复尝试过程中,Windows NT®备份 - 恢复公用程序间歇性失败 (15)当将 PowerVault RD1000 可移动存储介质置于 Free 类别之下时,可移动的存储管理器 (RSM) 发出错误信息 (15)对于采用 BIOS 0.2.4 修订版本和运行固件版本 78 的 PERC 6i 控制器卡的Dell PowerEdge T605 系统,在每一次重新引导时均会生成系统事件日志 (16)群集事件日志未以默认的时间顺序排序 (16)如果存在对服务器可见的 iSCSI LUN(使用 IBFT 连接),则无法从 DVD 介质将 Windows Server 2008 x86 和 x64 版本的操作系统安装至本地硬盘驱动器 (16)在 PowerEdge 6600 和 6650 系统中,设备管理器针对 ATA 信道 1 显示黄色感叹号标志 (16)无法从某些 DVD ROM 驱动器中将Microsoft Windows Server 2008 操作系统安装至 Dell PowerEdge 2650 和 4600 系统 (17)首次从休眠状态恢复时,系统显示Windows 错误恢复屏幕 (17)Windows 管理组成员没有继承组权限 (18)运行 slsvc.exe 进程时,MicrosoftApplication Verifier 3.1 显示软件许可错误 (18)无法将固件路径拖放至 Dell 固件更新公用程序 DOS (DFU DOS) 程序中 (19)设备管理器扫描完毕后,Windows 注册表中的磁带设备固件版本信息未更新 (19)虚拟软盘驱动器作为 Windows Server Backup工具的目标位置列出 (19)磁盘管理屏幕中的磁盘编号分配不一致 (20)解密硬盘驱动器时解密状态条没有显示准确的状态 (20)4目录如果未安装 ProStor 软件,在文件传输过程中会立即弹出 PowerVault RD1000 可移动磁盘驱动器的卡盒 (21)在 Windows Server 2008 操作系统中,磁带设备制造商名称显示在百分比符号内 (21)针对 OpenManage Server Assistant 5.4 的弹出式 NT LAN Manager (NTLM) 验证失败 (21)无法在带有预配置 RAID 1 的 SCSI 磁盘的Dell 系统上安装 Windows Server 2008操作系统 (21)Dell PowerEdge6650、2650、4600 和 6600系统中,没有 Broadcom 以太网控制器的内置驱动程序 (22)无法从多个卷中创建单一卷 (22)当 WER 服务未启动时,问题报告历史记录会列出应用程序崩溃 (22)无法从远程 Microsoft 管理控制台 (MMC)访问设备管理器和磁盘管理 (22)无法使用与 Server Core 系统登录帐户不同的其他帐户将驱动器从 Server Core映射至另一系统 (24)通过远程服务器进行安装时,Windows 部署服务 (WDS) 服务器没有列出操作系统映像的语言字符串和内部版本号 (24)终端服务管理器没有体现正确的连接状态 (25)如果在多路径或多主机配置中发出复位命令,则 I/O 请求会超时 (25)无意中关闭群集节点会导致群集关闭 (25)Windows Server 2008 设备管理器中的处理器速度显示不正确 (26)使用 USB 2.0 电缆无法对 Windows Server 2008进行调试 (26)如果您在旧版 BIOS 中手动加载智能平台管理接口 (IPMI) 驱动程序然后升级 BIOS,则该驱动程序会在设备管理器中列出两次 (26)在 Windows 命令行和 Windows GUI 中,组的 FailoverThreshold 值显示不正确 (27)目录5My Computer(我的电脑)下的 USB 闪存盘可能尚未装入 (27)无法使用需要验证的代理在线激活Server Core (27)当 OSLOADER 启用 Windows 预安装环境 (WinPE) 时会出现 System Properties(系统属性)窗口 (28)将 BCDedit 设置为引导至 WinPE 后,系统没有引导至 WinPE (28)在 PowerEdge 系统中安装 Windows Server 2008操作系统的过程中,未列出“磁盘已满”的驱动器 (29)6目录概览本说明文件提供有关适用于 Dell™PowerEdge™系统的Microsoft®Windows Server® 2008 Service Pack 2 (SP2) 的重要信息。
PCNS 2.20 使用手册
PowerChute Network Shutdown软件 2.20版本用户使用手册目录服务器软件信息● 事件日志● 配置事件● 配置关机● 设置通讯UPS信息● UPS型号● 连接的服务器● 交互式帮助● 系统问题报告事件列表APC技术支持服务器软件信息事件日志这一页显示了已经发生的UPS事件,这些事件可能会对你的服务器有影响。
事件是按照时间顺序排列的。
PowerChute Network Shutdown只显示你的UPS支持的事件。
一些UPS事件(如:自检和运行时间校准等)不会影响连接在UPS上设备的正常运行,因此这类事件不会记录在PowerChute Network Shutdown中。
使用管理卡用户界面可以查看已经发生的事件。
PowerChute Network Shutdown可以记录的事件描述请参见事件列表。
并记录在event log中。
注意部分事件只适用于某个型号的UPS。
缺省情况下,每个被认可的事件都记录在事件日志中。
可以在配置事件中设定不记录某种事件。
事件日志保存在PowerChute目录中的日志文件(Eventlog file)中。
超过1000个事件后,系统自动删除最早记录的三分之一事件。
完全清除事件日志过程是:停止PowerChute进程,删除日志文件,再重新启动进程。
记录新事件时PowerChute会建立一个新文件。
配置事件用户可以设置当某个事件发生时,Powerchute Network Shutdown执行的动作,对应每个事件有四种可能的动作:●记录日志●通知用户●运行命令行文件●关闭系统配置事件页面显示了每个事件对应动作的概要情况,如果需要了解动作的详细配置情况,请点击动作的CheckBox。
以下是可以配置的事件,选择任一事件看详细内容。
记录日志PowerChute Network Shutdown会记录UPS所发生的事件,缺省情况下所有事件都记录在日志中。
可以根据需要选择不想记录的事件。
MPIO 和MCS的区别

MPIO MC/SMPIOIn Microsoft Windows server base system, Microsoft MPIO driver allows initiators to login multiplesessions to the same target and aggregate the duplicate devices into a single device. Each sessionto the target can be established using different NICs, network infrastructure and target ports. Ifone session fails, then another session can continue processing I/O without interruption to theapplication.在基于微软Windows服务器的系统中,微软MPIO磁盘允许发起端登录同一个目标端的多个会话,并将副本设备聚合至一部设备。
可使用不同的NIC、网络基础设施和目标端端口建立与目标端的会话。
如果一个会话失败,另一个会话可在不干扰应用的情况下继续处理I/O。
MC/SMC/S (Multiple Connections per Session) is a feature of iSCSI protocol, which allows combiningseveral connections inside a single session for performance and failover purposes. In this way, I/Ocan be sent on any TCP/IP connection to the target. If one connection fails, another connectioncan continue processing I/O without interruption to the application.MC/S(每会话多连接)是iSCSI协议的一种特性,允许将多个连接结合于一次会话中,以改进性能和失效转移。
Intel MPI Library for Windows OS 入门指南说明书
Intel® MPI Library for Windows* OS Getting Started GuideThe Intel® MPI Library is a multi-fabric message passing library that implements the Message Passing Interface, v2 (MPI-2) specification. Use it to switch interconnection fabrics without re-linking.This Getting Started Guide explains how to use the Intel® MPI Library to compile and run a simple MPI program. This guide also includes basic usage examples and troubleshooting tips.To quickly start using the Intel® MPI Library, print this short guide and walk through the example provided.Copyright © 2003–2010 Intel CorporationAll Rights ReservedDocument Number: 316404-007Revision: 4.0World Wide Web: Contents1About this Document (4)1.1Intended Audience (4)1.2Using Doc Type Field (4)1.3Conventions and Symbols (4)1.4Related Information (5)2Using the Intel® MPI Library (6)2.1Usage Model (6)2.2Before you Begin (6)2.3Quick Start (7)2.4Compiling and Linking (8)2.5Setting up SMPD Services (8)2.6Selecting a Network Fabric (9)2.7Running an MPI Program (10)3Troubleshooting (12)3.1Testing Installation (12)3.2Compiling and Running a Test Program (12)4Next Steps (14)Disclaimer and Legal NoticesINFORMATION IN THIS DOCUMENT IS PROVIDED IN CONNECTION WITH INTEL® PRODUCTS. NO LICENSE, EXPRESS OR IMPLIED, BY ESTOPPEL OR OTHERWISE, TO ANY INTELLECTUAL PROPERTY RIGHTS IS GRANTED BY THIS DOCUMENT. EXCEPT AS PROVIDED IN INTEL'S TERMS AND CONDITIONS OF SALE FOR SUCH PRODUCTS, INTEL ASSUMES NO LIABILITY WHATSOEVER, AND INTEL DISCLAIMS ANY EXPRESS OR IMPLIED WARRANTY, RELATING TO SALE AND/OR USE OF INTEL PRODUCTS INCLUDING LIABILITY OR WARRANTIES RELATING TO FITNESS FOR A PARTICULAR PURPOSE, MERCHANTABILITY, OR INFRINGEMENT OF ANY PATENT, COPYRIGHT OR OTHER INTELLECTUAL PROPERTY RIGHT.UNLESS OTHERWISE AGREED IN WRITING BY INTEL, THE INTEL PRODUCTS ARE NOT DESIGNED NOR INTENDED FOR ANY APPLICATION IN WHICH THE FAILURE OF THE INTEL PRODUCT COULD CREATE A SITUATION WHERE PERSONAL INJURY OR DEATH MAY OCCUR.Intel may make changes to specifications and product descriptions at any time, without notice. Designers must not rely on the absence or characteristics of any features or instructions marked "reserved" or "undefined." Intel reserves these for future definition and shall have no responsibility whatsoever for conflicts or incompatibilities arising from future changes to them. The information here is subject to change without notice. Do not finalize a design with this information.The products described in this document may contain design defects or errors known as errata which may cause the product to deviate from published specifications. Current characterized errata are available on request.Contact your local Intel sales office or your distributor to obtain the latest specifications and before placing your product order.Copies of documents which have an order number and are referenced in this document, or other Intel literature, may be obtained by calling 1-800-548-4725, or by visiting Intel's Web Site.Intel processor numbers are not a measure of performance. Processor numbers differentiate features within each processor family, not across different processor families. See/products/processor_number for details.BunnyPeople, Celeron, Celeron Inside, Centrino, Centrino Atom, Centrino Atom Inside, Centrino Inside, Centrino logo, Core Inside, FlashFile, i960, InstantIP, Intel, Intel logo, Intel386, Intel486, IntelDX2, IntelDX4, IntelSX2, Intel Atom, Intel Atom Inside, Intel Core, Intel Inside, Intel Inside logo, Intel. Leap ahead., Intel. Leap ahead. logo, Intel NetBurst, Intel NetMerge, Intel NetStructure, Intel SingleDriver, Intel SpeedStep, Intel StrataFlash, Intel Viiv, Intel vPro, Intel XScale, Itanium, Itanium Inside, MCS, MMX, Oplus, OverDrive, PDCharm, Pentium, Pentium Inside, skoool, Sound Mark, The Journey Inside, Viiv Inside, vPro Inside, VTune, Xeon, and Xeon Inside are trademarks of Intel Corporation in the U.S. and other countries.* Other names and brands may be claimed as the property of others.Copyright © 2007-2010, Intel Corporation. All rights reserved.1 About this DocumentThe Intel® MPI Library for Windows* OS Getting Started Guide contains information on thefollowing subjects:•First steps using the Intel® MPI Library•Troubleshooting outlines first-aid troubleshooting actions1.1 Intended AudienceThis Getting Started Guide is intended for first time users.1.2 Using Doc Type FieldThis Getting Started Guide contains the following sections:OrganizationDocumentSection DescriptionSection 1 introduces this documentSection 1 About thisDocumentSection 2 Using the Intel®Section 2 describes how to use the Intel® MPI Library MPI LibrarySection 3 Troubleshooting Section 3 outlines first-aid troubleshooting actionsSection 4 Next Steps Section 4 provides links further resources1.3 Conventions and SymbolsThe following conventions are used in this document.Table 1.3-1 Conventions and Symbols used in this DocumentThis type style Document or product namesThis type style HyperlinksThis type style Document or product namesThis type style Commands, arguments, options, file namesTHIS_TYPE_STYLE Environment variables<this type style>Placeholders for actual values[ items ] Optional items{ item | item }Selectable items separated by vertical bar(s)(SDK only)For Software Development Kit (SDK) users only 1.4 Related InformationTo get more information about the Intel® MPI Library, see the following resources:Product Web SiteIntel® MPI Library SupportIntel® Cluster Tools ProductsIntel® Software Development Products2 Using the Intel® MPI Library2.1 Usage ModelUsing the Intel® MPI Library involves the following steps. These steps are described in thecorresponding sections in detail.Figure 1: Flowchart representing the usage model for working with the Intel® MPI Library.2.2 Before You Begin1.Before using the Intel® MPI Library, ensure that the library, scripts, and utility applications areinstalled. See the Intel® MPI Library for Windows* OS Installation Guide for installationinstructions.2.For getting proper environment settings, use the following commands from the Start menu:Start > Programs > Intel(R) Software Development Tools> Intel(R) MPI Library 4.0 > BuildEnvironment for the IA-32 architectureStart > Programs > Intel Software Development Tools > Intel(R) MPI Library 4.0 > BuildEnvironment for the Intel® 64 architectureAlternatively, you can open a new console (cmd) window and run one of the following BAT filesfrom the command line.<installdir>\ia32\bin\mpivars.bat<installdir>\em64t\bin\mpivars.bat3.You should have administrator privileges on all nodes of the cluster to start the smpd serviceon all nodes of the cluster.2.3 Quick Starte the call batch command for getting proper environment settings from the mpivars.batbatch scripts included with the Intel® MPI Library. It is located in the<installdir>\em64t\bin directory for the Intel® 64 architecture, or in the<installdir>\ia32\bin directory for the 32-bit mode.2.Make sure the smpd services are installed and started on compute nodes. Otherwise installthem manually from the command line by using the –install smpd option. If the smpdservice stops, start it through Computer Management -> Services and Applications -> Servicesor from the command line manually using the –start smpd option.3.(SDK only) Make sure that you have a compiler in your PATH.4.(SDK only) Compile the test program using the appropriate compiler driver. For example:> mpicc.bat –o test <installdir>\test\test.c5.Register your credentials using the wmpiregister GUI utility.6.Execute the test using the GUI utility wmpiexec. Set the application name and a number ofprocesses. In this case all processes start on the current host. To start a test on a remote hostor on more than one host press the Advanced Options button and fill the appropriate fields.Use the Show Command button to check the command line. Press the Execute button tostart the program.You can use the command line interface instead of the GUI interface.e the mpiexec –register option instead of the wmpiregister GUI utility to registeryour credentials.e the CLI mpiexec command to execute the test.> mpiexec.exe –n <# of processes> test.exeor> mpiexec.exe –hosts <# of hosts> <host1_name> \<host1 # of processes> <host2_name> \<host2 # of processes> … test.exeSee the rest of this document and the Intel® MPI Library Reference Manual for Windows*OS formore details.2.4 Compiling and Linking(SDK only)To compile and link an MPI program with the Intel® MPI Library do the following steps:1.Create a Winxx Console project for Microsoft* Visual Studio* 2005.2.Choose the x64 solution platform.3.Add <installdir>\em64t\include to the include path.4.Add <installdir>\em64t\lib to the library path.5.Add impi.lib (Release) or impid.lib (Debug) to your target link command for Capplications.6.Add impi.lib and impicxx.lib (Release) or impid.lib and impicxxd.lib (Debug)to your target link command for C++ applications. Link application with impimt.lib(Release) impidmt.lib (Debug) for multithreading.7.Build a program.8.Place your application and all the dynamic libraries in a shared location or copy them to all thenodes.9.Run the application using the mpiexec.exe command.2.5 Setting up SMPD ServicesThe Intel® MPI Library uses a Simple Multi-Purpose Daemon(SMPD) job startup mechanism. Inorder to run programs compiled with Microsoft* Visual Studio* (or related), set up a SMPD service.NOTE:You should have administrator privileges to start the smpd service and all users can launch processes with mpiexec.To set up SMPD services:1.During the Intel® MPI Library installation the smpd service is started. During installation youcan cancel the smpd service startup.2.You can start, restart, stop or remove the smpd service manually when the Intel® MPI Libraryis installed. Find smpd.exe in the <installdir>\em64t\bine the following command on each node of the cluster: > smpd.exe –remove to removethe previous smpd service.e the following command on each node of the cluster: > smpd.exe –install to install thesmpd service manually.2.6 Selecting a Network FabricThe Intel® MPI Library dynamically selects different fabrics for communication between MPIprocesses. To select a specific fabric combination, set the new I_MPI_FABRICS or the oldI_MPI_DEVICE environment variable.I_MPI_FABRICS(I_MPI_DEVICE)Select the particular network fabrics to be used.SyntaxI_MPI_FABRICS=<fabric>|<intra-node fabric>:<inter-nodes fabric>Where <fabric> := {shm, dapl, tcp}<intra-node fabric> := {shm, dapl, tcp}<inter-nodes fabric> := {dapl, tcp}Deprecated SyntaxI_MPI_DEVICE=<device>[:<provider>]Arguments<fabric>Define a network fabricshm Shared-memorydapl DAPL–capable network fabrics, such as InfiniBand*, iWarp*,Dolphin*, and XPMEM* (through DAPL*)tcp TCP/IP-capable network fabrics, such as Ethernet and InfiniBand*(through IPoIB*)Correspondence with I_MPI_DEVICE<device><fabric>sock tcpshm shmssm shm:tcprdma daplrdssm shm:dapl<provider>Optional DAPL* provider name (only for the rdma and the rdssmdevices)I_MPI_DAPL_PROVIDER=<provider>Use the <provider> specification only for the {rdma,rdssm} devices.For example, to select the OFED* InfiniBand* device, use the following command:> mpiexec -n <# of processes> \-env I_MPI_DEVICE rdssm:ibnic0v2-scm <executable>For these devices, if <provider> is not specified, the first DAPL* provider in the dat.conf file isused.NOTE:Ensure the selected fabric is available. For example, use shm only if all the processes can communicate with each other through shared memory. Use rdma only if all the processescan communicate with each other through a single DAPL provider. Ensure that thedat.dll library is in your %PATH%. Otherwise, use the –genv option for mpiexec.exe forsetting the I_MPI_DAT_LIBRARY environment variable with the fully-qualified path to thedat.dll library.2.7 Running an MPI ProgramUse the mpiexec command to launch programs linked with the Intel® MPI Library:> mpiexec.exe -n <# of processes> myprog.exeNOTE:The wmpiexec utility is a GUI wrapper for mpiexec.exe. See the Intel® MPI Library Reference Manual for more details.Use the only required mpiexec -n option to set the number of processes on the local node.Use the –hosts option to set names of hosts and number of processes:> mpiexec.exe –hosts 2 host1 2 host2 2 myprog.exeIf you are using a network fabric as opposed to the default fabric, use the -genv option to setthe I_MPI_DEVICE variable.For example, to run an MPI program using the shm fabric, type in the following command:> mpiexec.exe -genv I_MPI_DEVICE shm -n <# of processes> \myprog.exeYou may use the –configfile option to run the program:> mpiexec.exe –configfile config_fileThe configuration file contains:-host host1 –n 1 –genv I_MPI_DEVICE rdssm myprog.exe-host host2 –n 1 –genv I_MPI_DEVICE rdssm myprog.exeFor the rdma capable fabric, use the following command:> mpiexec.exe –hosts 2 host1 1 host2 1 –genv I_MPI_DEVICE rdma myprog.exe You can select any supported device. For more information, see Section Selecting a Network Fabric.If you successfully run your application using the Intel® MPI Library, you can move your application from one cluster to another and use different fabrics between the nodes without re-linking. If you encounter problems, see Troubleshooting for possible solutions.3 TroubleshootingUse the following sections to troubleshoot problems with installation, setup, and runningapplications using the Intel® MPI Library.3.1 Testing InstallationTo ensure that the Intel® MPI Library is installed and functioning, complete a general testing,compile and run a test program.To test the installation:1.Verify through the Computer Management that the smpd service is started. It calls the IntelMPI Process Manager.2.Verify that <installdir>\ia32\bin (<installdir>\em64t\bin for the Intel® 64architecture in the 64-bit mode) is in your path:> echo %PATH%You should see the correct path for each node you test.3.(SDK only) If you use Intel compilers, verify that the appropriate directories are included inthe PATH and LIB environment variables:> mpiexec.exe –hosts 2 host1 1 host2 1 a.batwhere a.bat containsecho %PATH%You should see the correct directories for these path variables for each node you test. If not,call the appropriate *vars.bat scripts. For example, with Intel® C++ Compiler 11.0 forWindows*OS for the Intel® 64 architecture in the 64-bit mode, use the Windows programmenu to select:Intel(R) Software Development Tools > Intel(R) C++ Compiler 11.0 >Build Environment forthe Intel® 64 architecture or from the command line%ProgramFiles%\Intel\Compiler\C++\11.0\em64t\bin\iclvars.bat3.2 Compiling and Running a Test ProgramThe install directory <installdir>\test contains test programs which you can use for testing.To compile one of them or your test program, do the following:1.(SDK only) Compile a test program as described in Section2.4 Compiling and Linking.2.If you are using InfiniBand* or other RDMA-capable network hardware and software, verifythat everything is functioning.3.Run the test program with all available configurations on your cluster.•Test the sock device using:> mpiexec.exe -n 2 -env I_MPI_DEBUG 2 –env I_MPI_DEVICE sock a.out You should see one line of output for each rank, as well as debug output indicating that the sock device is used.•Test the ssm devices using:> mpiexec.exe -n 2 -env I_MPI_DEBUG 2 –env I_MPI_DEVICE ssm a.out You should see one line of output for each rank, as well as debug output indicating that the ssm device is used.•Test any other fabric devices using:> mpiexec.exe –n 2 -env I_MPI_DEBUG 2 -env I_MPI_DEVICE <device>a.outwhere<device>can be shm, rdma, or rdssmFor each of the mpiexec commands used, you should see one line of output for each rank, as well as debug output indicating which device was used. The device(s) should agree with theI_MPI_DEVICE setting.4 Next StepsTo get more information about the Intel® MPI Library, explore the following resources:The Intel® MPI Library Release Notes include key product details. See the Intel® MPI LibraryRelease Notes for updated information on requirements, technical support, and known limitations.Use the Windows program menu to select Intel(R) Software Development Tools > Intel(R) MPILibrary > Intel(R) MPI Library for Windows* OS Release Notes.For more information see Websites:Product Web SiteIntel® MPI Library SupportIntel® Cluster Tools ProductsIntel® Software Development Products。
IBM System Storage N series Windows 主机实用程序 6.0 快速参
Service management commandsfcp {start|stop}iscsi {start|stop}Starts or stops the Fibre Channel or iSCSI service.fcp show initiatoriscsi initiator show Displays information about initiators connected to the target.fcp show cfmode Displays the cfmode value for FC connections. The single_image setting is required.Target and session management commandsiscsi interface Manages network interfaces used for iSCSI traffic. fcp config Manages Fibre Channel interfaces.iscsi session show [-v][session_num]Show status of one session or for all sessions if no session number is specified.iscsi tpgroup create [-f][-t tpgtag] tpgroup_name [interface …] Create user-defined target portal group. Needed for iSCSI multiple connections per session. All connections for a session must use interfaces in the same target portal group.portset create –f name stor_sys:port Creates a port set. Add the port set to an igroup to limit which FC ports can be used to access LUNs mapped to that igroup.iSCSI authentication (CHAP) management commandsiscsi security add -i initiator -s CHAP -p inpassword -n inname[-o outpassword -m outname]Defines authentication method for specified initiator. For initiator, use node name in iqn format. Note that inname on storage system is set to outgoing user name on host. Use -o and -m for mutual CHAP. The inpassword and outpassword cannot be the same.iscsi security default -s CHAP -p inpassword -n inname [-o outpassword -m outname] Sets the default authentication method, user names, and passwords for all initiators not specifically configured.Target status, performance, and troubleshooting commands{fcp|iscsi} status Displays current status of the Fibre Channel or iSCSI service. {fcp|iscsi} stats Displays performance statistics for the protocol.ifstat [-z] –a |interface Displays device-level statistics for the specified network interface. Use -z to clear statistics. Use -a to display statistics for all interfaces.sysstat {–i|-f}[interval]Displays iSCSI (-i) or Fibre Channel (-f) performance statistics.interval is integer reporting interval in seconds; default is 15 seconds. lun stats [-z][-o][-a|lun_path]Displays block access statistics for the specified LUN. Use -z to clearstatistics. Use -o for extended stats, -a to display stats for all LUNs. LUN and igroup management commandslun setup Interactive LUN creation. Combines the lun create, igroup create, igroup add, and lun map command functions.lun create -s size -t type lun_path Manual LUN creation. Enter size as an integer with one of the following suffixes: m (megabytes), g (gigabytes), or t (terabytes).Enter type as windows (MBR disk for Windows 2003, XP, or Vista), windows_gpt (GPT disk for Windows 2003), hyper_v (Data ONTAP 7.3.1 and later LUNs containing VHDs), windows_2008 (all other Windows 2008 disks). See Installation and Setup Guide for details.igroup create {-i|-f} -t windows [-a portset]initiator_group[node…]Creates a new iSCSI (-i) or Fibre Channel (-f) initiator group. Specify the initiator WWPNs or iSCSI node name. Use the optional port set to limit which FC ports access LUNs mapped to this igroup.igroup show [initiator_group]Displays the initiator nodes in the specified initiator group. Omit initiator_group to see all igroups.lun map lun_path initiator_group[lun_id]Makes the specified LUN accessible to initiators in the specified igroup. Specify optional LUN ID, or take default of lowest available value. You can map a LUN to more than one igroup (for example to enable FC and iSCSI access to the same LUN).lun show [-v|-m|-c] [all|mapped|offline| online|unmapped|lun_path|-g initiator_group] Displays general (-v), mapping (-m), or clone (-c) information about the specified set of LUNs.lun online | offline lun_path…Enables or disables block-protocol access to the specified LUNs.lun destroy [-f]lun_path…Destroys the specified LUNs and all their data. Use -f if LUN is in use. General notesThe FilerView® GUI (Data ONTAP 8.0 and earlier) or the System Manager software can also be used to manage your storage system. See the Data ONTAP System Administration Guide for your version of Data ONTAP software for more information.The format of an iSCSI node name is iqn.yyyy-mm.reverse_domain_name:anything and is automatically set on the storage system (target) and each host (initiator). You are advised to use the host name for the anything portion of the initiator node name.GC52-1294-04 NA 210-05243_A0Copyright © 1994—2011 Network Appliance, Inc. Portions copyright © 2006, 2011 IBM Corporation. All rights reserved.Setting required Windows registry valuesRun the Host Utilities installation program. After the Host Utilities are installed, you can use the Repair option of the installation program if you install a new HBA, remove a DSM, or make other configuration changes.Alternately, if Data ONTAP DSM for Windows MPIO is installed, run the Repair option of the DSM installation program.Microsoft iSCSI Initiator GUIStart > Control Panel > iSCSI InitiatorLaunches the Initiator GUI used to manage the iSCSI Initiator. iSCSI GUI tabsGeneral View or change node name and set CHAP password. Discovery Add storage systems and iSNS servers.TargetsLog on and configure targets (storage systems).Persistent Targets (Windows Server 2003) Favorite Targets (Windows Server 2008)Lists targets configured for automatic log on after host reboot. The actual configuration is done on the Targets tab.Bound Volumes/Devices (Windows Server 2003) Volumes and Devices (Windows Server 2008) View and create persistent bindings for applications that use iSCSI LUNs.RADIUSConfigure authorization using a RADIUS server. Requires Data ONTAP 8.0 or later.Displaying Fibre Channel world wide port names (WWPNs) for Windows Server 2008 Start > Administrative Tools > Storage ExplorerDisplays the WWPN and other information about each FC HBA in the Windows Server 2008 host.Displaying Fibre Channel world wide port names (WWPNs) for Windows Server 2003fcinfo /ports /details (from host console)Displays the WWPN and other information about each FC HBA in the Windows Server 2003 host. The fcinfo program is available for download from Microsoft.Accessing LUNs using the native Windows stackStart > Administrative Tools > Computer Management, then select Storage > Disk ManagementOpens the Disk Management tool. Note that LUNs appear in this tool only when the iSCSI session is active. Action > Rescan DisksIn Disk Management, discovers new LUNs.Accessing LUNs using Veritas Storage Foundation™Start > All Programs > Symantec > Veritas Storage Foundation > Veritas Enterprise Administrator Opens the Veritas Enterprise Administrator. Note that LUNs appear only when the FC/iSCSI session is active. Actions > RescanIn Veritas Enterprise Administrator, discovers new LUNs.Troubleshootingping storage_system_IP_address (from host console) ping host_IP_address (from storage system console) Verify basic network connectivity between storage system and host. license (from storage system console) Verify that FCP and iSCSI are licensed on the storage system. ifconfig -a (from storage system console) ipconfig /all (from host console) Verify that network parameters are compatible on host and storage system, especially duplex and jumbo frame (mtu) settings. If using Ethernet jumbo frames for iSCSI, verify that jumbo frames are configured on all switches between the host and storage system. Verify Fibre Channel switch zoning between HBAs and storage system. Each HBA port should be zoned to a port on both controllers. If using CHAP, verify correct user names and passwords. The incoming values on the host are the outgoing values on the storagesystem. The outgoing values on the storage system are the incoming values on the host. See the Microsoft iSCSI initiator release notes or online Help for the password rules; do not use hexadecimal passwords. Check the log file on the storage system (/etc/messages) for error messages. View IBM support information at /storage/support/nas.ResourcesIBM product information/storage/nasIBM N series interoperability matrix /systems/storage/network/interophome.html Contact IBM Support1-800-IBM-SERV。
磁盘阵列双控冗余技术windowsmpio手册
磁盘阵列双控冗余技术windowsmpio手册windows下mpio软件的安装1 说明mpio软件不是标准配置,需要用户额外购买,如果您已经购买了相应的软件,请参考此章进行安装调试。
MPIO(Mulitipath I/O)即通常所说的多路径,使用冗余的物理路径(双hba卡,或连接交换机)在服务器和存储设备间创建逻辑链路。
它的优点是假如一条链路或部件失效,可以切换到另外一条正常的链路,使应用程序可以不间断的运行。
本章会一步一步的说明如何在win2000/2003下安装/卸载MPIO驱动,而且会提供MPIO图形界面的详细说明。
2 安装windows下MPIO这一节将会一步一步的指导用户如何在系统中安装MPIO驱动(必须先连接好设备),如何在系统中添加新的设备,如何查看系统中在用的MPIO驱动的版本。
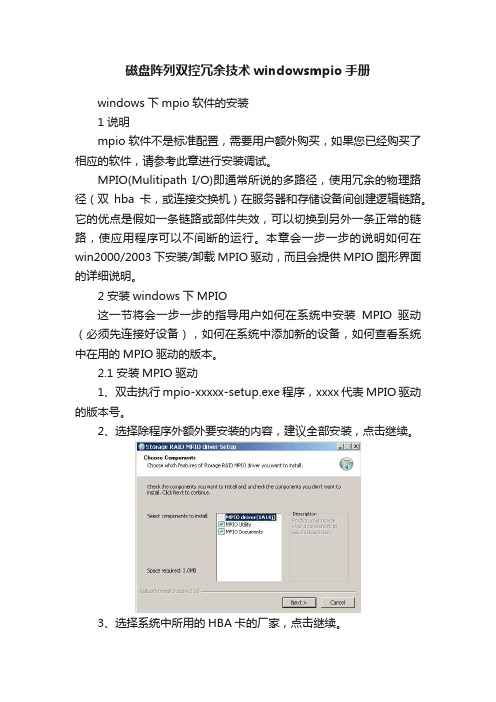
2.1 安装MPIO驱动1、双击执行mpio-xxxxx-setup.exe 程序,xxxx代表MPIO驱动的版本号。
2、选择除程序外额外要安装的内容,建议全部安装,点击继续。
3、选择系统中所用的HBA卡的厂家,点击继续。
4、选择安装路径,点击继续。
5、弹出对话框,提示用户需要关闭计算机管理程序才可以继续进行,关闭计算机管理窗口,点击继续。
6、弹出一个命令提示窗口显示安装过程,注意:安装时请不要关闭这个窗口。
7、点击继续安装MPIO驱动.对于win2000系统弹出如下提示框,点击继续。
8、命令提示窗口显示正在安装multi-path device driver。
9、安装结束,提示必须重启系统才能生效,点击重启系统。
10、点击计算机管理->设备管理器->SCSI和RAID控制器出现multi-path support 1.15 2003 或点击计算机管理->设备管理器->系统设备出现 StorageRAID Multi-Path Device Specific Module 1.15 xxxx 2003(xxxx代表MPIO驱动当前版本号),确认安装成功。
- 1、下载文档前请自行甄别文档内容的完整性,平台不提供额外的编辑、内容补充、找答案等附加服务。
- 2、"仅部分预览"的文档,不可在线预览部分如存在完整性等问题,可反馈申请退款(可完整预览的文档不适用该条件!)。
- 3、如文档侵犯您的权益,请联系客服反馈,我们会尽快为您处理(人工客服工作时间:9:00-18:30)。
Microsoft Multipath I/O (MPIO) User’s Guide for Windows Server 2012Bruce LangworthyMicrosoft CorporationPublished: July2012AbstractMicrosoft® Multipath I/O (MPIO) provides hardware and software vendors with a means of creating MPIO solutions that work effectively with the Windows Server® operating system to provide organizations with reliable multiple path support on Windows Server 2012. The MPIO solution provides support for Fibre Channel, Serial Attached SCSI, and Internet SCSI (iSCSI) storage, and also ensures that MPIO-based storage solutions from different storage partners can coexist on the same Windows Server host.Copyright InformationInformation in this document, including URL and other Internet Web site references, is subject to change without notice. Unless otherwise noted, the companies, organizations, products, domain names, e-mail addresses, logos, people, places, and events depicted in examples herein are fictitious. No association with any real company, organization, product, domain name, e-mail address, logo, person, place, or event is intended or should be inferred. Complying with all applicable copyright laws is the responsibility of the user. Without limiting the rights under copyright, no part of this document may be reproduced, stored in or introduced into a retrieval system, or transmitted in any form or by any means (electronic, mechanical, photocopying, recording, or otherwise), or for any purpose, without the express written permission of Microsoft Corporation.Microsoft may have patents, patent applications, trademarks, copyrights, or other intellectual property rights covering subject matter in this document. Except as expressly provided in any written license agreement from Microsoft, the furnishing of this document does not give you any license to these patents, trademarks, copyrights, or other intellectual property.© 2012 Microsoft Corporation. All rights reserved.Microsoft, Windows, and Windows Server are trademarks of the Microsoft group of companies.All other trademarks are property of their respective owners.ContentsWhat’s new in MPIO in Windows Server 2012 (5)PowerShell management and configuration (5)Heterogeneous HBA usage with MPIO (5)Support for MPIO with multiport-SAS enclosures (5)Understanding MPIO Features and Components (6)About MPIO (6)Multipath solutions in Windows Server 2012 (6)High availability solutions (6)Application availability through Failover Clustering (6)High availability through MPIO (6)Considerations for using MPIO in Windows Server 2012 (7)Upgrade and Deployment Requirements (7)Making MPIO-based solutions work (8)Device discovery and enumeration (8)Unique storage device identifier (9)Dynamic load balancing (9)Error handling, failover, and recovery (9)Differences in load-balancing technologies (10)Differences in failover technologies (10)Scenario 1: Using MPIO without Failover Clustering (10)Scenario 2: Combining the use of MPIO in fault tolerant mode with Failover Clustering (10)Scenario 3: Combining the use of MPIO in load-balancing mode with Failover Clustering (11)About the Windows storage stack and drivers (11)Storage stack and device drivers (11)Device drivers (12)Port drivers (12)Miniport drivers (12)Class drivers (12)Multipath bus drivers (mpio.sys) (13)DSM management (13)MPIO DSM (13)Device initialization (13)MPIO device discovery (13)Request handling (14)Error handling (14)Details about the Microsoft DSM in Windows Server 2012 (15)Determining whether to use the Microsoft DSM vs. a Vendor’s DSM (15)Installing and Configuring MPIO using the GUI (17)Install MPIO on Windows Server 2012 (17)MPIO configuration and DSM installation (17)Open the MPIO control panel (17)MPIO Properties dialog box (18)Claim iSCSI-attached devices for use with MPIO (19)Configure the load-balancing policy setting for a Virtual Disk (Aka LUN) (19)Configure the MPIO Failback policy setting (19)Installing and Managing MPIO using PowerShell: (21)Query the installation state of MPIO: (21)Enable or Disable the MPIO Feature: (21)Listing commands available in the MPIO module: (21)Obtaining additional PowerShell help and examples (22)Obtaining and updating help for PowerShell cmdlets (22)Script Example: Configuring MPIO using PowerShell: (23)Scripting the Configuration of MPIO Timer Values (24)Configuring MPIO Timers (24)Appendix A: MPCLAIM.EXE Usage examples (27)List the disks that are currently claimed by MPIO (27)Change the load-balancing policy settings (27)Examples of common MPCLAIM.exe commands used to configure MPIO (27)Capture the MPIO configuration with MPCLAIM.exe (29)Adding a Hardware ID for Use with MPIO and Viewing Hidden Devices (30)Determining the Hardware ID to Be Managed by MPIO (31)Appendix B: Path configuration requirements for MPIO (32)Appendix C: Enabling Software Tracing for MPIO (33)Create a GUID file to enable tracing (33)Start tracing (34)Stop tracing (34)Query the trace status (34)Appendix D: Glossary of Terms (35)Additional References: (36)What’s new in MPIO in Windows Server 2012The following changes to MPIO are available in Windows Server 2012:PowerShell management and configurationUtilizing the MPIO module in PowerShell, MPIO can be configured using PowerShell as an alternative to MPCLAIM.exe. See the section Installing and Managing MPIO using PowerShell: section of this document.Heterogeneous HBA usage with MPIOHeterogeneous, (That is different) HBA types can now be used together with non-boot Virtual Disks only. In prior releases of Windows Server, it was mandatory to use HBA’s of the same model. Support for MPIO with multiport-SAS enclosuresThe use of MPIO with Data volumes on a multiport-SAS enclosure is now supported.Page 5Understanding MPIO Features and ComponentsAbout MPIOMicrosoft Multipath I/O (MPIO) is a Microsoft-provided framework that allows storage providers to develop multipath solutions that contain the hardware-specific information needed to optimize connectivity with their storage arrays. These modules are called device-specific modules (DSMs). The concepts around DSMs are discussed later in this document.MPIO is protocol-independent and can be used with Fibre Channel, Internet SCSI (iSCSI), and Serial Attached SCSI (SAS) interfaces in Windows Server® 2008 and Windows Server 2012.Multipath solutions in Windows Server 2012When running on Windows Server 2012, an MPIO solution can be deployed in the following ways:∙ By using a DSM provided by a storage array manufacturer for Windows Server 2012 in a Fibre Channel, iSCSI, or SAS shared storage configuration.∙ By using the Microsoft DSM, which is a generic DSM provided for Windows Server 2012 in a Fibre Channel, iSCSI, or SAS shared storage configuration.NoteTo work with the Microsoft DSM, storage must be SCSI Primary Commands-3 (SPC-3)compliant.High availability solutionsKeeping mission-critical data continuously available has become a requirement over a wide range of customer segments from small business to datacenter environments. Enterprise environments that use Windows Server require no downtime for key workloads, including file server, database, messaging, and other line of business applications. This level of availability can be difficult and very costly to achieve, and it requires that redundancy be built in at multiple levels: storage redundancy, backups to separate recovery servers, server clustering, and redundancy of the physical path components.Application availability through Failover ClusteringClustering is the use of multiple servers, host bus adapters (HBAs), and storage devices that work together to provide users with high application availability. If a server experiences a hardware failure or is temporarily unavailable, end users are still able to transparently access data or applications on a redundant cluster node. In addition to providing redundancy at the server level, clustering can also be used as a tool to minimize the downtime required for patch management and hardware maintenance. Clustering solutions require software that enables transparent failover between systems. Failover Clustering [formerly known as Microsoft Cluster Server (MSCS)] is one such solution that is included with the Windows Server 2012 Enterprise and Windows Server 2012 Datacenter operating systems.High availability through MPIOMPIO allows Windows® to manage and efficiently use up to 32 paths between storage devices and the Windows host operating system. Although both MPIO and Failover Clustering result in high availability and improved performance, they are not equivalent concepts. While Failover Clustering provides high application availability and tolerance of server failure, MPIO provides fault tolerantPage 6connectivity to storage. By employing MPIO and Failover Clustering together as complimentary technologies, users are able to mitigate the risk of a system outage at both the hardware and application levels.NoteWhen using the Microsoft Internet SCSI (iSCSI) Software Initiator Boot, a maximum of 32 paths to the boot volume is supported.MPIO provides the logical facility for routing I/O over redundant hardware paths connecting server to storage. These redundant hardware paths are made up of components such as cabling, host bus adapters (HBAs), switches, storage controllers, and possibly even power. MPIO solutions logically manage these redundant connections so that I/O requests can be rerouted if a component along one path fails.As more and more data is consolidated on storage area networks (SANs), the potential loss of access to storage resources is unacceptable. To mitigate this risk, high availability solutions, such as MPIO, have now become a requirement.Considerations for using MPIO in Windows Server 2012Consider the following when using MPIO in Windows Server 2012:Upgrade and Deployment RequirementsIt is important to note that during Windows Upgrades with systems that are using MPIO, it is necessary to disconnect all but one data path during the upgrade, as MPIO is not available during Windows Setup.The recommenced steps for an upgrade are as follows:1.Disconnect all but one data path to the SAN that you are booting from.2.Perform the Windows upgrade.3.Install the Multipath I/O feature4.Reconnect the additional paths5.Verify MPIO settings, or reconfigure MPIO failover polices as desired.∙ When using the Microsoft DSM, storage that implements an Active/Active storage scheme but does not support ALUA will default to use the Round Robin load-balancing policy setting, although a different policy setting may be chosen later. Additionally, you can pre-configure MPIO so that when it detects a certain hardware ID, it defaults to a specific load-balancing policy setting.For more information about load-balancing policy settings, see Referencing MPCLAIM Examples. ∙ Windows multipathing solutions are required if you want to utilize the MPIO framework to be eligible to receive logo qualification for Windows Server. For additional information about Windows logo requirements, see Windows Quality Online Services (Winqual) (/fwlink/?LinkId=71551).This joint solution allows storage partners to design hardware solutions that are integrated with the Windows operating system. Compatibility with both the operating system and other partner provided storage devices is ensured through the Windows Logo program tests to help ensure proper storage device functionality. This ensures a highly available multipath solution by using MPIO, which offers supportability across Windows operating system implementations.Page 7Page 8To determine which DSM to use with your storage, refer to information from your hardware storage array manufacturer. Multipath solutions are supported as long as a DSM is implemented in line with logo requirements for MPIO. Most multipath solutions for Windows today use the MPIO architecture and a DSM provided by the storage array manufacturer. You can use the Microsoft DSM provided by Microsoft in Windows Server 2012 if it is also supported by the storage array manufacturer. Refer to your storage array manufacturer for information about which DSM to use with a given storage array, as well as the optimal configuration of it.Multipath software suites available from storage array manufacturers may provide an additional value-add beyond the implementation of the Microsoft DSM because the software typically provides auto-configuration, heuristics for specific storage arrays, statistical analysis, and integrated management. We recommend using the DSM provided by the hardware storage array manufacturer to achieve optimal performance because the storage array manufacturer can make more advanced path decisions in their DSM that are specific to their array, which may result in quicker path failover times.Making MPIO-based solutions workThe Windows operating system relies on the Plug and Play (PnP) Manager to dynamically detect and configure hardware (such as adapters or disks); including hardware used for high availability/high performance multipath solutions.You might be prompted to restart the computer after the MPIO feature is first installed.Device discovery and enumerationAn MPIO/Multipath driver cannot work effectively or efficiently until it discovers, enumerates, and configures different devices that the operating system sees through redundant adapters into a logical group. We will briefly outline in this section how MPIO works with DSM in discovering and configuring the devices.Without any multipath driver, the same devices through different physical paths would appear as totally different devices, thereby leaving room for data corruption. Figure 1 depicts this scenario.Figure 1Multipathing software and storage unit distinction NoteFollowing is the sequence of steps that the device driver stack walks through in discovering, enumerating, and grouping the physical devices and device paths into a logical set. (This assumes a scenario where a new device is presented to the server.)1. A new device arrives.2. The PnP manager detects the device’s arrival.3. The MPIO driver stack is notified of the device’s arrival (it takes further action if it is a supportedMPIO device).4. The MPIO driver stack creates a pseudo device for the physical device.5. The MPIO driver walks through all the available DSMs to determine which vendor-specific DSMcan claim the device. After a DSM claims a device, it is associated only with the DSM that claimed it.6. The MPIO driver, along with the DSM, verifies that the path to the device is connected, active,and ready for I/O.If a new path for this same device arrives, MPIO then works with the DSM to determine whether this device is the same as any other claimed device. It then groups this physical path for the same device into a logical set for the multipath group that is called a pseudo-Logical Unit Number (pseudo-LUN). Unique storage device identifierFor dynamic discovery to work correctly, some form of identifier must be identified and obtainable regardless of the path from the host to the storage device. Each logical unit must have a unique hardware identifier. The MPIO driver package does not use disk signatures placed in the data area of a disk for identification purposes by software. Instead, the Microsoft-provided generic DSM generates a unique identifier from the data that is provided by the storage hardware. MPIO also provides for optionally using a unique hardware identifier assigned by the device manufacturer. Dynamic load balancingLoad balancing, the redistribution of read/write requests for the purpose of maximizing throughput between server and storage device, is especially important in high workload settings or other settings where consistent service levels are critical. Without MPIO software, a server sending I/O requests down several paths may operate with very heavy workloads on some paths while others are underutilized.The MPIO software supports the ability to balance I/O workload without administrator intervention. MPIO determines which paths to a device are in an active state and can be used for load balancing. Each vendor’s load-balancing policy setting (which may use any of several algorithms, such as Round Robin, the path with the fewest outstanding commands, or a vendor unique algorithm) is set in the DSM. This policy setting determines how the I/O requests are actually routed.NoteIn addition to the support for load balancing provided by MPIO, the hardware used must support the ability to use multiple paths at the same time, rather than just fault tolerance. Error handling, failover, and recoveryThe MPIO driver, in combination with the DSM, supports end-to-end path failover. The process of detecting failed paths and recovering from the failure is automatic, usually fast, and completely transparent to the IT organization. The data ideally remains available at all times.Not all errors result in failover to a new path. Some errors are temporary and can be recovered by using a recovery routine in the DSM; if recovery is successful, MPIO is notified and path validity is checked to verify that it can be used again to transmit I/O requests.Page 9When a fatal error occurs, the path is invalidated and a new path is selected. The I/O is resubmitted on this new path without requiring the application layer to resubmit the data.Differences in load-balancing technologiesThere are two primary types of load-balancing technologies referred to within Windows. This document discusses only MPIO Load Balancing.∙ MPIO Load Balancing is a type of load balancing supported by MPIO that uses multiple data paths between server and storage to provide greater throughput of data than could be achieved with only one connection.∙ Network Load Balancing (NLB) is a failover cluster technology (formerly known as WLBS) that provides load balancing of network interfaces to provide greater throughput across a network to the server, and is most typically used with Internet Information Services (IIS).Differences in failover technologiesWhen addressing data path failover, such as the failover of host bus adapter (HBA) or iSCSI connections to storage, the following main types of failover are available:∙ MPIO-based fault tolerant failover in this scenario, multiple data paths to the storage are configured, and in the event that one path fails, HBA or the network adapter is able to fail over to the other path and resend any outstanding I/O.For a server that has one or more HBAs or network adapters, MPIO provides the following:∙ Support for redundant switch fabrics or connections from the switch to the storage array ∙ Protection against the failure of one of the adapters within the server directly∙ MPIO-based load balancing in this scenario, multiple paths to storage are also defined; however, the DSM is able to balance the data load to maximize throughput. This configuration can also employ Fault Tolerant behavior so that if one path fails, all data would follow an alternate path.In some hardware configurations you may have the ability to perform dynamic firmware updates on the storage controller, such that a complete outage is not required for firmware updates. This capability is hardware dependent and requires (at a minimum) that more than one storage controller be present on the storage so that data paths can be moved off of a storage controller for upgrades.∙ Failover Clustering This type of configuration offers resource failover at the application level from one cluster server node to another. This type of failover is more invasive than storage path failover because it requires client applications to reconnect after failover, and then resend data from the application layer. This method can be combined with MPIO-based fault tolerant failover and MPIO-based load balancing to further mitigate the risk of exposure to different types of hardware failures.Different behaviors are available depending on the type of failover technology used, and whether it is combined with a different type of failover or redundancy. Consider the following scenarios: Scenario 1: Using MPIO without Failover ClusteringThis scenario provides for either a fault tolerant connection to data, or a load-balanced connection to storage. Since this layer of fault tolerant operation protects only the connectivity between the server and storage, it does not provide protection against server failure.Scenario 2: Combining the use of MPIO in fault tolerant mode with Failover ClusteringThis configuration provides the following advantages:∙ If a path to the storage fails, MPIO can use an alternate path without requiring client application reconnection.Page 10∙ If an individual server experiences a critical event such as hardware failure, the application managed by Failover Clustering is failed over to another cluster node. While this scenario requires client reconnection, the time to restore the service may be much shorter than that required for replacing the failed hardware.Scenario 3: Combining the use of MPIO in load-balancing mode with Failover ClusteringThis scenario provides the same benefits as listed in Scenario 2, plus the following benefit:∙ During normal operation, multiple data paths may be employed to provide greater aggregate throughput than one path can provide.About the Windows storage stack and driversFor the operating system to correctly perform operations that relate to hardware, such as addition or removal of devices or transferring I/O requests from an application to a storage device, the correct device drivers must be associated with the device. All device-related functionality is initiated by the operating system, but under direct control of subroutines contained within each driver. These processes are considerably complicated when there are multiple paths to a device. The MPIO software prevents data corruption by ensuring correct handling of the driver associated with a single device that is visible to the operating system through multiple paths. Data corruption is likely to occur because when an operating system believes two separate paths lead to two separate storage volumes, it does not enforce any serialization or prevent any cache conflicts. Consider what would happen if a new NTFS file system tries to initialize its journal log twice on a single volume.Storage stack and device driversStorage architecture in Windows consists of a series of layered drivers, as shown in Figure 2. (Note that the application and the disk subsystem are not part of the storage layers.) When a device such as a storage disk is first added in, each layer of the hierarchy is responsible for making the disk functional (such as by adding partitions, volumes, and the file system). The stack layers below the broken line are collectively known as the device stack and deal directly with managing storage devices.Page 11Figure 2 Layered drivers in Windows storage architectureDevice driversDevice drivers manage specific hardware devices, such as a disks or tapes, on behalf of the operating system.Port driversPort drivers manage different types of transport, depending on the type of adapter (for example, USB, iSCSI, or Fibre Channel) in use. Historically, one of the most common port drivers in the Windows system was the SCSIport driver. In conjunction with the class driver, the port driver handles Plug and Play (PnP) and power functionality. Port drivers manage the connection between the device and the bus. Windows Server 2003 introduced a new port driver, StorPort, which is better suited to high-performance, high-reliability environments, and is typically more commonly used today than SCSIport.Miniport driversEach storage adapter has an associated device driver, known as a miniport. This driver implements only those rout ines necessary to interface with the storage adapter’s hardware. A miniport partners with a port driver to implement a complete layer in the storage stack, as shown in Figure 2.Class driversClass drivers manage a specific device type. They are responsible for presenting a unified disk interface to the layers above (for example, to control read/write behavior for a disk). The class driver manages the functionality of the device. Class drivers (like port and miniport drivers) are not a part of the MPIO driver package per se; however, the PnP disk class driver, disk.sys, is used as part of the multipathing solution because the class driver controls the disk add/removal process, and I/O requests pass through this driver to the MPIO bus driver. For more information, see the MPIO drivers sections that follow.Page 12The MPIO driver is implemented in the kernel mode of the operating system. It works in combination with the PnP Manager, the disk class driver, the port driver, the miniport driver, and a device-specific module (DSM) to provide full multipath functionality.Multipath bus drivers (mpio.sys)Bus drivers are responsible for managing the connection between the device and the host computer. The multipath bus driver provides a “software bus (also technically termed a “root bus”)”—the conceptual analog to an actual bus slot into which a device plugs. It acts as the parent bus for the multipath children (disk PDOs). As a root bus, mpio.sys can create new device objects that are not created by new hardware being added into the configuration. The MPIO bus driver also communicates with the rest of the operating system, and manages the PnP connection and power control between the hardware devices and the host computer, and uses WMI classes to allow storage array manufacturers to monitor and manage their storage and associated DSMs. For more information about WMI, see MPIO WMI Classes(/en-us/library/ff562468.aspx).DSM managementManagement and monitoring of the DSM can be done through the Windows Management Instrumentation (WMI) interface. In Windows Server 2012, MPIO can be configured by using the mpclaim.exe tool, and additionally includes the needed WMI code within the MPIO drivers.Note: The PowerShell module and MPIO UI can only be used for configuring the Microsoft DSM. When using a vendor-provided DSM, please refer to the vendor instructions for configuration steps with MPIO.MPIO DSMAs explained previously in this document, a storage array manufacturer’s device-specific module (DSM) incorporates knowledge of the manufacturer’s hardware. A DSM interacts with the MPIO driver. The DSM plays a crucial role in device initialization and I/O request handling, including I/O request error handling. These DSM actions are described further in the following sections.Device initializationMPIO allows for devices from different storage vendors to coexist, and be connected to the same Windows Server 2012-based system. This means that a single server running Windows Server can have multiple DSMs installed on it. When a new eligible device is detected via PnP, MPIO attempts to determine which DSM is appropriate to handle the device. MPIO contacts each DSM one at a time. The first DSM to claim ownership of the device is associated with that device and the remaining DSMs are not allowed a chance to press claims for that already claimed device. There is no particular order in which the DSMs are contacted, although the Microsoft DSM is always contacted last. If the DSM does support the device, it then indicates whether the device is a new installation, or is the same device previously installed but is now visible through a new path.MPIO device discoveryFigure 3 illustrates how devices and path discovery work with MPIO.Page 13。