Samsung Galaxy C7 SM-C7000(6.0.1)如何设置信息背景
Samsung Galaxy Tab S2 SM-T713(6.0.1)如何隐藏锁定屏幕通知内容

4.点击【在锁定屏幕上显示通知】。
5.点击【锁定屏幕上的内容】。
6.选择【隐藏内容】。
7.已隐藏锁定屏幕上通知内容。在屏幕锁定的情况下,应用程序通知内容将不会直接显示在屏幕上。(注:这里以微信通知为例介
绍,该功能需要网络连接。)
相关型号信息
SM-T713NZDECHN
相关内容
Samsung Galaxy Tab S2 SM-T713(6.0.1)如何使用滤镜效果? Samsung Galaxy Tab S2 SM-T713(6.0.1)在相机中如何设置音量键功能? Samsung1)如何开启轻松静音功能? Samsung Galaxy Tab S2 SM-T713(6.0.1)如何将全屏模式转为弹出式窗口?
Samsung Galaxy Tab S2 SM-T713(6.0.1)如何隐藏锁定屏幕通 知内容 ?
Last Update date : 2016.06.30
若想隐藏在锁定屏幕上显示的通知内容,保护您的隐私,请按以下步骤操作:
1.在待机页面下,点击【应用程序】。
2.点击【设置】。
3.向上滑动左侧屏幕,点击【锁定屏幕与安全】。
Samsung Galaxy Win如何设置电子邮件账户(I8558)
Last Update date : 2013.12.25
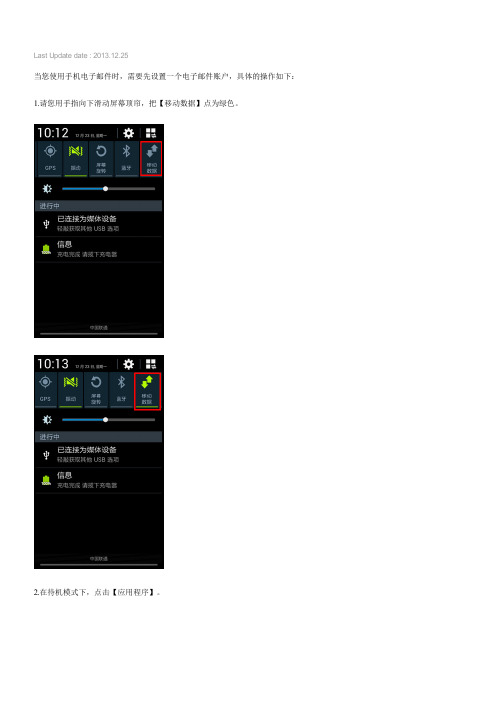
当您使用手机电子邮件时,需要先设置一个电子邮件账户,具体的操作如下:1.请您用手指向下滑动屏幕顶帘,把【移动数据】点为绿色。
2.在待机模式下,点击【应用程序】。
3.点击【电子邮件】。
4.选择需要设置的电子邮箱,这里以“sina”为例。
5.输入您的电子邮箱地址和密码,然后点击【下一步】。
6.根据您的需要设置账户选项,再点击【下一步】。
7.点击【完成】。
完成以上步骤后,邮箱就设置成功了,邮件将自动接收至【收件箱】中。
更多内容
Samsung Galaxy Win如何使用多窗口显示功能?(I8558) Samsung Galaxy Win如何解决黑屏过快的问题?(I8558) Samsung Galaxy Win通话时靠近屏幕会自动黑屏,如何解决?(I8558) Samsung Galaxy Win如何使用翻转静音功能?(I8558)
Samsung Galaxy Win如何移除账户?(I8558)
相关型号信息
GT-I8558。
三星话筒设置方法
三星话筒设置方法三星的话筒设置方法因不同型号而异,我将以三星Galaxy手机为例,详细介绍其话筒设置方法。
请注意,以下步骤仅适用于安卓系统。
1. 打开设置:在主屏幕或应用抽屉中找到设置图标(通常是一个齿轮状图标),然后点击打开。
2. 进入声音设置:在设置界面中,向下滑动直到找到"声音"或"声音和振动"选项,然后点击打开。
3. 调整通知声音:在声音设置界面中,您会看到各种调整声音的选项。
其中,最重要的是"通知声音"。
点击进入该选项。
4. 设置默认铃声:在通知声音设置界面中,您将看到所有可用的铃声列表。
您可以选择其中一个铃声作为默认的通知铃声,也可以点击右侧的"+"号添加新的铃声。
选择您喜欢的铃声后,点击保存。
5. 控制振动:在通知声音设置界面中,您还可以调整振动的设置。
您可以选择让手机在收到通知时振动,也可以将振动设置为关闭。
根据个人喜好,选择适合自己的振动设置。
6. 调整媒体音量:除了通知声音外,您还可以在声音设置界面中找到"媒体音量"选项。
点击进入该选项,然后通过滑动滑块或使用音量键调整媒体音量的大小。
7. 设置闹钟:在声音设置界面中,您还可以找到"闹钟铃声"选项。
点击进入该选项,然后从可用的铃声列表中选择一个闹钟铃声。
此外,您还可以设置闹钟的音量大小和振动模式。
8. 调整通话音量:在声音设置界面中,您还可以找到"通话音量"选项。
点击进入该选项,然后通过滑动滑块或使用音量键调整通话音量的大小。
9. 设置无声模式:在声音设置界面中,您还可以找到"静音模式"选项。
点击进入该选项,然后选择是否将手机设置为无声模式。
在无声模式下,您将不会收到来电、短信和通知的声音和振动。
10. 自定义通知铃声:在声音设置界面中,您可以继续向下滑动,找到"高级设置"或"更多设置"选项。
三星手机怎么改pin码
三星手机怎么改pin码手机有好几种密码。
一种是服务密码,默认一般是是6位,“000000”或手机尾号后6位,登录服务商网站查询个人情况时使用;一种是sim卡锁卡密码(pin码和puk码),默认一般是8位,防止手机丢失,造成话费损失时使用;还有就是锁屏密码(也叫pin码),防止外人偷看手机屏幕内容。
等等。
首先要弄清楚手机要的是什么密码,然后才能对症下药。
SIM卡的pin码输错3次SIM卡就会被锁,只能再输入PUK码才能解锁,PUK码输错10次,SIM卡就锁死了,只能到服务商那里重做新卡了。
手机SIM卡的这个设置主要是对个人移动通信业务的保护,防止SIM卡被别人盗用,产生高额费用,给用户造成不必要的损失。
想要知道自己的PIN码和PUK码,可以用手机号和服务密码登录中国移动网站,自动进入个人客户网页。
然后找到“我的移动--全部分类(把鼠标放在上面即可)--其它功能--SIM卡信息查询”,在这里面即可看到自己手机的PIN1/PIN2/PUK1/PUK2码。
如果是电信卡(号),可以用手机号、密码登录中国电信官网,找到“消费者帮助中心(在屏幕右上角)--便民服务--便民服务--实PUK码查询--在框中输入手机号即可显示PUK码”一般是两个,第一个是PUK1码,第二个是PUK2码。
现在好多SIM卡在大卡的上面就有PUK码。
另外,电子产品有多个需要设置PIN密码才能保护个人信息的通道。
解锁PIN一般有两个:一是SIM卡的解锁PIN码,这个是防止SIM卡被盗,被其它人使用浪费你的手机费;二是解屏PIN,也是防止其它人随意进入你的手机桌面进行访问,以保护你的个人信息。
另外还有其它安全PIN,如恢复出厂设置PIN就是其中一种,它可以防止不经意地使手机恢复到出厂状态,使你的手机个人信息丢失,所以当你要恢复时提示你输入PIN码,以便起到警示作用。
这些码可以一样,也可以不一样,一般为了便于记忆,都设置为一样的。
设备默认PIN码一般为四位密码,默认为“0000”或“1234”或“1111”,为了防止恶意试探以获取访问权,设备设置输入次数(一般默认为3次),超过次数后设备即可锁定或要求输入PUK码(这是一个密级更高的码)。
C7000中文操作手册
2010年9月出版精 密 空 调 机 组© STULZ 公司,德国汉堡第57索引 C7000控制器操作手册微处理控制器目录1.系统介绍 (3)2.硬件组件 (4)2.1I/O 控制器(C7000 IOC) (4)2.2EDIO -数字输入/输出扩展板 (5)2.3EAIO -模拟量输入/输出扩展板 (6)2.4EEIO - EEV扩展板 (7)2.5EBUS- RS485总线的扩展板 (8)2.5.1板卡设计 (8)2.5.2分配- EBUS (8)2.6C7000超级型控制器 – 终端(C7000 AT) (9)2.7驱动模块 (10)3.操作界面 (11)3.1操作元件- C7000 IOC (11)3.2操作元件 - C7000 超级型控制器 (12)4.启动控制器 (13)5.信息菜单 (17)5.1信息命令 - C7000 (17)6.配置 (23)6.1加载新软件 (24)6.2控制命令 - C7000 (25)6.3赋值 (26)6.4组件 (32)6.4.1标准型制冷回路 (32)6.4.2制冷回路、可选组件 (35)6.4.3冷却水回路、内部组件 (37)6.4.4冷却水回路、外部组件 (41)6.4.5空气回路、内部标准组件 (44)6.4.6空气回路、内部可选组件 (50)6.4.7空气回路、外部可选组件 (53)6.4.8传感器 (53)6.4.9辅助端口 (55)6.5统计数据 (56)7.特殊运行模式 (58)7.1周程序 (58)7.2区域控制 (59)7.2.1测序 (61)7.2.2CW待机管理 (62)7.2.3DFC控制区域 (62)7.3手动操作 (65)7.4UPS运行 (65)7.5夏季/冬季运行 (66)7.6差压控制 (67)7.7CW2机组 – 水回路切换 (68)7.8ECO-Cool通风口自然制冷 (69)8.总线通讯 (74)8.1C7000控制器的系统架构 (74)8.2C7000超级型控制器系统构架 (75)8.3总线布置 (76)9.默认配置 (82)9.1预配置 (92)10.报警处理 (93)10.1报警显示 (93)10.2报警配置 (93)10.3报警充值 (93)10.4报警内容 (95)10.5发生硬件错误时的报警内容 (96)4个插座用于 EDIOs/ EAIOs/ EEIOOK-LED 指示灯 TX1-LED 指示灯 RX1-LED 指示灯 Error-LED 指示灯O-总线的总线驱动模块详细信息请参见第10页维修端口 RS232总线地址的DIP 开关 EBUS 扩展板卡的插头维修端口 RS232绿色LED 指示灯代表数字输入1-11 红色LED 指示灯代 表数字输出1-7红色LED指示灯代表数字输出8-13绿色LED指示灯代表第一块EDIO板卡的数字输入12-19EDIO板卡是用于数字输入/输出扩展板。
三星Xchange for Samsung 统一通信管理器用户手册说明书
Unified Communicator – User Guide Version 2.4ContentsIntroduction (3)Welcome to Unified Communicator (3)Apple Basics/Glossary (3)Getting Started - Installation & Configuration (4)Pre-requisites & Server Configuration (4)Xchange Server Configuration (4)Provisioning (4)GSM (4)Client Installation (4)Client Configuration (4)Welcome Screen & Server Configuration Menu (5)Dial Through settings (6)A Quick Tour (7)Presence Icons (7)Presence Screen (7)Making Calls (8)Make calls from Unified Communicator (8)Using Dial Through dialing (9)Using Dial Direct (DDI/DID) dialing (9)Receiving Calls (9)Availability Status (10)Using Deskphone Mode (10)Searching the Address Book (12)Using the Call History (12)Features Connectivity Requirements (13)Feature Configuration Dependencies (13)IntroductionWelcome to Unified CommunicatorUnified Communicator is an application for Apple mobile devices that extends the power of your Samsung telephone system to your mobile device.Apple Basics/GlossaryNew to iOS or UC? Here are a few of the basic operations and features explained.Tap Hold DragTouch the mobile device’s screen in the area of interest for a second or two until the expected action occurs.Touch the mobile device’s screen briefly in the area of interest. While touching the mobile device’sscreen, move your finger in thedirection you want the screen or iconto scroll or move. Home ButtonDouble Press - Pressing the home button twice will bring up the multitasking bar where you can access apps and settings; it provides another option to re-open Unified Communicator if it runs in the background.App StoreThis is from where you can download the Unified Communicator onto your mobile device. It can be accessed via a web browser or through the app which is usually already installed by default on your iOS mobile device.Mobex (Mobile Extension)This is the term used where a user has a virtual extension number which, when dialed, rings the user’s mobile phone. It is often grouped (or twinned) with a standard deskphone such that when the deskphone rings the mobile phone also rings. This functionality can often be configured in different ways and the features described in this document may have a dependency on this configuration. In some instances the deskphone extension is also the virtual extension.ExtensionsXchange can display a complete list of extensions that you can choose to contact a specificExtensions are the telephone lines and physical devices that calls are made and received on; they tend not to move and are represented in Xchange by circle icons that look like these -.Getting Started - Installation & ConfigurationPre-requisites & Server ConfigurationXchange Server ConfigurationPlease refer to the Xchange Server Installation Guide for pre-requisites and setup information relating to Unified Communicator.ProvisioningUnified Communicator user configurations can be pre-configured on the server so that the end user need only enter the IP address of the Xchange server after installing the app on the phone. The server recognizes the user’s mobile device and automatically provisions user parameters. Note: manual set up is also available – see Xchange Server Installation Guide for more details.GSMUnified Communicator uses the dialer presented by the iOS (normally a GSM dialer) on your mobile device to make and receive calls – it does not install an IP phone.Client InstallationUnified Communicator can be downloaded from the App Store. The easiestway to find it is to search for “Unified Communicator”. Installation from hereon is simple; just click on Free App -> Install App , you will then be asked toenter your Apple ID and password. Once the credentials have been accepted,UC app will be automatically downloaded and installed on your mobile device.Client ConfigurationBefore you can get started making calls with Unified Communicator, you need toconfigure the client, so launch the app by tapping the shortcut that has been placed inyour iPhone® Applications menu.Note: Unified Communicator requires Xchange server 2.3.15or later. Compatible iOS Versions: iOS 5.0 or later (note: iPad 1 is not supported).Welcome Screen & Server Configuration MenuWhen Unified Communicator opens for the first time, you will be presented withthe Welcome screen. Tap the text box, then enter your Xchange Server’s IPaddress (note: if your administrator has given you a TCP port number then youshould add you this to the IP address separated by a colon (:) e.g.192.155.123.1:12345). Tap the Next button once the details are entered and thenUnified Communicator will check to see if your system administrator haspreconfigured your settings.If they have preconfigured your settings, the UC app shouldsuccessful connect to the server and take you straight toyour client menu, (you can skip the rest of this section too).If your settings have not been preconfigured, you will see a screen giving you twooptions. Tapping Refresh will cause Unified Communicator to check again foryour preconfigured settings; use this if you have contacted your systemadministrator asking them to setup your settings. To configure UnifiedCommunicator yourself, tap Manual setup to open the Settings menu.In the Settings menu you can access the first group of settings we need to configure. Tap on the options in the Connection section to enter the following details:Server address: The details you entered on the Welcome screen should already be in place here. If not, enter the IP address of your Xchange server. To use a specific port number, append it to the IP address using a colon e.g. 192.0.2.1:12345. You must append TCP port 21051 (default), orthe port number provided by your administrator, to the public IP address asexplained above.Deskphone extension: Enter the extension number that represents yourdeskphone on the phone system. This may be the same as your mobile extension.Mobile extension: Enter the extension number that represents your mobiledevice on the phone system. This may be the same as your deskphone extensionbut is more often a different virtual extension number. This can be left blank if thedevice is only used in deskphone mode.Tap on the options in the Login section to enter the following detailsUsername: Enter the username given to you by your administrator. This should match the username which is set up in your Xchange Server user settings.Password: The password you need to enter here is your Xchange Server User password that is set in your User record in Xchange Server.Click on your device’s “Done” button to save your settings and return to the main menu. At this point Unified Communicator is configured to connect to and communicate with Xchange Server but you also need to configure the Dial Through settings to make full use of Unified Communicator.Preconfigured SettingsIf your mobile client settings have been preconfigured by your System Administrator then the login options will be greyed out and unavailable for editing.Switch to another ServerTo change the server your mobile device is registered with, click on the option which displays your current Xchange Server’s IP Address, replace it for the new Xchange Server IP Address. If your mobile client settings have been previously pre-configured on the new server then your client will automatically refresh the login and configuration settings and connect to the new server. If however, your device hasn’t been previously preconfigured you will have to follow the steps mentioned in the Welcome Screen & Server Configuration Menu section for the manual configuration.Dial Through settingsUnified Communicator can use the Dial Through (also known as Direct InwardSystem Access –DISA) or Auto Attendant configuration capability of thetelephone system to allow the UC user dial extension numbers or any externalnumbers from their mobile phones via their office telephone system.Always Dial Through:When dialing an external number, the mobile phone usercan decide whether to dial an external number directly through GSM or via theSamsung telephone system. The preferred method of dialing out is controlledby toggle button (slide your finger across the slider button to turn it ON or OFF).Tap on each option in the Dial Through Settings section and enter the followingdetails:Dial Through number: Enter the pilot number for your DISA / Auto-attendant system. Enter the entire DDI/DID number to dial; entering only the last half of the DDI/DID number will not work.Pause character: Enter the character used by your telephone system to indicate a pause e.g., (a comma).Trunk access: Enter the code used by your telephone system’s Dial Through to access an outside line e.g.9 is common.External number length : Enter the number of digits an external telephone number would be expected to have i.e. a telephone number with fewer digits than the value entered here will be considered an internal number by Unified Communicator.Fast Dial : Enabling Fast Dial will significantly reduce the connection times that are normally associated with Dial Through dialing; this feature requires Wi-Fi/3G or better (slide your finger across the toggle button to turn it ON or OFF).Click your device’s “Done” button to save your settings and go back to the previous menu. At this point Unified Communicator is configured to connect to and communicate with Xchange Server as well as make and receive Dial Through calls.A Quick TourPresence IconsThe Presence icons indicate the call status and availability of you and your co-workers.Presence Screen The Presencescreendisplaysthelist of extensions that has been downloadedfrom the telephone server. The list can be split into departments as they arestored on Xchange Server. Groups can be expanded and contracted by simplytapping on them.You can create a group of Favorites by holding and tapping on the user andselecting ‘Add to favorites ’. If the user already exists in the group you can alwaysremove it by holding and tapping on the ‘Removefrom favorites’ option. Favorites group will always bedisplayed at the top of the Presence Screen. (Adding orremoving users from the Favorites does not affect thecontent of the other groups).No callRinging Offline Do not disturbDirectory ScreenYou can search the Xchange shared directory on your mobile device from this screen. Type in your search terms, tap the Search button () and tap to dial the number.Call History ScreenThis screen lists the calls received with Unified Communicator by the user. Tapping on any of the entries gives you the call options. Note: this feature requires WiFi/3G data connection or better. See section using the Call History chapter for full details.Making CallsMake calls from Unified CommunicatorIf you see a number in the Address Book or on the Presence Screen thatyou would like to call, just tap on it and the Actions menu will provide you with two options; 1. Call the number using Dial Through(Dial Through must be set-up, see Dial Trough settings above) or 2. Call using Dial Direct option (assuming that DDI/DID for the extension has been preconfigured on the Xchange Server). Tap on one of the preferred dialing methods and the call will be made.Note: Calls to internal numbers automatically goes using Dial Through.Using Dial Through dialingDial Through uses DISA or Auto-Attendant capability of the Samsung telephonesystem to route calls from your mobile device through the telephone system. Tosetup Dial Through, go to Dial Through Settings, enter the phone number specifiedby your Samsung telephone system administrator and turn onthe Always Dial Through option. Once this is setup, the UnifiedCommunicator mobile client will route calls through your officetelephone system. Please note that Unified Communicator willautomatically recognize numbers of a certain length as internalnumbers and will use the Dial Through option regardless of theAlways Dial Through setting (Assuming DISA or Auto-Attendantis set up the extension number dialed does not require a DID/DDI number to beassociated with it). Dependent upon the system configuration, Fast Dial canincrease the speed of the connection time when using Dial Through.Using Dial Direct (DDI/DID) dialingIf a DDI/DID number is associated with an extension, you can also dial the DDI/DID number directly by pressing Dial Direct (DDI/DID) instead of Dial Through. This option requires the DDI/DID number to be preconfigured against the extension on the Xchange Server. For more information please contact your Samsung Telephone System administrator.Receiving CallsWhen correctly licensed and configured, a Samsung telephone system can be set up to call both a user’s extension number and mobile phone simultaneously. This is known as twinning or mobile extension (Mobex for short).Sometimes it isn’t going to be approp riate for incoming calls to your office-based extension to be passed on to your mobile device e.g. You might be at your desk right next to your office extension so passing the call to your mobile device would be a little pointless.At times like this, you can block incoming calls from being passed on to your mobile device or you can reroute those calls to another extension or to an entirely different number.The Availability settings can be found by pressing your own Extension on the main menu.To block the incoming call, turn on the Do Not Disturb option which can be found also on the Availability screen.Availability StatusBy tapping on extension (e.g. 2323 Mike Jefferson) you will be presented withthe Availability screen where you can configure your individual settings:Do Not Disturb (slide your finger across the toggle button to turn it ON or OFF).Forward Calls (slide your finger across the toggle button to turn it ON or OFF –if this is the first time you use this option you will have to provide Destinationphone number to whom you would like to forward your calls).Status allows you to change your current availability toAvailable, Busy or Out of the Office.Also the Absencemessage option allows you to provide more information toyour colleagues at work.Using Deskphone ModeSometimes it would be really useful if your deskphone had a dedicatedtouchscreen that not only controlled your deskphone but linked to yourcontact information as well so that you could look up contacts and dial themwith a single tap. Well, putting Unified Communicator into Deskphone modeenables it to control an adjacent device e.g. your deskphone. So it is like yourmobile device has been turned into a detached touchscreen for yourdeskphone that can access the shared Xchange directory and pass data from itto your deskphone.W hat this means is that you won’t actually be making Dial Through callsthrough your mobile device but using your device to select which number tocall on your deskphone.For example, you could use Unified Communicator on your mobile phone tosearch for contacts but use your deskphone to actually make the call i.e. use the convenience of the mobile device to search for a number and the tariff rate of the deskphone. Deskphone mode will force any call made from Unified Communicator to call from your deskphone.Also, with tablet devices replacing PCs for many day-to-day tasks in many office workplaces around the world, running unified communicator in Deskphone mode on your tablet allows you to make calls from your deskphone in the same way you would use Xchange Client on your PC (bringing all the advantages of click to dial to your tablet device).Of course, calls to your mobile number will still come through as normal and all of the other functions and features of your mobile device will continue to work alongside deskphone mode.When you are in deskphone mode, the app looks the same as when it’s not in deskphone mode. The screens in Unified communicator all still work in the same way too so, when you tap on a Directory search result, a call is placed to that contact but it is made directly on your deskphone rather than through your mobile device.Enabling or Switching between Deskphone Mode and Mobile Mode by clicking thephone/house icon (shown below) located at the top of the main window andselecting the mode you require from the menu.As a mode of example you can see below the extensions associated to Mike Jefferson:Settings ScreenThis screen allows you to setup your Server IP Address with your mobile extensionand login credentials as well as preferences for your Presence Screen display like“Enhanced Presence”, group extensions by Departments b y simply sliding the “ONor OFF” button or sort the extensions either by Name or Number.Unified Communicator detects the Language of the iOS on your iPhone® if however,your language preferences differs from those set by the UC app you can easilychange them by selecting the pereferred language from t he ‘Language” list.The option “Clear Settings” will delete the current client configuration , pleaseconsult with your administrator before chosing this option.Searching the Address BookJust because you are out of the office doesn’t mean you are out of touchwith all of your office contacts anymore. Unified Communicator’s Address Book is not just the same as your office-based shared Address Book – it is your office-based shared Xchange Address Book.So when you enter all or part of a name or number into the search box and tap the Search button, Unified Communicator remotely searches the Xchange Address Book back in the office and delivers the search results direct to your mobile device.To call any of the numbers listed in the search results, simply tap on them. If there are more results than can fit on the screen simultaneously, drag the screen up to see more results.Using the Call HistoryThe Call History is your mobile device’s log ex cept that it only shows thecall activity made through Unified Communicator so it is ideal for times when you need a more narrow list of call activity than the log on your device.Callers with records in your shared Xchange directory are clearly identified by their name and you can see which direction the call was made in i.e. incoming or outgoing; the red arrow indicates incoming and the blue arrow indicates outgoing.To call any of the listed numbers, just tap on one.Scroll through the list by dragging the screen up if there are too many calls to see onscreen simultaneously.Note: this feature requires a Wi-Fi/3G data connection or better.Features Connectivity RequirementsWarning: Your mobile provider may charge you for data services used from your mobile deviceFeature Configuration DependenciesThe availability of certain features is dependent upon the configuration of the Samsung telephone system. These include:features may require additional licenses to be installed on the Samsung telephone system. Please check with your system maintainer。
Samsung Galaxy C7 SM-C7000(6.0.1)如何设置短信黑名单
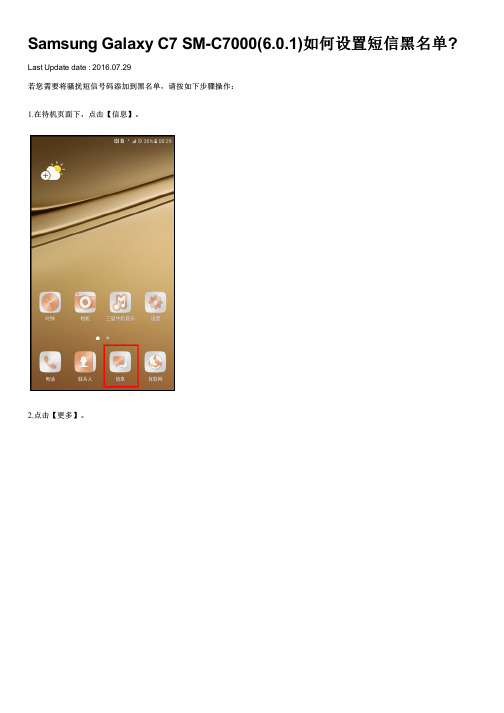
Samsung Galaxy C7 SM-C7000(6.0.1)如何设置短信黑名单? Last Update date : 2016.07.29
若您需要将骚扰短信号码添加到黑名单,请按如下步骤操作:
1.在待机页面下,点击【信息】。
2.点击【更多】。
3.点击【设置】。
4.点击【拦截信息】。
5.点击【黑名单】。
6. 点击右下角【+】图标。
7. 选择“手动添加"或“从联系人/通话记录添加”,这里以“手动添加”为例。
8.输入需要阻止的电话号码。
(注:您也可以点击【+】图标从【记录】或【联系人】中选择需要阻止的号码进行添加。
)
9.点击【匹配标准】选择要匹配的选项。
10.选择要匹配的类型,这里以【完全一样】为例。
11.点击【完成】。
12.此时该号码就添加成功了。
注:如果您想查看垃圾信息,依次点击【信息】
提示:短信黑名单和来电黑名单为通用列表,添加号码后,来电和信息均会被拦截。
相关型号信息。
三星c7000快速入门指南说明书
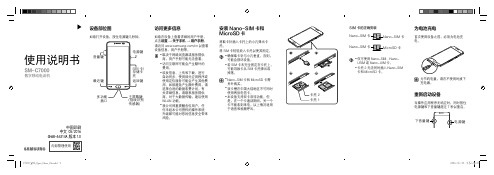
为电池充电为节约电量,请在不使用时拔下充电器。
重新启动设备当操作应用程序无响应时,同时按住电源键和下音量键超过 7 秒以重启。
ʾᮃ᧚᪄• 仅可使用 Nano-SIM、Nano-USIM 或 Nano-UIM 卡。
• 卡托 2 无法同时插入 Nano-SIM卡和 MicroSD 卡。
MicroSD 卡托。
• • 掉落。
• 另外购买。
•• 于语音和视频呼叫。
访问更多信息如欲在设备上查看详细的用户手册,点击设置 → 关于手机 → 用户手册。
请访问 /cn 以查看设备信息、用户手册等。
• 取决于网络浏览器或服务提供商,用户手册可能无法查看。
• 访问互联网可能会产生额外的费用。
• 收发信息、上传和下载、进行自动同步、使用部分应用程序或使用定位服务可能会产生其他费用。
如欲避免产生额外费用,请选择合适的数据收费计划。
有关详细信息,请联系服务提供商。
对于大数据传输,建议使用 WLAN 功能。
• 我公司郑重提醒各位用户,任何未经本公司授权的操作系统升级都可能对您的信息安全带来风险。
设备部位图如欲打开设备,按住电源键几秒钟。
ૉጯគѿ͜ਖ٨ଣ使用说明书SM-C7000数字移动电话机中国印刷中文 05/2016GH68-46314A 版本 1.0联系三星服务中心前,请先尝试以下解决办法联系三星服务中心前,请先仔细地阅读使用说明书,尝试以下解决方案。
某些情形可能不适用于您的设备。
如果尝试这些操作后,依然无法正常使用,请联系三星服务中心。
• 当操作应用程序无响应时,可能需要关闭应用程序并重启设备才能恢复正常。
如果问题依然存在,请进行出厂数据重置。
请注意,进行出厂数据重置时,最初购买本产品之后设备上存储的一切个人信息、包括购买并安装的应用程序都将被删除。
执行恢复出厂设定前,切记对存储在设备中的所有重要数据进行备份。
• 当使用耗电量大的应用程序或长时间在设备上使用应用程序,设备摸上去可能会感觉很热。
这属于正常情况,不会影响设备的使用寿命或性能。
Samsung电视用户操作手册说明书
ENGUSER MANUALThank you for purchasing this Samsung product.To receive more complete service, please register your product at Model Serial No.If you have any questions, please call us at 1-800-SAMSUNG (1-800-726-7864) for assistance.Figures and illustrations are provided for reference only and may differ from the actual product appearance.Product design and specifications may change without notice.© 2022 Samsung Electronics Co., Ltd. All rights reserved.Before Reading This UserManualThis TV comes with this User Manual and an embeddede-Manual ( > Menu > Settings > Support > Opene-Manual).On the website (), you can download themanuals and see its contents on your PC or mobile device.Warning! ImportantSafety InstructionsPlease read the Safety Instructions before using your TV.Refer to the table below for an explanation of symbols whichmay be on your Samsung product.CAUTIONRISK OF ELECTRIC SHOCK. DO NOT OPEN.CAUTION: TO REDUCE THE RISK OF ELECTRIC SHOCK,DO NOT REMOVE COVER (OR BACK). THERE ARENO USER SERVICEABLE PARTS INSIDE. REFER ALLSERVICING TO QUALIFIED PERSONNEL.This symbol indicates that high voltage ispresent inside. It is dangerous to make anykind of contact with any internal part ofthis product.This symbol indicates that this producthas included important literatureconcerning operation and maintenance.Class II product: This symbol indicatesthat a safety connection to electrical earth(ground) is not required. If this symbolis not present on a product with a powercord, the product MUST have a reliableconnection to protective earth (ground).AC voltage: Rated voltage marked withthis symbol is AC voltage.DC voltage: Rated voltage marked withthis symbol is DC voltage.Caution. Consult instructions for use: Thissymbol instructs the user to consult theuser manual for further safety relatedinformation.Power•Do not overload wall outlets, extension cords, or adaptorsbeyond their voltage and capacity. It may cause fire orelectric shock. Refer to the power specifications section ofthe manual and/or the power supply label on the productfor voltage and amperage information.•Power-supply cords should be placed so that they are notlikely to be walked on or pinched by items placed upon oragainst them. Pay particular attention to cords at the plugend, at wall outlets, and at the point where they exit fromthe appliance.•Never insert anything metallic into the open parts of thisapparatus. This may cause electric shock.•To avoid electric shock, never touch the inside of thisapparatus. Only a qualified technician should open thisapparatus.•Be sure to plug in the power cord until it is firmly seated.When unplugging the power cord from a wall outlet,always pull on the power cord's plug. Never unplug it bypulling on the power cord. Do not touch the power cordwith wet hands.•If this apparatus does not operate normally - in particular,if there are any unusual sounds or smells coming from it -unplug it immediately and contact an authorized dealer orSamsung service center.•To protect this apparatus from a lightning storm, or toleave it unattended and unused for a long time, be sure tounplug it from the wall outlet and disconnect the antennaor cable system.–Accumulated dust can cause an electric shock, anelectric leakage, or a fire by causing the power cord togenerate sparks and heat or by causing the insulationto deteriorate.•Use only a properly grounded plug and wall outlet.–An improper ground may cause electric shock orequipment damage. (Class l Equipment only.)•To turn off this apparatus completely, disconnect it fromthe wall outlet. To ensure you can unplug this apparatusquickly if necessary, make sure that the wall outlet andpower plug are readily accessible.Installation•Do not place this apparatus near or over a radiator or heat register, or where it is exposed to direct sunlight.•Do not place vessels (vases etc.) containing water on this apparatus, as this can result in a fire or electric shock.•Do not expose this apparatus to rain or moisture.•Be sure to contact an authorized Samsung service center for information if you intend to install your TV in a location with heavy dust, high or low temperatures, high humidity, chemical substances, or where it will operate 24 hours a day such as in an airport, a train station, etc. Failure to do so may lead to serious damage to your TV.•Do not expose this apparatus to dripping or splashing. Mounting the TV on a wallIf you mount this TV on a wall, followthe instructions exactly as set out by themanufacturer. If it is not correctly mounted,the TV may slide or fall and cause seriousinjury to a child or adult and serious damageto the TV.•To order the Samsung wall mount kit, contact Samsung service center at 1-800-SAMSUNG (1-800-726-7864).•Samsung Electronics is not responsible for any damage to the product or injury to yourself or others if you choose to install the wall mount on your own.•Samsung is not liable for product damage or personal injury when a non-VESA or non-specified wall mount is used or when the consumer fails to follow the product installation instructions.•You can install your wall mount on a solid wall perpendicular to the floor. Before attaching the wall mount to surfaces other than plaster board, contact your nearest dealer for additional information. If you install the TV on a ceiling or slanted wall, it may fall and result in severe personal injury.Safety PrecautionCaution: Pulling, pushing, or climbingon the TV may cause the TV to fall. Inparticular, ensure your children do nothang on or destabilize the TV. This actionmay cause the TV to tip over, causingserious injuries or death. Follow allsafety precautions provided in the SafetyFlyer included with your TV. For addedstability and safety, you can purchaseand install the anti-tip device, referringto "Preventing the TV from falling."WARNING: Never place a television set in anunstable location. The television set may fall,causing serious personal injury or death. Manyinjuries, particularly to children, can be avoidedby taking simple precautions such as:•Always use cabinets or stands or mounting methodsrecommended by Samsung.•Always use furniture that can safely support the televisionset.•Always ensure the television set is not overhanging theedge of the supporting furniture.•Always educate children about the dangers of climbingon furniture to reach the television set or its controls.•Always route cords and cables connected to yourtelevision so they cannot be tripped over, pulled orgrabbed.•Never place a television set in an unstable location.•Never place the television set on tall furniture (forexample, cupboards or bookcases) without anchoringboth the furniture and the television set to a suitablesupport.•Never place the television set on cloth or other materialsthat may be located between the television set andsupporting furniture.•Never place items that might tempt children to climb,such as toys and remote controls, on the top of thetelevision or furniture on which the television is placed.If the existing television set is going to be retained andrelocated, the same considerations as above should beapplied.•When you have to relocate or lift the TV for replacement orcleaning, be sure not to pull out the stand.•When installing a wall mount kit, we recommend youfasten all four VESA screws.•If you want to install a wall mount kit that attaches to thewall using two top screws only, be sure to use a Samsungwall mount kit that supports this type of installation. (Youmay not be able to purchase this type of wall mount kit,depending on the geographical region.)•Do not mount the TV at more than a 15 degree tilt.•Standard dimensions for wall mount kits are shown in thetable on the Quick Setup Guide.Do not install your wall mount kit while your TVis turned on. This may result in personal injuryfrom electric shock.•Do not use screws that are longer than the standarddimension or do not comply with the VESA standardscrew specifications. Screws that are too long may causedamage to the inside of the TV set.•For wall mounts that do not comply with the VESAstandard screw specifications, the length of the screwsmay differ depending on the wall mount specifications.•Do not fasten the screws too firmly. This may damage theproduct or cause the product to fall, leading to personalinjury. Samsung is not liable for these kinds of accidents.•Always have two people mount the TV onto a wall.–For 82 inch or larger models, have four people mountthe TV onto a wall.Providing proper ventilation for your TVWhen you install your TV, maintain a distance of at least4 inches (10 cm) between the TV and other objects (walls,cabinet sides, etc.) to ensure proper ventilation. Failing tomaintain proper ventilation may result in a fire or a problemwith the product caused by an increase in its internaltemperature.•When you install your TV with a stand or a wall mount, westrongly recommend you use parts provided by SamsungElectronics only. Using parts provided by anothermanufacturer may cause difficulties with the product orresult in injury caused by the product falling.Preventing the TV from fallingWall-anchor(not supplied)1. Using the appropriate screws, firmly fasten a set ofbrackets to the wall. Confirm that the screws are firmlyattached to the wall.–You may need additional material such as wall anchorsdepending on the type of wall.2. Using the appropriately sized screws, firmly fasten a set ofbrackets to the TV.–For the screw specifications, refer to the standardscrew part in the table on the Quick Setup Guide.3. Connect the brackets fixed to the TV and the bracketsfixed to the wall with a durable, heavy-duty string, andthen tie the string tightly.–Install the TV near the wall so that it does not fallbackwards.–Connect the string so that the brackets fixed to thewall are at the same height as or lower than thebrackets fixed to the TV.Contact SAMSUNG WORLD WIDECountry Samsung Service Center Web Site AddressU.S.A1-800-SAMSUNG (726-7864)/us/support Samsung Electronics America, Inc.85 Challenger Road Ridgefield Park, NJ 07660Accessibility contact information in U.S.A. : accessibility@If you experience issues, please do not take the TV back to the store.In the United States of America, call us at 1-800-SAMSUNG (1-800-726-7864) or visit us at or www.samsung. com/spsn for support and warranty service.-01–If your access point or modem has a standby mode button, use it to disconnect your home network from the Internet when it is not in use.•Use strong passwords for all your Internet accounts (Netflix, Facebook, etc.).•If any unexpected messages appear on your TV screen requesting permission to link a device or enable a remote session, do NOT accept.•Do not visit suspicious web sites and do not install any suspicious programs. We recommend that users install only those authorized apps provided by Samsung through Samsung Smart Hub.Operation•This apparatus uses batteries. In your community, there might be environmental regulations that require you to dispose of these batteries properly. Please contact your local authorities for disposal or recycling information. •Store the accessories (remote control, or etc.) in a location safely out of the reach of children.•Do not drop or strike the product. If the product is damaged, disconnect the power cord and contact a Samsung service center.•Do not dispose of remote control or batteries in a fire. •Do not short-circuit, disassemble, or overheat the batteries.•CAUTION : There is danger of an explosion if you replace the batteries used in the remote with the wrong type of battery. Replace only with the same or equivalent type. •WARNING - TO PREVENT THE SPREAD OF FIRE, KEEP CANDLES AND OTHER ITEMS WITH OPEN FLAMES AWAY FROM THIS PRODUCT AT ALL TIMES.Caring for the TV•To clean this apparatus, unplug the power cord from the wall outlet and wipe the product with a soft, dry cloth. Do not use any chemicals such as wax, benzene, alcohol, thinners, insecticide, air fresheners, lubricants, or detergents. These chemicals can damage the appearance of the TV or erase the printing on the product.•The exterior and screen of the TV can get scratched during cleaning. Be sure to wipe the exterior and screen carefully using a soft cloth to prevent scratches.•Do not spray water or any liquid directly onto the TV. Any liquid that goes into the product may cause a failure, fire, or electric shock.01 Initial SetupWhen you turn on your TV for the first time, it immediately starts the Initial Setup. Follow the instructions displayed on the screen and configure the TV's basic settings to suit your viewing environment.Using the TV ControllerYou can turn on the TV with the TV Controller button at the bottom of the TV, and then use the Control menu . The Control menu appears when the TV Controller button is pressed while the TV is On.•The screen may dim if the protective film on the SAMSUNG logo or the bottom of the TV is not removed. Please remove the protective film.Control menuTV Controller button / Remote control sensor / Microphone switchHow to turn on and off the MicrophoneType AOn Off Type BOn OffYou can turn on or off the microphone by using the switch at the bottom of the TV. If microphone is turned off, All voice and sound features using microphone are not available. •This function is supported only in Q7*B/Q8*B/QN8*B/QN9*B Series.•The position and shape of the microphone switch may differ depending on the model.•During analysis using data from the microphone, the data is not saved.Internet securitySamsung takes a number of steps to protect its Internet-compatible Smart TVs against unauthorized incursions and hacking. For example, certain sensitive communications between the TV and the Internet servers are encrypted. In addition, the TV’s operating system has adopted controls to prevent the installation of unauthorized applications.Although we take steps to protect your Smart TV and personal information, no Internet-connected device or transmission is completely secure. We therefore encourage you to take additional steps to safeguard your TV, secure your Internet connection, and minimize the risk of unauthorized access. These steps are listed below:•When Samsung releases software updates to improve the security of your TV, you should promptly install these updates. To automatically receive these updates, turn on Auto Update in the TV's menu (>Menu >Settings > Support > Software Update > Auto Update ). When an update is available, a popup message appears on the TV screen. Accept the software download and update by selecting Yes when prompted. Take steps to secure your wireless access point and network. Your access point's manual should provide additional details about how to implement the following measures: –Secure your wireless access point's management settings with a unique password to prevent unauthorized changes to security related settings. –Implement standard encryption (e.g., WPA2 encryption) on your wireless access point to secure your wireless network signal.–Secure access to your wireless network with a hard-to-guess password.–Confirm your access point's firewall setting is enabled (if so equipped).–Make sure that all your Internet-connected devices are behind your network's firewall.02 Troubleshooting and MaintenanceTroubleshootingFor more information, refer to "Troubleshooting " or "FAQ " in the e-Manual. >Menu >Settings > Support > Open e-Manual >Troubleshooting or FAQIf none of the troubleshooting tips apply, please visit "" and click Support or contact the Samsung service center.•This TFT LED panel is made up of sub pixels which require sophisticated technology to produce. There may be, however, a few bright or dark pixels on the screen. These pixels will have no impact on the performance of the product.•To keep your TV in optimum condition, upgrade to the latest software. Use the Update Now or Auto Update functions on the TV's menu ( >Menu >Settings> Support > Software Update > Update Now or AutoUpdate ).The TV won’t turn on.•Make sure that the power cord is securely plugged in to the TV and the wall outlet.•Make sure that the wall outlet is working and the remote control sensor at the bottom of the TV is lit and glowing a solid red.•Try pressing the TV Controller button at the bottom of the TV to make sure that the problem is not with the remote control. If the TV turns on, refer to "The remote control does not work."03 Specifications and Other InformationSpecificationsDisplay Resolution3840 x 2160Sound (Output)Q6*B/Q7*B Series: 20 W Q8*B Series: 60 W (50": 40 W)QN85BA Series: 60 W QN85BD Series: 70 WQN90BA Series: 60 W (43": 20 W, 50": 40 W)QN90BD Series: 70 W (43": 20 W, 50": 40 W)Operating Temperature50 °F to 104 °F (10 °C to 40 °C)Operating Humidity10 % to 80 %, non-condensingStorage Temperature-4 °F to 113 °F (-20 °C to 45 °C)Storage Humidity5 % to 95 %, non-condensing Notes•This device is a Class B digital apparatus.•For information about the power supply, and more information about power consumption, refer to the information on the label attached to the product. –On most models, the label is attached to the back of the TV. (On some models, the label is inside the cover terminal.)•To connect a LAN cable, use a CAT 7 (*STP type) cable for the connection. (100/10 Mbps)* Shielded Twisted Pair•The images and specifications of the Quick Setup Guide may differ from the actual product.The remote control does not work.•Check if the remote control sensor at the bottom of the TV blinks when you press the button on the remotecontrol.–When the remote's battery is discharged, charge the battery using the USB charging port (C-type), or turn over the remote to expose the solar cell to light. •Try pointing the remote directly at the TV from 5 ft. to 6 ft. (1.5-1.8 m) away.•If your TV came with a Samsung Smart Remote (Bluetooth Remote), make sure to pair the remote to the TV. To pair a Samsung Smart Remote, press the andbuttonstogether for 3 seconds.Eco Sensor and screen brightnessEco Sensor adjusts the brightness of the TV automatically. This feature measures the light in your room and optimizes the brightness of the TV automatically to reduce power consumption. If you want to turn this off, go to >Menu>Settings > All Settings > General & Privacy > Power andEnergy Saving > Brightness Optimization .•The eco sensor is located at the bottom of the TV. Do not block the sensor with any object. This can decrease picture brightness.Decreasing power consumptionWhen you shut the TV off, it enters Standby mode. In Standby mode, it continues to draw a small amount of power. To decrease power consumption, unplug the power cord when you don't intend to use the TV for a long time.LicensesThe terms HDMI and HDMI High-Definition Multimedia Interface, and the HDMI Logo are trademarks or registered trademarks of HDMI Licensing Administrator, Inc. in the United States and other countries.。
三星账户的设置规则
三星账户的设置规则(原创版)目录1.三星账户的概念和作用2.三星账户的设置流程3.三星账户的设置规则详细说明4.三星账户设置的注意事项5.总结正文三星账户,是三星公司为其产品提供的一种便捷服务,用户可以通过账户实现对三星产品的管理和使用。
例如,用户可以通过三星账户同步手机数据、下载应用、查看购买记录等。
然而,要想使用三星账户,首先需要进行账户的设置。
下面,我们就来详细了解一下三星账户的设置规则。
一、三星账户的设置流程1.打开三星官网或者下载三星应用商店,选择“登录”选项。
2.点击“创建新账户”按钮,进入账户创建页面。
3.输入手机号或者邮箱,然后设置密码。
4.验证手机号或者邮箱,通常需要输入手机验证码或者邮件验证码。
5.填写个人信息,包括姓名、生日、性别等,然后点击“创建”按钮。
二、三星账户的设置规则详细说明1.账户名:通常为用户的手机号或者邮箱,具有唯一性。
2.密码:长度至少为 8 个字符,包含大小写字母、数字和特殊符号,具有较高的安全性。
3.验证手机号或者邮箱:为了保证账户的安全性,三星要求用户进行手机号或者邮箱的验证。
4.个人信息:三星要求用户填写真实的个人信息,以便于提供更精准的服务。
三、三星账户设置的注意事项1.账户名和密码一定要记牢,避免遗忘或者泄露。
2.验证手机号或者邮箱一定要及时完成,否则无法创建账户。
3.个人信息一定要真实有效,否则可能会影响使用三星账户的服务。
总的来说,三星账户的设置规则主要体现在账户名、密码、验证手机号或者邮箱以及个人信息的填写上。
安司密信使用指南
安司密信使⽤指南安司密信使⽤指南后台收不到消息通知?- 1)检查是否开启了密信应⽤内消息免打扰功能,⽐如收不到好友A的消息通知,进⼊密友界⾯,打开好友A的密友资料页⾯,关闭消息免打扰功能。
- 2)打开⼿机中的密信通知开关,并确保安司密信进程在后台运⾏不被关闭,具体⽅法是:苹果【iOS】依次打开“设置”—“通知”—“安司密信”,打开允许通知开关,并选择相应的通知类型。
⼩⽶【MIUI】依次打开“设置”—“通知和状态栏”—“通知管理”—“安司密信”,打开允许通知开关,并选择相应的通知类型。
三星依次打开“设定”—“应⽤程序管理器”—“安司密信”,勾选显⽰通知。
华为【Emotion】 Android6.0以下版本,打开“设置”—“受保护的后台应⽤”,打开安司密信后的开关; Android6.0及以上版本,依次打开“设置”—“应⽤管理”—“安司密信”,打开“通知”,选择允许通知,再打开“电池”,允许屏幕关闭后保持运⾏。
魅族【Flyme】依次打开“设置”—“应⽤管理”—“安司密信”—“权限管理”,打开通知栏消息开关;“设置”—“电量管理”—“耗电排⾏”—“安司密信”中待机运⾏权限设为允许待机运⾏。
OPPO【ColorOS】依次打开“设置”—“通知与状态栏”—“通知管理”—“安司密信”,选择允许通知;打开“设置”—“电池”,在耗电详情中找到安司密信,关闭后台冻结。
VIVO【Funtouch OS】将安司密信加⼊⽩名单列表,防⽌系统⾃带的“⼀键加速”杀掉进程1. 添加密友、群组- 点击App右上⾓'+'号,扫描⼆维码或者进⼊添加好友/发起群聊页⾯。
- 在界⾯最上⽅搜索框输⼊⼿机号,(群)密信号进⾏查找好友或者群组。
- 您也可以通过短信、微信、QQ邀请好友⼀起使⽤我们的产品。
2. 桌⾯版登录- 在官⽹下载适配您电脑的桌⾯版安司密信:微软Windows,苹果macOS或Linux(包含国产操作系统)。
三星手机短信图标划线

三星手机短信图标划线篇一:三星手机使用说明书(共1篇)篇一:三星手机使用说明三星手机使用说明1、删除屏幕上多余的应用图标:按住屏幕上多余的应用图标,屏幕右上角会出现“移除”选项,直接拖动多余图标到“移除”选项上,即可删除。
2、在“联系人”中查找相关人员拨打电话:点击屏幕上“联系人”图标,找到需要的联系人,点击电话后面的绿色话筒图标即可。
3、添加新“联系人”和编辑已有的“联系人”:点击屏幕上“联系人”图标,再点击右上角添加联系人图标,输入联系人姓名,电话等,再点击右上角储存即可。
点击屏幕上“联系人”图标,再点击需要修改的联系人,进入后,修改联系人姓名,电话等,再点击右上角储存即可。
4、查看手机通话记录:点击屏幕上“手机”图标,在最上面一行,有四个选项,第一个选项是“键盘”,功能是直接输入电话号码拨打电话,第二个选项是“记录”,功能是查看之前的通话记录,第三、四个选项没有实际用途。
5、编辑短信息:点击屏幕上“信息”图标,进入后点击屏幕右上角“编辑信息”图标,再点击右上角“联系人”图标,点击需要的联系人前的方框后,会出现“√”,再点击右上角完成,完成后会自动跳转到编辑短信状态,选择拼音输入短信内容,再选择右下角哪个号码发送即可。
6、转发短信息:点击屏幕上“信息”图标,点击想要转发的短信息,按住短信息内容,会出现多个选项,包括“删除”,“转发”等,点击转发,再点击右上角“联系人”图标,点击需要的联系人前的方框后,会出现“√”,再点击右上角完成,选择右下角哪个号码发送即可。
7、删除短信:点击屏幕上“短信”图标,按住想要删除的短信,出现“删除”等选项,点击删除即可。
8、更换主屏幕和锁定屏幕图片:按住屏幕的空白处,会出现“设置墙纸”选项,点击“设置墙纸”出现“主屏”、“锁定屏幕”和“主屏幕与锁定屏幕”三个选项。
如果主屏幕与锁定屏幕使用同一个图片,可选择“主屏幕与锁定屏幕”选项,如果主屏幕与锁定屏幕使用不同图片,分别选择“主屏”、“锁定屏幕”,操作方法一样,以设置“主屏”为例,点击“主屏”选项,可以设置“动态墙纸”,“墙纸”,“相册”等,选择图片后,点击下方“设置墙纸”或右上角完成即可。
三星安卓手机wifi设置教程(电信定制机)
三星安卓手机wifi设置教程(电信定制
机)
1.开wifi(废话)
2.进入手机设定页面,点击WLAN进入wifi设置页面
3.在wifi设置页面点击菜单键选择“高级设定”把其中的“使用WAG域名”
去掉。
然后再返回到设置页面并拉到页面最底端
4.点击“添加WLAN”,SSID就输入你的无线网的名称例如:TP-LINK_250332;
安全选择WPA/WPA2 PSK.然后点击保存;最后在返回wifi设置页面。
5.此时你可以看见你所添加的TP-LINK_250332,长按TP-LINK_250332选择
“修改网络配置“输入密码,点击保存,然后返回到wifi设置页面;
6.长按TP-LINK_250332选择“修改网络配置“(千万不要再输密码),勾选”
显示高级选项“,把页面往上拉动,代理设置选择无,IP设定选择静止,IP 地址:192.168.1.120(可以看你电脑上的IP设定),网关:192.168.1.1(这个地址路由器上有,就是你用电脑的浏览器进入路由器设置的地址),DNS1:
61.177.7.1(这个是我这边的DNS,每个地方不一样,看自己的电脑是多少);
以上都设置完成后,点击”储存“,然后返回到wifi设置页面
7.关机重启。
三星手机的查询设置大全
三星手机的查询设置大全1.在待机状态下点出拨号盘先输入*#06#,查看手机内存中的IMEI码,记住这个号码,然后输入*2767*3855#进行码片复位,手机会自动重启2.在待机状态下点出拨号盘。
输入*#1546792*#然后进入工程模式,用笔点击选择Preconfiguration这时会提示输入密码,输入:*#81230*#然后确认然后,不管本来是什么,把国家选择成china,Operator选择chinamobile或者是联通的选择chinaunicom然后确认,会提示要重置机器。
确认。
i900下载铃声的放置看到坛子里有些机友不知道如何设置短信铃声或来电铃声,特来介绍一下我的方法。
为了管理方便,我在卡上建立一个文件夹,名称为MyDocuments(一定要是这个名),然后把所有的铃声全部放在该文件夹。
再在设置里的声音和提醒选项就能进行铃声类型的选择,非常方便。
还一种就是把音乐文件直接放在卡的根目录下,也能方便选择,只是卡里文件看得有点乱。
指令详解*#1111#软件版本*#1234#固件版本(一般我们也称这个为软件版本)*#2222#硬件版本*#8377466#软、硬件版本*#8999*8378#测试模式*#4777*8665#GPRS设定*#8999*523#液晶屏亮度*#8999*377#错误日志*#8999*327#只读存储器菜单*#8999*667#调试模式*#92782#WAP连接下手机型号*#2255#通话记录*#232337#蓝牙设备地址*#5282837#JAVA版本*#0*#按1测试屏幕#*3888#蓝牙测试模式#*536963JAVA下载#*5737425#JAVA连接模式#*7222#GSM运行类型#*7252#GPRS运行类型#*7337#WAP复位#*2886#开/关自动应答#*2527#GPRS转换到(级别4,8,9,10)#*4263#耳机模式有效/无效#*7462#SIM卡状态#*5376#删除所有短信#*6837#官方软件版本#*2474#充电持续时间#*2834#声音通道(耳机) #*3282#数据有效/无效#*3476#EGSM有效/无效#*3676#格式化闪存自定义信息#*4760#GSM有效/无效#*7326#显示附件#*3273#EGPRS转换到(级别4,8,9,10)*2767*3855#=手机EEPROM总复位*2767*2878#=手机EEPROM当前个人设置复位*2767*927#=手机EEPROMWAP复位*2767*226372#=摄像头复位*2767*688#移动电视复*2767*86927#=中国WAP自动设置*2767*86667#=中国MMS自动设置*2767*8636245#=中国Email自动设置怎样判定电池冲饱电量?方法很简单.我的I908ZDHH5版本.用的三星D888的充电器,结果一直显示充电(因为JS那个充电器没有办法充电啦.所以才更换原来的D888电源)针对一直充电问题.我发现一个可以直接看到手机是否冲饱电量的方法:待机状态下.调出拨号键盘.输入*#0228#可以进入TestModeMonitorGSM――――――――――――――――――――――――――――――――――AntennaRSSI:-71[这个是信号衰减为-71dB] AntennaBar:4[这个是信号段,最好的为5]ServingCell:GSM[电话机模式为GSM的,如果是3G的也会显示为WCDMA的] ReadThermADC:66CurrentTemp:26.7[电池温度]Batt_Type:1440mAStand[该部分是电池的电流参数,标准电池的电流参数为1.44A的]BatteryBar:4[冲饱电压为5]ADC:112IPDA:2=110Voltgae:3.912V[冲饱电压为4.2V]忠告大家,不要乱用别的程序进入,特别是WM系统的,最好是用工程测试模式进入.同时,如果大家买电池的话,要看清楚以上的几个参数.不要被JS欺骗啦]关于I900刷机和装GPS的几点重要告之各位购买I900的老手和新手,请参阅本人亲身体会几点意见I900和I908E的区别1.I900本体上面是SAMSUNG,而I908本体上面是AnyCall.2.目前I900没有什么亚太版,全部是欧洲版本.8G价格在3800左右.16G在4150左右.如果你买贵啦这个是人家也要赚钱吗.3.I900有前置摄像头的.I908没有.4.I908E是中国移动定制的,只是里面软件版本支持很多移动定制的软件而已,而I900是欧洲和除台湾和香港外的销售版本.故里面软件兼容性好一些.I900装R66导航软件问题.有的出现0X6.黑屏问题解决现在论坛上面有很多说G1版本不能装.出现0x6.打不开R66,出现黑屏.一直搜星.现象.现在予以告之答案 1.请不要乱下载什么简体中文版本,最好到论坛里面下载专业的R66软件.0.83那个.不要轻易相信什么装就好的.2.不要乱下载什么GPSgate,GPSView.软件.I900根本不需要.3.请将R66直接拷贝到Mystory(8G或16G内存里面,不要修改文件名.不要放在存储卡上面)4.修改R66里面那个Device文件里面的信息.用记事本打开[R66Mini]ComPortValue=2BaudrateValue=38400[R66Maxi]ComPortValue=1BaudrateValue=38400然后到手机里面有个设定里面修改GPS的设定Com3,Com9.自动.然后你就可以打开R66啦.绝对不会出现什么0X6问题啦.无论I900哪个ROM版本都可以的.我试过G1~G9R66刚开始的时候是会黑屏一下或跳出.不要管他.直接关机一下,然后就直接进入啦.放在空旷的地方,很快就会看到8颗卫星.时间大概需要10分钟左右刷机问题1.现在完美支持简体中文的只有G1ROM.其他的不是香港版本就是英文.2.G1没有名片扫描.3.G9没有GOOGLEMAPS.不支持简体中文名片扫描4.G9和G1的发热量一样,5.G9没有点讯输入法,需要自已安装.G9没有短信息聊天模式,需要修改注册表设定以上是本人刷机和装GPS的过程体会.不要乱下载什么软件,有些软件和6.1系统不兼容的.还有一些乱发软件的骗子.你们是否真的在I900上面试过?请大家自已知道.只有自已试过才能知道软件如何适合你用.记住,购买机器的时候要记得要正牌的充电器.JS那里的充电器很烂,根本没有办法冲饱电.要能收发彩信必需先要设置好上网才行。
Samsung GALAXY CORE Prime如何设置短信黑名单(G3609)
Last Update date : 2015.03.31
短信黑名单是指把自己不想收到的短信进行屏蔽,设置短信黑名单后,所有黑名单中的号码发送给您的短信都会被系统自动拦截,被阻止的短信将保存在已阻止的信息里。
如果您想使用该功能,请按照以下方法操作:
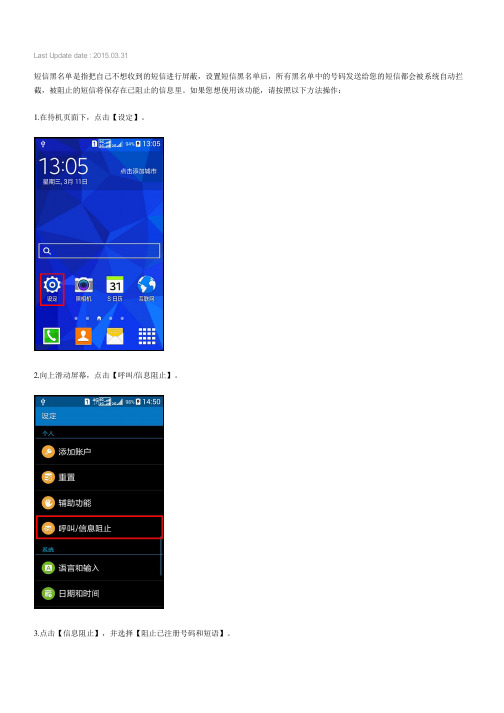
1.在待机页面下,点击【设定】。
2.向上滑动屏幕,点击【呼叫/信息阻止】。
3.点击【信息阻止】,并选择【阻止已注册号码和短语】。
4.点击【信息阻止列表】。
5.点击屏幕右上方的【+】图标。
6.输入要阻止的联系人号码(也可点击右侧的【联系人】图标添加号码),然后点击【保存】即可。
完成以上操作后,信息阻止列表中的号码发送的短信将被自动拦截。
如果您想查看被阻止的短信,依次点击【信息】图标-【菜单】键-【已阻止的信息】。
相关型号信息
SM-G3609HAWCTC
相关内容
Samsung GALAXY CORE Prime如何设置来电黑名单?(G3609)
Samsung GALAXY CORE Prime当检测到开放的无线网络可用时总会有通知,如何取消设置?(G3609)
Samsung GALAXY CORE Prime如何设置来电归属地?(G3609)
Samsung GALAXY CORE Prime如何使用计时器拍照?(G3609)
Samsung GALAXY CORE Prime如何使用动画拍摄功能?(G3609)。
Samsung Galaxy Tab S2 SM-T813(6.0.1)如何激活开发者选项
Last Update date : 2016.07.29
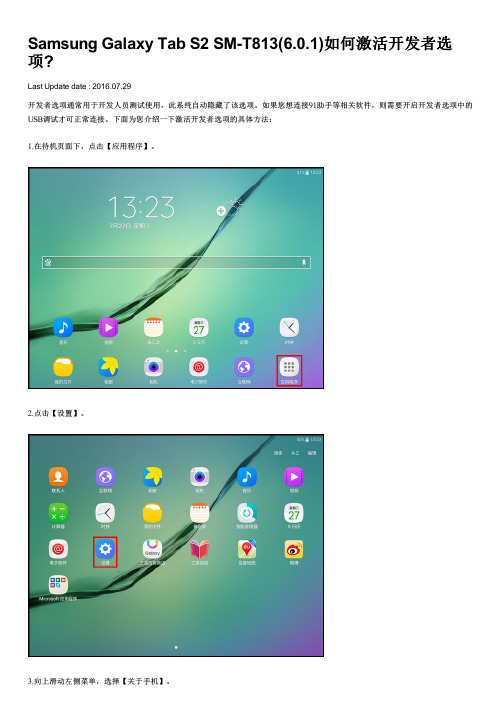
开发者选项通常用于开发人员测试使用,此系统自动隐藏了该选项。如果您想连接91助手等相关软件,则需要开启开发者选项中的
USB调试才可正常连接。下面为您介绍一下激活开发者选项的具体方法: 1.在待机页面下,点击【应用程序】关于手机】。
4.点击【软件信息】。
5.连续点击【版本号】7次后,将提示“开发者模式已启用”。
6.即可看到【开发者选项】。
相关型号信息
SM-T813NZDECHN
相关内容
Samsung Galaxy Tab S2 SM-T813(6.0.1)如何使用连拍功能? Samsung Galaxy Tab S2 SM-T813(6.0.1)如何移除电子邮件帐户? Samsung Galaxy Tab S2 SM-T813(6.0.1)如何连接WLAN? Samsung Galaxy Tab S2 SM-T813(6.0.1)如何设置电子邮件帐户? Samsung Galaxy Tab S2 SM-T813(6.0.1)如何在S日历中添加事件?
Samsung Galaxy MEGA如何设置短信黑名单(I9158)
Last Update date : 2014.01.20
短信黑名单是指把自己不想收到的短信进行屏蔽。
设置短信黑名单后,所有黑名单中的号码发送给您的短信都会被系统自动拦截,被阻止的短信将保存在垃圾信息里。
如果您想使用该功能,请按照以下方法操作:
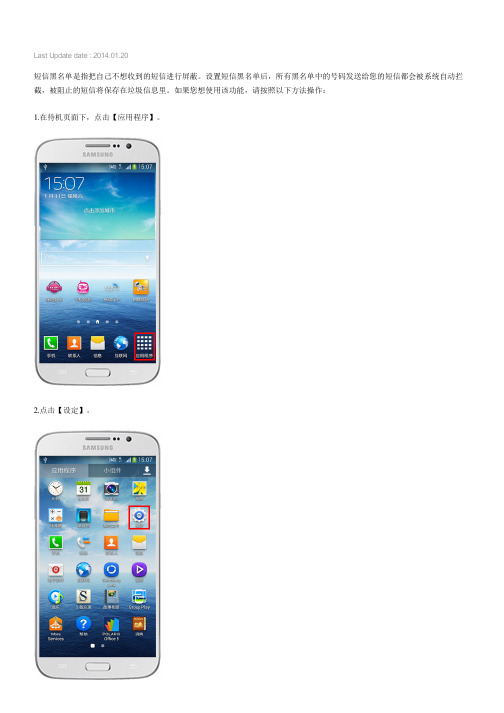
1.在待机页面下,点击【应用程序】。
2.点击【设定】。
3.点击【我的设备】,然后选择【呼叫/信息阻止】。
4.点击【信息阻止】。
5.选择【阻止已注册号码和短语】。
6.点击【信息阻止列表】。
7.点击【添加】。
8.使用拨号盘输入要阻止的联系人号码,或点击右侧的【联系人】图标添加号码。
9.点击【保存】即可。
上述操作完成后,短信黑名单就设置成功了,当黑名单中的联系人给您发信息时,该信息将自动保存到垃圾信息中。
更多内容
Samsung Galaxy MEGA如何与电脑连接?(I9158)
Samsung Galaxy MEGA如何连接Kies软件?(I9158)
Samsung Galaxy MEGA如何切换手写输入?(I9158)
Samsung Galaxy MEGA接收短信时无声音,如何解决?(I9158)
Samsung Galaxy MEGA如何设置屏幕锁定图案?(I9158)
相关型号信息GT-I9158。
