3D打印机[1.75耗材]【操作手册】中英文
3d 打印机快速使用指南说明书

3D打印机快速使用指南请仔细阅读此说明书目录A:让我们开始3D打印之旅-打印机安装与使用时注意事项-打印机的工作原理-您需要了解的专业知识B:准备好您的3D打印机-3D打印机功能图示-拆开3D打印机的包装-了解载物平台--热床-组装您的耗材支架-连接电源并尝试开机C:开始打印前的准备工作-了解喷头与热床的自动调平功能-自动调平指南-将耗材正确穿入挤出机并使喷头正常出丝-运行SD卡内的测试程序D:学习使用切片软件-认识CURA软件E:故障排除、屏幕操作、以及设备维护-常见故障及排除方法-LCD屏幕菜单及功能简介-设备日常维护及维修-如何更换耗材-调整与更换调平传感器-2/32让我们开始3D打印之旅吧!本用户指南的目的是开始您的3D打印之旅,跟随指南的指引您将以最快的速度了解如何使用SMARTMKAER系列3D打印机。
即使您已经在使用本公司的其它3D打印机产品或者其它类型的3D打印机,但仔细阅读本说明书仍是非常有必要的,当您阅读完毕后,您会发现本台3D打印机的与众不同之处。
警告:SMARTMKAER系列桌面3D打印机在工作时会产生高温,包括移动部分均可能对您造成伤害。
3D打印机在工作时或者没有完全冷却时,请不要操作机器内部部件。
注意:如果要对SMARTMKAER系列3D打印机进行维护维修工作,请务必关闭电源开关并断开电源连接。
——3D打印机放置与使用注意事项在安装和使用本机之前,请务必阅读以下内容。
请勿尝试任何用户手册中没有描述的方法来使用本机,避免可能造成的意外人身伤害和财产损失。
使用环境的要求:1本机适合放置在通风、阴凉、干燥和少尘的环境内。
2使用时注意打印机周围环境的散热,避免放置在地毯上或者紧靠墙壁放置。
3请勿将本机放置在易燃易爆物品或高热源附近。
4请勿将本机放置在振动较大或者其他不稳定的环境内。
5请勿在本机上堆积重物。
3/32安装前:1设备内有高压电源,切勿拆开外罩,进行修理和改造;2放置到儿童无法接触到的地方,以免儿童触碰设备造成烫伤或其它伤害;3请使用本机附带的电源线。
3D打印机使用说明书
3D打印机使用说明书3D打印机使用说明书一.Proe绘图。
1.proe绘图:2.proe保存副本并保存为*.STL格式:(弹出对话框点确认即可)二.Cura使用。
1.利用Cura将保存的STL文件打开。
打开方式:文件------打开模型或gcode------选择以保存的STL 文件(如下图)。
2.鼠标单击图形,图形左下方出现三个图标,如下图:5.第三个图标:图形镜像;6.对菜单栏内的基本、高级进行设置(这一项非常重要)。
插件、起始/停止GCode默认设置即可。
具体参数参照显示设置。
7如果是首次使用打印机,还需如下设置:高级选项------首次运行向导-------Next-----选择其他:更改以下参数,然后完成。
机器名称:机器宽度:150机器深度:150机器高度:180喷嘴大小:0.3热床:0,0,0为打印初始中心:8.完成以上操作,进行保存。
文件------保存配置-----三.上位机使用。
1.打开上位机软件。
2打开保存的*.gcodeFile------Open-----找到保存的*.gcode并打开。
软件右侧会出现数据:3.对代码内容进行修改:File----Edit-----弹出窗口如下:将小窗口内第二个M107改成M106(此命令控制风扇转动,M107风扇关,M106风扇开)4.点击Port,获得对应的COM口,其余参数如图。
5.连接控制板,进行调平。
Connect------复位X、Y、Z----控制(+X,-X )、(+Y,-Y)、(+Z,-Z)进行热床上平面的调平。
6.开始打印。
首先给热床加热,等温度到50度时,点击Print,此时热床和挤出头同时加热,当温度达到设定值时,打印机开始加热。
(注意:开始打印时时刻观察热床温度及挤出头温度,当热床温度60度,挤出头温度225度时,打印机动作,开始打印。
若当温度都达到要求且持续20s还未开始打印,因用风扇给挤出头降温,使其保持在225度,直到打印为止。
三维打印机设备说明书
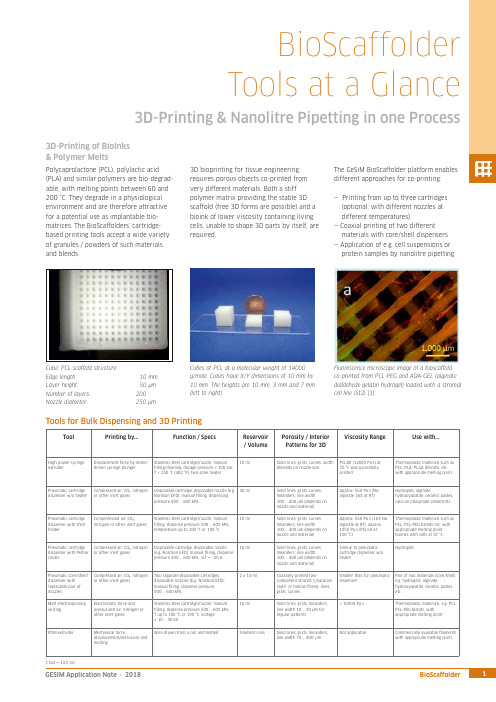
ToolPrinting by...Function / SpecsReservoir / VolumePorosity / InteriorPatterns for 3DViscosity Range Use with...High-power syringe extruder Displacement force by motor-driven syringe plungerStainless steel cartridge/nozzle; manual lling/cleaning, dosage pressure > 100 bar, T < 250 °C (482 °F), two-zone heater 10 mlSolid lines, grids, curves; width depends on nozzle sizePCL80 (12600 Pa·s) at 70 °C was succesfully printed Thermoplastic materials such asPCL, PLA, PLGA (blends), etc. with appropriate melting pointPneumatic cartridgedispenser w/o heater Compressed air, CO₂, nitrogen or other inert gasesDisposable cartridge, disposable nozzle (e.g Nordson EFD); manual lling, dispensing pressure 500 … 600 kPa30 ml Solid lines, grids, curves, meanders; line width100 … 400 µm (depends on nozzle and material)Approx. 550 Pa·s (Na-alginate 16% at RT)Hydrogels, alginate,hydroxyapatite, ceramic pastes,calcium phosphate cement etc.Pneumatic cartridge dispenser with shell heaterCompmressed air, CO₂,nitrogen or other inert gasesStainless steel cartridge/nozzle; manual lling, dispense pressure 500 … 600 kPa, temperature up to 100 °C or 190 °C10 mlSolid lines, grids, curves, meanders; line width100 … 400 µm (depends on nozzle and material)Approx. 550 Pa·s (16% Na-alginate at RT), approx. 1350 Pa·s (PCL50 at 100 °C)Thermoplastic materials such as PCL, PCL-PEG blends etc. with appropriate melting point, bioinks with cells at 37 °C Pneumatic cartridge dispenser with Peltier cooler Compressed air, CO₂, nitrogen or other inert gases Disposable cartridge, disposable nozzle (e.g. Nordson EFD); manual lling, dispense pressure 500 … 600 kPa, ΔT ≈ –20 K10 mlSolid lines, grids, curves, meanders; line width100 … 400 µm (depends on nozzle and material)Similar to pneumatic cartridge dispenser w/o heaterHydrogelsPneumatic core/shelll dispenser with replacable pair of nozzlesCompressed air, CO₂, nitrogen or other inert gasesTwo separate disposable cartridges, disposable nozzles (E.g. Nordson EFD); manual lling, dispense pressure 500 … 600 kPa2 x 10 mlCoaxially printed two-component strands (…macaroni style“ or hollow bres), lines, grids, curvesSmaller than for pneumatic dispenserPair of two materials (core/shell), e.g. hydrogels, alginate,hydroxyapatite, ceramic pastes etc.Melt electrospinning writingElectrostatic force andpressurized air, nitrogen or other inert gasesStainless steel cartridge/nozzle; manual lling, dispense pressure 500 … 600 kPa T up to 100 °C or 190 °C, voltage ± 10 … 30 kV10 ml Solid lines, grids, meanders; line width 10 … 20 µm for regular patterns> 10000 Pa·sThermoplastic materials, e.g. PCL, PCL-PEG blends, with appropriate melting pointFDM extruderMechanical force(displacement/extrusion) and meltingWire drawn from a coil and meltedFilament coilsSolid lines, grids, meanders; line width 70 (400)µmNot applicableCommercially available laments with appropriate melting pointBioScaffolder Tools at a Glance3D-Printing & Nanolitre Pipetting in one ProcessPolycaprolactone (PCL), polylactic acid (PLA) and similar polymers are bio-degrad-able, with melting points between 60 and 200 °C. They degrade in a physiological environment and are therefore attractive for a potential use as implantable bio-matrices. The BioScaffolders‘ cartridge-based printing tools accept a wide variety of granules / powders of such materials and blends.3D-Printing of BioInks & Polymer MeltsCubic PCL scaffold structure:Edge length: 10 mmLayer height: 50 µm Number of layers: 200Nozzle diameter:250 µmCubes of PCL at a molecular weight of 14000 g/mole. Cubes have X/Y dimensions of 10 mm by 10 mm. The heights are 10 mm, 3 mm and 7 mm (left to right).The GeSiM BioScaffolder platform enables different approaches for co-printing:— Printing from up to three cartridges (optional: with different nozzles at different temperatures)— Coaxial printing of two different materials with core/shell dispensers — Application of e.g. cell suspensions or protein samples by nanolitre pipetting3D bioprinting for tissue engineering requires porous objects co-printed from very different materials. Both a stiff polymer matrix providing the stable 3D scaffold (free 3D forms are possible) and a bioink of lower viscosity containing living cells, unable to shape 3D parts by itself, are required.Fluorescence microscope image of a bioscaffold co-printed from PCL-PEG and ADA-GEL (alginate dialdehyde gelatin hydrogel) loaded with a stromal cell line (St2) [1]Tools for Bulk Dispensing and 3D PrintingBioScaffolderTools at a GlanceTool Printing by...Function / Specs Reservoir/ VolumeInterior Patterns for3D ObjectsViscosity Range Use with...Piezoelectric pipette(optionally heatable)or Twin-TipUltrasonic wave; Twin-Tippipette allows kinetic mixingPipettor(s) with wash system, drop-on-demand dispensing, single drop volume100 … 400 picolitres, automatic ll-up,T < 100 °C96 well microtitreplate, max.120 µl/wellSingle spots of at least 80 µm,arrays, linesUp to 10 mPa·s All líquid samples, e.g. proteinsolutions, cell suspensions,solved polymers (two-componentsystems)Solenoid valvepipetteSolenoid valve andpressurized airPipettor with wash system, drop-on-demand dispensing, single pulse60 nanolitres, range up to microlitres,automatic ll-up96 well microtitreplate, max.120 µl/wellSingle spots, arrays, lines Up to 40 mPa·s All líquid samples, e.g. proteinsolutions, cell suspensions,dissolved polymersPassive pipette tips(Metal/Te on-coated)Diluter syringe displacement Pipettor with wash system, µl range,automatic ll-up96 well microtitreplate, max.120 µl/wellBulk dispensing of ml volumeson printed patternsLiquids (depends on tipsize)All liquid samples, e.g. proteinsolutions, cell suspensions,dissolved polymersPiezoelectricdispense valves (OEMcomponents)Piezoelectric valve andpressurized airCartridge dispenser, drop-on-demanddispensing, drop volume in the nanolitrerange (also heatable)3 ml Single spots, arrays, lines Approx. 50 … 200.000mPa·sHighly viscous liquids, e.g. glue,dissolved polymersPowder pipette Vacuum, compressed air Aspiration / dispensing of powder aliquotsin the µg rangemin. 1 ml Spots Solid materials Granular materials and powderReferences:[1] Tobias Zehnder, Tim Freund, Merve Demir, Rainer Detsch, Aldo R. Boccaccini: Fabrication of cell-loaded two-phase 3D constructs for tissue engineering, Materials 2016, 9, 887(Institute of Biomaterials, Department of Materials Science and Engineering, University of Erlangen-Nürnberg, Germany)[2] Stefan Giron, Anja Lode, Michael Gelinsky: In situ functionalization of scaffolds during extrusion-based 3D plotting using a piezoelectric nanoliter pipette, J. 3D Print. Med., 2017, 1,25 (Centre for Translational Bone, Joint & Soft Tissue Research, University Hospital Carl Gustav Carus & Faculty of Medicine, TU Dresden, Germany)Melt Electrospinning WritingThe Melt Electrospinning Writing Module(MES) uses electrical charge to draw verythin bres, typically in the micrometrerange, from a liquid or polymer melt.Depending on the experimental set-up,arbitrary and regular patterns can begenerated.The MES module for the BS3.x contains ahigh-voltage generator and a specialsubstrate support. Special dispense nozzlesand metal cartridges are required.The spun scaffold consists of stacked layers, eachrotated at 30 degrees. Printing was done withPCL 14,000 at 100 °C and 10 kV.SEM image, PCL 14,000, 15 kV, 100 °C, strutwidth is between 20 and 40 µmNanolitre PipettingThe pipetting module enables the partialfunctionalization of 3D-printed structuresby applying nanolitre amounts of cellsuspensions or protein solutions.Alternatively, micro-scaffolds from curableliquid samples are feasible.On the right: Fluorescein-labelled dots (green)printed at de ned XY positions on a scaffold thatwas printed from oil-based CPC (calcium-phoshatecement) paste [2]Tools for Liquid and Powder PipettingBottom layer with 20 µm strands, top layer with100 µm strandsOmniCure S1500: 200 W mercury UV lamp with selectable lters covering wavelengthsfrom 250 nm to 500 nm. Typical irradiation is in the range of 6 ... 28 W/cm².Camera with a wide range of lenses at different magni cationsOptical (OEM) Components。
创意力3D打印机用户手册说明书
K13D Printer User ManualV1.0Thank you for choosing our products. For the best experience, please read this User Manual carefully and strictly follow the instructions to operate the printer. Ourteams will always be ready to provide you with the best services. Please contact us via the phone number or e-mail address provided at the end of this User Manual when you encounter any problem with the printer. For a better experience in using our products, you can also learn how to use the printer in the following ways:Accompanied instructions: you can find the relevant instructions and videos in the USB flash disk.You can also visit our official website (https://) to find information regarding software, hardware, contact information, device instructions, device warranty information, and more.1. About the Device 1.1 About the Printer 1.2 Device Specifications 1.3 Packing List2. Unboxing 2.1 Unpacking Steps 2.2 Install the Product 2.3 Power-on guide3. About the User Interface 3.1 Main、Prepare 3.2 Files 3.3 Tune、Support4. First Printing 4.1 USB flash disk Printing 4.2 LAN Printing5. Functional Specification 5.1 Extrude、Filament Retreat6. Tips and Routine Maintenance 6.1 Maintenance Items 6.2 Error Code Instructions 6.3 Precautions for printing ...................................................................................................................................................................................................................................................................................................................................................................................................................................................................................................................................................................................................................................................................................................................................................................................................................................................................................................................................................................................................................................................................................................................................................................................................................................................................................................................................................................................................................................................................................................................................................................................................................................................................................................................................................................................................................................................................................................................................................................................................................................................................................................................................................................................................................................................................................................................................................................................................................................................................................................................................................................................................................................................................................................................................................................................................................................................................................................................................................................................................................................................................................................................................................................................................................................................................................................................................................................................................................................................................................................................................................................................................................................................................................................................................................................................................................................................................................................................................................................................................................................................................................................................................................................................................................................................................................................................................................................................................................................................................................................................................................................................................................................................................................................................................................................................................................................................................................................................................................................................................................................................................................................................................................................................................................................................................................................................................................................................................................................................................................................................................................................................................................................................................................................................01-0301-0102-0203-0309-0911-1112-1216-1617-1718-1819-2017-2013-1509-1110-1012-1516-1604-0804-0506-0708-081.1 About the Printer1.3 Packing ListWrench and Screwdriver ×14Touch screen 2Filament3Blade ×15M6 socketspanner ×112After-sales ServicesCard ×115Power Cable ×111Material barrel ×161.2mm nozzle cleaner ×1813Tool Box ListCutting plier ×17USB flash disk ×19LubricatingGrease ×1Quick Guide ×1* Tips: the above accessories are for reference only. Please refer to the physical accessories!2.1 Unpacking StepsKeep the blue cube in the figure clean of debris and then click "OK".① Network Settings② Time Zone Settings③ Creality Cloud binding④ Self-inspection⑤Self-testing2.3 Power-on guide⑥ Self-test completedNote: The current interface is for reference only. Due to the continuous upgrading of functions, it shall be subject to the latest firmware UI published on the official website.Prepare3.1 Tune、Prepare① Local model② Press and hold on the model to multi-selectand copy it to a USB flash drive③ USB flash drive model ④ HistoryTips: Choosing print calibration can improve print quality 3.2 FilesNote: The current interface is for reference only. Due to the continuous upgrading of functions, it shall be subject to the latest firmware UI published on the official website.SupportSystemSystem HelpNetworkError historyUpload LogNote: The current interface is for reference only. Due to the continuous upgrading of functions, it shall be subject to the latest firmware UI published on the official website.4.1 USB flash disk Printing④ Printing③ Select to print② USB flash drive modelNote: The current interface is for reference only. Due to the continuous② Choose a language and region;③ Choose a Printer;⑤ Select to download the model;④ Click on "Model Library" and select the model file;4.2 LAN Printing Creality Print①Download at()or find the software on a USB flash driveand install it.Note: The current interface is for reference only. Due to the continuous upgrading of functions,it shall be subject to the latest firmware UI published on the official website.4.2 LAN Printing⑥ Log into a Creality Cloud account;⑦Start slicing;⑧Selection of LAN printing;⑩ Device List;Add a device: a. Add by scanning;→Select a device;⑪ Device Details 。
3D打印机操作说明培训资料
3D打印机操作说明培训资料
1. 简介
本文档旨在提供关于3D打印机操作的详细指南和培训资料。
它适用于初学者和有经验的用户,旨在帮助他们了解和掌握3D打印机的基本操作和安全注意事项。
2. 3D打印机基础知识
- 什么是3D打印技术?
- 3D打印机的工作原理
- 常见的3D打印机类型和特点
3. 3D打印机操作步骤
3.1 准备工作
- 打印前的材料准备
- 打印床的调整和校准
- 打印模型文件的准备
3.2 开始打印
- 连接打印机和电脑
- 打开打印软件
- 导入和调整模型
- 设置打印参数
3.3 打印过程中的注意事项
- 监控打印过程
- 如何应对打印中出现的问题- 安全操作注意事项
3.4 完成打印
- 从打印床上取下打印模型
- 打印模型的后处理和处理建议
4. 常见问题解答
- 3D打印常见问题及解决方法
- 打印质量改善技巧
5. 安全注意事项
- 使用3D打印机的安全知识
- 安全措施和应急处理方法
6. 附录
- 3D打印相关术语解释
- 打印材料推荐和特点
以上是关于3D打印机操作说明培训资料的简要内容概述。
如需更详细的内容,请参考完整文档。
3D打印机新手操作手册
3D打印机新手操作手册编写日期:执行日期:目录开箱指南和硬件安装 (2)(一)警告 (3)(二)注意 (3)(三)装箱清单 (3)开箱指南 (3)初始硬件安装 (5)软件的安装 (6)O:空走速度一般为70-30选择 (6)F:喷头温度为220度 (6)连接机器以及如何给喷头及底板加温 (7)进丝与退丝 (9)如何载丝 (10)退丝 (11)开箱指南和硬件安装我们出厂时非常仔细的对Creator或者CreatorII进行打包装箱——我们希望您能在仔细阅读本指南后,再仔细开箱。
请您应该始终如一的小心爱护和使用Creator。
Creator对静电比较敏感,请确保你在操作Creator和尝试任何校正前,先通过接触接地物体把身体上的静电释放掉。
在您自行打开Creator进行维修时,请保证电源已经关闭,电线连接已经断开。
(一)警告1)高温危险。
里面有加热板,维修前先让它自然冷却。
2)可动部件可能会造成卷入挤压和切割伤害。
操作机器时请不要带手套或缠绕物。
(二)注意1)在工作温度下,设备可能会产生刺激性气味,请在使用Creator时保持环境的通风和开放。
2)在Creator运行过程中,请勿无人看管。
3)接触喷头出来的挤压材料可能会造成灼伤,请等到打印物件冷却后再把它移出打印工作平台。
(三)装箱清单——Creator系列机器在Creator机器顶部的纸盒是配件箱,里面有:——一个或两个喷头——1X或2x 丝盘支架——螺栓工具盒——六角扳手工具盒在Creator机架里的工作平台下面:——1kg 原色ABS丝盘——1kg 黑色ABS丝盘(仅配套双喷头机型)在Creator机器下面:——电源线——USB A to B 电缆——1x 或2x 丝线导套开箱指南Creator打印机出厂时经过非常紧凑而仔细的包装,请花点时间仔细拆箱。
在本部分内容中,机器的重要部件名称将会用粗体表示。
注意:不要强行撕开任何东西——你有可能会损坏Creator。
3D打印机[1.75耗材]【操作手册】中英文
![3D打印机[1.75耗材]【操作手册】中英文](https://img.taocdn.com/s3/m/cf7f1a21866fb84ae45c8d44.png)
3D打印机操作手册3D PRINTERMANUAL NSTRUCTION第一步、打印机组装FIRST STEP. PRINTER ASSEMBLY1、耗材托架的安装1.Installation of Consumable Bracket上组图中,左图为耗材托架,右图为耗材托架的安装位置,安装位置在打印机后侧机盖上。
As shown above,left picture is consumable bracket,and the right picture is Installation location of the consumable bracket which is on the back of printer machine cover.2、送料管的安装2.Installation of Transfer Material Pipeline上图所示位置在打印机后侧机盖上,白色的就是送料管,主要作用是为耗材提供输送通道。
快接头主要是用来固定送料管,防止送料管上下移动。
The installation which is shown above is on the back of printer machine cover,thewhite tube is the transfer material pipeline,it is designed for transfer the consumable. Quick connector is designed for fixed the transfer tube and prevent vertical movement.注:安装时送料管时,将送料管捅到底即可,插入长度约在一公分左右。
送料管的另外一端在安装好耗材之后进行安装,(后期如遇更换耗材或其他操作,需要将送料管拔出的情况时,需先将快接头上的塑料圈按下,之后才能将送料管拔出)。
Note:Please install the transfer material pipeline to the bottom of quick connector and it is about 1cm.The other end of the transfer material pipeline installed after the consumable installation.(If change the consumable or other operation,please press the plastic ring down before pull out the transfer material pipeline .)第二步、打印机平台调平SECOND STEP.ADJUST PRINTER OPTICAL FLATNESS说明:打印机平台调平一次之后,一般情况下不用重复调平。
3D打印机操作规程

05
3D打印机应用场景与 案例
工业制造领域应用
汽车制造:使用3D打印技术制造零部件和工具,提高生产效率。
航空航天:利用3D打印技术制造轻量化零件和定制化部件,提高性能 和安全性。
医疗行业:使用3D打印技术制造人工关节、假肢和外科手术模型,提高 医疗水平和治疗效果。
建筑行业:利用3D打印技术制造建筑模型和建筑材料,提高建筑质量 和效率。
喷嘴堵塞:使用 清洗剂对喷嘴进 行清洗
打印层断裂:调 整打印层厚度或 更换打印材料
打印层翘曲:调 整打印温度或更 换打印材料
安全注意事项
确保设备接地良好, 避免触电风险。
避免在设备工作时 移动或拆卸部件, 以免造成损坏或受 伤。
定期检查设备线路 和部件,确保设备 正常运行。
在进行设备维护和 保养时,务必关闭 电源并谨慎操作。
打印完成后的处理
关闭电源:关闭3D打印机电 源,确保设备安全。
清理工作台:清理3D打印机 工作台上的残留物,确保工 作台干净整洁。
取出打印品:从打印仓中取 出打印品,检查打印品是否
完好。
清理打印仓:清理打印仓内 的残留物,确保打印仓干净
整洁。
04 3D打印机维护与保养
清洁与保养
清洁3D打印机外壳
开机与关机
开机:接通电源,打开3D打印机开关,等待启动完成 关机:关闭3D打印机开关,断开电源线
安装与卸载耗材
安装耗材:根据打印机型号选择合适的耗材,按照说明书逐步完成安装 卸载耗材:打印完成后,按照说明书逐步完成耗材卸载 注意事项:避免触碰高温部位,遵循正确的安装和卸载步骤 常见问题及解决方法:如遇问题,可参考说明书或联系厂家进行咨询
建筑领域:3D打 印在建筑领域的 应用,如房屋和 建筑结构的打印, 提高建筑效率和 质量。
3d打印机菜单使用说明
洛阳创新梦工厂LCD 屏注解菜单项目功能说明主菜单注解:1.准备:关闭步进驱动点击之后电机可以自由转动,一般用作回零之后手动滑动喷头调平自动回原点喷头回到坐标原点预热 PLA 加热喷头和热床到 pla 材料合适的打印温度预热 ABS 加热喷头和热床到 abs 材料合适的打印温度降温可以冷却喷头和热床Move 10mm Move X移动轴Move 1mm Move Y 旋钮调节移动量Move 0.1mm Move ZMove E(单位移动量当选择10mm时,只可移动XY,选择移动轴,其中E轴是挤出电机,必须喷头温度高于 180 才能转动)控制:温度只列出常用选项(喷头、热床、风扇转速),旋钮旋转确定运动略(不懂勿调整)LCD Contrast无需设置恢复出厂设置当出现异常时可使用刷新刷新显示有储存卡*.gcode选择文件一、接通电源,开机之后看到的屏幕主界面喷嘴温度(上:目标温度下:当前温度)热床温度风扇速度打印时打印速度间及进度条按旋钮进入主菜单界面“↑”表示可以返回,“→”表示可以继续执行,当前是无SD卡状态。
准备界面如果开机后插入SD卡,需要点击“Init.SD-Card”界面变为下图选择“由储存卡”》》选择文件开始打印二、打印过程中主菜单界面“控制”选项和上面内容一样;“暂停打印”实现打印暂停,点击后打印机暂停,原选项变为“继续打印”选项,点击可继续打印;“停止打印”实现打印停止。
“调整”点击进入下图界面。
打印速率(百分比,100就是1)喷嘴温度调整热床温度调整风扇转速调整(范围:0~255)出丝量(百分数,100就是1)换丝(点击后喷头回原点上方,自动回抽耗材并有提示音,此时可以换新耗材,新耗材插入直到喷嘴出丝确定即可继续打印)。
3D打印机产品说明书
3D打印机产品说明书一、产品概述本产品是一款3D打印机,通过添加物料层层堆叠的方式制造三维实物模型。
它使用了先进的3D打印技术,可以满足各种个性化和生产需求。
本产品具有高精度、高效率、易操作等特点,能够广泛应用于工业设计、医疗、教育以及个人创作等领域。
二、主要特点1. 高精度打印:本产品采用先进的3D打印技术,能够实现高精度的打印效果,最小可打印精度达到0.1毫米,保证了打印出的模型的质量和细节。
2. 快速打印速度:本产品具备快速打印能力,平均每小时可完成多个模型的打印,大幅提升了生产效率。
3. 多材料适用:本产品适用于多种打印材料,包括ABS、PLA、PETG等,可根据实际需求选择不同材料进行打印,满足不同模型的要求。
4. 用户友好界面:本产品的操作界面简洁直观,配有易于理解的操作指南,使用户能够轻松上手,无需专业技术背景。
5. 大型打印空间:本产品具备宽敞的打印空间,最大打印尺寸可达400mm×400mm×400mm,满足使用者对于大型模型的需求。
三、安全操作1. 在使用本产品前,请阅读并严格遵守产品说明书中的安全操作指南,确保使用过程中安全。
2. 请勿将手指或其他物体伸入打印机工作区域,以免发生意外事故。
3. 当打印过程中发生异常或故障时,请立即停止使用,并联系售后服务。
4. 在清洁和维护打印机时,请先断开电源并等待机器冷却。
四、保养与维护1. 打印机长时间不使用时,请将其存放在干燥通风的环境中,避免灰尘积累。
2. 定期清洁打印机外壳和喷头,以确保打印质量。
3. 请使用适当的清洁剂清洁打印机的滑轨和导轨,保证打印机的正常运行。
4. 如发现机器运行异常或出现故障,请立即停止使用并联系专业维修人员进行检修。
五、技术参数1. 打印精度:最小打印精度可达0.1毫米。
2. 打印速度:平均每小时可完成多个模型的打印。
3. 打印材料:适用于ABS、PLA、PETG等多种材料。
4. 打印空间尺寸:最大打印尺寸为400mm×400mm×400mm。
Noztek 3D打印机说明书
© 2018. All rights reserved.Warranty / Safety3 Diagram / Introduction4 Quick-start Guide / Power Switch / Bracket5 Operation Guide6 Changing the nozzle/Colour mixing/Maintenance/Lubrication/Barrel7 JamContact Noztek8WARRANTY•Equipment manufactured by Noztek carries the standard machine tool guarantee of freedom from defects in workmanship and material for one year from date of shipment.•TO INSURE THAT YOUR WARRANTY IS HELD IN EFFECT, PROPER OPERATION PROCE-DURES MUST BE OBSERVED.•NOTE: READ THE SAFETY PRECAUTIONS BEFORE OPERATING THIS MACHINE.SAFETY1.Know your equipment2.Carefully read the instruction manual.3.Learn the use and limitations of the equipment.•DO NOT operate or use this equipment for any purpose other than its intended use.•DO NOT modify this equipment.•DO NOT perform adjustments or maintenance while system is operating or ener-gize•Do not clean the equipment with flammable solvents.•Do not wash down the equipment with water. This could cause an electrical hazard.•Do not probe into extruder vent with the machine running. Never Use a metal probe in the vent area. The screw may shear the probe, causing extensive damage to the barrel and screw. A wooden probe is recommended.•A face shield, insulated gloves, etc. should be worn around the extruder during op-eration. They must be worn when adjusting the die, cleaning the screw, etc. The extruder temperatures are extremely hot.•The feed hopper must be installed on the extruder feed section at all times when in operation•Never put hands in the feed section or vent to remove material.•Do not switch on the motor until the recommended temperature has been reachedINTRODUCTIONThe Noztek desktop extruder has been designed to produce high quality ABS and PLA filament for use with 3D printers. For best results we recommend using extru-sion grade polymer pellets.QUICK START GUIDEFirst attach the hopper; the bolts are located in the bolt holes in the barrel. Then at-tach the 45 degree bracket (if using). There are six bolts, two for either end and two which connect the bracket together.Before you turn on the motor, switch on the heater element, let it reach your desired temperature then wait 15 minutes for the barrel, screw and nozzle to thoroughly heat up. (DO NOT SWITCH ON THE SCREW UNTIL THE DESIRED TEMPERATURE HAS BEEN REACHED AND MAINTAINED FOR AT LEAST 15 MINUTES). Add your pellets, then turn on the motor, pull the filament through the guide and switch on the fan. Switch on the heater (middle switch) and you will see the temperature gauge lower LED, above this is the current temperature.T o change the temperature setting, press the set button and use the up/down but-tons to adjust the temperature, then press the set button again.POWER SWITCHY our Noztek Pro features an illuminated on/off switch. In an emergency simply push the button and the Noztek Pro will completely switch off.BRACKETIf you are using the 45 degree bracket it is very important that the extruder is se-cured to a workbench using the mounting holes in the bottom of the bracket.OPERATION GUIDE·Remove the unit from the packaging·If you are using the 45 degree bracket, secure the extruder to a bench using the mounting holes.·Plug the extruder into mains power.·Switch on the heater element and adjust the temperature gauge to the de-sired setting. For ABS we recommend between 180 – 200 degrees Celsius and PLA between 165 -175c. T o adjust the heat setting press the set key once, the tempera-ture LED will then flash, then the click up or down key to adjust. When you reach the desire temperature click the set button to engage. Let the extruder barrel heat fully, this should take about 15 minutes.·Once the required temperature has been reached, fill the hopper with resin pellets.·Switch on the screw motor (Do not switch on the motor until the recommend-ed temperature has been reached).·Switch on the fan·After a few minutes you will see plastic filament starting to extrude, carefully feed this through the guide. This filament will be hot so use heat resistant gloves ·Extrude approximately 5m of filament, switch off the motor, cut off the excess material then restart the motor. This should help to eliminate any air bubbles and metal particles in the system.·Adjusting the temperature also affects the tolerance of the filament. The high-er the temperature, the thinner the filament. The lower the temperature, the thicker the filament. Make these adjustments in 5 degree celsius increments.·If the extruder is left unattended for any period of time we recommend using a mains timer switch.CHANGING THE NOZZLEBefore attempting this operation please use insulated gloves. T o switch between nozzle sizes to heat up the unit to175c. Unscrew the nozzle, clean off any excess plastic from the internal threads, then screw on new nozzle.COLOUR MIXINGAdding colours is simple. Mix the natural and the colorant at the given ratio, then pour it into the hopper. It will take 10-20 minutes to see changes in the colour. It is also possible to mix colorants to create new colours. For example, mix blue and yel-low to make green.MAINTENTANCERegular cleaning of your plastic extrusion tooling during the disassembly process lengthens machine life, helps reduce waste and helps maintain tighter tolerances for your final product. Use a wire brush and fine metal pick to clean the threads and the screw assembly.BARREL JAMDepending on the type of resin you are using, you may occasionally experience a barrel jam. If at any time during extrusion the motor starts to labour and slow right down, switch off the motor immediately. A good way to free the jam is to turn the temperature up to around 230-240c and leave for 15 – 20 minutes, then switch on the motor again; this should allow the screw to rotate again. Also using a blow torch to heat the barrel just past the hopper will usually release any solidified plastic and free the screw.© 2018. All rights reserved.CONTACT NOZTEKPlease see our FAQ help section on our website at for further trou-bleshooting. If the answer to your quey is not found here, please contact the Noztek expert team directly.Noztek LtdUnit C3 Dolphin Industrial Estate Evershed Way, Shoreham by Sea West SussexBN43 6QB ENGLAND44 (0) 203 384 6208info@。
3D打印机说明书

3D打印机New thinking 5i 使用手册上海颉普智能科技有限公司Shanghai jiepu technology co., LTD❖目录目录 (2)一、产品概述 ................................... 错误!未定义书签。
二、技术参数 ................................... 错误!未定义书签。
三、操作步骤 ................................... 错误!未定义书签。
四、注意事项 ................................... 错误!未定义书签。
产品概述3D打印机概述3D打印机(3D Printers)是一位名为恩里科·迪尼(Enrico Dini)的发明家设计的一种神奇的打印机,它不仅可以“打印”出一幢完整的建筑,甚至可以在航天飞船中给宇航员打印任何所需的物品的形状。
3D打印机又称三维打印机,是一种累积制造技术,即快速成形技术的一种机器,它是一种数字模型文件为基础,运用特殊蜡材、粉末状金属或塑料等可粘合材料,通过打印一层层的粘合材料来制造三维的物体。
现阶段三维打印机被用来制造产品。
逐层打印的方式来构造物体的技术。
3D打印机的原理是把数据和原料放进3D打印机中,机器会按照程序把产品一层层造出来。
3D打印带来了世界性制造业革命,以前是部件设计完全依赖于生产工艺能否实现,而3D打印机的出现,将会颠覆这一生产思路,这使得企业在生产部件的时候不再考虑生产工艺问题,任何复杂形状的设计均可以通过3D打印机来实现。
3D打印无需机械加工或模具,就能直接从计算机图形数据中生成任何形状的物体,从而极大地所缩短了产品的生产周期,提高了生产率。
尽管仍有待完善,但3D打印技术市场潜力巨大,势必成为未来制造业的众多突破技术之一。
上海颉普科技智能科技New thinking 5i 3D打印机主要技术熔融沉积快速成型(Fused Deposition Modeling,FDM)熔融沉积又叫熔丝沉积,它是将丝状热熔性材料加热融化,通过带有一个微细喷嘴的喷头挤喷出来。
3D打印机新手操作手册

3D打印机新手操作手册编写日期:执行日期:目录开箱指南和硬件安装 (2)(一)警告 (3)(二)注意 (3)(三)装箱清单 (3)开箱指南 (3)初始硬件安装 (5)软件的安装 (6)O:空走速度一般为70-30选择 (6)F:喷头温度为220度 (6)连接机器以及如何给喷头及底板加温 (7)进丝与退丝 (9)如何载丝 (10)退丝 (11)开箱指南和硬件安装我们出厂时非常仔细的对Creator或者CreatorII进行打包装箱——我们希望您能在仔细阅读本指南后,再仔细开箱。
请您应该始终如一的小心爱护和使用Creator。
Creator对静电比较敏感,请确保你在操作Creator和尝试任何校正前,先通过接触接地物体把身体上的静电释放掉。
在您自行打开Creator进行维修时,请保证电源已经关闭,电线连接已经断开。
(一)警告1)高温危险。
里面有加热板,维修前先让它自然冷却。
2)可动部件可能会造成卷入挤压和切割伤害。
操作机器时请不要带手套或缠绕物。
(二)注意1)在工作温度下,设备可能会产生刺激性气味,请在使用Creator时保持环境的通风和开放。
2)在Creator运行过程中,请勿无人看管。
3)接触喷头出来的挤压材料可能会造成灼伤,请等到打印物件冷却后再把它移出打印工作平台。
(三)装箱清单——Creator系列机器在Creator机器顶部的纸盒是配件箱,里面有:——一个或两个喷头——1X或2x 丝盘支架——螺栓工具盒——六角扳手工具盒在Creator机架里的工作平台下面:——1kg 原色ABS丝盘——1kg 黑色ABS丝盘(仅配套双喷头机型)在Creator机器下面:——电源线——USB A to B 电缆——1x 或2x 丝线导套开箱指南Creator打印机出厂时经过非常紧凑而仔细的包装,请花点时间仔细拆箱。
在本部分内容中,机器的重要部件名称将会用粗体表示。
注意:不要强行撕开任何东西——你有可能会损坏Creator。
3D打印机手册

Creator首次体验警告1)高温危险。
里面有加热板,维修前先让它自然冷却。
2)可动部件可能会造成卷入挤压和切割伤害。
操作机器时请不要带手套或缠绕物。
注意1)在工作温度下,设备可能会产生刺激性气味,请在使用Creator时保持环境的通风和开放。
2)在Creator运行过程中,请勿无人看管。
3)接触喷头出来的挤压材料可能会造成灼伤,请等到打印物件冷却后再把它移出打印工作平台。
以下文本中所提到的M键,指的是机器前面板上的正中间那个按钮。
都准备好了吗?首先,请确认您是否已经完成开箱和硬件安装部分的所有安装步骤:您的喷头应该安装在安装座上,丝线导套已经连接好,丝盘已经安装在支架上。
然后,您可以插上电源了。
当您检查所有步骤都做好后,打开Creator背后的电源开关。
现在,Creator将引导您完成初始设置和第一次打印。
你会在LCD液晶屏上看到一下信息:如果您没有看到以上信息,别担心——打开Utilities ->Run Startup Script。
通过上下按键来移动光标,按“M”键进行选择。
这个按键很灵敏,所以请轻按。
M键还有以下其他功能,请记住:带红灯常亮的M键表示设备正在工作,请通过LCD或应用程序查看其状态;带红灯闪烁的M键表示设备在等到用户输入。
在M键周围有四个方向键,通过这些方向键可以进行菜单浏览和选择,左方向键还有返回和取消操作的功能。
首先,启动程序脚本会教给您关于Creator如何工作的基本介绍。
然后,它会教你如何调平打印平台,装载丝材,并开始一个打印测试。
第一次操作,请依据屏幕上的指令设置您的Creator!如果设备出现和本指南描述不符的故障或情况,请查看。
调平您的打印平台注意:调平打印平台对作品的打印质量非常关键!以下是第一屏信息:最后的省略号表示信息未显示完。
如果您已经阅读完要继续,请按闪烁的M键。
然后,你会看到:阅读完这个信息后,Creator会让您拧紧打印平台底部的旋钮。
这四个旋钮都在打印平台底部两个塑料支撑臂之间。
3D打印机的说明使用书
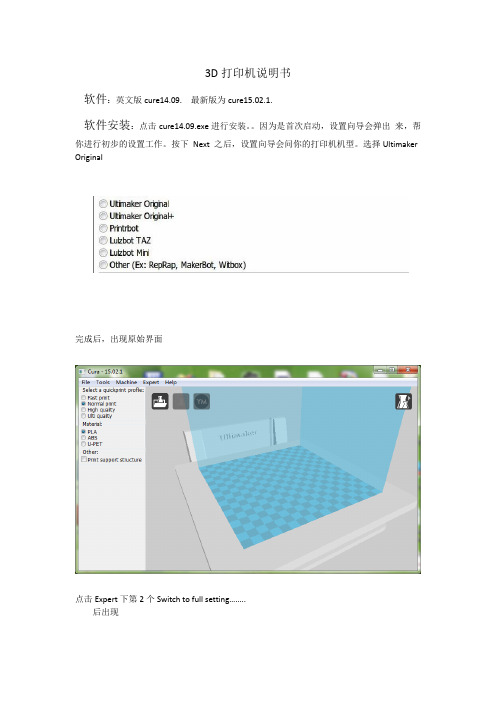
3D打印机说明书
软件:英文版cure14.09. 最新版为cure15.02.1.
软件安装:点击cure14.09.exe进行安装。
因为是首次启动,设置向导会弹出来,帮你进
行初步的设置工作。
按下Next 之后,设置向导会问你的打印机机型。
选择Ultimaker Original
完成后,出现原始界面
点击Expert下第2个Switch to full setting……..
后出现
添加热床
点击file中倒数第4个Machine setting 再打勾Heated bed
改众多参数。
其他不变。
先让电脑通过USB数据线连接打印机
然后打开Machine setting
选择右下方Communication setting的Serial port (但是,首先确保电脑的端口打开)
切片好了以后,用右键点击上图左上角中间图案。
用左键点击Print with COM(…)
加热完成后,点击Print。
打印2:SD卡打印
切片好了以后,用右键点击上图左上角中间图案。
用左键点击Save Gcode
保存到SD卡。
把SD卡插到打印机中后,选择Print from SD。
注意事项:
(1)开始打印时,检查模型是否不沾底盘。
(2)模型发生错位,检查热床底盘是否松动。
皮带轮是否松动。
切片是否有问题。
(3)注意打印耗材(材料)是否卡线。
(4)电脑连USB数据线打印过程中时,不得断开数据线。
3D打印机耗材操作手册中英文
3D打印机耗材操作手册中英文Document serial number【NL89WT-NY98YT-NC8CB-NNUUT-NUT108】3D打印机操作手册3D PRINTERMANUAL NSTRUCTION第一步、打印机组装FIRST STEP. PRINTER ASSEMBLY1、耗材托架的安装of Consumable Bracket上组图中,左图为耗材托架,右图为耗材托架的安装位置,安装位置在打印机后侧机盖上。
As shown above,left picture is consumable bracket,and the right picture is Installation location of the consumable bracket which is on the back of printer machine cover.2、送料管的安装of Transfer Material Pipeline上图所示位置在打印机后侧机盖上,白色的就是送料管,主要作用是为耗材提供输送通道。
快接头主要是用来固定送料管,防止送料管上下移动。
The installation which is shown above is on the back of printermachine cover,the white tube is the transfer material pipeline,it is designed for transfer the consumable. Quick connector is designed for fixed the transfer tube and prevent vertical movement.注:安装时送料管时,将送料管捅到底即可,插入长度约在一公分左右。
送料管的另外一端在安装好耗材之后进行安装,(后期如遇更换耗材或其他操作,需要将送料管拔出的情况时,需先将快接头上的塑料圈按下,之后才能将送料管拔出)。
3d打印机菜单使用说明

洛阳创新梦工厂LCD 屏注解菜单项目功能说明主菜单注解:1.准备:关闭步进驱动点击之后电机可以自由转动,一般用作回零之后手动滑动喷头调平自动回原点喷头回到坐标原点预热 PLA 加热喷头和热床到 pla 材料合适的打印温度预热 ABS 加热喷头和热床到 abs 材料合适的打印温度降温可以冷却喷头和热床Move 10mm Move X移动轴Move 1mm Move Y 旋钮调节移动量Move 0.1mm Move ZMove E(单位移动量当选择10mm时,只可移动XY,选择移动轴,其中E轴是挤出电机,必须喷头温度高于 180 才能转动)控制:温度只列出常用选项(喷头、热床、风扇转速),旋钮旋转确定运动略(不懂勿调整)LCD Contrast无需设置恢复出厂设置当出现异常时可使用刷新刷新显示有储存卡*.gcode选择文件一、接通电源,开机之后看到的屏幕主界面喷嘴温度(上:目标温度下:当前温度)热床温度风扇速度打印时打印速度间及进度条按旋钮进入主菜单界面“↑”表示可以返回,“→”表示可以继续执行,当前是无SD卡状态。
准备界面如果开机后插入SD卡,需要点击“Init.SD-Card”界面变为下图选择“由储存卡”》》选择文件开始打印二、打印过程中主菜单界面“控制”选项和上面内容一样;“暂停打印”实现打印暂停,点击后打印机暂停,原选项变为“继续打印”选项,点击可继续打印;“停止打印”实现打印停止。
“调整”点击进入下图界面。
打印速率(百分比,100就是1)喷嘴温度调整热床温度调整风扇转速调整(范围:0~255)出丝量(百分数,100就是1)换丝(点击后喷头回原点上方,自动回抽耗材并有提示音,此时可以换新耗材,新耗材插入直到喷嘴出丝确定即可继续打印)。
- 1、下载文档前请自行甄别文档内容的完整性,平台不提供额外的编辑、内容补充、找答案等附加服务。
- 2、"仅部分预览"的文档,不可在线预览部分如存在完整性等问题,可反馈申请退款(可完整预览的文档不适用该条件!)。
- 3、如文档侵犯您的权益,请联系客服反馈,我们会尽快为您处理(人工客服工作时间:9:00-18:30)。
m o c . i j e k e g a d . ww .d a g e k e j i .c o m第一步、打印机组装FIRST STEP. PRINTER ASSEMBLY1、耗材托架的安装1.Installation of Consumable Bracket上组图中,左图为耗材托架,右图为耗材托架的安装位置,安装位置在打印机后侧机盖上。
As shown above,left picture is consumable bracket,and the right picture is Installation location of the consumable bracket which is on the back of printer machine cover. 2、送料管的安装2.Installation of Transfer Material Pipeline上图所示位置在打印机后侧机盖上,白色的就是送料管,主要作用是为耗材提供输送通道。
快接头主要是用来固定送料管,防止送料管上下移动。
The installation which is shown above is on the back of printer machine cover,thew .d a g e k e j i .c o m white tube is the transfer material pipeline,it is designed for transfer the consumable. Quick connector is designed for fixed the transfer tube and prevent vertical movement.注:安装时送料管时,将送料管捅到底即可,插入长度约在一公分左右。
送料管的另外一端在安装好耗材之后进行安装,(后期如遇更换耗材或其他操作,需要将送料管拔出的情况时,需先将快接头上的塑料圈按下,之后才能将送料管拔出)。
Note:Please install the transfer material pipeline to the bottom of quick connector and it is about 1cm.The other end of the transfer material pipeline installed after the consumable installation.(If change the consumable or other operation,please press the plastic ring down before pull out the transfer material pipeline .)第二步、打印机平台调平SECOND STEP.ADJUST PRINTER OPTICAL FLATNESS说明:打印机平台调平一次之后,一般情况下不用重复调平。
不过在运输过程中因为颠簸抖动,可能会导致平台的平整度发生变化,所以在使用之前建议先进行检查调平操作。
Instruction:Usually you do not need to adjust the optical flatness after first adjustment.we recommend to check the status caused by transportation.1、调平前准备1. Adjustment Ready.首先检查喷嘴,保证喷嘴外表面洁净,没有赘余的耗材等物。
如下图(左)所示,喷嘴处的赘余物可以用剪钳等工具剔除掉。
达到如下图(右)所示即可。
First checking the nozzle and make sure it ’s clean on the surface.As shown below(Left),Use pliers and other tools to weed out the remainder.as shown below(Right).2、控制打印机辅助调平2.Printer Assist Adjust Level Control首先需要为3D 打印机通电,3D 打印机所使用的是普通220V 家用电,直接接入即可。
该款3D 打印机屏幕为触控屏幕,下图(左)为主界面,点击“工具”,选择“调平”如下图(右)。
Power ups the 3D printer first,3D printer use home voltage 220V.This 3D printer is touch screen model,The main menu as shown below(Left),Click the “TOOLS ”,selecte “ADJUST MENT ”as shown below (Right).w .d a g e k e j i .c o m随后会出现如下图(左)所示界面,点击“NEXT ”,当喷头每次移动到一个微调螺母上方时,进行平台的微调,微调螺母如下图(右)所示。
Then click “NEXT ”as shown below (Left),Adjust the platform when the nozzle move to the location above the fine adjustment nut.as shown below(Right).平台上共分布着三个微调螺母,随着“NEXT ”的点击,喷头会依次移动到微调螺母上方,每个点调节到如下图所示距离即可,或者可以将一张A4纸对折后,放在喷头和平台之间,调节时,适当抽拉纸张,纸张刚好可以轻松的抽出来的时候,说明喷头和平台的距离基本合适了。
也可以以玻璃平台上喷头的倒影和喷头实体之间的距离作为参照进行调节。
There distribute 3 fine adjust nuts,the nozzle will move above the nuts in turns, Adjust each of the regulatory point as shown below,Or fold a piece of A4 paper and place it between nozzle and platform.if you can draw out the paper gently,itproves the nozzle fit the basic platform.You can also Adjust it by the reflection on the glass platform sprinklers and nozzles entities as a reference.w .d a g e k e j i .c o m注:微调螺母的原理:微调机构由螺丝、蝶形螺母、弹簧三部分组成。
当螺母拧[紧]的时候,平台便会向[下]方移动,从而拉[远]喷头和平台的间距;当螺母拧[松]的时候,由于弹簧的弹性作用,便会将平台向[上]方顶起,从而拉[近]喷头和平台的间距;Note:Theory of fine adjustment nuts:Fine adjustment mechanism by screws, wing nuts, springs.Screwing the nuts,the platform will move down,it will pull away the distance between nozzle and platform.Loosening the nuts,the platform will move up,caused by spring action,it will shrink nearly the distance between nozzle and platform,第三步、耗材的安装及岀丝测试THIRD STEP.CONSUMABLES INSTALLATION AND TESTING EXTRUDER1、喷头加热1.HEATING NOZZLE通过打印机显示屏控制喷头加热,如下图(左)所示点击“预热”,随后出现如下图(右)所示界面。
Control heating nozzle by printer screen,Click the “Pre-Heating ”as shown below(Left),it will display the follow interface,as shown below(Right).如上图(右)所示。
第一行为平台的温度控制选项,数字表示平台的“当前实际温度/设置温度”; 第二行为喷头的温度控制选项,数字表示喷头的“当前实际温度/设置温度”;其中向上(向下)的箭头,分别表示提升(降低)温度。
现在需要将平台的“设置温度”设置到64度,将喷头的“设置温度”设置到205度。
如下图所示。
As shown above(Right).The first line are the platform temperature control options,the numbers shown on the screen are “TEMP /TEMP SETTING ”;The second line are the platform temperature control options,the numbers shown on the screen are “TEMP/TEMP SETTING ”;The UP and DOWN arrows stands for lifting and lowering the temperature.Set theplatform temperature to 64℃,then set the nozzle temperature to 205 ℃。
As shownbelow.2、耗材的处理2.Dealing with Consumables将耗材从包装盒内取出后,将耗材的端部用剪钳剪出一个斜口,以便于耗材的送入。
另外耗材的端部约五公分的长度需略微的握直,也是便于耗材的送入。
如下图所示。
Taking the consumables out of the packaging box,and For insert easily ,cut outan incline on one side and straight grip around 5cm from the end of the other side.as shown below,将耗材挂在耗材托架上,然后将耗材从打印机后侧机盖的快接头下方送入如下图(左)所示。
