Symantec System Recovery Disk Help
电脑电脑正版Symantec系统恢复操作流程
联想电脑原厂Symantec备份系统
----恢复操作流程
1、恢复之前先备份好电脑内重要数据。
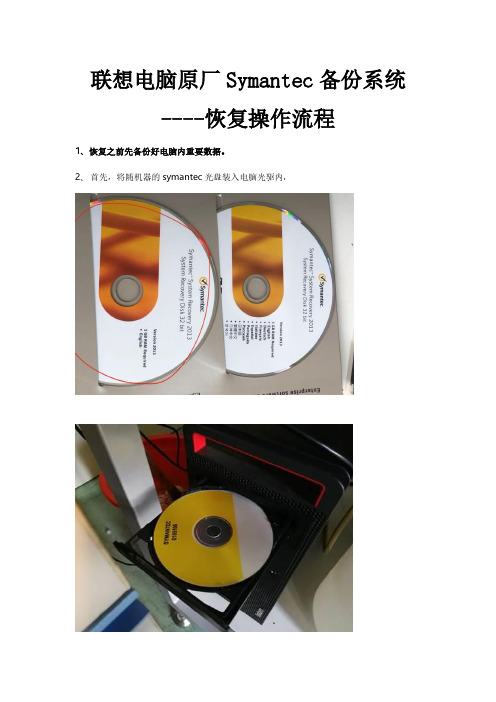
2、首先,将随机器的symantec光盘装入电脑光驱内,
3.随后,重启电脑
4.当电脑显示器显示如下界面时,连续点击Enter键。
(不同电脑或许会不一样,如果此法行不通,百度进入电脑BIOS设置的方法尝试)
5.连续点击Enter键,指导显示器出现如下画面:
6.点击键盘上的F12按钮,进入选择启动盘的界面,并利用上下箭头按钮选中Legacy:PLDS DVD-RW,点击Enter键确认(不同电脑或许会不一样,选择DVD作为启动盘即可。
)
7.随后显示器左上角将出现文字提示“Press any key …..”(注意这一步,电脑有可能不显示或者显示时间很短,点击Enter后持续点击一个键即可)此时点击键盘的任意键,显示器将出现如下画面,开始启动光盘中的系统
8.系统启动后出现如下界面,点击Accept
9.出现如下界面,点击Home>>Recover My Computer
10、出现如下界面,点击Next进入下一步
11、从界面中备份文件列表里选出你想要恢复的文件(一般选择最近日期的备份文件。
如果目标文件不在列表中,可以尝试更改路径或者备份的类型),单击选中它,点击Next 进入下一步
12、输入备份时设置的密码,点击OK确认
13、点击Next进入下一步
14、选中Reboot When Finished,恢复结束后会自动重启电脑,点击Finish确认并开始恢复
15、恢复结束后电脑正常重启,系统和软件都恢复到备份时间点的状态。
赛门铁克系统、数据备份与恢复的工具Ghost使用图解
Ghost使用图解Ghost是赛门铁克公司推出的一个用于系统、数据备份与恢复的工具。
其最新版本是Ghost11。
但是自从Ghost9之后,它就只能在windows下面运行,提供数据定时备份、自动恢复与系统备份恢复的功能。
本文将要介绍的是Ghost 11系列(最新为11),它在DOS下面运行,能够提供对系统的完整备份和恢复,支持的磁盘文件系统格式包括FAT,FAT32, NTFS, ext2, ext3, linux swap等,还能够对不支持的分区进行扇区对扇区的完全备份。
Ghost11系列分为两个版本,Ghost(在DOS下面运行)和Ghost32(在windows下面运行),两者具有统一的界面,可以实现相同的功能,但是Windows系统下面的Ghost不能恢复Windows操作系统所在的分区,因此在这种情况下需要使用DOS版。
工具/原料Ghost11步骤/方法1.启动Ghost11之后,会出现图一所示画面2.点击OK后,就可以看到Ghost的主菜单,如图二所示。
在主菜单中,有以下几项:Local:本地操作,对本地计算机上的硬盘进行操作。
Peer to peer:通过点对点模式对网络计算机上的硬盘进行操作。
GhostCast:通过单播/多播或者广播方式对网络计算机上的硬盘进行操作。
Option:使用Ghsot时的一些选项,一般使用默认设置即可。
Help:一个简洁的帮助。
Quit:退出Ghost。
注意:当计算机上没有安装网络协议的驱动时,Peer to peer和GhostCast选项将不可用(在DOS下一般都没有安装)。
3.使用Ghost对分区进行操作启动Ghost之后,选择Local->Partion对分区进行操作。
To Partion:将一个分区的内容复制到另外一个分区。
To Image:将一个或多个分区的内容复制到一个镜像文件中。
一般备份系统均选择此操作。
From Image:将镜像文件恢复到分区中。
如何使用 Symantec Recovery Disk 异机还原 Windows 7
如何使用Symantec Recovery Disk 異機還原Windows Vista / 7 / 2008 / 2008 R2環境介紹當Windows Vista/7/2008 安裝於新的硬碟上,預設多分割一個100MB隱藏的系統保留磁區,這個系統保留區含有必要的開機資訊。
如果這個磁區不存在,或是你把它移除來安裝Windows系統,很可能會在系統磁碟安裝以下的資料。
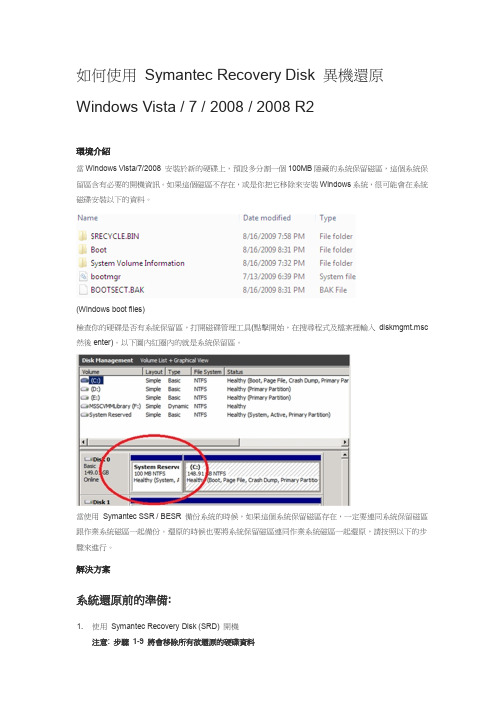
(Windows boot files)檢查你的硬碟是否有系統保留區,打開磁碟管理工具(點擊開始,在搜尋程式及檔案裡輸入diskmgmt.msc 然後enter)。
以下圖內紅圈內的就是系統保留區。
當使用Symantec SSR / BESR 備份系統的時候,如果這個系統保留磁區存在,一定要連同系統保留磁區跟作業系統磁區一起備份。
還原的時候也要將系統保留磁區連同作業系統磁區一起還原,請按照以下的步驟來進行。
解決方案系統還原前的準備:1. 使用Symantec Recovery Disk (SRD) 開機注意: 步驟1-9 將會移除所有欲還原的硬碟資料2. 在SRD程式中選擇分析這個選項3. 選擇分析然後選擇開啟「開啟命令提示字元」視窗這個選項4. 在指令視窗裡,輸入Diskpart。
這會顯示Diskpart指令層。
(例如D:\DISKPART>)5. 輸入List Disk,然後按Enter。
這樣會顯示所有磁碟資訊。
接下來會使用Disk 0 當做範例。
6. 輸入Select Disk 0, 然後Enter. 接者會提示磁碟0是所選擇的磁碟訊息。
7. 輸入Clean All, 然後Enter. 所有磁軌都會被清除,所有資料將會被移除。
依照硬碟的大小,可能會進行好幾分鐘,刪除動作期間游標會不停的閃爍,一直到完成為止。
8. 等待刪除完成會提示DiskPart 成功地清理了磁碟訊息.。
輸入Exit, 然後Enter.,離開命令提示視窗。
使用Symantec-System-Recovery-2011进行系统备份及还原
使用Symantec System Recovery 2011进行系统备份及还原系统备份在“程序〉Symantec System Recovery”下点击运行“Symantec System Recovery 2011”,如下图所示。
在打开页面后点击“任务〉一次性备份”,点击“下一步”。
如下图所示。
说明:系统备份一般在系统安装安毕后所有状态确定(即在该阶段基本应用无变化)后进行,因此,只需对其进行手动的一次性完整备份,从而减少对设备日常资源的消耗。
选择驱动器,即为选择分区,对于系统备份而言,我们选择C分区进行备份。
选择完成后点击“下一步”。
备份目标,即为将分区文件备份至何处,出于安全性及可靠性要求,我们将该文件备份至除系统分区(C分区)之外的分区即可。
选择完成后点击“下一步”。
在备份过程中,在“自定义恢复点文件名”下,可能根据需要对备份文件(恢复点文件)进行相应重命名,一次来标识文件的特殊含义。
在此我们增加“20130507”,表示为在2013年5月7日进行的系统备份。
修改完成后点击“下一步”。
进入下图所示页面后,点击“高级”按钮,在“高级选项”下,勾选“执行完全VSS 备份”项。
之后点击“下一步”。
进入下图所示页面后,确定相关配置信息无误后,点击“完成”即可。
下图所示为备份任务正在进行。
如下图所示,在备份工作完成后,显示“成功”,且无报错信息情况下,备份任务正常结束。
如下图所示,在“状态”页面,我们可以看到已生成的备份文件。
在备份目录下(此处为D:/本机系统备份),我们可以看到相关的备份文件,注意,里面的任何文件不可轻易删除,其中*.v2i格式的文件即为备份主文件(映像文件),其中“cjszf-back_C_Drive_20130507.v2i”文件即为我们本次任务生成的系统备份文件。
创建引导介质在对系统进行恢复的过程中,原系统已经无法使用,这就需要相关工具来引导设备,从而将原来的系统备份文件恢复至系统分区,下面我们就来介绍如何创建系统引导介质。
Symantec_System_Recovery_2011备份操作步骤(绝对经典)

Symantec_System_Recovery_2011备份操作步骤(绝对经典)Symantec System Recovery 2011备份步骤1.单击“计算机(C)”—单击“添加(A)”2.输⼊需要备份的远程计算机IP3.当出现此提⽰框时,请等待。
4.单击“部署代理”(请预先在远程计算机防⽕墙上开放相关端⼝,本例是把防⽕墙关掉)算机后,才可以做备份作业8.远程计算机重启后,再单击“重新连接”9.请输⼊有效的许可证10.此时提⽰已成功激活11.单击“运⾏或管理备份(B)”选项选项14.单击选择需要备份的分区15.保留默认选项16. 建议如下所⽰,输⼊备份⽂件存放⽬标⽹络路径,否则可能失败17. 单击此选项18. 请输⼊远程计算机具有管理权限的帐号和密码0 19. 单击此选项20. 请务必将此选项勾选上,否则可能备份不完整21. 单击“下⼀步(N)”22. 选择计划备份任务的时间,此处选择每周⽇的23:50进⾏备份23. 单击“下⼀步(N)”24. 单击“完成(F)”25. 此时备份作业已显⽰在此处备注1:请务必要将Symantec System Recovery服务器加⼊到域中,这样在选择备份⽬标计算机或备份⽂件的存放⽬标⽹络路径时才不会提⽰出错!备注2:如果要将⼀台Windows2008R2的服务器升级为额外域控,则必需要在原有域控上执⾏林扩展命令(adprep/forestprep),以及域扩展命令(adprep /domainprep),“adprep”⼯具可以在Windows2008R2的光盘⽬录support\adprep下找到。
besr使用
Problem问题Restoring Windows Server 2008 R2 or Windows 7 Using Backup Exec System Recovery (BESR) 2010 Symantec Recovery Disk (SRD)还原Windows Server 2008 R2或Windows 7的使用Backup Exec系统恢复(BESR)2010赛门铁克恢复磁盘(SRD)Solution解决方案Restore Preparation: 恢复方法:To get started, Insert the Symantec Recovery Disk.要开始,插入赛门铁克恢复磁盘。
Then power on or reboot the computer.然后接通电源或重新启动计算机。
A restore in which the hard disks are not replaced begins by cleaning the target partition.在其中一个硬盘不会被替换的清洁开始恢复目标分区。
Note: Performing a Clean operation on the target disk will remove all partition, data and boot information from the disk.注:执行对目标磁盘清理操作将删除磁盘上的所有分区,数据和信息引导。
To do this, perform the following steps:要做到这一点,请执行以下步骤:1. 1。
Select the Analyze tab选择分析标签2. 2。
Select Open Command Shell Window.选择打开命令shell窗口。
Once inside the Command Shell Window:一旦进入命令shell窗口:3. 3。
使用Symantec System Recovery备份与恢复域控制器的效果
BESR备份与恢复DCContents任务 (1)环境 (1)步骤 (2)备份系统 (2)恢复系统 (6)1、从本地文件恢复 (6)2、从网盘恢复 (6)恢复之后的状态 (10)结果 (12)总结: (12)任务1、BESR备份前,DC上有用户a1,a2,a32、BESR备份前,DC上有共享1.txt,2.txt3、恢复DC2,此时,DC上只有a1,a2,1.txt4、要求恢复之后,DC上只有a1,a2,1.txt5、在DC2上建立a4,可以同步6、在DC2上创建3.txt,可以同步环境DC1,DC2备份前状态:user\pwd:administrator\,备份后状态:user\pwd:administrator\123,安装SYSTEM RECOVERY在DC2上步骤备份系统完成备份设置备注:∙备份之后会产生两个文件,DC2.sv2i和dc2_C_Drive001.v2i,∙下次备份时,DC2.sv2i文件不发生变化,dc2_C_Drive001.v2i依据备份的次数进行变化,命名方法为dc2_C_Drive00X.v2i(X表示第几次备份)恢复系统1、从本地文件恢复2、从网盘恢复1、从光驱启动,放入恢复盘,进入如下界面2、配置网络参数3、映射网络驱动器4、输入凭证5、完成网络驱动器映射6、选择内容7、完成恢复之后的状态,(DC1没有开启)登录DC2,空密码提示错误,密码输入123,进入系统打开活动目录计算机和用户,在用户中看到用户a1,a2,a3。
这是我们不希望看到的。
打开NETLOGON目录,查看当前的文档,发现1.txt和2.txt都存在,这也不是我们希望看到的然后开启DC1,我们来看一下同步之后的结果,发现用户a3已经不存在了结果1、通过BESR恢复系统正常2、恢复后的状态中存在用户a1,a2,a33、恢复后文件夹NETLOGON中存在1.txt和2.txt4、同步之后,DC2中只有用户a1,a25、同步之后NETLOGON中的文件没发生变化6、在DC2中的活动目录发生的变化,将会在整个目录中进行更新总结:使用BESR恢复域控制器后,数据完全恢复,服务器可正常工作。
Symantec Systrem Recovry 2013 U盘版引导SOP
Symantec Recovry U盘版引导SOP目的:本引导光盘,原为出厂时随机配送两光盘,为Symantec安装程序光盘和Symantec Recovery恢复引导光盘。
经常发生客户处此引导光盘丢失,无法引导进入恢复系统从而无法正常恢复计算机。
因此采用U盘方式启动引导,不受光盘影响,所有程序及文件已备份至OneDriver。
方法:目前有三种U盘方式,方法一、方法二、方法三如果你不会制作WinPE,推荐采用第一种方法,简单方便,但是前提是客户电脑必须能正常启动;如有有好的U盘PE系统,推荐第三种方法;如果有全新U盘,可以采用第二种方法。
注意:所有恢复操作之前,请先将客户电脑上的Packard目录及其他重要文件拷贝到U盘或其他盘备份(若客户电脑蓝屏,可以使用U盘WinPE系统将重要文件拷贝至U盘)。
切记,请勿未备份直接操作!!!方法一:直接将BOOT.WIM引导文件拷贝在客户电脑上引导Symantec Recovery恢复系统。
(推荐)1、提取.WIM文件。
使用UltraISO软件或解压软件,打开Symantec官方的.ISO光盘文件,将里面\SOURCES\BOOT.WIM系统文件提取出来。
(OneDriver上有提取好的。
)2、将BOOT.WIM(请注意有32位和64位两种版本,请自己选择)文件拷贝到客户处Pre-NAT电脑上的任意目录。
3、安装EasyBCD程序至客户电脑。
4、双击打开刚刚安装EasyBCD程序,如图5、双单击 “添加新条目”选项,如图6、双单击 下方的“WinPE”选项,点击 路径:框右边的 查找图标,选择我们刚刚拷贝到电脑上的BOOT.WIM文件,然后再名称处输入我们的指定的名称。
比如Symantec-X64等等,然后单击“添加条目”,如图7、回到“编辑引导菜单”,我们就可以看到已经添加了一个引导项目Symantec-X64,点击右下角的“保存设置”如图,8、关闭所有程序,重启电脑,就可以看到我们添加的引导菜单了。
symantec recovery disk 的使用方法
Norton Ghost v14、15系列 symantec recovery disk 的使用方法:(1)、当系统崩溃、无法进入系统时,那只能通过Symantec Recovery Disk (SRD)或者Norton Ghost 的光盘进入系统恢复环境系统,才能恢复,设置这个LightsOut Restore ,可以无须光盘,即使系统无法进入,也能进入这个恢复环境;简而言之,LightsOut Restore利用磁盘上的软件恢复环境恢复系统,并不需要启动 CD,也就是说设置了LightsOut Restore ,可以无须光盘,就可以引导SRD 环境。
(2)、设置了LightsOut Restore可以无须光盘启动;恢复系统盘(通常是C 盘),必须在SRD环境中,只不过设置了LOR后,相当于安装了SRD(代替了光盘),相当于安装了双系统,系统启动时会跳出启动选项,一个是操作系统(XP 或VISTA),另一个就是SRD;不可以在windows状态下恢复系统盘,要恢复系统盘,系统会重新启动,然后引导到SRD环境中恢复。
(3)、安装完成Norton Ghost 后,打开主界面(文件)菜单,点击任务--会有个(LightsOut Recove设置创建恢复磁盘)大家可以根据设置向导添加驱动,设置网络,定义启动菜单的时间,中途需要插入Symantec Recovery Disk,按照要求上一步一步设置完成后重起,就可以看见多重启动菜单。
选择进入后就可以从网络远程或从硬盘恢复,要卸载这个功能也很简单,还是从(文件)菜单下,选择卸载LightsOut Recove就可以了。
(4)、 NortonGhost v12有简体中文完全光盘(iso)版,所以设置LightsOut Recove时,用原光盘(内含有Symantec Recovery Disk)创建恢复程序就可以了。
但是,Norton Ghost v 14.0、v 15.0这二个版本,目前本人没发现有简体中文光盘完全版,如果用英文原光盘版设置LightsOut Recove时,重起机器恢复镜像时界面是英文的。
Symantec System Recovery异机恢复至ESXI操作指南
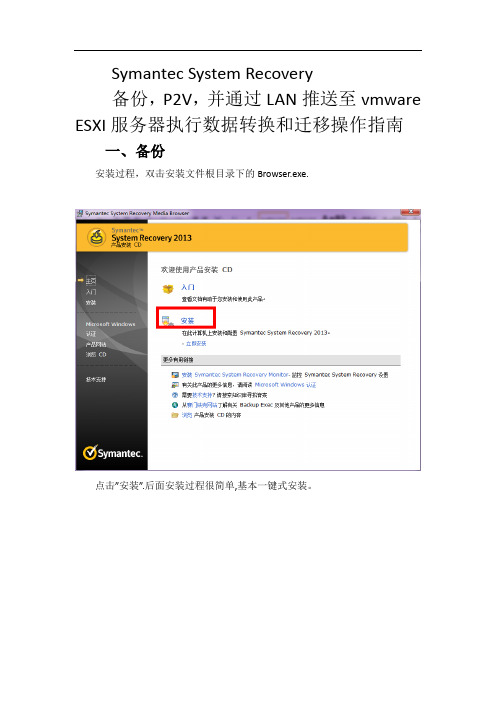
Symantec System Recovery备份,P2V,并通过LAN推送至vmware ESXI服务器执行数据转换和迁移操作指南一、备份安装过程,双击安装文件根目录下的Browser.exe.点击”安装”.后面安装过程很简单,基本一键式安装。
安装完毕后,重新启动,然后运行SSR。
打开后点击下一步,选择“以后激活”免费试用60天完全模块SSR。
后面两个勾都点掉就好。
配置完毕以后打开SSR。
点击“运行或管理备份”选好需要备份的磁盘和存储位置,开始备份。
按住ctrl选择所有需要备份的磁盘。
然后一直点下一步。
最后选择”立即运行备份”来执行备份操作。
注意:备份之前请停止数据库,之后给服务器做一次快照。
然后再执行备份活动。
二、数据迁移2.1 SSR部分打开ssr,点击“任务”-“一次性虚拟转换”之后,选择ESX/ESXI.选择备份文件以后,点击下一步。
在此输入ESXI 服务器IP和用户名与口令。
输入完成后点击“浏览”。
选择好数据存储后,新建一个文件夹,保存转换后的VMDK文件。
之后点击下一步,开始进行一次性虚拟化转换。
2.2vmware esxi部分转换完成之后打开vsphere client。
选择主机后,在数据存储中可以看到,我们之前选择的文件夹下生成了一个新的XX.VMDK文件。
此文件相当于我们计算机的硬盘。
然后我们新建一个虚拟机在配置处选择“自定义”,然后一直点下一步,直到选择虚拟硬盘界面。
选择“使用现有的虚拟磁盘”。
在文件路径处点“浏览”在数据存储中找到我们之前保存的XX.VMDK文件。
然后点击确定。
之后配置完成后,可以再“编辑设置”中更改虚拟服务器硬件配置编辑完成点击确定。
至此,完成数据格式转换以及数据迁移步骤。
然后点击打开虚拟机电源,开机,我们就可以看到一台全新的,和备份物理服务器完全相同的虚拟机了。
使用Symantec-System-Recovery-2011进行系统备份还原
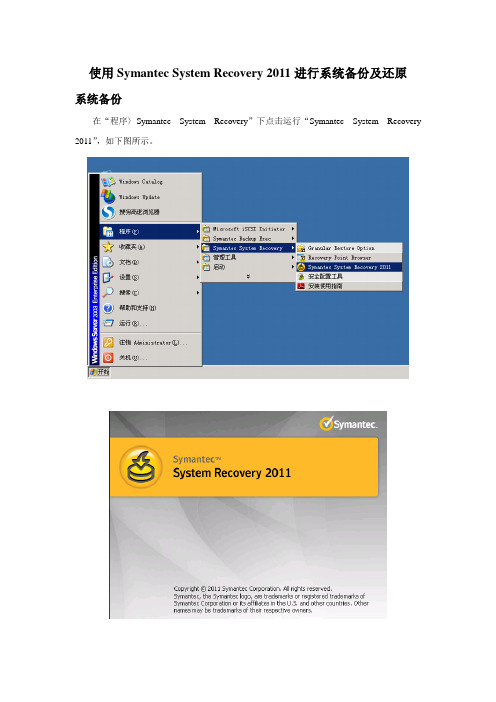
使用Symantec System Recovery 2011进行系统备份及还原系统备份在“程序〉Symantec System Recovery”下点击运行“Symantec System Recovery 2011”,如下图所示。
在打开页面后点击“任务〉一次性备份”,点击“下一步”。
如下图所示。
说明:系统备份一般在系统安装安毕后所有状态确定(即在该阶段基本应用无变化)后进行,因此,只需对其进行手动的一次性完整备份,从而减少对设备日常资源的消耗。
选择驱动器,即为选择分区,对于系统备份而言,我们选择C分区进行备份。
选择完成后点击“下一步”。
备份目标,即为将分区文件备份至何处,出于安全性及可靠性要求,我们将该文件备份至除系统分区(C分区)之外的分区即可。
选择完成后点击“下一步”。
在备份过程中,在“自定义恢复点文件名”下,可能根据需要对备份文件(恢复点文件)进行相应重命名,一次来标识文件的特殊含义。
在此我们增加“20130507”,表示为在2013年5月7日进行的系统备份。
修改完成后点击“下一步”。
进入下图所示页面后,点击“高级”按钮,在“高级选项”下,勾选“执行完全VSS 备份”项。
之后点击“下一步”。
进入下图所示页面后,确定相关配置信息无误后,点击“完成”即可。
下图所示为备份任务正在进行。
如下图所示,在备份工作完成后,显示“成功”,且无报错信息情况下,备份任务正常结束。
如下图所示,在“状态”页面,我们可以看到已生成的备份文件。
在备份目录下(此处为D:/本机系统备份),我们可以看到相关的备份文件,注意,里面的任何文件不可轻易删除,其中*.v2i格式的文件即为备份主文件(映像文件),其中“cjszf-back_C_Drive_20130507.v2i”文件即为我们本次任务生成的系统备份文件。
创建引导介质在对系统进行恢复的过程中,原系统已经无法使用,这就需要相关工具来引导设备,从而将原来的系统备份文件恢复至系统分区,下面我们就来介绍如何创建系统引导介质。
【原创】赛门铁克Ghost(克隆)简易使用图解教程——系统恢复、备份首选,ghost 11最新版本

【原创】赛门铁克Ghost(克隆)简易使用图解教程——系统恢复、备份首选Ghost 使用详解一、分区备份使用Ghost进行系统备份,有整个硬盘(Disk)和分区硬盘(Partition)两种方式。
在菜单中点击 Local(本地)项,在右面弹出的菜单中有3个子项,其中 Disk表示备份整个硬盘(即克隆)、Partition 表示备份硬盘的单个分区、Check 表示检查硬盘或备份的文件,查看是否可能因分区、硬盘被破坏等造成备份或还原失败。
分区备份作为个人用户来保存系统数据,特别是在恢复和复制系统分区时具有实用价值。
选Local→Partition→To Image 菜单,弹出硬盘选择窗口,开始分区备份操作。
点击该窗口中白色的硬盘信息条,选择硬盘,进入窗口,选择要操作的分区(若没有鼠标,可用键盘进行操作:T AB键进行切换,回车键进行确认,方向键进行选择)。
在弹出的窗口中选择备份储存的目录路径并输入备份文件名称,注意备份文件的名称带有 GHO 的后缀名。
接下来,程序会询问是否压缩备份数据,并给出3个选择:No 表示不压缩,Fast表示压缩比例小而执行备份速度较快,High 就是压缩比例高但执行备份速度相当慢。
最后选择 Yes 按钮即开始进行分区硬盘的备份。
Ghost 备份的速度相当快,不用久等就可以完成,备份的文件以 GHO 后缀名储存在设定的目录中。
二、硬盘克隆与备份硬盘的克隆就是对整个硬盘的备份和还原。
选择菜单Local→Disk→To Disk,在弹出的窗口中选择源硬盘(第一个硬盘),然后选择要复制到的目标硬盘(第二个硬盘)。
注意,可以设置目标硬盘各个分区的大小,Ghost 可以自动对目标硬盘按设定的分区数值进行分区和格式化。
选择 Yes 开始执行。
Ghost 能将目标硬盘复制得与源硬盘几乎完全一样,并实现分区、格式化、复制系统和文件一步完成。
只是要注意目标硬盘不能太小,必须能将源硬盘的数据内容装下。
巧用P2V迁移工具

巧用P2V迁移工具P2V迁移可分为四种类型:・将虚拟机器当成物理机器一样的部署操作系统与软件、・通过磁盘映像(Disk Image)的中介、・通过SAN的Raw Device模式・通过专用转换工具。
物理到虚拟迁移(Physical To Virtual,P2V)是导入服务器虚拟化将遇到的第一个问题。
尤其对于中大型IT环境,能否有效率地把数十台甚至上百台旧服务器,转换到虚拟环境中,更会影响到企业用户导入虚拟化的意愿,甚至是整个项目的成败。
P2V迁移的四种类型依执行程序,P2V迁移可分为四种类型:将虚拟机器当成物理机器一样的部署操作系统与软件、透过磁盘映像(Disk Image)的中介、透过SAN的Raw Device模式以及透过专用转换工具。
为虚拟机器依序部署操作系统与软件虚拟机器在逻辑上等同于一台物理机器,因此最基本的P2V方式,就是把物理机器原来使用的操作系统与应用程序,连同相关的驱动程序、更新与修补文件,逐一重新安装到转换后的虚拟机器上,就像是在一台新的实体机器上重新安装系统。
这种方法尽管确实可行,然而却是一种笨拙的方法,如果要转换的物理机器数量不多,还可容许一台台电脑逐一去安装操作系统与软件。
但若需要转换的计算机数量多达数十台甚至上百台,显然这种方法就行不通。
透过磁盘映像的中介若想省去重新安装系统与软件的麻烦,一种变通方式是透过磁盘映像的中介,利用Symantec Backup exec System Recovery或Acronis True Image这类磁盘映像(Disk Image)级的备份软件,先把物理机器的磁盘整个撷取成磁盘映像文件,然后再利用软件的还原功能,将映像文件还原到虚拟机器上使用。
由于磁盘映像文件包括了实体机器在特定时间点下的完整数据,用户可免除重新安装软件的麻烦。
而这种两段式方法是透过磁盘映像的中介,也可称为P2I2V(Physical To Image To Virtual)。
实体机转虚拟机
2017
Symantec System Recovery
实体机转虚拟机
一次性虚拟转换
Loeb.hong(洪立榮)
Symantec System Recovery(实体机转虚拟机)工具
电脑
Windows系统
Symantec System Recovery
备份文档_*.v2i格式
Hyper-V虚拟机
实体机转虚拟机(一次性虚拟转换)
一、一次性虚拟转换:
首先将已备份好了的Windows系统v2i格式文件。
01、开始转换v2i档案。
『图一』
2、
『图二』3、
『图三』4、
『图四』5、
『图五』6、
『图六』
7、
『图七』
8、提示:
选取的复原点包含EFI分割区,您无法将包含EFI分割区的复原点转换成下列虚拟磁碟格式
『图八』
9、点击确定
『图九』
10、这时要返回第02步的图二,选择虚拟格式:vhdx格式方可以转换。
『图十』11、
『图十二』13、
『图十四』15、
『图十六』17、
『图十七』
『图十八』19、
『图十九』20、转换初始化中。
『图二十』
21、转换计算时间,2vi文件越大转换的时间就越长。
我这里转换v2i文件大约36GB,转换时间大约需2到3个小时。
『图二十一』
22转换进度,剩余约39分钟完成转换工作。
『图二十二』23、完成了“一次性虚拟转换工作”
『图二十三』。
BESR异机恢复出错解决方法
How To: 如何在Backup Exec System Recovery的恢复光盘Symantec Recovery Disk里正确加载磁盘阵列卡驱动和网卡驱动?情形如何在Backup Exec System Recovery的恢复光盘Symantec Recovery Disk里正确加载磁盘阵列卡驱动和网卡驱动解释症状1. 在使用Symantec Recovery Disk (SRD)恢复光盘进行系统恢复时无法识别磁盘驱动器;2. 使用Restore Anyware Option对系统恢复后,开机时机器蓝屏无法进入系统,蓝屏错误代码为0x0000007B,或者系统在加载时自动重启;3. 无法启动恢复环境中的网络服务,因而无法对存放在远程文件服务器的恢复点进行还原;原因Symantec Recovery Disk恢复光盘中并没有包含该主机所使用的磁盘阵列卡驱动或网卡驱动;通常在恢复光盘已经包含部分主流的磁盘阵列卡驱动,如果所使用的磁盘阵列卡在SRD中没有包含驱动,则需要单独下载并在SRD中载入驱动。
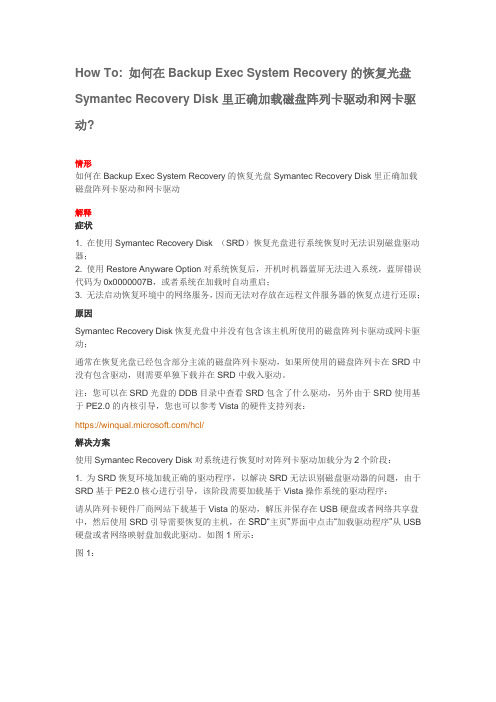
注:您可以在SRD光盘的DDB目录中查看SRD包含了什么驱动,另外由于SRD使用基于PE2.0的内核引导,您也可以参考Vista的硬件支持列表:https:///hcl/解决方案使用Symantec Recovery Disk对系统进行恢复时对阵列卡驱动加载分为2个阶段:1. 为SRD恢复环境加载正确的驱动程序,以解决SRD无法识别磁盘驱动器的问题,由于SRD基于PE2.0核心进行引导,该阶段需要加载基于Vista操作系统的驱动程序:请从阵列卡硬件厂商网站下载基于Vista的驱动,解压并保存在USB硬盘或者网络共享盘中,然后使用SRD引导需要恢复的主机,在SRD“主页”界面中点击“加载驱动程序”从USB 硬盘或者网络映射盘加载此驱动。
如图1所示:图1:注:如果由于网卡没有驱动而无法访问网络,请参考第三步解决网络问题。
Symantec System Recovery使用方法
1、Symantec System Recovery
SymantecSystem Recovery(简称SSR),是Microsoft Windows桌面计算机及笔记本电脑磁盘式系统完整回复解决方案。
当系统发生故障或数据遗失,Symantec System Recovery能迅速可靠地令系统还原,协助IT管理人员轻松达到严格的复原时间目标。
且在不中断服务器作业的状况下,精确撷取所有档案,包括使用中的操作系统、应用程序、系统设定、设置、和档案等,进行实时或特定时间点(point-in-time)备份。
Symantec System Recovery的备份功能十分强大,他能完美克隆数据且不改变文件格式,非常适用于服务器系统备份,和gohost相比,原理一样,但恢复数据更准确。
下载程序安装文件和破解破解工具,不破也行,可以试用60天。
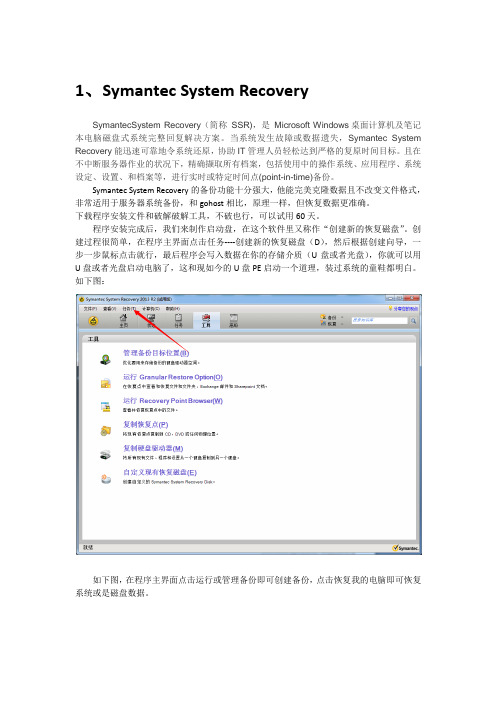
程序安装完成后,我们来制作启动盘,在这个软件里又称作“创建新的恢复磁盘”。
创建过程很简单,在程序主界面点击任务----创建新的恢复磁盘(D),然后根据创建向导,一步一步鼠标点击就行,最后程序会写入数据在你的存储介质(U盘或者光盘),你就可以用U盘或者光盘启动电脑了,这和现如今的U盘PE启动一个道理,装过系统的童鞋都明白。
如下图:
如下图,在程序主界面点击运行或管理备份即可创建备份,点击恢复我的电脑即可恢复系统或是磁盘数据。
使用Symantec-System-Recovery-2011进行系统备份及还原
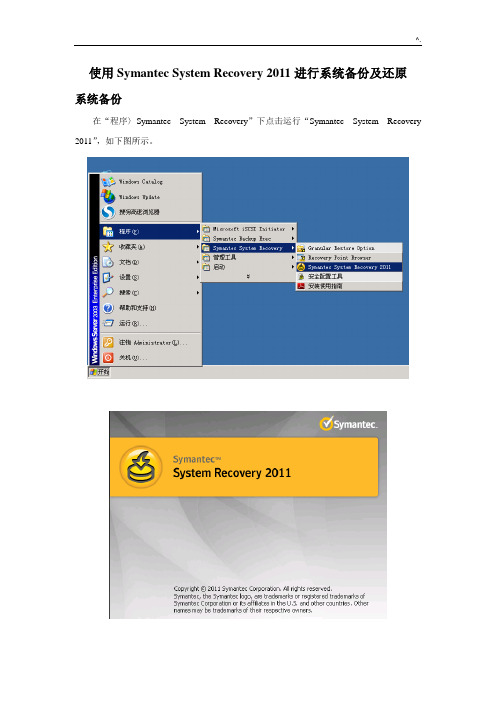
使用Symantec System Recovery 2011进行系统备份及还原系统备份在“程序〉Symantec System Recovery”下点击运行“Symantec System Recovery 2011”,如下图所示。
在打开页面后点击“任务〉一次性备份”,点击“下一步”。
如下图所示。
说明:系统备份一般在系统安装安毕后所有状态确定(即在该阶段基本应用无变化)后进行,因此,只需对其进行手动的一次性完整备份,从而减少对设备日常资源的消耗。
选择驱动器,即为选择分区,对于系统备份而言,我们选择C分区进行备份。
选择完成后点击“下一步”。
备份目标,即为将分区文件备份至何处,出于安全性及可靠性要求,我们将该文件备份至除系统分区(C分区)之外的分区即可。
选择完成后点击“下一步”。
在备份过程中,在“自定义恢复点文件名”下,可能根据需要对备份文件(恢复点文件)进行相应重命名,一次来标识文件的特殊含义。
在此我们增加“20130507”,表示为在2013年5月7日进行的系统备份。
修改完成后点击“下一步”。
进入下图所示页面后,点击“高级”按钮,在“高级选项”下,勾选“执行完全VSS 备份”项。
之后点击“下一步”。
进入下图所示页面后,确定相关配置信息无误后,点击“完成”即可。
下图所示为备份任务正在进行。
如下图所示,在备份工作完成后,显示“成功”,且无报错信息情况下,备份任务正常结束。
如下图所示,在“状态”页面,我们可以看到已生成的备份文件。
在备份目录下(此处为D:/本机系统备份),我们可以看到相关的备份文件,注意,里面的任何文件不可轻易删除,其中*.v2i格式的文件即为备份主文件(映像文件),其中“cjszf-back_C_Drive_20130507.v2i”文件即为我们本次任务生成的系统备份文件。
创建引导介质在对系统进行恢复的过程中,原系统已经无法使用,这就需要相关工具来引导设备,从而将原来的系统备份文件恢复至系统分区,下面我们就来介绍如何创建系统引导介质。
Symantec System Recovery 2013
Symantec™ System Recovery 2013灾难恢复领域的金牌标准产品资料: 备份和灾难恢复概述Symantec™ System Recovery 2013 可通过一款统一的解决方案为服务器、台式机和便携式计算机提供出色的备份和灾难恢复功能,从而使企业在几分钟内即可从停机或灾难中恢复。
借助获得专利的 Restore Anyware™ 技术,IT 管理员可随时随地、迅速而准确地将所需内容还原到裸机或不同硬件,包括所有物理计算机和虚拟机,以及文件、文件夹和粒度应用程序对象。
与其他技术不同的是,Symantec System Recovery 还可提供跨平台的物理到虚拟 (P2V)、虚拟到虚拟 (V2V) 和虚拟到物理 (V2P) 恢复功能,使之成为物理和虚拟环境的完美补充。
“有了 Symantec SystemRecovery,就能成功地恢复服务器。
以前,恢复需要耗费我们长达8 小时的时间。
如今,在短短的30 分钟内,我们便可非常快地恢复服务器。
”Occidental Technical Group 的Brian TiradoSymantec System Recovery 可主动保护便携式计算机、服务器和虚拟机,而不影响员工的工作效率或 IT 服务。
该解决方案还提供了快速灵活的恢复功能,让IT 管理员可以轻松地满足苛刻的恢复时间目标 (RTO)、还原点目标 (RPO) 和服务级别协议要求。
它最适用于单个服务器,与 Symantec™System Recovery Management Solution 结合使用时,可轻松扩展到规模较大的环境。
Symantec System Recovery 保护着 100 多万个系统,堪称当今市面上最可信赖、最为可靠的备份和灾难恢复解决方案之一。
主要优势•一款基于映像的统一解决方案,既可保护虚拟机,又可保护物理计算机。
•自动备份服务器、虚拟机、台式机和便携式计算机,而不影响用户的工作效率。
- 1、下载文档前请自行甄别文档内容的完整性,平台不提供额外的编辑、内容补充、找答案等附加服务。
- 2、"仅部分预览"的文档,不可在线预览部分如存在完整性等问题,可反馈申请退款(可完整预览的文档不适用该条件!)。
- 3、如文档侵犯您的权益,请联系客服反馈,我们会尽快为您处理(人工客服工作时间:9:00-18:30)。
Symantec System Recovery Disk Help^Back to topIf Windows fails to start or does not run normally, you can still recover your computer. You can use the Symantec System Recovery Disk and an available recovery point or a virtual disk that you created from a recovery point.The Symantec System Recovery Disk lets you run a recovery environment that provides temporary access to Symantec System Recovery 2011 recovery features. For example, you can access the recovery features of Symantec System Recovery 2011 to restart the computer into its previous, usable state.^Back to topThe Symantec System Recovery Disk lets you boot a computer that can no longer run the Windows operating system. Symantec System Recovery Disk is included with Symantec System Recovery 2011. When you boot your computer using the Symantec System Recovery Disk, a simplified version of Windows starts that runs a recovery environment. In the recovery environment, you can access the recovery features of Symantec System Recovery 2011.1.If you store your recovery points on a USB device, attach the device now (for example, anexternal hard drive).2.Insert the CD containing the Symantec System Recovery Disk into the media drive of thecomputer. If your Symantec System Recovery Disk is on a USB device, plug in the USB device into the media drive of the computer.If a computer manufacturer installed Symantec System Recovery 2011, the recoveryenvironment already could be installed on your computer's hard drive. Either watch your computer monitor after the computer restarts for on-screen instructions, or refer to your manufacturer's documentation.3.Restart the computer.If you cannot start the computer from the CD/DVD or the USB device, you might need to change the startup settings on your computer.See Configuring a computer to start from a CD/DVD or a USB device.4.As soon as you see the prompt Press any key to boot from CD/DVD or USB device, pressa key to start Symantec System Recovery Disk.5.Read the license agreement, and then click Accept.If you decline, you cannot start Symantec System Recovery Disk, and your computerrestarts.Configuring a computer to start from a CD/DVD or a USB device^Back to topYour Symantec System Recovery Disk might be on a CD/DVD or a USB device. Accordingly, to run Symantec System Recovery Disk, you must be able to start your computer using a CD/ DVD or a USB device.See Booting a computer by using the Symantec System Recovery Disk.To configure a computer to start from a CD/DVD or a USB device1.Turn on your computer.2.As the computer starts, watch the bottom of the screen for a prompt that tells you how toaccess the BIOS setup.Generally, you need to press the Delete key or a function key to start your computer's BIOS program.3.In the BIOS setup window, select Boot Sequence, and then press Enter.4.Follow the on-screen instructions to set the CD/DVD or the USB device to be the first startupdevice in the list.5.Place your Symantec System Recovery Disk CD/DVD into the media drive. If your SymantecSystem Recovery Disk is on a USB device, plug in the USB device into the media drive.6.Save the changes and exit the BIOS setup to restart the computer with the new settings.7.Press any key to start Symantec System Recovery Disk.When you start your computer with the Symantec System Recovery Disk CD/DVD or USB device in the drive, you see a prompt to Press any key to boot from CD/DVD or USB device. If you do not press a key within five seconds, your computer attempts to start from the next startup device.^Back to topIf you suspect that your hard disk is damaged, you can examine it for errors.To prepare to recover a computer by checking the hard disk for errors1. Boot the computer by using the Symantec System Recovery Disk.2.In the Analyze panel of Symantec System Recovery Disk, click Check Hard Disks forErrors.3.Select the drive that you want to check.4.Select any of the following options.▪Automatically fix file system errorsFixes the errors on the selected disk. If you do not select this option, errors aredisplayed but are not fixed.▪Find and correct bad sectorsLocates the bad sectors and recovers readable information.5.Click Start.Recovering a computer using the Symantec System Recovery Disk^Back to topIf you have a recovery point for the hard drives that you want to recover, you can fully recover your computer. Or you can recover a hard drive back to the state it was in when the recovery point was created.You can also recover files and folders from within a recovery point.See Recovering files and folders using the Recovery Point Browser in Symantec System Recovery Disk.To recover a computer using the Symantec System Recovery Disk1.Boot the computer by using the Symantec System Recovery Disk.2.On the Home panel, click Recover My Computer.3.In the Welcome to the Recover My Computer Wizard panel, click Next.4.In the Select a Recovery Point to Restore panel, select how you want to view availablerecovery points in this panel, and then set the options you want.5.Click Next.6.In the Drives to Recover panel, set the options you want.7.Click Next.8.Review the recovery options that you selected.You can optionally select Reboot when finished. This option automatically restarts the computer after the recovery process finishes.9.Click Finish, and then click Yes to begin the recovery process.Select a Recovery Point to Restore options^Back to topYou use the Select a Recovery Point to Restore panel to help you choose the recovery point that you want to use to restore your computer.You can view available recovery points by the following:▪The date they were created▪ A specific recovery point file name▪The system index that a recovery point createsThe available options in this panel depend on how you view the recovery points. See Recovering a computer using the Symantec System Recovery Disk. Table: Select a Recovery Point to Restore optionsDrives to Recover options^Back to top You can select each drive that you want to recover.If necessary, you can add or remove recovery points from the list. If you recover your computer, you can select the drive on which Windows is installed. On most computer systems, this drive is the C drive. In the recovery environment, the drive letters and labels might not match what appears in Windows. You might need to identify the correct drive based on its label, or the name that is assigned to it. Or, you may need to browse the files and folders in the recovery point.See Recovering a computer using the Symantec System Recovery Disk.Table: Drives to Recover optionsAdd Drive to Recover options^Back to topYou can use Add Drive to Recover to add another drive from within a recovery point that you want to restore. For example, a data drive.See Drives to Recover options.See Recovering a computer using the Symantec System Recovery Disk.Table: Add Drive to Recover optionsEdit Target Drive options^Back to topThe Edit target drive dialog box appears when you click Edit in the Drives to Recover panel of the wizard. You can select a drive that you want to recover. You can then set the options that you want to perform during the recovery process.See Drives to Recover options.See Recovering a computer using the Symantec System Recovery Disk. Table: Edit Target Drive optionsRecovering a computer from a virtual disk file using the Symantec System Recovery Disk^Back to topUsing Symantec System Recovery Disk, you can recover your computer from within a virtual disk file (.vmdk or .vhd). If you have a virtual disk for the hard drives that you want to recover, you can fully recover your computer. Or, you can recover another hard drive back to the state it was in when the original virtual disk was created.1.Boot the computer by using the Symantec System Recovery Disk.2.On the Home panel, click Recover My Computer.3.In the Welcome to the Recover My Computer Wizard panel, click Next.4.In the Select a Recovery Point to Restore panel, in the View recovery points by list,select Filename.5.Click Browse.If the virtual disk file is located on a network instead, you may need to first click Map a network drive. You can then specify a shared network folder path and assign a drive letter to it so you can browse the location.6.In the Open dialog box, in the Files of type list, select Virtual Disks (*.vhd, *.vmdk).7.Locate and select a virtual disk file, and then click Open.8.Click Next.9.In the Target Drive panel, select the target drive where you want to restore the virtual disk.10.Optionally, do any of the following:▪Click Delete Drive.Delete a selected drive in the list to make space available to restore your virtual disk.When you click Delete Drive, the drive is only marked for deletion. The actual deletionof the drive takes place after you click Finish in the wizard.▪Click Undo Delete.If you delete a drive and then change your mind, click Undo Delete to return the driveto the list.11.Click Next.12.If necessary, enter the product license key.A license key is required to use Restore Anyware when you recover a system from a virtualdisk file.13.Click Next.14.In the Recovery Options panel, set the options you want.15.Click Next.16.Review the recovery options that you selected.You can optionally select Reboot when finished. This option automatically restarts the computer after the recovery process finishes.17.Click Finish, and then click Yes to begin the recovery process.Target Drive options^Back to topIf there is insufficient space to restore your virtual disk, you can delete drives to make unallocated space available.See Recovering a computer from a virtual disk file using the Symantec System Recovery Disk. Table: Target Drive optionsRestore Anyware options^Back to topRestore Anyware lets you recover an operating system drive to a computer that has different hardware from the original computer.See Recovering a computer from a virtual disk file using the Symantec System Recovery Disk. Table: Restore Anyware optionsRecovery options^Back to topYou can set various options that you want to perform during the recovery process of a virtual disk. The options that are available depend on the target drive that you selected earlier in the wizard.See Recovering a computer from a virtual disk file using the Symantec System Recovery Disk. Table: Recovery optionsRecovering files and folders using the Recovery Point Browser in Symantec System Recovery Disk^Back to topYou can use the Symantec System Recovery Disk to recover any files and folders that are lost, damaged, changed, or deleted on your computer. For example, suppose you created a recoverypoint three days ago. Since that time, you accidentally changed an important folder that prevents Windows from starting properly. In such cases, you can start your computer using the Symantec System Recovery Disk. You can open the recovery point from three days ago inside the Recovery Point Browser, select the original folder, and recover it.See Recovering a computer using the Symantec System Recovery Disk.To recover files and folders using the Recovery Point Browser in Symantec System Recovery Disk1.Boot the computer by using the Symantec System Recovery Disk.2.In the browser window of Symantec System Recovery Disk, on the left side of the window,click Recover.3.In the Recover Data on My Computer panel, click Recover My Files.4.Do one of the following:▪If Symantec System Recovery Disk finds recovery points on your computer, select a recovery point from the list, and then click OK.▪If Symantec System Recovery Disk cannot locate any recovery points, you are prompted to browse to a location. Click OK to dismiss the message. In the SelectRecovery Point dialog box, browse to a recovery point, and then click OK.5.In the tree view pane of the Recovery Point Browser, double-click the drive that contains thefiles or folders that you want to restore.6.In the content pane of the Recovery Point Browser, select the files or folders that you want torestore.7.Click Recover Files.Where possible, the Recover Items dialog box automatically completes the Recover to this folder text box with the original path from which the files originated. If the original location does not include a drive letter you must type the drive letter at the beginning of the path.While in Symantec System Recovery Disk, drive letters and labels might not match what appears in Windows. You might have to identify the correct drive based on its label, which is the name assigned to it.8.If the original path is unknown or you want to restore the selected files to a different location,click Browse to locate the destination.Select a Recovery Point options^Back to topYou use the Select a Recovery Point panel to help you choose the recovery point that you want to use to restore files and folders to your computer.You can view available recovery points by the following:▪The date they were created▪ A specific recovery point file nameSee Recovering a computer using the Symantec System Recovery Disk.Table: Select a Recovery Point optionsAbout backing up a computer by using the Symantec System Recovery Disk^Back to topUsing a valid license key, you can create independent recovery points using the Back Up My Computer feature in Symantec System Recovery Disk. These types of backups are sometimes known as cold backups or offline backups. You create recovery points of a partition without the need to install Symantec System Recovery 2011 or its agent.With a cold backup, all files are closed when the backup occurs. You do not copy any data that may be in the middle of being updated or accessed on the desktop or server. Cold backups are particularly useful for databases. They ensure that no files are written to or accessed at any time during the backup so you have a complete recovery point.You can also use the Symantec System Recovery Disk to create recovery points if you experience any of the following:▪ A level of corruption prevents you from starting Windows on the computer.▪Symantec System Recovery 2011 does not function properly while it runs on a Windows operating system.▪You want to back up the condition of a damaged system before you recover. For example, suppose a server or desktop is severely damaged. You can use the Symantec SystemRecovery Disk to back up what remains of the system. Then, you can recover what you can later, after you restore an independent recovery point.When you create a backup using Symantec System Recovery Disk, you are prompted for a license key only for the following scenarios:▪You use the original, shipping version of the Symantec System Recovery Disk to create a backup of a computer. The computer does not have Symantec System Recovery 2011installed.▪The computer that you back up using the original, shipping version of Symantec System Recovery Disk has an unlicensed installation of Symantec System Recovery 2011.▪You create a custom Symantec System Recovery Disk on a computer that has an unlicensed installation (evaluation version) of Symantec System Recovery 2011. You then use thecustom Symantec System Recovery Disk. You can use it to create a backup of a computer that does not have an installation of Symantec System Recovery 2011.▪You did not add a license key at the time you create your own customized Symantec System Recovery Disk.See the Symantec System Recovery 2011 User's Guide for information about creating your own custom Symantec System Recovery Disk.See Backing up a computer by using the Symantec System Recovery Disk.^Back to topUsing a valid license key, you can create independent recovery points using the Back Up My Computer feature in Symantec System Recovery Disk. These types of backups are sometimes known as a cold backups or offline backups. You create recovery points of a partition without the need to install Symantec System Recovery 2011 or its agent.See About backing up a computer by using the Symantec System Recovery Disk.To back up a computer by using the Symantec System Recovery Disk1.If you intend to store the resulting recovery point on an external USB hard drive, attach thedevice to the computer now.e the Symantec System Recovery Disk to boot the computer that you want to back up.3.On the Home panel, click Back Up My Computer.4.Click Next.5.If you are prompted, on the Specify License Key panel, enter a valid license key.6.Click Next.7.On the Drives panel, select one or more drives that you want to back up.8.Click Next.9.On the Backup Destination panel, set the destination options you want.10.Click Next.11.On the Options panel, set the recovery point options you want.12.Click Next.13.Click Finish to run the backup.14.When the backup is finished, click Close to return to the main Symantec System RecoveryDisk window.Backup Destination options^Back to topYou can specify the location where you want the recovery point stored after it is created. You can also rename the recovery point file name.See Backing up a computer by using the Symantec System Recovery Disk.Table: Backup Destination optionsOptions for backing up a computer by using the Symantec System Recovery Disk^Back to topYou can set the compression level for a recovery point. You can also add a description to the recovery point and enable other advanced options.See Backing up a computer by using the Symantec System Recovery Disk.Table: Options for backing up a computer by using the Symantec System Recovery DiskAdvanced options^Back to topLets you set the advanced options that you want to be associated with a recovery point, such as password protection.See Options for backing up a computer by using the Symantec System Recovery Disk .SeeBacking up a computer by using the Symantec System Recovery Disk .Table: Advanced optionsAbout using the networking tools in Symantec System Recovery Disk^Back to topIf you store your recovery points on a network, you need access to the network. This access lets you restore your computer or your files and folders from Symantec System Recovery Disk. The Symantec System Recovery Disk includes a variety of networking tools that you can use to assist you with recovery.▪On the Network panel in Symantec System Recovery Disk, click Start My Networking Services.To verify the connection to the network, you can map a network drive.Mapping a network drive from within Symantec System Recovery DiskSee About using the networking tools in Symantec System Recovery Disk.Using the pcAnywhere thin host for a remote recovery^Back to topThe Symantec System Recovery Disk includes a pcAnywhere thin host. It lets you remotely access a computer in the recovery environment. The pcAnywhere thin host contains the minimum settings that are needed to support a single-use remote control session. The thin host requires an IP address for hosting a remote control session.See About using the networking tools in Symantec System Recovery Disk.After you start the thin host from Symantec System Recovery Disk, it waits for a connection from a remote computer. You can connect to the thin host to remotely manage a recovery or to perform other tasks in Symantec System Recovery Disk. You must use Symantec pcAnywhere to connect to the thin host.See Remotely connecting to the pcAnywhere thin host.To start the pcAnywhere thin host▪On the Network panel in Symantec System Recovery Disk, click Start the pcAnywhere Thin Host.The networking services are started, if necessary. The thin host waits for a connection.Remotely connecting to the pcAnywhere thin host^Back to topSymantec pcAnywhere lets you remotely connect to a computer that is running in the recovery environment. The computer must be running the pcAnywhere thin host. This host is included in theSymantec System Recovery Disk. The host also must be available and waiting for a connection. When the host and the client computer are connected, the client computer can remotely manage a recovery. Or, the client computer can perform other tasks that are supported in Symantec System Recovery Disk.1.Ensure that the computer to be remotely managed (the host) has started in SymantecSystem Recovery Disk. Also, ensure that the pcAnywhere thin host is available and waiting fora connection.2.Obtain the IP address of the thin host computer.3.On the client computer, in Symantec pcAnywhere, configure a remote connection item.For more information, see the Symantec pcAnywhere User's Guide.4.When you configure the connection in pcAnywhere, do the following:▪Select TCP/IP as the connection type.▪Specify the IP address of the host computer.▪Choose to automatically log on to the host on connection.If you do not include the logon information, you are prompted for it when you connectto the thin host.▪Type the following log on name:symantec▪Type the following password:recover5.The thin host shuts down when there is an attempt to connect by using any incorrectconfiguration settings.6.You can prevent unauthorized users from tampering with your settings. You can also preventusers from trying to launch a session without your permission. To do so, you can set apassword for your remote connection item.7.This option is available in the Remote Properties window on the Protect Item tab. Thethin host does not support encryption.8.In pcAnywhere, start the remote control session.If the connection attempt is unsuccessful, the thin host must be restarted on the hostcomputer before you attempt to connect again.9.Remotely perform the necessary tasks on the host computer.The remote control session ends when the thin host is closed. It is also closed when the thin host computer is restarted, or when the remote control session is ended.After the host computer starts Windows, the client computer can deploy and connect a thin host on the computer. The connection can help you verify the success of tasks that were performed in the recovery environment.See Using the pcAnywhere thin host for a remote recovery.See About using the networking tools in Symantec System Recovery Disk.Mapping a network drive from within Symantec System Recovery Disk^Back to topIf you started the networking services after you started the recovery environment, you can map a network drive. This mapping lets you browse to that drive and select the recovery point that you want to restore. Or, if you create backups from the recovery environment, you can select a destination that resides on a network location.See About using the networking tools in Symantec System Recovery Disk.If there is no DHCP server or the DHCP server is unavailable, you must provide a static IP address. You must also provide a subnet mask address for the computer on which you are running Symantec System Recovery Disk.See Configuring network connection settings.After you provide the static IP address and subnet mask address, you can enter the recovery environment. However, there is no way to resolve computer names. When you run the Recover My Computer wizard or the Recovery Point Browser, you can only browse the network by using the IP addresses to locate a recovery point. You can map a network drive so that you can locate the recovery points more effectively. Or, you can use the mapped network drive as a destination for recovery points that you create from within the recovery environment.To map a network drive from within Symantec System Recovery Disk1.In Symantec System Recovery Disk, on the Network panel, click Map a Network Drive.2.Map a network drive by using the UNC path of the computer on which the recovery point islocated.For example: \\computer_name\share_name or \\IP_address\share_nameYou can also map a network drive from within the Recover My Computer wizard orthe Back Up My Computer wizard in Symantec System Recovery Disk.See Using the pcAnywhere thin host for a remote recovery.Configuring network connection settings^Back to topYou can access the Network Configuration window to configure network settings while running in the Symantec System Recovery Disk environment.To configure network connection settings1.In the Symantec System Recovery Disk environment, click Network, and thenclick Configure Network Connection Settings.2.If you are prompted to start networking services, click Yes.See About using the networking tools in Symantec System Recovery Disk.Getting a static IP address^Back to topYou can restore a recovery point that is located on a network drive or share. Sometimes, however, you cannot map a drive or browse to the drive or share on the network to access the recovery point. The lack of an available DHCP service can cause such a failure. In such cases, you can assign a unique static IP address to the computer that is running the recovery environment. You can then map to the network drive or share.See Configuring network connection settings.See About using the networking tools in Symantec System Recovery Disk.To get a static IP address1.In the Symantec System Recovery Disk environment, click Network, and thenclick Configure Network Connection Settings.2.In the Network Adapter Configuration dialog box, click Use the following IP address.3.Specify a unique IP address and subnet mask for the computer that you want to restore.Be sure that the subnet mask matches the subnet mask of the network segment.4.Click OK.5.Click Close to return to the recovery environment's main menu.6.In the Network panel, click Ping a Remote Computer.7.Type the address of the computer that you want to ping on the network segment.8.Click OK.If you specified a computer name or a computer name and domain as the address method, make note of the IP address that is returned.If communication to the storage computer operates as expected, you can use the MapNetwork Drive utility to map a drive to the recovery point location.^Back to top You can view various properties of a recovery point by using the Recovery Point Browser.See Viewing the properties of a drive within a recovery point.To view the properties of a recovery point1.Do one of the following:▪In Symantec System Recovery 2011, on the View menu, click Tools. Click Run Recovery Point Browser.▪On the Windows Start menu, click Programs > Symantec System Recovery 2011 > Recovery Point Browser.2.In the Recovery Point Browser, in the tree panel, select the recovery point file name that youwant to view.3.Do one of the following:▪On the File menu, click Properties.▪Right-click on the recovery point file name, and then click Properties.Recovery Point Properties^Back to topThe following table describes the information available on the Recovery Point Properties dialog box. This dialog box is available from the Recovery Point Browser.Table: Recovery Point Properties^Back to top You can view the properties of a drive within a recovery point:See Viewing the properties of a recovery point.To view the properties of a drive within a recovery point1.Do one of the following:。
