DR356-2-251中文资料
Canon DR-C225W II 扫描仪说明书
SPECIFICATIONS Type:Office Document Scanner Document Feeding :Automatic or Manual Document Size (U-Turn Path)Width: 2.0” – 8.5” Length: 2.12” – 14.0”Document Size (Straight Path)Width: 2.0” – 8.5” Length:2.12” – 14.0”Long Document Mode Up to 118.1"Folio Mode Up to 11” x 17"Document Weight:U-Turn Path: 14 – 34 lb. Bond Straight Path: 11 – 58 lb. Bond Feeder Capacity: Up to 30 Sheets Grayscale: 8-bit Color:24-bitScanning Element: One-Line Contact Image Sensor (CMOS)Light Source: RGB LEDScanning Modes: C olor, Grayscale, Black and White Color Dropout: RGB Optical Resolution: Up to 600 dpiOutput Resolution:100/150/200/240/300/400/600 dpiMax. Scanning Speeds *Simplex DuplexBW/Grayscale /Color Up to 25 ppm Up to 50 ipmInterface:DR-C225 II USB 2.0DR-C225W II USB 2.0 or Wi-Fi®Dimensions (H x W x D): 8.7’’ x 11.8’’ x 6.1’’ (with trays closed)Weight:DR-C225 II 5.95 lb.DR-C225W II6.17 l b.As an ENERGY STAR Partner, Canon U.S.A., Inc. has certified this model as meeting the ENERGY STAR energy efficiency criteria through an EPA recognized certification body. ENERGY STAR and the ENERGY STAR mark are registered U.S. marks. Canon is a registered trademark of Canon Inc. in the United States and may also be a registered trademark or trademark in other countries. imageFORMULA and CapturePerfect are registeredtrademarks of Canon Electronics, Inc. Microsoft, Sharepoint and Windows are either registered trademarks or trademarks of Microsoft Corporation in the United States and/or other countries. Mac is a registered trademark of Apple Inc. Wi-Fi is a registered trademark of the Wi-Fi Alliance. The name EPEAT is a registered trademark of EPEAT Inc. The EPEAT logo is a trademark of EPEAT Inc. Subscription to a third party cloud service is required for certain software, and is subject to third party cloud service providers terms and conditions. Neither Canon Inc. nor Canon U.S.A., Inc. represents or warrant any third-party product or feature referenced hereunder. All other referenced product names and marks are trademarks of their respective owners. The bundled software contains multiple components, some of which are manufactured by third parties. To the extent that such third party offerings come with limited warranties, such limited warranties are hereby passed to the purchaser, and Canon shall have no obligation or any liability with respect to such third-party offerings. Specifications and availability subject to change without notice. Not responsible for typographical errors.©2020 Canon U.S.A., Inc. All rights reserved.0320-DR-C225II/C225WIIB-PDF-IH* E xamples based on typical settings, rated in pages/images per minute with letter-sized documents, portrait-feeding direction, up to 200 dpi. Actual processing speeds may vary based on PC performance and application. **T he facts and product statistics about ErP Lot 6, EU RoHS and WEEE were obtained from Canon Electronics Inc. as of 2018. ***Calculations based on scanning speed and assumed daily time of use.Power Consumption:DR-C225 II 12.7 W or Less (Energy Saving Mode: 1.7 W or Less)DR-C225W II 15.6 W or Less (Energy Saving Mode: 4.3 W or Less)Suggested Daily Volume: Approx. 1,500 Scans ***Supported Microsoft Windows OS:W indows ® 7/8/8.1/10 Service Pack 1 or later (32-bit/64-bit) or later, Windows ® Server 2008 R2 2012/R2 2016 Service Pack 1 or later Supported MAC OS: 10.11 (DR-C225 II only), 10.12, 10.13Bundled Windows Software:I SIS/TWAIN Driver; Canon CaptureOnTouch, Downloadable Windows Software :Nuance eCopy PDF Pro Office, Cardiris Bundled MAC Software: T WAIN Driver; Canon CaptureOnTouch Downloadable Mac Software: CardirisOptions: Exchange Roller Kit, Flatbed Scanner Unit 102, Flatbed Scanner Unit 201, eCarePAK Extended Service Other Features:A utomatic Color Detection, Automatic Page SizeDetection, Automatic Resolution Setting, Background Smoothing, Character Emphasis, Color Dropout/Red Color Enhance, Deskew, Duplex, Edge Emphasis, Face-Up Feeding, Folio Mode, Image Rotation, Long Document Mode, Moiré Reduction, MultiStream, Pre-Scan, Prevent Bleed-Through/RemoveBackground, Shadow Cropping / Removal, Simplex, Skip Blank Page, Text Enhancement, Text Orientation Recognition, Three-Dimensional Color Correction, Ultrasonic Double-Feed Detection, User PreferencesItem Number:DR-C225 II 3258C002AA DR-C225W II 3259C002AAENVIRONMENT IN MINDThe DR-C225 II and DR-C225W II scanners are registered EPEAT silver and meet ENERGY STAR® guidelines for energy efficiency. They also comply with the ErP Lot 6 directive for energy consumption and the EU RoHS and WEEE directivesfor the reduction of hazardous substances and waste products.**CUSTOMER CAREFor investment protection, eCarePAK options are available to extend service beyond the initial three-year advancedexchange warranty period. This helps save on costs associated with post-purchase maintenance and helps maximize uptime throughout the product life.。
2512中文资料

For more information, contact Pulse Consumer Division Applications Engineering via e-mail at: consumer@.
46
G003.U (2/07)
元器件交易网
14"- 90° color TV Set-top Box 14"÷21" - 90° 17"÷21" - 90° 110° Color TV 25"÷29" 110° Color TV 28"÷34" 110° Color TV 14"-15" CTV 90° 25"-29" CTV 110° LCD TV 26" LCD TV 26"-32"
Series (Part Number)
2182 2414 2444 2464 2074 2074.5 2084 2094 2344 2354
2502 2502.5 2512 2522 2532 2542 2552 2562 2102 2722 2732
2742
2432 2182.5 2252 2262 2262.5 2362 2361 2362.3 2362.5 2362.7 2452 2452.7 2472
Applications
This transformer is mainly intended to be used as a Resonant Switch-Mode Transformer for low-end 22” LCD TV sets with mains insulation. The most suitable circuit topology for this transformer is a half-bridge, quasi-resonant converter using Phillips ZVS controller TEA1610. The common range of operation for this switch-mode transformer is from 50-200 kHz.
25136中文资料

CHOOSE XTRA•GUARD® 2 FOR:
s s
s s
s
s s
Now Rated To 90°C! Unmatched Resistance to Oils, Fuels, Solvents, and Water Twice the Tensile Strength of PVC Three Times the Tear and Abrasion Resistance of PVC Superior Low-Temperature Flexibility to -20° C Ultraviolet Light Stability (jacket color black) SUPRASHIELD® - Twice as Effective as Foil Shielding
24 AWG (0,23mm2), 7/32 (7x0,20mm), Insulation Thickness: 0.010" (0,25mm) Jacket Thickness Nominal Diameter Part No. No. of Pairs. Inches mm Inches mm
25271 25272 25273 25274 25275 25276 25279 25279/11 25279/15 25279/19 1 2 3 4 5 6 9 11 15 19 0.032 0.032 0.032 0.032 0.032 0.032 0.032 0.032 0.032 0.032 0,81 0,81 0,81 0,81 0,81 0,81 0,81 0,81 0,81 0,81 0.18 0.23 0.25 0.28 0.30 0.31 0.36 0.38 0.43 0.46 4,6 5,8 6,5 7,0 7,5 8,0 9,1 9,7 10,8 11,8
PD251系列设备用户手册说明书

Owner’s manualPlease read this manual carefully before operatingyour device.MODEL : PD251W/ PD251P/ PD251Y/ PD251TWENGLISHThe actual device may differ from the image.CAUTION: TO REDUCE THE RISK OF ELECTRIC SHOCK DO NOT REMOVE COVER (OR BACK) NO USER-SERVICEABLE PARTS INSIDE REFER SERVICING TO QUALIFIED SERVICE PERSONNEL.This lightning flash with arrowheadsymbol within an equilateral triangle isintended to alert the user to the presenceof uninsulated dangerous voltage withinthe product’s enclosure that may be of sufficientmagnitude to constitute a risk of electric shock topersons.The exclamation point within anequilateral triangle is intended to alertthe user to the presence of importantoperating and maintenance (servicing)instructions in the literature accompanying theproduct.WARNING: TO PREVENT FIRE OR ELECTRIC SHOCKHAZARD, DO NOT EXPOSE THIS PRODUCT TO RAINOR MOISTURE.WARNING: Do not install this equipment in aconfined space such as a book case or similar unit.CAUTION: Do not use high voltage products aroundthis product (ex. Electrical swatter). This product maymalfunction due to electrical shock.CAUTION: Do not block any ventilation openings.Install in accordance with the manufacturer’sinstructions.Slots and openings in the cabinet are providedfor ventilation and to ensure reliable operation ofthe product and to protect it from over heating.The openings shall never be blocked by placingthe product on a bed, sofa, rug or other similarsurface. This product shall not be placed in a built-in installation such as a bookcase or rack unlessproper ventilation is provided or the manufacturer’sinstruction has been adhered to.2CAUTION concerning the Power CordMost appliances recommend they be placed upon a dedicated circuit;That is, a single outlet circuit which powers only that appliance and has no additional outlets or branch circuits. Check the specification page of this owner’s manual to be certain. Do not overload wall outlets. Overloaded wall outlets, loose or damaged wall outlets, extension cords, frayed power cords, or damaged or cracked wire insulation are dangerous. Any of these conditions could result in electric shock or fire. Periodically examine the cord of your appliance, and if its appearance indicates damageor deterioration, unplug it, discontinue use of the appliance, and have the cord replaced with an exact replacement part by an authorized service center. Protect the power cord from physical or mechanical abuse, such as being twisted, kinked, pinched, closed in a door, or walked upon. Pay particular attentionto plugs, wall outlets, and the point where the cord exits the appliance. The Power Plug is the disconnecting device. In case of an emergency, the Power Plug must remain readily accessible.This device is equipped with a portable battery or accumulator.Safety way to remove the battery or the battery from the equipment: Remove the old batteryor battery pack, follow the steps in reverse order than the assembly. To prevent contamination ofthe environment and bring on possible threatto human and animal health, the old battery orthe battery put it in the appropriate containerat designated collection points. Do not disposeof batteries or battery together with other waste. It is recommended that you use local,free reimbursement systems for batteries and accumulators. The battery shall not be exposed to excessive heat such as sunshine, fire or the like. NOTICE: For safety marking information including product identification and supply ratings, please refer to the main label inside the apparatus.3CAUTION:y The apparatus should not be exposed to water (dripping or splashing) and objects filled withliquids, such as vases, shouldn’t be placed on the apparatus.y Minimum distance around the apparatus for sufficient ventilation, no less than 5 cm.y The ventilation should not be impeded by covering the ventilation openings with items, such as newspapers, table-cloth, curtains etc.y No naked flame sources, such as lighted candles, should be placed on the apparatus.y The unit’s internal lithium battery should only be serviced by an authorised service centre.4ContentsSafety information . . . . . . . . . . . . . . . . . . . . . .2 STEP 1 Getting Started . . . . . . . . . . . . . . . . . .6 Supplied items (6)Product Overview (6)Power On / Off (7)STEP 2 Charging Battery . . . . . . . . . . . . . . . . .7 STEP 3 Inserting Photo Paper . . . . . . . . . . . .9 Cleaning printer head using Smart Sheet 10 About photo paper (11)Paper Jam Solution (12)STEP 4 Installing App . . . . . . . . . . . . . . . . .12 Installing App for Android phone (12)App Setting (13)Installing App for iPhone (14)Setting Bluetooth of iPhone .............14Installing App for Windows phone . (15)Setting Bluetooth of Windows phone (15)STEP 5 Printing Photo . . . . . . . . . . . . . . . . .16 Printing using Android phone (16)Printing using iPhone (19)Printing using Windows phone (21)Using the edit mode (23)Notes on the printing (23)Checking where to buy paper (24)Updating the device (25)Checking Label . . . . . . . . . . . . . . . . . . . . . . . .26 About LED Indicator . . . . . . . . . . . . . . . . . . .27 Specifications . . . . . . . . . . . . . . . . . . . . . . . . .29 Troubleshooting . . . . . . . . . . . . . . . . . . . . . .3056STEP 1 Getting StartedSupplied itemsy Depending on the model or region, supplied items may differ . (ex . USB cable etc .)Product Overviewport (for recharging)Press (1) p ower button for 2 sec. to turn on or off.STEP 2 Charging Battery This device uses a built-in battery. Before using it,fully charge the battery using a Smart phone USB(Refer to below)yyyprinted.7y To charge this product, you must always use a DC Array 5V, 1A or more. Certified/Listed Adapter whichcomplies with LPS.81.2.3.yyy of rear.9Cleaning printer head using Smart Array SheetSmart sheet (Cleaner)When you insert new smart sheet and photo papers, this device scans the barcode of smart sheet to maintain optimized photo paper. (It will be ejected before the first printing.)To maintain the best quality, remove foreign materialof the head using cleaning feature.10About photo paperPhoto paper pouchUse exclusive photo paper for LG Pocket Photo. Otherwise, the print quality cannot be guaranteed,y Handle with care not to get dirt on, when you touch the paper.y Once unpacked, the papers may begin to curl up or discolor after a period of time.It is recommended to use them as soon aspossible.y Using photo papers from other company may result in malfunction, paper jam or low quality.y Do not place inside a car or, expose to direct sunlight or moisture.y Do not leave in a place where thetemperature or humidity is too high or low. It may reduce the quality of the printed photo.Paper Jam SolutionDo not pull the paper out. Turn the device off and on again, the paper will be ejected automatically.y If there are foreign material or dust on the roller, it may not be ejected properly.In that case, remove the foreign material of thehead with scotch tape first. And then, clean using smart sheet and try again.y If the photo paper has bent, paper jam may occur. y If this problem is not solved, please refer to “Troubleshooting”.STEP 4 Installing App Installing App for Android phoneFrom Play Store (Android market)Search for “LG Pocket Photo”.Using QR codeScan the QR code on the product box.App SettingSet the options in [Settingy Bluetooth : Prints using Bluetoothy To optimize printing photo, activate all modes anduse pocket photo App.See “Help” for detailsFor more information about the App, touch [Help].From App StoreSearch for “LG Pocket Photo”.Using QR codeScan the QR code on the product box.1. 2. Touch “Bluetooth” and touch the slider to turn Bluetooth [On]. 3. To connect your Pocket Photo device to the iPhone, turn on your device and make sure it is discoverable mode. 4. When you find the device, touch the model name of Pocket Photo on the screen.See “Help” for detailsFor more information about the App, touch [Help].Installing App for Windows phoneFrom StoreSearch for “LG Pocket Photo”.Setting Bluetooth of Windows phone1. On your Windows phone home screen, touch[Settings].2. Select “Bluetooth” on the system and touch theslider to turn Bluetooth [On].3. To connect your Pocket Photo device to Windowsphone, turn on your device and make sure it isdiscoverable mode.4. When you find the device, touch the model nameof Pocket Photo on the list.5. After Checking [Connected], Run the App.STEP 5 Printing Photowith the LED indicator turning on.1. Run LG Pocket Photo App on Android phone.2. Select a photo to print, and touch [].3. Touch [OK], then it will start searching forBluetooth devices.y To print, set print mode or the number of photo on the preview screen.4. When LG Pocket Photo is paired for the first time,[Bluetooth pairing request] appears. To startprinting, touch [Pairing] or input the PIN code ‘0000’.y If Smart Sheet is in the device, it will be ejected before the printing starts.,You can print photos directly from Android phones or PC via Bluetooth without the App. Choose a photo and select [Bluetooth] in [Share]or [Menu].Setting Pocket Photo App of Android phone You can check device/battery status, the number of photos printed, MAC address and device version. And you can change setting of print mode and Auto power off.1. Run LG Pocket Photo App on Android phone. (To check [Device Information], set to [On] the Bluetooth of smartphone.)2. Go to Setting .3.Touch [Device Information].4. [Print setting]Paper FullPrints without white space. (The edge of the image can be cut off.)Image FullPrints an image as a whole. (White space can occur at the edge of the paper.)Automatic Device Power OffSet a time so that the device turns itself off. (Default is [5 min].)with the LED indicator turning on.1. Run LG Pocket Photo App on iPhone.2. Select a photo to print, and touch [].3. “Print” message appeares. Touch [Print the photo]to start printing.y To print, set print mode or the number ofphoto on the preview screen.y If Bluetooth is not connected, “ Paired devicenot found” message is appeared. (refer to theBluetooth setting for iPhone.)y If Smart Sheet is in the device, it will be ejectedbefore starting printing.In case of iPhone/iPad, the last paired iPhone/iPad is paired to PocketPhoto automaticallywhen you turn on PocketPhoto if the Bluetoothon your iPhone/iPad is on.,NoteSetting iPhone Pocket Photo AppYou can check device/battery status, the number of photos printed, MAC address and device version. And you can change setting of print mode and Auto power off.1. Run LG Pocket Photo App on iPhone.(To check [Device information], set to [On] the Bluetooth of iPhone.)2. Go to Setting .3. Touch Settingoptions to change.4. [Print setting]Paper FullPrints without white space. (Theedge of the image can be cut off.)Image FullPrints an image as a whole. (White space can occur at the edge of the paper.)Automatic Device Power OffSet a time so that the device turns itself off. (Default is [5 min].)Printing using Windows phonewith the LED indicatorturning on. 1. Run LG Pocket Photo App on Windows phone.2. Select a photo to print, and touch [].3. “Do you want to print?” message appeares. Touch[OK] to start printing.y If the printing is not started, check power of the device. y If Bluetooth is not connected, select registered Pocket photo device or reset Bluetooth by selecting [Search]. Print modey [] Paper Full: Prints without white space. (The edge of the image can be cut off.) y [] Image Full: Prints an image as a whole. (White space can occur at the edge of the paper.)y If Smart Sheet is in the device, it will be ejected before starting printing. y To print, set print mode or the number of photo on the preview screen.,NoteSee “Help” for detailsFor more information about the App, touch [] / [Help].You can download the Owner’s manual at using PCs .Note on Windows Phoney You can check Manual, Share, App version and Where to buy paper by touching []. y In case of Windows phone, to print a photo in the normal folder via bluetooth it is available only when using the app. y The limitations of Windows Phone -Device information is not supported.-Windows phone does not support firmware /TMD *update of Pocket Photo.(At , under Downloadable, you can download the Pocket Photo update tool for Windows PCs.)TMD : TMD means colour correction data.Using the edit modeYou can edit a photo quality, color or size using edition tool on the menu.Use the edit function with a variety of image correction filter Notes on the printingy The printed image may differ from the orginal image due to the printing method (thermaltransfer printing).y Use the lastest App of LG Pocket Photo ( when printing a photo, it makes optimized image.)y The higher resolution of the image, the printed picture has the higher quality. (The properresolution is more than 1280 x 2448 pixel.)y Once the battery is fully charged, you can print up to 20 papers in a row.y The maximum prints are based on ISO 24712 Colour image standard and the number of photos printed may vary depending on user enviromental conditions (time, temperture,humidity or printing method).y If there are more than a LG Pocket Photo device, check MAC address on the label to choose oneyou want to use. (Refer to “Checking Label”.)y The Bluetooth searching and transferring may fail depending on its environment. Check theBluetooth condition on your phone and try again. y If pairing multiple smartphone, re-pairing may occur.y Printing for Passport / VISA image may be unsuitable as the case may be. Printing theimage taken in studio is recommended.y The printing quality may differ depending on the original image (When too dark ordim). Use the image after correcting it usingPocket photo App.y Pocket photo APP’s resolution is optimized in 1440 x 2560 fixel. (Android)Checking where to buy paper1. To check where to buy paper, go to setting ormenu screen.2. After touching [Where to buy paper], select acountry.Updating the deviceYou can update the device by pairing smart phone to the latest software to enhance the products operation and /or add new features.1. Connect the device and smart phone via Bluetooth.2. Run the Pocket Photo App and then, touch [Setting] menu.3. The current version and higher version are shown if new version is existed. 4. Touch [Firmware Version] button to update the device.During the device update procedure, do notturn off the power or press Reset button.This device cannot be updated to previous version.If there is no higher version, the Message [This is the lastest version.] appears.At , under Downloadable, you can download the Pocket Photo update tool for Windows PCs.,NoteChecking LabelIn case there are more than a LG Pocket Photo device,check MAC address on the product label to chooseone you want to use.2. You can find the product label.1. Open the upper cover.SpecificationsPhoto size50 mm x 76 mm (Dot size : 640x 1224)Image file type/ size PNG (Max: 1350x1050), JPEG (Baseline) / less than 10 MB (Progressive JPEG is not supported.)Media paper used ZINK TM Photo Paper (exclusive for LG)Media paper storage environment Temperature : 20 - 25 °C Humidity : 40 - 55 % RHDevice operation environment Temperature : 5 - 40 °C Humidity : less than 70 % (35 °C) (An temperature limitation message appears on the App.)Optimum print environment Temperature : 15 - 32 °CHumidity : less than 70 % (32 °C)LED indicatorPower / Waiting / Bluetoothtransmitting / Charged /Discharged / Error / Condition ofprinter/ UpdateCommunication Bluetooth 4.0ExternalconnectorMicro USB port for chargingbatteryBus PowerSupply (USB)(Adapter) DC 5 V 0 1.0 ABattery life470 mAh Li-Polymerrechargeable batteryImageresolution More than 1280 x 2448 pixelsDimensions (Wx D x H)79 mm x 128 mm x 23.5 mmNet Weight183 gPocket Photo App supporting version y Android v4.4 or highery iOS v9.0 or highery Windows Phone 8.0 or highery Your phone may be incompatible with the device depending on its manufacturer, environment or(Android or iOS) operating system.y Design and specifications are subject to change without prior notice.y All other product and brand names are trademarks or registered trademarks of their respectiveowners.TroubleshootingThe paper is jammed before printing.1. Turn the device off and onagain then paper is ejectedautomatically.2. If above solution doesnot work, open the Uppercover and arrange thepapers. Then insert themwith Smart Sheet (Blue) orpull the paper out slowlyand gently.The paper is jammed during printing.The printed photo has lines.Open the Upper cover, arrange the papers and insert them with Smart Sheet locating at the bottom. Then try printing again. (To open the Upper cover, refer to “Checking Label”.No or incomplete image is printed.The edge of the image on the photo is cut off.Set Print mode to [Image Full]in the App’s setting then theimage is printed as a whole.White spaceappears at theedge of the paper.When print mode is set to[Image Full], white space mayappears if the aspect ratio ofthe paper and your image isnot the same.When print mode is set to[Paper Full] , the edge of theimage can be cut off o r whitespace at the edge of the papermay appear.31Quality of printed photo is too low.In case you magnify an imageusing [] menu in the App,the quality of the printedphoto may be reduced.Turn off the device and insertSmart Sheet locating at thebottom of the papers. Then tryprinting again.Be sure the photo size isbigger than the properresolution.(1280 x 2448 pixels)When using Smart Sheet, itshould be used with photopapers in the same pouch.If you use other company’sphoto paper, it cannot beguaranteed for print quality ordamage of pocket photo.Device does notprint.Preheating is needed. Wait forabout 2 min.Be sure there are papers inthe device.It may take time to print afterSmart Sheet is ejected.Be sure the photo file is lessthan 10 MB.Only baseline JPEG, PNG(Max: 1350x1050) format issupported.Device is turned offautomatically.Check [Automatic DevicePower Off] time in the App’ssetting.Above solutions donot work.Press Reset hole with apointed thing like mechanicalpencil to initialize.32。
岛津DR参数
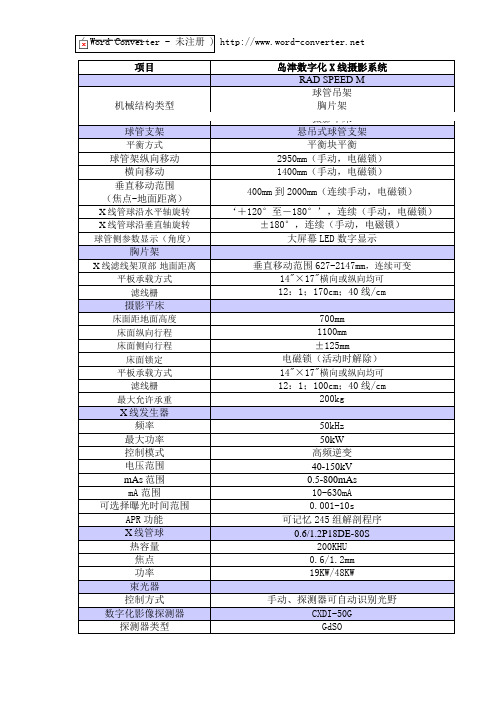
探测器有效探测面积14"X17"
采集矩阵2,208 x 2,688
像素大小160×160μm
X线照射剂量检测线性范围0.005-35mR
采集像素A/D转换位数14bit
MTF @ 1 lp/mm, RQA5 0.68
MTF @ 2 lp/mm, RQA5 0.35 二次曝光间隔6S
自动曝光控制
AEC探测器类型惰性气体
初始kV设置方式预置/手动手动设置具有
APR程序预置具有
AEC密度补偿调整方法预置/手动数字影像处理
图像处理矩阵2,208 x 2,688 图像预示时间<5s
图像浏览及常规后处理功能灰度转换,滤波,增强,翻转,
标注等
图像质量优化技术灰阶调整、增强显示计算机系统采集工作站(操作系统:Windows)
主机及工作站CPU 酷睿双核处理器3.0GHz,内存容量2G,硬盘容量80G,液晶显示器:15″、19"
主机硬盘80G硬盘存档系统(CDRW/DVD/PACS) DVDRW
网络连接、DICOM 符合DICOM 3.0,打印管理(SCU)及储存(SCU)
(JPEG格式传输可用)
工作流程控制
患者信息输入方式鼠标+键盘
图像采集/存档/打印并行处理具有
根据APR解剖部位自动调整显
示参数进行图像优化处理
具有
根据摄影视野大小自动剪裁图
像,以最佳尺寸在屏幕上显示
具有
后处理后处理工作站选配
主机及工作站 20.1英寸黑白监视器(分辨率1600x1200);
CPU Xeon 3.0GHz or more ;内存 1GB
主机硬盘硬盘容量 160GB。
电脑印刷365平台1-2章总集
A、照片
B、天然色正片
C、印刷品原稿
D、数码照片
正确答案:D 得 分:3.0 分
解析:数码照片是采用数码技术与照相摄影技术的完美结合体,所以不属于传统原稿。
11、下列属于特种印刷创新的是( )。
A、立体印刷
B、胶印
C、雕版印刷
D、包装印刷
正确答案:A 得 分:3.0 分
解析:特殊印刷有:塑料印刷、 马口铁印刷 、软管印刷、 铝箔纸印刷 、贴花纸印刷 、胶体转印、 立体印刷、 磁性印刷等。这里的胶印不属于特种印刷,它属于平版印刷。参考教材P13和P16-17。
12、印刷五要素中,作为整个制版、印刷工艺的依据,直接关系到印刷品艺术效果和复制还原效果的要素是( )。
A、印版
电脑印刷3
1、下列选项中,不能用于图像输入的设备是( )。
A、数码相机
B、扫描仪
C、电子分色机
D、打印
正确答案:D 得 分:3.0 分
解析:数码相机、扫描仪、电子分色机均是图像输入设备,打印机是输出设备。
2、铅合金活字的发明者是( )。
A、毕昇
B、王桢
C、谷腾堡
D、蔡伦
正确答案:C 得 分:3.0 分
A、纸板
B、卡纸
C、白卡纸
D、铜版纸
正确答案:A
12、印刷原理是油墨通过( )来印刷到纸张上的。
A、胶皮
B、晒版
C、电脑
D、材料
正确答案:A 得 分:0.0 分解析:印版是用于传递油墨至承印物上的印刷图文载体,胶皮是一种印版,晒版是曝光,是将载有图文的胶片、硫酸纸和其它有较高透明度的载体上的图文,通过曝光将图文影印到涂有感光物的网版、PS版、树脂版等材料上的工作。
5W可调光非隔离LED驱动器(RDR-251)-中文手册应用指南

LinkSwitch-PL集成了多项有用功能,可在使用相控可控硅调光 器时扩大调光范围和降低外部电路的复杂度。LED输出电流由反 馈引脚电压控制,反馈引脚电压随可控硅调光器的导通角按比 例进行变化。当导通角减小时,反馈引脚电压随之降低,从而 减小LED平均电流。
在接近AC输入半周期持续时间的25%时,开始调整反馈引脚参 考电压。超过该阈值(jOS)后,VFB和LED输出电流将降低,直到
LNK454/456-458/460 LinkSwitch™-PL产品系列
带可控硅调光、单级PFC和恒流控制的LED驱动器IC, 适用于非隔离式应用
产品特色
大幅简化离线式LED驱动器 • 无闪烁的相位控制可控硅调光 • 单级功率因数校正(PFC)及精确恒流(CC)输出 • 输入使用容量很小的电容,不使用电解电容,元件数量极少,
LNK454/456-458/460
IC供电和旁路引脚 在功率MOSFET处于关断期间,内部的5.85 V稳压器就会从漏极 引脚电压吸收电流,将连接到旁路引脚的旁路电容充电到5.85 V。旁路引脚是内部供电电压节点。当功率MOSFET导通时,器 件利用储存在旁路电容内的能量工作。内部电路极低的功率耗 散使LinkSwitch-PL可使用从漏极吸收的电流持续工作。一个1 µF 的旁路电容就足够实现高频率的去耦及能量存储。调光应用可 能需要更高的旁路电容值。
启动、开关频率及导通时间范围 启动时,控制器采用初始开关频率fMIN和最小导通时间tON(MIN)。输出 电容的充电和提供到输出LED的能量,决定着每个AC输入电压半 周期所更新的功率MOSFET开关频率和导通时间的增加幅度。
稳态开关频率和导通时间由输入电压、LED上的电压降及转换器 效率决定。
轻载条件下,当器件达到最小频率fMIN和导通时间tON(MIN)时,控制 通过跳过周期进行调整。在此工作模式下,输入电流没有功率 因数校正,平均输出电流无法确保处于正常范围内。反馈引脚 周期跳频阈值从接近正常调整水平的两倍,减小至刚刚超出在 此条件下限制输出功率所需的水平。设计合理的电源在正常负 载条件下是不会在此模式下工作的。如果电源设计正确,在连 接到正常负载时,它将在[fMIN … fMAX]的开关频率范围内进行工 作,且导通时间缩短到tON(MIN)和tON(MAX)之间。
LC251中文资料

100
IF = f (VF), Ta= 25ºC
X Y
0.8
Relative Luminous Intensity
0.6
Forward Current IF [mA]
-60 -30 0 30 60 90
10Leabharlann 0.40.210.0 -90
2.6
2.8
3.0
3.2
3.4
3.6
3.8
4.0
Off Axis Angle [deg.]
Ambient Temperature vs. Forward Current
<060712> Rev. 0.1 LR770D
SEOUL SEMICONDUCTOR CO., LTD.
148-29, Kasan-Dong, Keumchun-Gu, Seoul, Korea TEL : 82-2-3281-6269 FAX : 82-2-857-5430 -6-
148-29, Kasan-Dong, Keumchun-Gu, Seoul, Korea TEL : 82-2-3281-6269 FAX : 82-2-857-5430 -5-
元器件交易网
6. CHARACTERISTIC DIAGRAMS
Irel = f (θ ), Ta= 25ºC
Dominant Wavelength (nm) @ IF = 20mA BIN CODE 1 2 3 Min. 620 626 632 Max. 626 632 636
Forward Voltage (V) @ IF = 20mA BIN CODE 1 2 Min. 1.9 2.3 Max. 2.3 2.7
0.8
PMC251 中文资料
提供本文档的中文简体版是为了便于了解,请勿忽视文中英文的部份,因为其中提供有关产品性能以及产品使用的有 用信息,应广科技暨代理商对于文中可能存在的差错不承担任何责任,建议参考本文件英文版。
TLE:15626510025
©Copyright 2013, PADAUK Technology Co. Ltd
IO 类型、采用 FPPATM 技术双核心 8 位单片机
重要声明
应广科技保留权利在任何时候变更或终止产品,建议客户在使用或下单前与应广科技或代理 商联系以取得最新、最正确的产品信息。 应广科技不担保本产品适用于保障生命安全或紧急安全的应用,应广科技不为此类应用产品 承担任何责任。关键应用产品包括,但不仅限于,可能涉及的潜在风险的死亡,人身伤害,火灾 或严重财产损失。 应广科技不承担任何责任来自于因客户的产品设计所造成的任何损失。在应广科技所保障的 规格范围内,客户应设计和验证他们的产品。为了尽量减少风险,客户设计产品时,应保留适当 的产品工作范围安全保障。
2SK3652中文资料

Forward transfer admittance
Pl
17
Short-circuit forward transfer capacitance (Common-source) Short-circuit output capacitance (Common-source) Reverse transfer capacitance (Common-source) Turn-on delay time Rise time Turn-off delay time Fall time
Drain current ID (A)
10
DC
t= 1 ms
1
t= 10 ms t= 100 ms
10−1
1
10
100
1 000
Drain-source voltage VDS (V)
e
vi
si
tf o ht llow tp in :// g pa U na RL so a ni bo c. u ne t l t/s ate c/ st en in f
Conditions
Min 230 2
or m
D S
Typ 29 35 5 950 850 80 65 140 470 145
(2.0)
Peak drain current
IDPΒιβλιοθήκη AID = 1 mA, VGS = 0
si
VDS = 25 V, ID = 10 mA VDS = 184 V, VGS = 0 VGS = ±30 V, VDS = 0
(4.0) 2.0±0.2 1.1±0.1
5˚
0.7±0.1
Rating 230 ±30 50 200
USCAR中文第版
5.6.3高温暴露。。。。。。。。。。。。。。。。。。。。。。。。。。。。。。。。。。。。。。。。。。。。。。。。。。。。。。。。。。55
5.6.4流体阻力。。。。。。。。。。。。。。。。。。。。。。。。。。。。。。。。。。。。。。。。。。。。。。。。。。。。。。。。。。56
3.4.1样品,试验类型及专用试验。。。。。。。。。。。。。。。。。。。。。。。。。。。。。。。。。。。。。。。。。。。6
3.4.2实验要求/顺序说明。。。。。。。。。。。。。。。。。。。。。。。。。。。。。。。。。。。。。。。。。。。。。。。。。6
3.4.3性能和耐久性实验说明.。。。。。。。。。。。。。。。。。。。。。。。。。。。。。。。。。。。。。。。。。。。。。6
5.8.1高压喷射。。。。。。。。。。。。。。。。。。。。。。。。。。。。。。。。。。。。。。。。。。。。。。。。。。。。。。。。。。69
5.8.2剧烈振动。。。。。。。。。。。。。。。。。。。。。。。。。。。。。。。。。。。。。。。。。。。。。。。。。。。。。。。。。。72
SAE/USCAR-2第五修订版修订日期:2007-11
5.4.9模腔损坏系数。。。。。。。。。。。。。。。。。。。。。。。。。。。。。。。。。。。。。。。。。。。。。。。。。。。。。。48
5.4.10端子/型腔极化测试。。。。。。。。。。。。。。。。。。。。。。。。。。。。。。。。。。。。。。。。。。。。。。。。54
连接器电性能试验。。。。。。。。。。。。。。。。。。。。。。。。。。。。。。。。。。。。。。。。。。。。。。。。。。49
190225-2资料

190225-2 Product DetailsHome | Customer Support | Suppliers | Site Map | Privacy Policy | Browser Support© 2007 Tyco Electronics Corporation All Rights Reserved SearchHome > Products > By Type > Product Feature Selector > Product Details190225-2Active Ring and Spade Tongue TerminalsAlways EU RoHS/ELV Compliant (Statement of Compliance)Product Highlights:?Terminal Shape = Ring Tongue?Receptacle Style = Straight?Barrel Type = Open Barrel?Wire/Cable Type = Regular Wire?Wire Range = 0.50-1.40²[20-16] mm[AWG]View all FeaturesCheck Pricing &AvailabilitySearch for ToolingProduct FeatureSelectorContact Us AboutThis ProductQuick LinksDocumentation & Additional InformationProduct Drawings:?RING TONGUE(PDF, English)Catalog Pages/Data Sheets:?None AvailableProduct Specifications:?Terminal, AMPLIVAR, Ring, Crimping(PDF, English)?Terminal, Ring, Extruded, Crimping(PDF, English)Application Specifications:?None AvailableInstruction Sheets:?None AvailableCAD Files:?None AvailableList all Documents Additional Information:?Product Line InformationRelated Products:?ToolingProduct Features (Please use the Product Drawing for all design activity)Product Type Features:?Terminal Shape = Ring Tongue?Receptacle Style = Straight?Barrel Type = Open Barrel?Wire/Cable Type = Regular Wire?Insulation = No?Insulation Support = Insulation Support?Insulation Diameter (mm [in]) = 2.54-3.56[.100-.140] Max.?Stud Size = None?Stud Diameter (mm [in]) = 5.00 [0.197]?Shape = RING-001?Heavy Duty = No?Material = Brass?Finish = Pre-Tin Body Related Features:?Wire Range (mm [AWG]) = 0.50-1.40²[20-16]Industry Standards:?Government/Industry Qualification = No?RoHS/ELV Compliance = RoHS compliant, ELVcompliant?Lead Free Solder Processes = Not relevant forlead free process?RoHS/ELV Compliance History = Always wasRoHS compliantPackaging Related Features:?Packaging Method = Strip?Packaging Quantity = 6,000Other:?Brand = AMPProvide Website Feedback | Contact Customer Support Products Documentation Resources My Account Customer Support。
磁环知识

一. 線架(BOBBIN):(1) 線架主要用來繞線時一個支撐物,一般取用塑膠類作其材料,材質方面分多種,如電木(PHONIC)、尼龍(NYLON)、尼龍66(NYLON-66)、PBT、PET、LCP等,其中最常用的為電木、P.B.T、P.E.T、LCP材質。
幾種常用的BOBBIN特性簡單區分如下:材質 外觀 耐熱性 硬度 韌性 環保性 價位 電木 黑色 耐高溫高熱 高 差,易碎 不能回收 中 尼龍 透明 不耐高溫,遇熱變形差,易變形好 可回收 高 PBT、PET 白、黑、黃色 介於電木和尼龍之間 可回收 低(2) 另外尼龍BOBBIN為增加其硬度,常加玻璃纖維,如FR50;(3) 電木BOBBIN大多含有尿素,所產生的尿素酸對銅線有腐蝕性.因此大部分線徑較細的產品標明用不含尿素電木BOBBIN其主要的成份為電木粉,目前較為常用的有:長春電木粉:T373、T357、T375……住友電木粉:PM-9820、PM-9630……杜邦電木粉:PE9087……它們的主要區別在其耐熱性、流注性、含水性的不同。
以我們常用的長春電木粉舉例:流注性:T373(好) > T357 > T375耐熱性:T375(高) > T357 > T373含水性:T375(少) > T357 > T373形的磁芯且其長度為9.8mm。
(3) 鐵芯構成之原料為鎳、錳、鋅等材料經高溫(1200℃)熱處理成型而成.(4) 變壓器依靠鐵芯與線圈產生磁場,再感應至次极端,轉換成所需之電壓,故有人稱磁芯是變壓器的心臟,所有磁交鏈的形成、頻段的適用皆由它來控制。
三. 漆包線/銅線(COPPER WIRE):(1) 銅、鋁乃金屬中最易導電元素,但因銅較鋁更易鍍錫,故在繞制線圈時大多選用銅線作繞線材料.(2) 變壓器依其電流大小,選擇使用大小尺寸,其尺寸一般使用mm為單位.(以測DCR亦可查出線徑,單位是Ω(OHM); 銅線越粗,DCR越低;銅線越細,DCR越高). 欧姆定律: R=ρl/s(3) 在銅線外表塗上一層漆包膜,作用為保護銅線表層,其實際之尺寸應扣除漆包膜.(4) 銅線因其表面漆包膜的厚度和材料及其各方面所體現的物理及抗化學特性的不同,有其不同的分類:(4)-1根據其表面漆包膜的材料構成不同可分為:(4)-1-1聚乙烯甲醛漆包線(PVF) 耐溫等級105℃漆膜抗化學性好,曝露在冷凍的溫度下仍保有其絕緣的特性,主要用於充油變壓器、轉子線圈、馬達、乾式變壓器等,具有高溫直焊性。
cb-2-365 空气电容参数

cb-2-365 空气电容参数CB-2-365空气电容参数CB-2-365是一种空气电容,具有一定的电容参数。
本文将详细介绍CB-2-365的电容参数,并探讨其在电路中的应用。
CB-2-365的电容参数是指其电容值以及其他相关的参数。
电容是电路中常见的一种被动元件,用于储存电荷。
CB-2-365的电容值通常以法拉(F)为单位进行表示,表示其可以存储的电荷量。
CB-2-365的电容值可以根据需要进行选择,不同的电容值可以在电路中实现不同的功能。
除了电容值,CB-2-365还有其他与电容性能相关的参数。
其中之一是电压系数,它表示电容值随电压变化的程度。
电压系数越小,CB-2-365的电容值对电压的变化越不敏感。
另一个重要的参数是温度系数,它表示电容值随温度变化的程度。
温度系数越小,CB-2-365的电容值对温度的变化越不敏感。
这些参数的合理选择可以确保CB-2-365在不同的工作条件下都具有稳定的性能。
CB-2-365还有一个重要的参数是损耗因子,它表示电容元件中能量的损耗程度。
损耗因子越小,CB-2-365的能量损耗越小,电路的效率越高。
在一些对效率要求较高的应用中,选择具有较低损耗因子的CB-2-365可以提高电路的效率。
CB-2-365的电容参数使其在电路设计中有着广泛的应用。
首先,CB-2-365可以用作电路中的储能元件。
通过合理选择电容值,可以实现对不同频率的信号的滤波效果。
此外,CB-2-365还可以用作电路中的耦合电容,用于将不同电路之间的信号进行传递。
通过调整电容值,可以实现对信号的不同频率成分的传递或阻断。
CB-2-365还可以用于电源电路中的降压滤波电容。
在直流电源中,通过将CB-2-365与其他元件(如电感)组合使用,可以实现对电源信号的滤波和稳压。
这对于保护后续电路的正常工作非常重要。
CB-2-365还可以用于无线通信系统中的射频电路。
在射频电路中,CB-2-365可以用作耦合电容、调谐电容等。
5 1 2-in., 30-32 ft., IEU, 1.15 FF drill pipe spe
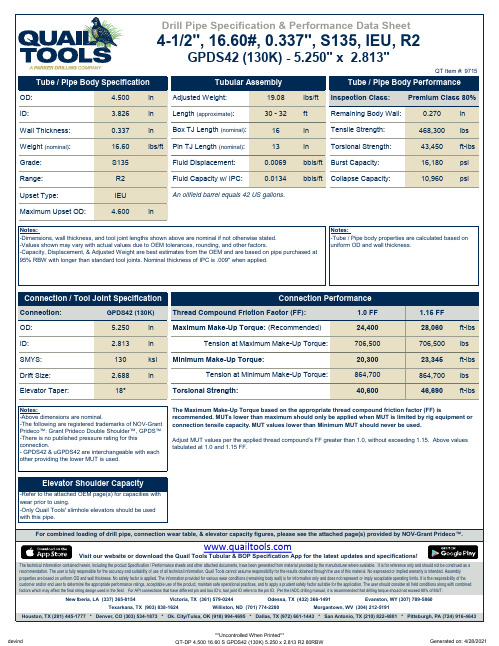
connection. - GPDS42 & uGPDS42 are interchangeable with each
Tubular Assembly
Tube / Pipe Body Performance
OD:
4.500
in
Adjusted Weight:
19.08
lbs/ft Inspection Class: Premium Class 80%
ID:
3.826
in
Length (approximate):
30 - 32 ft
Morgantown, WV (304) 212-5191
Houston, TX (281) 445-1777 * Denver, CO (303) 534-1873 * Ok. City/Tulsa, OK (918) 994-4695 * Dallas, TX (972) 661-1443 * San Antonio, TX (210) 822-4801 * Pittsburgh, PA (724) 916-4643
Visit our website or download the Quail Tools Tubular & BOP Specification App for the latest updates and specifications!
The technical information contained herein, including the product Specification / Performance sheets and other attached documents, have been generated from material provided by the manufacturer where available. It is for reference only and should not be construed as a recommendation. The user is fully responsible for the accuracy and suitability of use of all technical information. Quail Tools cannot assume responsibility for the results obtained through the use of this material. No expressed or implied warranty is intended. Assembly properties are based on uniform OD and wall thickness. No safety factor is applied. The information provided for various wear conditions (remaining body wall) is for information only and does not represent or imply acceptable operating limits. It is the responsibility of the customer and/or end user to determine the appropriate performance ratings, acceptable use of the product, maintain safe operational practices, and to apply a prudent safety factor suitable for the application. The user should consider all field conditions along with combined factors which may affect the final string design used in the field. For API connections that have different pin and box ID’s, tool joint ID refers to the pin ID. Per the IADC drilling manual, it is recommended that drilling torque should not exceed 80% of MUT.
电脑印刷365平台1-2章总集

电脑印刷365平台1—2章1、下列选项中,不能用于图像输入的设备是( )。
A、数码相机B、扫描仪C、电子分色机D、打印正确答案:D 得分:3.0 分解析:数码相机、扫描仪、电子分色机均是图像输入设备,打印机是输出设备。
2、铅合金活字的发明者是()。
A、毕昇B、王桢C、谷腾堡D、蔡伦正确答案:C 得分:3.0 分解析:谷腾堡被各国学者公认为现代印刷术的创始人,源于他发明了铝合金活字印刷术,为现代印刷奠定了基础。
参见教材P3.3、宋代庆历年间(公元1041年~1048年),()发明了胶泥活字版印刷方法。
A、蔡伦B、毕昇C、谷登堡D、王祯正确答案:B 得分:3。
0 分解析:毕昇首创泥活字,造出世界上第一副泥活字。
参见教材P3.4、印刷被誉为人类的“文明之母”,但其发明是以()的出现为前提。
A、油墨B、造纸C、打印D、盖印正确答案:B 得分:3。
0 分解析:印刷被誉为人类的“文明之母”,但其发明是以造纸的出现为前提。
参见教材P2。
5、我国印刷术发明后,()开始向国外传播。
A、公元5 世纪B、公元6 世纪C、公元7 世纪D、公元8 世纪正确答案:C 得分:3。
0 分6、公元1297,()创制木活字与转轮排字法,写成“选活字印事法".A、蔡伦B、毕昇C、谷腾堡D、王祯正确答案:D7、印刷出版物必须有版权页和().A、书名B、出版社C、条形码D、作者您的答案:C 。
8、中国标准字号由标识符ISBN和( )组成.A、11位数字B、13位数字C、9位数字D、10位数字正确答案:B 得分:3。
0 分9、柔版的印刷方式属于().A、直接印刷B、拓印C、间接印刷D、特种印刷正确答案:A 得分:3。
0 分解析:柔性版印刷,也常简称为柔版印刷,使用柔性版、通过网纹传墨辊传递油墨施印的一种印刷方式,属于凸版印刷,而凸版印刷属于直接印刷,所以此题选A。
参见教材P11。
10、下列不属于印刷复制传统原稿的是()。
A、照片B、天然色正片C、印刷品原稿D、数码照片正确答案:D 得分:3.0 分解析:数码照片是采用数码技术与照相摄影技术的完美结合体,所以不属于传统原稿。
