Solaris系统安全配置手册
SOLARIS10系统配置文件

梯调系统配置文件一、Solaris 10安装说明将Solaris 10操作系统安装光盘(DVD版)放入光驱,在OK提示符下(# halt , 或按stop+A出现),键入boot cdrom。
1、在“Select a Language”窗口下,选择6:Simplified Chinese2、在“欢迎”窗口下,点击“下一步”3、在“网络连接”窗口下,选择“联网的”,点击“下一步”4、在“配置多个网络接口”窗口下,选择ce0、ce1,点击“下一步”5、在“主网络接口”窗口下,选择ce0,点击“下一步”6、在“ce0的DHCP”窗口下,选择“否”,点击“下一步”7、在“ce0的主机名”窗口下,输入主机名,点击“下一步”8、在“ce0的IP地址”窗口下,输入IP地址,点击“下一步”9、在“ce0的网络掩码”窗口下,输入255.255.255.0,点击“下一步”10、在“ce0的IPV6”窗口下,选择“否”,点击“下一步”11、在“ce0的缺省路由”窗口下,选择“无”,点击“下一步”12、在“ce1的DHCP”窗口下,选择“否”,点击“下一步”13、在“ce1的主机名”窗口下,输入主机名,点击“下一步”14、在“ce1的IP地址”窗口下,输入IP地址,点击“下一步”15、在“ce1的网络掩码”窗口下,输入255.255.255.0,点击“下一步”16、在“ce1的IPV6”窗口下,选择“否”,点击“下一步”17、在“ce1的缺省路由”窗口下,选择“无”,点击“下一步”18、在“Kerberos”窗口下,选择“否”,点击“下一步”19、在“名称服务”窗口下,选择“无”,点击“下一步”20、在“时区”窗口下,选择“地区性的洲/国家/地区”, 点击“下一步”21、在“洲与国家”窗口下,点击“亚洲”选择“中国”,点击“下一步”22、在“日期和时间”窗口下,输入正确时间,点击“下一步”23、在“超级用户(root)口令”窗口下,输入超级用户口令点击“下一步”24、在“确认信息”窗口下,选择“确认”25、在“欢迎”窗口下,点击“下一步”26、在“安装选项”窗口下,点击“下一步”27、在“指定媒体”窗口下,选择“CD/DVD”,点击“下一步”28、正在初始化…29、在“许可证”窗口下,选择“接受”,击“下一步”30、在“选择升级安装或初始安装”窗口下,选择“初始安装”,击“下一步”31、在“选择安装类型”窗口下,选择“自定义安装”,点击“下一步”32、在“选择软件语言环境”窗口下,选择“亚洲,中文(zh)”点击“下一步”33、在“选择系统语言环境”窗口下,选择“亚洲,中文(zh)”点击“下一步”34、在“选择附带软件”窗口下,选择“Solaris 10 Extra Value Software 87.3MB”,点击“下一步”35、在“附加产品”窗口下,选择“无”,点击“下一步”36、在“选择Solaris 软件组”窗口下,选择“整个郡组以及OEM”的“缺省包”,点击“下一步”37、在“选择磁盘”窗口下,点击“下一步”38、在“保存数据”窗口下,选择“否”,点击“下一步”39、在“分布文件系统”窗口下,选择“修改”选择“确定”,点击“下一步”31、在“准备安装”窗口下,点击“立即安装”32、重新引导后,出现“Do you need to override the system’s default NFS version 4 domain name (yes/no)?[no]:输入“no”,回车33、输入用户名:root34、输入密码:xxxx35、选择其中一个:选择“公用桌面环境”36、安装完毕二、Sun Fire V240磁盘镜像在安装系统时,到划分硬盘分区那一步时,给硬盘预留一部分的空间,可以是200MB。
Solaris安全指南
copyright Yiming Gong Sep 2001
• 屏蔽服务信息
– 举例:
• • • • • • yiming# telnet 1.2.3.4 Trying 1.2.3.4... Connected to 1.2.3.4 Escape character is '^]'. UNIX(r) System V Release 4.0 (www) login:
copyright Yiming Gong Sep 2001
• Sendmail系统中如何实现
– Sendmail.cf – SmtpGreetingMessage="Yiming's private box”
copyright Yiming Gong Sep 2001
安装后的基本工作
• 1:打patch 为什么要先打patch
在哪里打patch 打patch注意事项
copyright Yiming Gong Sep 2001
• inetd.conf的处理 建议在vi中:1,$s/^/#/ 停掉所有的服务, 再选择性的打开所需要的服务,不要忘记 重新启动。 Netstat -an | grep LISTEN来检查
• 危险的“.“路径
– 去掉/.login /etc/.login /etc/default/login /.cshrc /etc/skel/local.cshrc中所有的.路径
copyright Yiming Gong Sep 2001
• 纪录所有ineቤተ መጻሕፍቲ ባይዱ连接请求
copyright Yiming Gong Sep 2001
Solaris系统基准安全配置标准20061227
Solaris系统基准安全配置标准TMT中国业务中心信息管理部2006年12月5日目的通过建立系统的安全基线标准,规范TMT中国业务中心网络环境Solaris系统服务器的安全配置,并提供相应的指导;降低系统存在的安全风险,确保服务器系统安全可靠的运行。
范围适合TMT中国业务中心网络环境的所有Solaris系统服务器。
标准维护与解释1.本标准由TMT中国业务中心每年审视1次,根据审视结果修订标准,并颁布执行;2.本标准的解释权归TMT中国业务中心;3.本标准自签发之日起生效。
目录1.优化网络服务 (4)1.1.禁用不必要的系统服务 (4)1.2.卸载或禁用网络服务 (4)2.核心参数调整 (5)2.1..堆栈保护 (5)2.2.网络参数调整 (5)3.日志审计 (6)3.1.启用INETD审计 (6)3.2.启用FTP日志 (6)3.3.记录FTP和INETD连接信息 (6)3.4.记录发送到SYSLOG的MESSAGES信息 (6)3.5.创建/V AR/ADM/LOGINLOG (7)3.6.启用CRON日志记录 (7)3.7.配置系统日志文件权限 (7)4.文件和目录权限 (8)4.1.修改PASSWD、SHADOW、GROUP文件权限为600 (8)4.2.删除没有属主的文件和目录 (8)5.系统访问,认证与授权 (8)5.1.去除/ETC/PAM.CONF文件中的.RHOSTS (8)5.2.删除空的CRONTAB文件,并限制其权限 (9)5.3.只允许ROOT可配置CRON (9)5.4.设置帐号错误口令尝试次数 (9)6.用户帐号和环境 (10)6.1.确保没有空口令(/薄弱口令)帐号 (10)6.2.设置口令期限 (10)6.3.确保除ROOT以外没有其它UID为0的帐号存在 (10)6.4.确保在ROOT $PATH中没有'.'或全局可写目录 (11)6.5.删除.NETRC文件 (11)如果可以,最好将操作系统升级到最新的Solaris 10版本,以下操作说明适用于Solaris 10平台。
Solaris实用管理手册
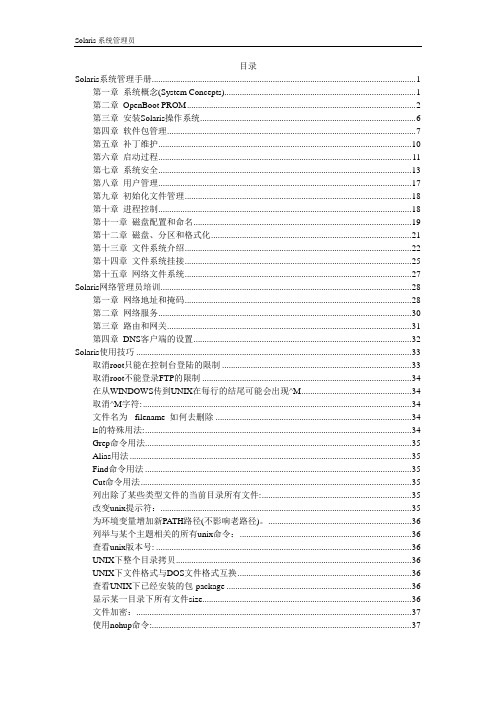
目录Solaris系统管理手册 (1)第一章系统概念(System Concepts) (1)第二章OpenBoot PROM (2)第三章安装Solaris操作系统 (6)第四章软件包管理 (7)第五章补丁维护 (10)第六章启动过程 (11)第七章系统安全 (13)第八章用户管理 (17)第九章初始化文件管理 (18)第十章进程控制 (18)第十一章磁盘配置和命名 (19)第十二章磁盘、分区和格式化 (21)第十三章文件系统介绍 (22)第十四章文件系统挂接 (25)第十五章网络文件系统 (27)Solaris网络管理员培训 (28)第一章网络地址和掩码 (28)第二章网络服务 (30)第三章路由和网关 (31)第四章DNS客户端的设置 (32)Solaris使用技巧 (33)取消root只能在控制台登陆的限制 (33)取消root不能登录FTP的限制 (34)在从WINDOWS传到UNIX在每行的结尾可能会出现^M (34)取消^M字符: (34)文件名为-filename 如何去删除 (34)ls的特殊用法: (34)Grep命令用法 (35)Alias用法 (35)Find命令用法 (35)Cut命令用法 (35)列出除了某些类型文件的当前目录所有文件: (35)改变unix提示符: (35)为环境变量增加新PA TH路径(不影响老路径)。
(36)列举与某个主题相关的所有unix命令: (36)查看unix版本号: (36)UNIX下整个目录拷贝 (36)UNIX下文件格式与DOS文件格式互换 (36)查看UNIX下已经安装的包-package (36)显示某一目录下所有文件size (36)文件加密: (37)使用nohup命令: (37)查看文件的方法: (37)检查磁盘剩余空间: (37)超级用户修改系统时间: (37)制作UNIX文件系统的iso文件 (37)建SCO UNIX的安装光盘,可以增加自己的文件. (38)调整内核,防止黑客使用堆栈溢出 (38)远程mount主机的目录 (39)磁盘扫描fsck的语法如下: (39)ln软连接: (40)使用第二块硬盘. (40)将SOLARIS设置成PPP拨入服务器 (42)使用第二块硬盘. (44)solaris下用光标键来调出历史命令 (45)看进程,内存大小 (46)看cpu的情况. (46)windows,unix,linux三个操作系统共存 (46)Solaris 下打开硬盘DMA模式. (46)Solaris 下PPPOE的配置 (46)◆加强Solaris SPARC/x86操作系统的安全性 (49)oracle8.1.5 for solaris 8 x86安装说明 (60)1. 创建dba组和oracle用户 (60)9. 实现数据库的自启动 (62)oracle8.1.7 for solaris 8 x86安装说明 (63)安装步骤 (63)安装介绍 (66)Solaris7 Apache+MySQL+PHP安装指南 (71)1.下载并解压Apache ,MySQL ,PHP (71)2.下载并安装编译器 (72)3.编译并安装这3个软件: (73)4.配置Apache + MySQL + PHP (74)5.验证Apache + MySQL + PHP 的有效性: (75)RealTek 8139网卡在solaris x86上的安装 (76)Solaris 中安装声卡(X86) (77)附录: (78)A. Sun推荐培训 (78)B.在VMWare中安装Solaris 8 (82)C.UNIX系统操作入门 (83)SOLARIS 2.6 常用管理命令 (104)Solaris系统管理员培训第一章系统概念(System Concepts)操作系统的主要三个部分UNIX操作系统是基于文件的,操作系统的主要三个部分是:KernelShellFile structure1.Kernel 是操作系统的核心,它的主要功能是:管理系统的设备、内存、进程以及守护进程系统程序与系统硬件之间接口执行所有的命令管理:Swap space(交换分区) –系统运行时保留的一部分磁盘空间Daemons (守护进程)–处理特定的系统任务2.shell 是用户与kernel之间的接口。
Solaris操作系统的系统要求与安装指南说明书
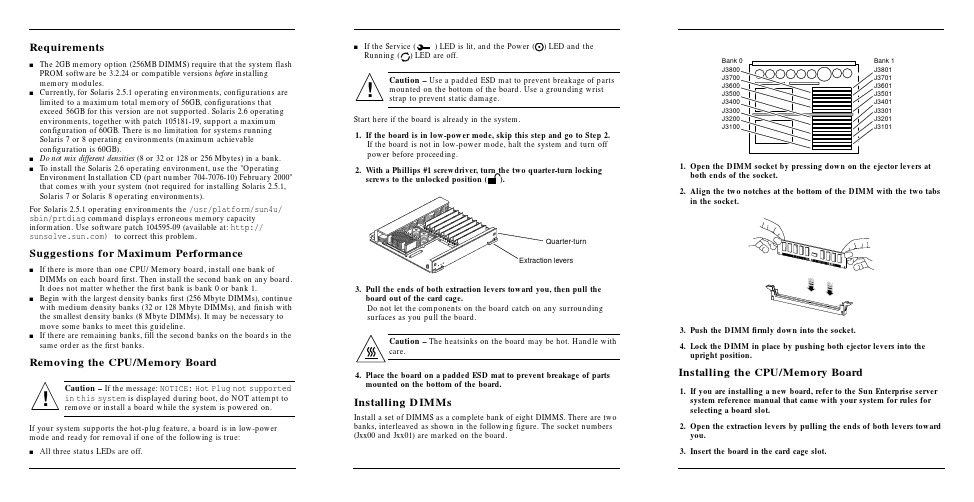
Requirementss The2GB memory option(256MB DIMMS)require that the system flash PROM software be3.2.24or compatible versions before installingmemory modules.s Currently,for Solaris2.5.1operating environments,configurations are limited to a maximum total memory of56GB,configurations thatexceed56GB for this version are not supported.Solaris2.6operating environments,together with patch105181-19,support a maximumconfiguration of60GB.There is no limitation for systems runningSolaris7or8operating environments(maximum achievableconfiguration is60GB).s Do not mix different densities(8or32or128or256Mbytes)in a bank.s To install the Solaris2.6operating environment,use the"Operating Environment Installation CD(part number704-7076-10)February2000"that comes with your system(not required for installing Solaris2.5.1, Solaris7or Solaris8operating environments).For Solaris2.5.1operating environments the/usr/platform/sun4u/ sbin/prtdiag command displays erroneous memory capacity e software patch104595-09(available at:http:// )to correct this problem.Suggestions for Maximum Performances If there is more than one CPU/Memory board,install one bank of DIMMs on each board first.Then install the second bank on any board.It does not matter whether the first bank is bank0or bank1.s Begin with the largest density banks first(256Mbyte DIMMs),continue with medium density banks(32or128Mbyte DIMMs),and finish with the smallest density banks(8Mbyte DIMMs).It may be necessary to move some banks to meet this guideline.s If there are remaining banks,fill the second banks on the boards in the same order as the first banks.Removing the CPU/Memory BoardCaution–If the message:NOTICE:Hot Plug not supportedin this system is displayed during boot,do NOT attempt toremove or install a board while the system is powered on.If your system supports the hot-plug feature,a board is in low-power mode and ready for removal if one of the following is true:s All three status LEDs are off.s If the Service()LED is lit,and the Power ()LED and theRunning()LED are off.Caution–Use a padded ESD mat to prevent breakage of partsmounted on the bottom of the e a grounding wriststrap to prevent static damage.Start here if the board is already in the system.1.If the board is in low-power mode,skip this step and go to Step2.If the board is not in low-power mode,halt the system and turn offpower before proceeding.2.With a Phillips#1screwdriver,turn the two quarter-turn lockingscrews to the unlocked position().3.Pull the ends of both extraction levers toward you,then pull theboard out of the card cage.Do not let the components on the board catch on any surroundingsurfaces as you pull the board.Caution–The heatsinks on the board may be hot.Handle withcare.4.Place the board on a padded ESD mat to prevent breakage of partsmounted on the bottom of the board.Installing DIMMsInstall a set of DIMMS as a complete bank of eight DIMMS.There are twobanks,interleaved as shown in the following figure.The socket numbers(Jxx00and Jxx01)are marked on the board.1.Open the DIMM socket by pressing down on the ejector levers atboth ends of the socket.2.Align the two notches at the bottom of the DIMM with the two tabsin the socket.3.Push the DIMM firmlydown into the socket.4.Lock the DIMM in place by pushing both ejector levers into theupright position.Installing the CPU/Memory Board1.If youare installing a new board,refer to the Sun Enterprise serversystem reference manual that came with your system for rules forselecting a board slot.2.Open the extraction levers by pulling the ends of both levers towardyou.3.Insert the board in the card cage slot.!!Extraction leversQuarter-turnBank 1J3801J3701J3601J3501J3401J3301J3201J3101Bank 0J3800J3700J3600J3500J3400J3300J3200J3100sFor a 4-slot or 5-slot card cage,orient the board with the component side to the right.sFor a 16-slot or 8-slot card cage (diagram follows):Front slot installation,orient the board with the component side down.Rear slot installation,orient the board with the component side up.4.Push the board into the card cage,then simultaneously press both extraction levers to seat the board on the centerplane.Caution –Do not press on the board front panel to seat it—doing so will damage the connector pins.Caution –When inserting a board into slot 4or slot 10of a16-slot card cage,lift the board slightly to avoid damage to the centerplane connectors.Pushing both levers simultaneously avoids twisting the board and bending the connector pins.5.With a Phillips #1screwdriver,turn the two quarter-turn locking screws to the locked position ().Rear viewFront view!!Sun ™ Enterprise ™6x 00/5x 00/4x 00/3x 00 Systems DIMM Installation GuideCaution –The heatsinks on the board can bedamaged by incorrect handling.Do not touch the heatsinks while installing or moving the board.Hold the board only by the edges.If a heatsink is loose or broken,obtain a replacement board.Caution –The heatsinks on the board can bedamaged by improper packaging.When storing or shipping the board,ensure that the heatsinks have sufficient protection.Note –Make sure the DIMM and connector are freeof dust and debris.If necessary,gently clean them using the dry,stiff brush supplied.!!Part Number: 802-5032-15Revision A of January 2000Accessing Sun Documentation OnlineThe sm web site enables you to access Sun technicaldocumentation on the Web.You can browse the archive or search for a specific book title or subject at:Sun Welcomes Your CommentsWe are interested in improving our documentation and welcome your comments and suggestions.You can email your comments to us at:*******************Please include the part number (802-5032-14)of the document in the subject line of your email.Copyright 2000 Sun Microsystems, Inc. All rights reserved. Use is subject to license terms. Third-party software, including font technology, is copyrighted and licensed from Sun suppliers. Sun, SunMicrosystems, the Sun Logo, SunDocs, and Solaris are trademarks or registered trademarks of Sun Microsystems, Inc. in the U.S. and other countries.RESTRICTED RIGHTS : Use, duplication, ordisclosure by the U.S. Government is subject to restrictions of FAR 52.227-14(g)(2)(6/87) and FAR 52.227-19(6/87), or DFAR 252.227-7015(b)(6/95) and DFAR 227.7202-3(a).Copyright 2000 Sun Microsystems, Inc. Tous droits réservés. Distribué par des licences qui enrestreignent l’utilization. Le logiciel détenu par des tiers, et qui comprend la technologie relative aux polices de caractères, est protégé par un copyright et licencié par des fournisseurs de Sun. Sun, SunMicrosystems,le logo Sun,SunDocs,et Solaris sont des marques de fabrique ou des marques déposées de Sun Microsystems, Inc. aux Etats-Unit et dans d’autres pay.Sun Microsystems Computer Company •901San Antonio Road •Palo Alto,CA 94303-4900USA •650960-1300•Fax 650969-91316.Reboot the system now or schedule a later time to reboot when system disruption will be minimized.The system cannot use the new board until the system is rebooted.7.If the system is running,look for a system message similar to the following example.This example is for a CPU/Memory board in slot 5:NOTICE: CPU Board Hotplugged into Slot 5NOTICE: Board 5 is ready to remove。
Solaris安全设置手册
禁止基于rhosts的用户认证10
检查信任关系10
启动服务脚本的屏蔽掩码10
六,网络接口的调整和安全11
缩短ARP缓存的存在周期11
缩短条目在arp-table里刷新的时间11
禁止回应广播的的请求来防止一些特别的具有危害性的ping包11
启动时禁止源路由11
user:lRs.8R9EfQXx.:11137:0:10000::::
加密段有无被修改的迹象
去掉所有path环境变量里的“.”
安全层面:本地
解决方法:
从用户及root的初始化脚本中的path变量里去除“.”,比如如下脚本:
/.login /etc/.login /etc/default/login /.cshrc /etc/skel/local.cshrc
修改syslog.conf文件22
安装tripwire22
IDS22
日志文件观察者(swatch)22
禁止telnet远程管理,用ssh23
十二,其他23
设置启动标示23
一 solaris系统安装
系统patch
解决方案:
# grep sugroup /etc/group
sugroup::600:root,httpadm,wsphere
只有是sugroup组里的用户才能使用su命令
四 inetd终极进程
注释掉所有确实不必的服务
打开cron程式的记账20
检查utmp,utmpx的权限20
寻找没有用户关联的文件21
寻找没有组关联的文件21
检查/var/cron的权限21
十一,登录和记账21
SOLARIS操作系统安全配置规范
S o l a r i s操作系统安全配置规范S p e c i f i c a t i o n f o r S o l a r i s O SC o n f i g u r a t i o n U s e d i n C h i n a M o b i l e版本号:1.0.0网络与信息安全规范编号:【网络与信息安全规范】·【第四层:技术规范·Solaris操作系统】·【第4505号】2007-12-19发布2008-01-01实施目录1概述 (1)1.1适用范围 (1)1.2内部适用性说明 (1)1.3外部引用说明 (3)1.4术语和定义 (3)1.5符号和缩略语 (3)2SOLARIS设备安全配置要求 (3)2.1账号管理、认证授权 (3)2.1.1账号 (3)2.1.2口令 (6)2.1.3授权 (9)2.2日志配置要求 (12)2.3IP协议安全配置要求 (15)2.3.1IP协议安全 (15)2.3.2路由协议安全 (18)2.4设备其他安全配置要求 (20)2.4.1屏幕保护 (20)2.4.2文件系统及访问权限 (21)2.4.3物理端口及EEPROM的口令设置 (22)2.4.4补丁管理 (23)2.4.5服务 (24)2.4.6内核调整 (27)2.4.7启动项 (27)前言本标准由中国移动通信有限公司网络部提出并归口。
本标准由标准提出并归口部门负责解释。
本标准起草单位:中国移动通信有限公司网络部。
本标准解释单位:同提出单位。
1概述1.1 适用范围本规范适用于中国移动通信网、业务系统和支撑系统中使用SOLARIS操作系统的设备。
本规范明确了SOLARIS操作系统配置的基本安全要求,在未特别说明的情况下,均适用于所有运行的SOLARIS操作系统版本。
1.2 内部适用性说明本规范是在《中国移动设备通用设备安全功能和配置规范》(以下简称《通用规范》)各项设备配置要求的基础上,提出的Solaris操作系统安全配置要求。
Solaris安全设置和日志管理

/etc/services
ftp
21/tcp
telnet 23/tcp 取消不必要的服务,然后kill –HUP inetdPID
8
网络服务(cont.)
r服务(见下页图) 1)/etc/hosts.equiv 2)$HOME/.rhosts 3)修改/etc/inetd.conf
tcpd的访问控制 first check /etc/hosts.allow e.g. ALL: 172.16.3.0/255.255.255.0 second check /etc/hosts.deny e.g. ALL: /usr/bin/mailx -s "%d: connection attempt from %c"
4
备份
系统初装时的备份 定期备份 增量式备份 特别备份
tar ufsdump e.g. Perform a full level 0 backup of the /export/home
# umount /export/home # fsck /export/home # ufsdump 0uf /dev/rmt/0 /export/home ufsrestoreyslog Logged Entry
22
补丁管理
显示系统中安装的所有patch及版本
showrev –p
patchadd –p
安装patch
patchadd
Note: -d option instructs the commands not to save copies of the files being updated or replaced in the /var/sadm/patch directory. However, it also prevents being able to back out or remove a patch from the system.
教你如何配置安全的SOLARIS系统

教你如何配置安全的SOLARIS系统一、帐号和口令安全策略1.1更改口令文件、影像文件、组文件的权限/etc/passwd 必须所有用户都可读,root用户可写–rw-r—r—/etc/shadow 只有root可读–r--------/etc/group 必须所有用户都可读,root用户可写–rw-r—r—1.2修改不必要的系统帐号移去或者锁定那些系统帐号,比如sys、uucp、nuucp、listen、lp、adm等等,简单的办法是在/etc/shadow的password域中放上NP字符。
还可以考虑将/etc/passwd文件中的shell域设置成/bin/false1.3修改口令策略修改/etc/default/passwd文件MAXWEEKS=4 口令至少每隔4星期更改一次MINWEEKS=1 口令至多每隔1星期更改一次WARNWEEKS=3 修改口令后第三个星期会收到快要修改口令的信息 PASSLENGTH=6 用户口令长度不少于6个字符二、用户授权安全策略2.1移去组及其它用户对/etc的写权限。
执行命令#chmod -R go-w /etc2.2禁止root远程登录在/etc/default/login中设置CONSOLE=/dev/concle2.3setuid和setgid特殊权限。
Setuid是指设置程序的有效执行用户身份(uid)为该文件的属主,而不是调用该程序进程的用户身份。
Setgid与之类似。
Setuid和setgid 用1s -1显示出来为s权限,存在于主人和属组的执行权限的位置上。
系统设置特殊权限,使用户执行某些命令时,具有root的执行权限, 命令执行完成, root身份也随之消失。
因此特殊权限关系系统的安全,可执行命令#find / -perm -4000 -print 寻找系统中具有setuid权限的文件,存为列表文件,定时检查有没有这之外的文件被设置了setuid 权限。
solaris系统配置文件说明
solaris系统配置⽂件说明etc/bootparams 从⽹络客户机的配置⽂件/etc/cron.d/cron.allow/etc/cron.d/cron.deny ⽤于对crontab进⾏访问控制./etc/defaultdomain NIS域名设置⽂件/etc/default/cron 对cron的log进⾏控制./etc/default/login 对root⽤户远程登陆许可进⾏设置。
/etc./default/su SULOG及SYSLOG值可以控制su的⽇志,还有可以对其su后环境变量进⾏设置。
/etc/dfs/dfstab NFS共享的配置⽂件/etc/dfs/sharetab/etc/group ⽤户组配置⽂件。
/etc/hostname.interface ⽹络接⼝名称⽂件,其IP在/etc/inet/hosts⽂件中设置。
/etc/hosts.allow/etc/hosts.deny 主机远程访问控制⽂件。
/etc/hosts.equiv r系列命令访问控制⽂件。
/etc/inittab init启动进程所需要的脚本⽂件,⽤于控制不同的启动级别。
/etc/logindevperm ttymon的配置⽂件主要⽤来控制设备的访问权限。
/etc/magic file命令所显⽰的⽂件类型数据库/etc/mail/aliases/etc/aliases sendmail的邮件别名⽂件/etc/mail/sendmail.cf/etc/sendmail.cf sendmail的控制⽂件/etc/minor_perm 使⽤drvconfig命令所许可的设备。
/etc/mnttab 当前系统中已mount的所有资源/etc/name_to_major 当前配置的主设备号,被⽤于drvconfig命令/etc/netconfig ⽹络配置数据库,⽤于⽹络初始化。
/etc/netgroup 定义主机和⽤户组。
Solaris安全配置规范

3. 配置:
openssh 自动启动脚本(/etc/init.d/openssh)
#!/bin/sh # # start/stop the secure shell daemon
case "$1" in
'start') # Start the ssh daemon if [ -f /usr/local/sbin/sshd ]; then echo "starting SSHD daemon" /usr/local/sbin/sshd & fi ;;
注 1:除非必须使用 X-Window,否则最好关闭;
注 2:如果使用 X-Window 系统,rpc 服务应该开放;
2.4.3. 安装 OpenSSH
OpenSSH 是 SSH (Secure Shell) 协议的免费开源实现。它用安全、加密的网络连 接工具代替了 telnet、ftp、 rlogin、rsh 和 rcp 工具。使用 OpenSSH 工具将会增加系统 安全性。 所有使用 OpenSSH 工具的通讯,包括口令,都会被加密。 telnet 和 ftp 使用 纯文本口令,并被明文发送。这些信息可能会被截取,口令可能会被窃取,然后未经 授权的人员可能会使用截取的口令登录系统而对你的系统造成危害。
Solaris 安全配置规范
禁用的服务
操作
NFS
sendmail
打印服务 名字服务缓 冲守护程序 CDE(注 2) SNMP 服务 rpc 服 务 ( 注 1) 其它服务
rm /etc/rc2.d/{S73nfs.client,K28nfs.server} rm /etc/rc3.d/S15nfs.server rm /etc/rc2.d/S88sendmail 在 cron 行中增加处理邮件队列的命令:
Solaris安全手册word资料14页

Solaris安全手册发布日期: 2019-12-8内容:1,Preparation2,Initial OS installation3,Stripping/configuring OS: 1st pass4,Connect to test network5,Installing tools & sysadmin software6,Stripping/configuring OS: 2nd pass7,Create Tripwire image, backup, test8,Install, test, harden applications.9,Install on live network, test1. Preparation最小限度保证安全的方法是只在主机上运行一个或两个服务。
使用一个机器比只使用一个拥有所有权利的机器安全的多,因为这样可以隔离,方便查找问题所在。
总之:在你的机器上运行你一些最必要的服务。
考虑拆除键盘,屏幕,这样可以避免使用X11和知道命令行所示,在一个隔离的信任的网络段中进行测试。
明确你的系统和硬件配置能产生什么样的结果,如在安装SUN的Disksuite时要考虑你是否需要RPC服务,因为DISKSUITE必须使用RPC服务。
明确各种应用程序是怎样工作的如:使用什么端口和文件.2,初始化安装操作系统。
连接串口控制台,开机,当出现OK提示时发送Stop-A信息(~#,~%b,或者F5,主要取决于你使用tip,cu或者vt100终端),然后开始安装过程-"boot cdrom - install"使用最小安装 end user bundle(除非你要额外的server/developer工具),设置主机名,终端,IP参数,时区等等,不要激活NIS或者NFS及不要激活电源管理。
选择手工划分分区:把/usr和/opt和ROOT分离开来以便这些分区可以以只读方式挂(mount)起来。
Solaris系统安全
# last reboot
显示远程系统中登录的用户
# rusers -l
==改变文件权限
chown命令:用于改变文件的属主
命令格式:chown[option(s) ]user_name filename(s)
chown[option(s) ]UID filename(s)
==维护密码和登录控制
==监控系统使用情况
==限制文件访问
==root用户登录
==控制通过网络的远程访问
==维护密码和登录控制
pwconv命令:使用/etc/passwd文件的信息创建和升级/etc/shadow文件。
如果系统中/etc/shadow文件不存在,使用/etc/passwd文件信息创建/etc/shadow文件。
==监控系统使用情况
显示系统中登录的用户
# who(调用/var/adm/utmpx文件中的信息)
显示系统中登录的用户的详细信息
# finger username
# finger username@remotehostname
-m:仅仅匹配用户名
显示系统中所有登录活动的记录
# last(调用/var/adm/wtmpx文件中的信息)
#
#ULIMIT=0
# If CONSOLE is set, root can only login on that device.
# Comment this line out to allow remote login by root.
#
CONSOLE=/dev/console
限制root访问
CONSOLE=/dev/console
#
Solaris安全配置规范

Solaris操作系统安全配置规范2011年3月第1章概述1.1适用范围适用于中国电信使用SOLARIS操作系统的设备。
本规范明确了安全配置的基本要求,可作为编制设备入网测试、安全验收、安全检查规范等文档的参考。
由于版本不同,配置操作有所不同,本规范以SOLARIS 8/10为例,给出参考配置操作。
第2章安全配置要求2.1账号编号:1要求内容应按照不同的用户分配不同的账号。
操作指南1、参考配置操作为用户创建账号:#useradd username #创建账号#passwd username #设置密码修改权限:#chmod 750 directory #其中750为设置的权限,可根据实际情况设置相应的权限,directory是要更改权限的目录)使用该命令为不同的用户分配不同的账号,设置不同的口令及权限信息等。
2、补充操作说明检测方法1、判定条件能够登录成功并且可以进行常用操作;2、检测操作使用不同的账号进行登录并进行一些常用操作;3、补充说明编号:2要求内容应删除或锁定与设备运行、维护等工作无关的账号。
操作指南1、参考配置操作删除用户:#userdel username;锁定用户:1)修改/etc/shadow文件,用户名后加*LK*2)将/etc/passwd文件中的shell域设置成/bin/false3)#passwd -l username只有具备超级用户权限的使用者方可使用,#passwd -l username锁定用户,用#passwd –d username解锁后原有密码失效,登录需输入新密码,修改/etc/shadow能保留原有密码。
2、补充操作说明需要锁定的用户:listen,gdm,webservd,nobody,nobody4、noaccess。
检测方法1、判定条件被删除或锁定的账号无法登录成功;2、检测操作使用删除或锁定的与工作无关的账号登录系统;3、补充说明需要锁定的用户:listen,gdm,webservd,nobody,nobody4、noaccess。
Solaris安全设置和日志管理ppt课件

/var/yp/securenets参与信任主机
采用NIS+
网络效力
Telnet和ftp
inetd 守护进程
/etc/inetd.conf ftp stream tcp nowait root /usr/local/bin/tcpd /usr/local/bin/wuftpd telnet stream tcp nowait root /usr/local/bin/tcpd /usr/sbin/in.tel netd
forward_directed_broadcasts 0 封锁转发源路由包 #ndd -set /dev/ip ip_forward_src_routed 0
ndd (cont.)
封锁对echo广播的呼应 #ndd -
set /dev/ip ip_respond_to_echo_boadca st 0 封锁呼应时间戳广播 #ndd set /dev/ip ip_respond_to_timestamp_b roadcast 0 封锁地址掩码广播
#/etc/init.d/syslog stop #/etc/init.d/syslog start //restart the syslogd daemon
Forward the messages to the printer #vi /etc/syslog.conf *.err;kern.debug;daemon.notice;mail.crit /dev/lp0
example, kern.*)
系统日志(cont.)
Another sample /etc/syslog.conf
#user1 and user2 receive alert messages if they are logged in.
Solaris安全手册
Solaris安全手册发布日期: 1999-12—8内容:1,Preparation2,Initial OS installation3,Stripping/configuring OS: 1st pass4,Connect to test network5,Installing tools & sysadmin software6,Stripping/configuring OS: 2nd pass7,Create Tripwire image, backup, test8,Install, test, harden applications。
9,Install on live network, test1. Preparation最小限度保证安全的方法是只在主机上运行一个或两个服务。
使用一个机器比只使用一个拥有所有权利的机器安全的多,因为这样可以隔离,方便查找问题所在。
总之:在你的机器上运行你一些最必要的服务。
考虑拆除键盘,屏幕,这样可以避免使用X11和知道命令行所示,在一个隔离的信任的网络段中进行测试。
明确你的系统和硬件配置能产生什么样的结果,如在安装SUN的Disksuite时要考虑你是否需要RPC服务,因为DISKSUITE必须使用RPC服务。
明确各种应用程序是怎样工作的如:使用什么端口和文件.2,初始化安装操作系统。
连接串口控制台,开机,当出现OK提示时发送Stop—A信息(~#,~%b,或者F5,主要取决于你使用tip,cu或者vt100终端),然后开始安装过程—”boot cdrom - install”使用最小安装 end user bundle(除非你要额外的server/developer工具),设置主机名,终端,IP参数,时区等等,不要激活NIS或者NFS及不要激活电源管理。
选择手工划分分区:把/usr和/opt和ROOT分离开来以便这些分区可以以只读方式挂(mount)起来.考虑把大的/var文件系统和拥有较多的数据量如(web,ftp)划分为独立的分区.如果硬盘是2GB建议200MB / (+var), 200MB swap, 600MB /usr 及 1GB 给 /opt如果硬盘是2GB建议300MB / (+var+opt), 200MB swap, 500MB/usr给ROOT设置一个7到8字符大小写结合等比较强壮的密码,再重启动。
- 1、下载文档前请自行甄别文档内容的完整性,平台不提供额外的编辑、内容补充、找答案等附加服务。
- 2、"仅部分预览"的文档,不可在线预览部分如存在完整性等问题,可反馈申请退款(可完整预览的文档不适用该条件!)。
- 3、如文档侵犯您的权益,请联系客服反馈,我们会尽快为您处理(人工客服工作时间:9:00-18:30)。
Solaris系统安全配置
1 身分识别
描述:用户身分和权限管理是系统基本安全机制。
solaris系统通过给用户和用户所属的组分配合适的权限,来管理系统资源。
系统通过用户登录机制来确认用户的身份,同时,系统中每个文件都具有访问控制列表(ACL),描述了用户对该文件具有的权限。
当用户访问某个文件时,系统通过用户的身份信息,检查访问控制列表中是否对用户进行了适当的授权,拒绝未授权的访问。
1.1 账户设定
编号:5015 名称:帐户设定重要等级:中
基本信息:
用户名必须由2到8个字符组成;第一个字符必须为字母;不能包含空格。
每个用户必须有唯一的一个UID,并且属于某一个GID。
检测内容:
可以查看passwd file:
More /etc/passwd
建议操作:
1.2 配置umask设置
编号:5015 名称:Umask设置重要等级:中
基本信息:
umask设置用户文件和目录的文件创建缺省屏蔽值,若将此命令放入.profile
文件就可控制该用户后续所建文件的存取许可。
umask命令与chmod命令的作
用正好相反,它告诉系统在创建文件时不给予存取许可。
检测内容:
1.进如终端模式
2.#umask
建议操作:
编辑/etc/default/login,在# UMASK sets the initial shell file creation mode mask. See umask(1).下面一行添加umask=022
1.不要让文件或目录被他人读写。
如果不信任本组用户,umask设置为022。
确保自己的.profile他人不可读写;暂存目录最好不要存放重要文件;home目录任何人不可写; uucp传输的文件应该加密,并尽快转移到自己的目录中。
2.若不想要其它用户读文件或目录,就要使其不允许任何人读。
umask设置为006/007。
若不允许同组用户存取自己的文件和目录,umask设置为077;暂存文件按当前umask设置。
存放重要数据到暂存文件的程序,就被写成能确保暂存文件其它用户不可读。
这样,就可确保别的用户不可读home 目录。
操作结果:
推荐umask设置值为022,操作不会对系统造成影响。
1.3 停用无用的账户
编号:5015 名称:帐户设定重要等级:中
基本信息:
根据具体的应用情况可以停止以下帐户:
lp:打印服务帐户
smtp:smtp服务帐户
如果不使用UNIX-to-UNIX copy program (UUCP) ,可以关闭uucp帐户;。
