云端时代管理系统用户手册
FusionAccessV100R005C10SPC200操作指引

目录T01 虚拟机桌面基本业务 (1)T01-01 用户通过TC访问Windows XP 32位普通虚拟机 (1)T01-02 用户通过TC访问Windows 7 32位普通虚拟机 (1)T01-03 用户通过TC访问Windows 7 64位普通虚拟机 (2)T01-04 用户通过软客户端访问虚拟机 (3)T01-05 用户访问链接克隆虚拟机 (4)T01-06 用户使用Office办公软件 (4)T01-07 用户使用IE、火狐等浏览器 (5)T01-08 用户使用Adobe Reader阅读软件 (5)T02 虚拟桌面业务管理 (6)T02-01 快速发放完整复制专有桌面 (6)T02-02 快速发放快速封装专有桌面 (7)T02-03 快速发放链接克隆动态池桌面 (8)T02-04 指定IP创建虚拟机(可选) (9)T02-05 支持无域桌面(可选) (10)T02-06 重启虚拟机 (11)T02-07 启动虚拟机 (12)T02-08 休眠虚拟机 (13)T02-09 关闭虚拟机 (13)T02-10 添加虚拟机 (14)T02-11 分配虚拟机 (14)T02-12 解分配虚拟机 (15)T02-13 删除虚拟机 (16)T02-14 更新链接克隆虚拟机组件 (16)T02-15 动态调整桌面组桌面规模 (17)T03 系统运行和维护管理 (18)T03-01 查看操作日志及导出操作日志 (18)T03-02 支持查看系统告警,并能够通过邮件发送告警信息 (18)T03-03 支持按虚拟机组,桌面组或Desktop维度的登录,分配,运行状态统计 (19)T03-04 支持虚拟机性能和历史注册异常信息统计 (20)T03-05 支持灵活的虚拟机用户使用信息统计 (20)T03-06 支持时间同步 (21)T04 虚拟桌面基础安全 (21)T04-01 使用强密码安全 (21)T04-02 防暴力破解攻击 (22)T05 系列化客户端 (23)T05-01 使用瘦终端通过HDP协议登录虚拟机 (23)T05-02 TC版本升级 (23)T06 多媒体支持 (24)T06-01 使用TC播放480P的标清视频 (24)T06-02 使用TC用重定向方式播放720P的高清视频功能(可选) (24)T06-03 用户使用客户端播放Windows自带音频文件 (25)T07 高效维护管理 (25)T07-01 定时任务 (25)T07-02 虚拟桌面分权分域管理 (26)T07-03 虚拟桌面三权分立管理(可选) (27)T07-04 桌面代理软件升级(可选) (28)T08 用户体验提升 (28)T08-01 自助界面修改 (28)T08-02 桌面用户自助登录(可选) (29)T08-03 开机画面(可选) (30)T08-04 用户远程重启虚拟机桌面 (30)T08-05 网络质量检测 (31)T08-06 用户登录WI可以看到系统发布的每日提示信息 (31)T08-07 使用用户体验优化工具进行虚拟机优化 (32)T08-08 用户使用连接诊断工具自助修复连接类问题(可选) (32)T09 客户端资源映射 (33)T09-01 用户使用U盘进行文件拷贝、粘贴、删除 (33)T09-02 用户使用USB打印机进行打印 (33)T09-03 用户使用网络打印机进行打印 (34)T09-04 用户使用USB摄像头 (34)T09-05 用户通过打印机设备重定向使用打印机 (35)T09-06 用户通过TWAIN设备重定向使用扫描仪 (35)T09-07 管理员限制用户使用USB外设 (36)T10 高性能图形(可选) (37)T10-01 GPU直通虚拟机的业务发放及回收 (37)T10-02 GPU直通高性能图形 (38)T10-03 GPU共享服务器虚拟机发放 (39)T10-04 GPU共享虚拟机发放 (40)T10-05 GPU共享高性能图形 (41)T11 分支机构(可选) (42)T11-01 集中查看各分支机构告警 (42)T11-02 集中查看各分支机构操作日志 (42)T12 用户接入安全增强(可选) (43)T12-01 指纹登录认证 (43)T12-02 USB Key登录认证 (43)T12-03 固定TC终端接入 (44)T12-04 动态口令登录认证 (45)T13 虚拟桌面在线备份(可选) (46)T13-01 NAS备份 (46)T14 可靠性(可选) (46)T14-01 管理节点可靠性 (46)T14-0101 系统单点故障不影响用户登录 (46)T14-0102 系统能自动识别管理节点故障并自动拉起 (47)T14-02 连接可靠性 (47)T14-0201 虚拟机断线自动重连 (47)T14-0202 虚拟机桌面代理进程故障自愈 (48)FusionAccess V100R005C10SPC200 验收操作指引内部公开FusionAccess V100R005C10SPC200验收操作指引T01 虚拟机桌面基本业务T01-01 用户通过TC 访问Windows XP 32位普通虚拟机1.打开TC 设备,进入TC 终端操作界面,单击“开始 > 云客户端”,选择待登录的WI ,单击“登录”; 2.输入待登录虚拟桌面的用户名和密码,单击;3. 单击要登录的虚拟机名称或,连接虚拟桌面; 4. 在桌面C 盘新建一个文本文件test.txt ;5.删除test.txt 文件。
云终端系操作手册

云终端系统管理控制台用户操作手册版本〈0.1〉修订历史记录目录1. 引言 (2)1.1。
编写目的 (2)1.2。
读者对象 (3)1。
3. 定义和术语 (3)1。
4. 参考资料 (3)1。
5。
环境要求 (3)2. 软件综述 (3)2。
1。
系统简介 (3)2.2. 系统流程介绍 (4)3。
软件安装 (4)3。
1. 软件安装 (4)3.2。
参数配置 (4)4. 操作说明 (4)4。
1。
虚拟机服务器管理 (4)4。
1。
1。
添加虚拟机服务器 (4)4。
1。
2. 导入虚拟机模板 (5)4.1。
3。
创建虚拟机 (5)4。
1。
4. 新建存储 (5)4。
1.5. 虚拟机开关机 (5)4。
1。
6。
虚拟机快照 (5)4.1。
7。
虚拟机删除 (6)4.1。
8. 修改虚拟机内存和CPU (6)4.1。
9。
虚拟机控制 (6)4.1。
10. 虚拟服务器或者池的网络操作 (6)4.1.11. 虚拟机或者模板的网络接口操作 (7)4.1.12。
连接虚拟机服务器池 (7)4.1。
13. 新建虚拟机服务器池 (7)4。
2. 桌面发布控制管理 (7)4。
2.1. 创建发布站点 (7)4。
2.2。
添加桌面发布控制器到站点 (8)4。
2.3。
创建连接资源 (8)4。
2。
4. 删除连接资源 (8)4。
2.5。
创建计算机目录 (8)4。
2.6. 删除计算机目录 (9)4。
2.7. 创建交付组 (9)4.2。
8。
删除交付组 (9)4。
2.9. 发布应用 (9)4.2。
10. 删除应用 (10)4.2。
11。
配置策略 (10)4。
3。
访问站点管理 (10)4。
3。
1。
创建新的站点部署 (10)4.3。
2. 管理桌面发布控制器 (11)4.3.3。
添加服务器 (11)4.3.4. 加入服务器组 (11)4.3。
5。
传播更新 (11)5。
附录:常见问题解答 (12)1.引言1.1.编写目的本文档旨在介绍云终端系统的功能,说明每个功能的界面操作流程,帮助用户理解系统的概念,熟悉系统的操作方法.1.2.读者对象1.3.定义和术语云终端系统:基于虚拟化平台,通过集中部署和管理的方式,为企业和用户提供虚拟应用和桌面云服务的系统。
云管理系统CRM系统操作手册

云管理系统CRM系统操作手册云管理系统CRM系统操作手册一、前言本操作手册旨在为使用云管理系统CRM系统的用户提供操作指南和技术说明,以便高效地进行客户关系管理。
本手册主要针对以下方面进行详细说明:系统安装与配置、数据输入与整理、模块功能详解、常见问题解答以及安全与维护。
二、系统安装与配置1、下载并安装CRM系统:根据您的设备(电脑、手机、平板等),从我们的官网下载适用的CRM系统,并按照提示进行安装。
2、配置系统:在安装完成后,按照系统要求进行配置,例如设置公司名称、员工信息、部门及权限等。
3、连接云端:确保您的设备联网,然后按照系统提示连接云端,以便实时同步数据。
三、数据输入与整理1、客户信息:输入并更新客户的详细信息,包括姓名、联系方式、需求等。
2、产品信息:输入并更新公司销售的产品信息,包括产品名称、价格、规格等。
3、销售数据:记录每次销售活动的详细信息,包括销售金额、销售渠道等。
4、市场活动:记录市场活动的详情,包括活动名称、预算、时间等。
5、数据分析:利用系统提供的数据分析工具,对销售数据和市场活动进行分析,以便优化销售策略。
四、模块功能详解1、客户管理:该模块用于管理客户信息,包括查询、添加、编辑客户信息等功能。
2、产品管理:该模块用于管理产品信息,包括查询、添加、编辑产品信息等功能。
3、销售管理:该模块用于管理销售数据,包括查询、分析销售数据等功能。
4、市场活动管理:该模块用于管理市场活动,包括查询、添加、编辑市场活动等功能。
5、报告与分析:该模块提供数据分析功能,帮助用户了解销售趋势,优化销售策略。
五、常见问题解答本部分将详细解答用户在使用CRM系统过程中可能遇到的问题,例如如何添加新客户、如何查看销售报告等。
我们将在后续的更新中不断补充和完善此部分内容。
六、安全与维护1、定期备份:建议用户定期备份数据,以防数据丢失或损坏。
2、系统更新:当系统有新的更新时,应及时进行更新以获得更好的使用体验和安全性。
iCollege 远程云教育平台 管理端用户操作手册说明书

iCollege远程云教育平台管理端用户操作手册北京软通动力教育科技有限公司流程图测评课程1登录通过网址进入登录页面,选择企业用户登录,输入ipsa账号及密码。
进入如下图页面,登录成功。
注:如非企业员工,请用手机号快速登录。
2题库点击题库进入题库管理界面如下图。
新增题库左上角点击新增题库,创建题库。
试题管理题库创建成功后,点击题库,进入试题管理界面。
系统支持单选题、多选题、判断题、问答题、编程题、评价题的录入。
新增分类注:分类是题库专属属性,其它题库看不到。
试题录入点击要录入的题型,选择试题分类,试题难度,试题来源,知识点等属性输入试题内容及答案解析。
试题预览试题录入完成后,点击预览,查看试题详情。
3测评3.1试卷管理测评-试卷管理,进入试卷管理页面,如下图。
创建试卷组卷方式分为手工组卷和自动组卷。
手工组卷试卷试题是固定的,试题顺序、试题选项支持随机。
出题方式分为手动添加和快速抽题。
快速抽题:选题时看不到具体题目,组成的试卷符合一定的要求,例如一套试卷所考知识点相同。
添加题目快速抽题自动组卷通过题数、题目难度、包括题型、出自题库、分类等组出符合一定规则的试卷。
试卷预览试卷创建成功后,支持在线预览,查看试卷详细情况。
3.2测评管理测评-测评管理,进入测评管理界面新增测评项目左上角点击新增测评项目创建测评点击创建好的测评项目,进入测评管理页面点击创建测评按钮注:1测评形式分为普通测评和投票类测评,投票类测评学员参与投票后随时查看当前投票结果。
2测评分为公开测评和邀请测评,测评类型选择公开,公开测评在用户端测评区展示,任意学员登录后随时参与测评。
3选择试卷,只能选择发布过的试卷。
4普通测评的报告设置主要通过题目对应分类得分给出对应评价。
成员管理测评发布后进入成员管理模块添加人员注:测评只有发布后才被允许添加人员添加人员支持单个人员录入和批量人员导入手动添加人员单个人员录入批量人员导入批量导入前先下载名单模板,按模板要求输入正确的人员名单。
云管理平台操作手册

云管理平台操作手册云管理平台操作手册目录1.介绍1.1 什么是云管理平台1.2 功能概述2.登录与账户管理2.1 注册账户2.2 登录云管理平台2.3 修改密码2.4 忘记密码找回3.云资源管理3.1 虚拟机管理3.1.1 创建虚拟机3.1.2 启动/停止/重启虚拟机3.1.3 虚拟机管理操作3.2 存储管理3.2.1 创建存储卷3.2.2 挂载/卸载存储卷3.2.3 存储管理操作3.3 网络管理3.3.1 创建网络3.3.2 网络配置和连通性测试3.3.3 网络管理操作4.安全管理4.1 资源访问控制4.2 虚拟机安全4.2.1 安全组配置4.2.2 防火墙配置4.2.3 虚拟机安全管理操作 4.3 数据加密4.3.1 存储卷加密4.3.2 数据传输加密5.监控与报警5.1 云资源监控5.1.1 监控指标概述 5.1.2 设置监控报警 5.2 日志管理5.2.1 日志查看与检索5.2.2 日志分析与报告6.故障与恢复6.1 故障排查6.2 灾备与备份恢复7.计费与账单管理7.1 资源计费7.2 账单查询与支付7.2.1 查询账单7.2.2 支付账单8.附件:用户操作指南附件A:虚拟机操作指南附件B:存储管理操作指南附件C:网络管理操作指南法律名词及注释1.云管理平台:指提供云计算资源管理和操作的在线平台。
2.虚拟机:云中的一种虚拟计算资源,相当于一台模拟的计算机,具有自己的操作系统和应用程序。
3.存储卷:云中的一种数据存储资源,用于存储虚拟机的磁盘镜像、数据文件等。
4.网络:云中的一种网络资源,用于虚拟机之间或虚拟机与外界的通信。
5.安全组:用于设置虚拟机的网络访问控制规则,限制虚拟机之间或虚拟机与外界的通信。
6.防火墙:网络安全设备,用于监控、过滤和控制网络流量,保护网络资源免受未授权访问和攻击。
本文档涉及附件:附件A:用户操作指南附件B:虚拟机操作指南附件C:存储管理操作指南附件D:网络管理操作指南。
云系统使用说明
超级辅导系统功能模块说明1.0一、学习中心1. 主流程学习点这里,进入本科目课程的智能学习流程。
这是承载主体学习内容的核心流程,由超级智能云系统全程精准引导。
你经历的每一个学习步骤都将被记载和分析,你迎来的每一个学习步骤都是超级智能动态设定的,专属于你的最佳学习路径和最优学习资源。
主流程学习,由九类学习任务包所精密衔接和科学组合而成,每一类学习任务包,就是实现考研最佳学习效果的一种重要力量,九种力量的契合,恰如独孤九剑之威力,让你无敌于考研江湖。
(1)标准学习任务包超级智能系统按照逻辑深层关联、最佳认知量度、思维兴奋驱动等十二种高级学习原理,将考研学习的全部内容,细分为若干知识模块。
每一个知识模块的标准与多倍精细阐述文本、标准与多倍精细课程、基本与补充习题组、习题标准与多倍精细解析、高效笔记索引等多项学习内容组合构成了一个标准学习任务包。
学员通过标准学习任务包对各个知识模块完成最佳效果的第一轮学习。
(2)加强学习任务包超级智能系统会自动分析锁定学员在标准学习任务包中未能达标的知识模块。
每当学习进程达到一定任务量和时间量,系统将启动加强任务包对学员在第一轮标准学习中未达标的知识模块进行第二轮加强学习。
(3)难点学习任务包超级智能系统会自动分析锁定学员在加强学习任务包中仍未达标的知识模块。
每当学习进程达到一定的任务量和时间量,系统将启动难点任务包对学员在第二轮加强学习中未达标的知识模块进行第三轮难点攻克学习。
(4)复习循环任务包每当学员学习进程达到一定的任务量和时间量,系统将启动复习循环任务包,对一定范围的知识模块,进行第三至五轮的复习循环,从而完整及时的巩固所学的全部知识模块。
(5)重点循环任务包在复习循环任务包针对全部知识模块巩固学习的基础上,系统将启动重点循环任务包,将对重要知识模块,进行第四至七轮的重点学习,从而确保学员对高概率成为考点的知识模块达到更深层次的掌握程度。
(6)高难点循环任务包超级智能系统会阶段性对第六至七轮学习中仍未能达标和考试中命题难度高的知识模块,启动高难点循环学习任务包,按照特定规则对高难知识模块进行第八至十轮集中循环学习,从而帮助学员全面和有效的清除所有高难度学习障碍。
辛普西亚商务端云端门户用户指南说明书
Scholastic Oracle Cloud Supplier Portal User GuideTable of ContentsIntroduction to the Supplier Portal (3)What is the Supplier Portal? (3)Navigating the Supplier portal (3)Logging in (3)Homepage Navigation (4)Notifications (5)Overview Menu (6)Summary Tab (6)Orders Tab (7)Schedules (8)Negotiations Tab (9)Request for Quote (RFQ) (10)Receiving an Invite for a Negotiation (10)Viewing the RFQ (10)Creating a Response (12)Award Decision (18)Purchase Orders (PO) (20)PO Notification (20)Review PO Details (21)Acknowledge a PO (22)Enter/Revise a Promised Ship Date for a Schedule (24)Manage Schedules (26)Order Life Cycle (27)Invoices (29)Create and Submit an Invoice (29)Miscellaneous Charges (33)Create Invoice without PO (34)View Invoices (36)View Payments (37)Supplier Preferences (39)Introduction to the Supplier PortalWhat is the Supplier Portal?The Scholastic Supplier Portal is a secure, web-based workspace that provides our vendors with full visibility to Scholastic transactions, including request for quotations (RFQ), purchase orders, and invoices.The Supplier Portal plays a key role in Scholastic’s Or acle ERP transformation, as this tool helps improve communication with our suppliers by automating and streamlining the source-to settleprocess.Navigating the Supplier portalLogging inOnce your password has been set, click on the “Oracle Fusion Prod” icon to reach the Supplier Portal home page.Once your password has been set, log in on the home pageHomepage NavigationOn the home page, click on the Supplier Portal icon to open the “Overview” page.NotificationsAt the top right corner of the home page, a bell icon will display your pending notifications. This includes new purchase orders pending acknowledgement as well as invitations to a negotiation.Note: Clicking on the notification brings you to the PO or Negotiation in questionOverview MenuThe overview page provides a snapshot into Scholastic’s most recent transact ions as well as anything requiring attention.Summary TabWorklist: A list of all pending notifications sent to the current supplier user. These are the same notifications found in the bell at the top of the page. Please note that most notifications willalso be sent via email.Watch list: Contains a set of saved searches which display counts of urgent or recenttransactions, possibly requiring action, such as Orders Pending Acknowledgment. Clicking awatch list entry navigates direct to the screen so that user can begin working on the transactions immediately.Contains the header detail of our purchase orders. The header contains the PO issued date andthe total $ amount ordered. The item level detail, quantity, and ship-to locations can be foundin “Schedules”.Orders with Recent Activity: A list of orders that have been Opened, Changed, or Canceledwithin the last week. This date can be manually changed to display more or less orders. Indicates an orderhas been cancelledA purchase order “Schedule” contains the quantity, ship-to location, and promised ship date.An order with a ship date in the past is highlighted with an alert. Schedules must be kept up todate. The promised ship dates that you provide are visible for everyone at Scholastic.At the bottom, “Recent Receipts” will list all purchase order schedules received within the lastweek.Indicates a promisedship date is past dueNegotiations TabRequest for Quotation (RFQ) transactions that the supplier is involved in or is invited to by Scholastic. It provides a quick summary to easily monitor the status and responses.Request for Quote (RFQ)Receiving an Invite for a NegotiationThe Scholastic Sourcing group has the ability to invite vendors to bid on projects through theSupplier Portal. If your organization is invited to a negotiation, you will receive an email as well as a notification in the Supplier Portal.The email invitation will include a PDF overview of the project. There is also a link that will take you directly to the RFQ in the Supplier Portal.Viewing the RFQYou can view the RFQ by clicking on the link the email notification. Another option is to go to the Supplier Portal and navigate to the Negotiations tab. Click on the negotiation number inquestion.This will bring up the RFQ cover page with the time remaining to respond displayed. On the left hand side of the RFQ, you will see links to the different components of the RFQ.Click on the Overview link. This will bring up the Overview page, which has key dates tied to the RFQ. On the right hand side, you will find attachments to the RFQ. The attachment will have the requirements for the RFQ along with instructions, quantities, and any other relevant information.Click on the Lines link. This will bring up the line items tied to the RFQ. In some cases, due to complex requirements, there will be one placeholder line visible with the advanced requirements included in an attachment.Creating a ResponseWhen you decide to bid on an RFQ, you must first acknowledge that you will participate. You can do this from the Negotiations dashboard by scrolling to the “Open Invitations” section. Highlight the negotiation, and click on the Acknowledge Participation button.This will bring up the Acknowledge Participation popup. You can select Yes or No, and enter a comment to the Scholastic buyer.At this point, if you refresh the Negotiations dashboard, you will see YES listed in the ‘Will Participate’ column. You can create your response by highlighting the Negotiation and clicking on the Create Response button.Another way to create a response is to open the RFQ and click on the Create Response button on the upper right hand sideThis will bring up the response page. Enter the quote expiration date, an internal quote number if you have one, and any notes to the buyer. You can also attach any correspondence by clicking on the + sign next to Attachments.You can attach more than one file by clicking on the + sign.Once you attach a file, it will show up on the main screen. You can remove the attachment by clicking on the X next to the file name. Hit Save and then Next.This will bring you to the “Lines” screen. Enter unit costs for the lines along with a Promised Ship Date.For most negotiations, the Scholastic buyer will give the supplier an option to create your own line by clicking on the + sign under Create Alternate. This is especially useful if you want to incorporate a unique idea or proposal.On the Alternate Line screen, you are required to enter a description, response price, and response quantity. You can enter a note to the buyer and also attach files to the alternate line.After hitting Save and Close, the alternate line will be added to the RFQ response.Hit Save and Next. This will bring you to the Review screen, where you can view the response as a whole. There are tabs for the Overview and Lines. When you are ready to submit the response to Scholastic, hit Submit.You will receive confirmation that the response was submitted.Award DecisionAfter the Scholastic buyer receives all bids, they will award either the whole job, or part of the job.If you are selected, you will receive an email notification as well as an Oracle notification confirming which lines of the negation were awarded to you. If you are not selected, it’s up to the Scholastic buyer if they want to inform the suppliers systematically that were not selected. You would receive a similar alert, but t he awarded lines amount will be “0”.Clicking on the notification will bring up the award decision. In the screenshot below, one line was awarded.Here is a screenshot of an award decision where nothing was awarded:Another way to view the outcome of the RFQ is to go to the Negotiations home screen. Scroll down to Completed Negotiations. The little green circle with a check mark indicates that the bid was awarded, while the note “No award” in the amount signifies that your bid was not accepted.Purchase Orders (PO)PO NotificationWhen a Scholastic purchase order is issued, you will receive an email notification with a PDFattachmentIf an acknowledgment is required, the email subject will include “Requires Acknowledgment”. A notification alert will also be displayed at the top of Supplier Portal to note an action is required.When a “R evised” PO is received, the email subject will include the “Revision #”Review PO DetailsOpen the attachment in the email to view a PDF of the purchase order. Additionally, on the “Orders” overview tab in the Supplier Portal, all recent PO’s will be listed under “Opened”. You will have the option of viewing a PDF, opening the order for acknowledgment, as well as updating the order with a confirmed promised ship date.Acknowledge a POSome Scholastic POs will require a supplier acknowledgment within the Portal. The PO will not be considered “open” until the Supplier completes the acknowledgment process. If a PO requires acknowl edgment, the email subject will note “Requires Acknowledgement”. You can acknowledge the PO from the link in the email or log into the supplier portal and click on the “Pending Acknowledgment” link in the Watch list.Note: A notification alert will pop-up as well as a task in the “Work list”. While both of these serve as links to the PO, it is suggested to acknowledge an order by using the link in the “Watch List”, as this method is most efficient.A “Manage Orders” screen will be displayed with all orders pending acknowledgement. Click on an order #.The PO header and details will be displayed. At the top right of the screen, select the “Acknowledge PO” button.You may need to acknowledge both the order (under “Terms”) and each Schedule line. You are given the option to “Accept” or “Reject”. Please only “Accept” the PO using this process. If there is something wrong with the order, please reach out to your Scholastic buyer via email or phone.In the top right hand corner, hit “Submit”Then hit “OK” and “Done” to close out of the order.The acknowledgment has been sent back to Scholastic and the order status is now “Open”.Enter/Revise a Promised Ship Date for a ScheduleOn every order, we send a “Requested Ship Date”. We expect that every supplier will respond with a “Promised Ship Date” confirming when you can ship. These dates are loaded into the Scholastic system for reporting purposes, so it’s i mportant that they are populated for every order and kept up to date.From the “Orders” or “Schedules” tab, select an order to edit:This brings you to the PO screen. The top part contains the PO header information with your supplier information. The “Lines” and Schedules” tabs at the bottom contain the PO detail.In the previous screenshot, the requested ship date is 4/26/18. However, the promised ship date is blank. In order to enter a new promised ship date or revise an existing promised ship date, click the “Actions” button on the top right of the screen and select “Edit”.A warning message pops up to confirm that any action will create a change order. Click “Yes”.In the “Schedules” tab, enter a new promised ship date and a change reason if applicable.Enter a description of the change order you made at the top o f the PO and then hit “Submit”.Note: Hitting “Save” will save your work, but will not send the updated date back to Scholastic. You must select “Submit”.After hitting “submit”, a popup message confirms that your changes have been sent to Scholastic. We will reach out to you with any questions.Manage SchedulesTo search and view all orders and schedules, select the task button while in the Overview screen in the supplier portalIt opens up a tab on the right side with a number of options. Under “Orders”, select “Manage Schedules”.The Manage Orders screen allows you to search all PO Schedules, open or closed. The default search is “All”, but you can search using a number of parameters, as well as setup custom searches. You can also easily tell which schedules don’t have a “Promised Ship Date” by sorting the field. In fact, all of the fields are sortable.Order Life CycleWhen you select a PO to view or edit, the “Order Life Cycle” graph can be found on the top right of the screen. It is a graphical view of the dollar amount ordered, received, delivered, and invoiced. Select “View Details” for additional information.The Order Life Cycle now displays a complete order summary including in-transit shipment information (pulled in from our OTM module), receipt dates, and invoice status.InvoicesCreate and Submit an InvoiceThe Scholastic Supplier Portal allows you to submit invoices directly to Scholastic. Processing your invoices through the supplier portal will increase the speed that your payment isprocessed. In the task list, select “Create Invoice”.In the “Create Invoice” section, s elect an order from the “Identifying PO” drop down list. This will populate most of the fields. Then enter y our internal “Invoice Number” and today’s date.In the “Items” section, hit the “Select and add” button to choose the PO lines you’d like to add to the invoice.Select the line(s) and hit “Apply”.Then hit “OK”. The item(s) has been added to the invoice.In the quantity field, enter the shipped quantity.Note: This version of Oracle Cloud does not allow overage to be invoiced. Theinvoiced quantity cannot exceed the order quantity. We are working with Oracle to correct this in a future release. For now, please work with the buyer to revise the PO when the shipped quantity exceeds the ordered amount, or add the overage amount as a miscellaneous cost under “Shipping and Handling” at the bottom of the invoice.In the Location of Final Discharge, enter the tax Province to capture the correct tax code.Once all the line items have been added to the Invoice, click on the Calculate Tax Button. Your taxes should now be calculated on the Invoice.Note: if you calculate tax after only one line item is picked, it will not work on anysubsequent line items.Miscellaneous ChargesHit the “Add” button under “Shipping and Handling” and select “Miscellaneous”. Enter an amount and descriptionNote: Freight is not a viable option as all of our shipments should route through the Scholastic Logistics group via the OTM system.Hit “Submit” to send the invoice to ScholasticA pop-up message will confirm that the invoice has been submittedCreate Invoice without POFor services completed where a Scholastic PO wasn’t issued, please submit an invoice using the “Create Invoice without PO”.On the invoice header, enter your invoice number, today’s date, and attach any pertinent documents. You must also enter the email address of the buyer at Scholastic who will receive and approve the invoice.Must be TODAYS DATEFor the invoice details, hit the + icon to add a line. Select a ship to and Location of Final Discharge, enter an amount and a description of the services provided.To add taxes, hit the “Calculate Tax” button.Note: Location of Final Discharge much be populated in order to calculate taxes on the invoice.Add miscellaneous charges at the bottom under “Shipping and Handling”.Hit “Submit” at the top of the screen and you’ll receive a confirmation message that your invoice has been submitted.To search for all submitted invoices, o n the Task Menu, select “View Invoices”Select your “Supplier” name, and hit search. You can use the fields to narrow your search as well as create custom searches. You can see the Invoice Status, as well as a Payment Number to confirm that a payment has been made against your invoice. Please note that all of these columns can be sorted.To search for invoice payment status, on the Task Menu, select “View Payments”Select your “Supplier” name, and hit search. You can use the fields to narrow your search as well as create custom searches. You can also see the payment status to confirm that a payment has been made. Select a “Payment Number” to see the complete detai ls of the payment.Complete payment detail will be displayedSupplier PreferencesOn the home page, select “Set Preferences”Select “Regional” in the General Preferences list to review the option to update your date and time format, preferred number format, primary currency, and time zone.Select “Save and Close” when finished.Select “Language” to change the primary language of the website. The default is “American English”。
RippleTek云端管理平台使用文档
RippleTek云端管理平台版本信息1.2 本文档包含RippleTek云端管理平台的使用。
一、用户登录1.登录地址/users/sign_in有账号密码的可以直接登录,没有账号密码的需要注册。
2.用户注册用户输入注册信息进行用户注册,并进行邮箱验证。
3.登录在登录页面输入正确的用户名和密码进行登录。
登录成功如图所示,进入管理页面。
二、设备管理1.用户登录后选择设备管理,进入设备管理页面,用户会得到平台对应的绑定设备用的密钥,如图所示;2.用户在路由器上进行设备绑定后,设备管理页面会出现对应的设备,表明已绑定成功,如图所示;3.设备详细信息可以查看设备ssid、固件版本、客户端连接数、下载和上传的速度、使用的信道、系统负载、内存状态,并且可以对设备进行远程管理。
云端管理设备,直接连接到设备进行操作,真正实现设备的远程管理。
三、认证管理1.用户登录后选择认证管理,进入认证管理页面,会出现节点列表,用户可进行节点操作,如图所示;2.新增节点配置节点分为使用模板和自定义页面,使用RippleTek提供的在线模板,如图所示进行配置,更换的图片及LOGO使用推荐的像素大小能得到最佳效果。
使用模板:店铺名称、店铺地址、联系电话都会显示在模板上。
其中认证方式:1)微信登录:填写微信号、微信名、是否仅手机登录以及未认证可使用微信聊天的时间。
2)微博登录填写绑定的新浪微博名(此名可用于微博关注),分享的内容,分享的图片,用于微博分享。
3)QQ登录QQ登录是分享到QQ空间,填写分享到QQ空间的标题、分享摘要、分享内容及图片,用于QQ空间分享。
4)手机号登录支持手机号的方式登录,不对手机号码进行验证,不产生短信费用。
自定义页面:对应输入新增节点信息,如图所示:开启弹出页面,如图:/ext/portal/rptkportal.html;认证成功连接地址:/ext/portal/rptksuccess.html),可以选择是否使用新浪微博或腾讯QQ进行登录从而获取上网权限。
云终端管理软件操作指南V2.1

目录1 终端控制 (1)1.1 监控终端 (2)1.2 IP设置 (3)1.3 时间同步 (5)1.4 分辨率调整 (6)1.5 声音调节 (7)1.6 终端属性 (9)1.7 升级/恢复出厂设置 (10)1.8 重启 (15)1.9 关机 (16)2 用户管理 (17)2.1 新增用户 (17)2.2 修改用户密码 (18)2.3 删除用户 (19)3 系统管理 (20)4 升级版本 (22)5 版本信息 (22)6 管理员设置 (23)6.1 添加/删除管理员 (23)6.2 锁定/解锁工具栏 (25)1 终端控制云终端管理软件将管理员的管理对象由包括所有客户端设备的整个系统,集中到中心主机(服务器)一个点,软硬件升级、应用软件安装、用户帐户管理等。
云终端管理软件对客户端进行终端控制,包含以下功能:l监控终端查看当前运行的终端状态,包含终端型号、IP地址和用户名信息。
l IP设置在“IP设置”界面下,可以给云终端重新设置IP地址。
l时间同步在“时间同步”界面下,可以获取终端当前显示时间或者重新设置终端显示时间。
说明:仅对本地安卓系统下的时间进行同步。
l分辨率调整在“在分辨率调整”界面下,可以从终端列表中选择一个或者多个终端,重新设置其分辨率。
l声音调节调节终端音量,或者将终端设置为静音。
说明:仅对本地安卓系统下的媒体音量进行调节。
l终端属性在“终端属性”界面下,可以修改终端主机名称,或者删除终端。
l升级/ 恢复出厂设置。
在“升级/ 恢复出厂设置”下,可以从终端列表中选择一个或者多个终端,对其进行升级或者恢复出厂设置。
l重启在后台对云终端进行重启。
l关机在后台关闭云终端。
1.1 监控终端1)安装完成后,双击GYManageToolV2.1,启动终端管理系统,进入登陆界面,如图1-1所示。
输入管理员用户名和密码,单击“确定”登录。
图1-12)登录后进入监控终端界面,如图1-2所示。
管理员可以查看所有终端的连接状态,终端机型号、IP地址和用户名。
云管理系统系统操作手册

云管理系统CRM系统操作手册目录一、概述销售CRMCRM(Customer Relationship Management)即客户关系管理。
其焦点是自动化并改善与销售、市场营销、客户服务于支持等领域的客户(包括最终客户、代理商及合作伙伴)关系有关的商业流程。
CRM既是一套管理原则和制度,也是一套软件和技术。
而销售其作用是缩减销售周期和销售成本、增加收入、寻找巩固并扩展业务所需的新的市场和渠道以及提供客户的价值、满意度、赢利性和忠诚度。
提升企业核心竞争力,为企业带来丰厚的利润和上升空间)销售CRM 角色权限简介本销售CRM系统共有管理员、经理、代理商、销售总监、销售主管和业务员六种角色。
管理员:查看所有公海客户信息、跟进中的客户信息和已签单的订单信息;添加、编辑公海客户信息并分配给下属人员跟进;设置签单时间和业务员跟进客户人数限制。
经理:查看所有公海客户信息、跟进中的客户信息和已签单的订单信息;添力口、编辑公海客户信息并分配给下属人员跟进。
大区经理和渠道经理的权限相同。
代理商:查看用户所在省市的公海客户信息、跟进中的客户信息和已签单的订单信息;添加、编辑公海客户信息并分配给下属人员跟进。
销售总监[代理商的销售总监]:权限与代理商一致。
业务员[销售总监的业务员]:查看用户所在省市的公海客户信息、跟进中的客户信息和已签单的订单信息;添加、编辑公海客户信息并分配给下属人员跟进。
术语说明渠道:与客户建立关联所通过的方式成熟度:A类(KP一周类能确认付款的客户),B类(KP对筑巢有兴趣),C 类(非KP对筑巢有兴趣)公海:还没有被领取或分配的客户,称为公海。
跟进中:已被认领或被分配的公海客户。
二、【管理员】用户操作流程登录操作流程1、在浏览器中打开网址,进入系统登录界面(本手册说明时,使用的是谷歌浏览器)2、在登录界面输入管理员账户、密码登录成功(见图)图我的桌面进入云管理平台,显示平台主页。
详解见(图)图图示说明:①销售CRM功能模块菜单:本手册阐述的对象。
管理系统操作说明及使用手册(升级版)

管理系统操作说明及使用手册(升级版)1. 简介管理系统是一种用于帮助组织或企业管理业务流程和数据的工具。
本操作说明及使用手册旨在帮助用户快速上手使用管理系统,并提供详细的操作指南和技巧。
2. 系统登录2.1 访问系统首先,确保您已获得系统的访问权限。
通过输入系统的网站地址或点击系统图标访问系统主页。
2.2 用户登录在系统主页中,您需要使用您的个人账号和密码进行登录。
输入正确的用户名和密码后,点击“登录”按钮即可成功进入系统。
3. 首页导航3.1 顶部导航栏在登录后,您可以看到系统顶部导航栏。
顶部导航栏包含了系统的各个功能模块,方便用户快速切换和使用各个功能。
3.2 侧边导航栏在页面左侧,有一个侧边导航栏,用于展示当前所在模块的相关菜单和功能。
用户可以通过点击侧边导航栏中的菜单项,切换到相应的功能页面。
4. 功能模块4.1 用户管理在用户管理模块,用户可以进行新增、编辑和删除用户账号,设置用户权限等操作。
管理员具备最高级别的权限,并可以对其他用户的权限进行管理。
4.2 数据管理数据管理模块提供了对系统中的数据进行添加、修改和删除的功能。
用户可以根据具体业务需求,对数据进行灵活的操作,以满足不同的管理需求。
4.3 报表生成报表生成模块是系统的重要功能之一。
用户可以通过设置查询条件,生成各种类型的报表,以便对业务数据进行分析和展示。
生成的报表可以导出为常见的文档格式,如Excel和PDF。
4.4 任务调度任务调度模块用于管理系统中的各类任务。
用户可以创建和分配任务,设置任务的优先级和截止日期,并通过系统提供的提醒功能,及时了解任务的执行情况。
5. 操作指南5.1 创建用户账号在用户管理模块中,点击新增用户按钮,在弹出的对话框中填写相关信息,如用户名、密码和权限等。
点击保存按钮,即可成功创建用户账号。
5.2 数据录入在数据管理模块中,选择要进行操作的数据表,点击新增按钮,填写相关信息。
保存后,数据将被成功录入系统。
云平台用户操作手册v

云计算管理平台用户操作手册文档日期:2015年7月20日文档版本:<V1.0>关于本文档文档名称云平台用户操作手册作者审批者审批者签名签名:日期:签名:日期:说明文件名称修订历史(REVISIONHISTORY)版本章节类型日期作者备注1.0.0 创建 2 初稿目录1.准备工作 (6)1.1基础知识 (6) (6) (6)1.2系统统一规则 (6)1.3工作界面介绍 (6)2.登录与统一权限管理 (8)2.1登录与退出 (8) (8) (10)3.云门户 (10)3.1云中心概览 (10)3.2资源使用情况 (11)3.3最近活动 (12)3.4资源机构分配情况 (13)3.5告警分布 (13)3.6应用使用情况 (13)4.我的云中心 (14)4.1待办事项 (14)4.2已办事项 (15)4.3我的申请 (16)4.4我的虚拟机 (16)4.5我的资源池 (19)4.6任务活动 (20)4.7事件告警 (20)4.9系统通知 (21)5.服务目录 (21)5.1创建虚拟机 (21)5.2创建资源池 (22)6.应用管理 (22)6.1应用管理 (22)7.健康中心 (25)7.1实时告警 (25)7.2告警配置 (25)7.3主机监控 (27)7.4虚拟机监控 (28)8.基础设施 (29)8.1资源管理中心 (29)8.2虚拟机创建策略 (30)8.3模板配置 (31)9.系统管理 (32)9.1机构管理 (32)9.2人员管理 (34)9.3角色管理 (36)10.基本工作流程 (38)10.1初次登录 (38)10.2审批流程说明 (38)1.准备工作1.1基础知识为使语言表述简洁,本书使用了一些标准的计算机操作说明术语。
◆点击鼠标:按一下鼠标左键,然后释放鼠标。
◆双击鼠标:连续按两下鼠标左键,然后释放鼠标。
◆拖动鼠标:按住鼠标左键不放,同时移动鼠标。
◆右键单击:按一下鼠标右键,然后释放鼠标。
云端CRM客户管理系统使用手册 1.0
云端C R M客户管理系统使用手册 1.0
------------------------------------------作者
------------------------------------------日期
云端CRM客户管理系统使用手册 1.0
系统界面 (3)
新增客户【桌面—客户管理—新增客户】 (3)
客户列表【桌面—客户管理】 (4)
客户信息快速关联【桌面—客户管理—点击客户的公司名称】 (4)
新增跟单【桌面—跟单管理—新增跟单】 (5)
新增订单【桌面—订单管理—新增订单】 (6)
合同管理【桌面—合同管理—新增合同】 (7)
新增售后记录【桌面—售后管理—新增售后】 (8)
财务管理【桌面—财务管理】可自行新增收入和支出 (9)
数据导出【开始菜单—数据导出】 (9)
数据导入【开始菜单—数据导入】 (10)
添加员工【开始菜单—员工管理—新增员工】 (11)
系统设置【右键—系统设置】可对系统信息、选项值、部门、权限、产品服务进行设置 (12)
系统界面
新增客户【桌面—客户管理—新增客户】
客户列表【桌面—客户管理】
客户信息快速关联【桌面—客户管理—点击客户的公司名称】
新增售后记录【桌面—售后管理—新增售后】
财务管理【桌面—财务管理】可自行新增收入和支出
数据导出【开始菜单—数据导出】
数据导入【开始菜单—数据导入】
添加员工【开始菜单—员工管理—新增员工】
系统设置【右键—系统设置】可对系统信息、选项值、部门、权限、产品服务进行设置。
首科力通 5G智能工业终端 管理平台用户手册

管理平台用户手册目录一、云平台注册账号 (2)1.1浏览器注册 (2)1.2输入注册信息 (2)二、平台配置 (3)2. 1添加终端 (3)2.2 VPN证书下载 (4)2.3 SuperNet100接入配置 (5)2.4 PLC接入配置 (8)2.5 PC接入配置 (9)2.6 Android OS接入配置 (12)一、云平台注册账号账号注册前,将SuperNet100设备侧面标签IMEI内容提供给设备厂家,由厂家核实IMEI的正确性和准确性后方可正常使用。
1.1浏览器注册打开浏览器,输入网址http://39.107.155.18:8088/打开平台首页。
进入云平台主页1.2输入注册信息点击页面右侧的"Sign up "进入注册页面Account:为自拟用户名,支持数字、英文字母、下划线,长度8~24Password:为自设定密码,支持数字、英文字母、下划线,长度8~24Confirm Password 须与Password 保持一致Email:为注册邮箱,激活或修改密码须用到此邮箱,务必填写有效邮箱(注:此邮箱与报警接收邮箱并无关联)Product Code:设备识别码,见5G模块侧面.请填写IMEI内容.填写正确的设备识别码为创建云平台账户的必要条件,每个设备识别码只能注册一次。
Description:可填写账户描述内容所有内容填写完成后,点击submit。
待激活账户后,就可以正常登录云平台了。
注册完成后,云平台会提示等待系统建立账户,云平台管理系统会发送到注册邮箱里面一封邮件,用户需采用此邮件激活账户。
所以验证注册邮箱需真实有效,用以找回密码和确认身份。
一些电子邮件服务器可能会认为该邮件是垃圾邮件,如长时间无法收到该邮件请在垃圾邮件箱中查找。
二、平台配置2. 1添加终端登录云平台后,需要先将智能5G终端添加到您的账户中。
点击绿色的"Add"按钮,弹出对话框Device Type: 选择不同,填写内容不同PC:为连接云平台远程诊断的电脑,如下图(后续章节详细介绍)Device Type:为终端的产品型号为,请选择该选项,如下图OpenVPN Certificate:Build:如果需要通过OPEN VPN远程修改程序,远程维护,请选择该选项Do not build: 该型号产品不能选择此项Name:中填写要添加的模块名称,自定义模块名称,长度为2~32个字母或数字(可支持使用下划线)Description:可填写描述内容,支持字母,数字,下划线,或者中文(最大支持32个字母)IMEI code:设备的编码,请见模块侧面LAN IP:设备LAN口的IP地址LAN mask:设备LAN口的子网掩码点击“Submit”提交,显示设备添加成功后,点击OK关闭下图显示模块已经在云平台中添加成功,Status:代表协议转换功能是否正常,绿色是正常,灰色是不正常。
LuoYunCloud-0.5云平台管理员手册
LuoYunCloud 0.5管理员手册介绍 LuoYunCloud 的安装、部署、 管理等文档项目 落云科技管理员手册LuoYunCloud 0.5 管理员手册介绍 LuoYunCloud 的安装、部署、 管理等版 20121217作者文档项目 落云科技contact@luoyun.co Copyright © 2012 | 落云科技 | This material may only be distributed subject to the terms and conditions set forth in the GNU Free Documentation License (GFDL), V1.2 or later (the latest version is presently available at /licenses/fdl.txt).请填写简单介绍Preface v1. 文档约定 (v)1.1. 排版约定 (v)1.2. 抬升式引用约定 (vi)1.3. 备注及警告 (vii)2. 我们需要您的反馈意见! (vii)1. 安装 LuoYunCloud 11.1. 获取安装文件 (1)1.2. 使用 LiveCD 安装 (1)1.3. 使用 yum 源安装 (17)1.4. 从源代码安装 (20)1.5. 多节点安装部署 (21)1.5.1. 配置节点网络为桥接模式 (21)1.5.2. 安装并配置 lynode 节点服务程序 (21)1.5.3. 部署完成后的注意事项 (22)2. 升级 LuoYunCloud 232.1. 从 0.4 升级到 0.5 注意事项 (23)2.2. 升级数据库 (23)3. 运行 / 停止 LuoYunCloud 253.1. 运行 LuoYunCloud (25)3.2. 停止 LuoYunCloud (26)4. Web 管理后台 294.1. 进入管理后台 (29)4.2. 上传应用 (29)4.3. 用户权限配置 (30)4.4. 用户资源配置 (31)4.5. 地址池配置 (32)4.6. 启用二级域名 (33)4.7. 对应用库进行分类整理 (34)4.8. 查询 LuoYunCloud 平台的整体计算资源状态 (34)4.9. 查询 LuoYunCloud 平台的任务记录 (35)4.10. 管理员用户和普通用户一样也可以创建自己的虚拟机 (35)4.11. 启用更多的 lynode 节点服务器 (36)4.12. 域名配置 (36)4.13. 配置邮件服务 (37)5. 计算节点配置与管理 395.1. lynode.conf配置文件说明 (39)5.1.1. 配置文件参数说明 (39)6. OsManager 436.1. OsManager 安装 (43)6.1.1. Windows 下安装 (43)7. Appliances 497.1. 基于 CentOS6 的应用制作及 OSManager 的安装 (49)7.1.1. 创建 CentOS6 虚拟机 (49)7.1.2. 安装 OSManager (49)7.1.3. 将虚拟机制作成应用 (50)8. Nginx 的配置管理 518.1. FAQ (51)8.1.1. Nginx 日志报諎: "24: Too many open files" (51)iii管理员手册9. FAQ - 用户经常问道的问题 539.1. Live CD 可以不安装直接运行吗? (53)9.2. 为什么创建虚拟机只能配置 256M 内存,1CPU ? (53)9.3. 管理界面配置用户资源时有限制怎么办? (54)9.4. 我的系统能跑多少个虚拟机? (54)9.5. 节点注册不上? (55)9.6. 访问不了虚拟机的 Web 页面? (56)A. Revision History 57索引 59ivPreface1. 文档约定本手册使用几个约定来突出某些用词和短语以及信息的某些片段。
MX行业领先的云管理系统说明书
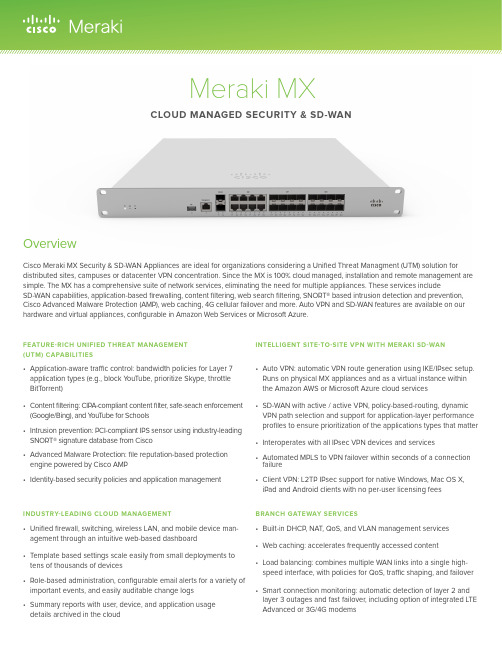
INDUSTRY-LEADING CLOUD MANAGEMENT• Unified firewall, switching, wireless LAN, and mobile device man-agement through an intuitive web-based dashboard• Template based settings scale easily from small deployments to tens of thousands of devices• Role-based administration, configurable email alerts for a variety of BRANCH GATEWAY SERVICES• Built-in DHCP, NAT, QoS, and VLAN management services • Web caching: accelerates frequently accessed content• Load balancing: combines multiple WAN links into a single high-speed interface, with policies for QoS, traffic shaping, and failover FEATURE-RICH UNIFIED THREAT MANAGEMENT (UTM) CAPABILITIES• Application-aware traffic control: bandwidth policies for Layer 7 application types (e.g., block Y ouTube, prioritize Skype, throttle BitTorrent)• Content filtering: CIPA-compliant content filter, safe-seach enforcement (Google/Bing), and Y ouTube for Schools• Intrusion prevention: PCI-compliant IPS sensor using industry-leading SNORT® signature database from Cisco• Advanced Malware Protection: file reputation-based protection engine powered by Cisco AMP• Identity-based security policies and application managementINTELLIGENT SITE-TO-SITE VPN WITH MERAKI SD-WAN• Auto VPN: automatic VPN route generation using IKE/IPsec setup. Runs on physical MX appliances and as a virtual instance within the Amazon AWS or Microsoft Azure cloud services• SD-WAN with active / active VPN, policy-based-routing, dynamic VPN path selection and support for application-layer performance profiles to ensure prioritization of the applications types that matter • Interoperates with all IPsec VPN devices and services• Automated MPLS to VPN failover within seconds of a connection failure• Client VPN: L2TP IPsec support for native Windows, Mac OS X, iPad and Android clients with no per-user licensing feesOverviewCisco Meraki MX Security & SD-WAN Appliances are ideal for organizations considering a Unified Threat Managment (UTM) solution fordistributed sites, campuses or datacenter VPN concentration. Since the MX is 100% cloud managed, installation and remote management are simple. The MX has a comprehensive suite of network services, eliminating the need for multiple appliances. These services includeSD-WAN capabilities, application-based firewalling, content filtering, web search filtering, SNORT® based intrusion detection and prevention, Cisco Advanced Malware Protection (AMP), web caching, 4G cellular failover and more. Auto VPN and SD-WAN features are available on our hardware and virtual appliances, configurable in Amazon Web Services or Microsoft Azure.Meraki MXCLOUD MANAGED SECURITY & SD-WANRedundant PowerReliable, energy efficient design with field replaceable power suppliesWeb Caching 128G SSD diskDual 10G WAN Interfaces Load balancing and SD-WAN3G/4G Modem Support Automatic cellular failover1G/10G Ethernet/SFP+ Interfaces 10G SFP+ interfaces for high-speed LAN connectivityEnhanced CPU Layer 3-7 firewall and traffic shapingAdditional MemoryFor high-performance content filteringINSIDE THE CISCO MERAKI MXMX450 shown, features vary by modelModular FansHigh-performance front-to-back cooling with field replaceable fansManagement Interface Local device accessMulticolor Status LED Monitor device statusFRONT OF THE CISCO MERAKI MXMX450 shown, features vary by modelCryptographic AccelerationReduced load with hardware crypto assistCisco Threat Grid Cloud for Malicious File SandboxingIdentity Based Policy ManagementIronclad SecurityThe MX platform has an extensive suite of security features including IDS/IPS, content filtering, web search filtering, anti-malware, geo-IP based firewalling, IPsec VPN connectivity and Cisco Advanced Malware Protection, while providing the performance required for modern, bandwidth-intensive yer 7 fingerprinting technology lets administrators identifyunwanted content and applications and prevent recreational apps like BitT orrent from wasting precious bandwidth.The integrated Cisco SNORT® engine delivers superior intrusion prevention coverage, a key requirement for PCI 3.2 compliance. The MX also uses the Webroot BrightCloud® URL categorization database for CIPA / IWF compliant content-filtering, Cisco Advanced Malware Protection (AMP) engine for anti-malware, AMP Threat Grid Cloud, and MaxMind for geo-IP based security rules.Best of all, these industry-leading Layer 7 security engines and signatures are always kept up-to-date via the cloud, simplifying network security management and providing peace of mind to IT administrators.Organization Level Threat Assessment with Meraki Security CenterSD-WAN Made SimpleTransport independenceApply bandwidth, routing, and security policies across a vari-ety of mediums (MPLS, Internet, or 3G/4G LTE) with a single consistent, intuitive workflowSoftware-defined WAN is a new approach to network connectivity that lowers operational costs and improves resource us-age for multisite deployments to use bandwidth more efficiently. This allows service providers to offer their customers the highest possible level of performance for critical applications without sacrificing security or data privacy.Application optimizationLayer 7 traffic shaping and appli-cation prioritization optimize the traffic for mission-critical applica-tions and user experienceIntelligent path controlDynamic policy and perfor-mance based path selection with automatic load balancing for maximum network reliability and performanceSecure connectivityIntegrated Cisco Security threat defense technologies for direct Internet access combined with IPsec VPN to ensure secure communication with cloud applications, remote offices, or datacentersCloud Managed ArchitectureBuilt on Cisco Meraki’s award-winning cloud architecture, the MX is the industry’s only 100% cloud-managed solution for Unified Threat Management (UTM) and SD-WAN in a single appliance. MX appliances self-provision, automatically pulling policies and configuration settings from the cloud. Powerful remote management tools provide network-wide visibility and control, and enable administration without the need for on-site networking expertise.Cloud services deliver seamless firmware and security signature updates, automatically establish site-to-site VPN tunnels, and provide 24x7 network monitoring. Moreover, the MX’s intuitive browser-based management interface removes the need for expensive and time-consuming training.For customers moving IT services to a public cloud service, Meraki offers a virtual MX for use in Amazon Web Services and Microsoft Azure, enabling Auto VPN peering and SD-WAN for dynamic path selection.The MX67W, MX68W, and MX68CW integrate Cisco Meraki’s award-winning wireless technology with the powerful MX network security features in a compact form factor ideal for branch offices or small enterprises.• Dual-band 802.11n/ac Wave 2, 2x2 MU-MIMO with 2 spatial streams • Unified management of network security and wireless • Integrated enterprise security and guest accessIntegrated 802.11ac Wave 2 WirelessPower over EthernetThe MX65, MX65W, MX68, MX68W, and MX68CW include two ports with 802.3at (PoE+). This built-in power capability removes the need for additional hardware to power critical branch devices.• 2 x 802.3at (PoE+) ports capable of providing a total of 60W • APs, phones, cameras, and other PoE enabled devices can be powered without the need for AC adapters, PoE converters, or unmanaged PoE switches.MX68 Port ConfigurationVirtual MX is a virtual instance of a Meraki security appliance, dedicated specifically to providing the simple configuration benefits of site-to-site Auto VPN for customers running or migrating IT services to the public cloud. A virtual MX is added via the Amazon Web Services or Azure marketplace and then configured in the Meraki dashboard, just like any other MX. It functions like a VPN concentrator, and features SD-WAN functionality like other MX devices.• An Auto VPN to a virtual MX is like having a direct Ethernetconnection to a private datacenter. The virtual MX can support up to 500 Mbps of VPN throughput, providing ample bandwidth for mission critical IT services hosted in the public cloud, like Active Directory, logging, or file and print services.• Support for Amazon Web Services (AWS) and AzureMeraki vMX100MX68CW Security ApplianceLTE AdvancedWhile all MX models feature a USB port for 3G/4G failover, the MX67C and MX68CW include a SIM slot and internal LTE modem. This integrated functionality removes the need for external hardware and allows for cellular visibility and configuration within the Meraki dashboard.• 1 x CAT 6, 300 Mbps LTE modem • 1 x Nano SIM slot (4ff form factor)• Global coverage with individual orderable SKUs for North America and WorldwideMX67C SIM slotSmall branch Small branch Small branch Small branch50250 Mbps250 Mbps250 Mbps200 Mbps1Requires separate cellular modemMX67MX67C MX68MX68CW 1Requires separate cellular modemMedium branch Large branch Campus orVPN concentrator Campus orVPN concentratorRack Mount Models 1Requires separate cellular modemVirtual AppliancesExtend Auto-VPN and SD-WAN to public cloud servicesAmazon Web Services (AWS) and Microsoft Azure1 + VirtualIncluded in the BoxPackage Contents Platform(s)Mounting kit AllCat 5 Ethernet cable (2)AllAC Power Adapter MX64, MX64W, MX65, MX65W, MX67, MX67W, MX67C, MX68, MX68W, MX68CWWireless external omni antenna (2)MX64W, MX65W, MX67W, MX68W250W Power Supply (2)MX250, MX450System Fan (2)MX250, MX450SIM card ejector tool MX67C, MX68CWFixed external wireless and LTE paddle antennas MX68CWRemovable external LTE paddle antennas MX67CLifetime Warranty with Next-day Advanced ReplacementCisco Meraki MX appliances include a limited lifetime hardware warranty that provides next-day advance hardware replacement. Cisco Meraki’s simplified software and support licensing model also combines all software upgrades, centralized systems management, and phone support under a single, easy-to-understand model. For complete details, please visit /support.ACCESSORIES / SFP TRANSCEIVERSSupported Cisco Meraki accessory modulesNote: Please refer to for additional single-mode and multi-mode fiber transceiver modulesPOWER CABLES1x power cable required for each MX, 2x power cables required for MX250 and MX450. For US customers, all required power cables will beautomatically included. Customers outside the US are required to order power cords separately.SKUMA-PWR-CORD-AUThe Cisco Meraki MX84, MX100, MX250, MX450 models support pluggable optics for high-speed backbone connections between wir-ing closets or to aggregation switches. Cisco Meraki offers several standards-based Gigabit and 10 Gigabit pluggable modules. Each appliance has also been tested for compatibility with several third-party modules.Pluggable (SFP) Optics for MX84, MX100, MX250, MX450AccessoriesManagementManaged via the web using the Cisco Meraki dashboardSingle pane-of-glass into managing wired and wireless networksZero-touch remote deployment (no staging needed)Automatic firmware upgrades and security patchesTemplates based multi-network managementOrg-level two-factor authentication and single sign-onRole based administration with change logging and alertsMonitoring and ReportingThroughput, connectivity monitoring and email alertsDetailed historical per-port and per-client usage statisticsApplication usage statisticsOrg-level change logs for compliance and change managementVPN tunnel and latency monitoringNetwork asset discovery and user identificationPeriodic emails with key utilization metricsDevice performance and utilization reportingNetflow supportSyslog integrationRemote DiagnosticsLive remote packet captureReal-time diagnostic and troubleshooting toolsAggregated event logs with instant searchNetwork and Firewall ServicesStateful firewall, 1:1 NAT, DMZIdentity-based policiesAuto VPN: Automated site-to-site (IPsec) VPN, for hub-and-spoke or mesh topologies Client (IPsec L2TP) VPNMultiple WAN IP, PPPoE, NATVLAN support and DHCP servicesStatic routingUser and device quarantineWAN Performance ManagementWeb caching (available on the MX84, MX100, MX250, MX450)WAN link aggregationAutomatic Layer 3 failover (including VPN connections)3G / 4G USB modem failover or single-uplinkApplication level (Layer 7) traffic analysis and shapingAbility to choose WAN uplink based on traffic typeSD-WAN: Dual active VPN with policy based routing and dynamic path selection CAT 6 LTE modem for failover or single-uplink1MX67C and MX68CW only Advanced Security Services1Content filtering (Webroot BrightCloud CIPA compliant URL database)Web search filtering (including Google / Bing SafeSearch)Y ouTube for SchoolsIntrusion-prevention sensor (Cisco SNORT® based)Advanced Malware Protection (AMP)AMP Threat Grid2Geography based firewall rules (MaxMind Geo-IP database)1 Advanced security services require Advanced Security license2 Threat Grid services require additional sample pack licensingIntegrated Wireless (MX64W, MX65W, MX67W, MX68W, MX68CW)1 x 802.11a/n/ac (5 GHz) radio1 x 802.11b/g/n (2.4 GHz) radioMax data rate 1.2 Gbps aggregate (MX64W, MX65W), 1.3Gbps aggregate (MX67W,MX68W, MX68CW)2 x 2 MU-MIMO with two spatial streams (MX67W, MX68W, MX68CW)2 external dual-band dipole antennas (connector type: RP-SMA)Antennagain:*************,3.5dBi@5GHzWEP, WPA, WPA2-PSK, WPA2-Enterprise with 802.1X authenticationFCC (US): 2.412-2.462 GHz, 5.150-5.250 GHz (UNII-1), 5.250-5.350 GHZ (UNII-2), 5.470-5.725 GHz (UNII-2e), 5.725 -5.825 GHz (UNII-3)CE (Europe): 2.412-2.484 GHz, 5.150-5.250 GHz (UNII-1), 5.250-5.350 GHZ (UNII-2)5.470-5.600 GHz, 5.660-5.725 GHz (UNII-2e)Additional regulatory information: IC (Canada), C-Tick (Australia/New Zealand), RoHSIntegrated Cellular (MX67C and MX68CW only)LTE bands: 2, 4, 5, 12, 13, 17, and 19 (North America). 1, 3, 5, 7, 8, 20, 26, 28A, 28B, 34, 38, 39, 40, and 41 (Worldwide)300 Mbps CAT 6 LTEAdditional regulatory information: PTCRB (North America), RCM (ANZ, APAC), GCF (EU)Power over Ethernet (MX65, MX65W, MX68, MX68W, MX68CW)2 x PoE+ (802.3at) LAN ports30W maximum per portRegulatoryFCC (US)CB (IEC)CISPR (Australia/New Zealand)PTCRB (North America)RCM (Australia/New Zealand, Asia Pacific)GCF (EU)WarrantyFull lifetime hardware warranty with next-day advanced replacement included.Specificationsand support). For example, to order an MX64 with 3 years of Advanced Security license, order an MX64-HW with LIC-MX64-SEC-3YR. Lifetime warranty with advanced replacement is included on all hardware at no additional cost.*Note: For each MX product, additional 7 or 10 year Enterprise or Advanced Security licensing options are also available (ex: LIC-MX100-SEC-7YR).and support). For example, to order an MX64 with 3 years of Advanced Security license, order an MX64-HW with LIC-MX64-SEC-3YR. Lifetime warranty with advanced replacement is included on all hardware at no additional cost.*Note: For each MX product, additional 7 or 10 year Enterprise or Advanced Security licensing options are also available (ex: LIC-MX100-SEC-7YR).and support). For example, to order an MX64 with 3 years of Advanced Security license, order an MX64-HW with LIC-MX64-SEC-3YR. Lifetime warranty with advanced replacement is included on all hardware at no additional cost.*Note: For each MX product, additional 7 or 10 year Enterprise or Advanced Security licensing options are also available (ex: LIC-MX100-SEC-7YR).。
云端时代s15x瘦终端系统配置简易说明

系统用户及密码管理员administrator 密码Ct#123普通用户User 密码User操作系统默认登陆用户说明系统默认会自动用User帐户登陆,User帐户为普通用户,不具备管理员权限,比如右键不能用、无法安装软件、无法打开控制面板、我的电脑等,如需修改配置或安装软件,需要注销User账户,用administrator账户登录管理员administrator账户是管理员权限账户,拥有最大系统操作权限系统写保护功能系统默认是开启写保护功能的,如需关闭写保护功能,需要切换到管理员账户,在系统界面右下角,点开小三角程序图标,展开程序,有一个圆圈图标,绿色状态为开启,红色状态为关闭,右键图标可以切换状态。
需要注意的是,开启或关闭写保护状态,都会触发命令,系统会自动重启写保护功能说明,当写保护功能开启的情况下,任何对系统做过的更改,在系统重启之后,都会不生效,系统会恢复到上次开机启动时的状态更换vmware客户端如前所述,先切换到管理员账户,关闭写保护程序,重启后在切换到管理员账户,找到控制面板-程序,卸载原先的vmware view客户端,安装官网最新的4.1.0的客户端,安装完重启系统即可自动登录功能此功能需要在管理员账户下操作,默认系统是User账户登录,如需修改,请切换到管理员账户,找到控制面板-自动登录,打开后,输入administrator,密码Ct#123,点确定后生效云端快速登录功能此功能分别可以在User、administrator账户配置路径在,控制面板-云端快速登录,双击打开后,选择配置vmware,点击上面的vmware图标后,输入view服务器地址,名称自定义,下一步,可以勾上用户名记住,也可以去掉,输入域名vdi后,点下一步,配置完成后,注意底下状态为本地桌面模式,如需开机自动进入云桌面,需点击创建的条目名称后面的小三角按钮,切换为云桌面模式即可,切换后注意底下模式是否已经更改为云桌面模式云桌面模式切换回本地桌面模式当启动云桌面模式后,如果想切换回本地桌面模式做一些本地系统的修改,需要把云桌面断开退出,返回到本地桌面界面后,点击左下角的小三角,在弹出对话框中输入,目前登录用户的用户名和密码,在弹出云端快速登录工具中切换云桌面模式到本地桌面模式,点击x 关闭,会弹出关闭、重启等操作功能界面,关机重启或直接选择重启后,下次开机会进入到本地桌面模式禁用本地usb存储此功能通过本地策略来实现打开cmd命令行窗口,输入gpedit.msc,调出组策略编辑器,路径在,用户配置-管理模板-系统-可移动存储访问下,分别对可移动磁盘:拒绝写入权限,可移动磁盘:拒绝读取权限两台策略,修改状态为已开启即可。
- 1、下载文档前请自行甄别文档内容的完整性,平台不提供额外的编辑、内容补充、找答案等附加服务。
- 2、"仅部分预览"的文档,不可在线预览部分如存在完整性等问题,可反馈申请退款(可完整预览的文档不适用该条件!)。
- 3、如文档侵犯您的权益,请联系客服反馈,我们会尽快为您处理(人工客服工作时间:9:00-18:30)。
CTDM系统 V3.0.0
使用产品前请仔细阅读本手册
云端时代 CTDM 系统用户手册
版权声明
本手册的版权归北京云端时代科技有限公司所有。未得到北京云端时代科技有限 公司书面许可, 任何人不得以任何方式或形式对本手册内的任何部分进行复制、 摘录、 备份、修改、传播、翻译成其他语言,将其部分或全部用于商业用途。
云端时代 CTDM 系统用户手册
目录
1 前言 ....................................................................................................................... 1 1-1 文档目的................................................................................................................. 1 1-2 适用范围................................................................................................................. 1 1-3 术语与缩略语......................................................................................................... 1 1-4 参考资料................................................................................................................. 2 1-5 格式约定................................................................................................................. 2 2 产品概述................................................................................................................ 3 2-1 主要功能................................................................................................................. 3 2-2 运行环境................................................................................................................. 4 2-2-1 硬件环境..................................................................................................... 4 2-2-2 软件环境..................................................................................................... 4 2-2-3 数据库......................................................................................................... 4 2-3 软件安装................................................................................................................. 5 3 系统登录................................................................................................................ 6 3-1 用户登录................................................................................................................. 6 3-2 布局介绍................................................................................................................. 7 4 配置管理.............................................................................................................. 11 4-1 用户管理............................................................................................................... 11 4-1-1 用户列表................................................................................................... 11 4-1-2 新建用户................................................................................................... 11 4-1-3 删除用户................................................................................................... 12 4-1-4 修改属性................................................................................................... 12 4-2 权限管理............................................................................................................... 13 4-2-1 权限列表................................................................................................... 13 4-2-2 新建角色................................................................................................... 14 4-2-3 删除权限................................................................................................... 15 4-2-4 修改属性................................................................................................... 15 4-3 子网配置............................................................................................................... 16 4-3-1 子网列表................................................................................................... 16 4-3-2 新建子网................................................................................................... 17 4-3-3 删除子网................................................................................................... 17 4-3-4 修改属性................................................................................................... 18Fra bibliotek免责声明
北京云端时代科技有限公司保留对本手册的解释和修改的权利,对本手册的任何 修正、更新、解释将在云端时代网站()予以公布,请您 留意。
联系方式
北京云端时代科技有限公司 地址:北京市海淀区中关村南 4 街 18 号紫金数码园 3 号楼 1 层 电话:+86 10 62415355 传真:+86 10 62415355 邮编:100190 网站:http://
云端时代 CTDM 系统用户手册
4-3-5 刷新........................................................................................................... 18 4-4 IP 范围配置 ..........................